Conditional routing functionality allows you to automate decision-making throughout the business process – based on the values entered in form fields by the field workers.
Example use cases
Conditional routing in Fluix routes completed forms to different emails, cloud storage and a CRM, or returns a task for another round of approval, and many other scenarios. Below we collected a couple examples for your convenience.
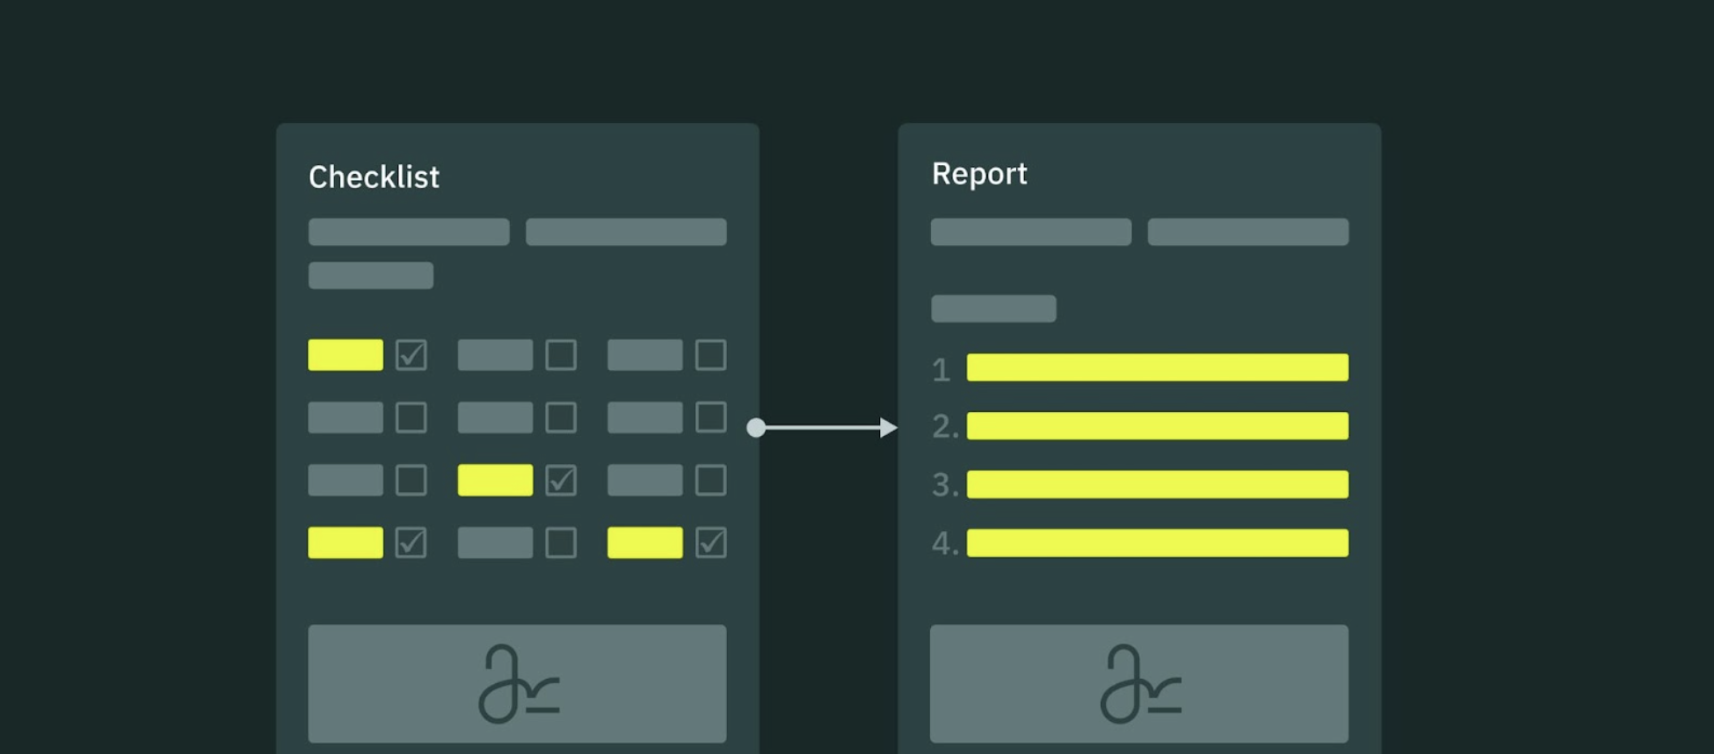
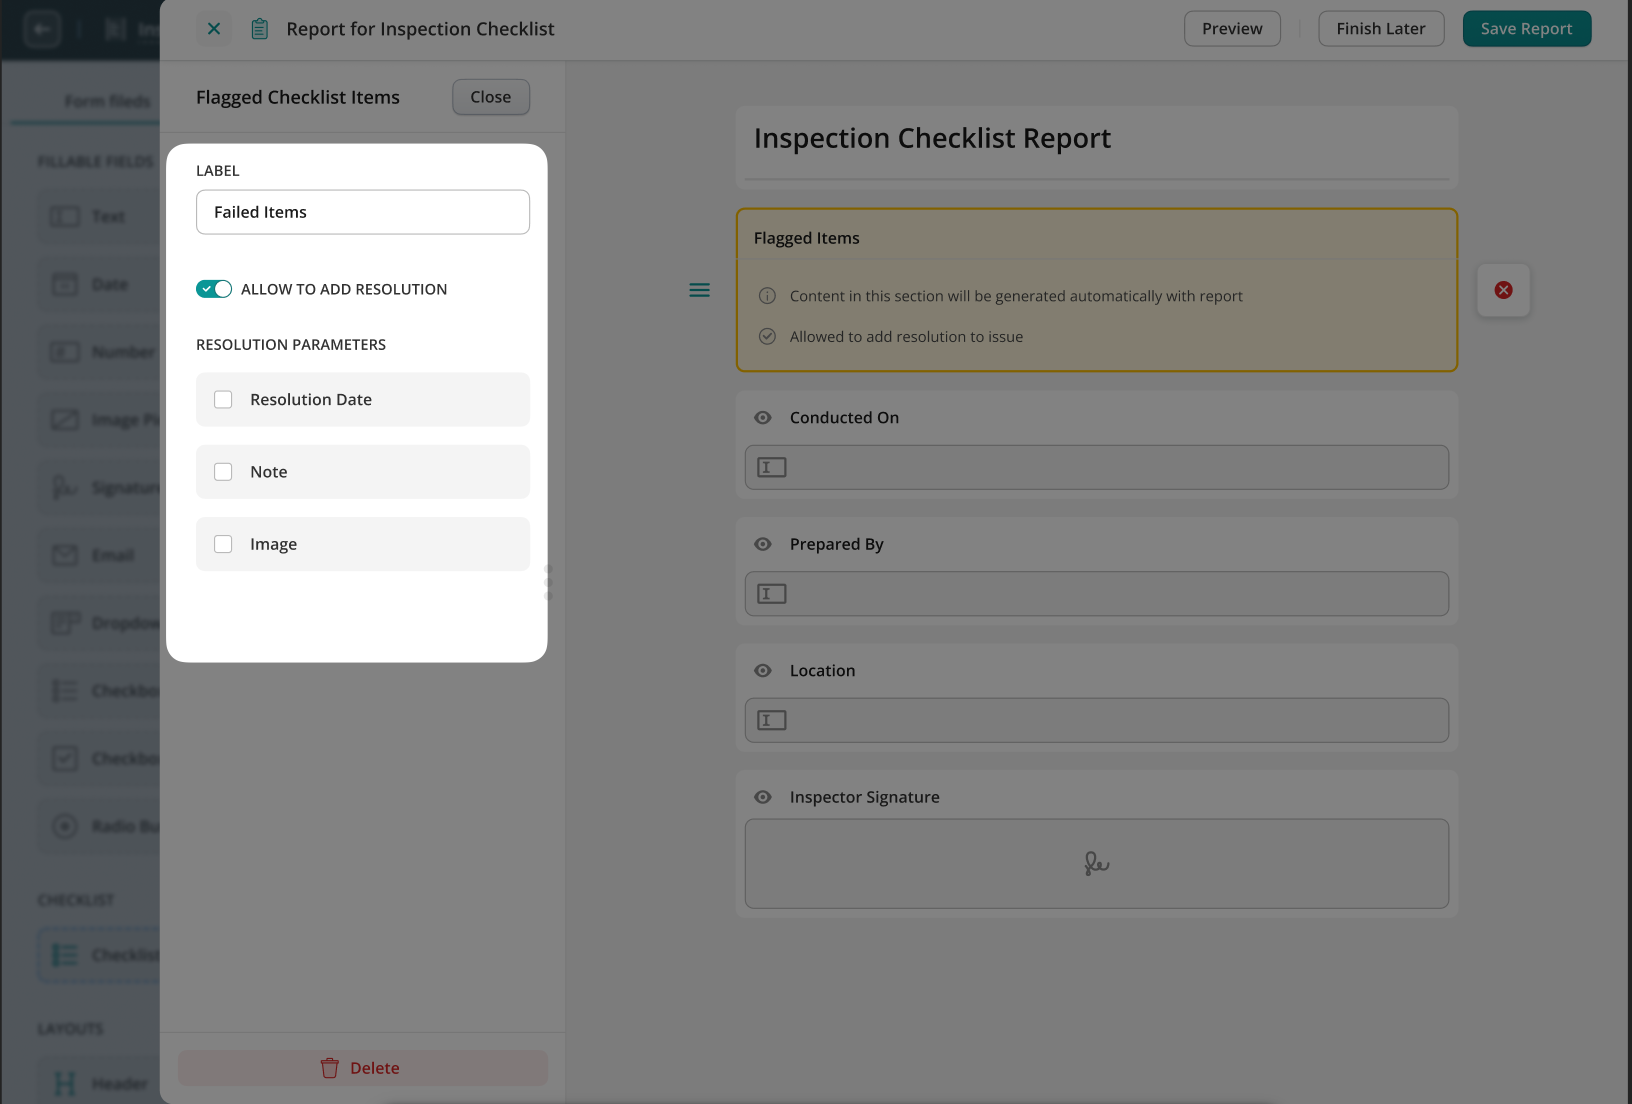
Checklists Instead of manually checking the checklist content, conditional routing automates the process based on predefined rules. Assuming a checklist has 10 checkpoints, if all 10 are set to be OK or the values are within a predefined range, the checklist will automatically be approved and saved on cloud storage, so no human interaction is required. In case one check is set to Not OK, the checklist will be reviewed.
Field inspections A similar case is when a fillable form contains a field Checked with dropdown options, Passed and Failed. If-then logic says: if Failed is chosen, then an email is sent to the responsible person.
Safety accident reports When an employee is injured on the job, the manager must submit an injury report to the office. If the manager chooses Yes next to Hospitalization required, conditional routing automatically sends the report to a safety director.
Employee COVID screening Before entering a workspace, all employees fill out a COVID-19 screening form. If a worker checks the Fever box, they need to either WFH or include their submitted report due to the symptoms.
Employee hiring & onboarding While hiring and onboarding a new person, each company sets up a list of steps and procedures to make the employee onboarding as smooth as possible. An employee’s new-hire or onboarding checklist would be among those forms that help both a newcomer and their manager to ensure all aspects are covered. For example, if the Info Security Agreement is not signed, the respective task is automatically assigned to the Info Security Director.
How to set up conditional routing in the business process?
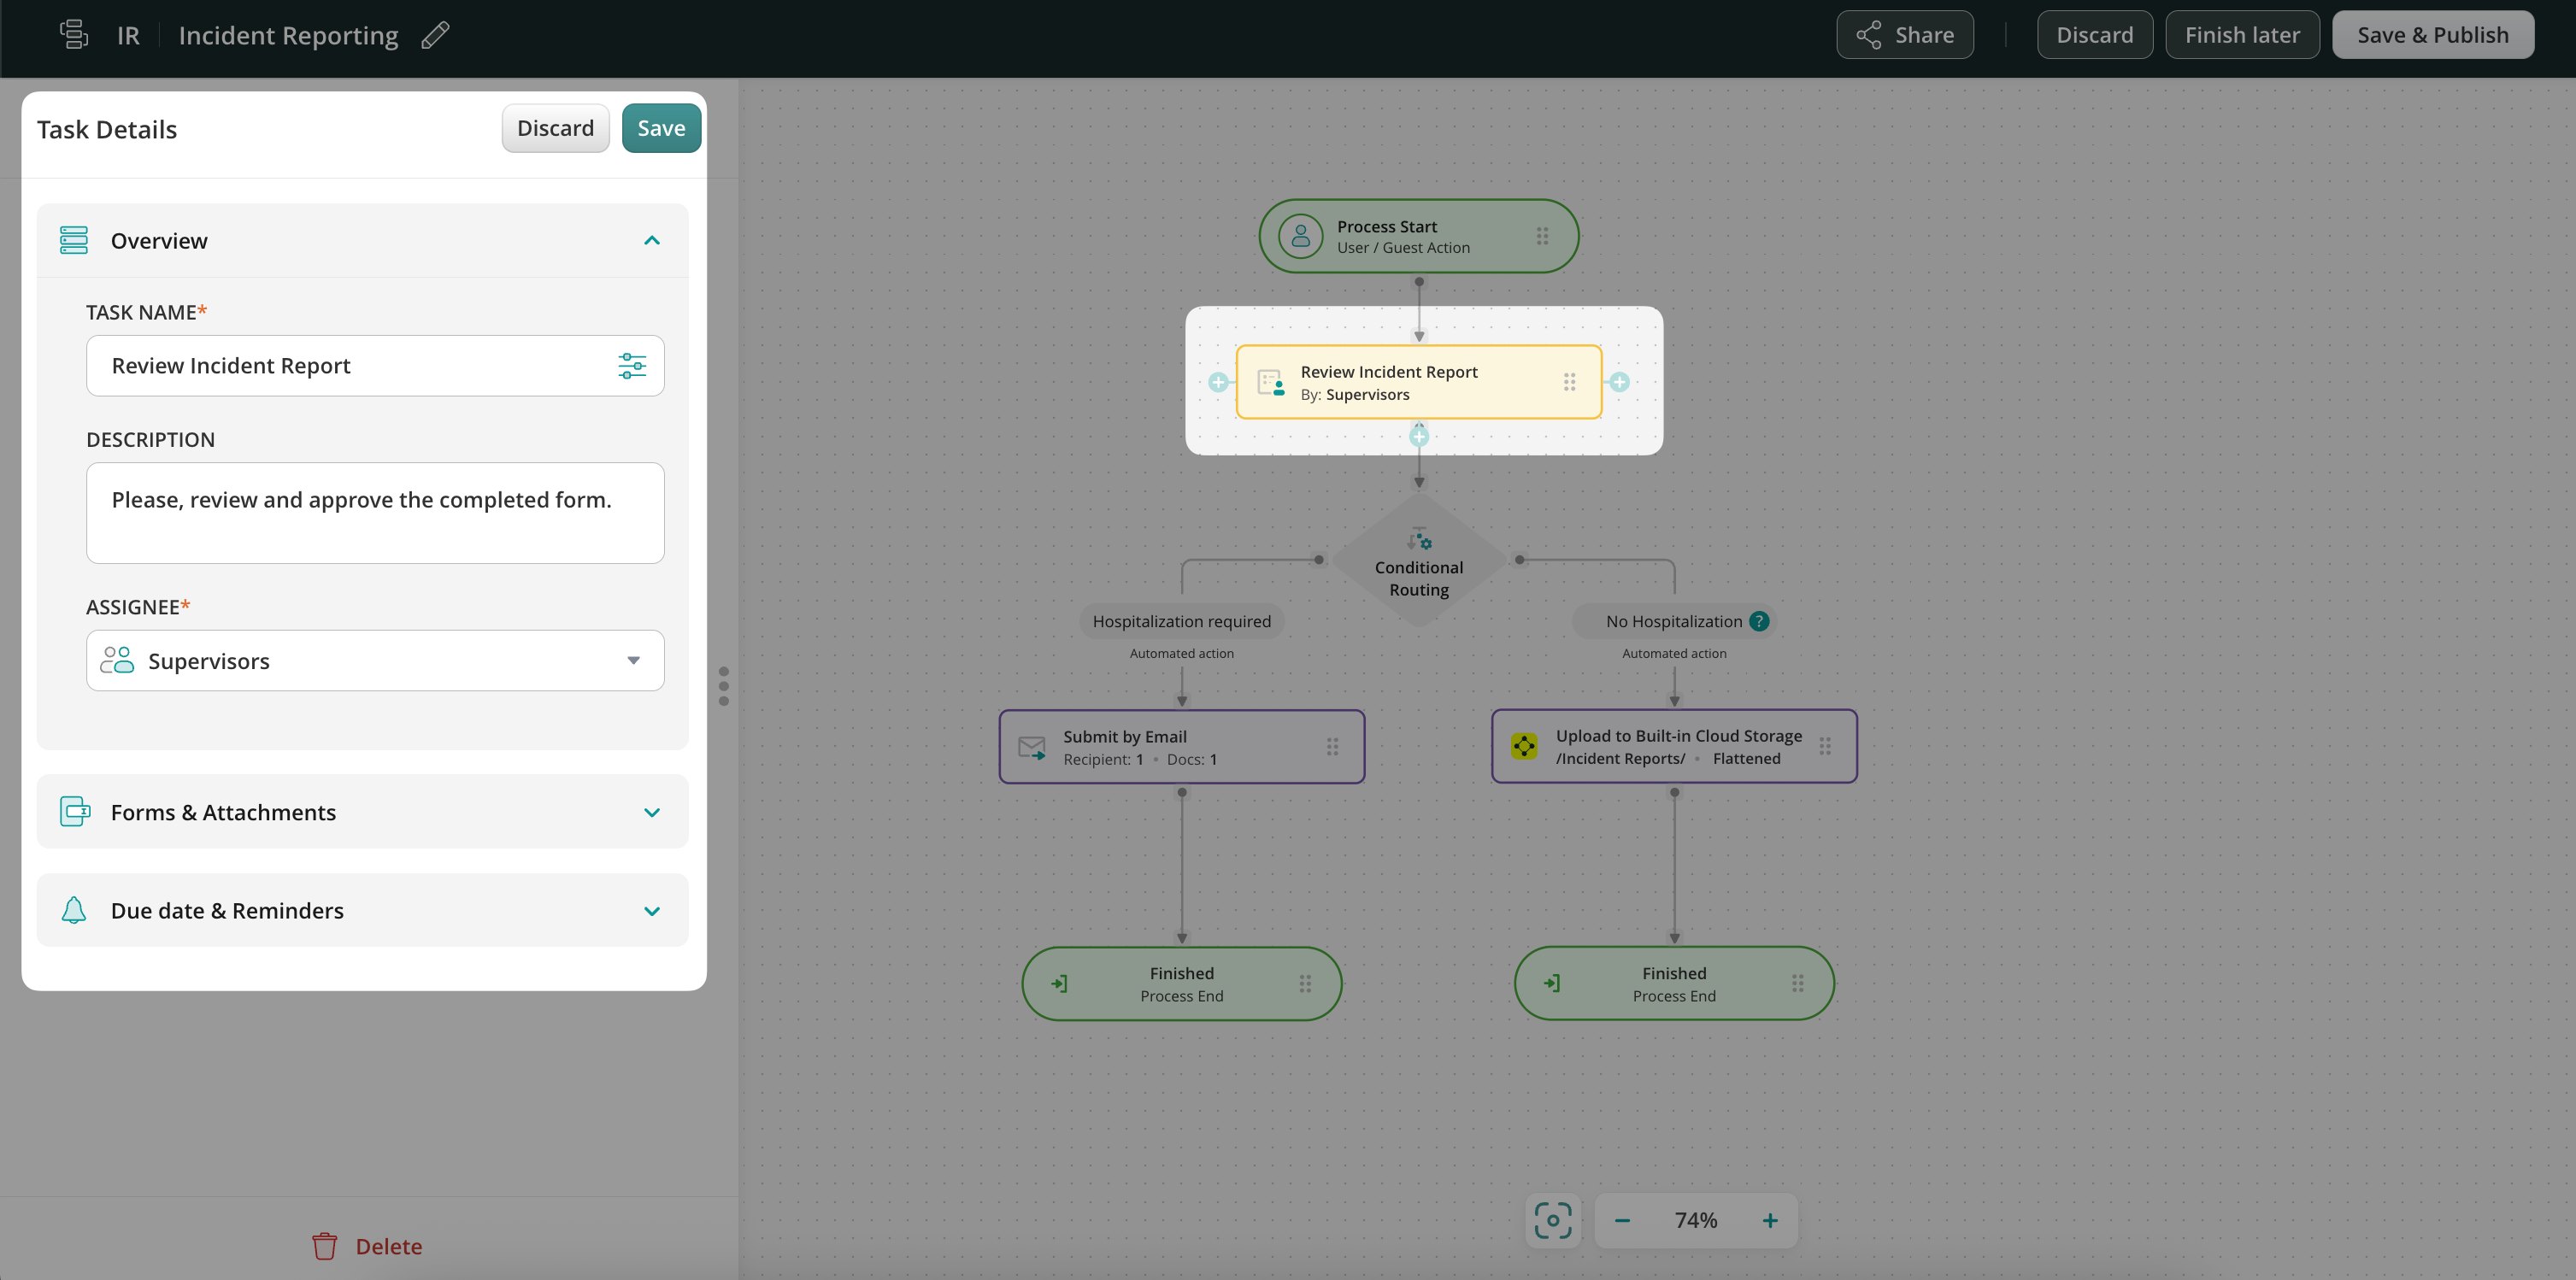
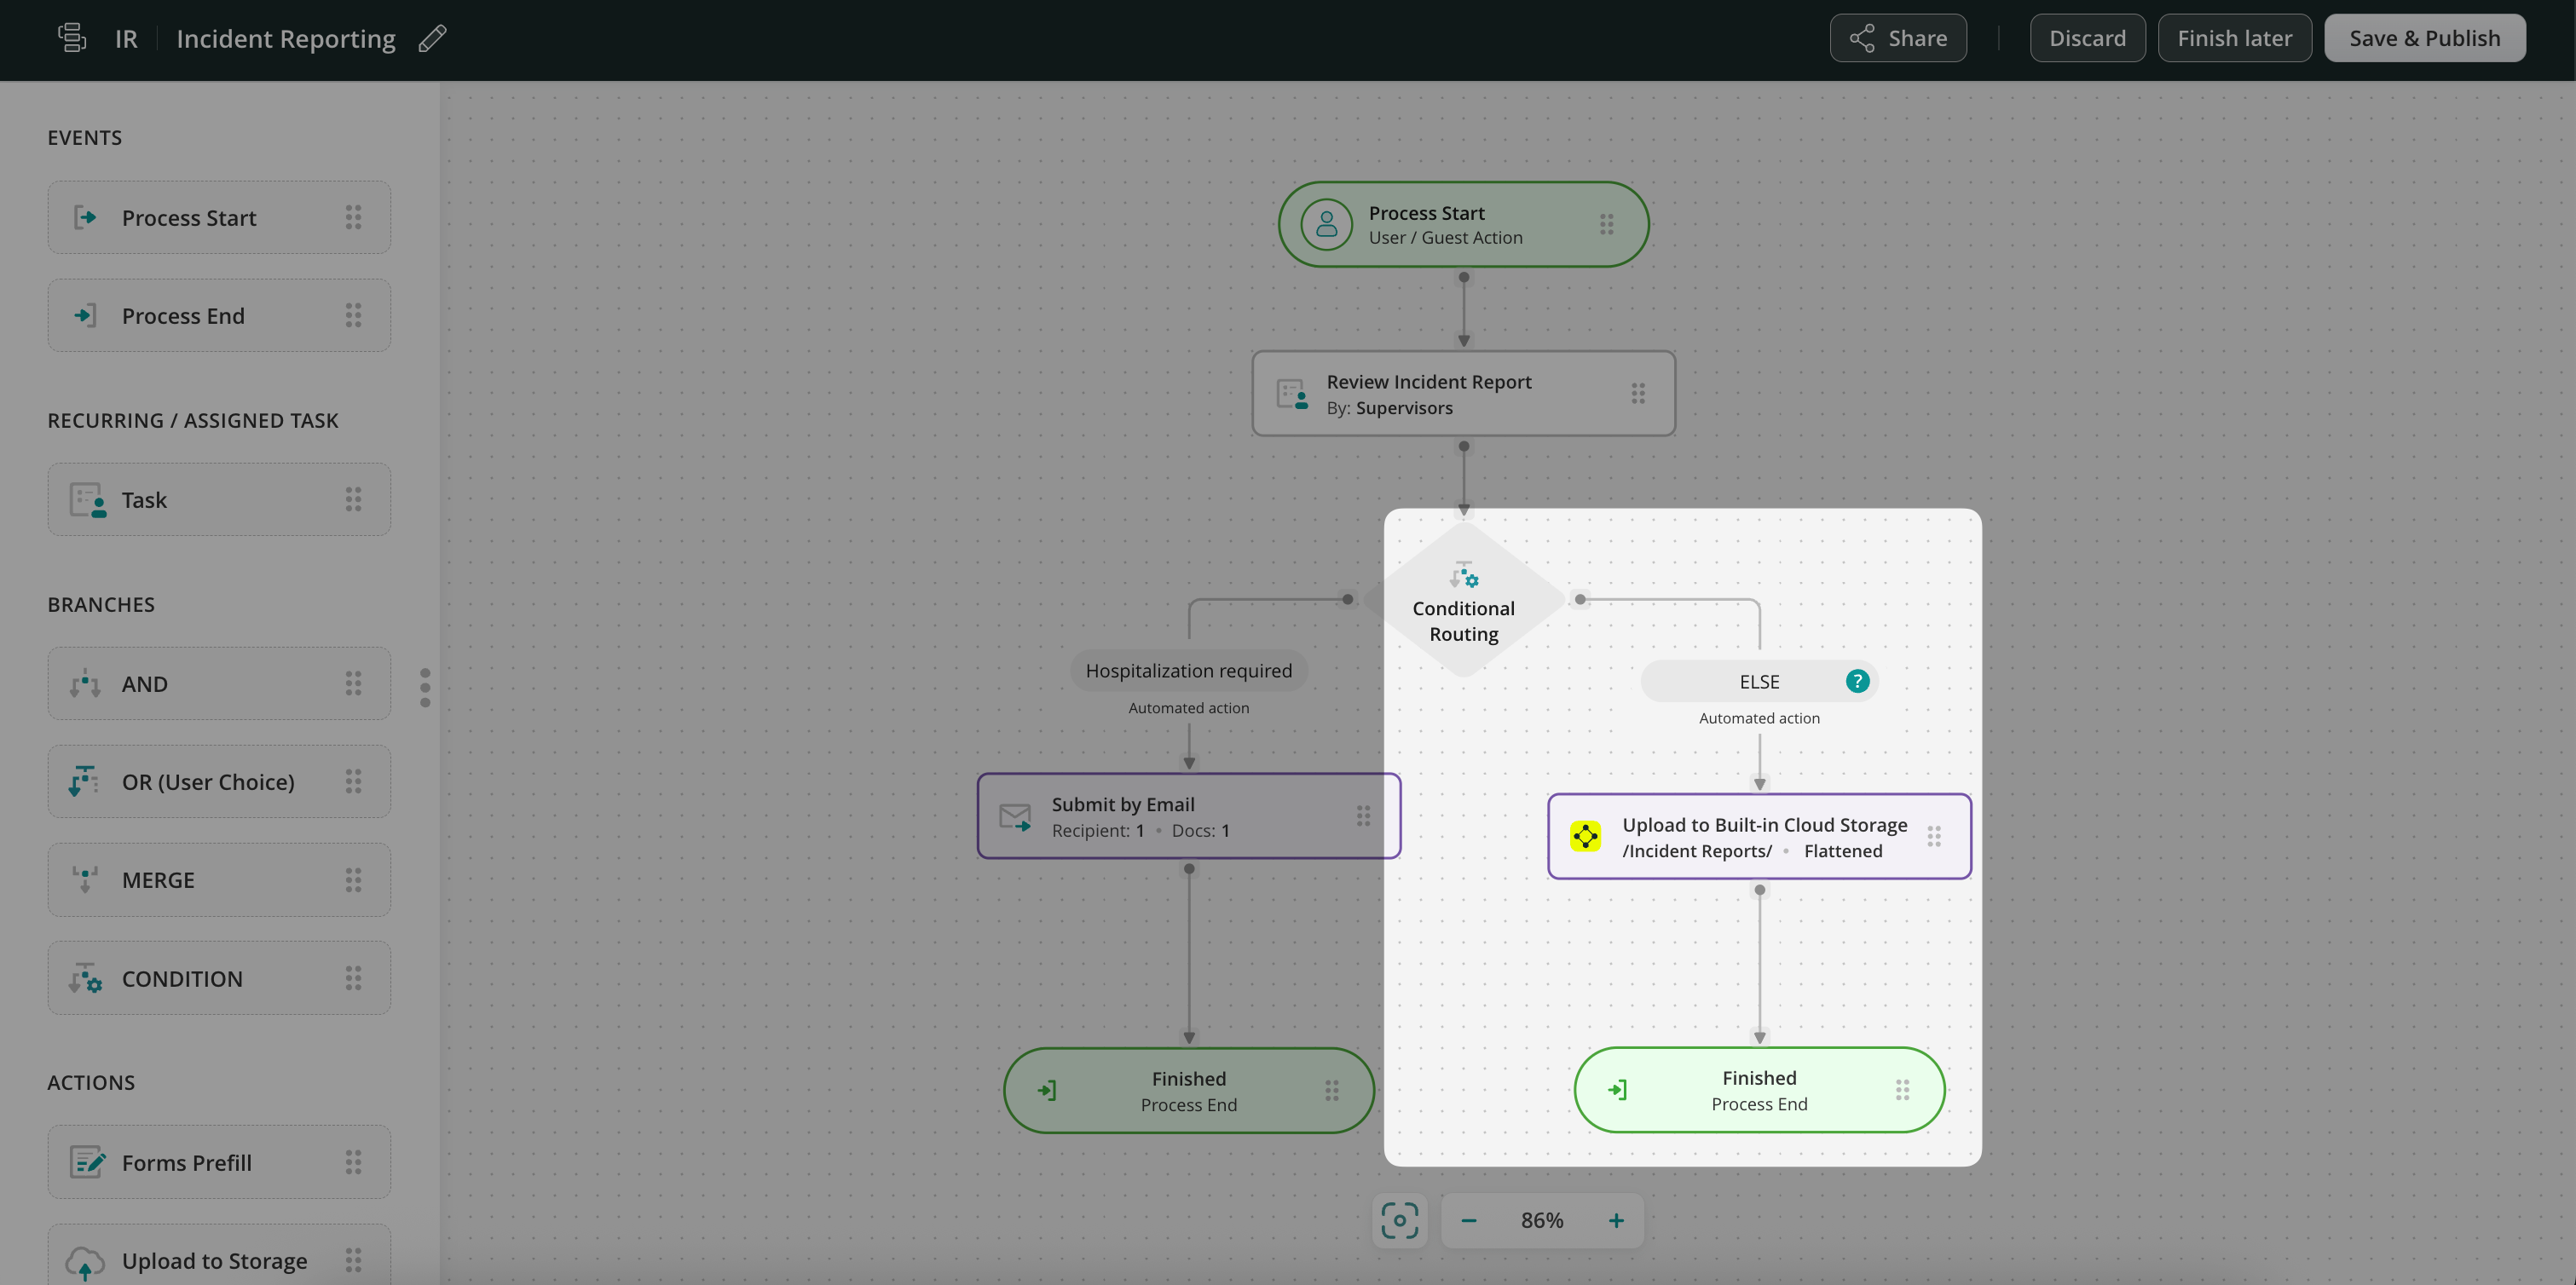
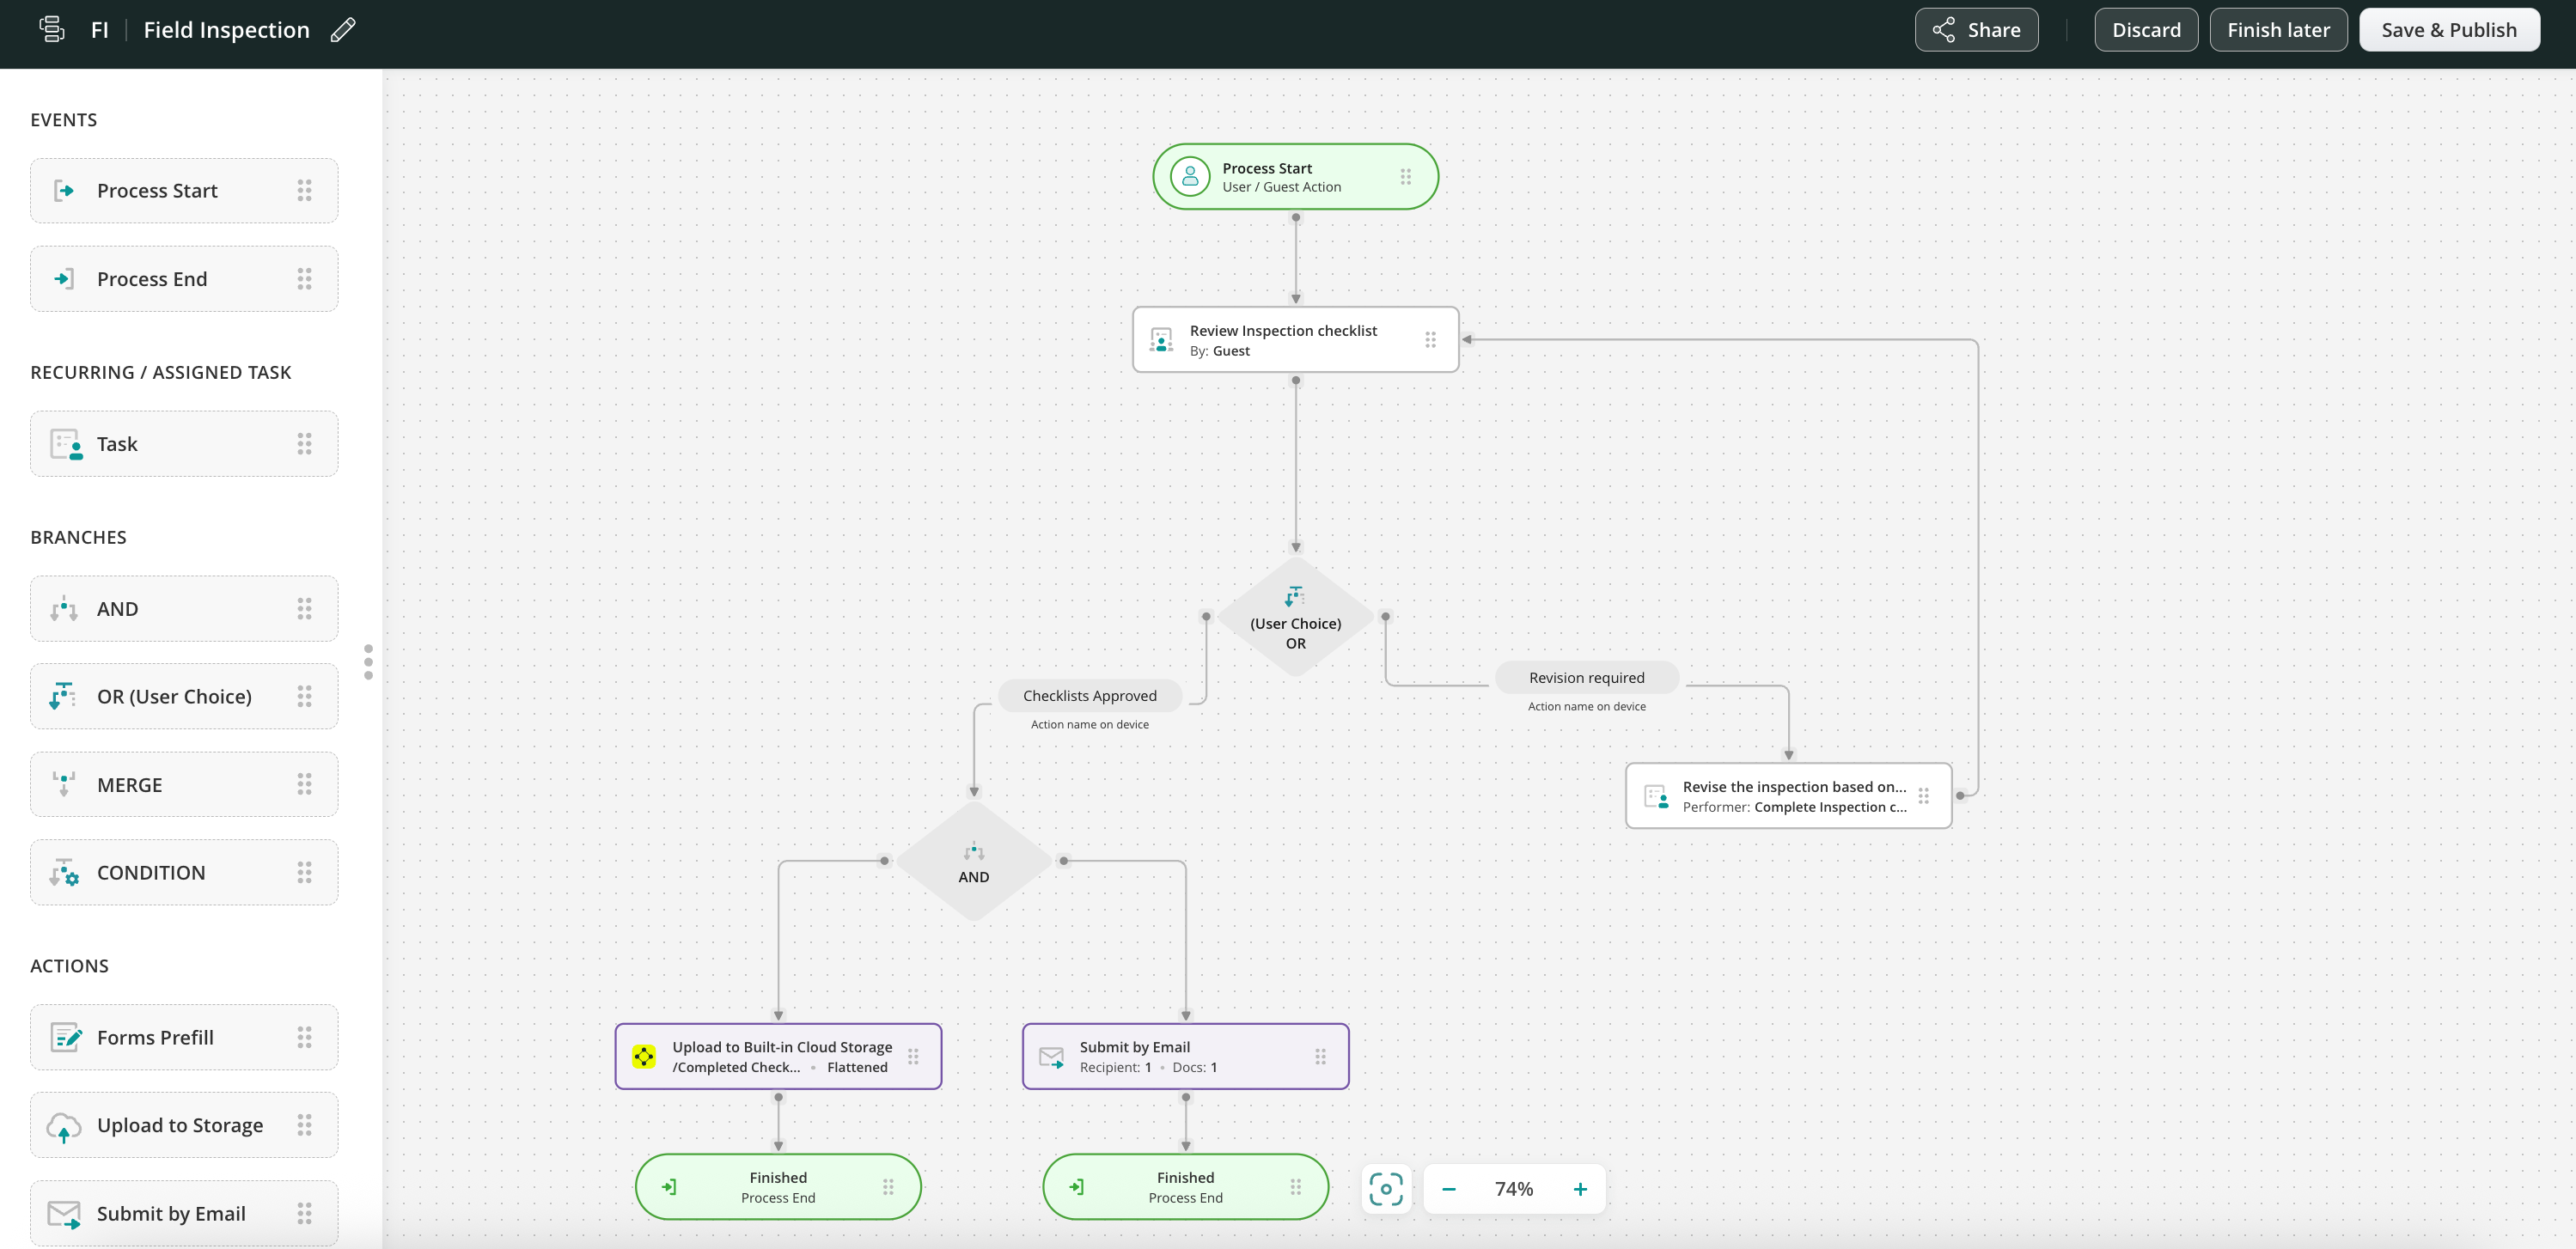
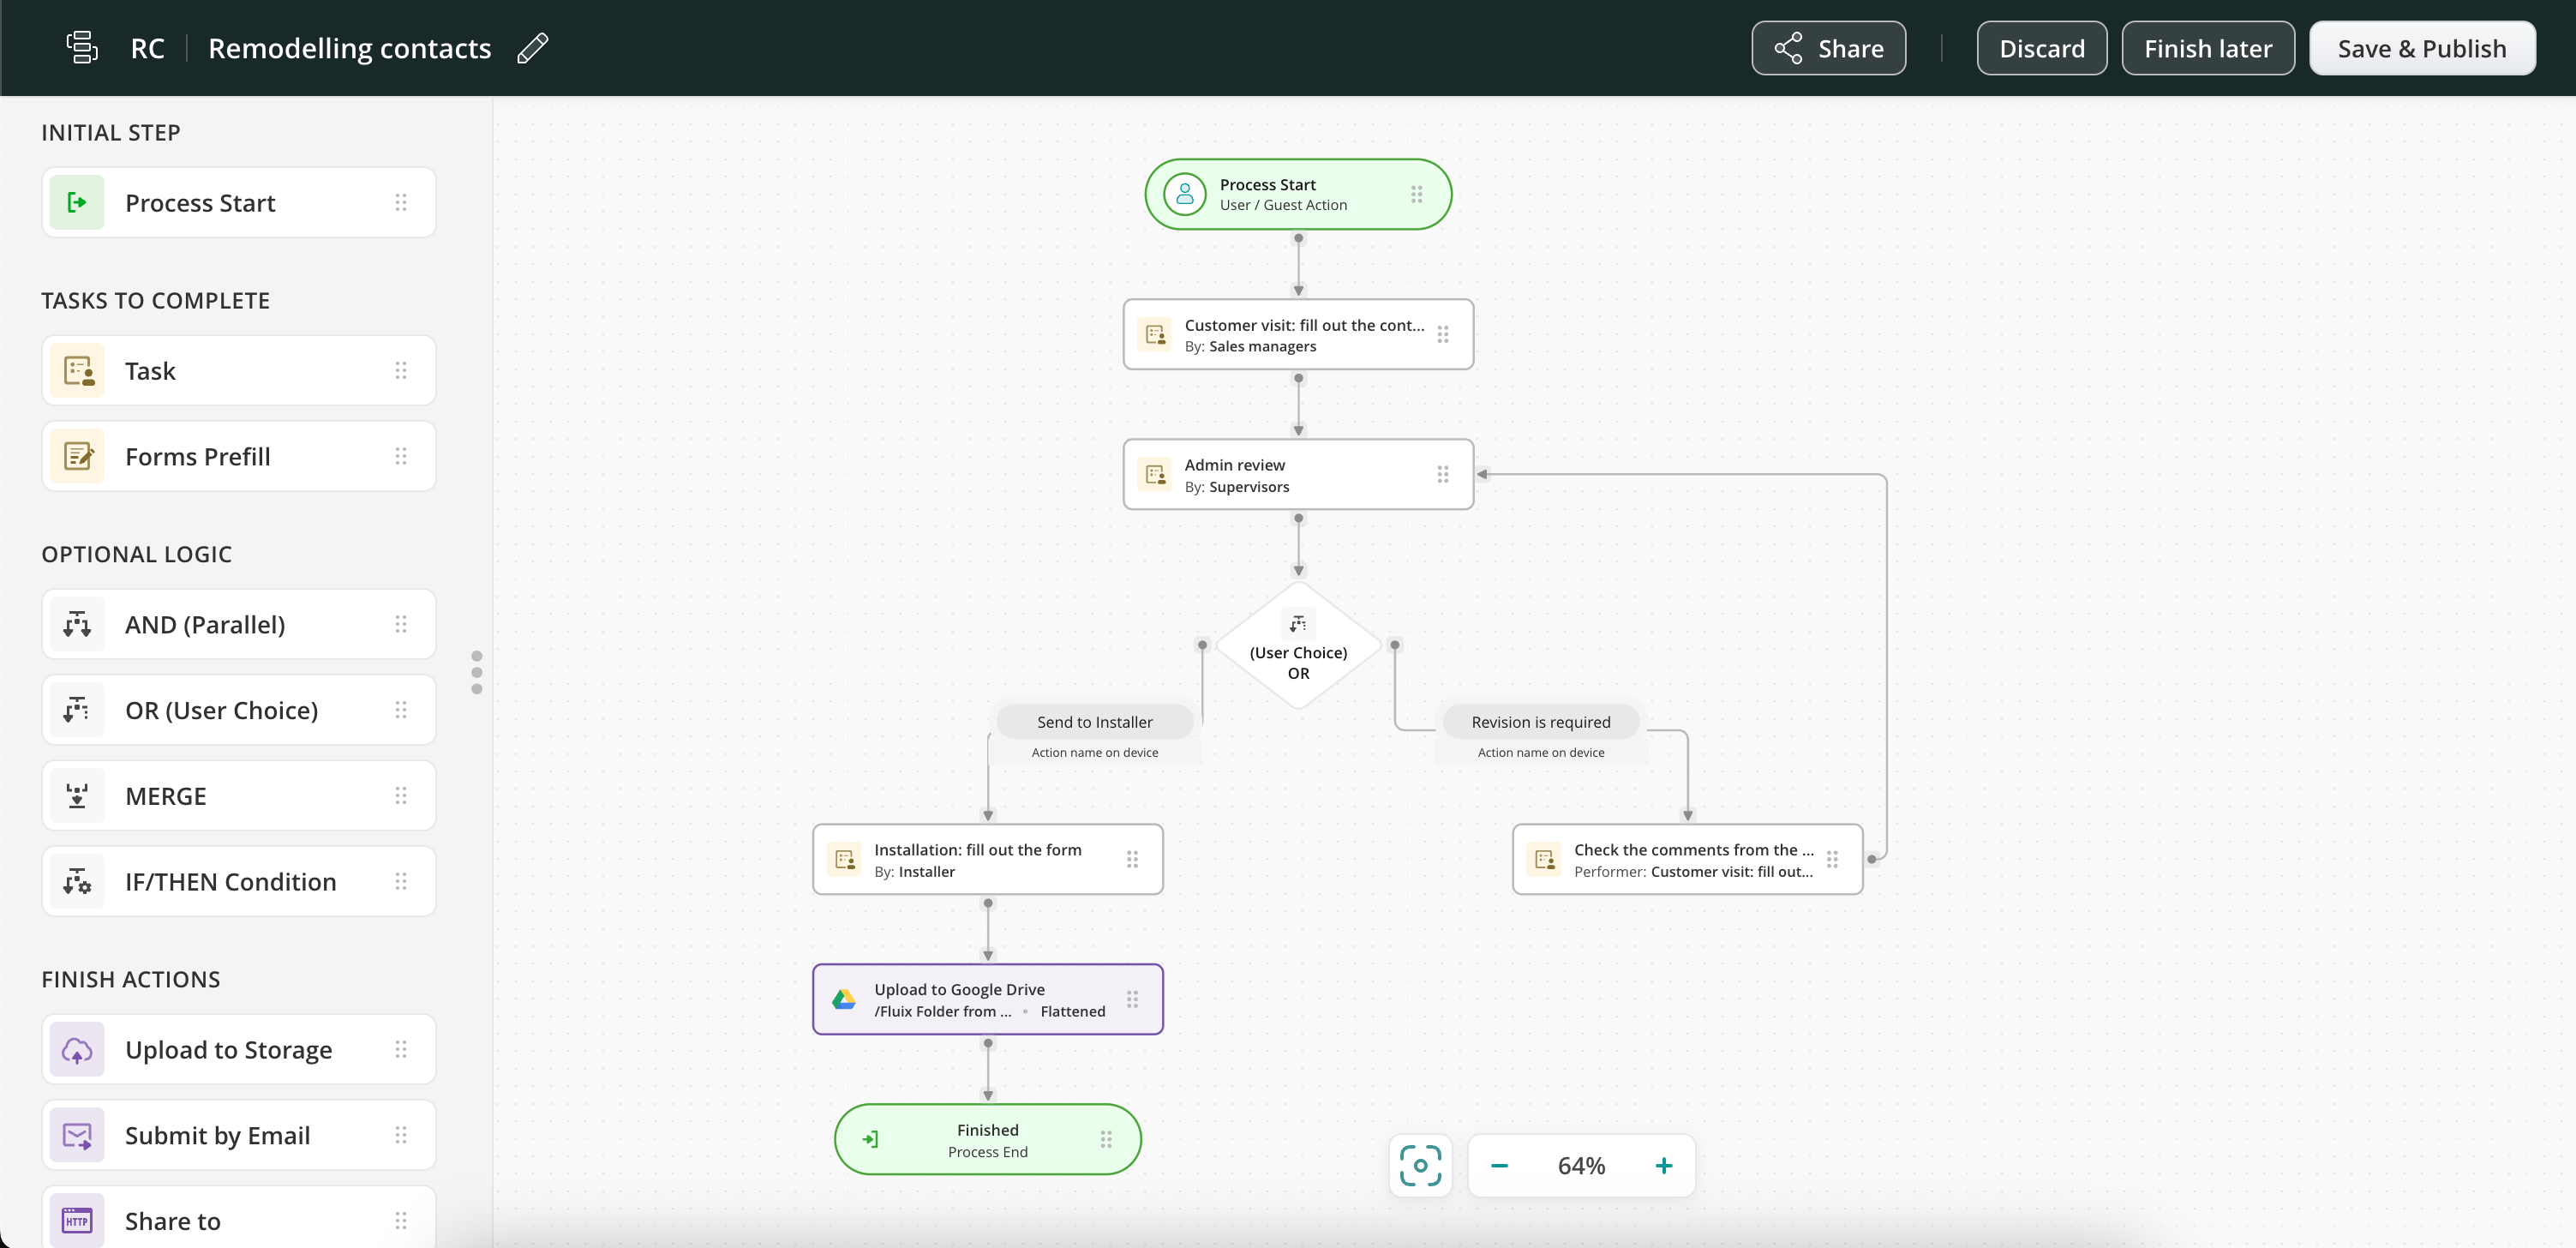
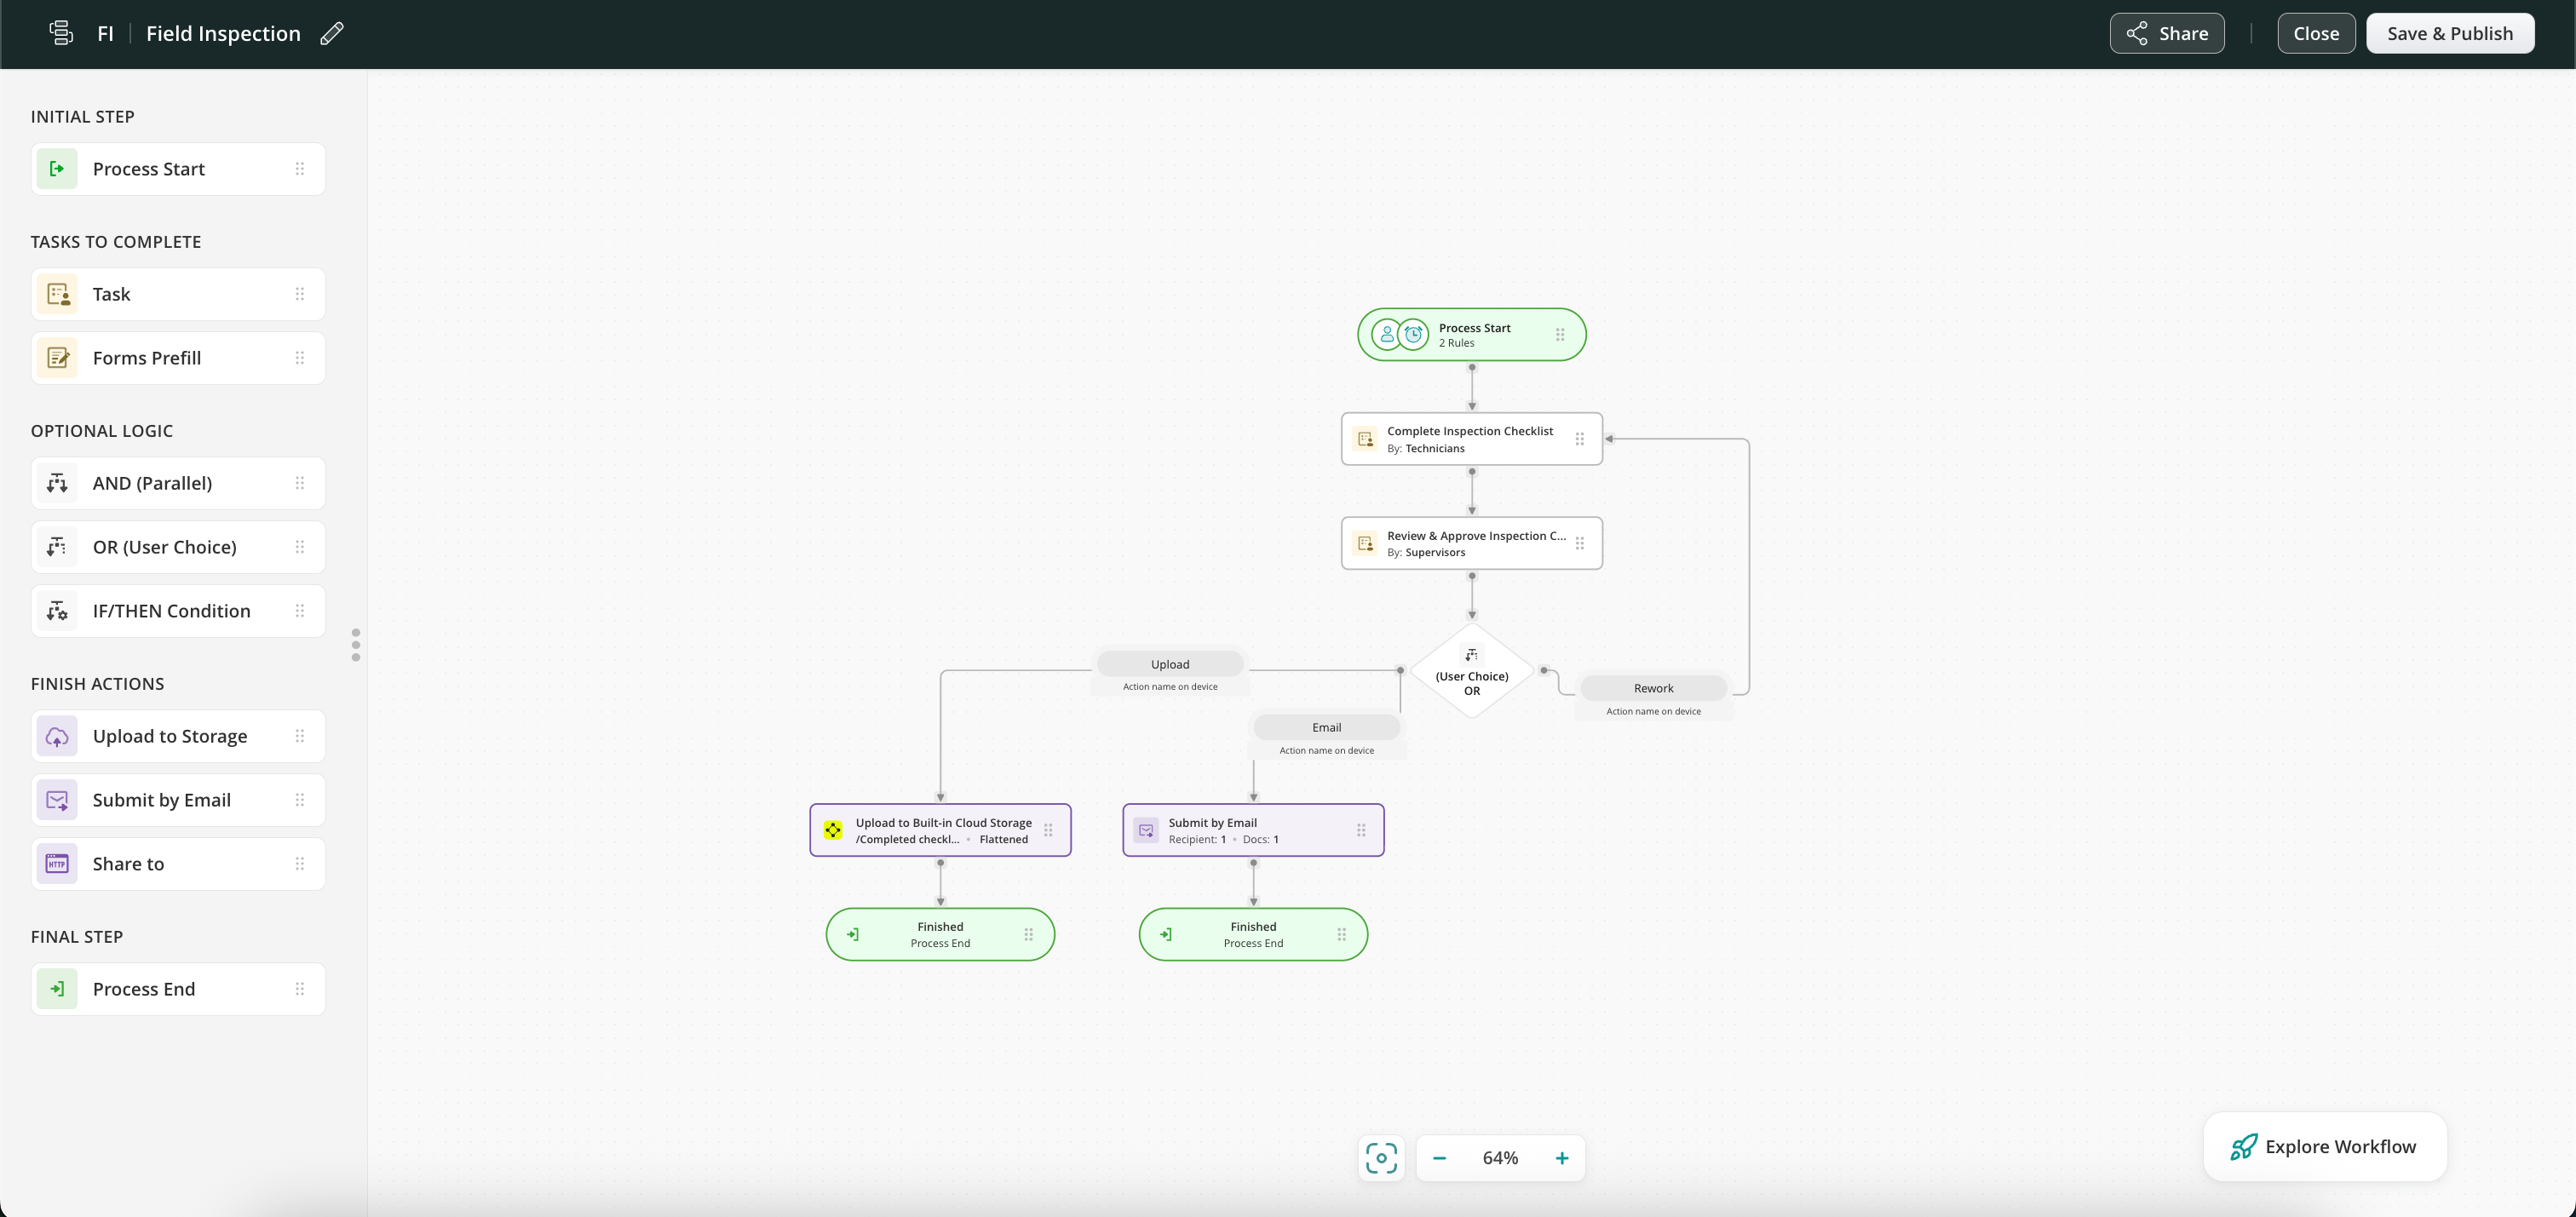
Let’s examine a real-life safety injury reporting case as an example of utilizing conditional routing in Fluix workflows. An employee is injured on the job, and the supervisor must submit an injury report to the Safety Director.
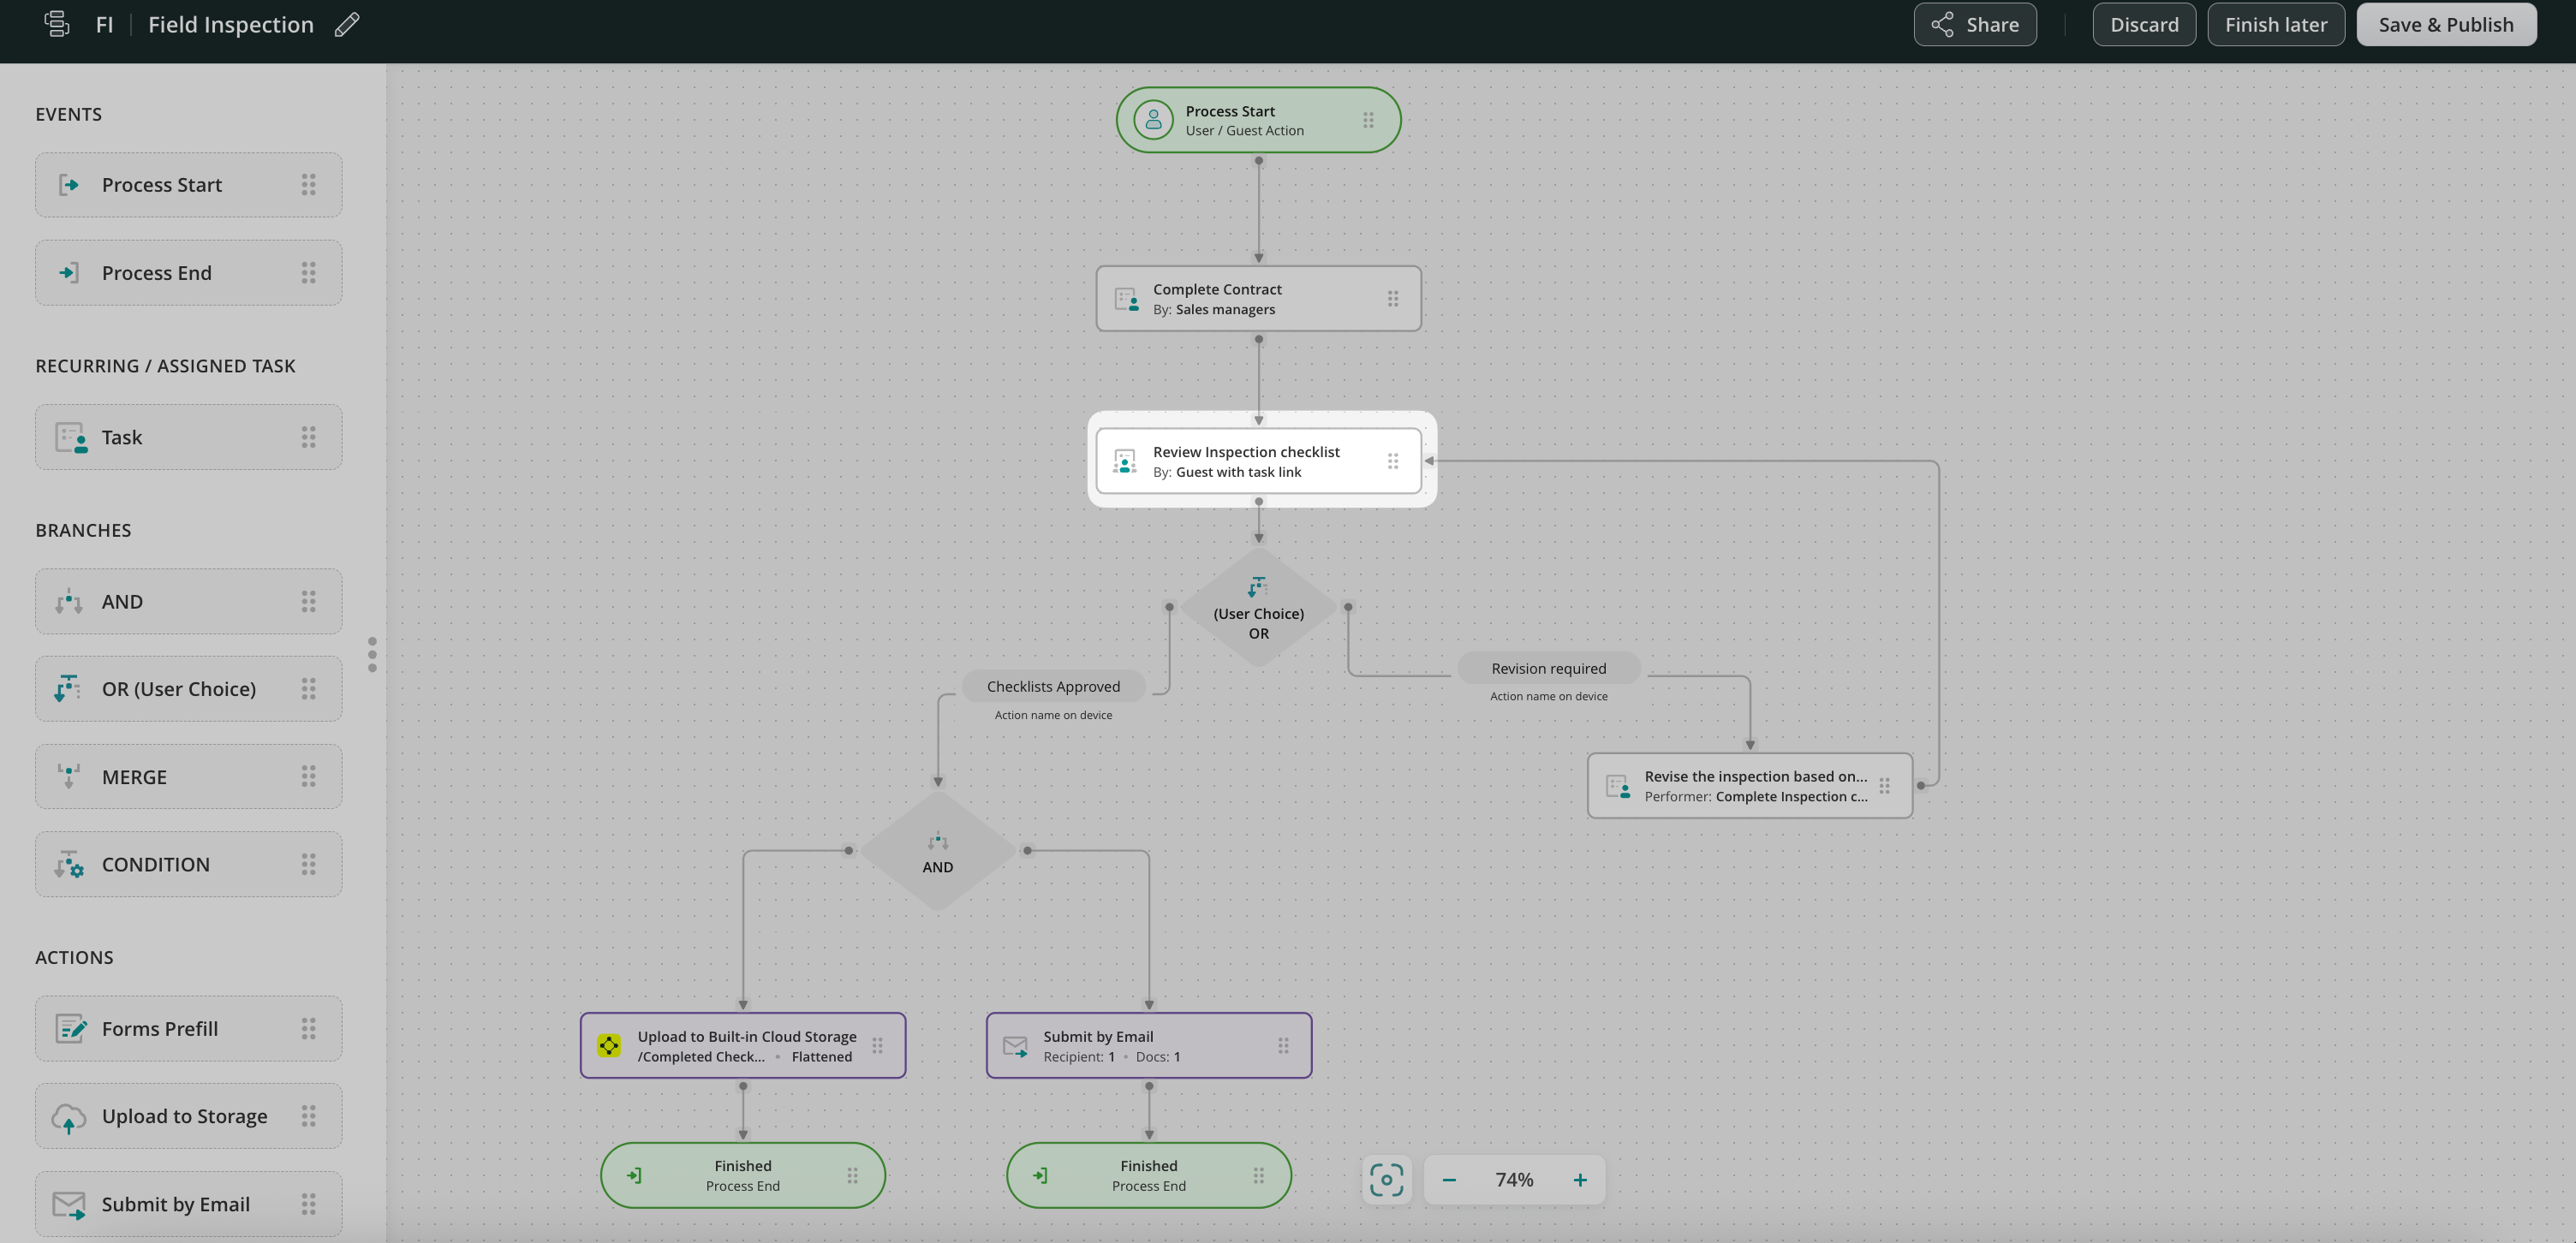
Step 1 – Create the first task and a form. Navigate to the Fluix admin portal, create a new workflow, and configure the first task for Supervisors who will fill out a safety incident report.
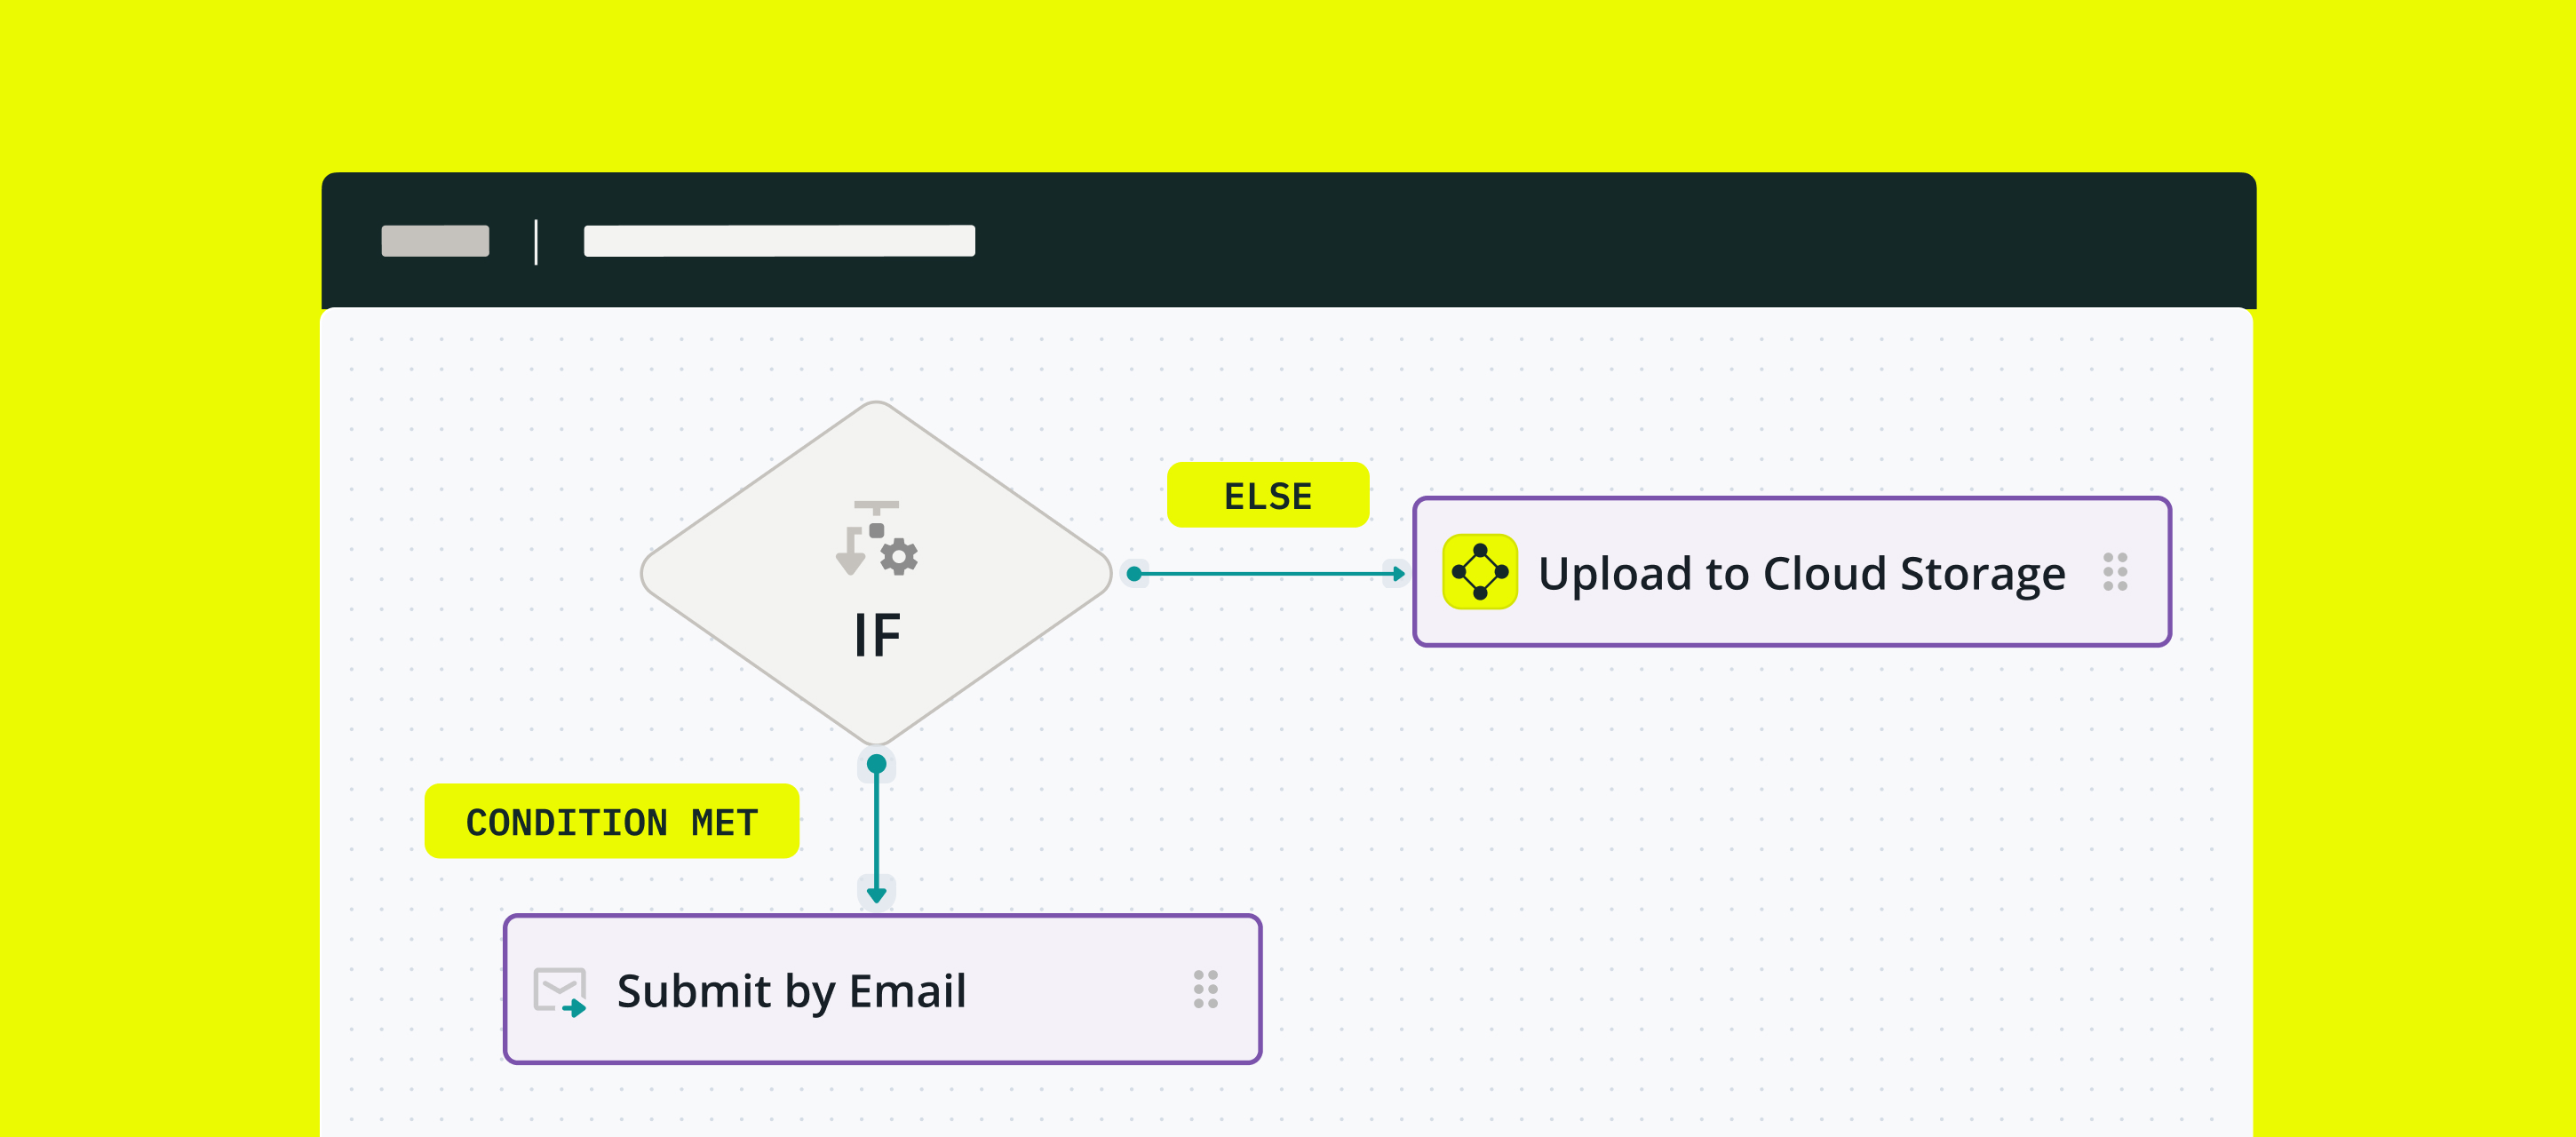
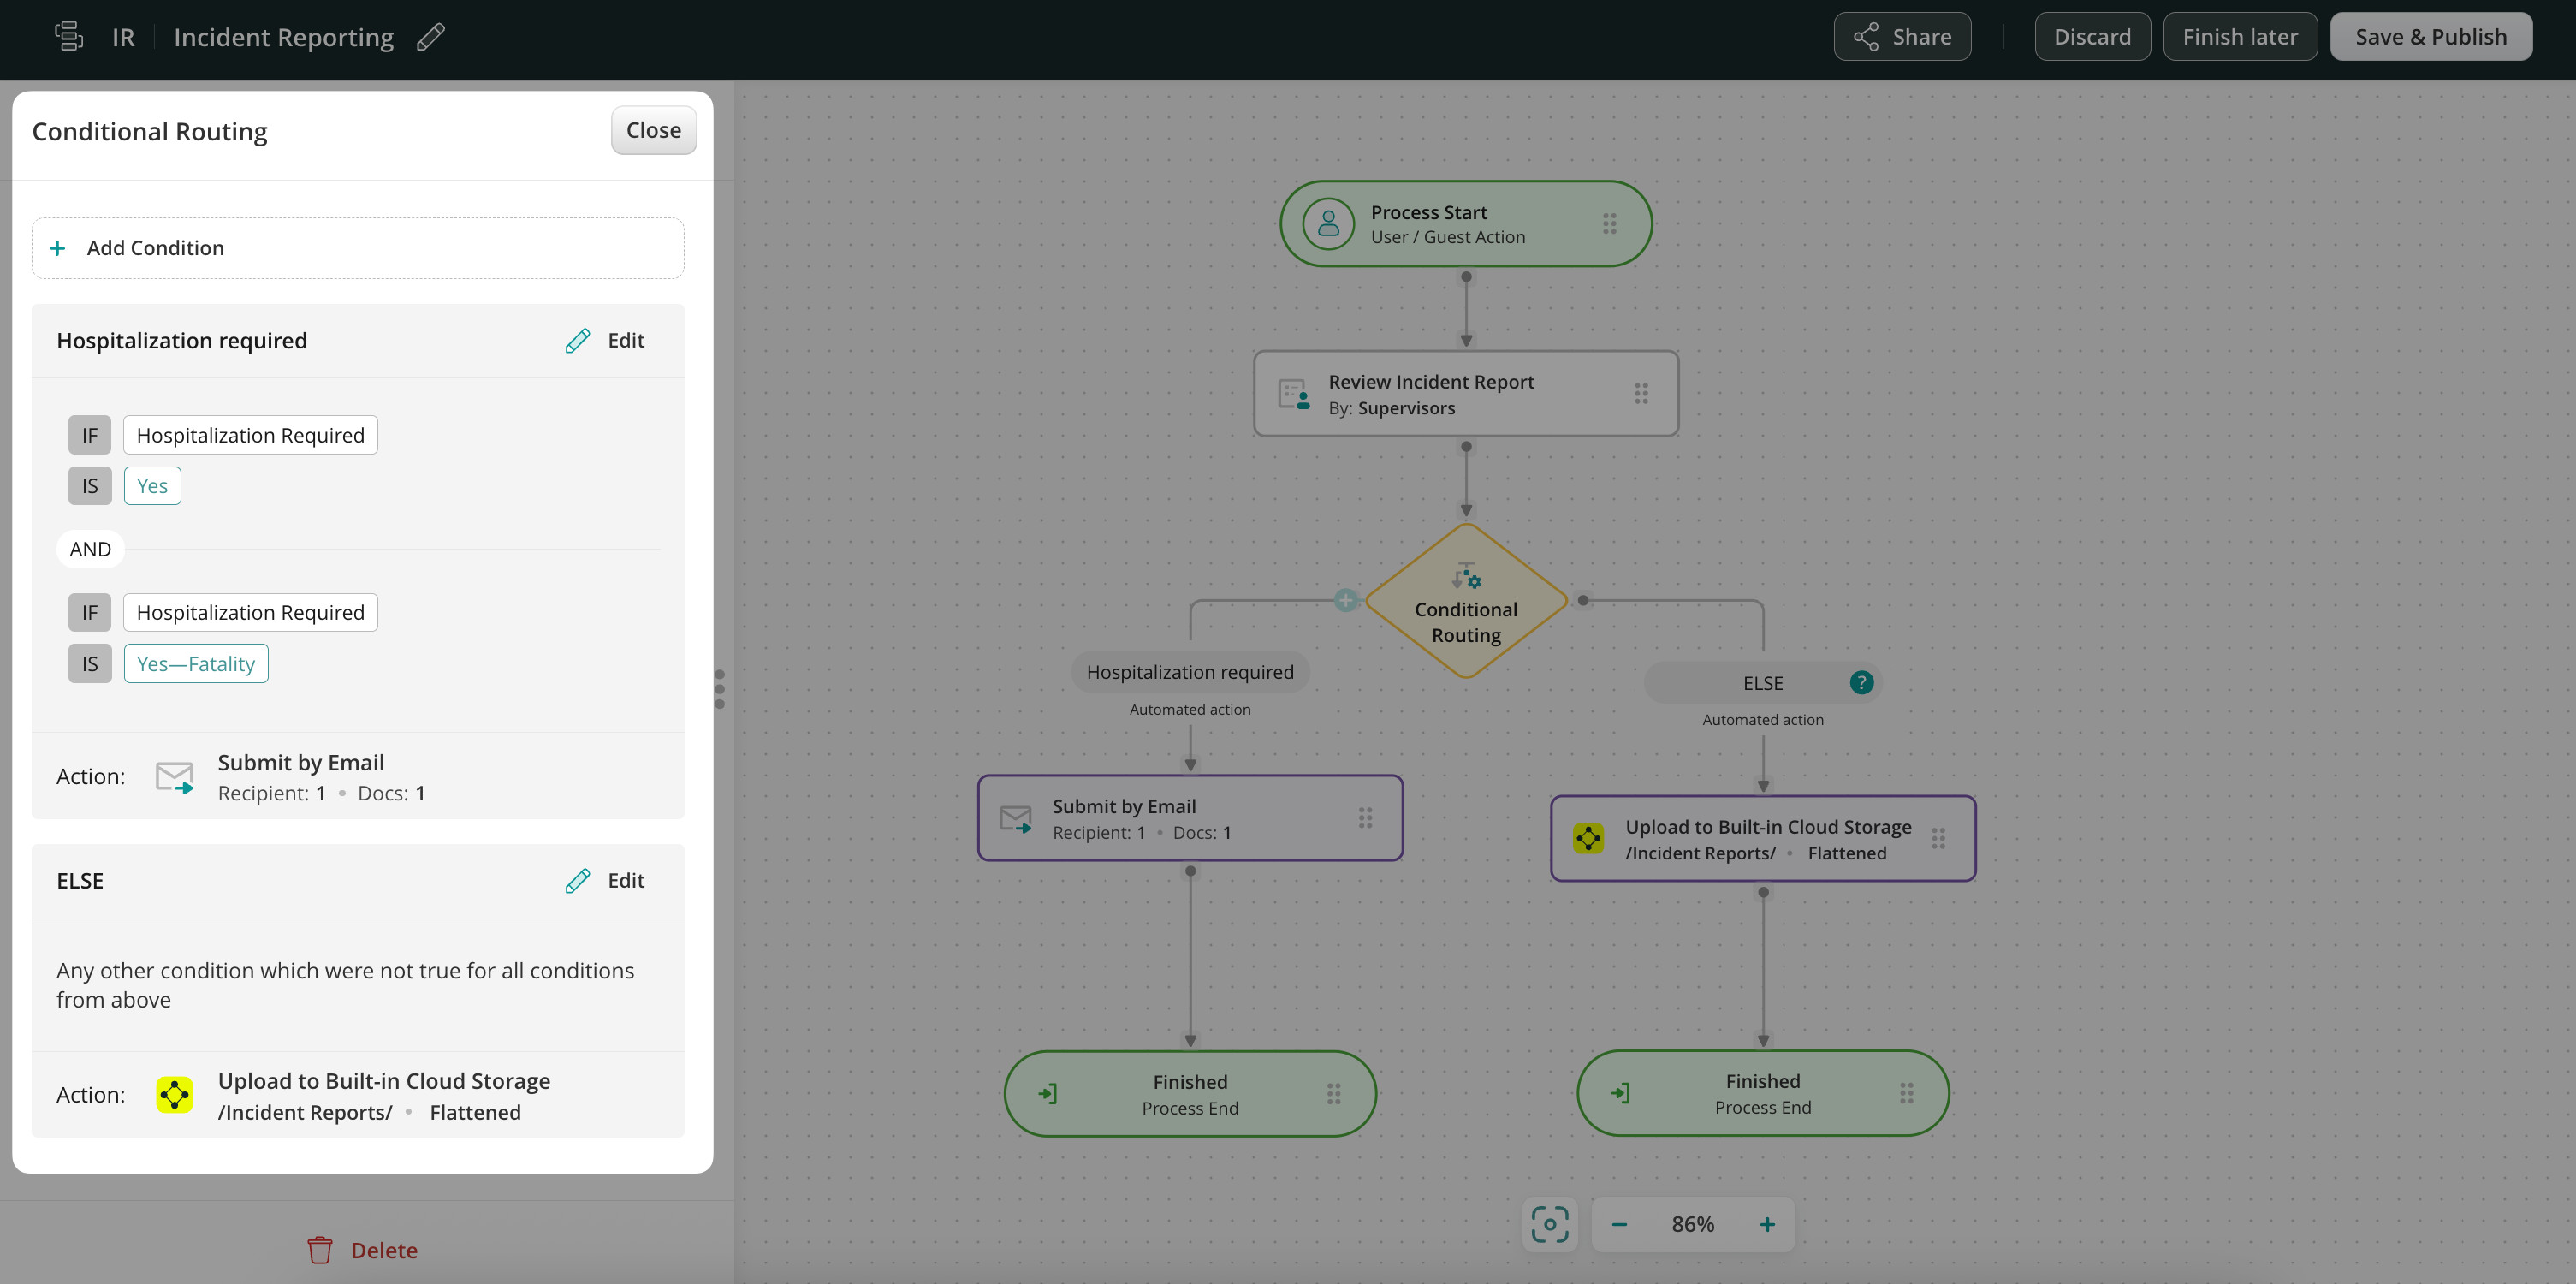
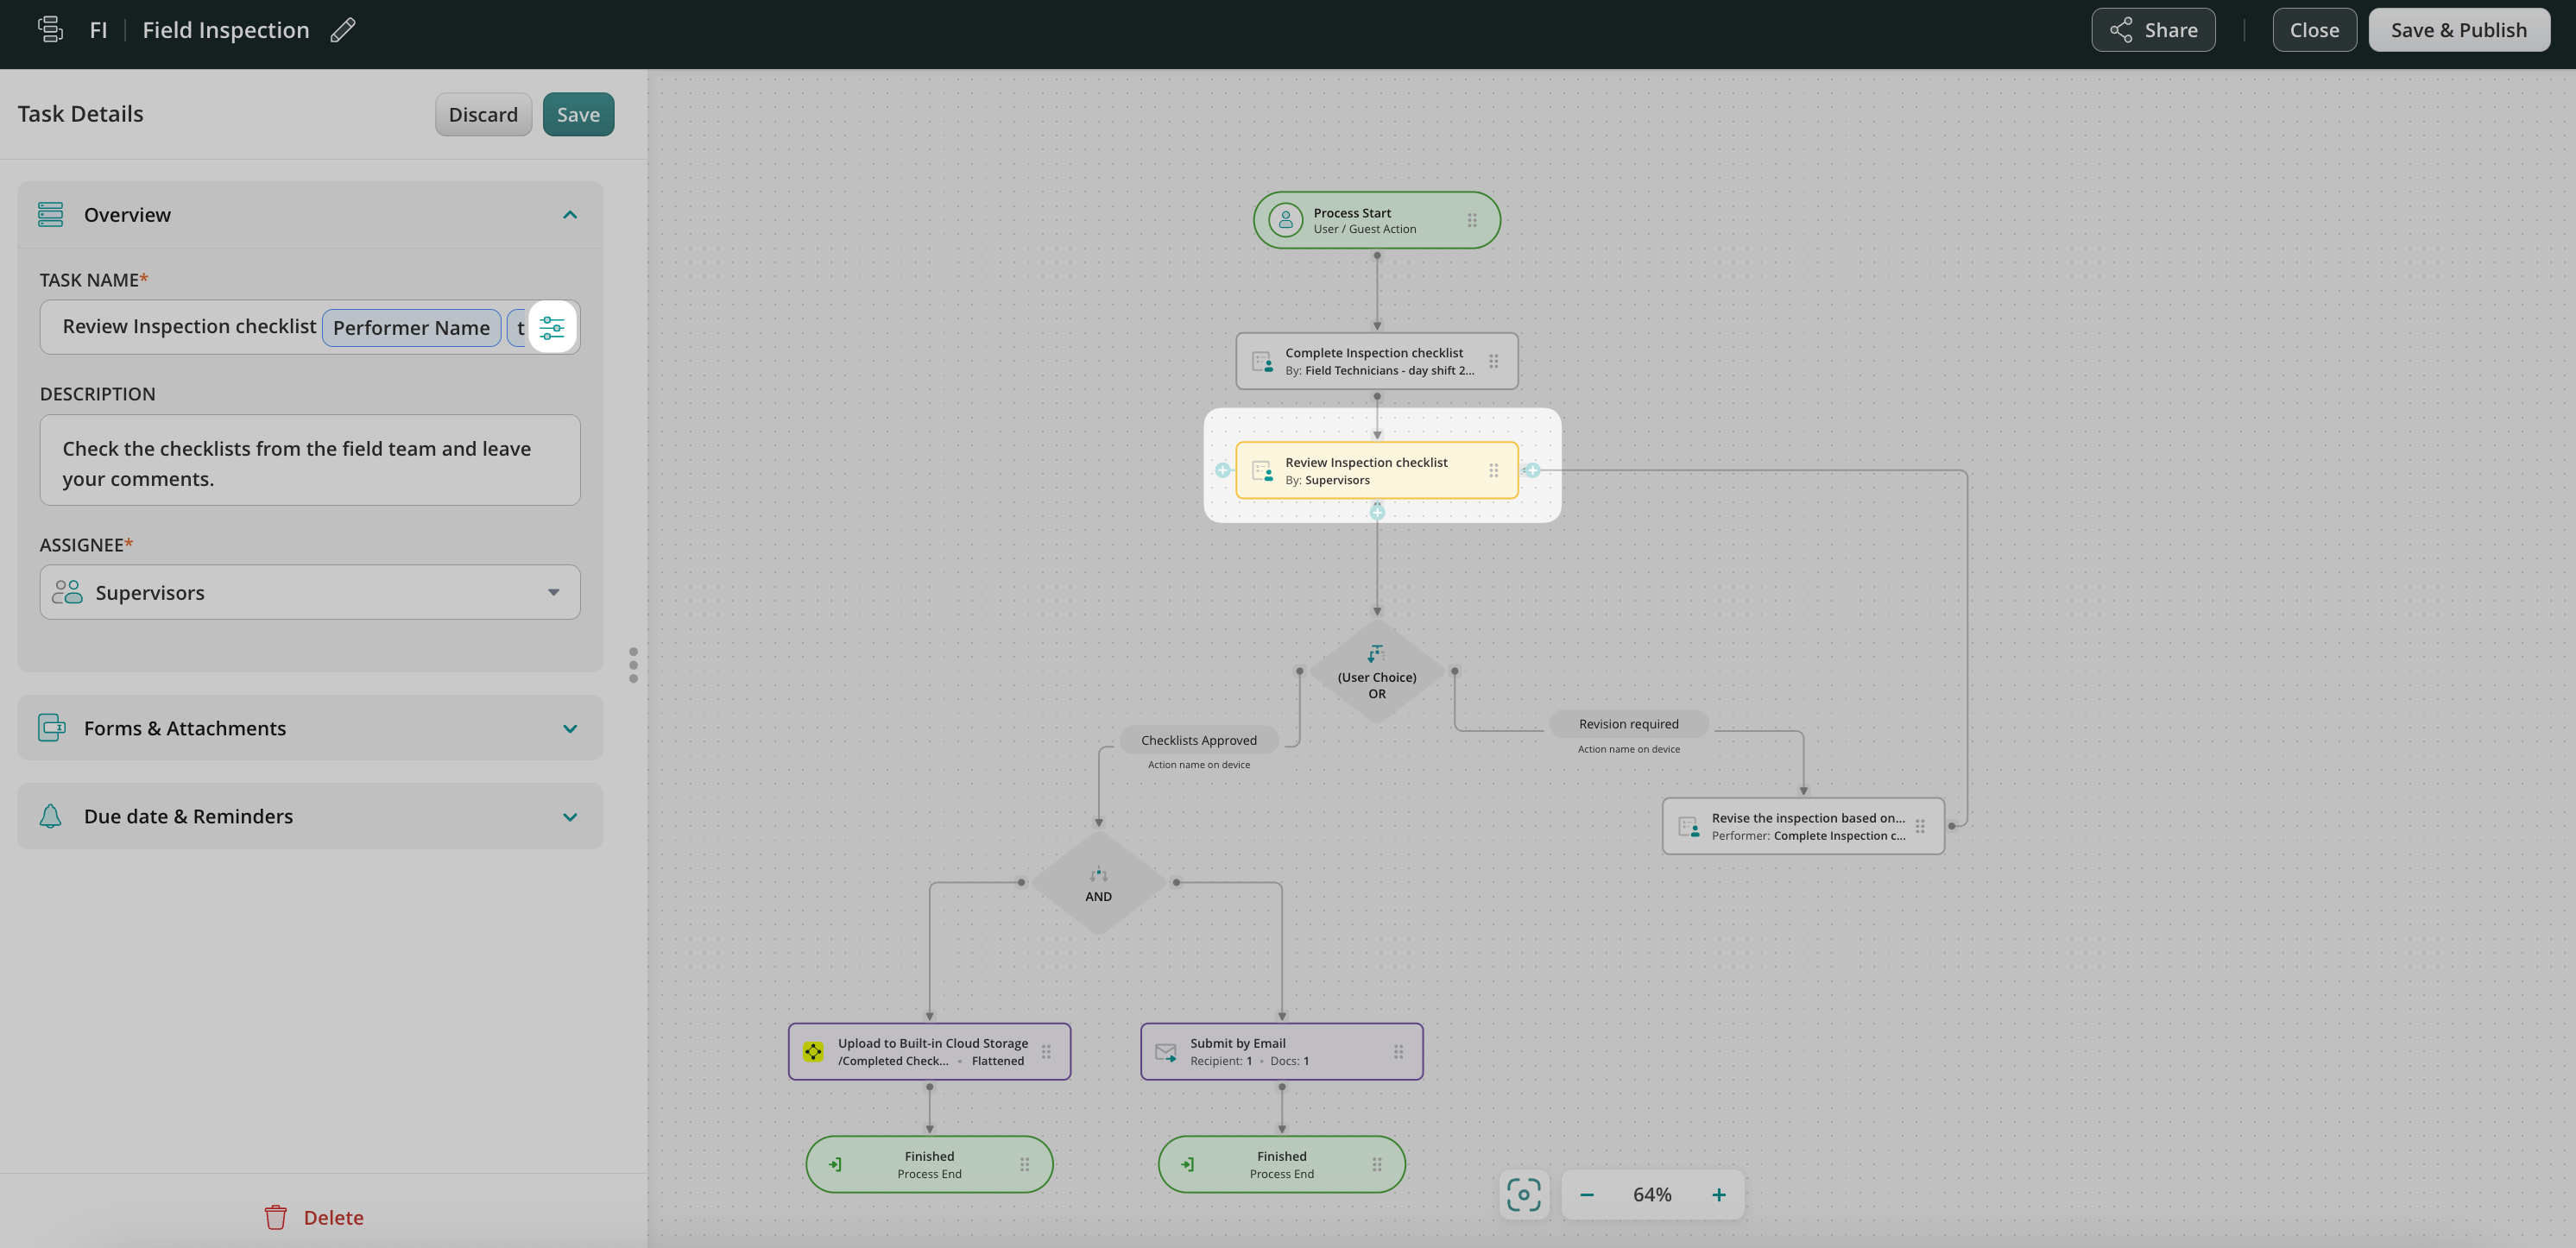
Step 2 – Configure the Conditional routing. Drag and drop the Conditional routing element to the workflow chart and connect it with the Supervisors’ task using an arrow. By default, the Conditional Routing element has two conditions: Condition 1 and Else. You may rename them as needed for more clarity. You can also add more conditions if needed (check the details in Step 3 below).
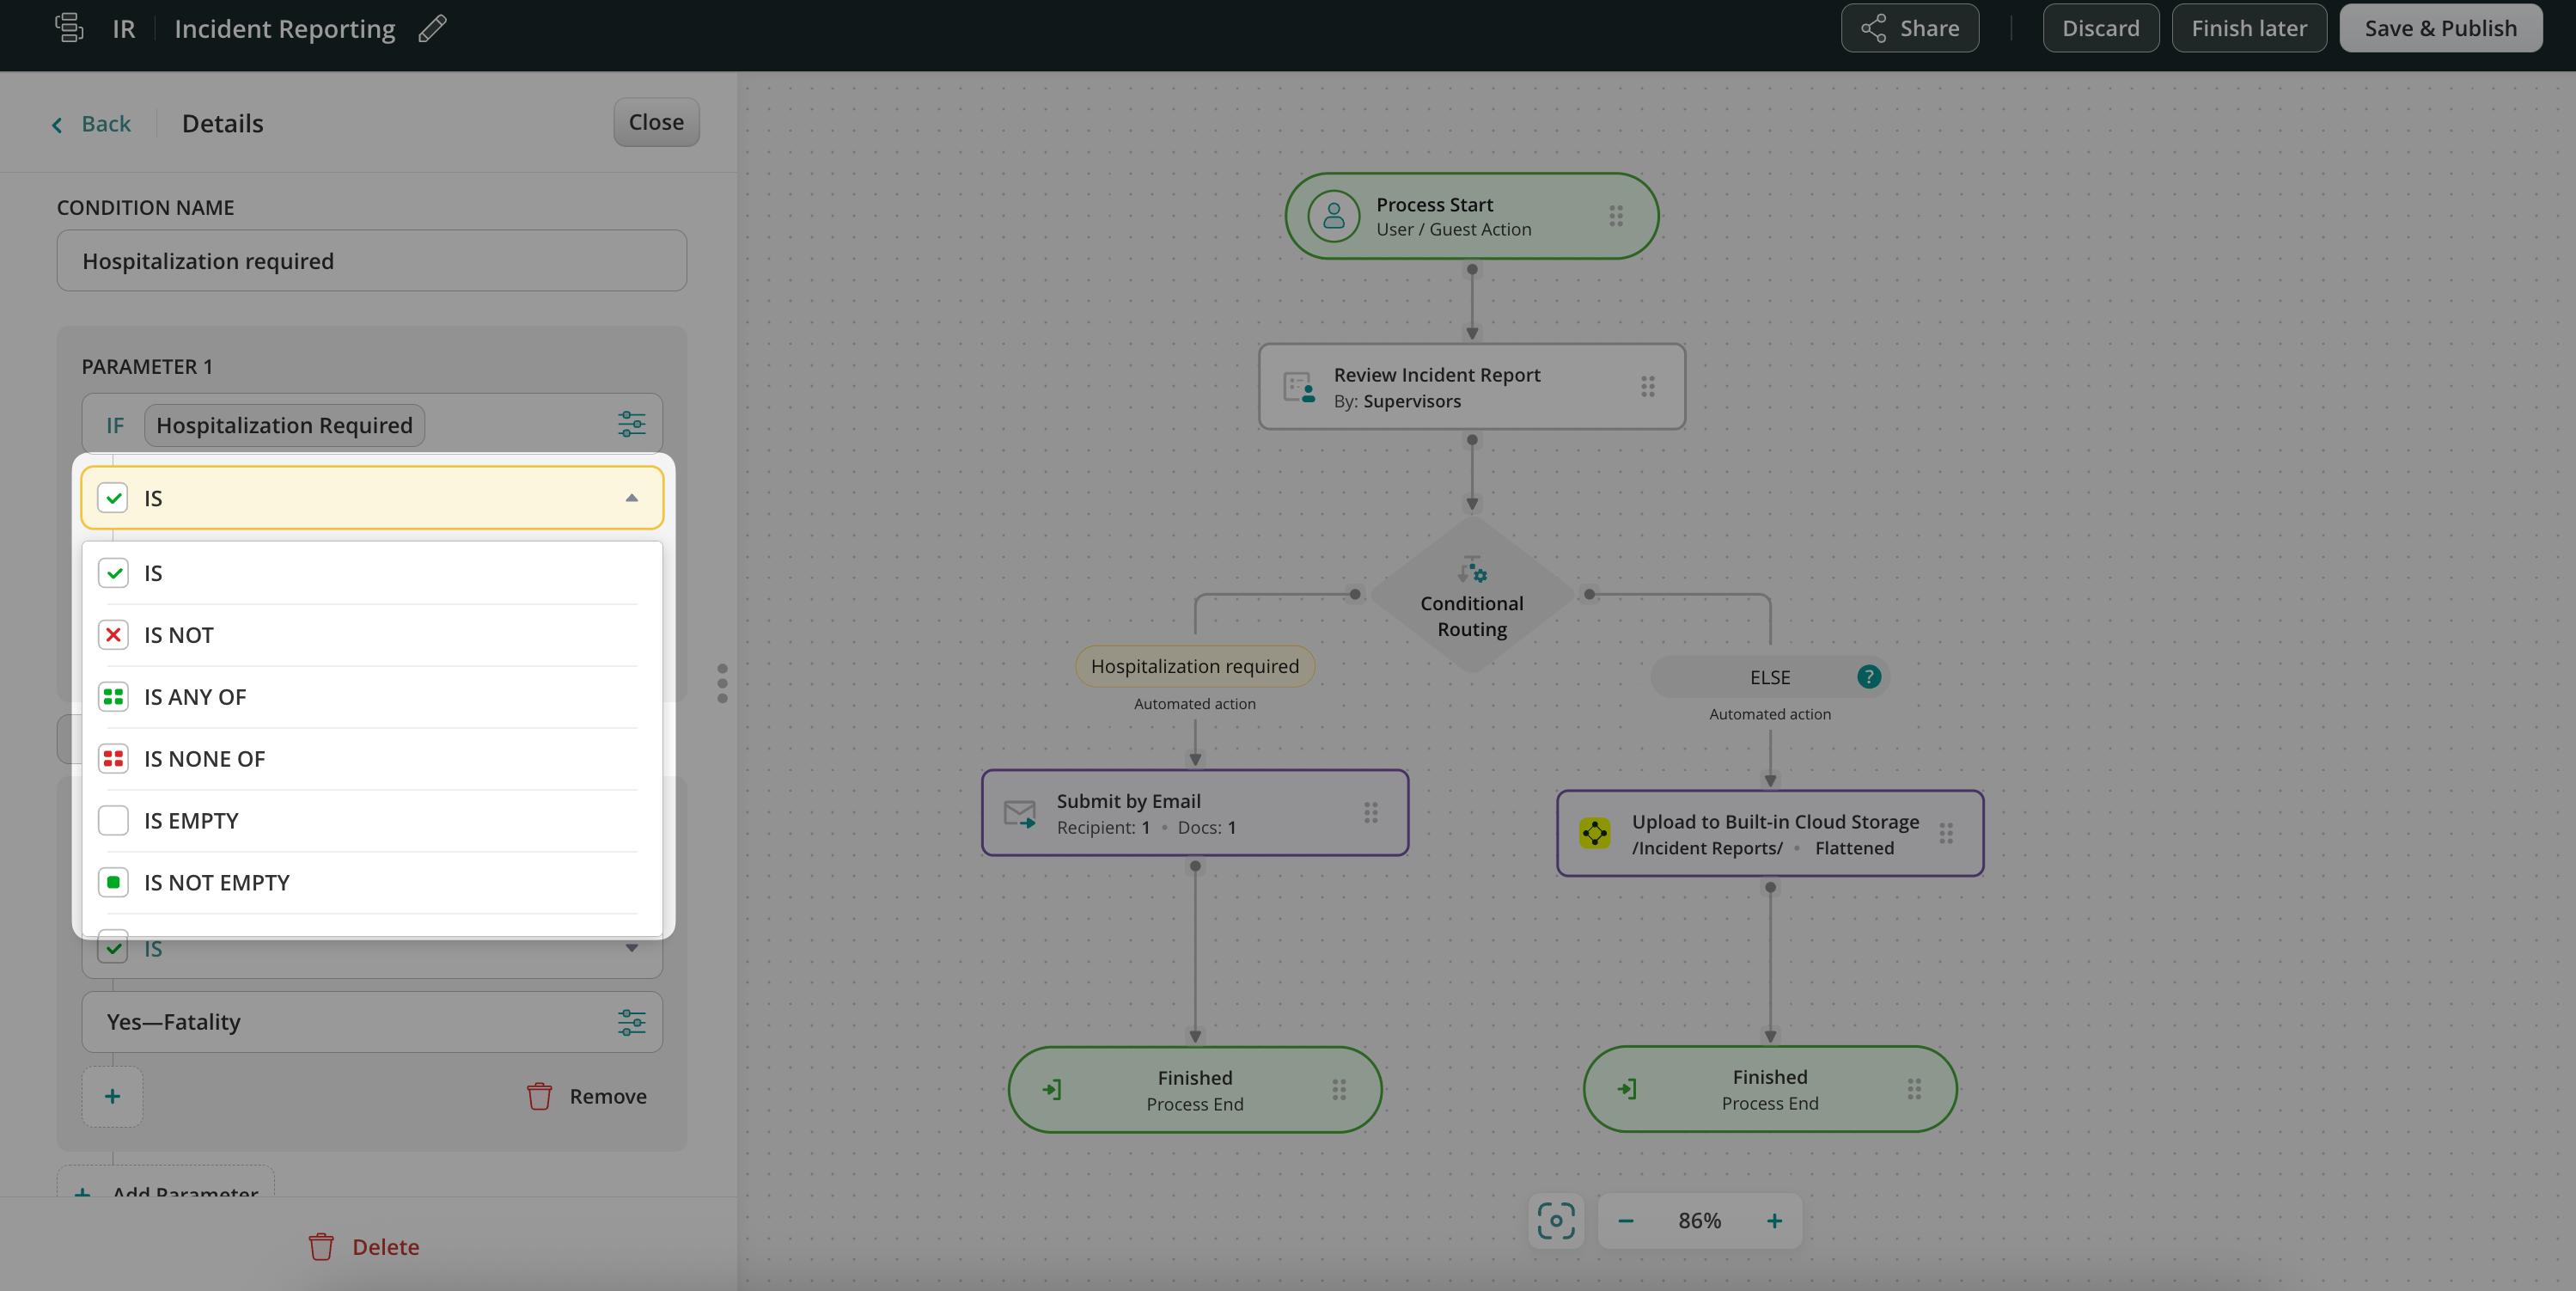
Click on the condition and configure it. In our example, the report will go down this branch of the workflow only if the site Supervisor enters Yes or Yes—Fatality into the hospitalization required field.
To select the field in a form, click on the configuration icon to open a dynamic values configurator. Here is what the preview of the configured condition looks like:
Besides IS the list includes other options:
Step 3 – Decide on actions when the condition is met and not met.
In this example, when the condition is met – we chose submit action Send by Email, therefore, the report will be emailed to the Safety Director.
When the condition is not met, the form will go down the second branch of the conditional routing – in our scenario, the report will be uploaded to another folder on the cloud storage for record purposes.
In fact, you may add as many conditions as needed. Drag and drop a task or submit action and connect it with the Conditional Routing element by stretching an arrow from the latter.
Step 4—Save changes and proceed to testing. To try the setup, add yourself to the Group of Supervisors in the workflow, open the app on an iOS or Android device or a web-based User app, and complete the task.
Benefits of Conditional Routing
Saved time: Conditional Routing in a business process cuts off unnecessary workflow steps, like several rounds of manual review and approval, thus allowing the team to deliver their work faster and reducing the administration effort.
Streamlined processes: Your users see only the tasks and forms required for their project. The system navigates them to the next workflow steps based on their input in the forms.
Automated notifications: Conditional routing helps your users receive only relevant notifications based on the data they enter.
Reduced error: As an admin, you have full control over the route the completed form and task will take down the workflow, which eliminates human error.
Conditional Routing is a powerful tool for streamlining documents, tasks, and workflows. Creating automated branching based on conditional inputs can help you bring the expected logic to a business process of any complexity.
Feel free to contact us at support@fluix.io if you have any questions about the setup.
Was this article helpful?
Thanks for your feedback!
Oops, something went wrong. Please, try again later.
Thank you!
What details or examples would have made this article more helpful for you? We appreciate your insights!
Dynamic values in naming forms and tasks, as well as customizing emails with completed forms, are aimed to:
Eliminate human error in the field
Help email recipients grab all the needed information even without opening the attachment
Minimize administrative work.
Dynamic values in workflows allow you to automatically name the submitted documents and customize the email recipients, subject, and body based on the information your remote team enters into the forms while working in the app. Let’s explore these capabilities in a bit more detail.
1) Automated document naming
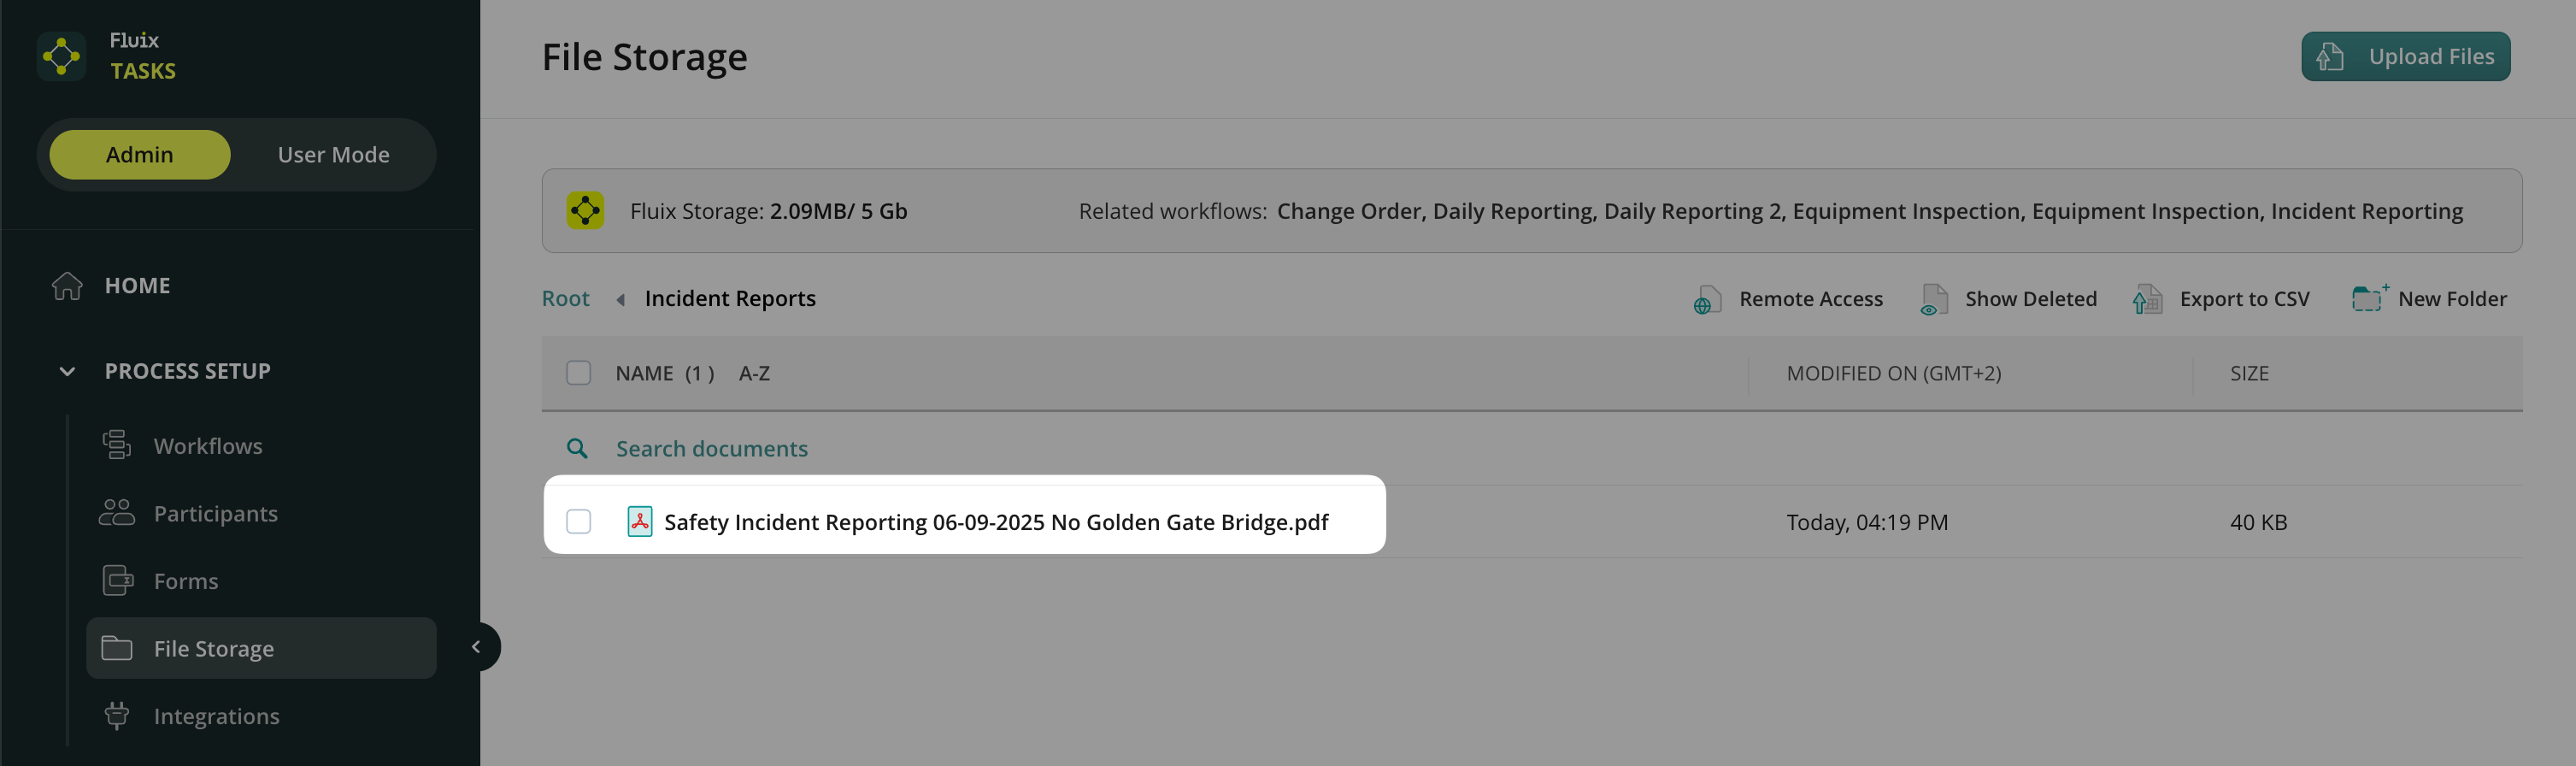
Keep the document names consistent with the dynamic values. Upon task completion, field data is automatically pulled from the predefined fields in the form to name the document correctly.
Steps from setup to end result:
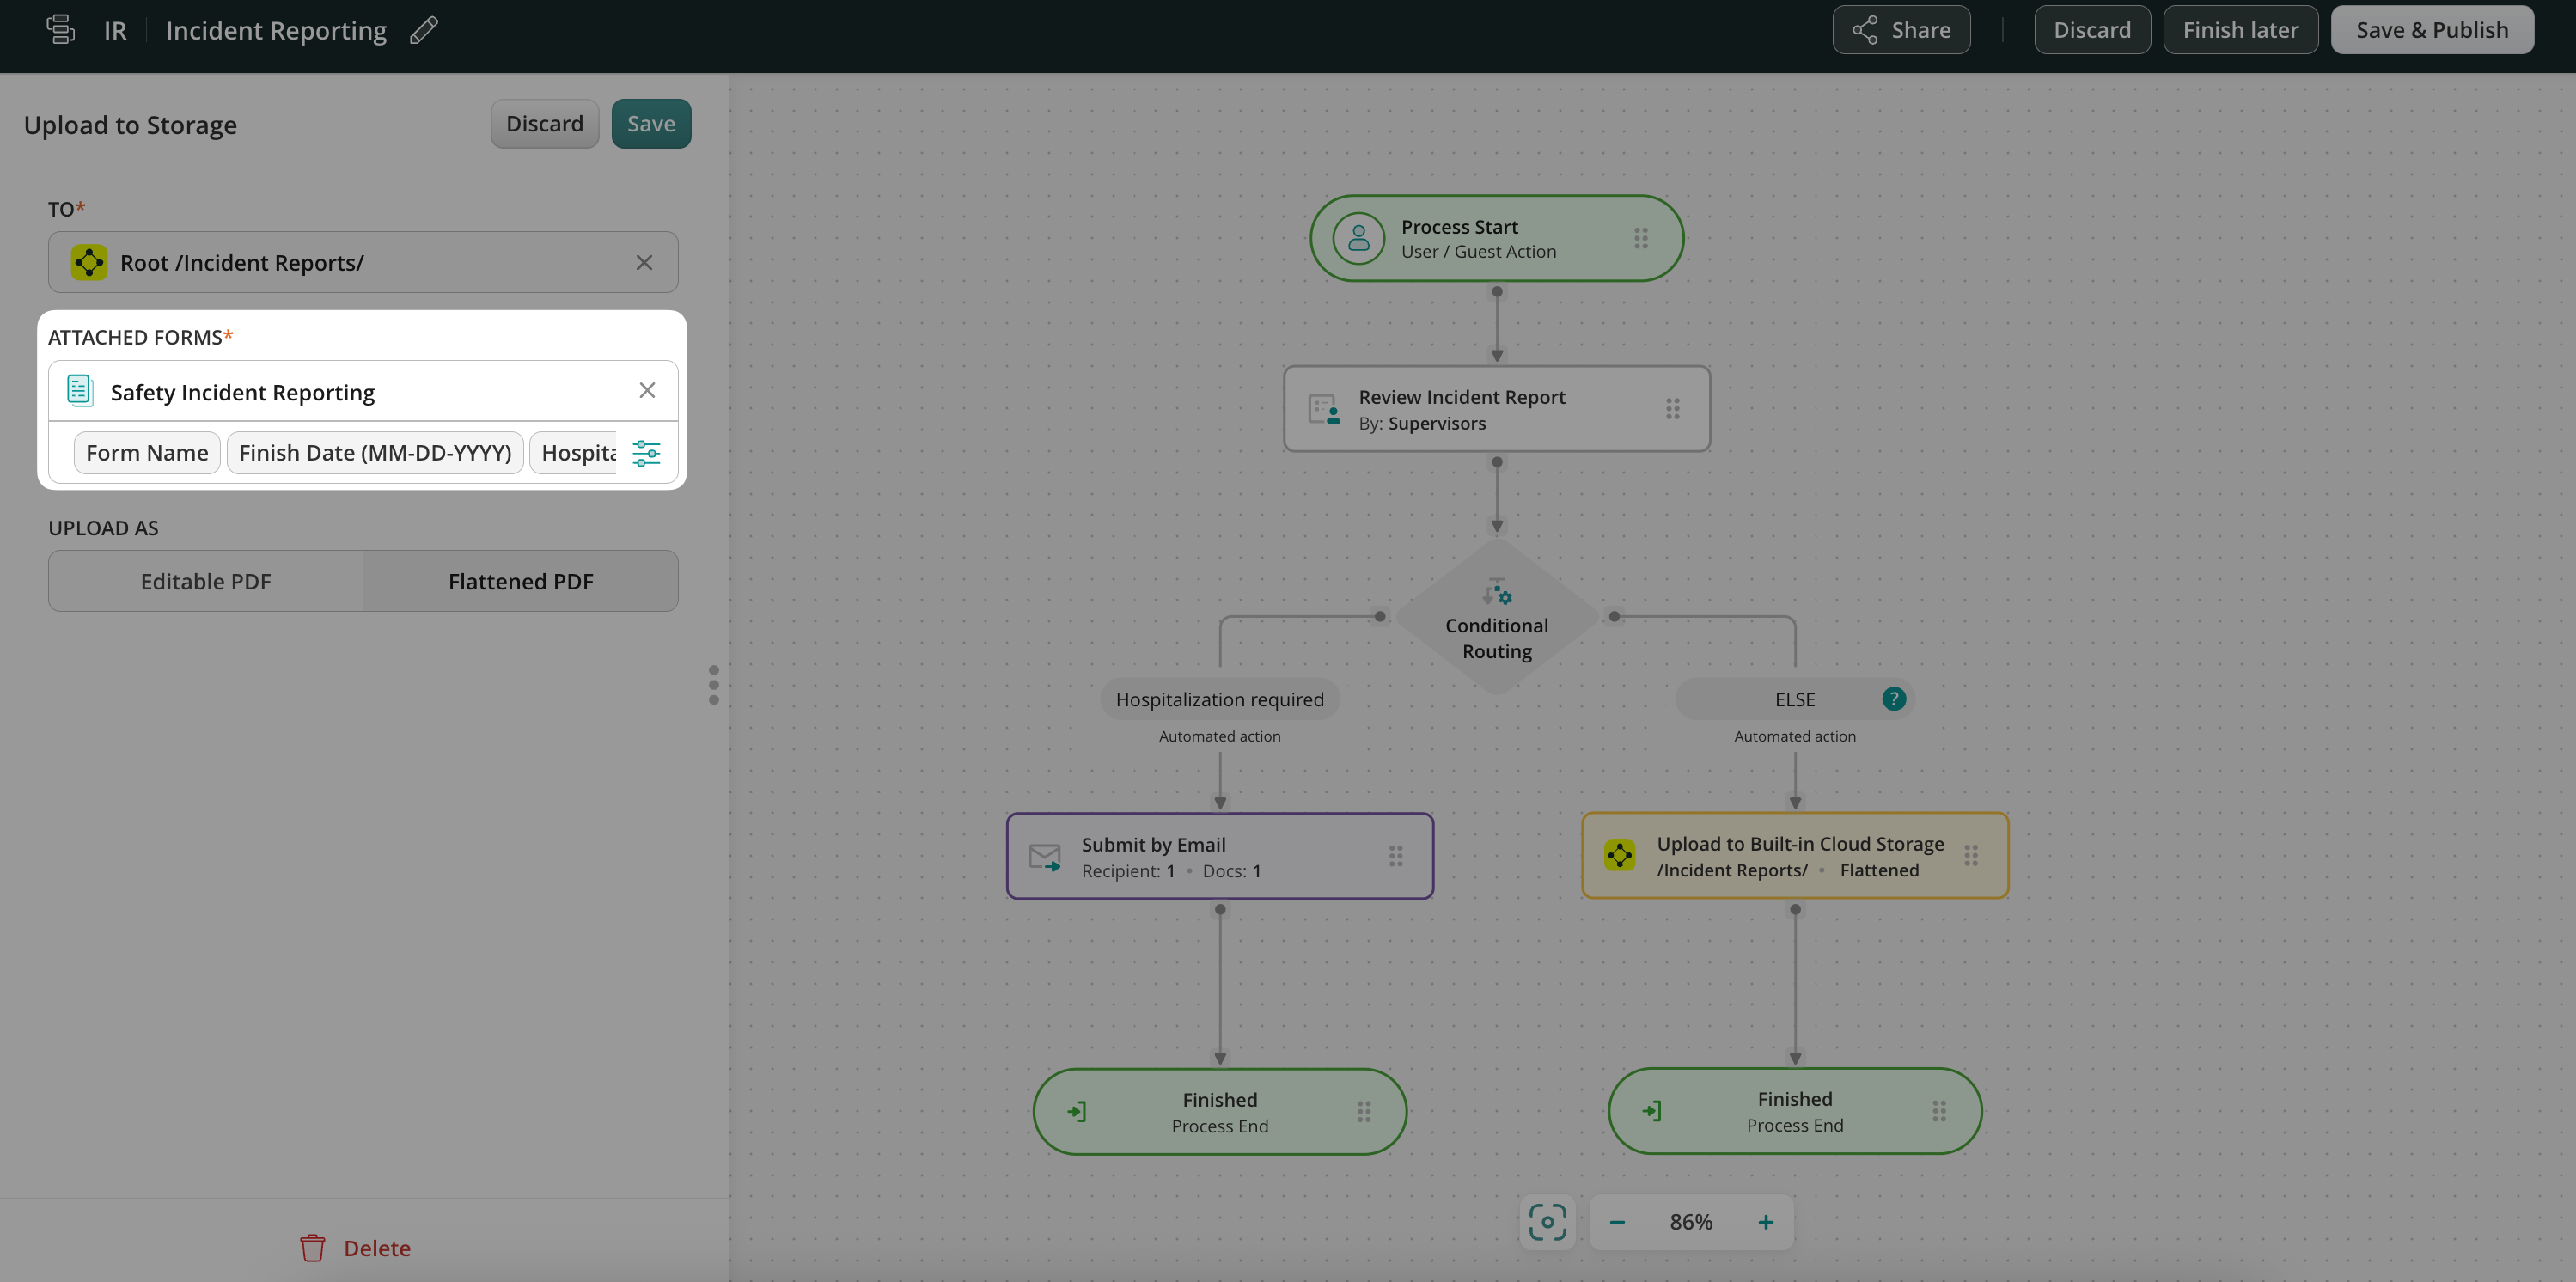
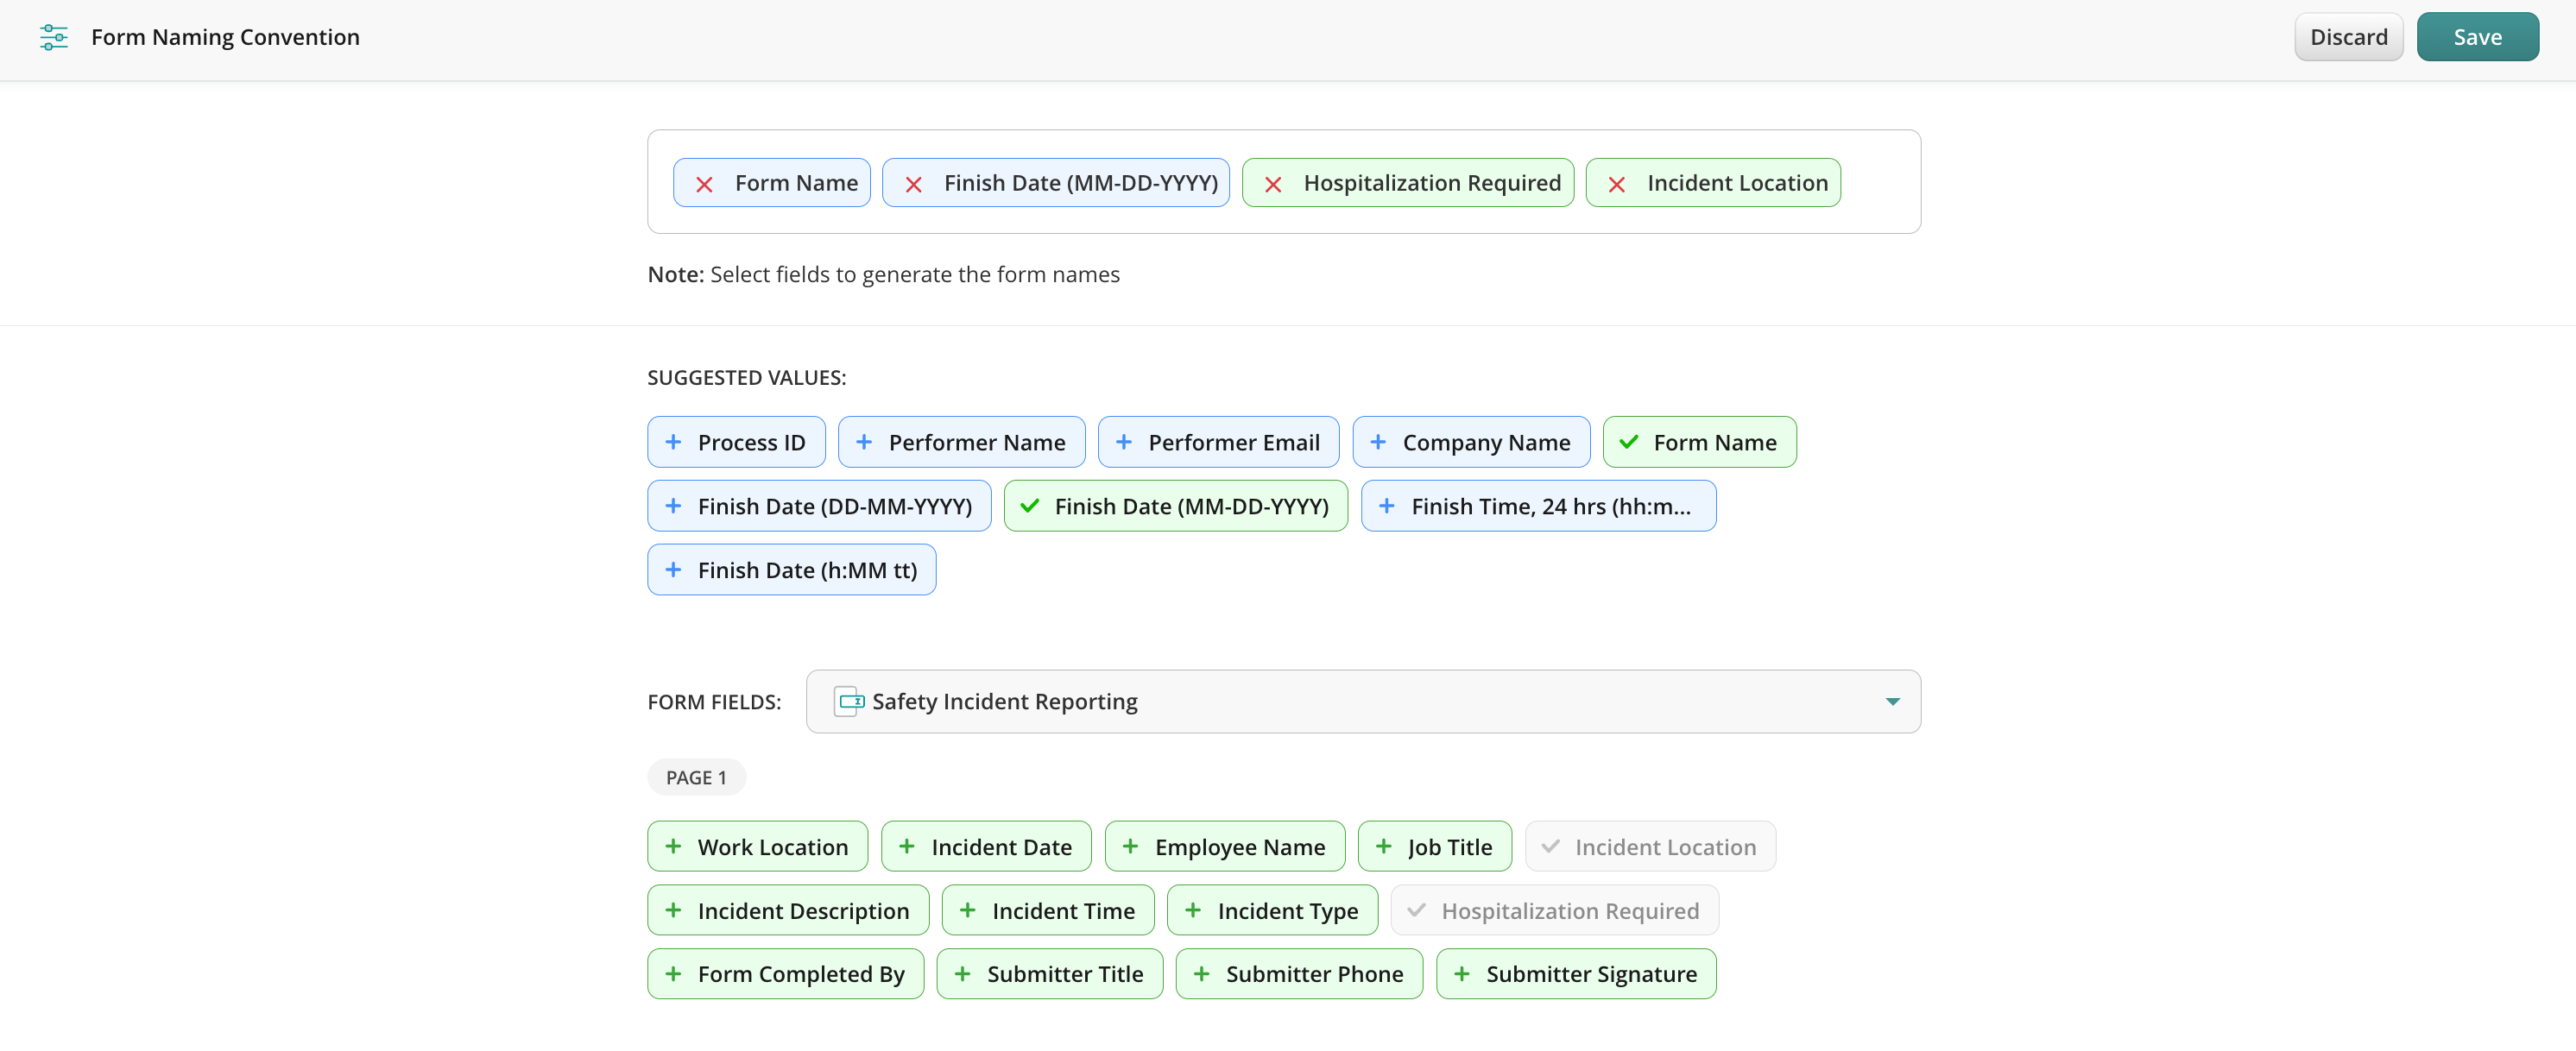
1. The form naming pattern is configured in a recurring task in the workflow chart.
Upon submission, the form names were generated using the Form Name, Finish Date, dropdown option from the field Hospitalization Required, and IncidentLocation values.
2. A form completed by a team member on the device: The preconfigured fields in the setup have been filled out.
3. The form with a proper name is submitted to the cloud storage:
The submitted form contains the following values: Form Name, Finish Date, selected option from the field Hospitalization Required, and Incident Location.
2) Customization of the Submit by email action
In addition, dynamic values can help you customize the emails that are sent out upon task completion. Hence, email recipients, subjects, and bodies can be created based on the recent data input made by a user in the related form on the device or web app.
Flow from the setup to the received email:
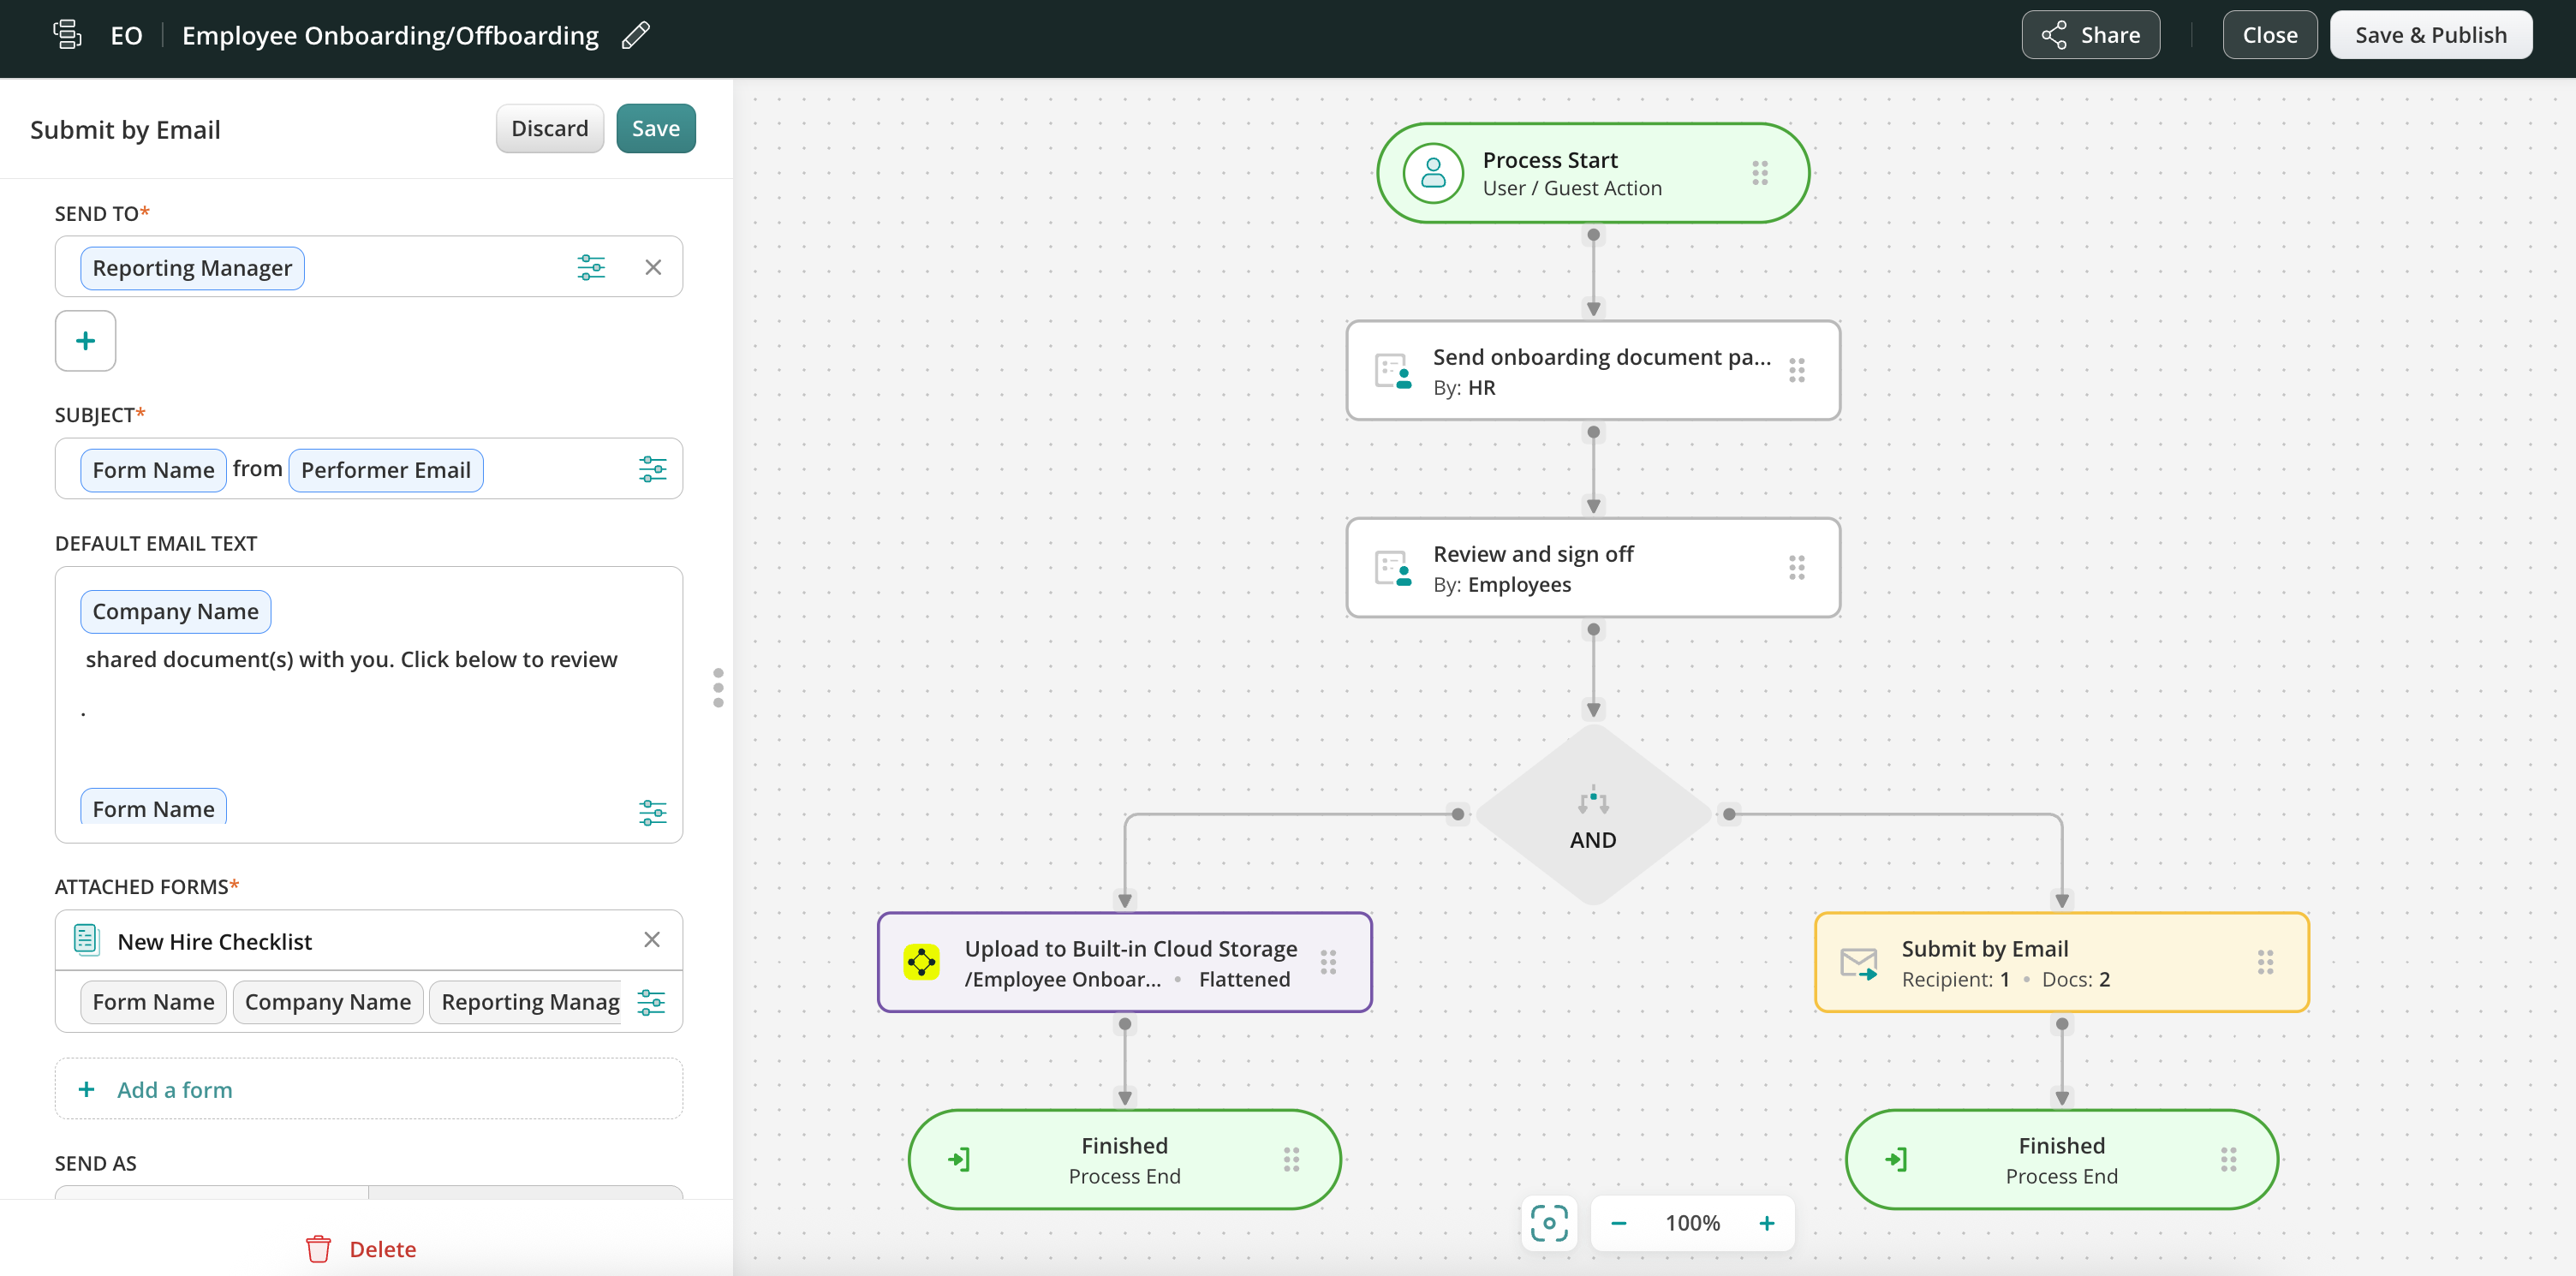
1. Configured Submit by Email action for your workflow:
The Reporting Manager value is used to generate recipients’ emails.
Form Name and Performer email – values are used for the email subject. In addition, the list of values was added to the email text.
2. The new hire checklist was filled out by the field user on the device. The email address mario.wanner@fluix.io was entered into the Reporting Manager field in the form.
3. An email received by the defined person – mario.wanner@fluix.io is the recipient, the email subject contains the form name and performer name, and finally, the email text contains all expected values.
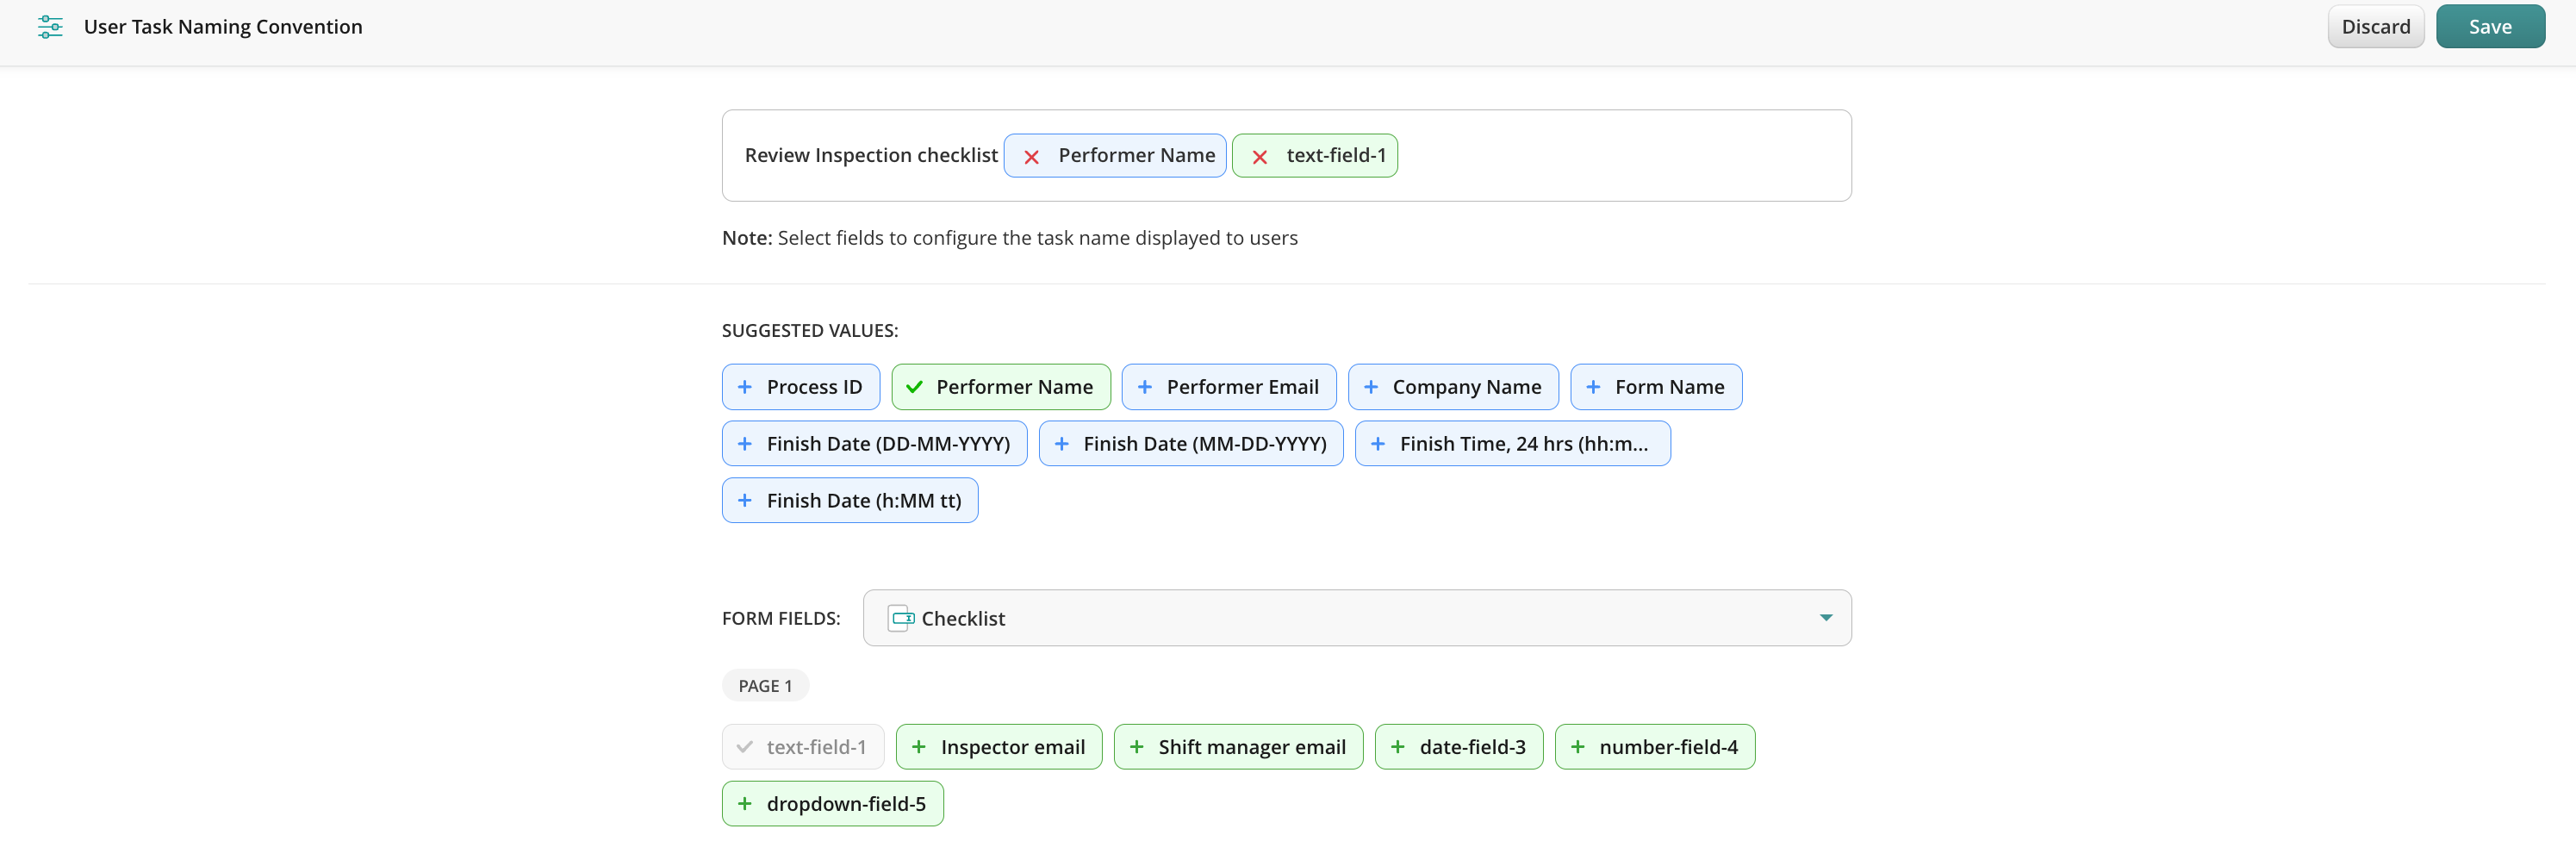
3) Automated task naming
For your users’ convenience, you may also set up dynamic values to name the task on the user’s device upon its completion based on the values entered by the user in the form.
Once the task is finished, a user will be able to easily distinguish it from the finished ones.
Setup Steps For Automated Task Naming
1. Go to the preferred workflows in the admin portal and click on the task where you would like to customize form naming. In the Task Details, click on the configuration icon:
2. In the input configurator that appears, choose the required form and pick the fields and values you want to see in the form name after it is completed by the user.
3. Save changes.
4. To test the naming, add yourself to the Group of assignees in the workflow where you configured the naming, open the app either on a device or the User app in the web, and complete the task.
Conclusion
As you can see, dynamic values are very handy for both those who perform the job on-site and managers who supervise the process. Dynamic values save time and cut off manual effort while tasks, submitted forms, and email data are being named and filled accurately without employee involvement.
Feel free to contact us at support@fluix.io if you have any questions or comments.
Was this article helpful?
Thanks for your feedback!
Oops, something went wrong. Please, try again later.
Thank you!
What details or examples would have made this article more helpful for you? We appreciate your insights!
Why and how to automate the data transfer between the systems your teams use
The main idea of integrating business tools used in your organization is to optimize business processes and eliminate manual effort. The ultimate benefit is the automation that saves employees’ time and your costs.
Fluix cloud platform helps to both streamline the business processes related to data collection and approval in the field, and further data reporting and account management in the office. If you used to perform the office part with the help of a data analysis platform, CRM, or any other tool, you can easily integrate it with Fluix to automate the flow.
How integration works
1. Workers on the ground collect data (text, images, signatures, etc.) in the Fluix app on mobile devices, both iOS, and Android, and push the filled-out forms for review.
2. Once the approval is obtained, the completed work is usually submitted down the workflow: to the cloud storage, email, customer management system, database, etc. At this step, the integration helps to avoid manual file download from storage or data copying from forms. The form, or the particular data from it, or even a message about the completed job is automatically pushed into a system you choose.
Premade integrations
Fluix already integrates with various popular SaaS products via API. Our current list of integrations includes the following popular tools:
Business Intelligence
Fluix Smartsheet Integration Smartsheet is a platform where you can aggregate and act on data that is collected in forms in the Fluix app.
Fluix SeaTable Integration SeaTable is an online database software for managing data in a spreadsheet/database kind of view where you can store and process different types of data captured in the Fluix app.
Fluix Qlik Integration Qlik is a business analytics platform that helps companies analyze real-time data captured in the Fluix app.
Fluix Airtable Integration Airtable is a cloud collaboration service that allows to aggregate and visualize data extracted from forms submitted in the Fluix app.
Fluix Tableau Integration Tableau is a visual analytics platform that helps you create any kind of charts, diagrams, and filters based on the data your remote teams collect in the Fluix app.
Fluix Power BI Integration Power BI is a data processing and visualization tool that helps to uncover meaningful insights of your current workflow using the data collected by your field team with the help of the Fluix app.
CRM (Customer Relationship Management)
Fluix Pipedrive Integration Pipedrive is a CRM cloud-based system where the contracts and other documents can be uploaded once completed and signed in the Fluix app.
Cloud Storage Tools
Fluix Integration with File Cloud Storage Services (Google Drive, Office 365, Dropbox, Box) With these integrations, you can automatically upload documents completed in Fluix to your corporate cloud storage.
Fluix Azure Files Integration Azure Files is a cloud storage by Microsoft where you can upload and store documents completed by your remote team in the Fluix app.
Fluix SharePoint List Integration SharePoint list is a unique storage solution by Microsoft where the data is presented as a collection of content that has rows and columns, very much like a table in Microsoft Excel. With this integration, your field team has the ability to upload documents submitted in Fluix to the corporate Sharepoint List storage in accordance with the predefined tag pattern.
Integration Platforms
Fluix Zapier Integrations Through the Zapier platform, you may connect almost any existing tool for project management, data tracking, storage, and more, to your Fluix account. The form is being completed in Fluix while integration automatically performs predefined action to push the data or the document itself as an attachment to the tool of your choice where Zapier acts as a middle man.
Fluix Automate.io Automate.io is a tool that lets you connect the web apps you use. Another alternative that may help connect third-party tools to Fluix. With this integration, you can create a bot in Automate.io so that the submitted form in Fluix will trigger the predefined workflow and transfer the form data to the chosen tool.
Fluix Make (Integromat) Integromat is an integration platform that allows you to connect apps to Fluix using webhooks. Similar to Zapier, with Make integration you have the ability to submit the field data from forms completed in the Fluix app or the form itself to the tool of your choice.
Fluix Trello Integration via Zapier Trello is a web and mobile-based, Kanban-style project management tool. With this integration, you may use field data collected by your team in the Fluix app to create tasks and track progress in Trello after document submission.
Fluix Google Sheets Integration via Zapier Google Sheets is an Excel-like spreadsheet program included as part of the free, web-based Google Docs Editors suite. This integration is useful for data aggregation and processing after the field paperwork is completed in Fluix and the data from it is automatically transmitted to the predefined columns in Smartsheet.
Project Management
Fluix Wrike Integration through Make (Former Integromat) Wrike is a web and mobile-based project management application. With this integration, you may automatically create tasks in Wrike after submitting documents in Fluix. Task’s title and description will be created based on the information taken from the particular fields in the submitted form.
Fluix Monday.com Integration Monday.com is a project management platform that provides dashboards to delegate tasks and track their progress. Besides that, monday.com can be used as a CRM tool that will allow you to create leads based on the data retrieved from the completed forms in Fluix.
Fluix Asana Integration Asana is a web and mobile-based project management tool. With this integration, tasks are automatically created on the Asana dashboard with the attached documents completed in the Fluix app.
Fluix Procore Integration Procore is a construction management platform. With this integration, you may automatically upload documents completed in the Fluix app to the required project in Procore.
Fluix Trello Integration Trello is a web and mobile-based, Kanban-style application. This integration will automatically create cards in Trello after sending the completed documents by email from Fluix.
Work Collaboration
Fluix Slack Integration Slack is a business communication software. You can submit the completed document in the Fluix app and the notification message with the attached document will be automatically sent to the predefined recipient or group in Slack.
Important note: Fluix can integrate with almost any tool that has a public API available upon request.
How to start
The integration doesn’t require special technical skills and months to configure it. Contact the Fluix team and we’ll help you to set up the integration taking into account your project-specific requirements.
Was this article helpful?
Thanks for your feedback!
Oops, something went wrong. Please, try again later.
Thank you!
What details or examples would have made this article more helpful for you? We appreciate your insights!
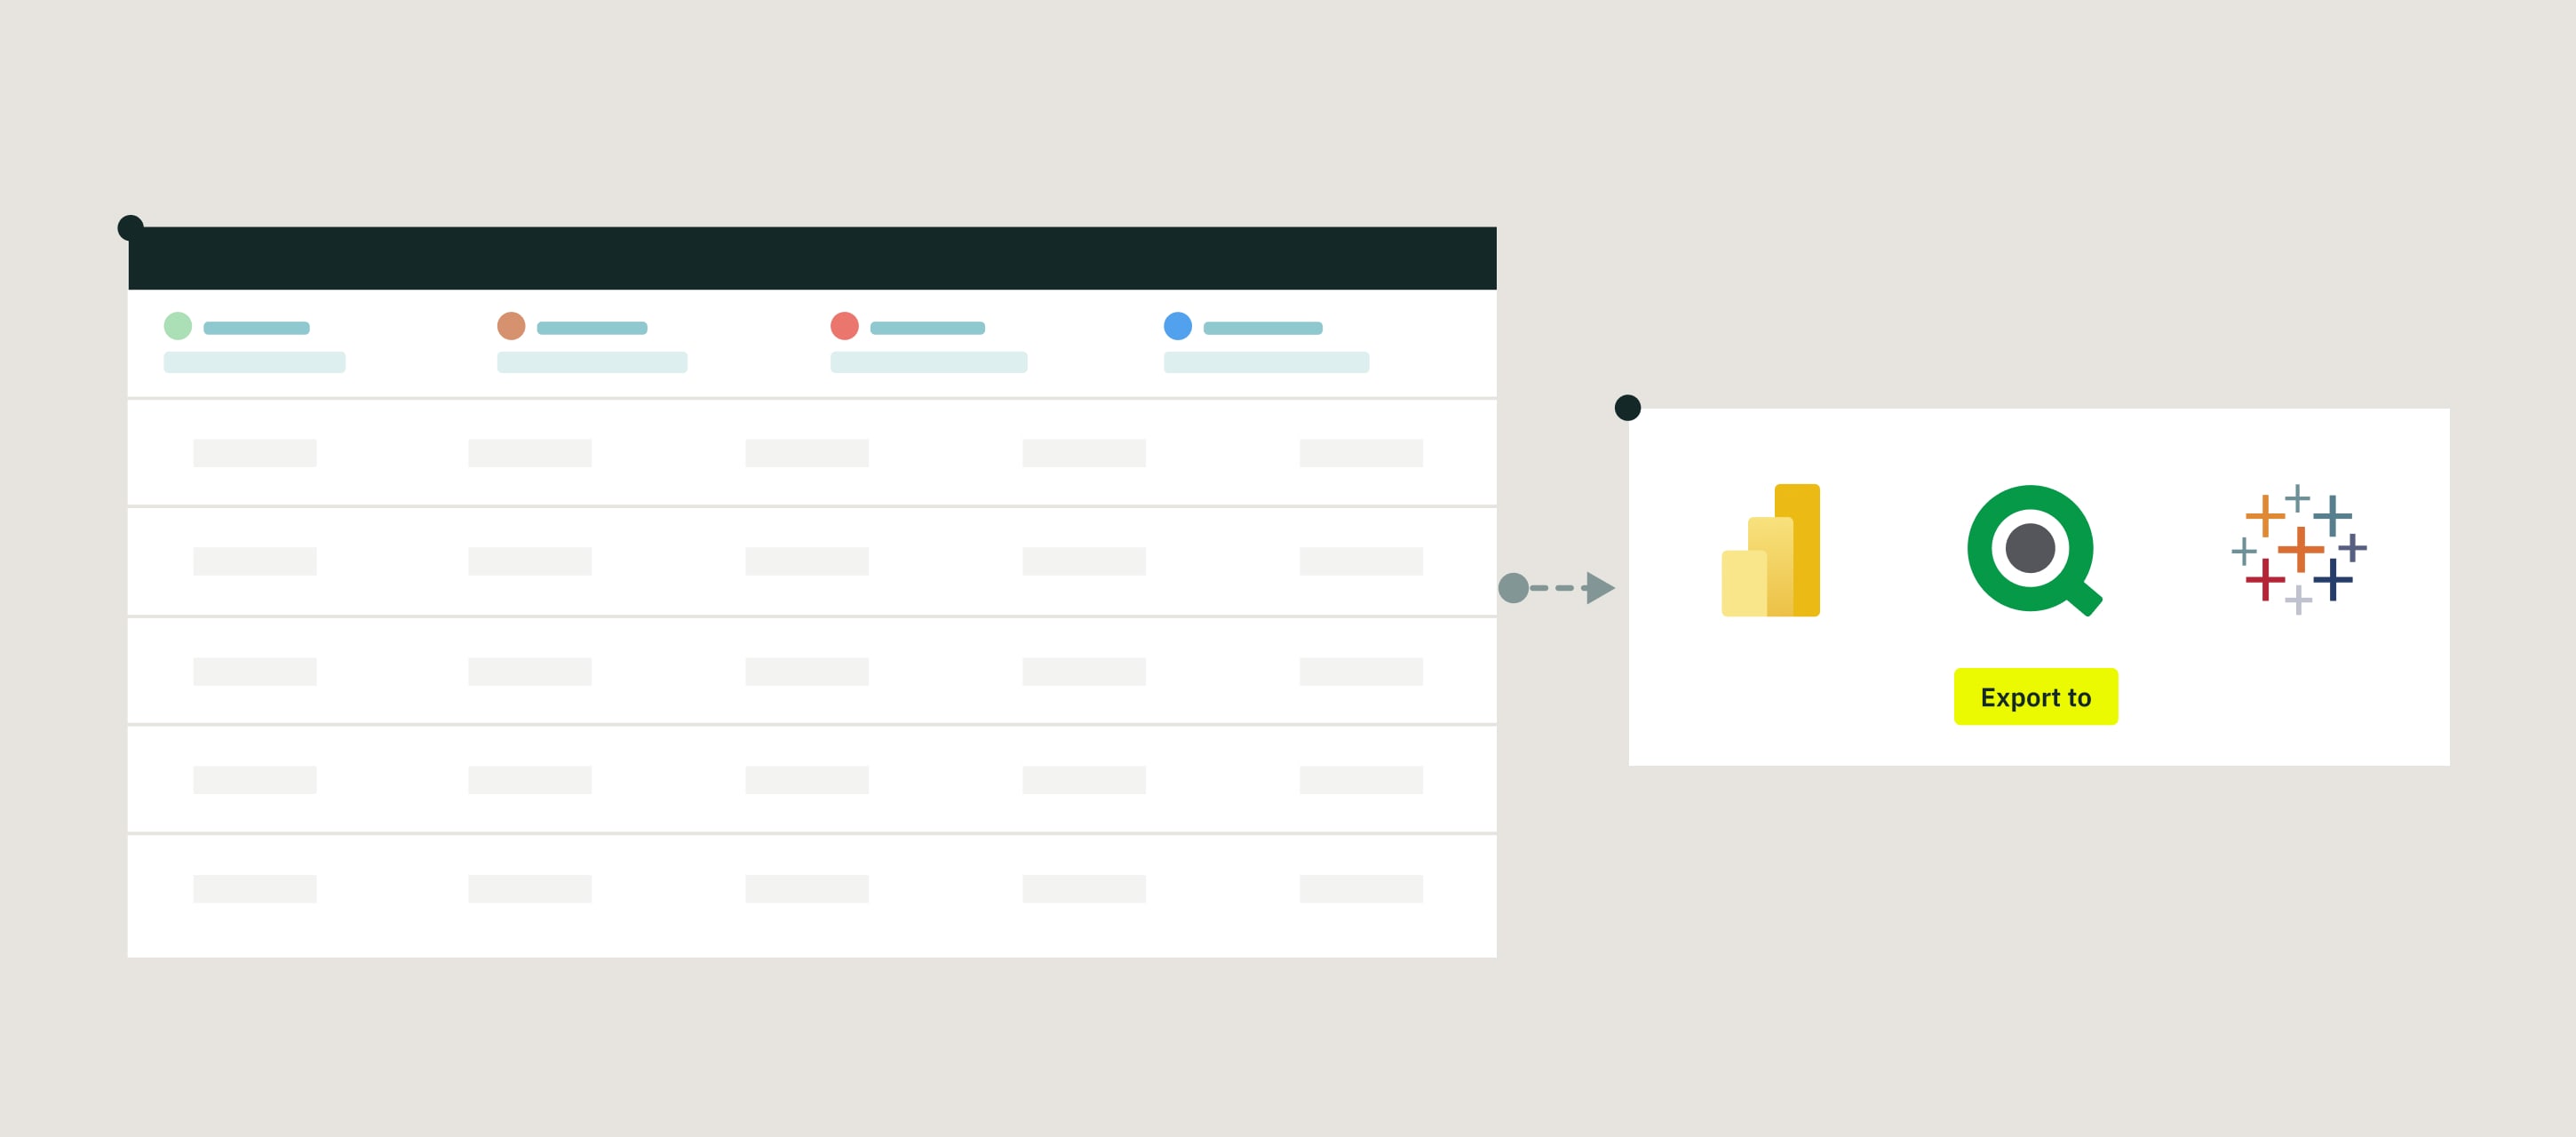
Data collected by your field teams in checklists, time sheets, work orders and other forms in the Fluix app, can be automatically aggregated and extracted into datasets for further data export and analysis.
How to start extracting data?
Data is extracted from documents that are filled out and submitted by your end users within Fluix workflows. The data is saved to a report called Dataset, and can be then downloaded in Excel/CSV.
To create a dataset:
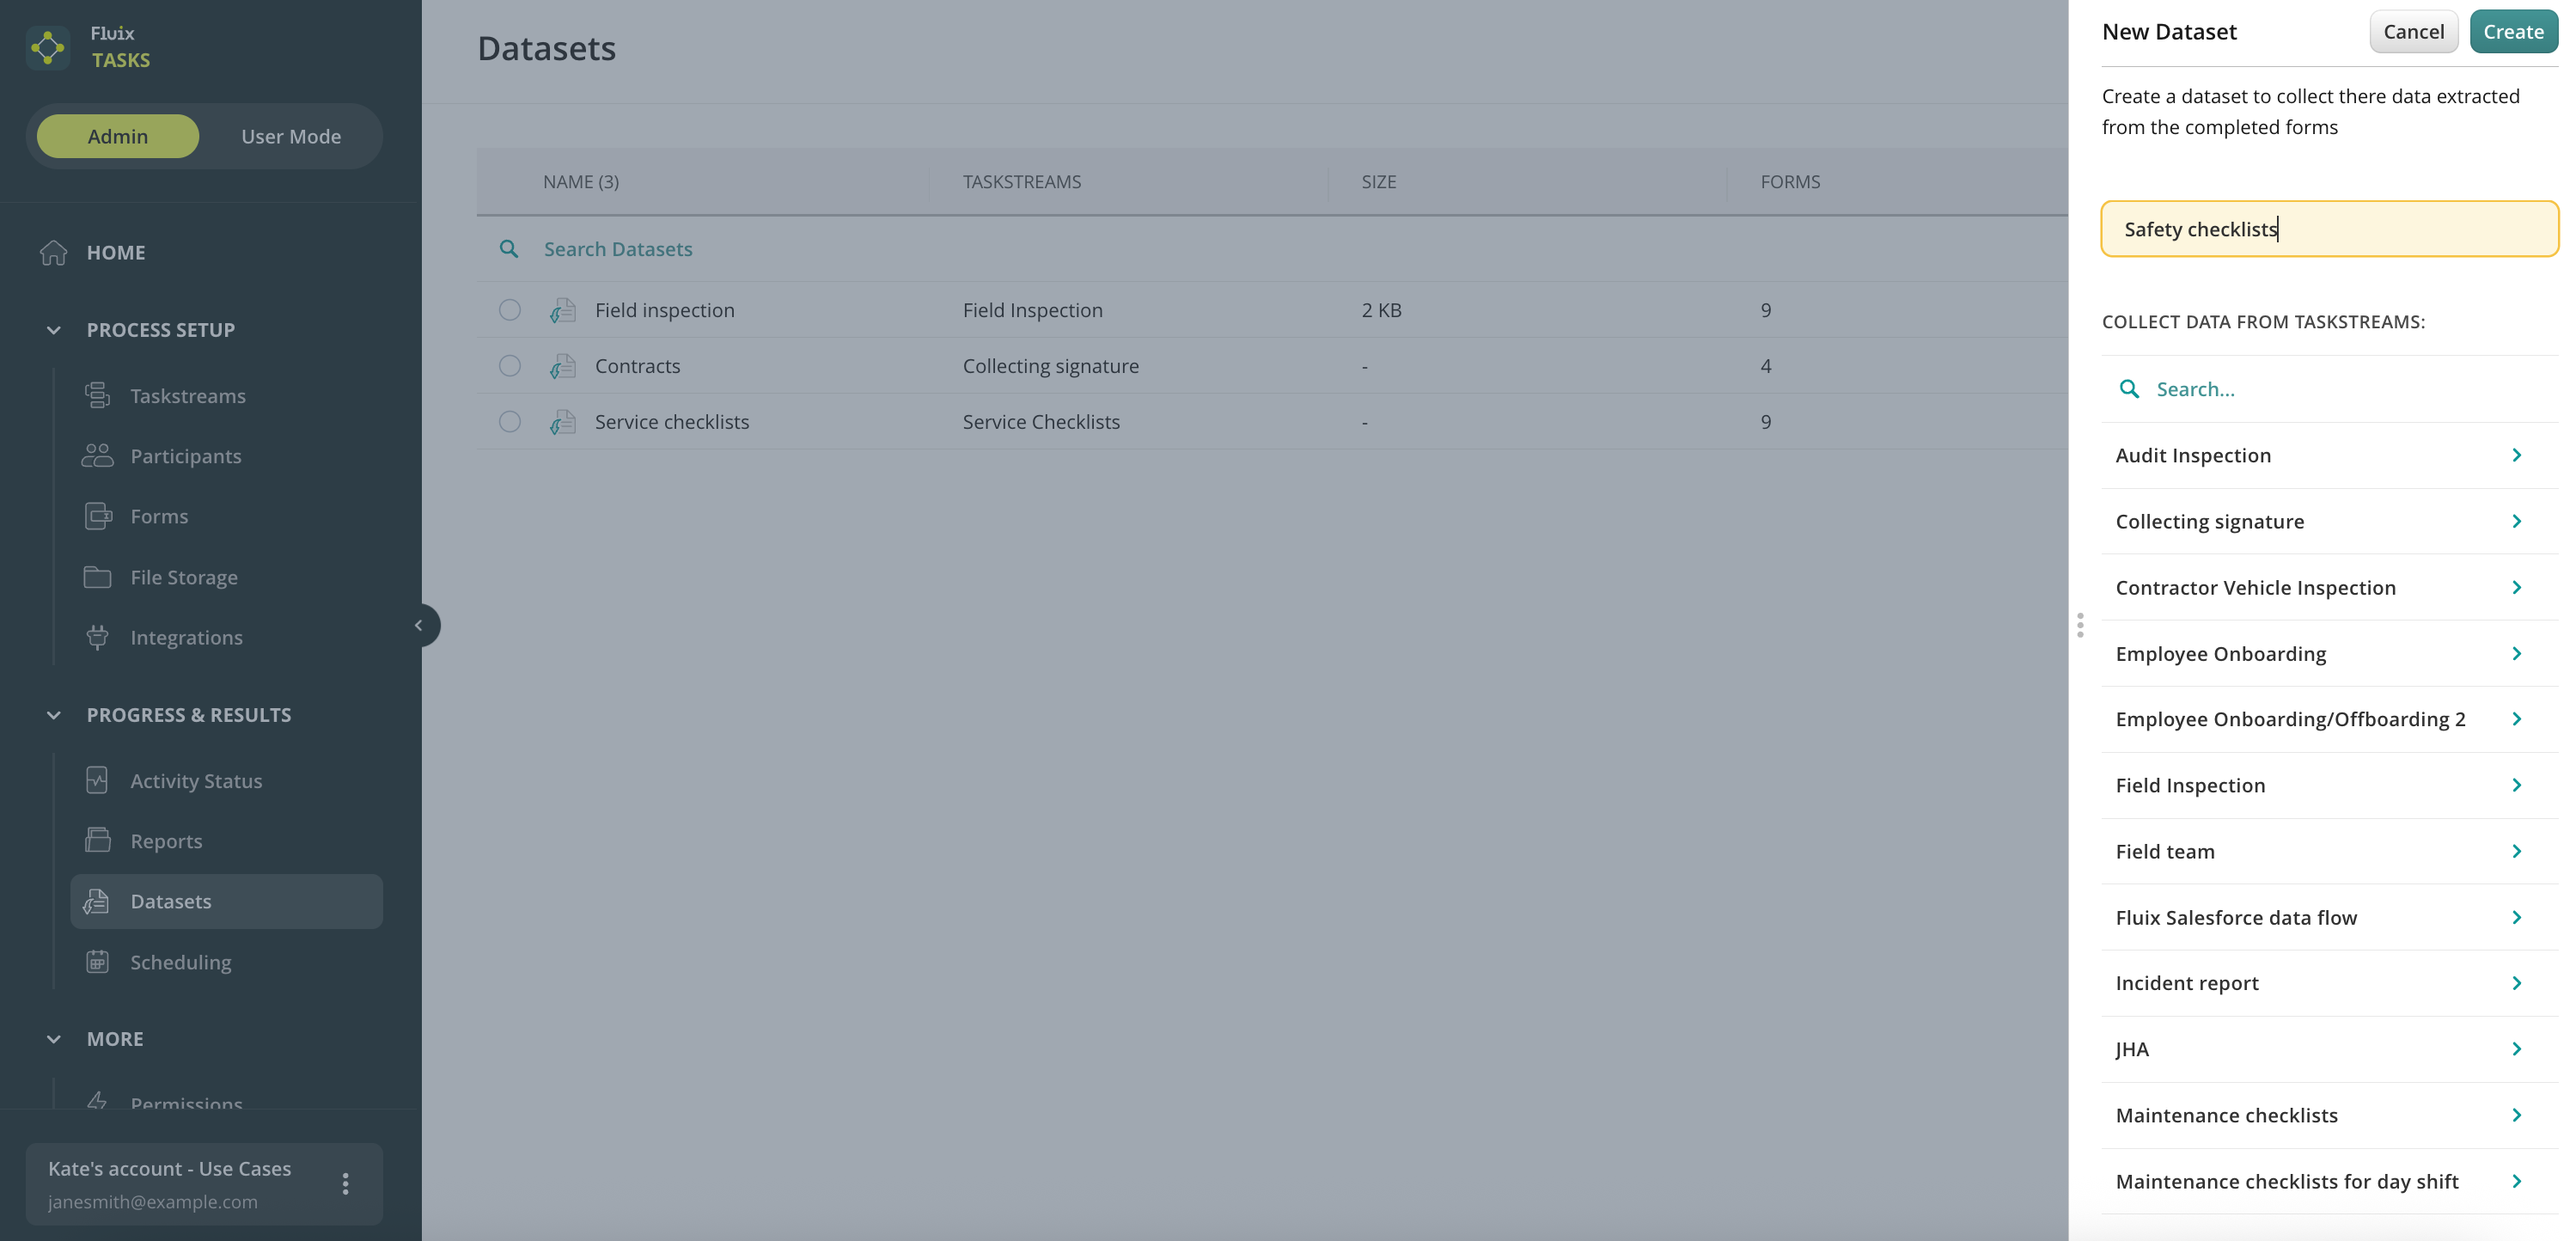
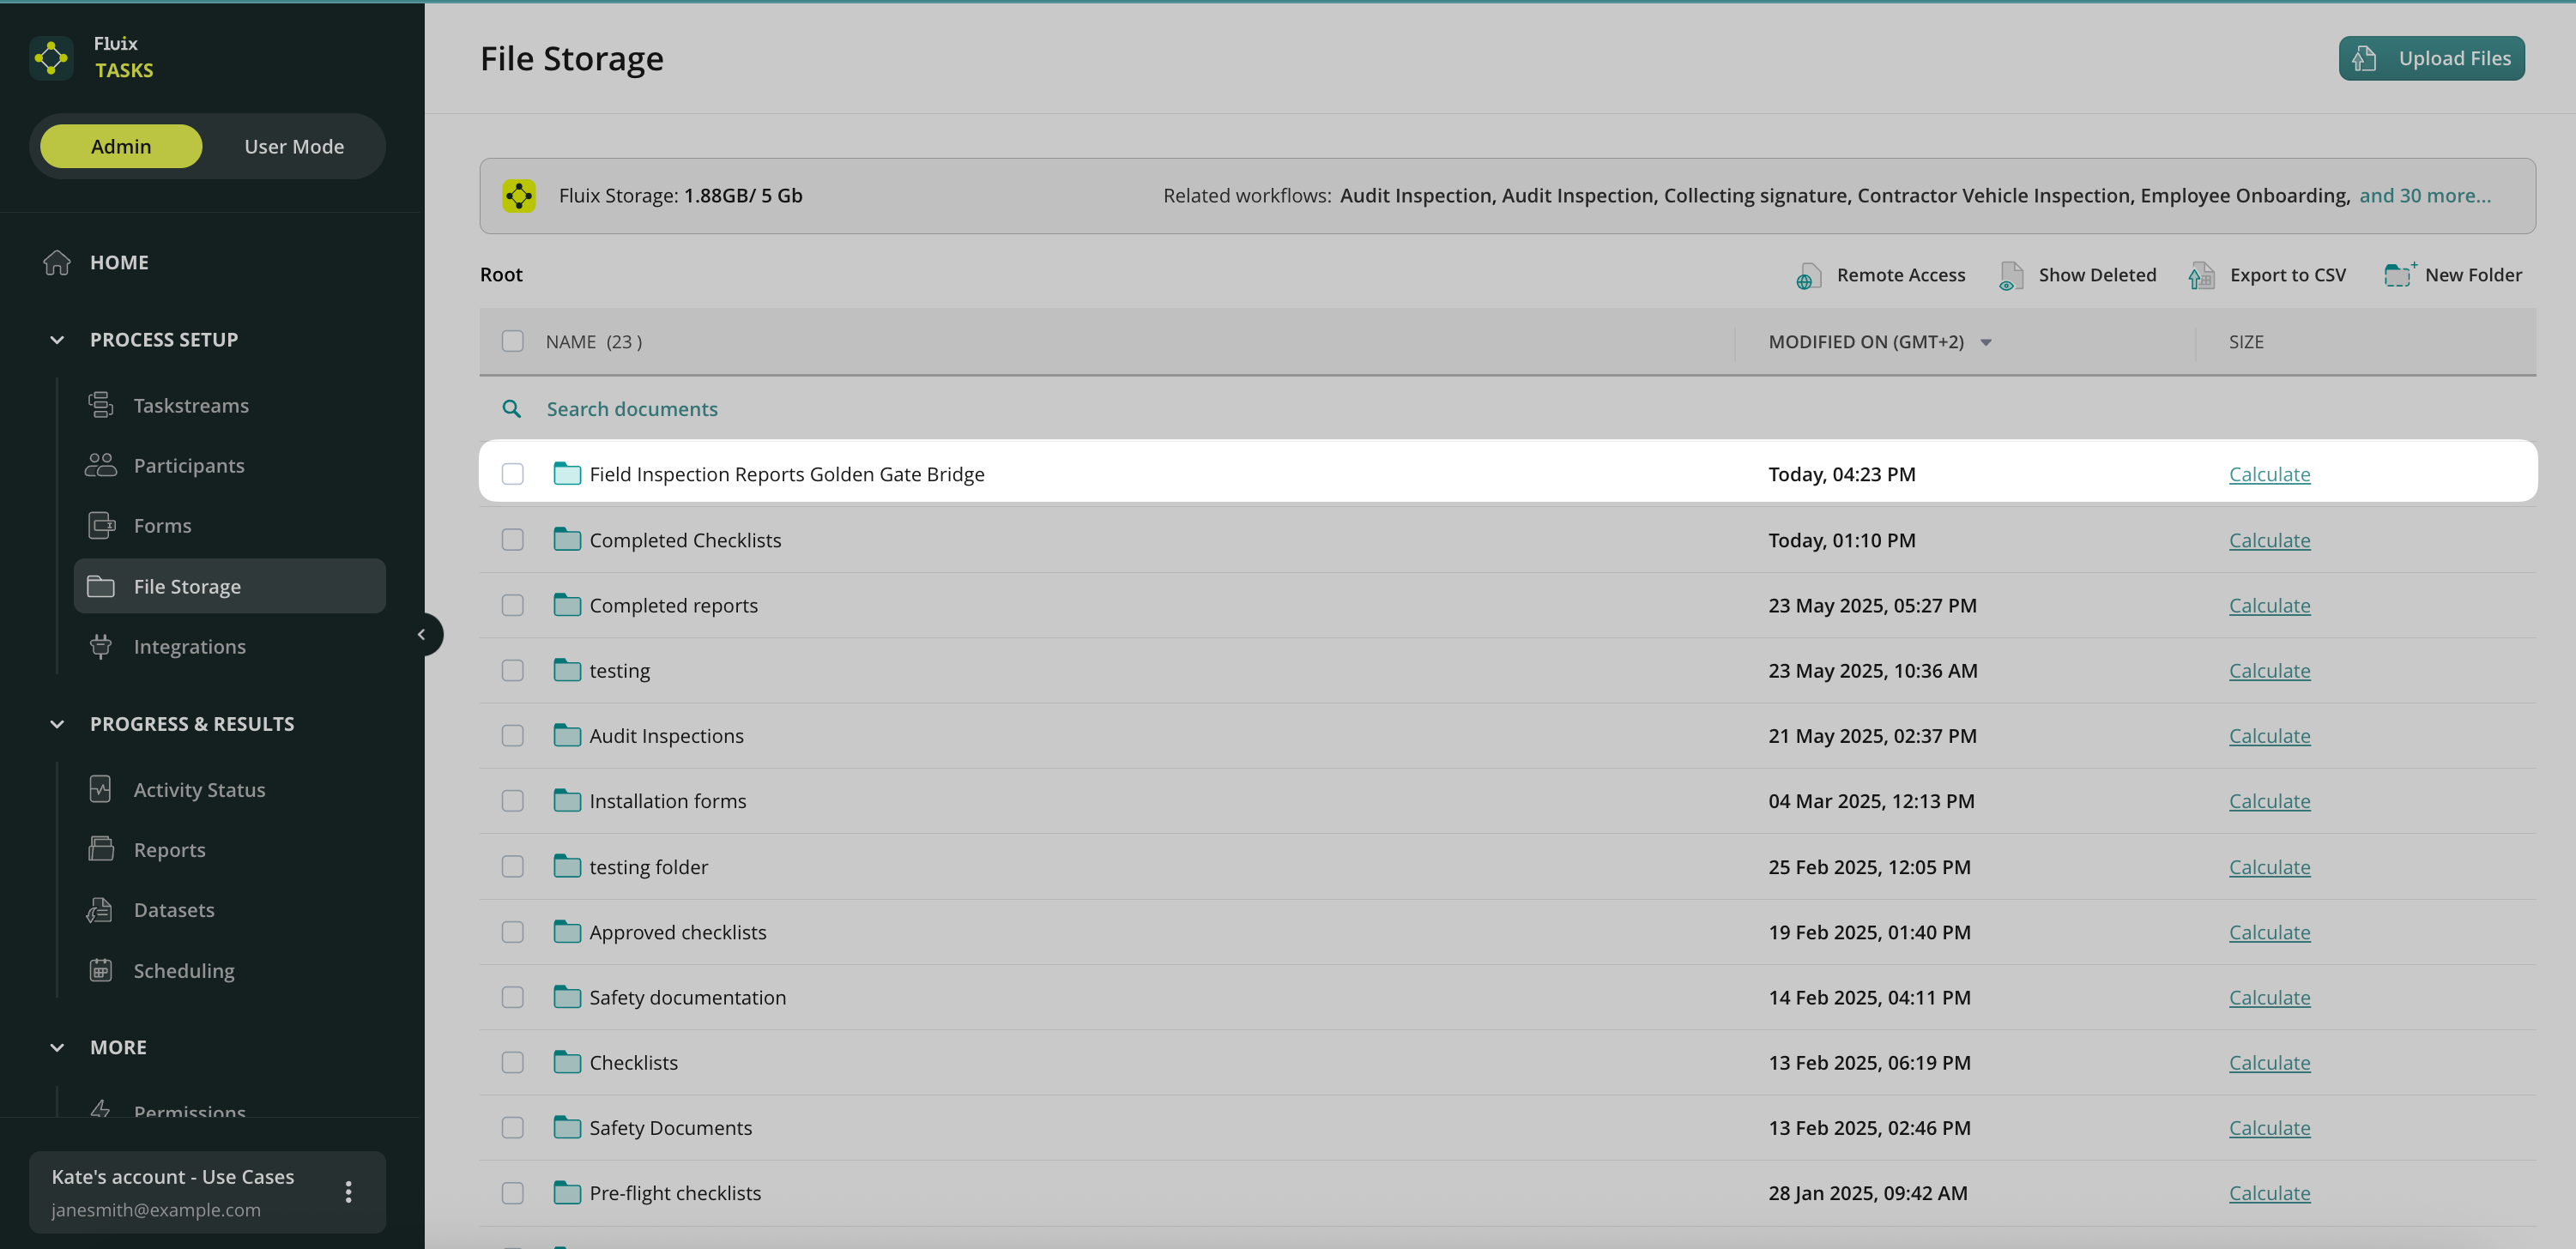
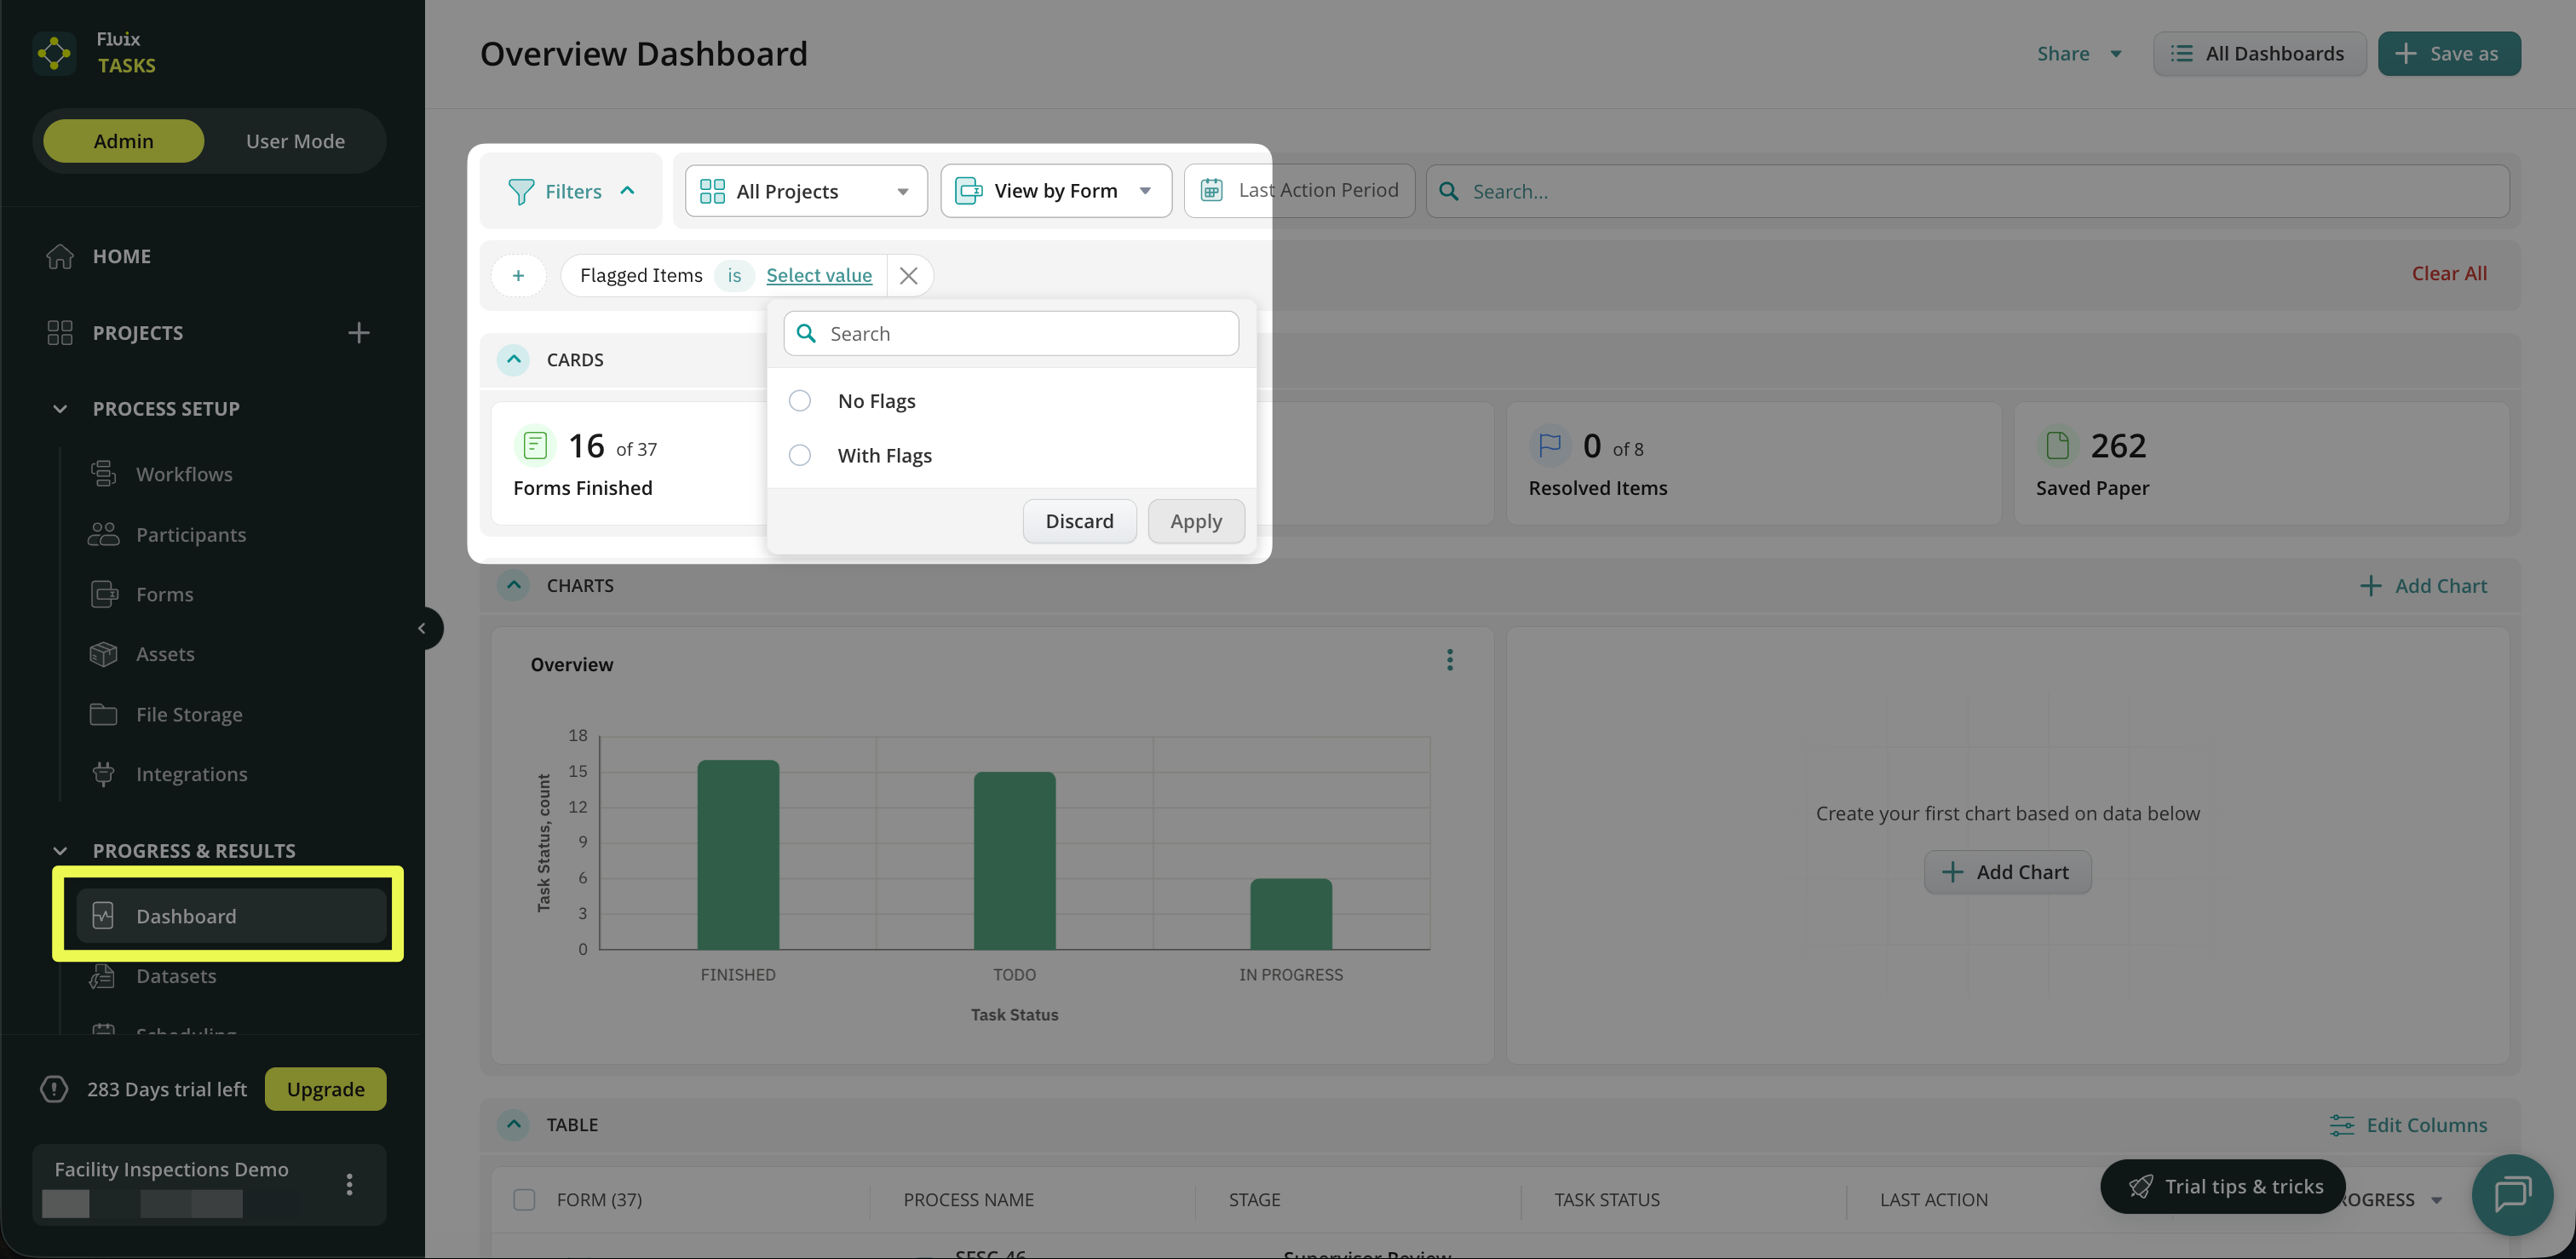
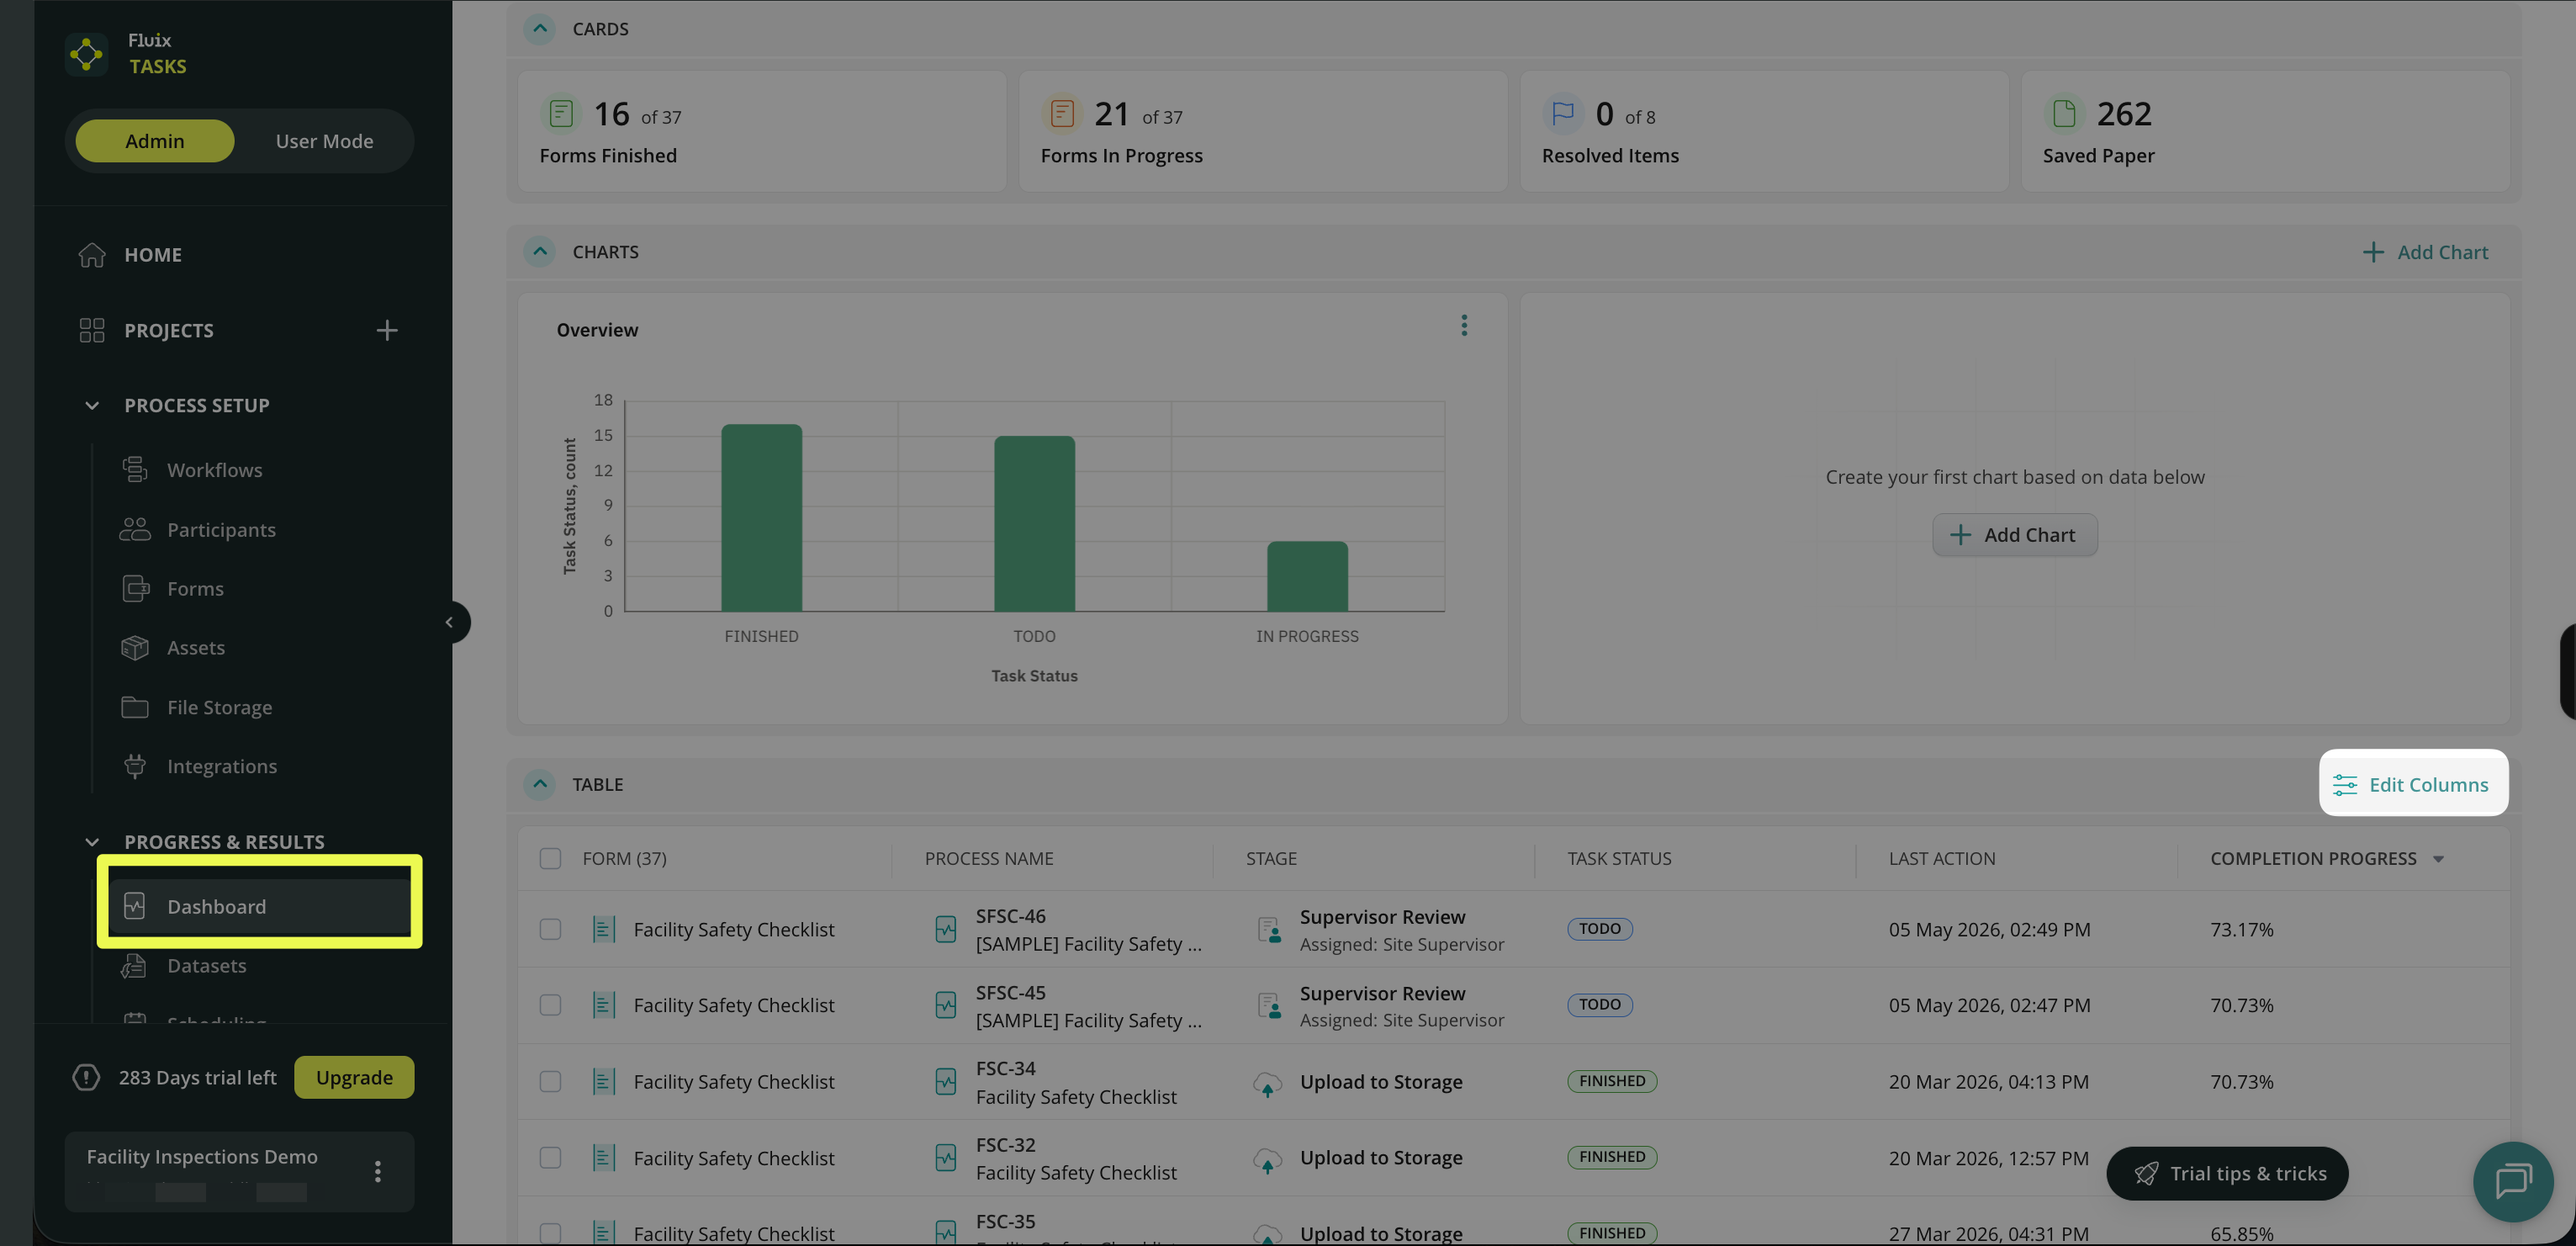
1. Navigate to the Data section of Fluix admin portal, tab Datasets.
2. Click New Dataset, name it, and click Create.
Note: If there are no workflows yet, create one first with the forms from which you would like to extract data.
3. Select the workflow and then the forms from which you need the data.
Each dataset will include the list of submitted documents, columns with the fields, and data that were filled out in the documents:
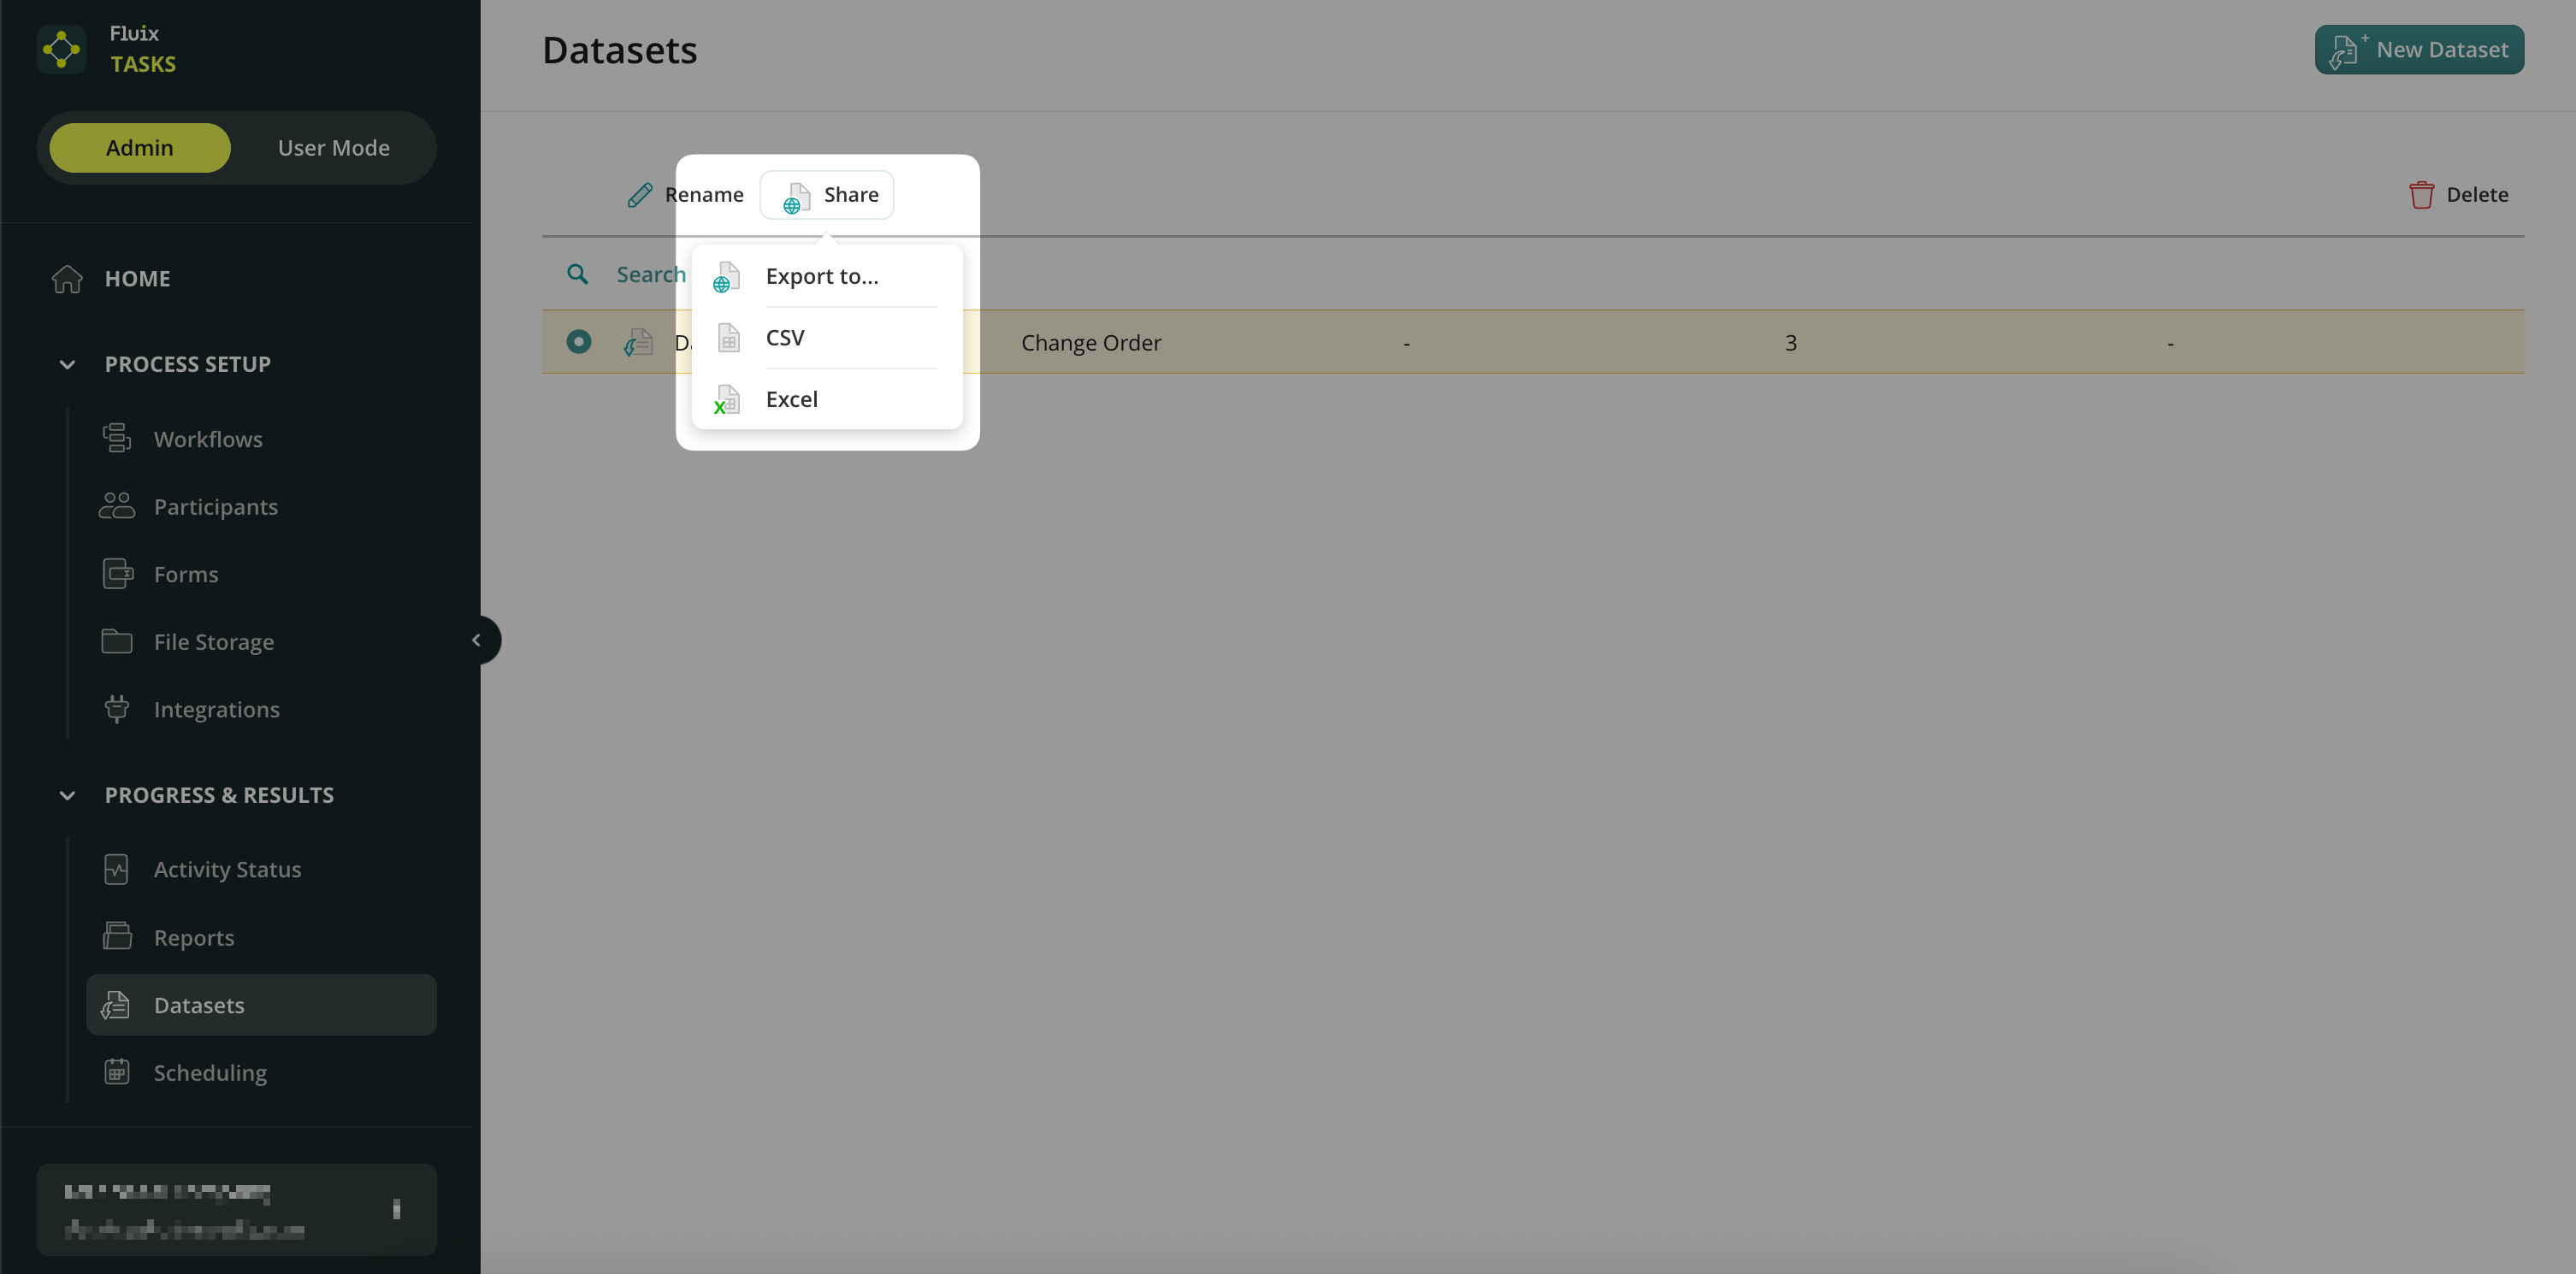
When selecting any dataset, you can:
Rename it;
Share it as CSV/Excel;
Export it to BI platforms such as Power BI, Tableau, and many others;
Delete it.
Finding bottlenecks and benchmarking in your business processes is now very easy.
Feel free to contact us at support@fluix.io if you have any questions or comments.
Was this article helpful?
Thanks for your feedback!
Oops, something went wrong. Please, try again later.
Thank you!
What details or examples would have made this article more helpful for you? We appreciate your insights!
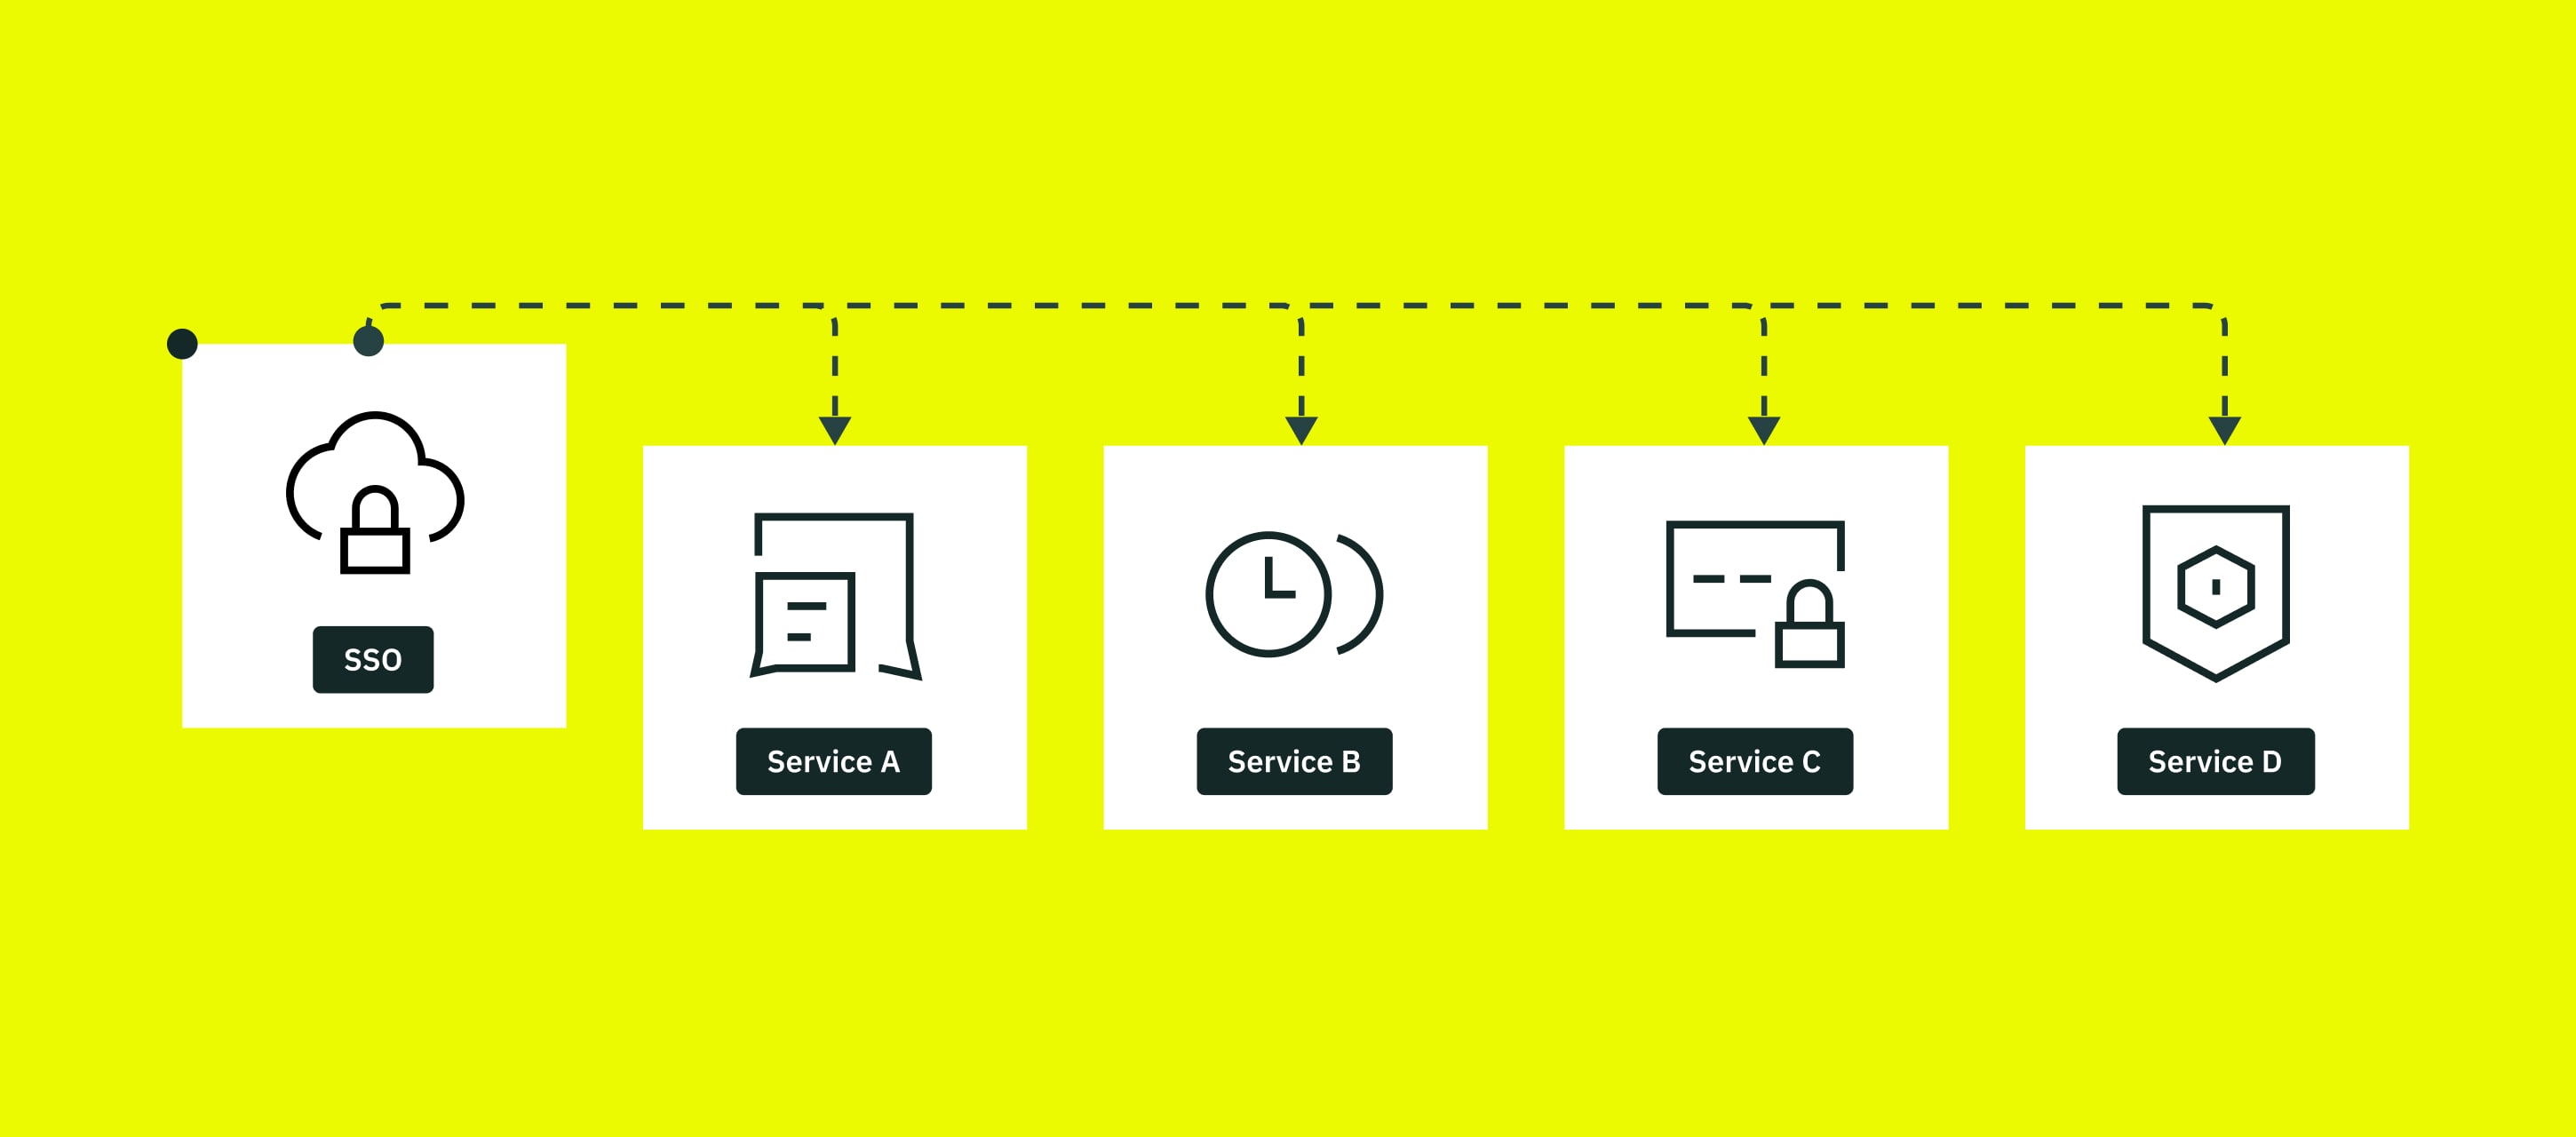
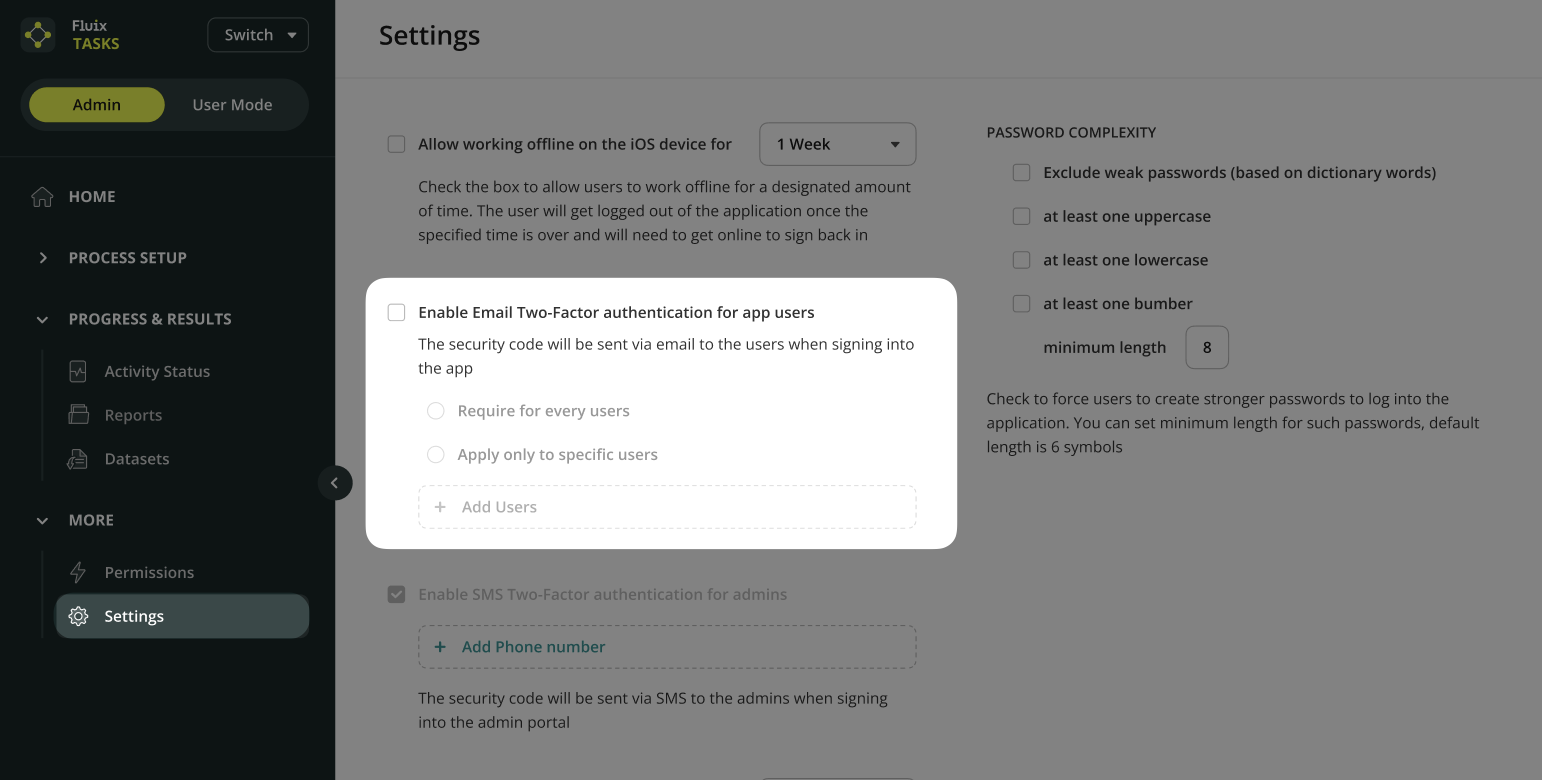
Single Sign-On (SSO) is one of the ways of authentication that enables users to use one set of login credentials to securely access multiple applications.
In addition to being much simpler and more convenient for users, SSO is widely considered to be more secure. The full list of the advantages of using SSO are the following:
Reduces password fatigue Remembering one password instead of many makes users’ lives easier. As a tangential benefit, it gives users a greater incentive to come up with strong passwords.
Streamlines the user experience SSO saves time and effort because users do not have to repeatedly log into, and since the repeated logins are no longer required, customers can enjoy a modern digital experience.
Relieves admin and support team workloads It saves admin and support team time by reducing the number of tickets sent to the support regarding access issues such as misplaced or forgotten passwords.
Simplifies username and password management When changes of personnel take place, SSO reduces both IT effort and opportunities for mistakes. Employees leaving the organization relinquish their login privileges.
Improves network and application security SSO can uniquely identify a user, and it, therefore, complies with the most demanding safety standards. Information provided by SSO moves encrypted across the network.
Additionally, the tech requirements listed below should be met in order to set the Single Sign-On functionality successfully:
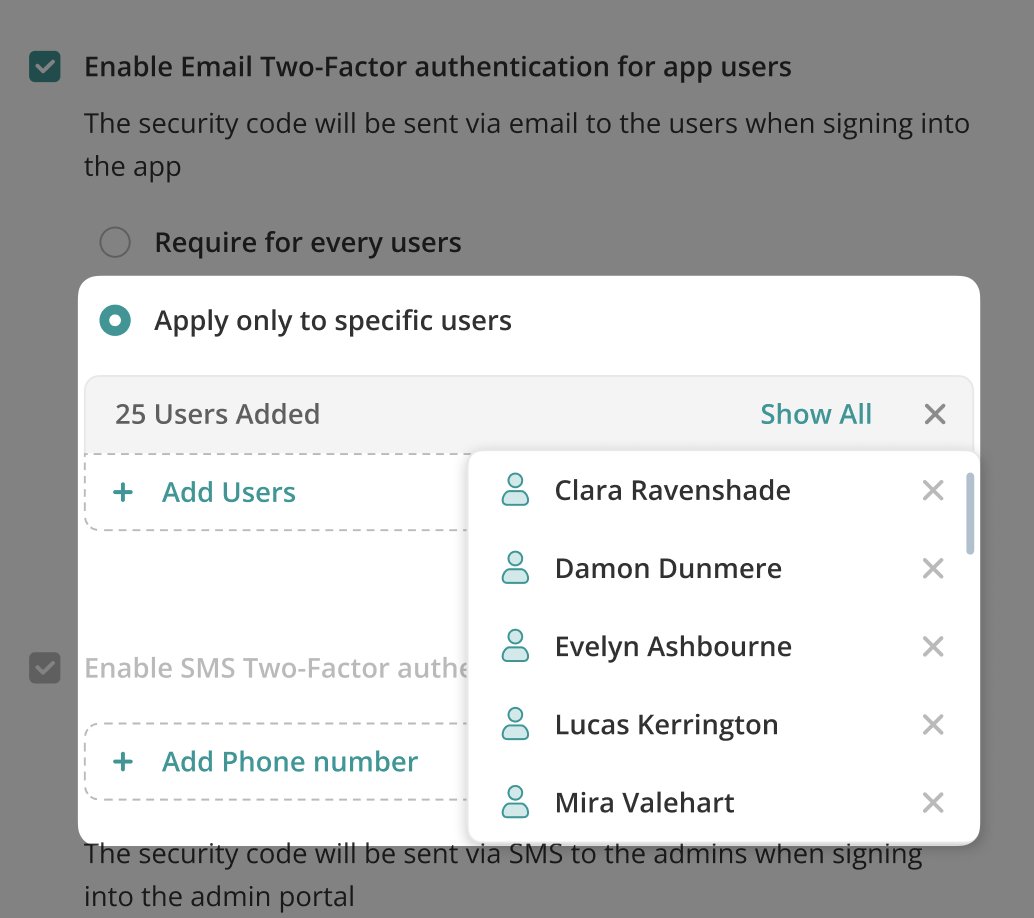
User management. The user is needed to be added to Fluix in advance by the admin to be able to login in using SSO.
Corporate domain integration. The company’s domain needs to be specified in Fluix and it should match the email domain of the users for the particular company. Let’s say, the domain that was specified by Admin in Fluix is readdle.com, therefore, the emails of the users who are going to login to Fluix account using SSO should be corresponding with this domain, e.g. user@readdle.com, user2@readdle.com, etc.
Multi-accounts restriction. In case there are some users who have different email domains within the same company account (e.g., user@readdle.com, user2@fluix.io, user3@gmail.com) the company Admin will need to select only one email domain that will be used for the SSO. Other users having different email domains will not be able to login in using SSO.
SAML authentication standard. The identity provider, which specifies the user name, is required to return the NameID value of the user email address in Fluix. There could be also another attribute that may contain the email address, though, a custom attribute name will be needed to be configured on the company’s end in Fluix settings.
Identity Provider Compatibility. Any identity provider for authentication (Okta, Auth0, Microsoft AD, etc) can be used in Fluix, and any of them are compatible with our system.
Verification certificate. The certificate file that will be added on the company’s end needs to contain the public key so that Fluix could verify sign-in requests and the SAML response sent to Fluix in order to make sure that SSO assertion was received from a particular company’s account and wasn’t modified during transmission.
If you already have Fluix account, learn how the Single Sign-On functionality works and the way it can be implemented for your Fluix account in the article about Security Settings.
Was this article helpful?
Thanks for your feedback!
Oops, something went wrong. Please, try again later.
Thank you!
What details or examples would have made this article more helpful for you? We appreciate your insights!
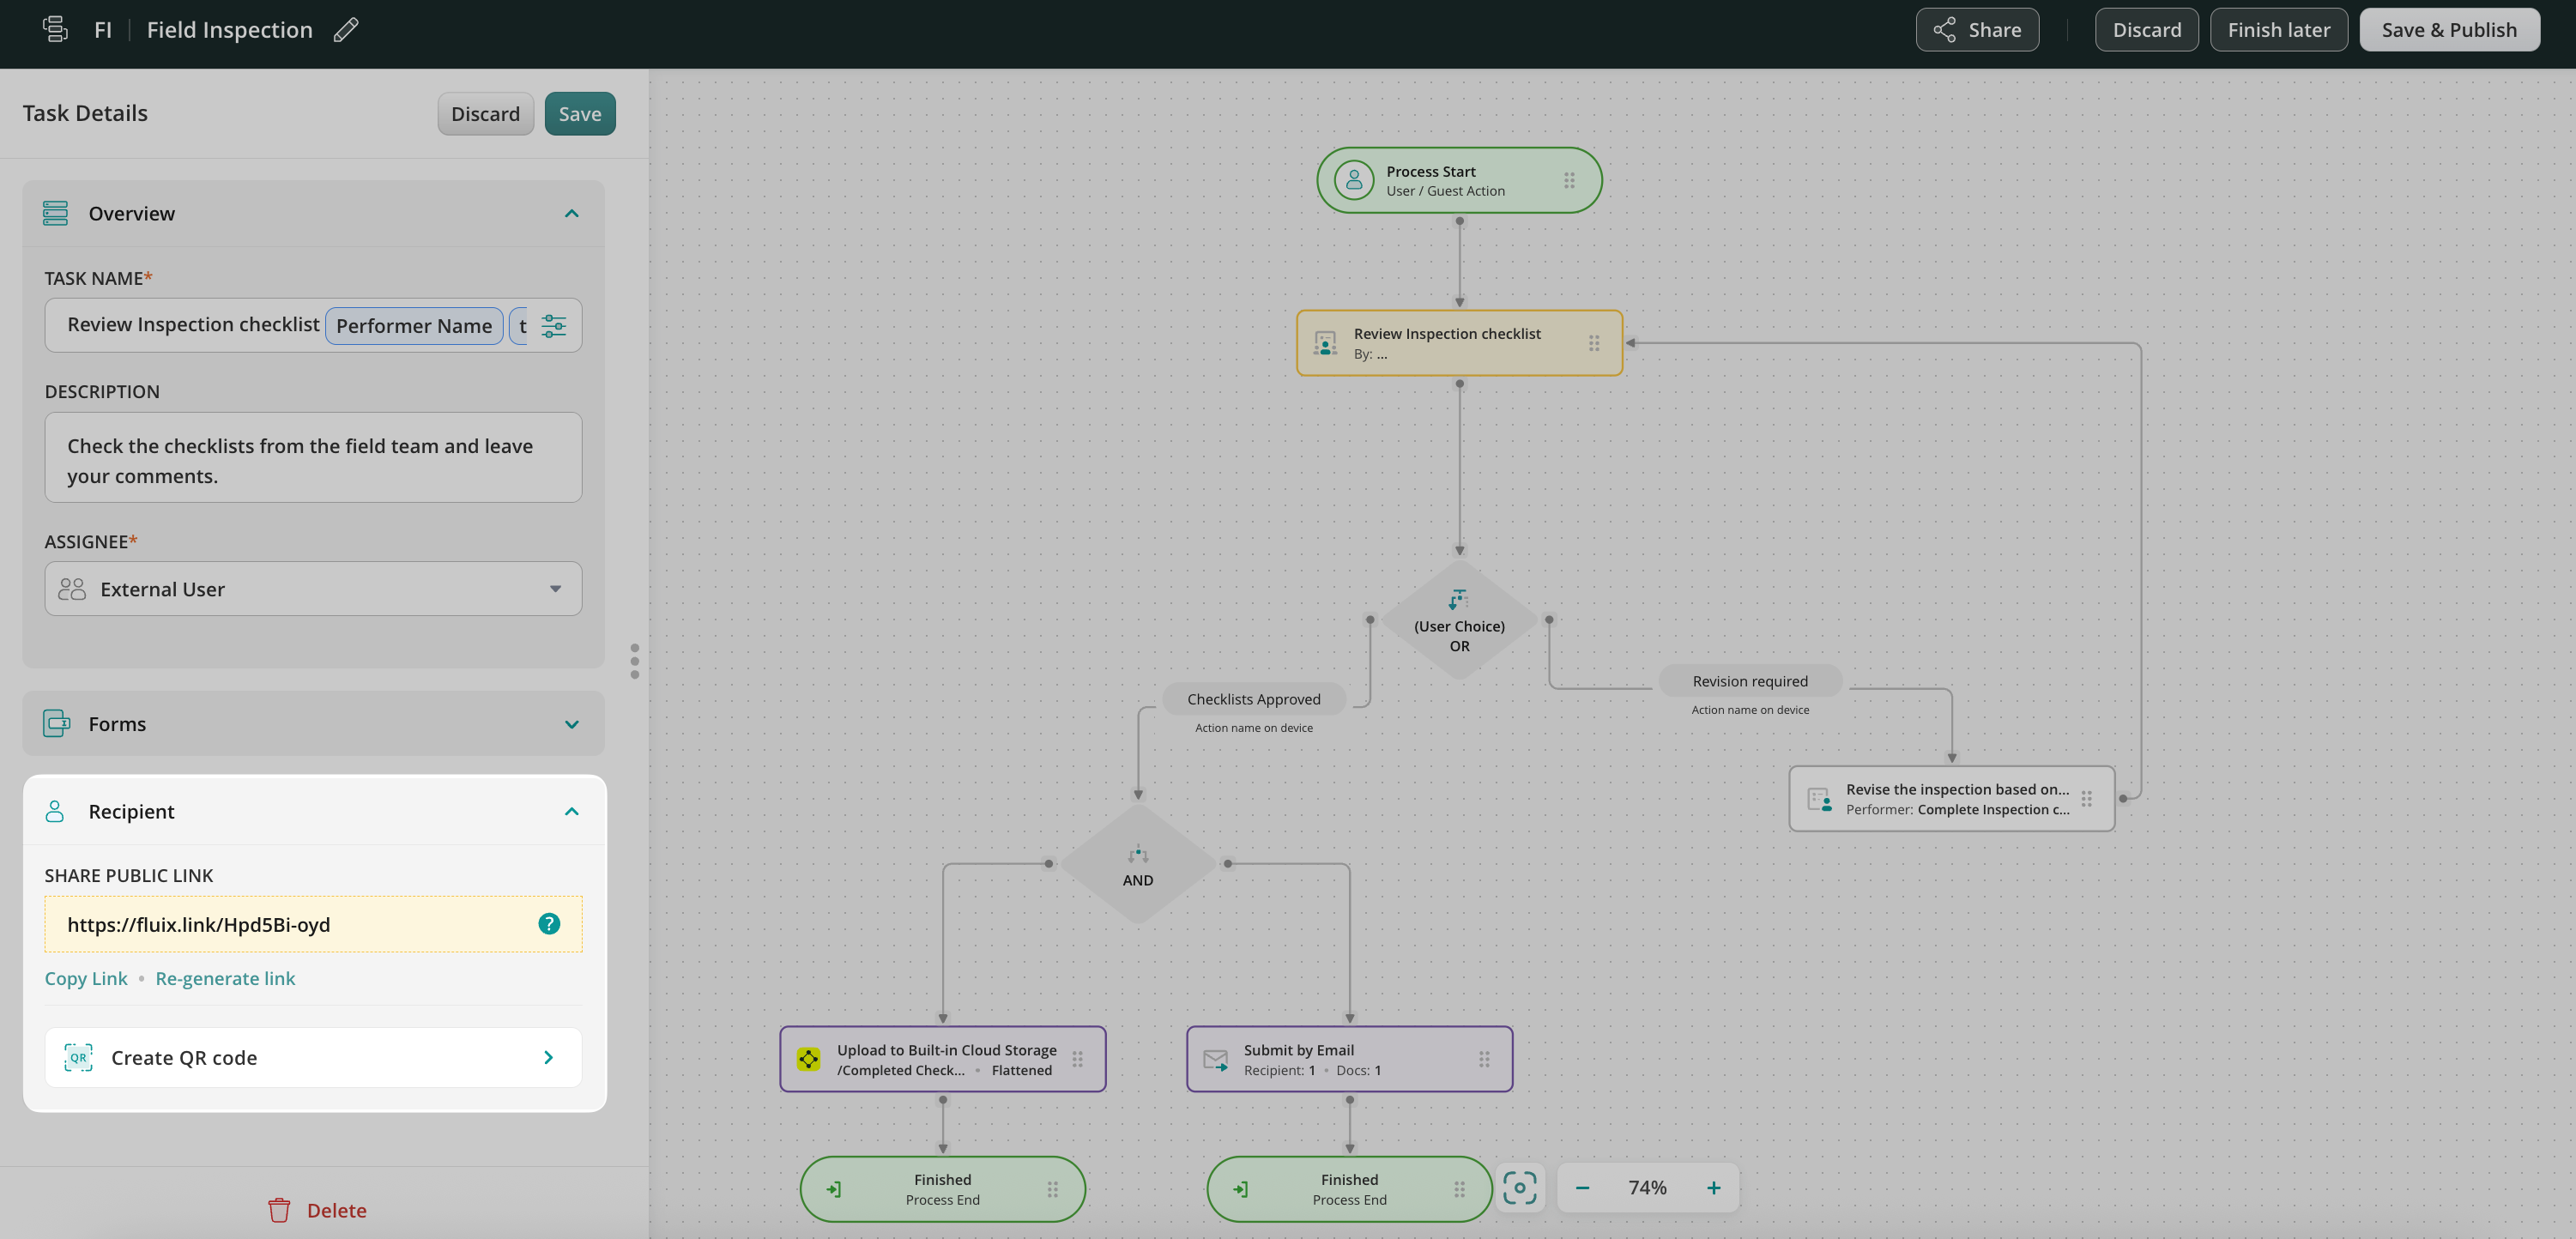
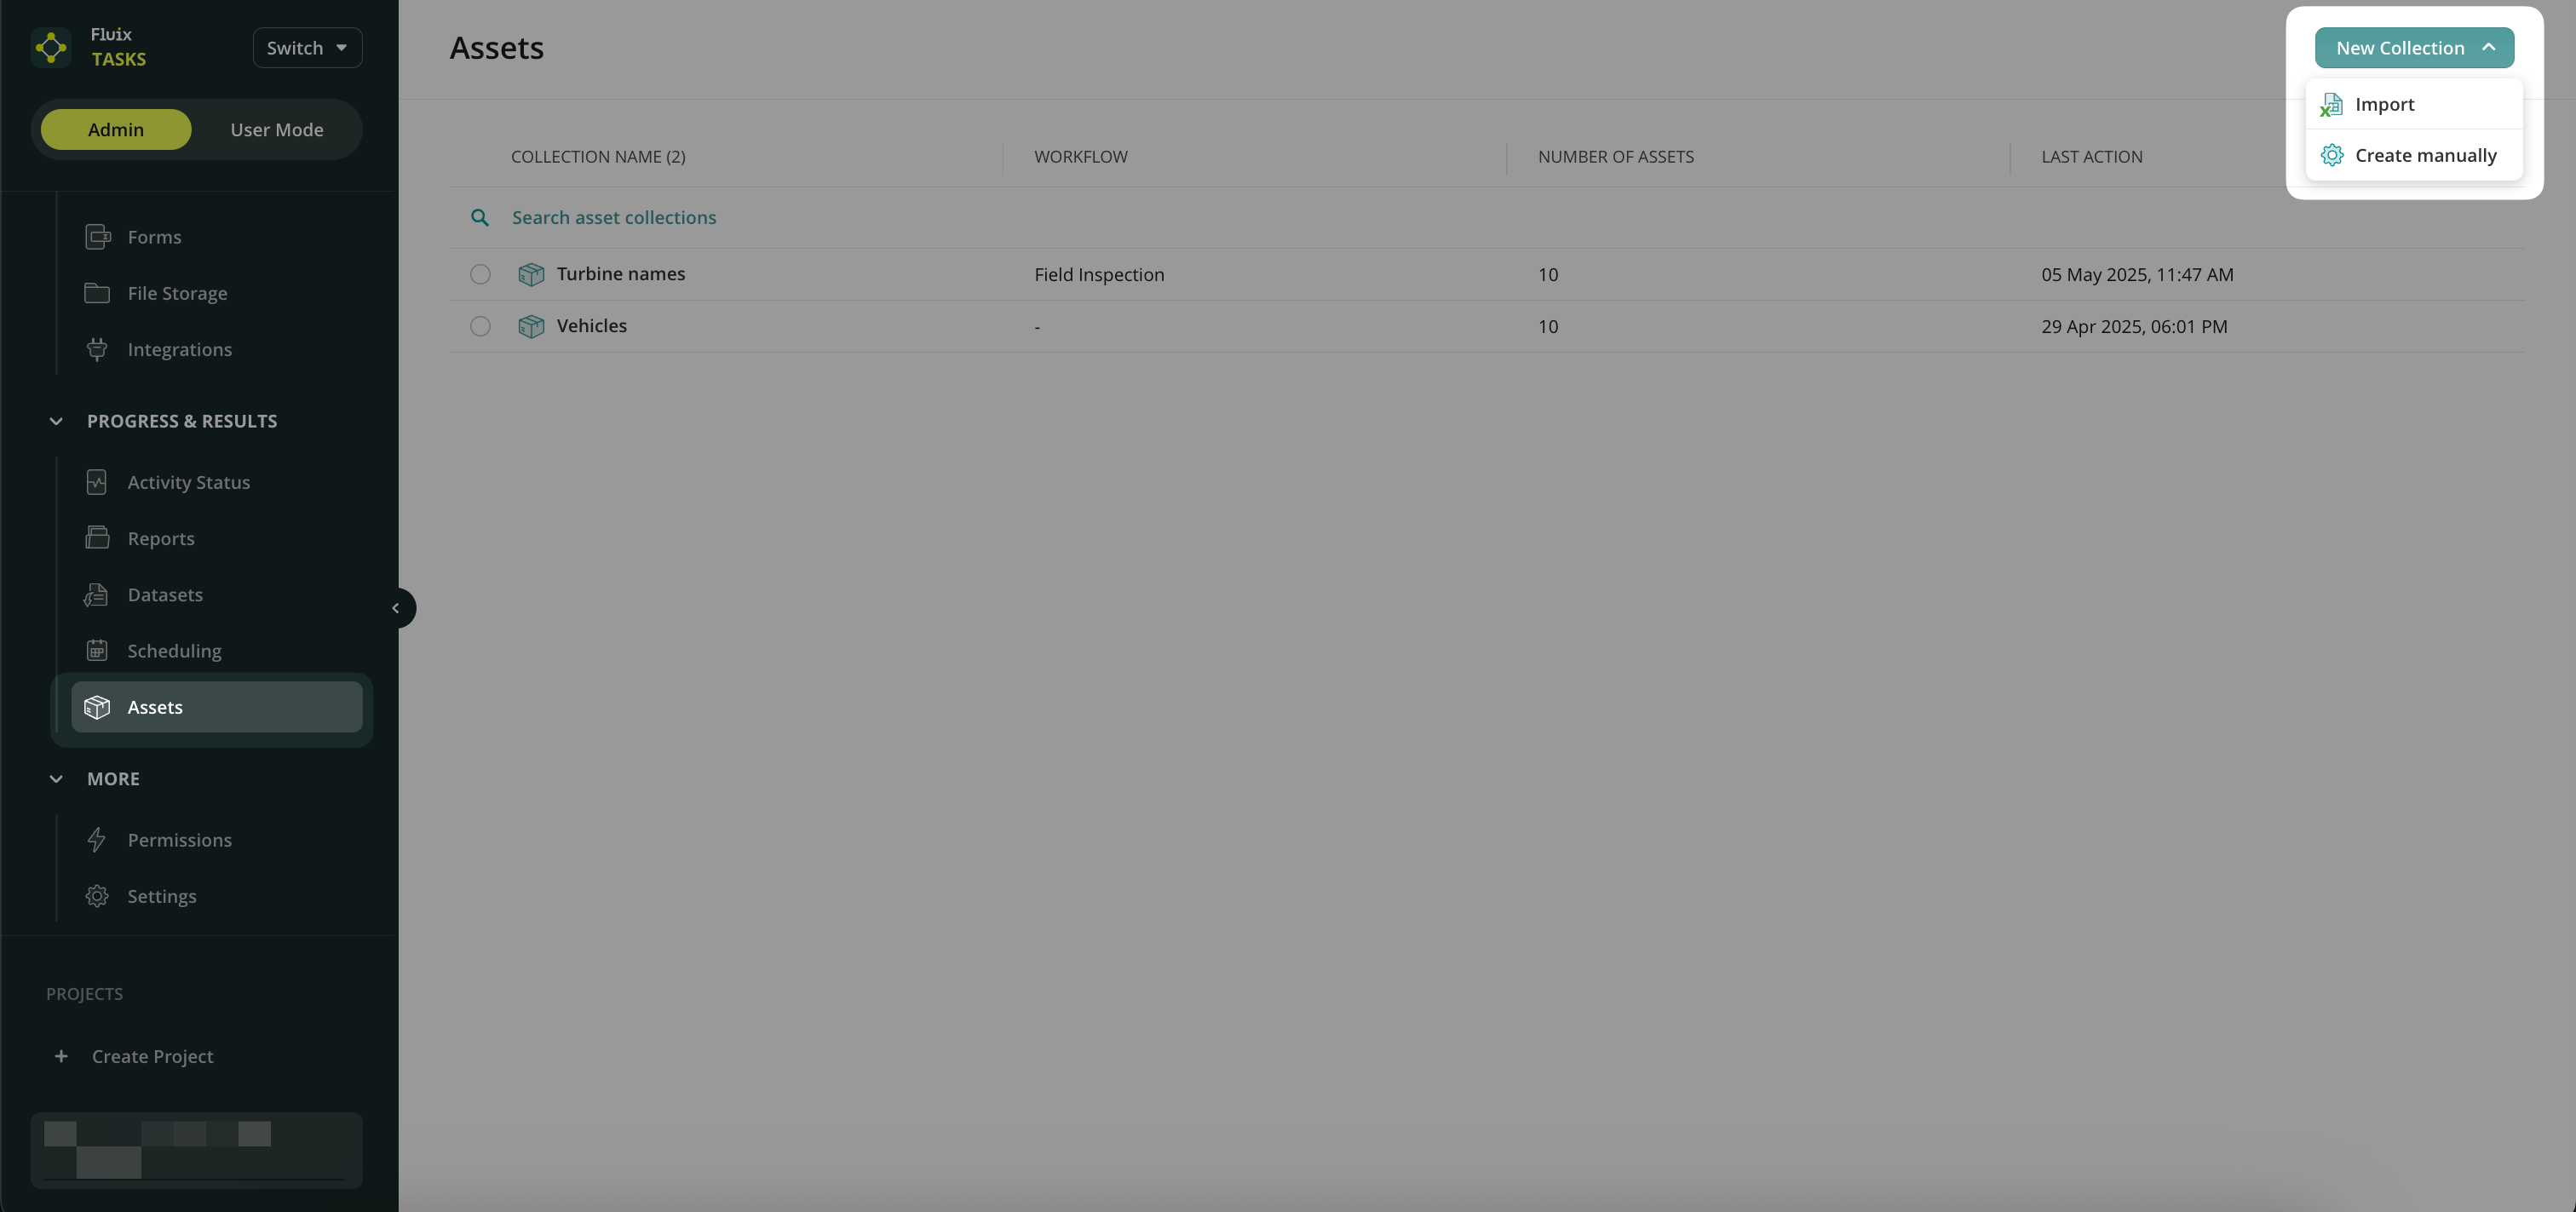
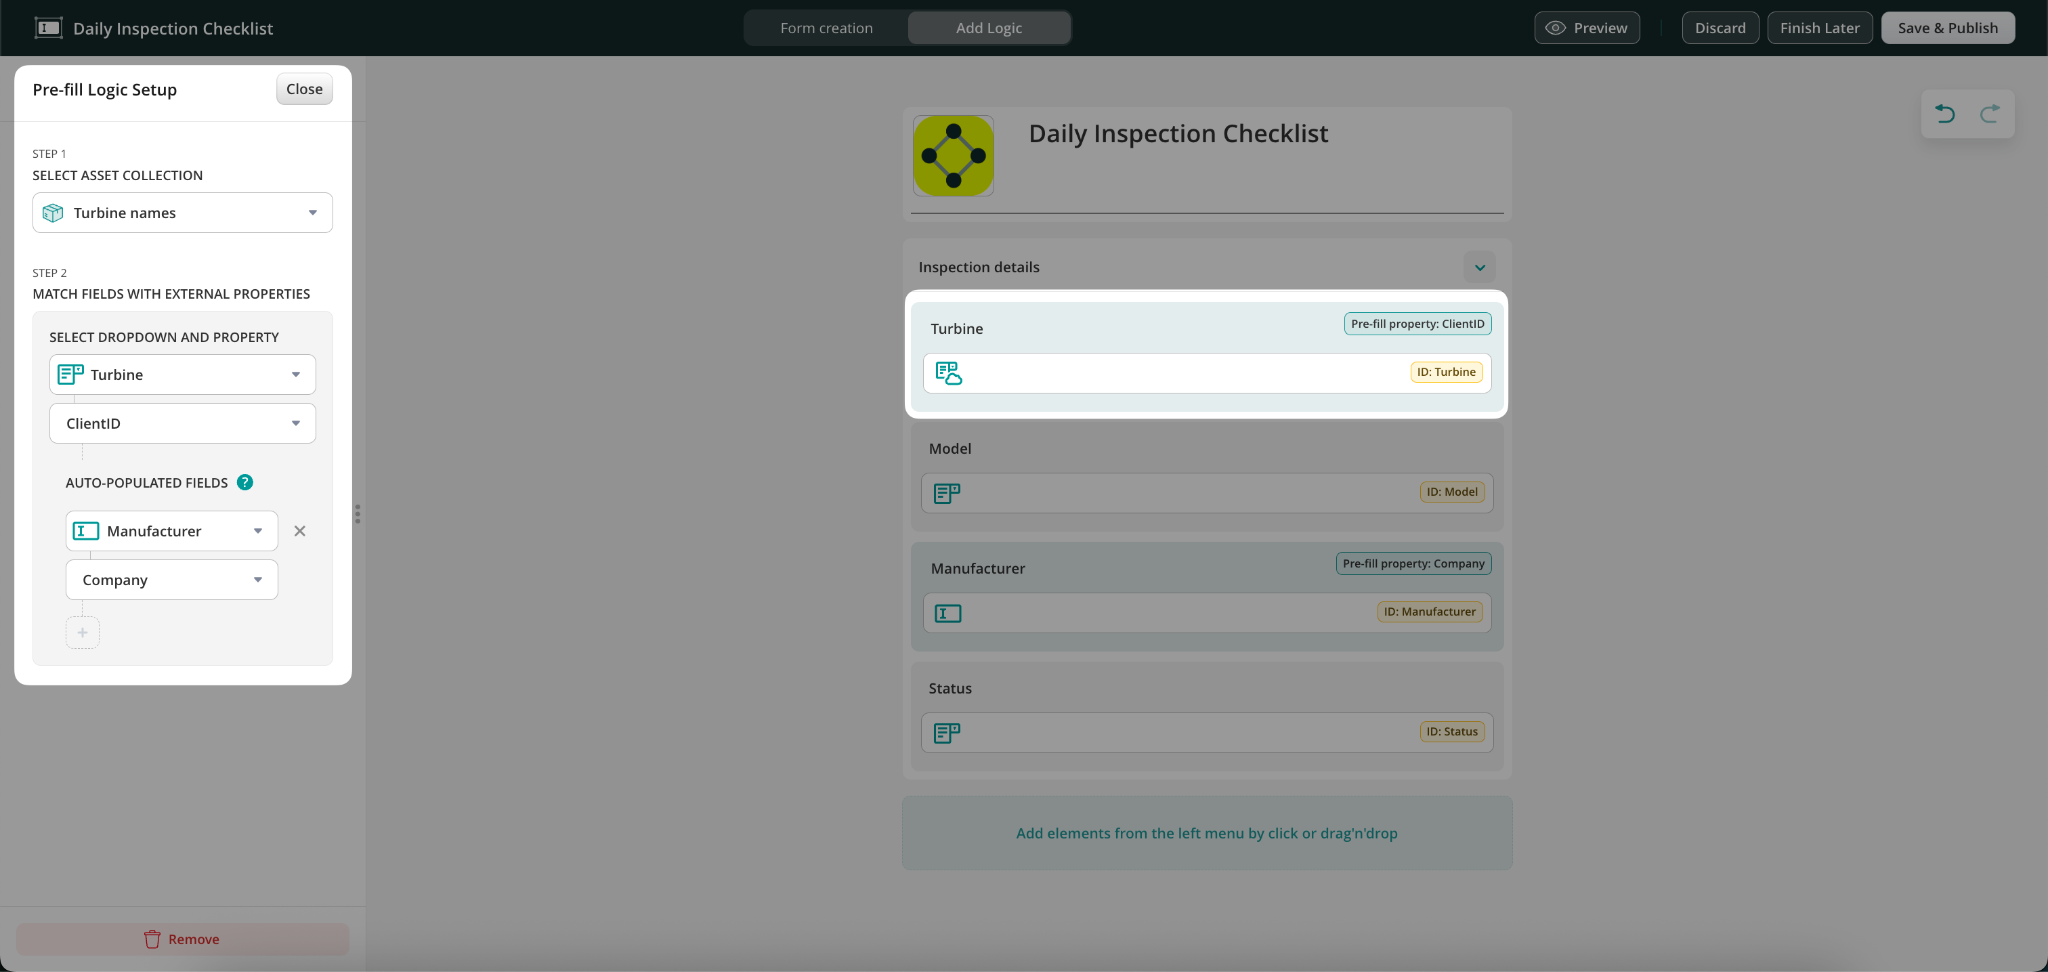
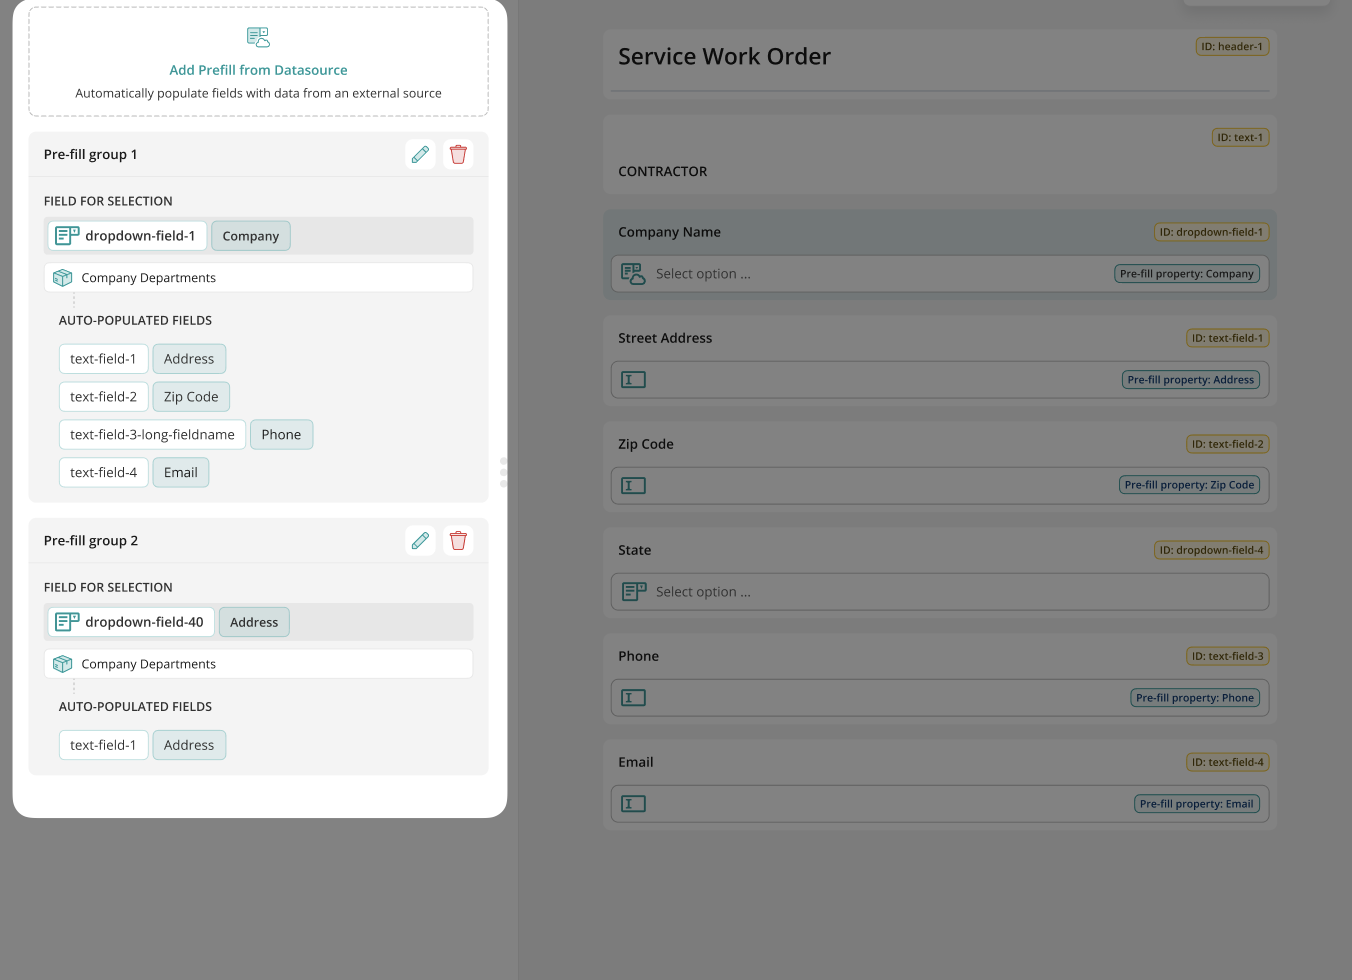
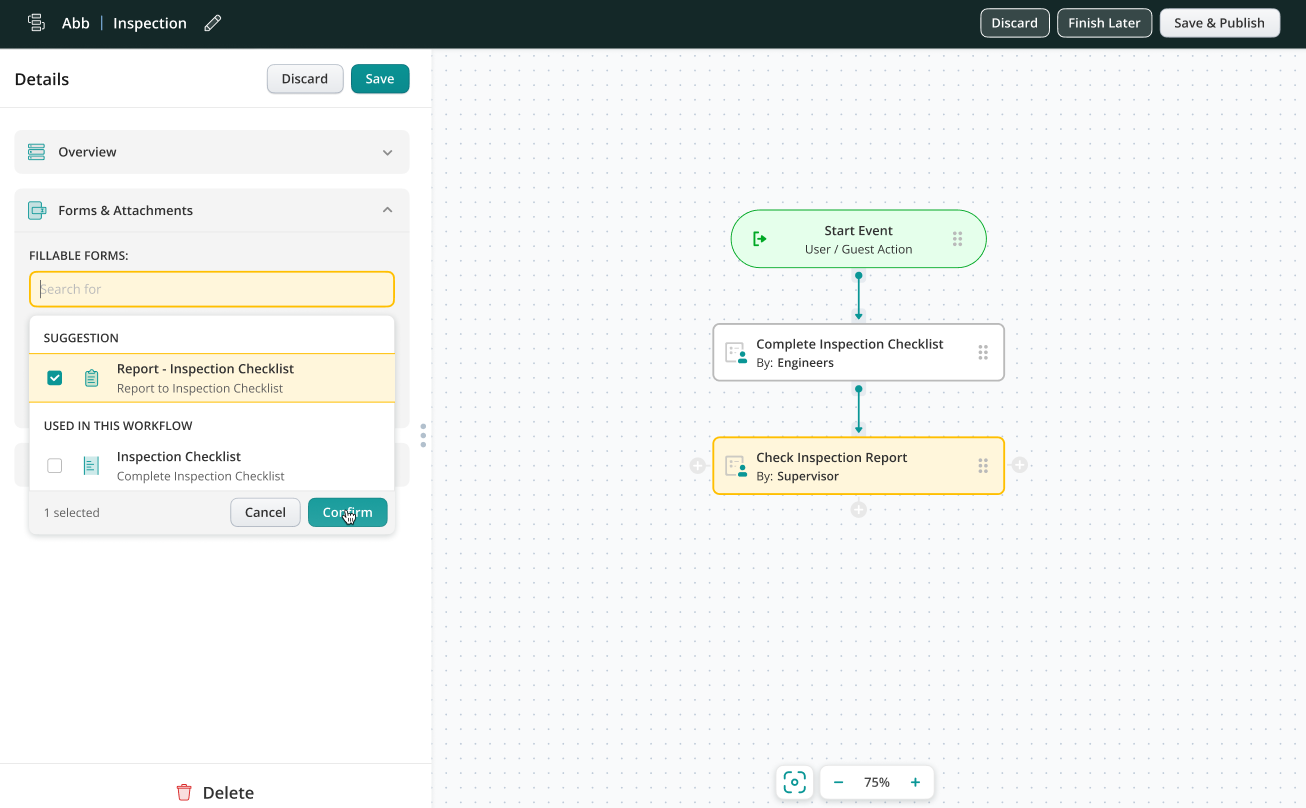
Forms Prefill is a new functionality in Fluix workflows that allows you to automate the pre-population of data in forms and save users time on manual data entry. Let’s look at 3 real-life scenarios as examples of configuring form prefill in Fluix workflows.
Scenario 1: Prefill from Forms Completed in Previous Tasks
In this case, form prefill is performed using the data from the forms completed in the previous user or guest tasks. The prefill is done in the middle of the process and should be followed by any other submit action.
To set up such a flow in Fluix, you’ll need to follow the steps below.
Step 1 – Create a workflow in Fluix
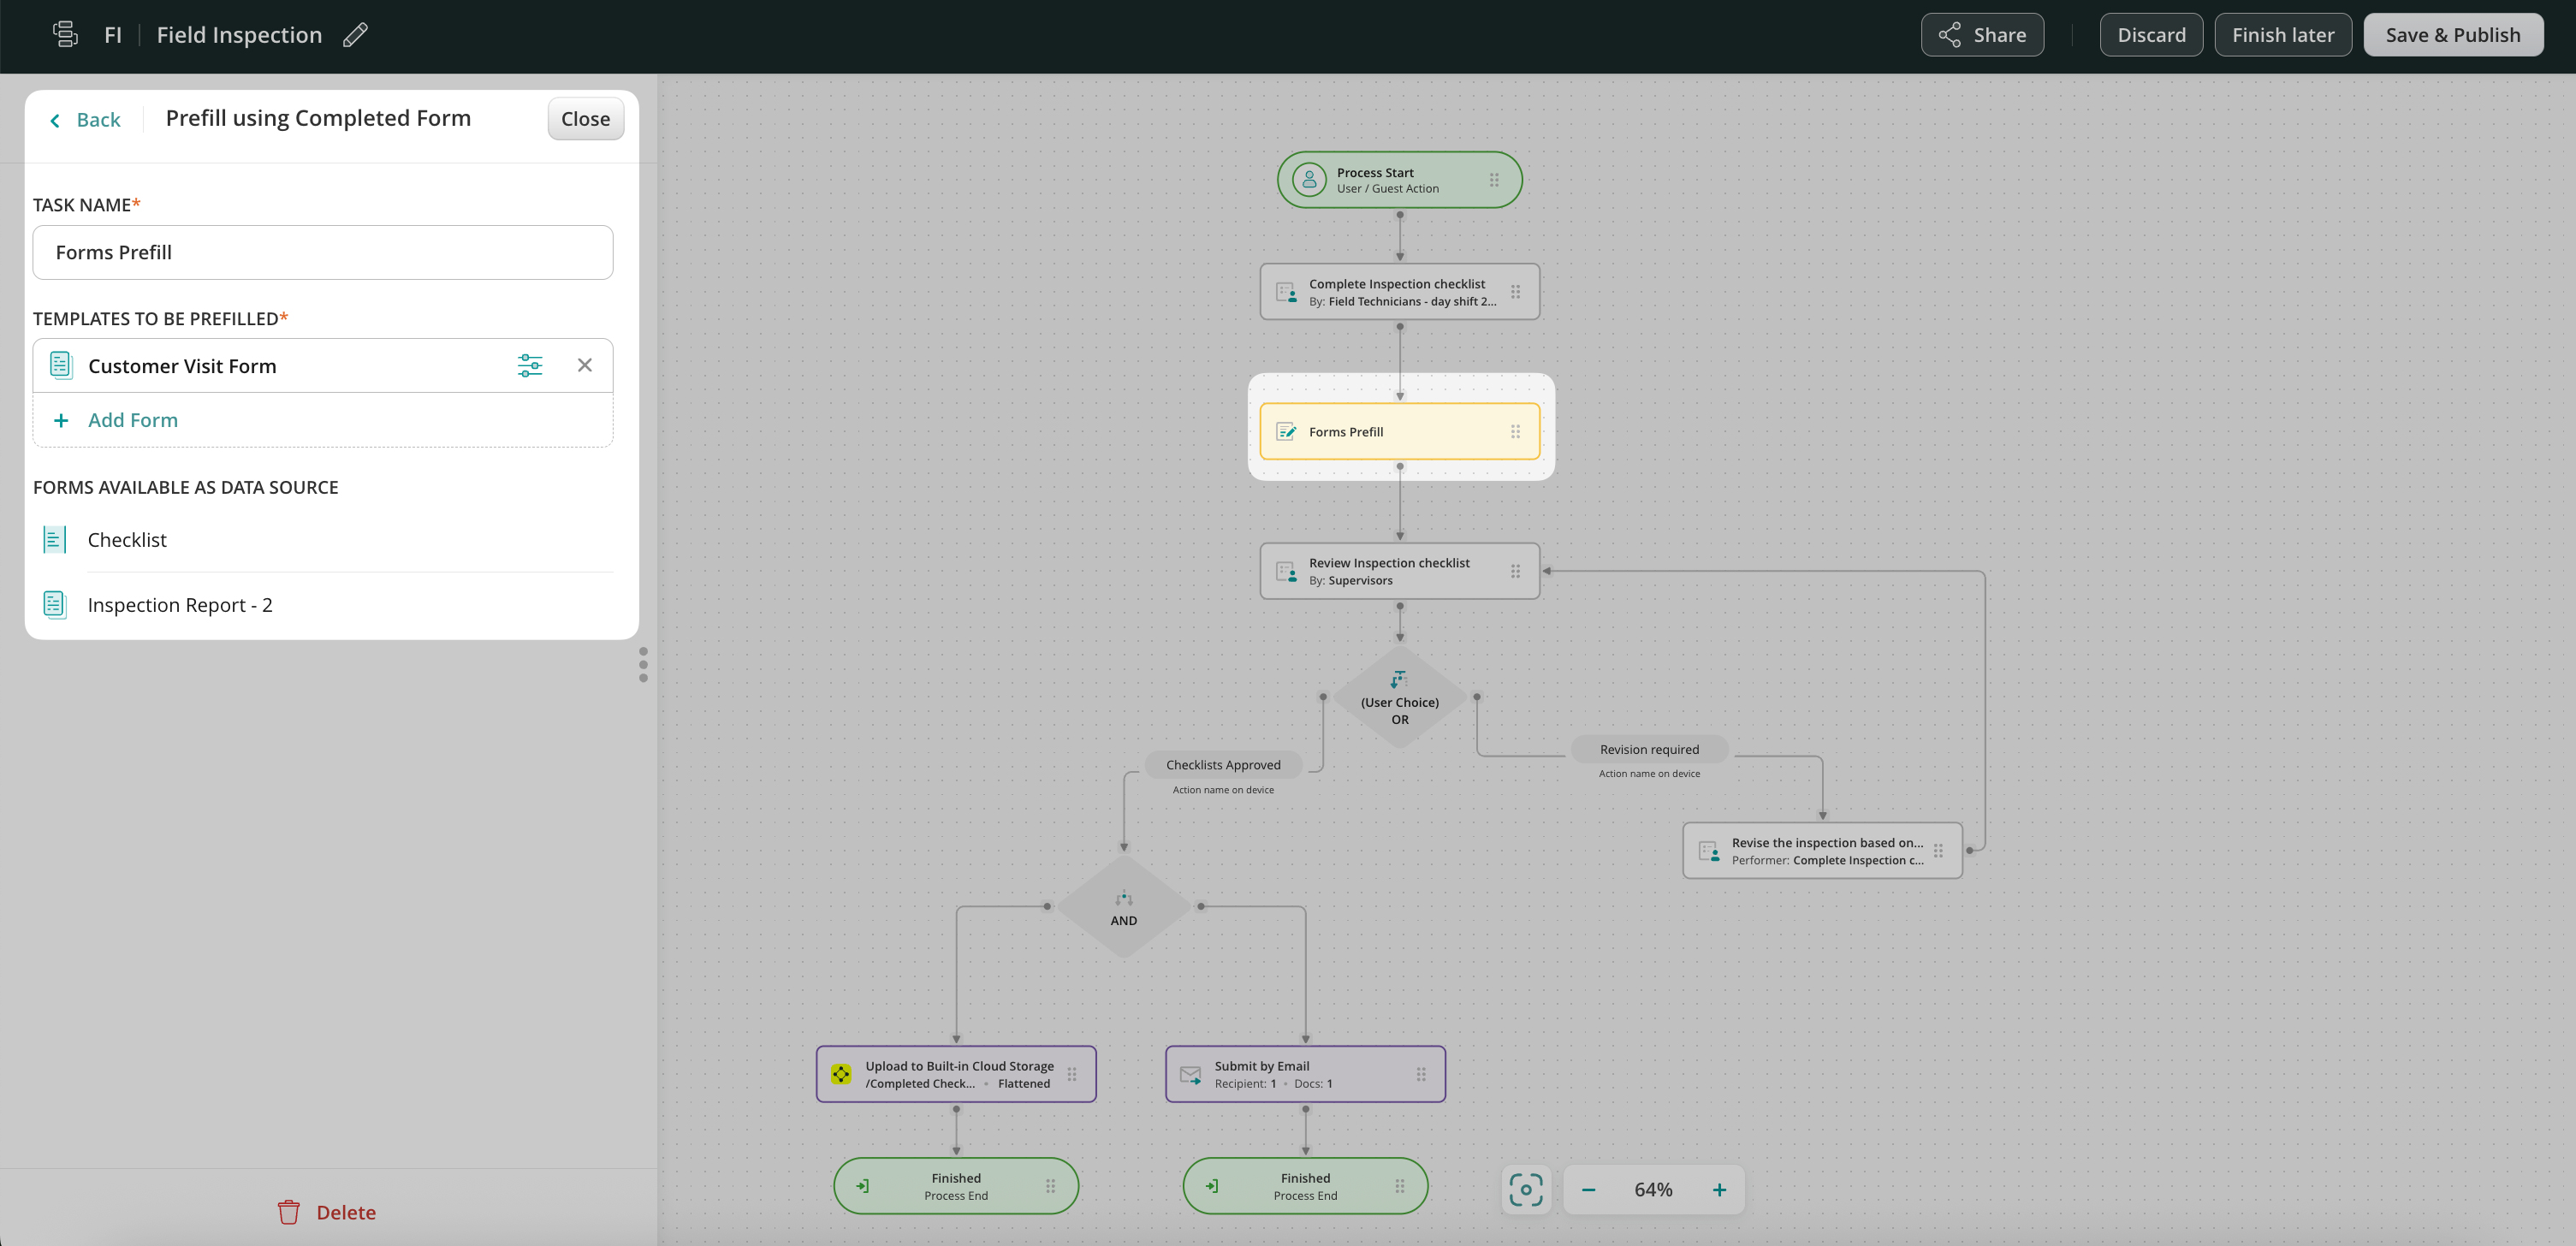
Create a workflow with a process that includes a series of repetitive User tasks for your teams, and Forms Prefill action between them. Each team will be assigned a task containing fillable forms.
Step 2 – Create a form prefill from a form completed in previous tasks
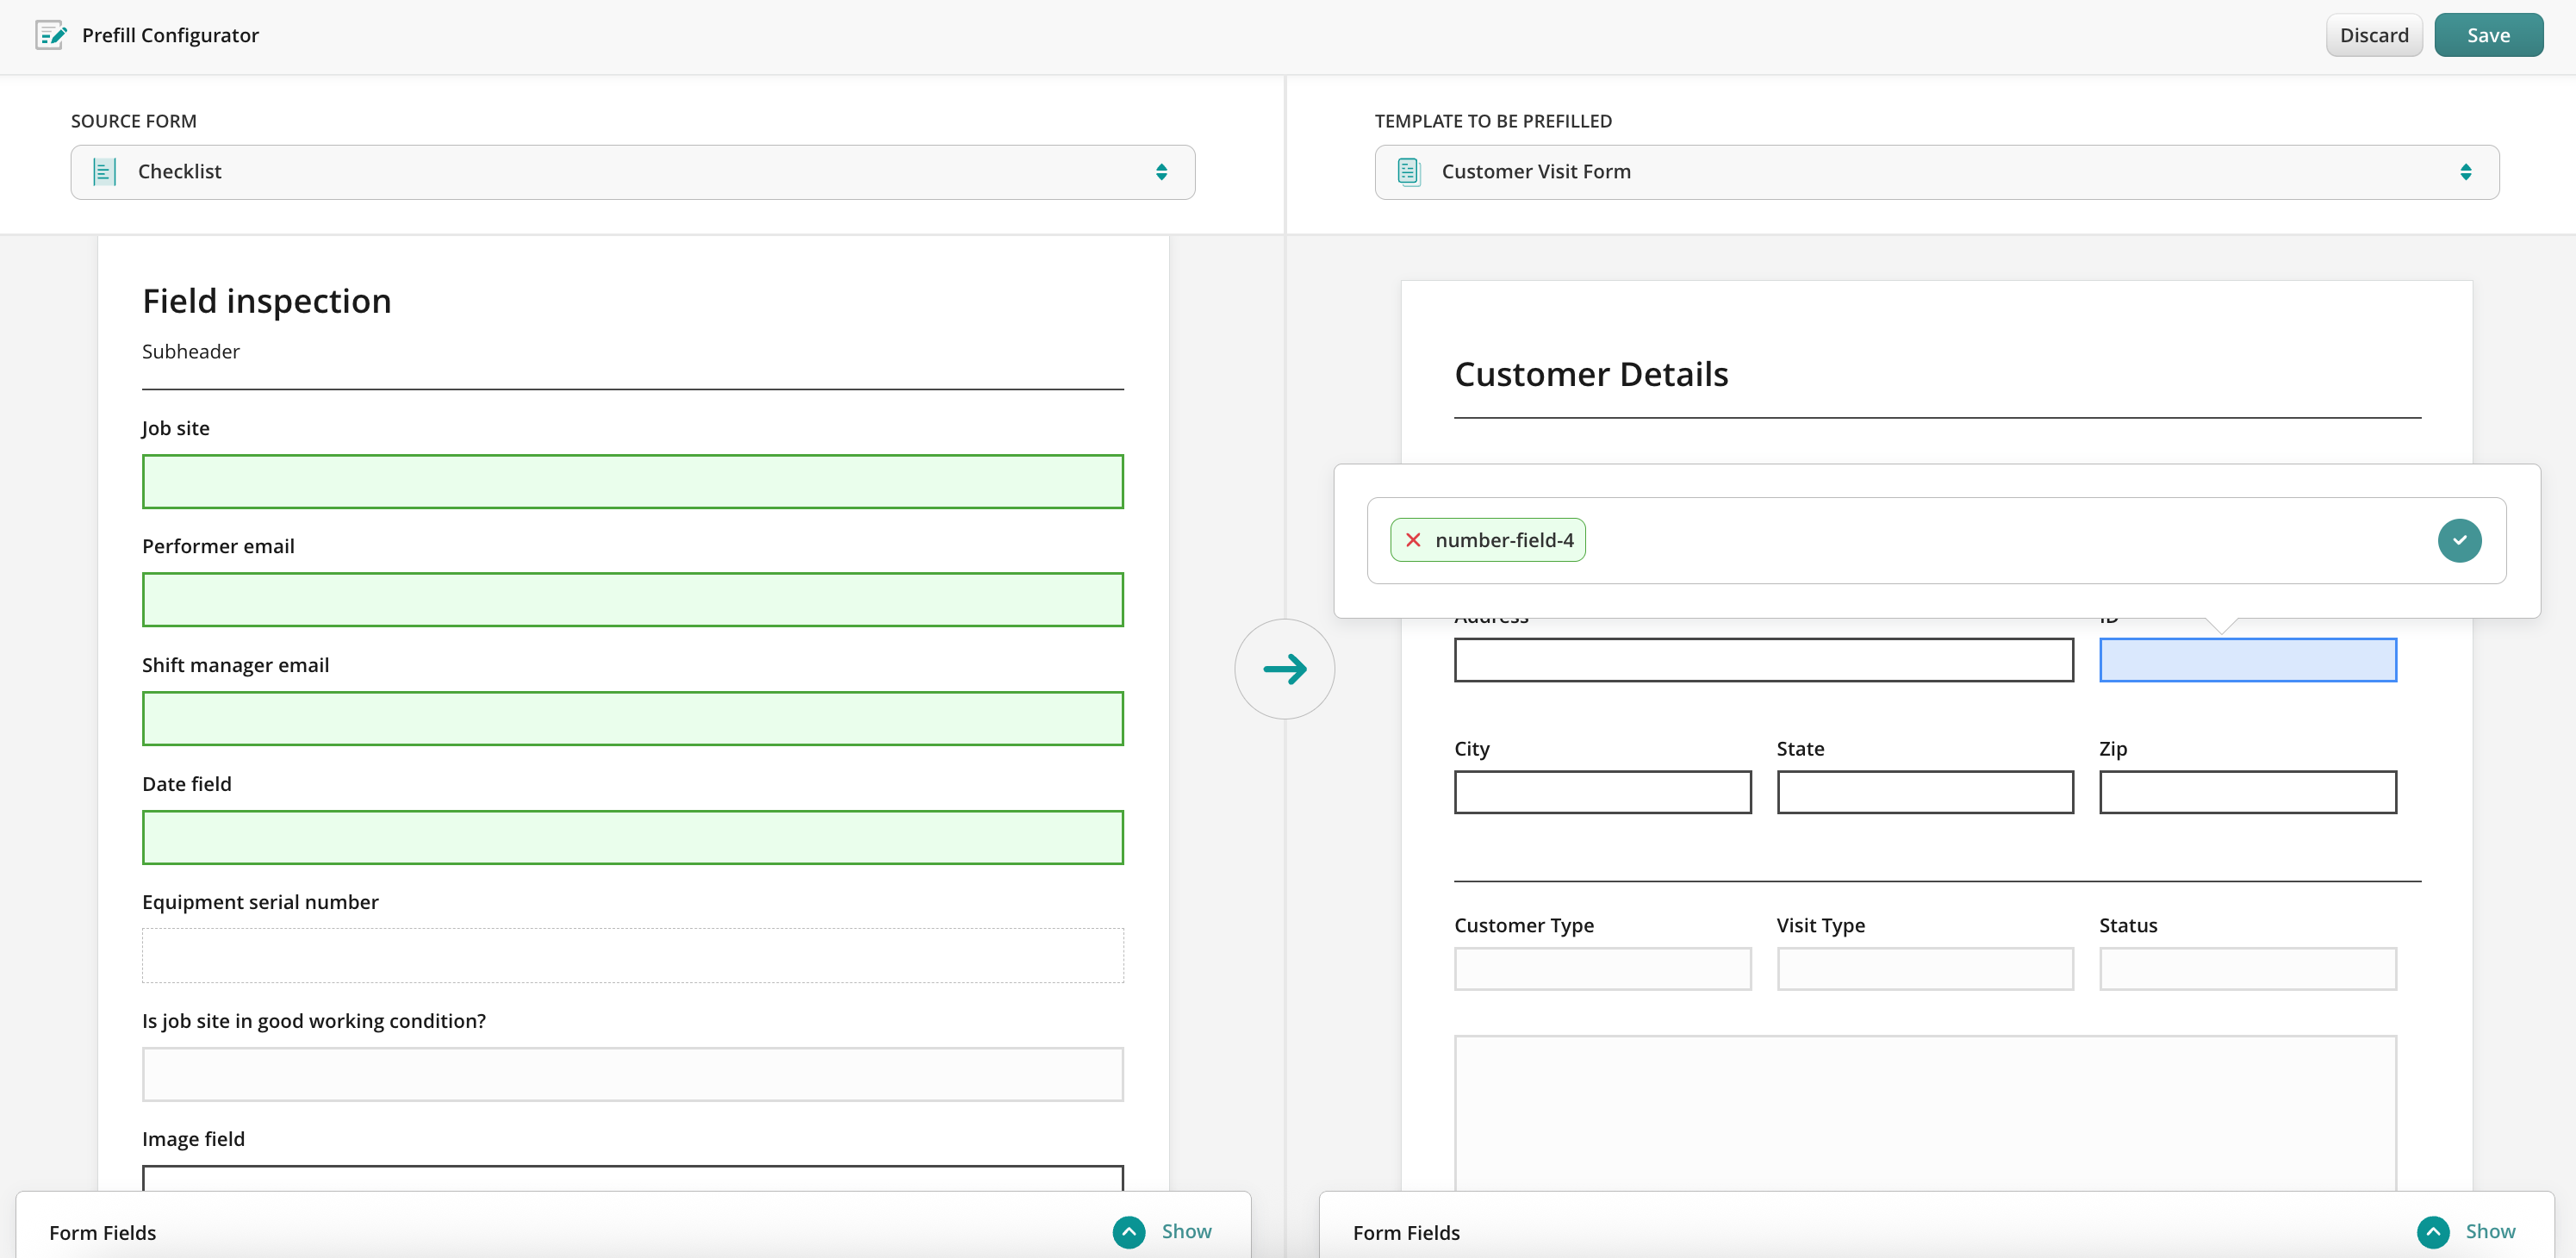
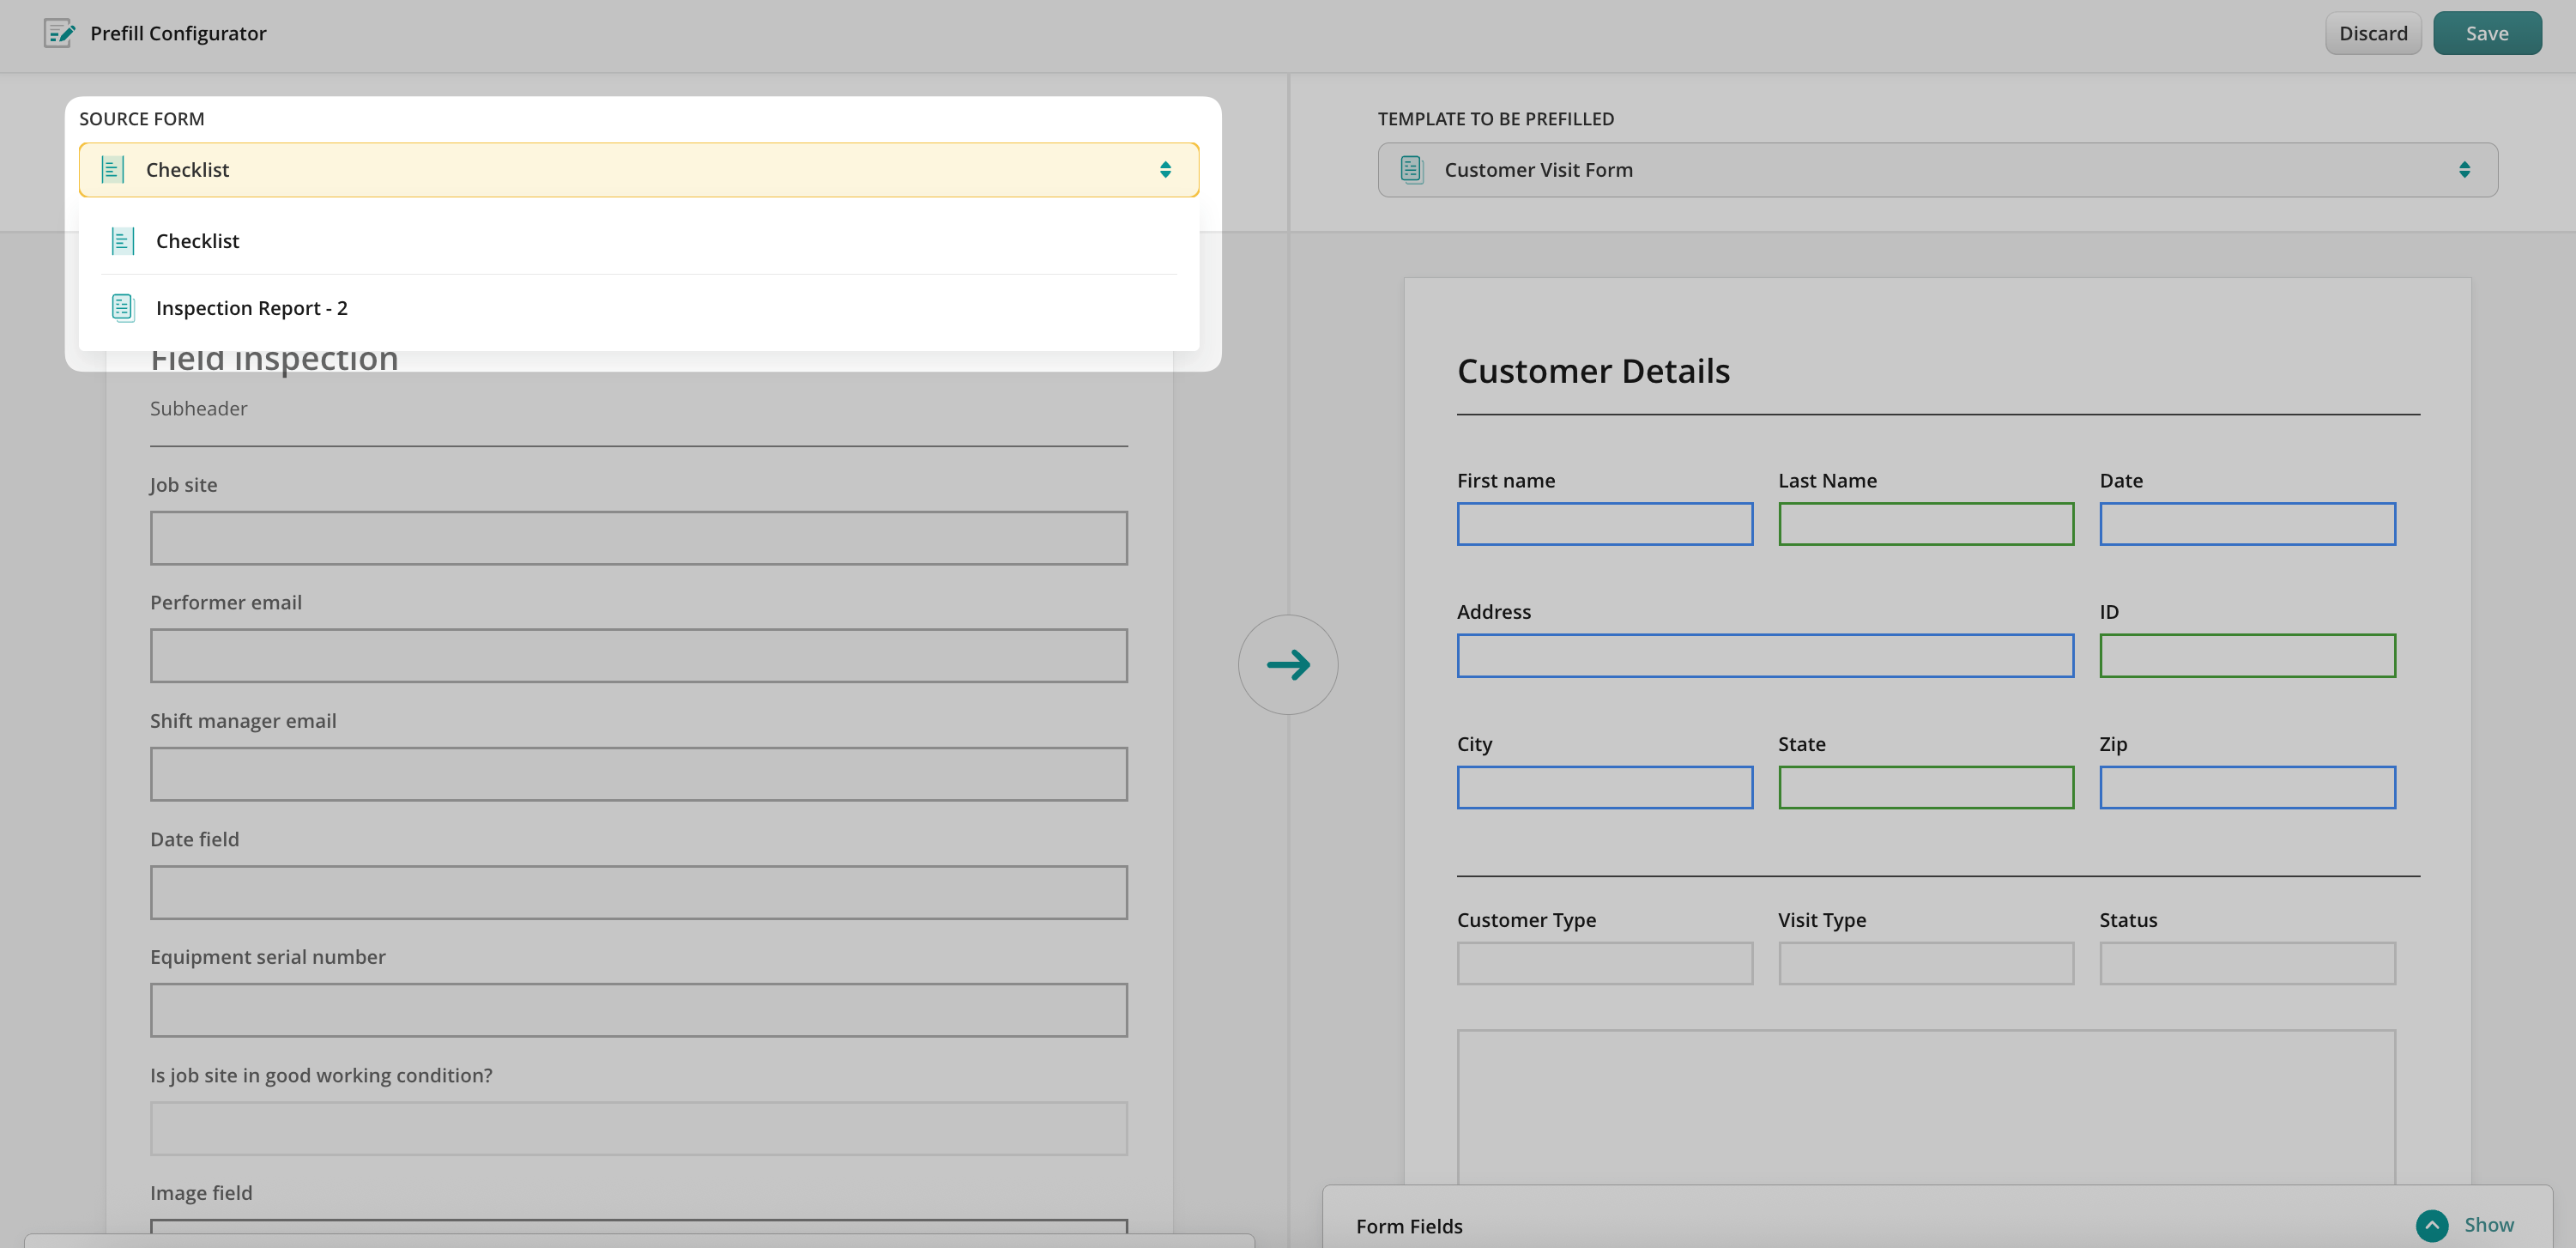
To configure the prefill from one form to another, in the Forms Prefill action, next to the form name click on the icon to open Prefill Configurator.
There you will map the fields from the source form to a template to be prefilled. By clicking on the field in a source form you will be suggested to match it with the field in the template form.
Also, it is possible to track field configuration in case there was more than one form in the previous task. Use a simple dropdown menu to see and navigate the list of the forms from the previous task to use them as the data source for prefill.
Once configured, save and publish the workflow, to make the data flow seamless and accurate.
Scenario 2: Prefill Initiated by Third-party Tool
In this case, the process in Fluix starts right when the specific fields are changed in the third-party tool that is integrated in the respective workflow in Fluix. Therefore, it triggers a webhook and prefills the data into the pre-configured fields in the form in the workflow. A new task is created for the user or guest in Fluix where they fill out the rest of this form.
To set up such a flow in Fluix, you’ll need to follow the steps below.
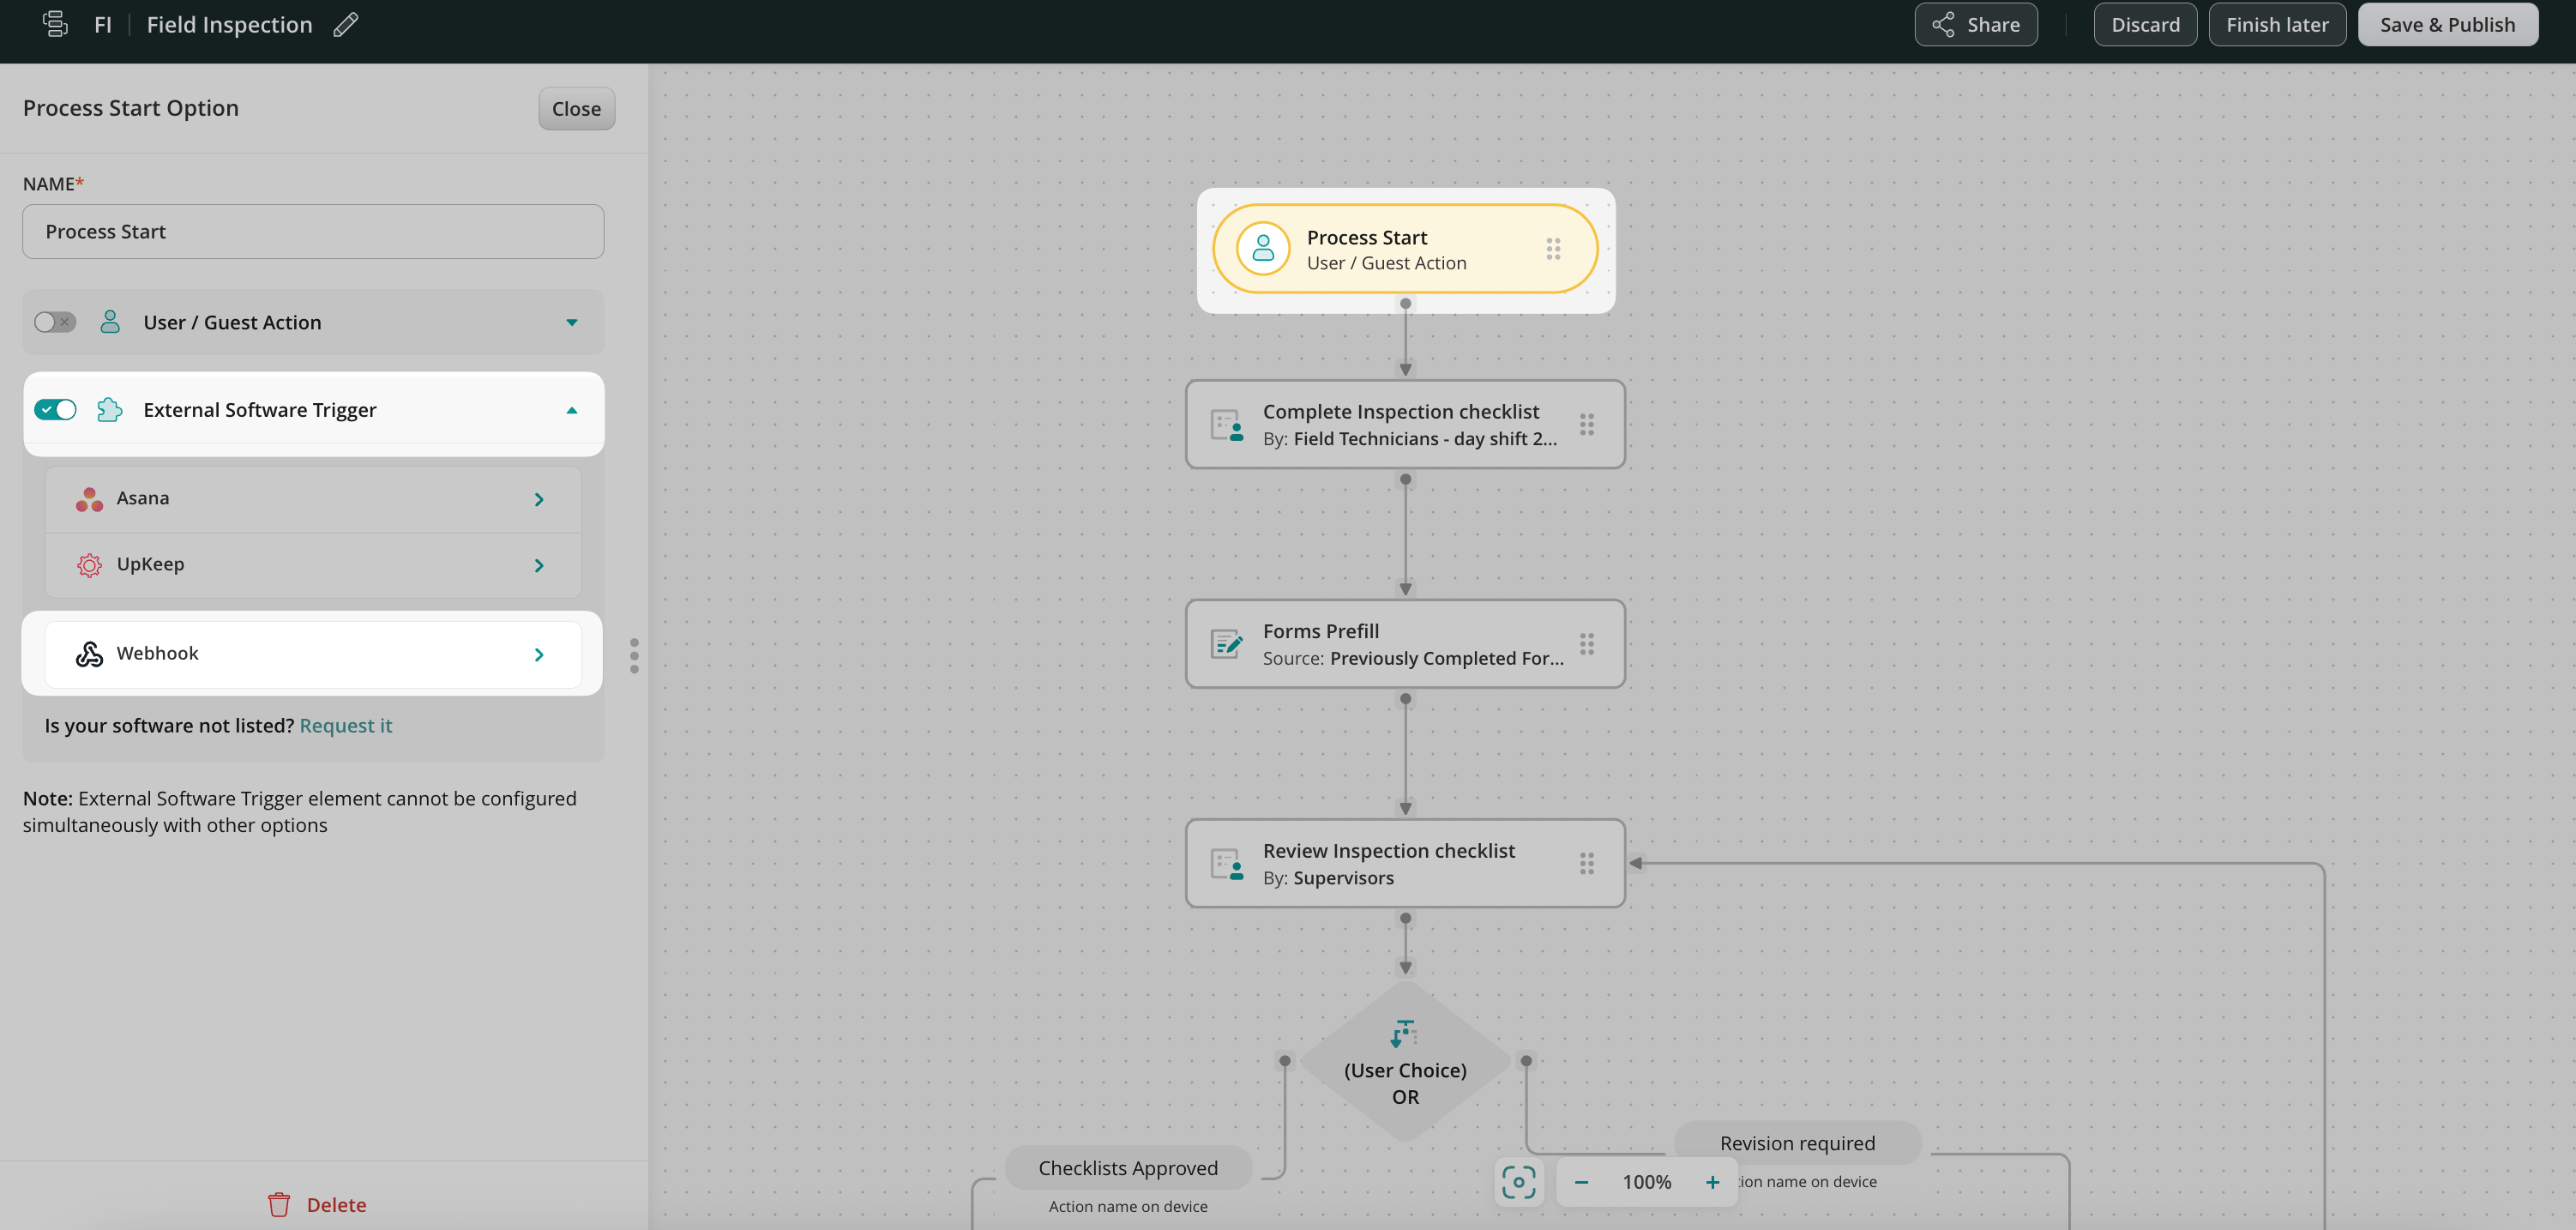
Step 1 – Create a workflow with the Start event in Fluix
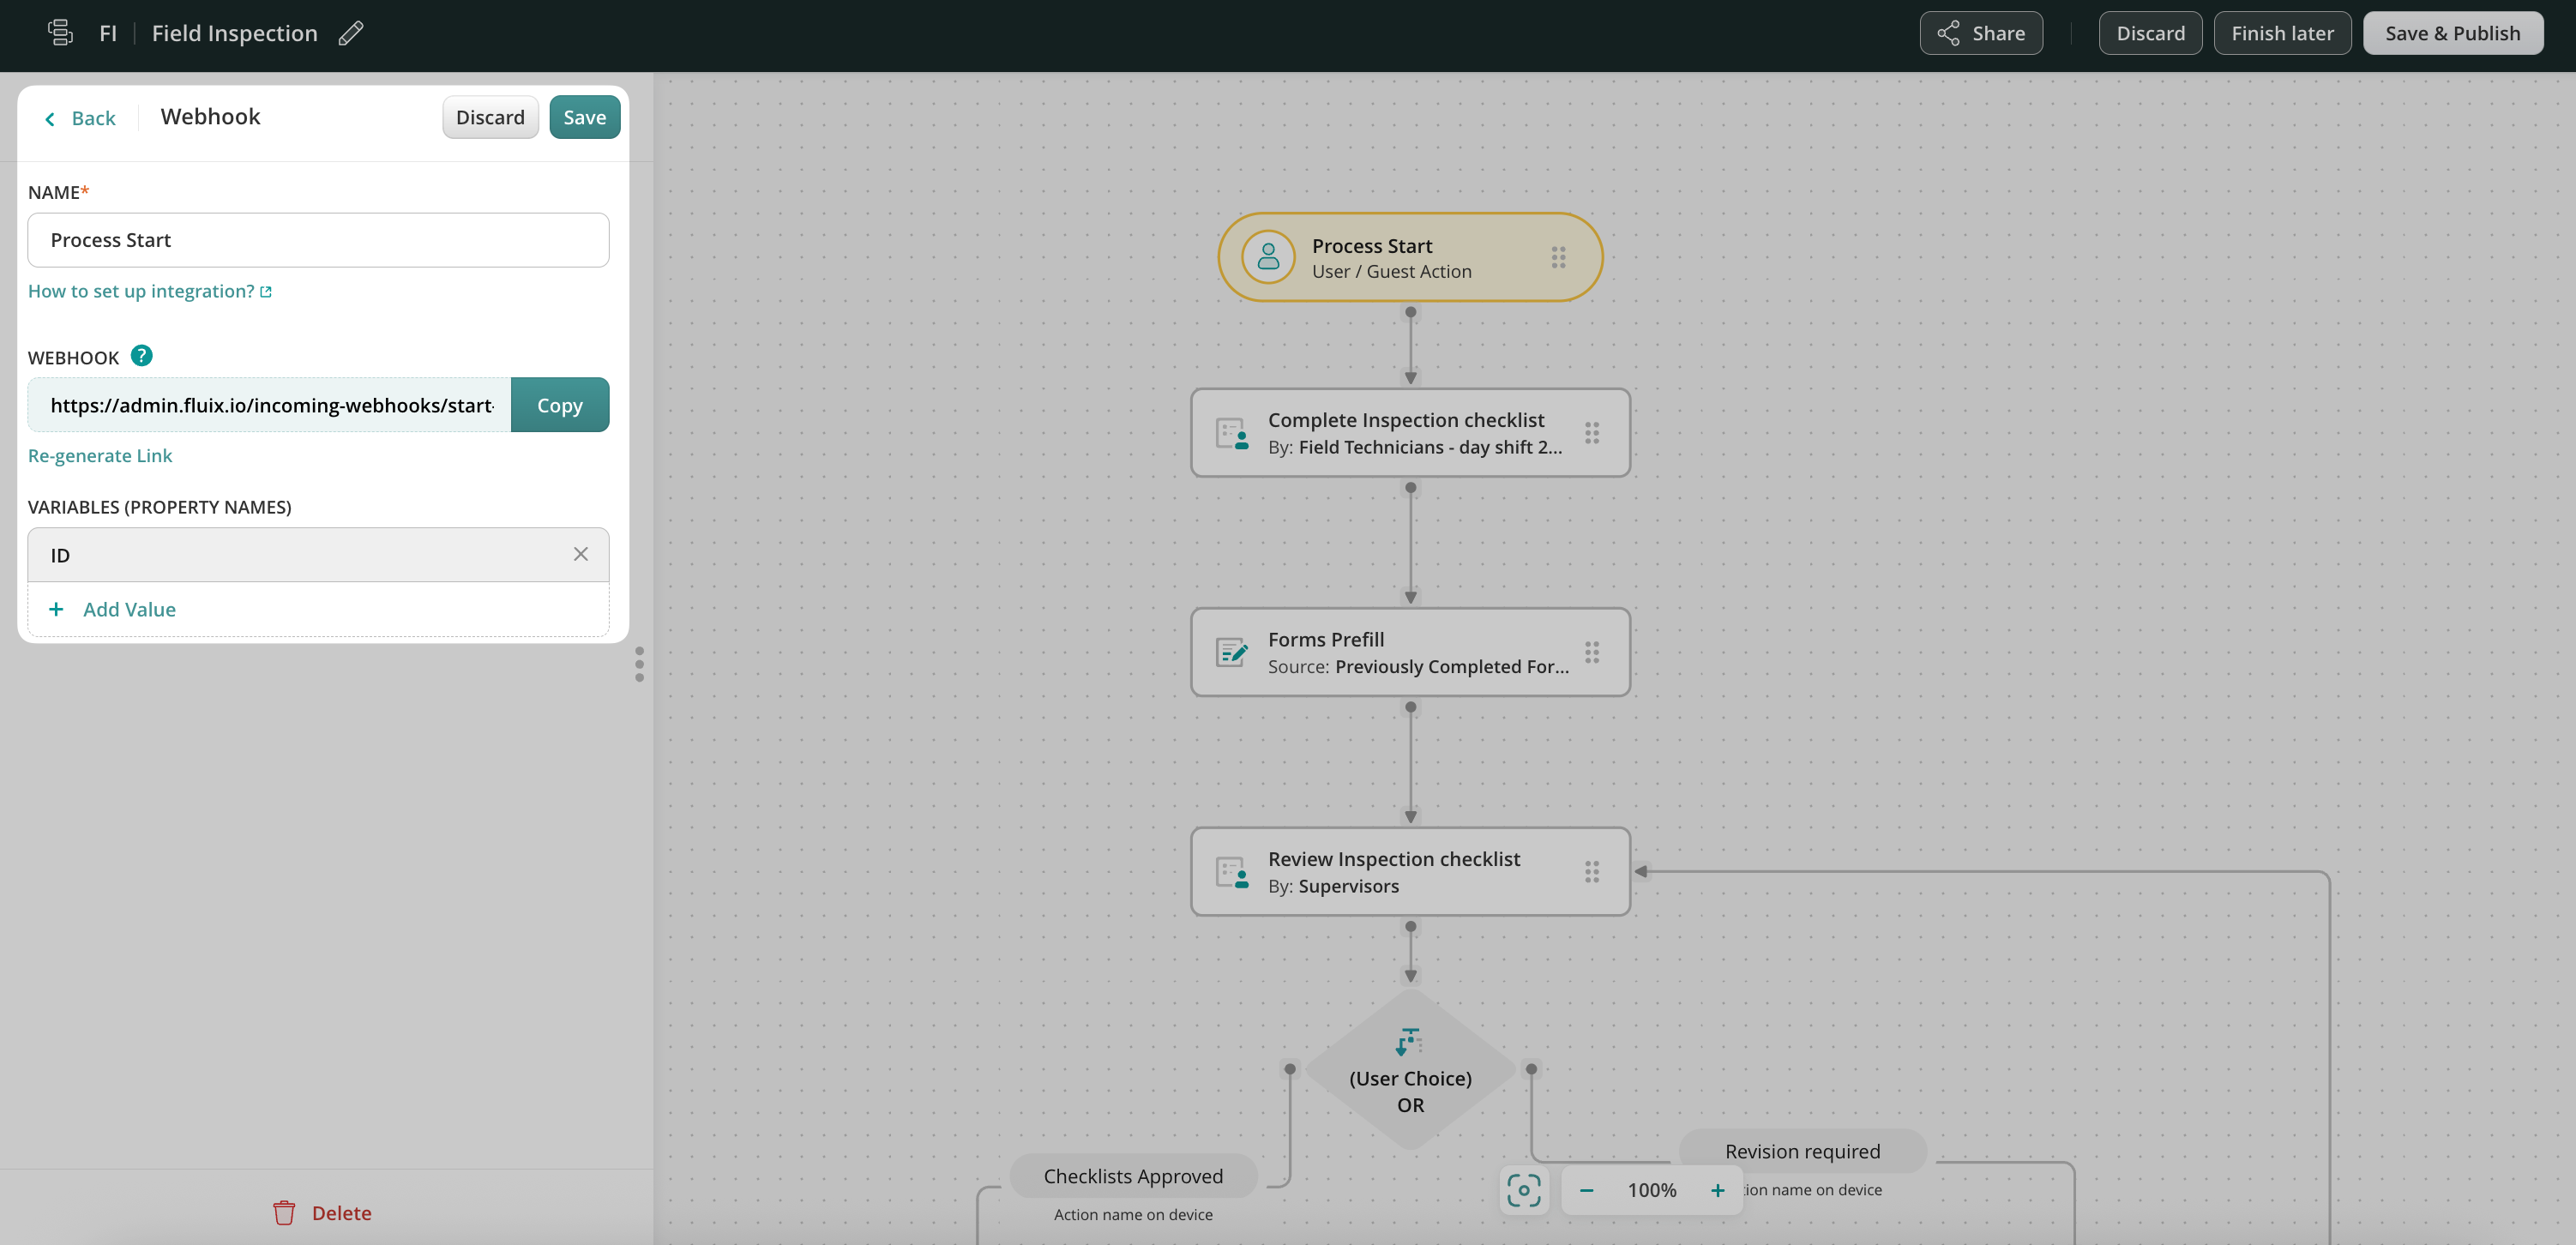
Create a workflow with a Process start option and select External Software Trigger from the list of options. Copy the webhook from Fluix to put into your tool and select possible variables.
Add the Possible Variables (property names) from the third-party tool that you would like to integrate.
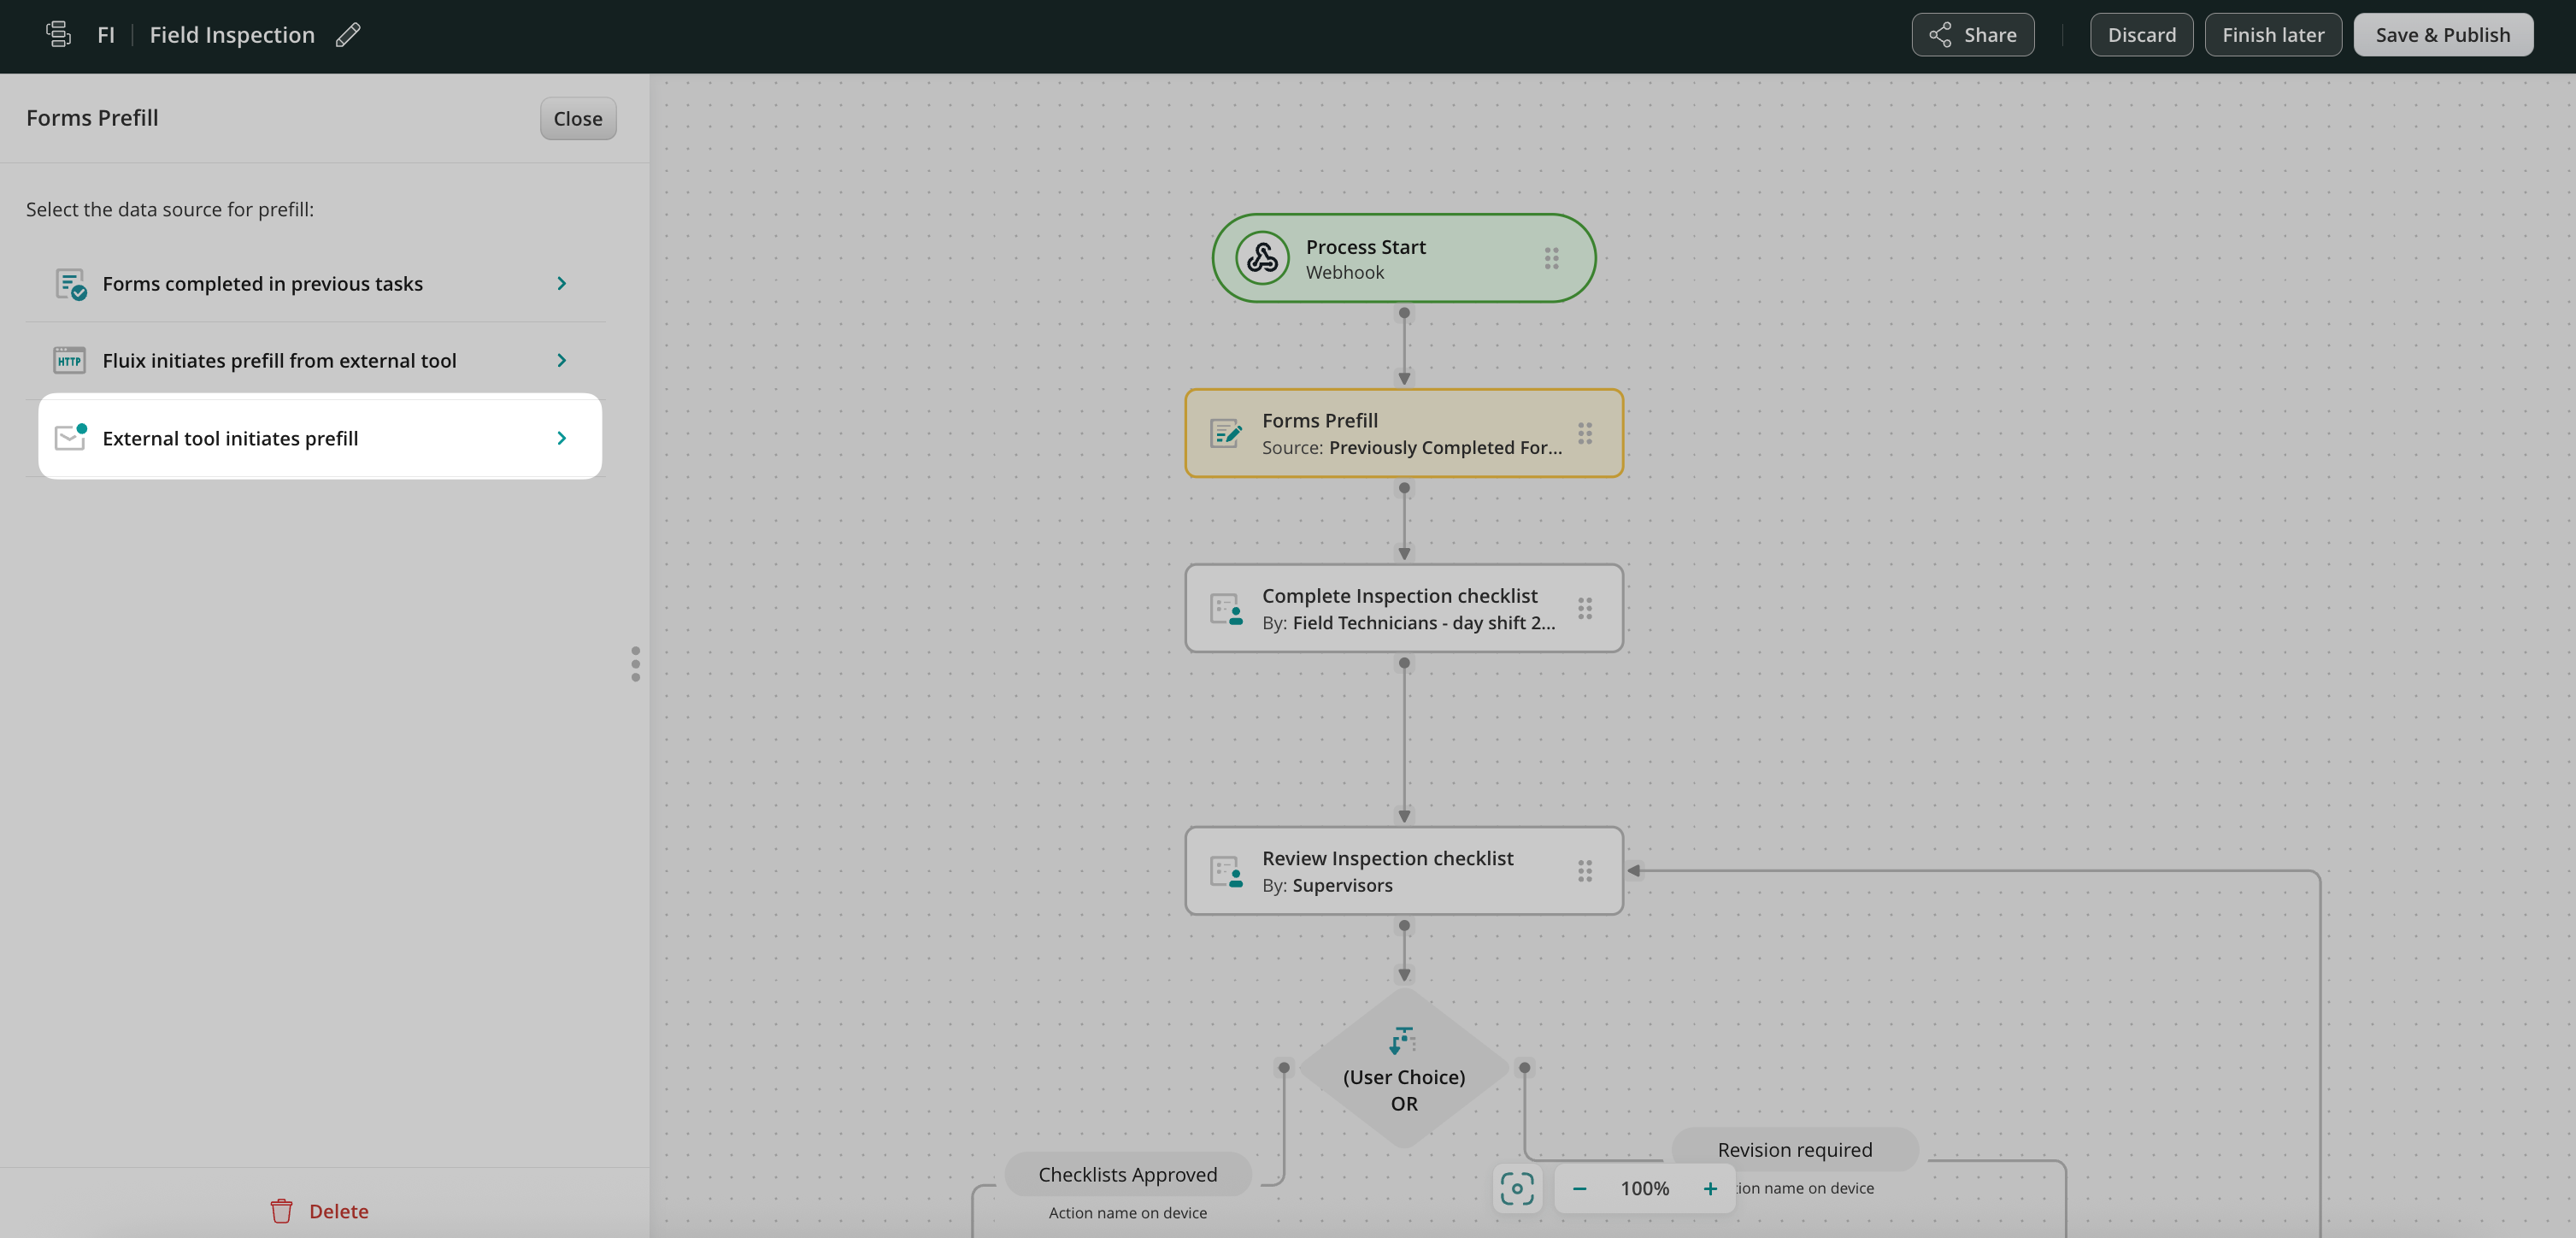
Step 2 – Create a Form Prefill from a Third-party Tool
Drag and drop the Form prefill element to the workflow chart, and it will be automatically connected with the Process Start Event. Click on the Forms Prefill element and select External tool initiates prefill.
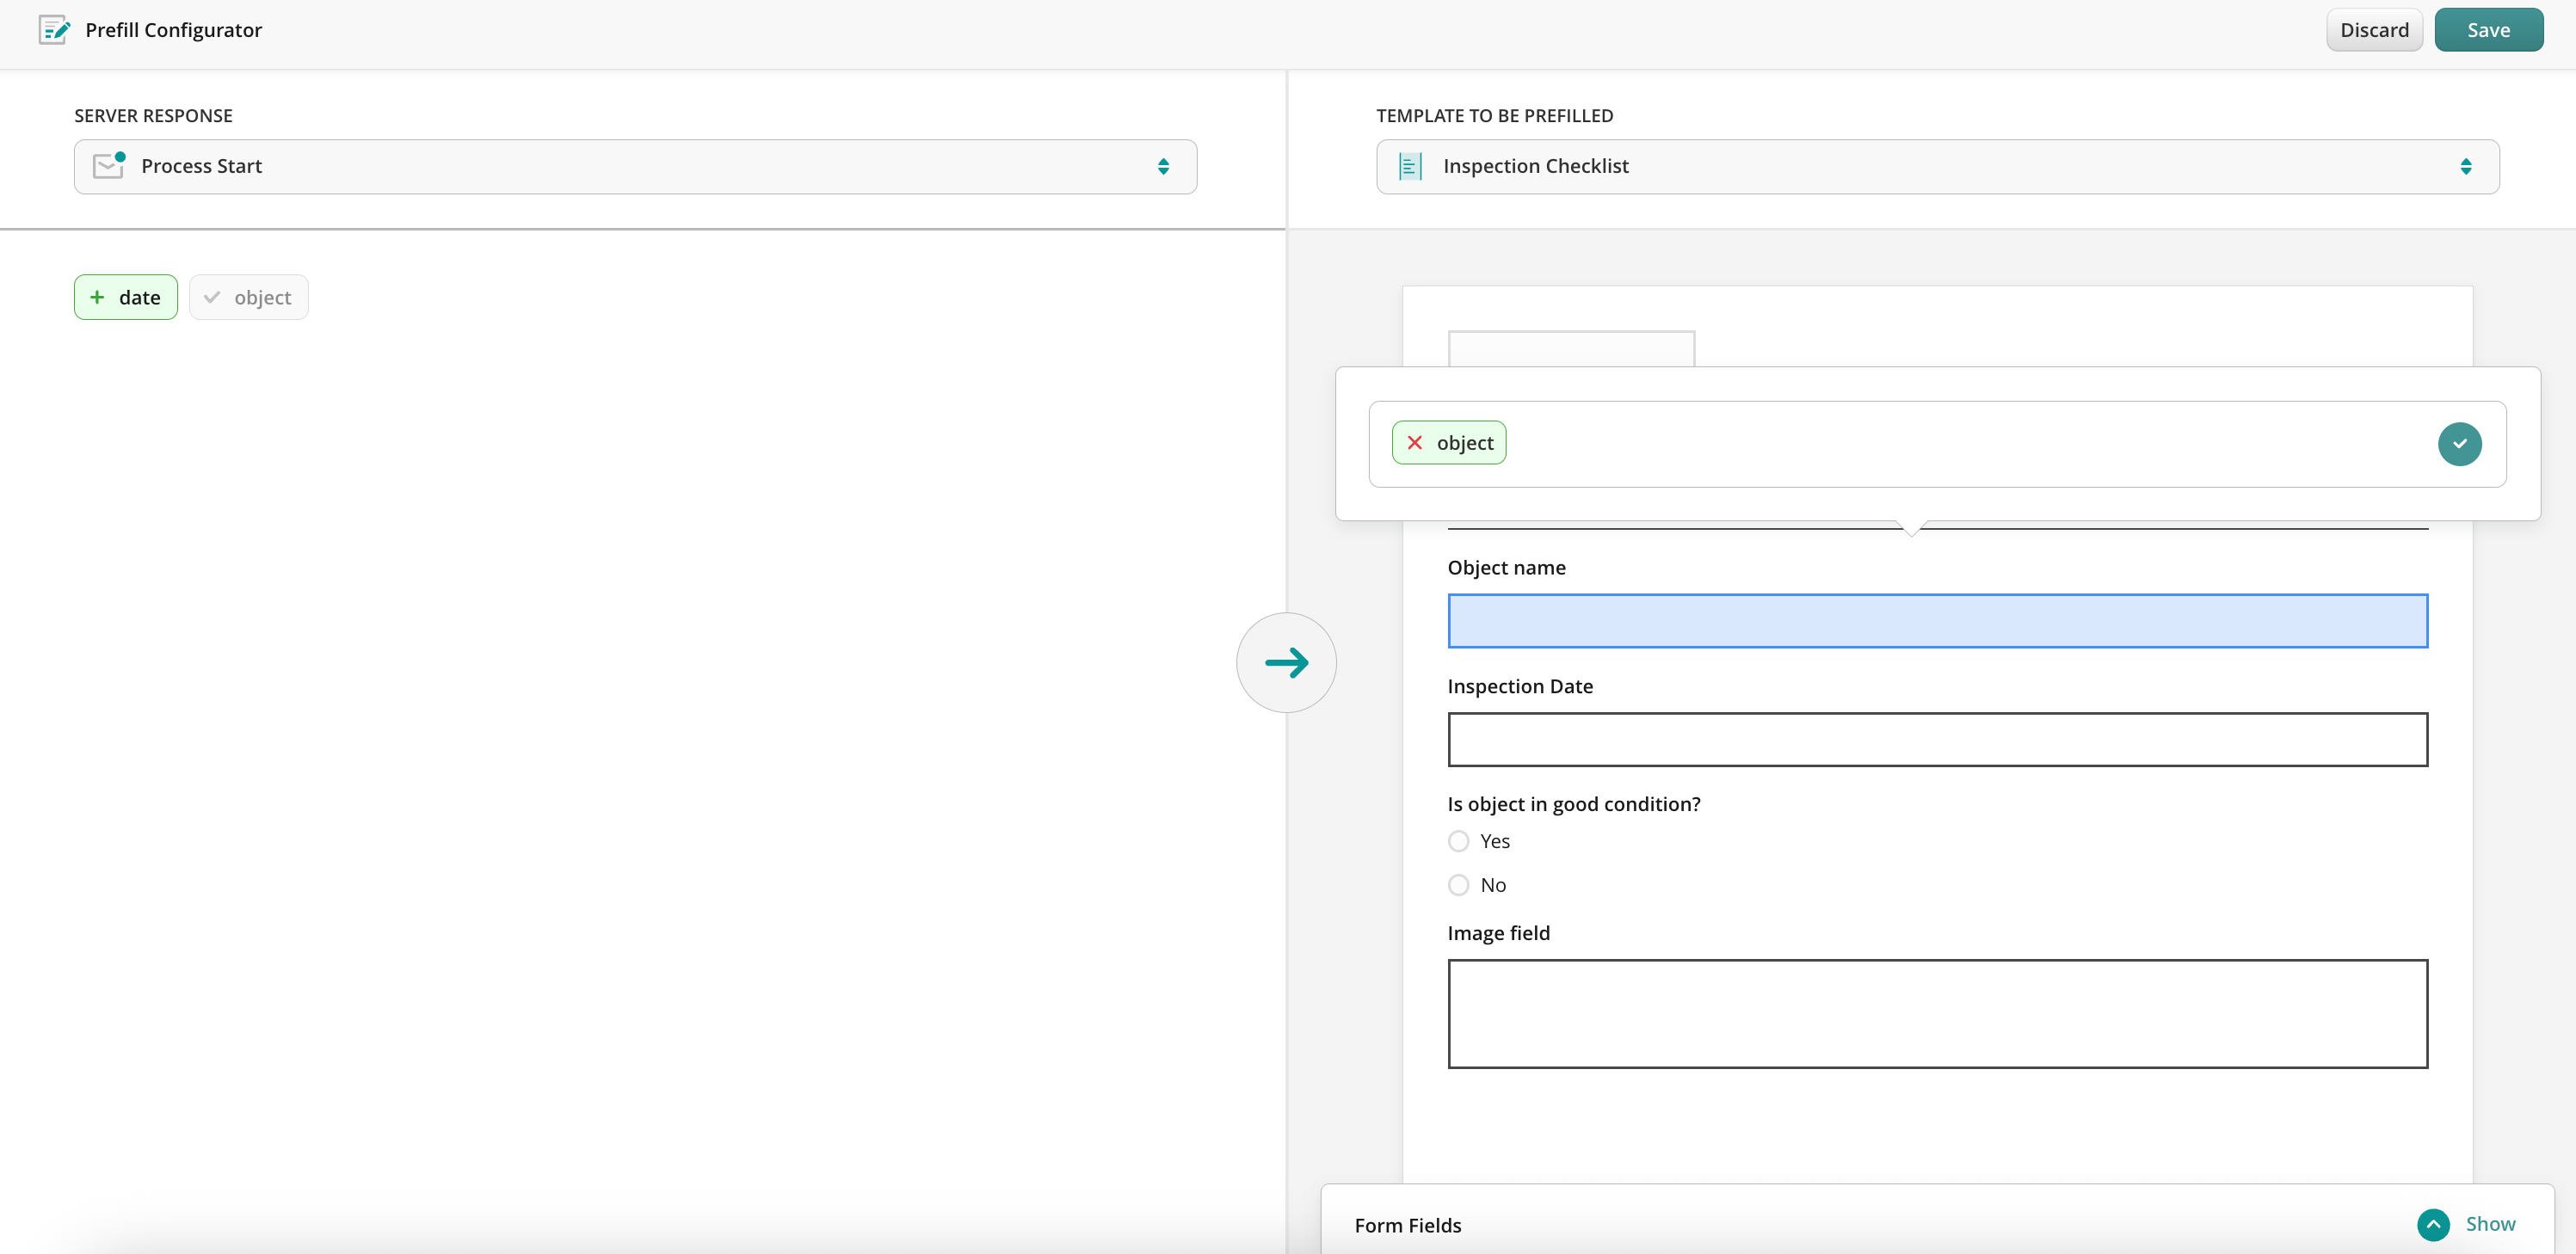
Add a form to be prefilled and open Prefill Configurator. There you will map the fields from the server response to a template to be prefilled.
By clicking on the field, in a server response, you will be suggested to match it with the field in the template form.
Step 3. Create User or Guest Task
Drag and drop the User or Guest task, connect the task with the previous action, and configure it: For the User task: add the description of the task, and add the Group to whom this task will be assigned. In the Forms and Attachments section, add the form by selecting the Used in the workflow option. For the Guest task: add the description of the task that will help the Guest to understand what they need to do with the form from the task and configure the way the Guest will receive the form in the Recipient section.
Step 4 – Configure the final destination for the form
When the User/Guest completes the task, it will be automatically pushed down the process. For example, the document can be sent for approval, and after that, it can be uploaded directly to the Cloud Storage or any Third-party Storage. Alternatively, the data from the completed forms can be shared to the third-party tool or the completed document can be simply shared by email.
Once configured, save and publish the workflow, to make the data flow seamless and accurate.
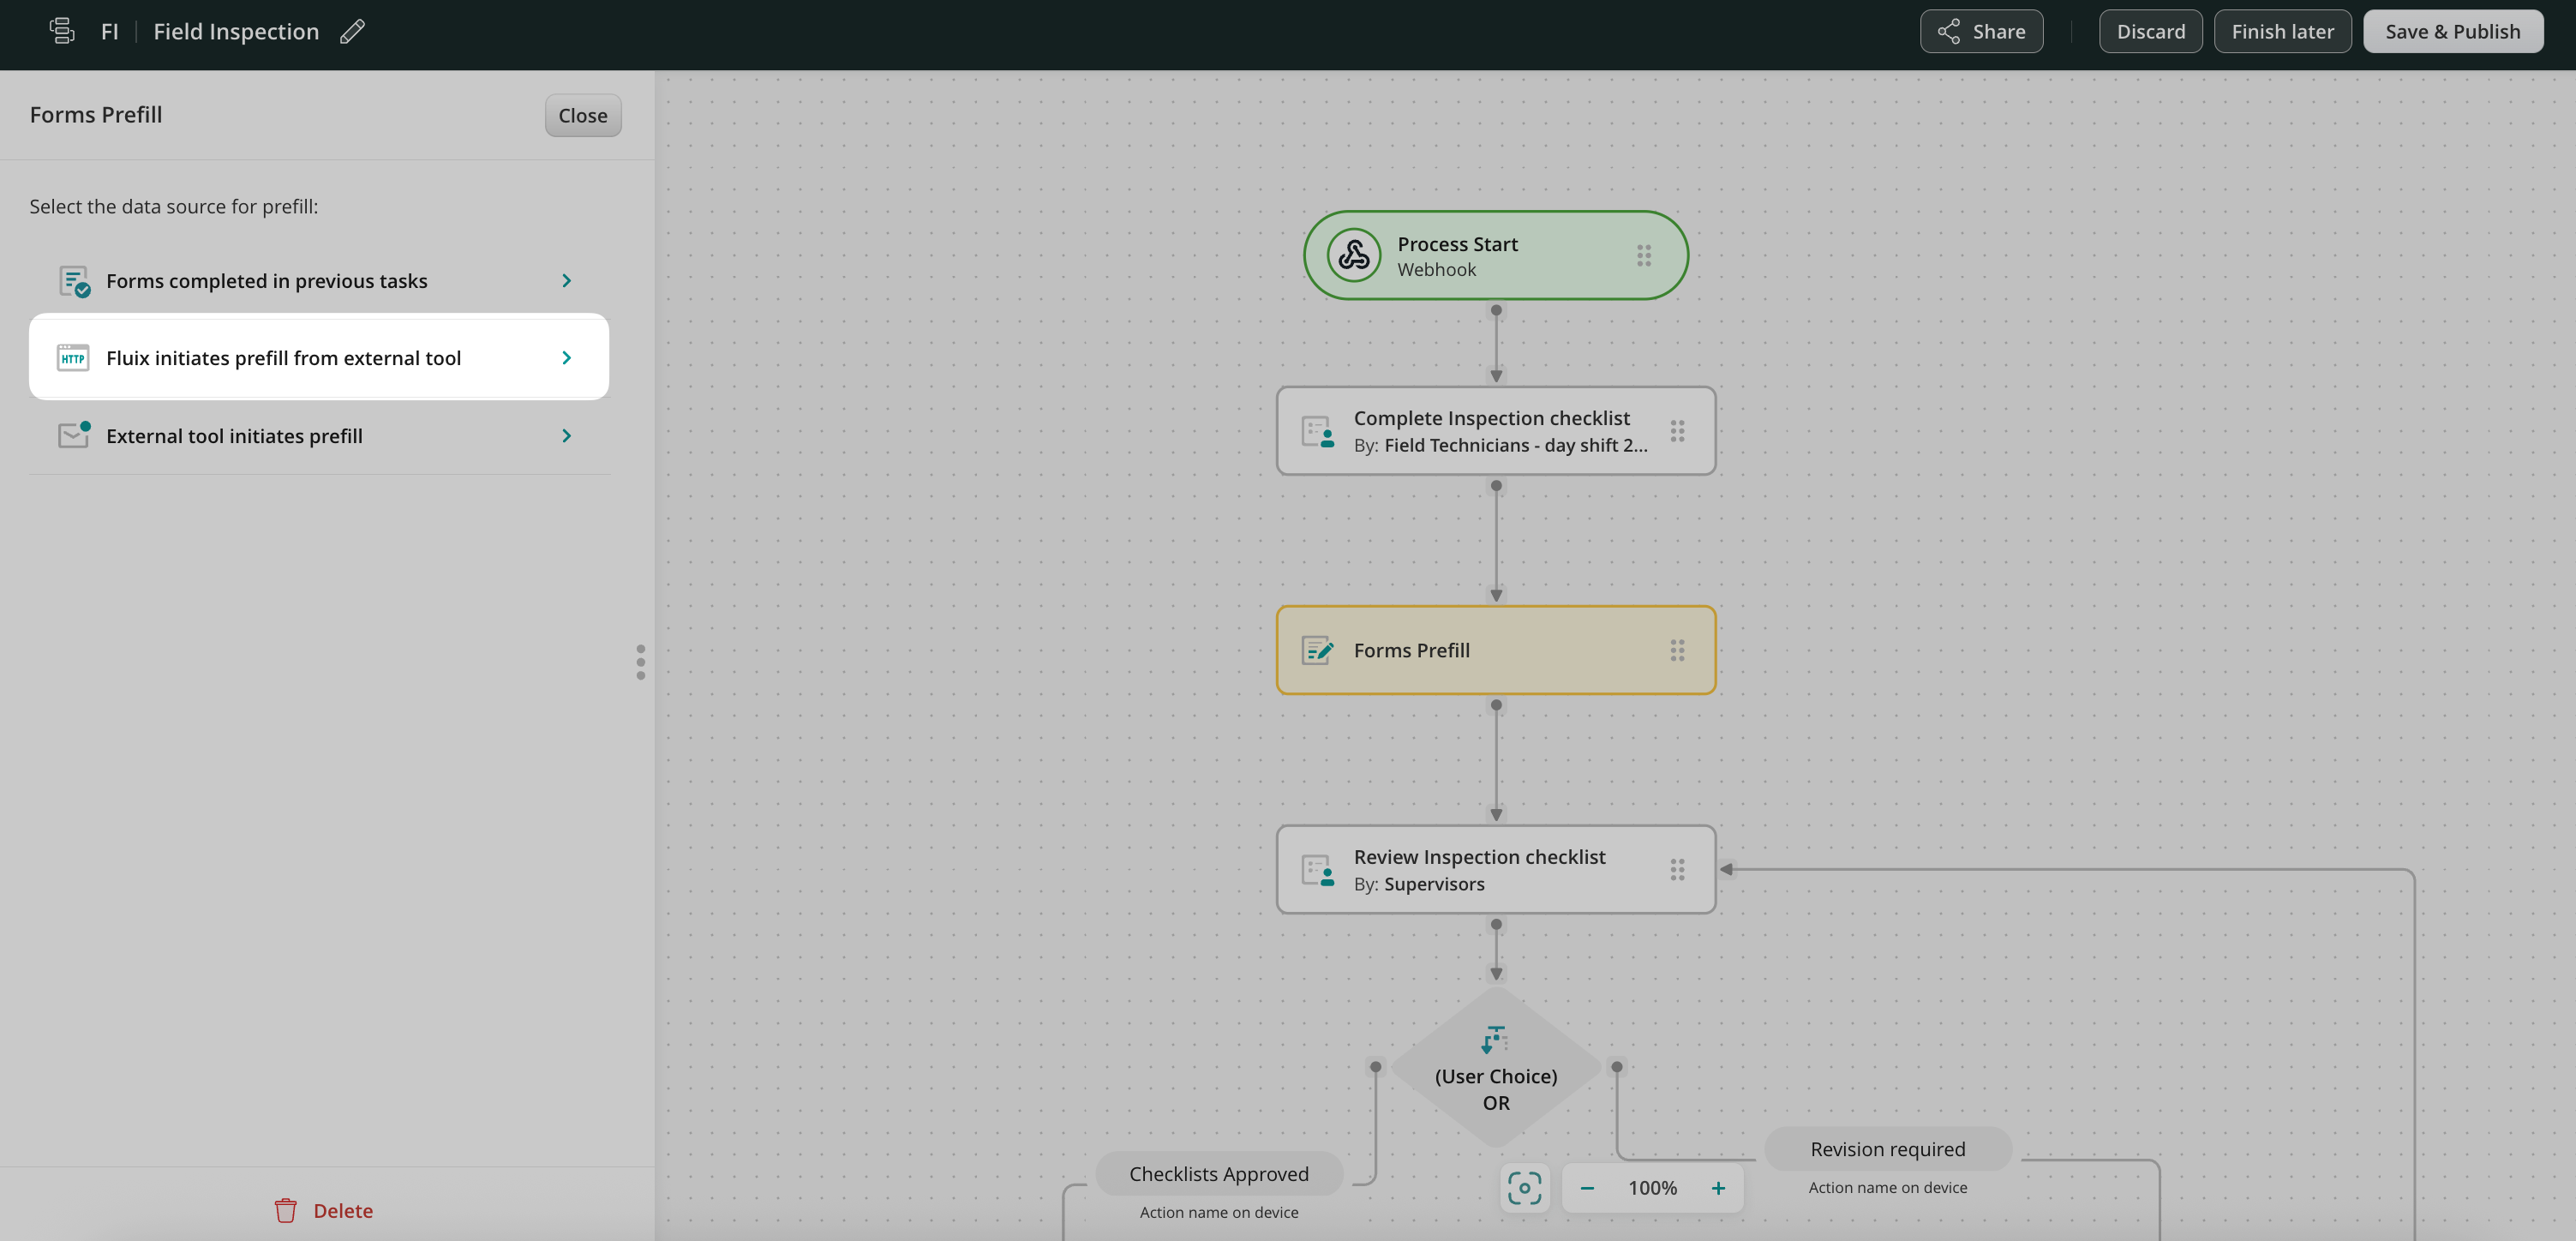
Scenario 3: Fluix initiates prefill from Third-party Tool
In this case, form prefill is performed using the data from the third-party tool. The prefill is done in the middle of the process and should be followed by any other submit action.
To set up such a flow in Fluix, you’ll need to follow the steps below.
Step 1 – Create a workflow in Fluix
Create a workflow with a process that includes a series of repetitive User tasks for your teams, and Forms Prefill action between them. Each team will be assigned a task containing fillable forms.
Step 2 – Create a form prefill from external tool
To configure the prefill from an external tool to the form, in the Forms Prefill action, select Fluix initiates prefill from external tool and click Configure to set up API integration.
Note: Supported response format is JSON
In the Advanced HTTP Builder, specify the requests and the required parameters needed to perform prefill to the form. If you require any assistance during this step, please reach out to Fluix team at support@fluix.io and we’ll help you set up the integration taking into account your project-specific requirements.
After configuration is completed add a form to be prefilled and open Prefill Configurator. There you will map the fields from the server response to a template to be prefilled.
Step 3. Create User or Guest Task
Drag and drop the User or Guest task, connect the task with the previous action, and configure it: For the User task: add the description of the task, and add the Group to whom this task will be assigned. In the Forms and Attachments section, add the form by selecting the Used in the workflow option. For the Guest task: add the description of the task that will help the Guest to understand what they need to do with the form and configure the way the Guest will receive the form in the Recipient section.
Step 4. Configure the final destination for the form
When the User/Guest completes the task, it will be automatically pushed down the process. For example, the document can be sent for approval, and after that, it can be uploaded directly to the Cloud Storage or any Third-party Storage. Alternatively, the data from the completed forms can be shared to the third-party tool or the completed document can be simply shared by email.
Once configured, save and publish the workflow, to make the data flow seamless and accurate.
In case you have any questions or difficulties with setup, contact our support at support@fluix.io and we’ll be happy to help you.
Was this article helpful?
Thanks for your feedback!
Oops, something went wrong. Please, try again later.
Thank you!
What details or examples would have made this article more helpful for you? We appreciate your insights!
The External user is a person whom you can invite to collaborate with your team on a task, sign a contract, or fill in a form without even adding this person to the Fluix system. There can be someone from your or any other organization involved in a specific project or team to work on specific tasks. Here are some examples:
Subcontractors that work on the same project with your employees
Clients that receive documents to review and sign them remotely
Employees in your organization who need to fill in forms periodically
Students who pass training and do their paperwork and get a copy
What’s the difference between an External user and a Regular FluixUser?
External user:
No registration is needed (follow the link to access the task)
No need to download the app, accessible from any device in any web browser
Work on one task at a time
Online access
Regular Fluix User:
Admin needs to set up an account and provide access to tasks
iOS and Android app, Web app
Access to multiple tasks in the app
Online and offline access
How to set up the External Task in the process?
First, you’ll need to decide whether the External user is the one who starts the process or joins in the middle of it. Based on this choice, the way the External task can be set up will be different. Let’s look at 2 real-life scenarios as examples of configuring such tasks:
Scenario 1: Externaluser starts the process – the Subcontractor enters the field, opens Fluix as the External User, and fills out the checklist related to this location. Once done, the checklist is sent to the Supervisor – Fluix user for review.
Scenario 2: Externaluser is in the middle of a process – the Salesperson as a Fluix user fills out the contract in the app and sends it to the Client as a Externaluser for review, signing, and sending further down the workflow.
Scenario 1: Externaluser starts the process
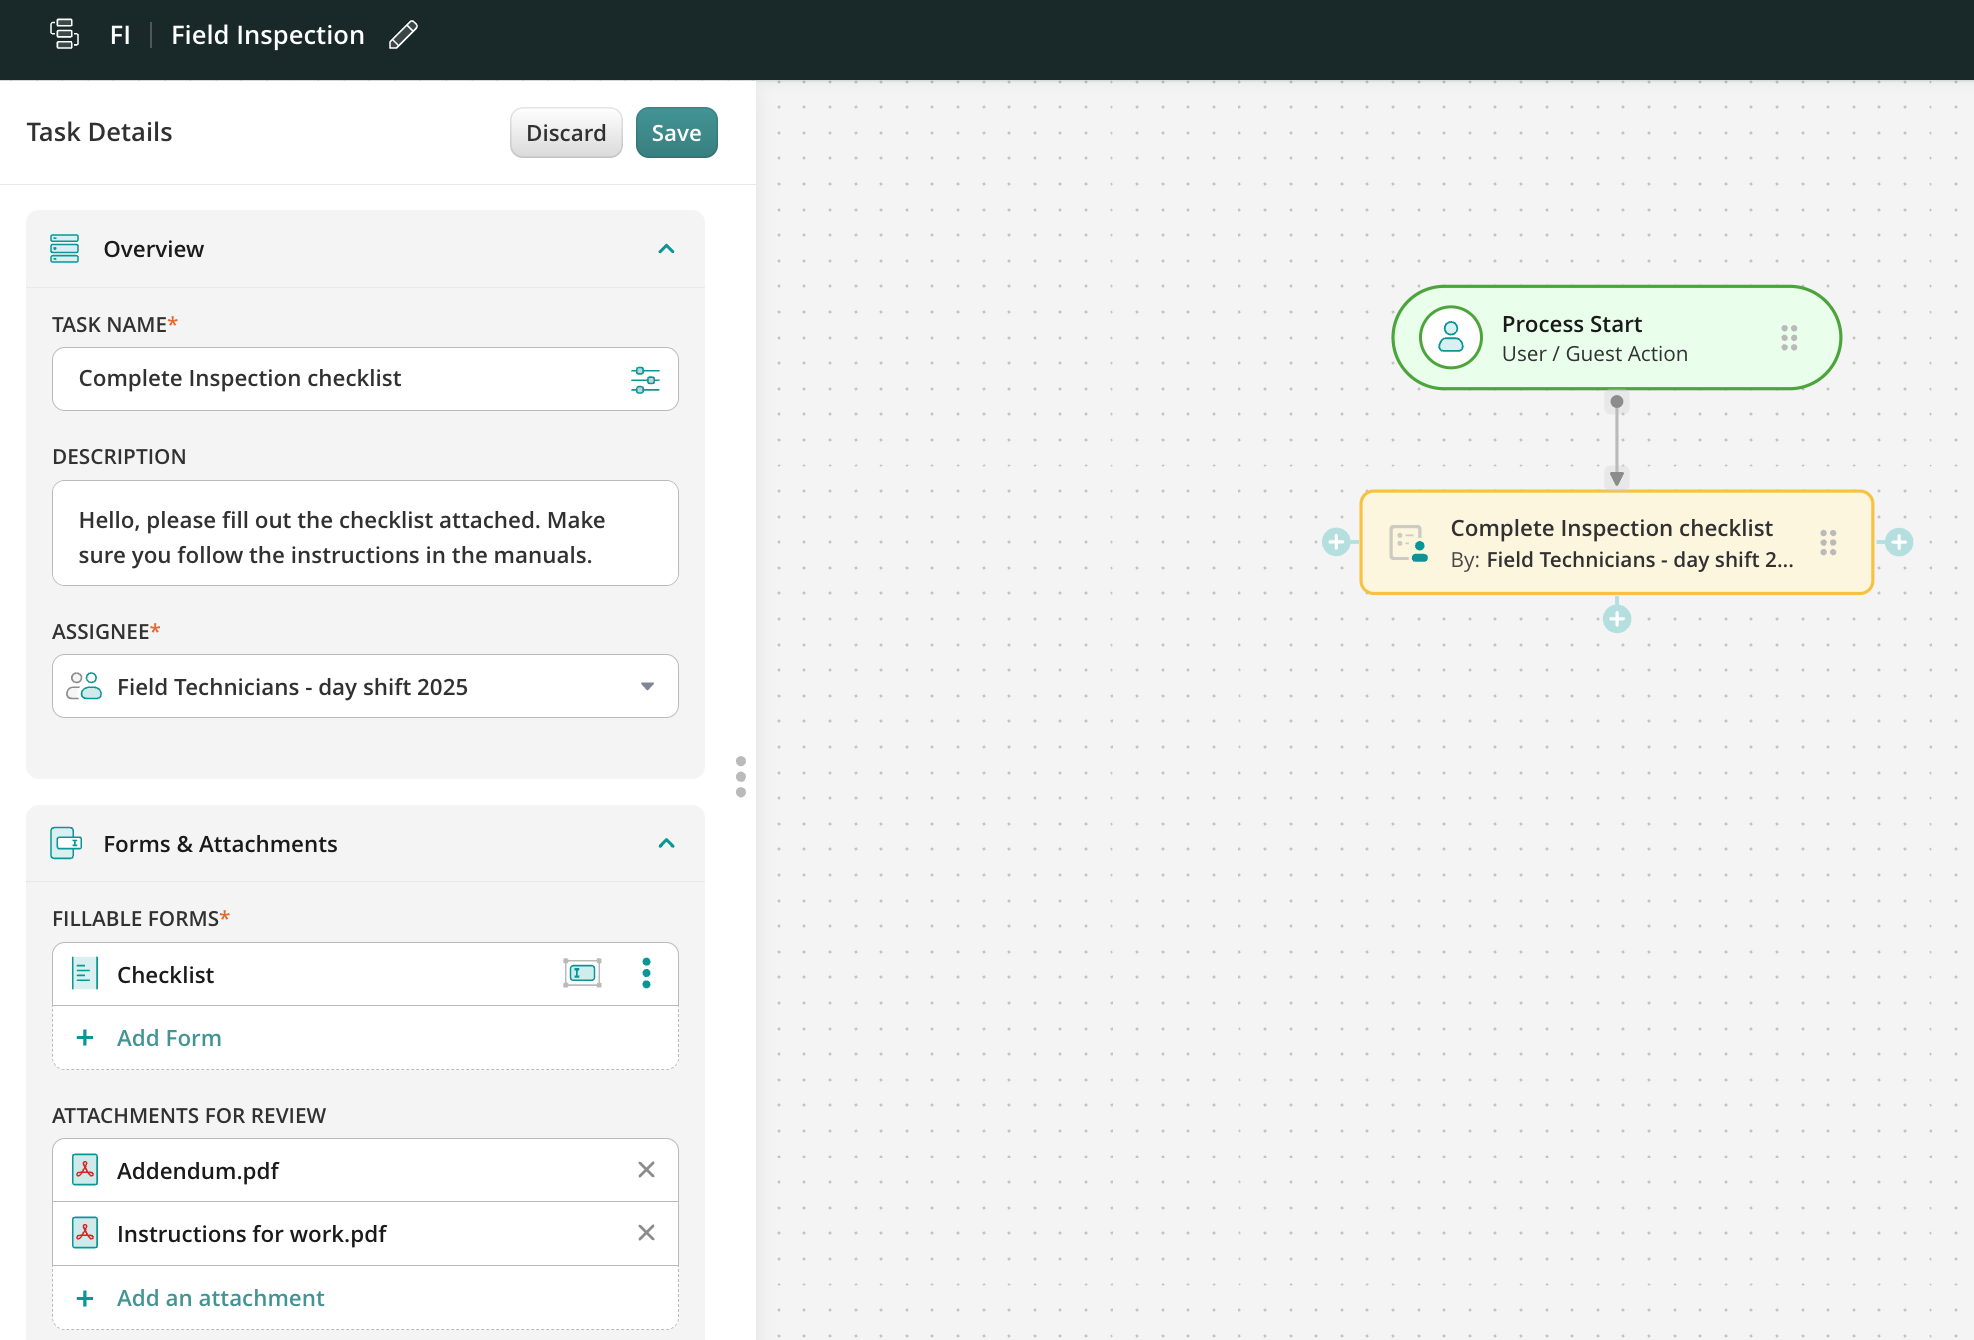
Step 1 – Create a task and add a form.
Navigate to the Fluix Admin Portal, create a new workflow, and configure the first task for Subcontractors who will fill out a checklist.
To do this, drag and drop the Process Start and User task elements from the sidebar on the left to the working area. Once done, select the External User option in the Assignee section.
Fill out the task name and description that will be displayed to the External User, and add a checklist in the Forms tab.
Step 2 – Copy a link for External User to access the task.
In the Recipient tab, you will see two options how such task can be shared with the External User:
You may share the public link for providing access to the task for non-Fluix users. Such links are automatically generated, however, you can manually regenerate them if necessary upon clicking the Re-generate Link button.
You may also create QR Code that the external user can scan to be redirected to the preconfigured workflow form. By tapping Create QR Code option, the new window with the options that you can add to the QR code image will be shown, select the preferable options (e.g. Task Name, Task Description or Company logo), and click the Download button. After that, select the form in which you would like to save the created QR code (PNG, PDF).
Step 3 – Decide on the task or action that will follow the External task.
When the external user completes the task, it will be automatically pushed down the process. You may decide on the action or set of those that will be taken to continue or finish the flow. For example, the checklist can be sent to the Supervisor for review and then emailed to the office or uploaded to the cloud storage.
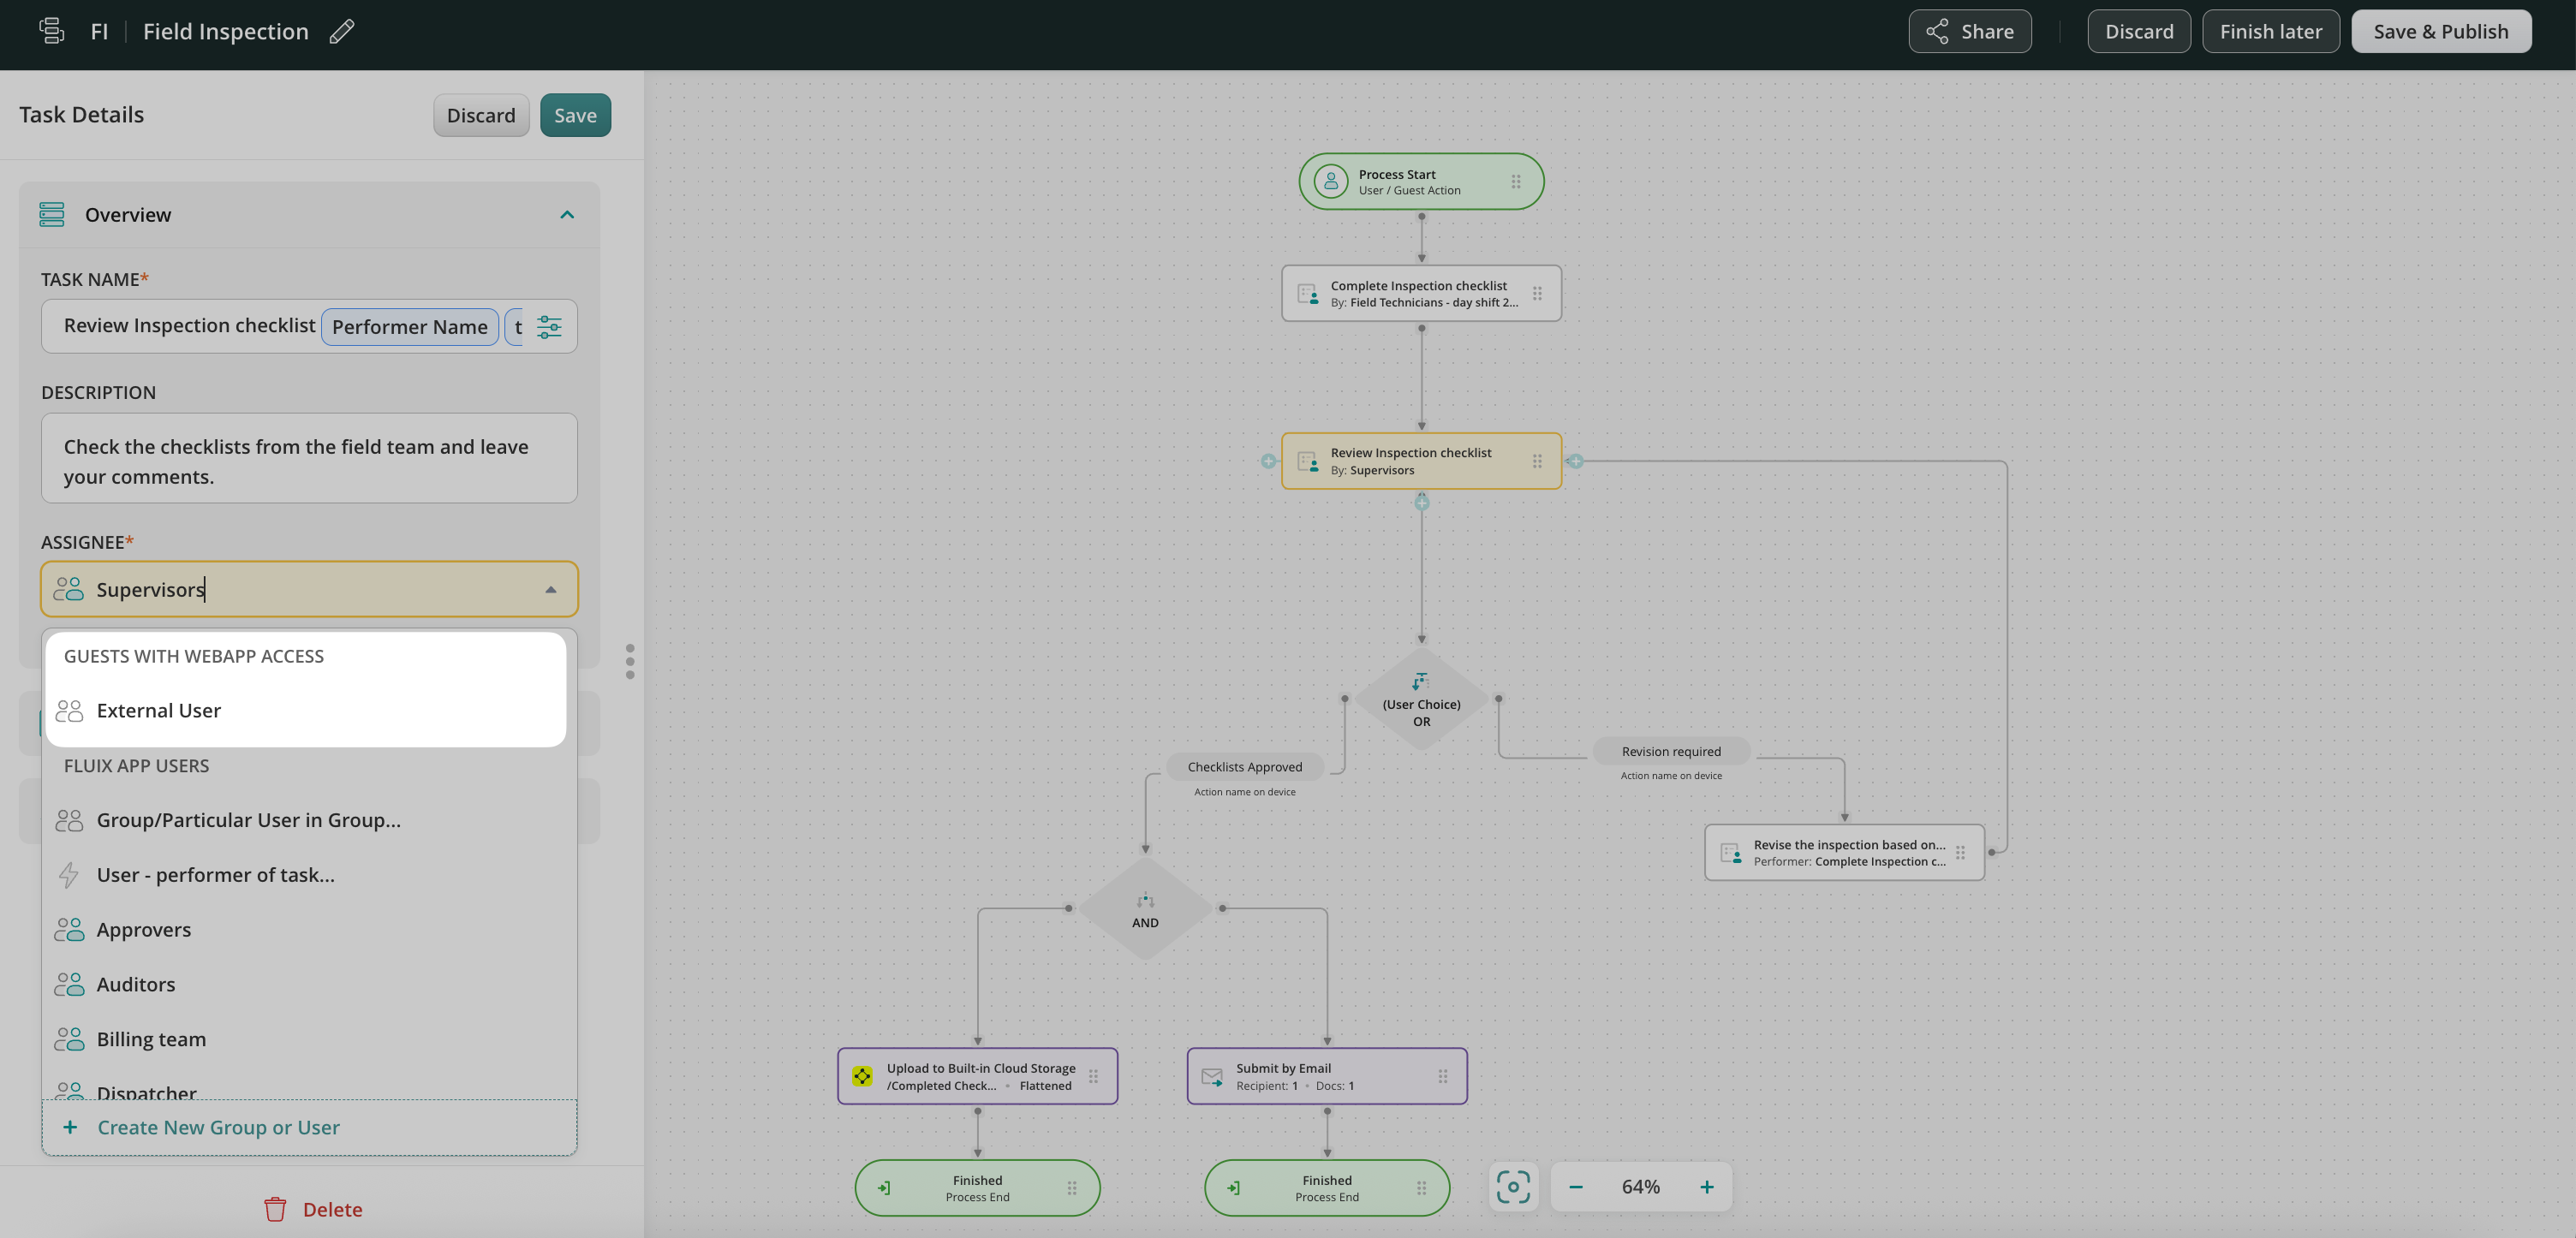
Scenario 2: External user is in the middle of a process
Step 1 – Create the initial flow before adding the External task.
Navigate to the Fluix Admin Portal, create a new workflow, and configure the first task for the Sales Managers who will fill out the contract.
Step 2 – Add an External task to the workflow.
Drag and drop the User task from the sidebar on the left to the working area. In the Assignee section, select External user and connect the task with the previous action or task by an arrow.
Fill out the task name and description displayed to the External user and specify the due date if needed.
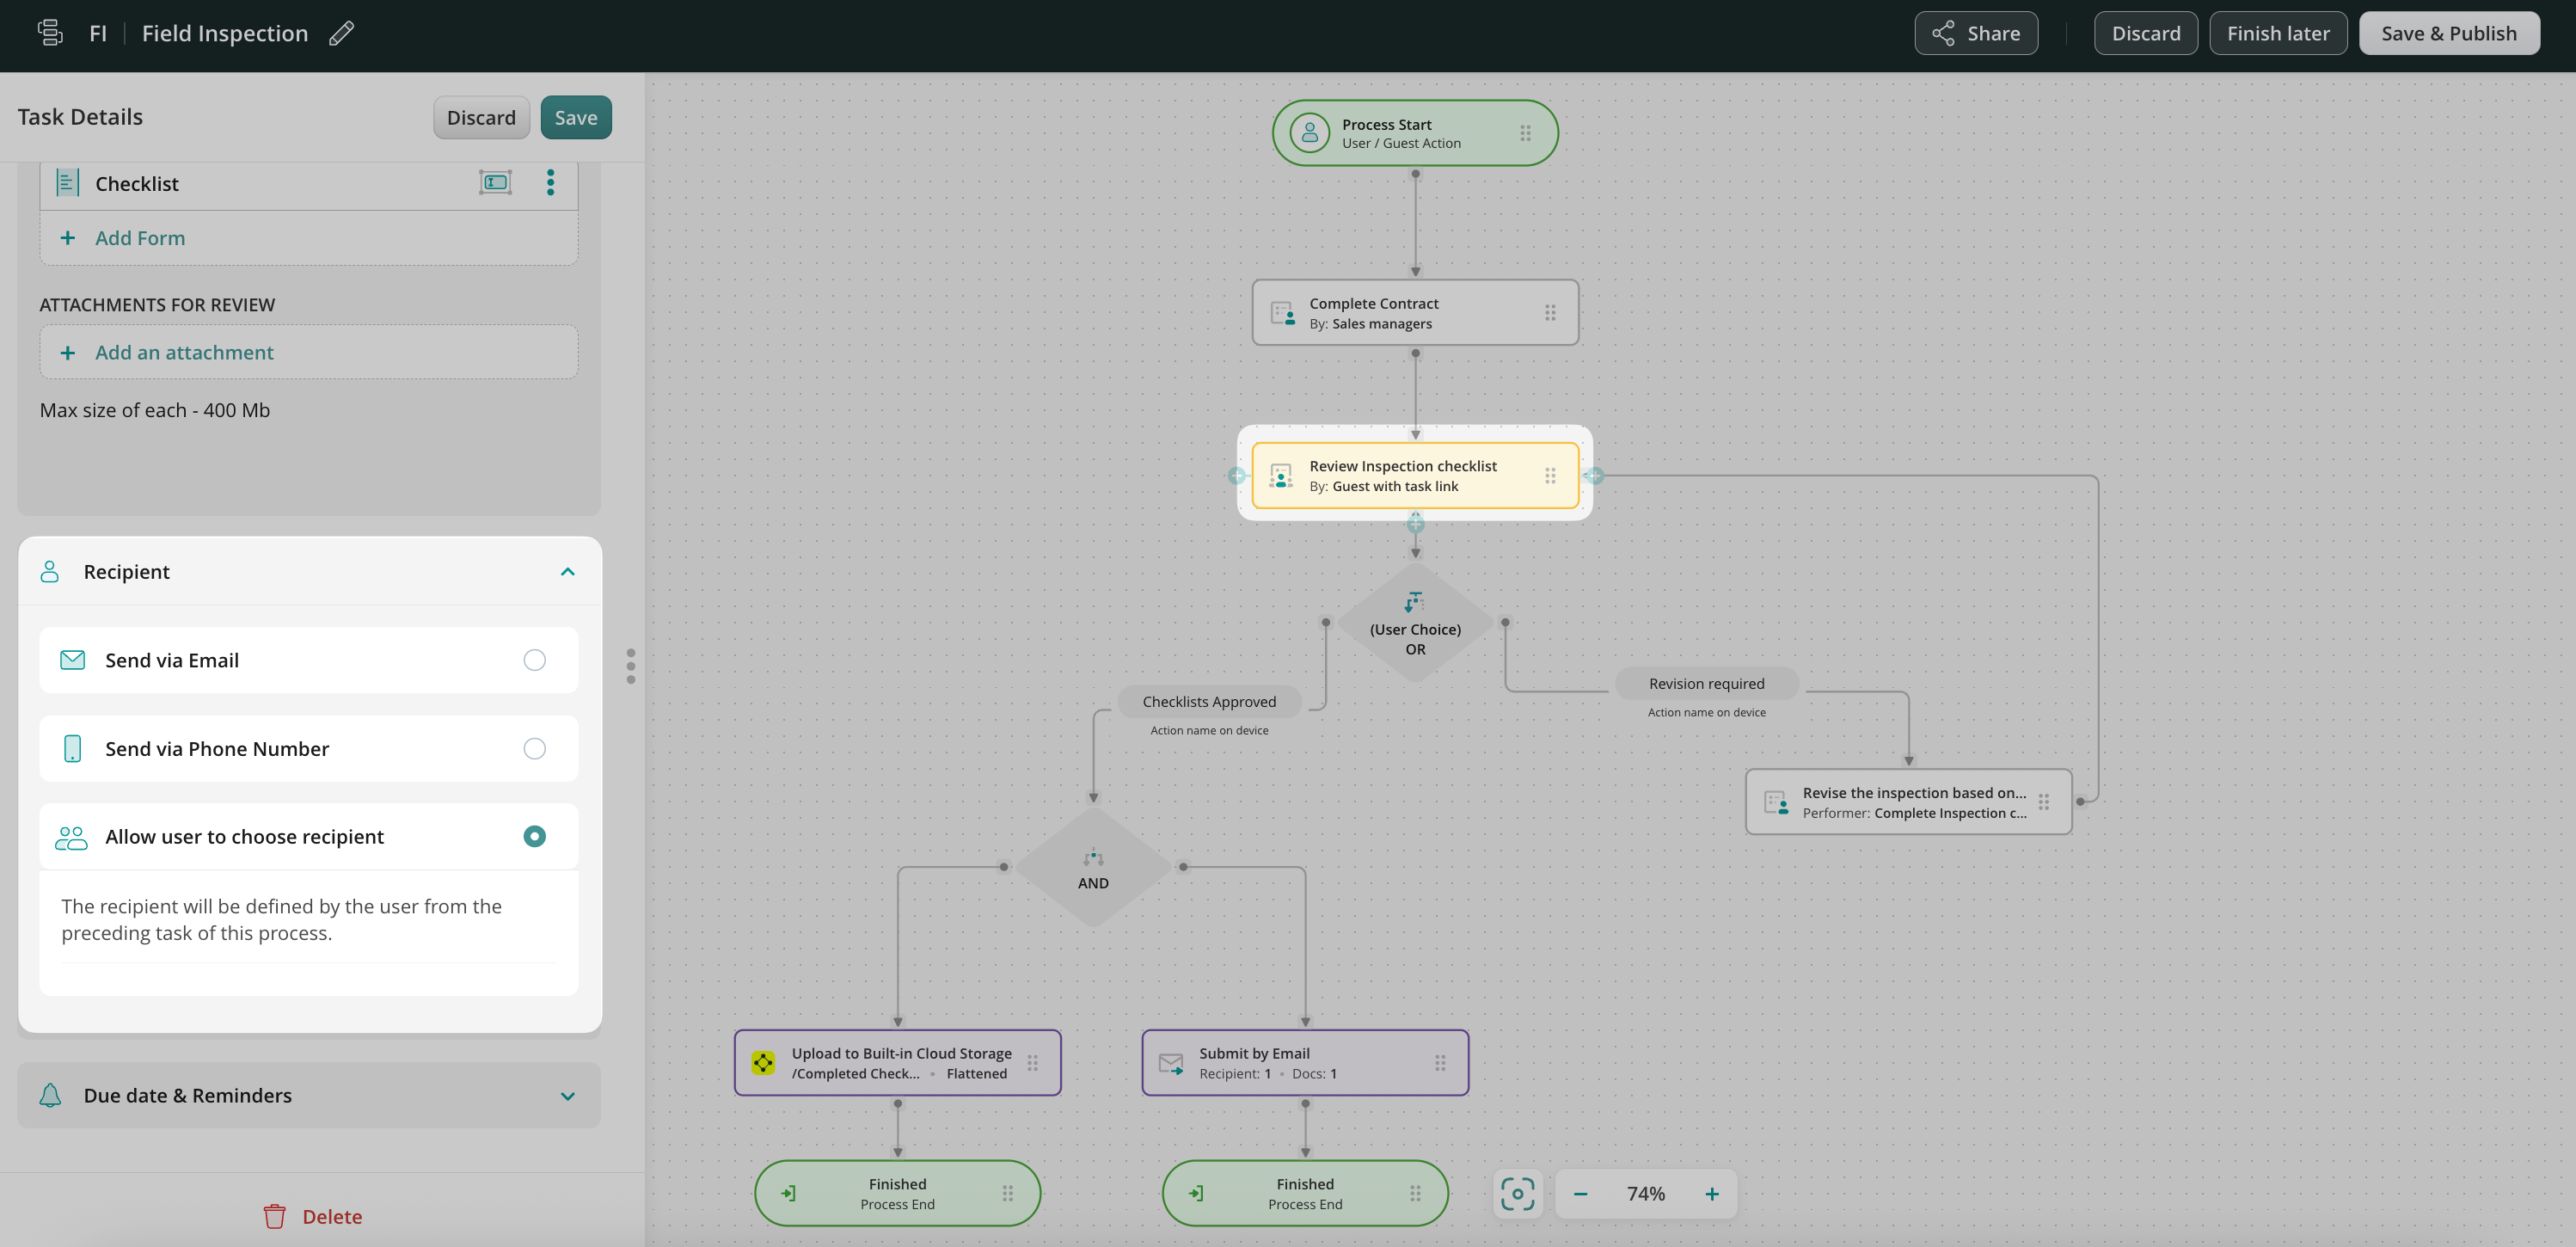
Step 3 – Configure the Recipient for the External task and set reminders.
There are three options for how the user from the preceding task can send the email to the Recipient, let’s look closer at each of them.
1) Send via Email option Specify the email address to which the task should be delivered or configure the dynamic values to allow users to fill out the email from the form data automatically. Modify the email subject and the text according to your needs.
2) Send via Phone number By configuring this option, the user from the preceding task will be able to fill out the recipient’s phone number upon finishing the task. Once he finishes the task, the link for the External task will be sent to the phone number that the user filled out.
3) Allow users to choose the recipient option By selecting this feature, you give the user from the preceding task an option to decide on his own to whom to send the form/task to. Therefore, upon finishing the task, the user will see the pre-defined subject and the text of the email that he will be able to edit according to his needs and send the task via email to the respective recipient.
Set reminders to notify your external users about the due date for the task or when it’s overdue already.
Step 4 – Decide on the task or action that will follow the External task.
When the External User completes the task, it will be automatically pushed down the process. You may decide on the action or set of those that will be taken to finish the flow. For example, the documents can be sent to the Salesperson for review and after getting approval, they can be emailed back to the office, uploaded to your company’s cloud storage, or sent to any other tool.
How the External user may work in Fluix?
The External user can easily access the task and documents shared with them. Here are the steps:
Follow the link in the received email.
Fill out your name.
Open the task and click on the attached form to open it and start filling it out or signing the documents.
Once all the required data is filled out, click Finish, and the task will be completed and sent according to the preconfigured flow.
FAQ
What can External users do in Fluix?
Guests can access tasks that were shared with them. In tasks, they can:
fill out forms
sign forms
add unlimited photos in forms
read user notes in forms and add new notes for the next participants of the flow
review attachments added by the Admin.
Can External users see each other in the company’s account?
External users have limited access to the task they were invited to collaborate on, and can only see the task shared with them. They may see the Users’ or other Guests’ names only if the previous executors of the task earlier have left some notes in this specific task.
Who can invite External users to the company’s account?
Depending on the setup, there can be several ways of adding External user to the account:
Admin copies and sends the link to the task to Guest
External users may share the link provided by Admin with other External users
Users upon finishing the task, send the email with the link to the External users using the email address specified in the form.
How can a External users be converted to a User or vice versa?
Any External user may become a Fluix User once the User is added to the company Fluix account by Admin. When a new User is created, the invitation email is sent to their email address with the link, upon following which the User will be able to download the app, create a secure password and log into the User account.
Feel free to contact us at support@fluix.io if you have any questions on setup.
Was this article helpful?
Thanks for your feedback!
Oops, something went wrong. Please, try again later.
Thank you!
What details or examples would have made this article more helpful for you? We appreciate your insights!
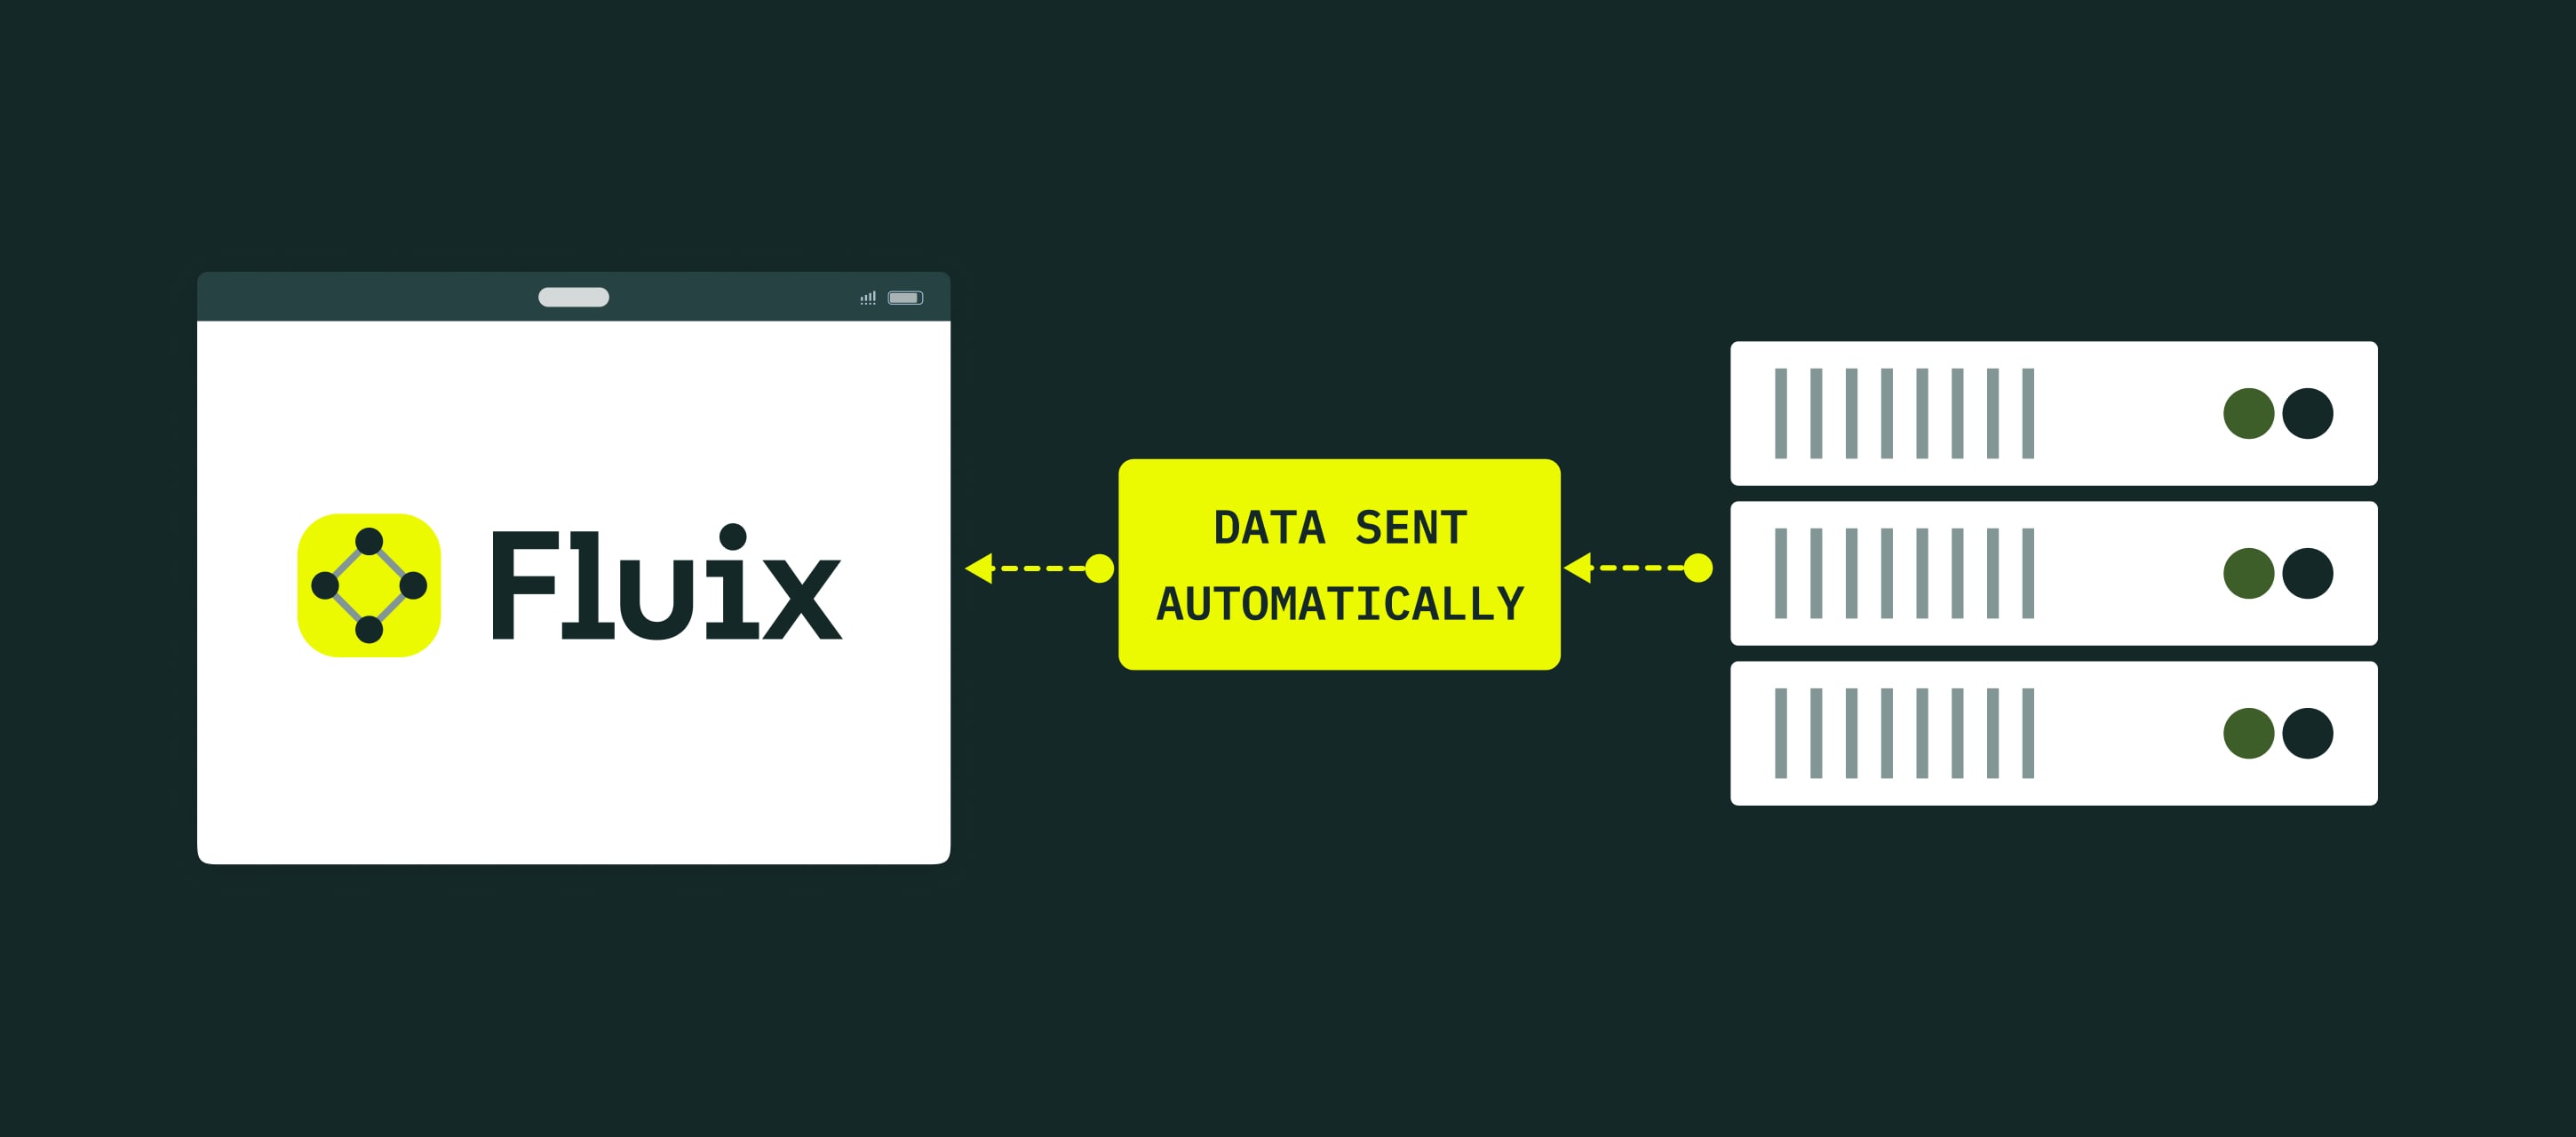
Webhook is an ability to automatically push the data your team enters in forms to the third-party tool in POST values format.
The flow:
Your team member fills out the form in Fluix and clicks Finish.
The data entered in the form is pushed through the URL to a third-party tool depending on your preference in the POST Values format.
In order to set up the webhook integration in Fluix workflow, please follow the instructions below.
Step 1 – Create the repetitive process in Fluix
Navigate to the Fluix admin portal, Workflows section, to create a new workflow. Drag and drop User task and configure it: add fillable forms and assign the task to the team that will complete it on a regular basis. Make sure that you have added yourself to the group of users in order to test the setup later.
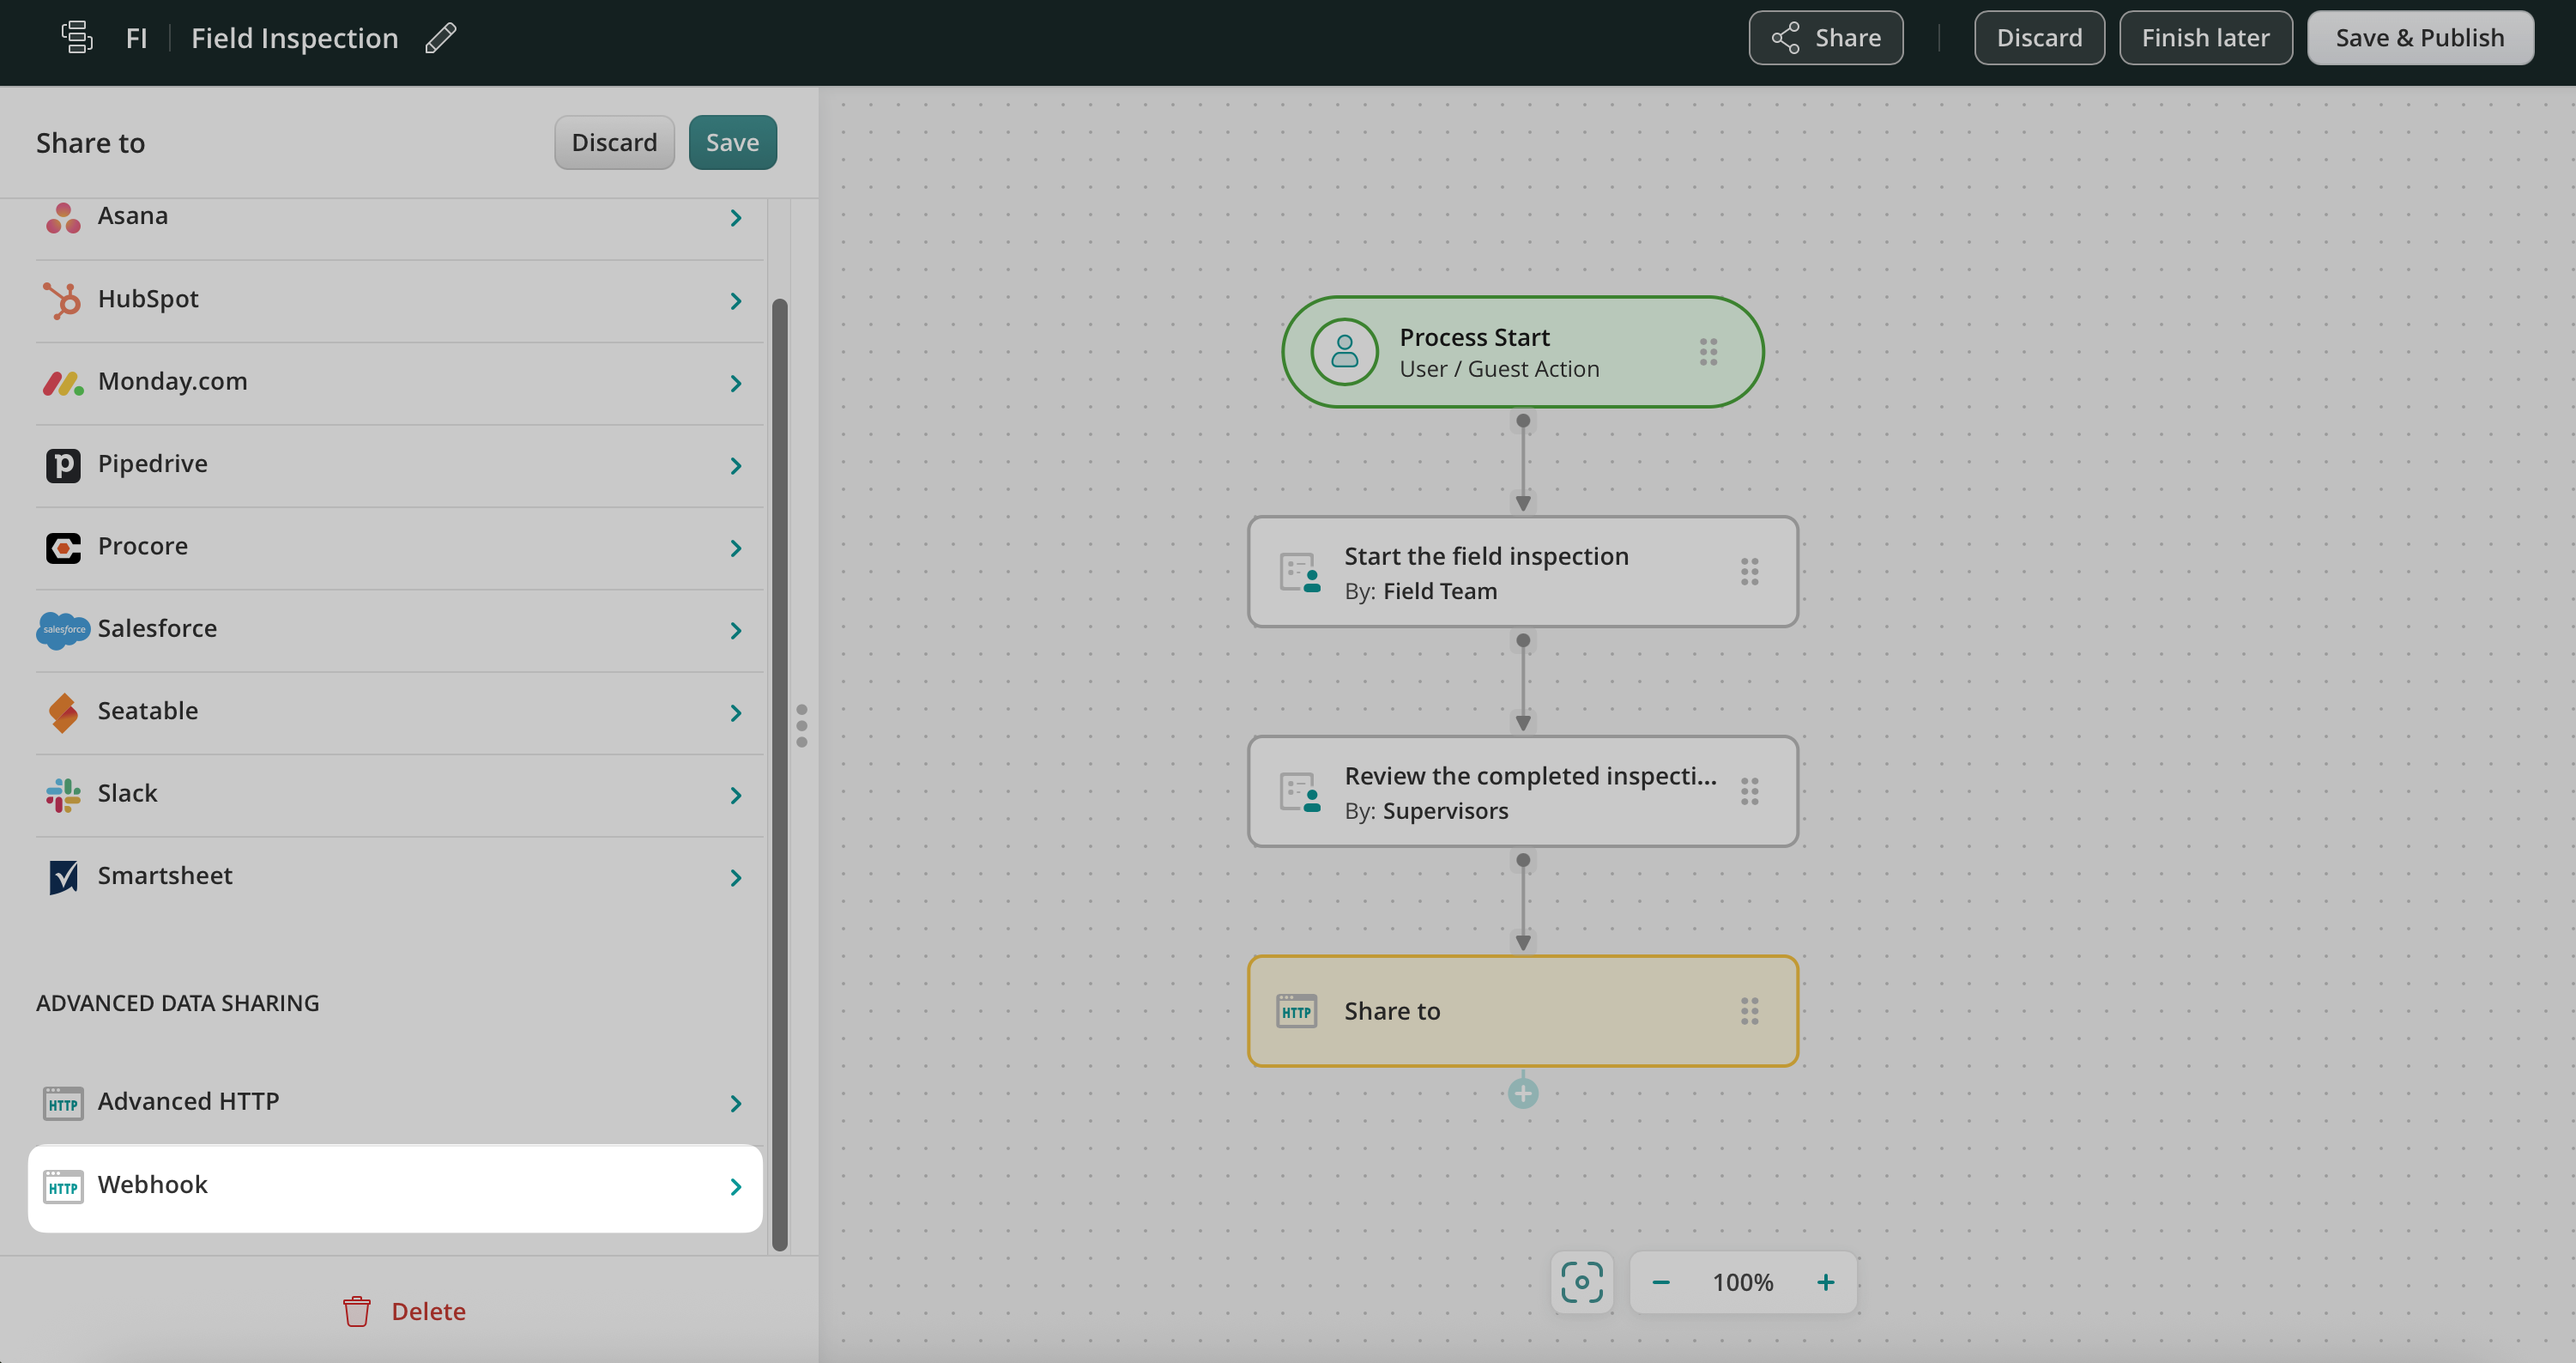
Step 2 – Configure Share to integration in Fluix
Drag and drop Share to submit action to the workflow chart and connect it with the User task that your team will be working on.
Click on the Share to element and select Webhook among the Advanced Data sharing options.
In the Name section, you can add the respective name of this Webhook integration.
In the Webhook link sectionpaste the URL to which you would like the entered data to be sent.
Depending on the third-party tool where you would like to send the data to, the Webhook can be located in one of the following ways:
– Webhook link can be provided in your Admin Portal of the preferred tool by default.
– You may use Zapier or any other platform that allows you to connect different software tools with each other in order to receive a webhook link. Therefore, we suggest checking if Zapier or any other tool has the preferred third-party tool in their list.
Once you paste the Webhook link, select the form in the Attached form section from which the data will be pushed to the third-party tool, and click the Save button.
If you need any suggestions regarding the platforms that provide webhook links, contact us at support@fluix.io
Step 3 – Save and test the setup
Click Save & Publish in the upper right corner to save the workflow.
Open the user app on the mobile device, or click User App in the right corner of the admin portal.
Open the task that you configured, fill in the form, and finish the task.
Once the task is finished, the data that you have filled out in the form will be sent to the URL which you have configured while building your workflow in the POST values format.
In case you have any questions or difficulties with setup, contact us at support@fluix.io and we’ll be happy to help you.
Was this article helpful?
Thanks for your feedback!
Oops, something went wrong. Please, try again later.
Thank you!
What details or examples would have made this article more helpful for you? We appreciate your insights!
Fluix allows for the electronic signing of contracts, agreements, NDAs, forms and other documents. Such paperless contract execution can save companies money on labor, printing, scanning, faxing, mailing and the storage of paper documents.
With Fluix, it is easy and intuitive to capture handwritten signatures on iPad, much like traditional signatures on paper, while still maintaining the same sense of security.
Digital Signature Process
Fluix’s digital signature process makes PDF-based e-signing secure and reliable for both the customer and the company. It solves crucial problems that can arise with the use of e-signatures in PDF documents:
Discourages changes being made to the document after being signed.
Prevents signatures being copied for use in another document.
Once a signature is captured, the document is sealed with a digital certificate. Any subsequent change to the document will result in the signature being invalidated. A document signed in Fluix can be validated to prove its authenticity by using the free Adobe Reader software.
Capturing eSignatures in Fluix
Fluix provides several ways to reach your customers and colleagues according to their signee role and available tools:
• In person: The simplest scenario is when a signature is captured in the field, most often produced with the finger on iPad/iPhone screen. This is a modern and convenient way to seal the deal both visually and electronically. Locking documents with a digital certificate ensures security and helps to identify invalidated documents, when changes are made after signing.
• Via workflow: Another method is to reassign a document to an existing Fluix user according to a pre-defined workflow. Signee might already have his own signatures stored on the device, and even apply company’s digital certificate to fully authorize decisions. Signing documents via workflow will help you save multiple signatures for repeated use, accelerate time to document completion and streamline approval processes.
• Via email: Most recently added capability allows anyone with an email addresses and a web browser to officially sign documents. Fluix user fills in a document and submits it for signing to a person outside the Fluix system. Signee receives email notification, opens a secure link, types in the name in the signature field, and the document is automatically returned to the workflow.
Offering your customers, suppliers and contractors the capability to receive documents from you, fill in required information, and sign digitally provides your business with even further back-office efficiencies from a digital workflow, now extended to non-employees.
Digital Signature Technical Specifications
Fluix uses proven cryptographic technology to ensure a document’s validity and protects it from forgery or misuse. This technology enhances Fluix deployment with a Digital Identity (a pair of private and public 2048 bit key).
As a document is signed, Fluix generates a Document Digest by computing a SHA-1 hash of the PDF content. A Document Digest is a set of characters (letters and numbers) that corresponds to a given document. Altering anything in the document will cause an immediate and dramatic change in the Document Digest value.
To create the Digital Signature, Fluix uses a Digital Identity private key to RSA encrypt the Document Digest. In the final step, the Digital Signature and Digital Identity public key are put into the document.
Whoever receives the document can then use the embedded Digital Identity public key to decrypt the Digital Signature and retrieve the Document Digest corresponding to the original document. Then, the receiver can compare the Document Digest with the SHA-1 hash of the received PDF content. If these two digests match, it means that the document has not been changed after being signed and the content is valid. In case of any difference, the document will be marked as invalid.
In order to digitally sign documents in Fluix, you will need to have:
A valid Digital Signature Certificate
Signature fields in your PDF form
There are two ways a document can be signed with a Digital Certificate in Fluix:
Using Fluix certificates. Fluix automatically generates and deploys unique certificates (RSA algorithm, 2048 bit). No iPad user interaction is required.
Manually create Digital Signature Certificates. Adobe Acrobat Pro enables formal signer’s verification through powerful encryption and public key infrastructure support. This kind of certificates have to be deployed by manually copying files to the iPad/iPhone (Signature section).
Fluix Signatures Are Legal & Secure
Electronic signatures created through Fluix are legal and secure. Digital Signatures support allows both the company and the customer to check the authenticity of a document signed on the iPad with Fluix. The document is also sealed to ensure that it can’t be changed after it is signed.
All these Fluix security enhancements remove the worry of document validity, allowing you to focus on more important business activities.
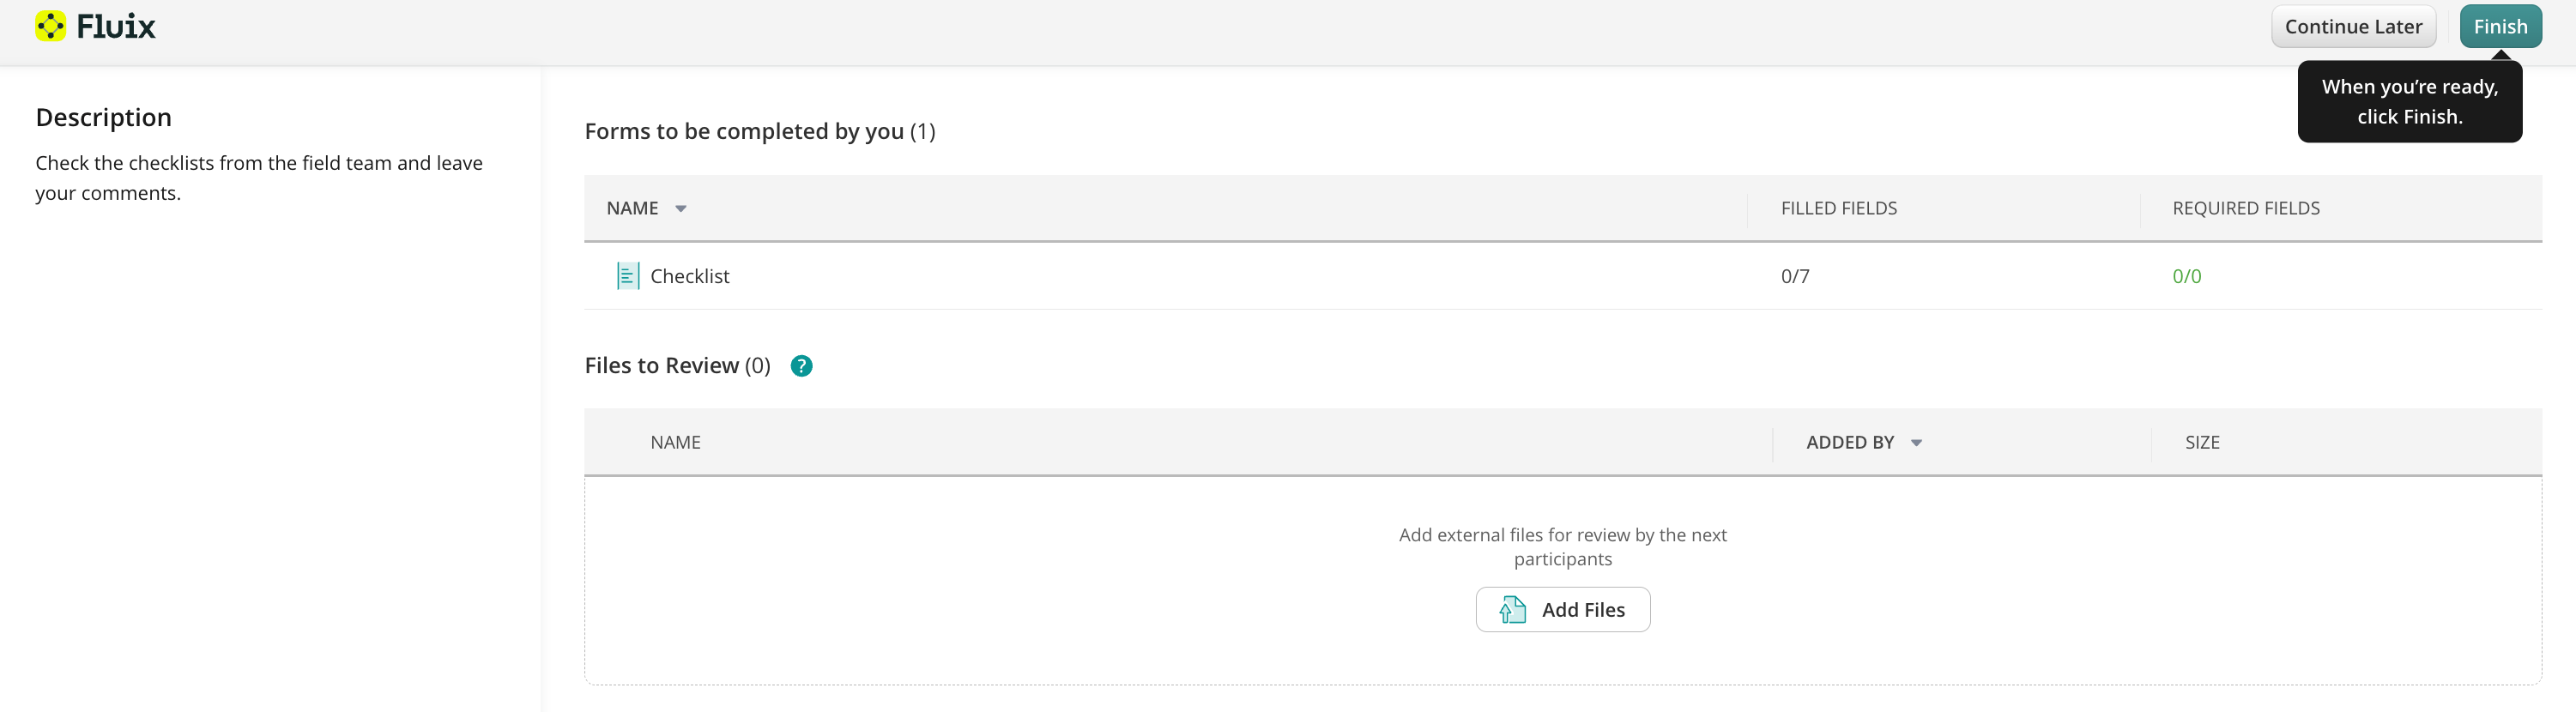
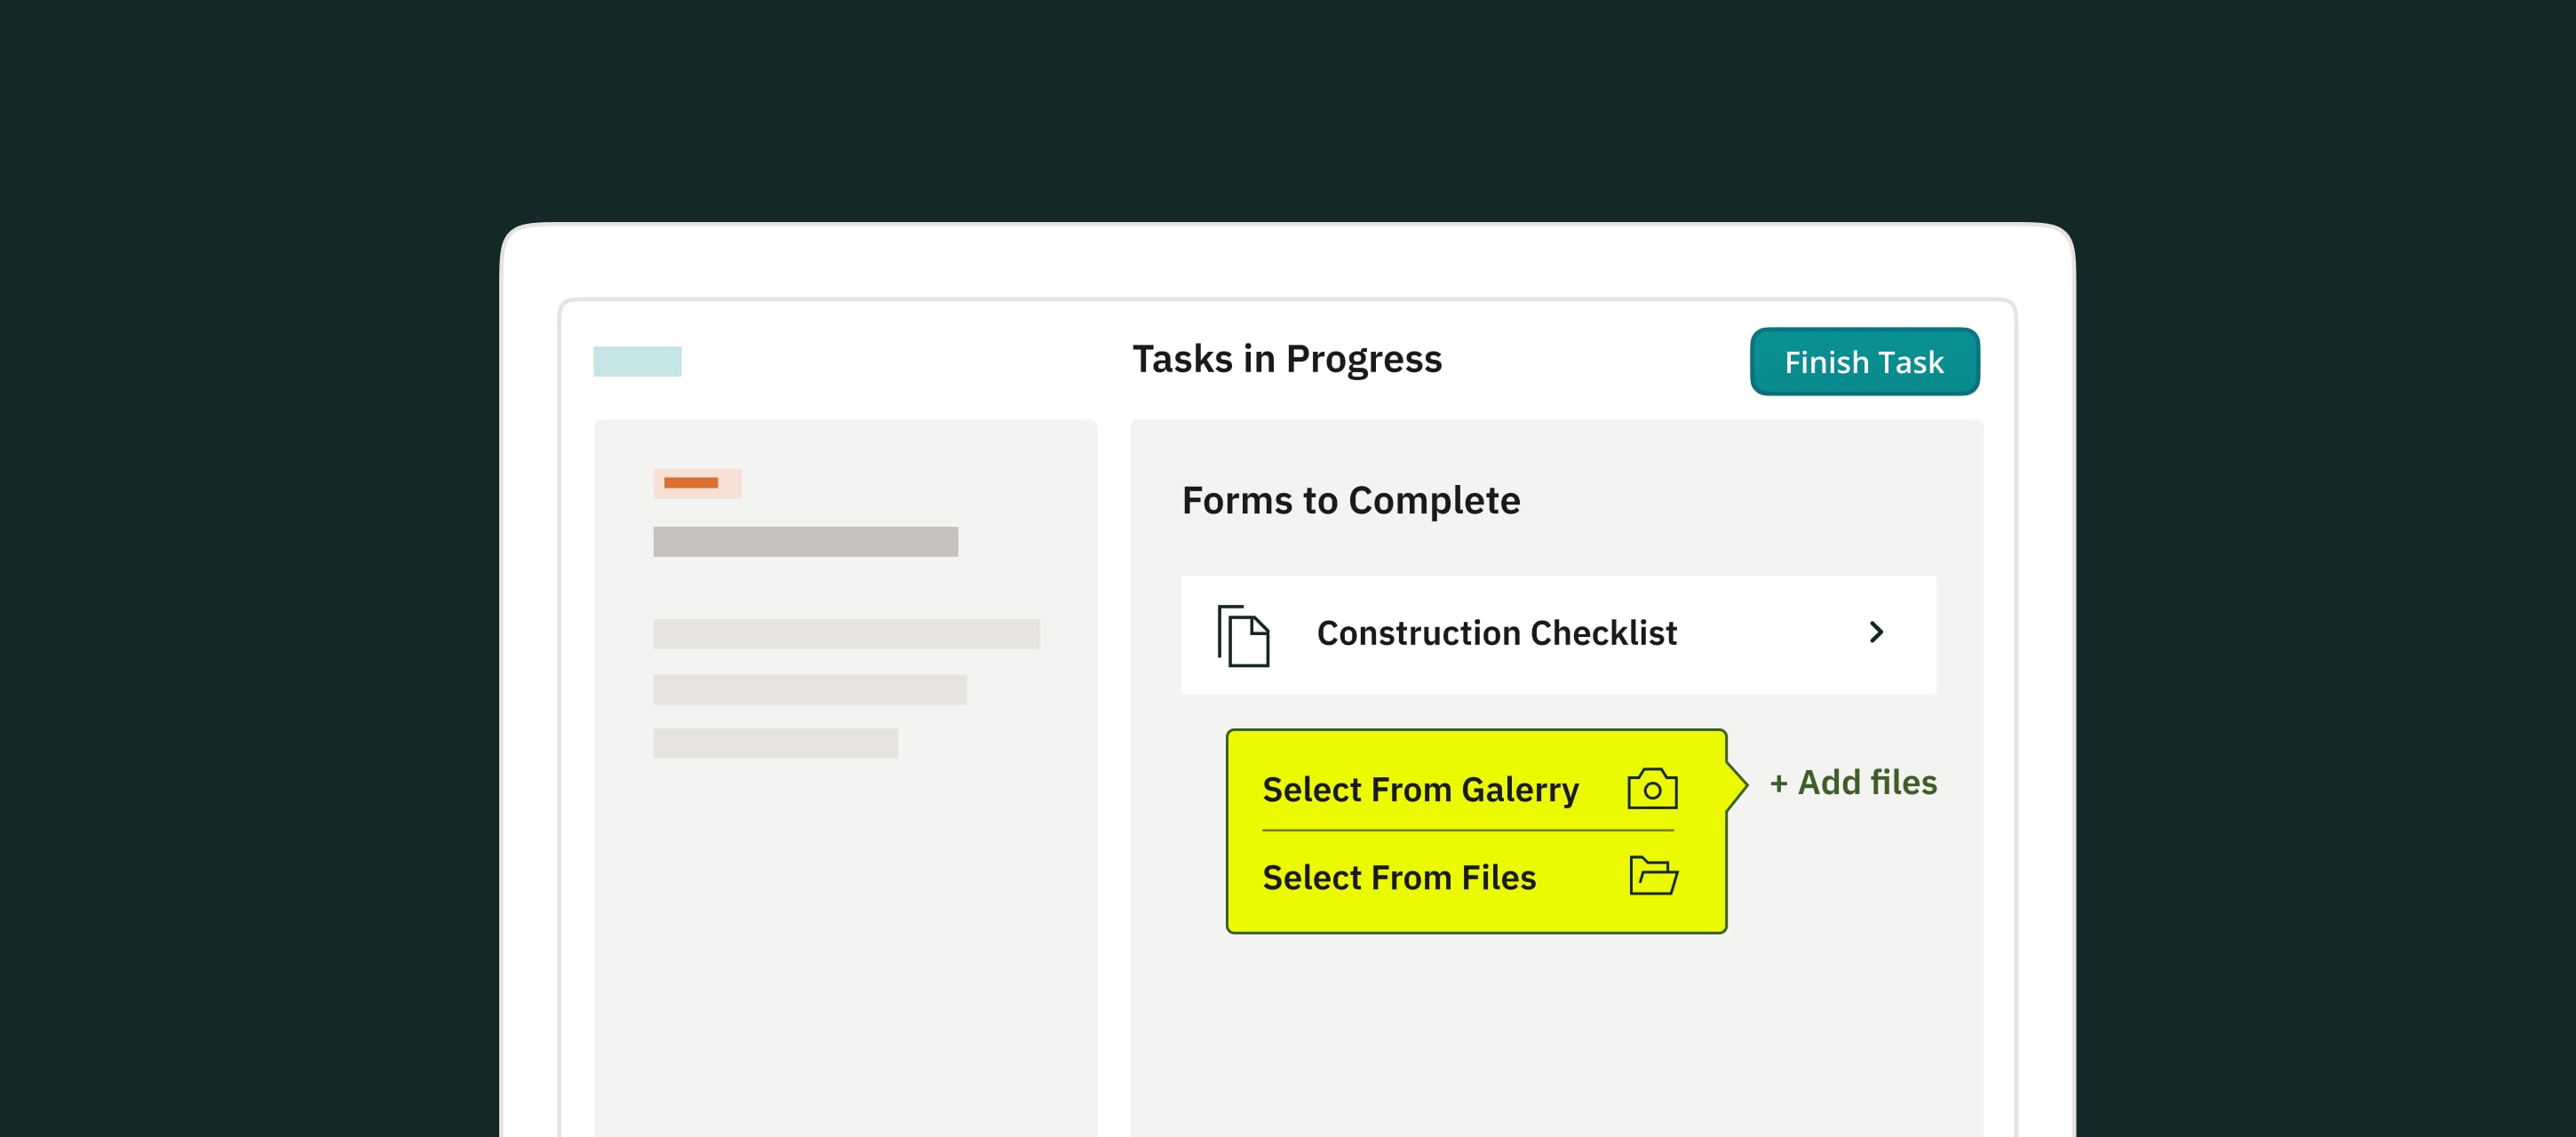
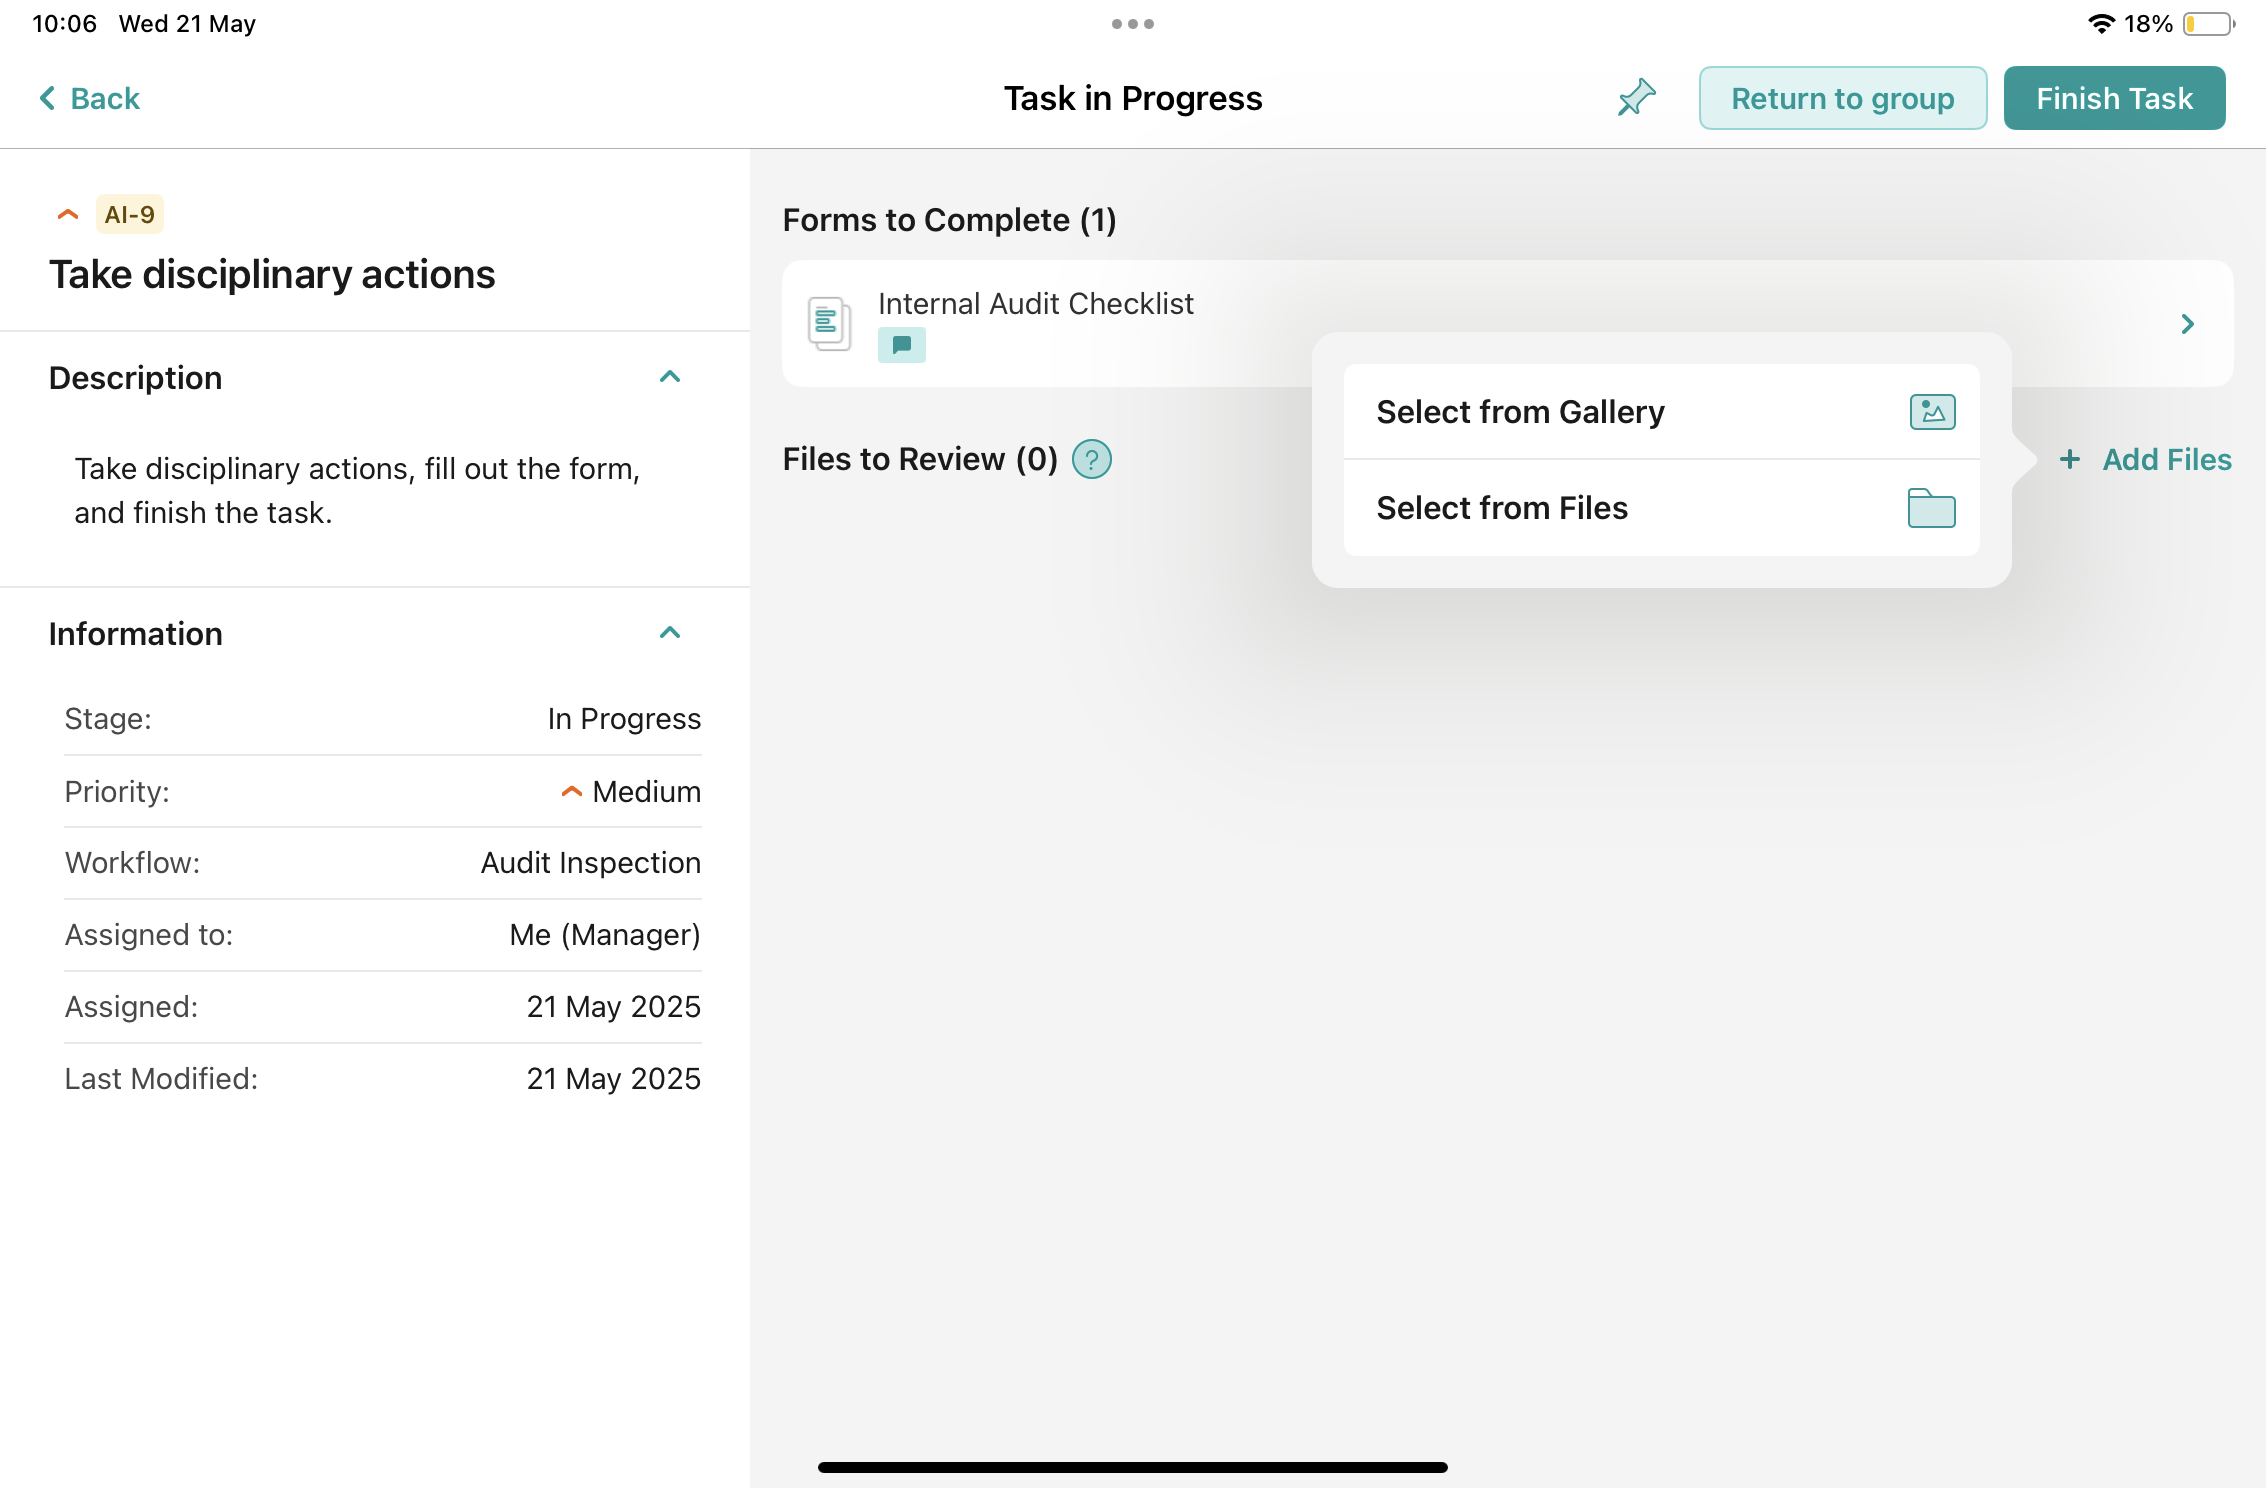
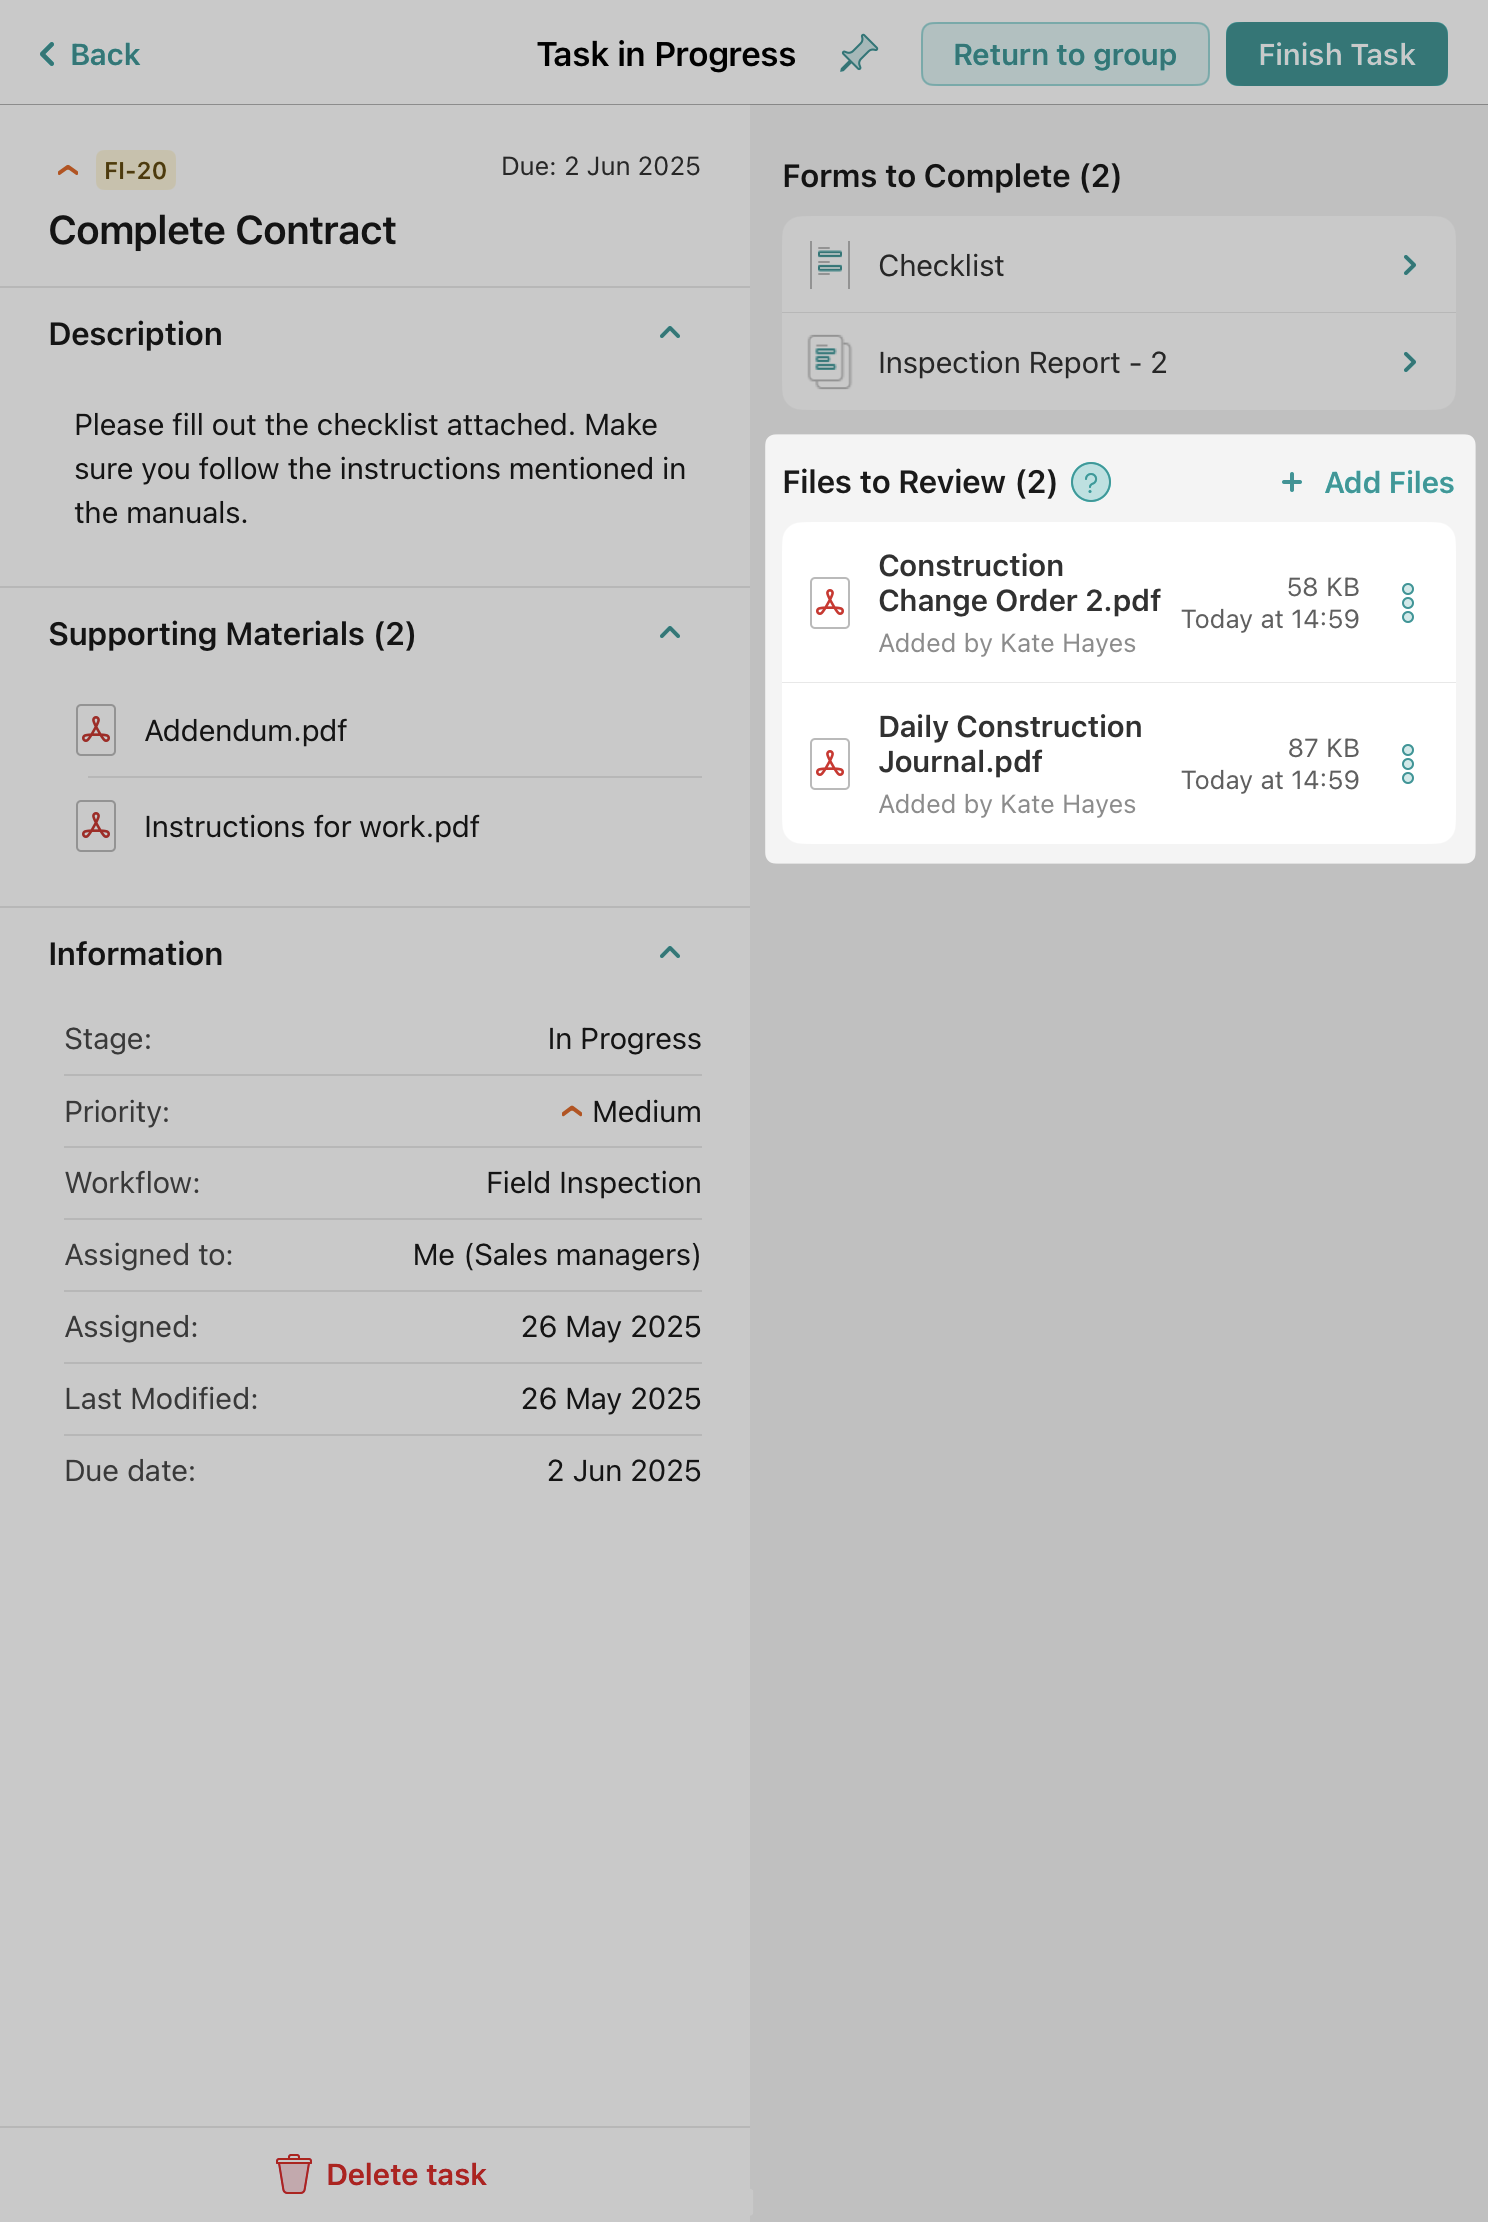
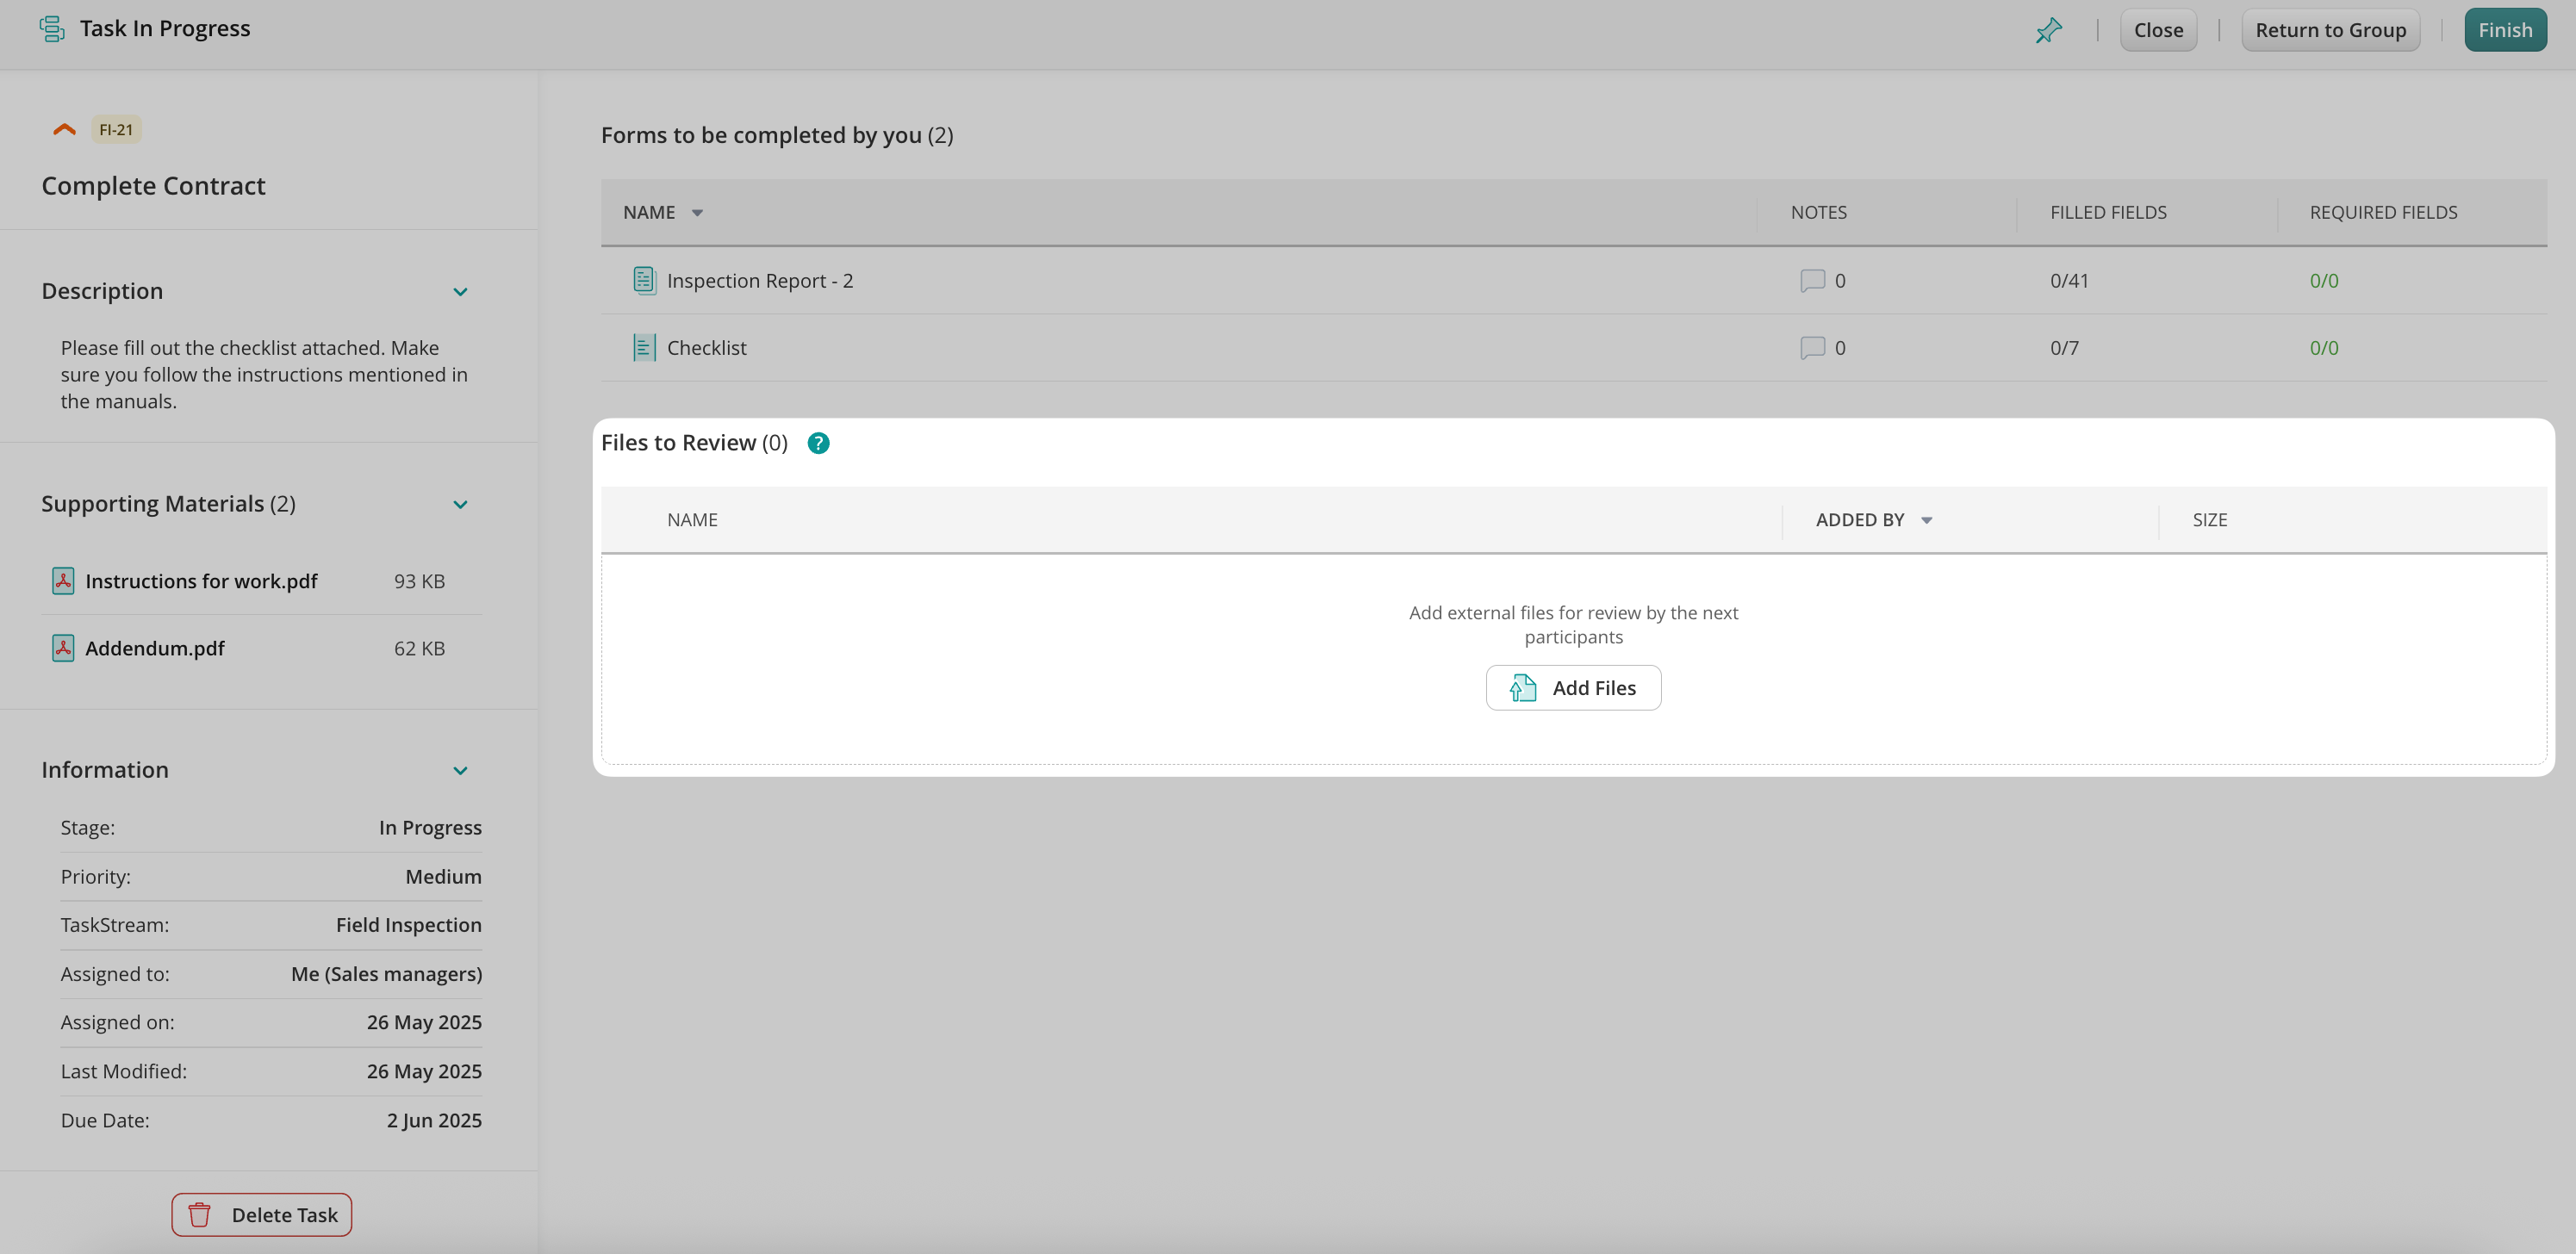
Integrate seamless file exchange into your workflow with the Files to Review feature. This feature complements the preconfigured forms, providing your team with additional resources to facilitate collaboration and information sharing enhancing the daily workflow experience.
Use Case
While Fluix serves as a tool to streamline team collaboration and automate the business process, we have expanded our capabilities to allow users to easily upload images and files in various formats from external sources while working on a task and seamlessly integrate them into their business flow. Added files can be shared with other participants within the flow, who can review and manage these files according to their needs. Further, the attached files will be submitted along with the completed forms and follow the preconfigured rules.
How it works?
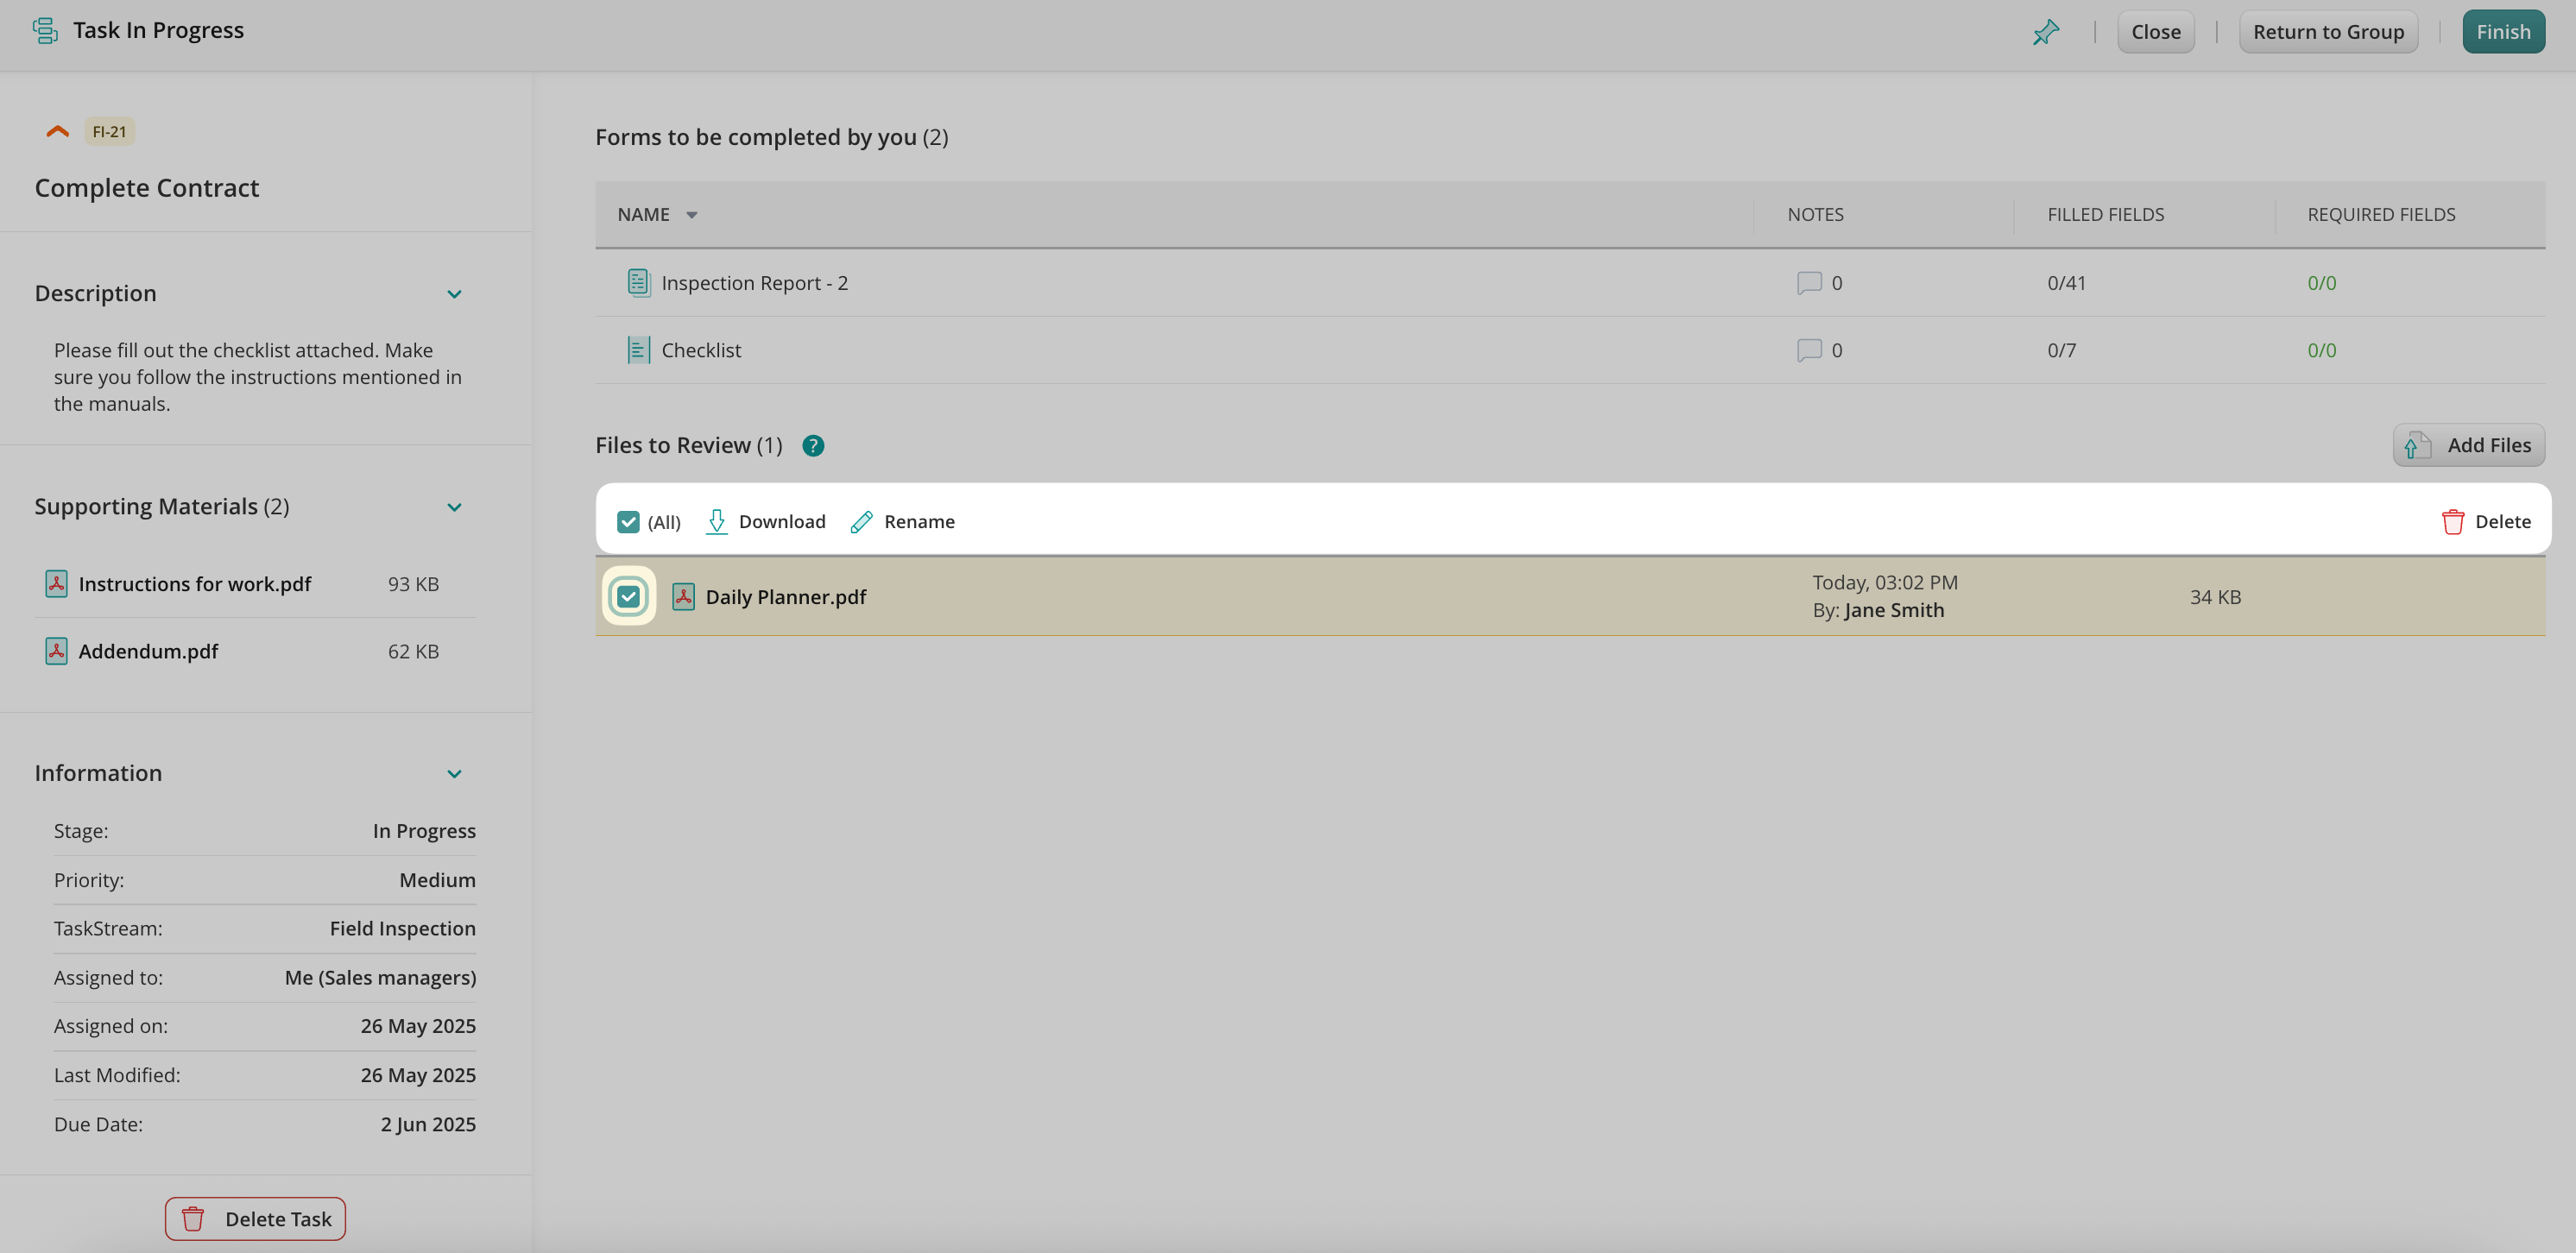
Once the users start working on the task by tapping the Start Work button, the task moves to the In Progress section. Simultaneously, a new section titled Files to Review becomes visible on the screen. This feature is available in the Fluix iOS, Android, and Web User apps.
Let’s check how the User Attachment feature can be utilized in both the Fluix mobile apps and the Web User apps.
User attachments in the Fluix mobile apps
The user may select the photo from the Gallery in order to share it with colleagues or select the document from the Files on the device. Additionally, the users can drag & drop the file to Fluix in case they are using the Split Screen functionality. The drag & drop feature is currently available only in the Fluix app on Android devices.
Please note: The maximum allowed file size is 400MB.
The user may also share the files intended for review and edit them using the external tools by tapping three dots next to the file name and tapping the Share button. Alternatively, the user can also delete the files that were added by him or her if they are not needed anymore.
Additionally, the user may upload files to the tasks from third-party apps, e.g. Gmail, Outlook, Slack, etc. via the Open in option. To do this, the user needs to tap the Share button in any of the apps on the device and select Fluix in the list of apps. Upon opening the file in Fluix, the user will be asked to specify the section “Templates”, “Assigned” or “In Progress” and the task to which the files for review need to be uploaded.
While working on any task of the preconfigured workflow, the users will be able to add more files by tapping the button Add Files.
Consequently, the next user who will be working on the task will receive access to the addendum along with the preconfigured forms. Upon finishing the process, the files that were added by the users during the workflow process will be submitted together with the forms according to the submit actions (e.g Upload to Storage, Send by Email, Share to Integration) preconfigured in the workflow.
Please note: Files to Review feature is available starting fromthe Fluix 3.16 app version on iOS devices and the Fluix 1.5 app version on Android devices.
User attachments in the Fluix Web User app
The user may upload the files from their computer or drag them to Fluix.
Once the files are uploaded, the users can rename, delete, or download them.
Please note: the users can rename and delete only the files which they have uploaded.
While working on any task of the preconfigured workflow, the users will be able to add more files by tapping the button Add Files.
Please note: The maximum allowed file size is 400MB.
Feel free to contact us at support@fluix.io if you have any questions on setup.
Was this article helpful?
Thanks for your feedback!
Oops, something went wrong. Please, try again later.
Thank you!
What details or examples would have made this article more helpful for you? We appreciate your insights!
In the routine of daily operations, users often find themselves repeatedly completing identical forms or checklists. This repetitive data entry process can be both time-consuming and tedious. To enhance the user experience and expedite these routine tasks, Fluix suggests the Form Filling Suggestions feature which is designed to simplify and accelerate the form-filling process for the users.
Let’s explore how the Form filling suggestions can optimize the daily work allowing users to save valuable time on their activities.
Example use cases
Permanently filling out the same Location fields in the forms;
Permanently filling out the User’s name and surname;
Permanently filling out the Supervisor’s name and surname;
Any other data that the user is filling out daily and would like to automate this process.
What is the Form Filling Suggestions feature about?
Form Filling Suggestions feature helps users fill out the same information faster into the forms preconfigured for them by the Fluix account admins by suggesting the words or phrases the users have filled out earlier to any of the forms in their Fluix accounts.
How do the Form Filling Suggestions work on iOS and Android devices?
This functionality is available starting from the Fluix 3.15 app version on iOS devices and the Fluix 1.4 app version on Android devices and is enabled by default. For the Fluix app to remember the data that the users enter and start suggesting it to them, the users need to fully fill out the same words/phrases to the respective fields in the form two times (on one form level or within different forms which are configured for the users).
Consistently, when the users previously entered the data 2 times in the forms, suggestions results will be shown on the 3rd time the users are filling out the forms after the 3rd character to suggest for the relevant value.
Please note: The maximum number of displayed suggestions – is 3. The suggestions are shown based on the last entered values. The collected data will be stored for 3 months, locally on the device.
In case the users need to disable this feature on their devices, they can achieve the following by tapping the lightning icon on their keyboards.
Feel free to contact us at support@fluix.io if you have any questions or comments.
Was this article helpful?
Thanks for your feedback!
Oops, something went wrong. Please, try again later.
Thank you!
What details or examples would have made this article more helpful for you? We appreciate your insights!
The Dynamic Path feature allows you to automate the creation of folders in the cloud storage or other tools, like Procore, or other platforms with the file structure.
Dynamic Path brings essential benefits to streamlining document organization:
Creation of only needed folders.
Consistent automated folder naming and easy search afterward.
Creation of multiple folders dynamically.
Proper folder structure without manual effort.
How it works?
As an admin, you create a workflow using the Dynamic Path option for the submit action and define the rules for creating folders on your cloud storage.
Once the user finishes the task in the app, the folder is automatically created based on predefined rules.
How to set up Dynamic Path?
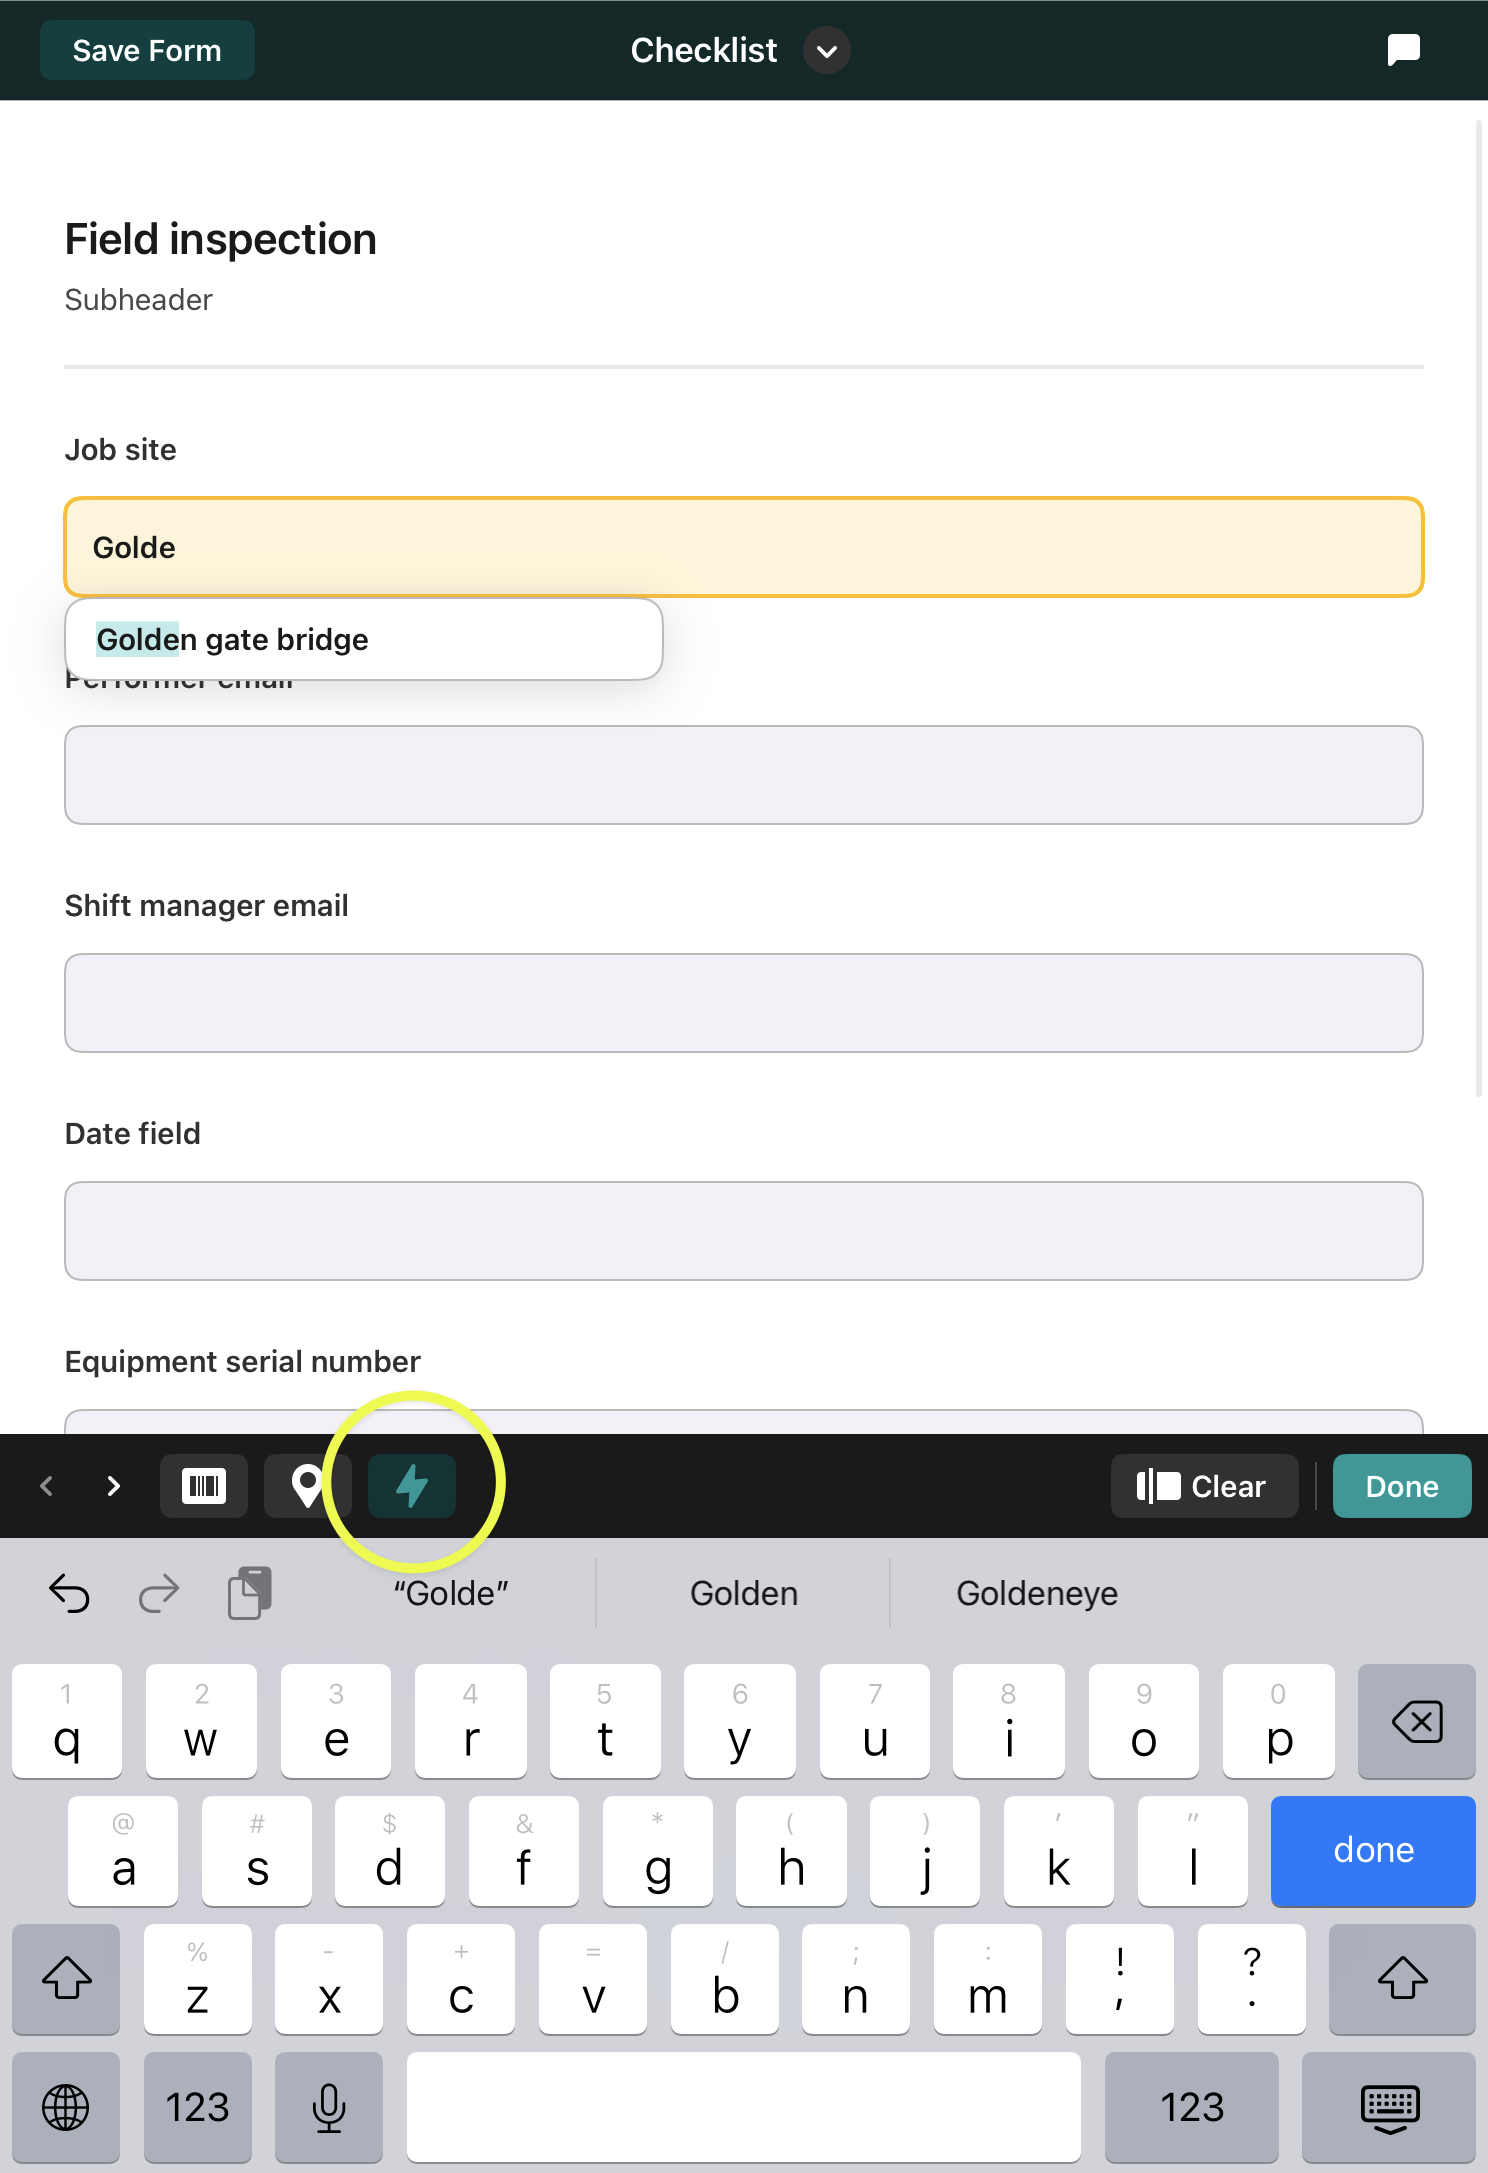
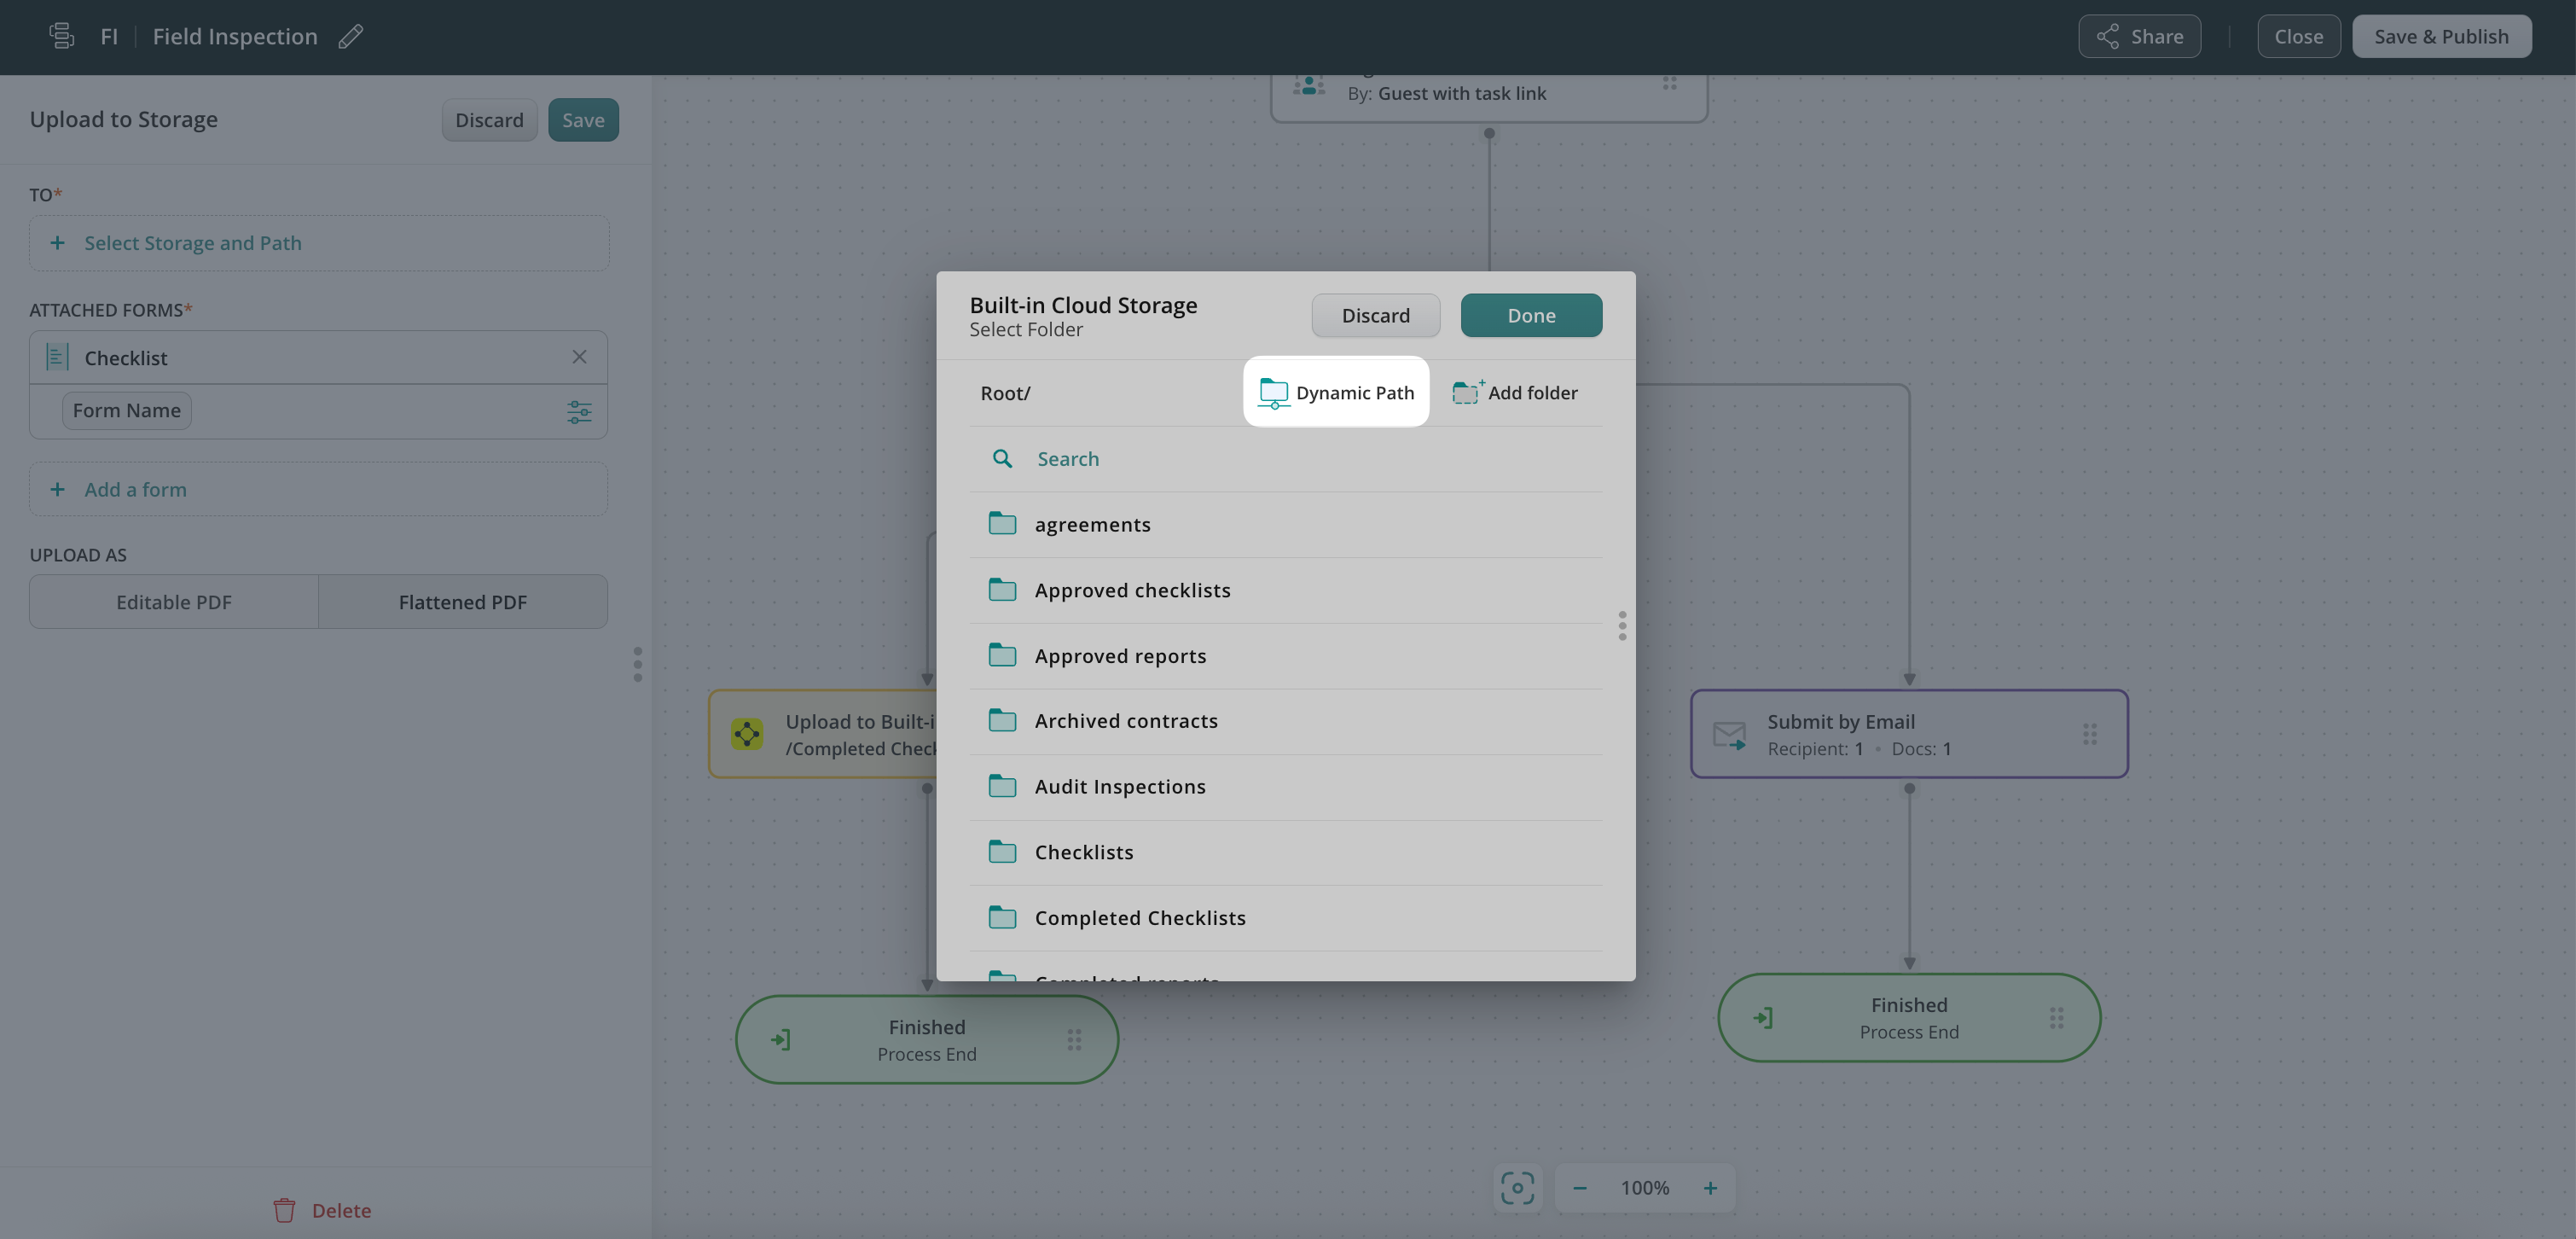
The Dynamic Path is available in actions such as Uploadto Storage and Share to. Once the action is configured, click on the Select Storageand Path or Select Folder (if Procore) field next to the /Root tab, there you may find the Dynamic Path button.
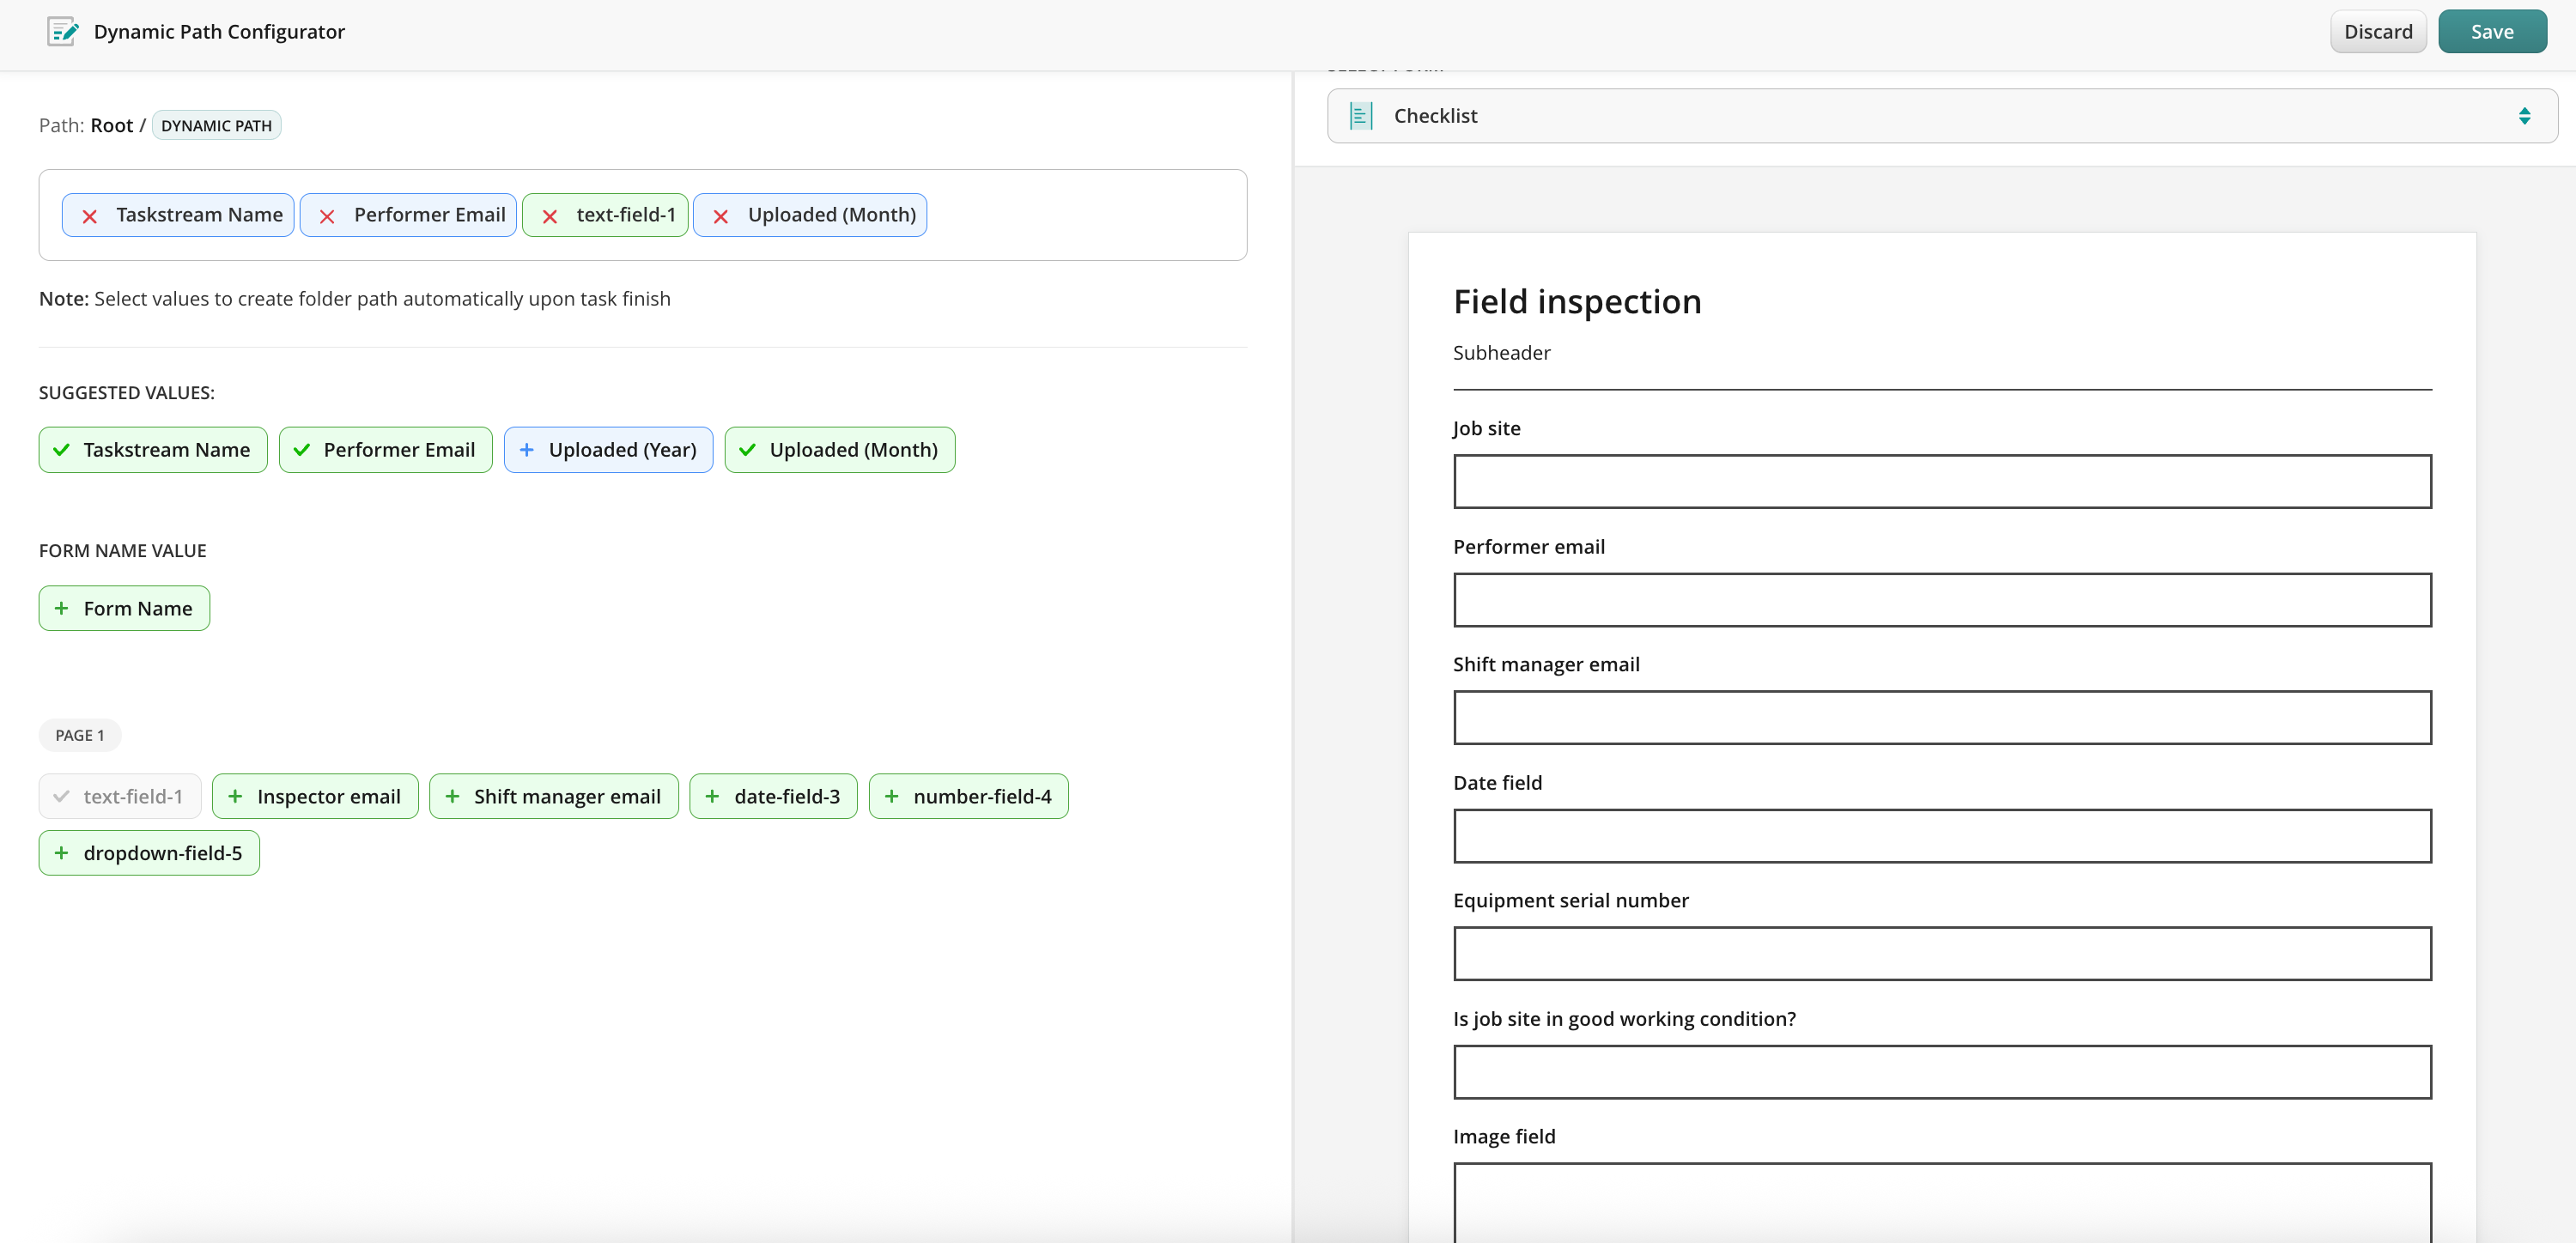
When opening the Dynamic Path Configurator, you may select as many values as needed to create a folder path, select the desired task in order to determine from which task the Performer Email will be selected, and choose the form.
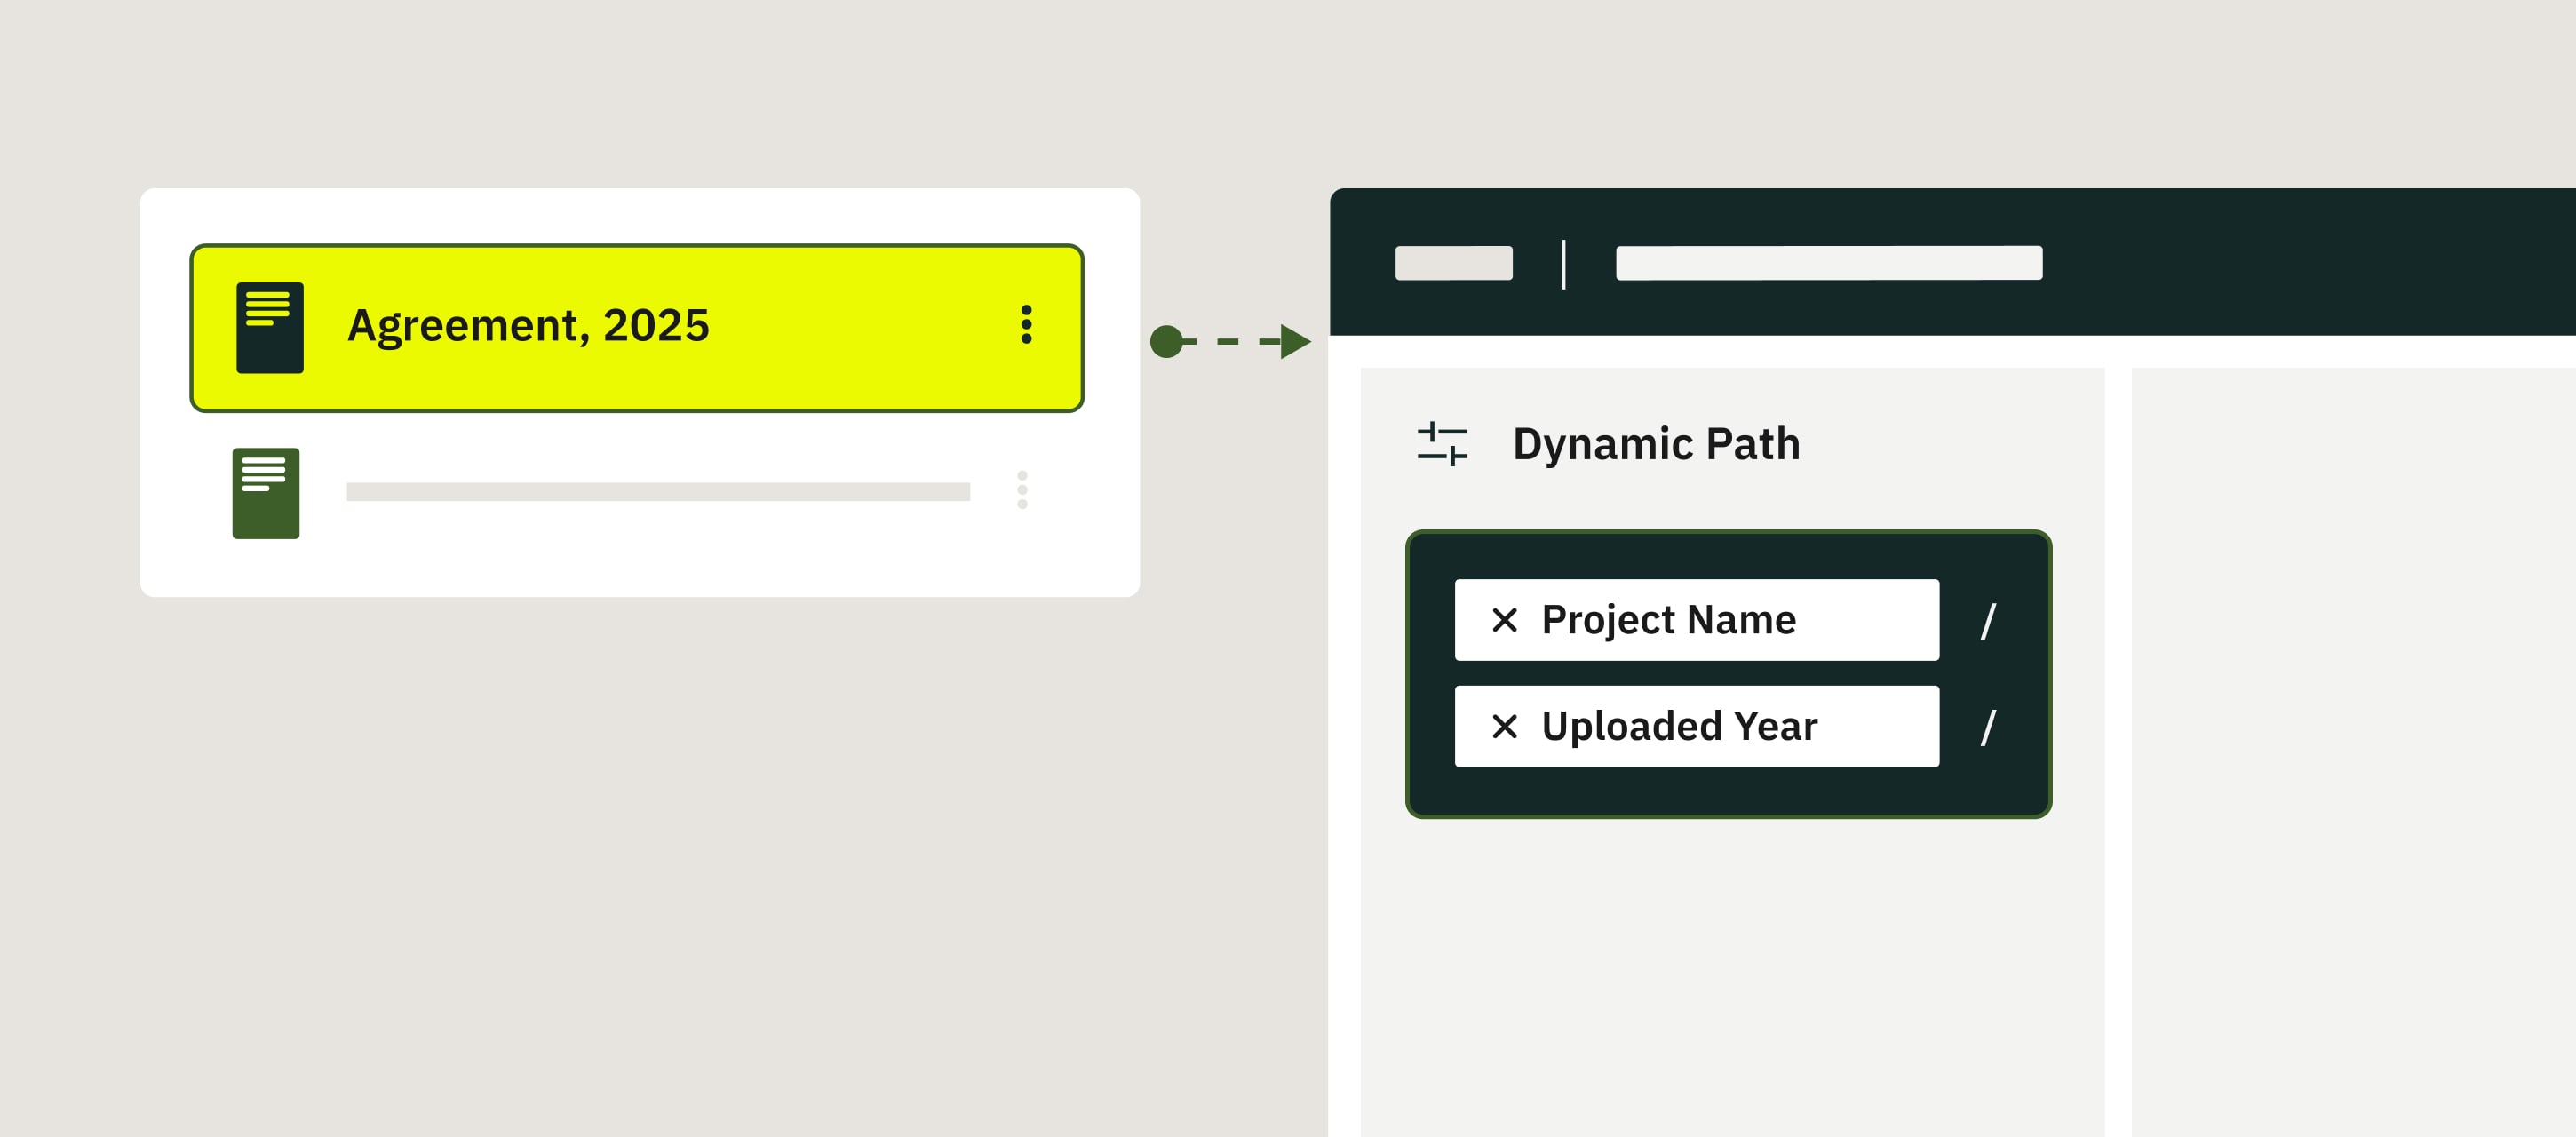
Once the path is created, the Dynamic Path tag will appear at the end of the configured path. You can see the full path by hovering over the tag.
When all configurations are made, save and publish the workflow to enable changes.
Once a user in this workflow finishes a task in the app, the folder will be automatically created based on the values entered by the user.
Feel free to contact us at support@fluix.io if you have any questions or comments.
Was this article helpful?
Thanks for your feedback!
Oops, something went wrong. Please, try again later.
Thank you!
What details or examples would have made this article more helpful for you? We appreciate your insights!
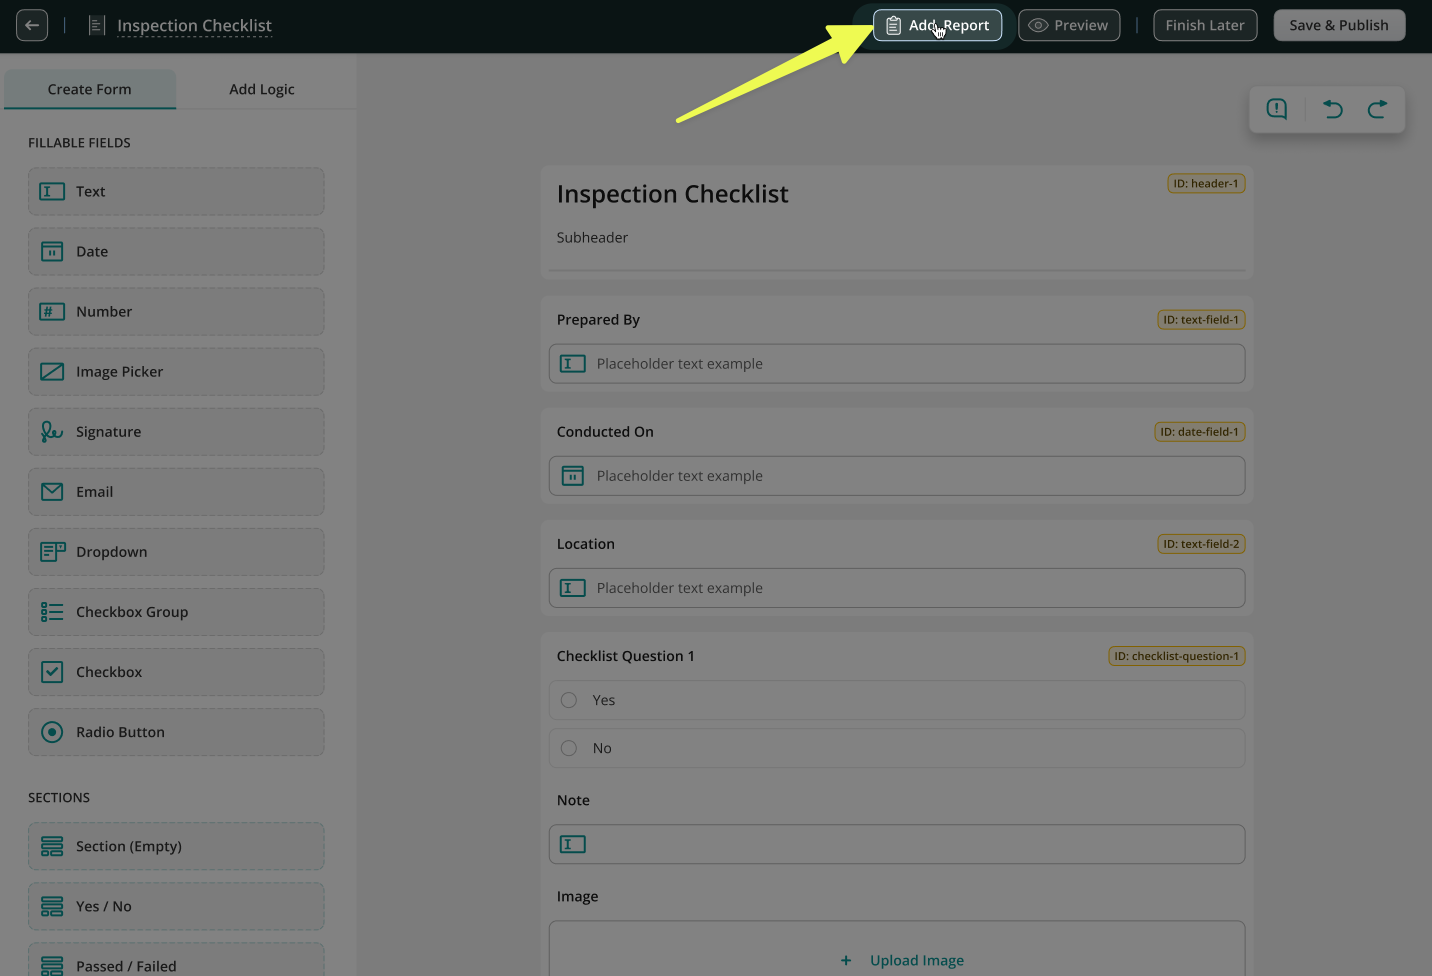
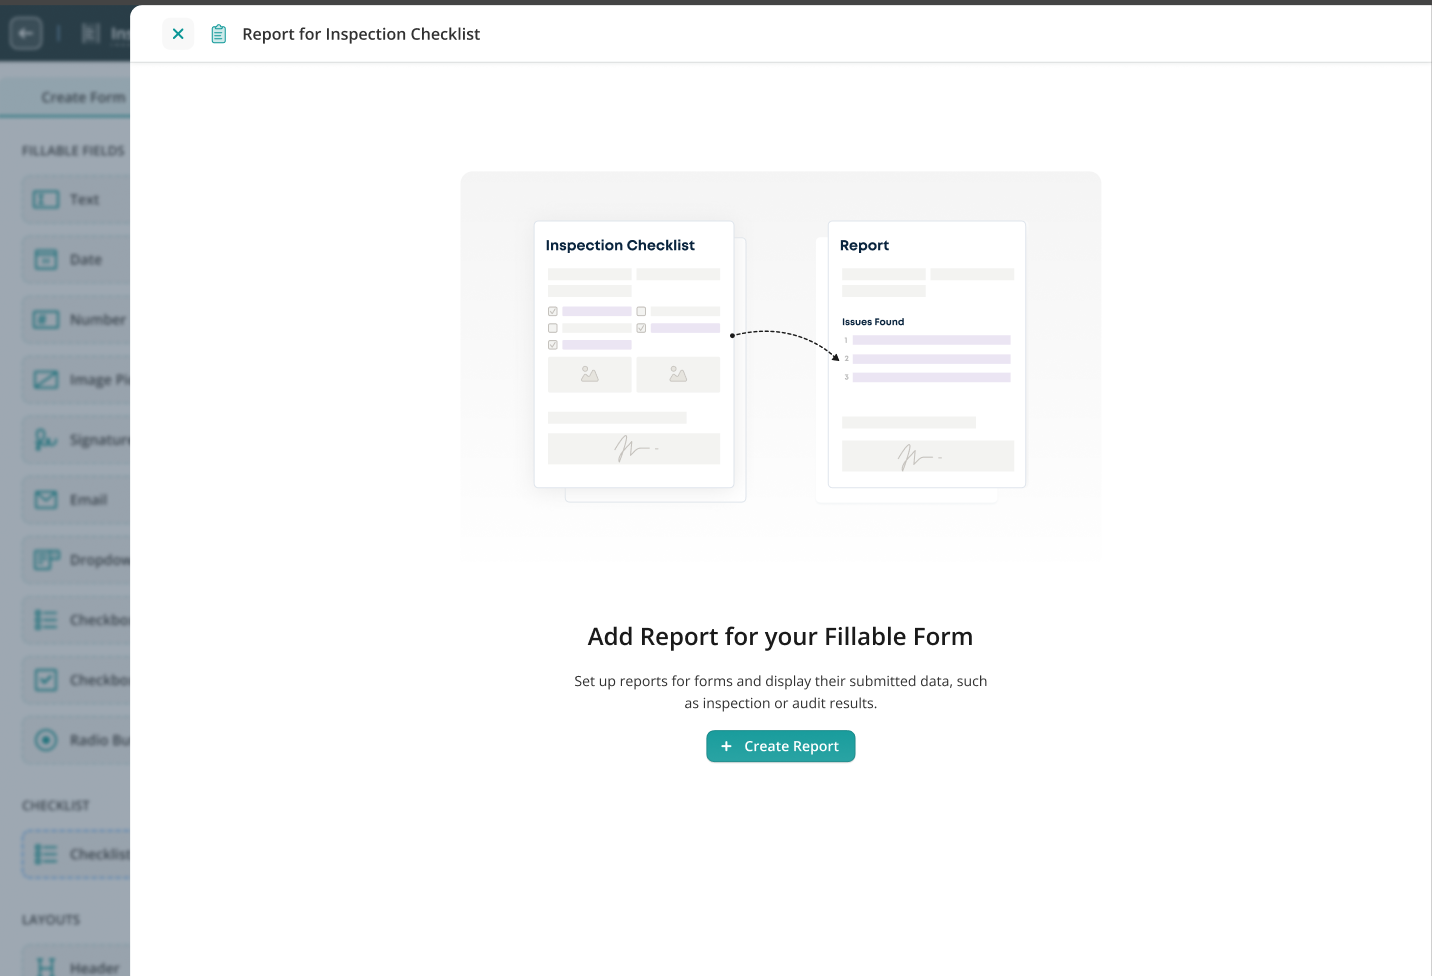
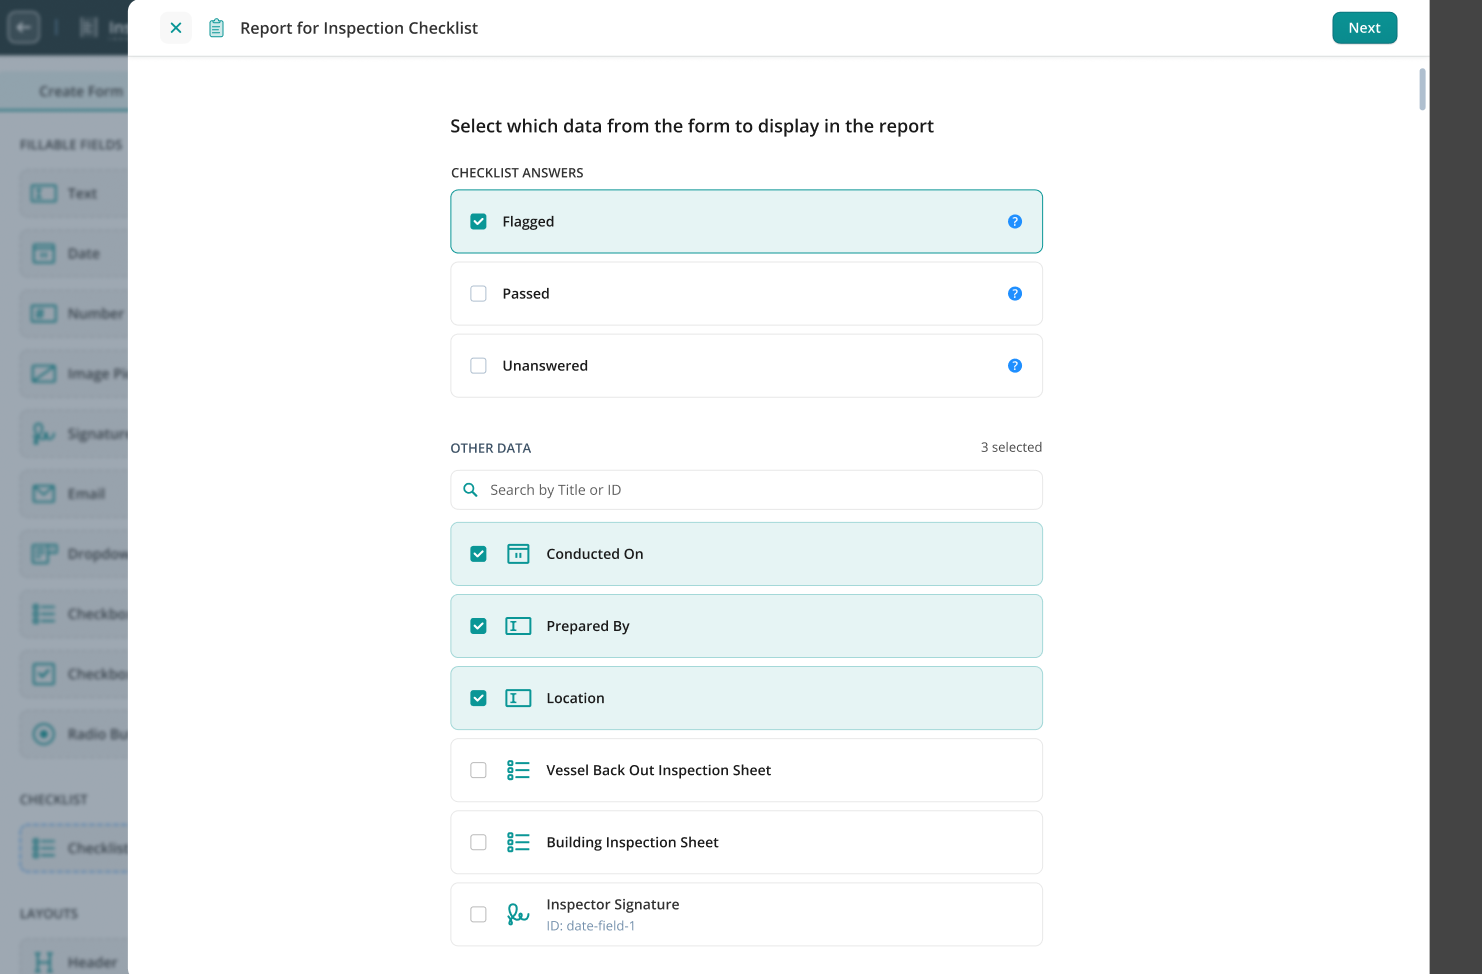
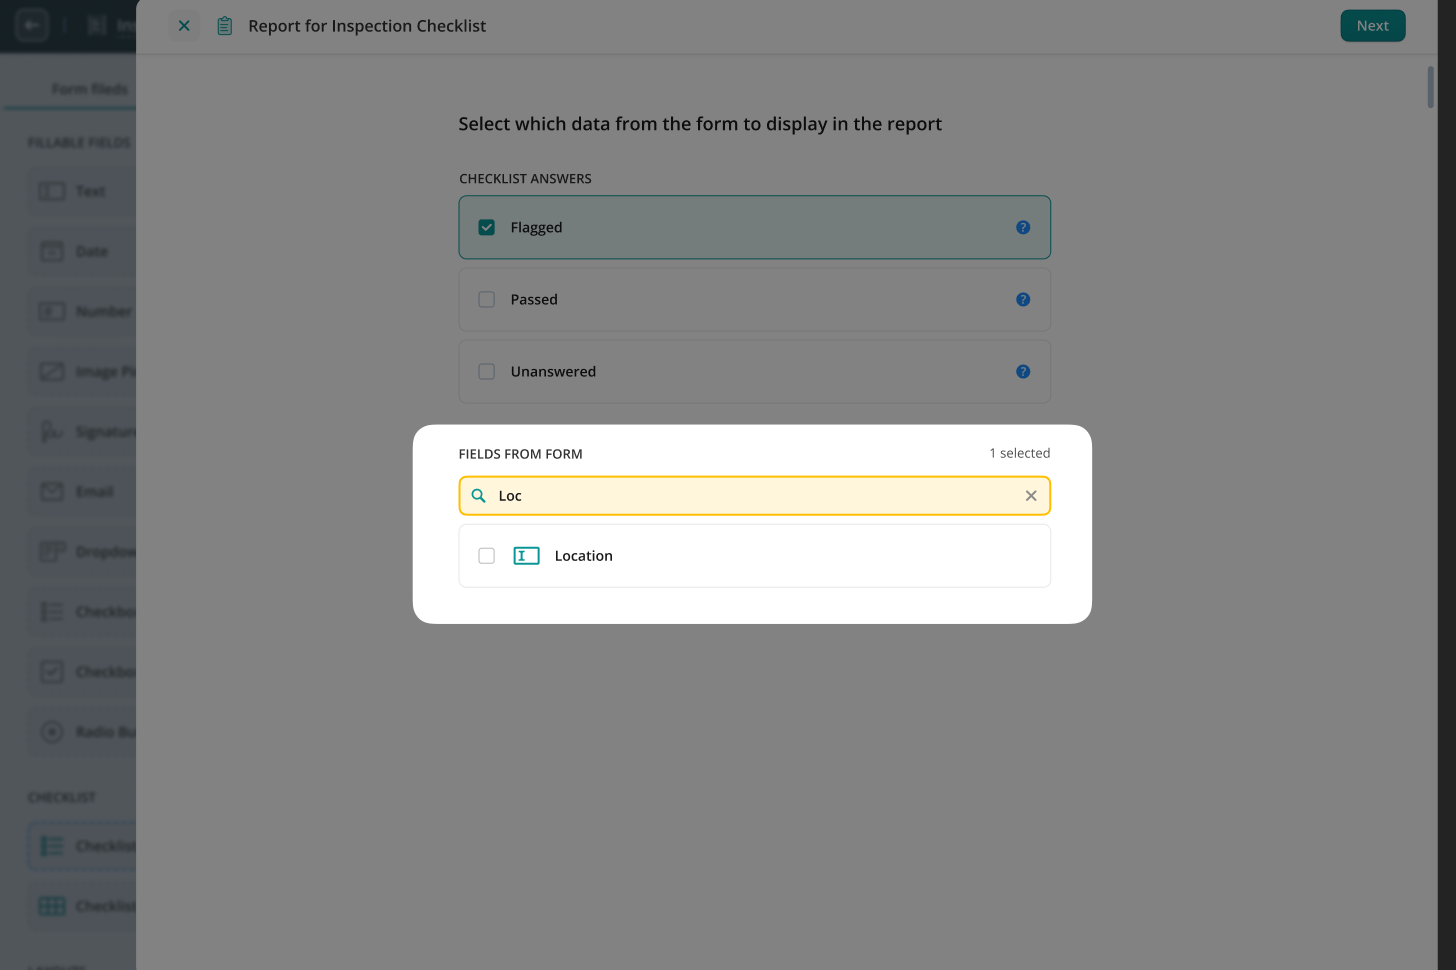
Fluix Reports are designed to help you track team activity, manage tasks, monitor work progress, and streamline document flow.
How to Export Data from Reports
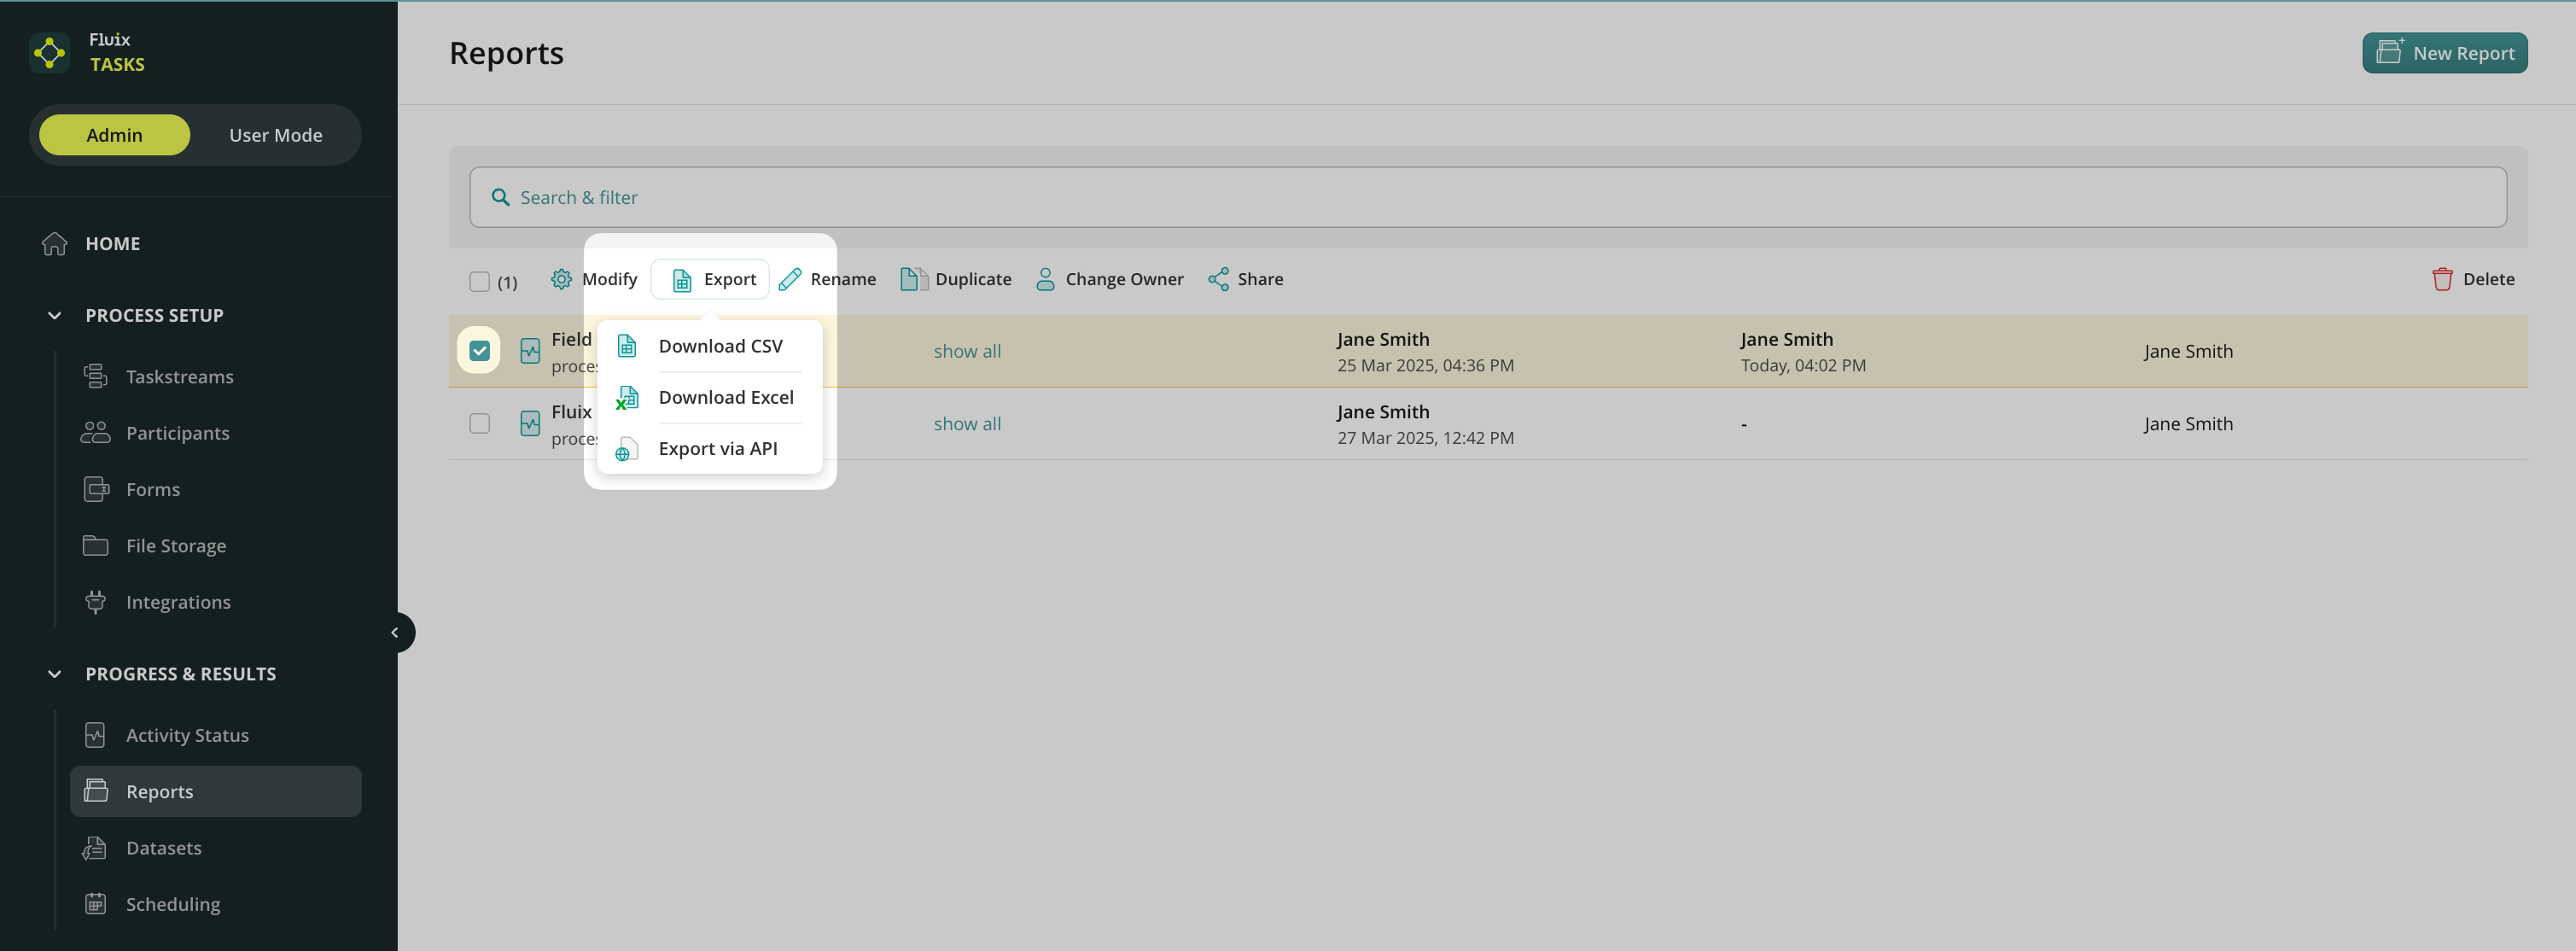
To export data from Reports to a third-party platform, follow these steps:
Go to Reports: Open the Reports section in the Admin Portal and select the report you want to export.
Click Export: In the opened panel, you will see four options:
To share the created report with other Fluix admins. Learn more about Reports ownership in this tutorial.
Download report in CSV or XLS formats with the filtered data as a report to share with your team, stakeholders, or management as a file.
Export data via API. Send data directly to third-party software like Power BI or Tableau for further analysis and visualization.
How to Export Data from Reports via API?
Select Export via API from the list.
A window with Authorization Details will open.
Copy the authorization link provided.
Use this link in your third-party platform to create a request to an endpoint and receive the exported data.
You may create the report based on the following view types: Process or Form. Depending on the selected option, after exporting data from reports via API, there might be two following endpoints.
Example of the request for Report view by Process:


GET {api_url}/customer-api/v1/reports/process-view/aabb34e4-4fb7-483e-a5e7-f32bd07c596f?size=2


Example of the response:
{
  "collection": [
    {
      "Process Key": "QAI-1",
      "Taskstream Name": "Quality Assurance Inspection",
      "Task Name": "Upload to Storage",
      "Assignee": "",
      "Task status": "FINISHED",
      "Due Date": "",
      "Last Action": "2024-12-31 10:59:38",
      "Task Completion": 100,
      "Duration": "1m",
      "Inspector Name": ""
    },
  ],
  "hasNext": true,
  "nextUrl": "{api_url}/customer-api/v1/reports/process-view/aabb34e4-4fb7-483e-a5e7-f32bd07c596f?size=2&cursor={some_cursor}
}

Example of the request for Report view by Form:
GET {api_url}/customer-api/v1/reports/process-view/aabb34e4-4fb7-483e-a5e7-f32bd07c596f?size=2
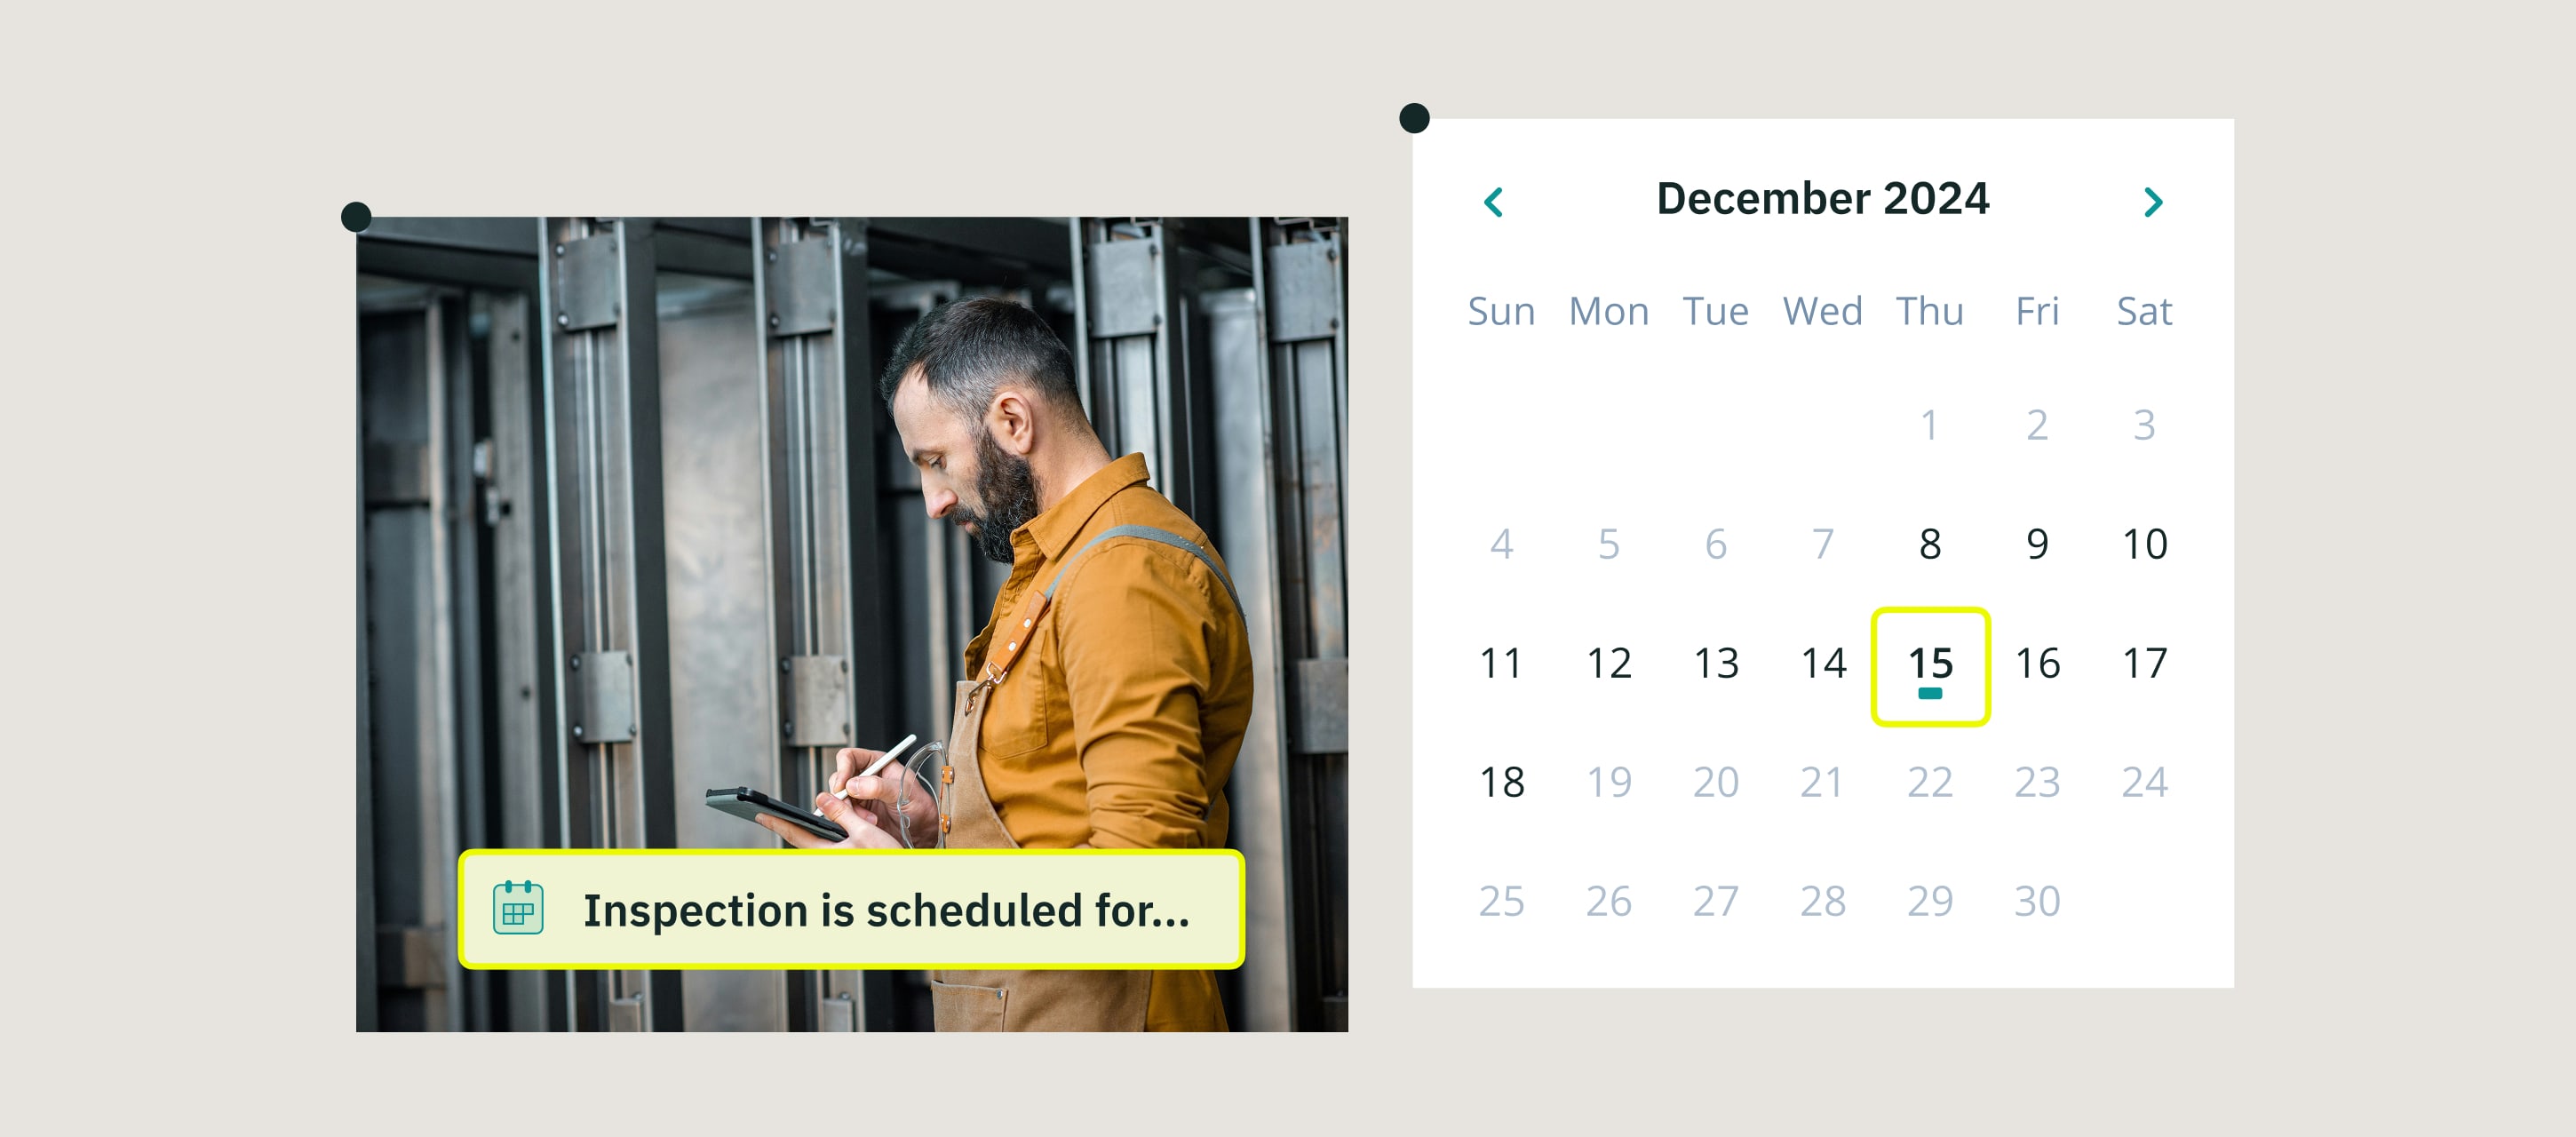
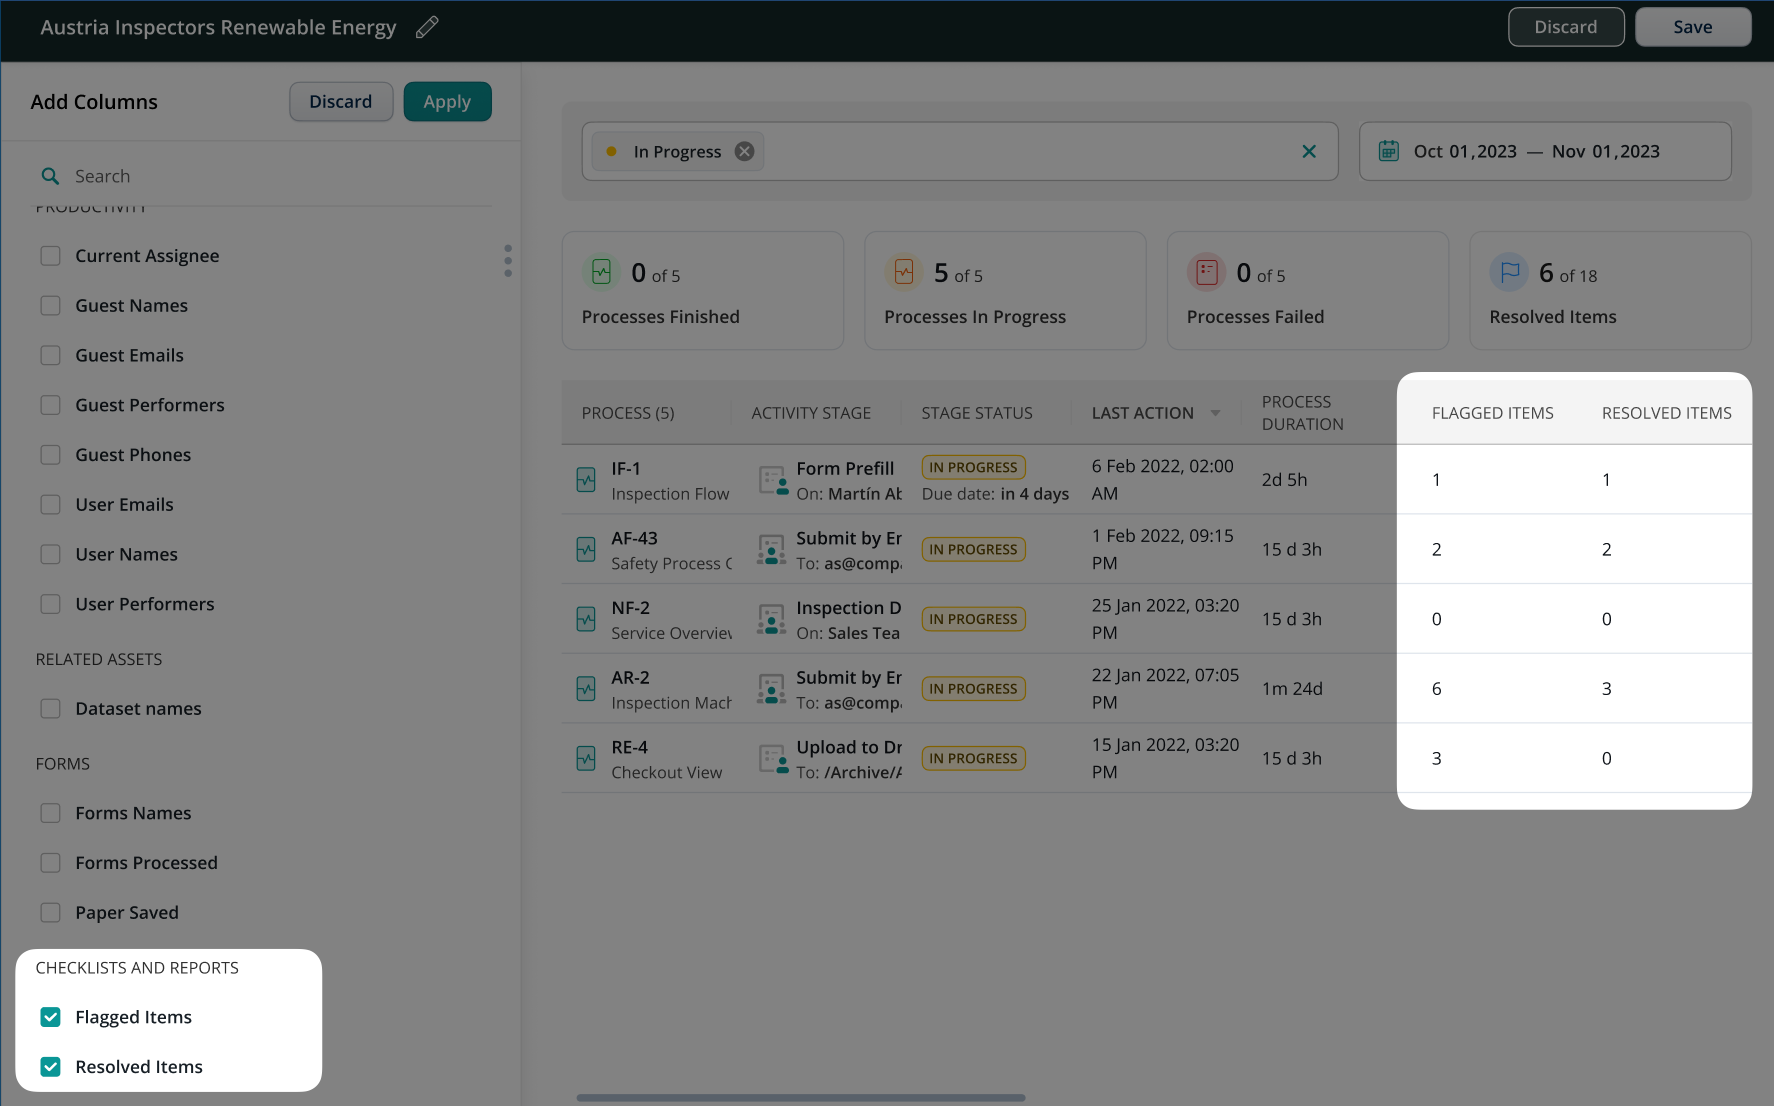
Fluix now offers Scheduling, a powerful feature designed to help you plan and automate task assignments, ensuring smooth project execution and effortless recurring tasks, such as inspections.
Who Benefits from Scheduling?
Back Office Teams – Easily automate task assignments based on project requirements. Schedule inspections daily, weekly, monthly, or quarterly without manual input, ensuring nothing is overlooked.
Field Teams – Receive task notifications exactly when needed, without manually tracking deadlines. Simply open the Fluix app when notified and start working on your assigned task.
What Can You Achieve with Scheduling?
Set up automatic triggers to run your processes at the perfect time.
Streamline your operations, save time, and ensure tasks are completed on schedule, reducing manual scheduling efforts.
Automate both recurring and one-time tasks.
Ensure time-bound tasks are never missed.
Clear task views, including upcoming tasks for admins and field staff.
Optimise task assignments by location and skills.
Improve compliance and reduce operational risks.
Note: Scheduling functionality is available starting from CorePricingPlan.
How to set up Scheduling in Admin Portal?
Use Case Example:
Imagine a Field Supervisor who needs to ensure that field workers perform weekly maintenance tasks efficiently without overlapping assignments.
Step 1 – Choose a workflow to schedule
Select the workflow where your tasks will be scheduled. You can either choose an existing one or create a new workflow.
Note: Scheduling is only available for processes initiated within Fluix and cannot be combined with processes initiated by external software.
Additionally, Scheduling currently applies only to User tasks in Fluix. We are actively working on adding scheduling for External Users.
Step 2 – Configure Scheduled Events
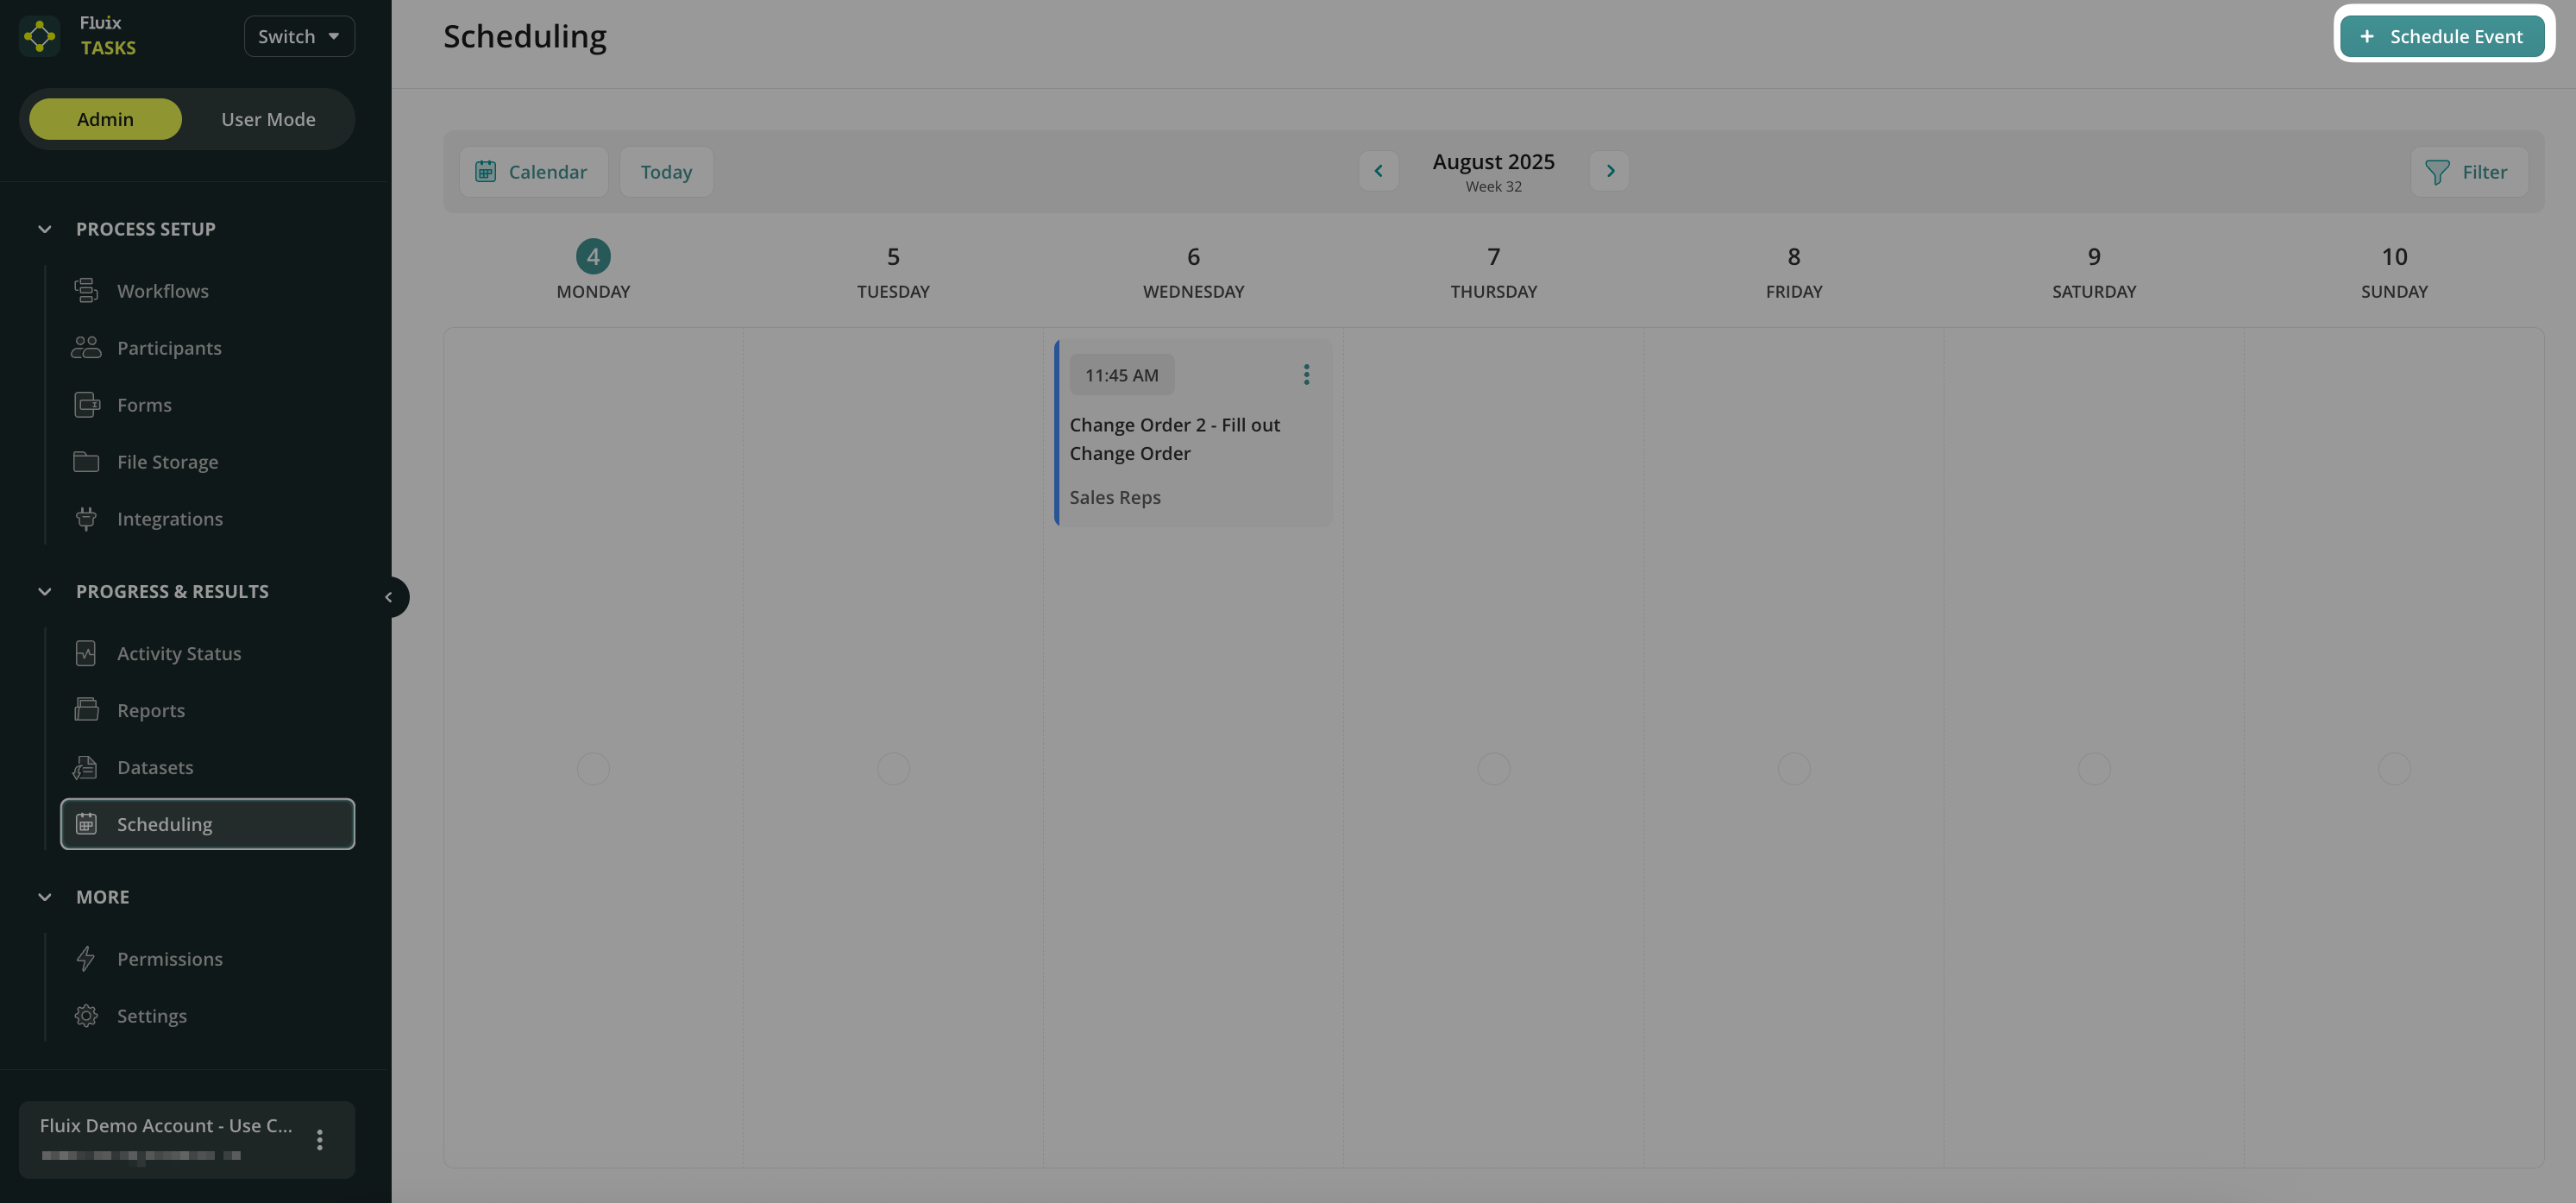
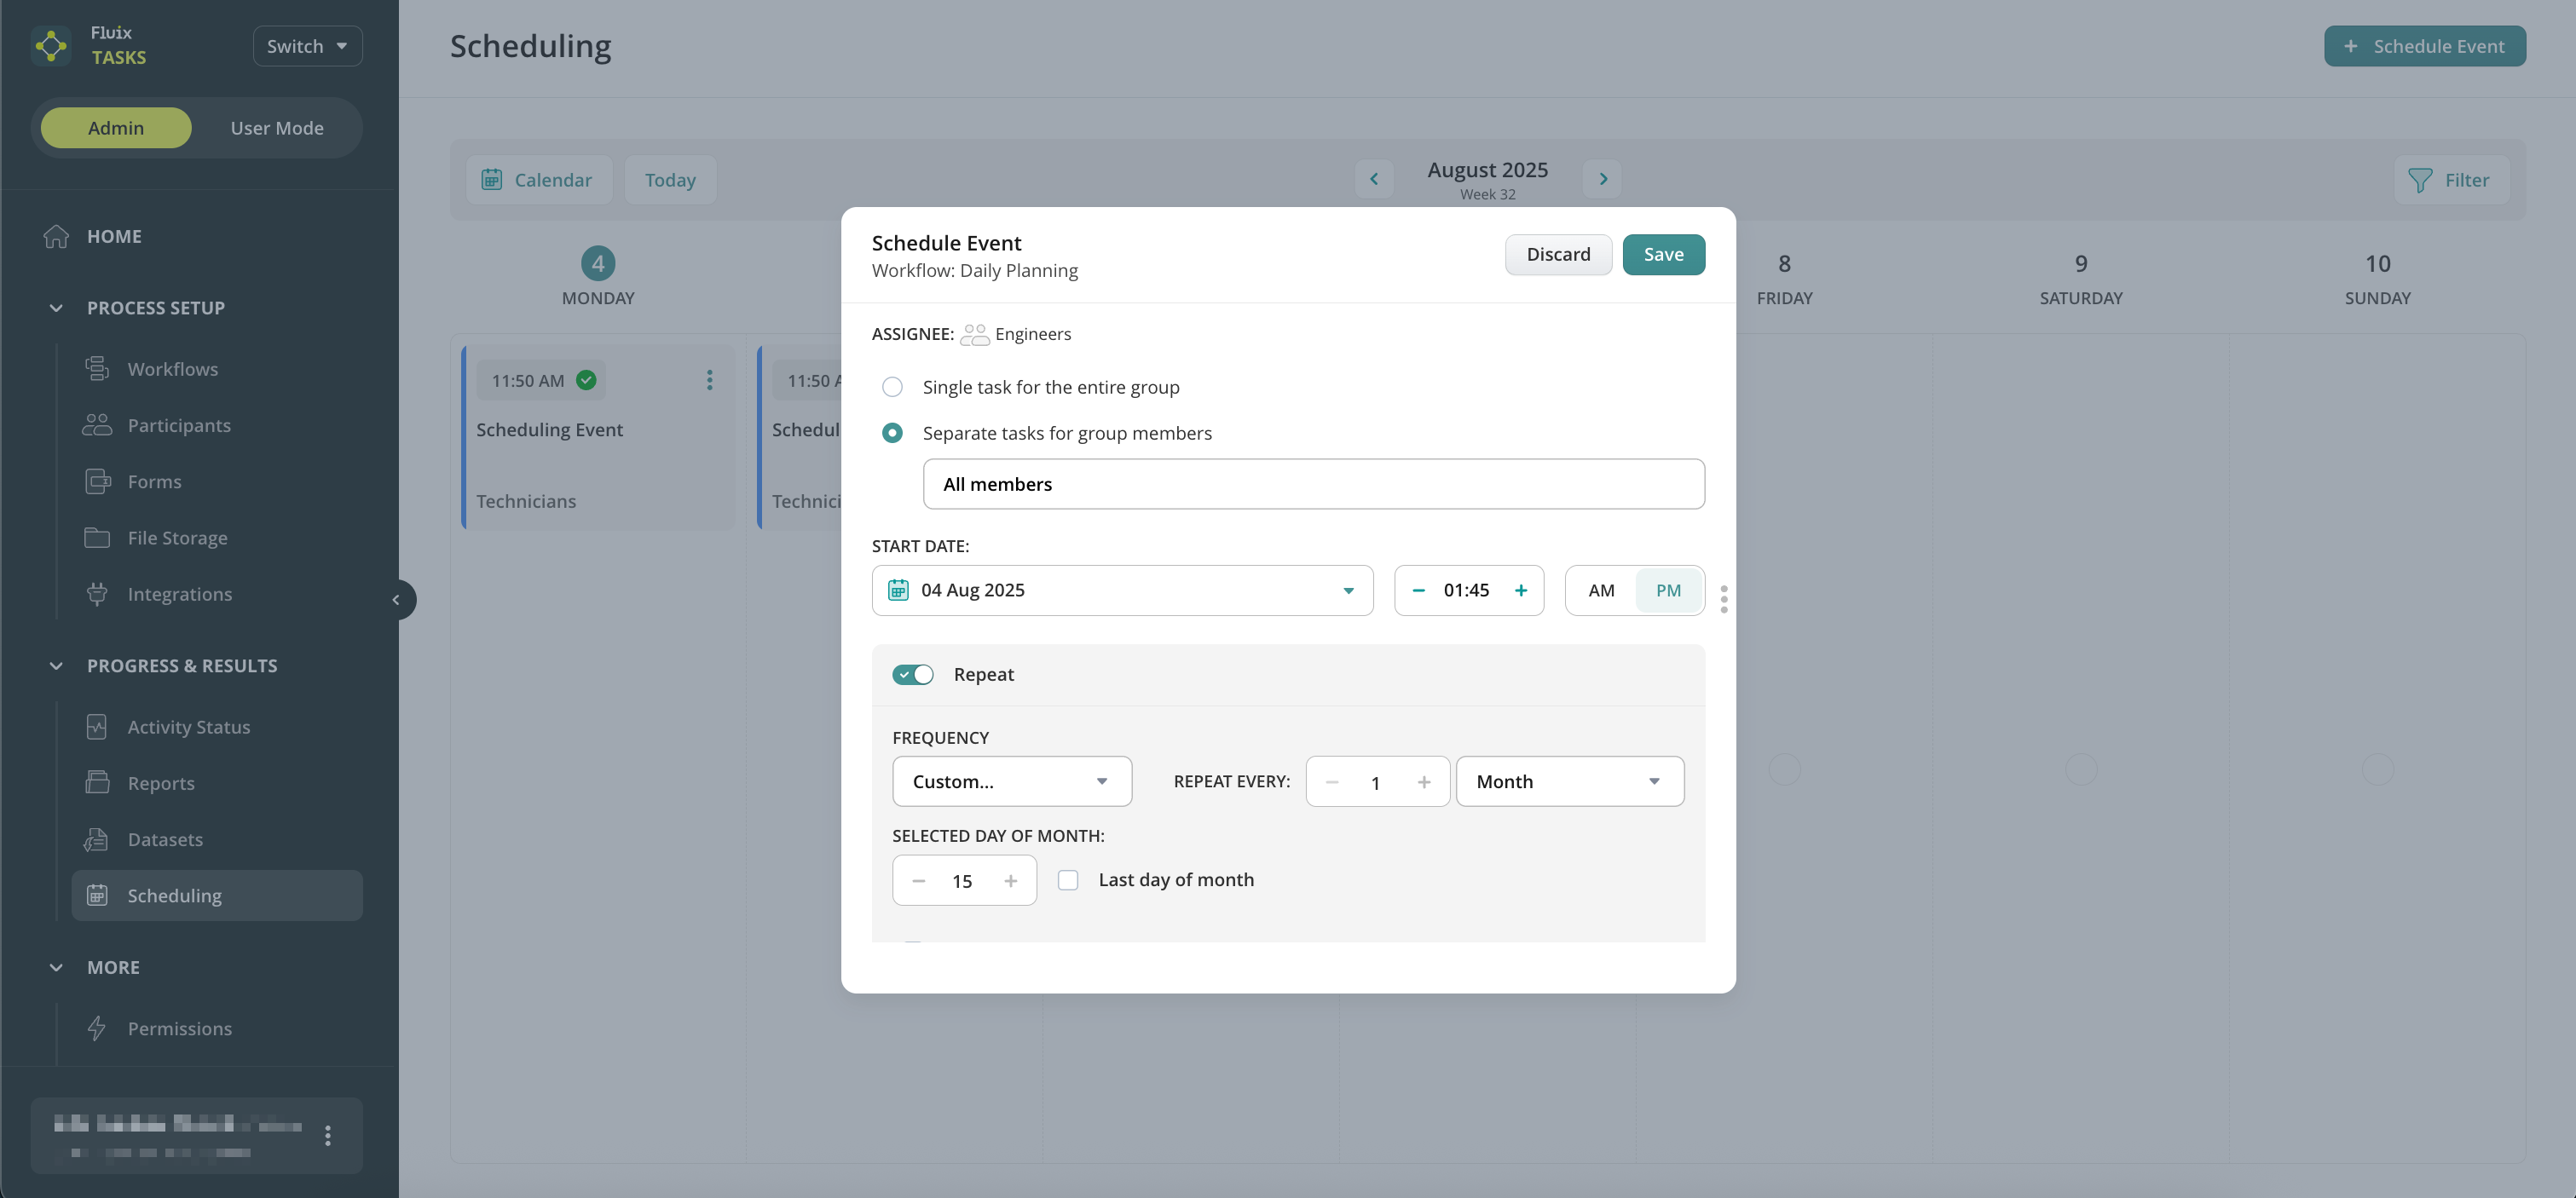
1. Go to the Scheduling section in the Fluix Admin Portal. 2. Click Schedule Event.
3. Choose the relevant workflow and give your event a clear name. 4. In the opened window, name the scheduled event and select the Assignee from the workflow. The assignee can be:
Group of Users – One shared task appears in the group’s Assigned section.
Each Group Member individually – Each group member receives their own task.
Individual team members from the Group – The selected group members will receive the tasks.
5. Define the Task Start Date and Time when users will receive the task and notification. 6. Choose the Recurrence:
One-time
Daily / Weekly – Pick specific weekdays.
Monthly – Choose a specific date or the last day of the month.
Quarterly – Every three months from the start date.
e.g., 15 Dec 2024 → 15 Mar 2025 → 15 Jun 2025
Yearly – Same day annually or the last day of the month.
e.g., 15 Dec 2024 → 15 Dec 2025 → 15 Dec 2026
Custom period – Plan and schedule tasks on your own terms, even if they don’t follow a fixed schedule
e.g. every 2 months on 15th.
7. (Optional) Set an end date if the task should stop after a period. Click Save.
You’ll now see a weekly view in the Scheduling section indicating that tasks are configured for automation. The Scheduled column will also be added in the workflow section.
Step 3 – Test Your Scheduled Tasks
Add yourself to the user group and verify the task assignment.
At the scheduled time, open the Fluix Tasks app to check that you received the notification.
Verify the task appears in your Assigned section—either individually or as part of a group.
If you have any questions, reach out to support@fluix.io. Also, subscribe to our product newsletter to stay updated on new features in Fluix!
Was this article helpful?
Thanks for your feedback!
Oops, something went wrong. Please, try again later.
Thank you!
What details or examples would have made this article more helpful for you? We appreciate your insights!
Dynamic Forms is a new functionality in Fluix Tasks that adds even more flexibility in creating processes according to the company’s business needs. In addition to the classic PDF format that is supported in Fluix, you can create web forms with dynamic layouts. Let’s dive into the details in this article.
What tasks do Dynamic Forms solve?
The main benefits of Dynamic Forms functionality are faster form filling and more accurate data. Below are specific ways to achieve these benefits.
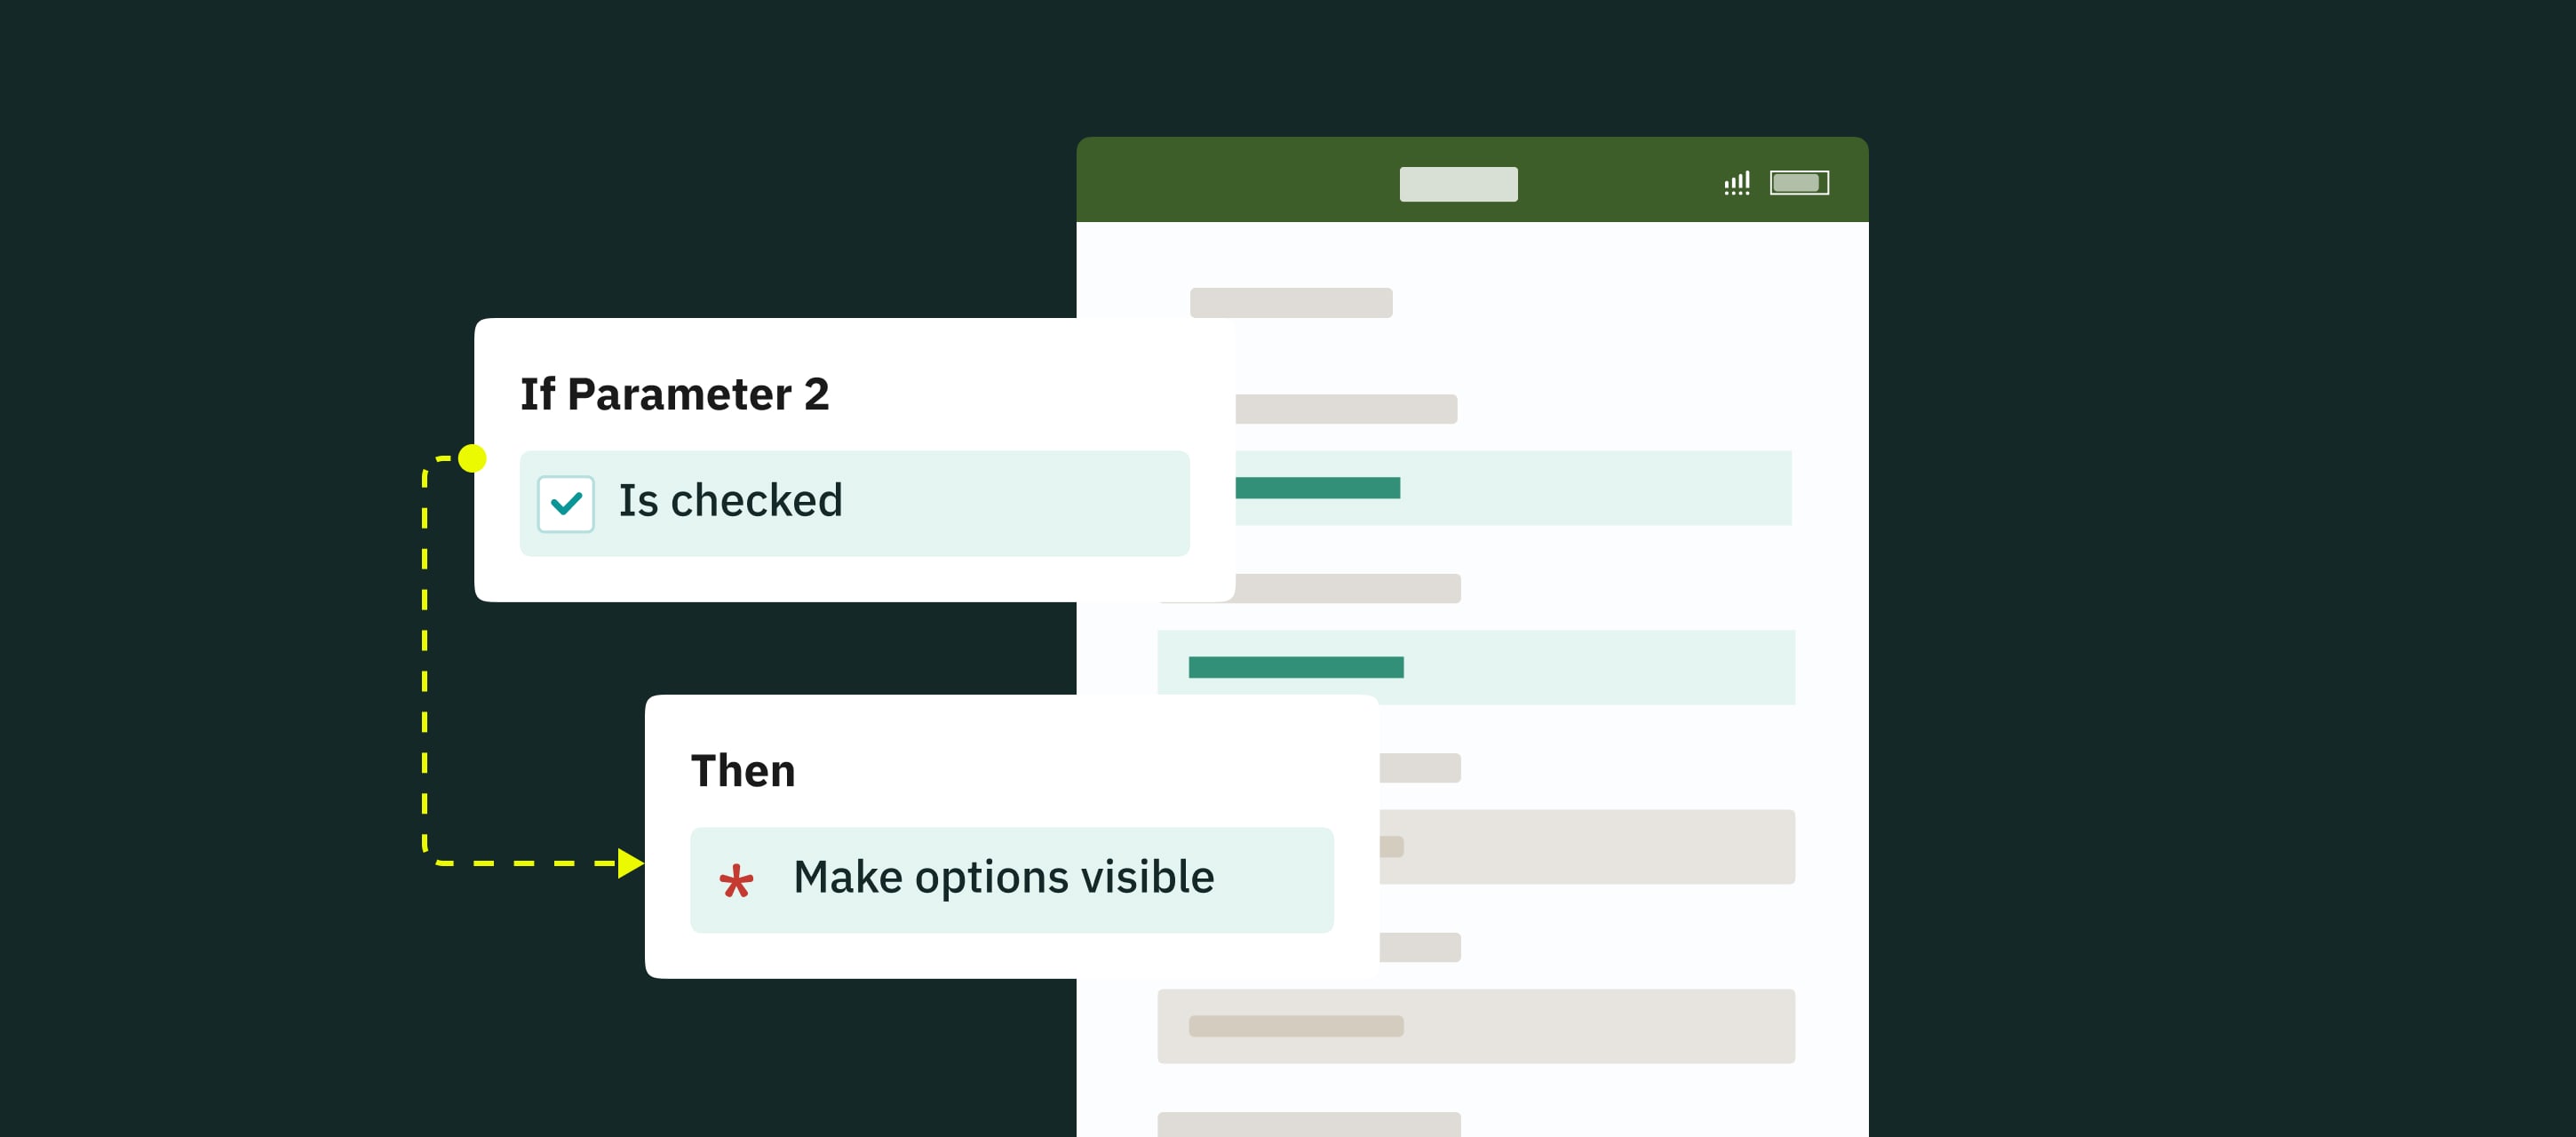
Conditional Logic
The fillable fields may appear, become required, read-only, and hidden dynamically based on the options the users select in the form. This ensures a more relevant and personalized form-filling experience, adapting to the users’ specific needs and choices in real time.
Unlimited Photo Upload
Let your field team upload as many images and comments as necessary in every case. Depending on the specific requirements or circumstances of the user’s case, the forms are flexible in providing the essential visual information and automatically adjust the size of the form depending on the number of photos added.
Mobile-friendly Look
On-device forms look easy to fill in on smartphones and tablets, fields are big enough. This allows app users to collect data quickly.
Fields Assignment on a Group Level
The admin can predefine who will fill out which fields at different flow steps. This enhances the form-filling process by tailoring forms to each group’s requirements and preferences as they fill them out.
Use Case Example
Here’s how dynamic forms can streamline real-life workflows in Fluix:
Imagine a field technician completing an inspection checklist during their shift. They need to attach several photos from the site. Based on their selections in the form, predefined conditions automatically trigger additional fields, guiding the technician to fill in only the relevant information.
How to set up Dynamic Forms in the business process?
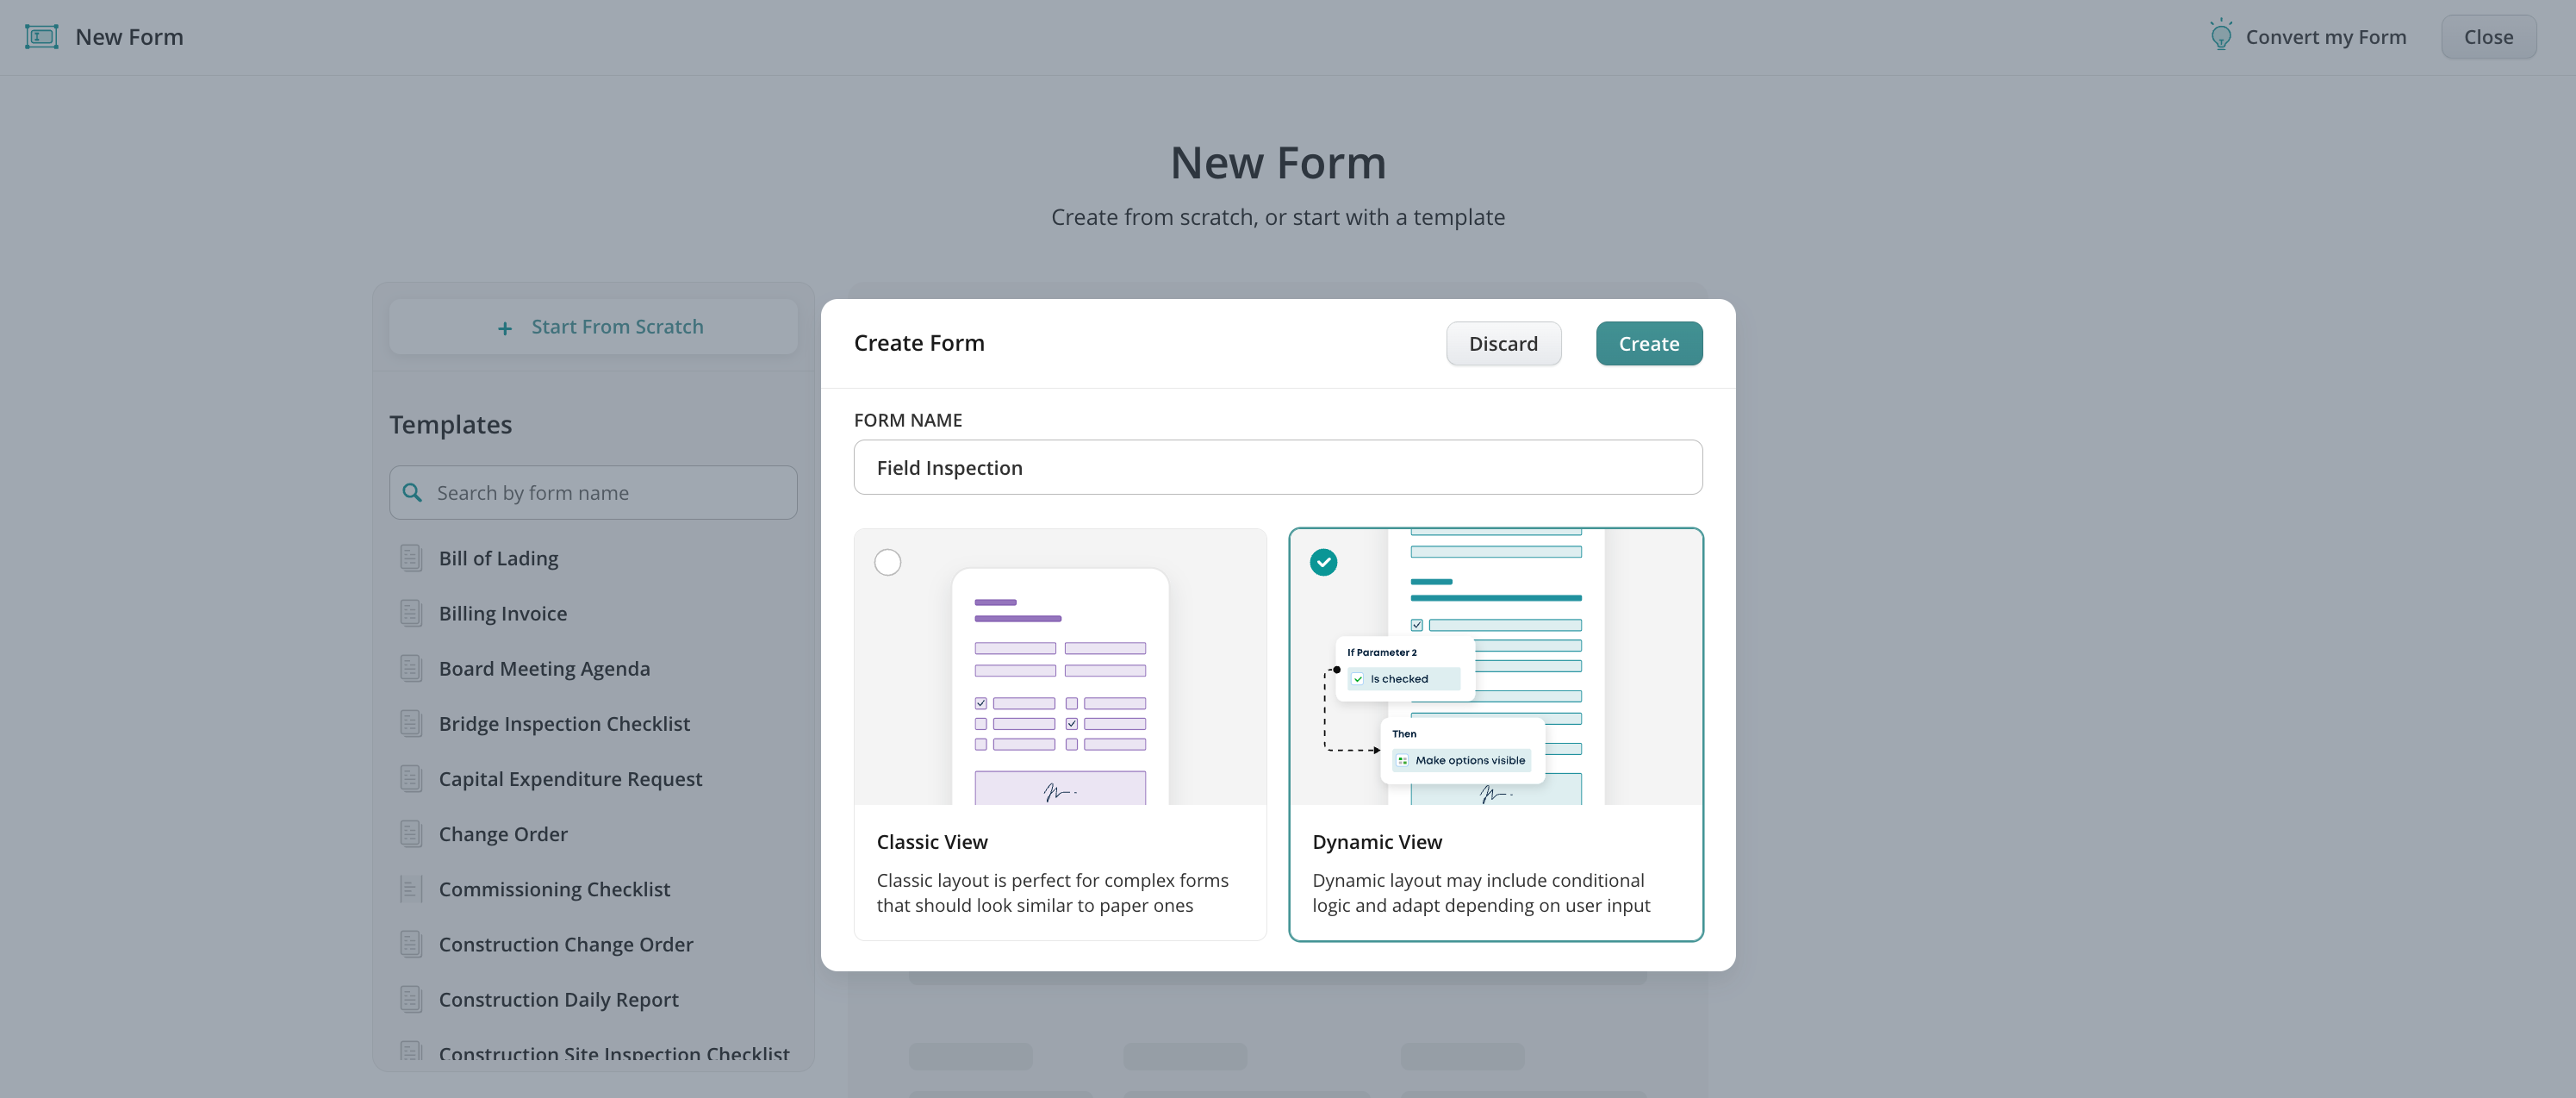
Step 1 – Create a dynamic form in Form Builder
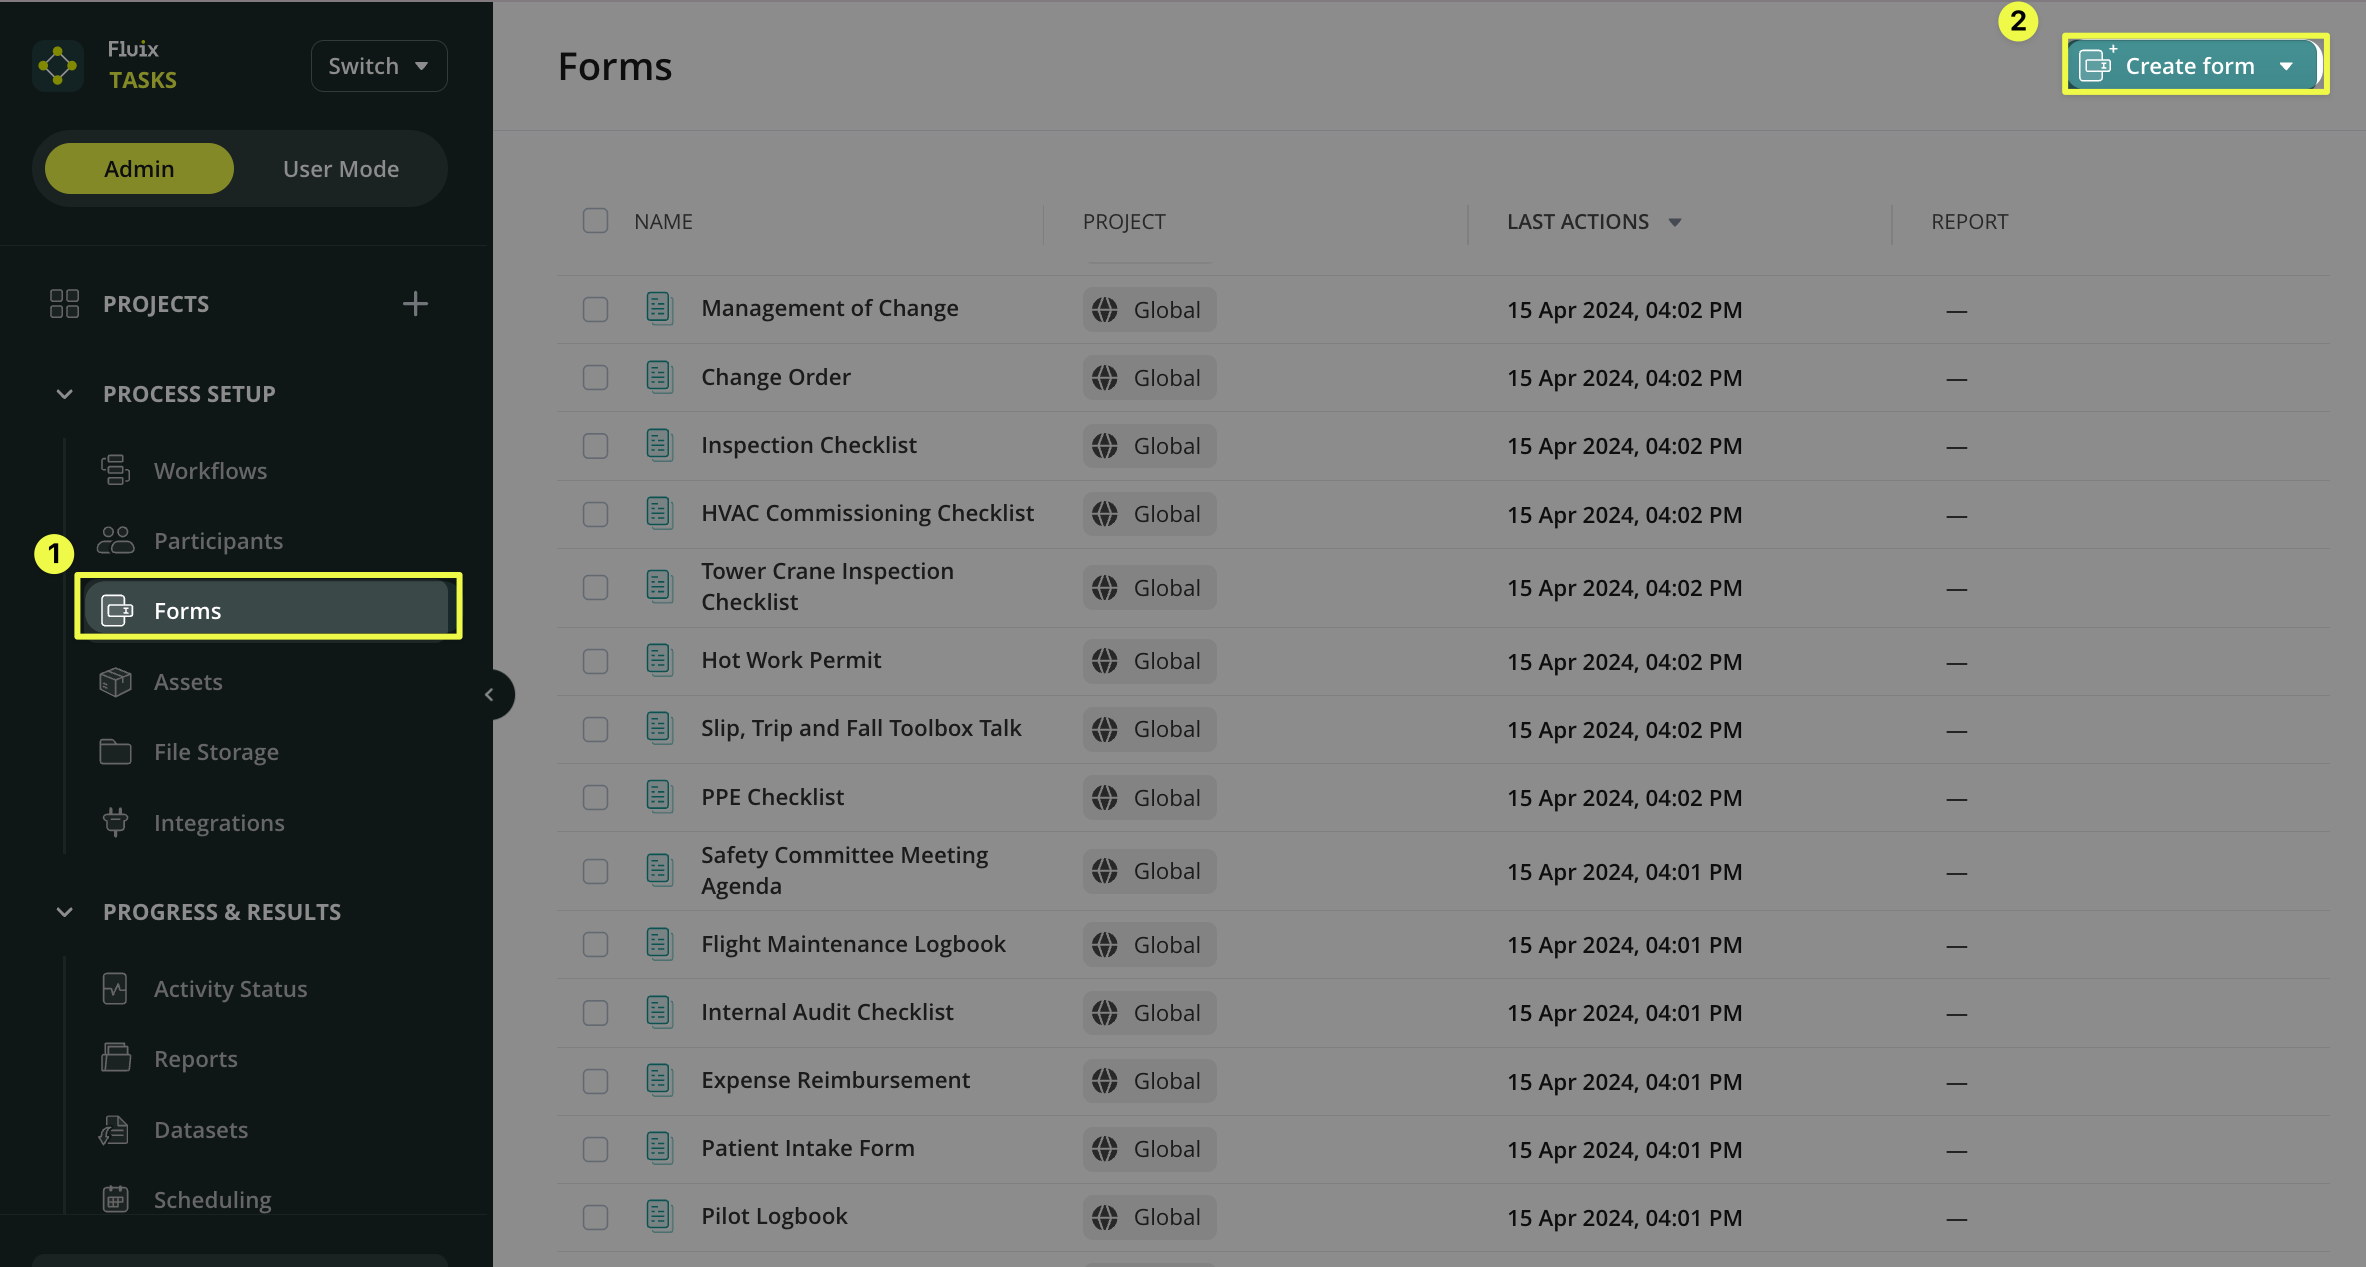
1.Navigate to the Admin tab -> Process Setup -> Forms.
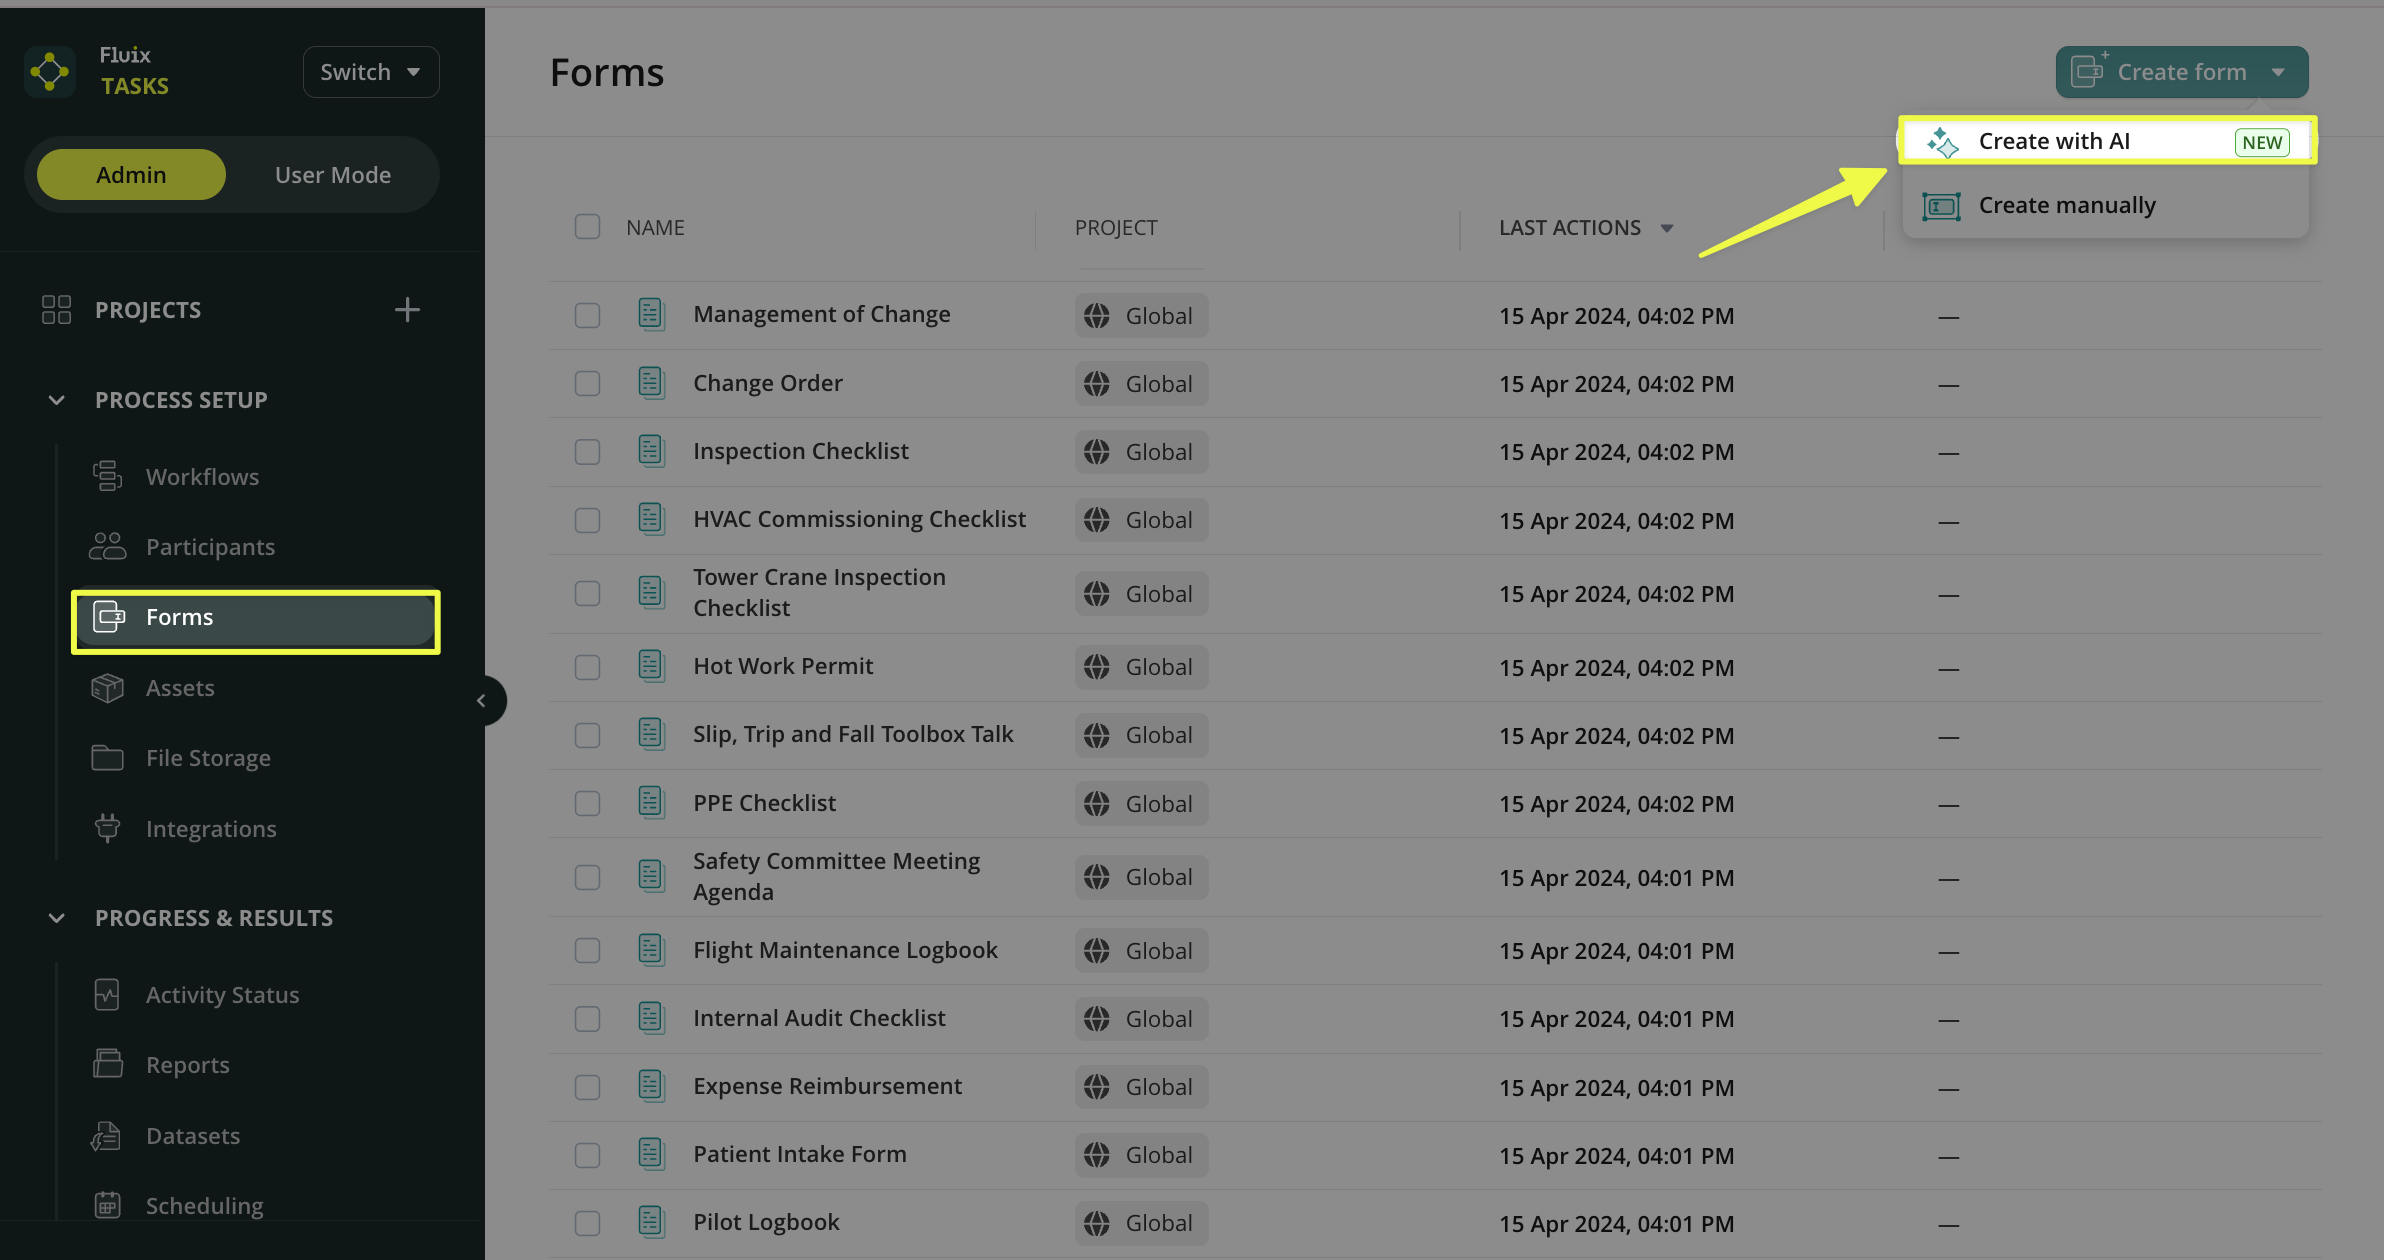
2.Click Create Form –> on the left, click Start from Scratch, select Dynamic View in the opened window, and name your form.
3.In the upper panel, you will see two tabs:
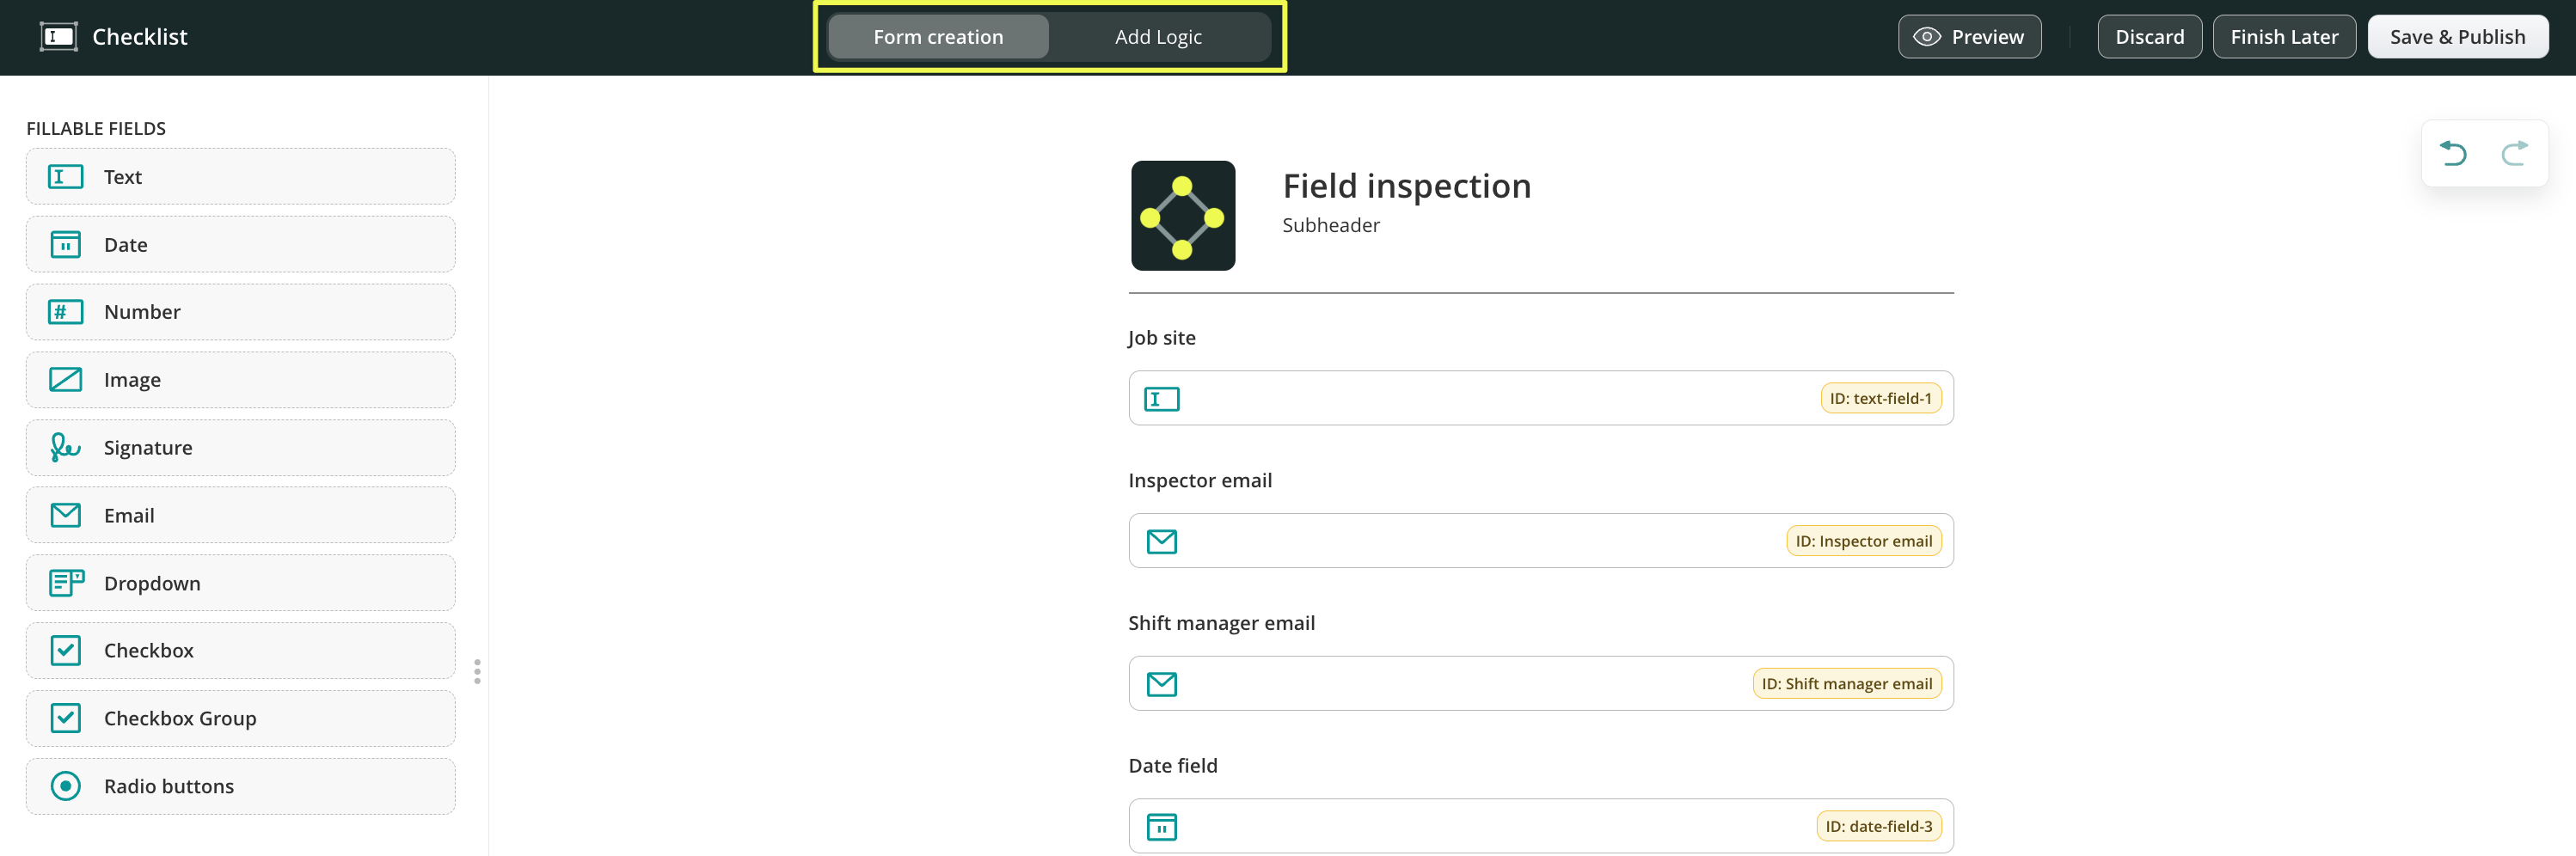
Form creation—displays a menu with a list of elements that can be used to create a form. Click on the element to add it or drag and drop it to the centre to start creating your form.
Add Logic tab—here, you can configure the conditions for fields in the form to make them required, read-only, or hidden dynamically based on the options the users select in the form.
Form creation tab – mapping the fields in the form
The elements are divided into two groups:
Fillable fields – the different types of fields to add to the forms to collect the most relevant data.
Layout – helps you customize your forms by creating Sections, adding a header, text, company logo, and a divider.
Once the element is added, you may do the following:
In the Field ID section, a specific ID for each field is assigned. This will help you later navigate through the fields when setting up the conditions for the fields.
In the Label section, you may add the name of how this field should be reflected in the form for the user. If needed, you can also make the field required. The required status does not work if this field is read-only or hidden. You can change it later in conditional options.
Please note: We recommend naming the fields IDs and labels of the fields the same way. It will help you to navigate through the dynamic form when configuring easily.
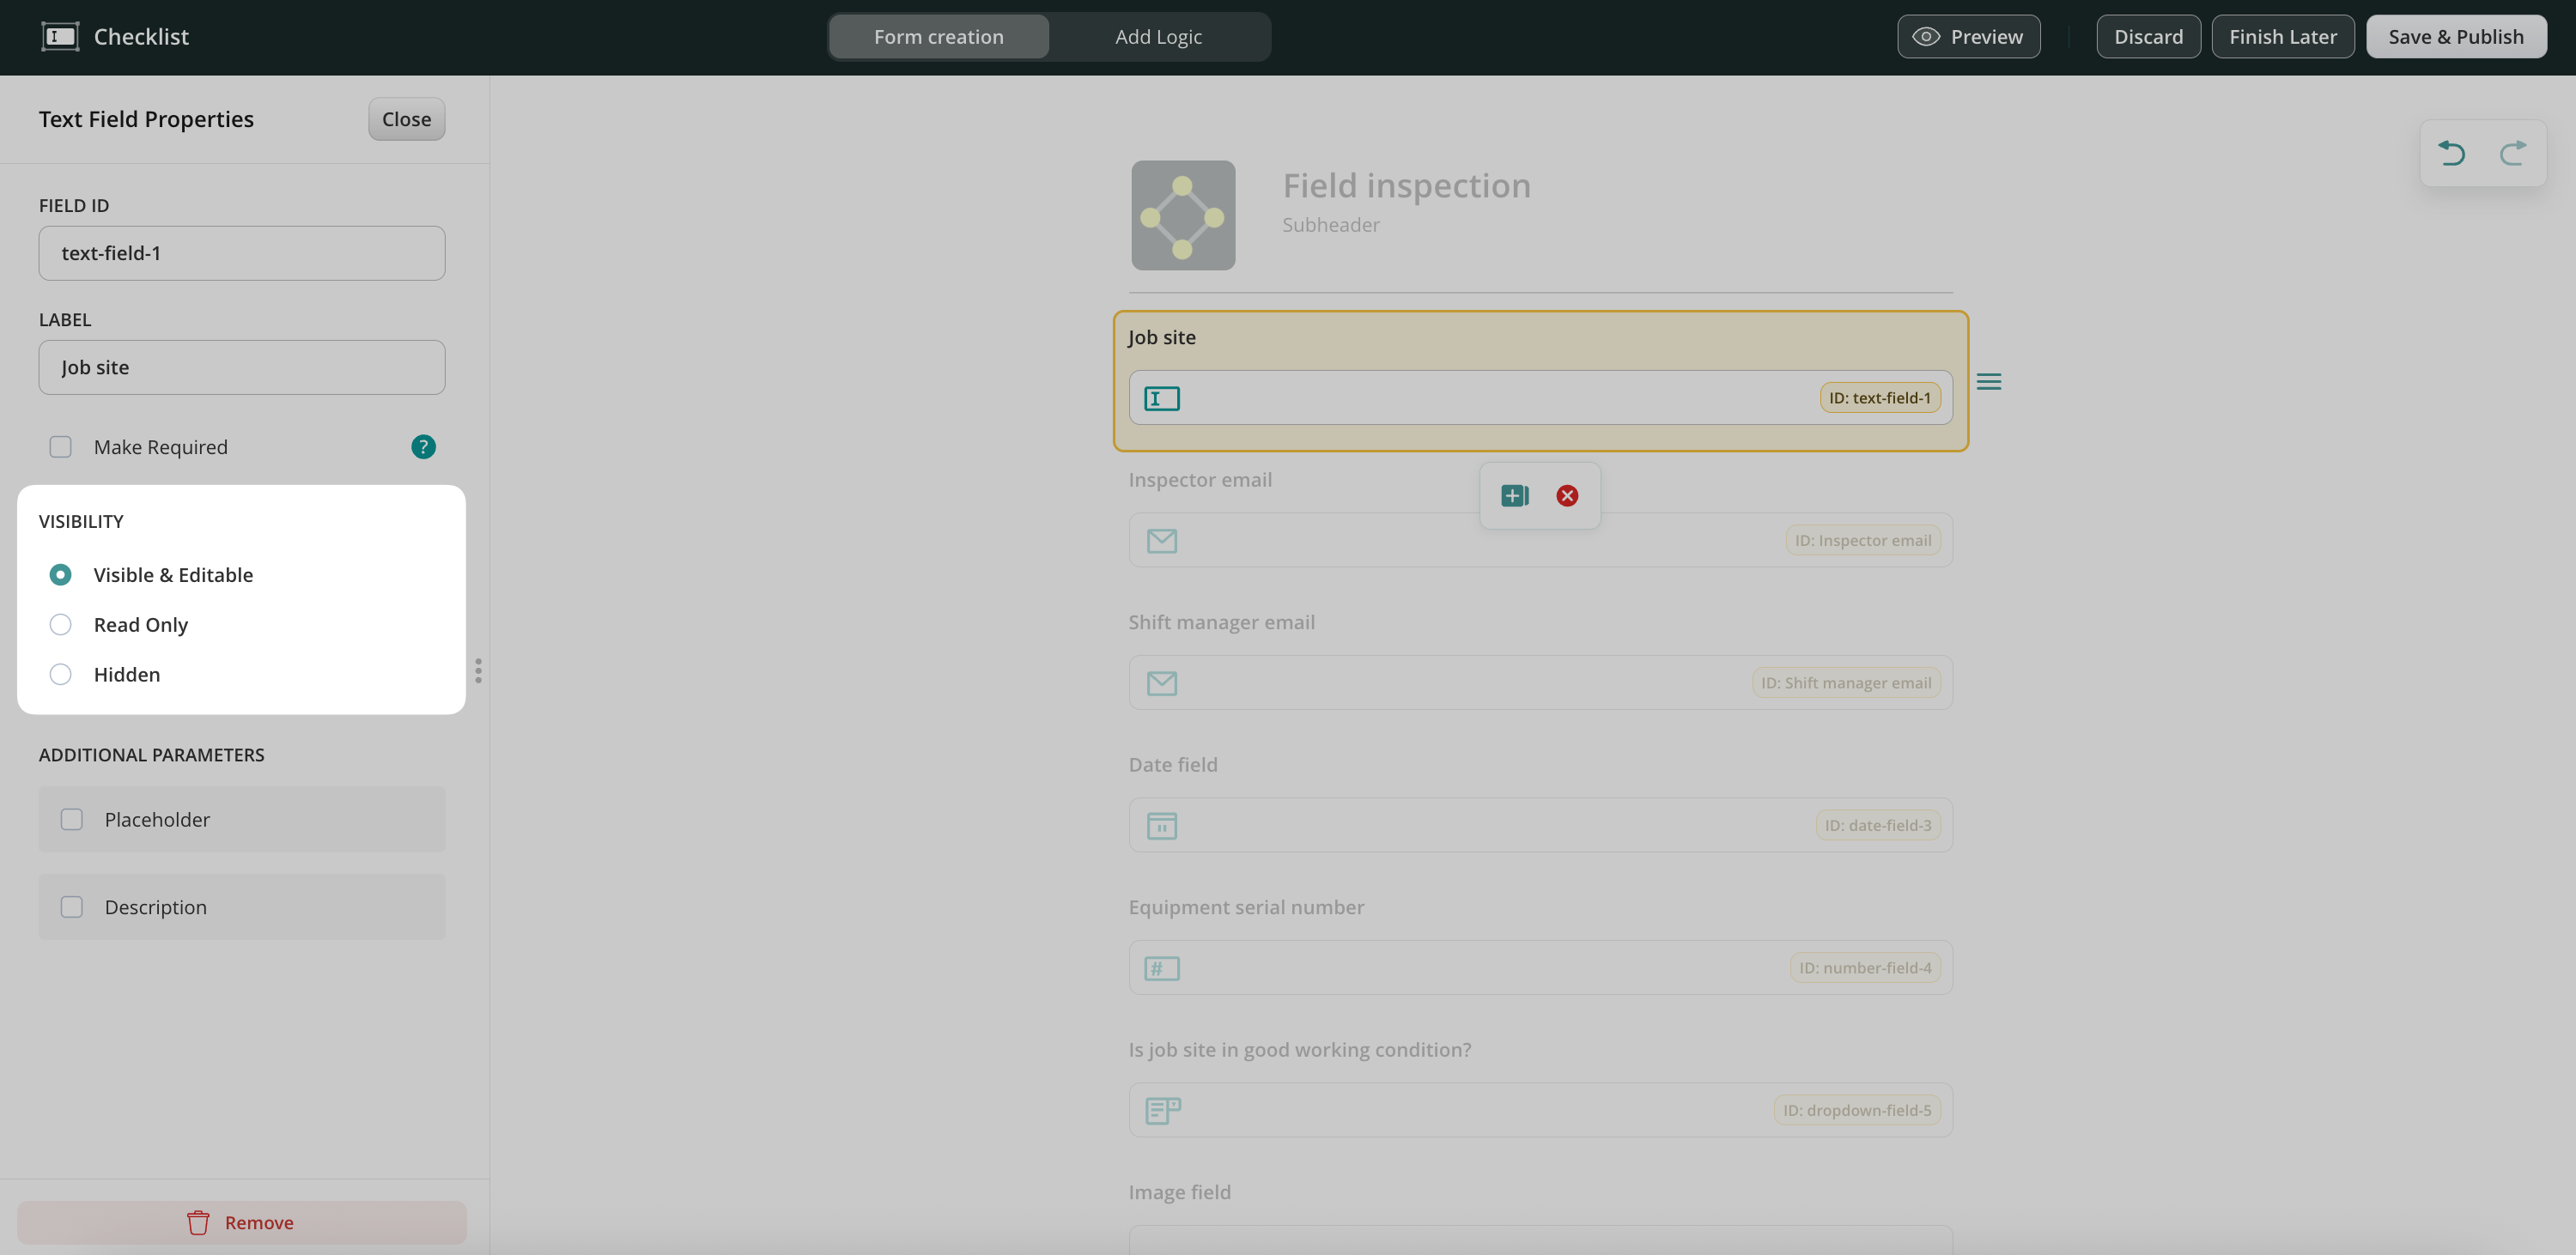
In the Visibility section, you can select how the field will be reflected in the form: should it be visible & editable, read only, or hidden.
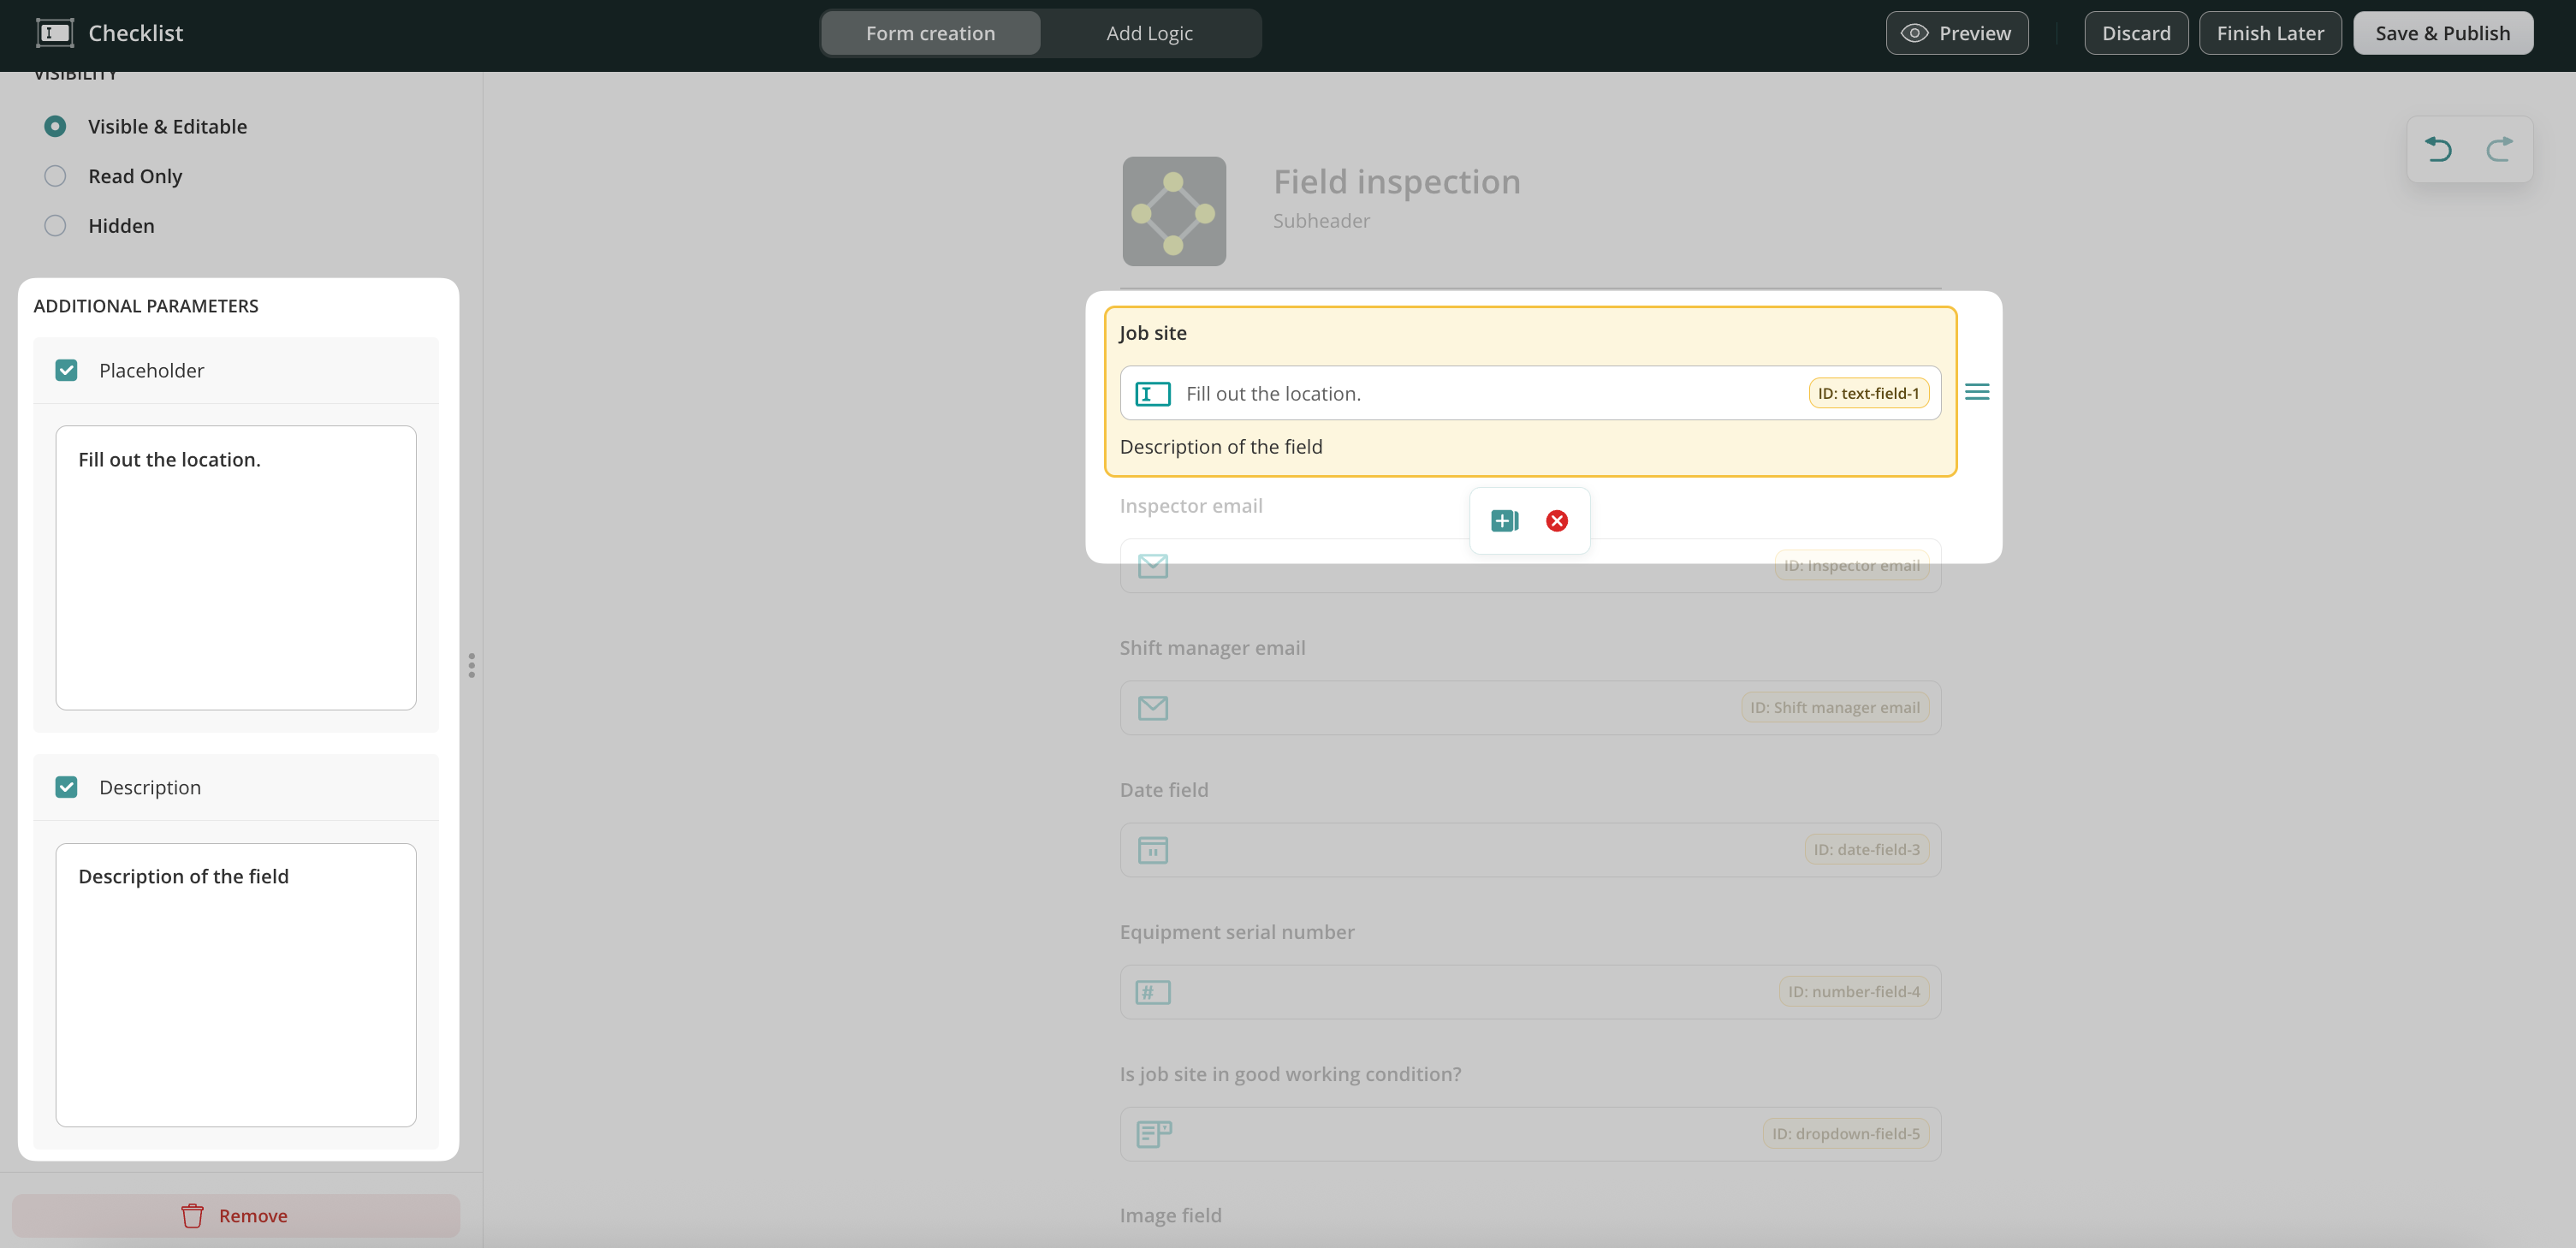
In the Additional Parameters section, you can add the following options:
1. Placeholder and/or Description — lets you create hints for your users, e.g., which information you expect them to fill out in the respective fields.
2. Format option is available for the Number field and lets you configure the visual view of the number that will be filled out in this field.
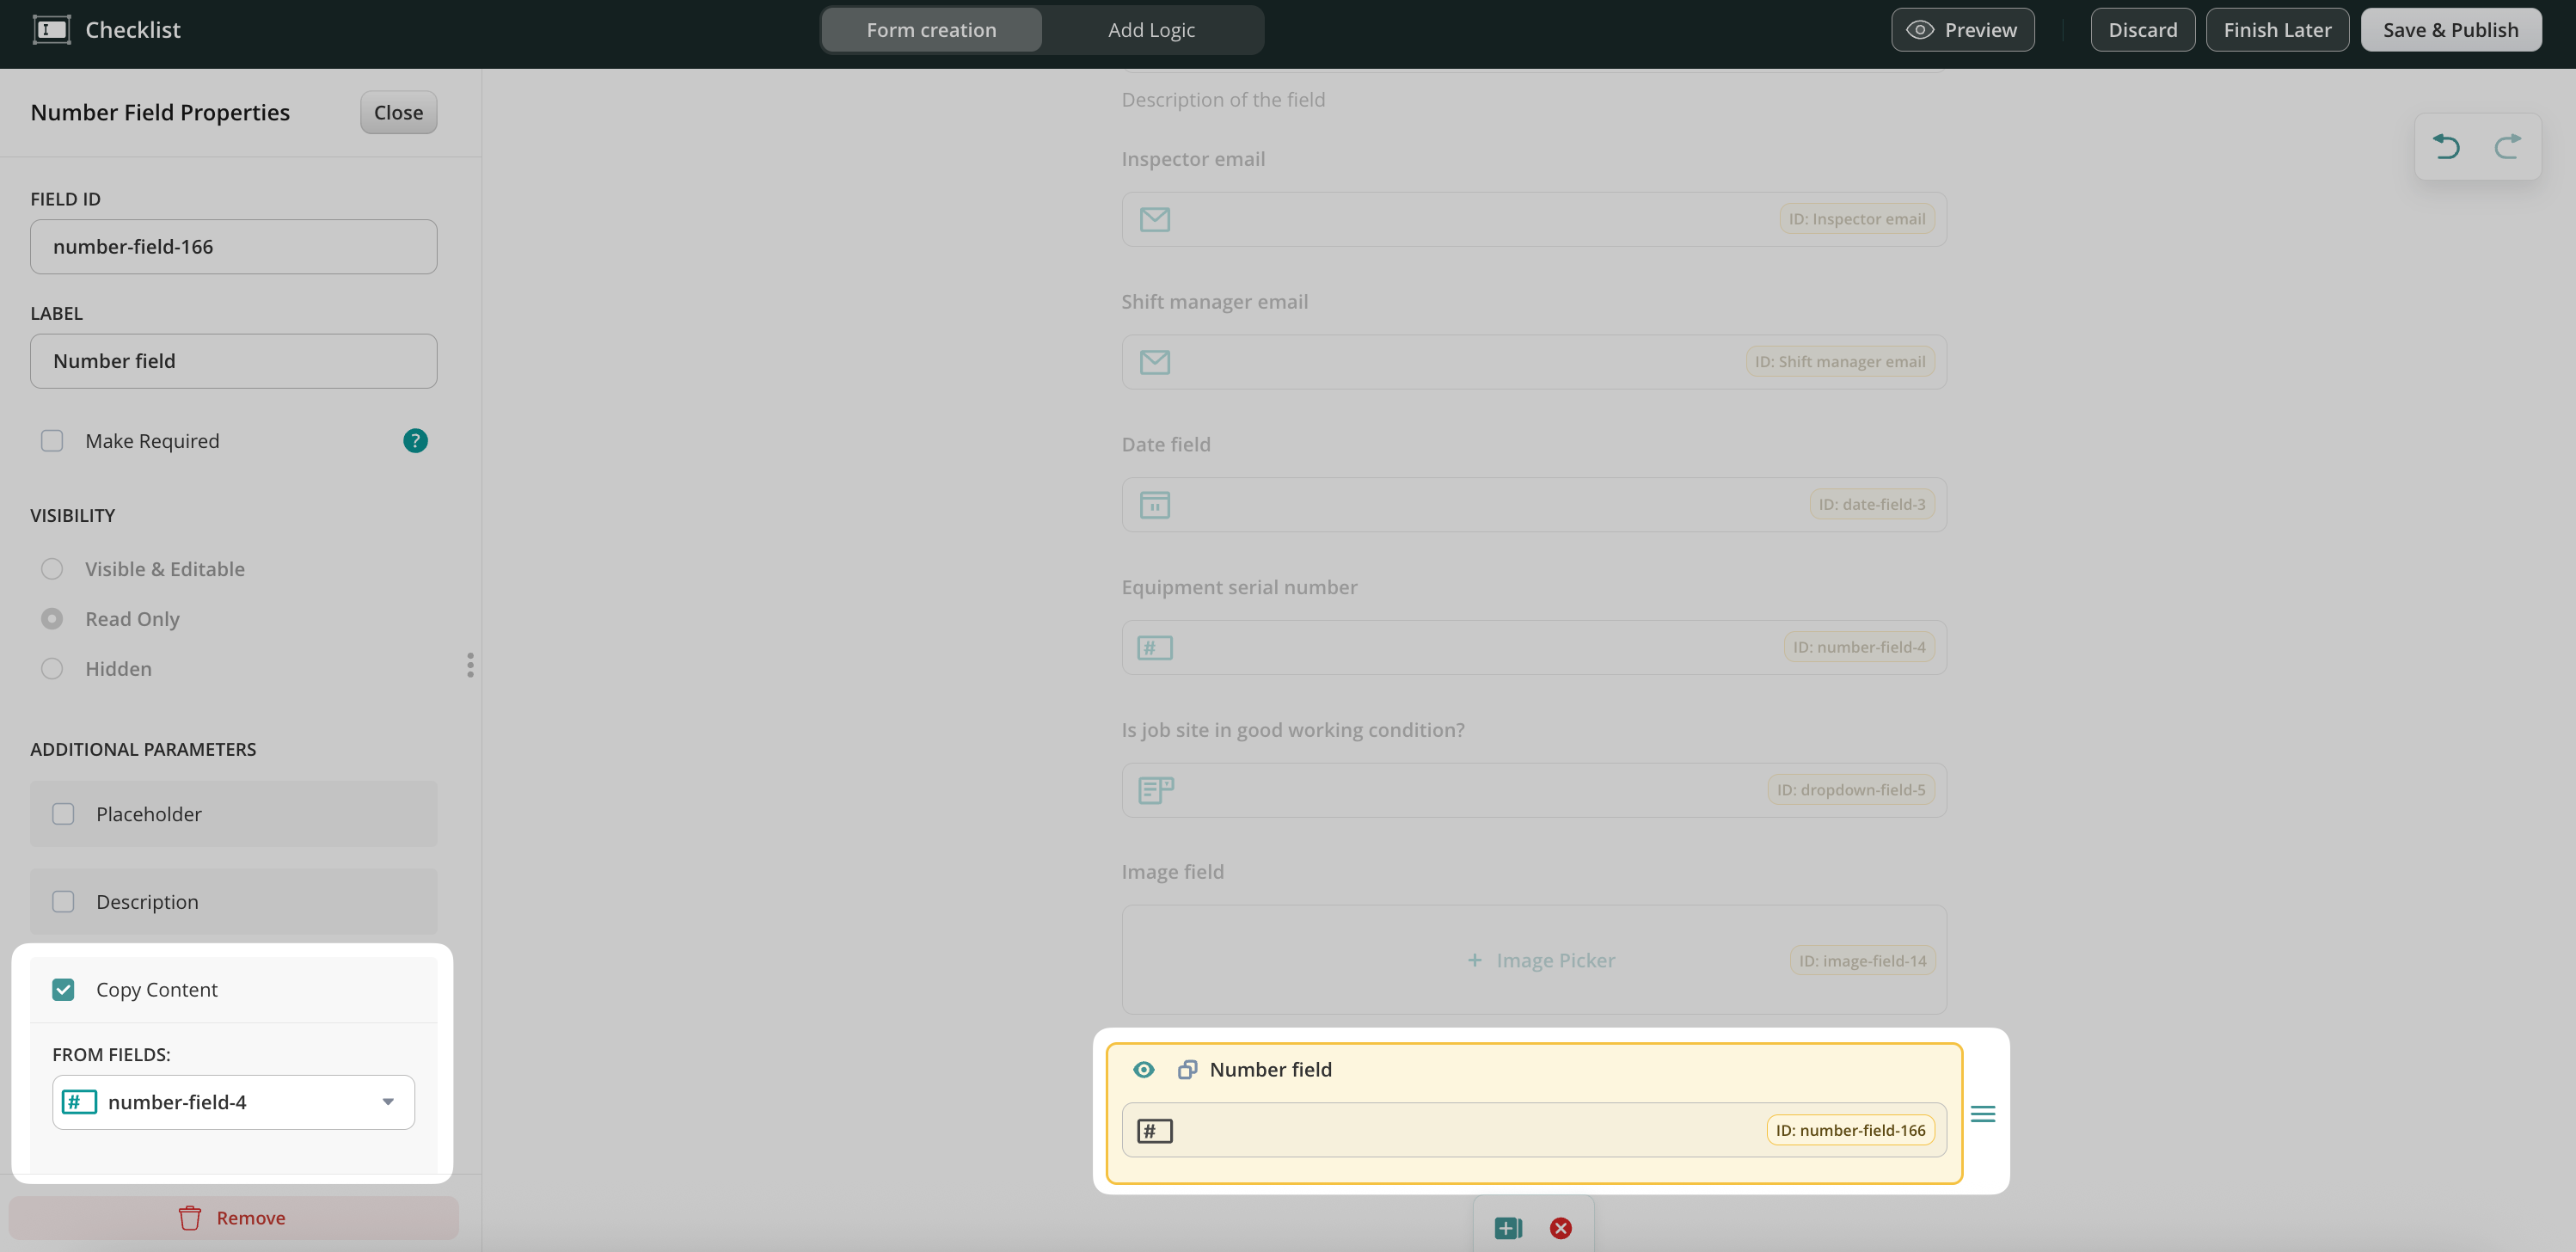
3. Copy Content is an option that can be added to the Number, Text, and Email fields in the form builder. This function duplicates the content added from one field to another.
For example: If, according to the business flow, your users fill out the same information on the form a couple of times, you may automate this flow by enabling the Copy Content option for the respective field. For this, add two similar fields, e.g., Number fields, to the Dynamic Form builder -> click on the field to open it -> select the ID of the field from which you would like the data to be transferred to the current field.
Please note: if the field used to copy content is deleted, the checkbox for the field to which the content should be copied will be automatically unchecked.
Please note 2.0: the field to which the content will be copied should not be set as required or read-only when the copy content is set up. Otherwise, a form with such configurations cannot be submitted due to the conflict of the configurations.
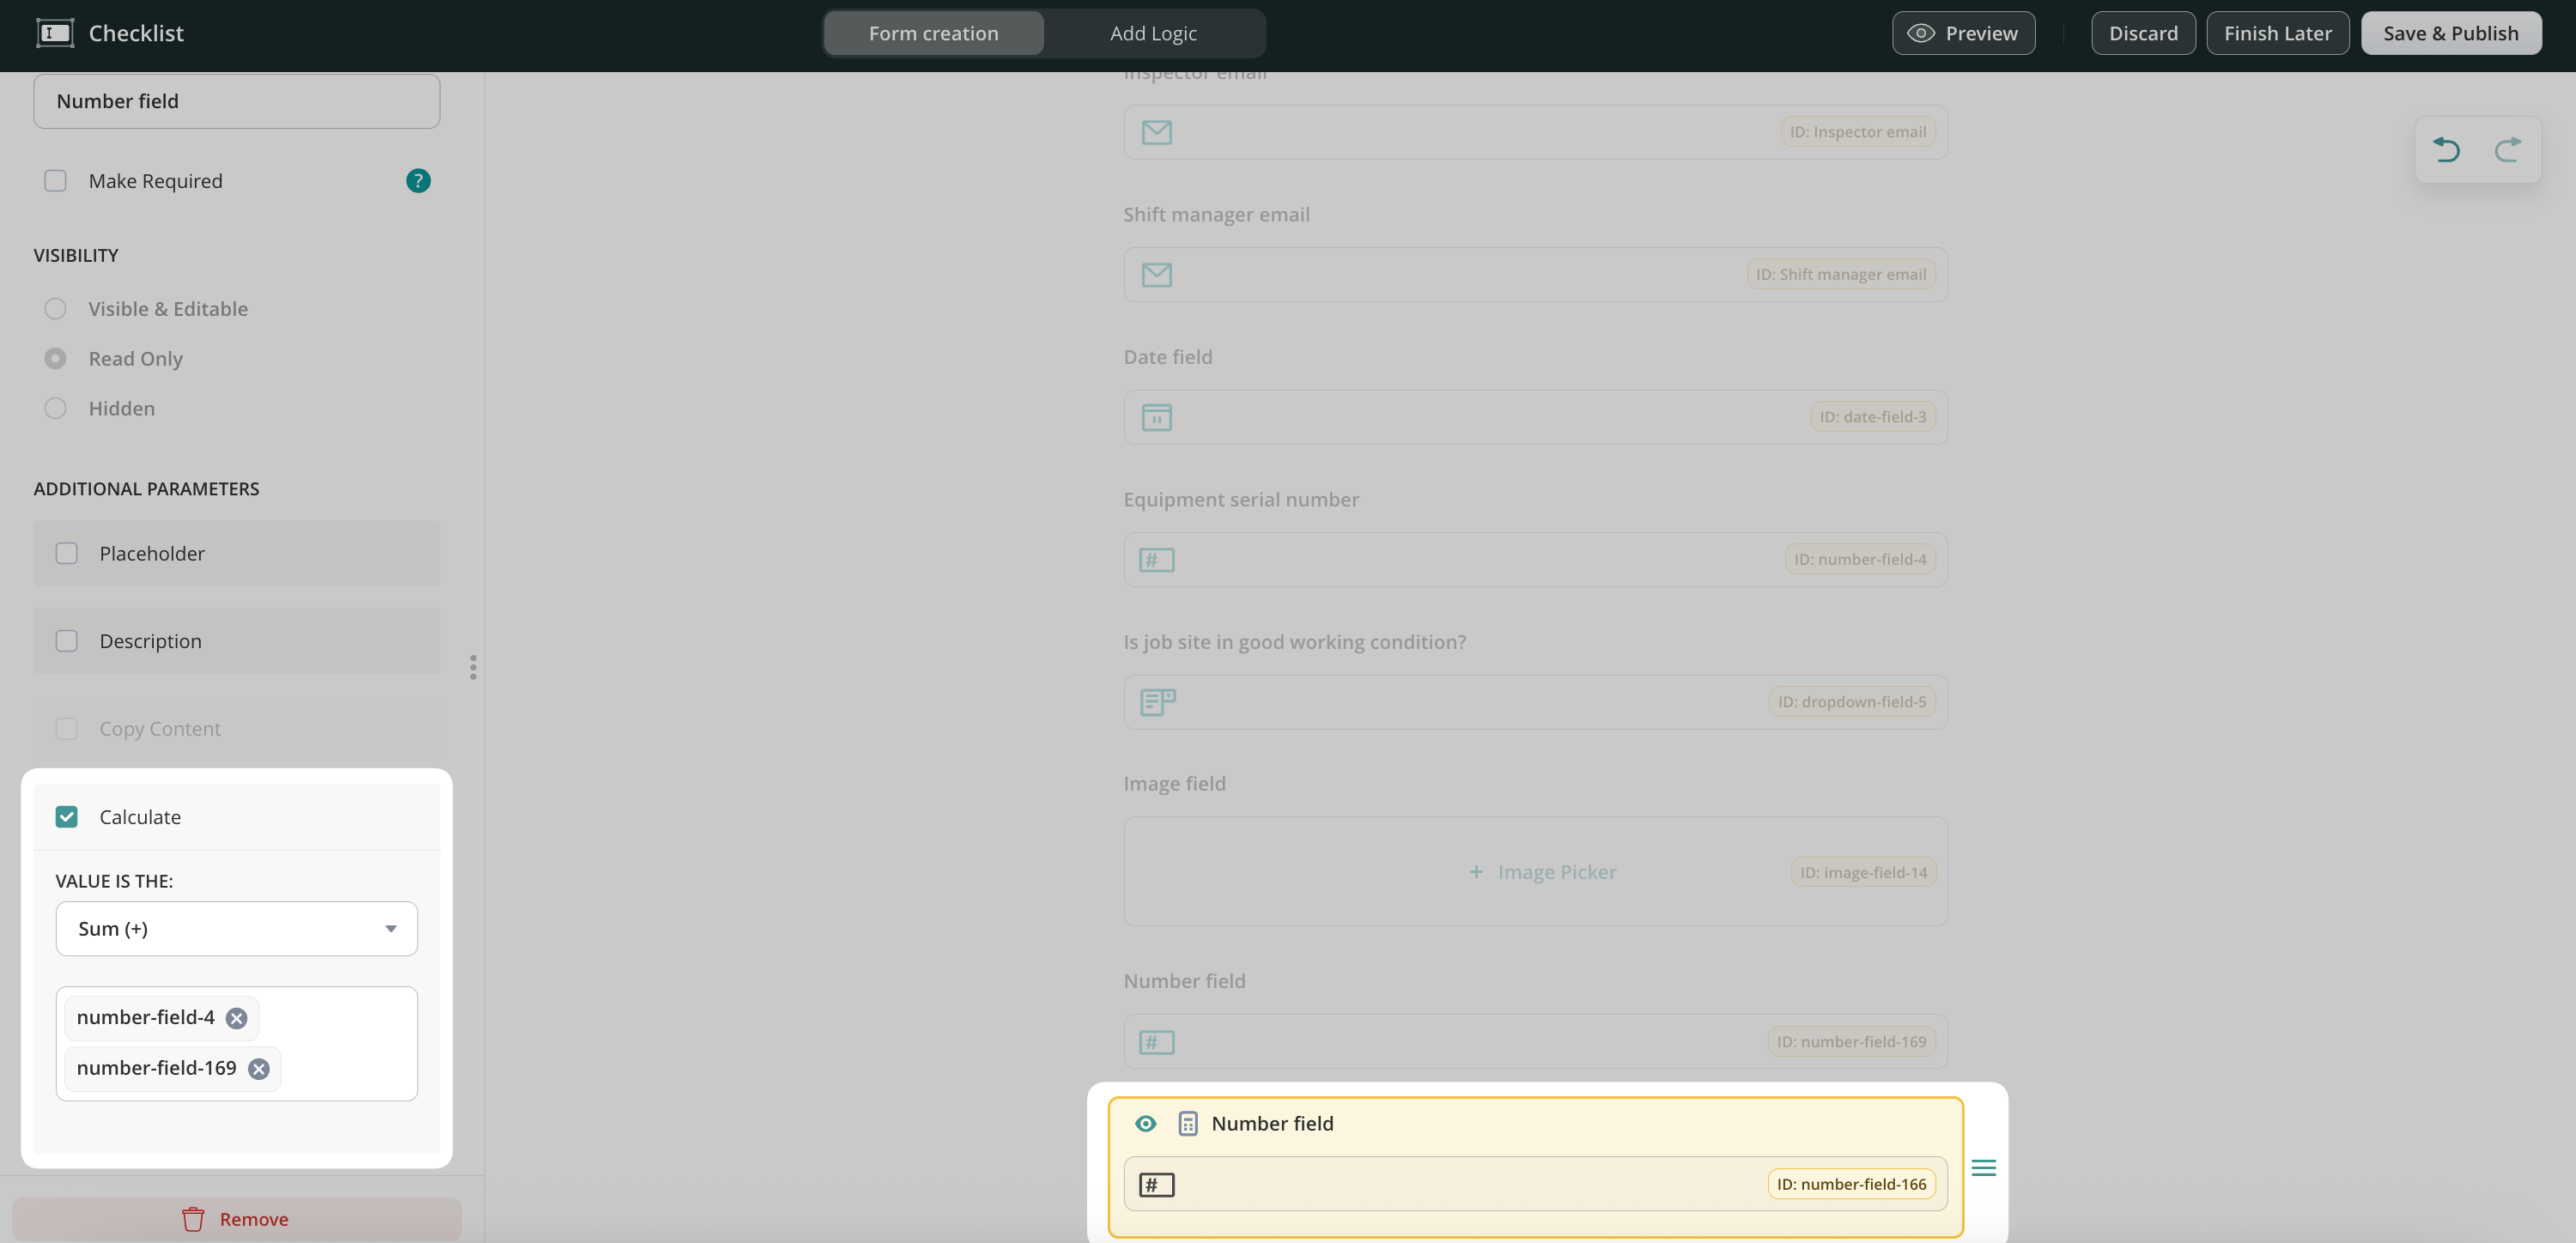
4. Calculate – this function is available for the Number field and lets you configure automatic calculations such as Sum ( + ), Product ( x), Average, Minimum, and Maximum.
5. Preview – check the editable version of the created form in three main modes: Mobile, Tablet, and Desktop, before you publish it and use it in your workflow.
6. Move the added field through the page by clicking on the element from the right side of it and pulling it.
7. Duplicate or delete the field by clicking on it and selecting the respective option.
8. Undo the action done earlier or redo it to discard the results of the last Undo action by clicking on the arrows.
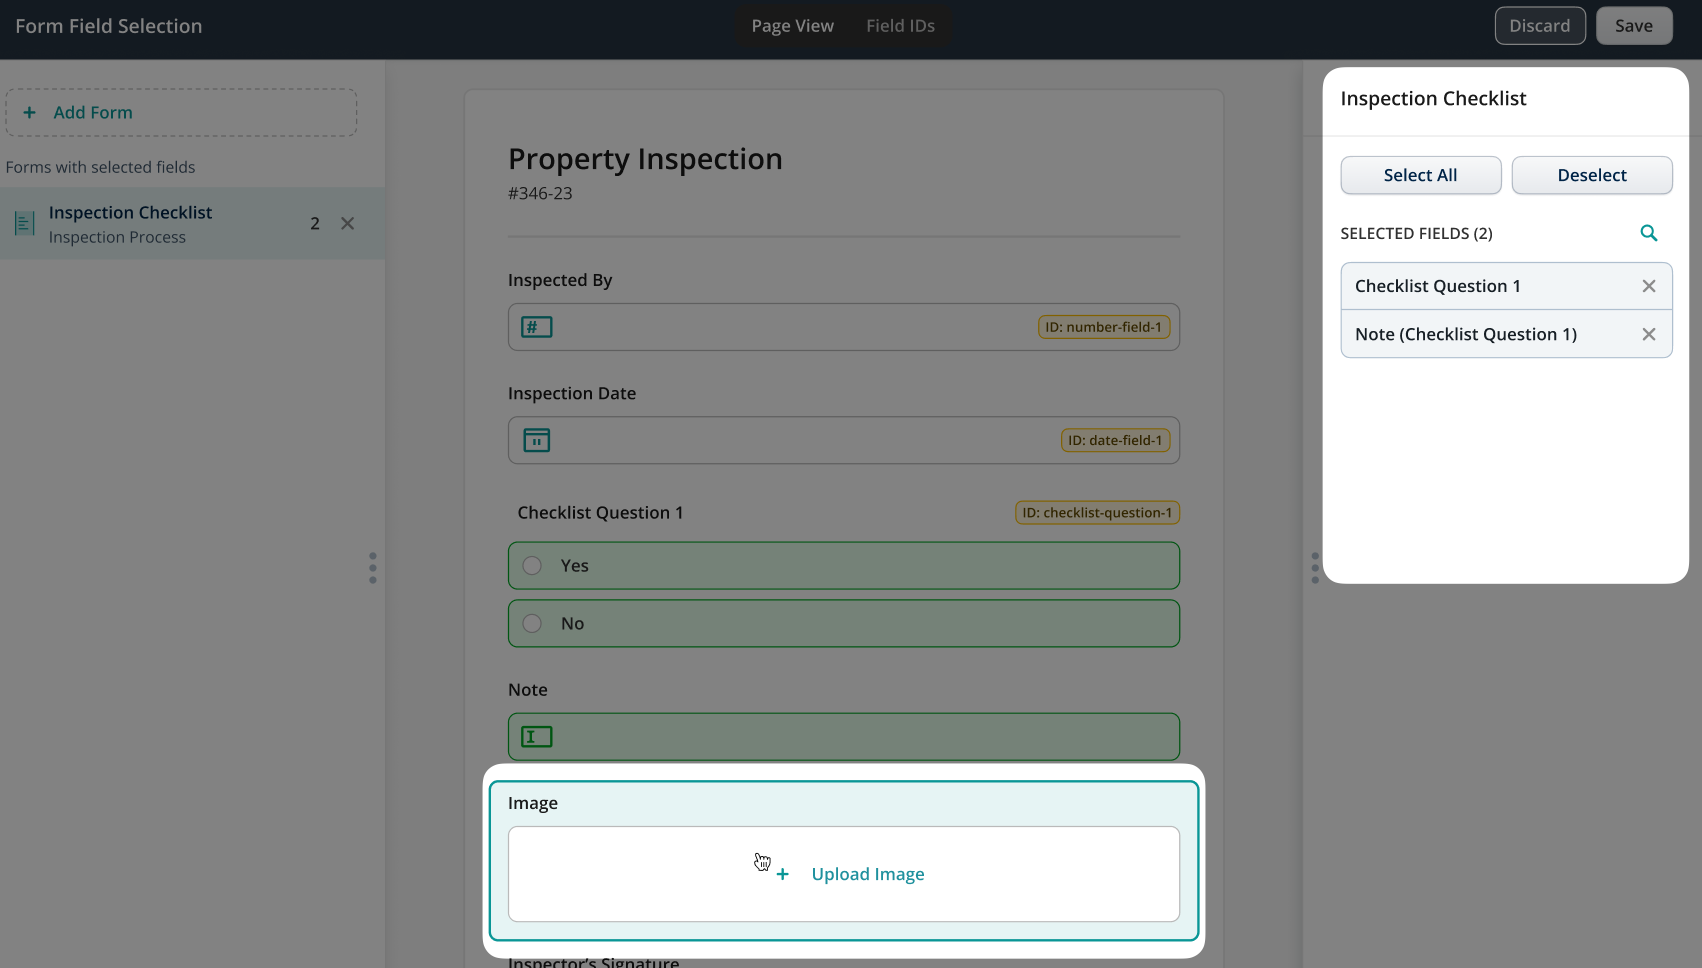
Unlimited Photo Upload – How to set up?
In our use case, during the inspection in the field, the service technicians might need to add multiple photos to the form in case some of the remarks do not match the standards. Let’s check how this can be achieved.
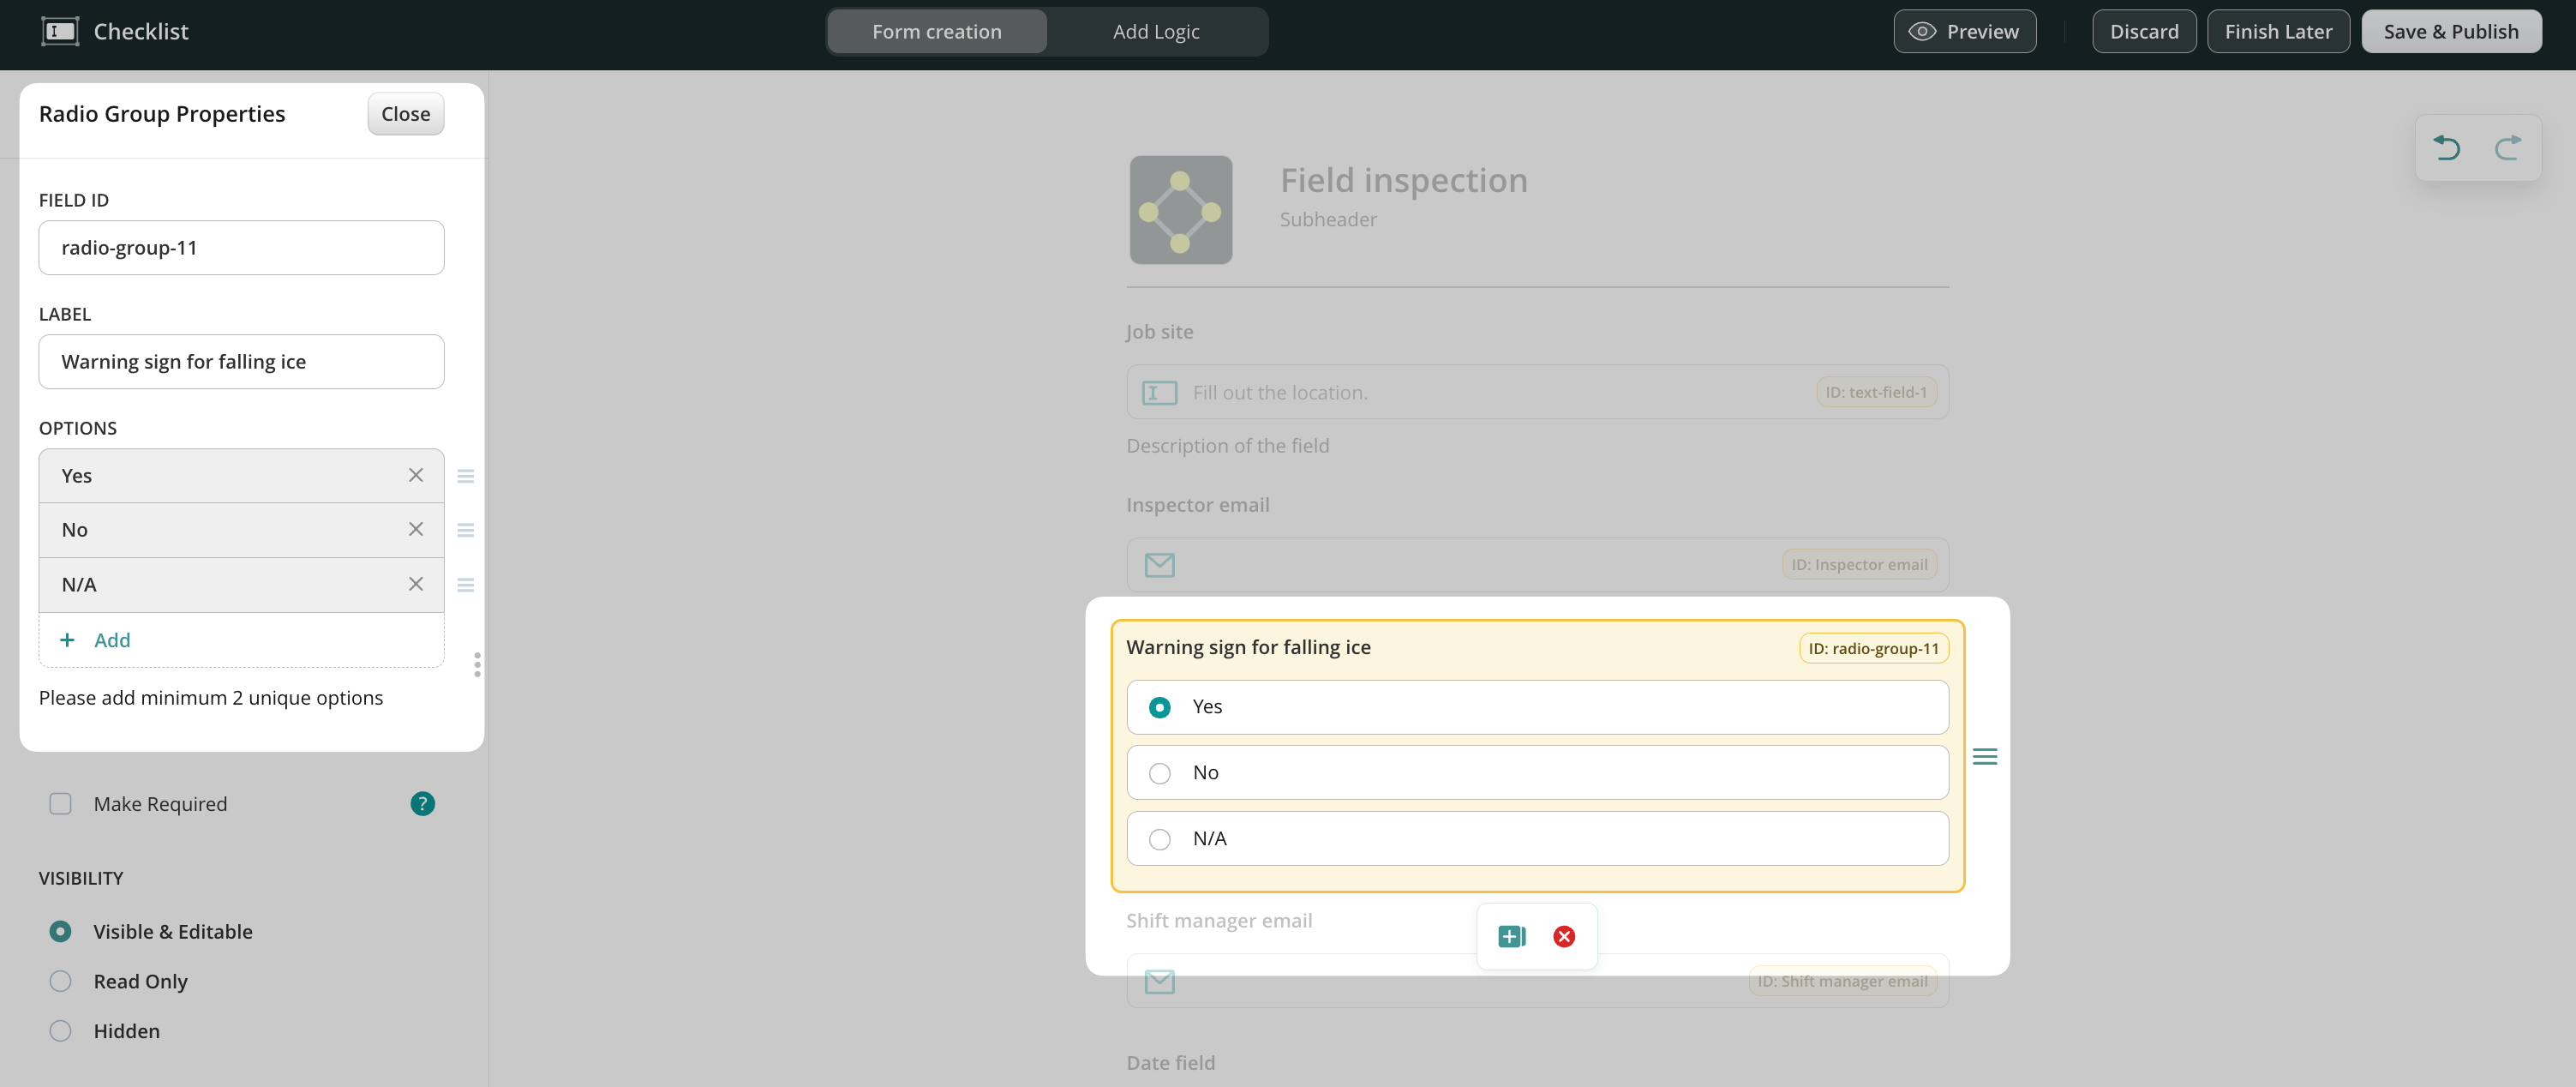
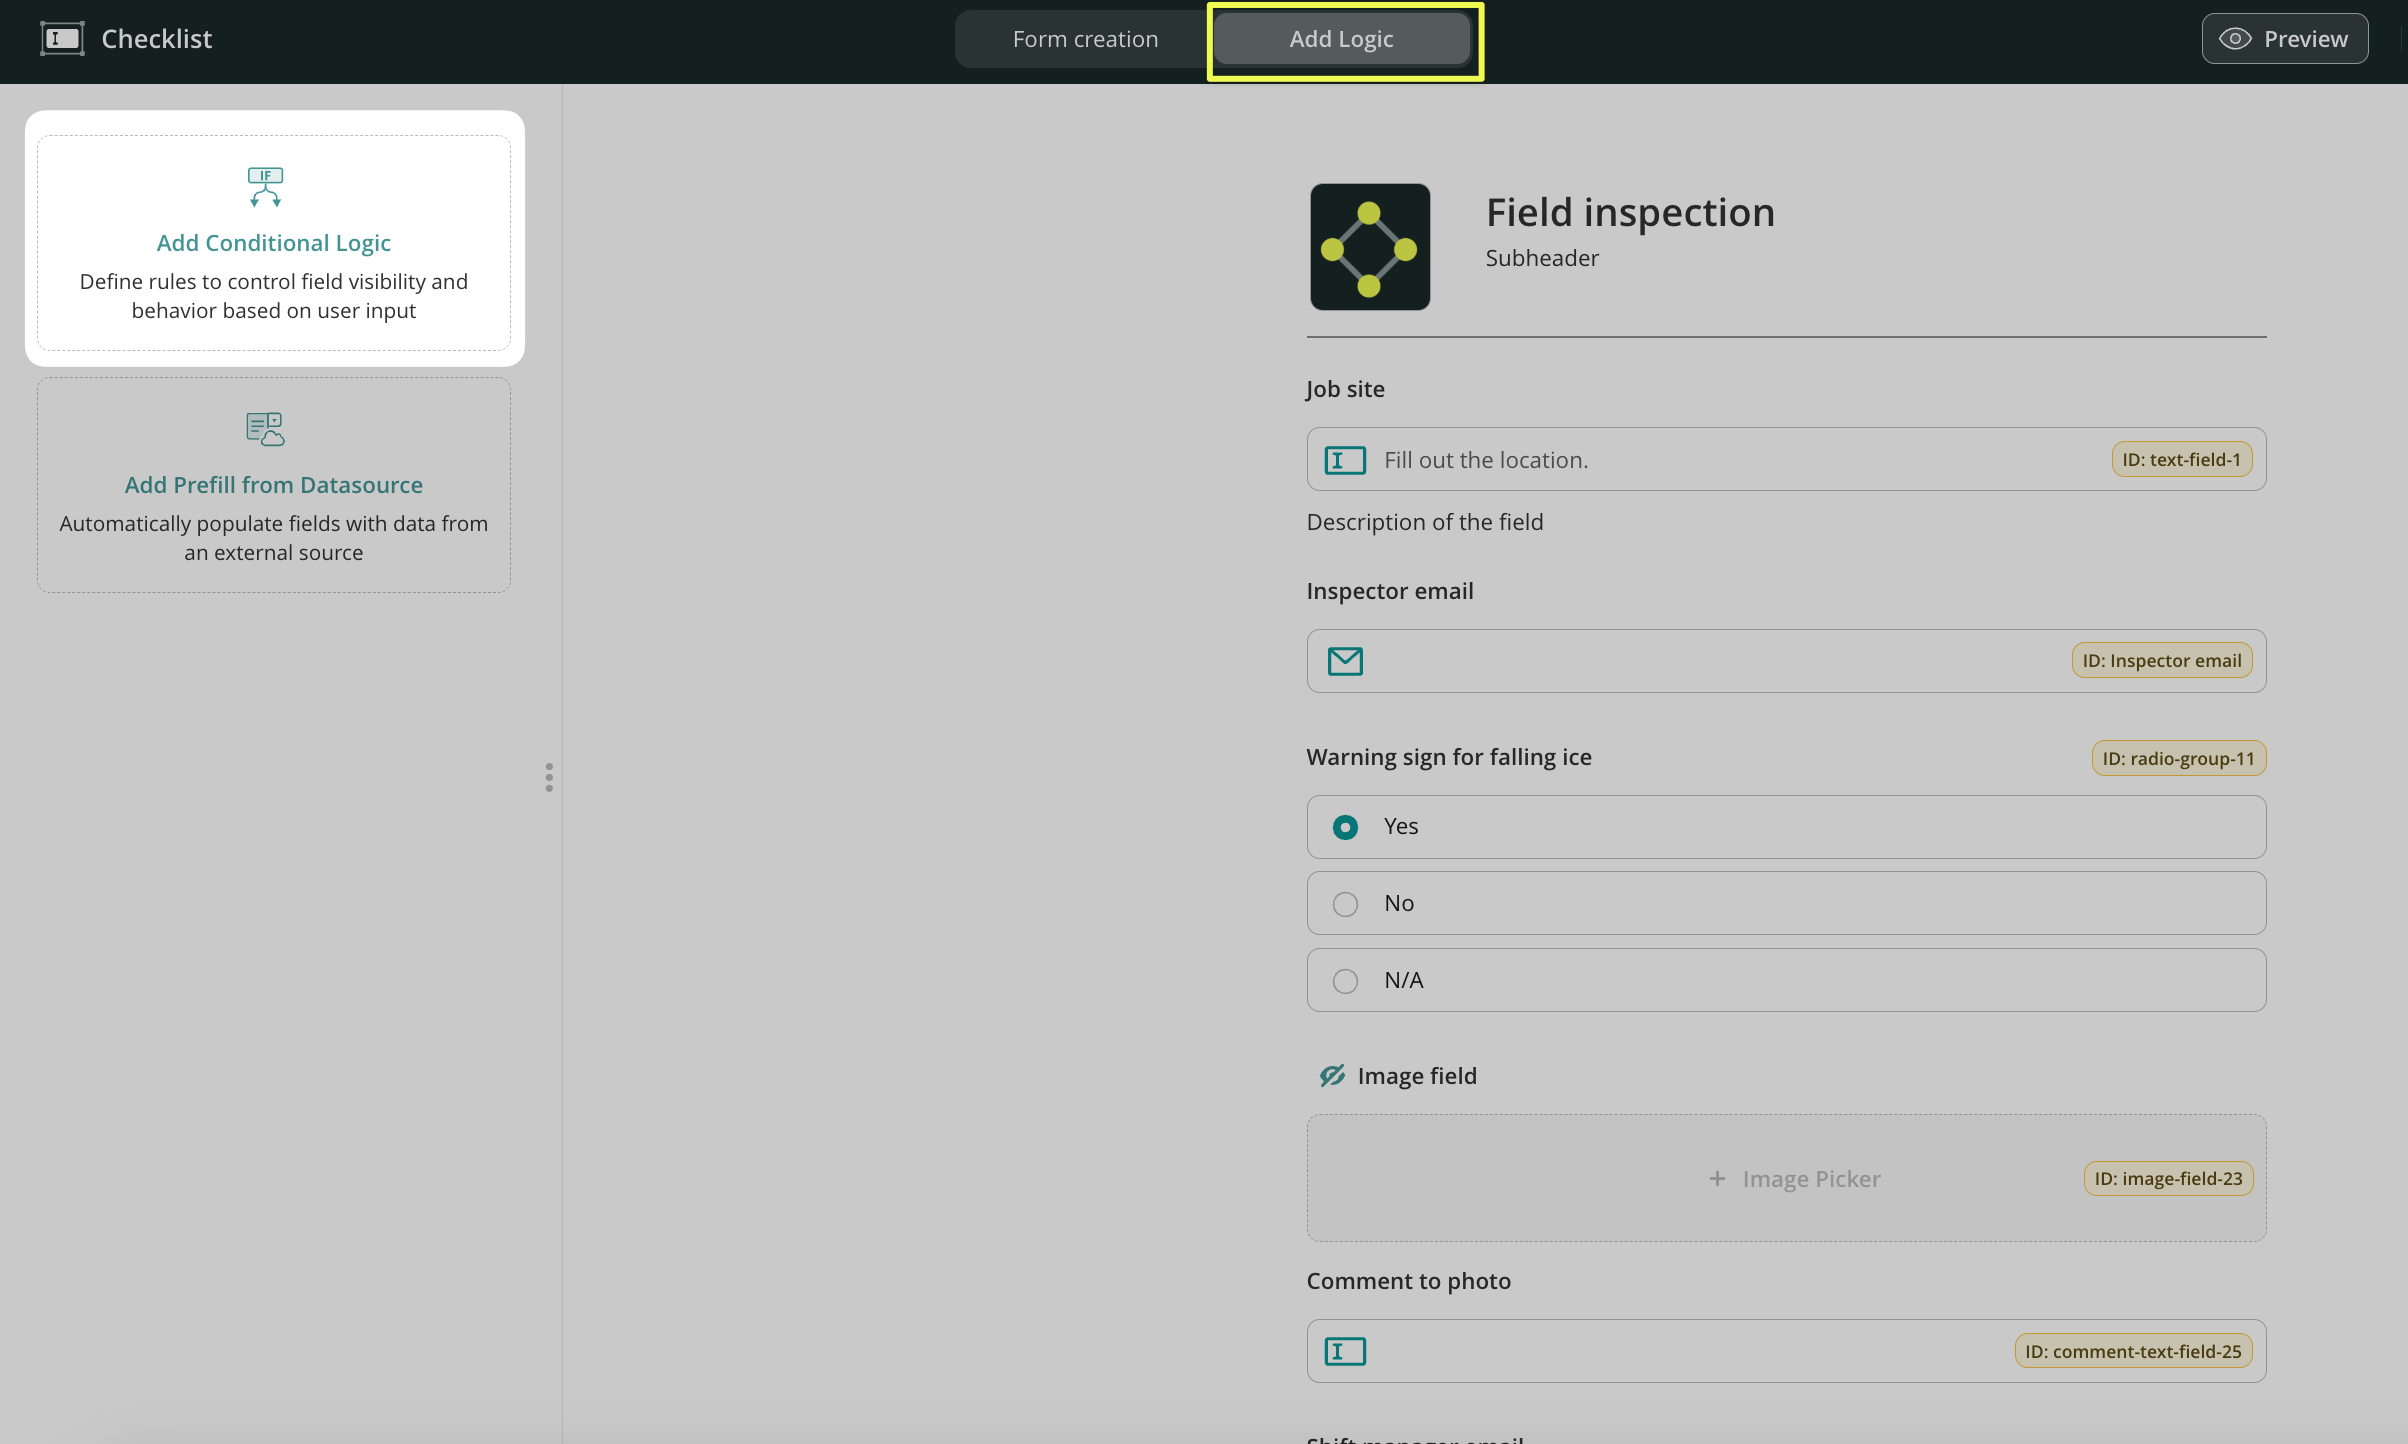
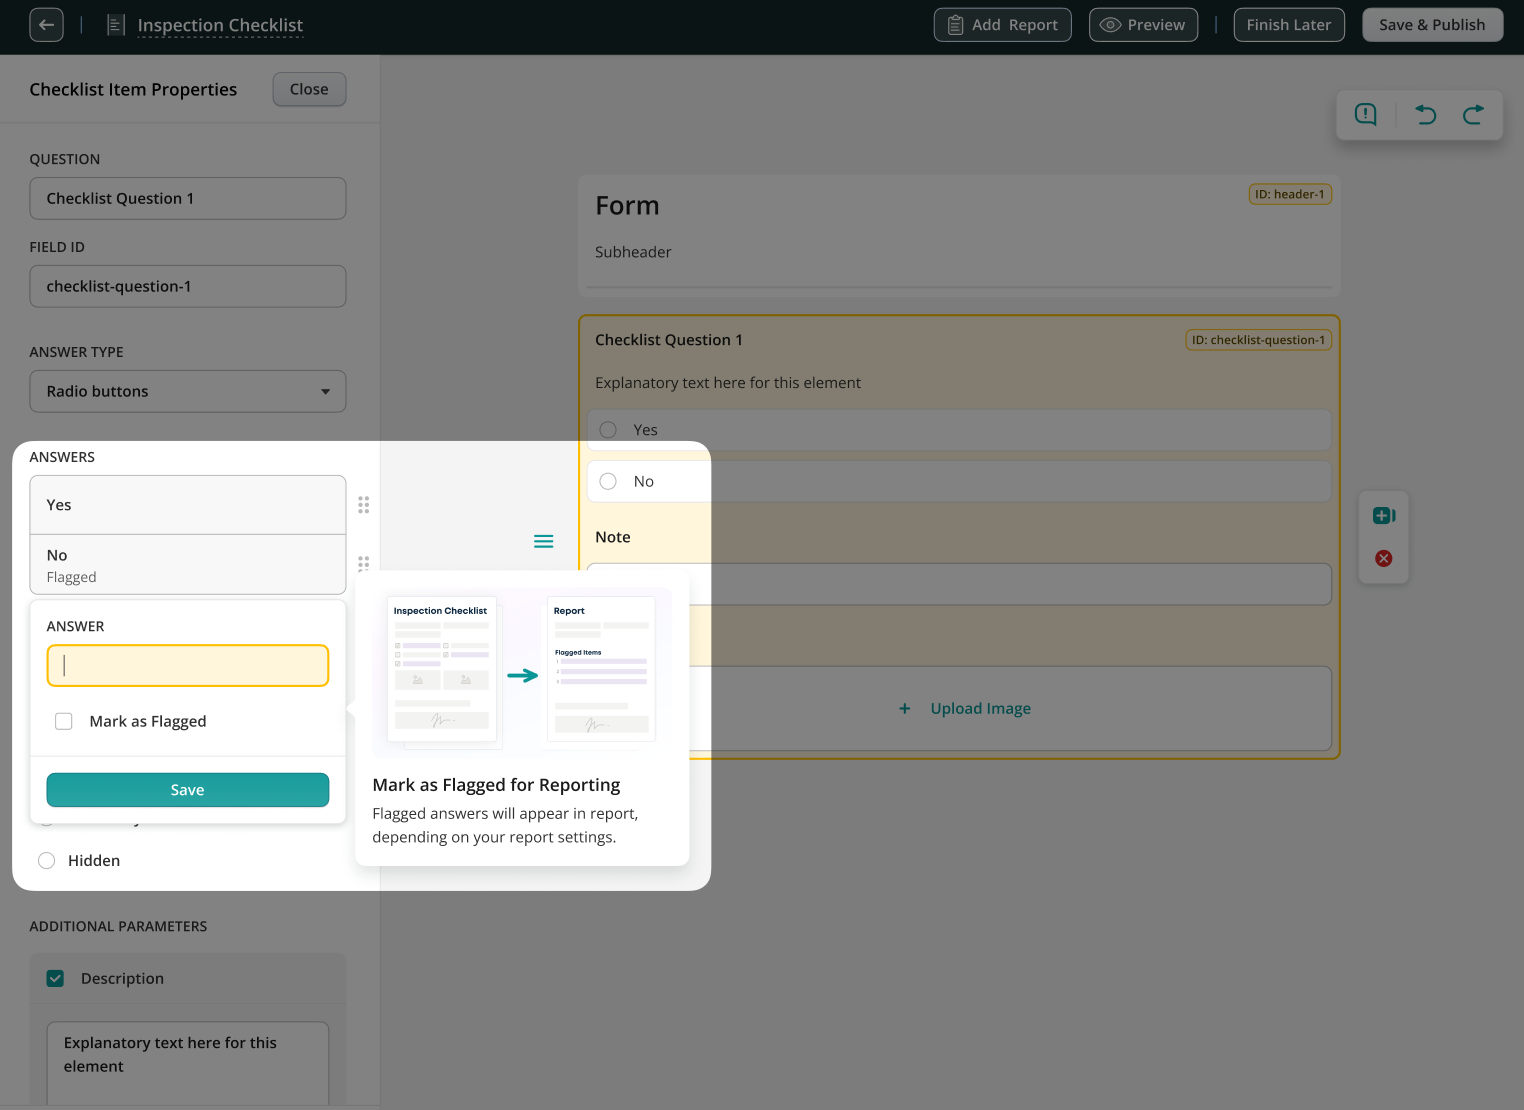
In the Form Creation section, you may add the Radio Buttons field to the form, add the options from which the users will select, and make the field Visible & Editable.
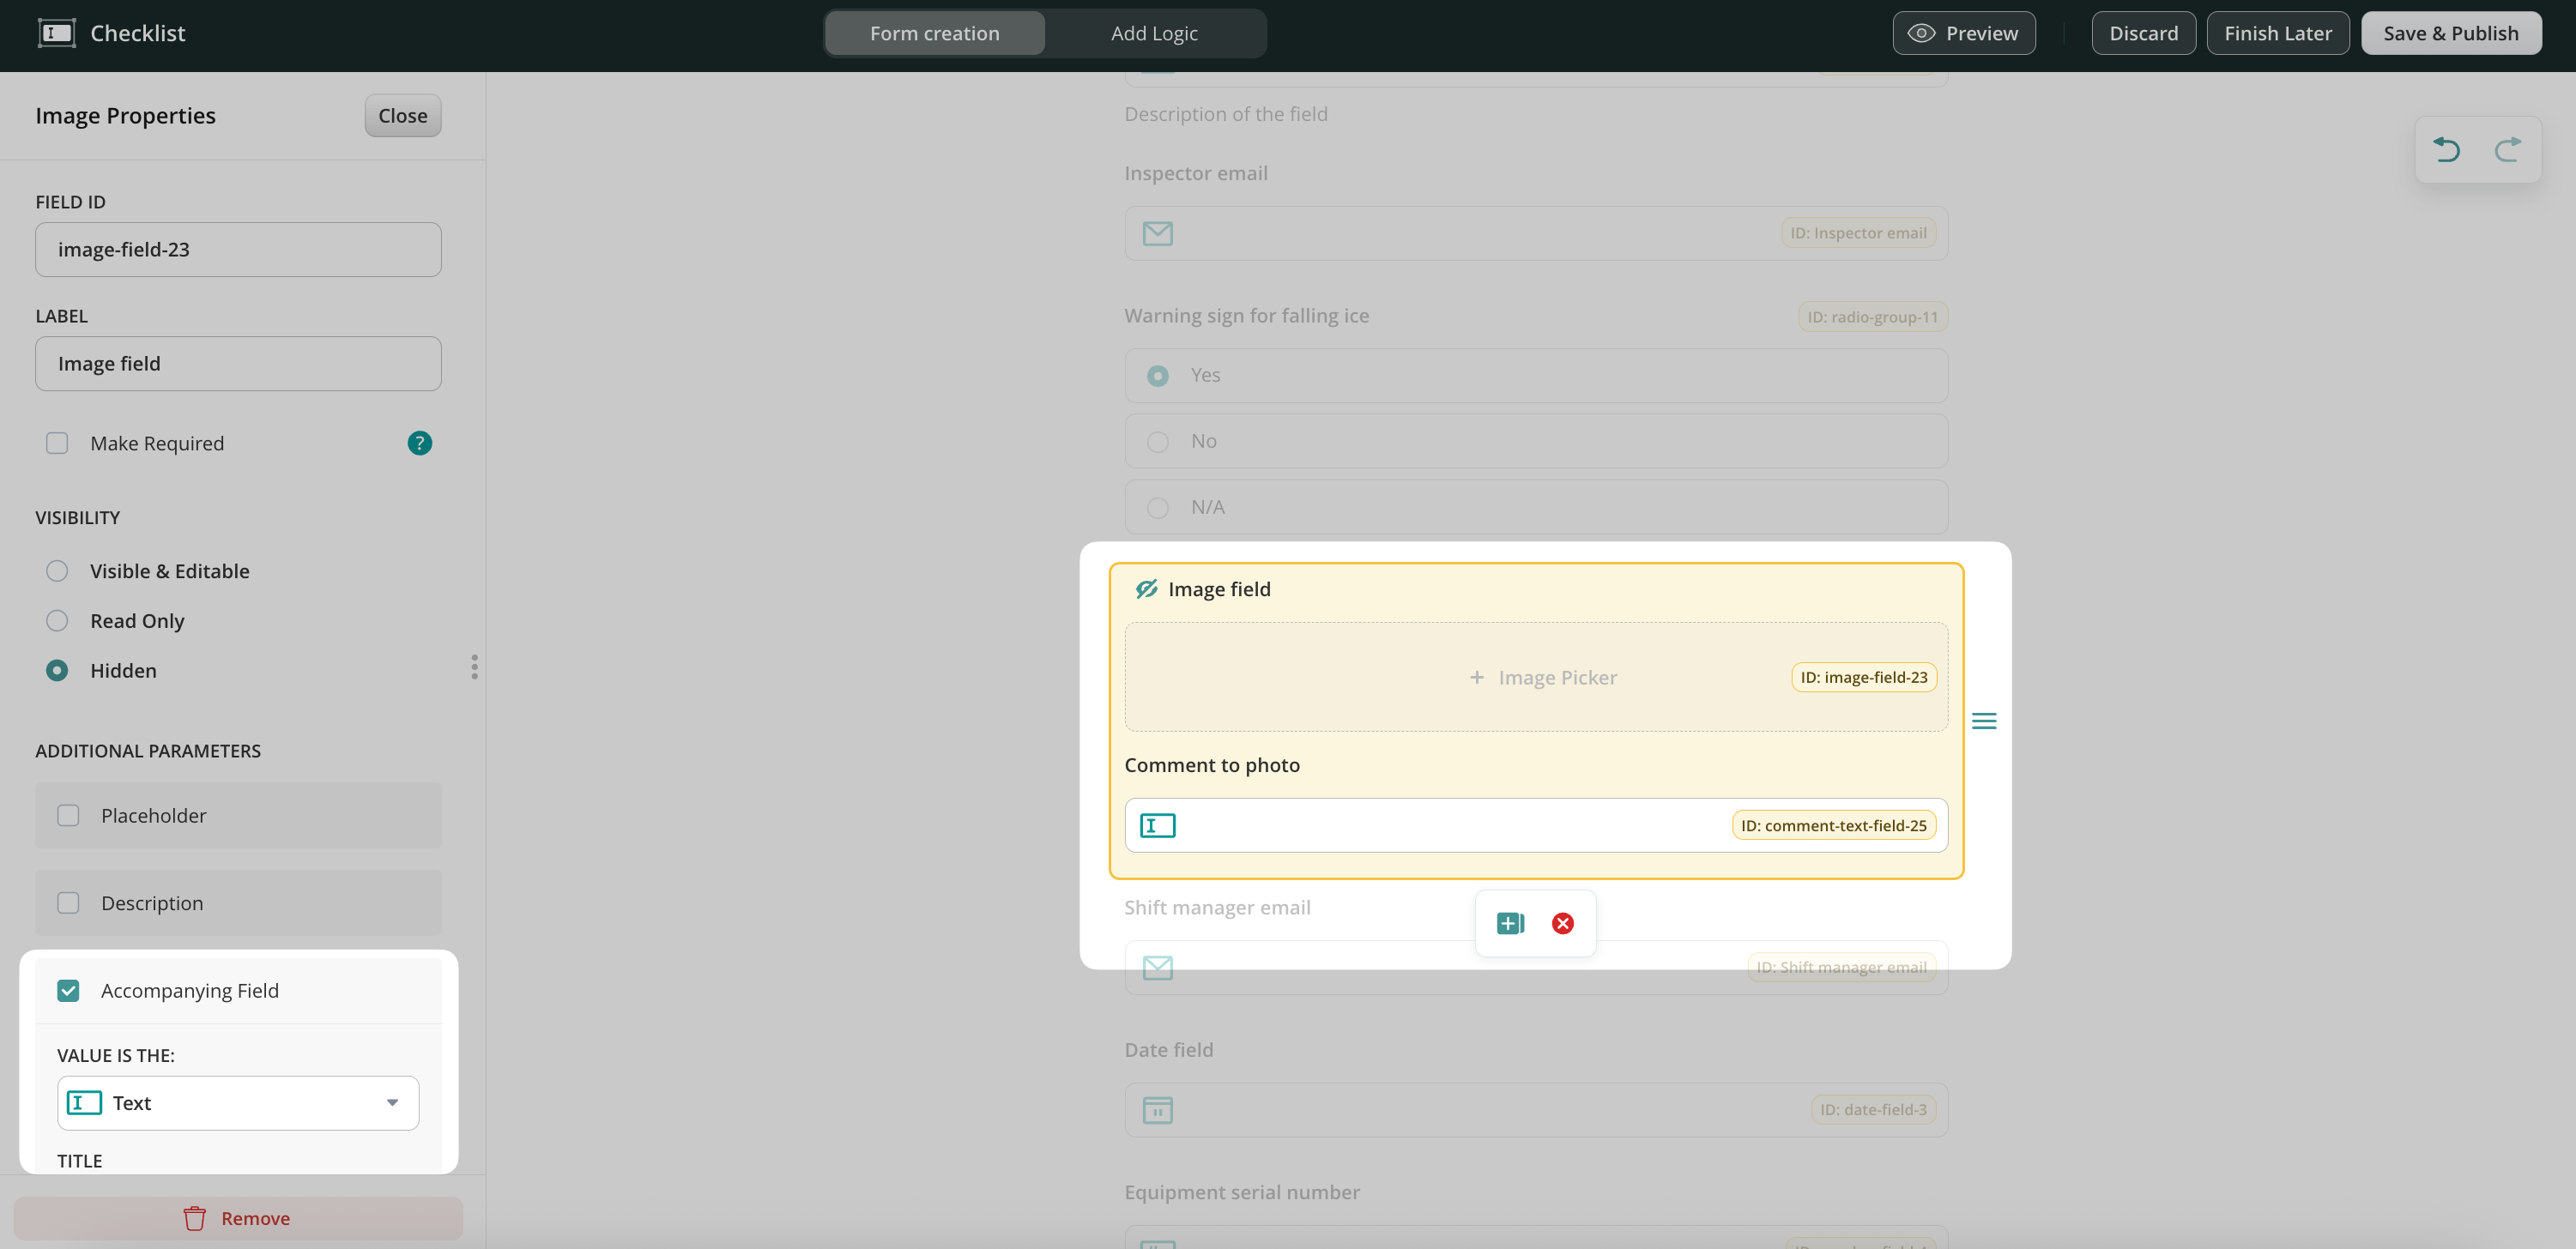
After that, you may add an Image field and make it hidden by default since we’ll add a condition to it later. You may add the Accompanying Field, an additional field where the tech can add more context to the added image (possible formats: text field, date, number, signature, or email field).
Once we map the fields in the form, it’s time to add conditional logic based on which the specific fields in the form will be demonstrated to the service technicians.
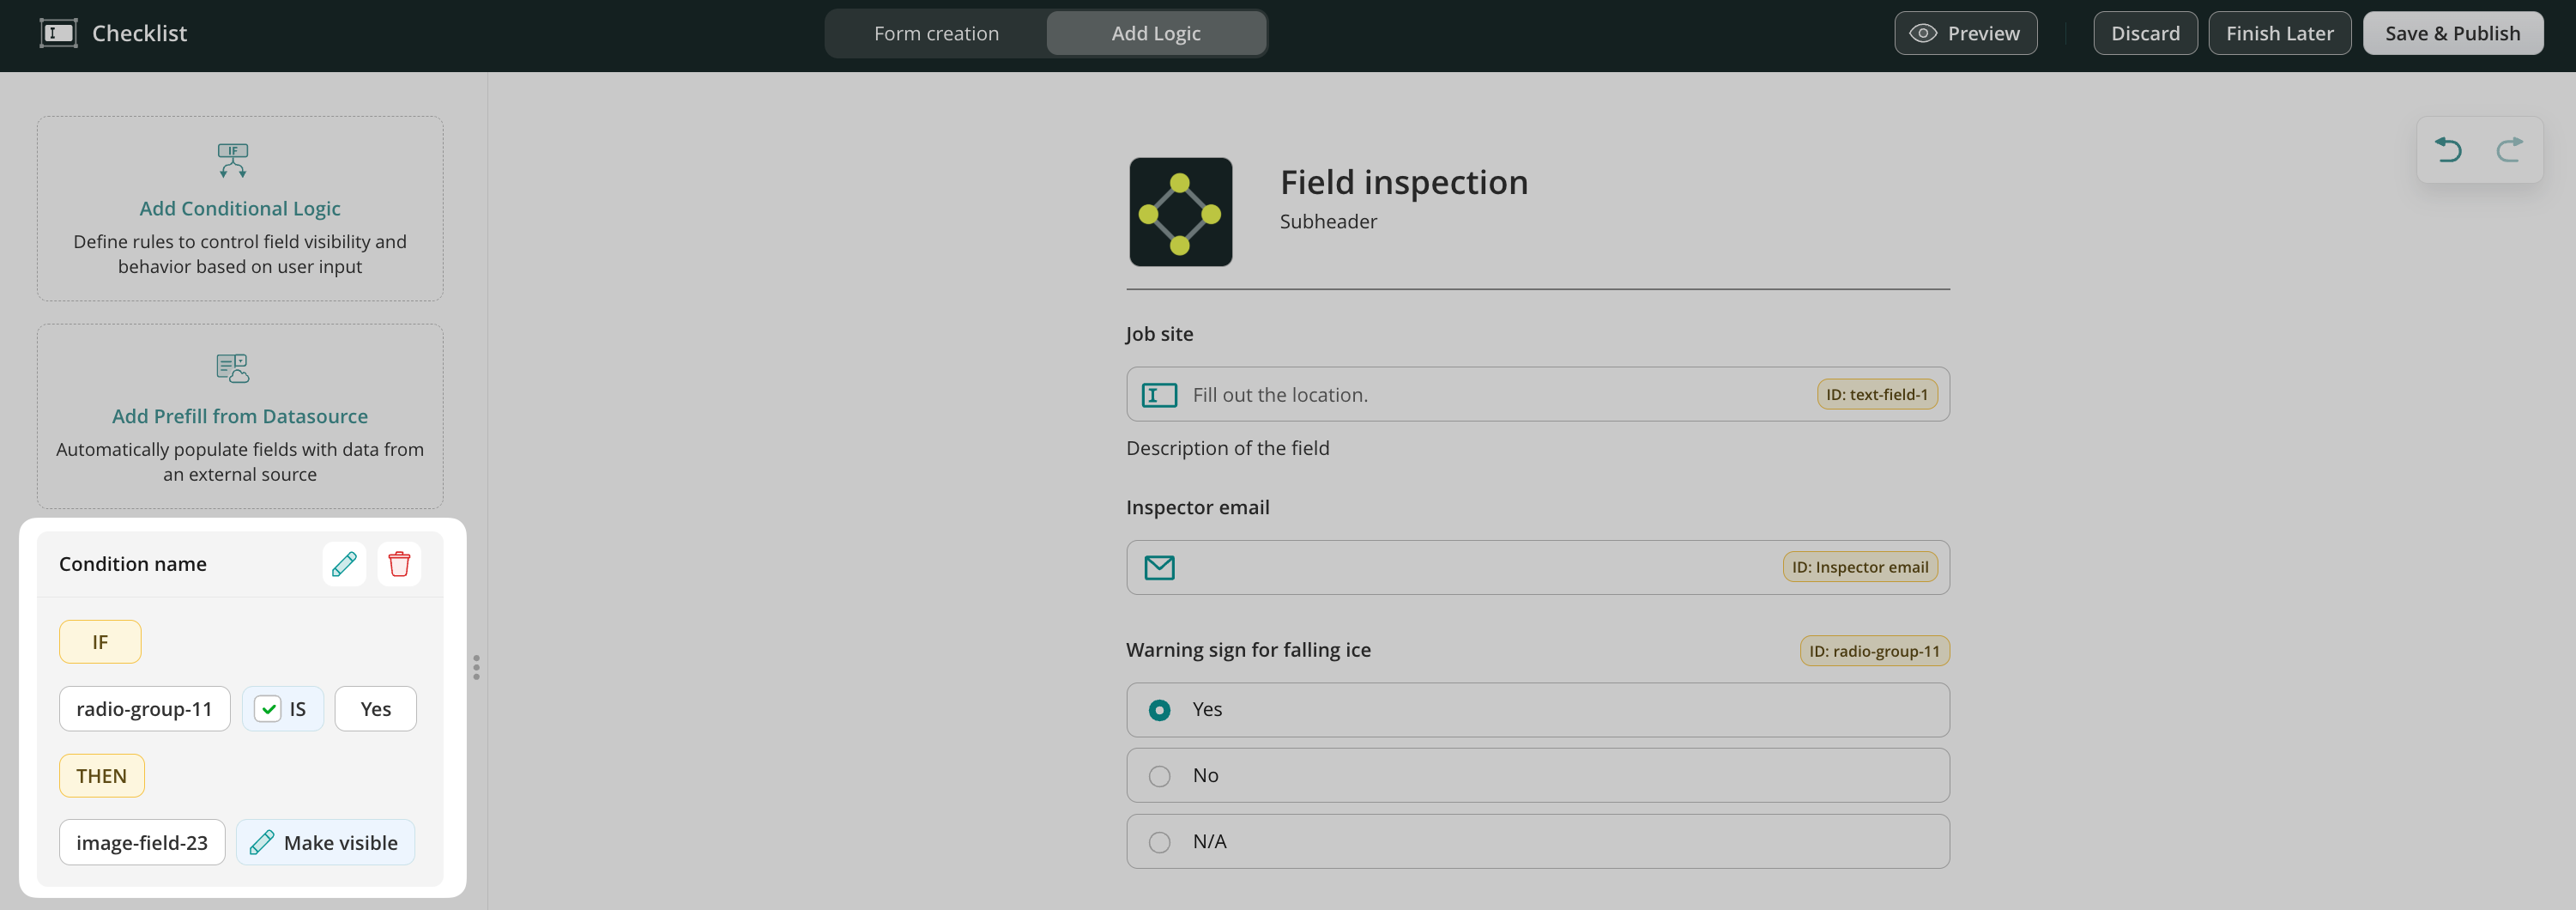
Add Logic tab – Add conditions to the form
Open the Add Logic tab, click Add Conditional Logic on the left side, and name the condition.
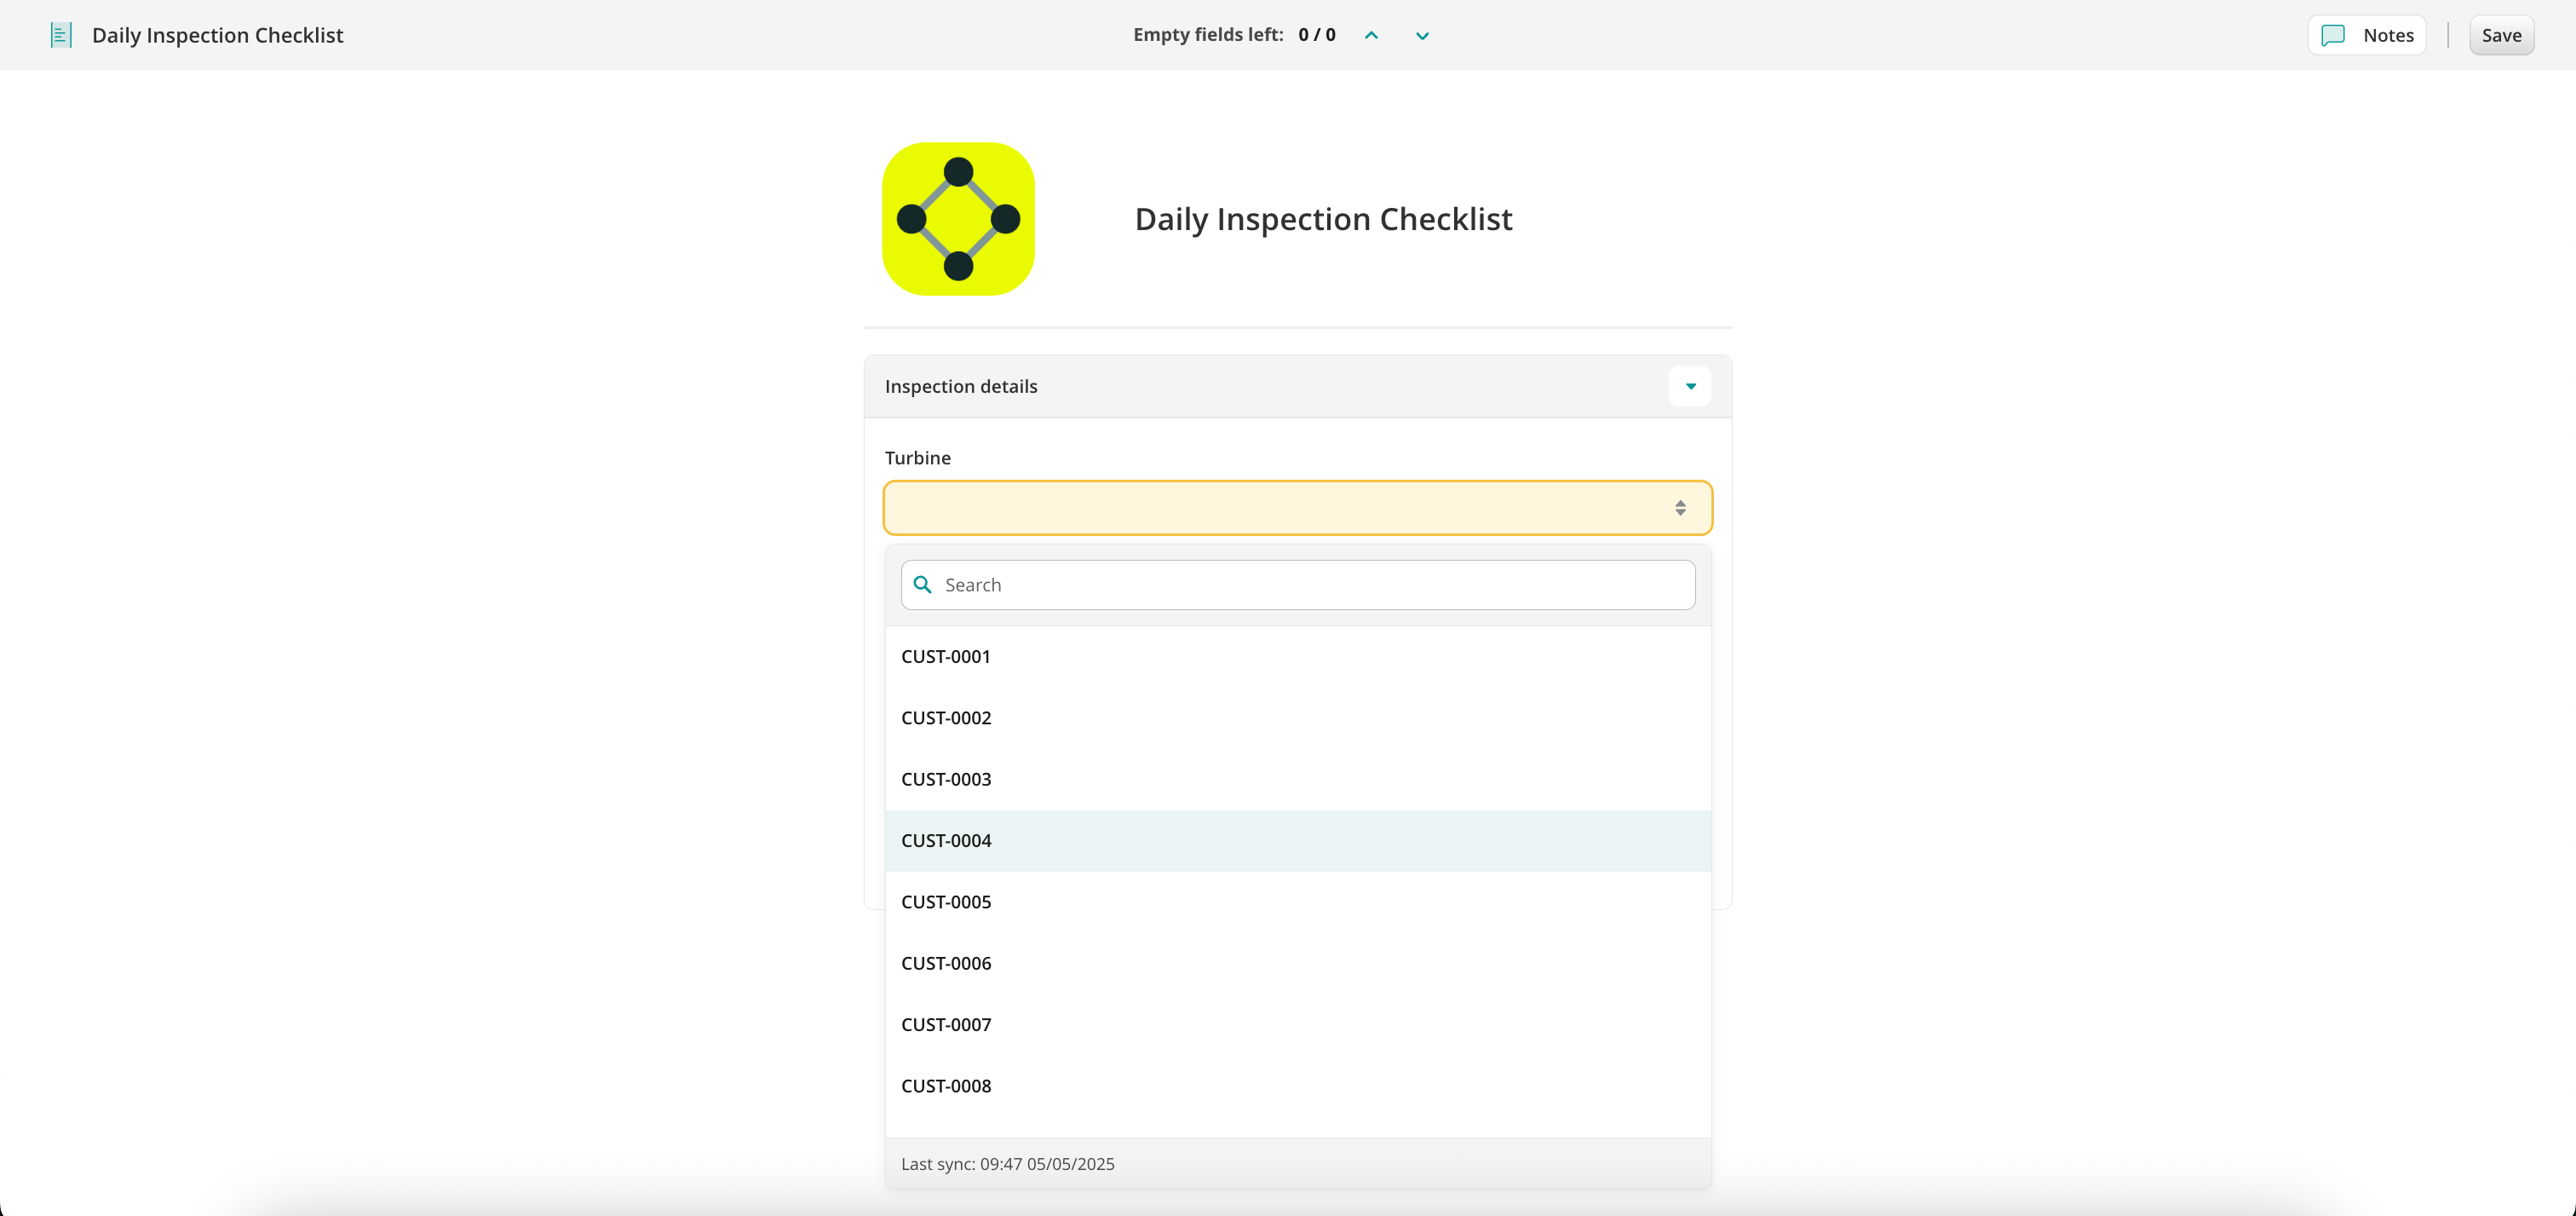
You may also configure a dropdown field prefill with data from your data source. To learn more about this, see the Feature Tutorial Prefill from Data Sources in Fluix.
In our case, service technicians will need to add the images to the form if the Yes option is selected for the question.
Select the specific field ID and value from the dropdown list that will trigger the Image field to appear in the form.
Add similar conditions to other radio buttons in your form and click the Save & Publish button in the upper right corner to save the form. Once the checklist is created, let’s add it to the process.
Step 2 – Create the repetitive inspection process in Fluix
1.Navigate to the Fluix admin portal -> Workflows -> NewWorkflow.
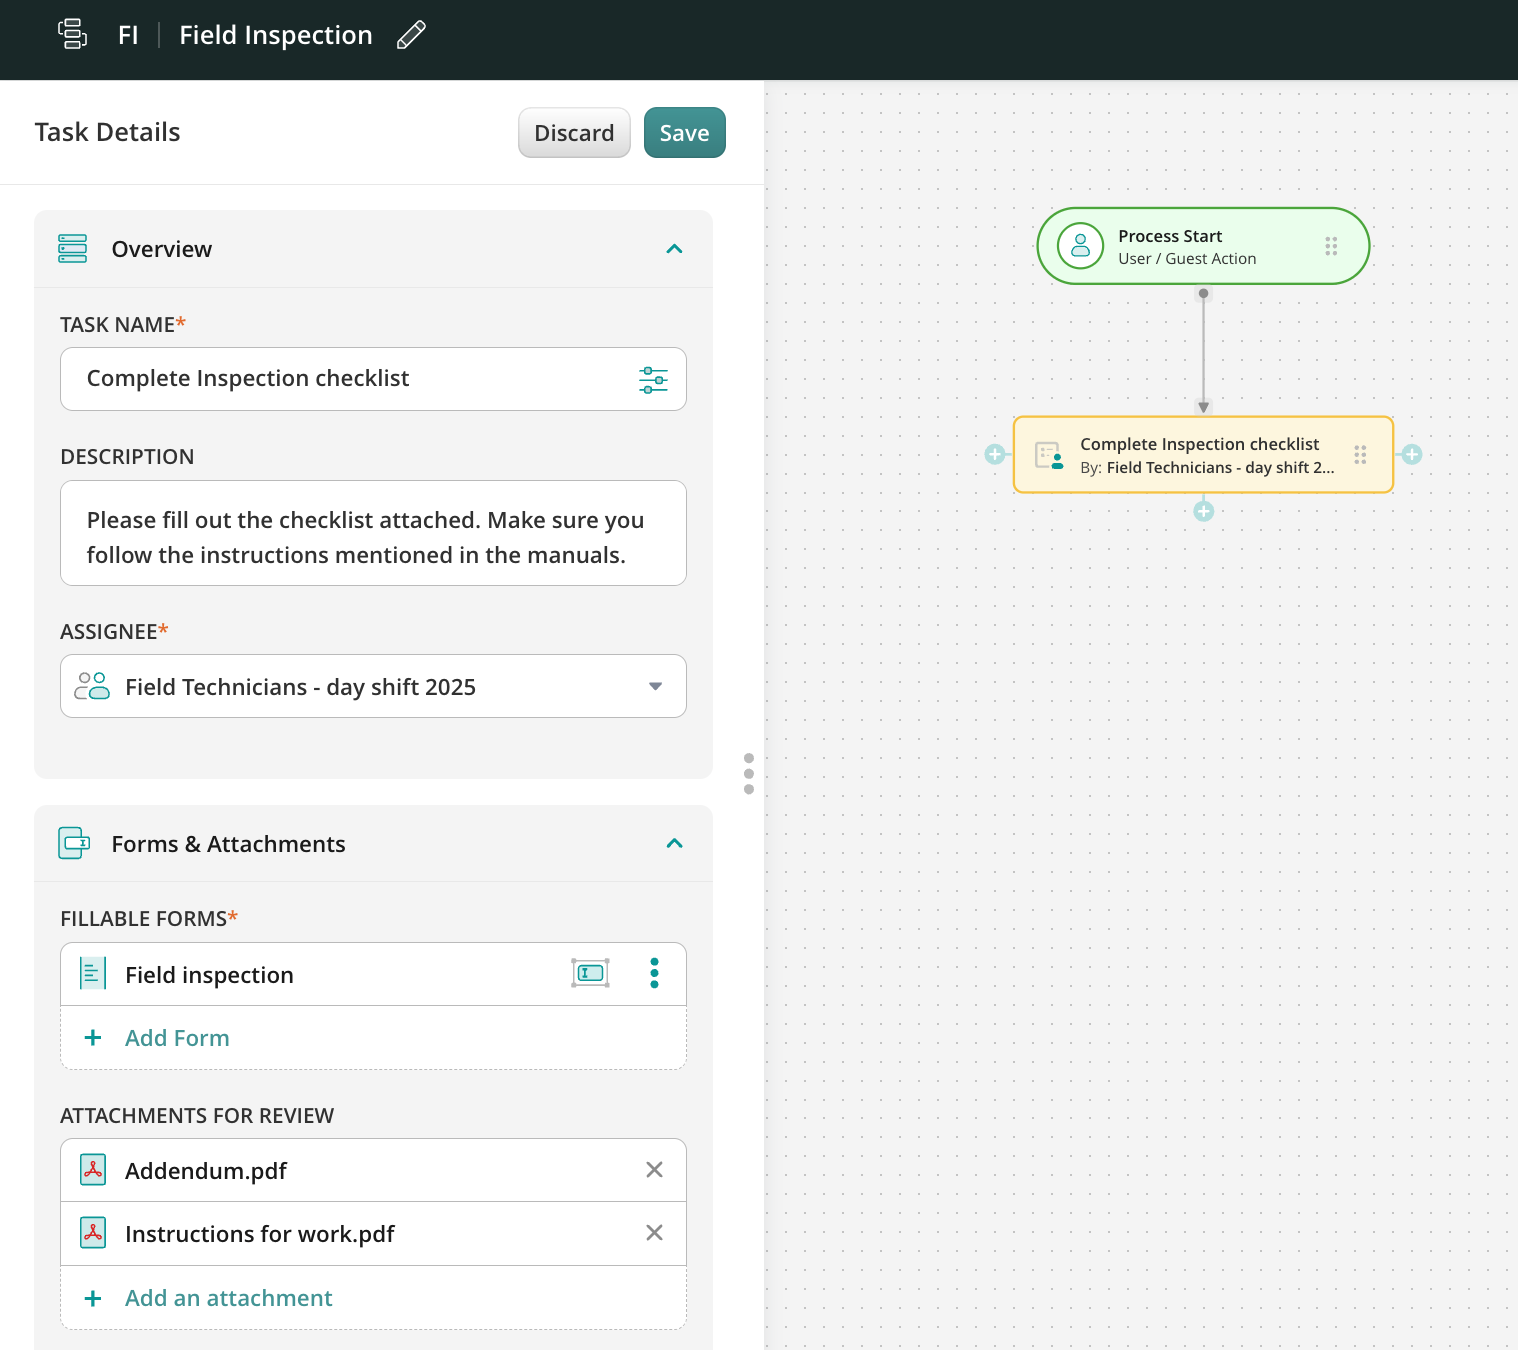
2.Drag and drop Process Start to the working area and add a User task.
4.In the Forms & Attachments section, click Add form -> Choose from forms option and select the checklist created earlier.
Optionally, you can click on theform assignmentmode to configure who will fill out which fields in a form on different steps of the process. By assigning form fields, you define the particular fields in a form for the Group-Assignee of the current Task. You can make particular fields visible & editable, read only, hidden, or required for this Group. Please note: Making the field required does not work in case this field will be read-only or hidden.
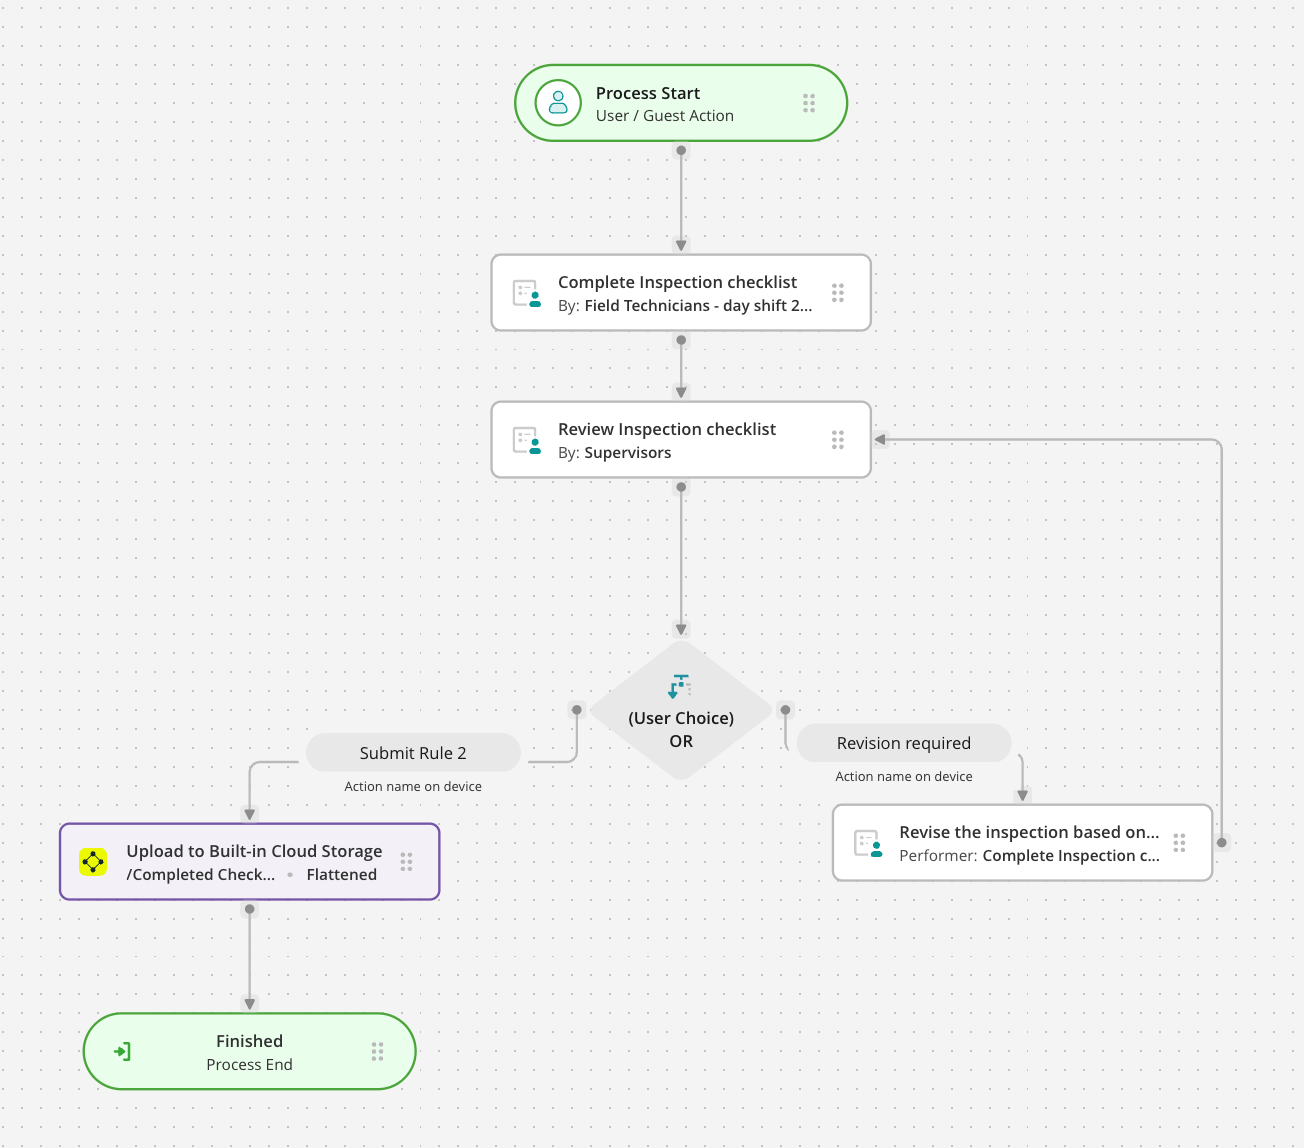
The final look of your Workflow may look like the example below:
6.Once ready, Save & Publish the workflow and proceed to its testing.
Step 3 – Testing Dynamic Form in the App
1.To test the setup, make sure that you have added yourself to the group of users who participate in this workflow.
2.Open the Fluix app on your iOS or Android device. Alternatively, you may test the setup through the User Mode.
3.Open the task and the dynamic form, and click the Start work button to fill out the checklist.
Initially, the form will not display any image fields; however, upon selecting the Yes option from the list, the Image picker will become available, allowing you to add as many photos and comments from your location as you need.
In case you have any questions or difficulties with setup, contact our support at support@fluix.io and we’ll be happy to help you.
Was this article helpful?
Thanks for your feedback!
Oops, something went wrong. Please, try again later.
Thank you!
What details or examples would have made this article more helpful for you? We appreciate your insights!
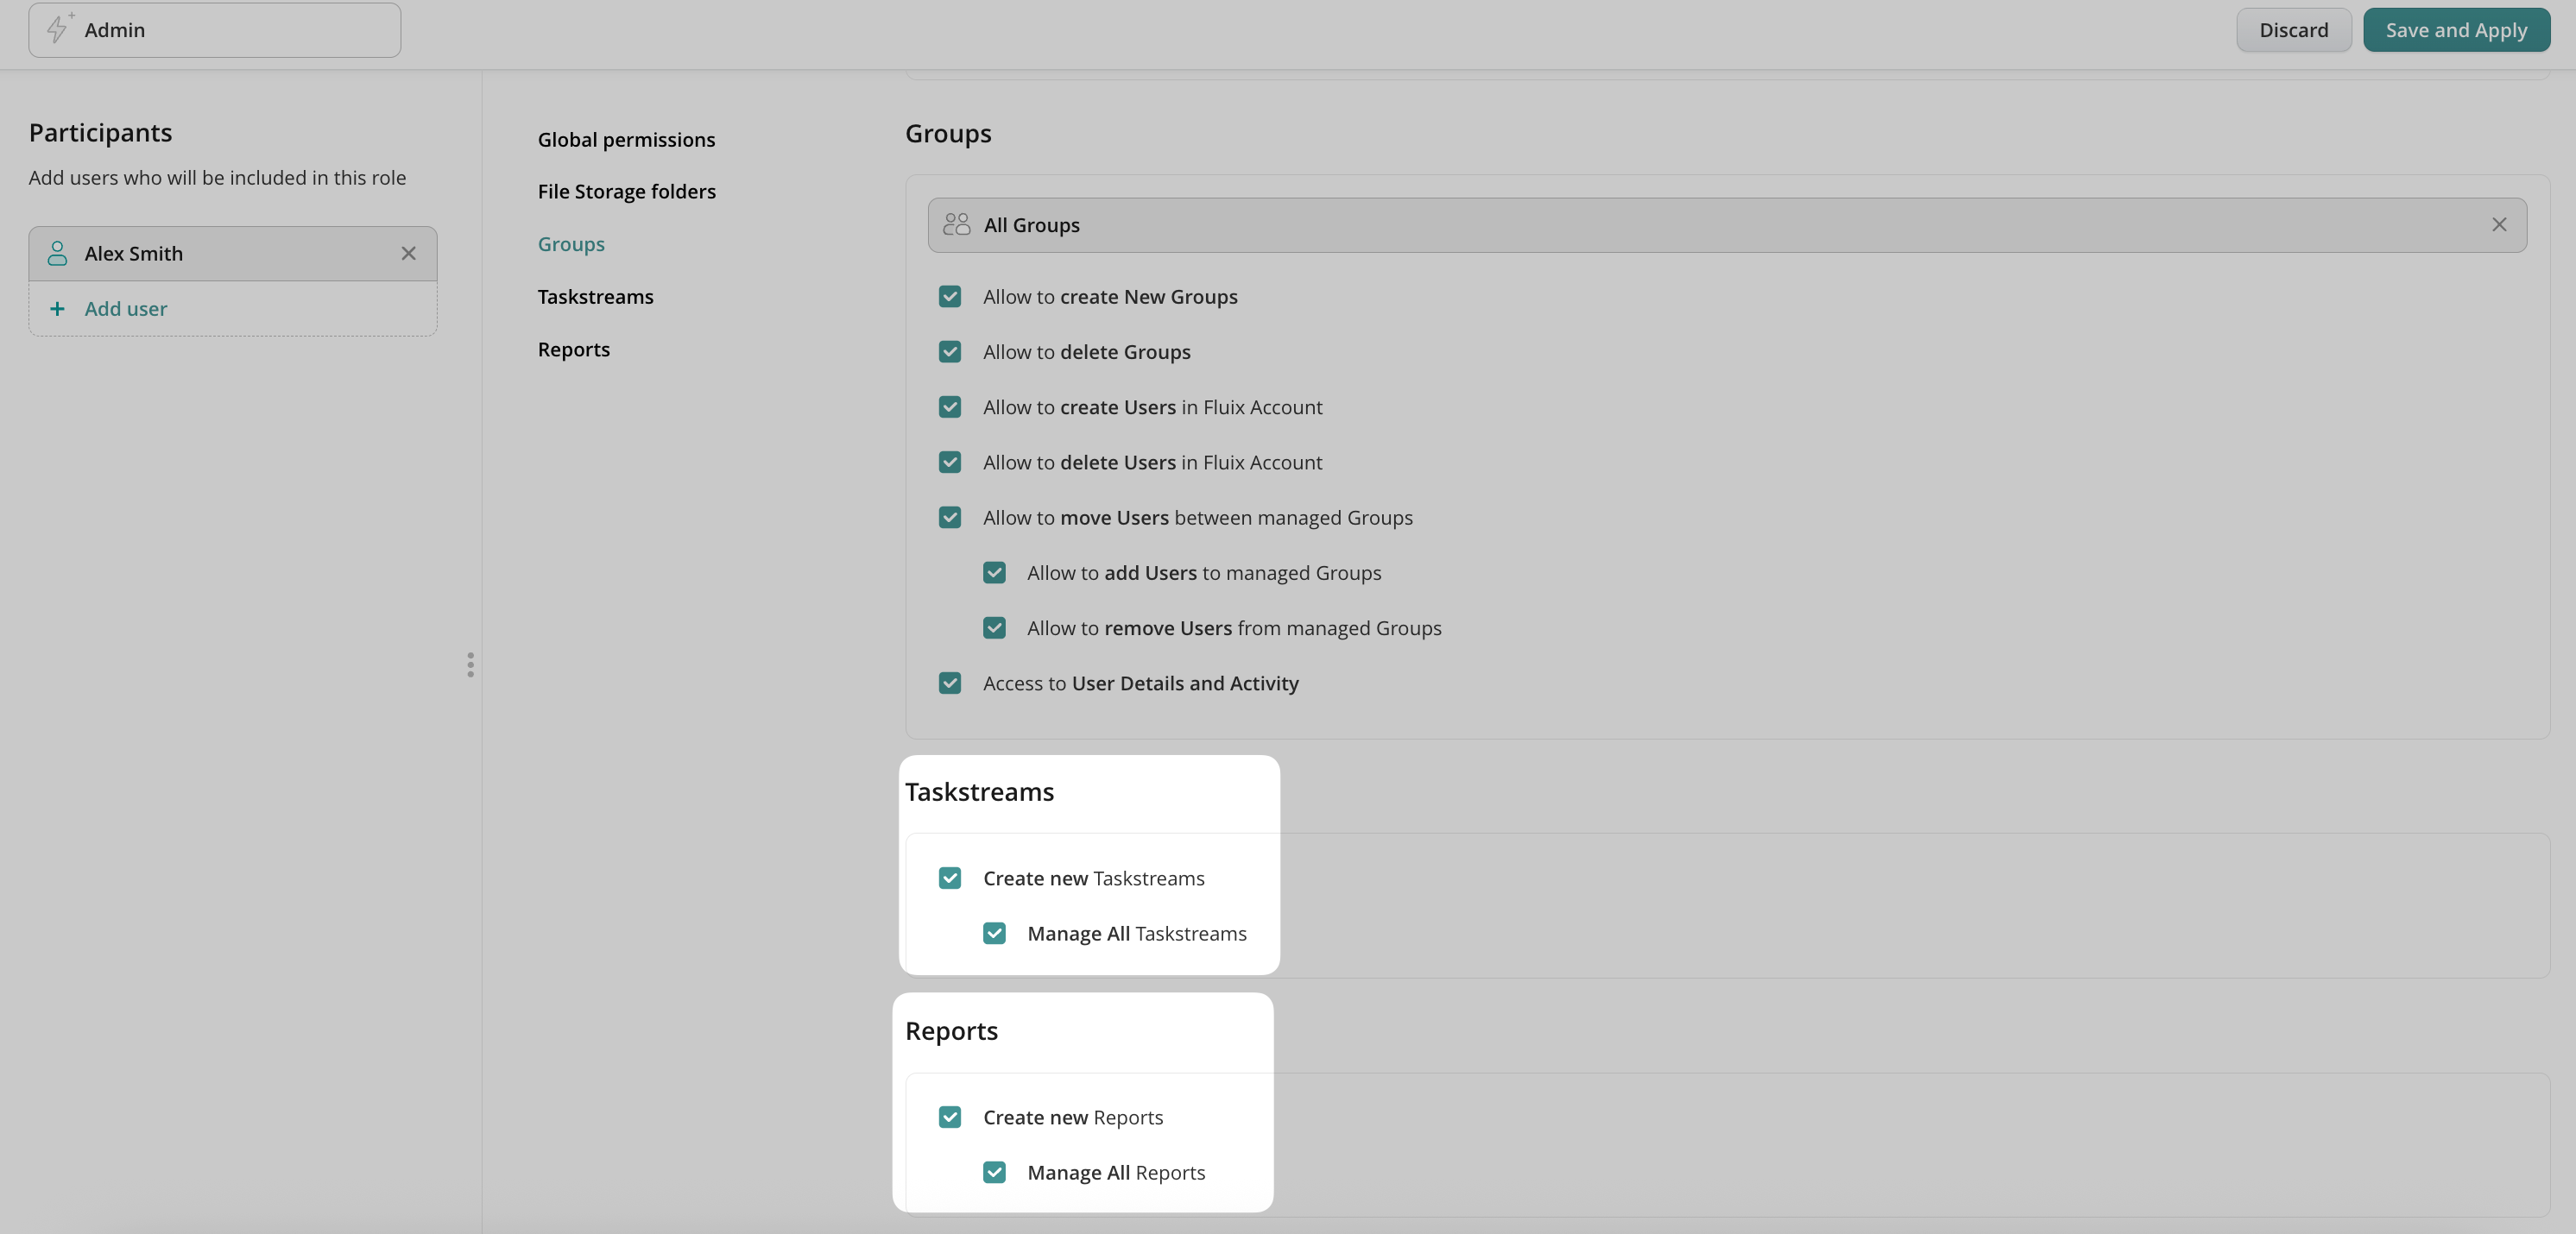
Giving your users the proper permissions in the Admin Portal is key to efficiency and more protected team processes. With Fluix’s advanced permissions, admins can now grant access, assign ownership, and manage sharing for Workflows and Reports.
Why Use Permissions?
With permissions, account admins can:
Create Workflows and Reports.
Automatically become owners of what they create.
Share their projects with others in view-only or edit mode.
Manage existing projects if granted the proper access.
What Is Workflow/Report Ownership?
Whenever an admin creates a Workflow or Report, they automatically become its owner. This means they can:
Manage and update their own projects.
Decide who can view or edit them.
Ensure smooth collaboration across departments or teams.
Ownership = full control over what you create.
Sharing Projects with Others
As an owner, you can share your Workflows and Reports with:
Other admins in your company account.
Specific users.
A group of users—even if they’re not admins.
Sharing Options:
View mode – Users can see the Workflow or Report but can’t make changes. Here is how the users will see the Workflow in view mode:
Edit mode – Only available to admins; allows full editing access.
How to Grant Admins Permission to Create & Manage Projects
Go to the Admin Portal > Permissions section.
Open an existing role or create a new one.
In the Workflows and/or Reports section, check:
✅ Create new Workflow/Reports
Save your changes.
Once enabled, any new Workflow or Report created by this admin will list them as the owner. You’ll also see a new column showing the owner’s name in the Workflows and Reports sections.
Let Admins Manage Existing Projects Too
To allow admins to edit Workflows they didn’t create, follow these steps:
In the same Permissions settings, enable:
✅ Manage all Workflows/Reports
This gives them full access to edit all existing content in your account.
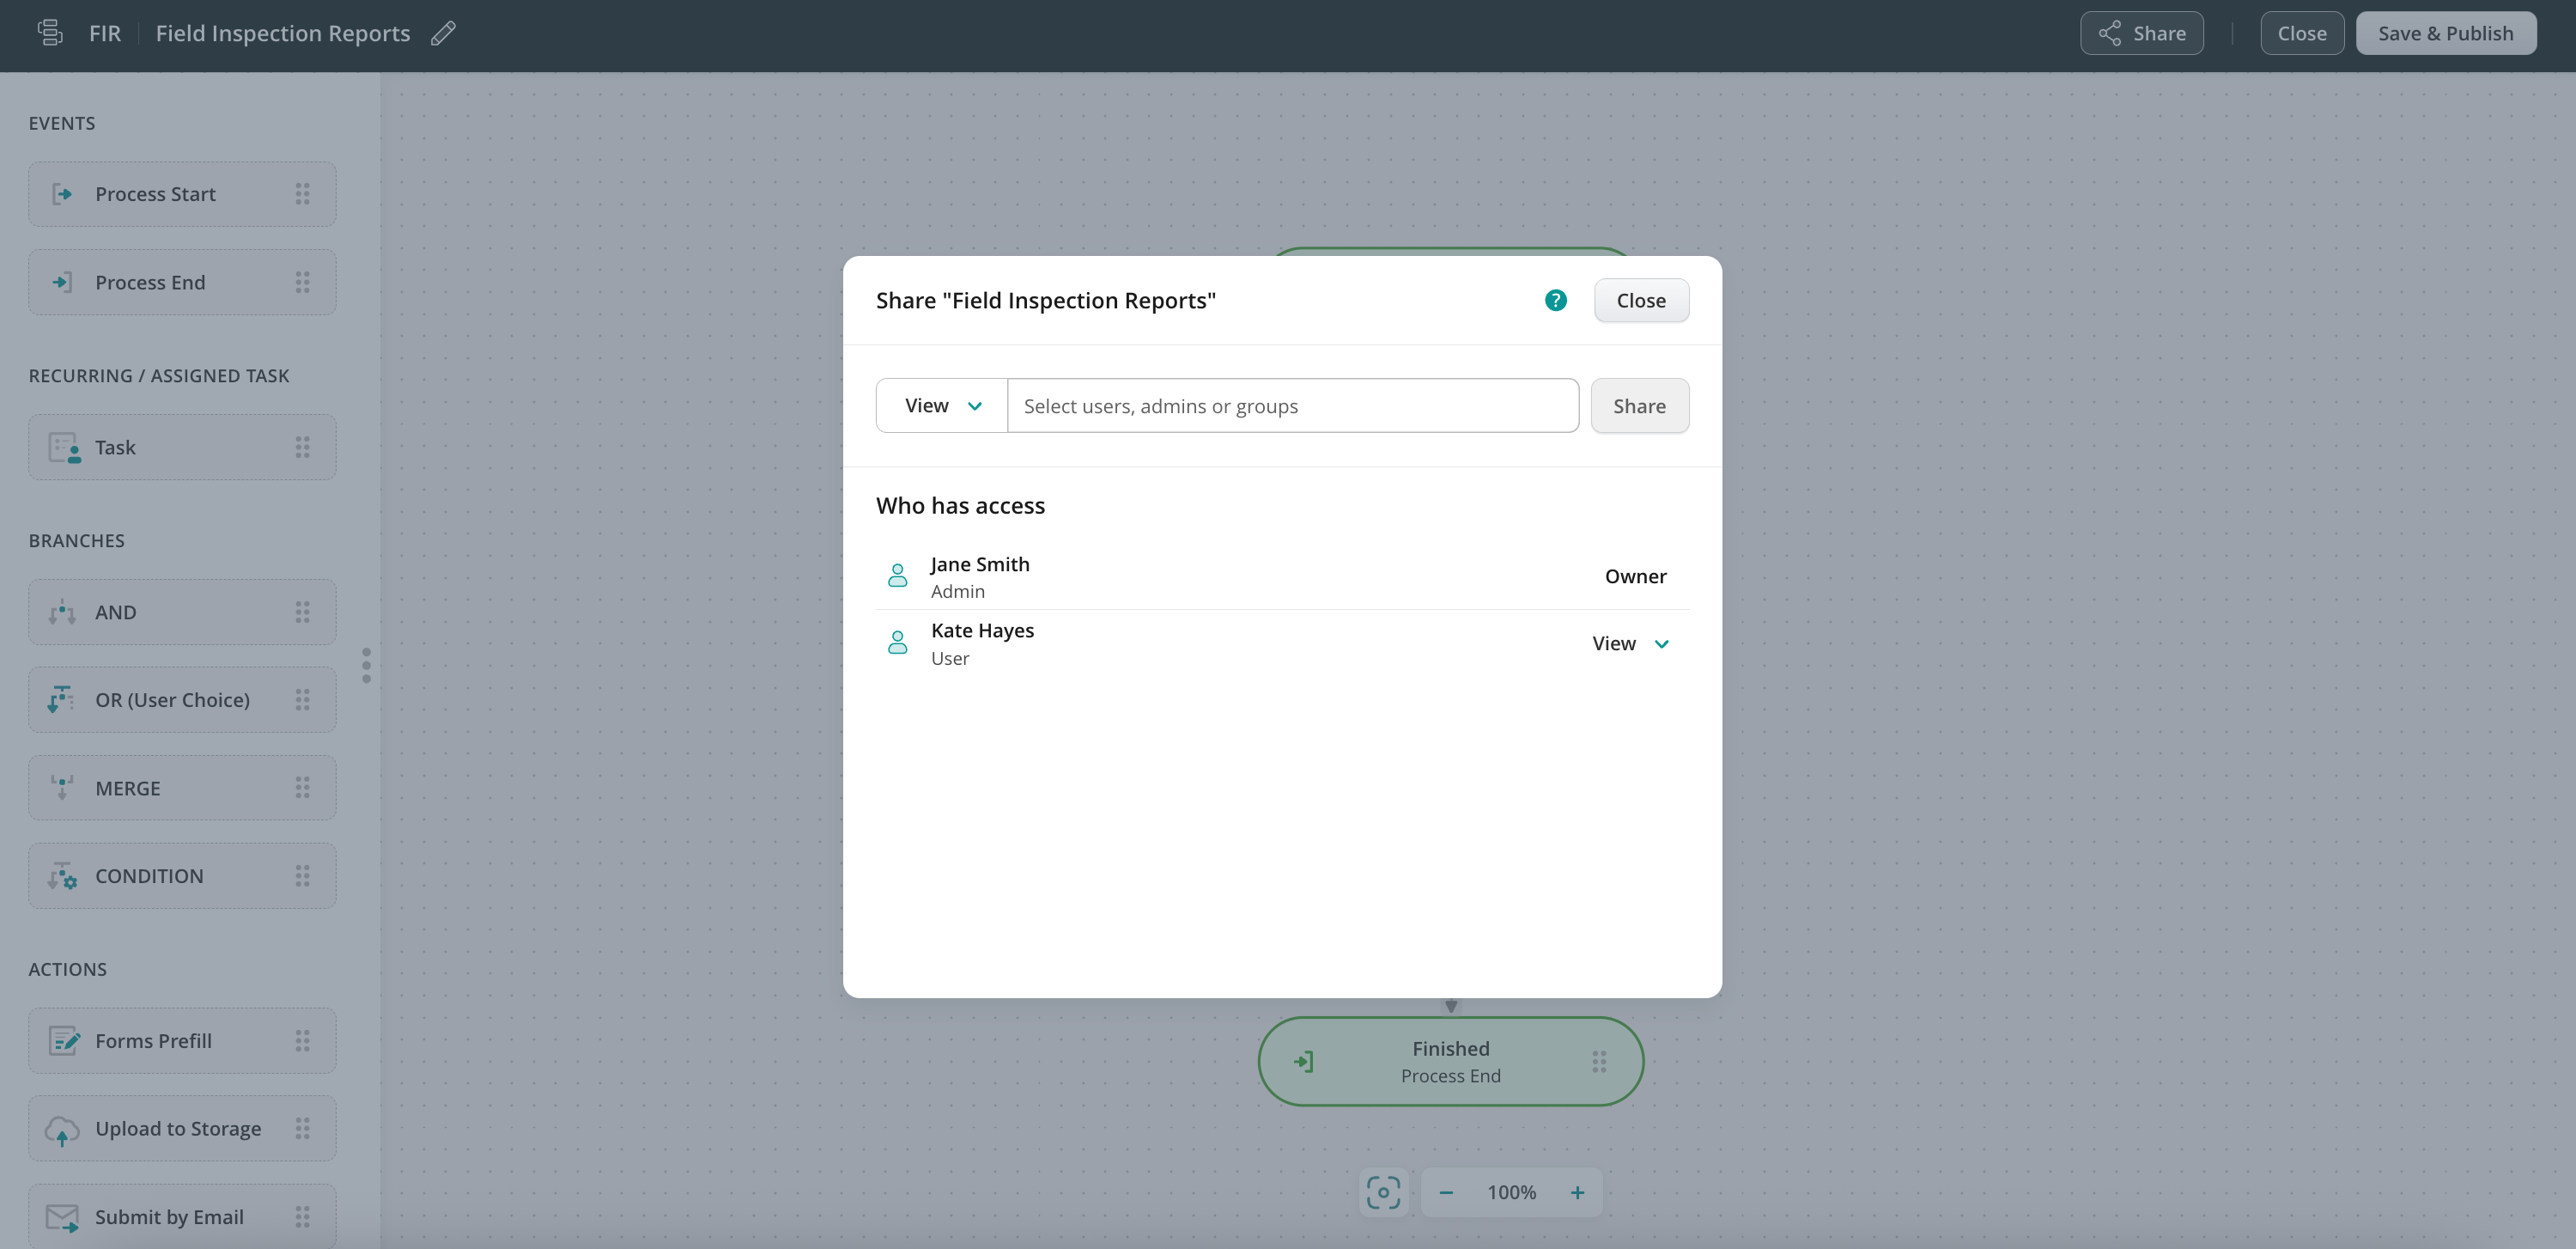
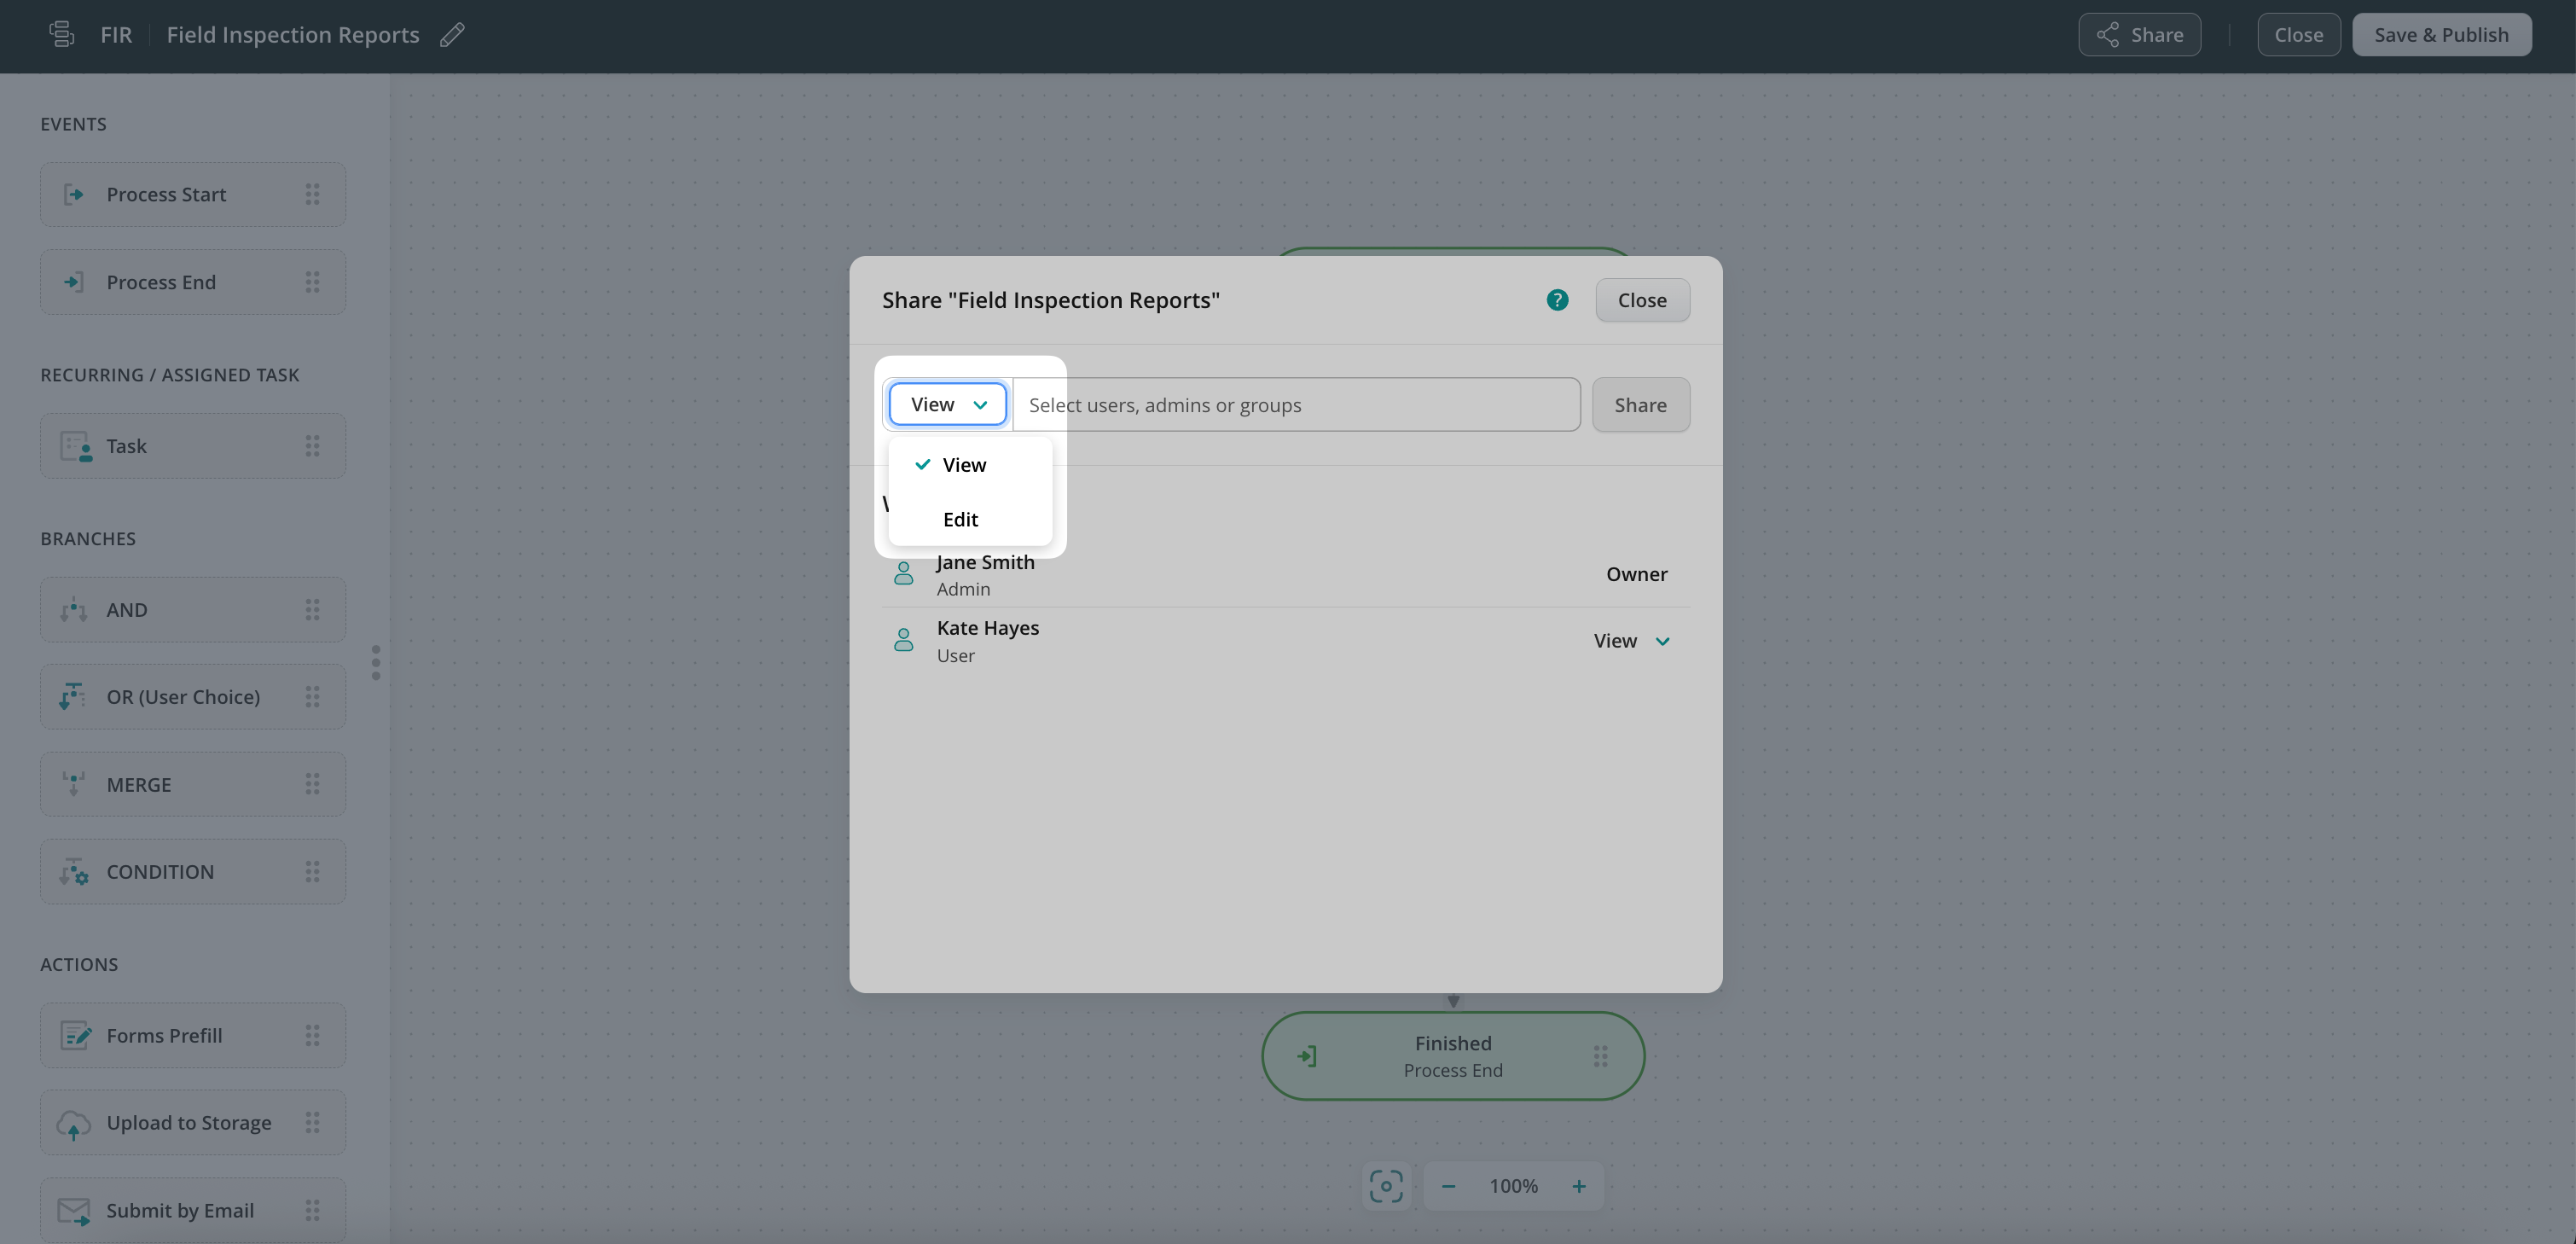
How to Share a Workflow in Fluix
Open the Workflow you want to share.
Click the Share button.
Choose how you want to share:
View mode – For regular users or groups.
Edit mode – For admins only.
Once shared, users will see the Workflow under the Admin tab in the Fluix Web App.
Key Things to Remember
The creator of a Workflow/Report is always its owner.
Owners retain control even if their “Create new Workflows/Reports” permissions are later removed.
Only users with “Create and manage own” or “Manage all” permissions can be owners.
If the owner is deleted or loses admin status, ownership transfers to the Account Owner.
Track Shared Workflows
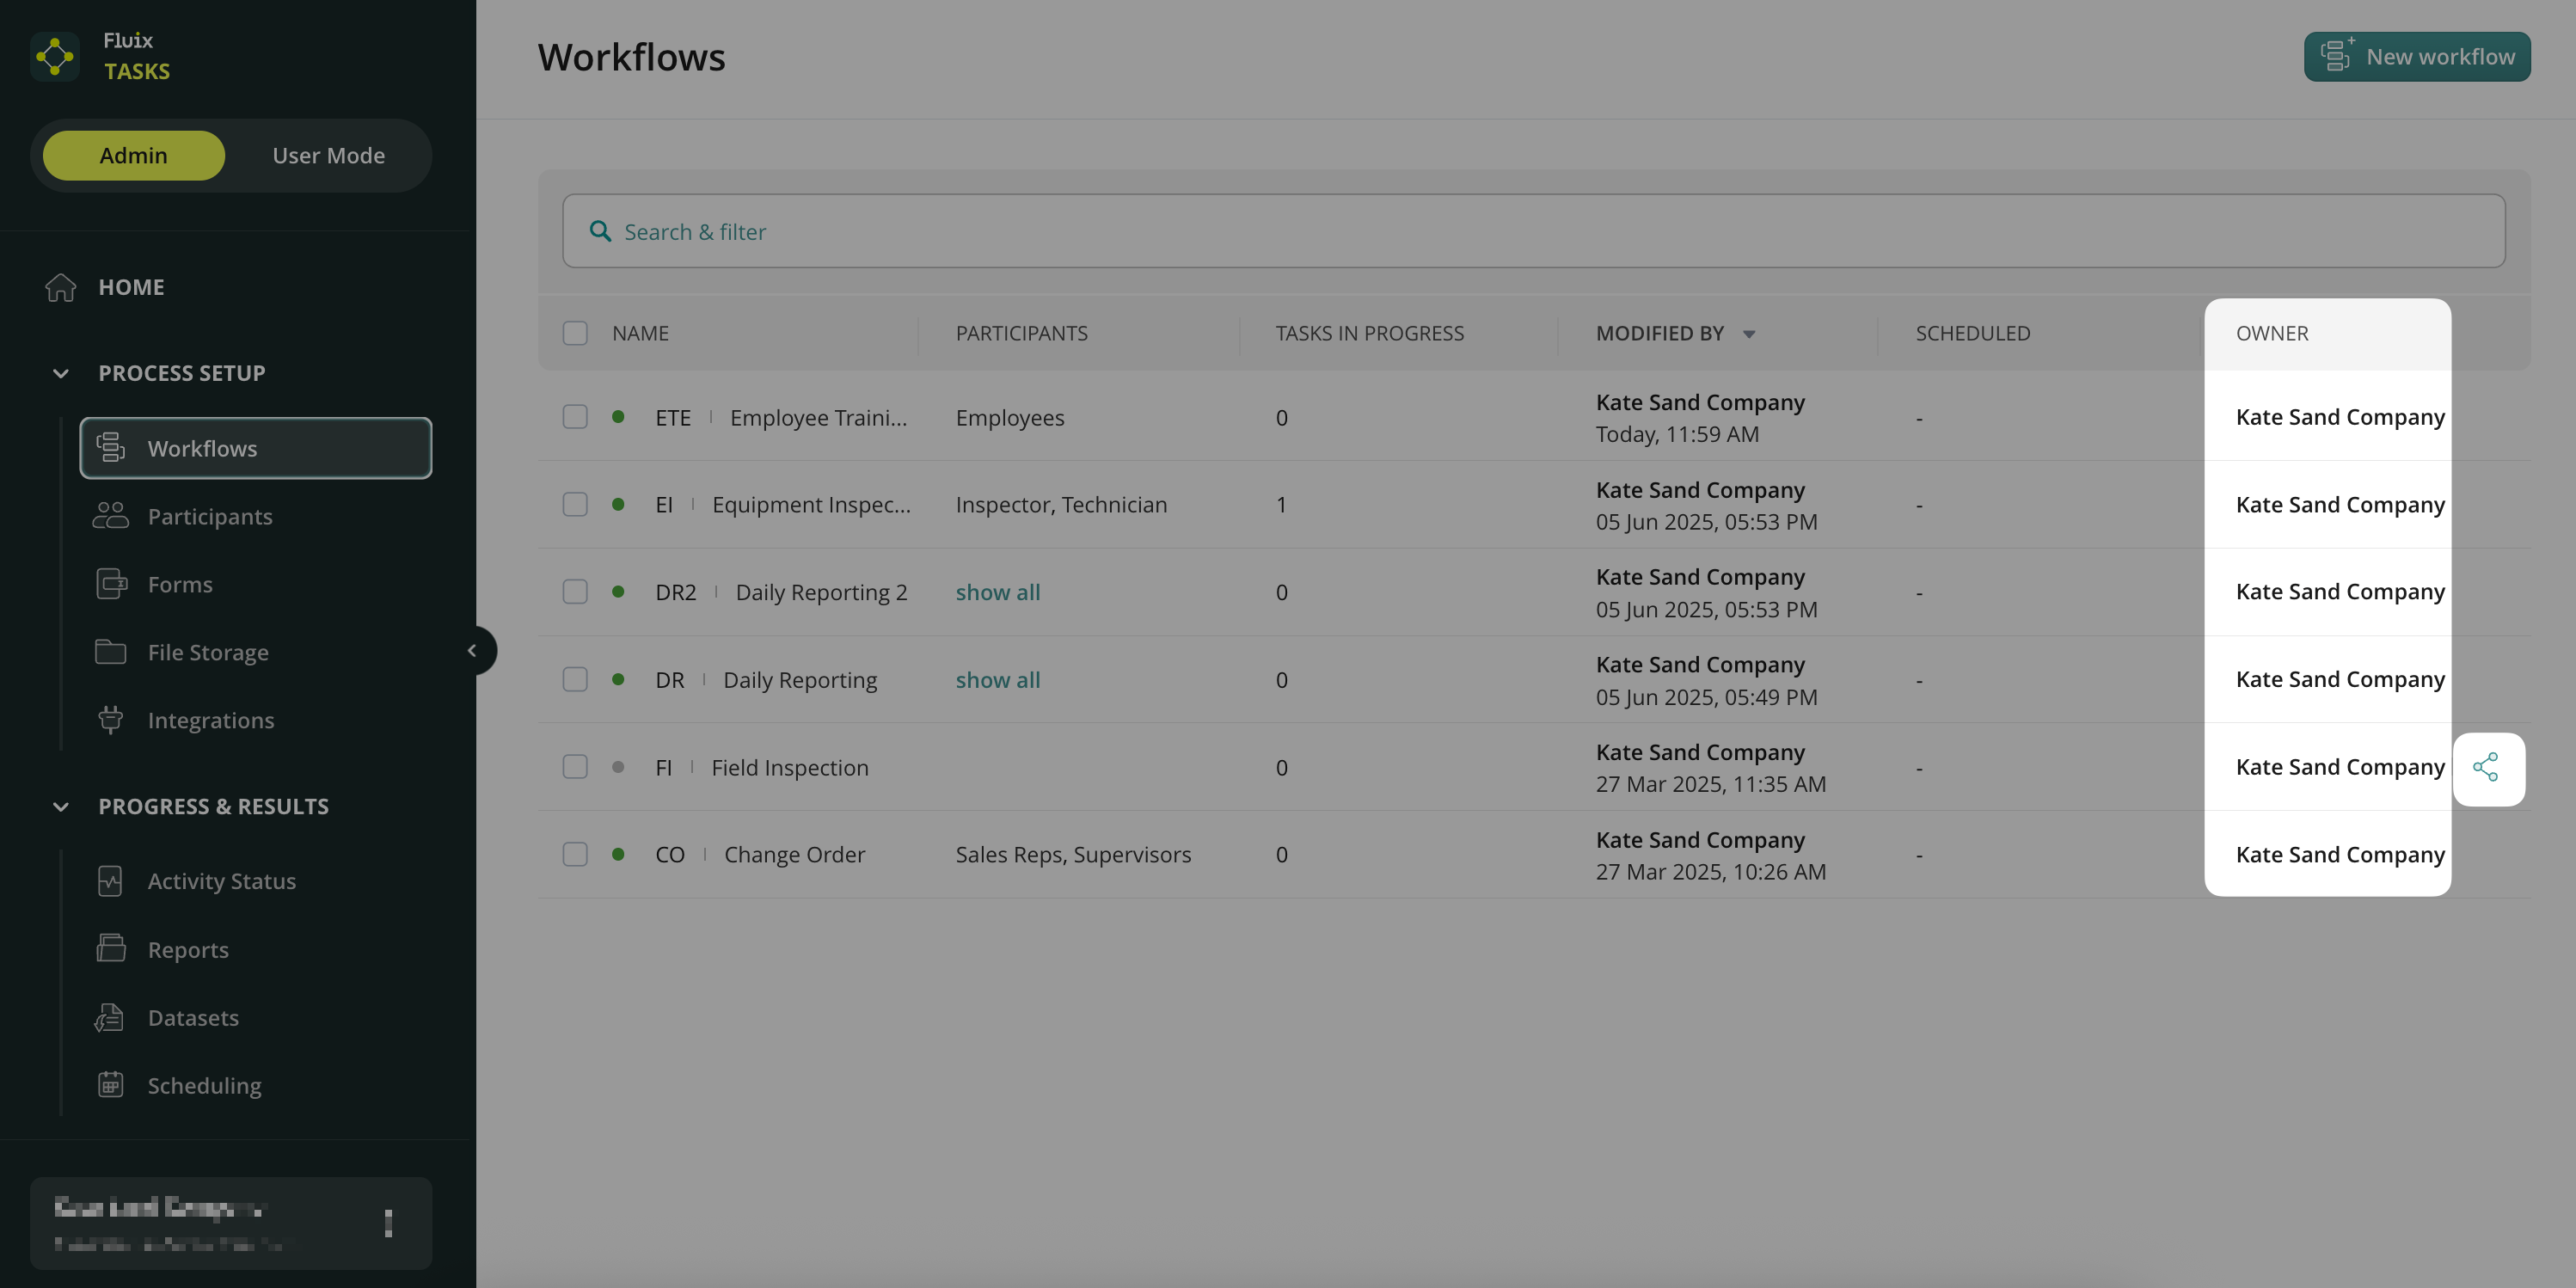
In the Workflows section, look for the share icon next to the Workflow. Click the icon to view or update who has access.
Feel free to contact us at support@fluix.io if you have any questions about the setup.
Was this article helpful?
Thanks for your feedback!
Oops, something went wrong. Please, try again later.
Thank you!
What details or examples would have made this article more helpful for you? We appreciate your insights!
Ensure the right people fill out the right parts of the form and nothing else. With smart field assignment in Fluix, you can control which fields are editable, read-only, or required for each person involved in a workflow.
Why Use Field Assignment?
Let’s say you have one form that needs to go through several people, but not everyone should be able to change everything. With field assignment, you can:
Decide which fields each person can fill in
Prevent unwanted edits Make sure key information is completed before moving forward
Example Workflow
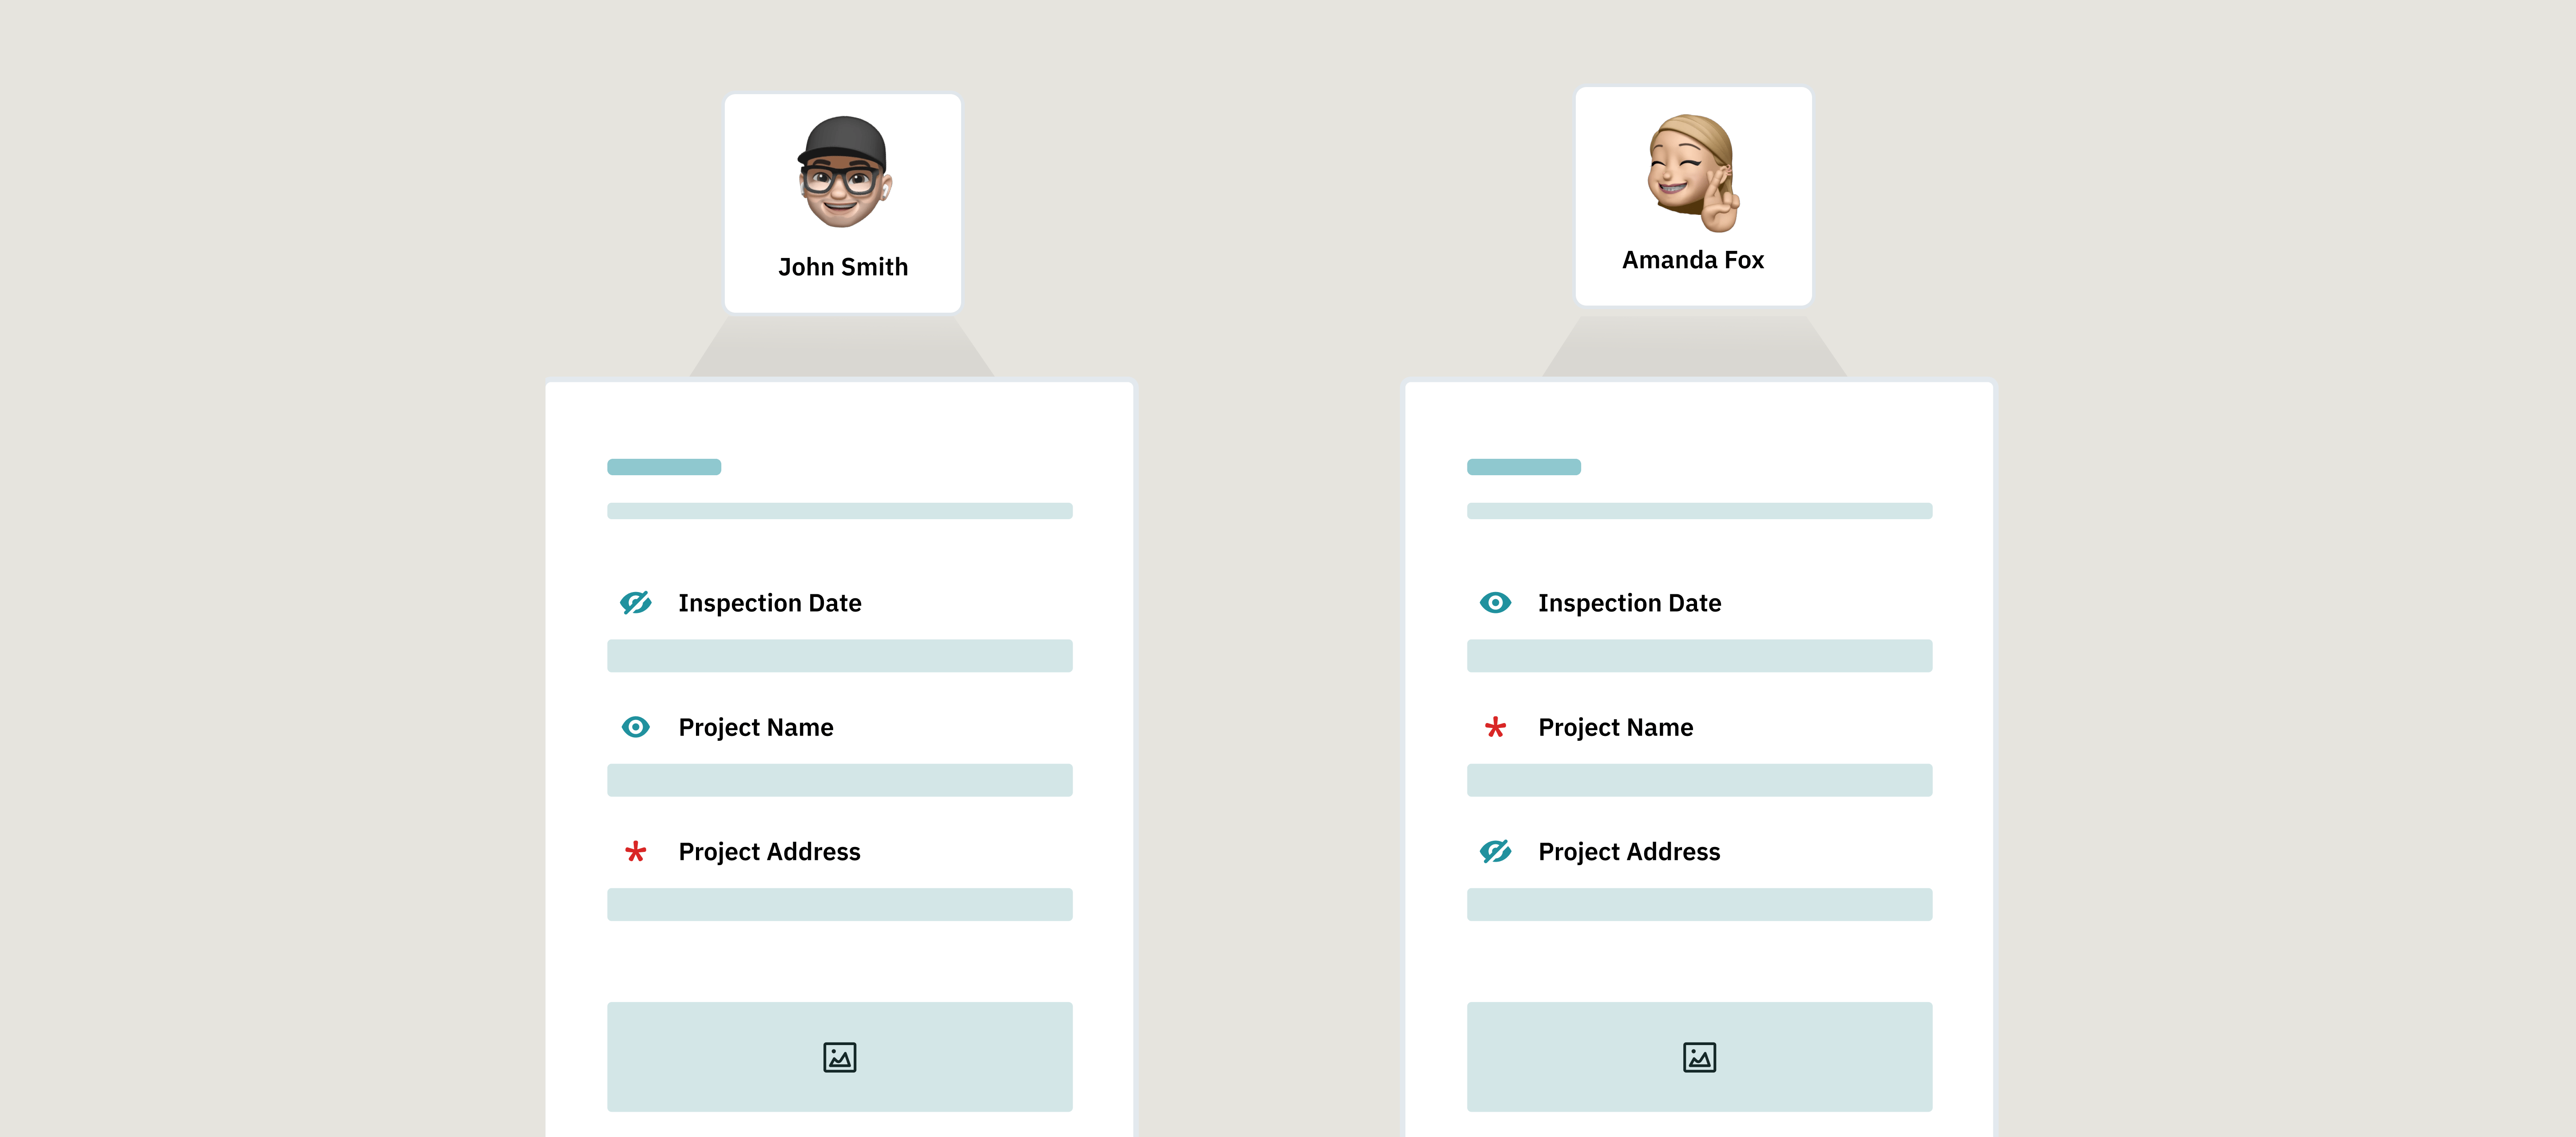
Imagine a remodeling project with three participants using the same form:
Participant 1: Sales Manager
Fills in customer details and agreement terms
Can only edit the section for customer preferences
Cannot change installation dates or leave comments
Participant 2: Supervisor
Reviews the contract completed by the Sales Manager
Can edit the entire form, including what the Sales Manager entered
Can send the form back for updates if needed
Participant 3: Installation Specialist
Gets the form once everything is agreed upon
Can view the signed contract, but not edit it
During the customer visit, must collect a signature and any required confirmations — those fields should be marked as required.
How It Looks in Fluix
Here’s an example of how the full setup will look in Fluix’s workflow builder:
Each person in the process has a task. But what makes this workflow powerful is that each participant can only work with the form fields meant for them. Let’s walk through how to set this up.
How to Set Up Field Assignment (Step-by-Step)
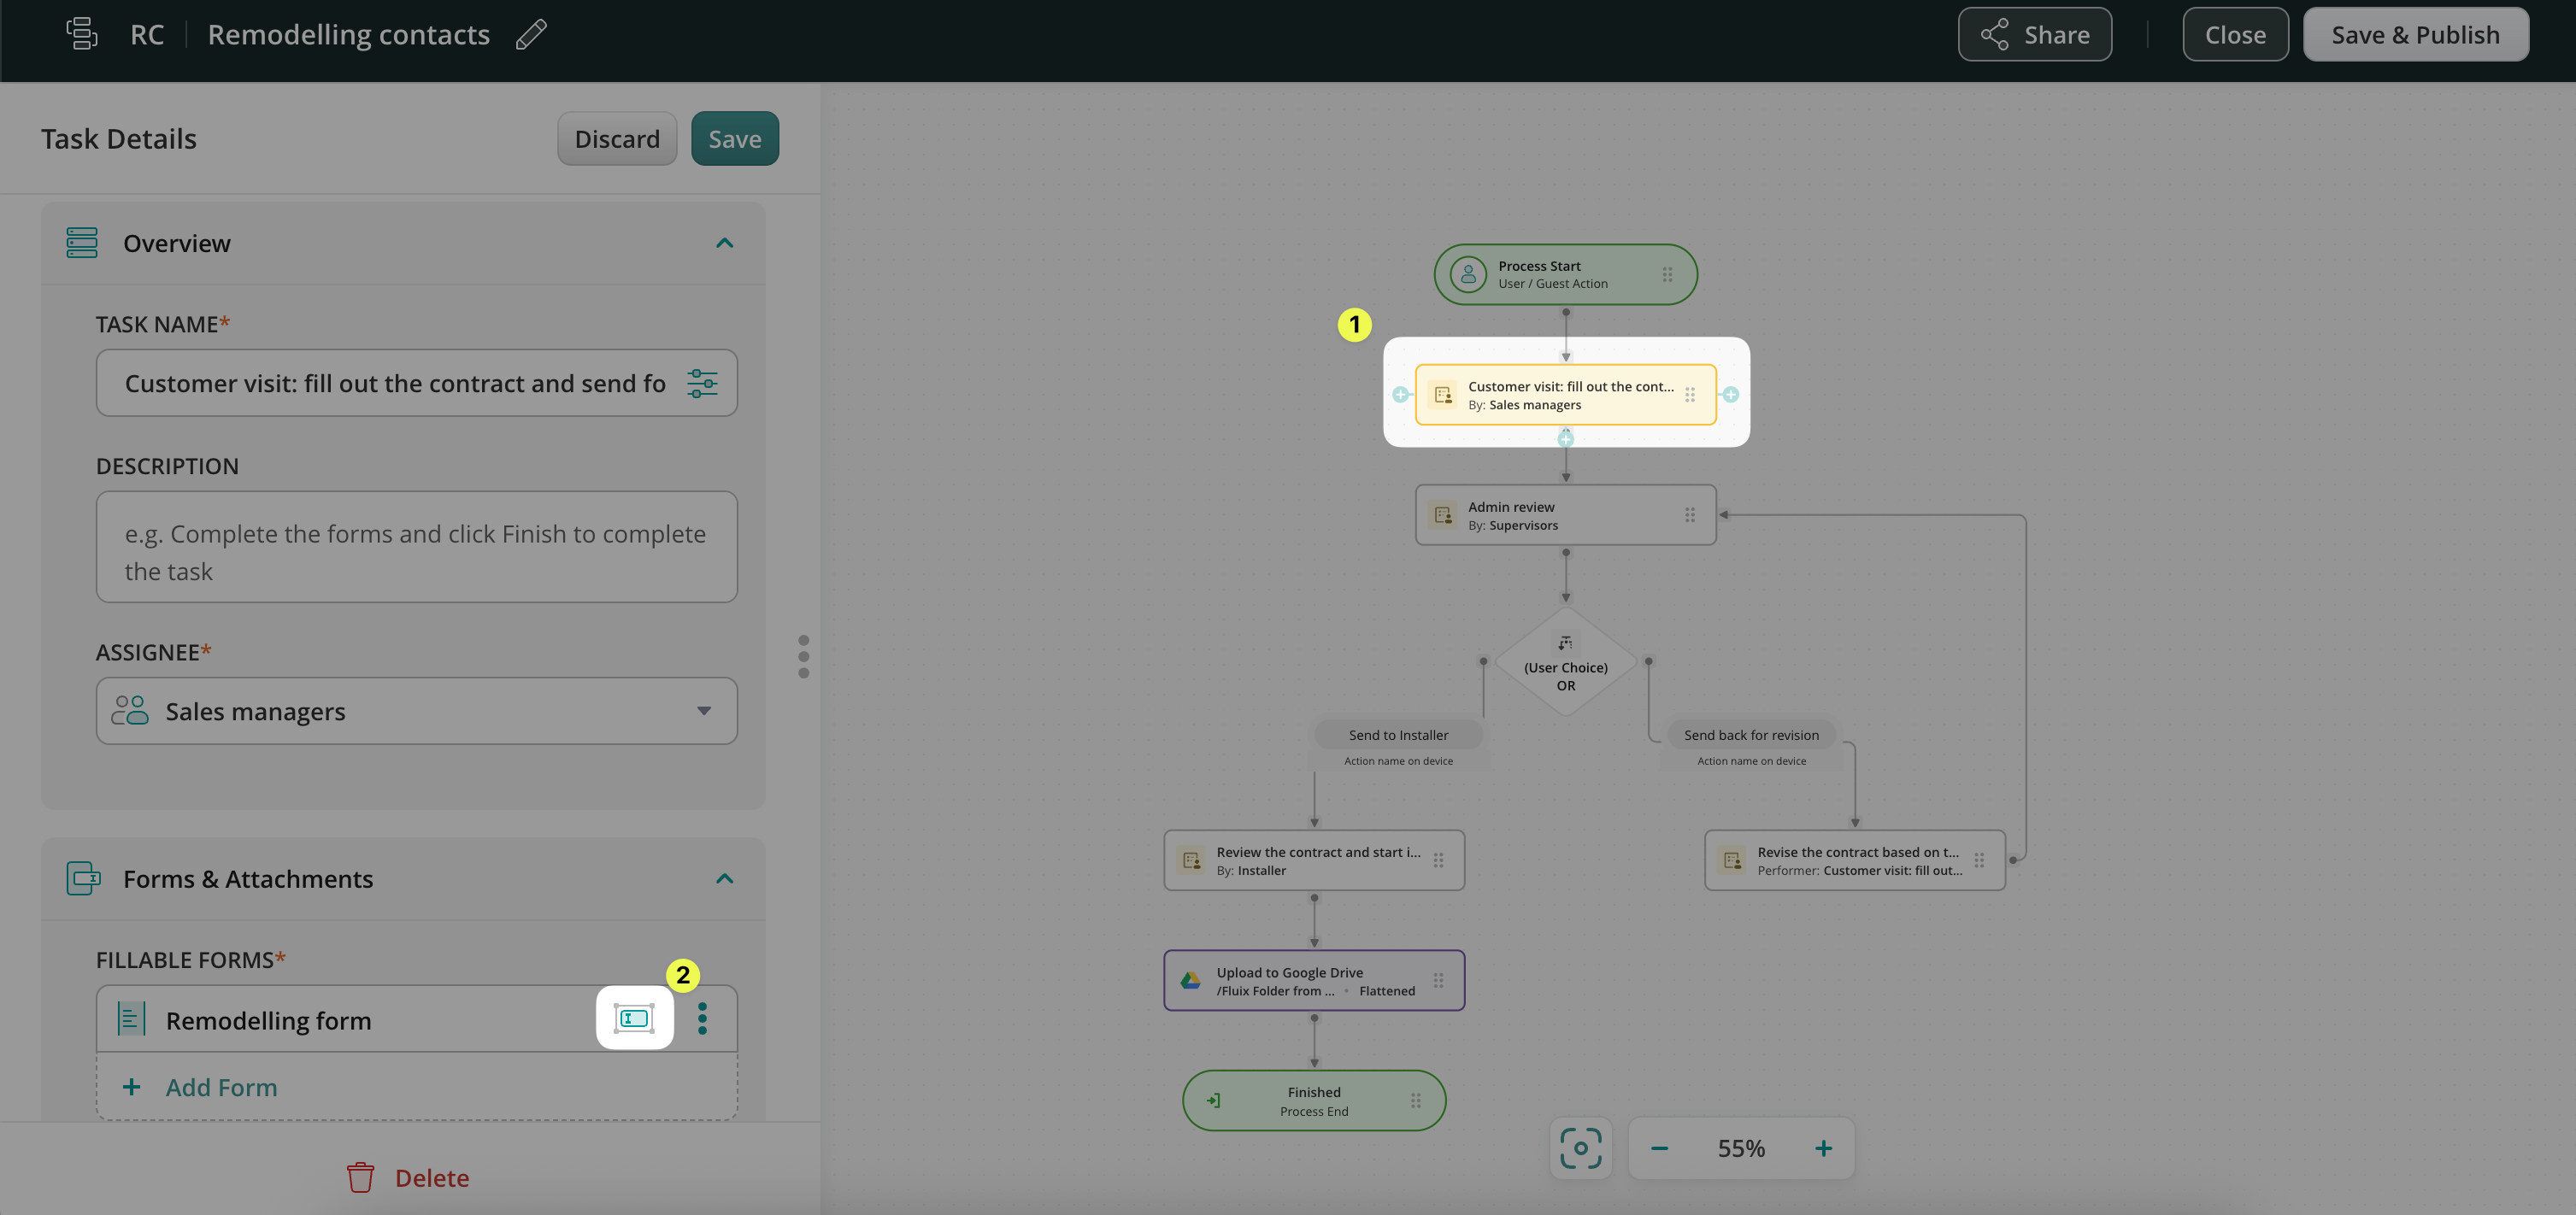
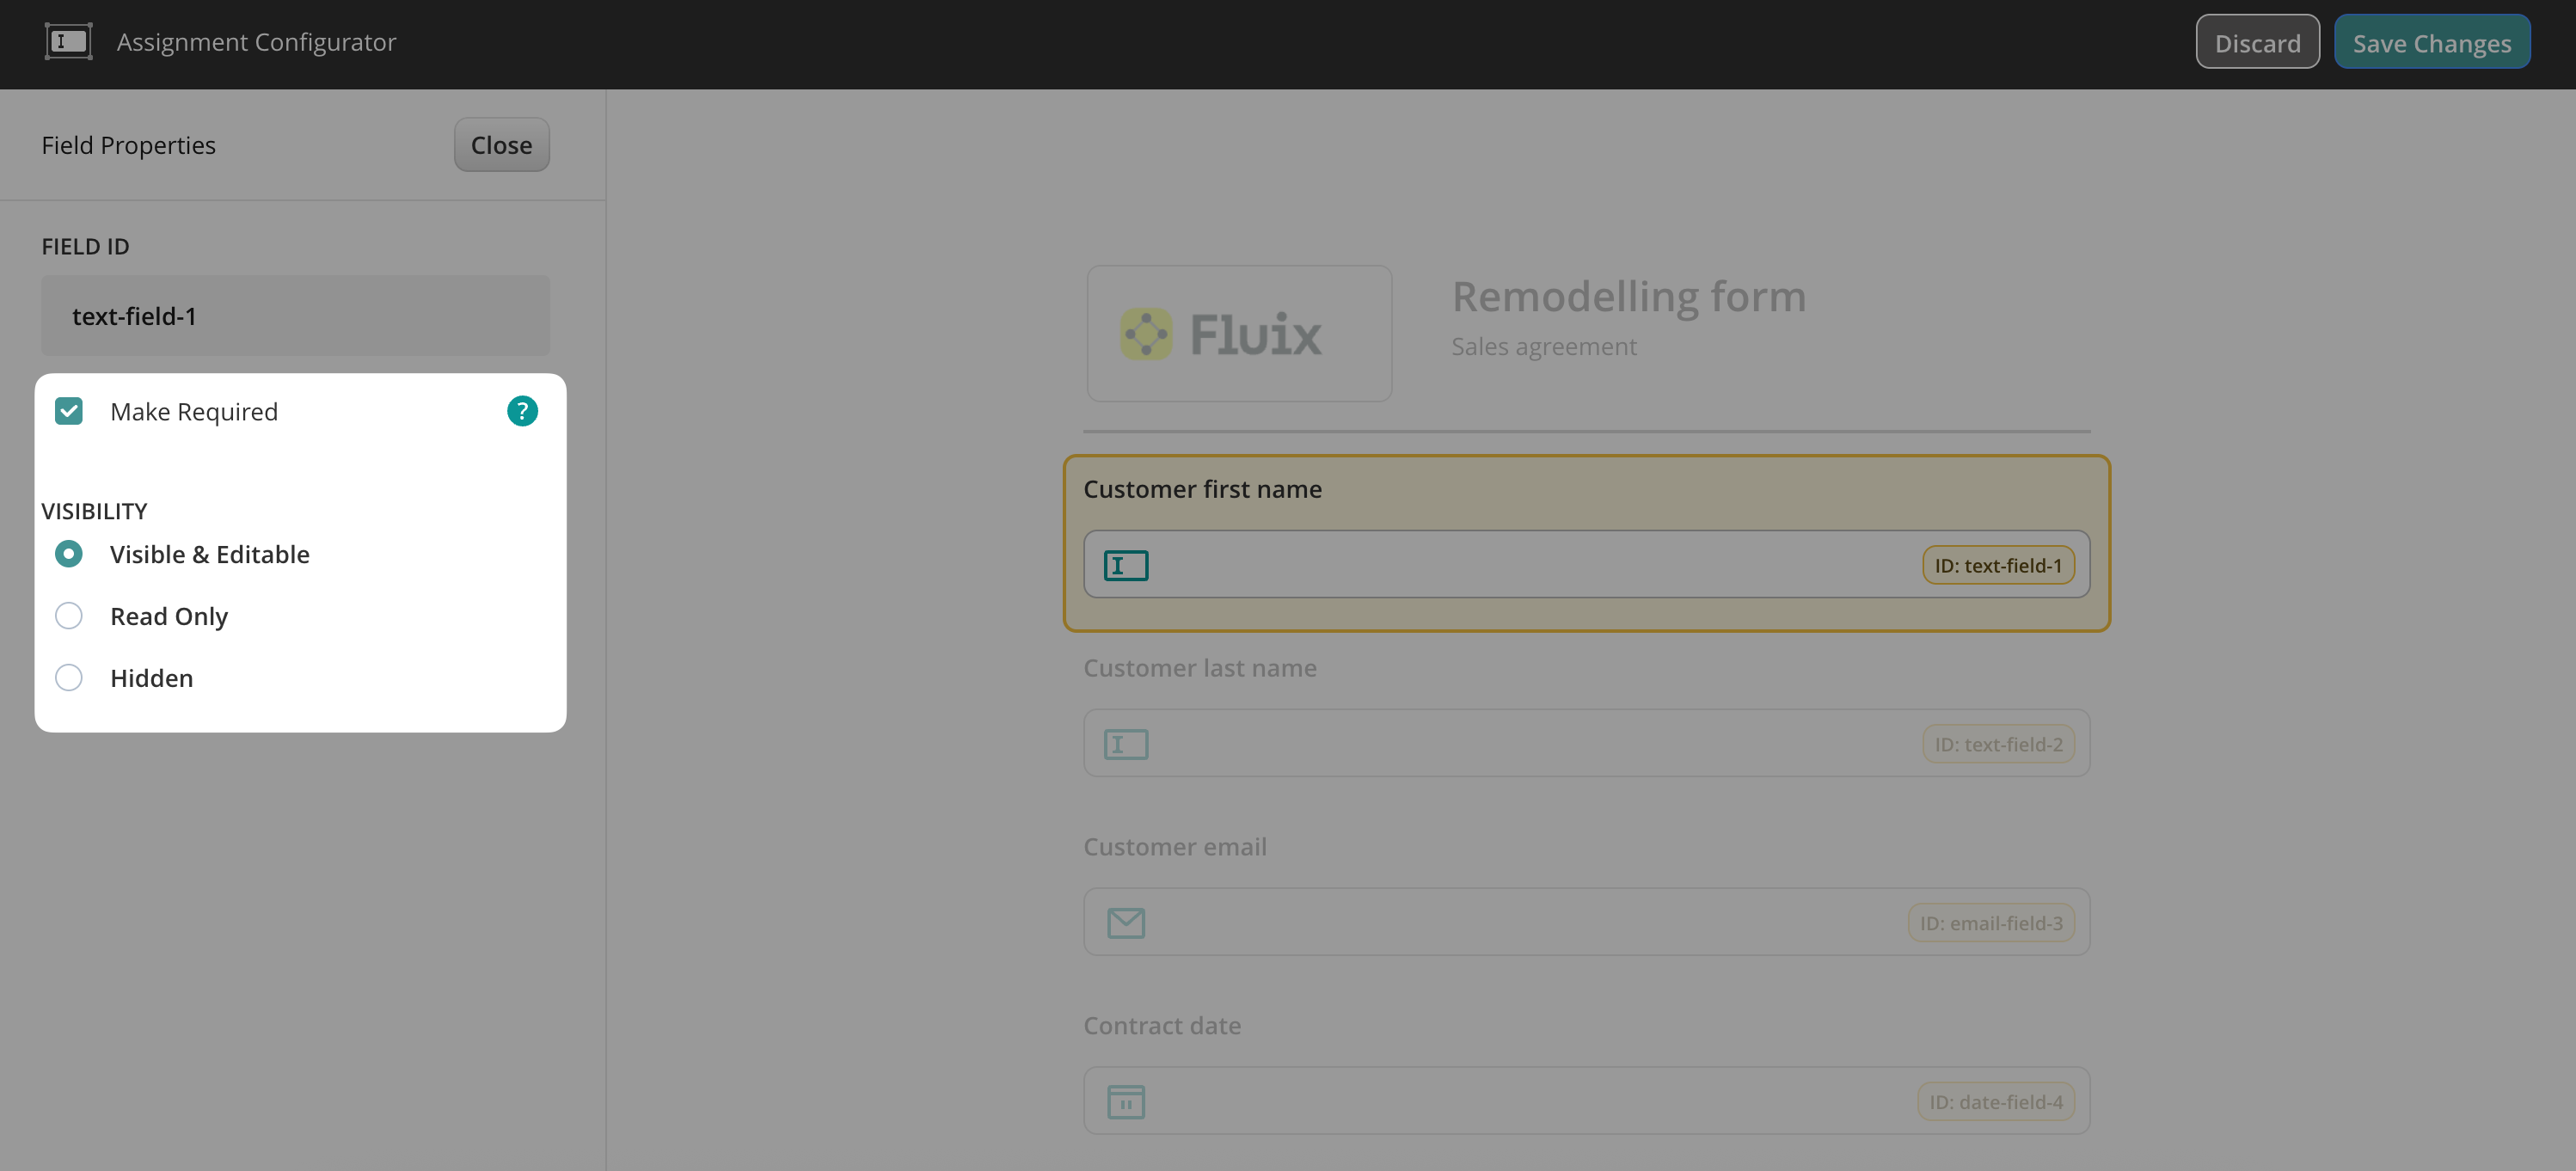
1. Go to the Admin Portal and open your workflow under the Workflows section. 2. Click on the first task in your process (e.g., the Sales Manager’s task). 3. In the Forms & Attachments section, click the Assign form fields icon next to your form.
4. In the form preview, click on the fields you want to configure:
Mark fields as Required (they must be filled out)
Or set them as Read-only (they can be viewed but not changed)
Example: Make “Customer First Name” and “Customer Last Name” required for the Sales Manager.
5. Repeat the same steps for any other fields this participant should fill out.
Note: Field assignments apply only to the workflow you’re currently editing. If you want a similar setup in another process, repeat the steps in that workflow or duplicate the workflow and customize it accordingly.
Setting Up Fields for Other Participants
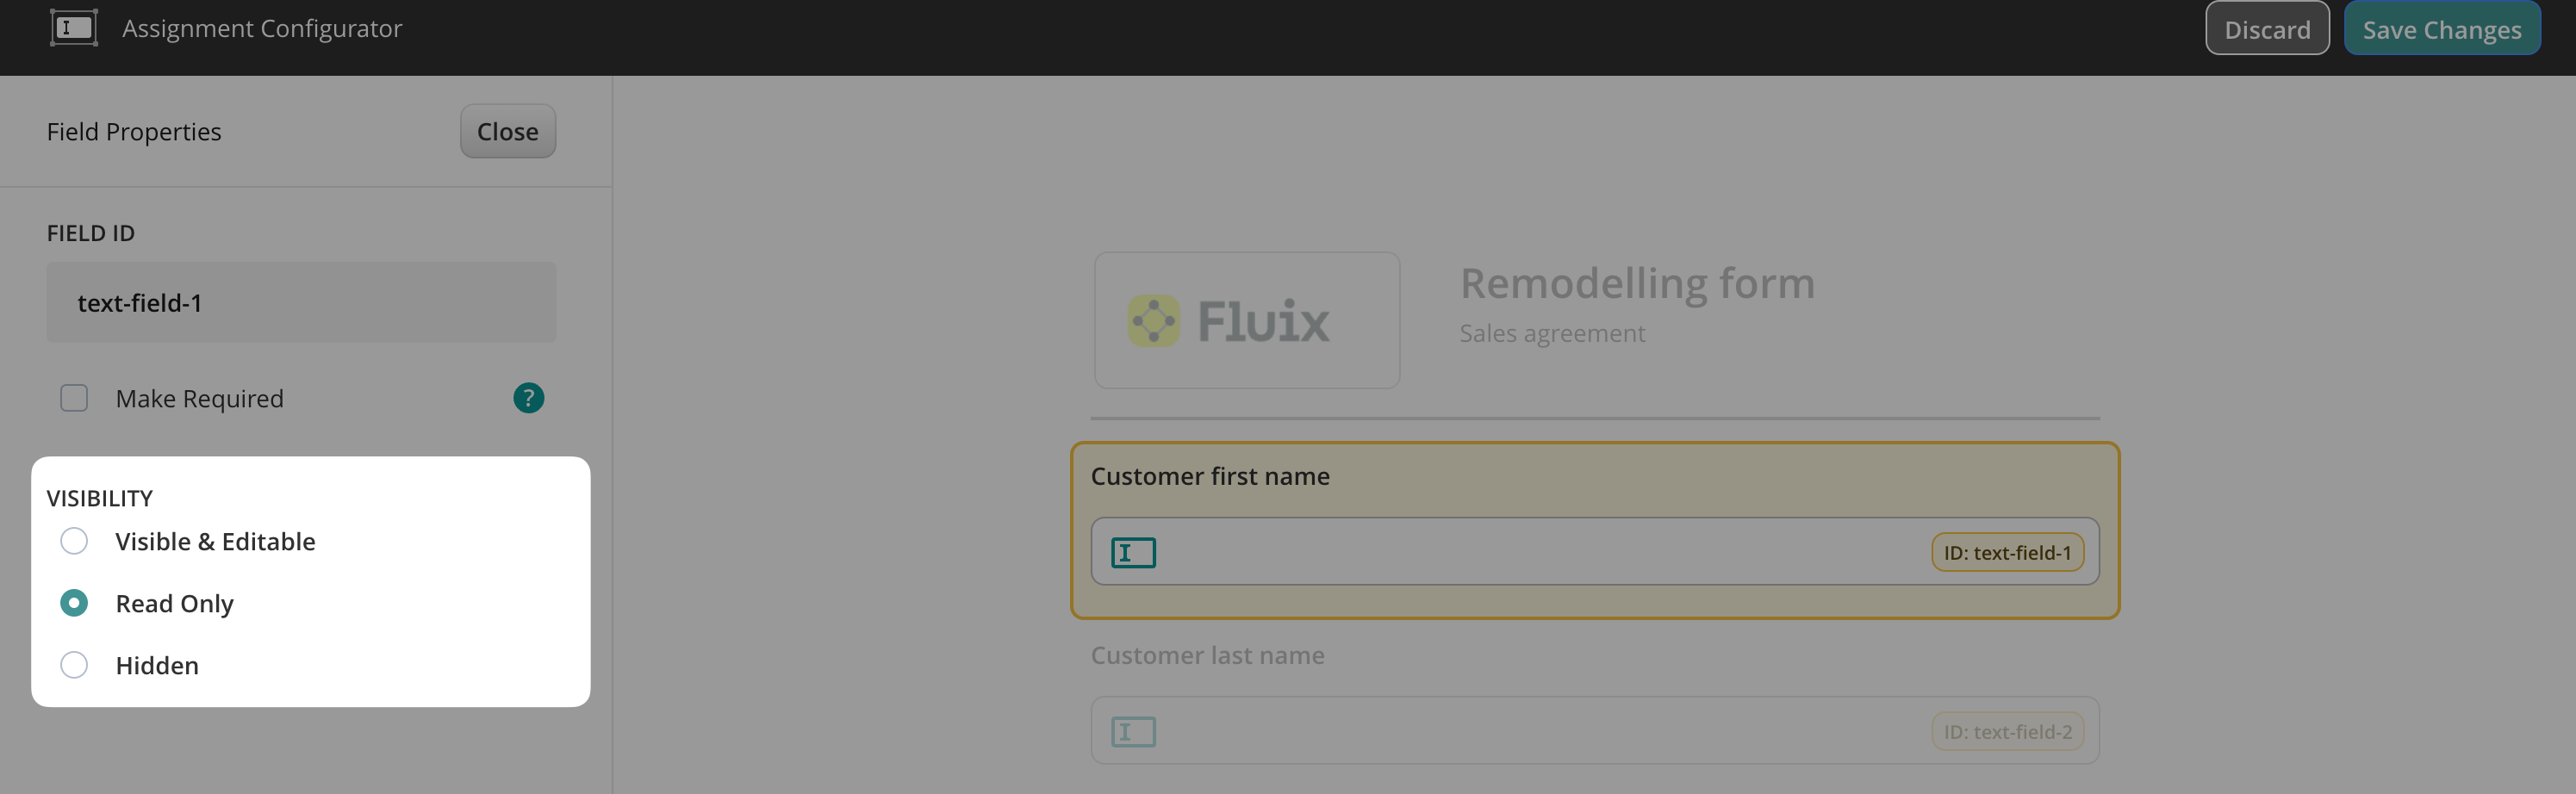
Now let’s configure the fields for the next person in the workflow.
1. Go to the task for the Installation Specialist (or any other participant). 2. Open the Forms & Attachments section and click the Assign form fields icon. 3. Set fields as read-only where necessary; for example, the contract fields are already filled out by others. 4. Mark new fields as required, like the customer’s signature, after the job is done.
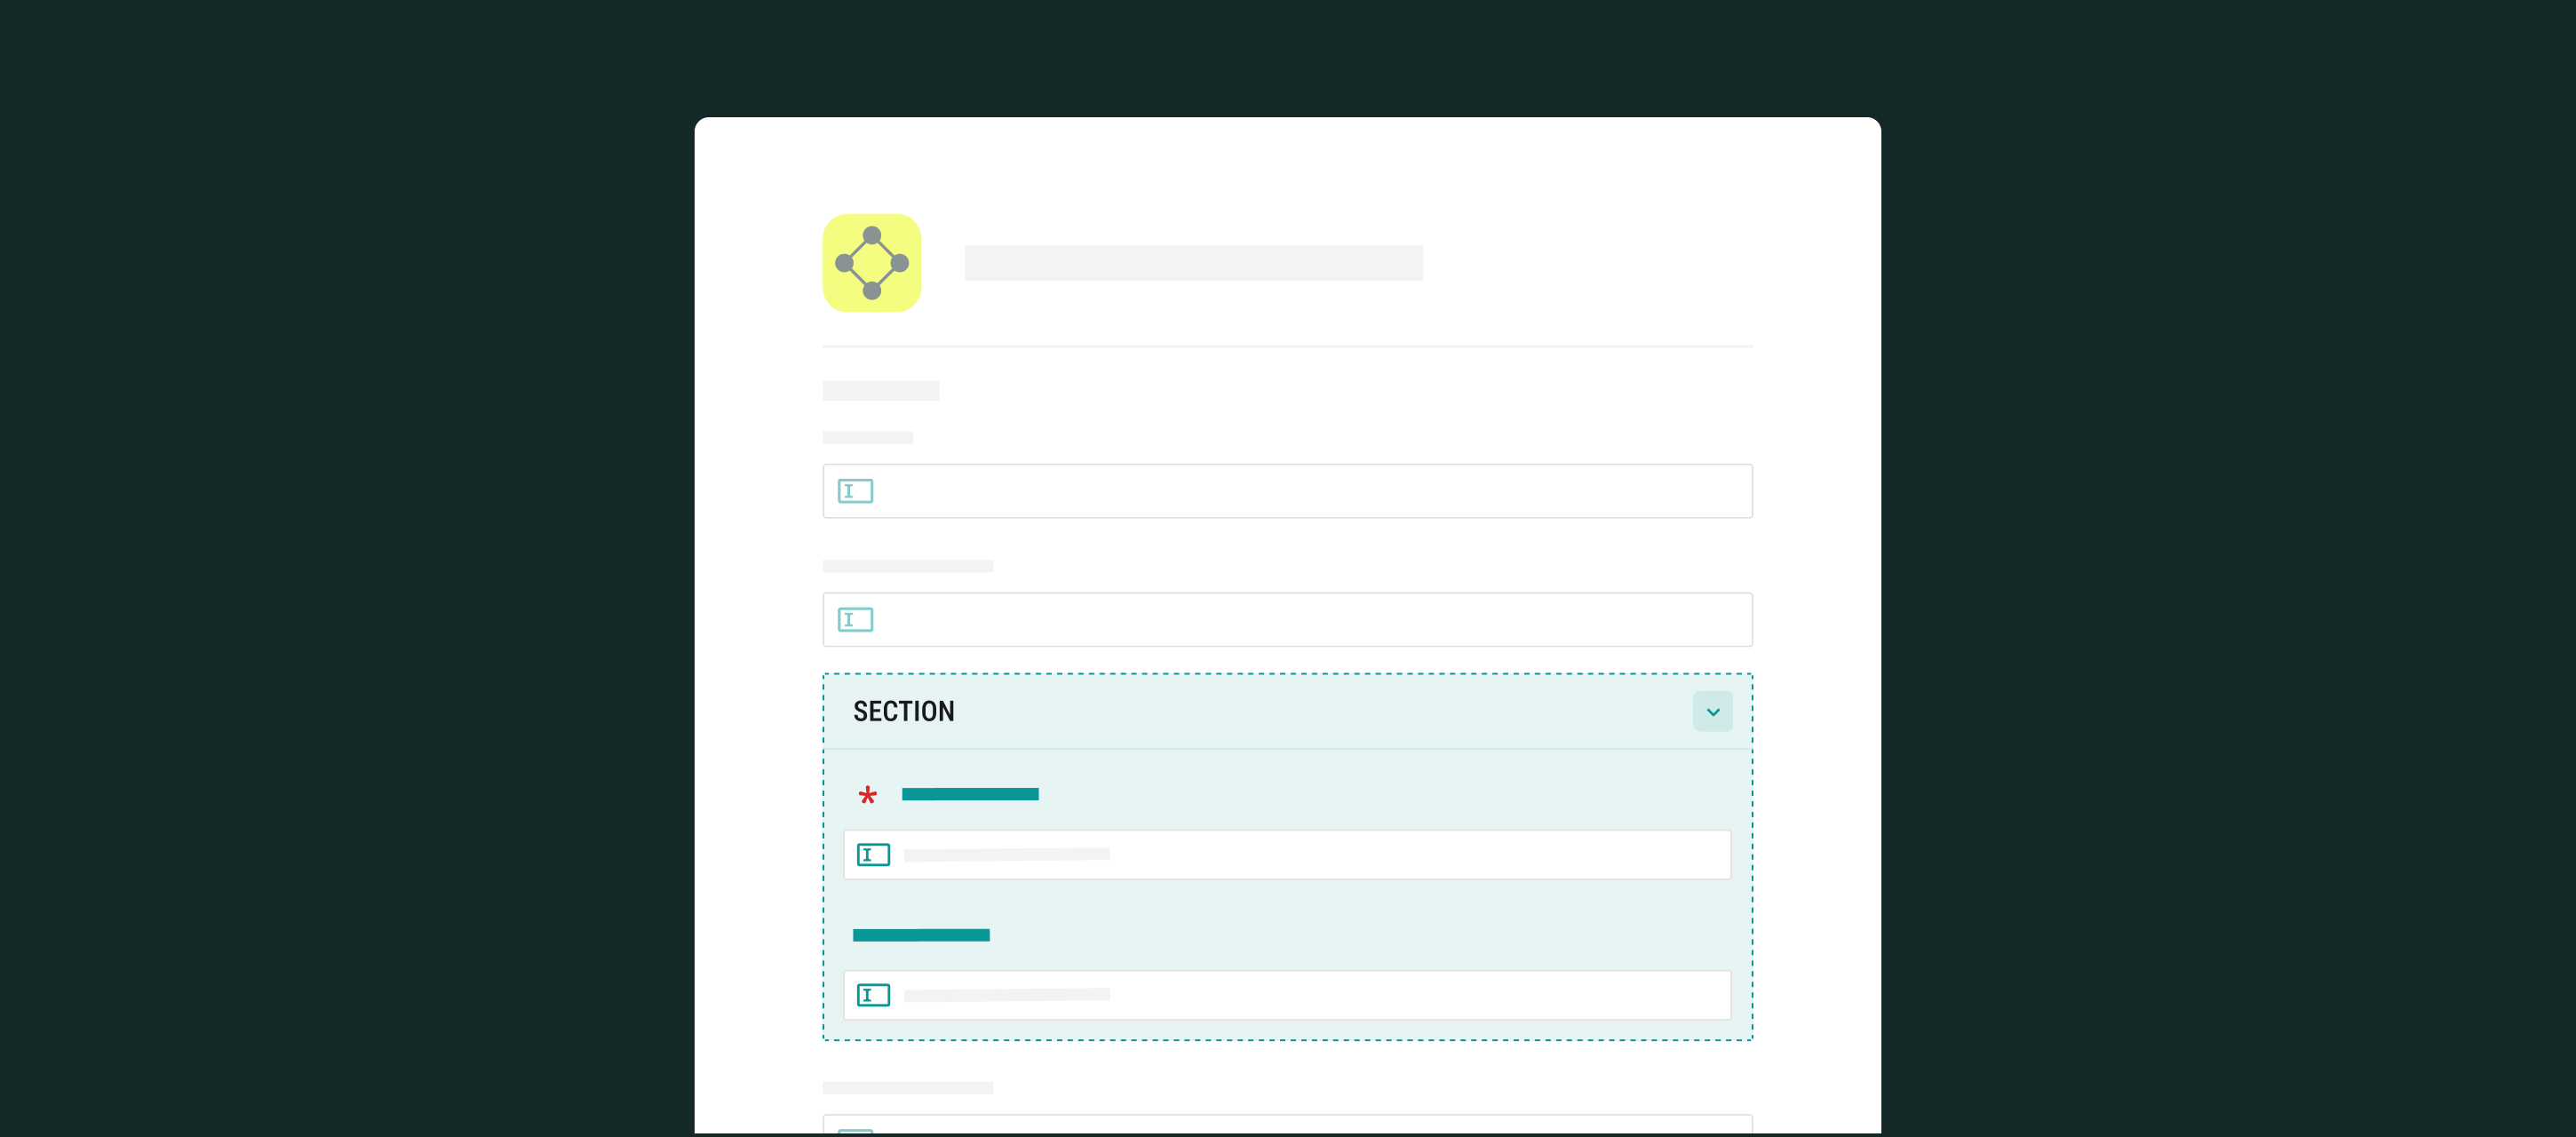
Sections help you build smart and flexible dynamic forms faster, especially when you need to repeat groups of fields, add logic, or simplify long forms for your field teams.
Why Use Sections?
Here’s why Sections in Dynamic Forms can be helpful for you:
Build One Section, Use Anywhere through the Form
Instead of recreating the same fields over and over, create a Section and duplicate it in one click. Example: Inspecting 10 rooms with the same checklist? Create one Section and duplicate it 9 times.
Keep Long Dynamic Forms Easy to Navigate
Allowing Sections to collapse once filled to prevent unnecessary scrolling makes your forms cleaner and easier to use. This helps field teams focus on the necessary parts of the forms. Example: A technician can fold completed sections and stay focused on the next room.
Add Conditional Logic
Use conditional logic to show or hide entire Sections or just individual fields within a Section based on the user’s input. Example: If “Additional inspection needed” is selected, a Section with follow-up questions appears and becomes required.
How to Create a Section in a Dynamic Form?
Note: This feature is available in the Fluix Tasks app for iOS & Android starting from v. 2.5.
1.Navigate to your Admin Portal > Forms -> open an existing form or click New Form. 2.In the Form Builder, locate the Section under the Layout elements.
3.Drag and drop the Section into your form -> add the necessary fields inside it (e.g., checkboxes, dropdowns, comment boxes, image upload)
4.You can also:
Add a Section title and description or set its initial visibility (Visible or Hidden options).
Make it collapsible for end users. Below, you can see how this function will look for the field team in the Fluix Tasks app.
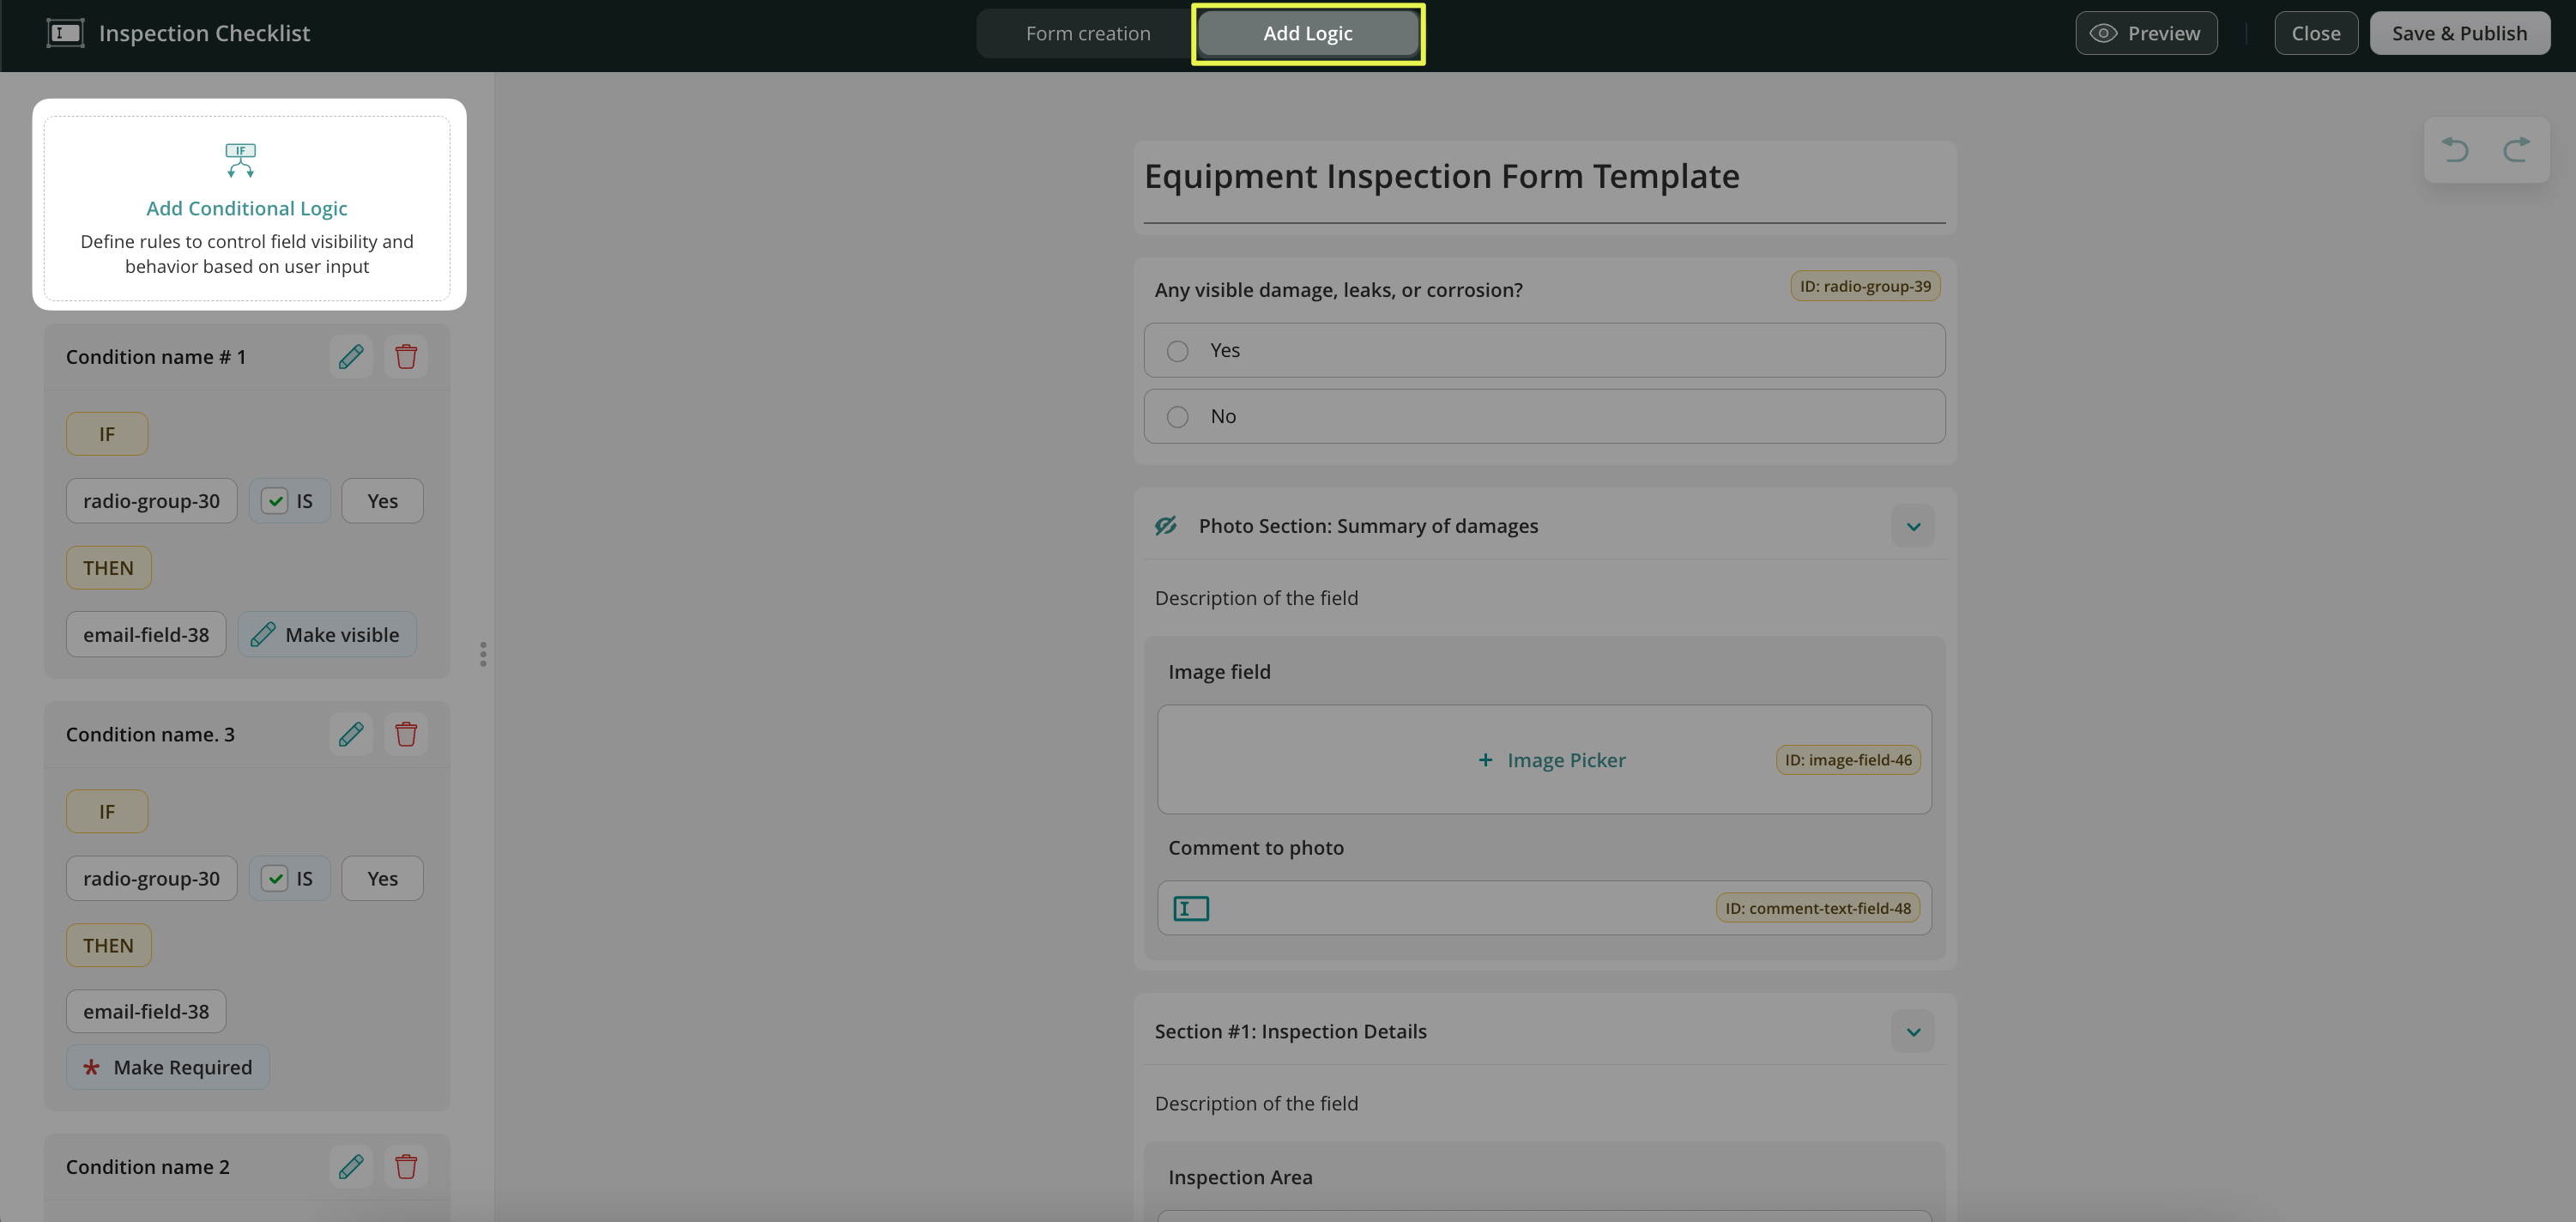
1.Go to the Add Logic tab in the Form Builder -> click Add Conditional Logic to configure the trigger field (e.g., a checkbox or radio button)
2. Set the action. Check an example of the possible logic in the examples below.
Add Logic to Fields within a Section
You may use this approach when specific answers should trigger additional input fields.
Example: If “Maintenance Required” is selected, show a field for Supervisor Email and make it required.
Add Logic to Entire Sections
You may use this when a group of related fields should appear based on earlier answers.
Example: If a user selects “Leak Detected,” show a Section with image upload + comment fields. Keep it hidden unless needed.
What appears in the Final version of the form?
To check the progress of tasks completed by the field team, navigate to the Dashboard in the Admin Portal and open the process to view the completed form.
Folded-but-visible sections in the forms will appear in the exported documents.
Hidden sections (never shown during the field team’s completion) will not appear in the form.
All required fields will still be filled before submission.
If you have questions about setting up Sections or conditional logic, contact us at support@fluix.io — we’re here to help!
Was this article helpful?
Thanks for your feedback!
Oops, something went wrong. Please, try again later.
Thank you!
What details or examples would have made this article more helpful for you? We appreciate your insights!
With Fluix Assets, you can prefill your team’s forms with data from your company database. This means no more manual typing, fewer errors, and faster form completion in the field.
Why Use Fluix Assets
For Managers: Connect your internal databases (e.g., vehicles, equipment, machinery) to Fluix forms. With just a few clicks, keep all records up to date from the Admin Portal.
For Field Teams: Save time and reduce mistakes. Instead of typing information, your team selects from a prefilled list of options in their forms.
1. Upload an Excel (.xlsx) or CSV (.csv) file with your assets, or create one directly in Fluix. 2. Make sure your file includes:
Column headers in the first row
A unique ID column for each asset
No merged cells
Step 2 – Create an Asset Collection
1. In the Admin Portal, go to Assets → click New Collection.
2. Upload your file or create a list manually. 3. Name your collection and click Create. 4. Your assets will now be displayed in a table. Click on an asset name to edit it directly in Fluix.
Step 3 – Connect Assets to a Form
1. Go to Forms in the Admin Portal and open or create a dynamic form. 2. In the Form Builder, add a Dropdown field and give it a clear label (e.g., “Select Vehicle”). 3. In the Options panel, choose Pre-fill options → Open Pre-fill setup. 4. Select your Asset Collection and choose which column should populate the dropdown list.
You can include multiple drop-down fields connected to different data sources within the same dynamic form. This provides greater flexibility and allows users to work with several data sources simultaneously.
In the Form Builder, you can add an unlimited number of data sources and link them to individual drop-downs and related fields.
1. Make sure you’re assigned to the workflow group. 2. Open the Fluix app (iOS, Android, or Web). 3. Start the task and open the form. 4. Tap the dropdown field—you should now see the prefilled asset list.
6. Complete and submit the form.
Step 6 – Track the progress of the used Assets
To monitor the assets used and the current status of the related tasks:
1. Navigate to the Dashboard section. 2. There, you will see a separate column with the used assets.
If you have any questions or experience challenges setting up Assets in your Dynamic forms, contact us at support@fluix.io, and we will assist you shortly.
Was this article helpful?
Thanks for your feedback!
Oops, something went wrong. Please, try again later.
Thank you!
What details or examples would have made this article more helpful for you? We appreciate your insights!
Projects in Fluix help you organize forms, teams, workflows, and assets related to a specific department, location, or function — all within one dedicated space. This keeps operations structured, secure, and easy to manage.
Note: Projects are available starting from the Basic Plan, which includes one project. Unlimited Projects are available on the Core Plan and above.
What Are Projects?
Projects are isolated environments within your Fluix account that enable both account admins and the field team to structure processes by any differentiator — such as region, site, or department.
Each Project can include:
Project Admins
Workflows
Forms
Dedicated storage
Groups of users
Activity per project
This setup keeps information localized to the relevant team, helping to maintain data security.
Creating a New Project
In the Admin Portal, open the Projects section.
Click New Project.
Enter a name — for example, “North Region”.
Click Create. After the project is created, you can begin adding its components.
Setting Up a Project
You can configure the following sections inside each Project:
General Settings
Adjust the project name, connect the dedicated storage, assign a Project Admin, and specify the groups that will participate.
Copy or move them from your main account. Reusing approved templates of workflows and forms helps streamline setup and ensures consistency across teams.
Storage
Connect the storage location that will be used specifically for this project — for example, Fluix Storage. This keeps completed forms and project documents organized and easily accessible.
Project Admin
Assign a team member to oversee the project. They have access only to their assigned project and can:
Track workflow activity
Manage submitted data
Schedule follow-up tasks
Generate project-specific reports
Groups
Create user groups for the project and add the team members who will work on it. Groups help control who can access workflows, forms, and data associated with that project.
Managing Project Workflows
Workflows can be organized by department, location, team, or any structure your organization uses.
For example:
Create a workflow for site inspections in the North Region.
Assign it to the corresponding field team.
Define the storage folder where completed forms will be saved.
Click Save and Publish to make it active for your users.
Visualize data that your field team captures in the field
Schedule maintenance or follow-up inspections based on collected data
This helps project managers make informed decisions and maintain visibility into team performance.
How to Standardize Processes Across Projects
If your organization follows standardized procedures, Projects make it easy to replicate approved processes across multiple locations.
You can:
Build and approve workflows and forms in your primary company account.
Copy or move them into the respective Projects (e.g., by region, department, or function).
This approach saves setup time and ensures all teams follow the same company standards.
Benefits of Using Projects
Isolated environment of workflows, forms, and groups, per department, location, or activity within the main Admin Portal.
Simplified reporting and trend tracking within the project.
Granular access per project based on the role and responsibility.
Faster setup with reusable templates.
With Projects in Fluix, you can manage your teams, sites, and workflows within a dedicated, isolated environment. This way, you can improve the structure and maintenance of project assets, ensuring that the collected data is accessible only to dedicated admins with relevant, granular permissions.
Feel free to contact us at support@fluix.io if you have any questions about the setup.
Was this article helpful?
Thanks for your feedback!
Oops, something went wrong. Please, try again later.
Thank you!
What details or examples would have made this article more helpful for you? We appreciate your insights!
Issue Report helps field teams automatically turn completed inspection checklists into clear, shareable summary reports. Instead of manually creating reports after every inspection, field inspectors can generate them in seconds and share the results with customers, supervisors, or internal teams.
In this article, you will learn how to set up and use Issue Report in Fluix.
Note:
The Issue report is available starting from theOperationsPlan.
2. Click to open the task where the Issue Report should be generated or processed. For example:
The engineers have completed the Inspection Checklist at the beginning of the workflow.
The next participant of the process, e.g., the supervisor, will receive the Issue Report that was generated based on the data that they filled out in the Inspection Checklist.
3. In the Forms & Attachments section:
Select the respective form.
Fluix will automatically suggest the Issue Report that belongs to this form.
4. Select the required report and finish configuring the workflow.
5. Test the setup.
Once assigned, the Issue Report will be generated automatically after the checklist is completed and can be shared according to the workflow configuration.
Admins can filter processes using Issue Reports in the Dashboard to make it easier to track flagged items and their resolutions across workflows. Depending on the selected Dashboard view (View by Forms or View by Process), admins can filter results to focus on Issue Reports using the Is Report or Flagged Items filters.
Admins can also control what information is displayed in the Dashboard by clicking Edit Columns in the top-right corner.
From there, they can add or remove Dashboard, including Resolved Items and Flagged Items.
Additionally, it is possible to add Form Field Data, including checklist components such as:
Answers
Notes
Images
Admins can also track progress and actions in Process Details. Here, you can see who completed each task, who reviewed the report, and how long each step took. This provides full visibility into both activity and the issue-reporting process, making it easier to monitor performance and turnaround time.
Check the full video tutorial on how to automatically create Issue Reports below:
If you have any questions, feel free to contact us at support@fluix.io.
Was this article helpful?
Thanks for your feedback!
Oops, something went wrong. Please, try again later.
Thank you!
What details or examples would have made this article more helpful for you? We appreciate your insights!
To simplify user management, admins can enable Email Two-Factor Authentication (2FA) for app users. This way, an extra verification step is added during login for the end users by sending a one-time security code to the user’s email.
When Email 2FA is enabled, users must enter their email address and password, along with a one-time security code sent to their email, before they can sign in to the Fluix Tasks app or the Web User App. A new security code is sent each time the user logs in, and it remains valid for 5 minutes before expiring.
Note: If Single Sign-On (SSO) is enabled, Email 2FA for app users does not apply. Additionally, Two-Factor Authentication is not required when the app is used in Offline Mode.
Admins can enable this feature in the Admin Portal by following this guide:
1. Go to the Admin Portal, the Settings tab.
2. Select the checkbox “Enable Email Two-Factor authentication for app users.”
3. When switching it ON, a confirmation pop-up will appear, warning that:
The change will affect users.
All users will be logged out.
4. Click “Save changes”.
When the Email 2FA is enabled, all users are automatically logged out, forcing them to log in again with an Email 2FA verification code. On the next login, the user follows the same 2FA process as a first-time login.
Email 2FA for app users is disabled by default. When enabled, it can be applied either to all users, which is the default behavior, or only to specific users. Admins have the ability to add users to the specific users list and remove them from that list at any time.
Note: If admins have both 2FA via SMS and email enabled, the SMS option will be usedby default.
If Email 2FA for app users is disabled, admins can still manually enable 2FA for a new user during the account creation process. If Email 2FA is already enabled for all users, the admin will be informed during new user creation that 2FA is active automatically.
When the user opens the Fluix Tasks app or the Web User App and enters their email and password on the login page, a screen appears requesting a two-factor authentication (2FA) security code. A one-time code is then sent to the user’s email. The user enters the code in the app and successfully logs in.
Users also have a chance to use the “Resend code” option in case their verification code has expired.
Feel free to contact us at support@fluix.io if you have any questions or comments.
Was this article helpful?
Thanks for your feedback!
Oops, something went wrong. Please, try again later.
Thank you!
What details or examples would have made this article more helpful for you? We appreciate your insights!
We are happy to introduce the ability to create forms with AI in Fluix Tasks! Isn’t it exciting?
With this new feature, the form creation process takes only a few minutes and aims to save admin time, speeding up the process and supporting different formats (PDF, xlsx, CSV, etc)
Here is also a guide to manually creating forms in our ‘Forms’ section of the Admin Portal. But let’s dive deeper into AI form creation in Fluix!
Note: AI generates forms only in the dynamic view. To learn more about the benefits of dynamic forms,check out this tutorial.
To create the web form with AI, follow the quick instructions below:
In the Admin Panel of your account, open the ‘Forms’ section.
Click the ‘Create Form’ button.
Click the ‘Create with AI’ button.
You can either use one of the following approaches:
– Enter a prompt with a description of what you expect AI to generate. Be precise with your requirements to receive the most valuable result. – Enter a prompt and attach the document – Simply attach your document – Use the templates below with ready-made prompts
Once done, click on the ‘Generate Form’ button.
The form generation process has started. Depending on the scope, it may take a couple of minutes to generate a form; you will see approximate estimates on the screen.
Note: Ensure that you keep the web page open during the form generation process.
After the form is created, you will see the options to ‘Go Back,’ ‘Save and Publish,’ or ‘Open in Form Builder’ to make further edits in the form.
By clicking on the ‘Open in Form Builder’ button you will have the posibility to review your form and make the necessary changes.
Once you have finished working on your form in the ‘Forms’ section, you can click on the ‘Create Form’ button to publish the Dynamic form.
In order to make this form part of your company’s workflow, you will need to add this form to the workflow. Check out a separate article or the video tutorial below in order to build the workflow from scratch.
If you have any questions or need help building a process, contact our support team at support@fluix.io, and we’ll be happy to help.
Was this article helpful?
Thanks for your feedback!
Oops, something went wrong. Please, try again later.
Thank you!
What details or examples would have made this article more helpful for you? We appreciate your insights!
Sign Up to Our Product Newsletter
The latest updates from our Product team, straight to your inbox