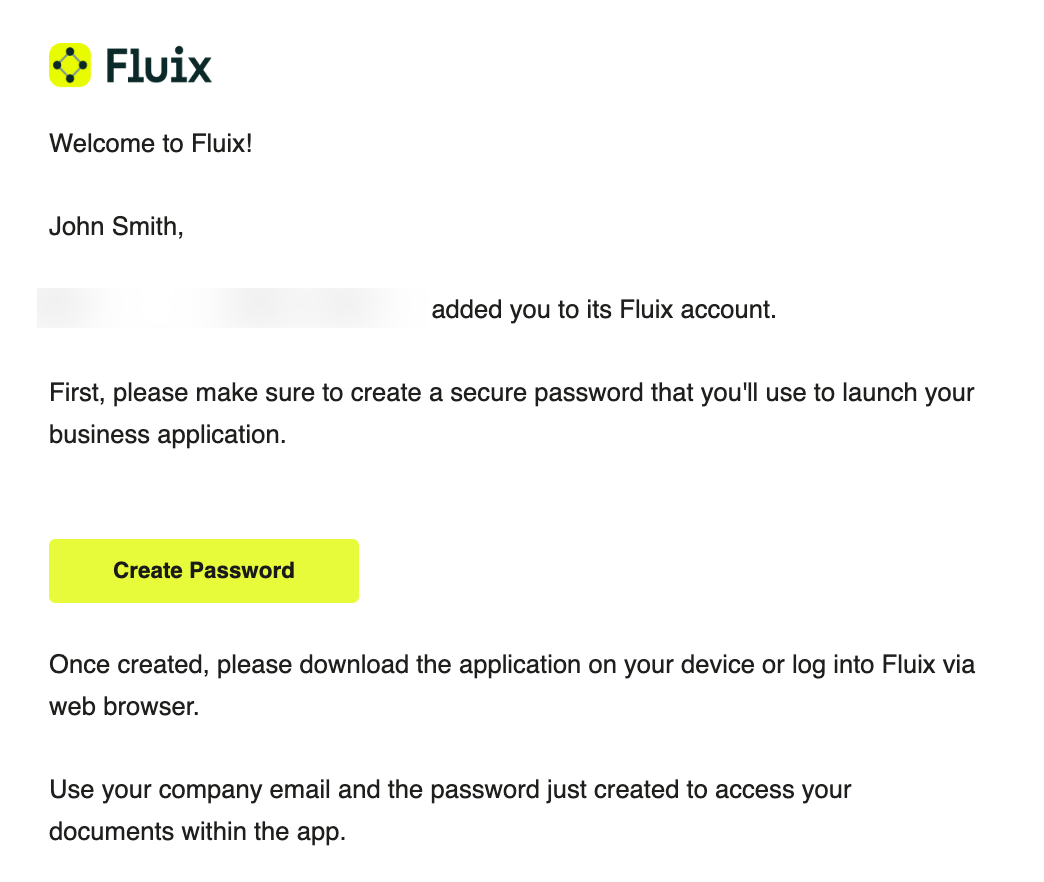
Fluix is a software that helps companies automate routine tasks for their team and increase productivity. Once your account is set up by your company administrator, you will receive an invitation letter to create your login password and to log into Fluix from an iPad, iPhone, Android Tablet or Phone.
If you used to download the apps from the App Store or Google Play Store (i.e. your company is not distributing apps on your device directly), then find Fluix in the App Store or Google Play Store, download it and log into the app using your email and password, or use the Single Sign-On (SSO) option, if it has been configured for your company account.
Once logged in, you’ll see the list of the following sections:
Home
Notifications
Pinned Tasks
Templates
Assigned
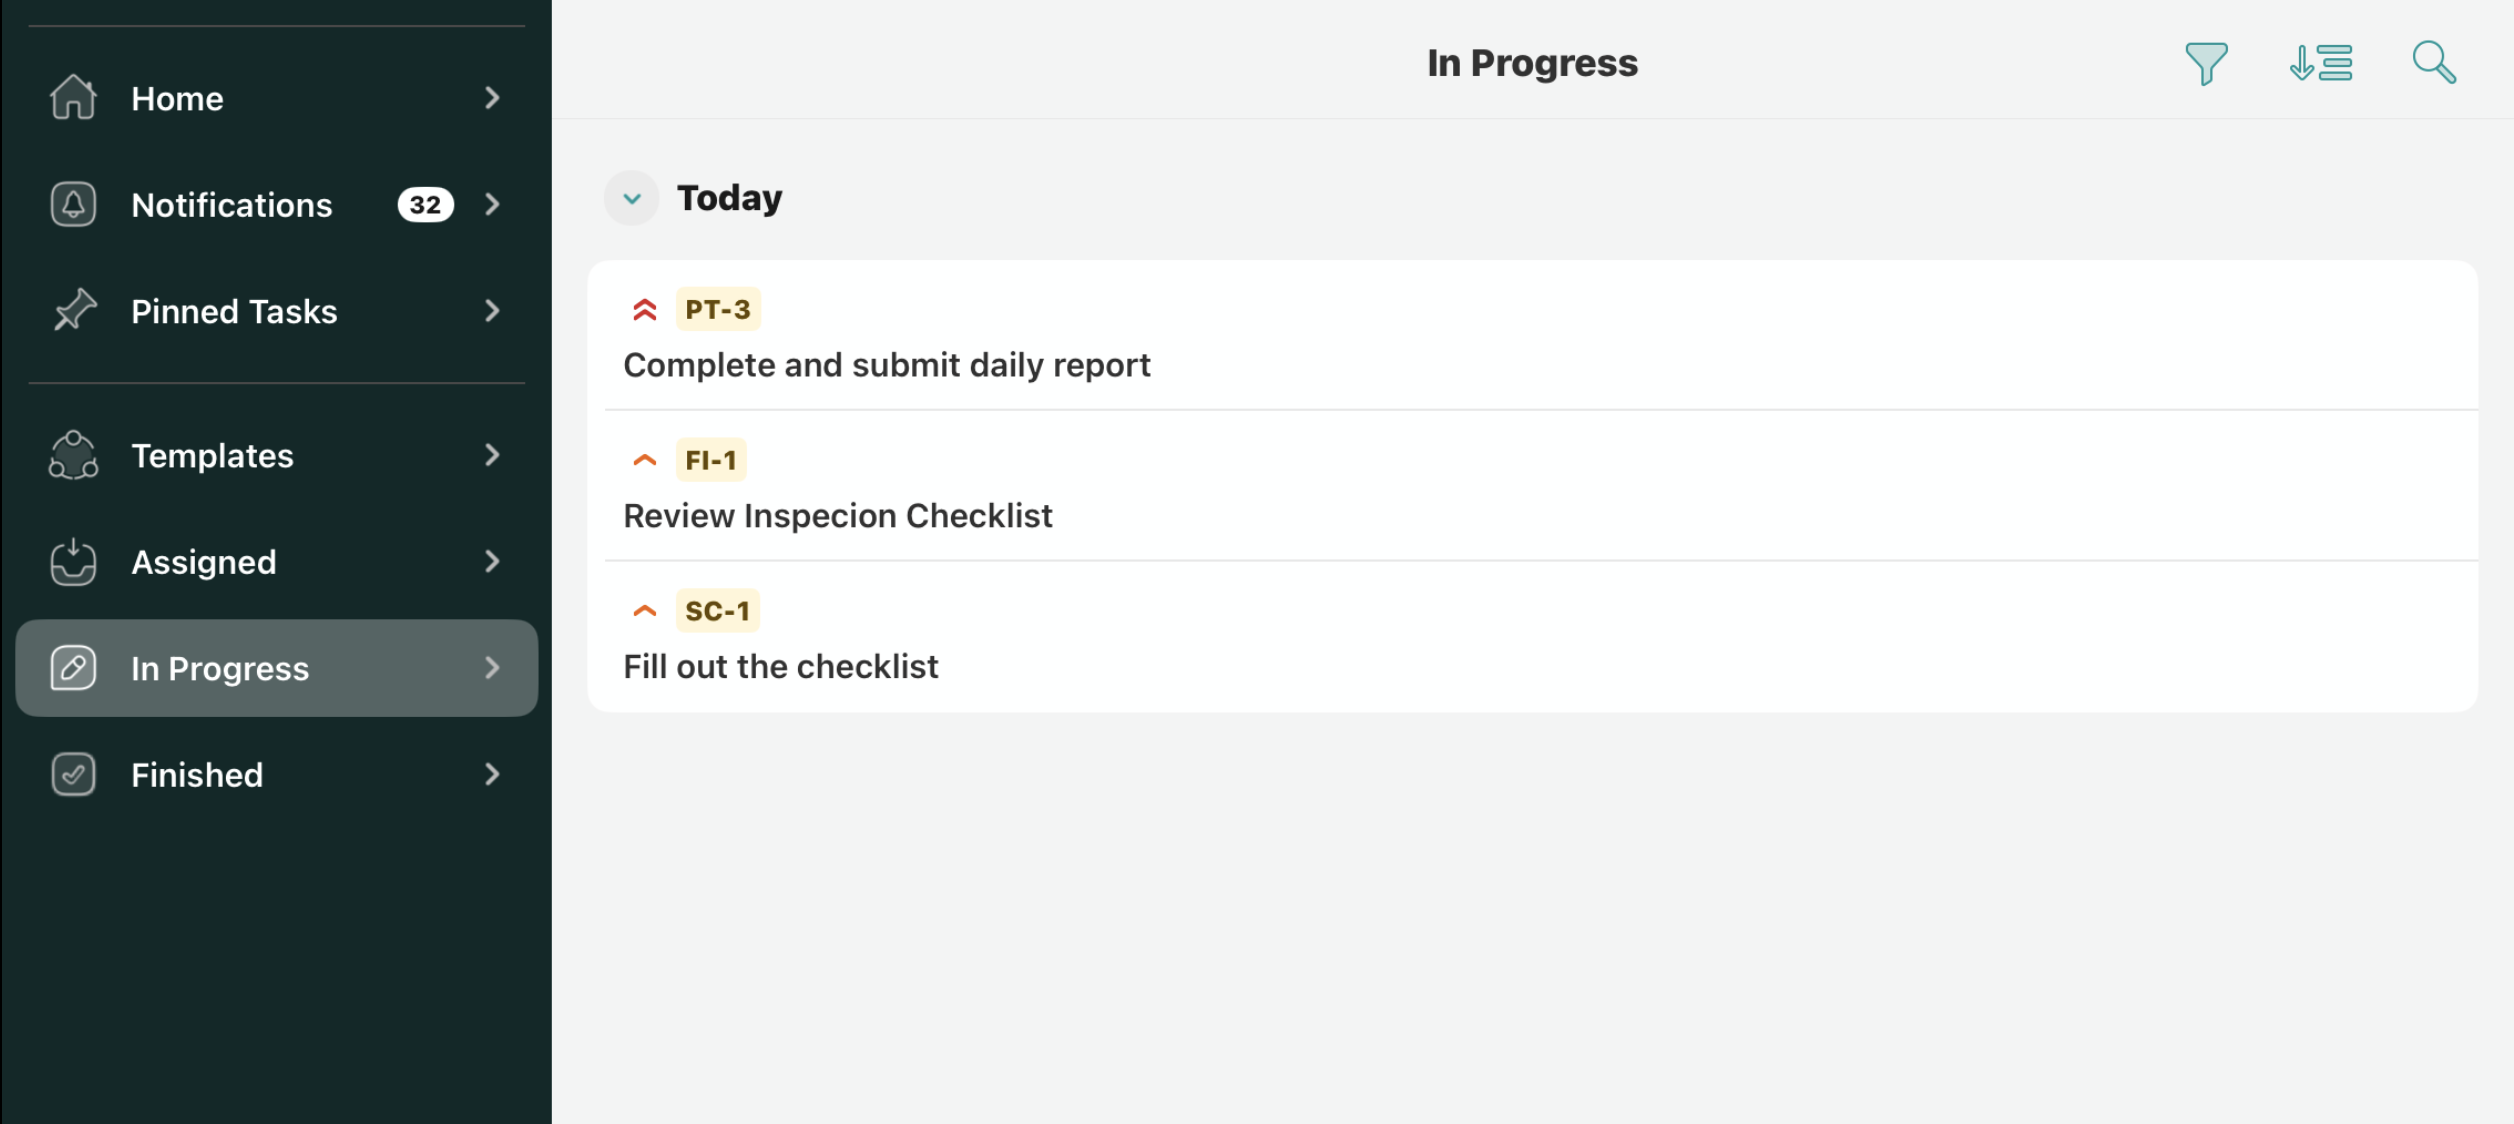
In Progress
Finished
With Fluix, you can easily fill out and sign PDFs, add images, scan barcodes, submit documents via workflow to your colleagues and customers, etc.
This guide provides tips on how to use Fluix, manage documents, and how to troubleshoot in case something goes wrong. We are always glad to hear your feedback and ideas at support@fluix.io.
Was this article helpful?
Thanks for your feedback!
Oops, something went wrong. Please, try again later.
Thank you!
What details or examples would have made this article more helpful for you? We appreciate your insights!
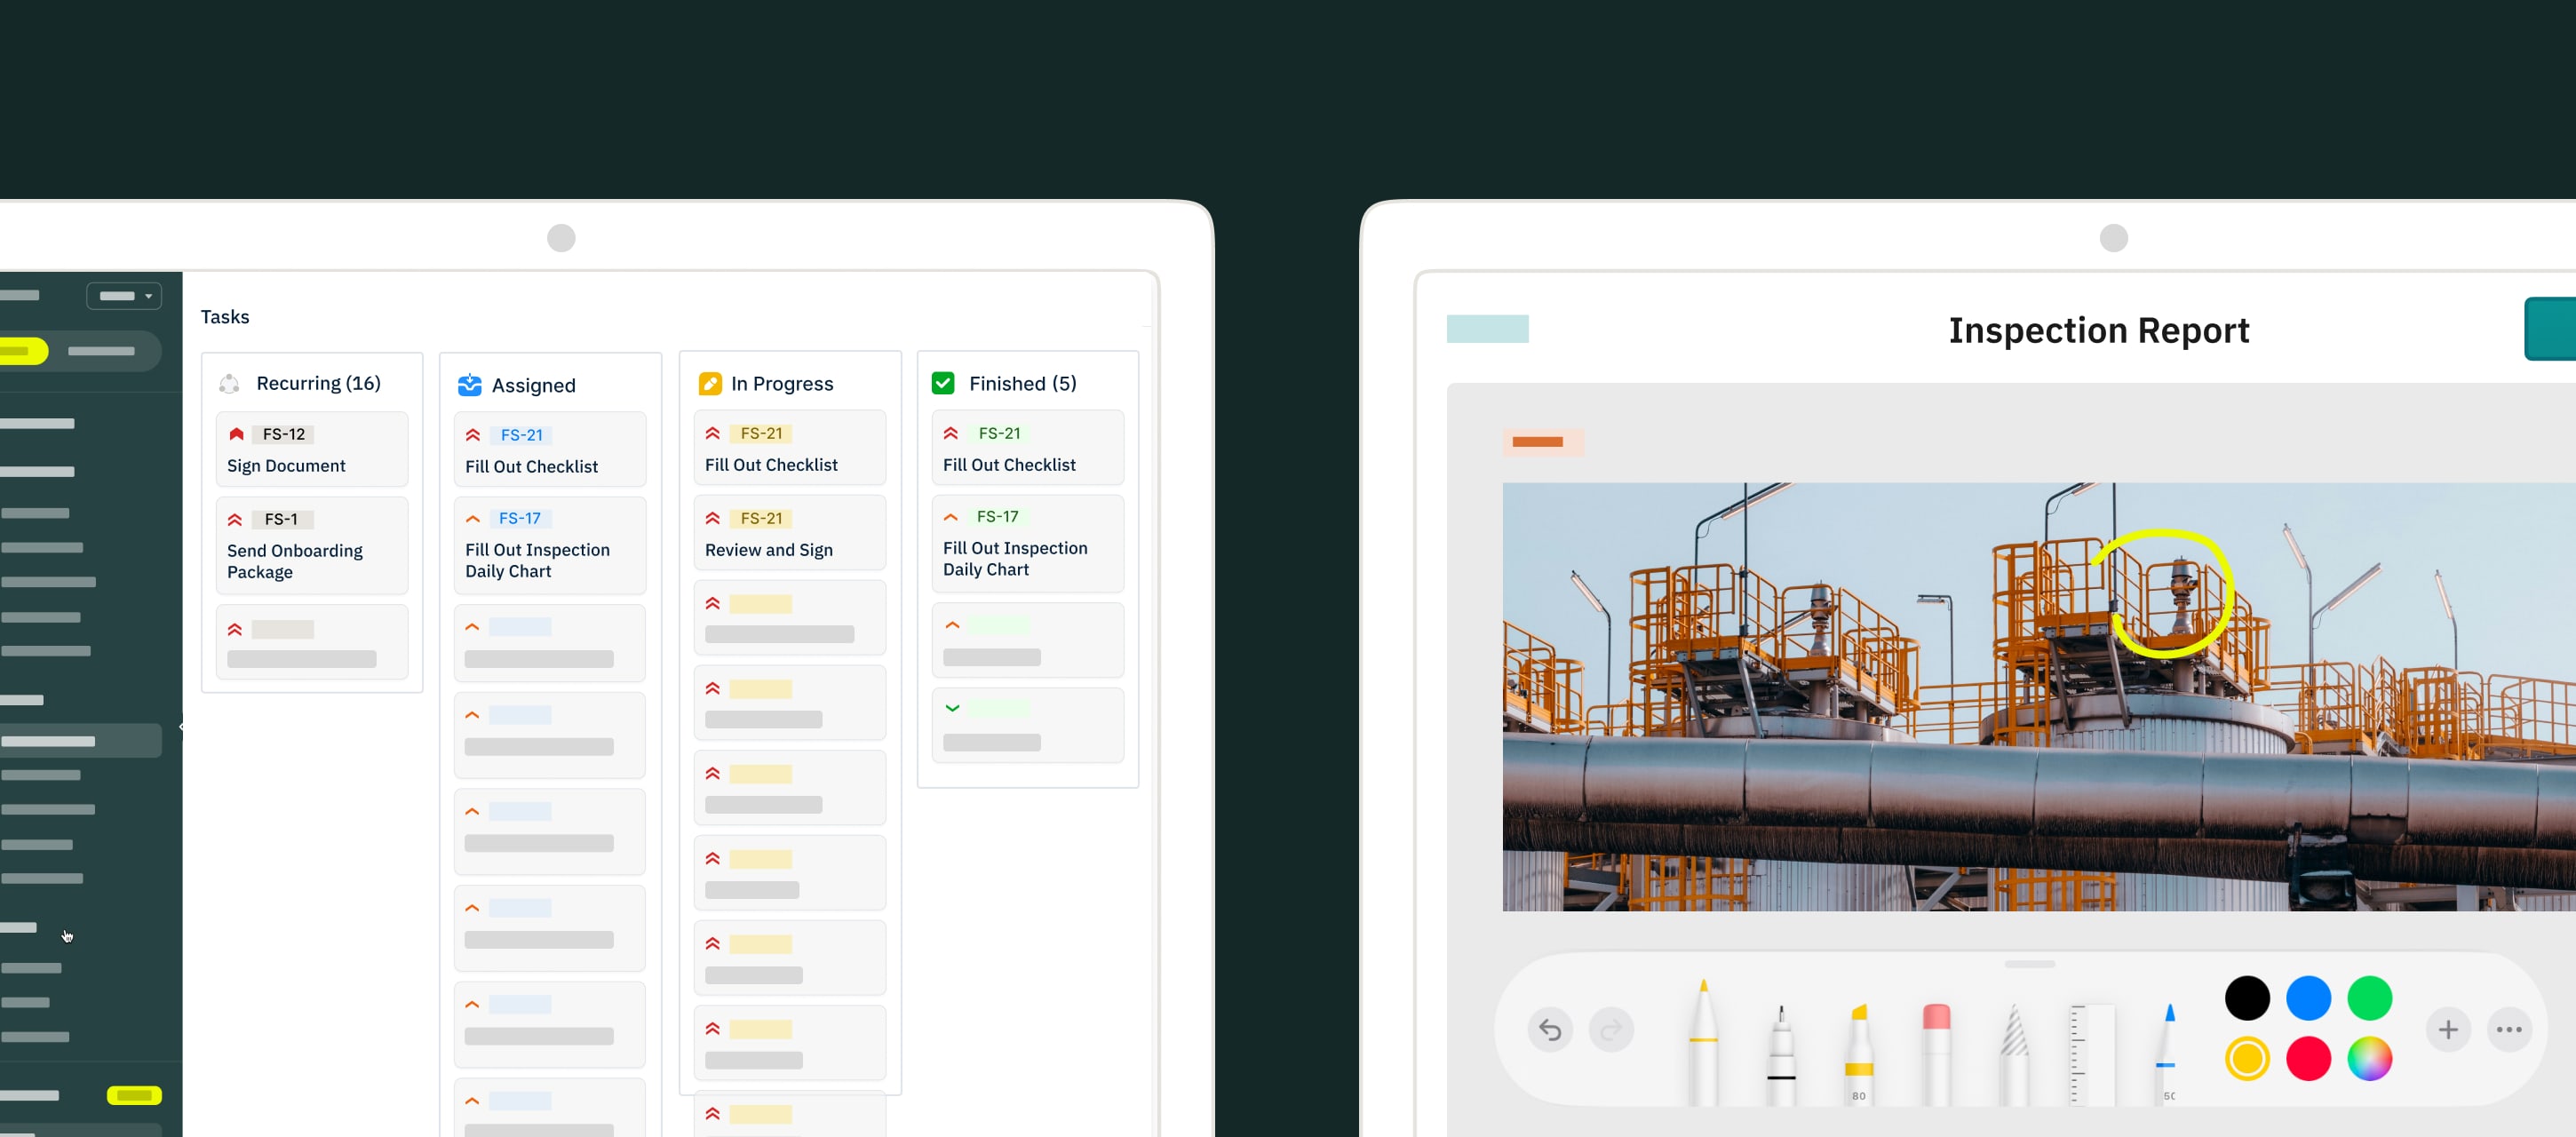
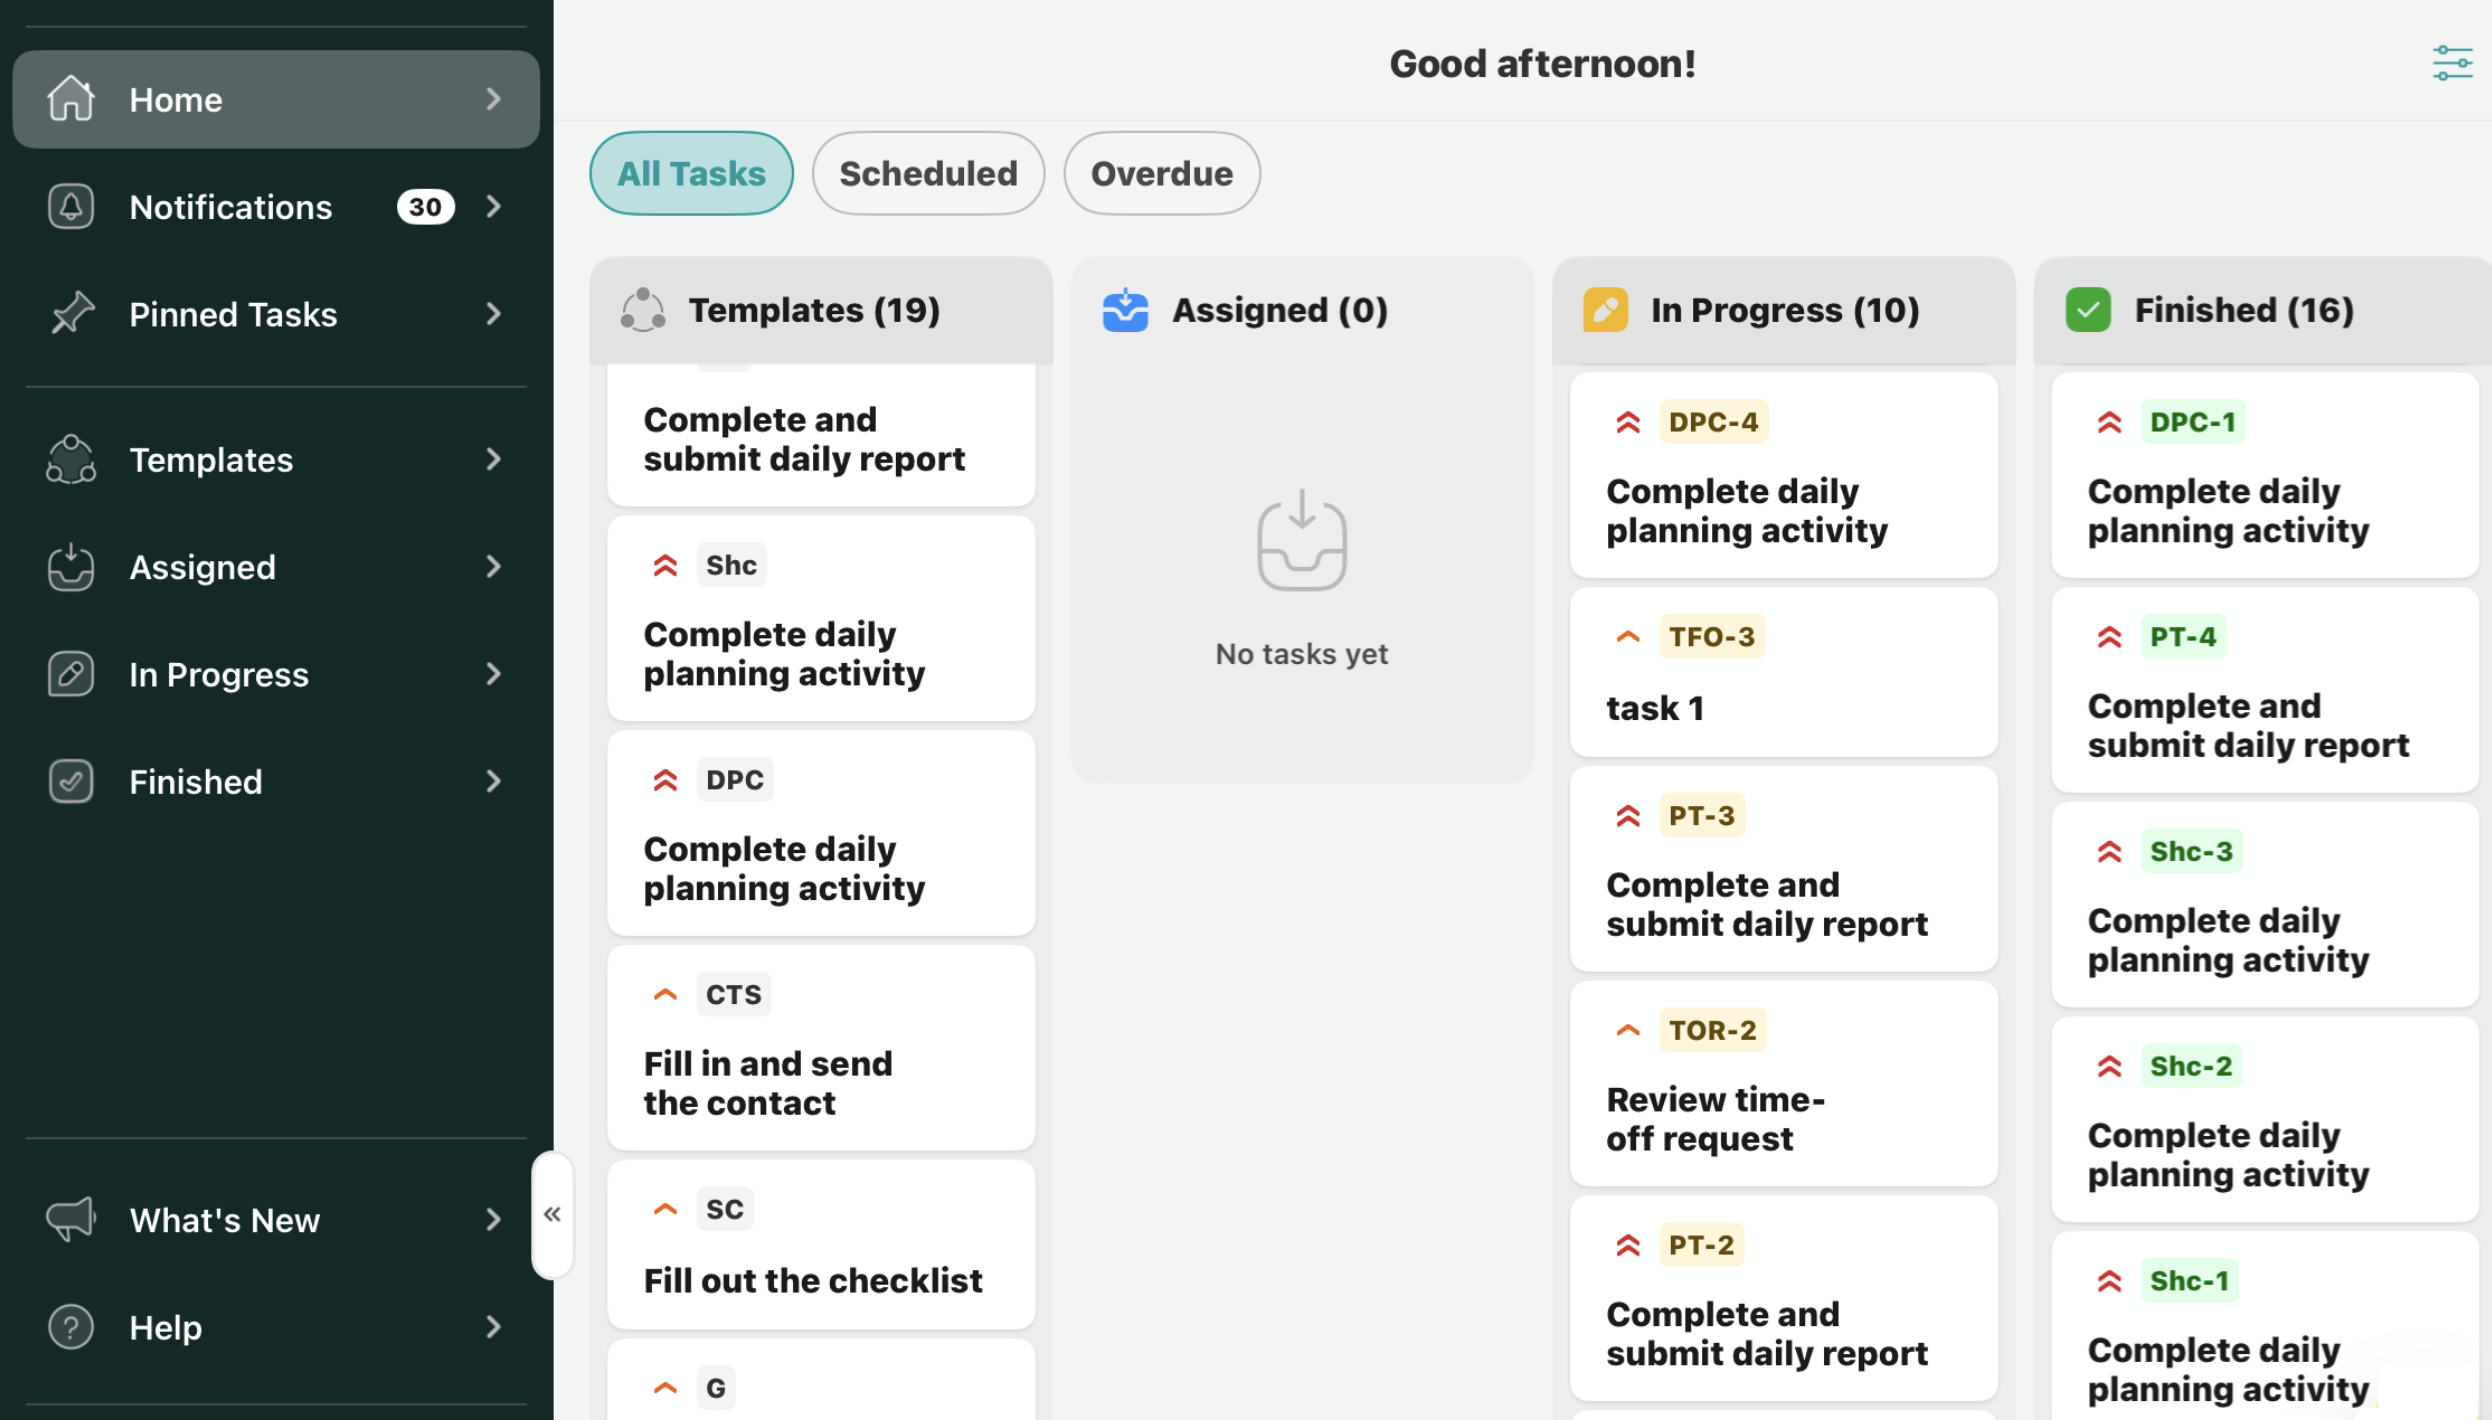
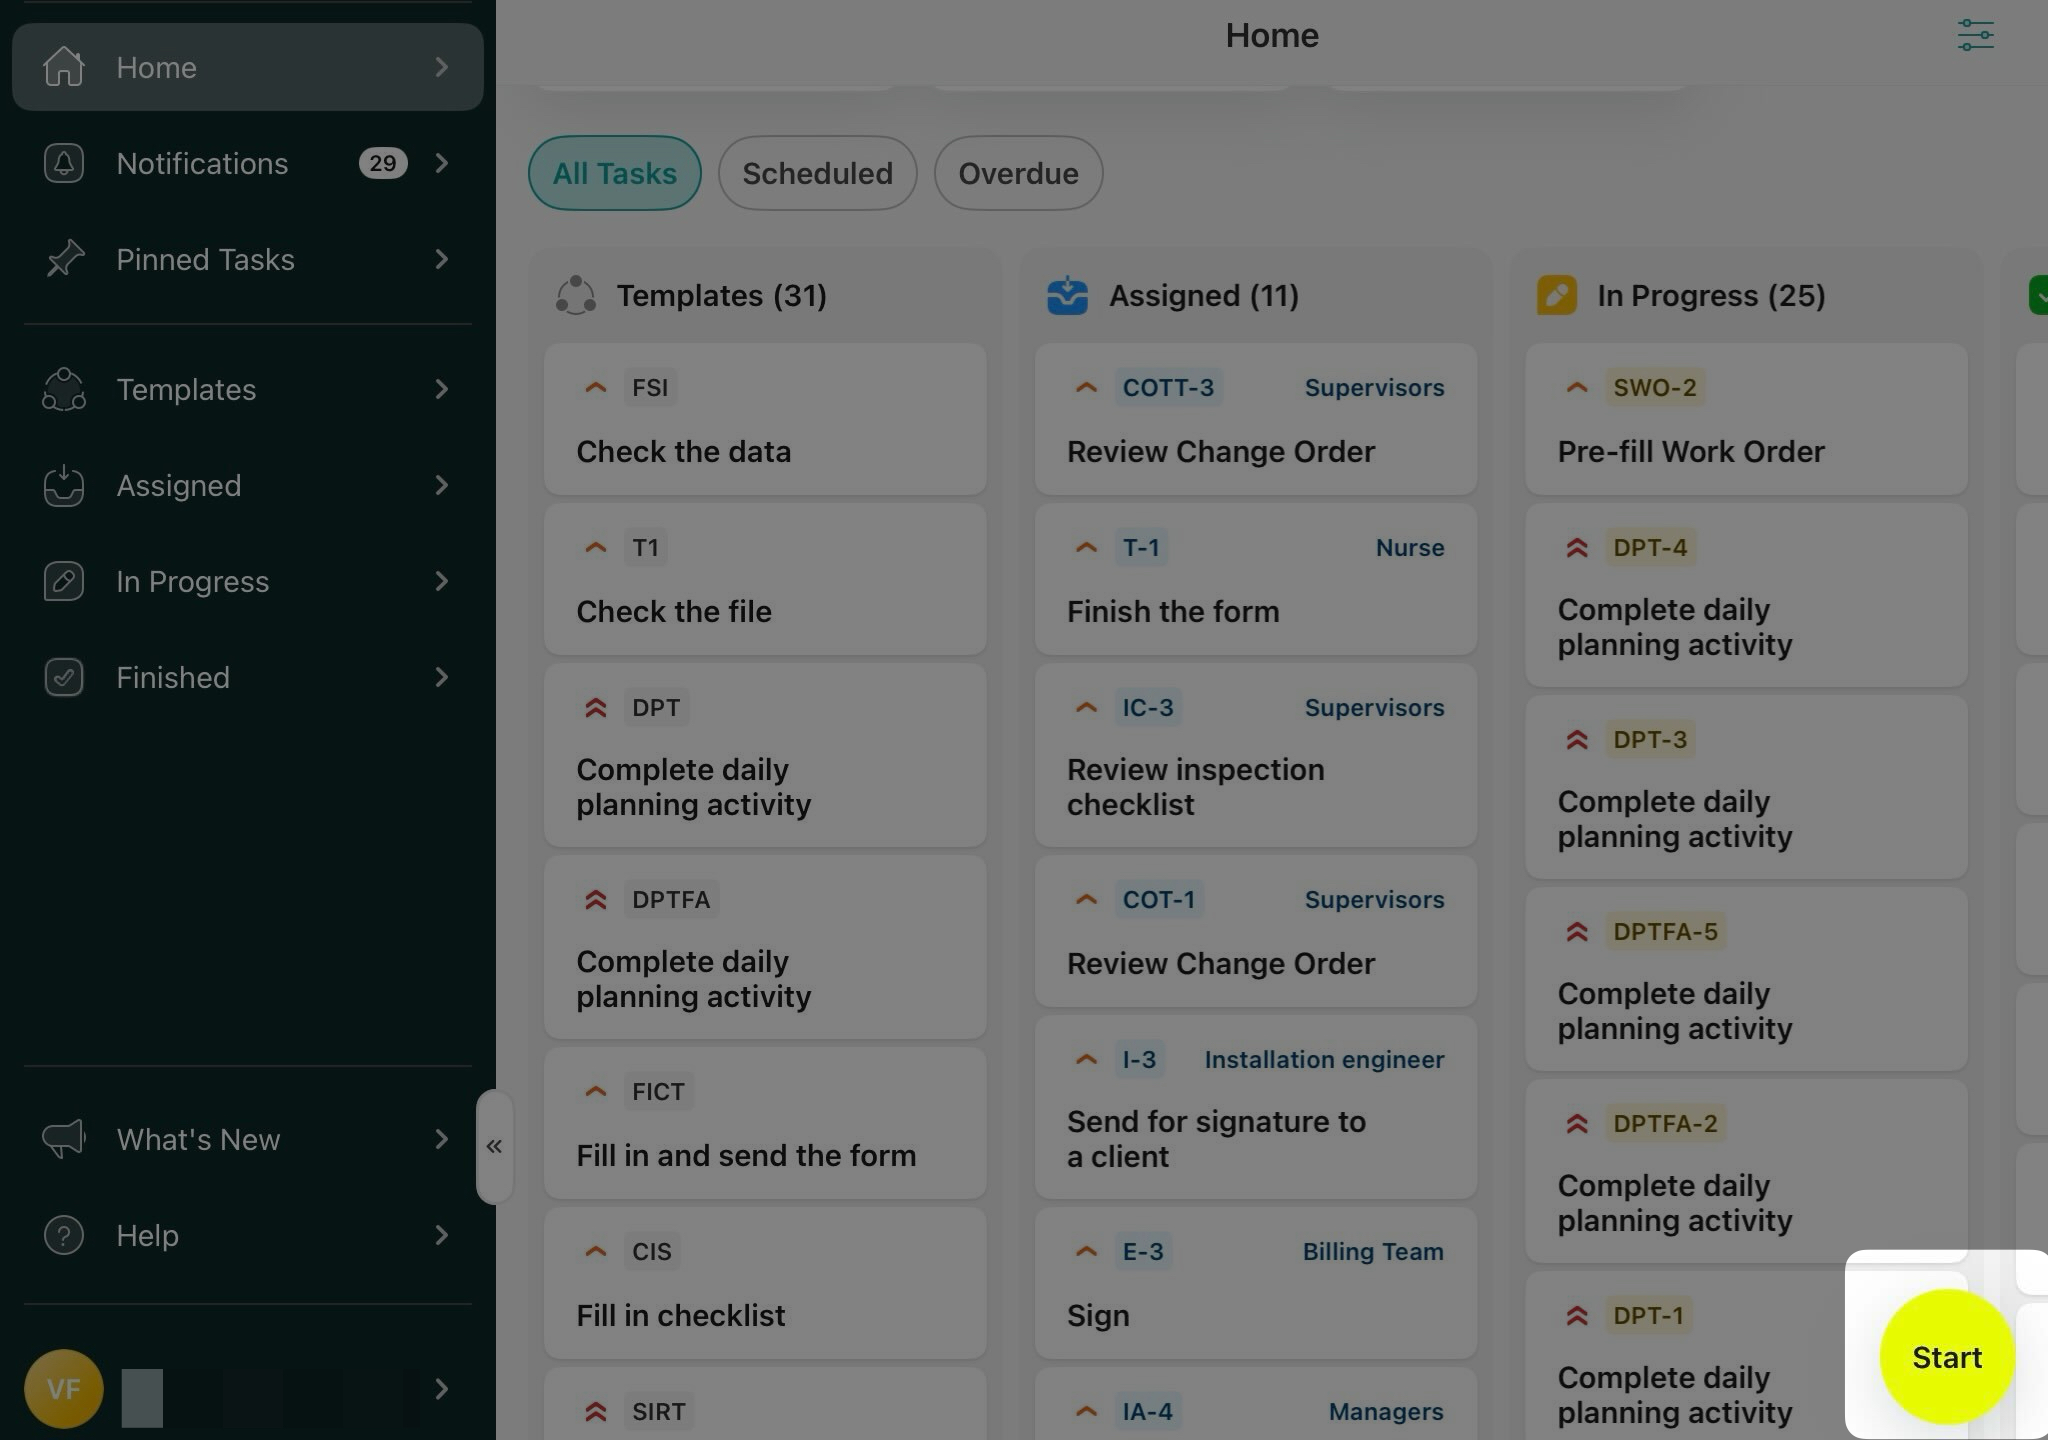
The Home section serves as the starting page of your Fluix account, providing a comprehensive overview of your tasks, as configured by your Fluix account administrator. These tasks are categorized into:
Templates – Ongoing tasks that are pre-configured by your company admin.
Assigned – Tasks specifically assigned to you that require your attention.
In Progress – Tasks you have started but not yet completed.
Finished – Completed tasks and documents for reference.
This section allows you to easily track tasks requiring your attention, monitor ongoing work, and access completed documents.
Feel free to contact us at support@fluix.io if you have any questions or comments.
Was this article helpful?
Thanks for your feedback!
Oops, something went wrong. Please, try again later.
Thank you!
What details or examples would have made this article more helpful for you? We appreciate your insights!
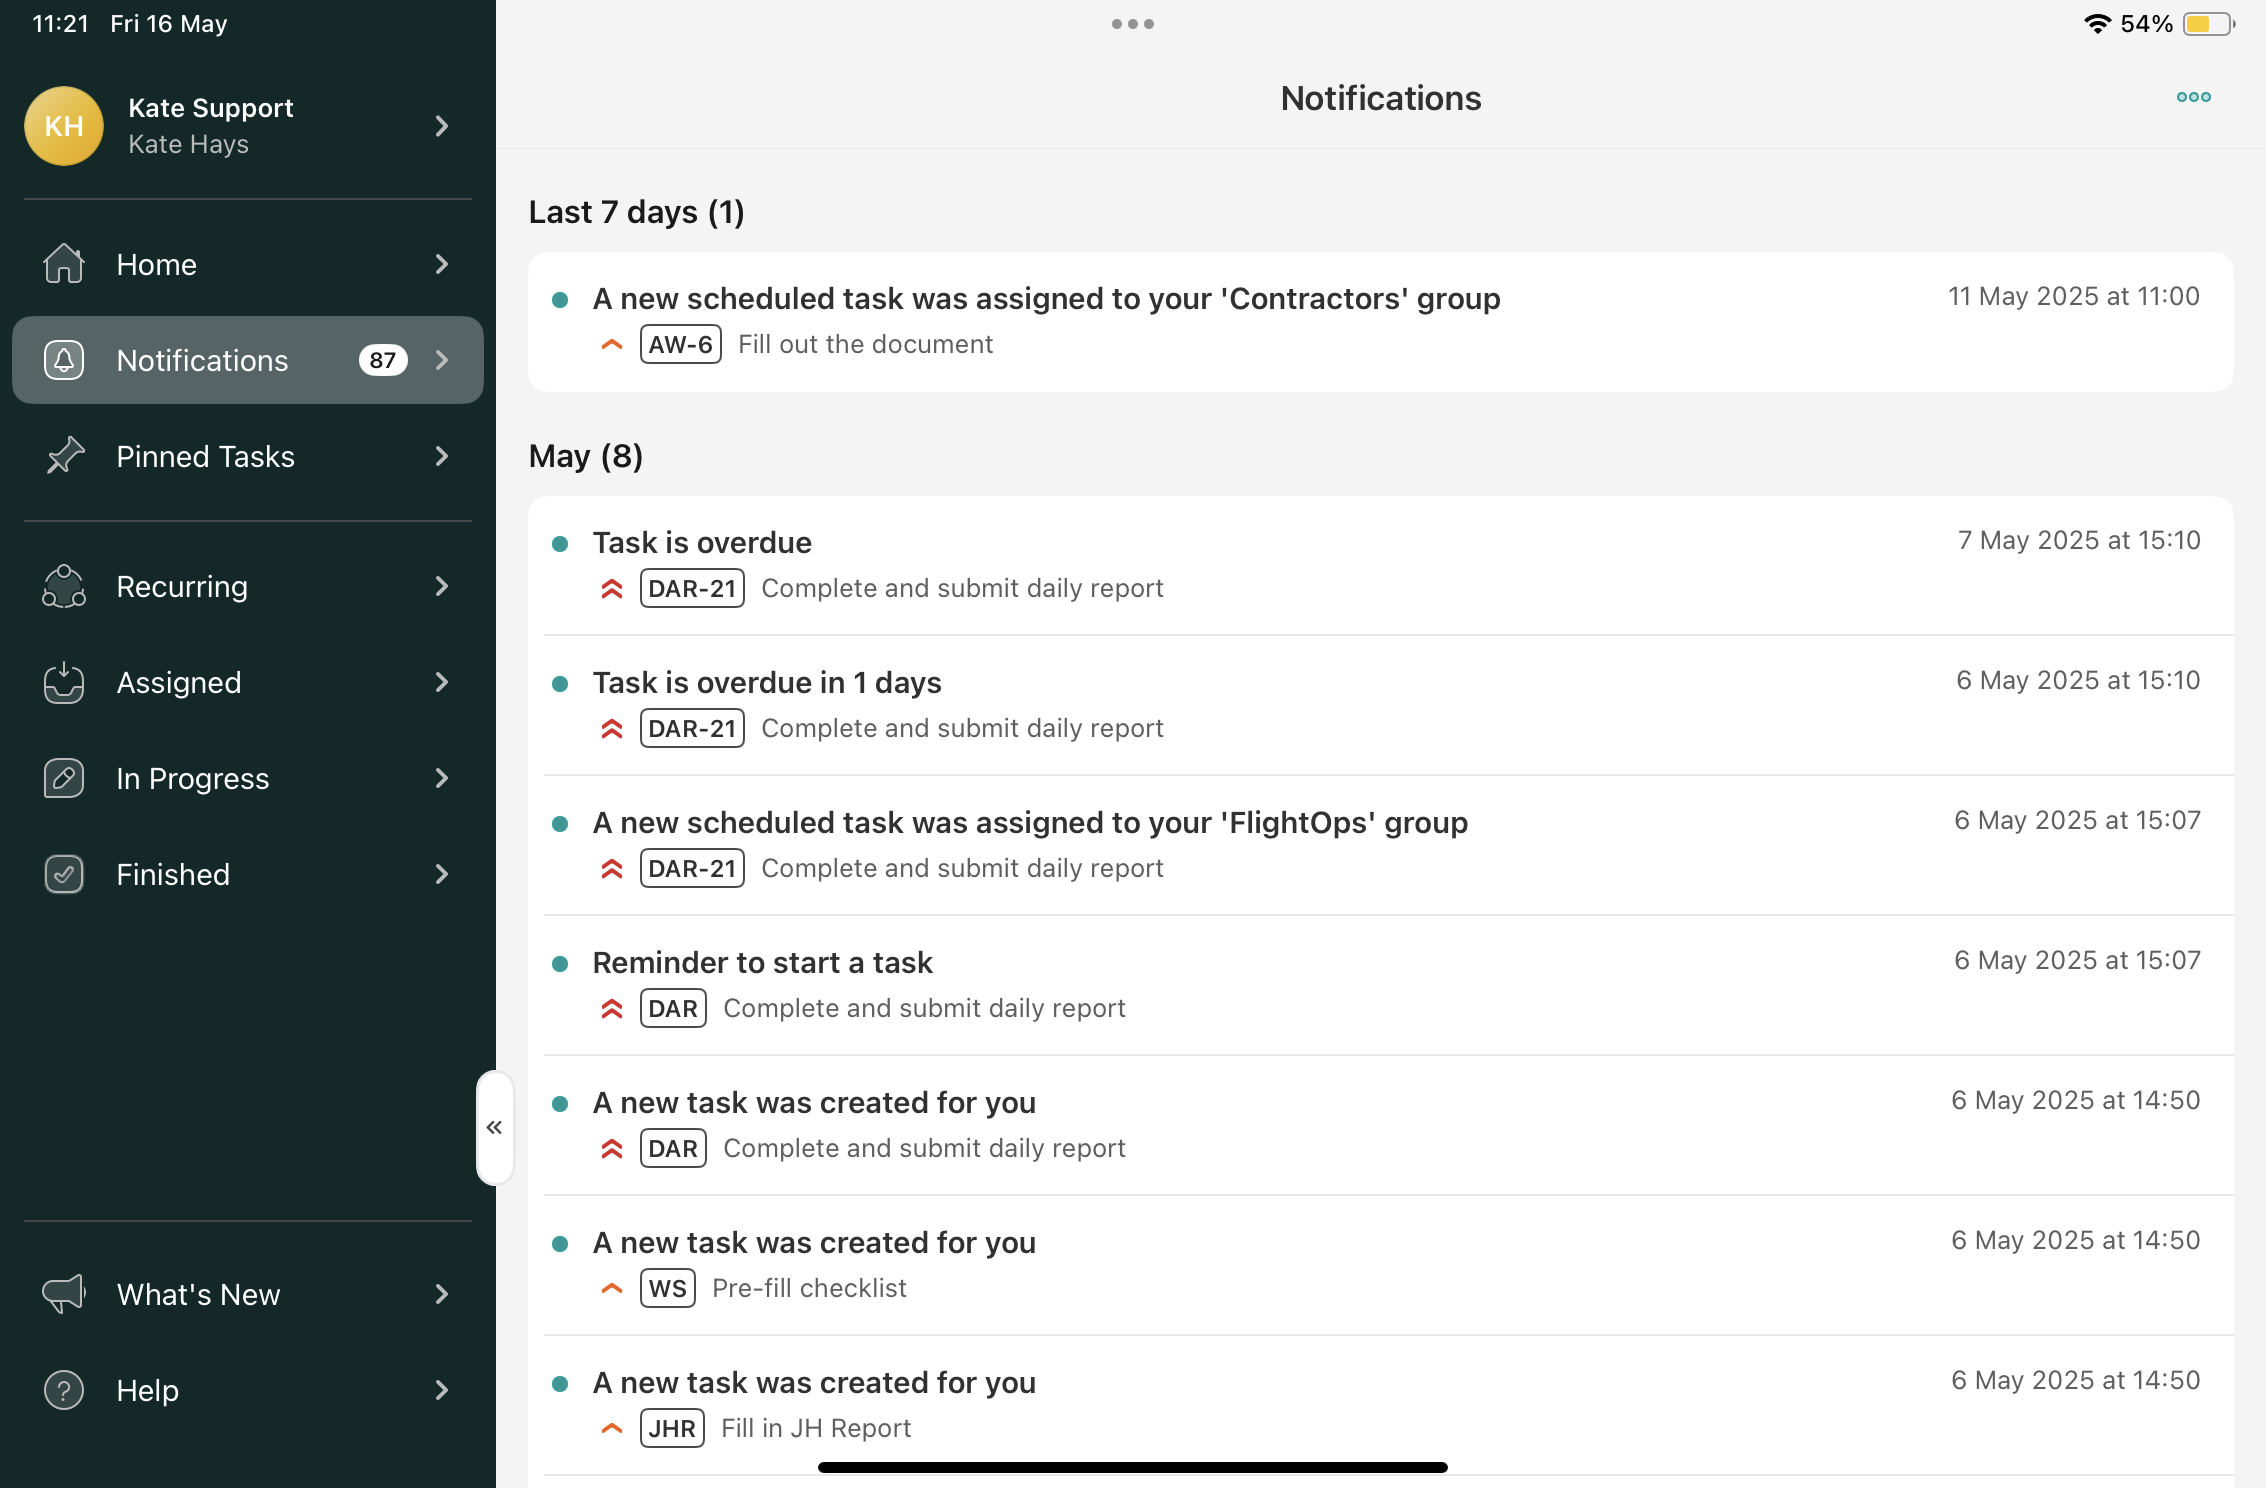
The Notifications section in the Fluix Tasks app helps you stay informed about all new tasks preconfigured for you by your Fluix account administrator.
Viewing Your Notifications
In this section, you’ll find a list of tasks synced to your device, along with details on how they relate to you. Notifications may include:
New tasks assigned to you;
New tasks created for you;
Tasks returned to a group you are part of.
At the top, you’ll see the number of unread notifications, with unread items marked by blue bullet points next to the task names.
Accessing and Managing Notifications
To view the details of a task, simply tap on it.
You can also customize which notifications are displayed by tapping the three dots in the upper-right corner of the Notifications section. Available options include:
Show All Notifications
Show Only Unread
Mark All as Read
Feel free to contact us at support@fluix.io if you have any questions or comments.
Was this article helpful?
Thanks for your feedback!
Oops, something went wrong. Please, try again later.
Thank you!
What details or examples would have made this article more helpful for you? We appreciate your insights!
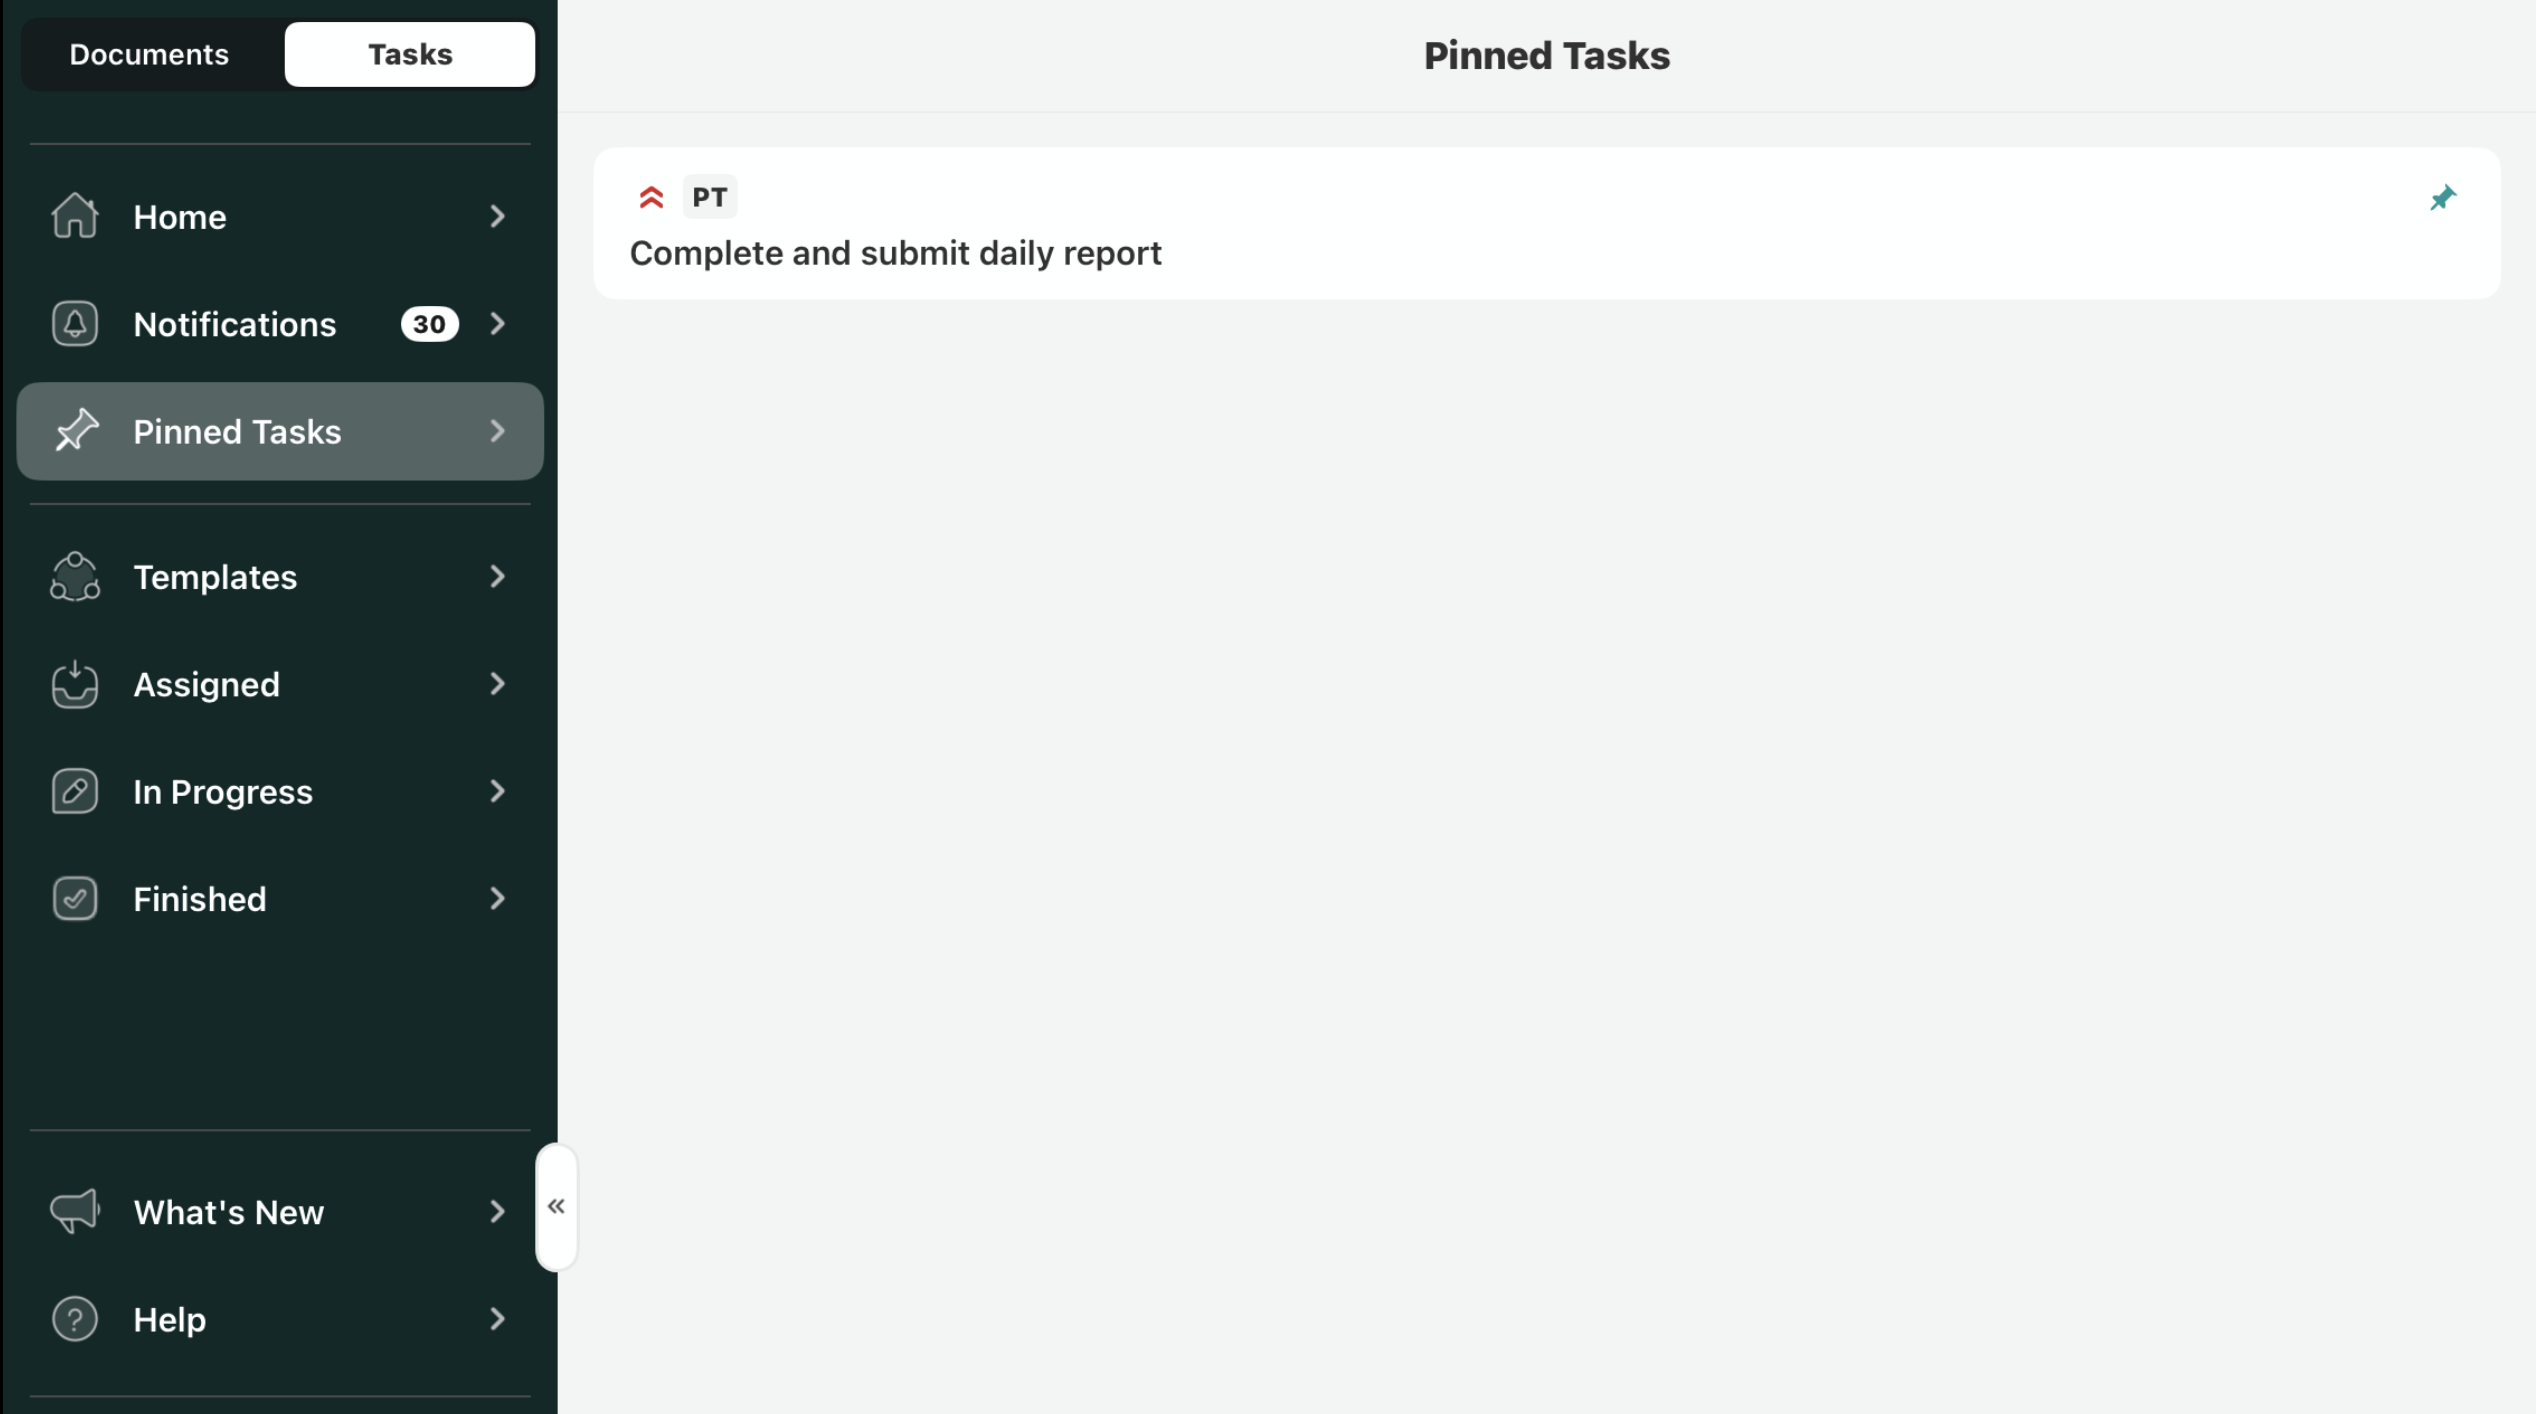
The Pinned section in the Fluix Tasks app suggests quick access to tasks that you frequently work on or want to keep readily available. Whether these are templates, assigned tasks, or completed ones you’d like to reference, pinning helps streamline your workflow.
Pinning a Task
To pin a task:
Open the task you want to pin.
Tap the Pin action, as shown below.
Working with Pinned Tasks
You can start working on pinned tasks if they are in any of the following states:
Templates
Assigned
In Progress
If you edit a document from a pinned task, the task will automatically move to the In Progress section to reflect the changes.
Can’t find what you’re looking for? Feel free to contact us at support@fluix.io if you have any questions or comments.
Was this article helpful?
Thanks for your feedback!
Oops, something went wrong. Please, try again later.
Thank you!
What details or examples would have made this article more helpful for you? We appreciate your insights!
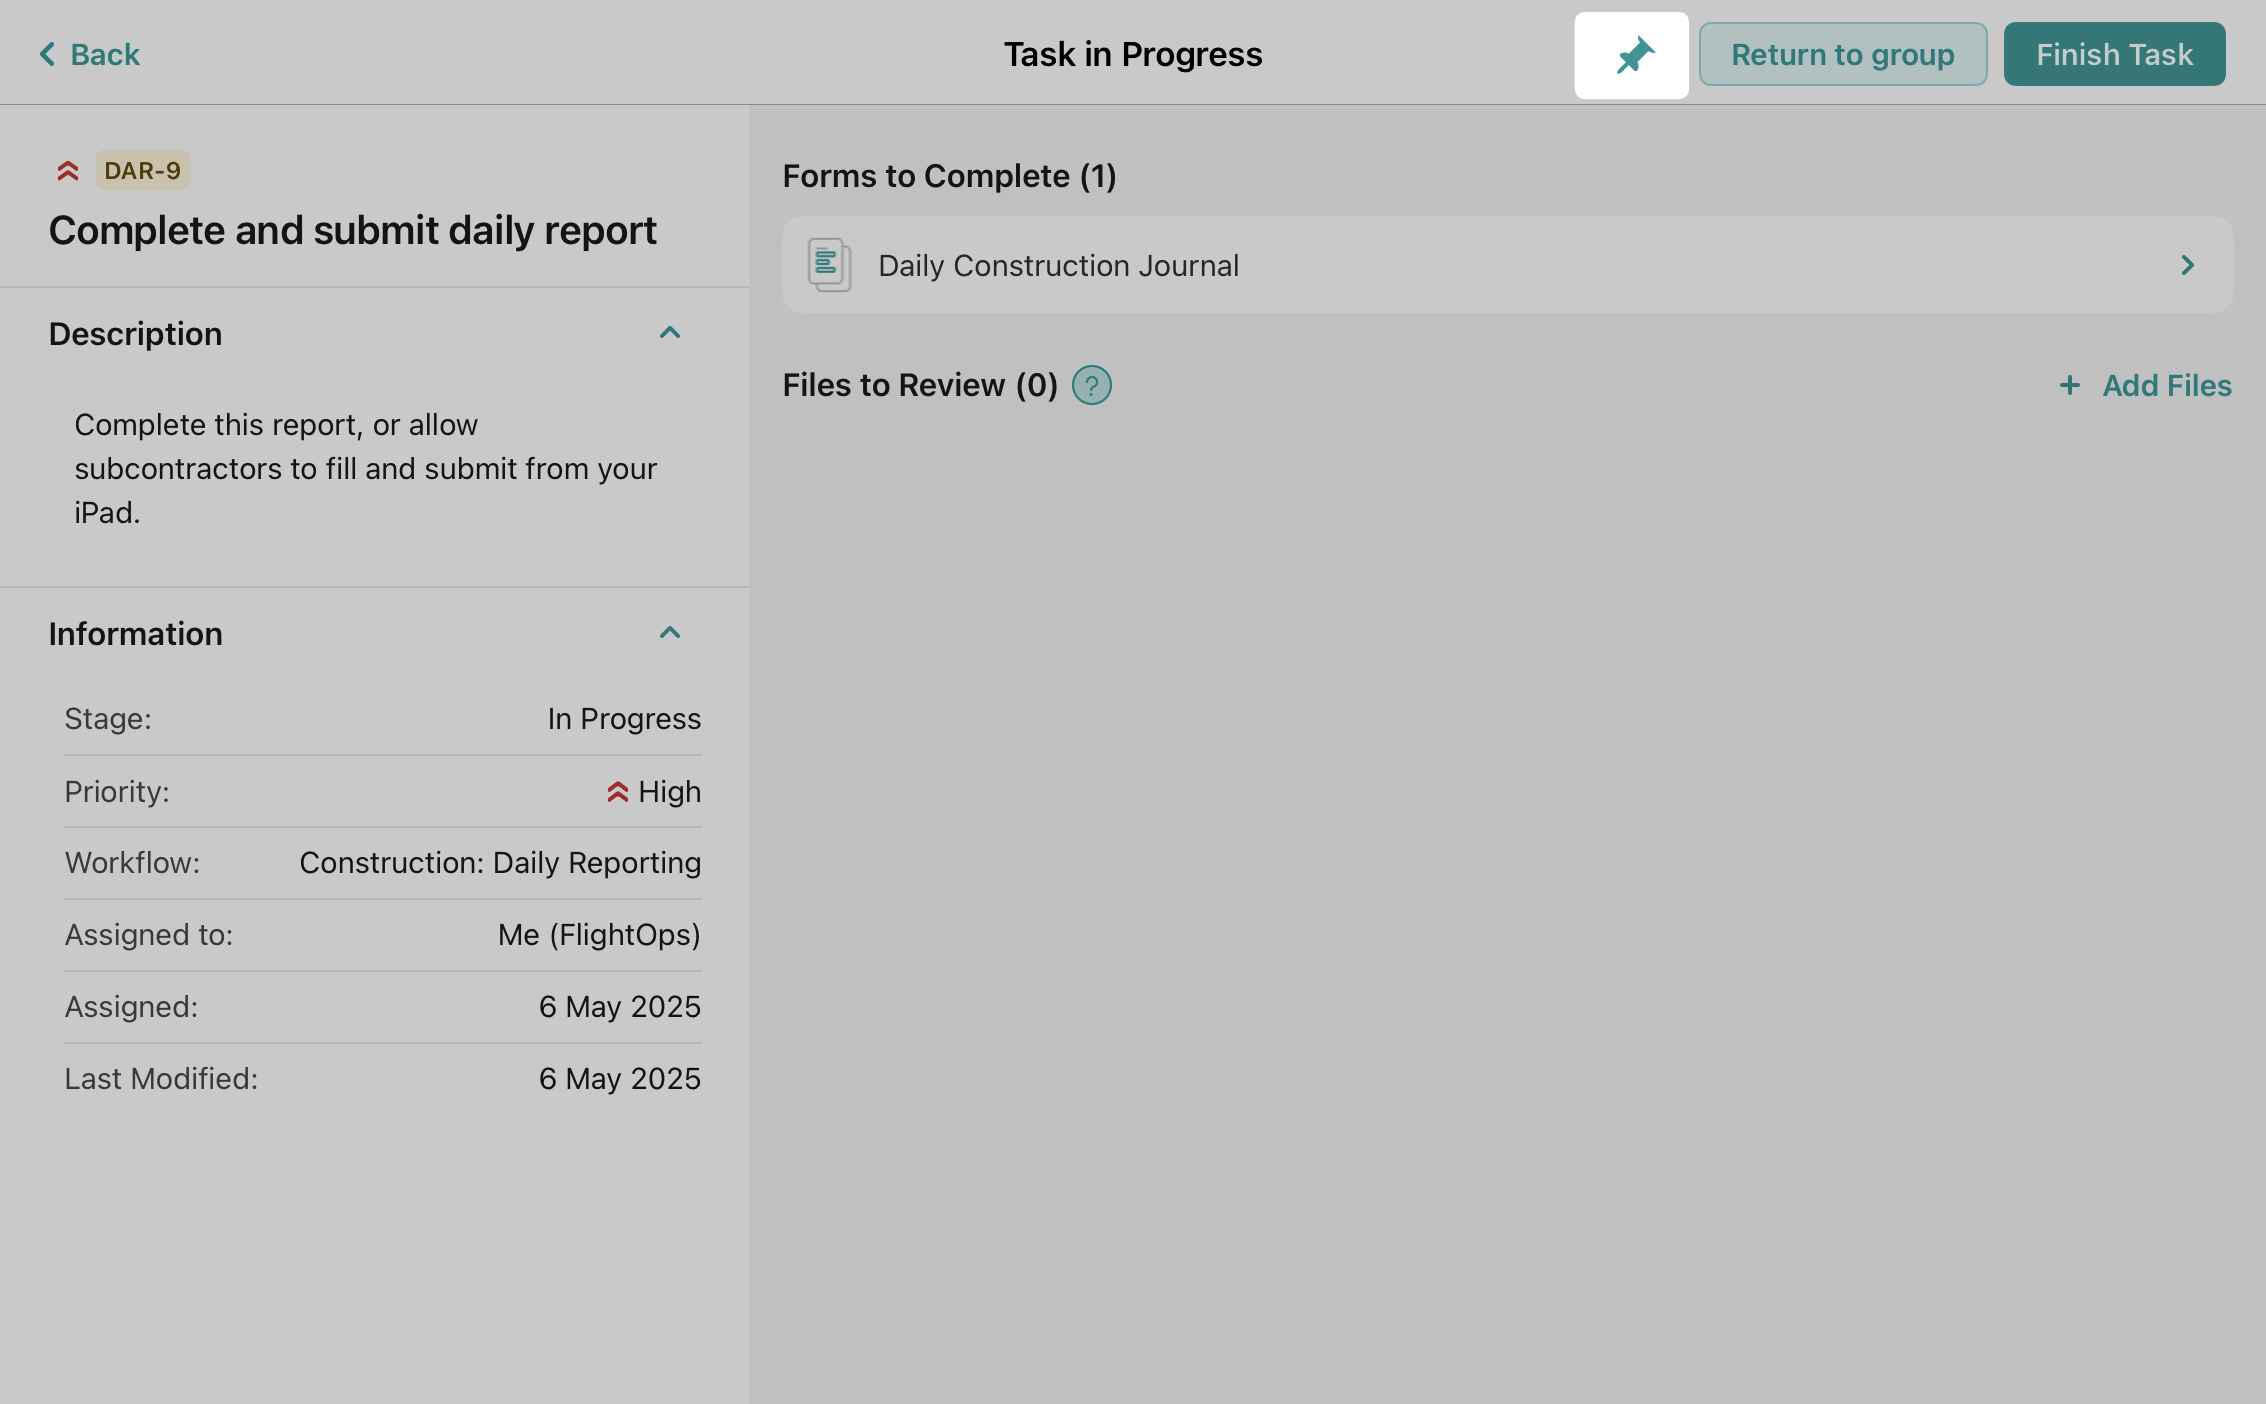
To start working on the task, tap on the line containing its basic information. In the left sidebar, you will see detailed information about the task, including its full description, the stage, priority, workflow name, and task due date.
The Start button, located in the bottom-right corner of the Home section, lets you launch tasks with a single click.
Note. The Start button only appears when there is at least one task available to begin.
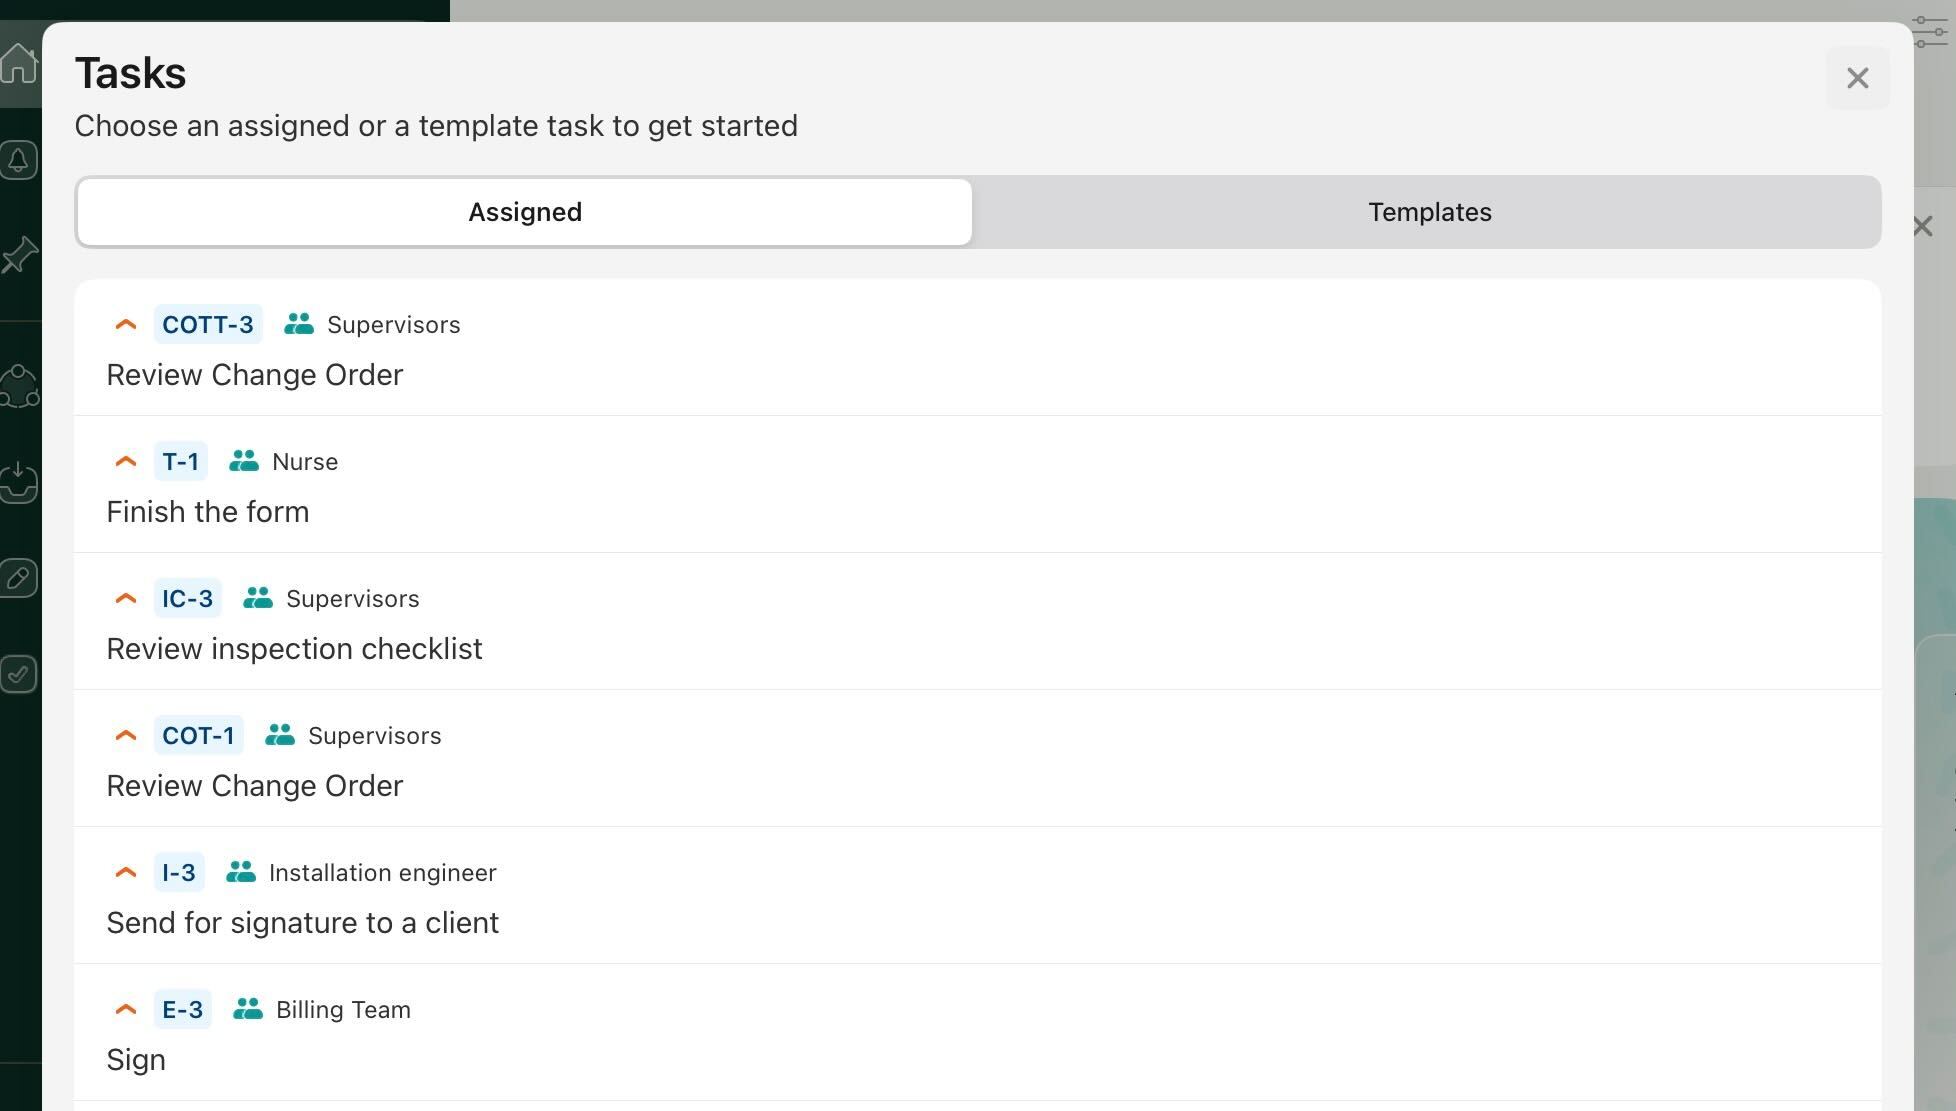
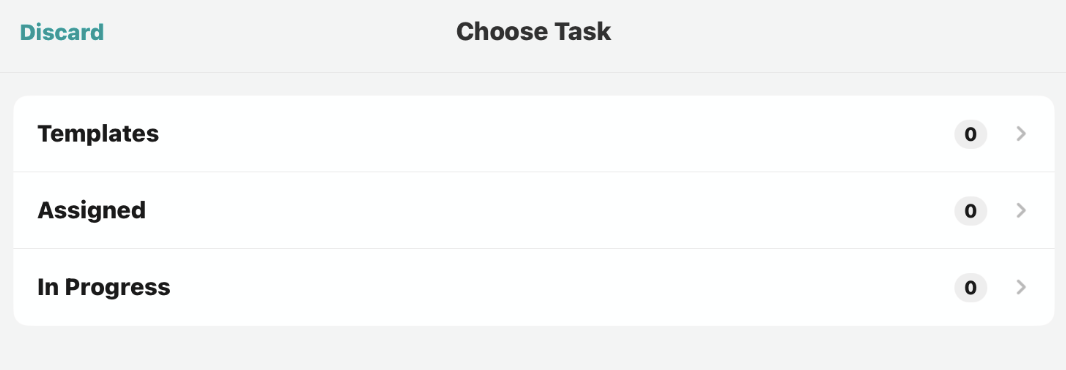
A Tasks modal will open, displaying a list of tasks organized in a Kanban-style format. You can switch between Assigned and Template tasks.
Click on a task to open it. If there are no assigned tasks, the modal opens the Template tab automatically.
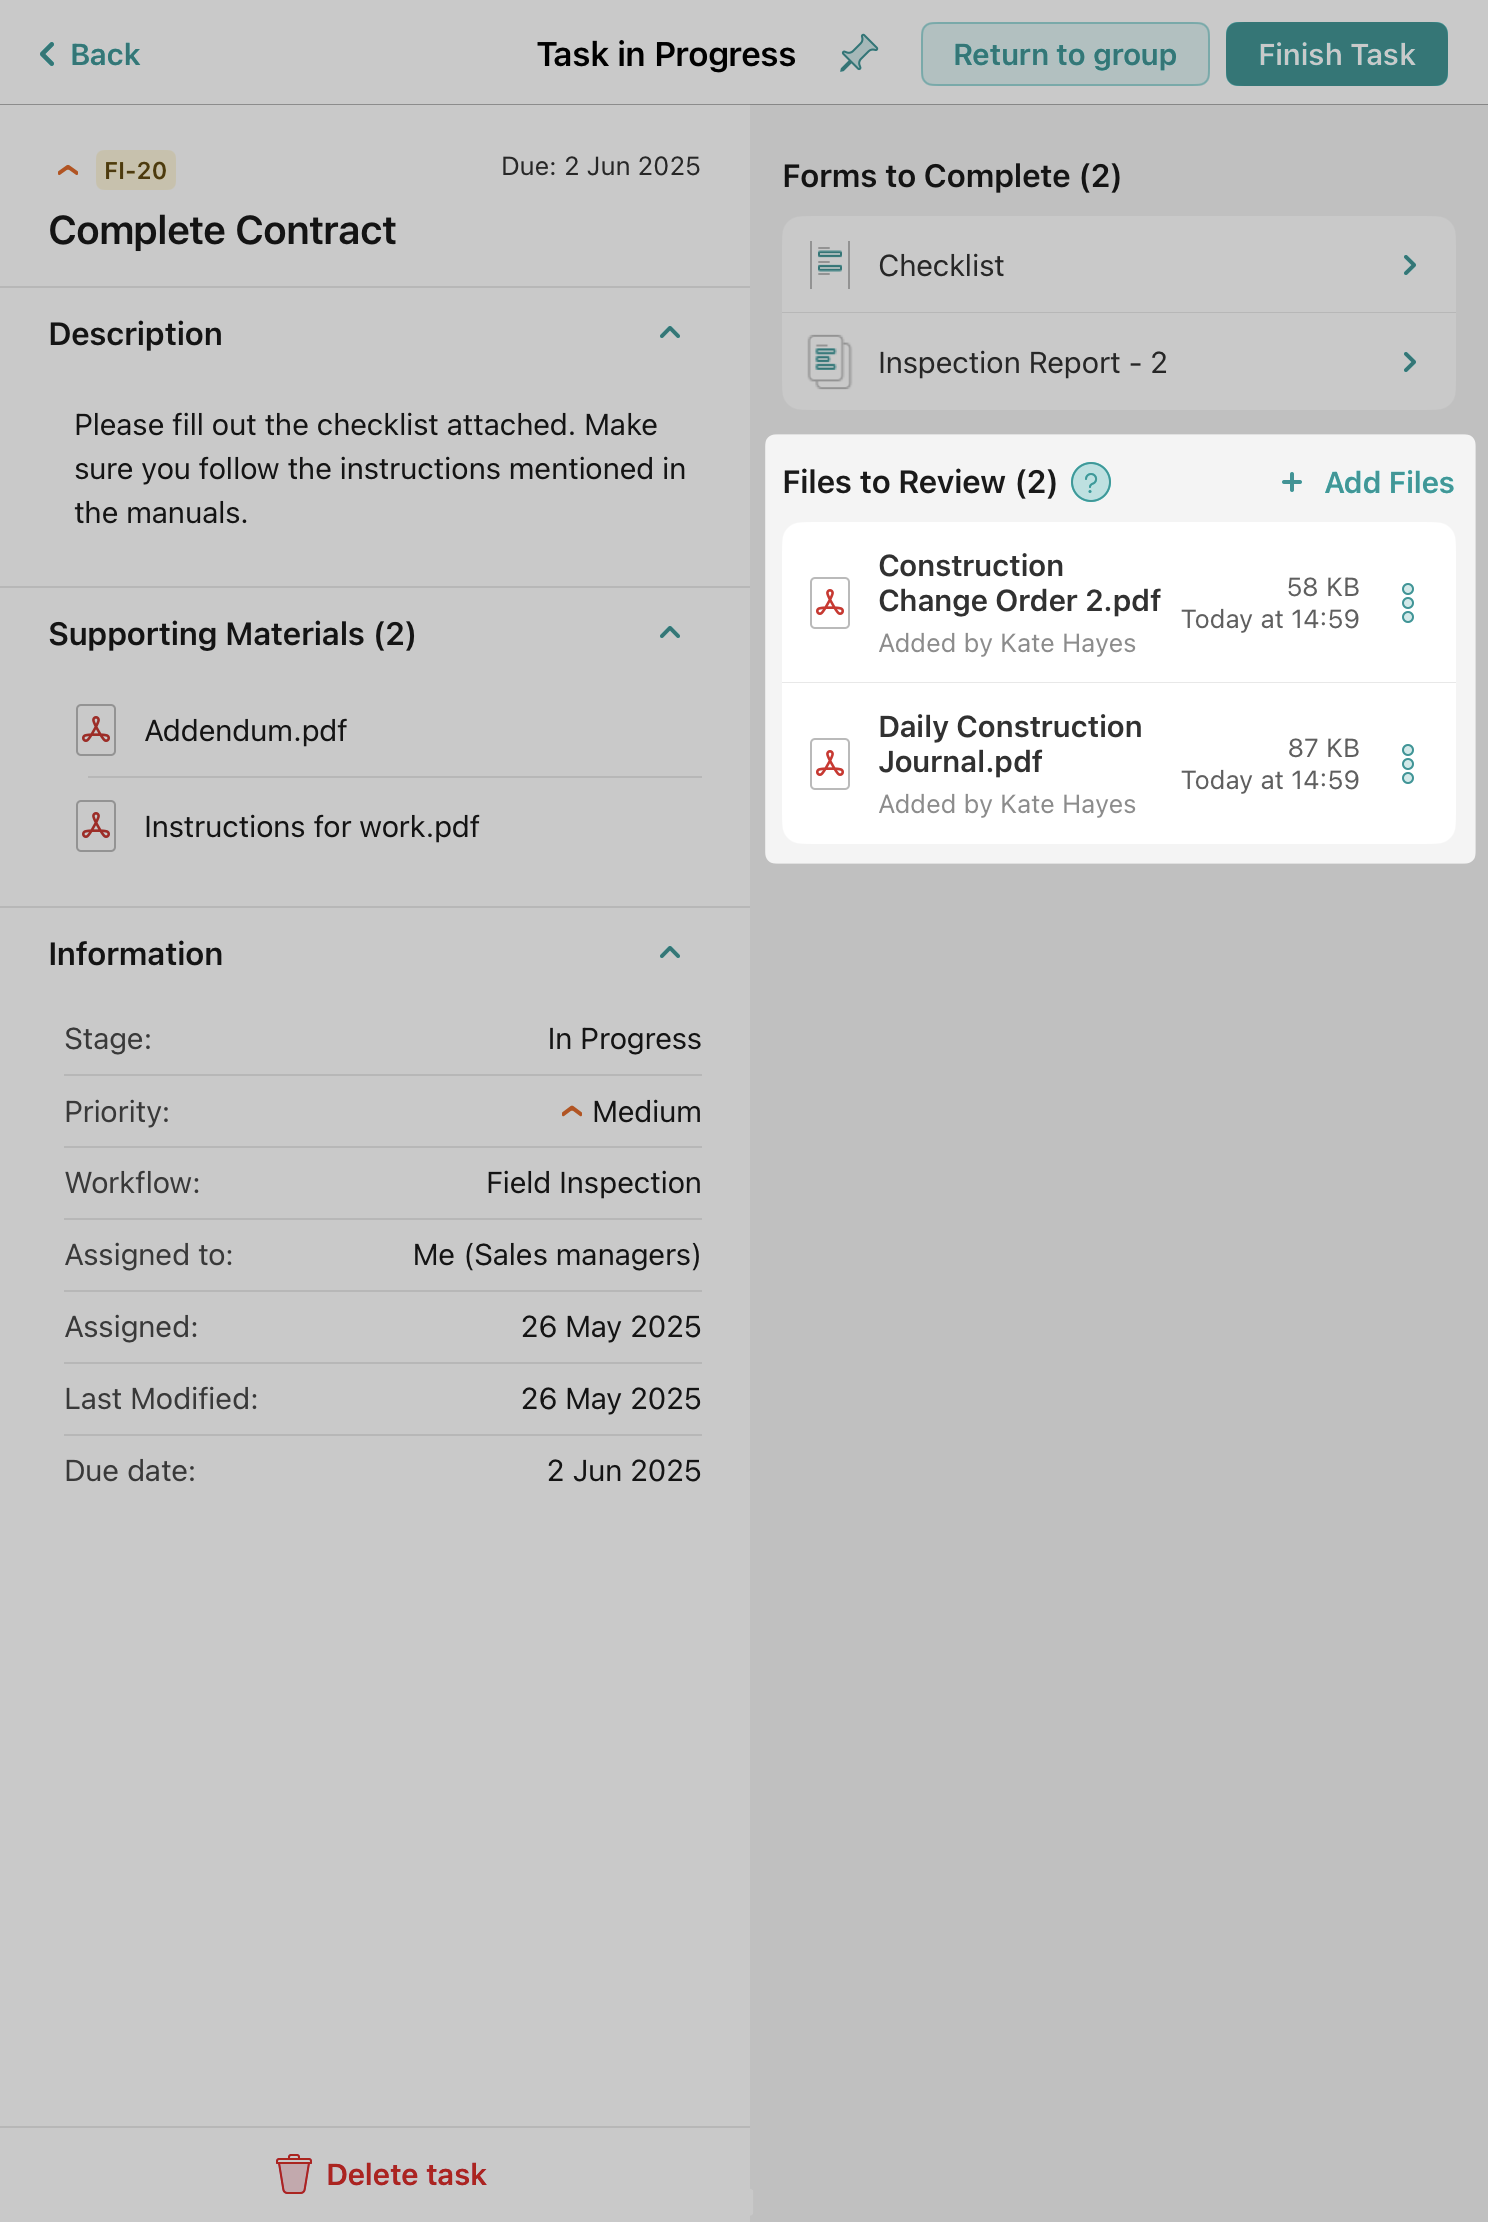
Supporting materials
Supporting materials are additional files added by your Fluix admin that he thought might be helpful for you while working on the task.
Forms to Complete
Forms to Complete section will display the list of forms that your Fluix account admin has added to this task.
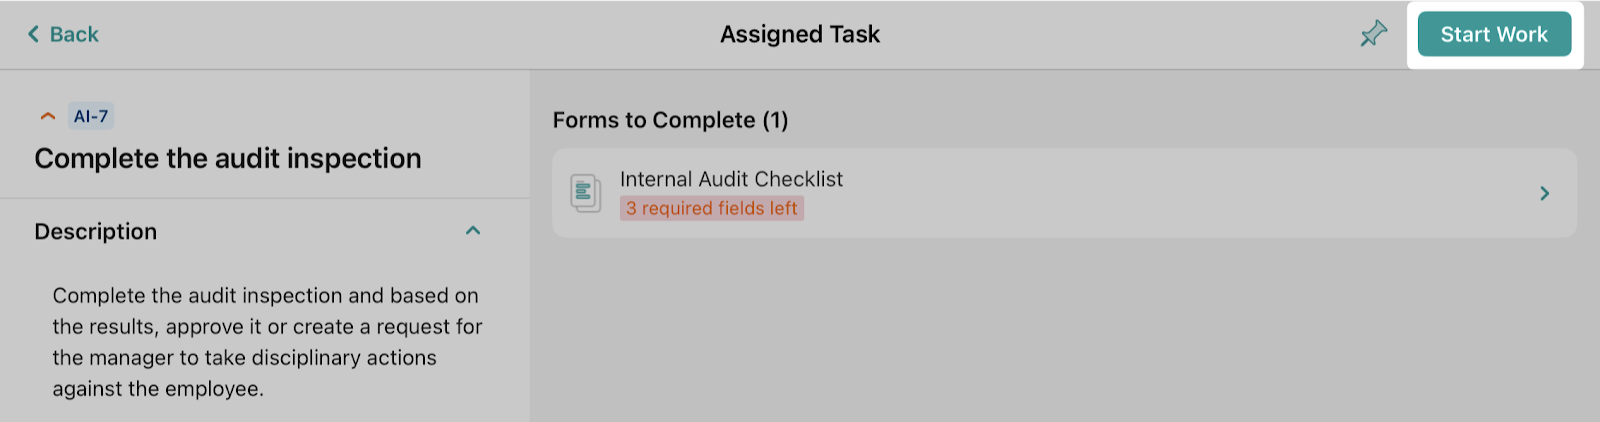
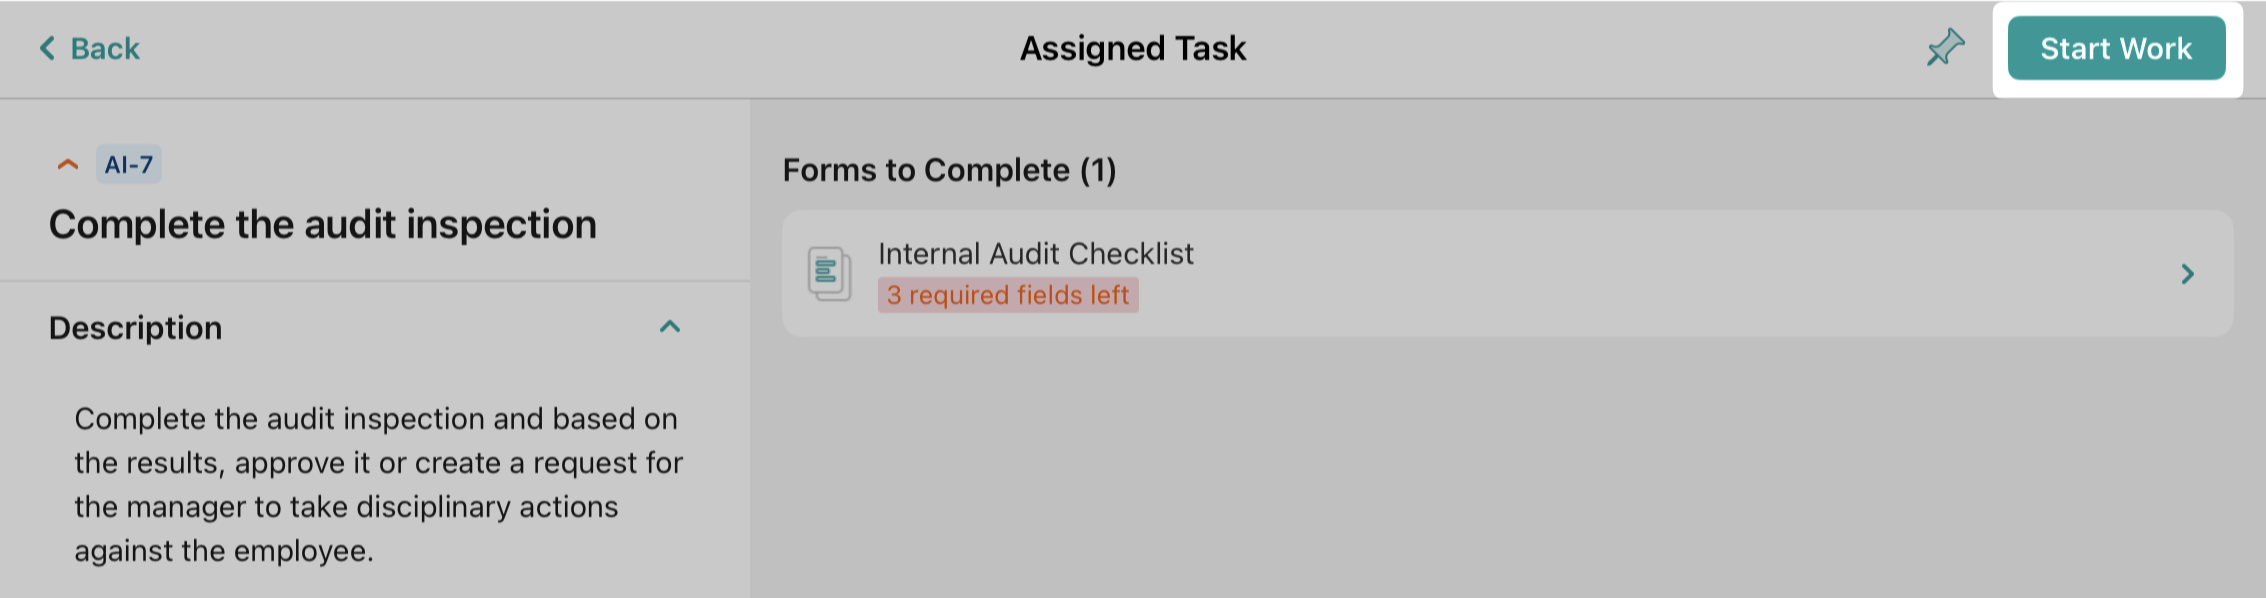
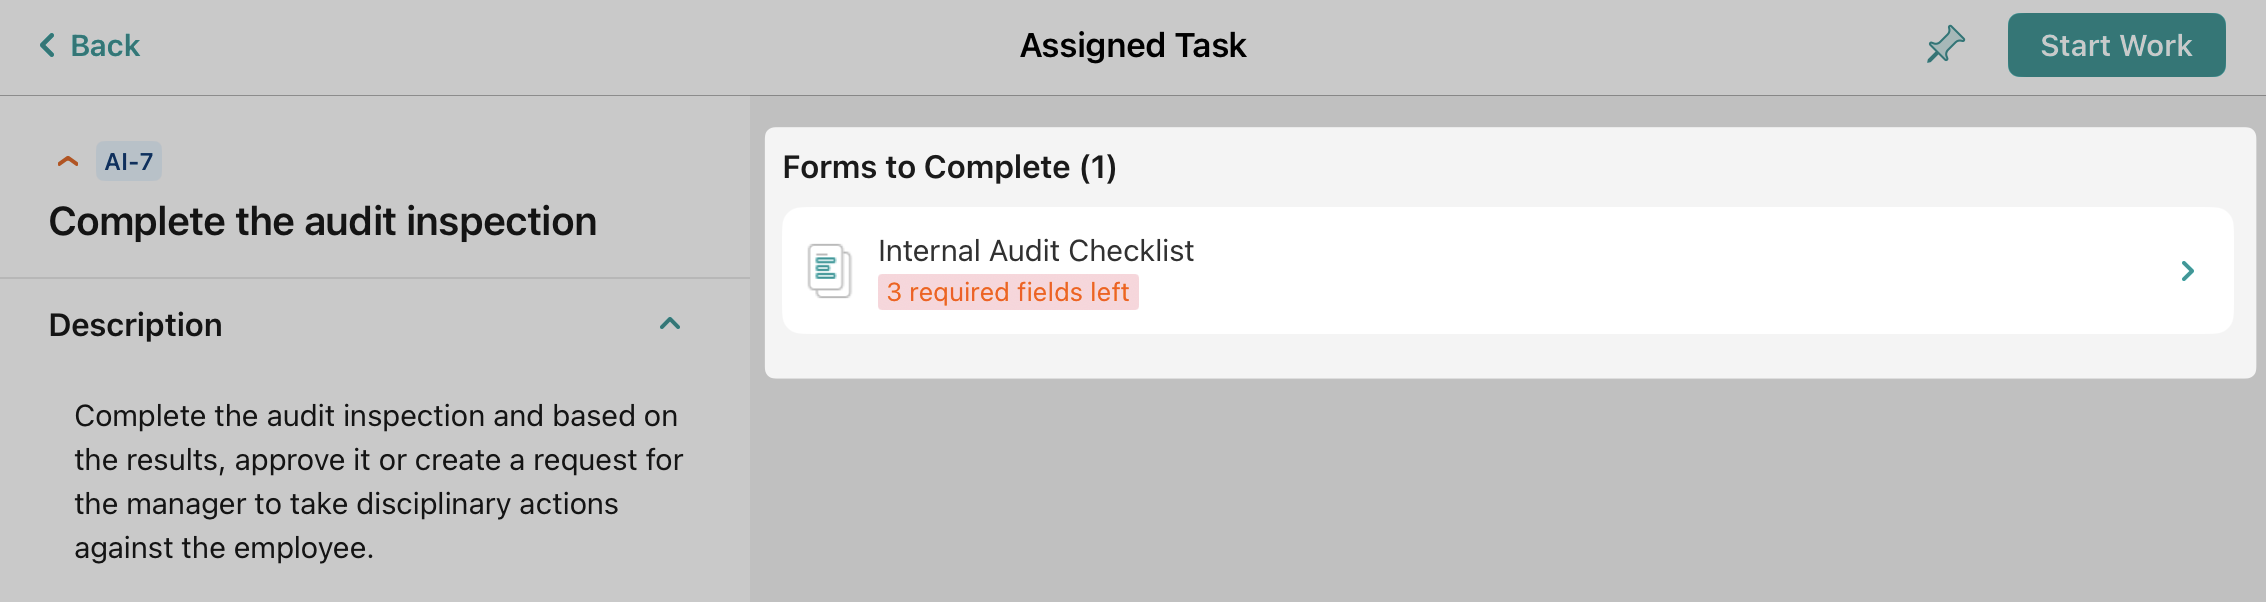
To start working on a task or assign it to yourself (in case the task was initially assigned to the group you are a participant in), tap the ‘Start work’ button in the top right corner.
Required fields in the forms
If configured by your Fluix account admin, the form you will be working on may contain several required fields. Their exact number will be shown to you right under the name of the form you will fill out.
Note: You can submit the task after all the required fields in the form are filled out.
Interim progress of the work done in the tasks
Once you start working on a task, it will be automatically moved to the In Progress tab. It will stay in progressuntil you submit it via the Finish button.
Note: Any work you do in the Fluix app is saved locally, so you can leave and return anytime to finish it if you work in the Fluix iOS or Android app.
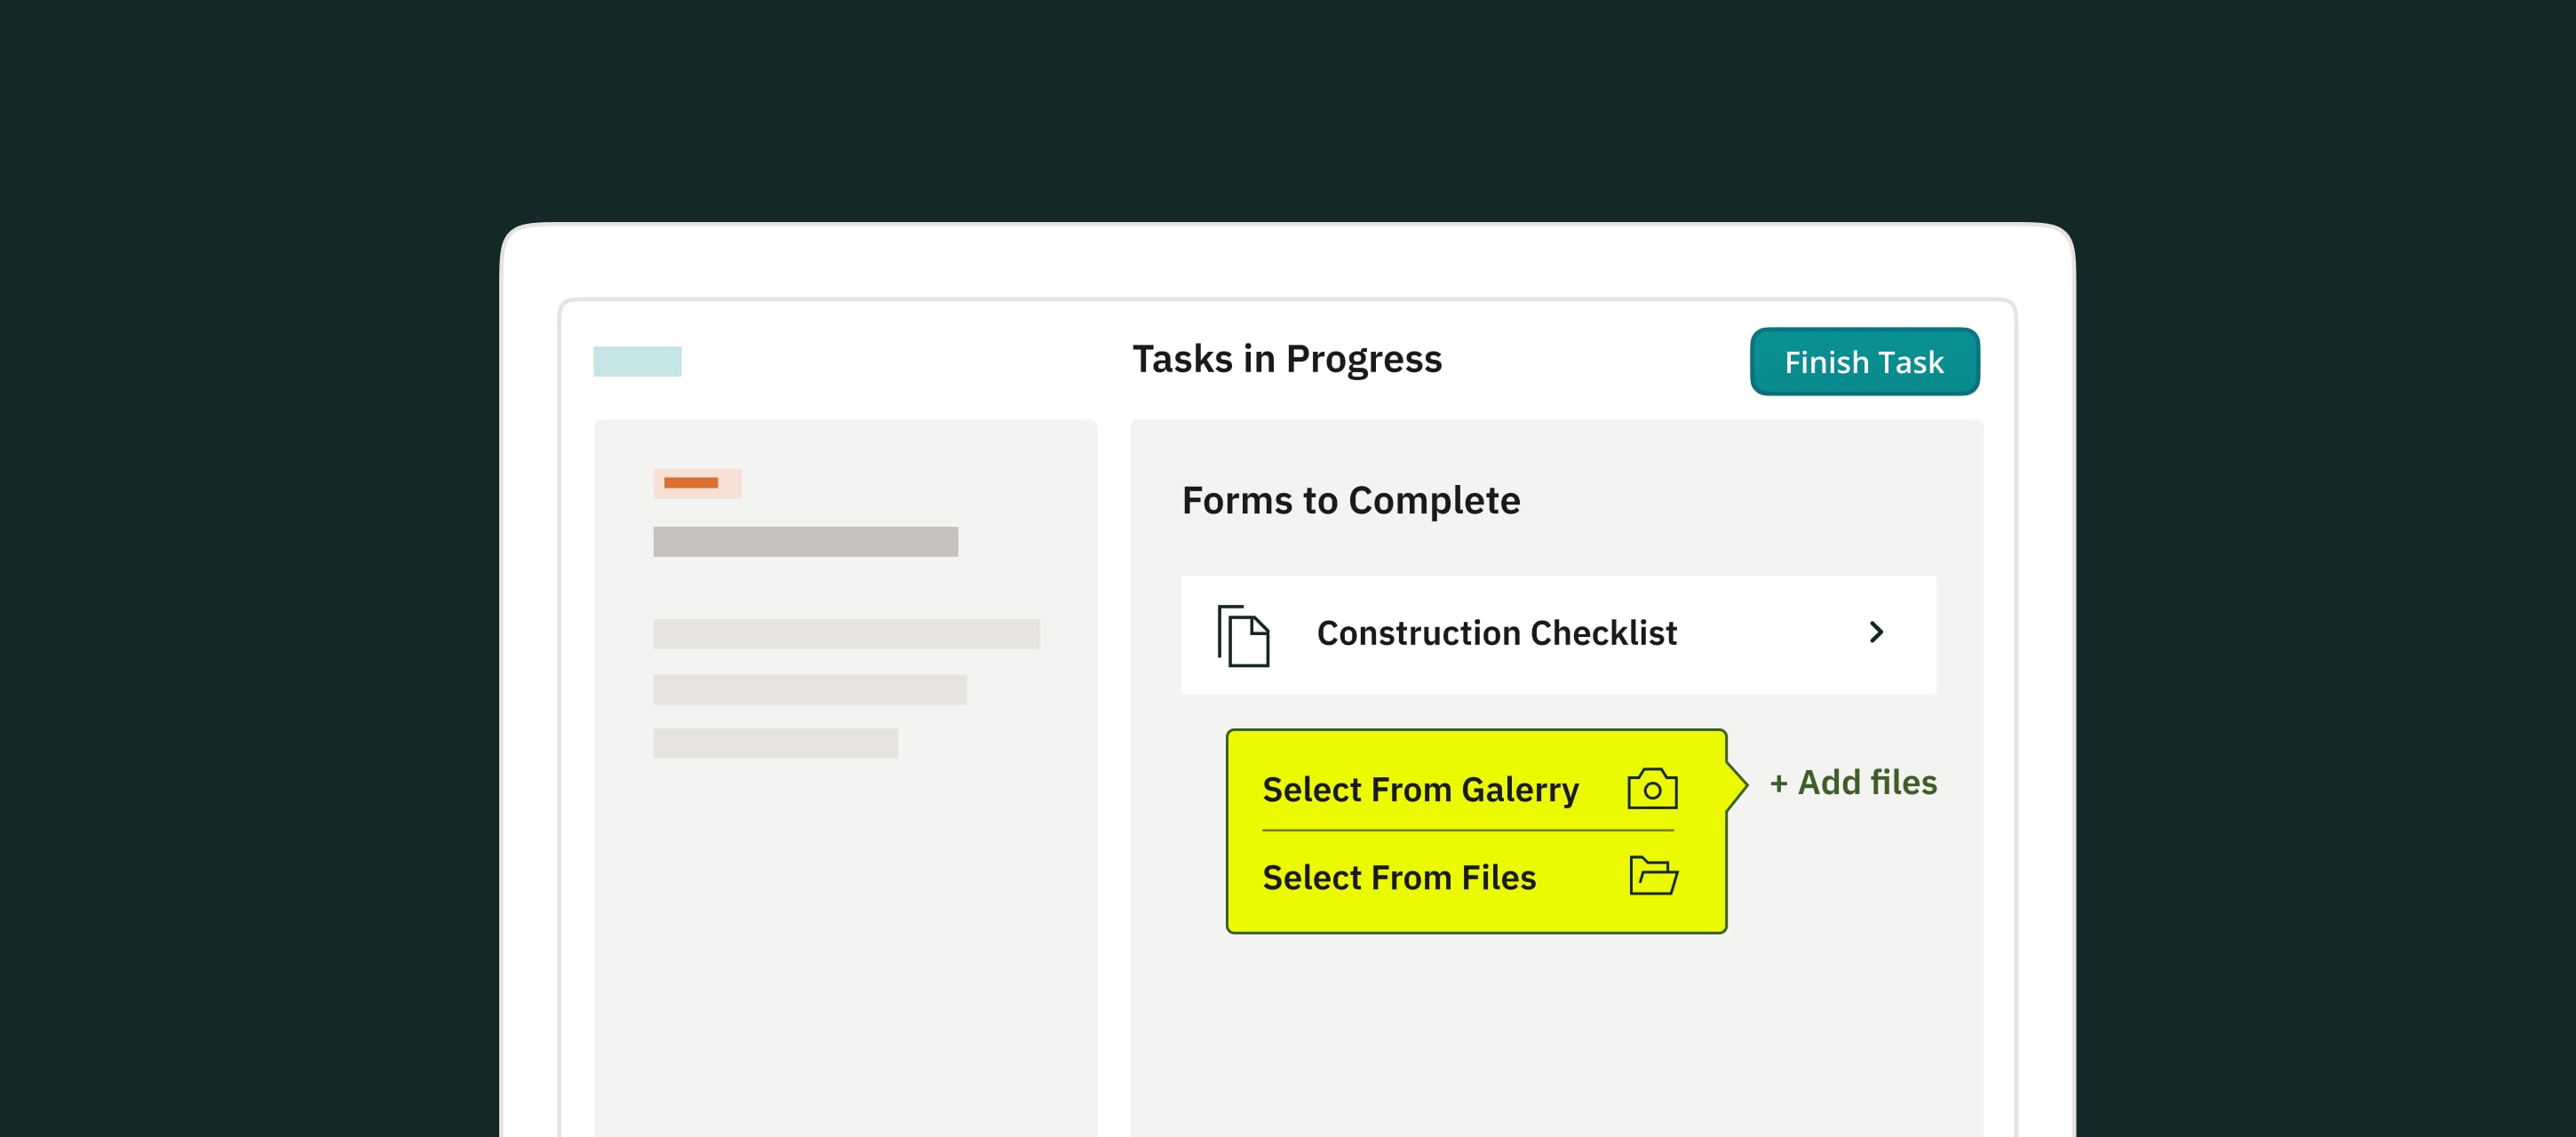
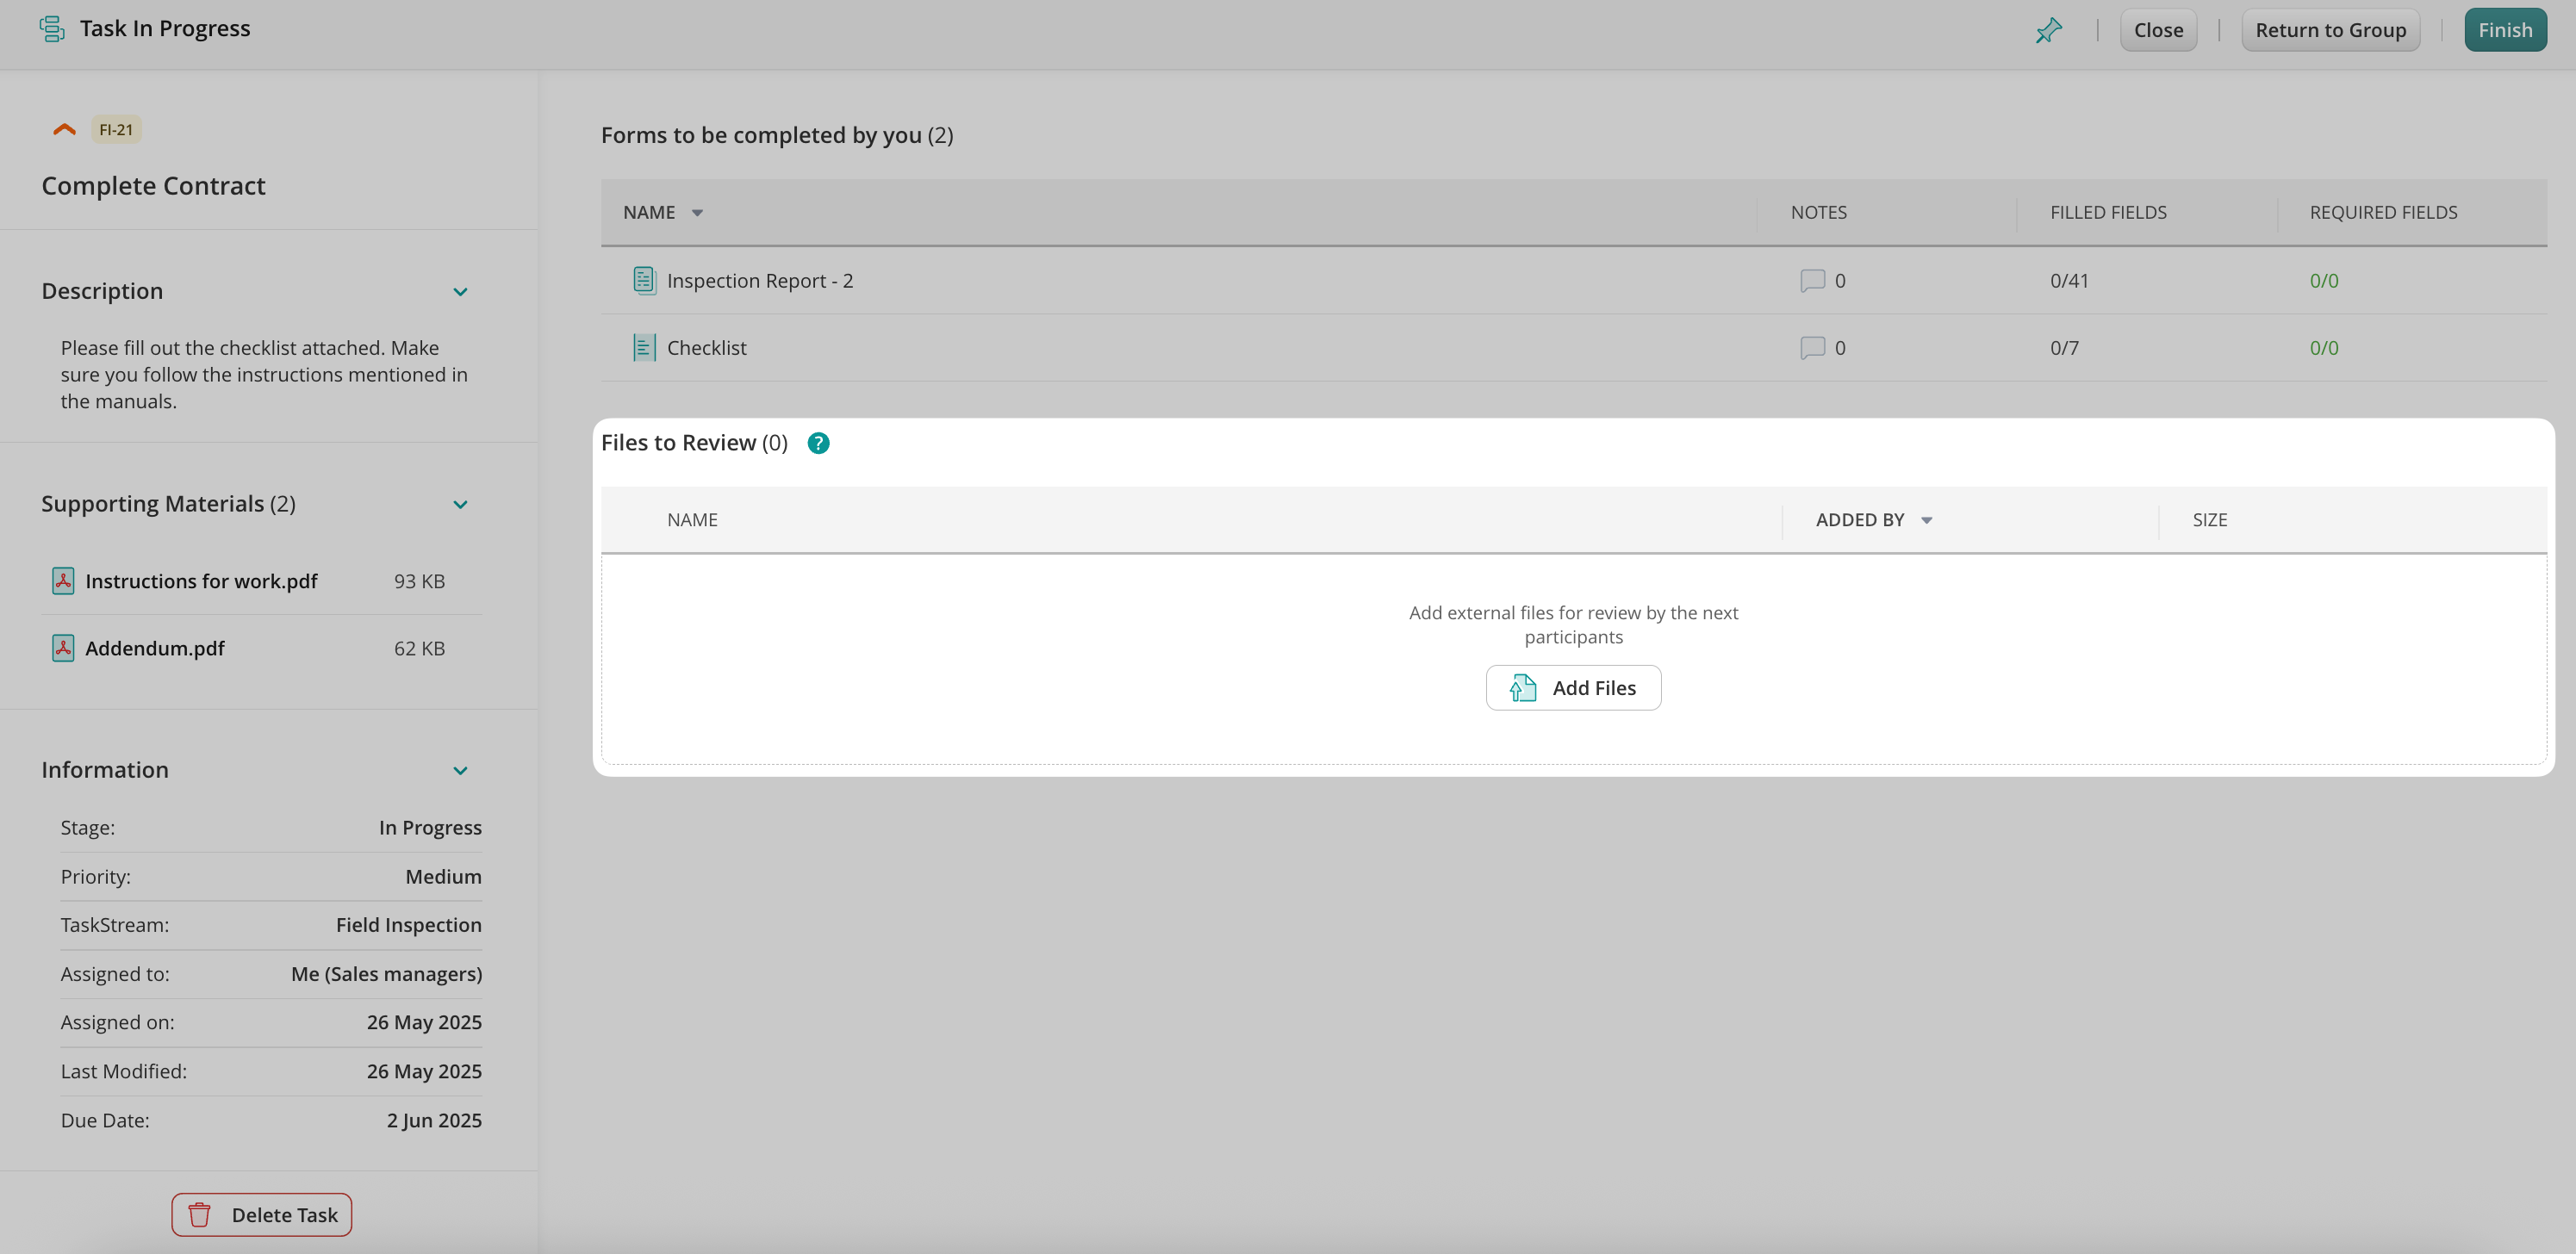
Files to Review
Files to Review section makes it easy for you to add your supporting files or images if you need to pass extra details to your colleagues who will receive the task in the next step. Learn more about this functionality in the Files to Review tutorial.
Keep your team in the loop with Notes
Use the Notes feature to communicate with your teammates about any changes or extra details needed in the document, whether you’re filling it out or reviewing it. Learn more about Notes in this tutorial: Exchanging Notes with Team Members.
If you have any questions or need further assistance, please contact us at support@fluix.io.
Was this article helpful?
Thanks for your feedback!
Oops, something went wrong. Please, try again later.
Thank you!
What details or examples would have made this article more helpful for you? We appreciate your insights!
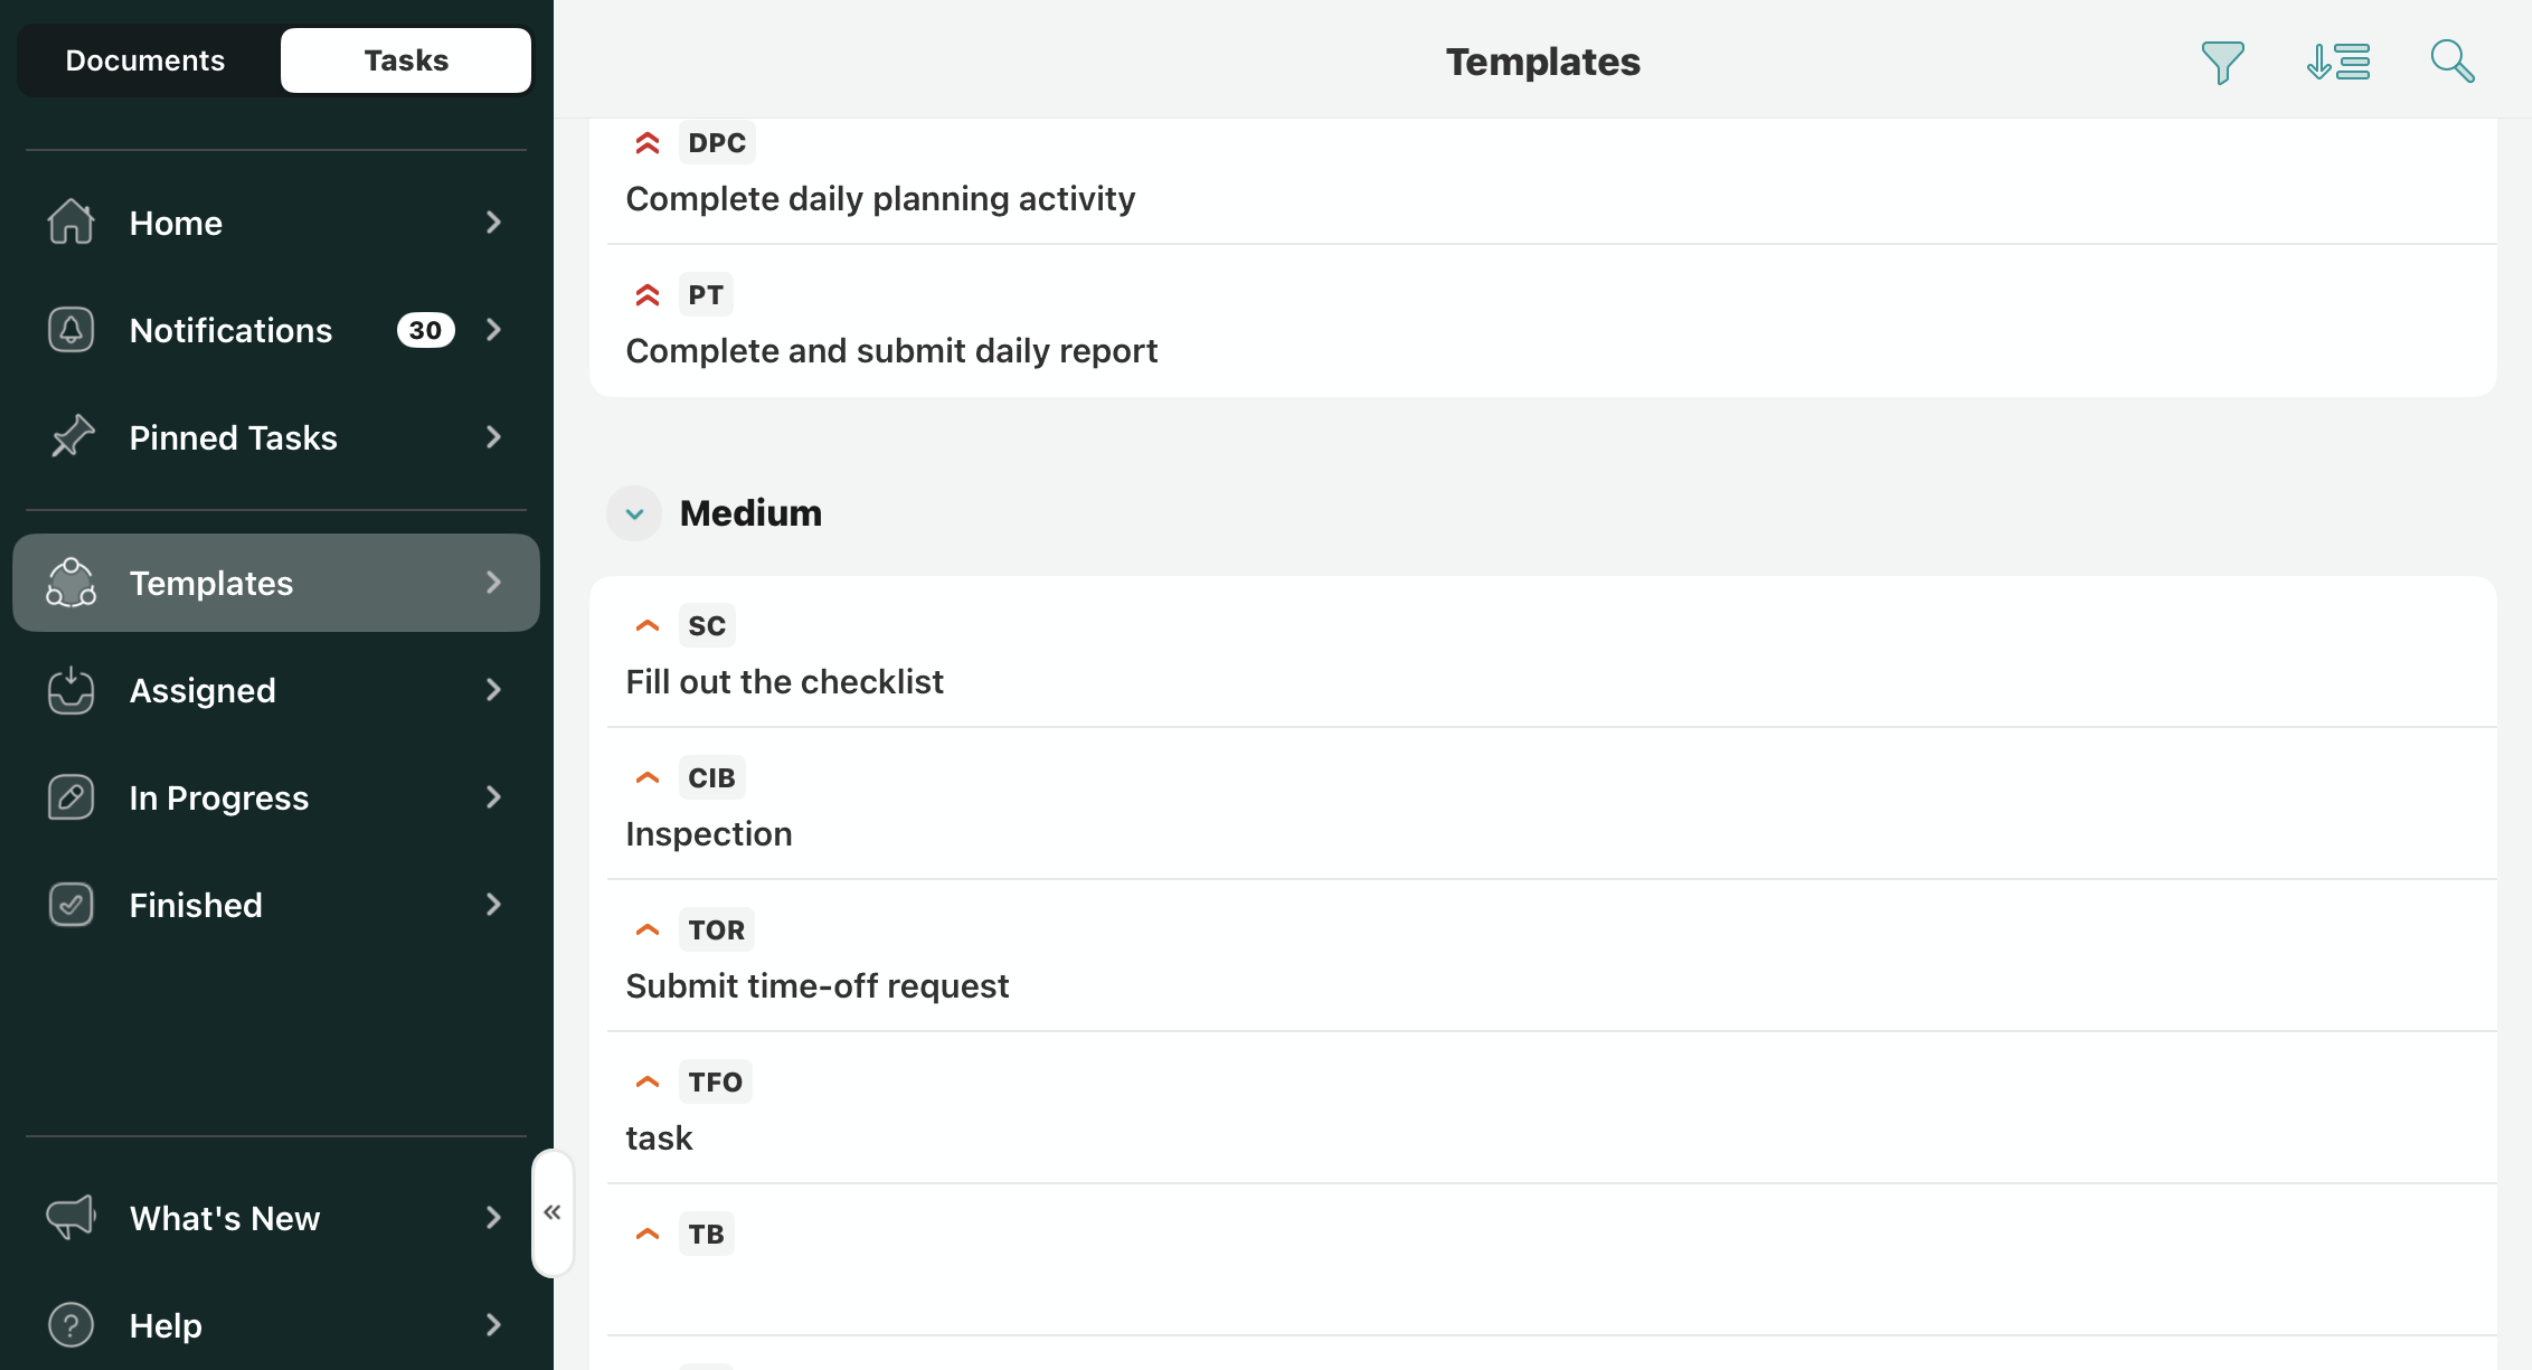
The templates section displays the tasks with the documents pre-configured by your company admin. You can initiate them at any time, even offline. Since these tasks are always available in the Templates tab, you may initiate as many tasks as needed with empty template forms ready to be filled out.
Sorting the tasks
You may sort the tasks in the Templates section by the following options:
Priority
Task ID
Task Name
The Priority option lets you sort the tasks from critical to low priority. The Task ID option lets you sort the tasks based on the task abbreviation in the alphabetic order or vice versa. The Task Name option lets you sort the tasks based on the task name in the alphabetic order or vice versa.
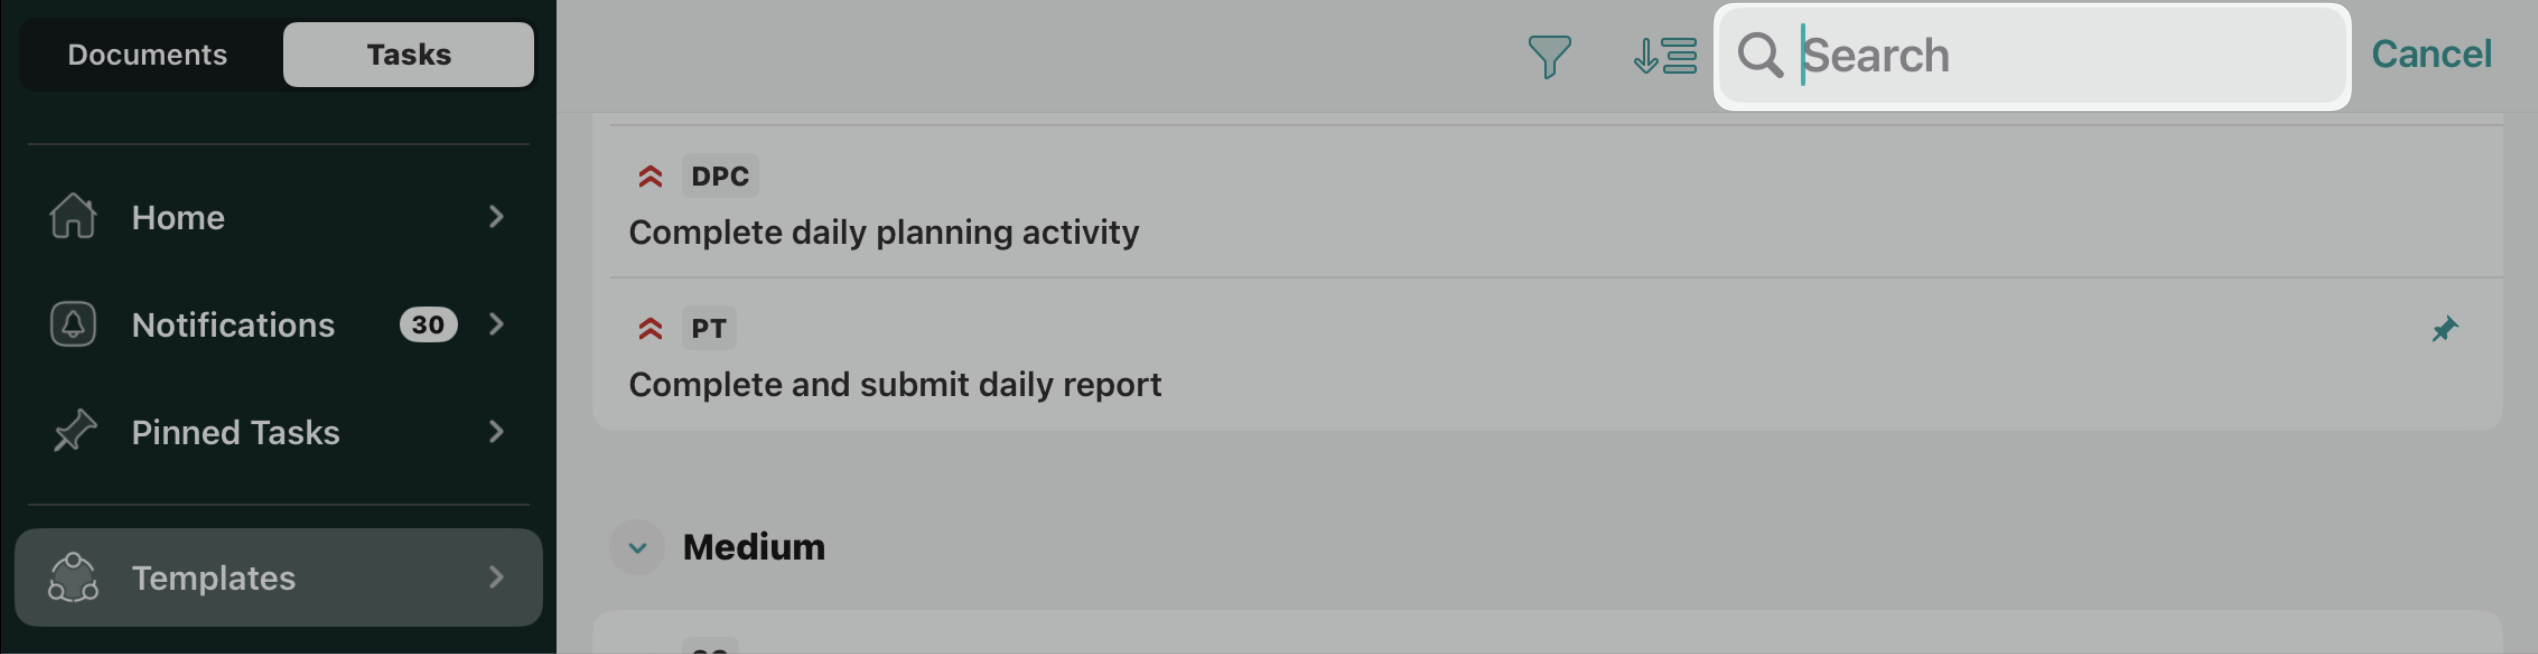
Search for the relevant tasks
In the upper right corner of the Templates section, use the Search icon to locate the tasks you need to complete.
In order to review the task and to start working on it, tap on its line containing the basic information about the task.
Feel free to contact us at support@fluix.io if you have any questions or comments.
Was this article helpful?
Thanks for your feedback!
Oops, something went wrong. Please, try again later.
Thank you!
What details or examples would have made this article more helpful for you? We appreciate your insights!
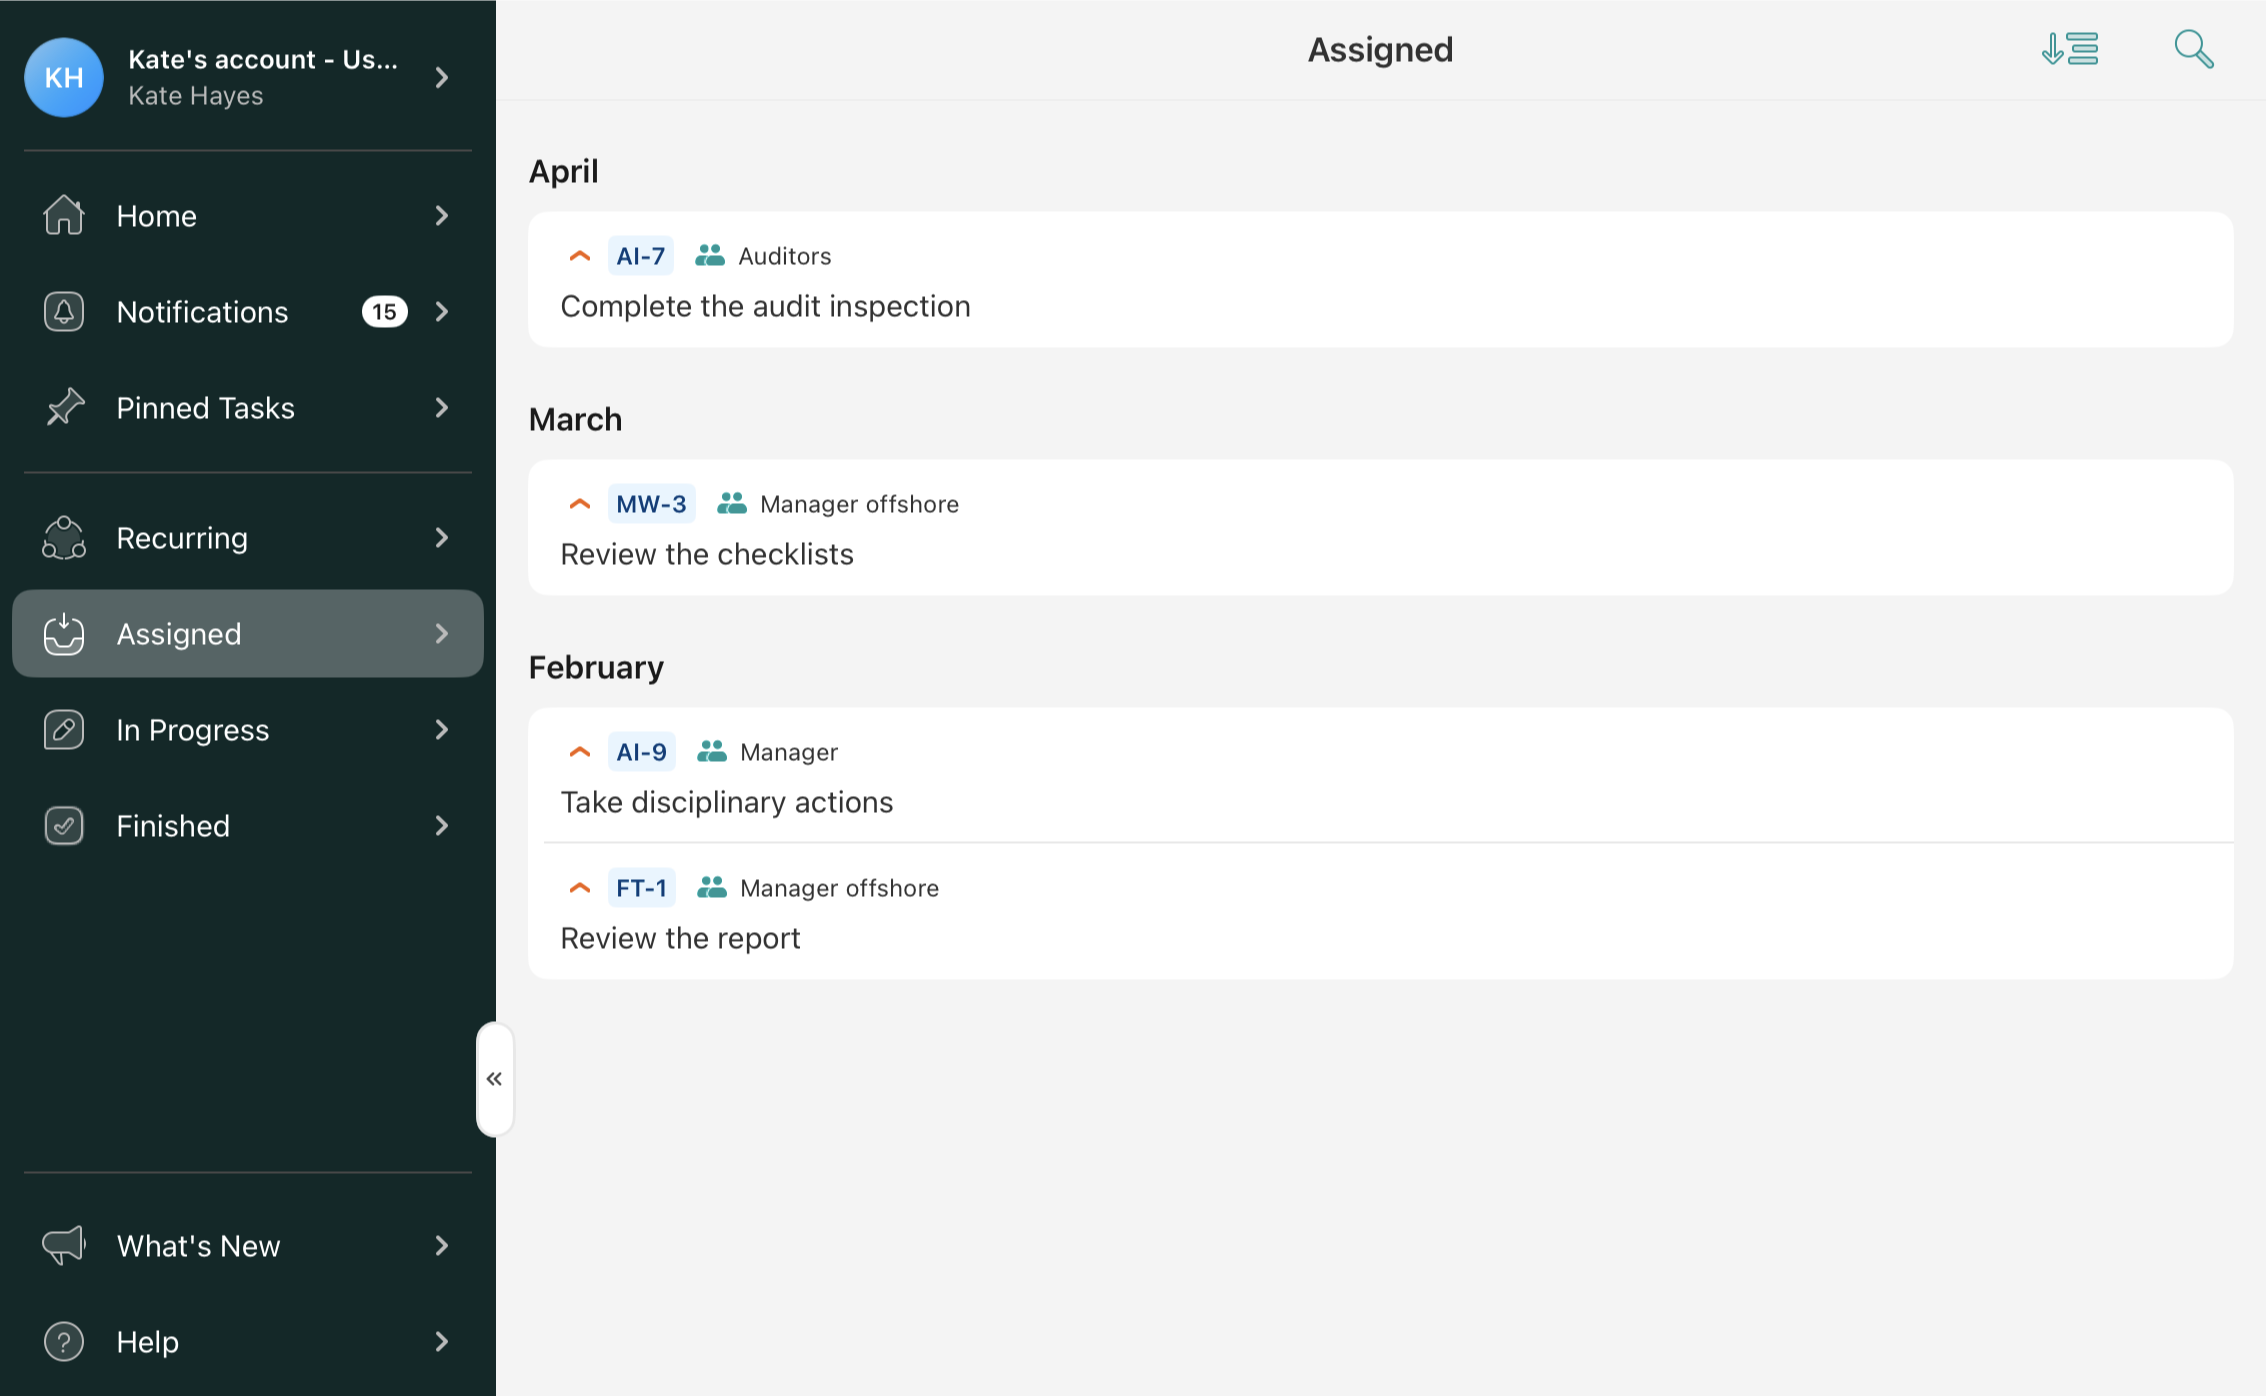
The tasks appear in the Assigned section when someone sends them to you either as a user or as a member of a particular group. If the task was assigned to a group in which you are a participant, the name of the group will be displayed next to the Process ID e.g. DAP-27.
When a task is assigned to a group, and one of the group members assigns it to himself or herself, it will not be displayed in the Assigned section. Your company admin may have pre-configured the due date for the assigned tasks. Once a task is overdue, it is marked accordingly and shows the number of overdue days.
Sorting the tasks
You may sort the tasks in the Assigned section by the following options:
Priority
Task ID
Due Date
Creation Date
Assignee name
Task name
The Priority option lets you sort the tasks from critical to low priority, which is pre-configured by your company’s account admin. The Task ID option lets you sort the tasks by their abbreviation. The Due Date option lets you sort the tasks by priority; the due dates can be pre-configured by the company’s Fluix account admin. The Assignee name option lets you sort the tasks by the names of the Groups to which they are assigned. The Task Name option lets you sort the tasks based on the task name in alphabetical order or vice versa.
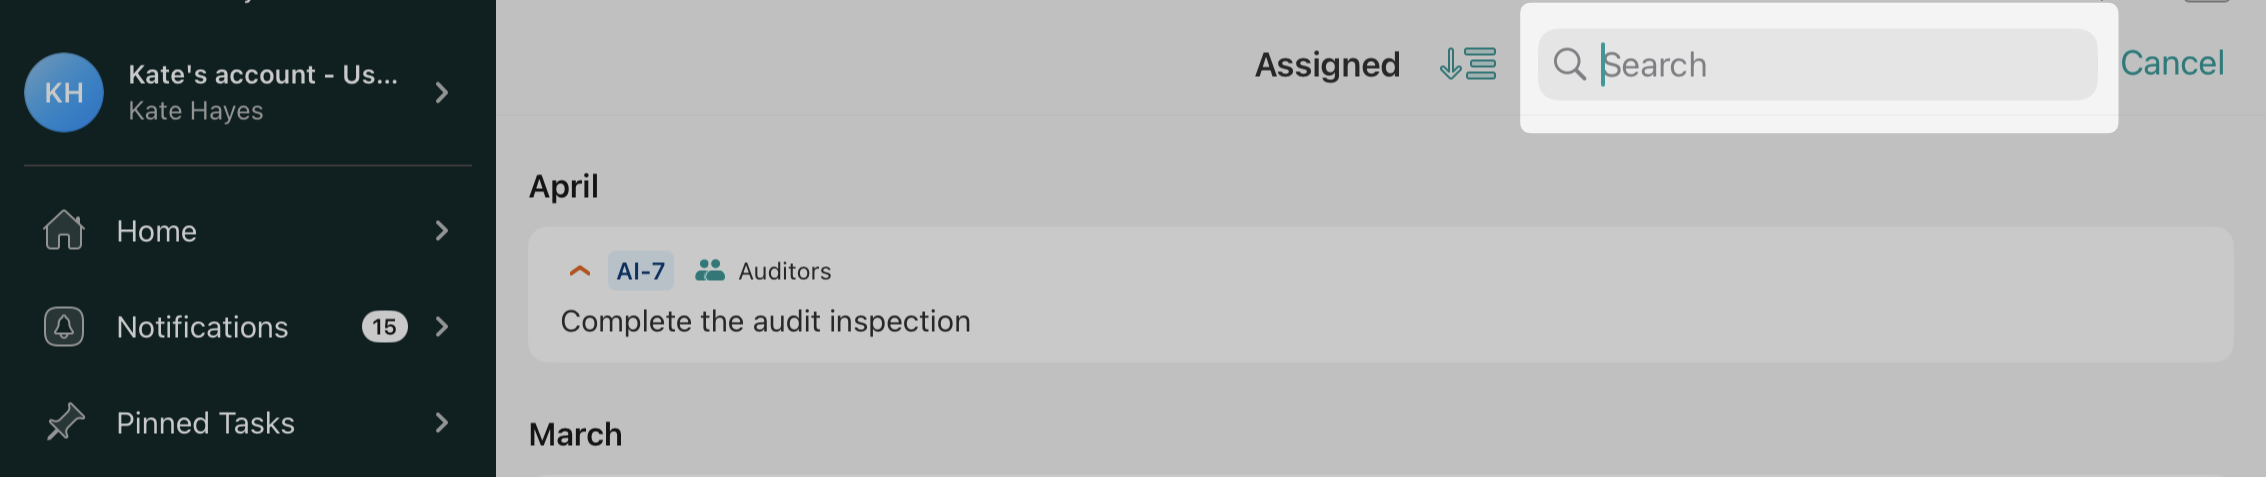
Search for the relevant tasks
In the upper right corner of the Assigned section, use the Search icon to locate the tasks you need to complete.
Start working on tasks
To review the task and/or to start working on it, simply tap on its line containing the basic information about the task.
To start working on a task or assign it to yourself (in case the task was initially assigned to the group in which you are a participant), tap the ‘Start work’ button in the top right corner. Once you start working on a task, it will be automatically moved to the In Progress tab.
Once you finish working on the form, click the Back button to exit editable mode and click the Finish Task button. The task will be moved to the Finished section and available for you to review.
Feel free to contact us at support@fluix.io with any questions or comments.
Was this article helpful?
Thanks for your feedback!
Oops, something went wrong. Please, try again later.
Thank you!
What details or examples would have made this article more helpful for you? We appreciate your insights!
Once you start working on any of the tasks from the Templates or Assigned tab, the task will be automatically moved to the In Progress tab and will stay there until you finish it.
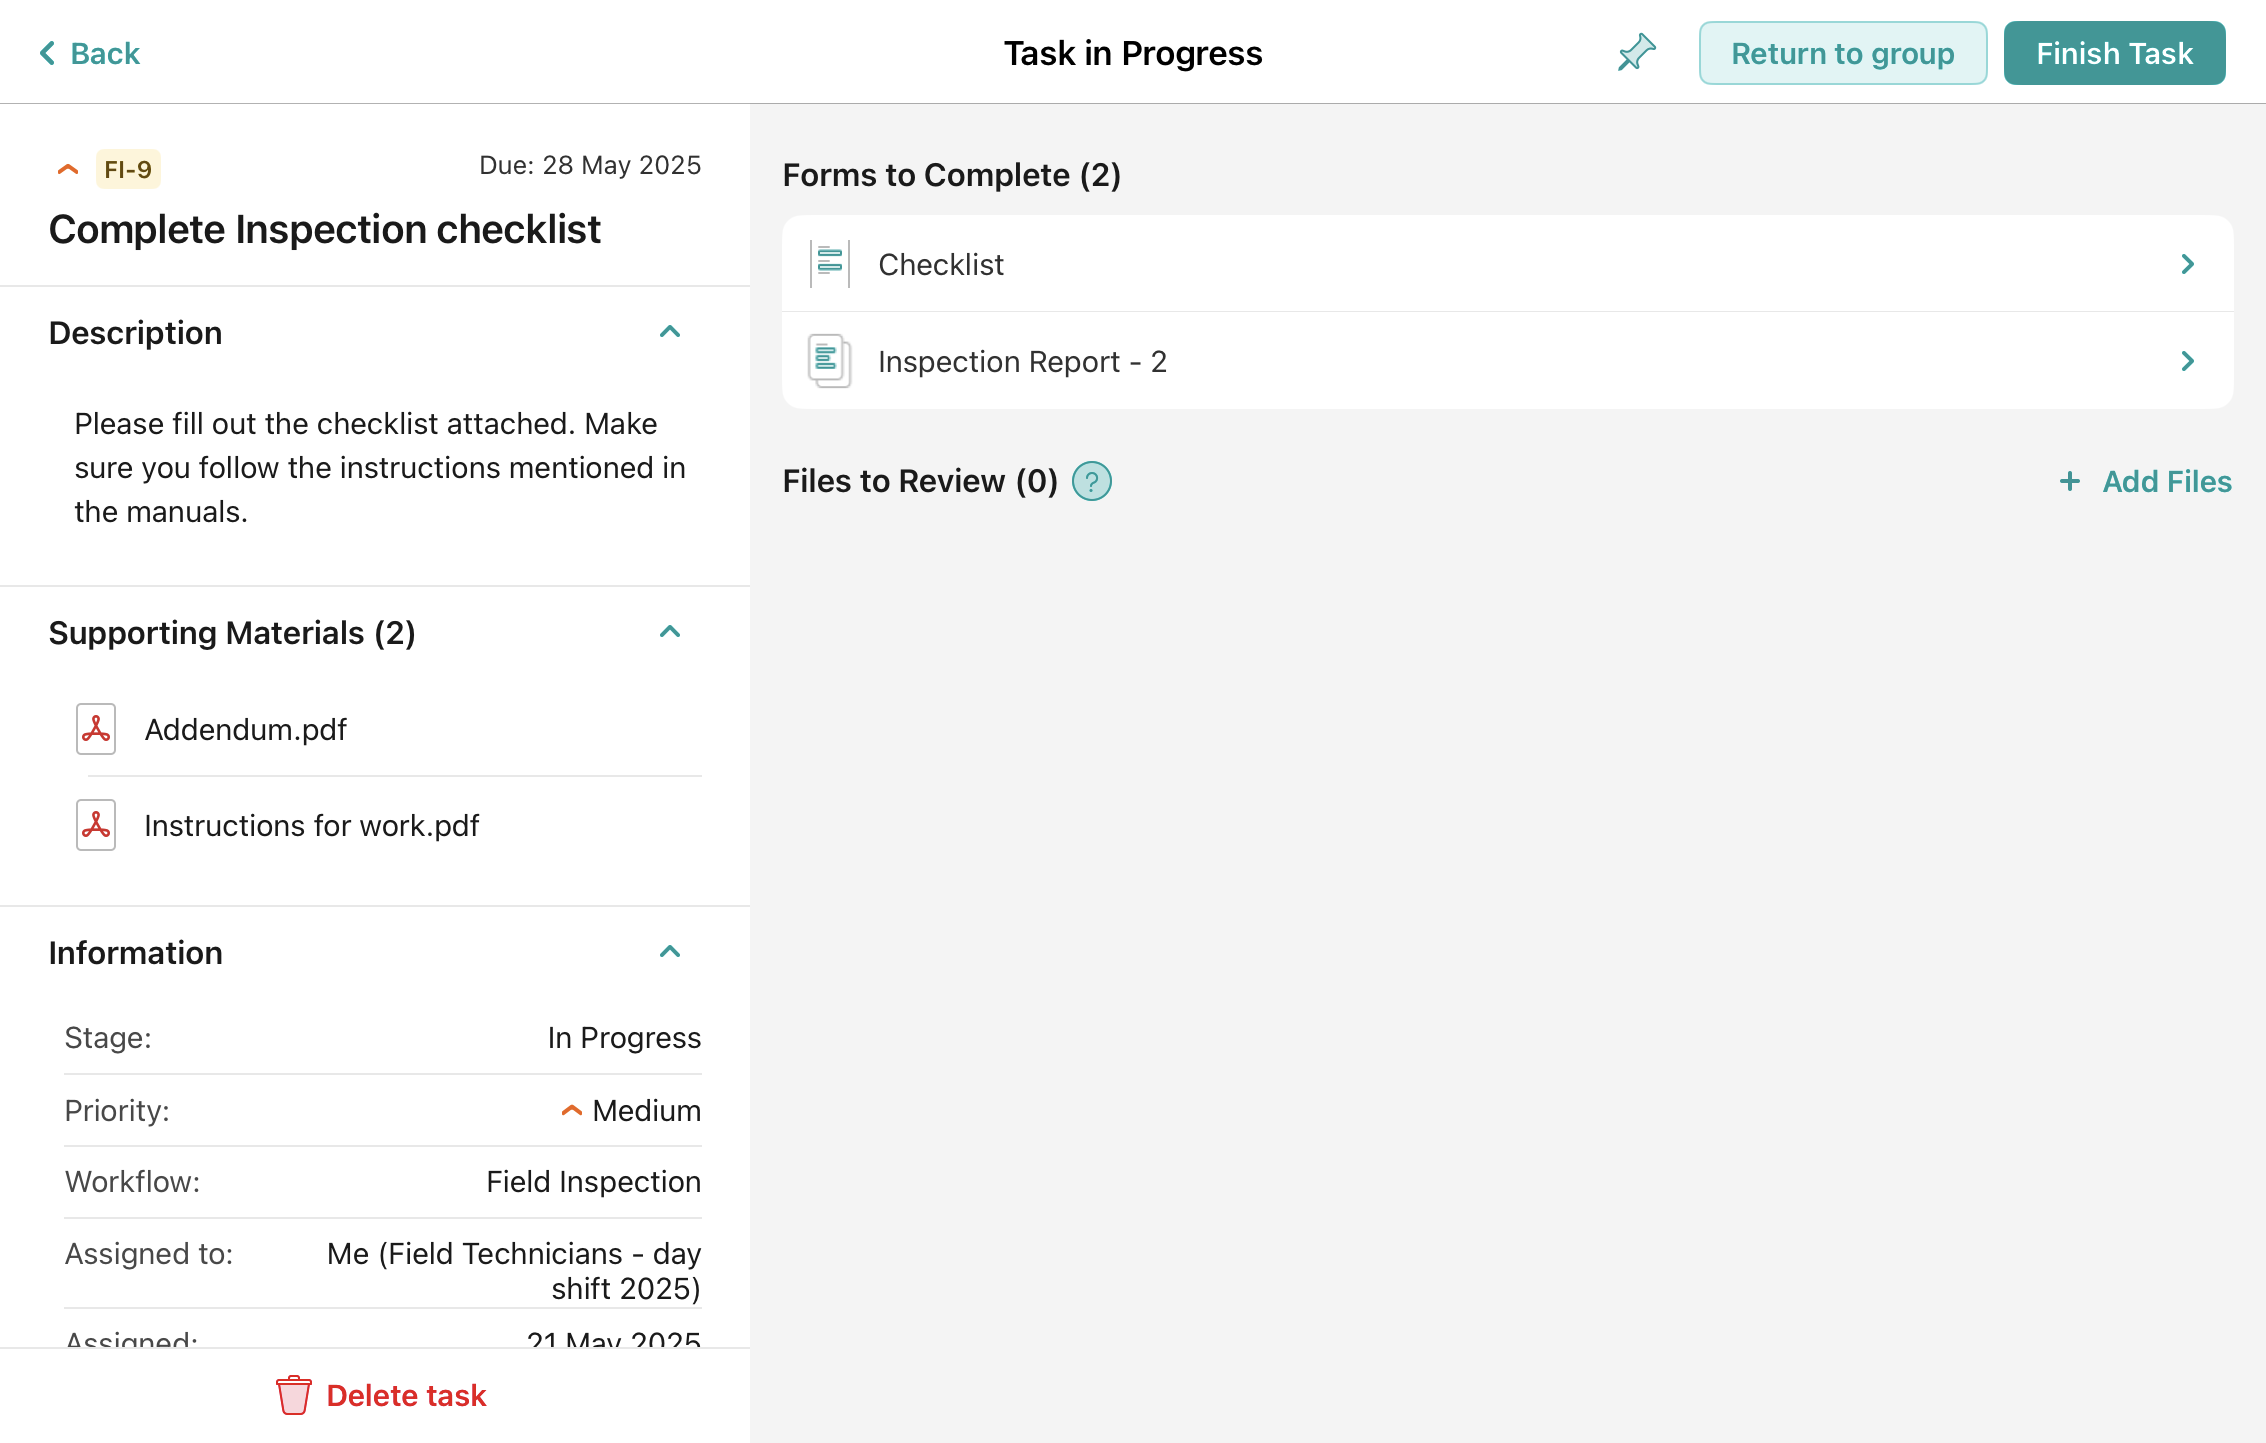
Forms to Complete
On the main screen, you can find the forms that must be filled out to finish the task and the supporting materials.
If the form configured by your company admin has some required fields, the number of these fields will be displayed next to the form’s name. The task cannot be finished until all the required fields are filled out.
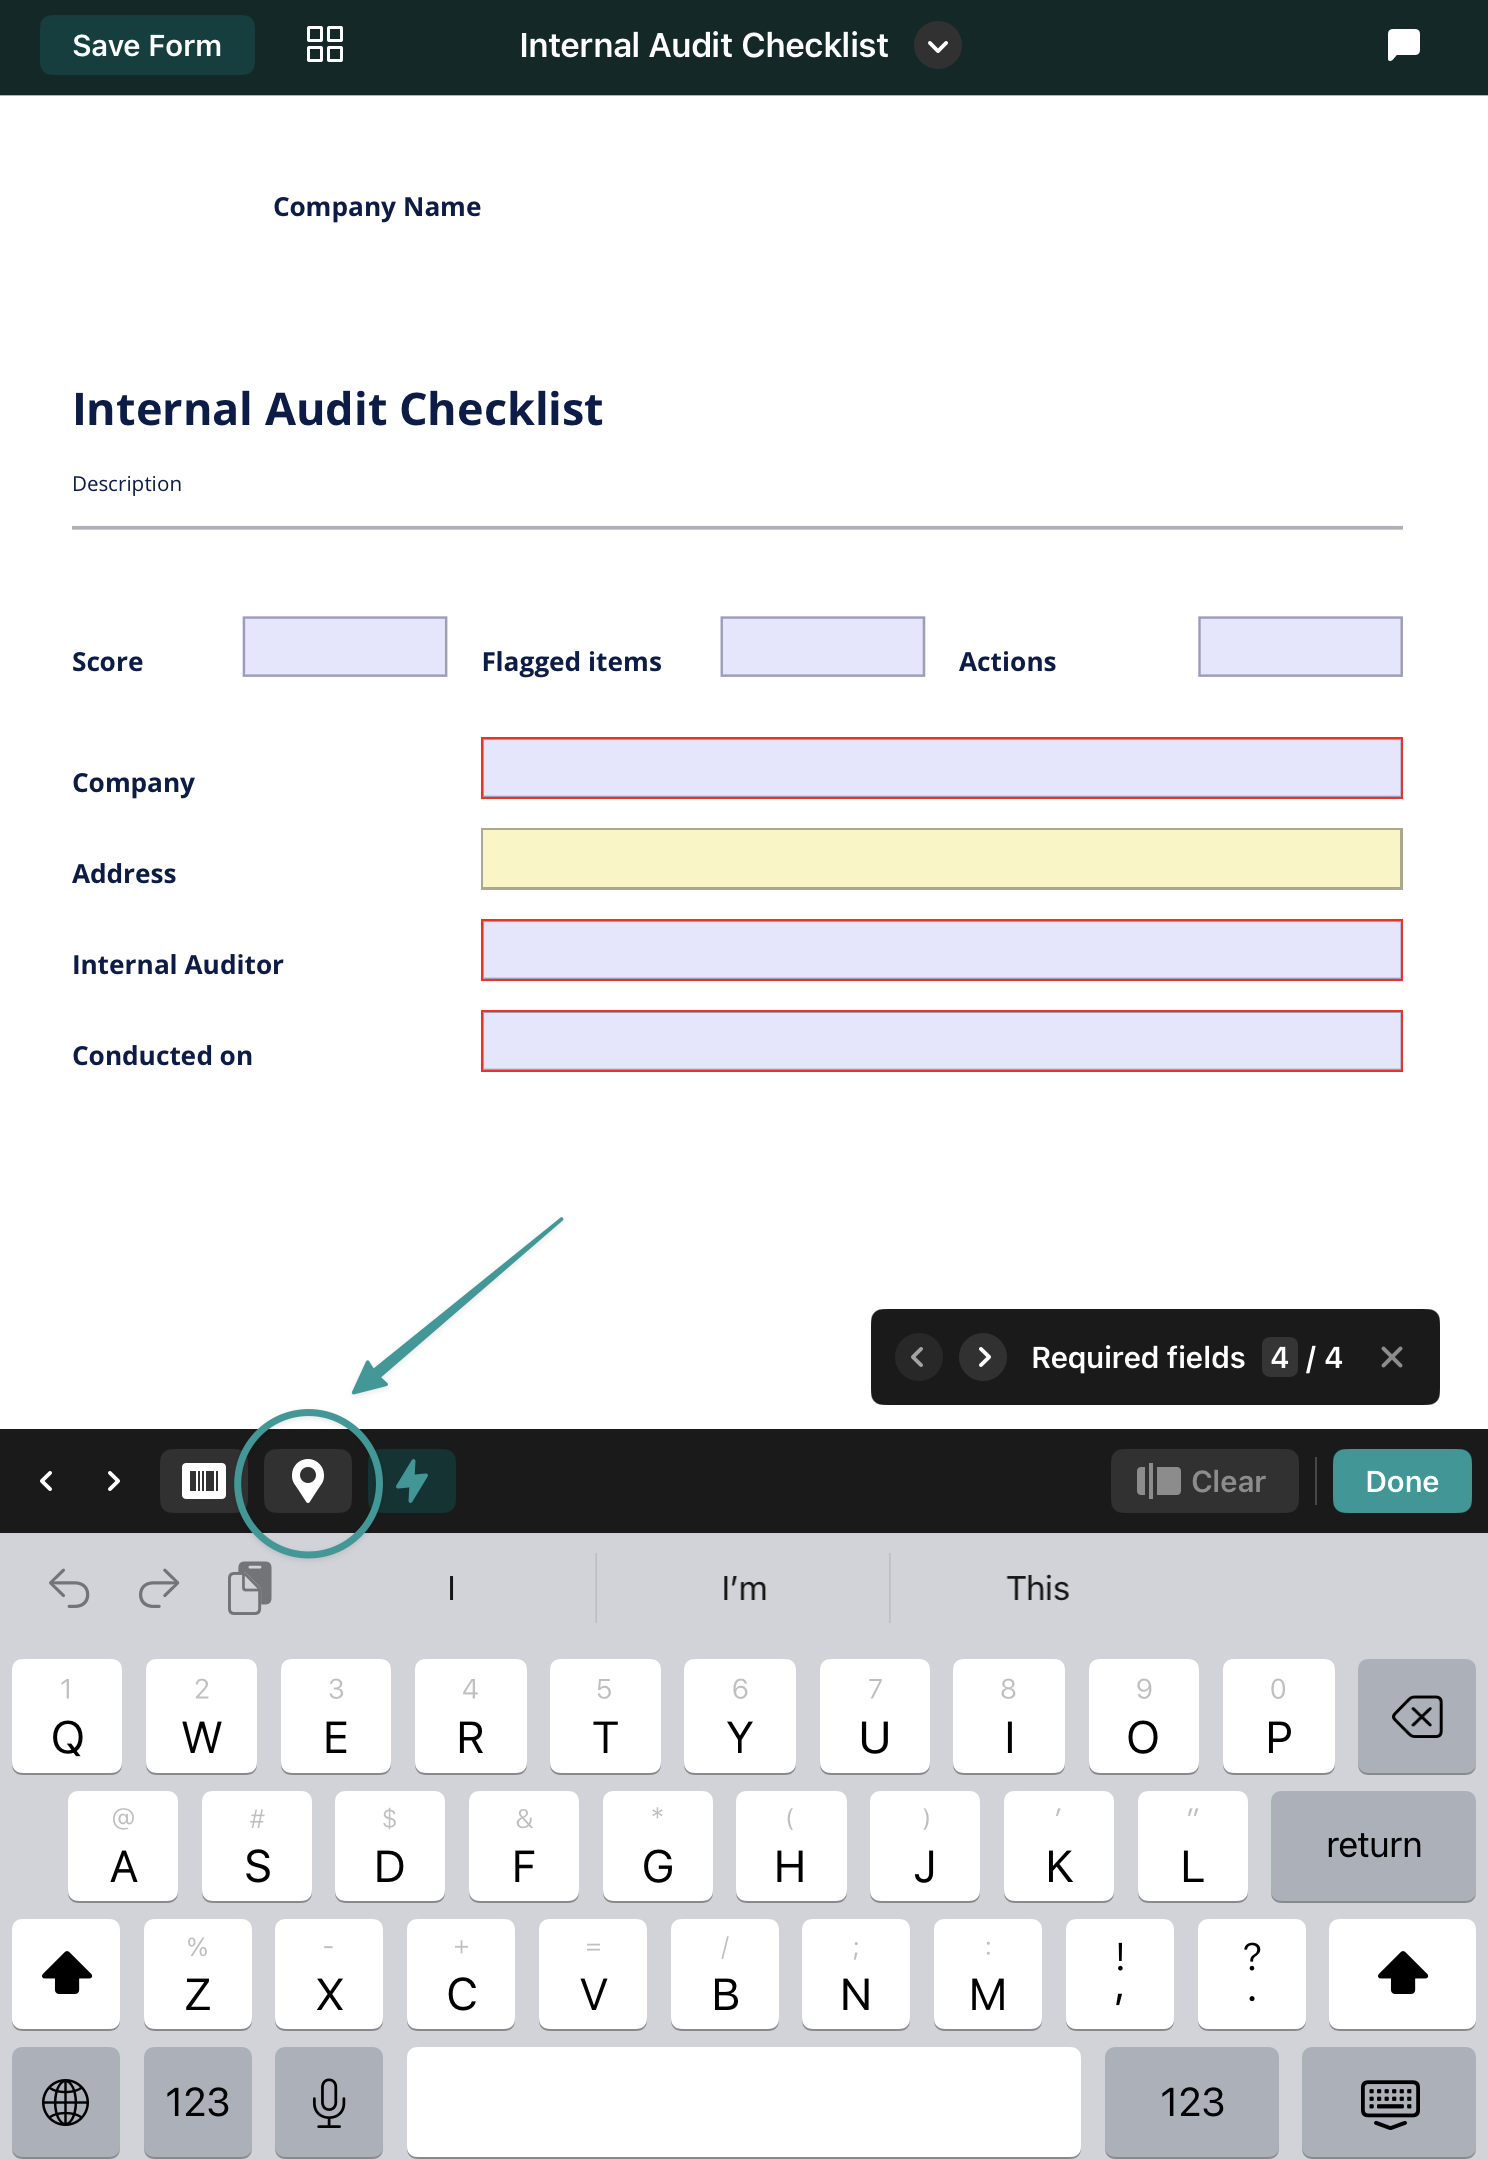
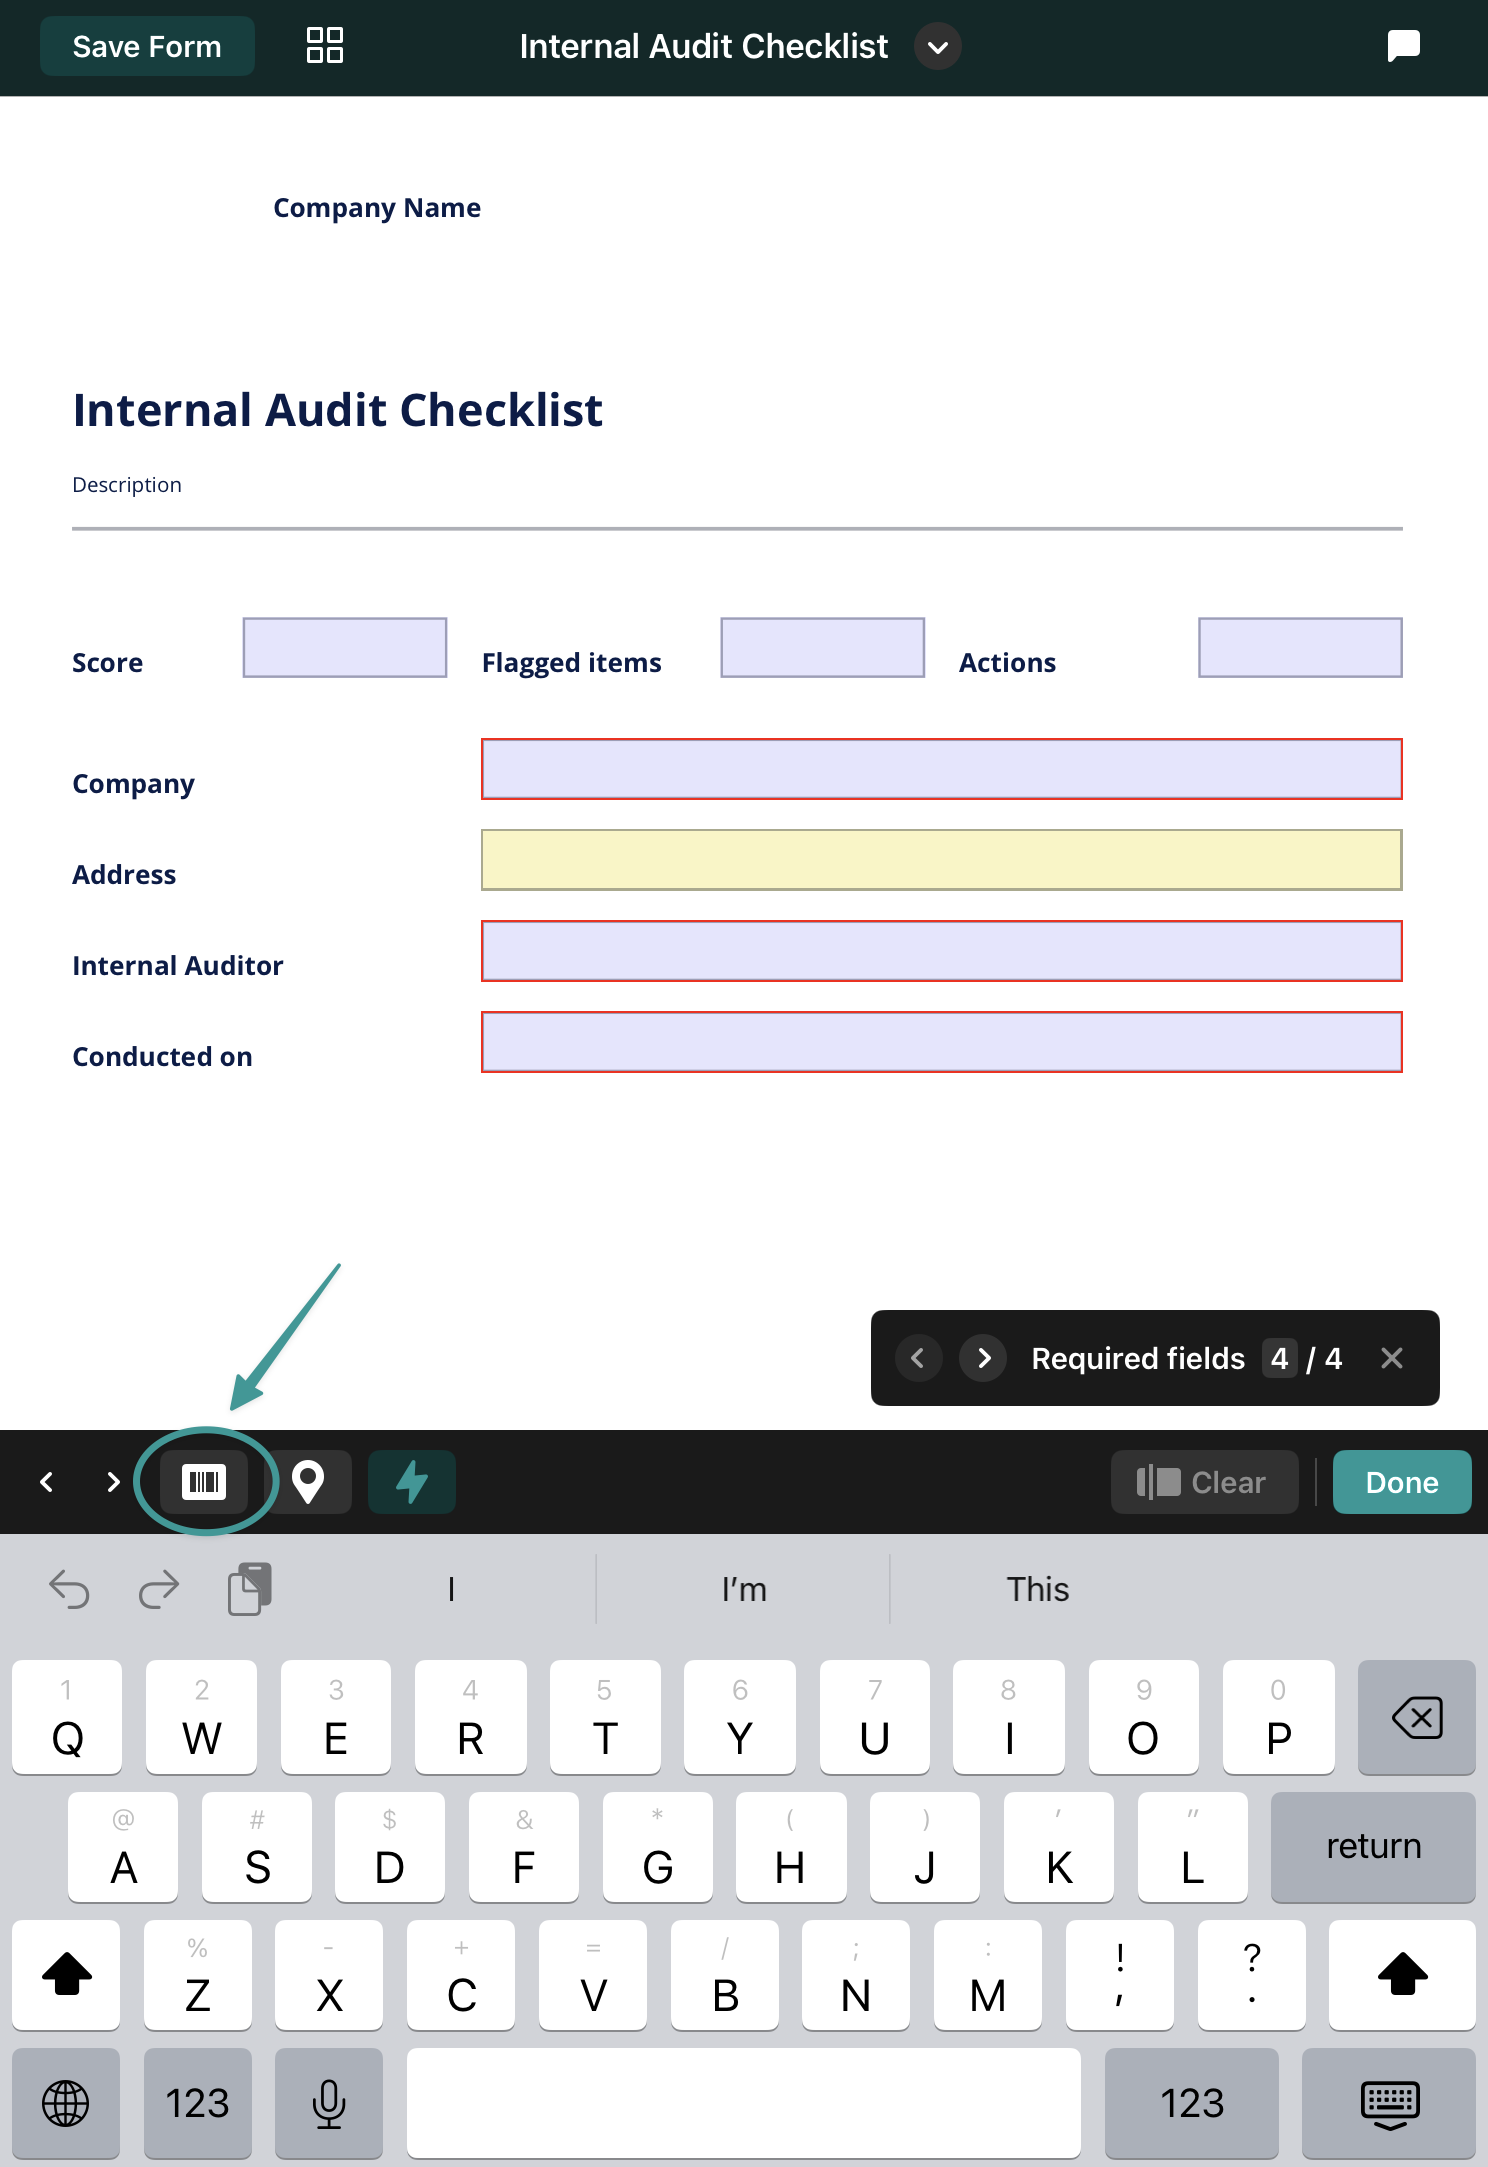
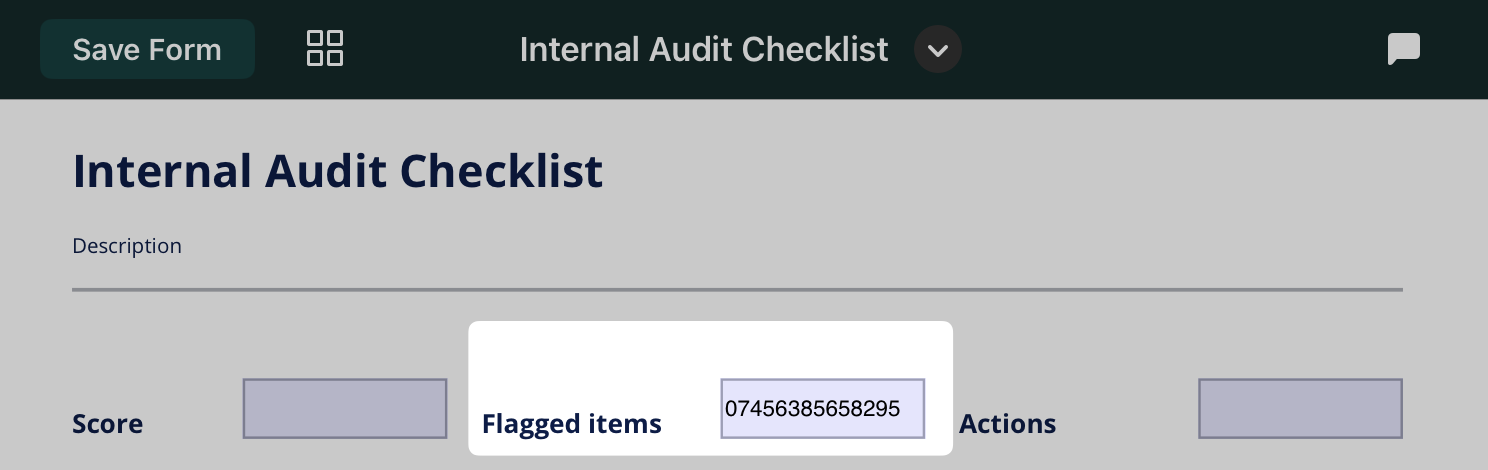
You can fill in text fields, add images and a signature, and add barcodes and QR codes to a form.
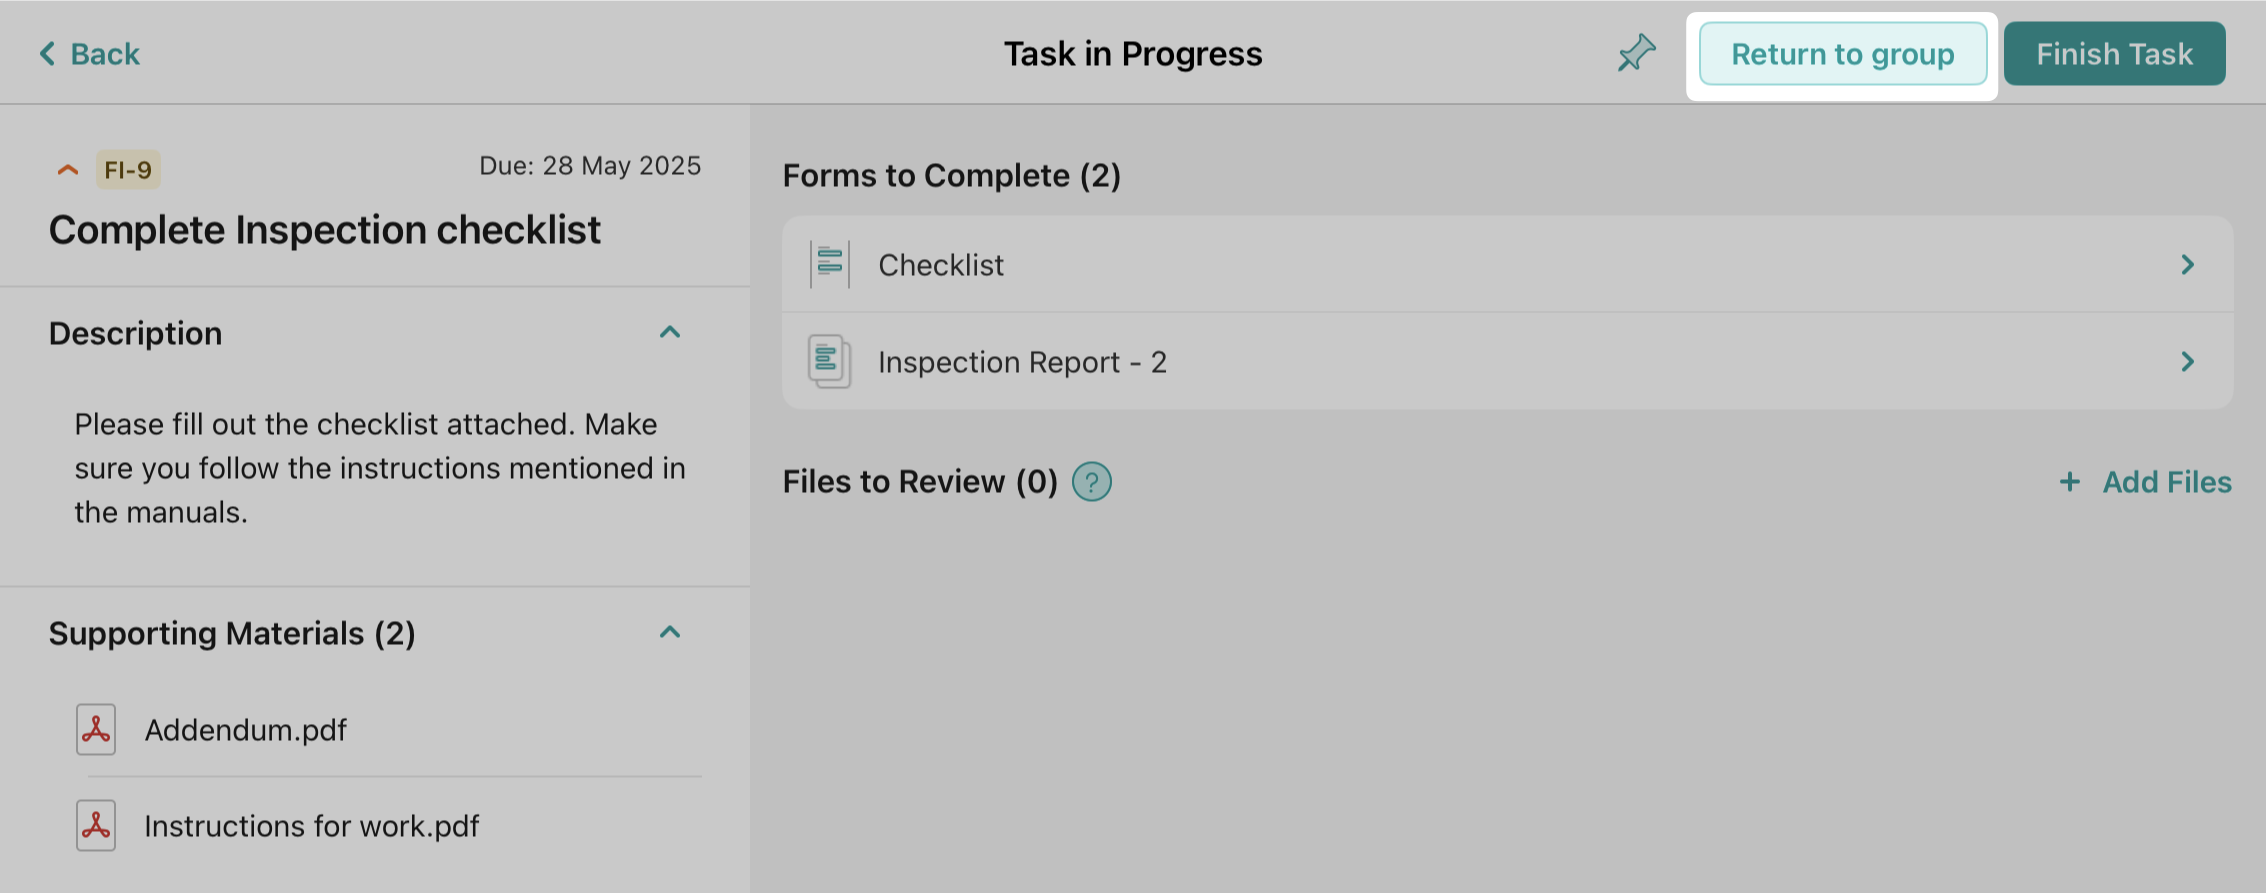
In case you are working on a task that was initially assigned to a group in which you are a participant, besides having the option to finish the task, you see an option called ‘Return to Group’.
This means that you can return the task to the group when it hasn’t been finished yet. It may happen if your shift is over or you assigned this task to yourself by mistake. All the changes you made to the task will be saved.
The task can be deleted only if you initiated it from the Recurring section. Otherwise, the admin may withdraw it from you only.
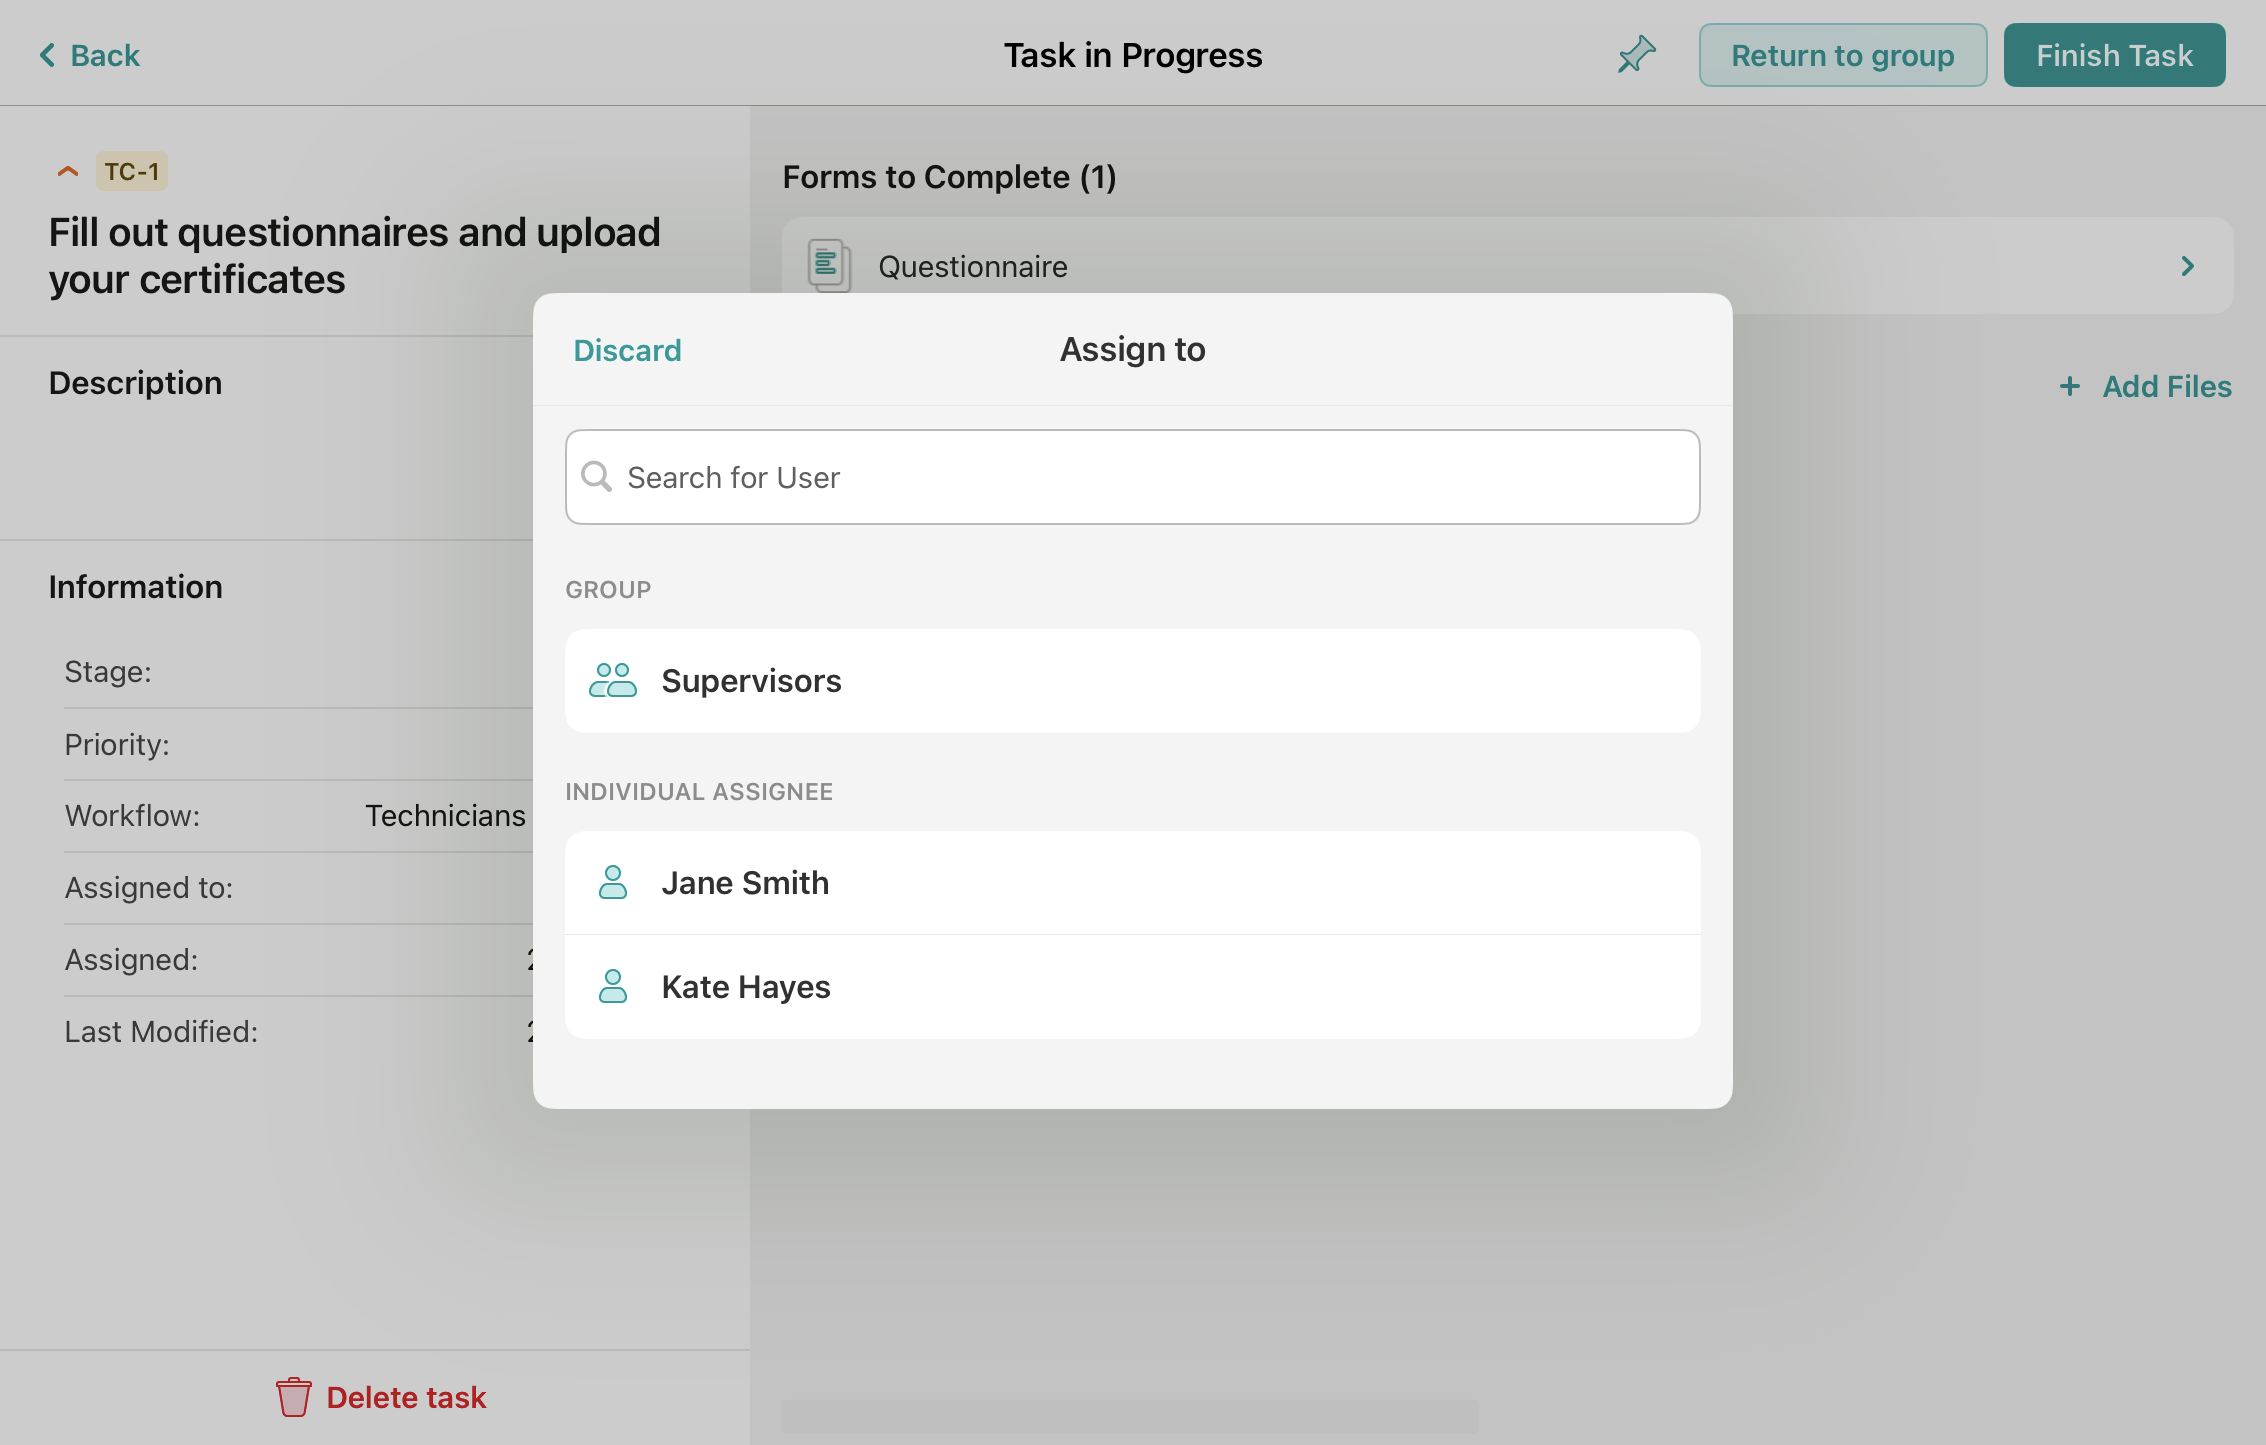
Once you tap the ‘Finish Task’ button, depending on the setup, you might receive a list of alternative submit actions to choose from. For example, if your Fluix account admin preconfigured it, you may select the individual assignee from the preconfigured group in the flow to whom you would like to pass the completed form, e.g., for approval.
Feel free to contact us at support@fluix.io if you have any questions or comments.
Was this article helpful?
Thanks for your feedback!
Oops, something went wrong. Please, try again later.
Thank you!
What details or examples would have made this article more helpful for you? We appreciate your insights!
In case you work offline or the connectivity is poor, it might take some time for the task to get finished. In such cases, the Outgoing tab appears and the task ends up there. Once the Internet connection is established, the task is automatically submitted and the section disappears.
Was this article helpful?
Thanks for your feedback!
Oops, something went wrong. Please, try again later.
Thank you!
What details or examples would have made this article more helpful for you? We appreciate your insights!
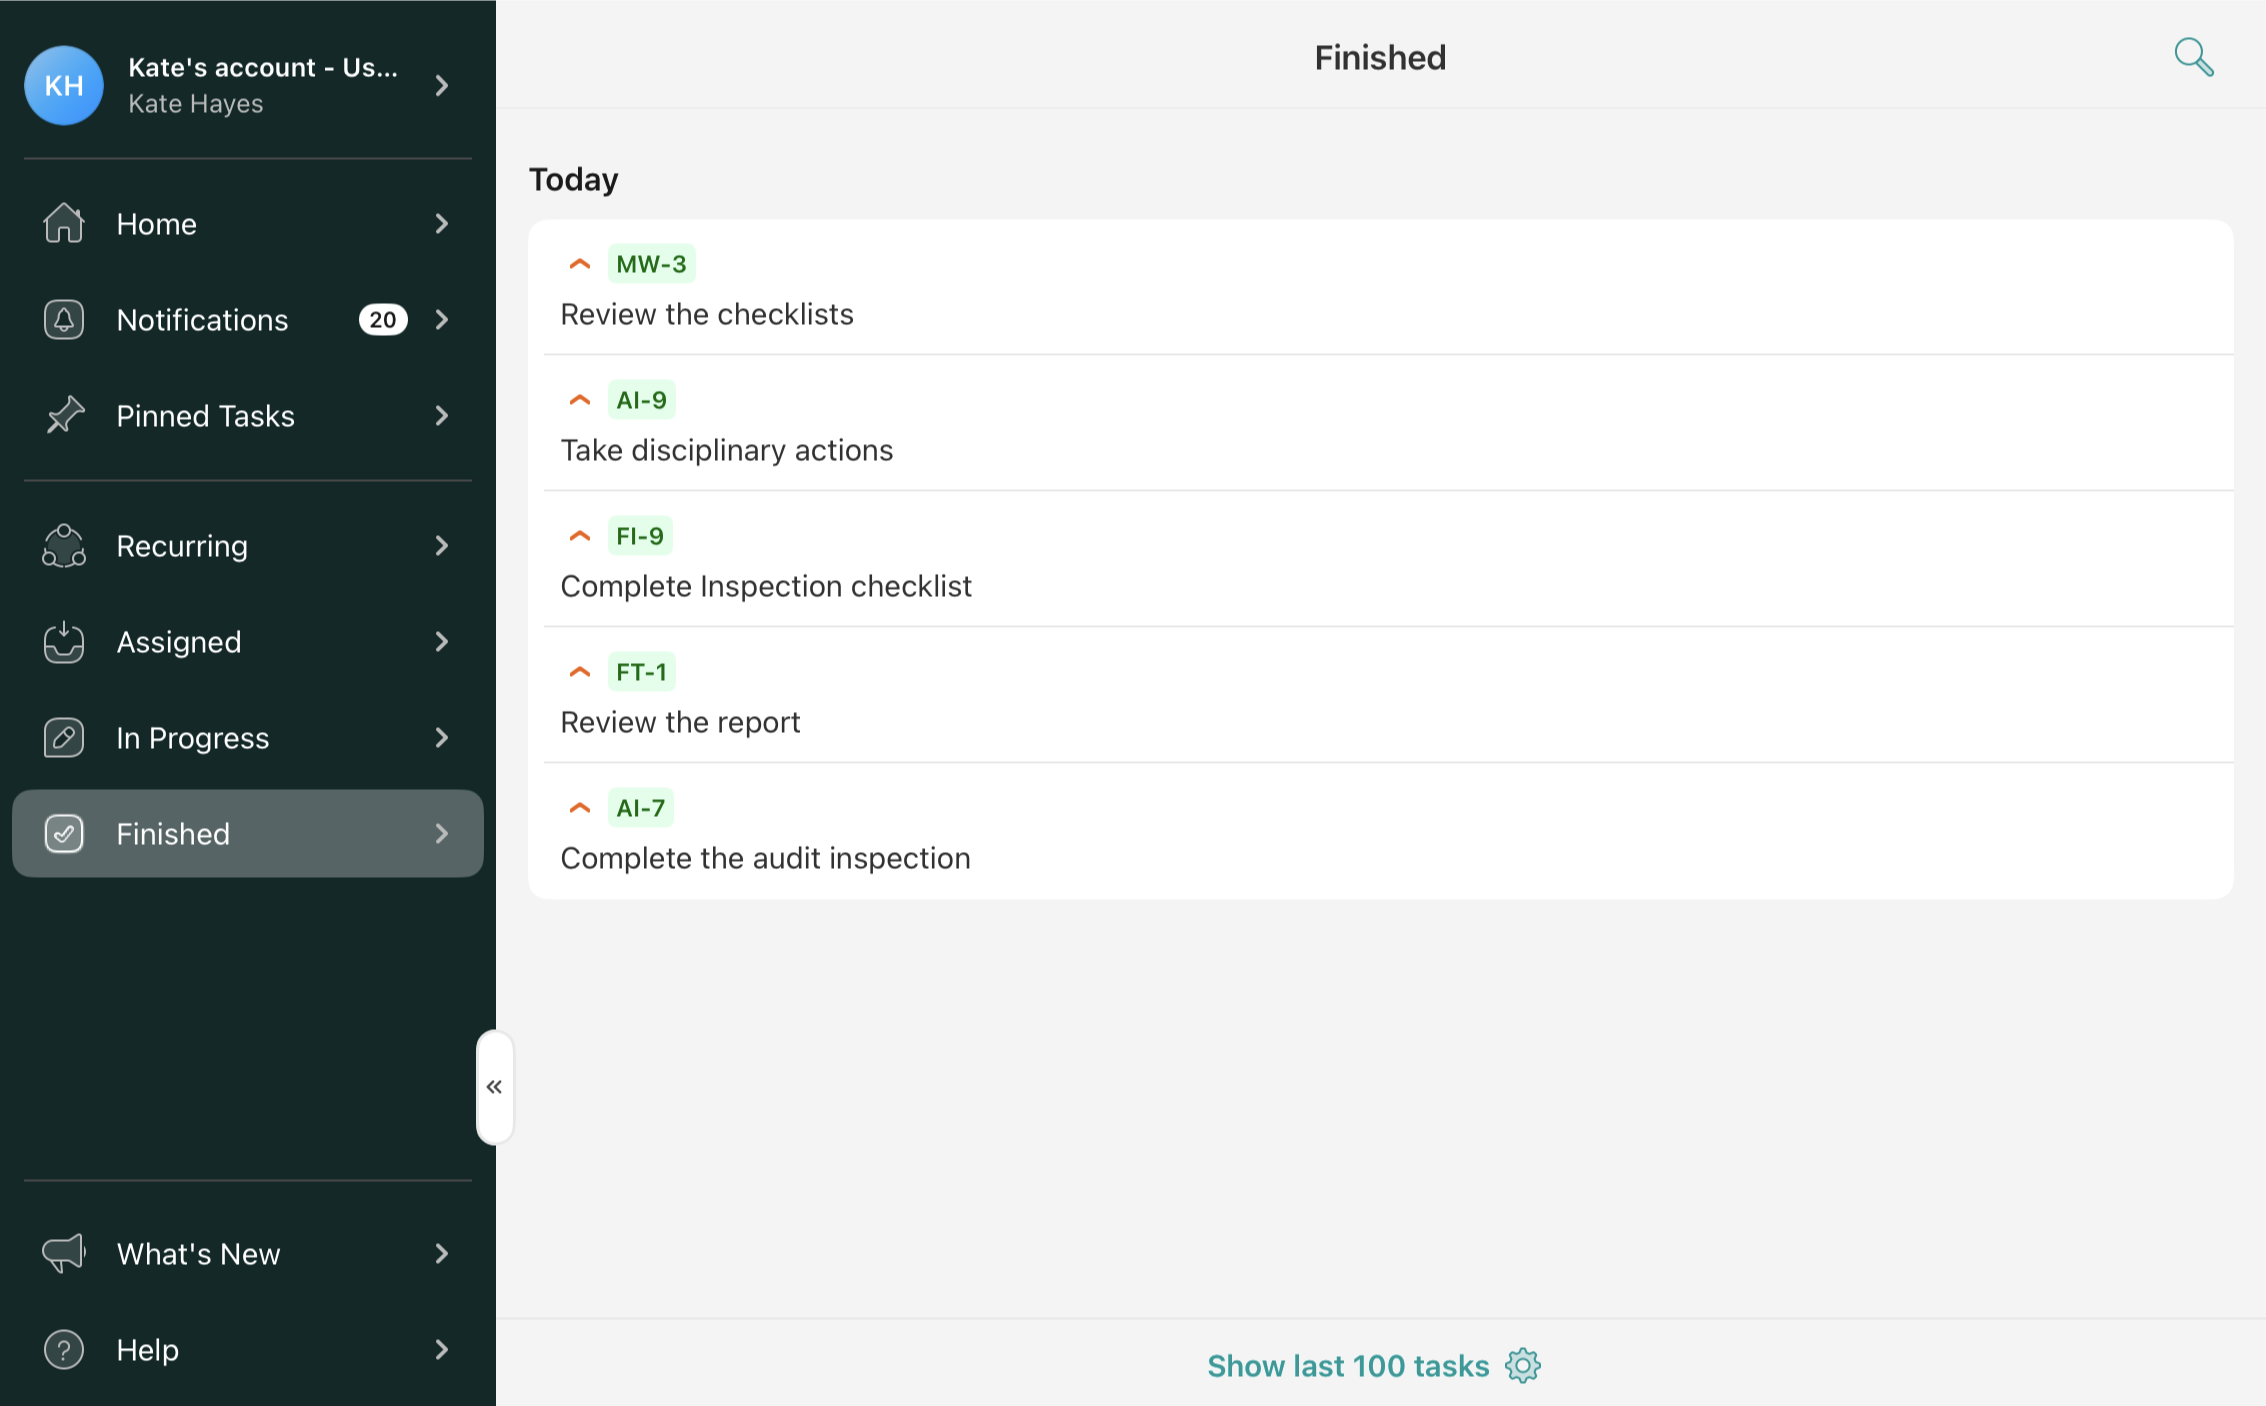
In the Finished tab, you may find a list of the last 500 tasks you completed. All tasks are opened in view mode, i.e., you cannot make further changes or resubmit them.
The list of tasks is sorted by date and separated into sections based on the date each task was finished.
Search for the relevant tasks
In the upper right corner of the Finished section, use the Search icon to locate the tasks you need to complete.
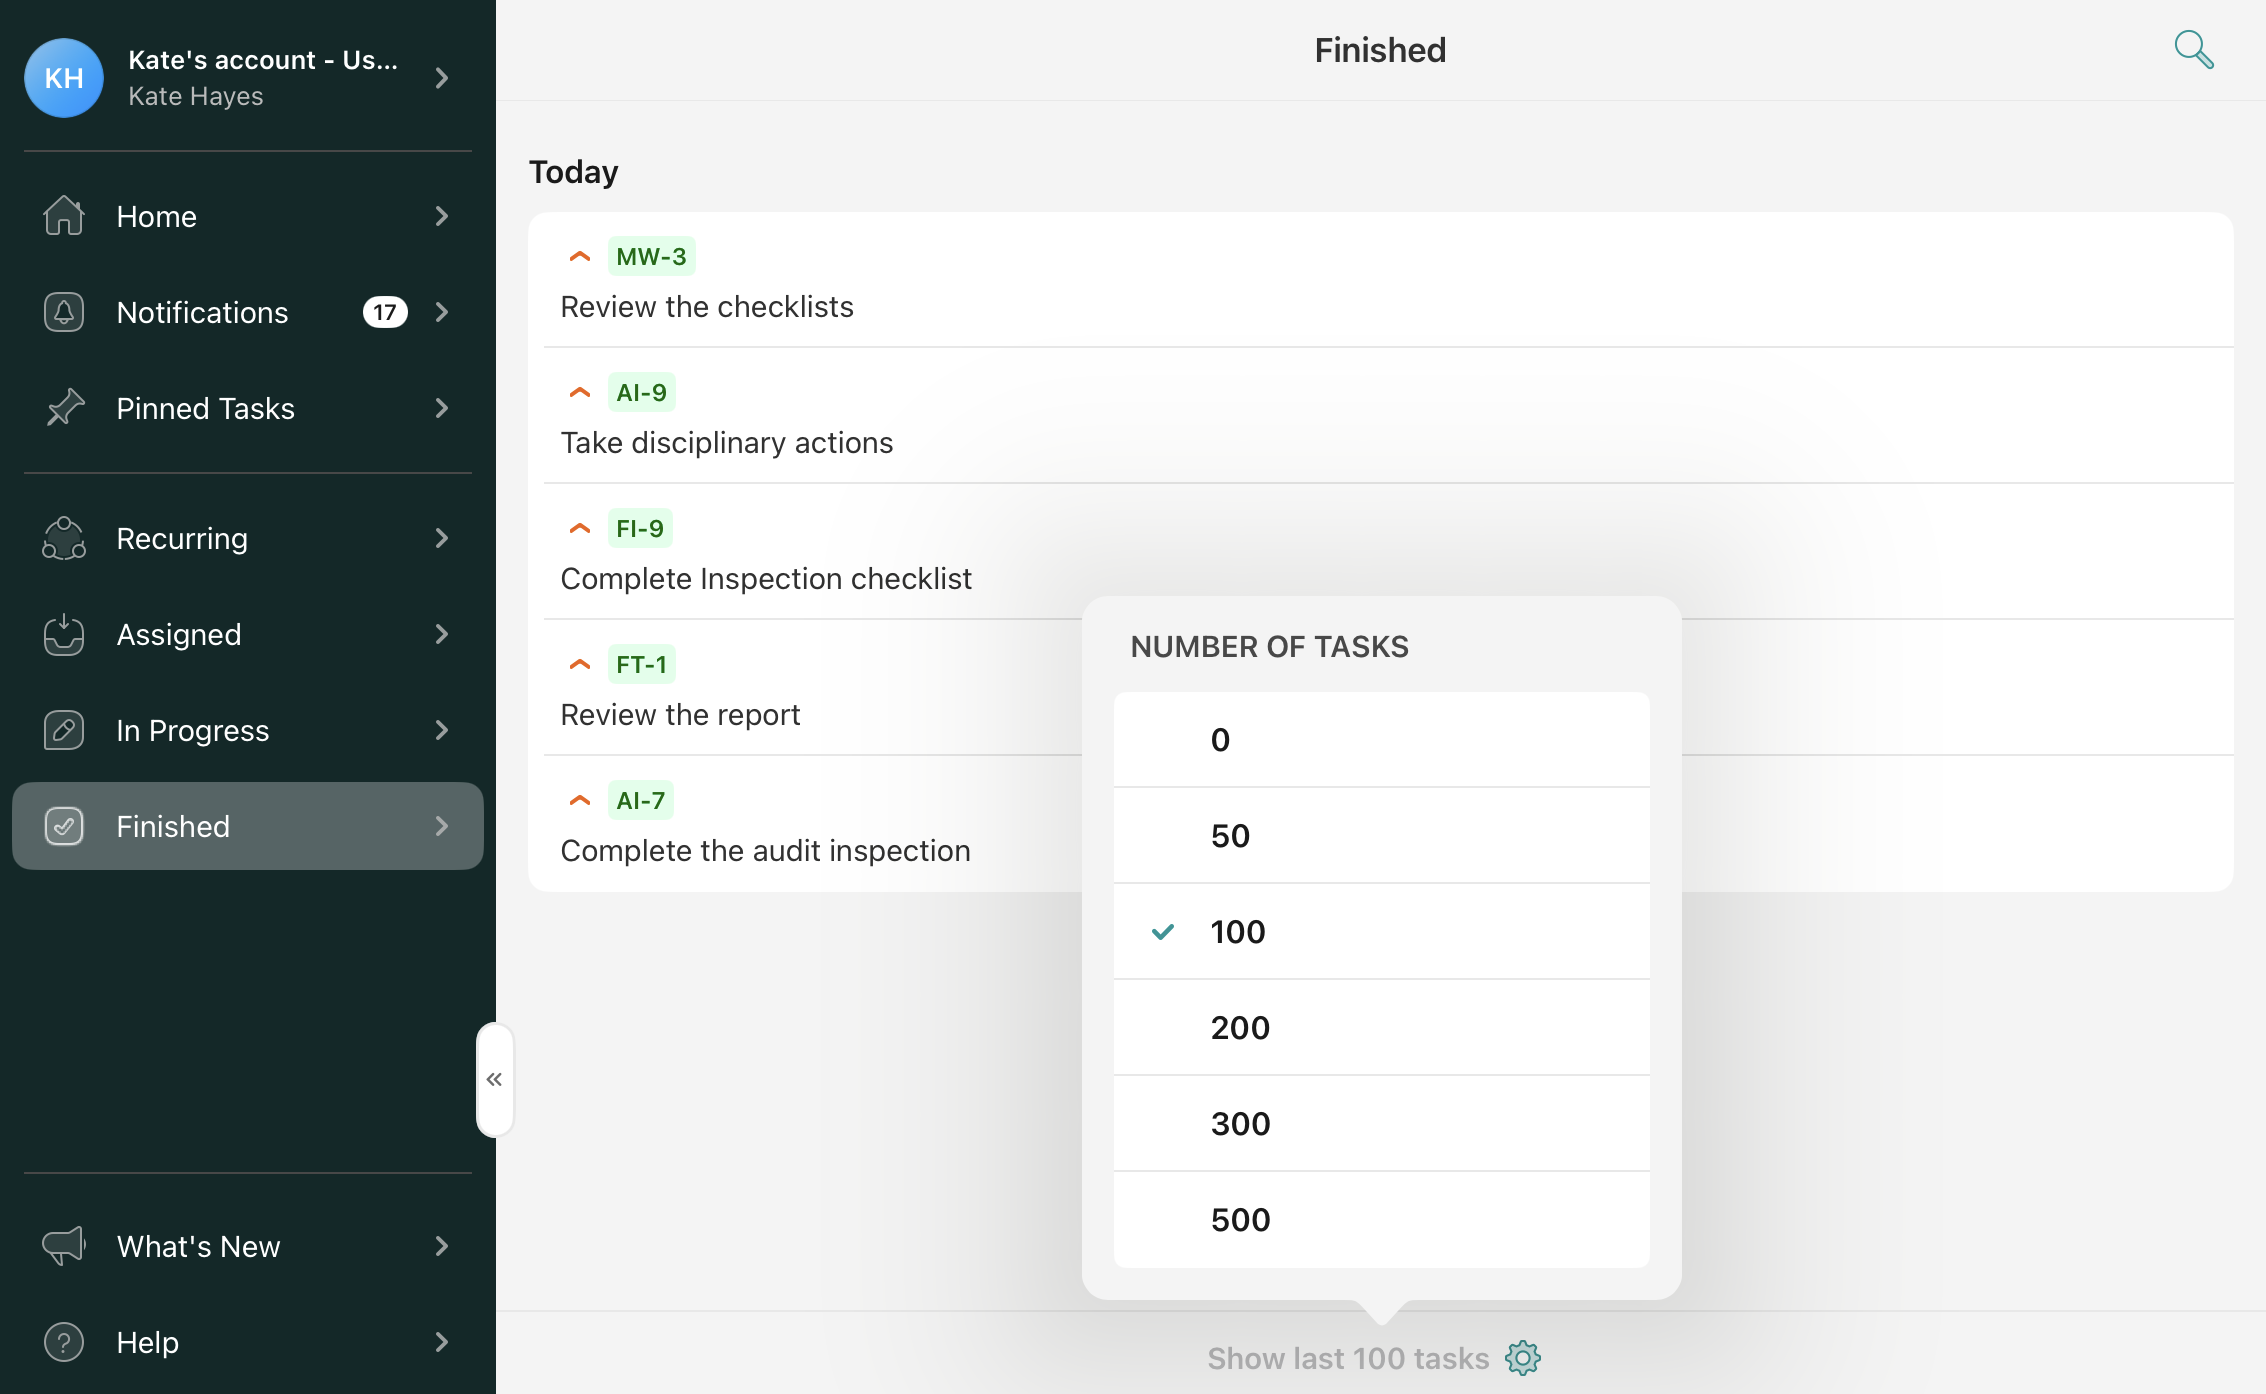
Manage Finished Tasks Wisely
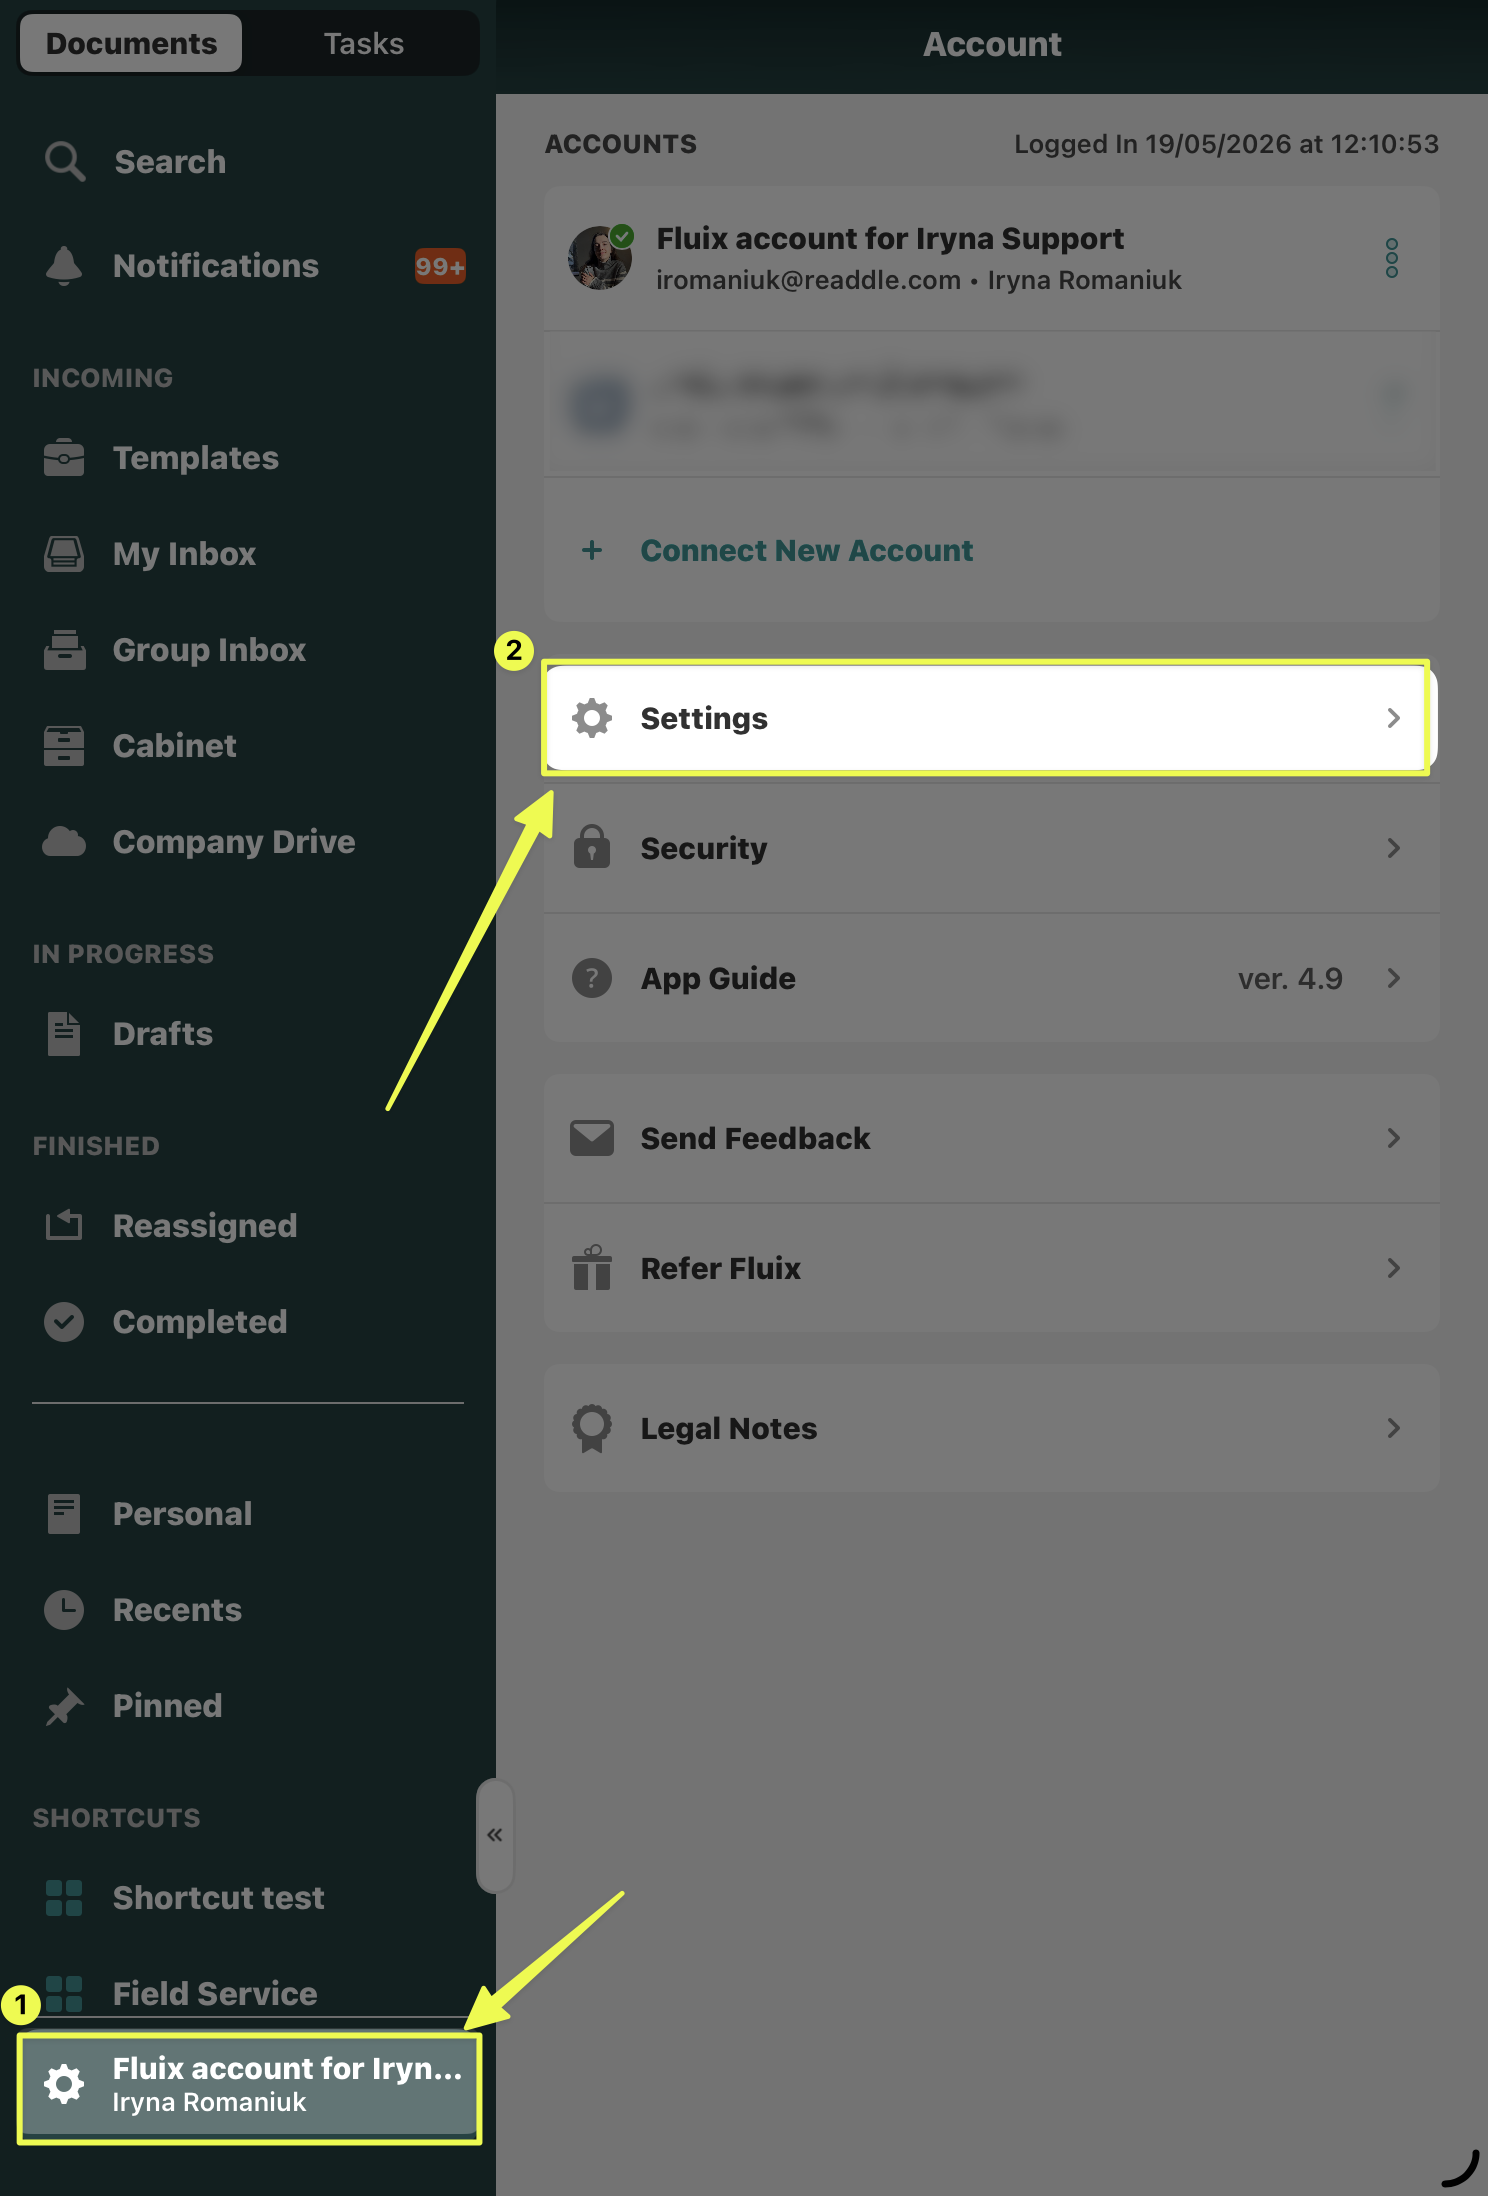
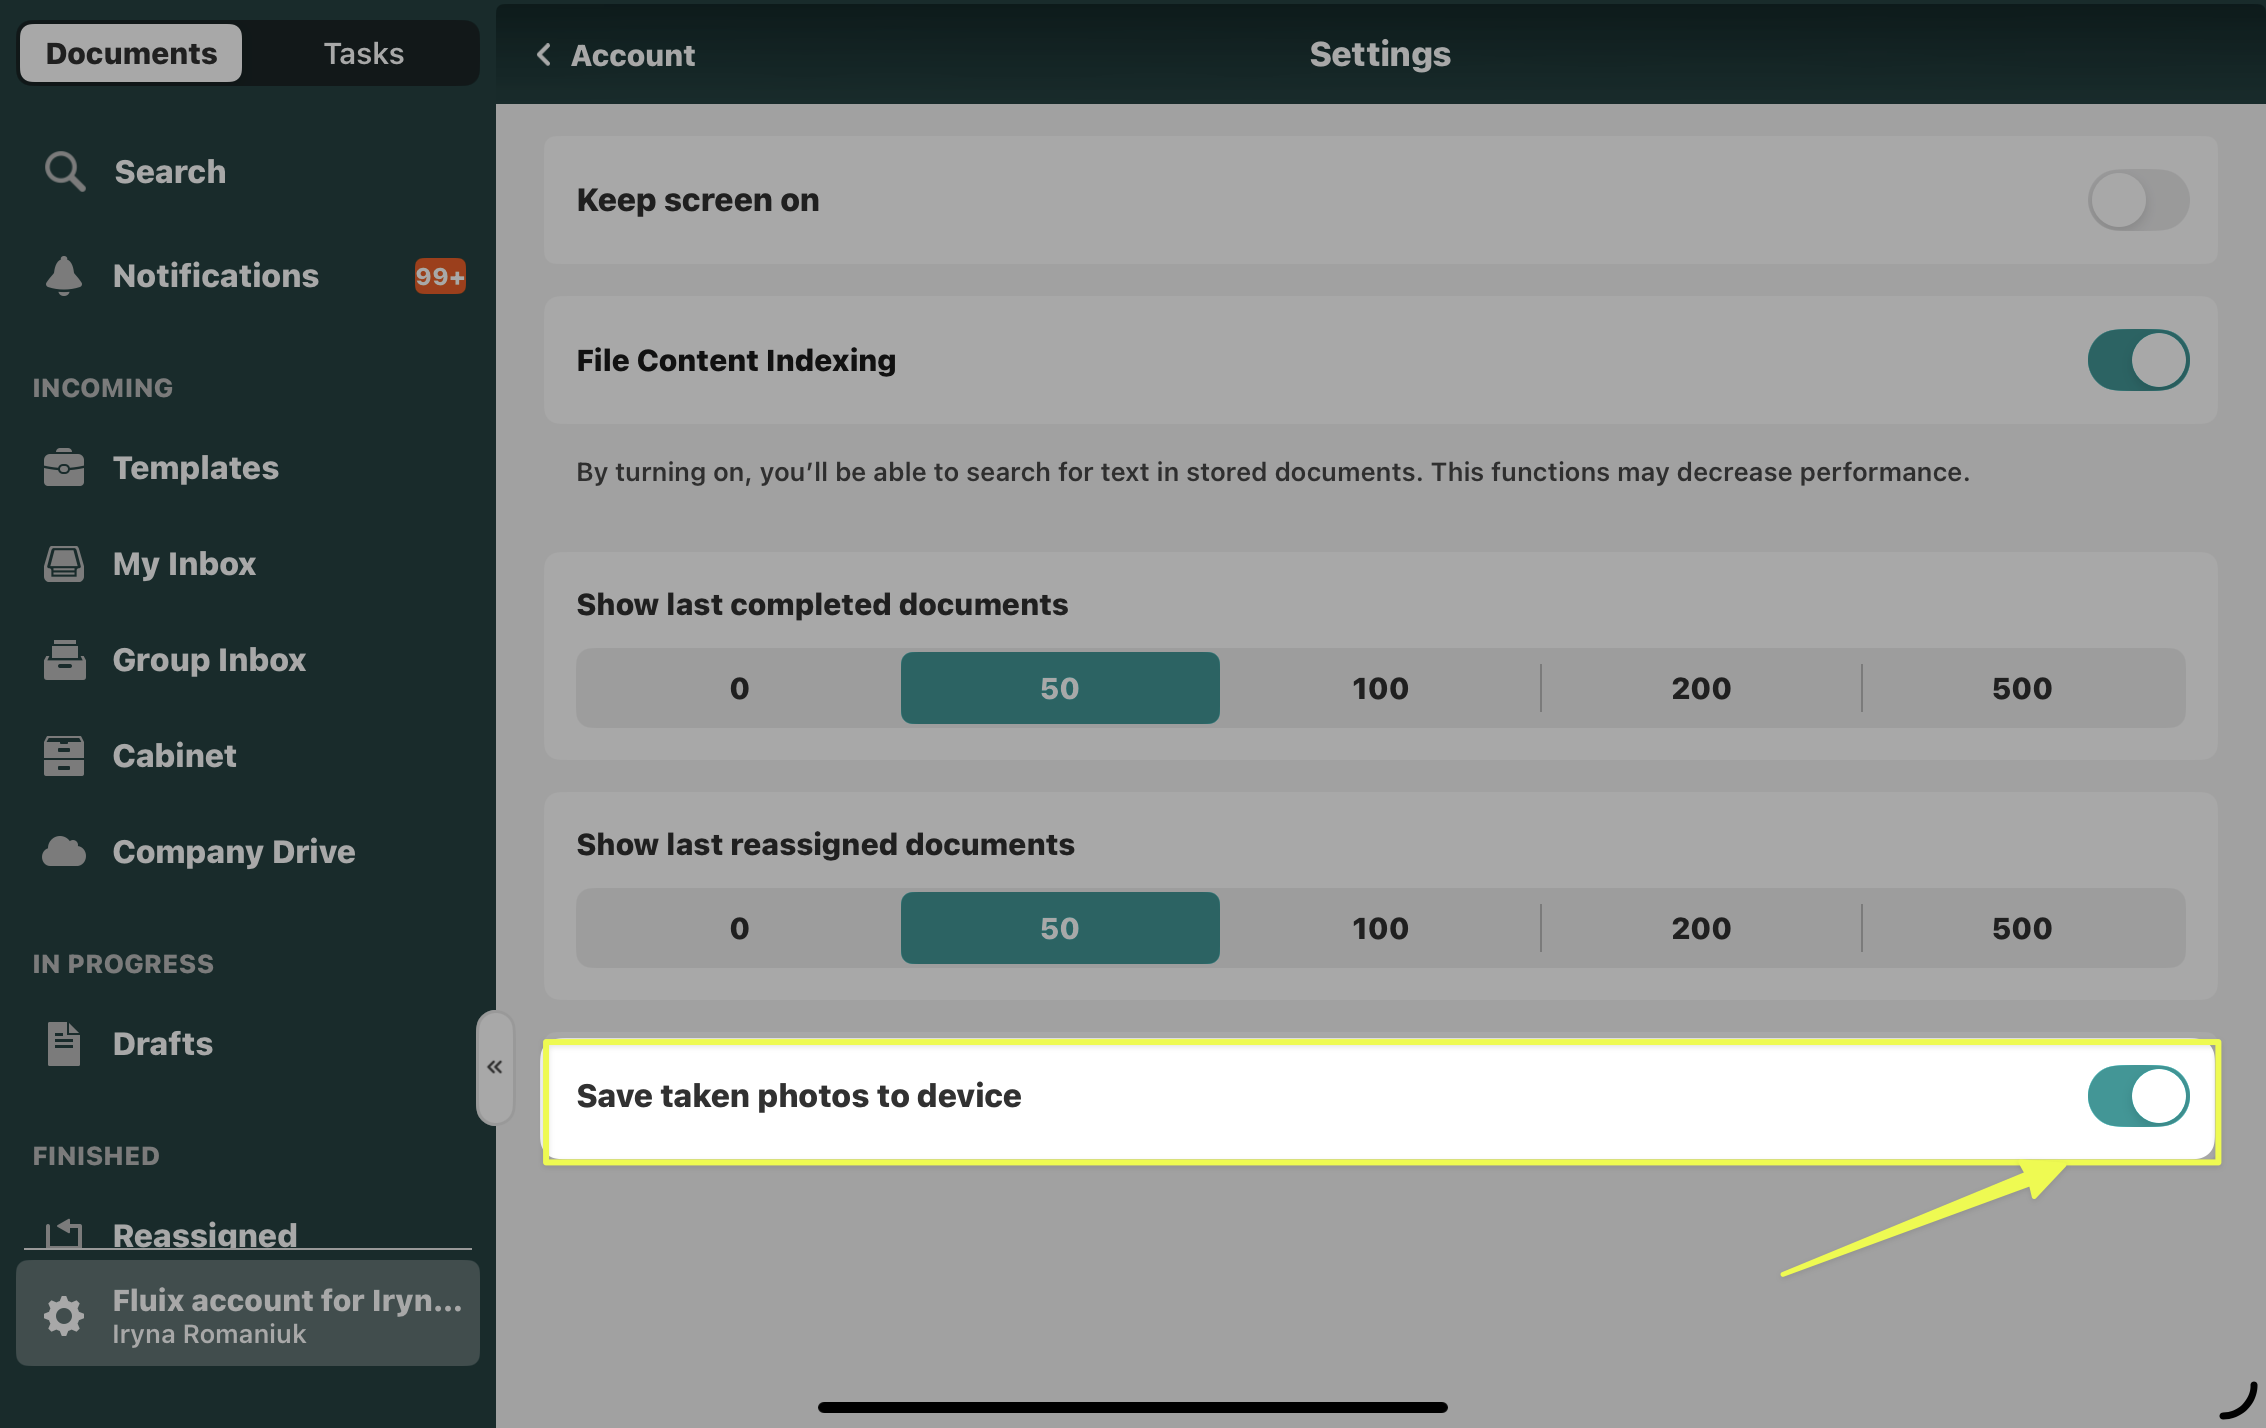
Fluix Tasks app includes a setting to limit the number of saved finished tasks to avoid using too much device storage.
Feel free to contact us at support@fluix.io with any questions or comments.
Was this article helpful?
Thanks for your feedback!
Oops, something went wrong. Please, try again later.
Thank you!
What details or examples would have made this article more helpful for you? We appreciate your insights!
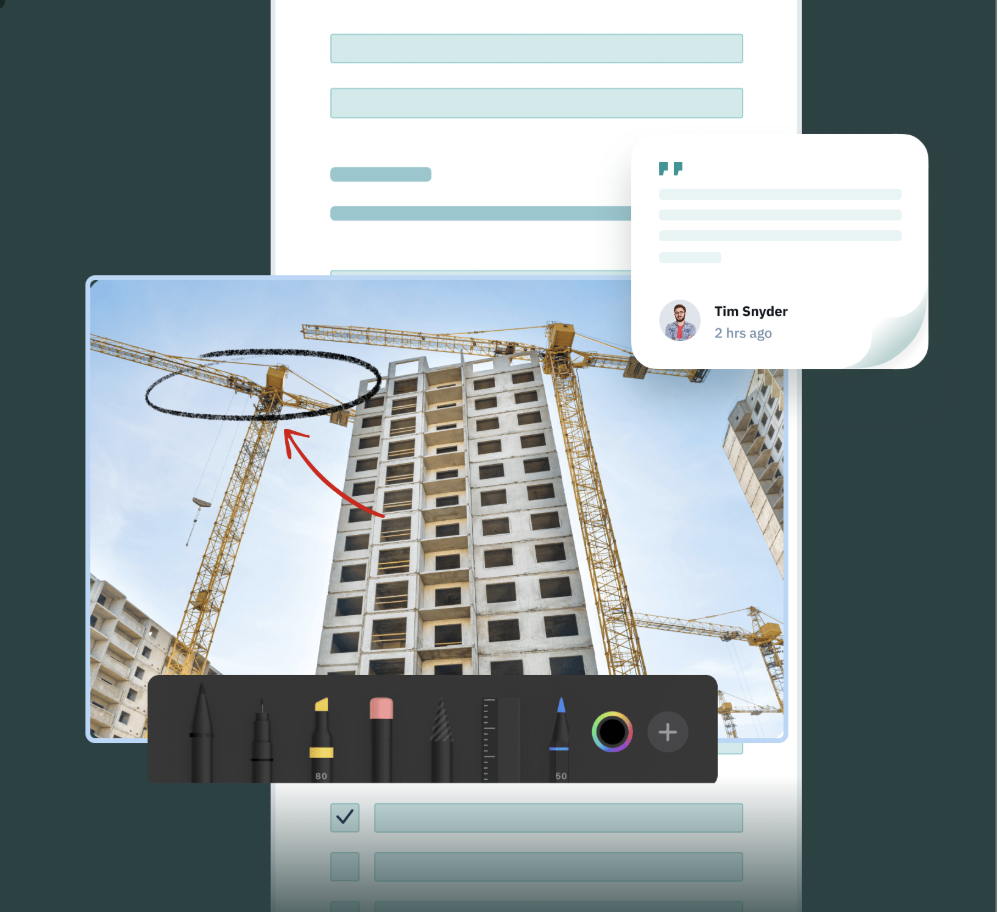
Working with forms in Fluix is getting even more effortless! With the new functionality of Annotations, you can quickly draw on the photos you take while in the field to highlight essential things for your team members.
Note: Annotations in photos are supported in Dynamic and PDF forms.
How to add annotations to photos in Fluix?
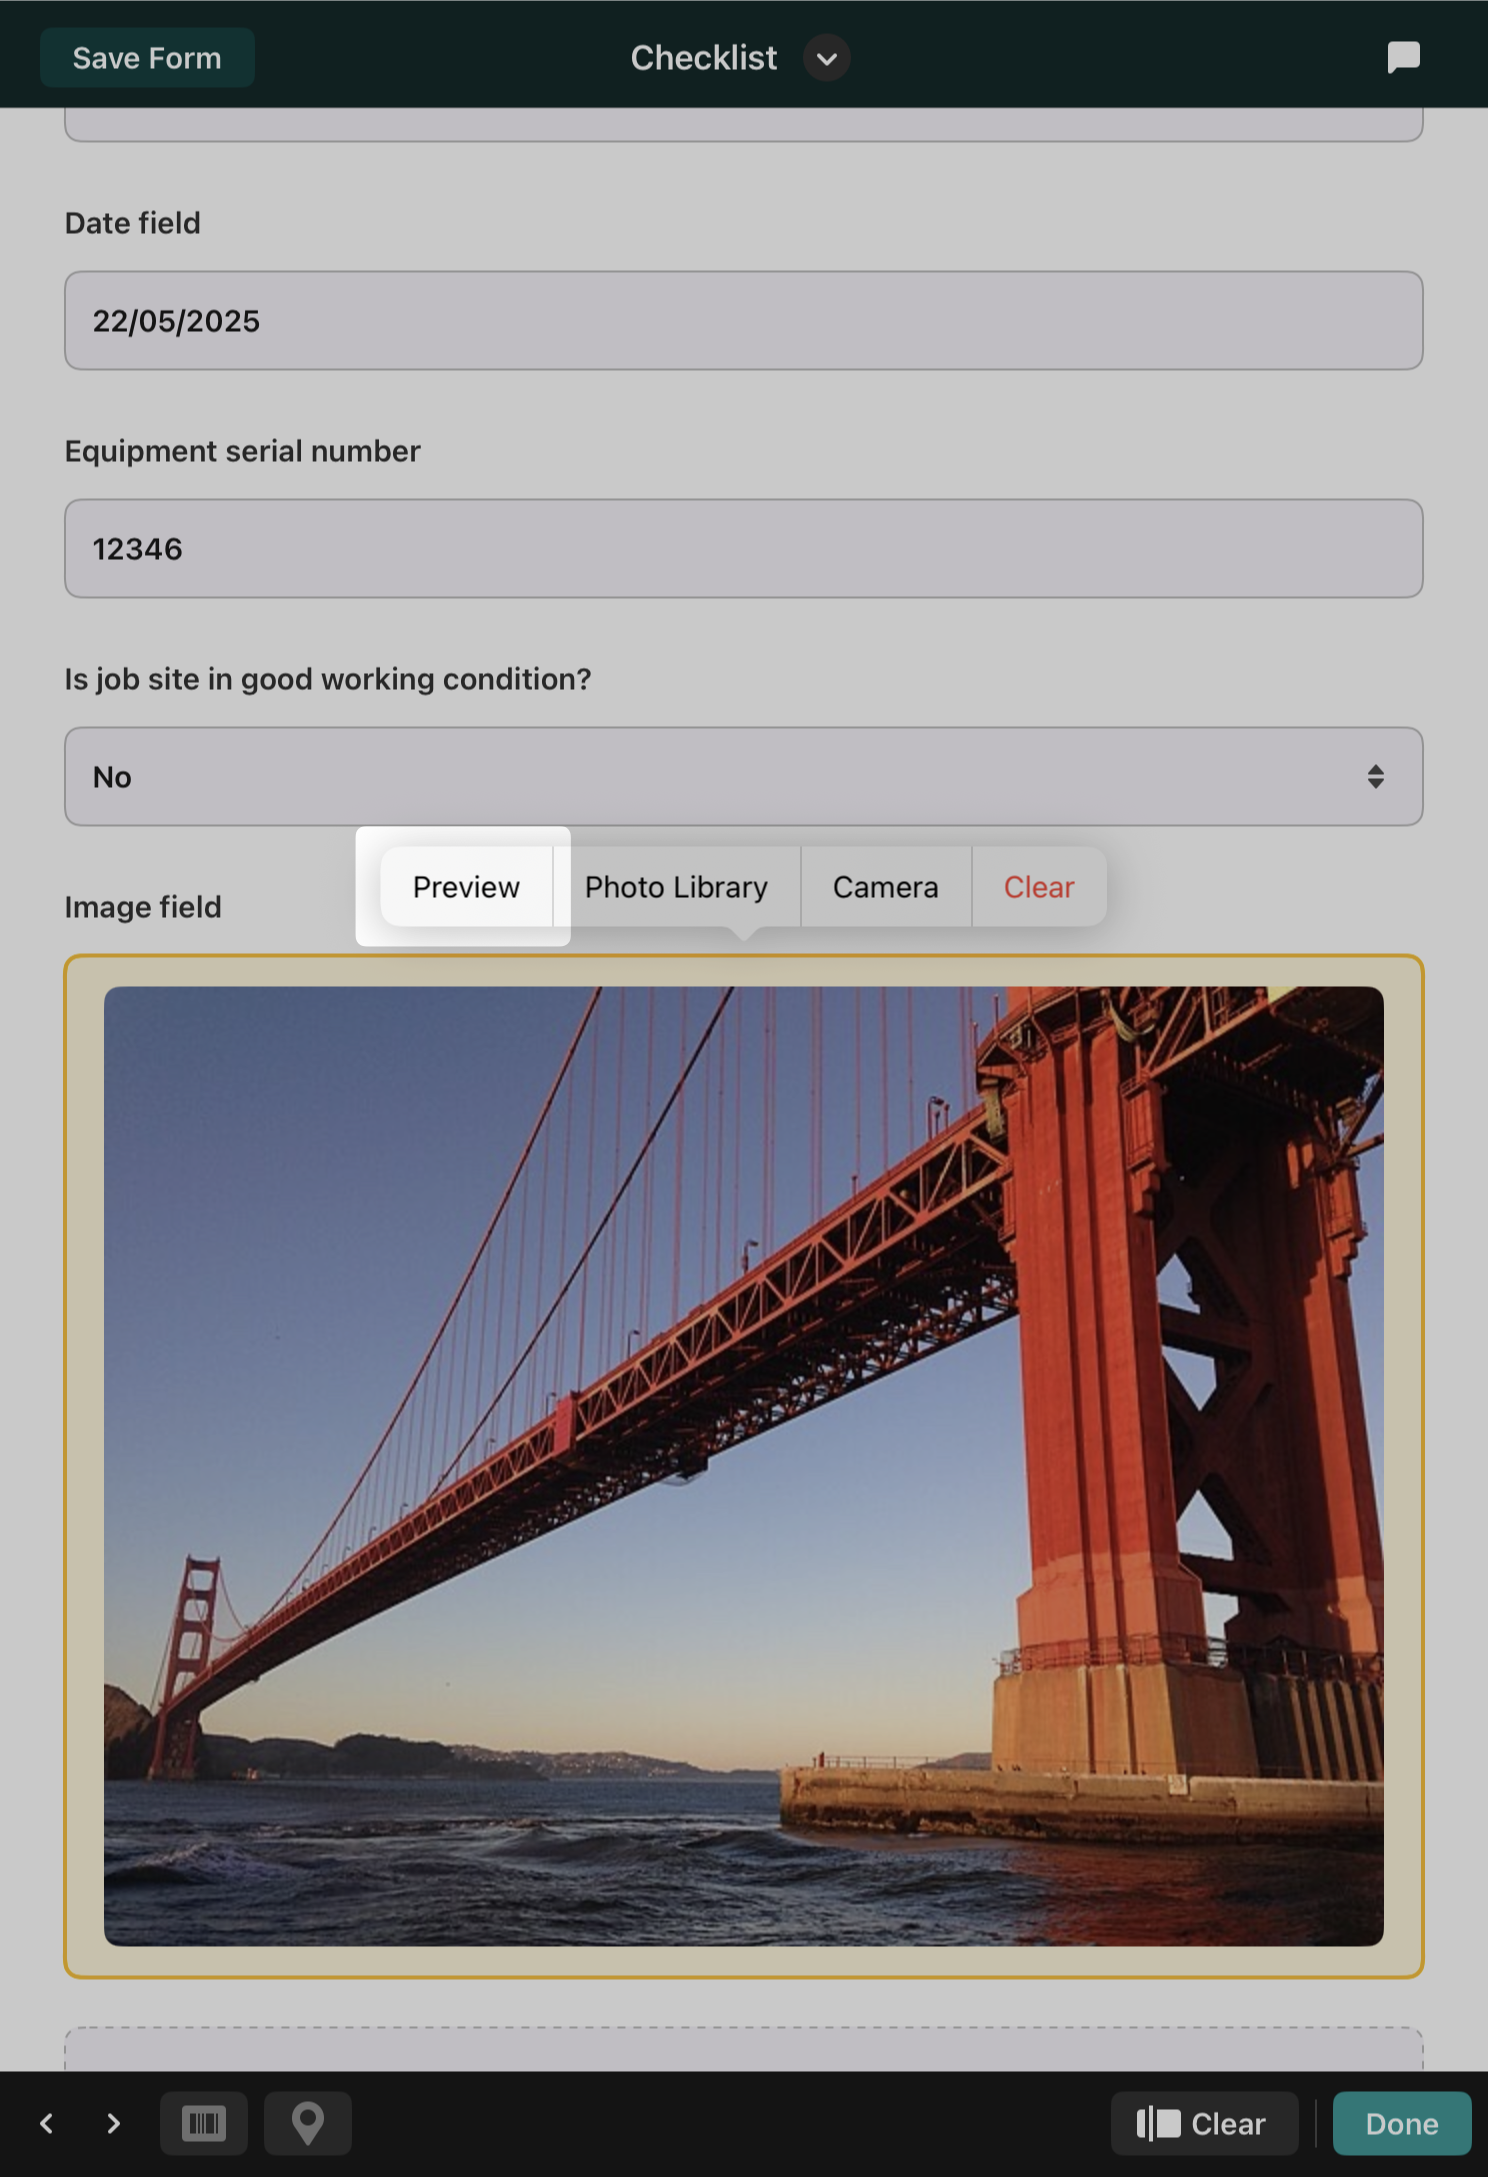
Open the Fluix Tasks app and find the document in which you would like to make annotations. To locate the task and the form in question, navigate to the app’s Templates, Assigned, or InProgress section.
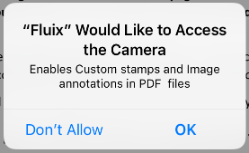
Tap on the respective task and the document inside the task to open it, and click the Start Work button. Find the image field in the form and select how you want to add the photo: from Camera or Photo Library. After that, tap on the added photo and select the Preview option:
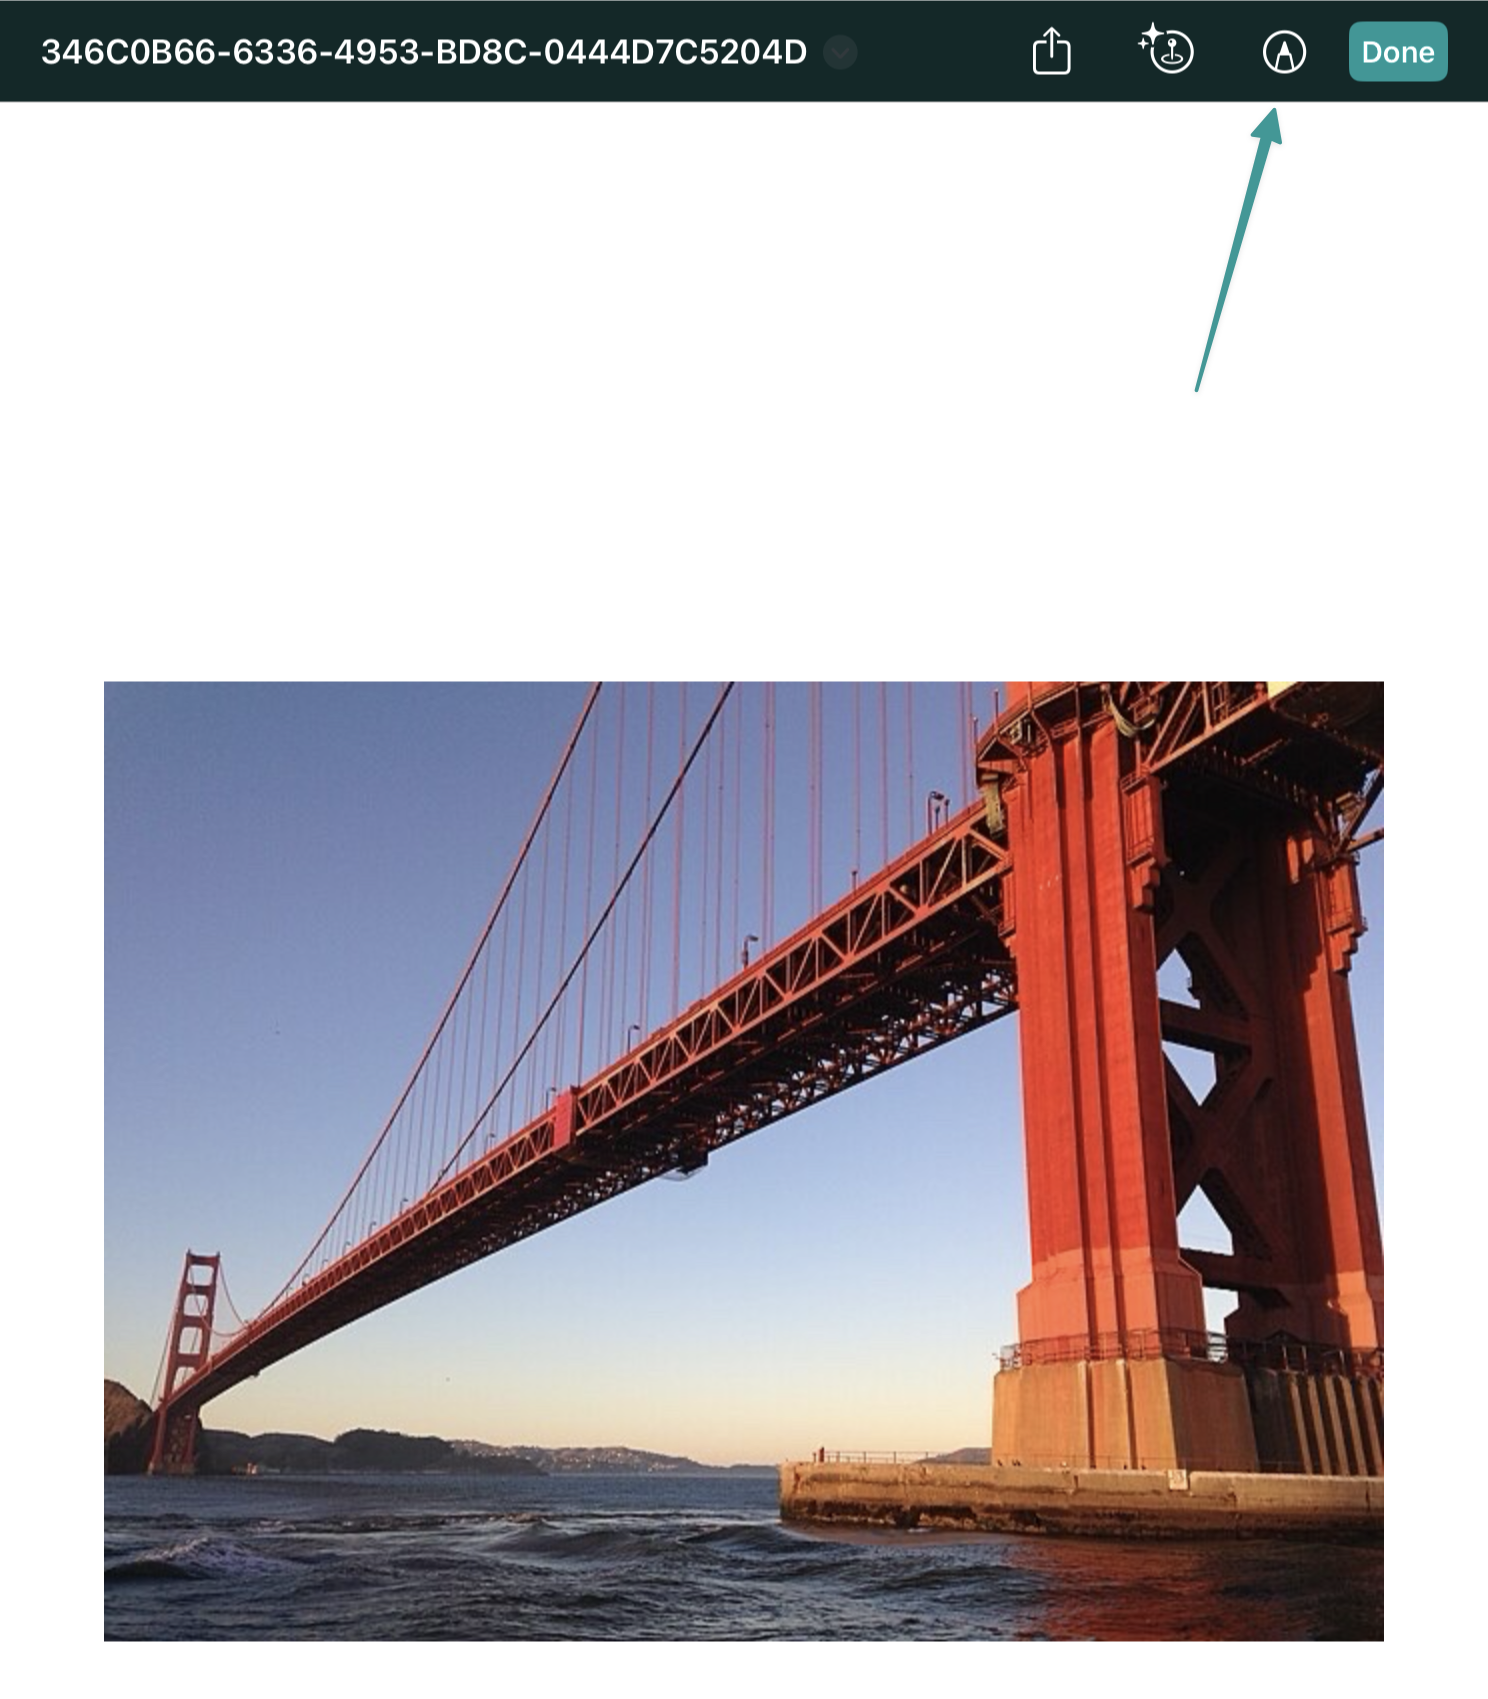
Click on the Pencil icon displayed on the screen to enable the Annotations mode.
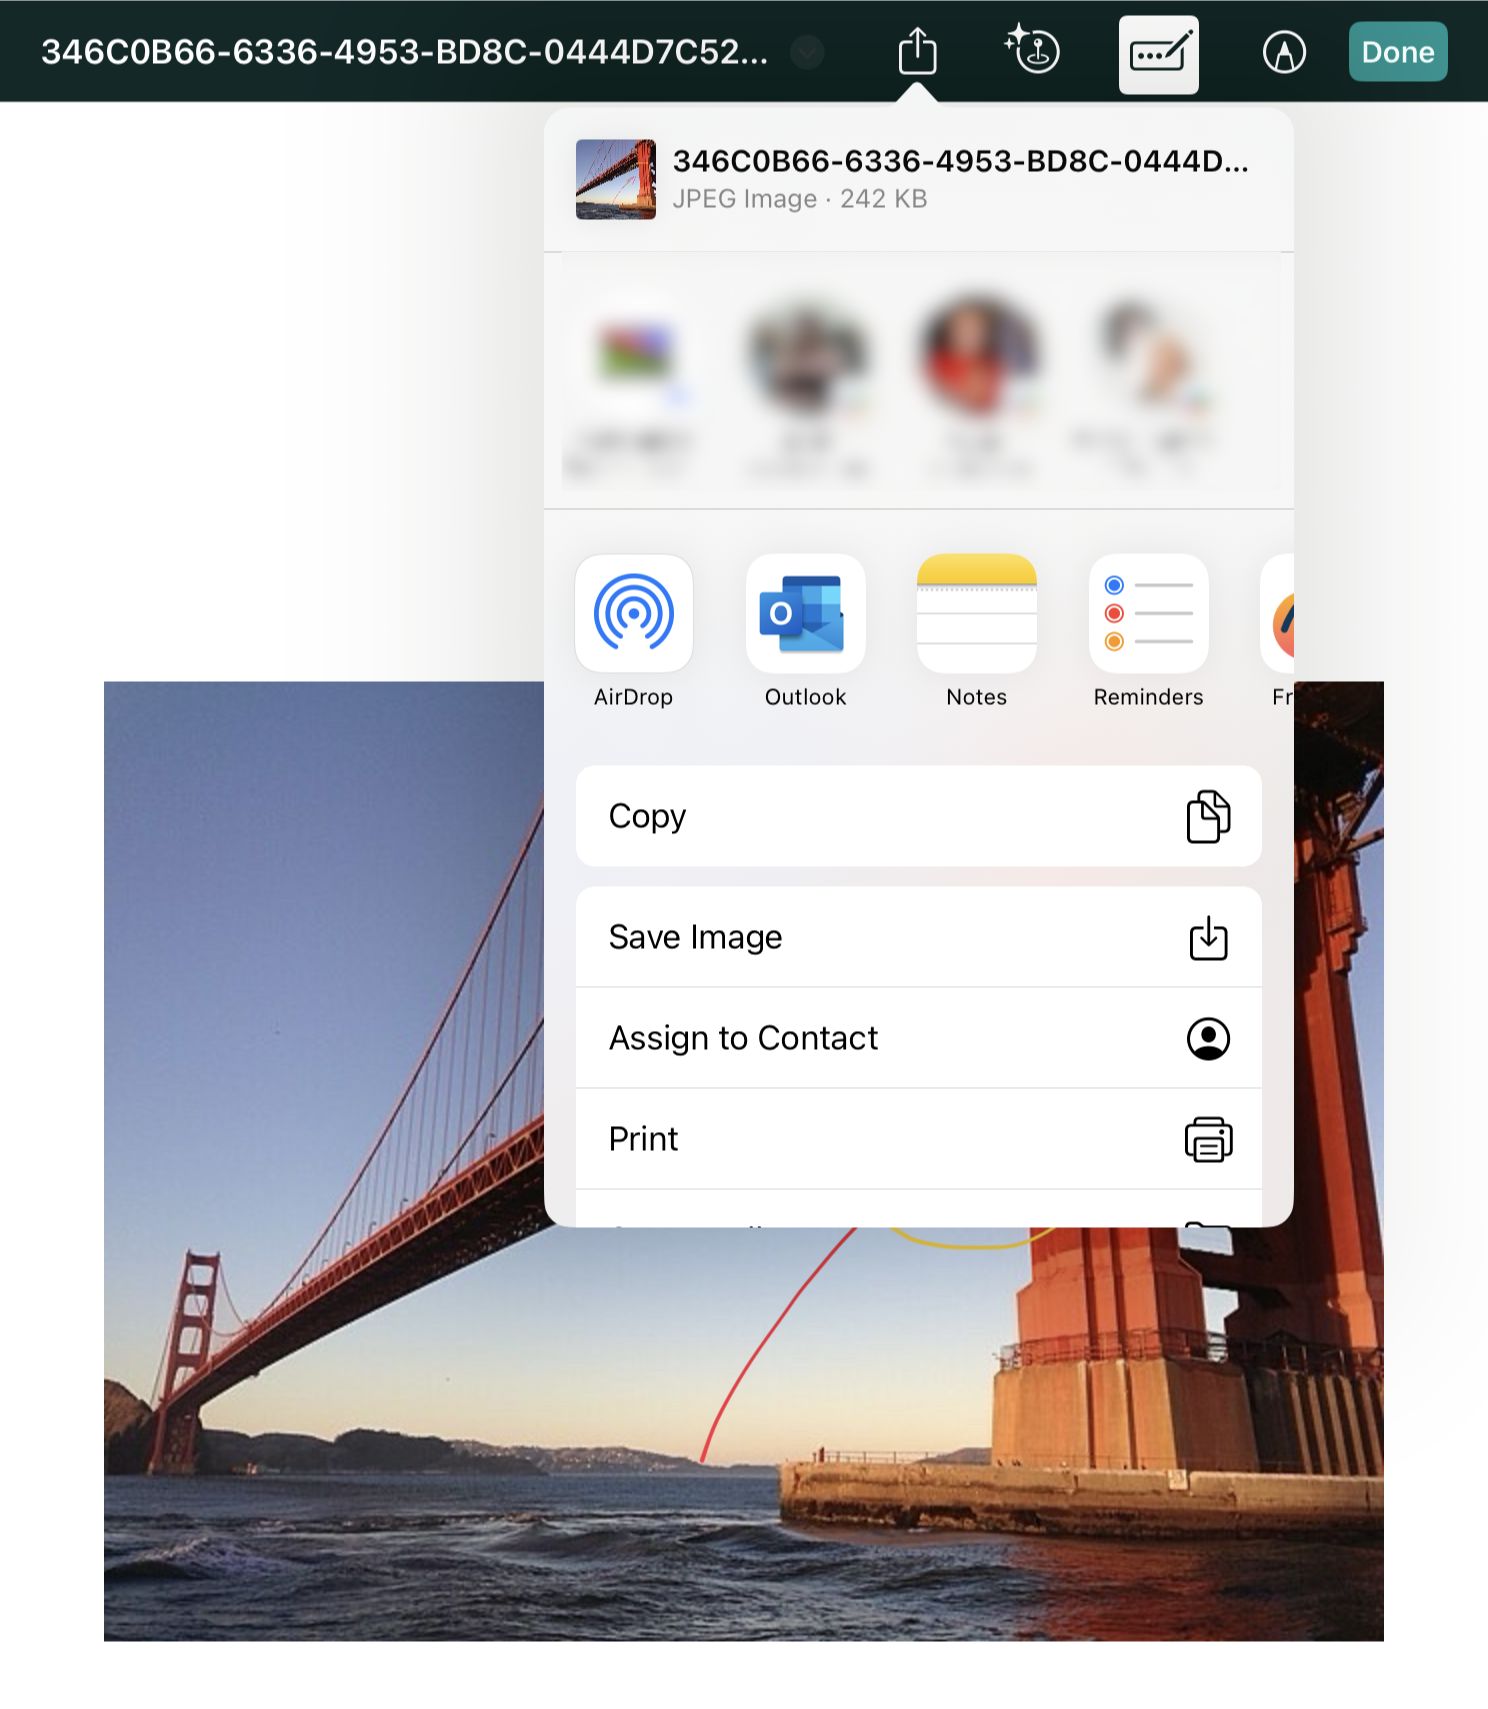
In Preview mode, you may save the photo taken locally to your device’s Photos or Files. Alternatively, you can share the photo to third-party platforms via the Open In button.
Feel free to contact us at support@fluix.io with any questions or comments.
Was this article helpful?
Thanks for your feedback!
Oops, something went wrong. Please, try again later.
Thank you!
What details or examples would have made this article more helpful for you? We appreciate your insights!
The Notes feature in the Fluix Tasks app allows users to share additional context with other process participants regarding the work completed or any required changes.
Adding and Viewing Notes
When you add a note and complete your task, the next assigned participant can view all previously created notes and add their own for future team members.
When you open a task with existing notes, unread notes that require your attention will be displayed in the respective column of the task viewer.
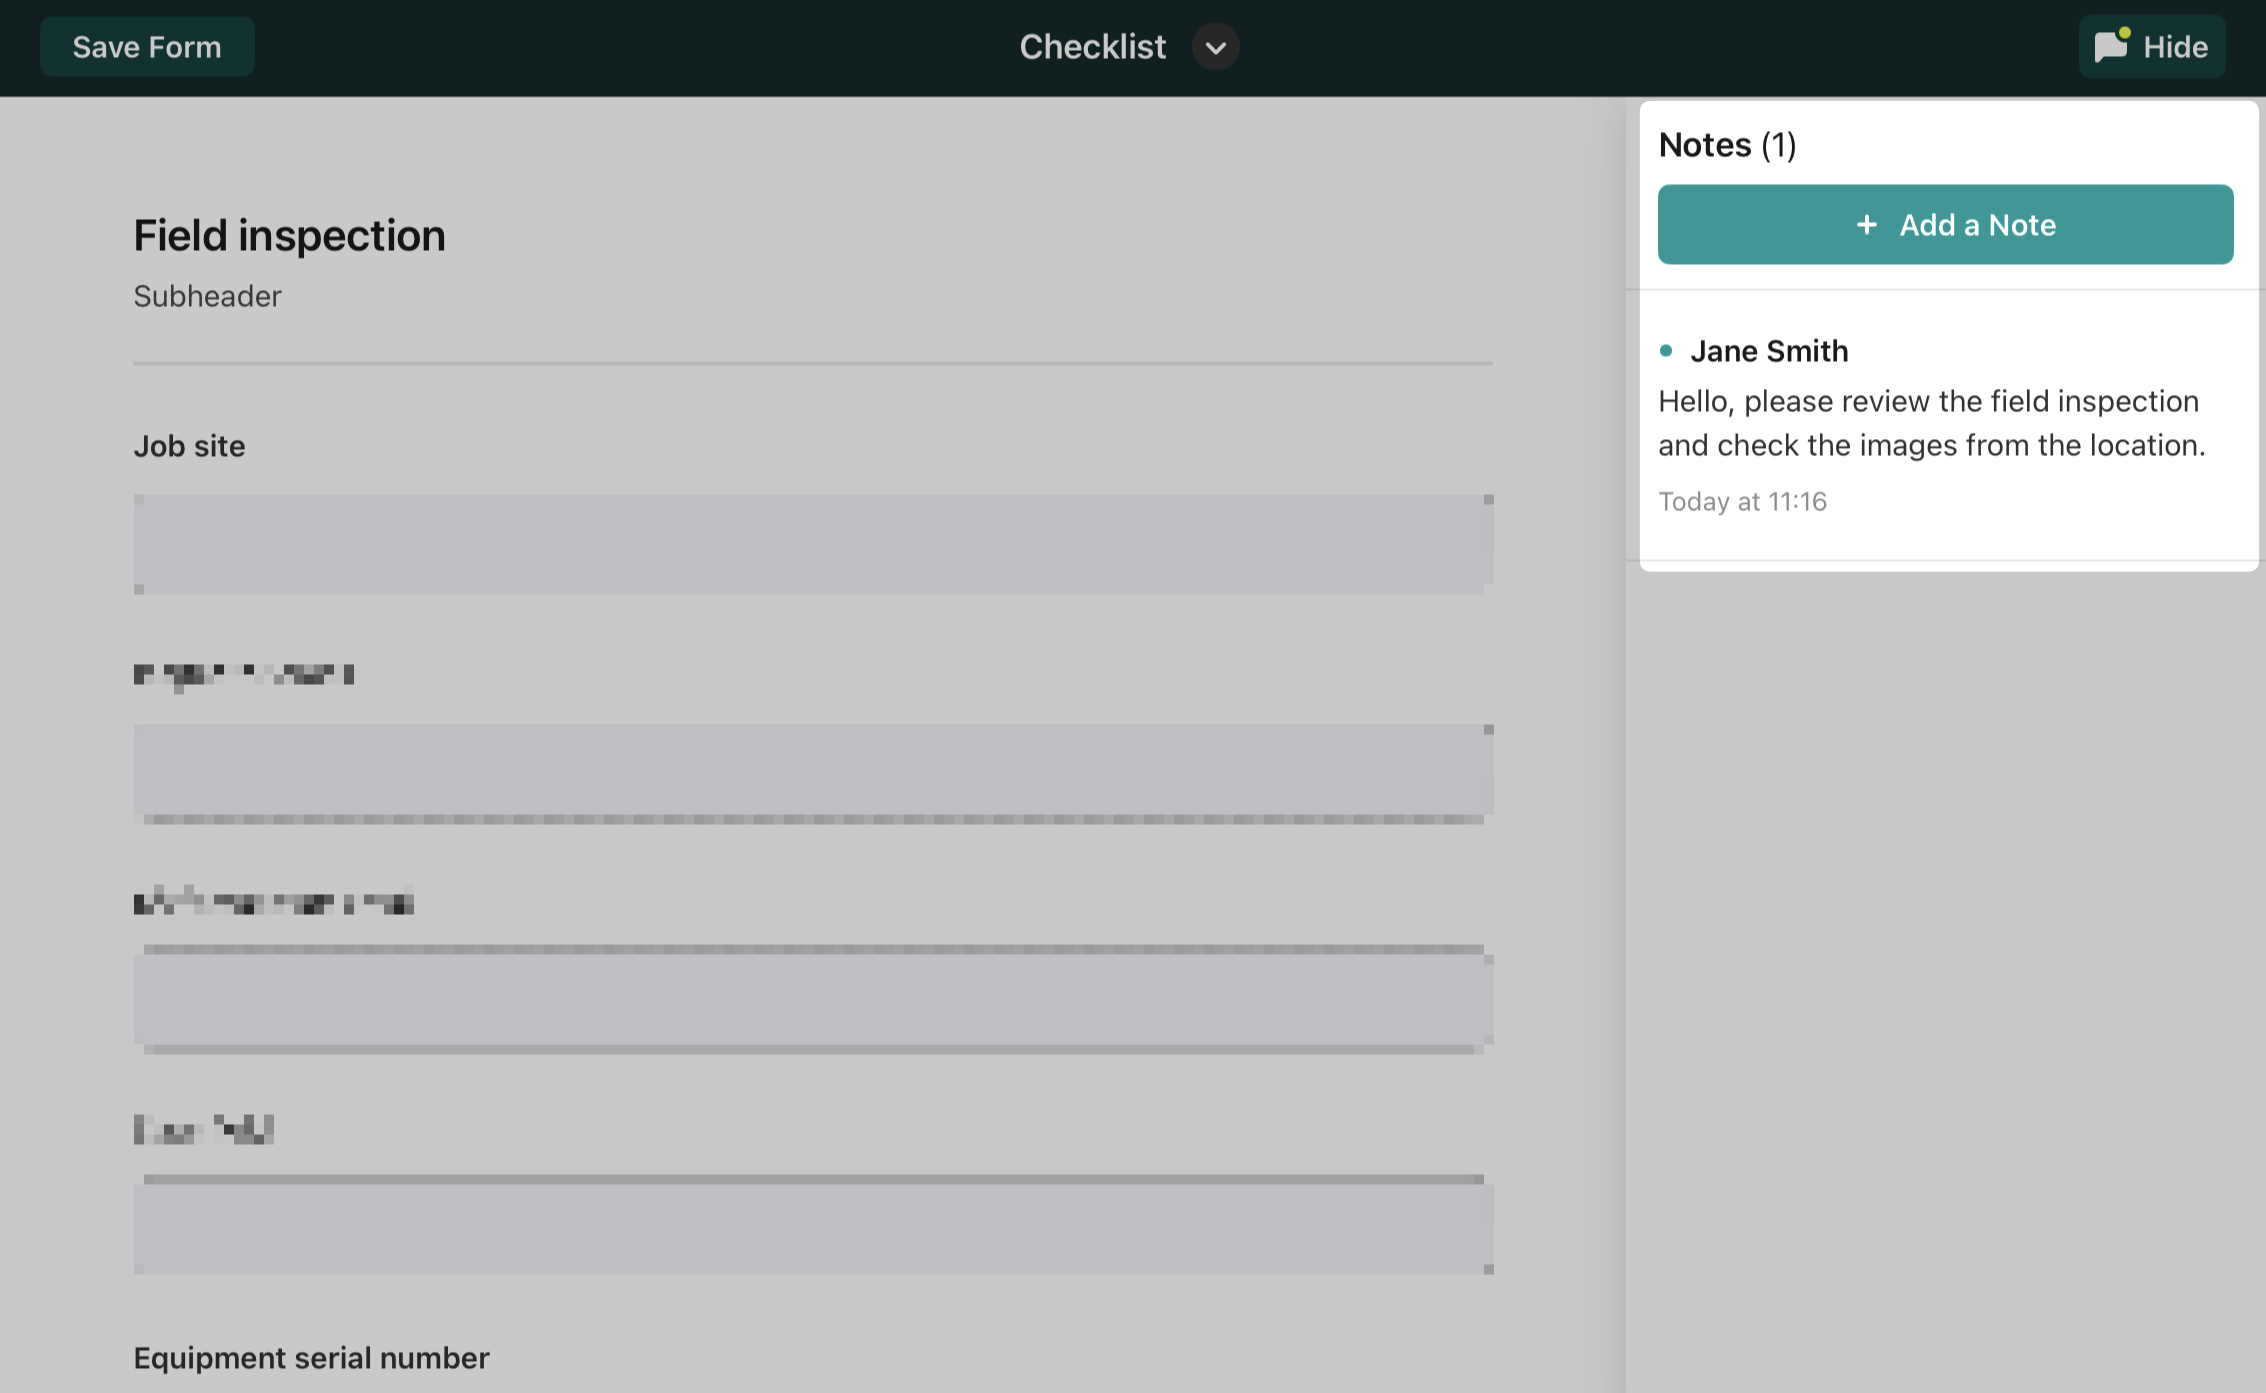
To review the entire history of notes added by other participants:
Open the document within the task.
Tap the Notes button in the upper-right corner.
Notes are displayed chronologically, with the most recent ones at the top.
Editing and Deleting Notes
You can edit or delete only the notes that you have personally added to a task.
If you have any questions or need further assistance, please contact us at support@fluix.io.
Was this article helpful?
Thanks for your feedback!
Oops, something went wrong. Please, try again later.
Thank you!
What details or examples would have made this article more helpful for you? We appreciate your insights!
Integrate seamless file exchange into your workflow with the Files to Review feature. This feature complements the preconfigured forms, providing your team with additional resources to facilitate collaboration and information sharing enhancing the daily workflow experience.
Use Case
While Fluix serves as a tool to streamline team collaboration and automate the business process, we have expanded our capabilities to allow users to easily upload images and files in various formats from external sources while working on a task and seamlessly integrate them into their business flow. Added files can be shared with other participants within the flow, who can review and manage these files according to their needs. Further, the attached files will be submitted along with the completed forms and follow the preconfigured rules.
How it works?
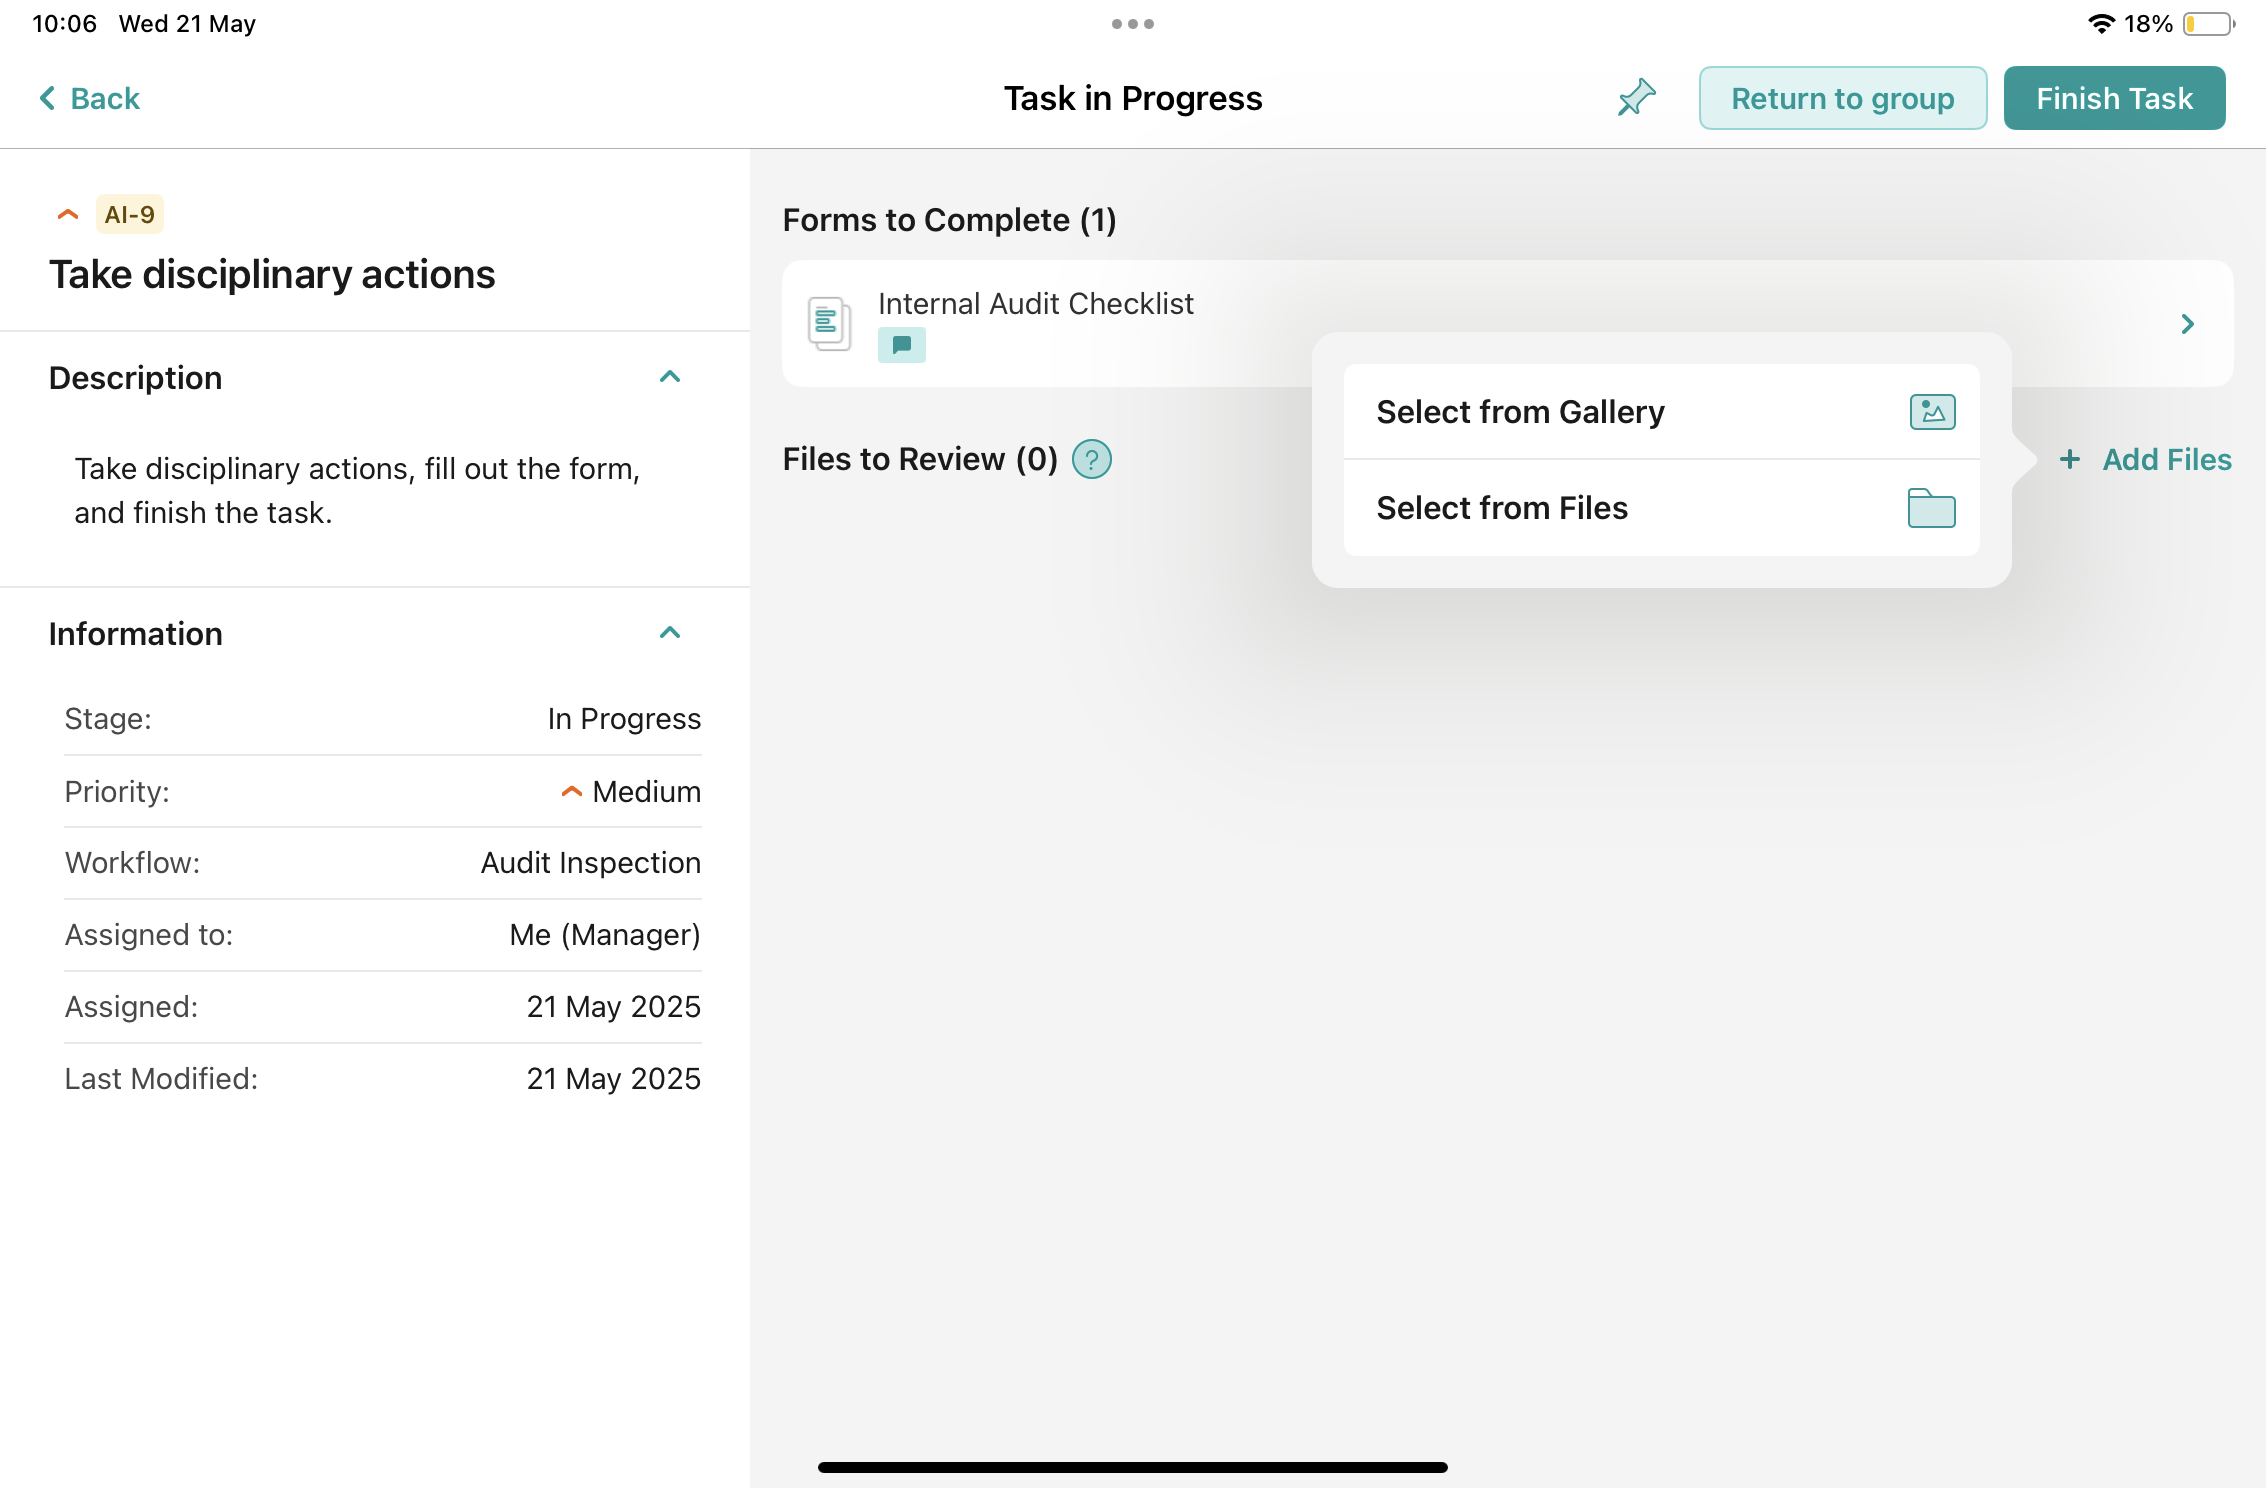
Once the users start working on the task by tapping the Start Work button, the task moves to the In Progress section. Simultaneously, a new section titled Files to Review becomes visible on the screen. This feature is available in the Fluix iOS, Android, and Web User apps.
Let’s check how the User Attachment feature can be utilized in both the Fluix mobile apps and the Web User apps.
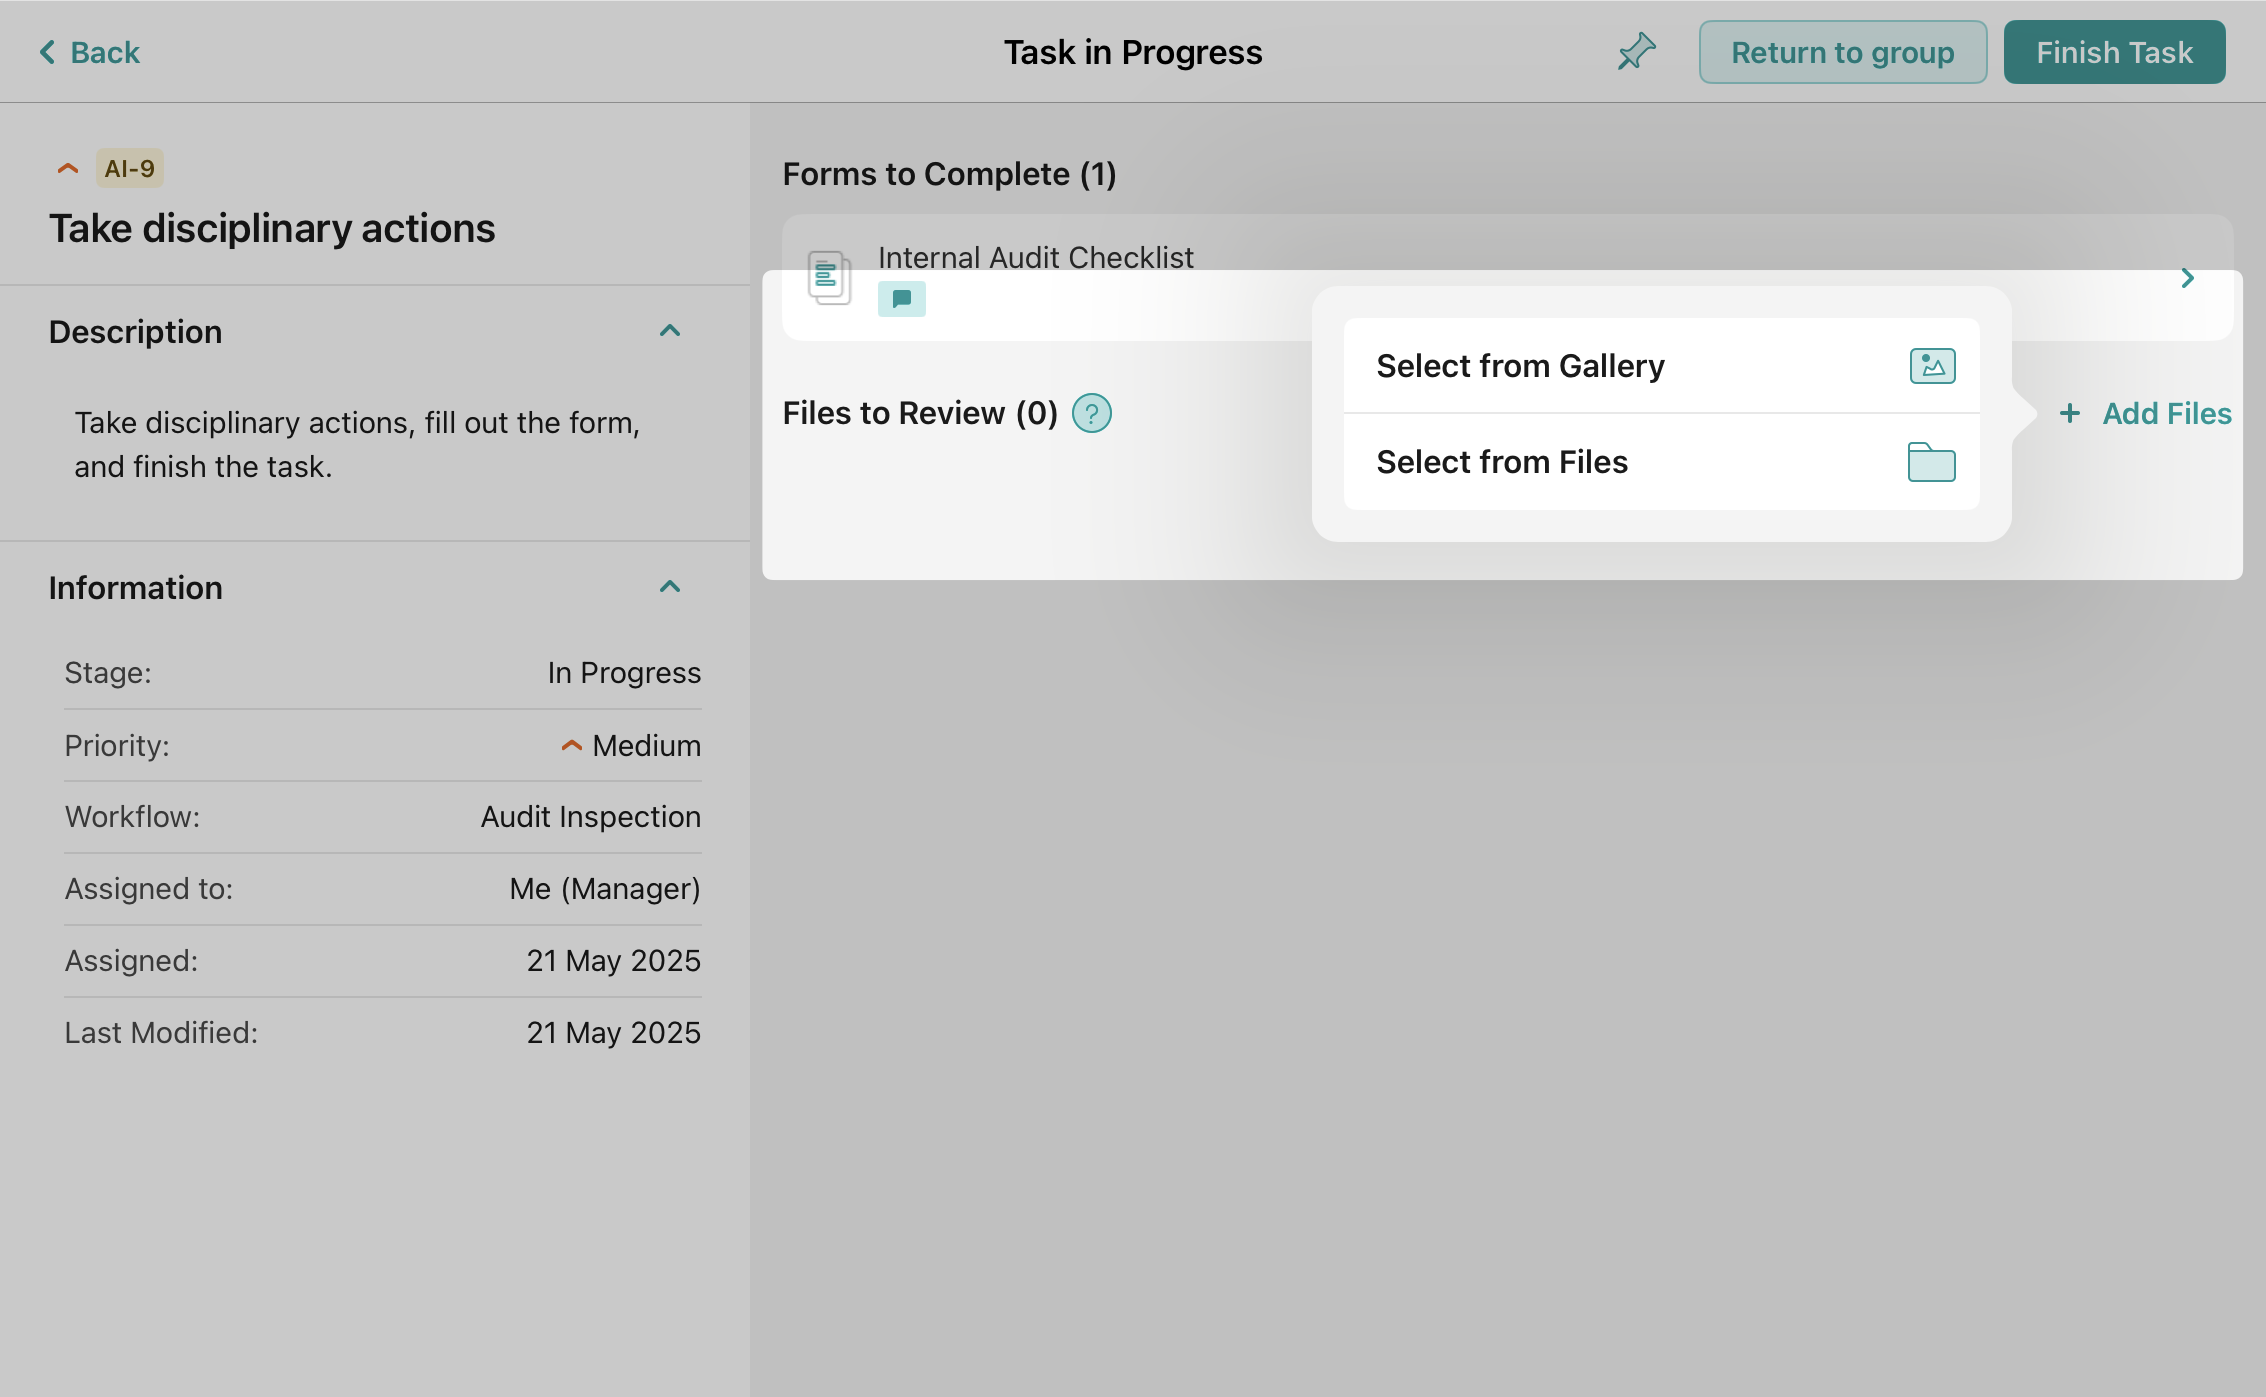
User attachments in the Fluix mobile apps
The user may select the photo from the Gallery in order to share it with colleagues or select the document from the Files on the device. Additionally, the users can drag & drop the file to Fluix in case they are using the Split Screen functionality. The drag & drop feature is currently available only in the Fluix app on Android devices.
Please note: The maximum allowed file size is 400MB.
The user may also share the files intended for review and edit them using the external tools by tapping three dots next to the file name and tapping the Share button. Alternatively, the user can also delete the files that were added by him or her if they are not needed anymore.
Additionally, the user may upload files to the tasks from third-party apps, e.g. Gmail, Outlook, Slack, etc. via the Open in option. To do this, the user needs to tap the Share button in any of the apps on the device and select Fluix in the list of apps. Upon opening the file in Fluix, the user will be asked to specify the section “Templates”, “Assigned” or “In Progress” and the task to which the files for review need to be uploaded.
While working on any task of the preconfigured workflow, the users will be able to add more files by tapping the button Add Files.
Consequently, the next user who will be working on the task will receive access to the addendum along with the preconfigured forms. Upon finishing the process, the files that were added by the users during the workflow process will be submitted together with the forms according to the submit actions (e.g Upload to Storage, Send by Email, Share to Integration) preconfigured in the workflow.
Please note: Files to Review feature is available starting fromthe Fluix 3.16 app version on iOS devices and the Fluix 1.5 app version on Android devices.
User attachments in the Fluix Web User app
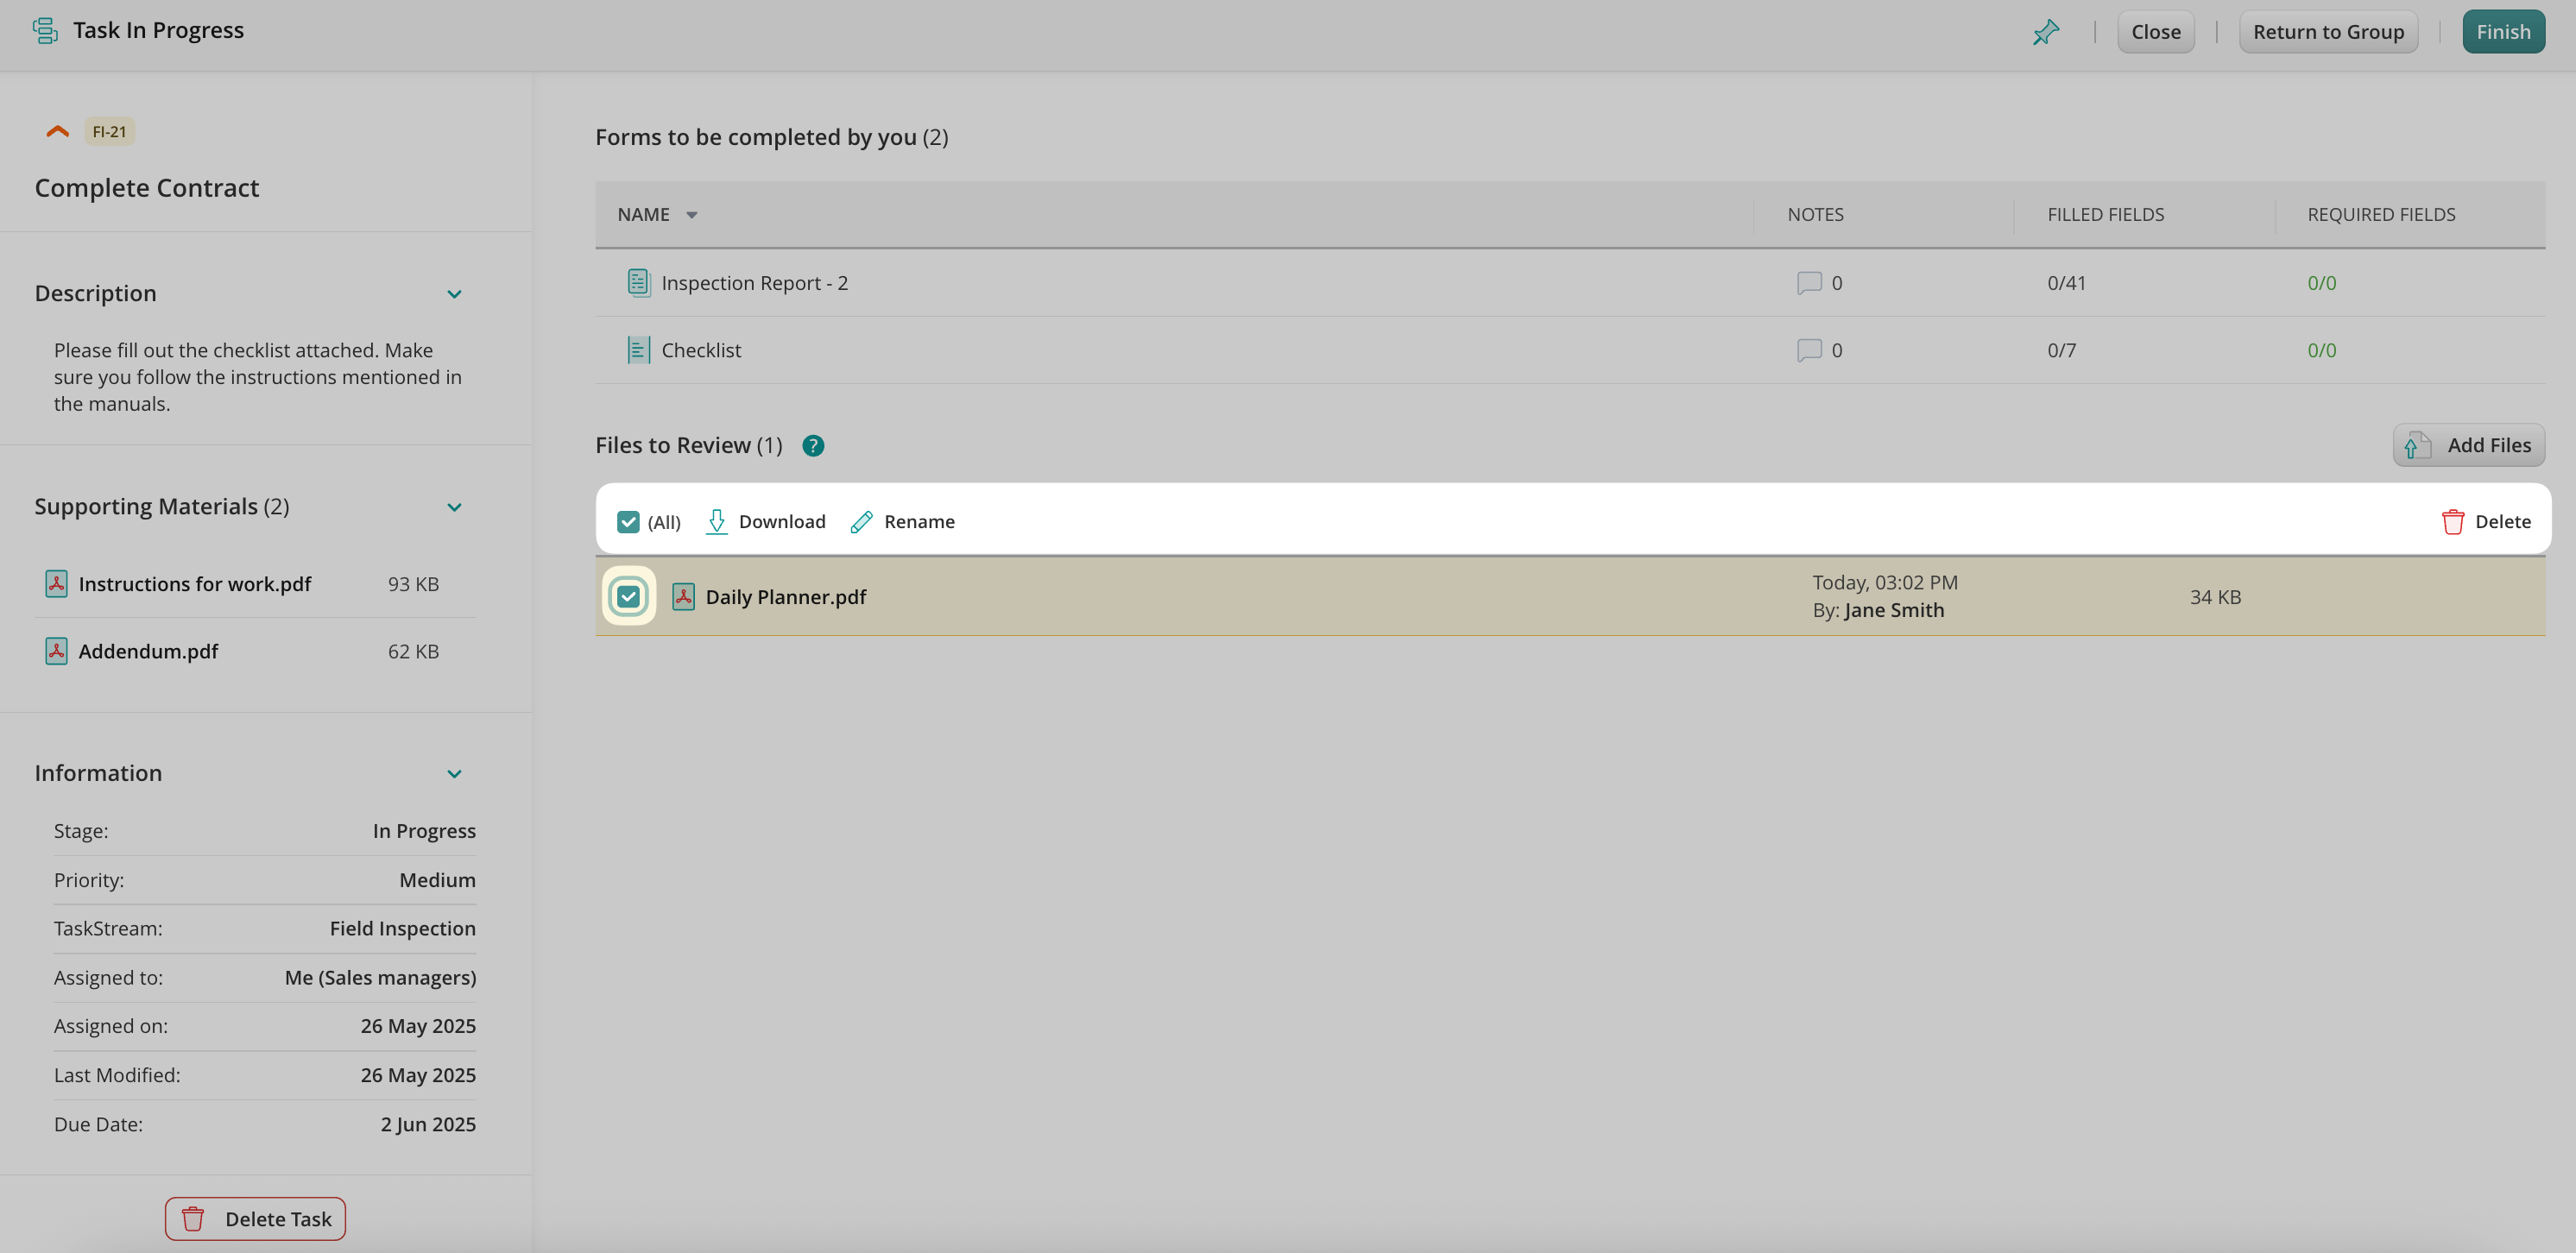
The user may upload the files from their computer or drag them to Fluix.
Once the files are uploaded, the users can rename, delete, or download them.
Please note: the users can rename and delete only the files which they have uploaded.
While working on any task of the preconfigured workflow, the users will be able to add more files by tapping the button Add Files.
Please note: The maximum allowed file size is 400MB.
Feel free to contact us at support@fluix.io if you have any questions on setup.
Was this article helpful?
Thanks for your feedback!
Oops, something went wrong. Please, try again later.
Thank you!
What details or examples would have made this article more helpful for you? We appreciate your insights!
Mistakes happen — and that’s okay. That’s why we’ve introduced the Undo Finished Action option, allowing you to reverse tasks you’ve submitted by accident or need to revisit. Here’s a step-by-step guide on how it works:
When to use the Undo Finished Action
The Undo Finished Action option becomes available immediately after you finish a Task. This option is available for 5 seconds, allowing you to discard the task’s submission.
What happens after you click Undo Action:
The task returns to its previous In Progress section. Please note that all the previously introduced information will remain in the form, and no data will be lost.
Any follow-up processes (like notifications to your teammates or task assignments) do not happen.
You can make changes, add comments, or correct details within your tasks as needed.
What happens if you choose not to click the Undo Action:
Your finished task will be submitted within the workflow preconfigured by your Fluix account Admin.
Your finished task will move to the Finished tab, where it will be available for reference only.
Feel free to contact us at support@fluix.io with any questions or comments.
Was this article helpful?
Thanks for your feedback!
Oops, something went wrong. Please, try again later.
Thank you!
What details or examples would have made this article more helpful for you? We appreciate your insights!
In the Fluix Tasks app, you have enhanced navigation with flexible filters that help you manage long task lists more effectively.
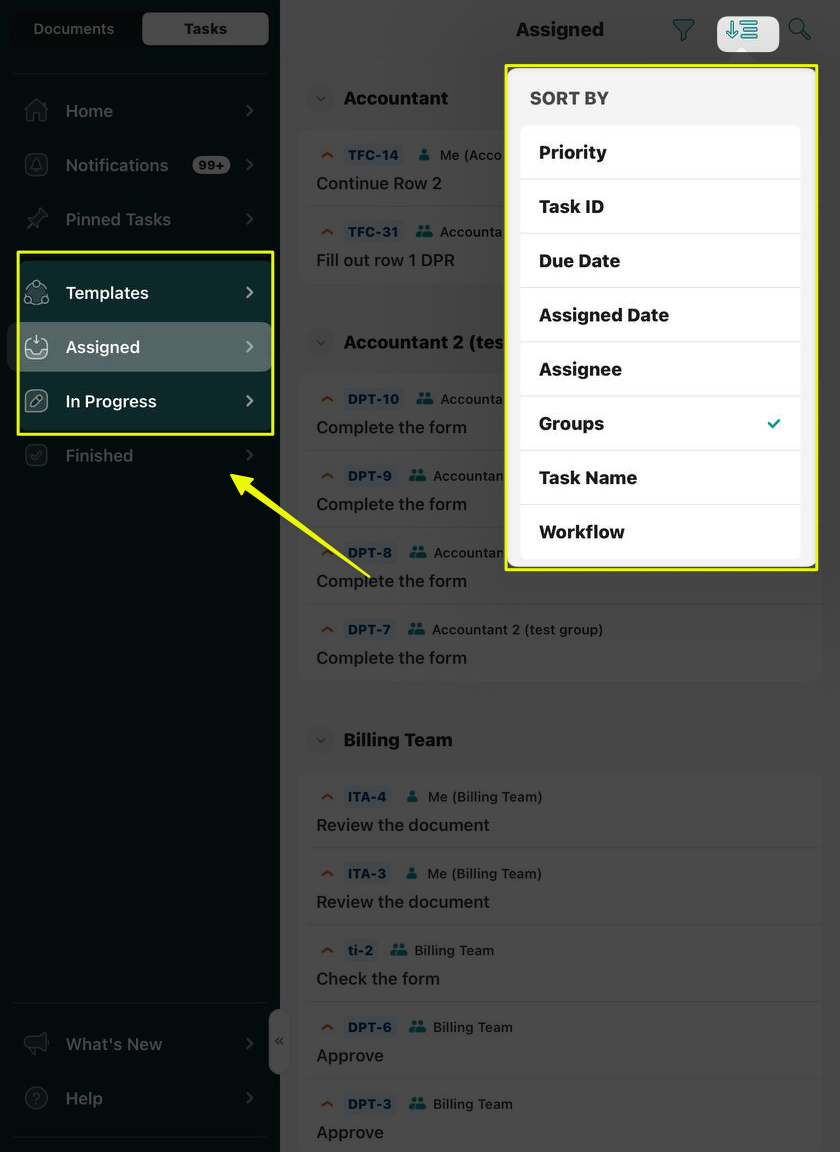
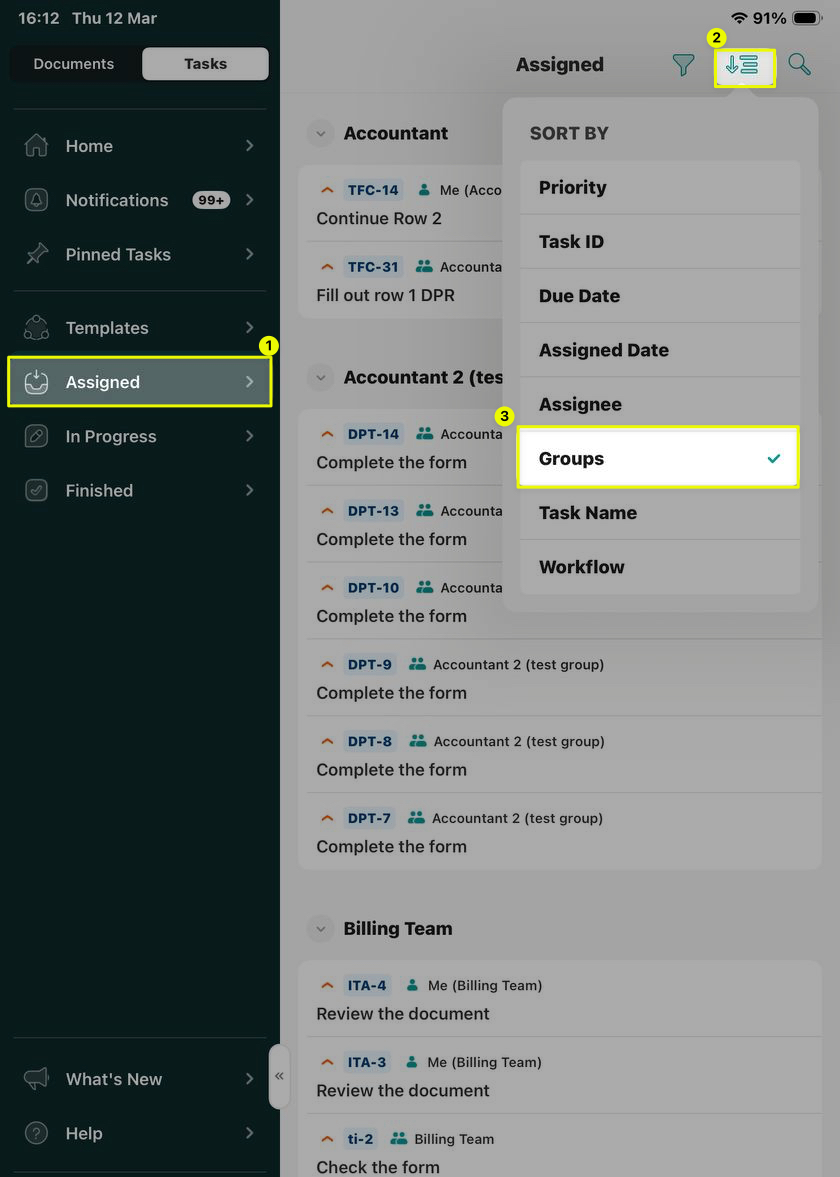
You can utilize advanced sorting parameters in the ‘Templates,’ ‘Assigned,’ and ‘In progress’ sections on your device and sort tasks by specific parameters:
Priority
Task ID
Due Date
Assigned Date
Assignee
Groups
Task Name
Workflow
Additionally, the Expand and Collapse options on the sorted list of tasks give a way to organize the tasks respectively and find exactly what you need in seconds, regardless of the list’s length.
Below is the list of the specific filtering parameters that can be applied to your tasks:
Priority filters tasks from critical to low priority, as configured by your company’s account admin.
Assignee filters the tasks by the names of the Groups to which you are added.
Task ID option lets you sort the tasks by their abbreviation.
Due Date option lets you sort the tasks by the level of urgency based on the tasks’ due dates, pre-configured by your company’s Fluix account admin.
Assigned Date filters the tasks by months.
Assignee filters tasks by the user assigned to each task.
Groups filter tasks by the participants of the workflow.
Task Name filters the tasks based on the task name in alphabetical order or vice versa.
Workflow filter groups tasks into lists for each workflow.
In case you have any additional questions about the functionality, contact us at support@fluix.io to learn more about it.
Was this article helpful?
Thanks for your feedback!
Oops, something went wrong. Please, try again later.
Thank you!
What details or examples would have made this article more helpful for you? We appreciate your insights!
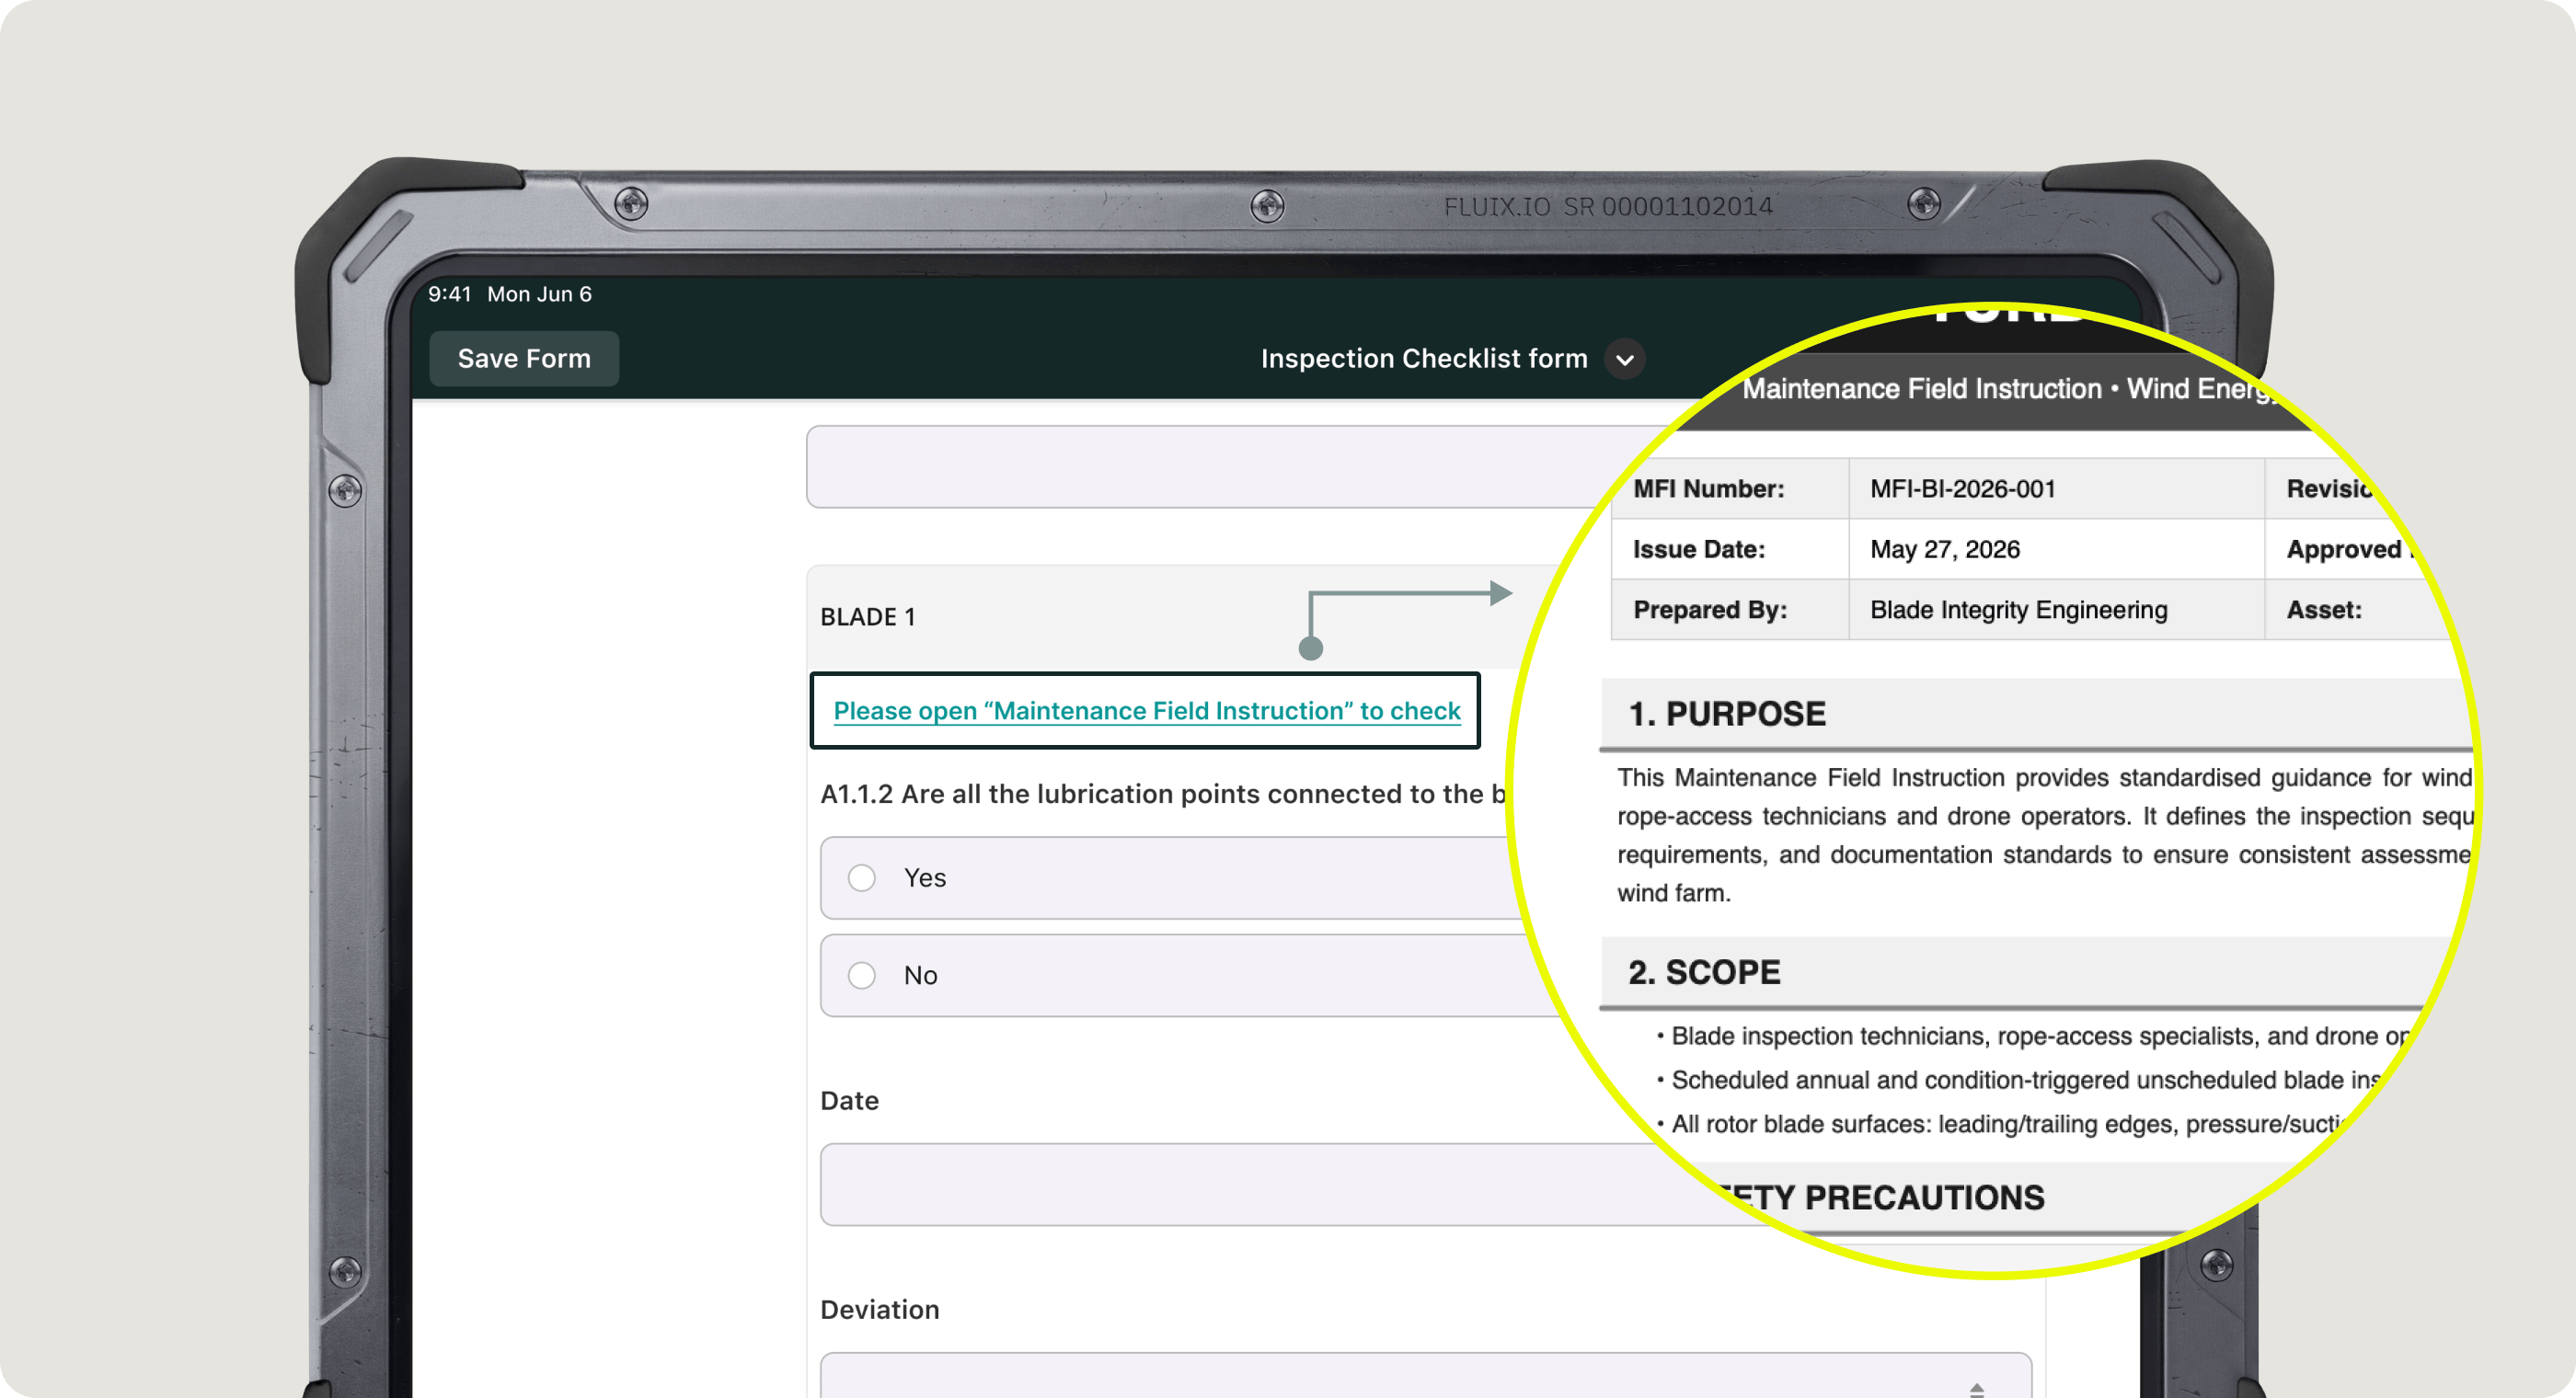
Admins can link PDF documents stored in Fluix Storagedirectly to the sections within a dynamic form. This way, Fluix app users, e.g., inspectors, field workers, can access the exact page of a manual, policy, or standard operating procedure directly from a checklist.
This allows app users to open the relevant reference material with a single tap, without having to manually search through attachments or switch between multiple applications.
This feature is especially useful when working with lengthy technical documents (100+ pages) during inspections or audits. Linked PDFs can point to a specific page, giving app users instant access to the exact section they need.
Note: All linked PDFs are automatically added to every task that includes this form, appearing in the Attachments for review section. You may not be able to remove linked PDFs at the individual task level.
If you have any questions or feedback about the functionality, please contact our team at support@fluix.io.
Was this article helpful?
Thanks for your feedback!
Oops, something went wrong. Please, try again later.
Thank you!
What details or examples would have made this article more helpful for you? We appreciate your insights!
Projects in Fluix tasks were designed to centralize forms, teams, workflows, and assets in a single dedicated space, organized by department, location, or function. By utilizing Projects, you can ensure that operations remain structured, secure, and easily manageable.
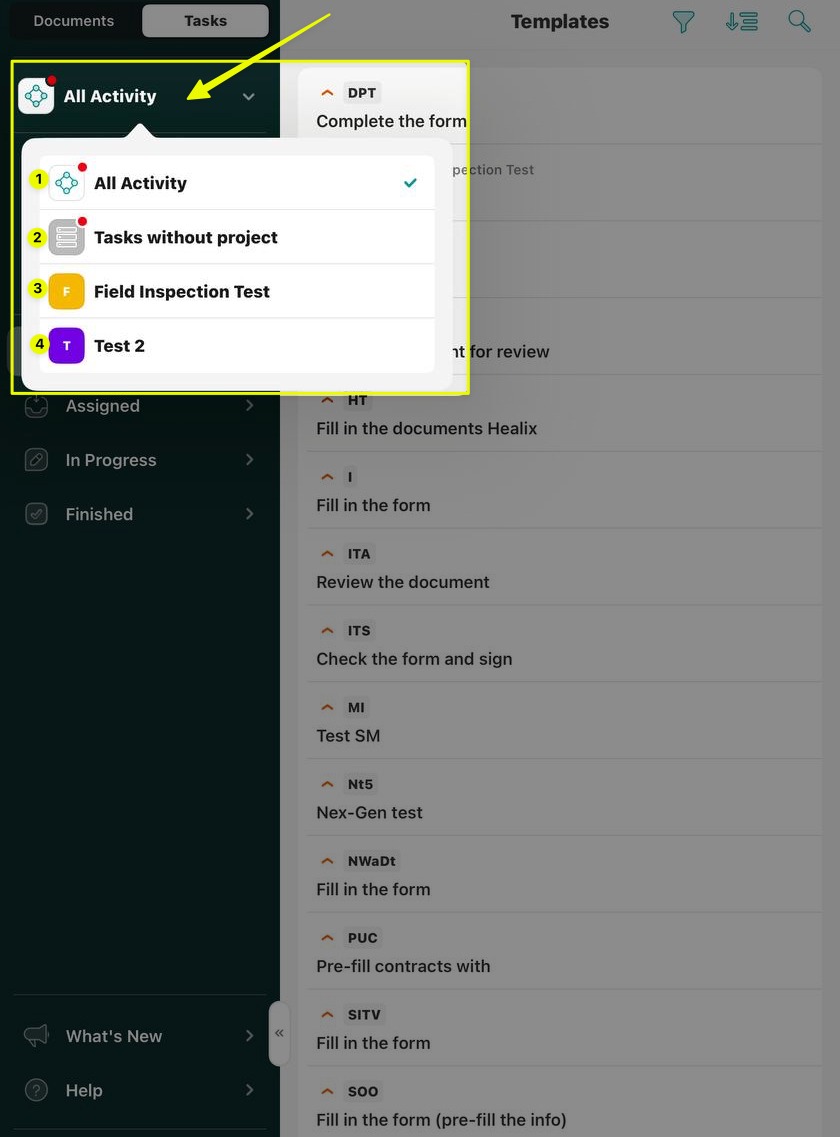
In the Fluix Tasks app, you now have the opportunity to view all your tasks, categorized by different criteria, including projects.
By clicking ‘All Activity,’ you will see the list of projects, which were sorted for you by your Fluix Account Admin.
Note: The red dot on the “All Activity” icons in the left sidebar indicates unread notifications.
How to differentiate tasks in the app?
All Activity option
In the All Activity view, tasks related to a specific project will display the project name and color next to the Task ID.
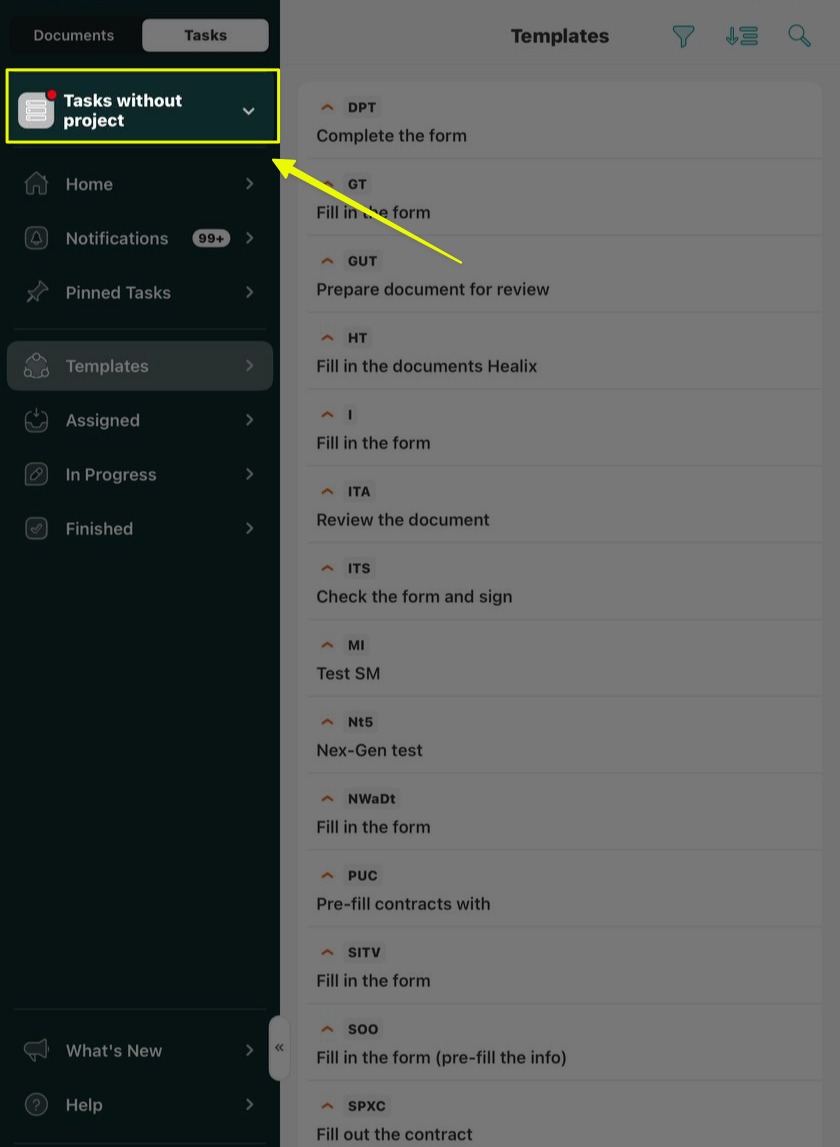
Tasks without projectview
You can check all tasks that do not relate to specific projects and filter them in this view.
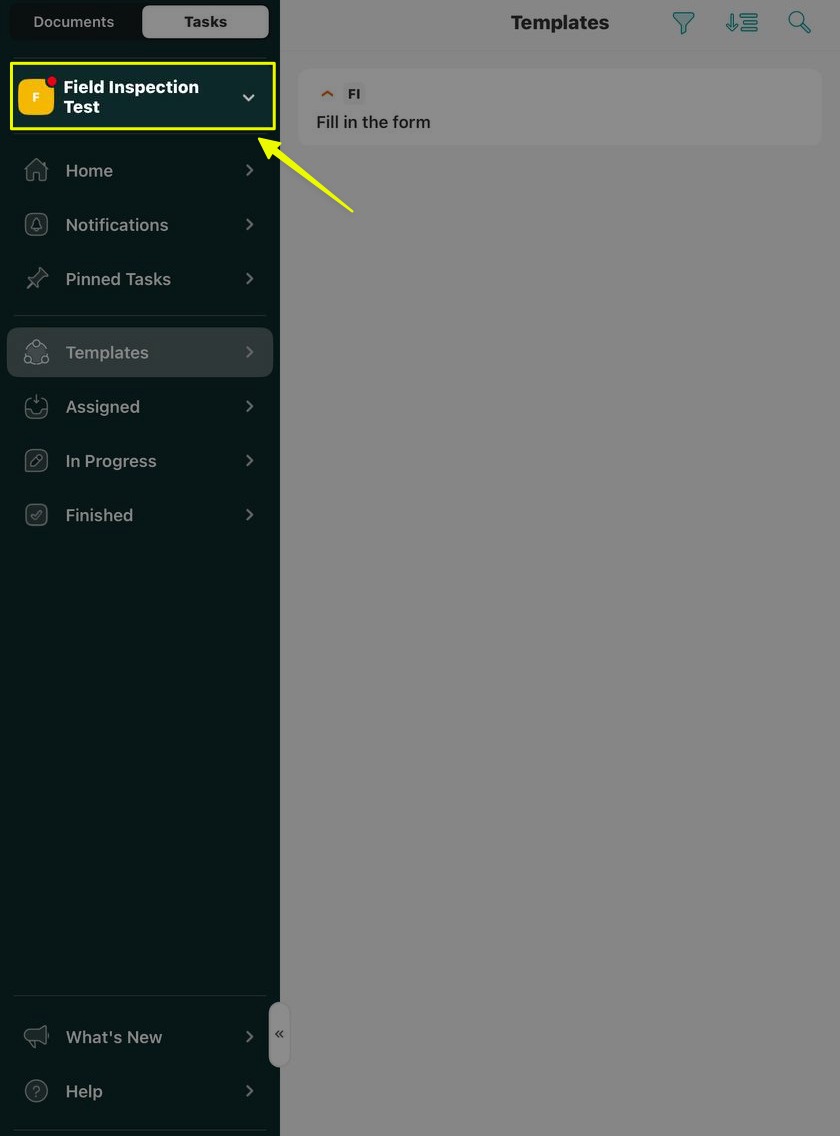
Project, created by the admin of your account
In this view, you will see the project’s custom name assigned by your admin for the tasks you organized in this project.
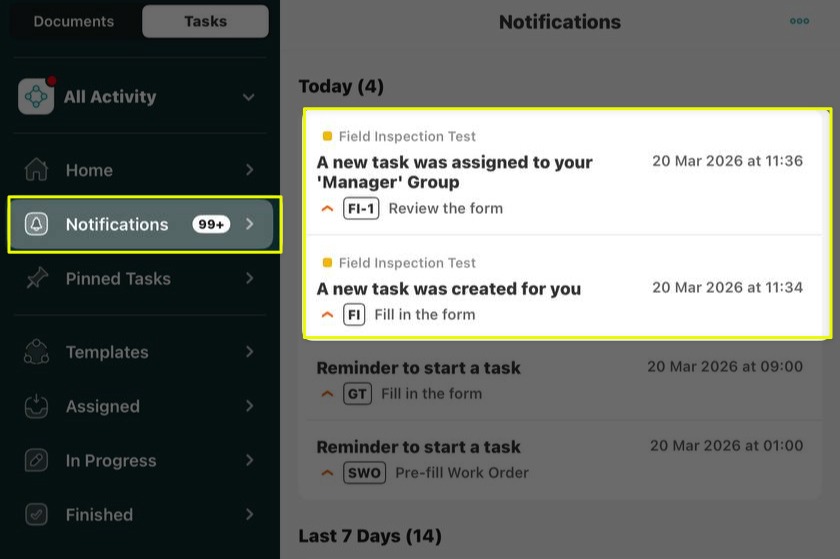
By clicking on the Notifications section, you will see all the notifications related to the tasks from projects, which will be defined by color and description of the project name under the other task details.
If you have any additional questions about the functionality, contact us at support@fluix.io to learn more.
Was this article helpful?
Thanks for your feedback!
Oops, something went wrong. Please, try again later.
Thank you!
What details or examples would have made this article more helpful for you? We appreciate your insights!
When working with large forms, it can sometimes be difficult to keep track of your progress or quickly navigate to a specific section. The Track Form Completion feature provides a clear overview of how much of the form has been completed and allows users to jump directly to any section.
This feature is especially useful for lengthy forms with multiple sections and when several users collaborate on completing the same document.
Note: The Form Completion feature works together with Dynamic Forms in Fluix.
How it works
As you complete fields in a Dynamic Form, Fluix automatically calculates the completion progress for:
The entire form.
Each individual section within the form.
Progress updates automatically whenever the form is autosaved.
View form completion progress
To view your progress:
Open the assigned task and start filling out the form.
Tap the Table of Contents icon in the upper-right corner of the form.
The Table of Contents panel will open, displaying:
The overall completion percentage for the form.
A list of all sections in the form.
The completion percentage for each section.
Navigate through large forms
The Table of Contents also makes it easy to navigate within large forms. To jump to a specific section:
Open the Table of Contents.
Tap the name of the section you want to review.
Fluix will automatically scroll to the selected section in the form.
If you have any questions, contact our support at support@fluix.io , and we’ll be happy to help.
Was this article helpful?
Thanks for your feedback!
Oops, something went wrong. Please, try again later.
Thank you!
What details or examples would have made this article more helpful for you? We appreciate your insights!
Sign Up to Our Product Newsletter
The latest updates from our Product team, straight to your inbox