Fluix Workflow is a way to automate your team’s daily routine.
A Workflow is a template for repetitive tasks and paperwork performed by your team members. The Administrator’s job is to model such a sequence of tasks to achieve a business goal, while users only need to follow the configured processes. This separation allows everybody to focus on their core competence according to their role in a company and current workflow steps, and automate the technical routine of in-between transitions.
In other words, the Workflow is a flow of tasks to be performed, forms to be filled out, and work to be reviewed and approved.
Through Workflows, field workers receive tasks on their mobile devices, with descriptions of jobs to be done, fillable forms, and attachments for review. Users can fill out data and eSign, add photos and scan barcodes, and submit tasks to the next step in the process.
Flowchart example
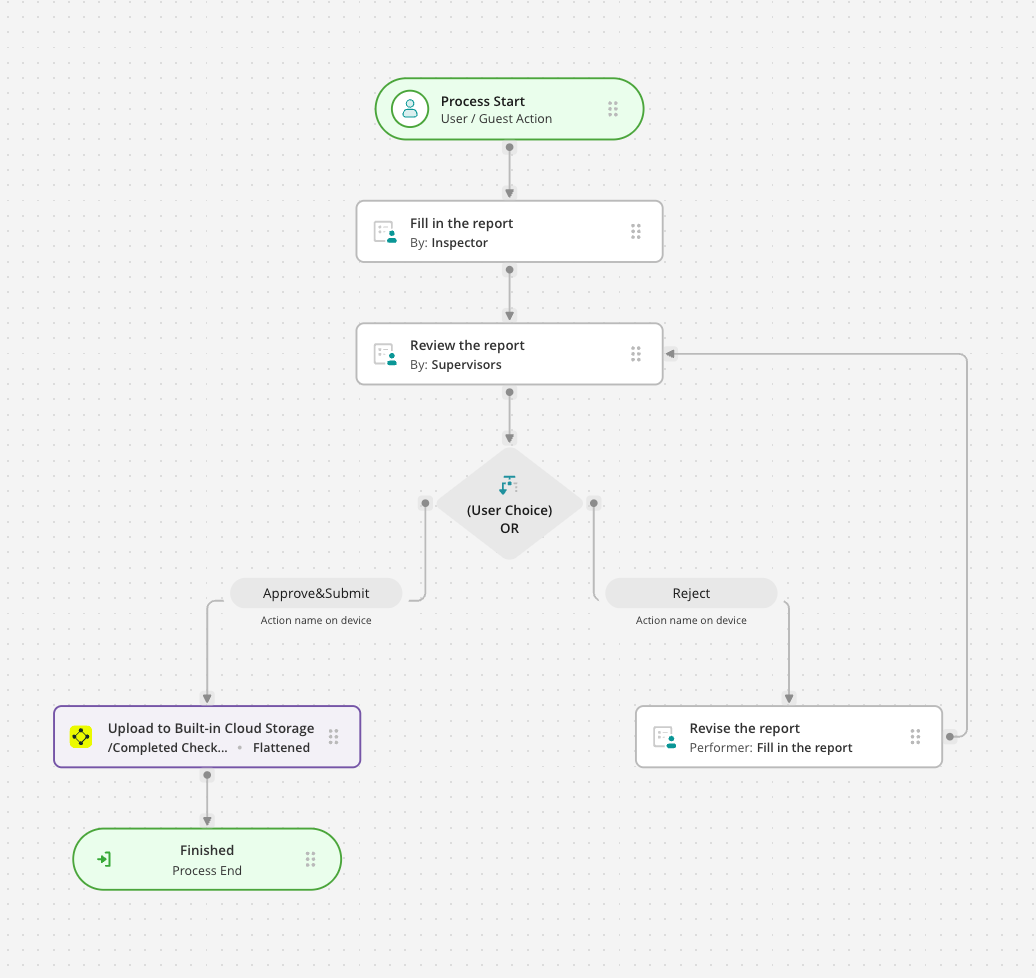
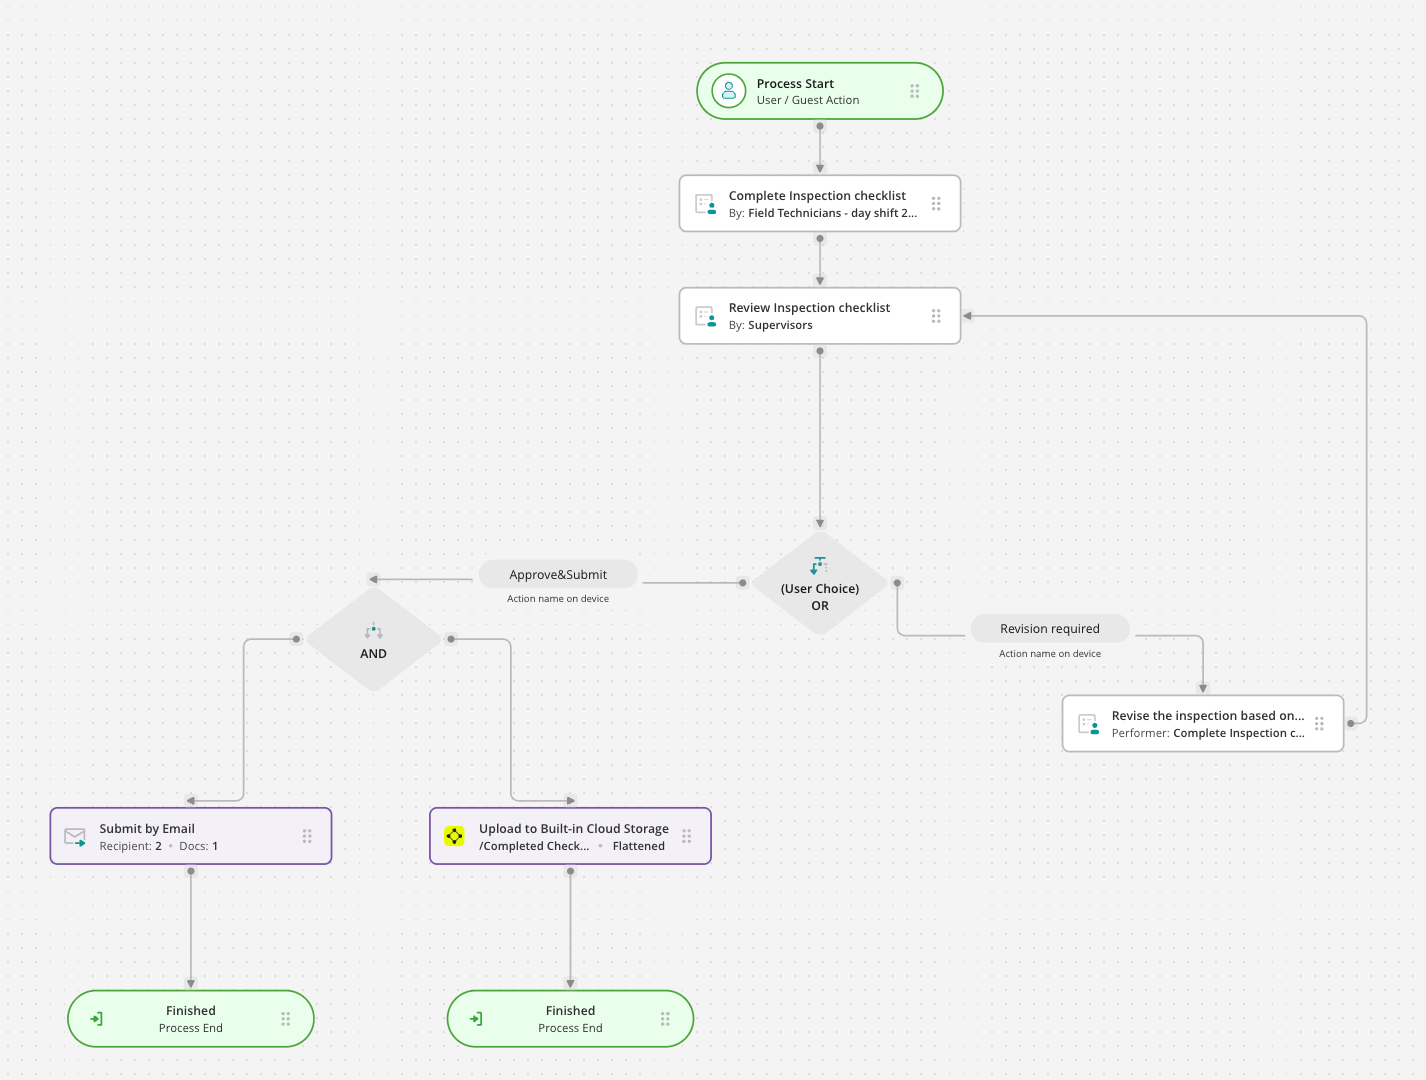
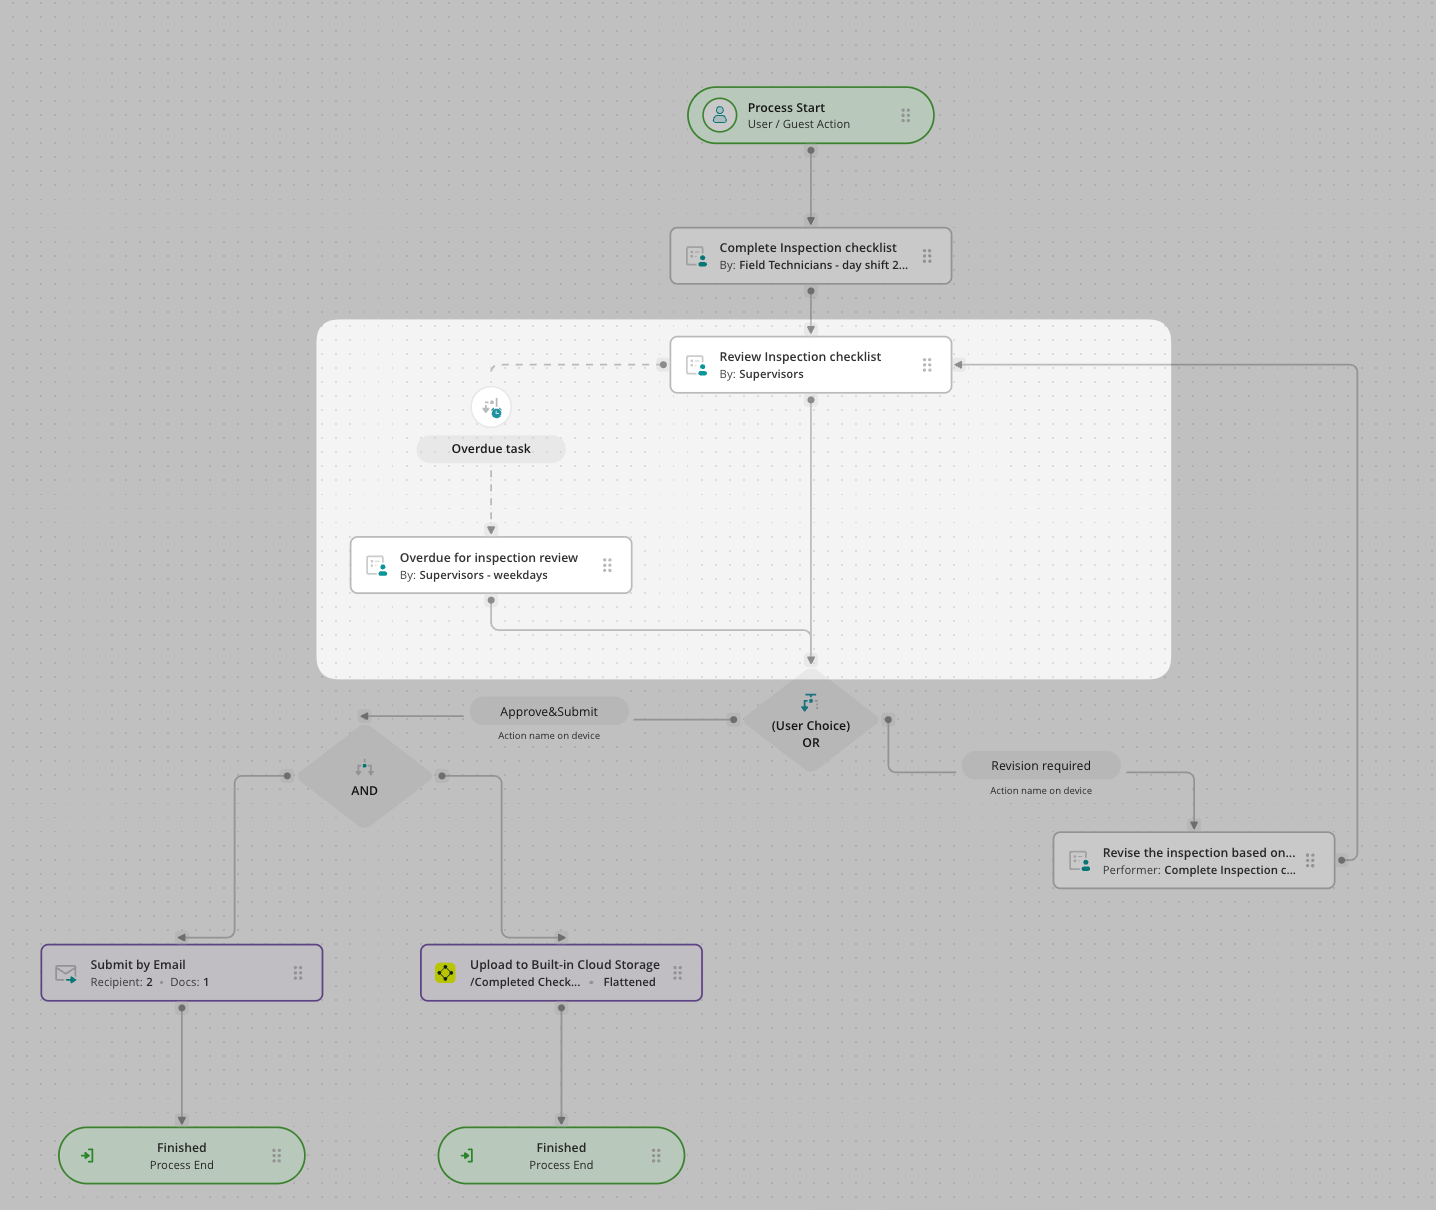
Below is the basic flowchart showing how inspectors fill out checklists, how supervisors review them, and have two options to submit the checklist:
Approve & Submit – Send the documents to your company’s storage and office team.
Reject – Send the document back for revision to the inspector, who initially filled out the checklist.
In terms of a Workflow, it will look like a number of steps:
Team view
1) The inspector picks up a task on their mobile device, fills out the checklist with all of the necessary information from the site, and submits it to the site Supervisor for review.
2) If any rework is required, the Supervisor returns the checklist to the inspector for rework. If no corrections are needed, the site Supervisor signs the checklist and approves it. The completed checklist is automatically uploaded to your company storage and emailed if needed.
Starting points to model a process
Before you proceed with a Workflow, here are the starting points to begin modeling your process:
1) Process
What is the business goal of the process?
Do you know the precise flow of actions to achieve the goal?
2) Participants
Who will work on each specific task?
Can you organize users in groups to make Workflows role-based?
Do you offer users the option to select the cases to work on, or directly assign them?
3) Forms
Do you have digital or spare form templates that will be used in a flow?
Does your company currently use any cloud storage to store completed forms?
Do you know the answers to the above? Then we invite you to the next article.
In case you need our assistance, feel free to contact us at support@fluix.io, we are always here to help!
Was this article helpful?
Thanks for your feedback!
Oops, something went wrong. Please, try again later.
Thank you!
What details or examples would have made this article more helpful for you? We appreciate your insights!
Before creating a Workflow itself, please make sure to have the main elements ready:
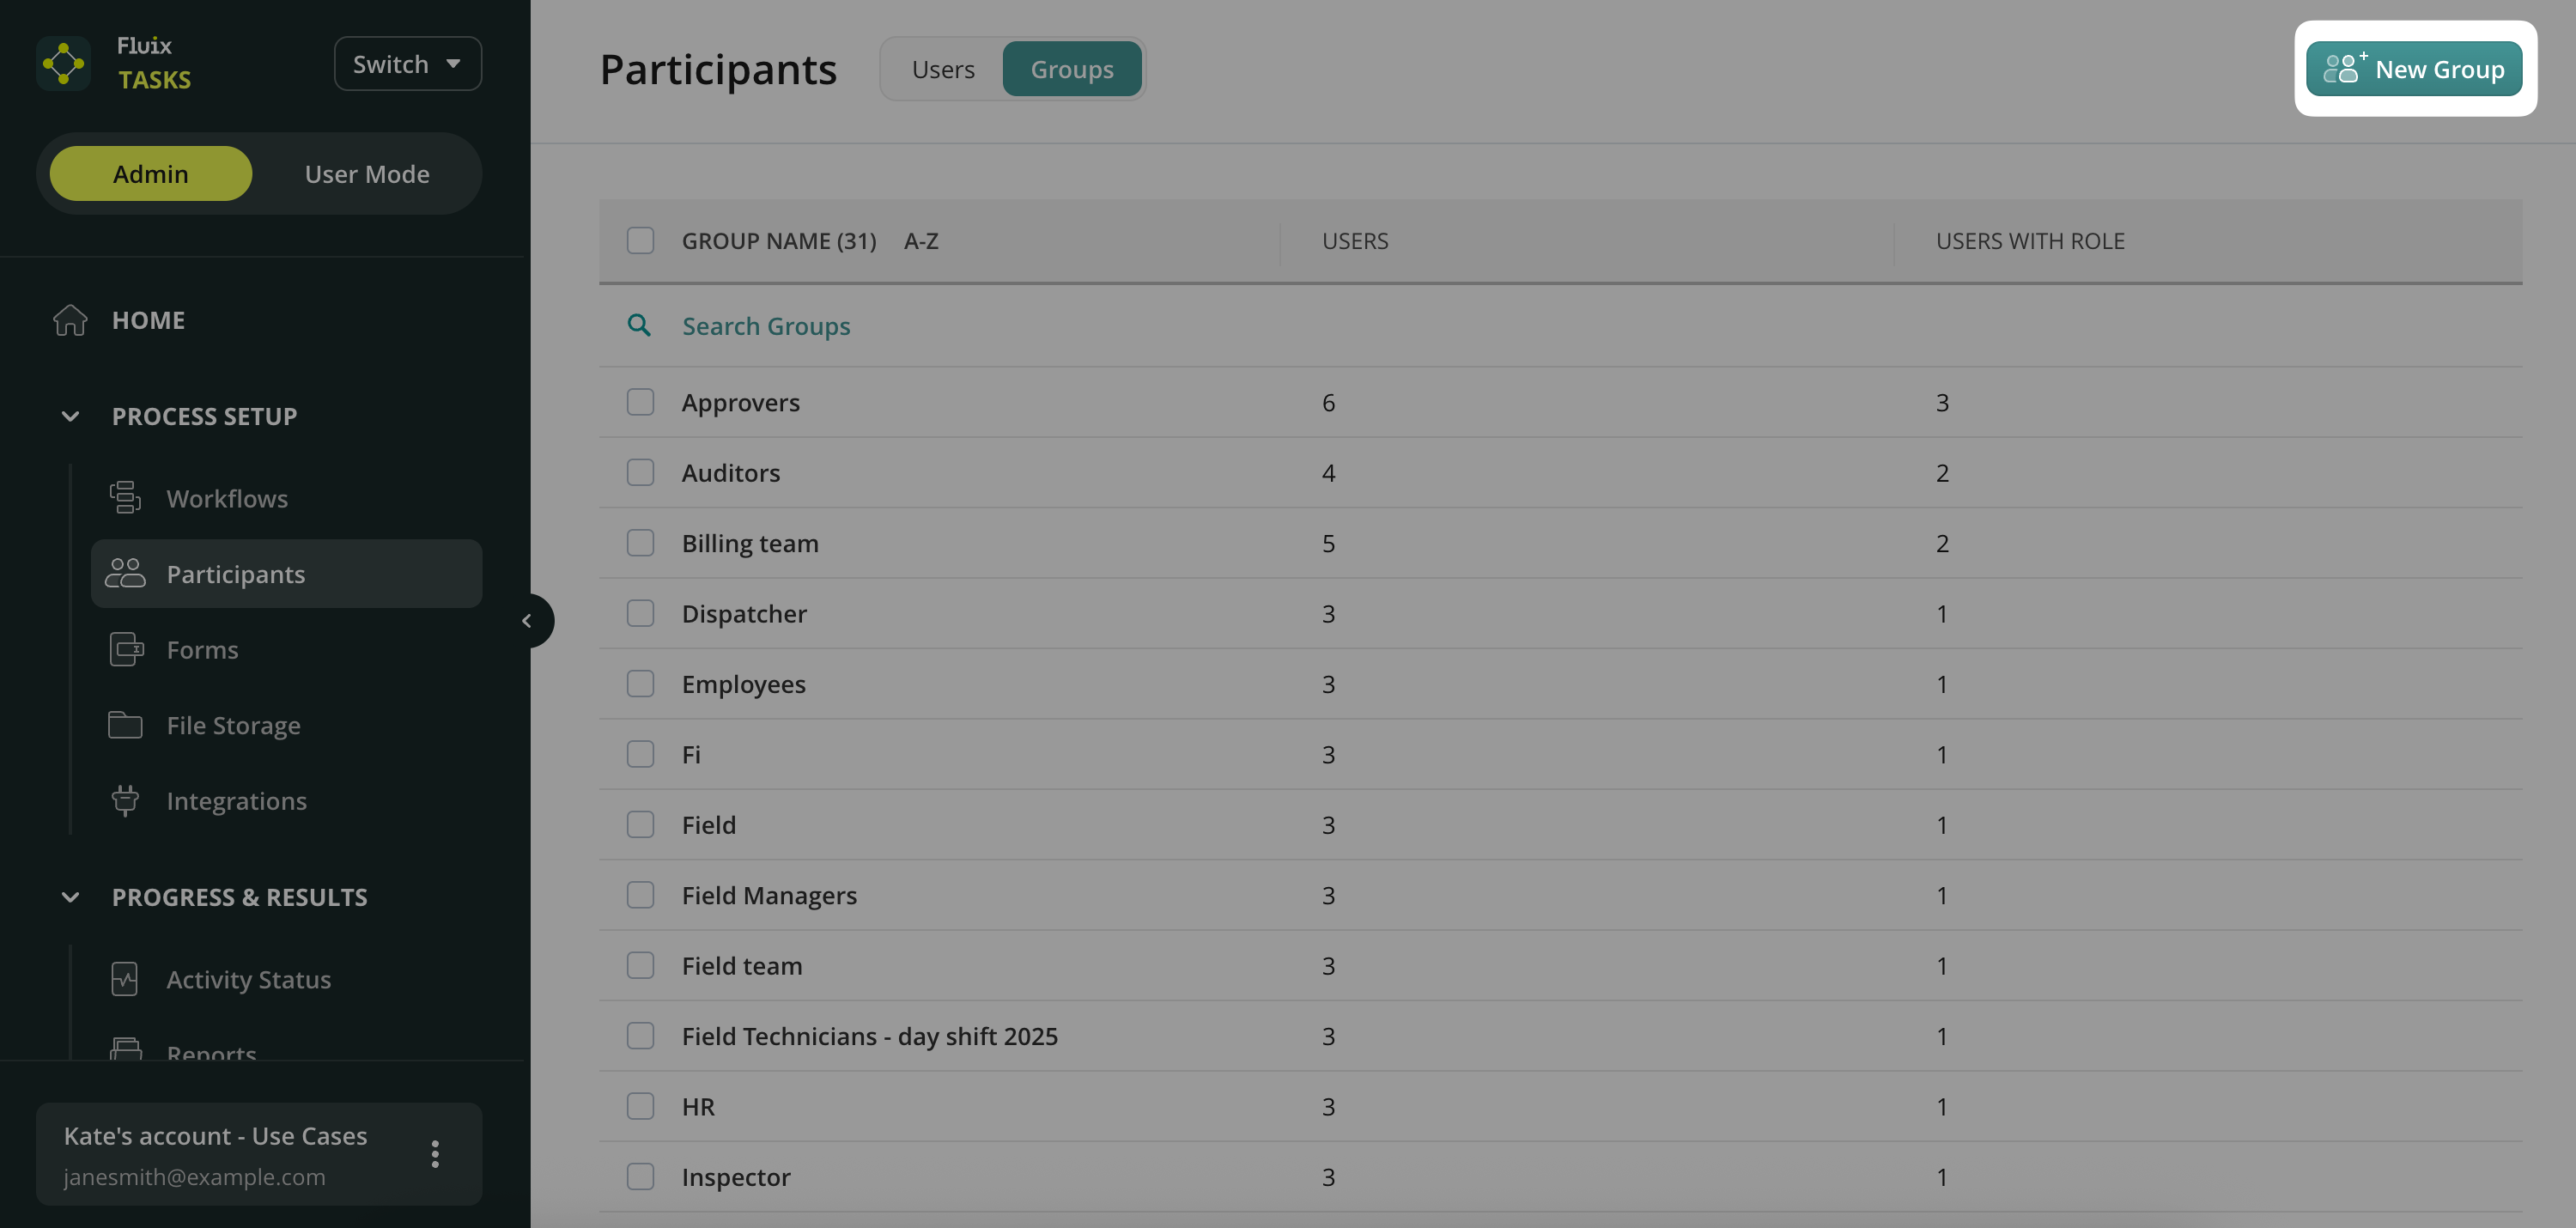
1)User Groups that will participate in a Workflow. Navigate to Admin tab -> Process Setup -> Participants section to create the Groups and add the users:
2) Cloud storage. If you want to store the forms/documents completed in the Fluix app in a cloud storage and you already use a certain service, you can connect it to Fluix in the Process Setup -> Integrations section.
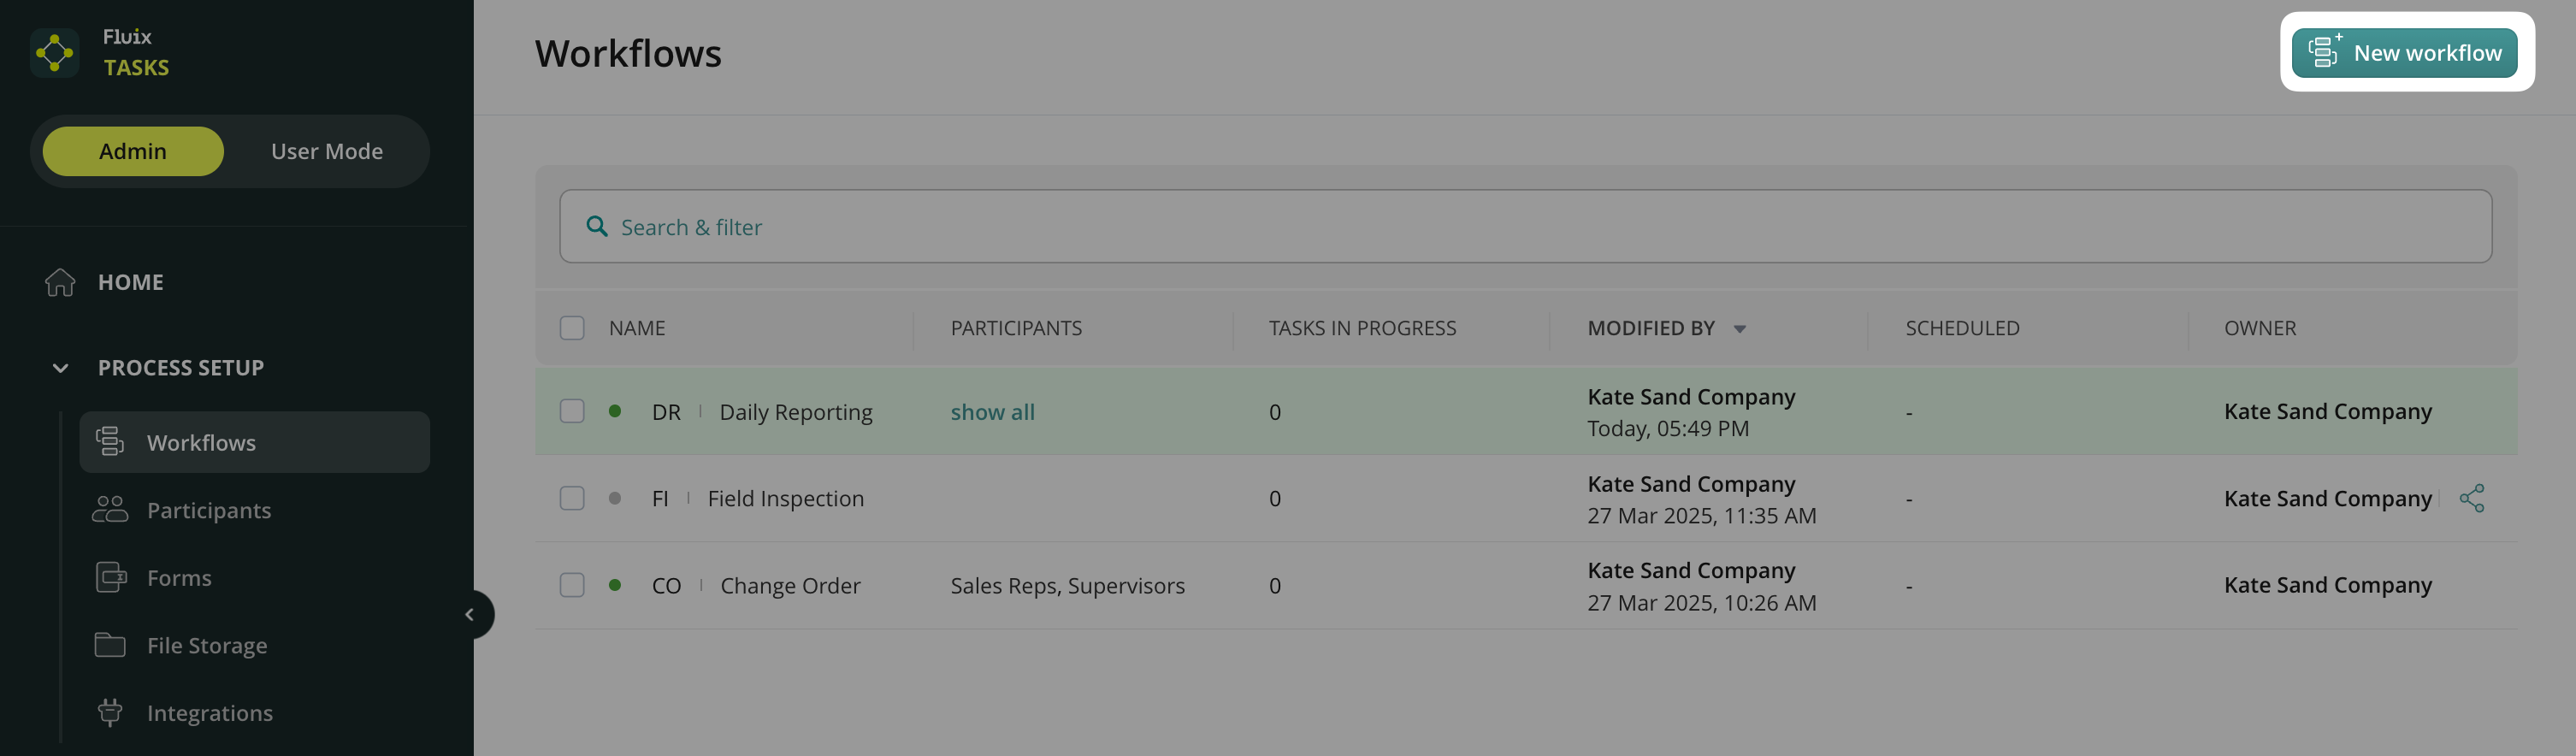
Our product experts are here to assist! Navigate to the Admin Tab -> Process Setup -> Workflows section and click New workflow in the upper right corner of your screen.
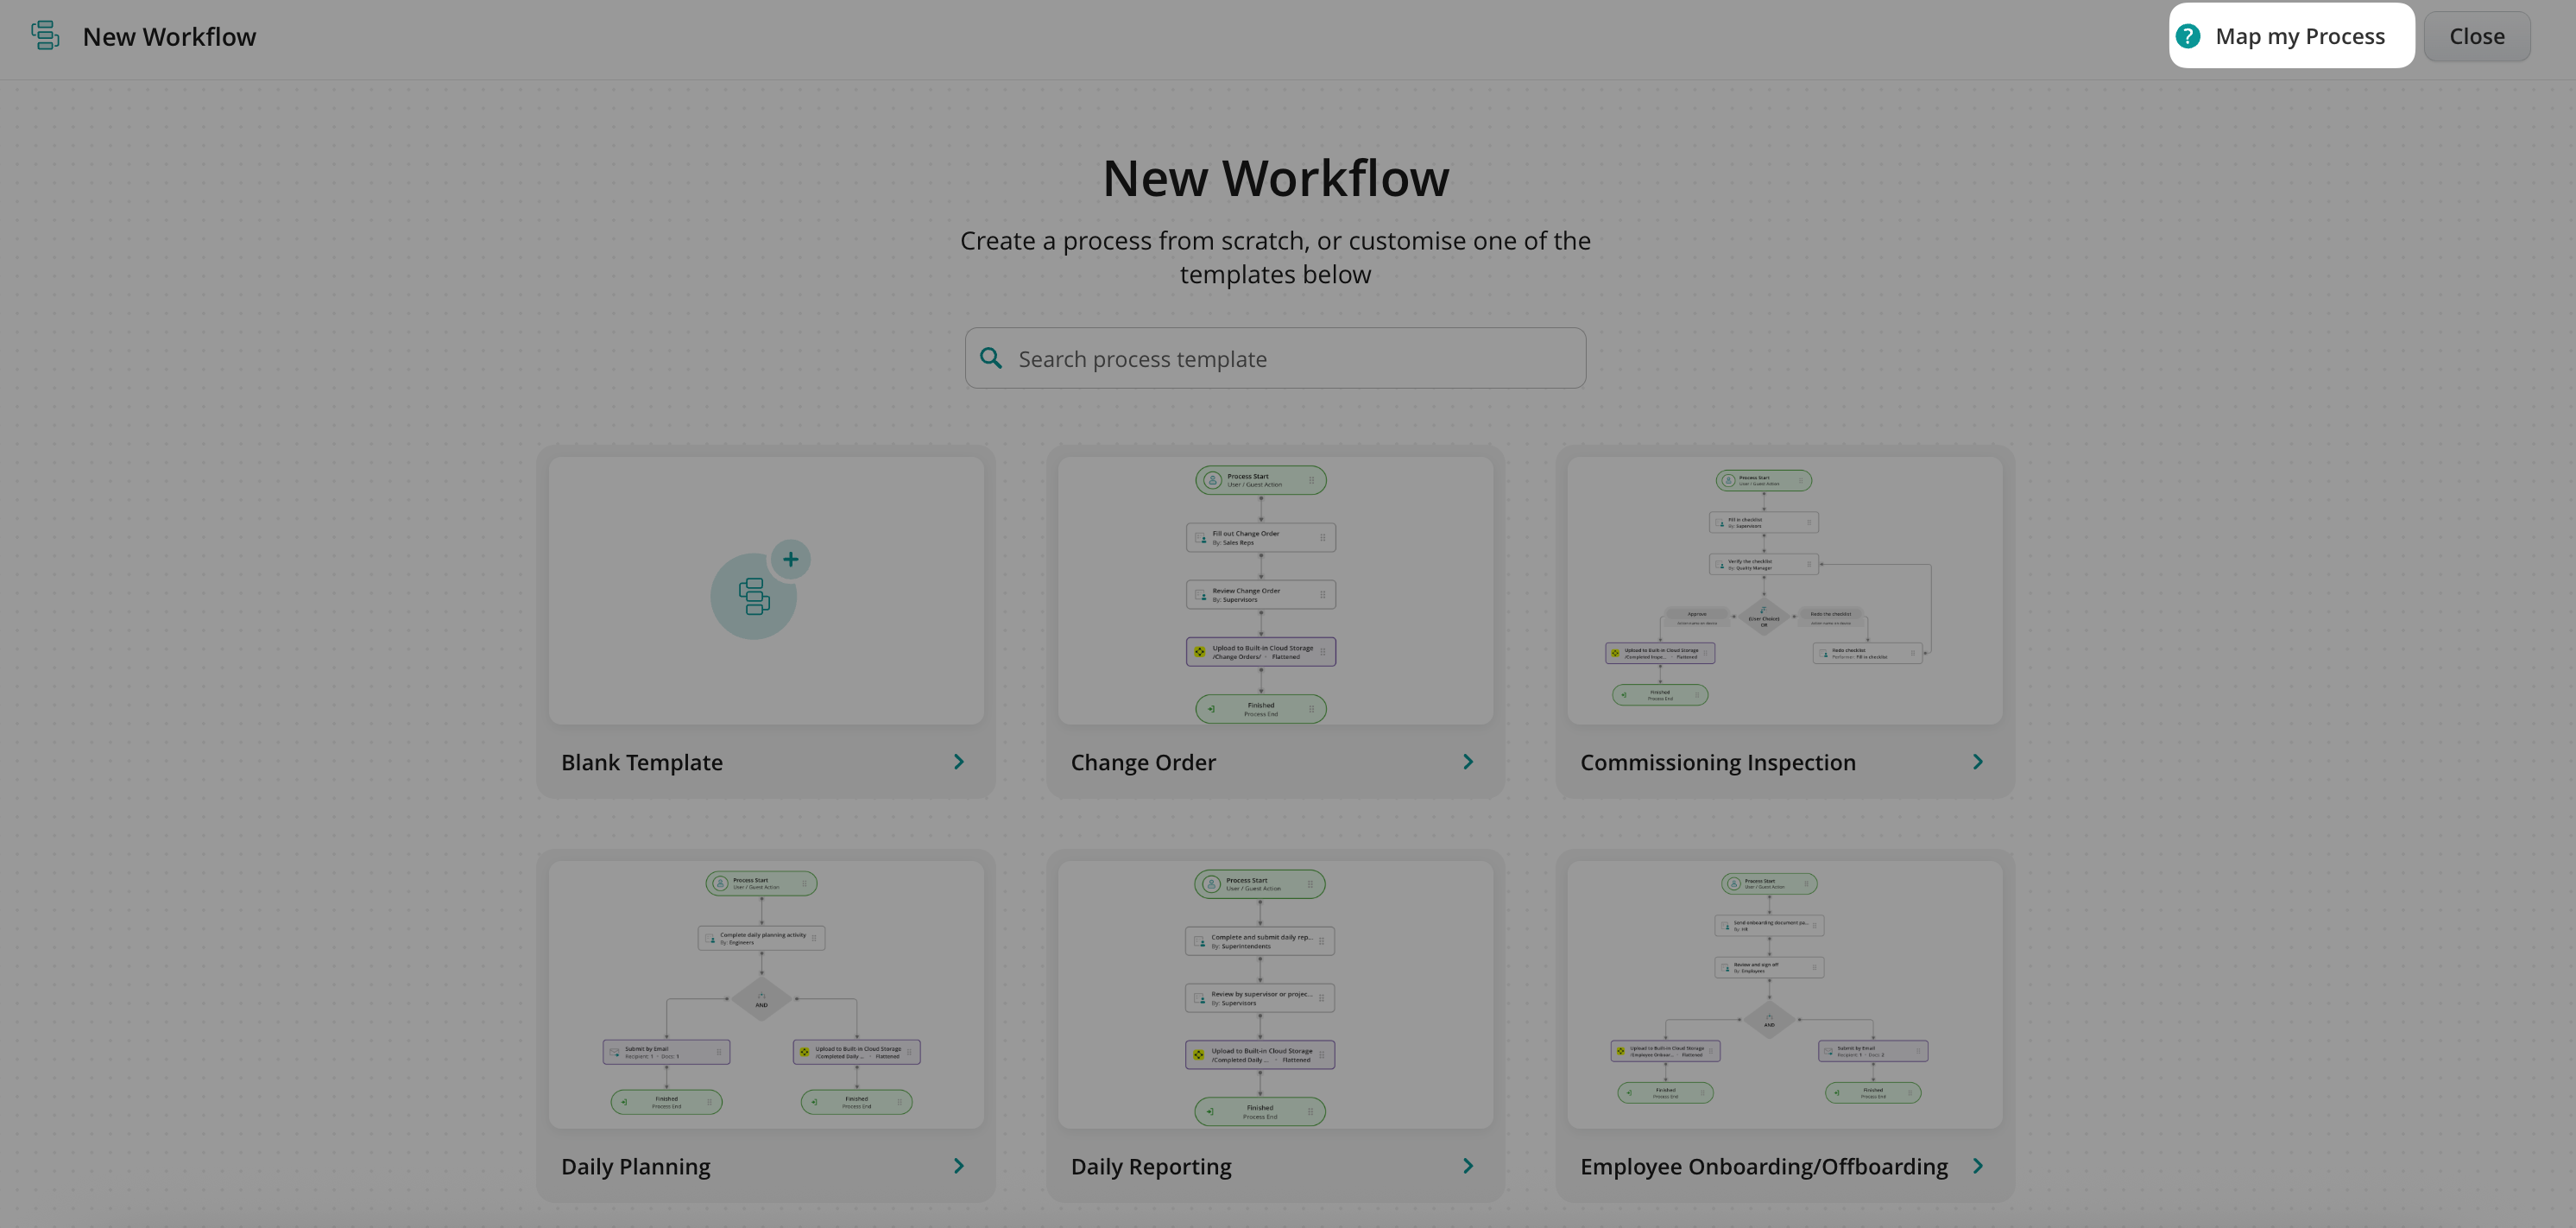
Click Map my Process in the upper right corner.
In the window that appears, describe the use case you want to build and attach any relevant files (such as forms or flow diagrams). Once you submit the form, our team will contact you shortly to guide you through the process.
Was this article helpful?
Thanks for your feedback!
Oops, something went wrong. Please, try again later.
Thank you!
What details or examples would have made this article more helpful for you? We appreciate your insights!
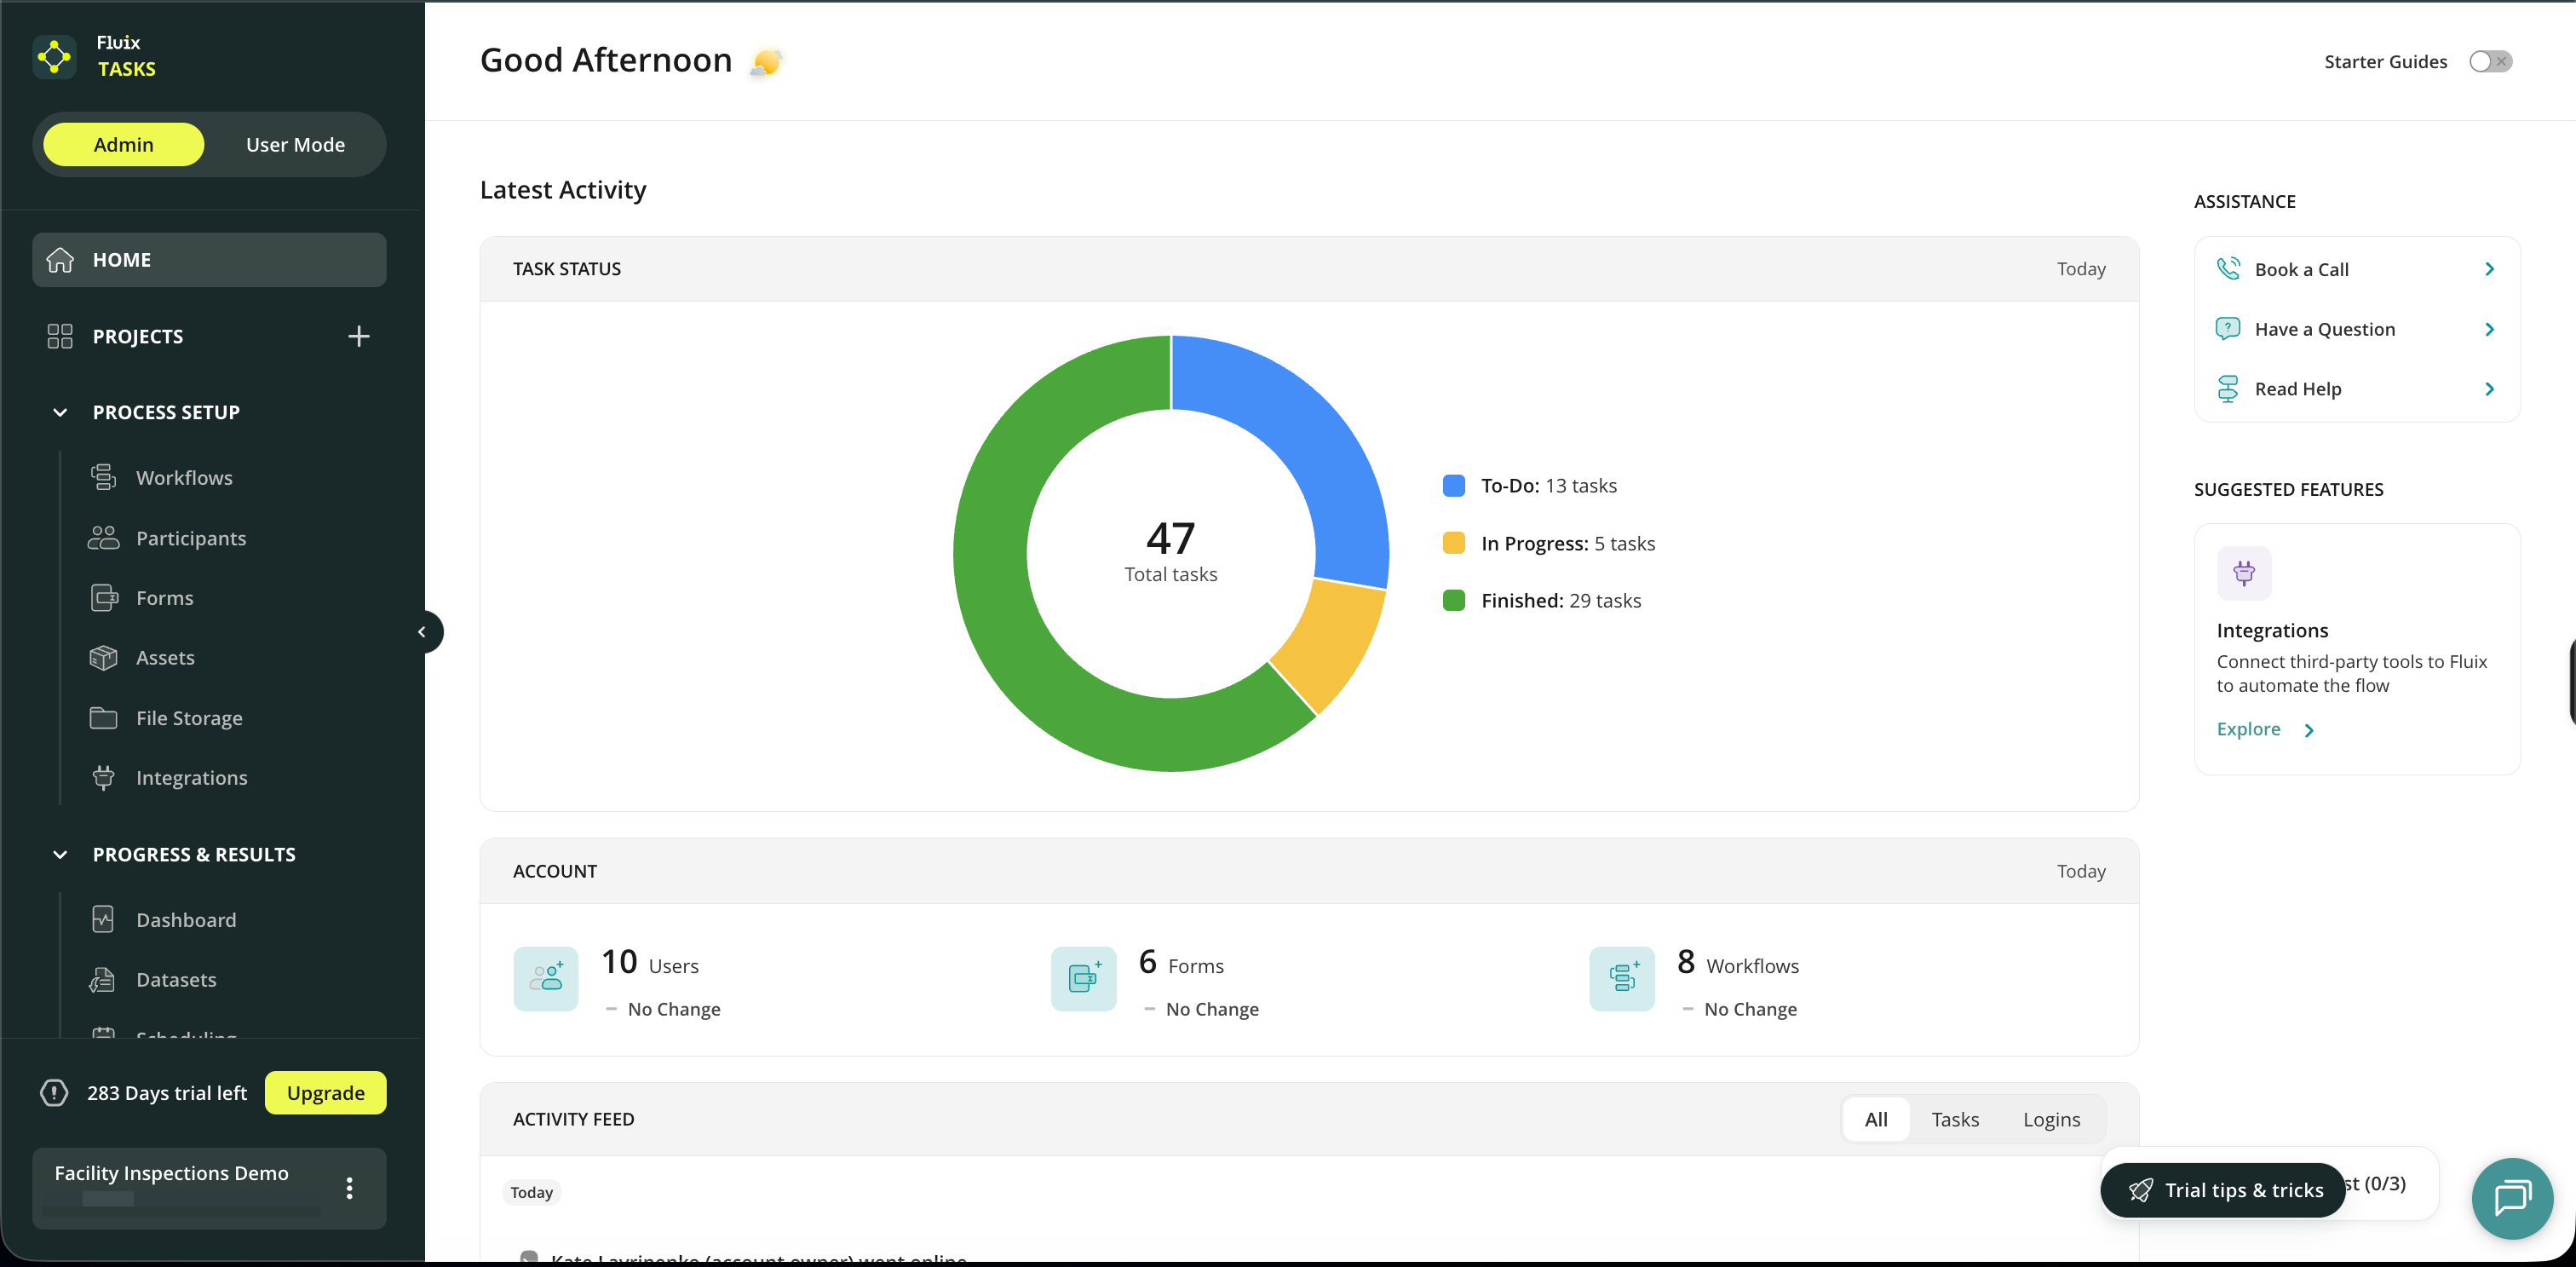
The Fluix Home page is the start page of your Fluix account, where you can check a brief overview of your company’s latest activity.
Account section
Here, you may see the recent changes to the most crucial part of your setup: the number of added/deleted users, Forms, and Workflows in the account.
Task Status
Task Status reflects the current number of ToDo, In Progress, Finished, Failed, and Overdue tasks so you can better understand your team’s current workload and progress.
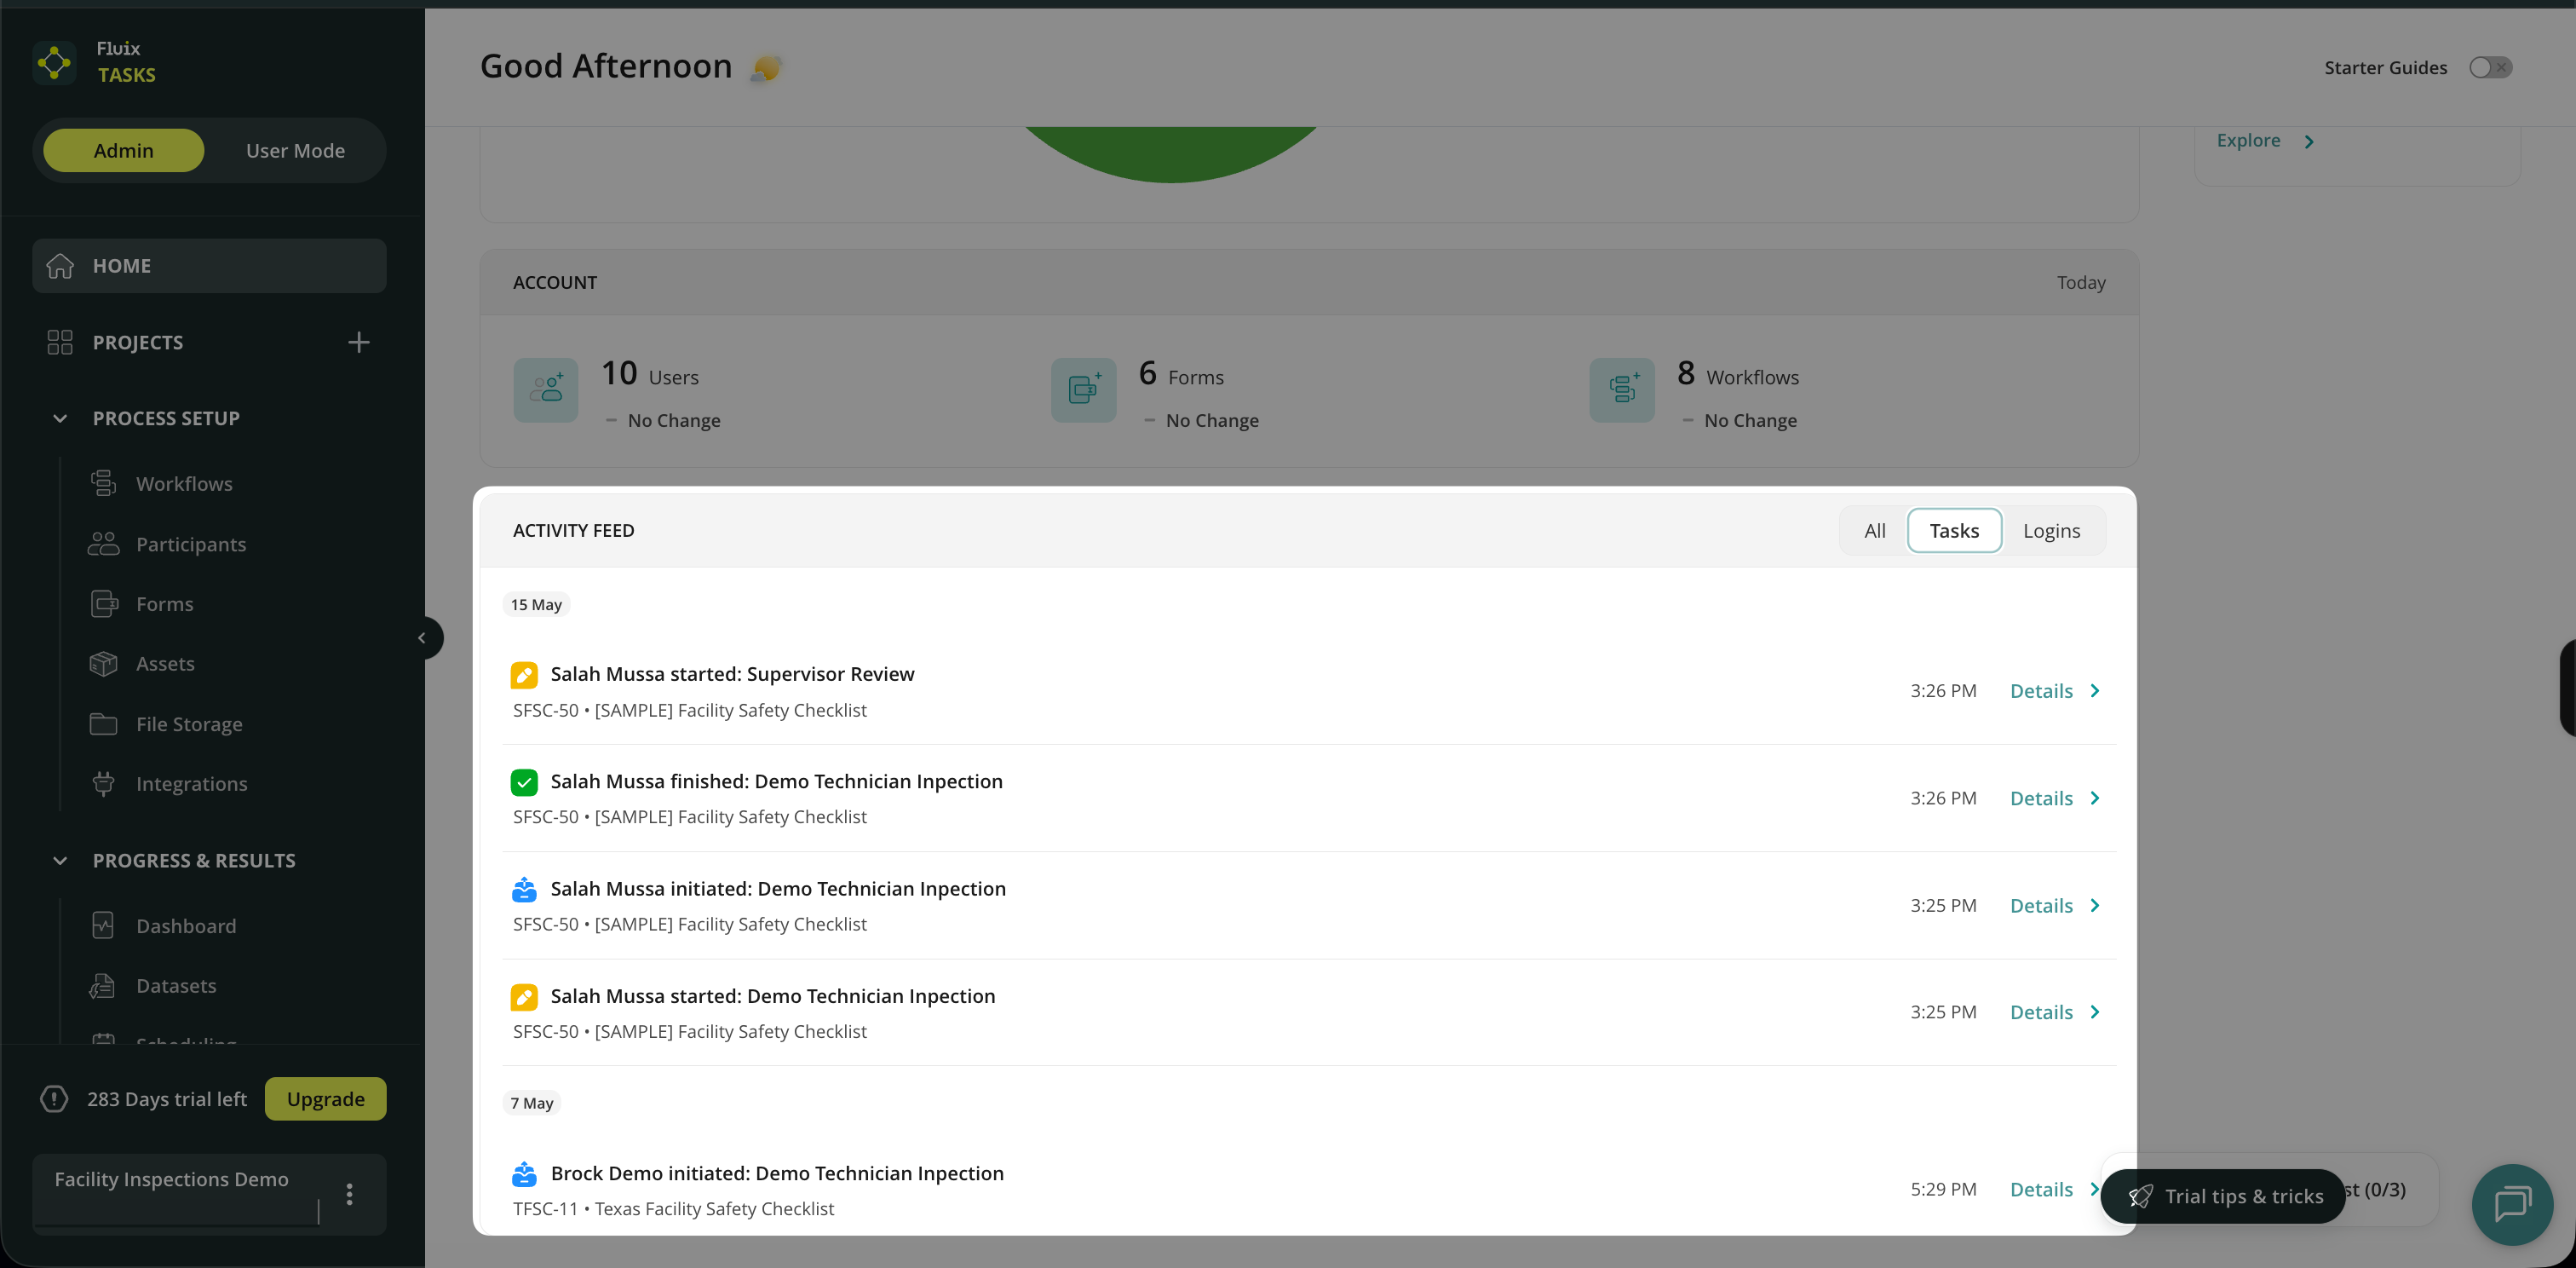
Activity Feed
In the Activity Feed, you can track all the activities within your account, such as users’ last login date and the forms they are currently working on. For easier navigation, you may filter these actions by Tasks or Logins in the Activity Feed panel.
By clicking Details button, you may check more precise information about the user or the task he/she was working on. For example, by clicking Details on the user login record, you will be redirected totheUser Details page to see the current setup configured for this user, which devices he used to log in, etc.
By clicking Details in the record regarding the form the user was working on, you’ll be redirected to the respective Process Details page. Here, you can see how long it took the user to fill out and submit the form, to whom the form was sent, and its current status.
If you need our assistance, feel free to contact us at support@fluix.io.We are always here to help!
Was this article helpful?
Thanks for your feedback!
Oops, something went wrong. Please, try again later.
Thank you!
What details or examples would have made this article more helpful for you? We appreciate your insights!
To start building a workflow chart, go to the Admin Tab -> Process Setup -> Workflows section and click New Workflow in the upper right corner of your screen.
Here, you may create a chart from scratch or use the template of the preconfigured Workflows, which you can later customize according to your business process.
Click Blank Template to map your process from scratch, name a Workflow, and click Next. The abbreviation (ABBR) will be automatically generated and later displayed next to the user’s task name in the Fluix app.
Once your users start working on the recurring tasks, the respective number will be displayed next to the Workflow‘s abbreviation. For example:
Your Workflow name is “Field Inspection”, the abbreviation is FI.
When your users start working on the first task from this Workflow, it will obtain the name FI-1, when the second process is started – FI-2 etc.
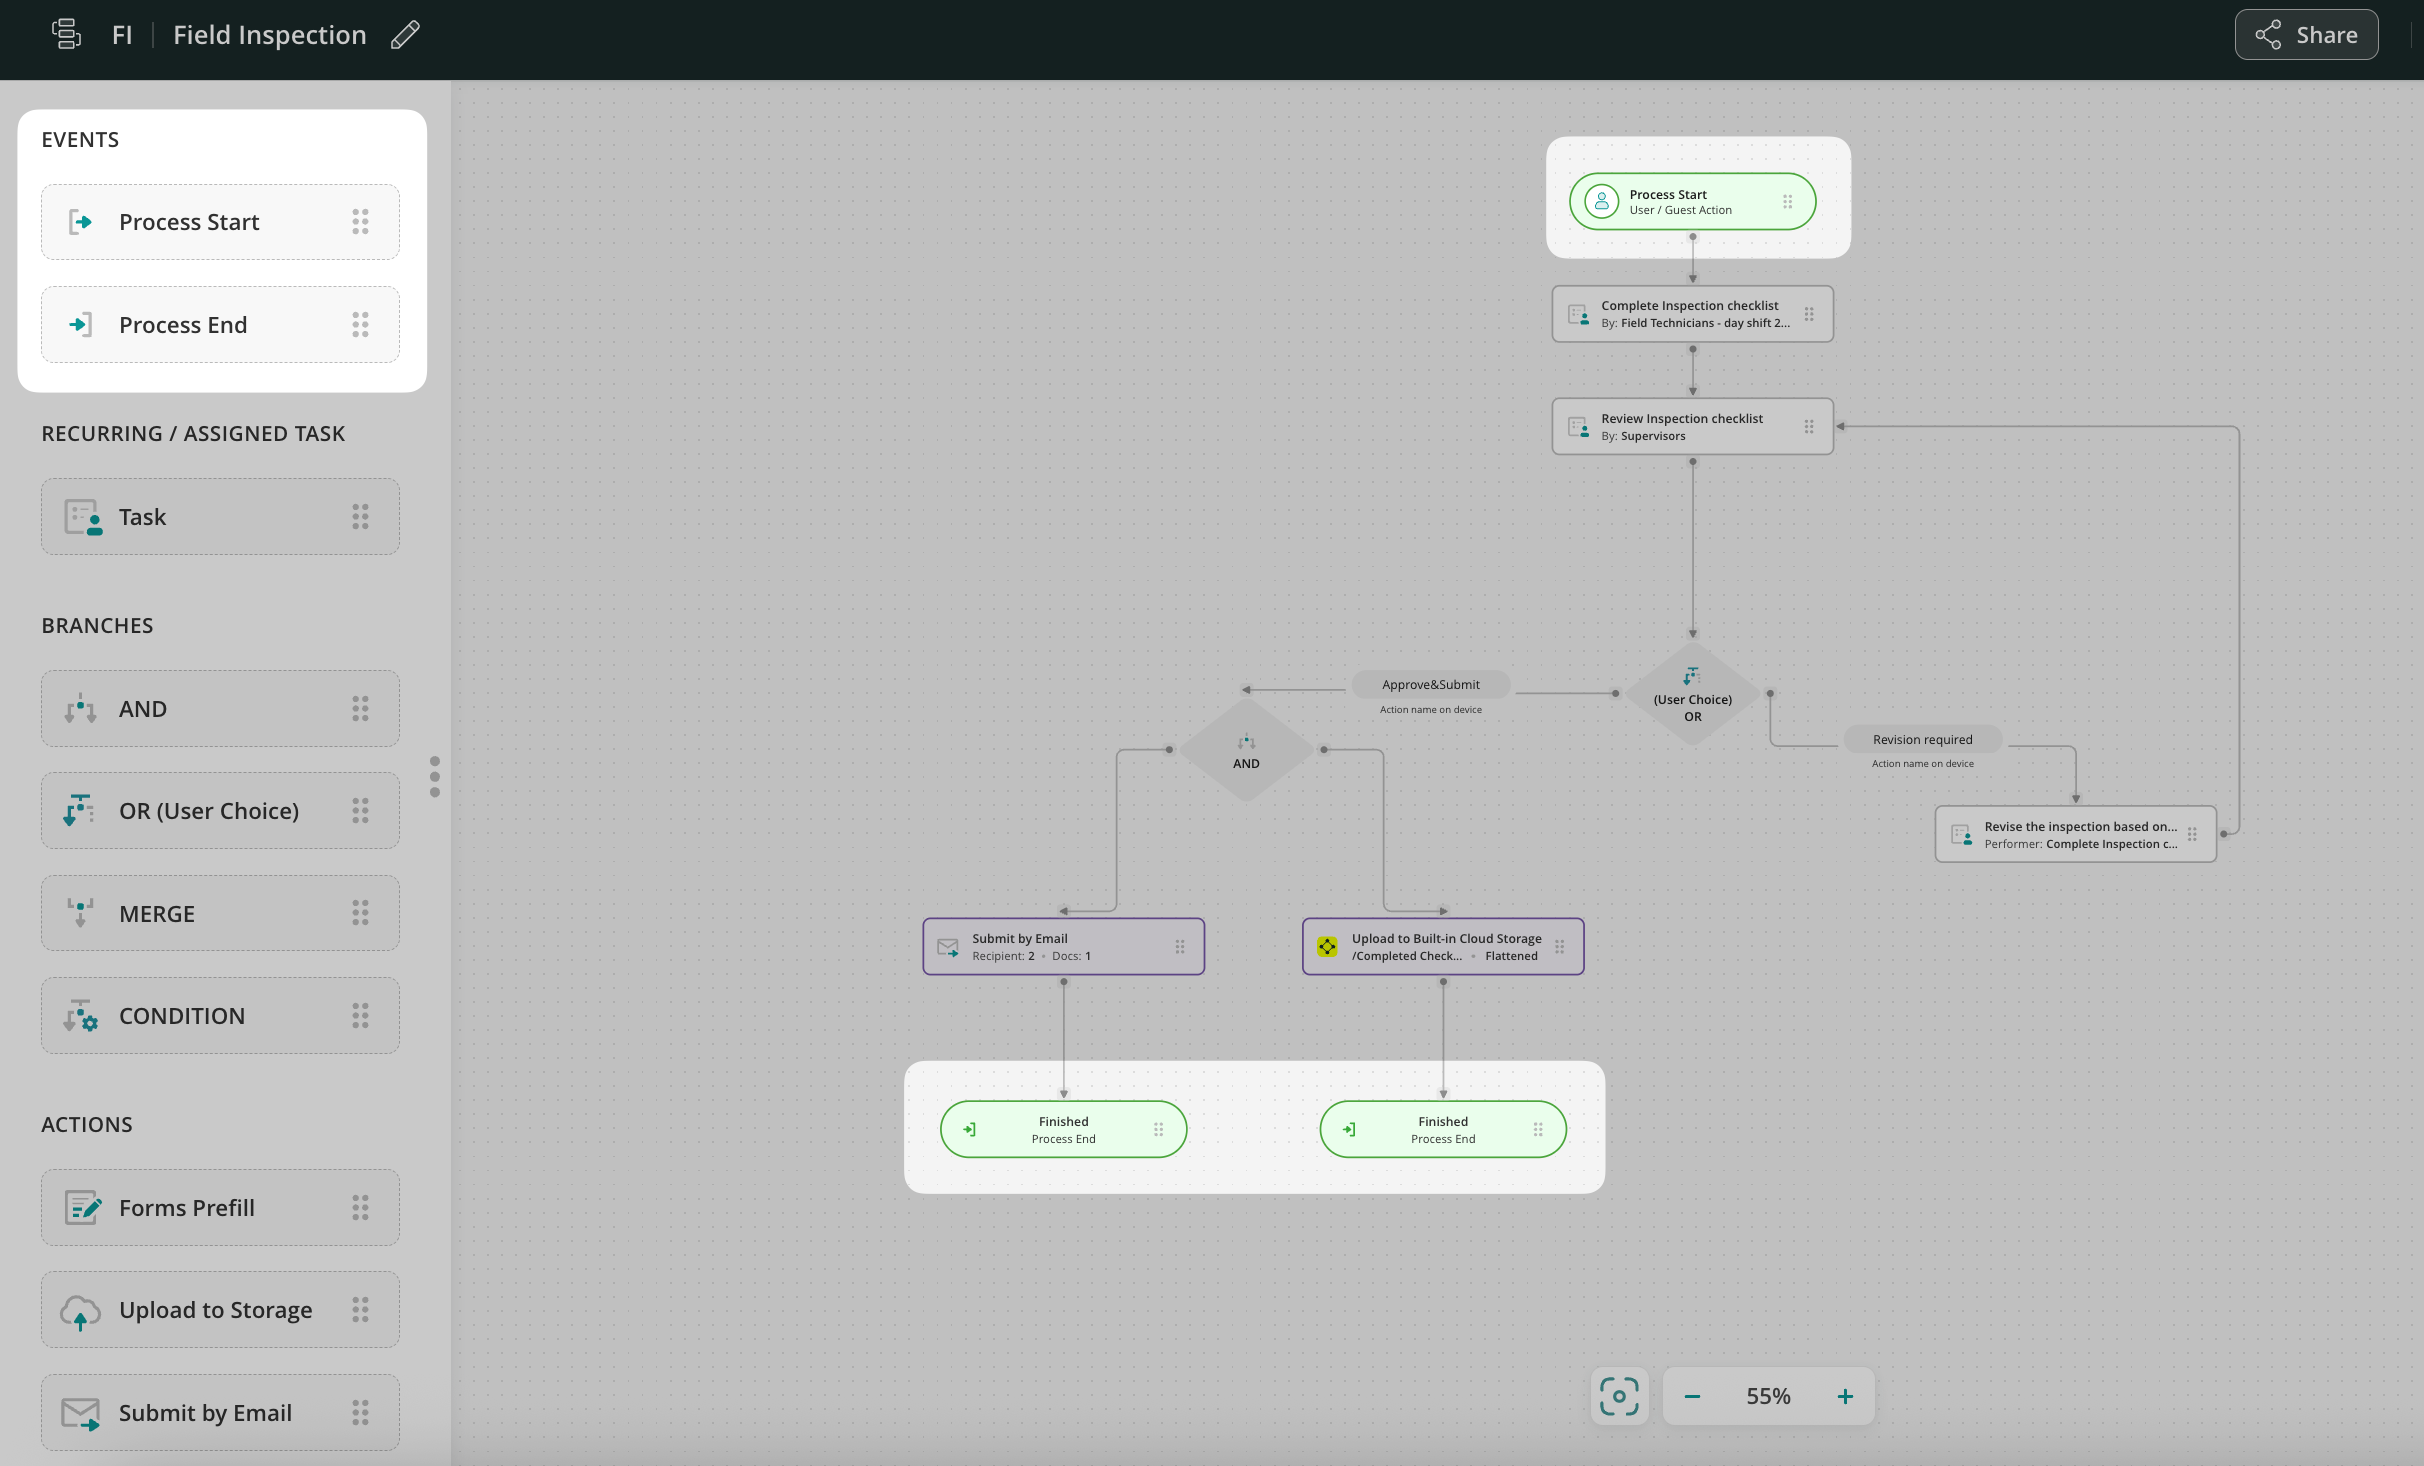
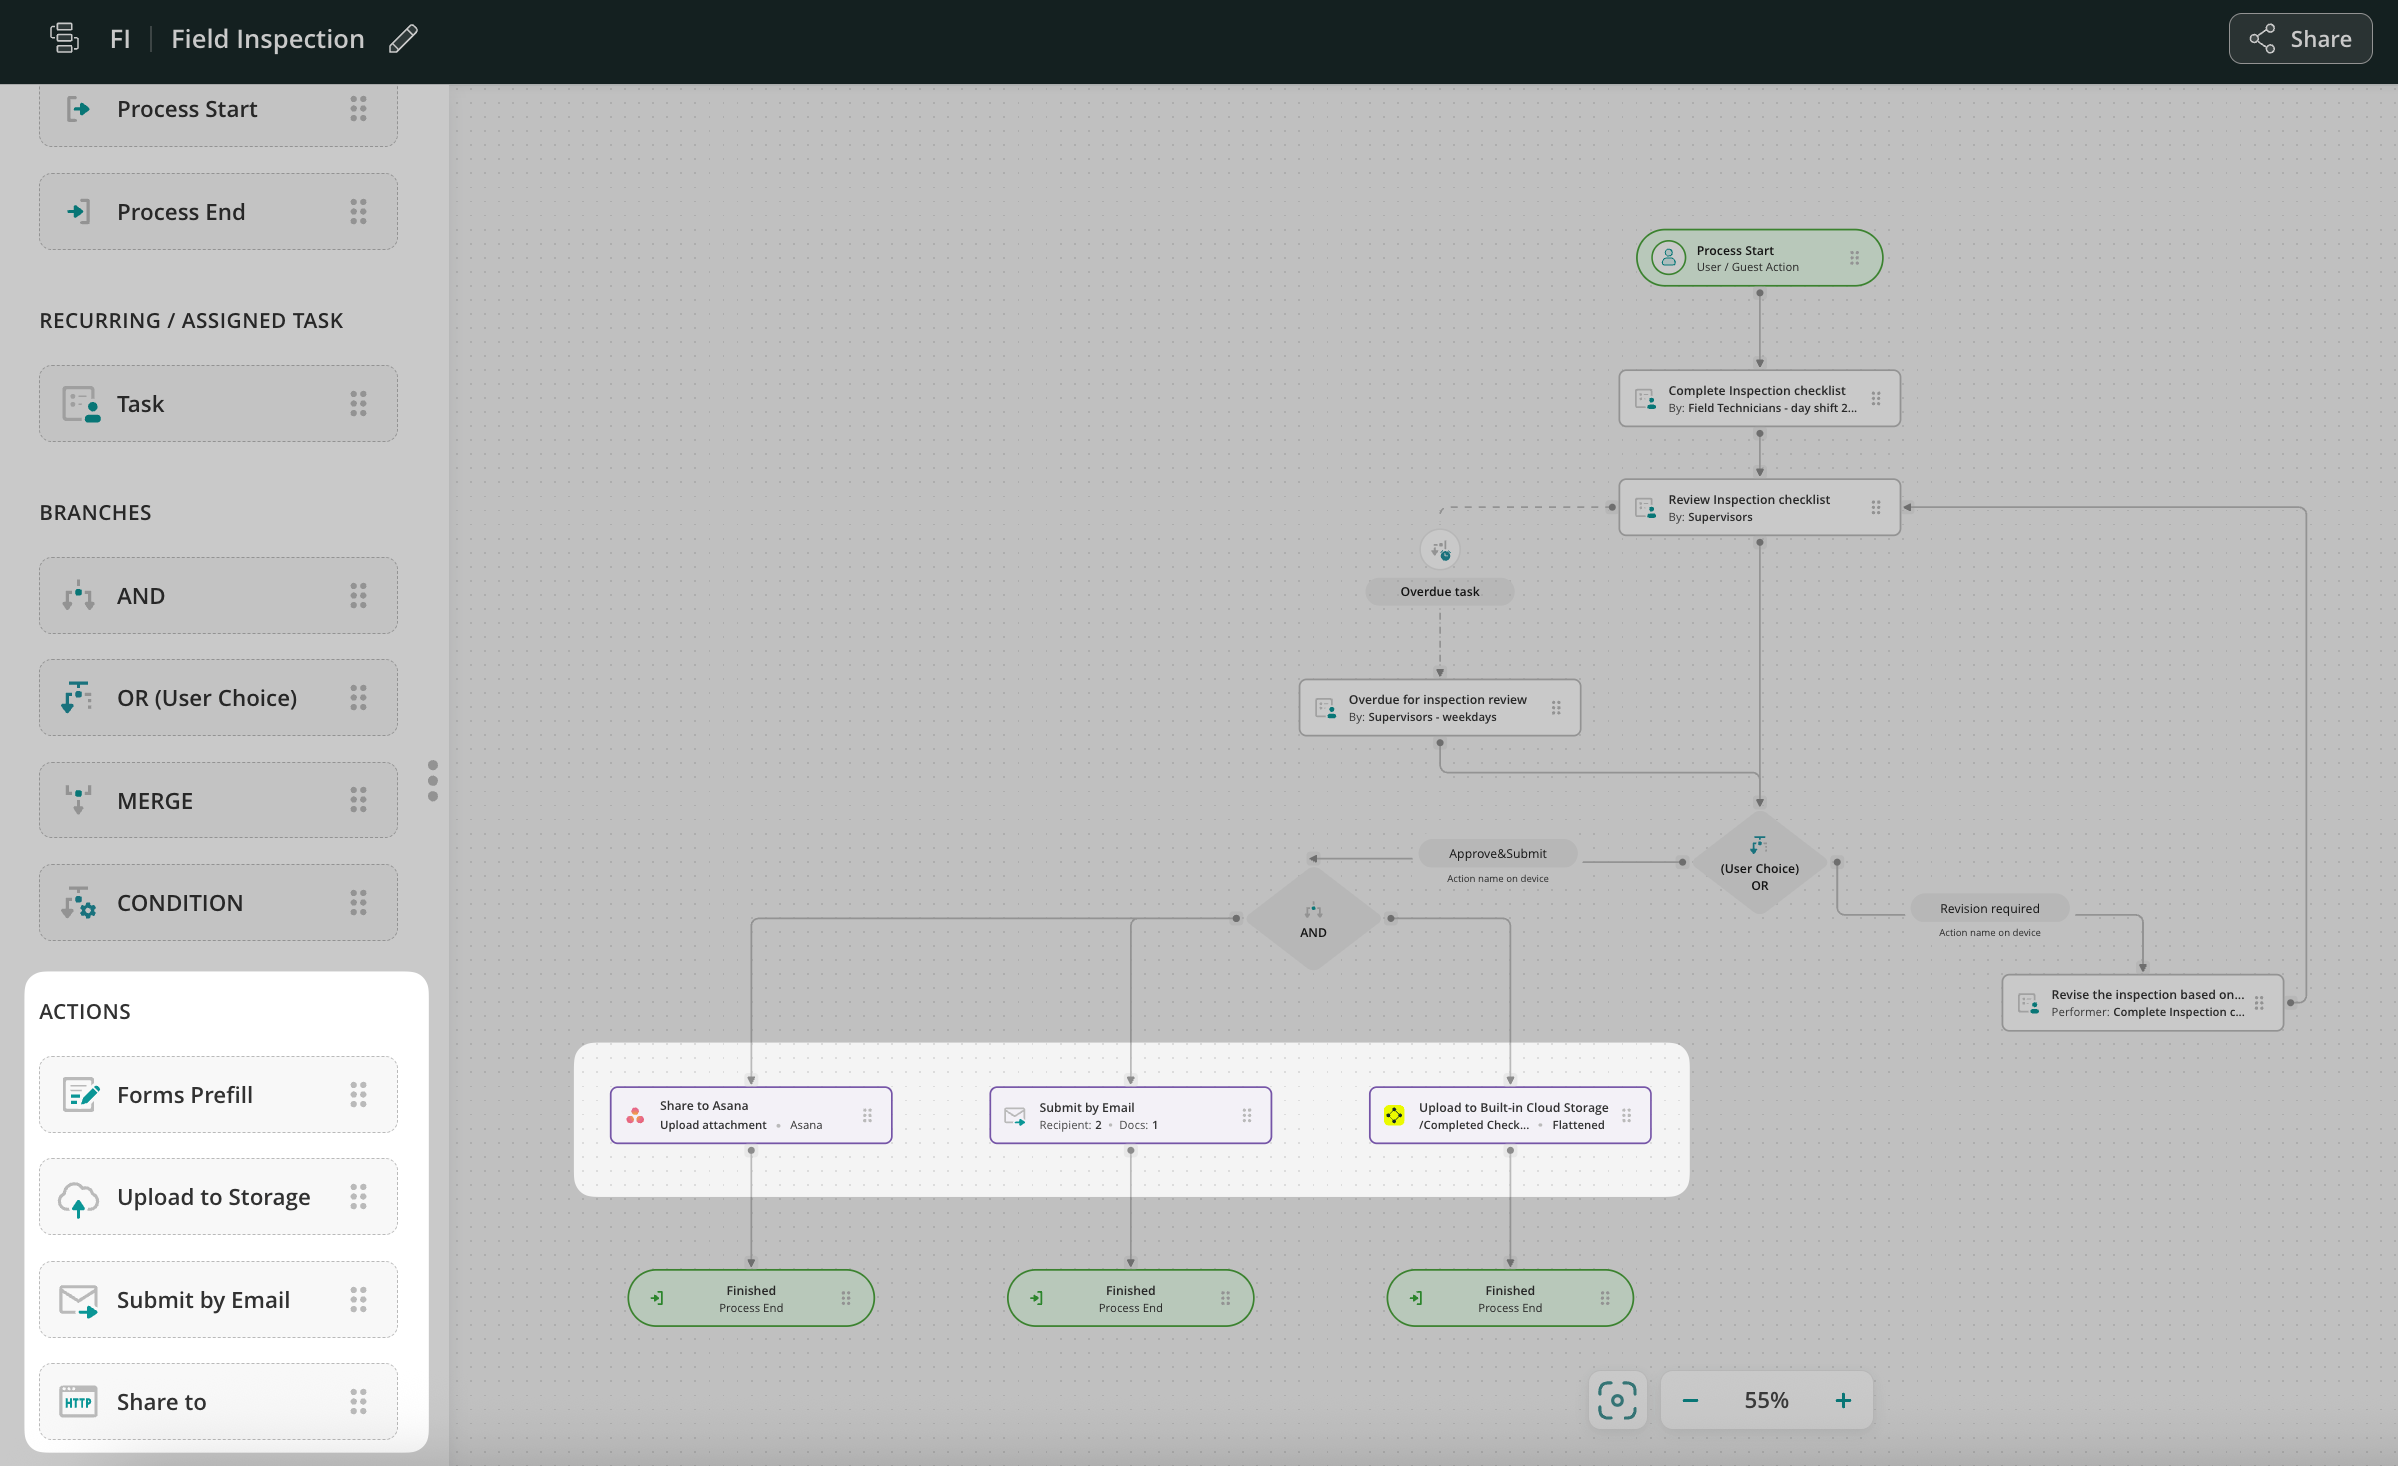
In the Workflow builder, you will see the menu of elements on the left. In the previous article, you can check what each element does.
Drag and Drop Process Start from the left sidebar to the chart. To create the first task, drag and drop the Usertask under Process Start and connect it.
Click on the User task to open the menu that will appear on the left. We’ll return to the Task details in the next article.
You will see blue “+” plus icons surrounding the task. By clicking and dragging, you can add and connect any other workflow elements.
Use shortcuts to speed up the creation of the Workflow. By clicking on the green “+” icon, you can connect or add elements to the Workflow.
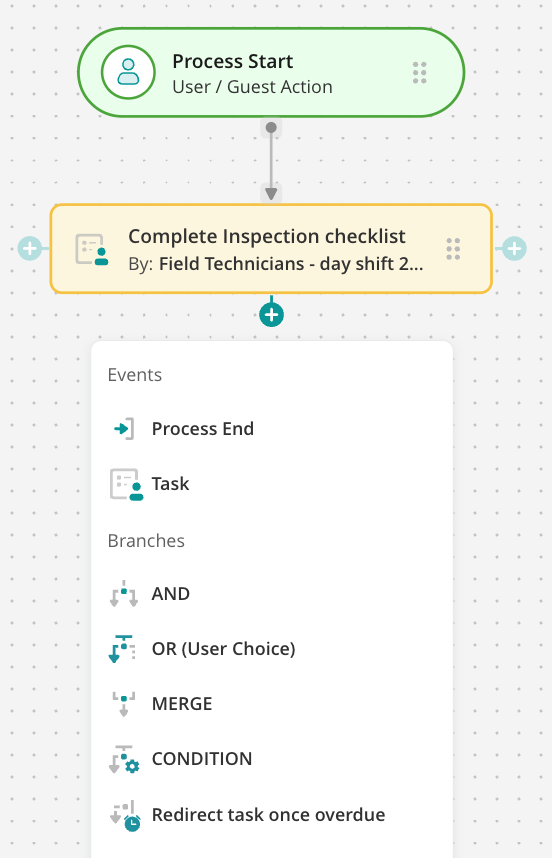
Let’s get familiar with the list of workflow elements available in the menu on the left-hand side of the workflow builder:
Events
Process Start is the element to be used at the beginning of your chart. It marks the start of the flow and is visible only to you and other admins who have access to the workflow.
Process End is the element that marks where the workflow process will end visually. It can usually be added after actions such as Upload to Storage, Send by Email, or Share to (external tools).
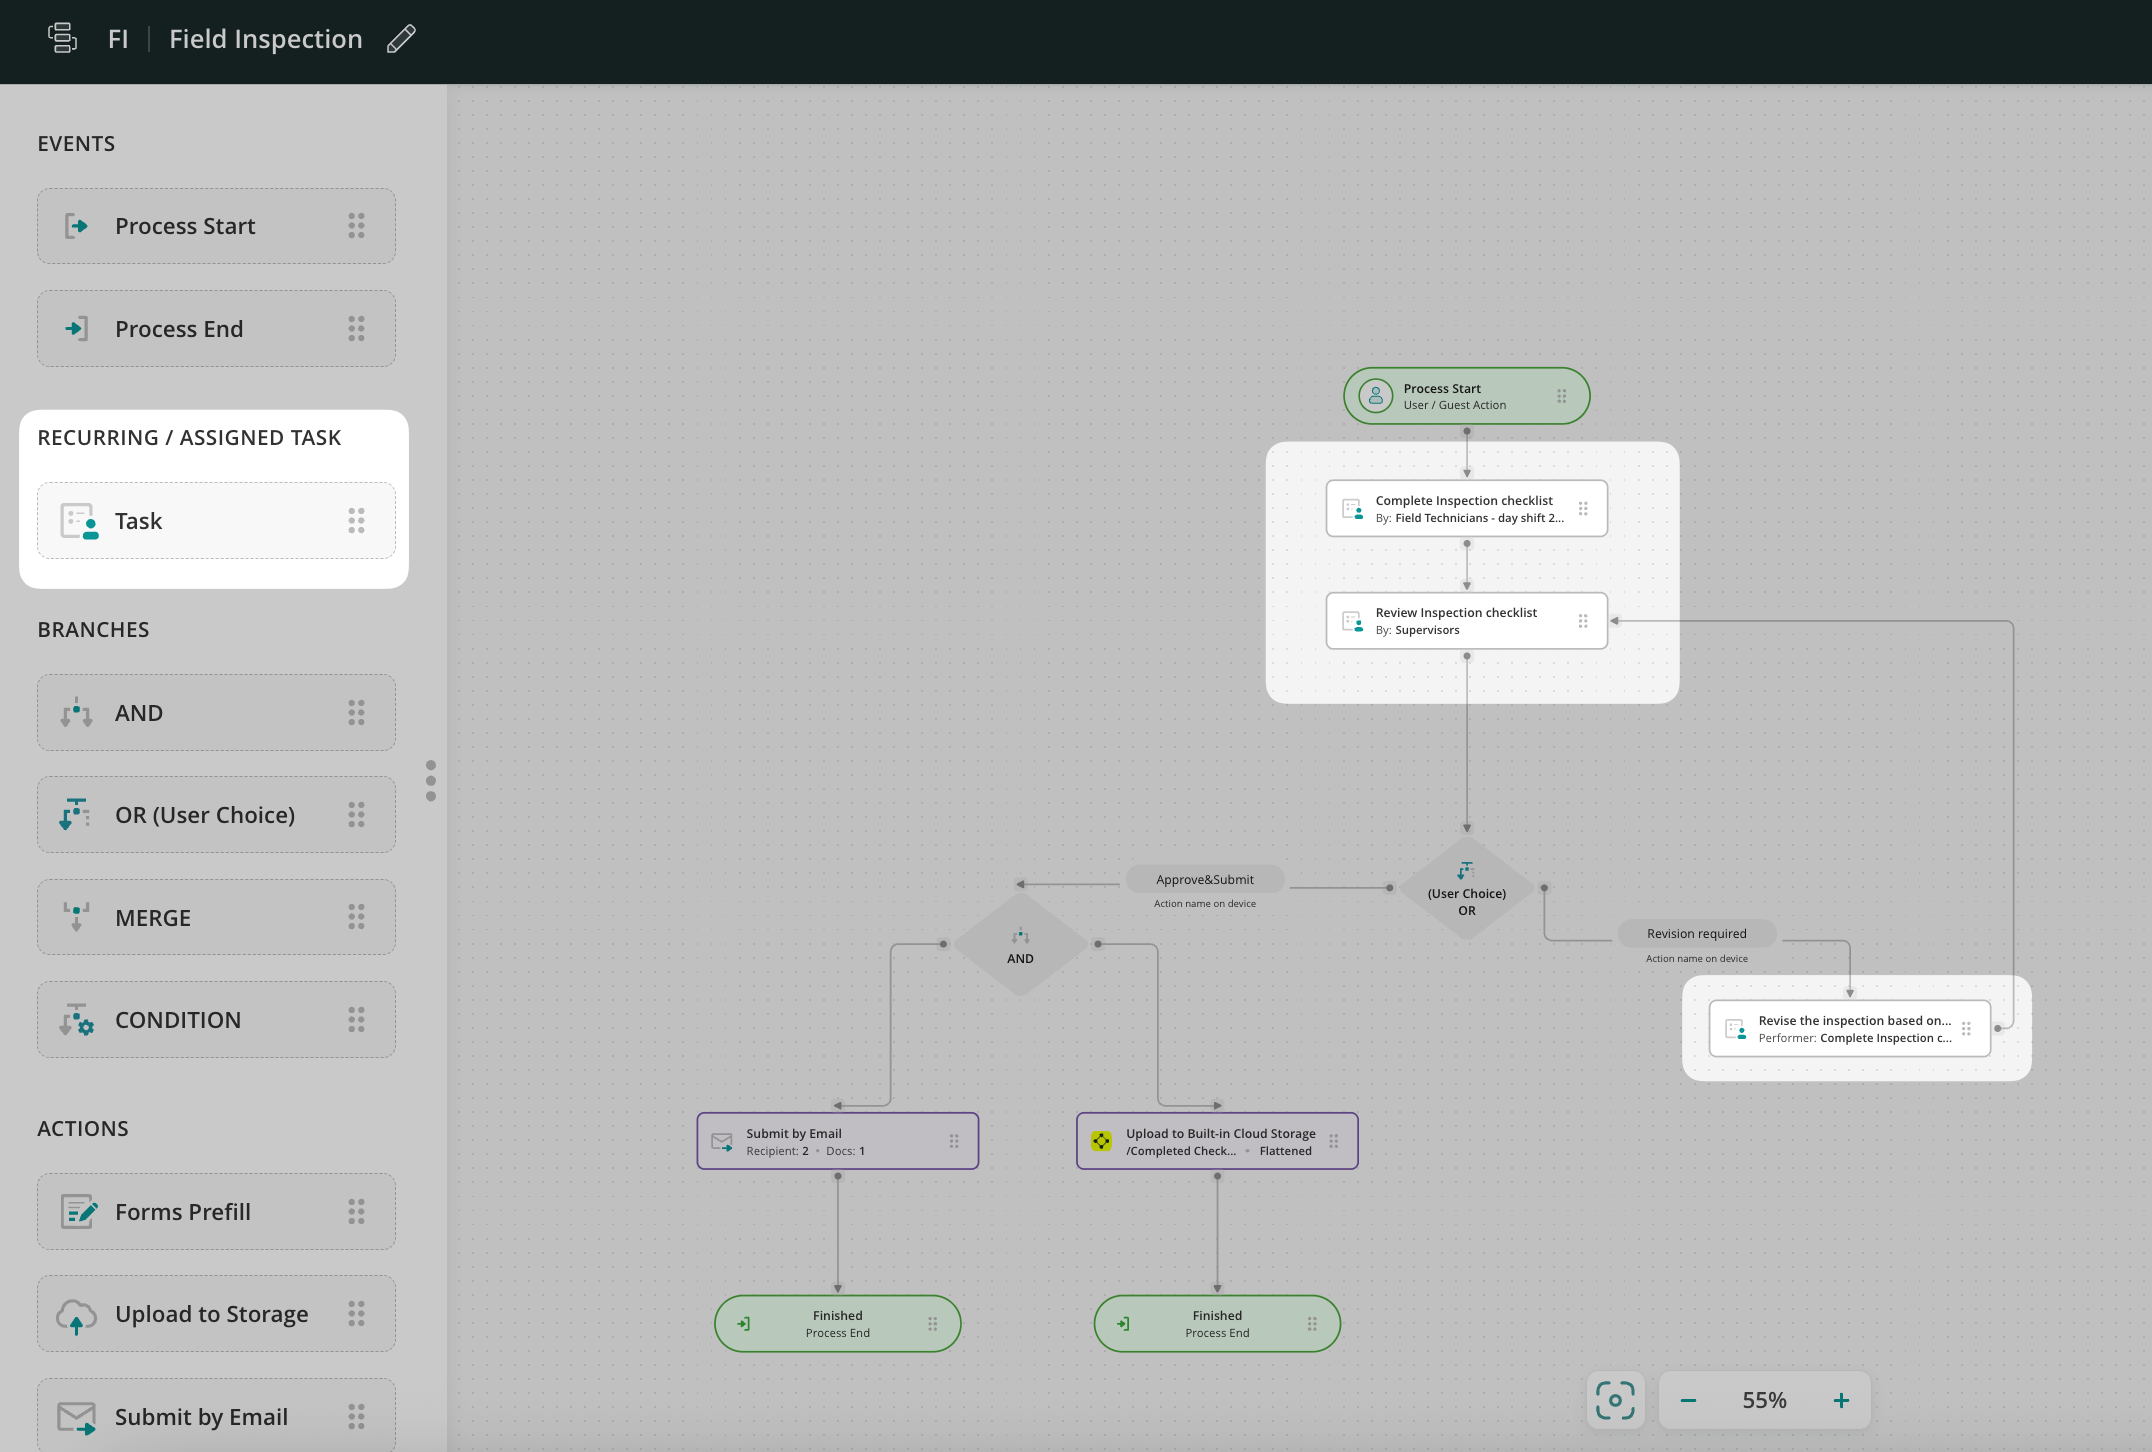
Templates/Assigned Task
Task is a recurring or assigned action that the Assignee will perform on a preconfigured basis. The Assignee can be:
A task consists of a description of the job to be done, fillable forms, and attachments for review. The priority, duration, and reminders can be set up for each task. You may add as many tasks for your process as needed; they should be connected accordingly with other workflow elements to meet the desired outcome of the built flow.
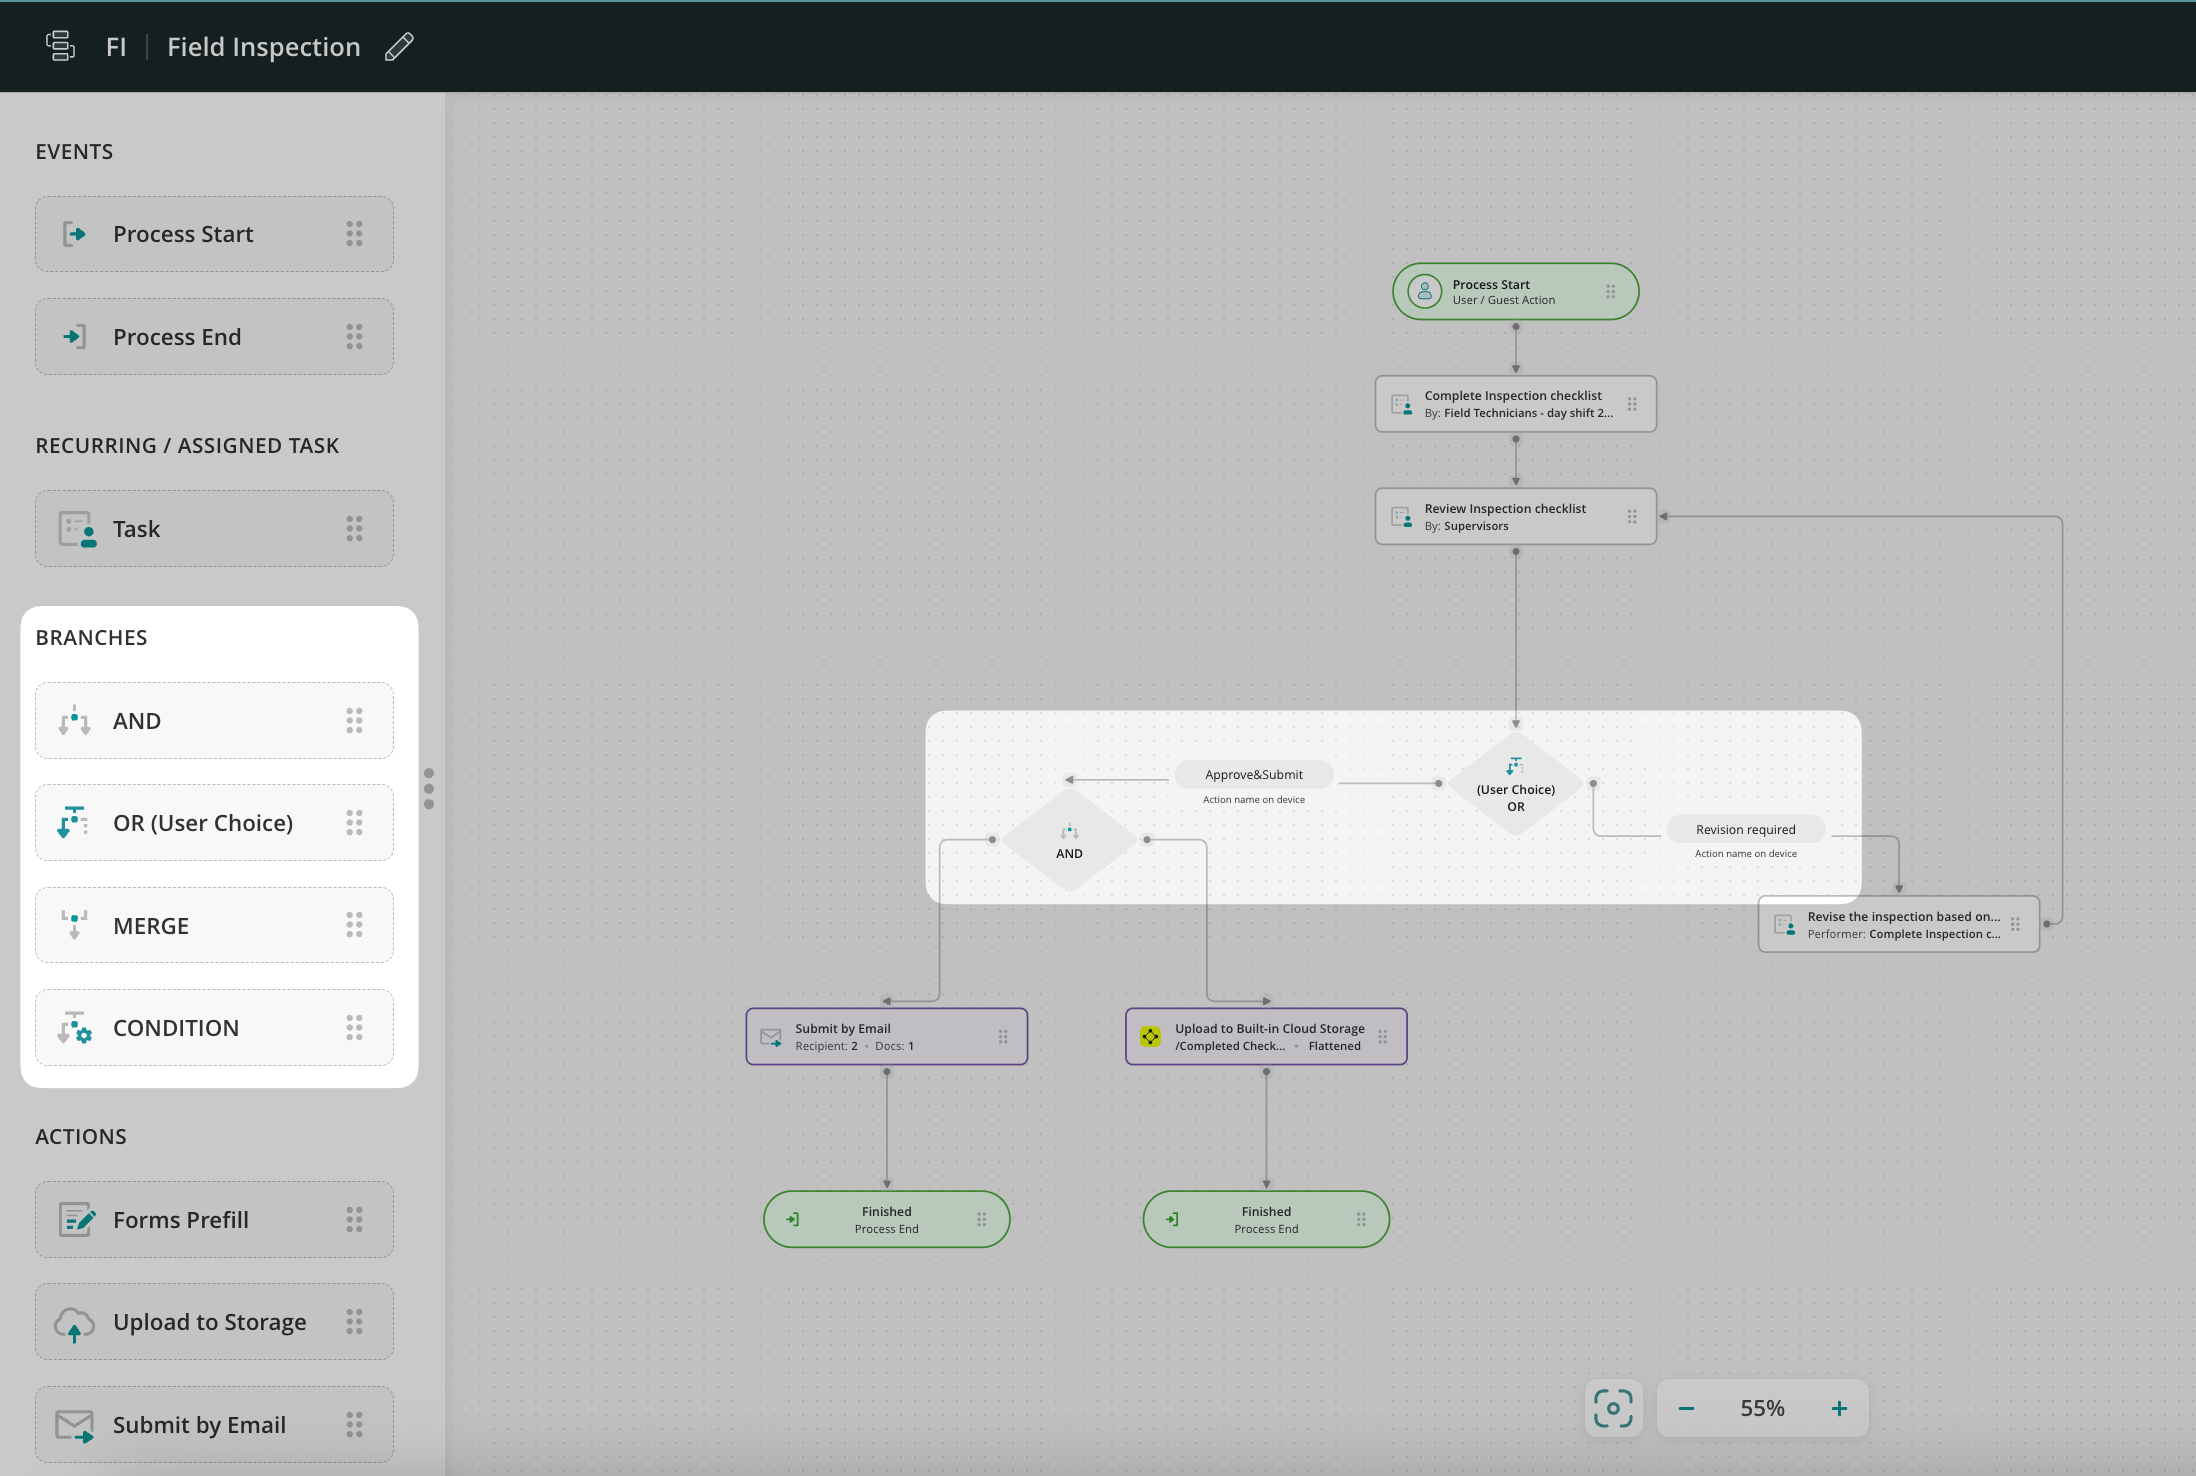
Branches
And action is an element that helps configure two or more parallel branches of the process.
Or (User Choice) actionis an element that configures two or more branches of the process. A user on the device will choose manually which action to take for the task.
Merge actionis needed to ensure that the parallel user tasks (e.g., simultaneous completion of different parts of one form) pass to the next step (e.g., manager’s review).
Condition action is an element that defines the task flow based on the data filled out in a particular field of the form. Learn more about this functionality in the Conditional Routing to automate a business process tutorial.
Redirect Overdue Task Action – an element that allows automatic redirect of the task to another predefined flow in case it was not completed on time by the user.
Actions
Forms Prefill is an element that you may use to configure the pre-population of data in the forms from one task to another or from external software to Fluix forms. Learn more about this functionality in the Forms Prefill in Fluix tutorial.
Submit by Email action allows you to send documents from Fluix to any email without manually entering the email address and message in the field. You can preconfigure the recipients’ addresses and email subjects and add custom messages.
Share to action allows to share the completed documents or the data from them to any third-party software.
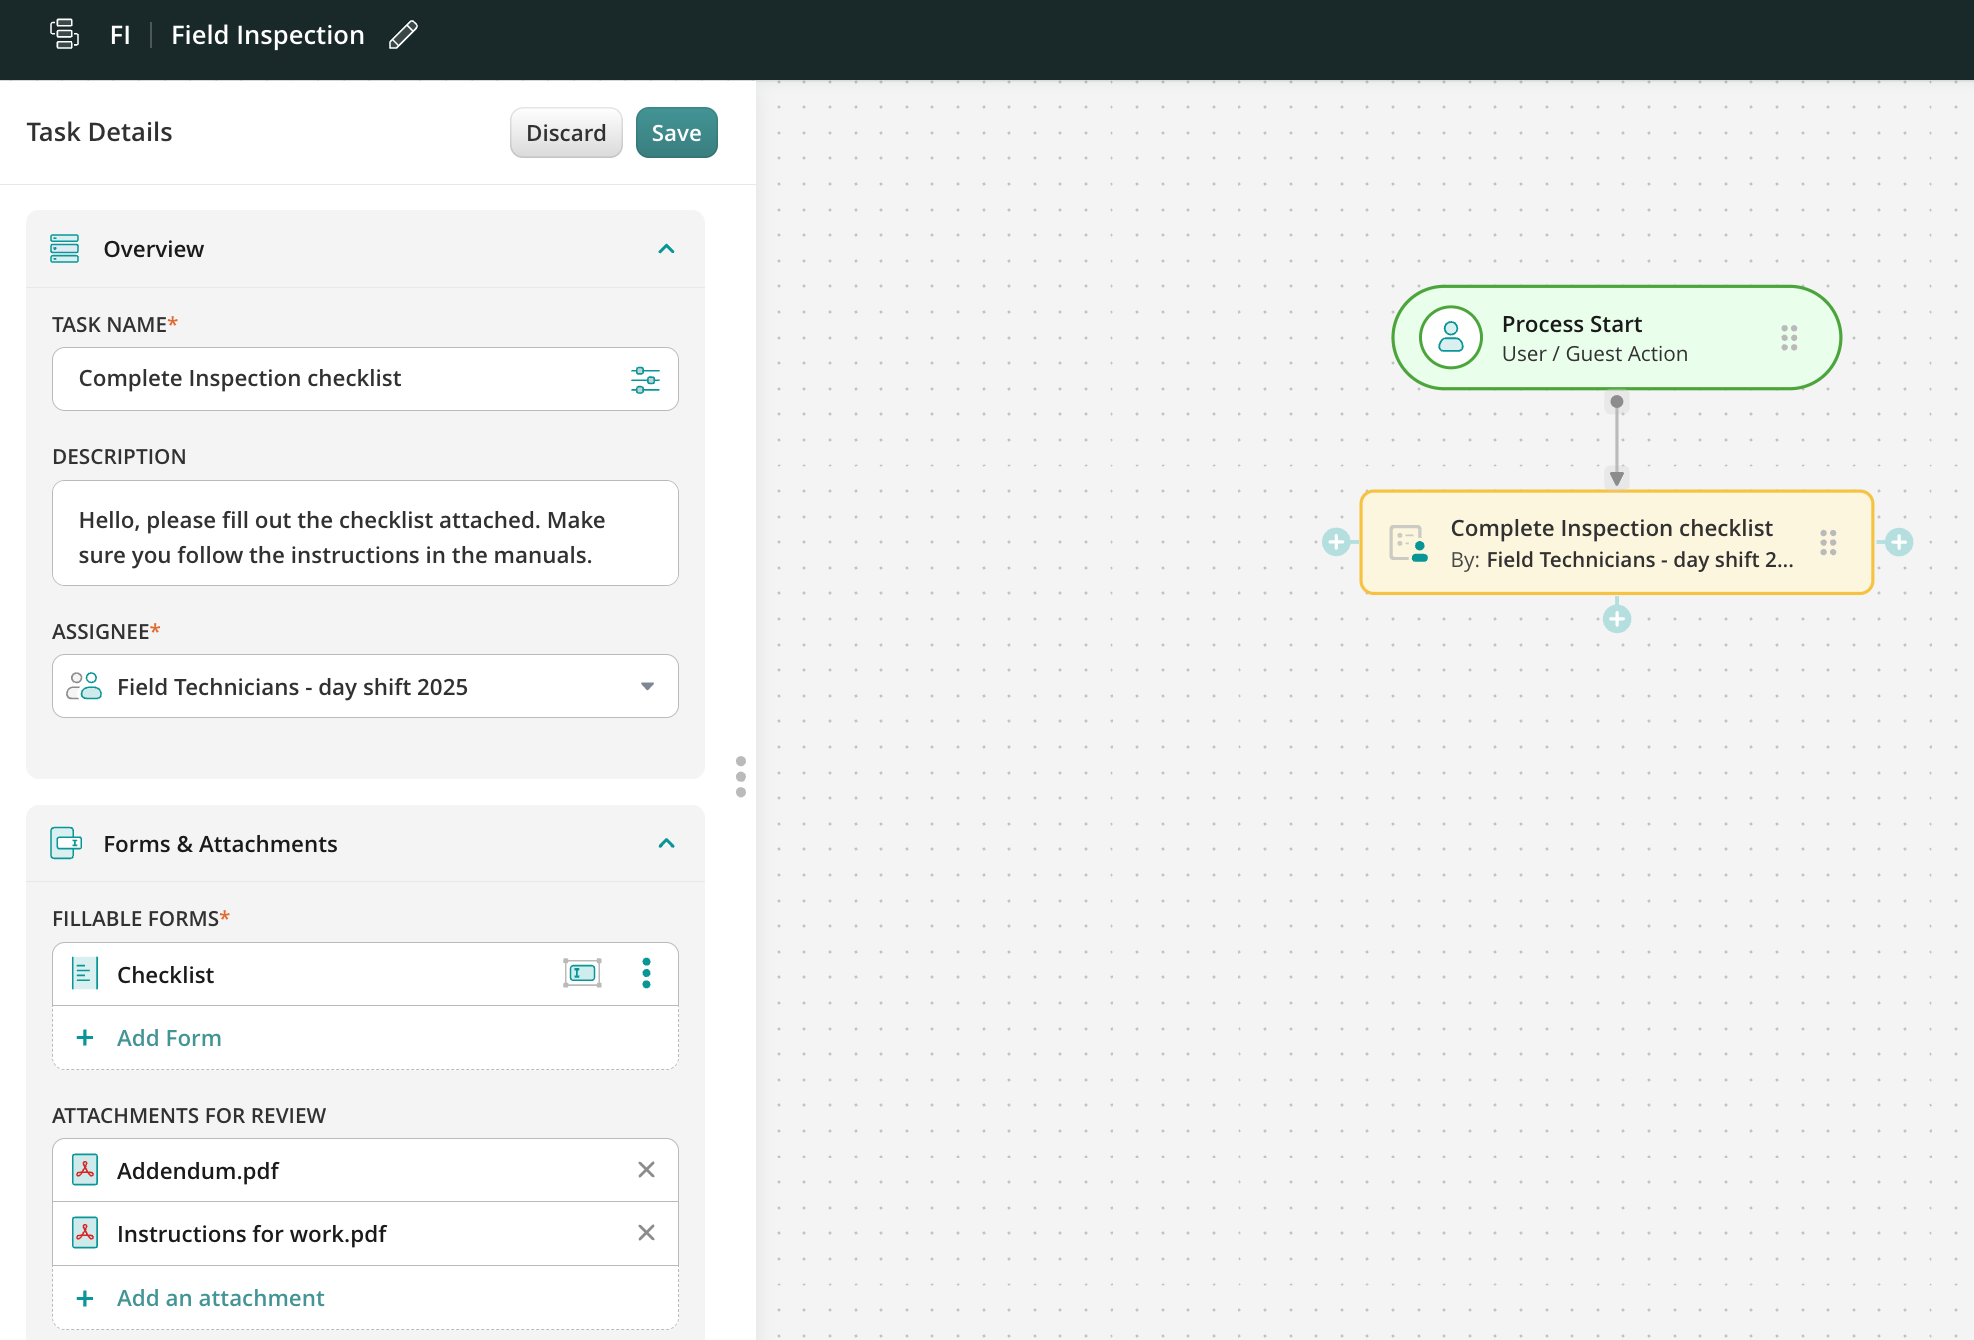
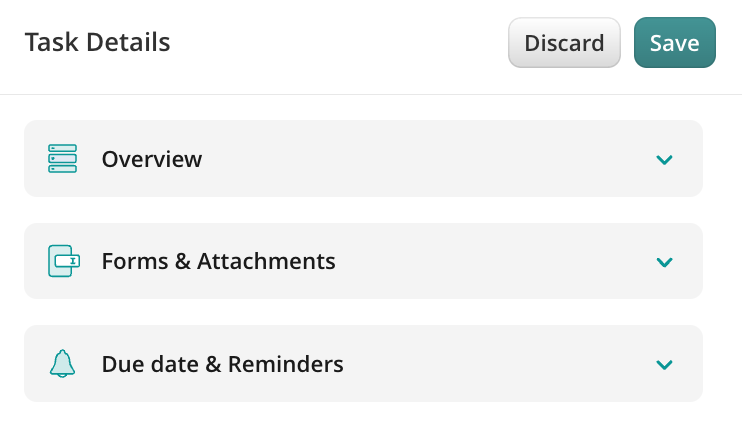
Task configuration menu has 3 main tabs: Overview, Forms & Attachments, and Notifications.
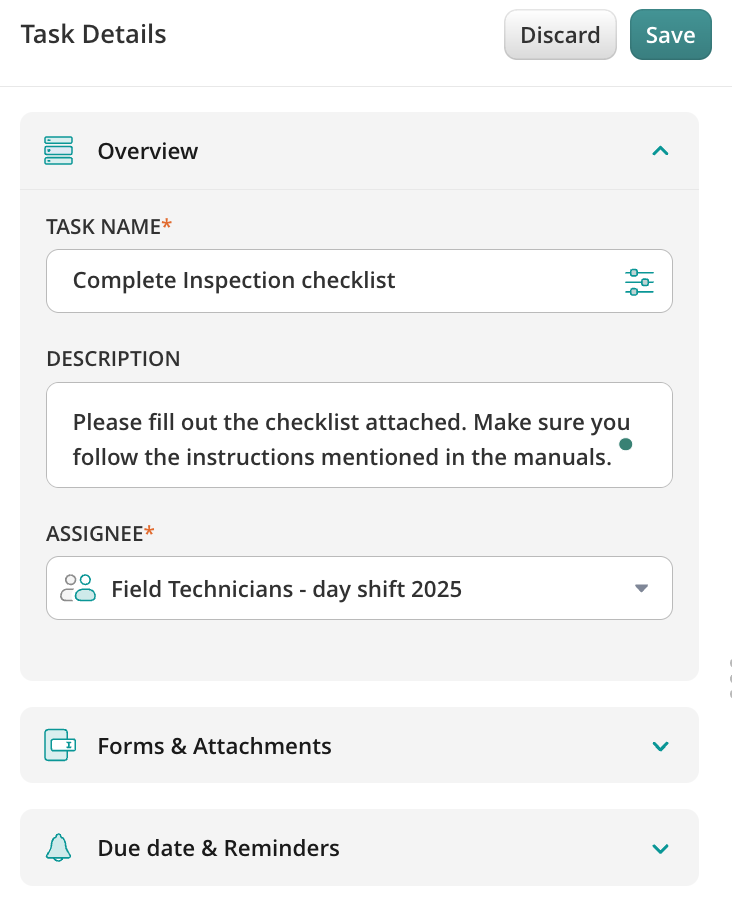
Overview
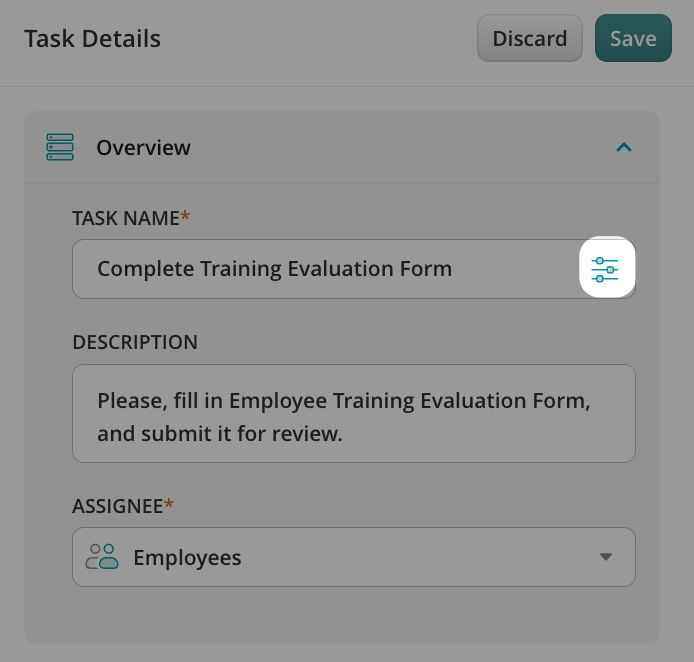
Overview tabcontains basic information about the task.
Task Name suggests you fill out the name of the task that the user will see on his/her device. By clicking on the Dynamic Values icon on the Task Name field, you may select the list of fields and values that you’d like to see in the task name after the user completes it.
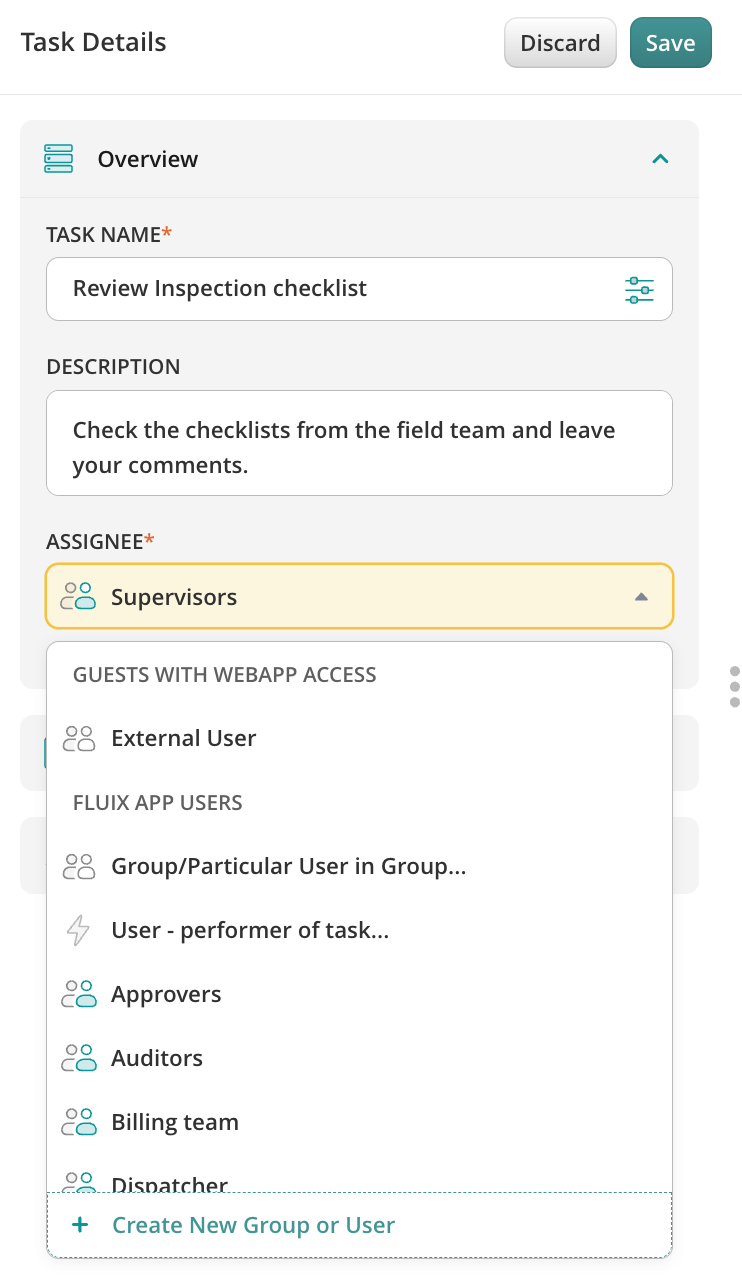
Assignee who will perform the task gives the ability to select the respective group/user who will perform the task. Let’s take a closer look at how you may configure the assignee for the task:
Group option automatically assigns the task to the group preconfigured by the account admin. In this case, the user who submits the task cannot select a specific user; the task will be available for all the participants of the preconfigured group.
The Group/Particular User in Group option lets the performer of the previous task select the particular user from the Group to whom the task will be assigned. In this scenario, the account admin selects the Group while building the workflow, from which the user will be able to select a particular user and assign a task to him/her upon submission.
User-performer of the task option automatically assigns the task to the particular user who performed any of the previous tasks.
Please note: both the Group/Particular User in Group and the User—performer of the task options can be configured starting from the second task in the workflow.
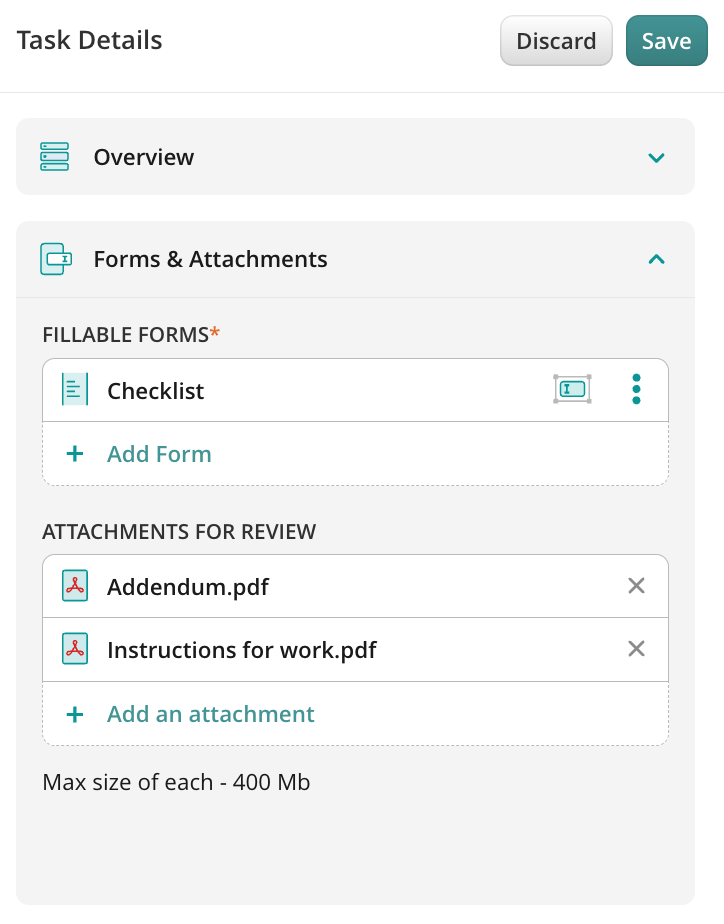
Forms & Attachments
Forms & Attachments tab was designed to add forms and attachments to the task to be performed.
Web forms are the primary elements of work in a task. They contain inputs, checkboxes, and other fields that the user will fill in.
You can select a form from the Fluix Form Library, create a new one in the Form Builder, reuse the already used one from other tasks in this workflow, or import the fillable PDF from your cloud storage or your computer:
If you choose a form from the Fluix Library and the same form has already been used in one of the tasks in the current workflow, you will see it as a new form, while the form name will stay the same.
A number of forms in one task is unlimited, thus you can select as many as you wantand add them to the task.
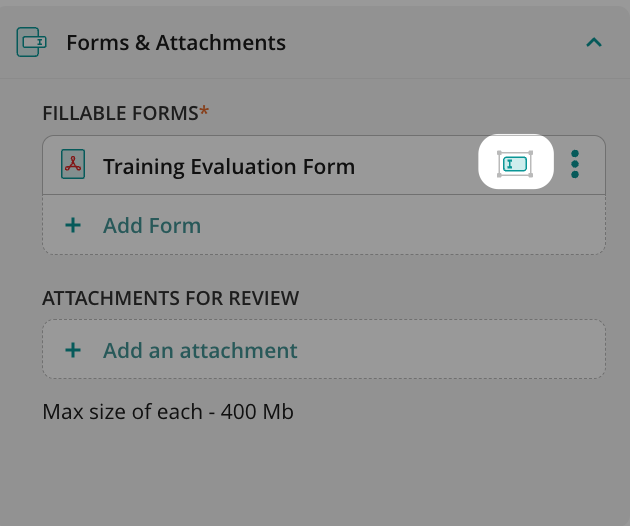
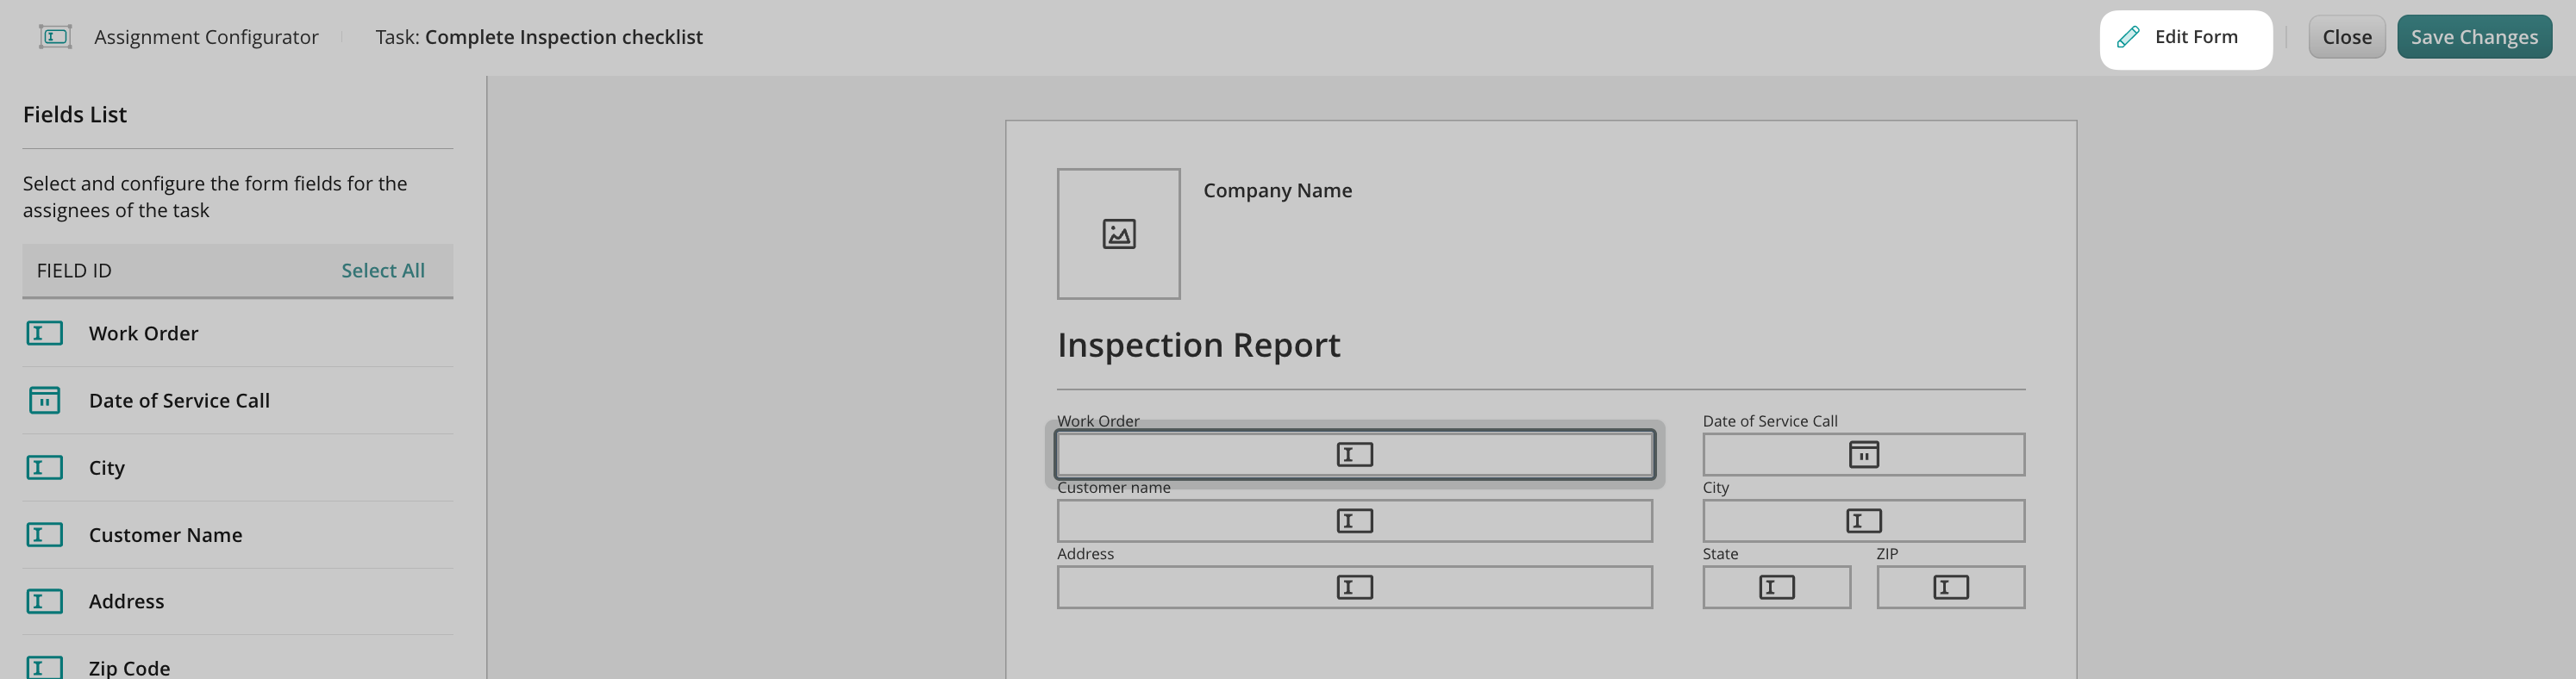
Next to the name of the added form, you will see the Assign form fields, and Remove from the list options:
By assigning form fields, you define the particular fields in a form for the Group-Assignee of the current Task. You can make particular fields required or view only for this Group. If the same form should be filled out by different Groups, you can assign the respective fields in this form to each task.
You may also edit the web form created in the Form Library in the Assignment mode by clicking the Edit form button.
Attachments do not travel within a workflow; they serve as materials for review in a particular task (usually manuals, instructions, or handbooks).
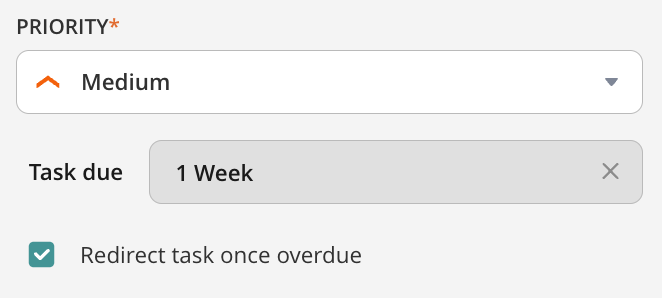
Priority is a section where you can set a task priority for the end user that will be displayed on their device. It contains the following states: critical, high, medium, and low. By default, the priority is medium.
Comment is a section where you can add a list of actions or a simple description that accompanies the task. These actions are for the end users’ viewing purposes and will be shown on their devices.
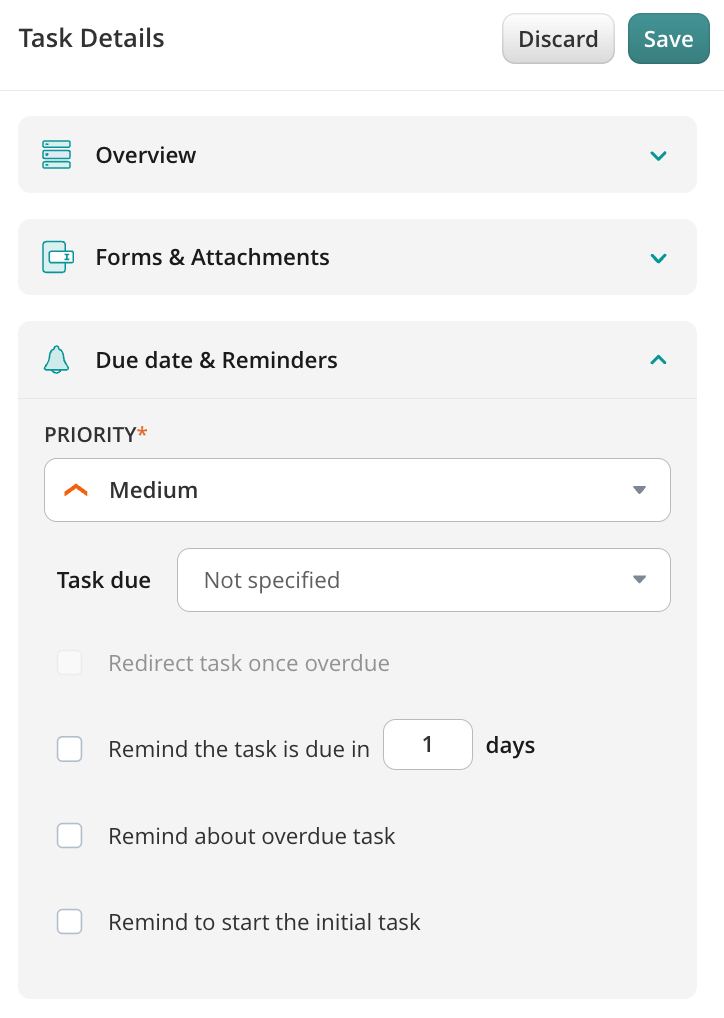
Due Date & Reminders
Due Date & Reminders is a tab where you can set the execution duration of a particular task and configure the reminders that the performer of the current task can receive. By setting execution durations, the end users will be notified about Task timelines and overdue status. This allows you to manage the redirection of both User and Guest Tasks in case they are not completed on time. If a Task becomes overdue, it will be automatically redirected to prevent any potential disruptions in the process.
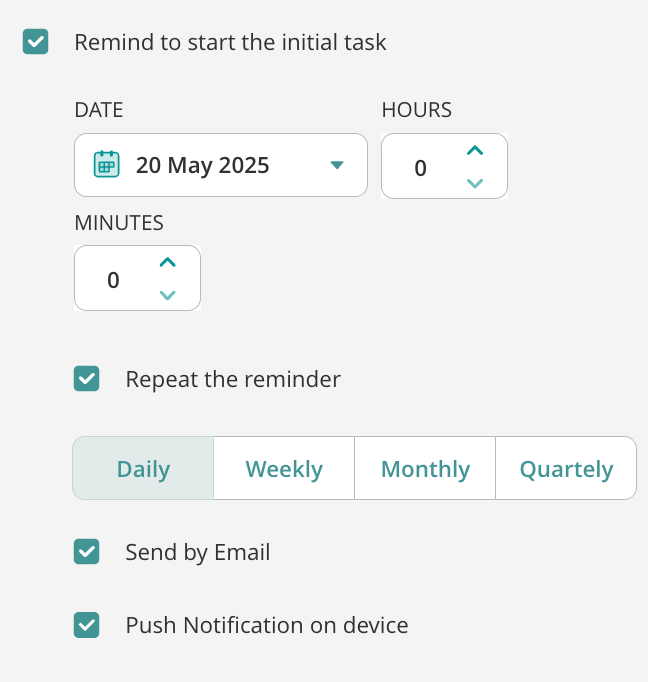
You may set the date and time for the user to receive a notification to start the initial task. To do this, put the checkmark next to the “Remind to start the initial task” option, select the preferred time, and select how you would like the notification to be sent to the user: via email or by pushing the reminder to their device.
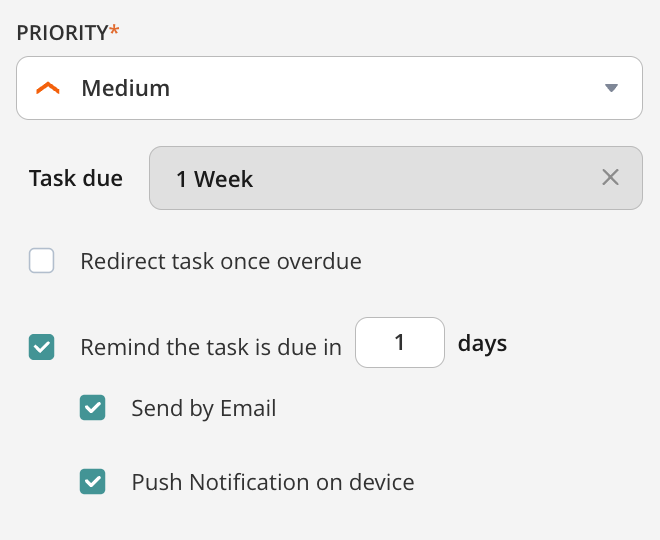
You can specify the due date for a particular Task and set a reminder for when it’s due by selecting the checkbox next to “Remind the Task is due in x days” and selecting how you would like the user to receive the notification: send by email or to push the reminder to the user’s device.
There is an option to settle the redirection of the Task in case it becomes overdue by putting the checkmark next to “Redirect the Task once overdue.” You will see an element “Overdue task” appear. You can link this element to another task, automatically redirecting the task to another predefined flow if the user did not complete it on time.
In case of any questions, feel free to contact us at support@fluix.io
Was this article helpful?
Thanks for your feedback!
Oops, something went wrong. Please, try again later.
Thank you!
What details or examples would have made this article more helpful for you? We appreciate your insights!
You can make a copy of any existing Workflow and then modify any task or submit action if needed. To do that, follow the steps below:
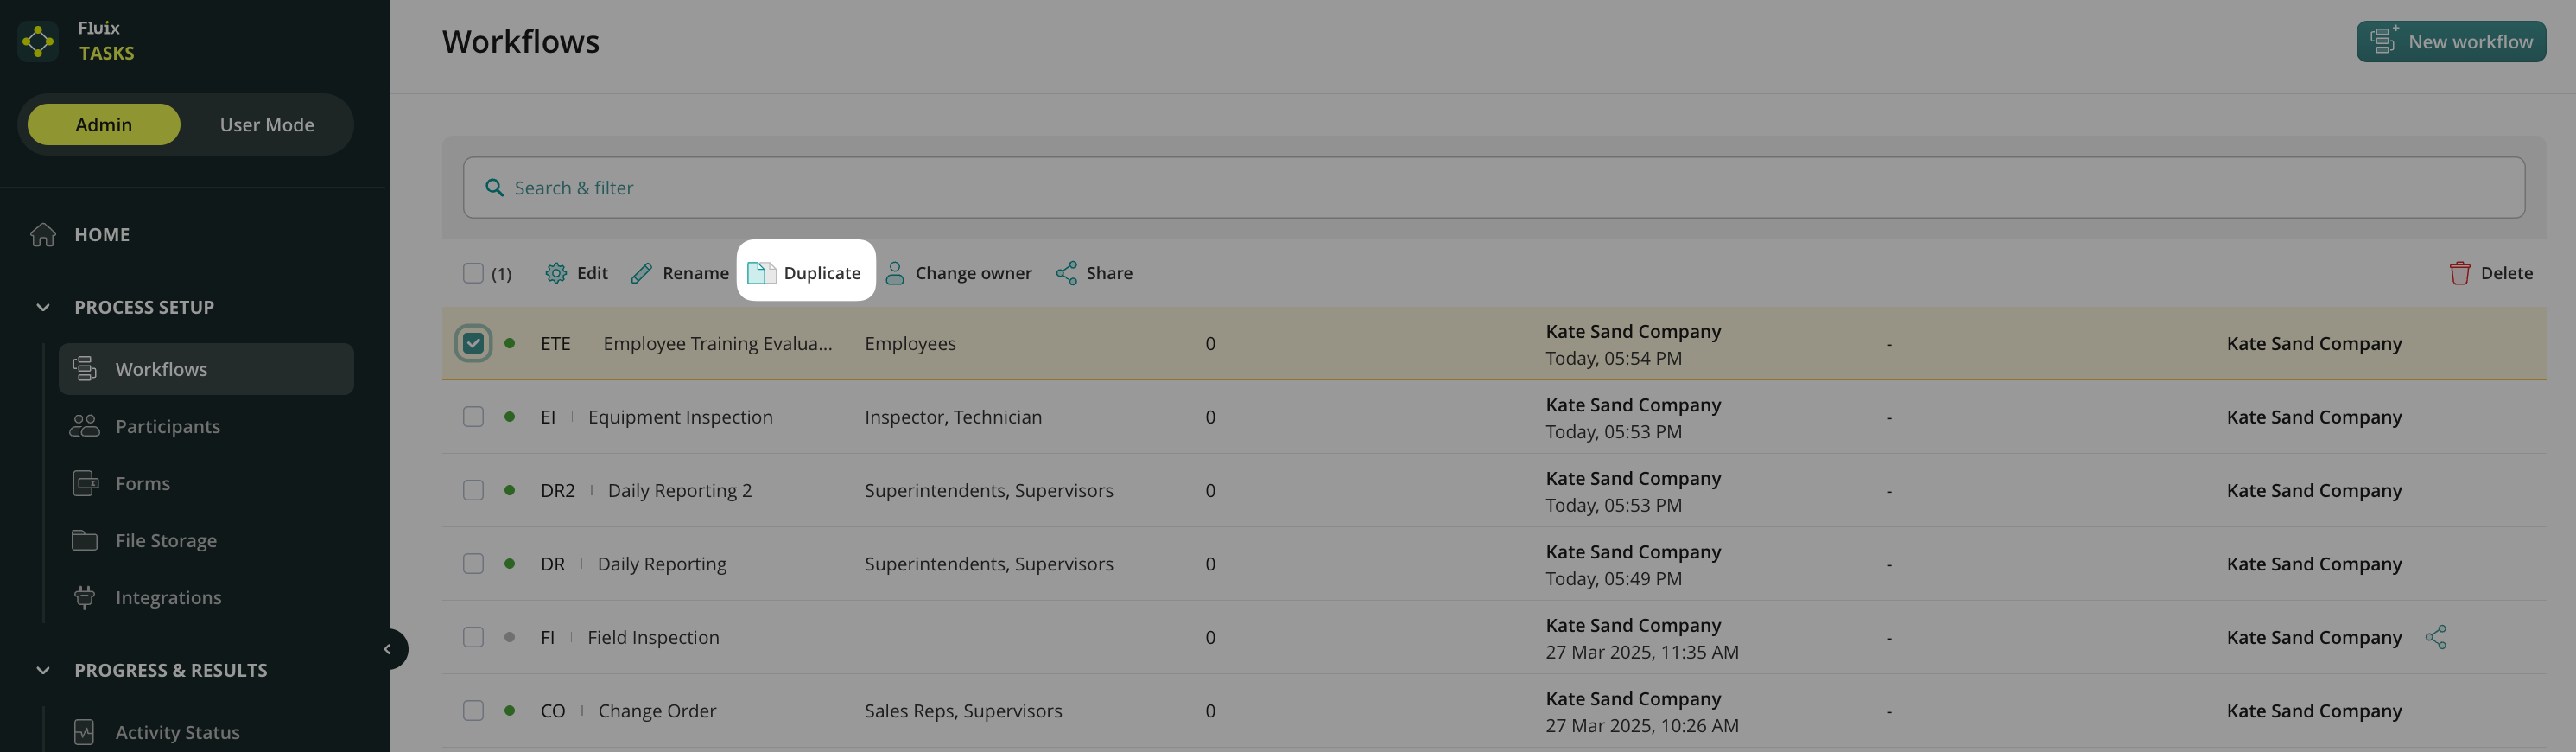
Step 1. Duplicate a Workflow
Go to Menu > Workflow section of Fluix Admin Portal, select a Workflow you want to copy, and click Duplicate:
Once a copy is created, start editing as needed. Below are the guidelines for making changes in the duplicated Workflow.
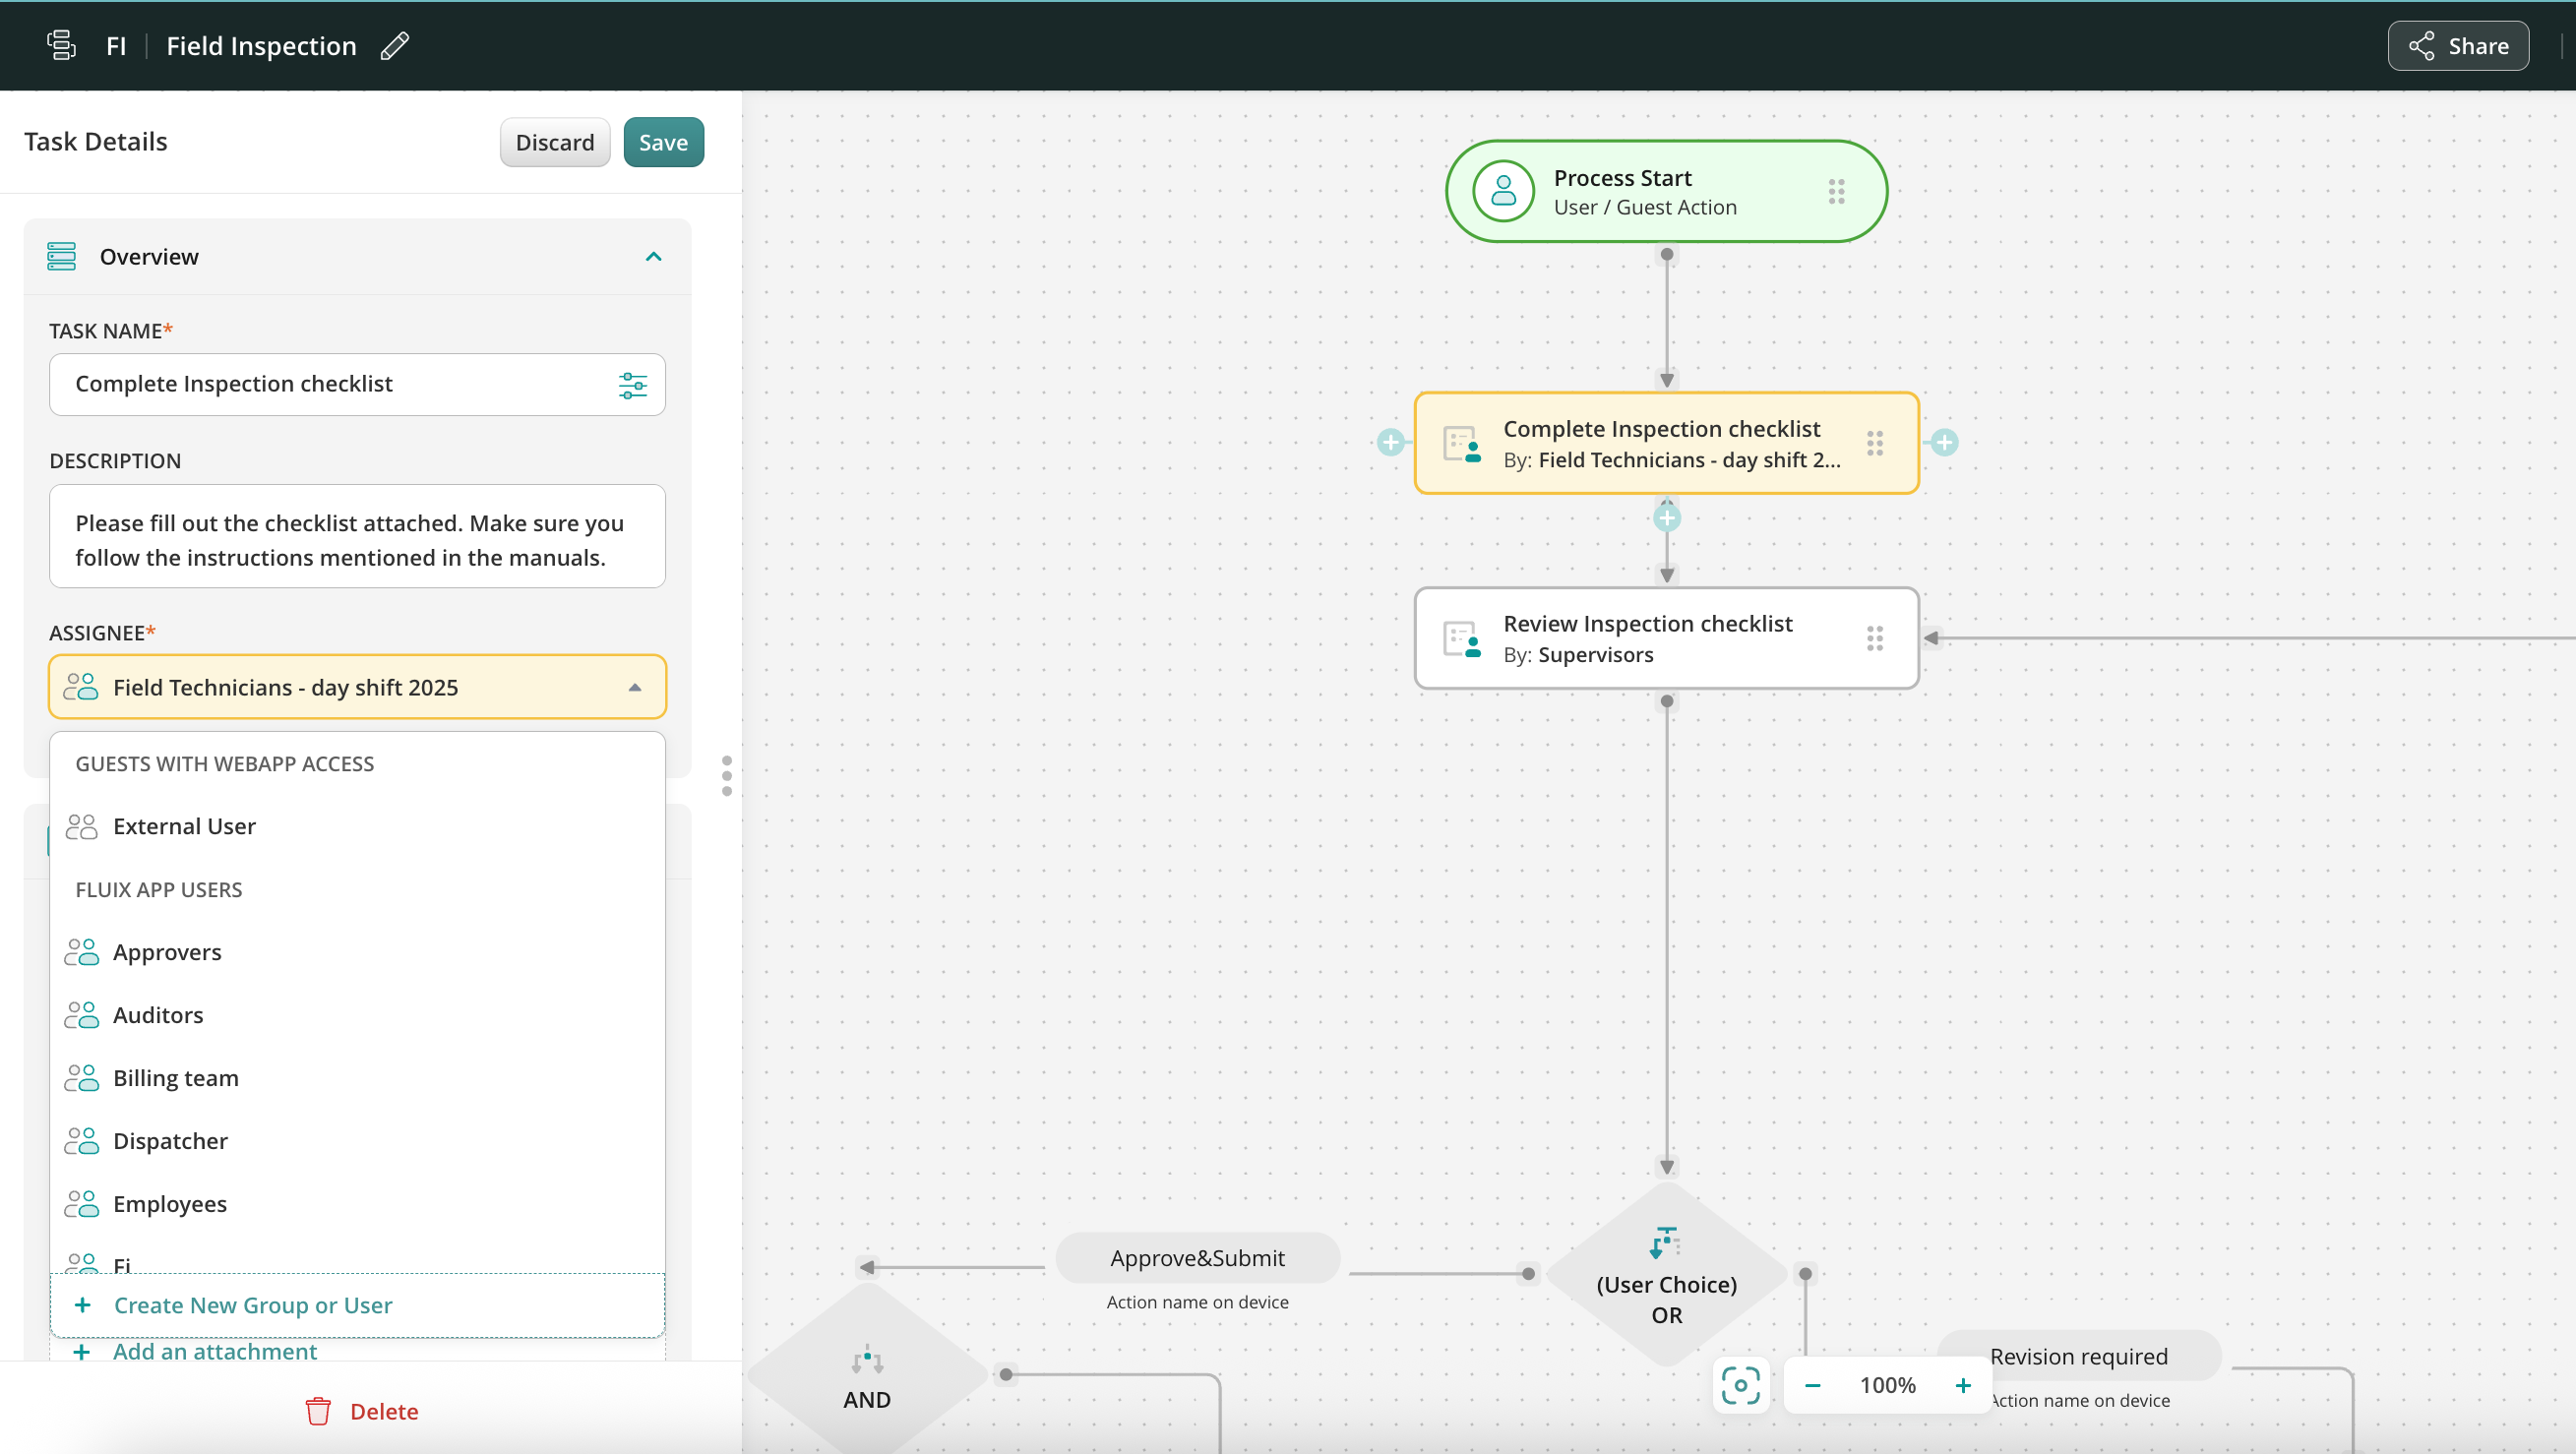
Step 2. Change Assignees
In order to change assignees, select the task and click on the cross icon next to the assignee’s name. To add a new assignee, click on Add Assignee and select a new assignee from a dropdown list:
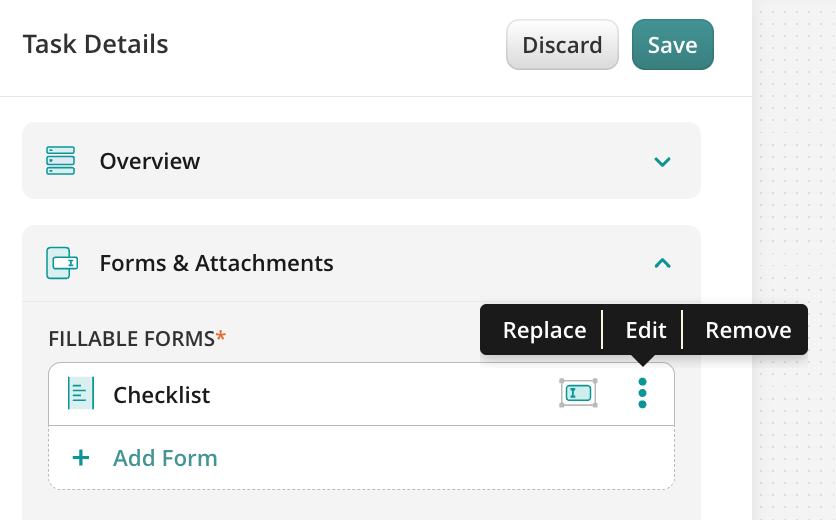
Step 3. Add or Replace Forms and Attachments
You can add new forms and attachments, or replace the current ones in the Forms tab. To replace them, click on the cross icon next to the form’s or attachment’s name. To add a new form or attachment, click on Add From or Add an attachment, select a source from where the form or the file should be taken, and the form or file itself.
Step 4. Modify Submit Actions
For the Upload to Storage submit action, please make sure to connect new storage or a folder. For the Submit by Email action, you may change the email address or add an additional one, or change the subject or text of the email. For the Share To option, you may edit the configuration of the integration in the Request Builder.
Step 5. Rename the Workflow
Rename the Workflow by clicking the Pencil icon in the top left corner of your screen and click the Save & Publish button to activate it.
Your new Workflow is now ready for use.
In case of any questions feel free to contact us at support@fluix.io.
Was this article helpful?
Thanks for your feedback!
Oops, something went wrong. Please, try again later.
Thank you!
What details or examples would have made this article more helpful for you? We appreciate your insights!
Sign Up to Our Product Newsletter
The latest updates from our Product team, straight to your inbox