Zapier is a platform that easily connects the web applications you use. In this article we will describe how to connect Fluix to Google Sheets via Zapier and let your data collected in forms flow directly to spreadsheets without having to manually download and copy it.
If you don’t have any document management software yet, consider Fluix.
Join Innovative CompaniesTry forms automation software today
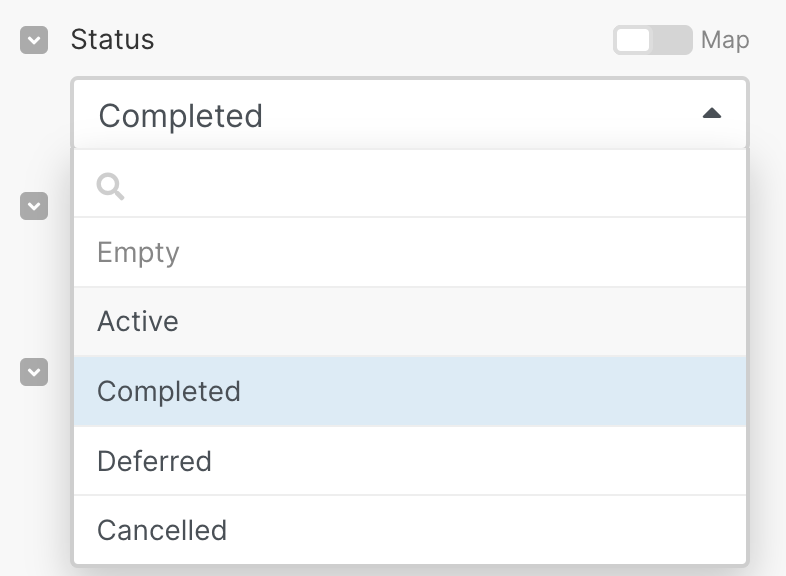
6. Under Choose a Trigger App type in and select Fluix
7. Connect an account by copying the username and password from Fluix (from the ‘Export’ dialog box in step 2 above)
8. In the Fluix Export dialog box copy the first Authorization Link (Power BI) and click Continue, example: https://admin.fluix.io/api/public/v1/fdata/dataset41
9. Select one of the documents in the list to set up your Zap
10. Select Google Sheet as an app to connect
11. Select Google Sheets Action
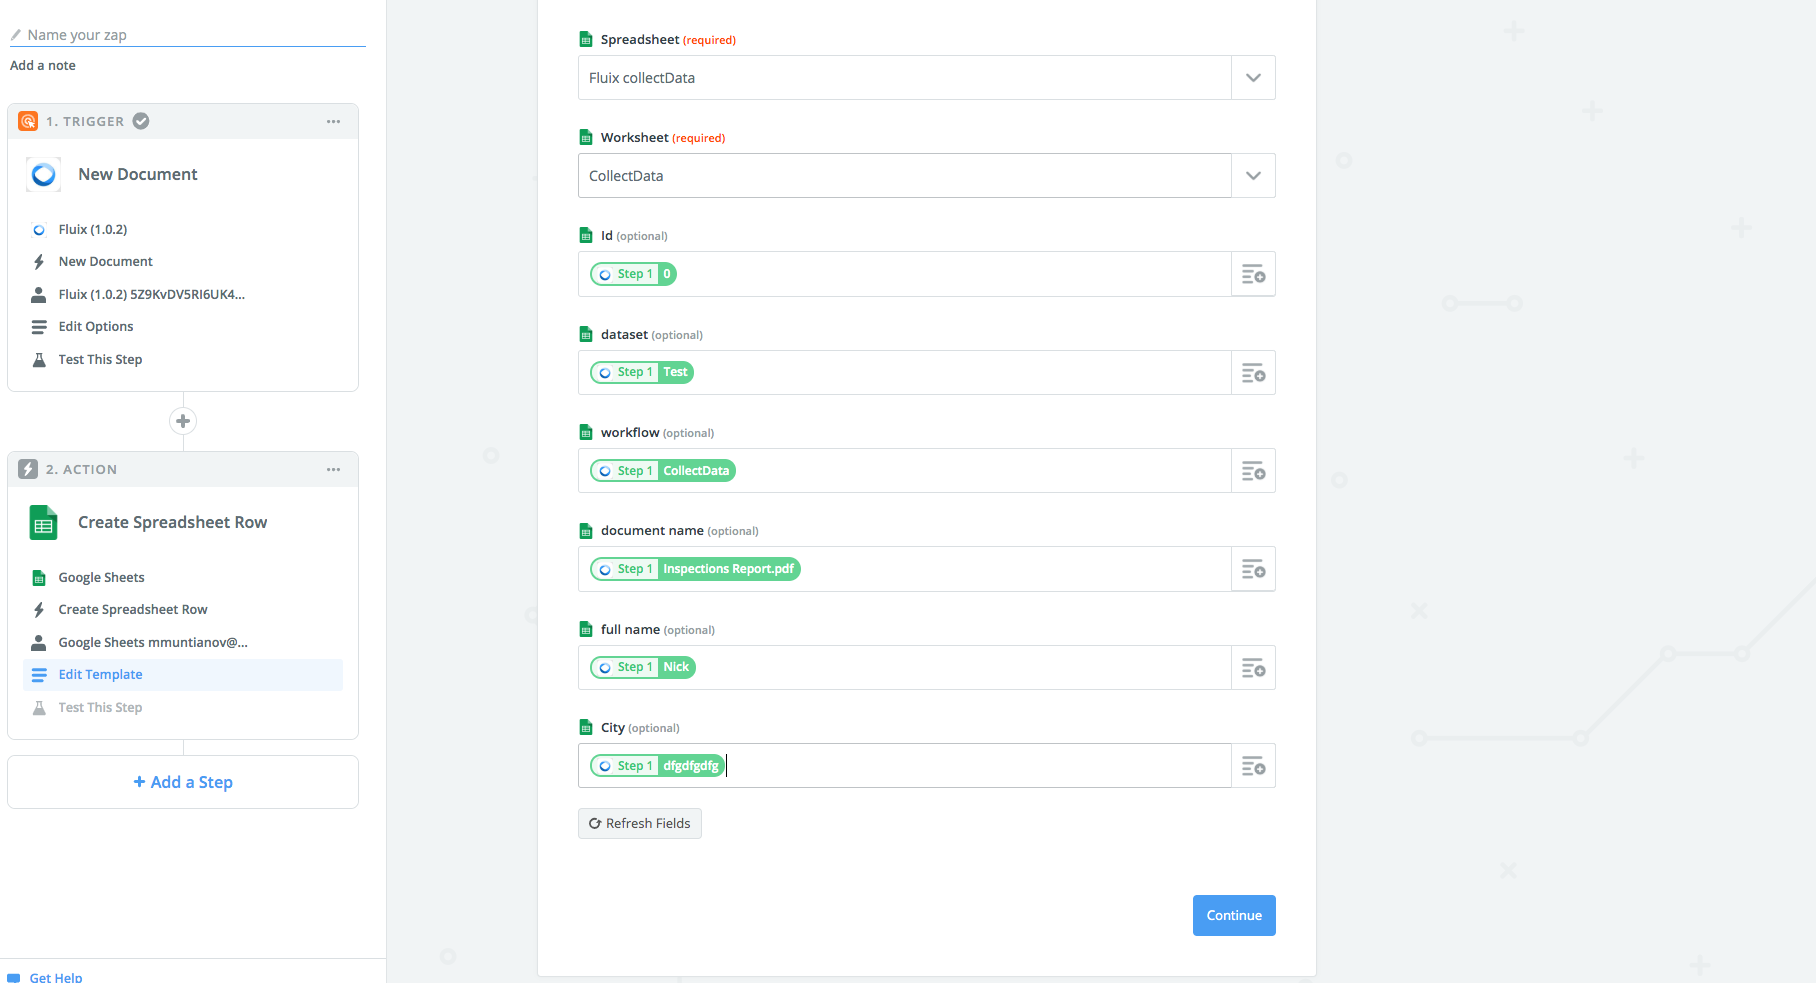
12. Insert Google Sheets information where the spreadsheet resides and other fields you would like be mapped to the report and click ‘Continue’ to test the set-up. Zapier will notify you about a test completion. Example:
13. After a successful Zap set-up, all completed documents will be exported directly to the selected Google Sheet spreadsheet (Zap will automatically check for your Fluix Data Export every 15 minutes).
In case you have any questions or difficulties with setup, contact our support at support@fluix.io and we’ll be happy to help you.
Workato is an iPaaS (integration platform as a service) that lets organizations connect the applications they use in business. In this article, we will describe how to connect Fluix to Google Sheets via Workato and automate the data flow from the completed forms to spreadsheets without any manual effort.
Note
To test the integration, you’ll need a Fluix license, Workato license, and access to Google Sheets.
To proceed with connecting Fluix to Google Sheets via Workato, please follow the steps below:
Step 1 – Creating a process in Fluix.
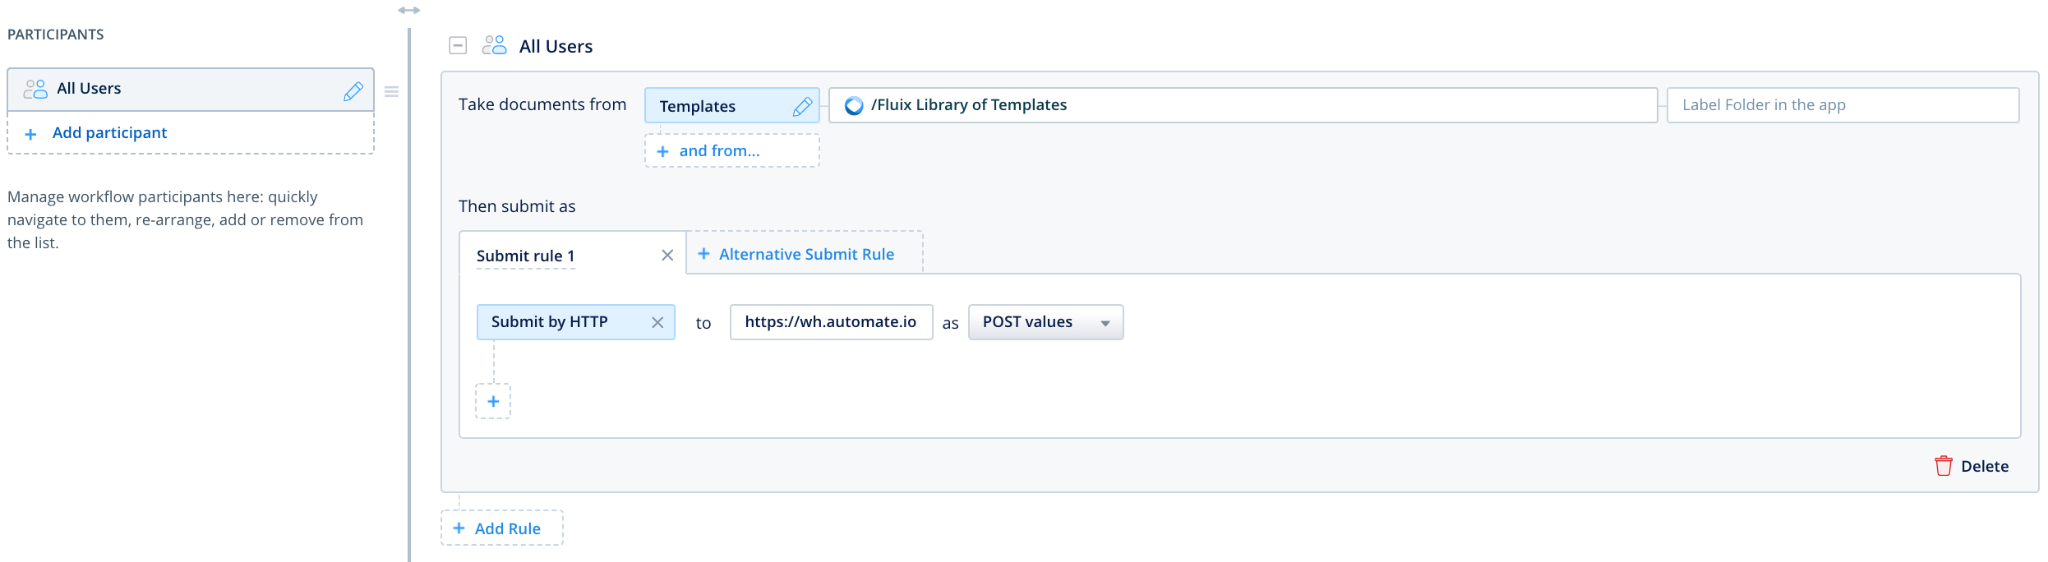
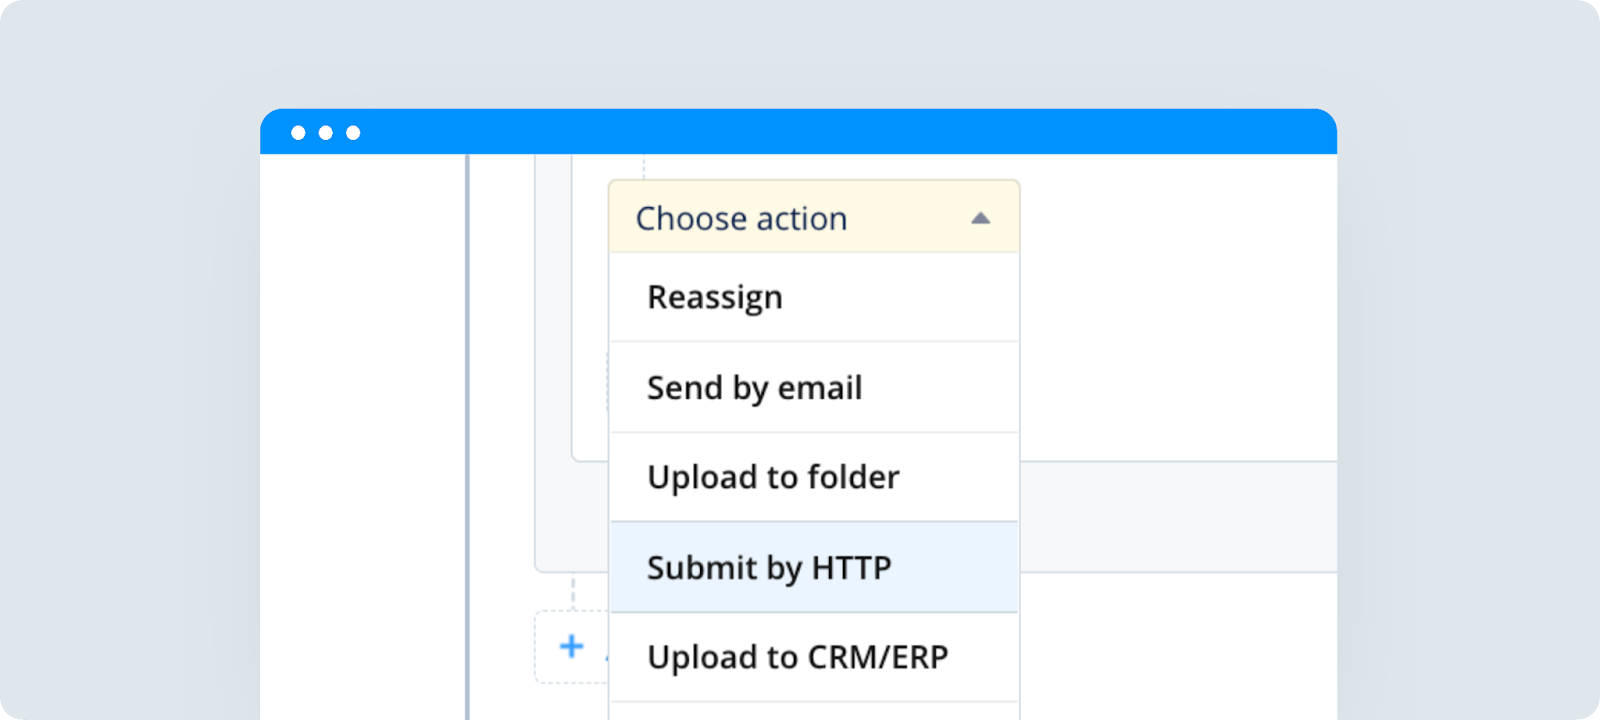
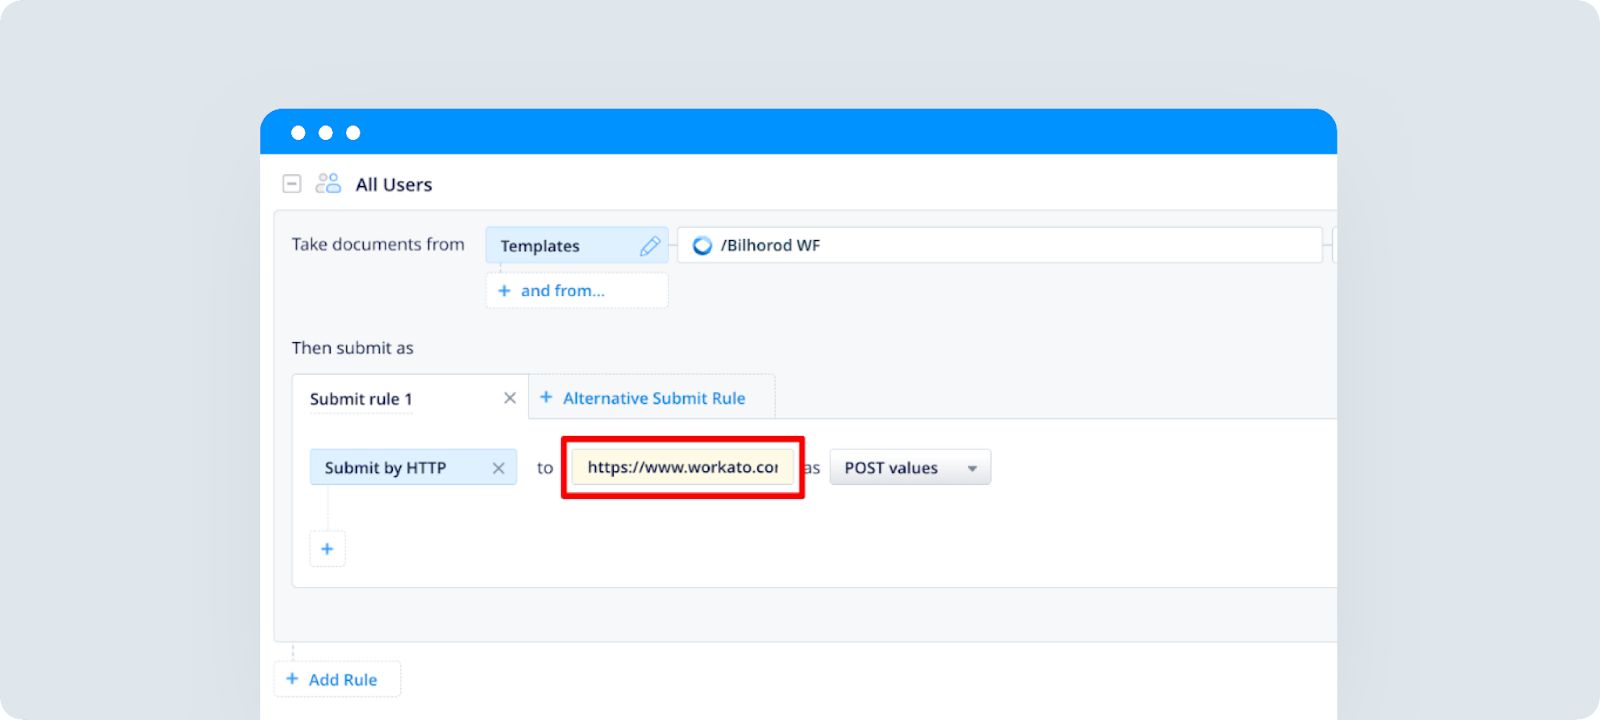
Log into the Fluix admin portal and go to the Workflows section. Create a new workflow with the Submit by HTTP submit action and select POST values as the data type.
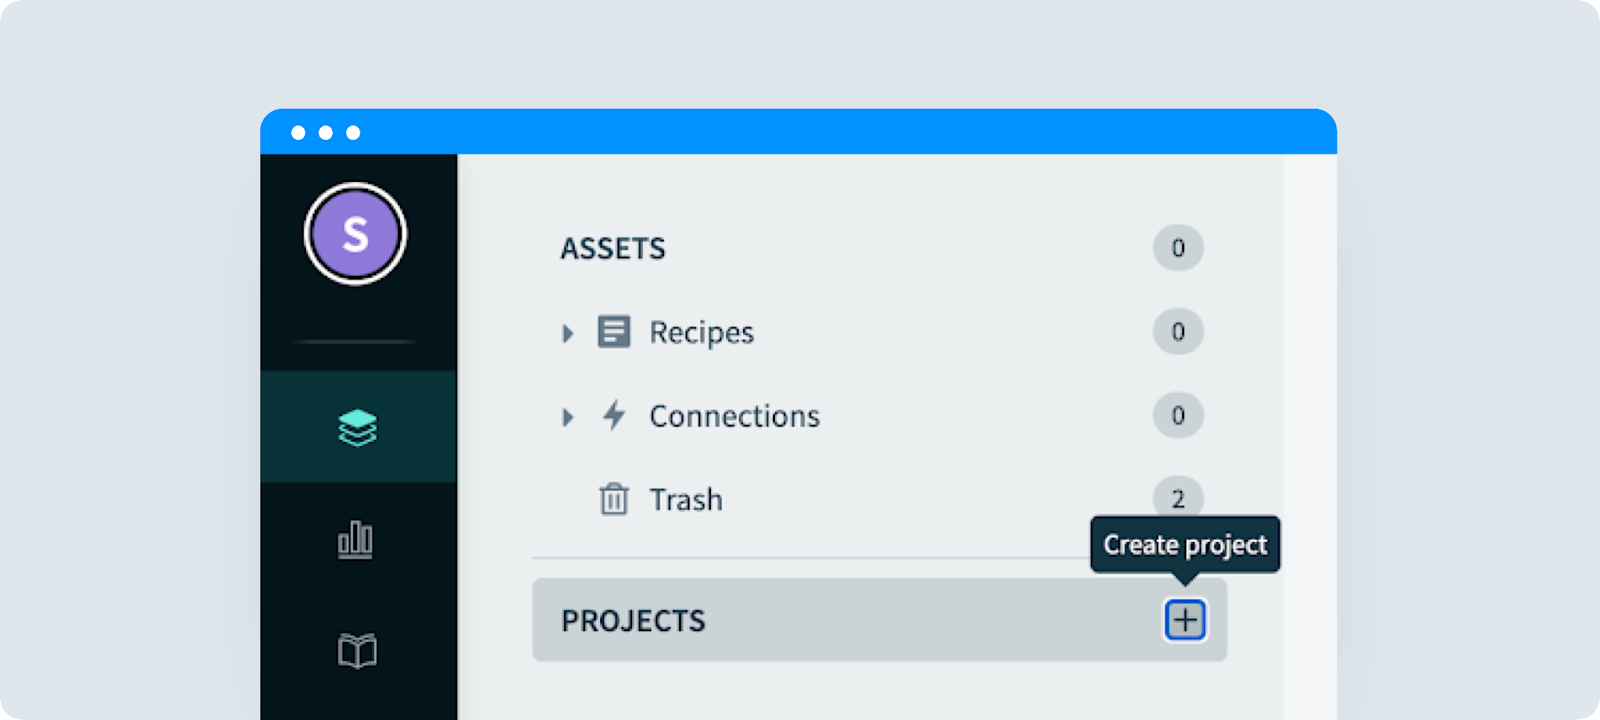
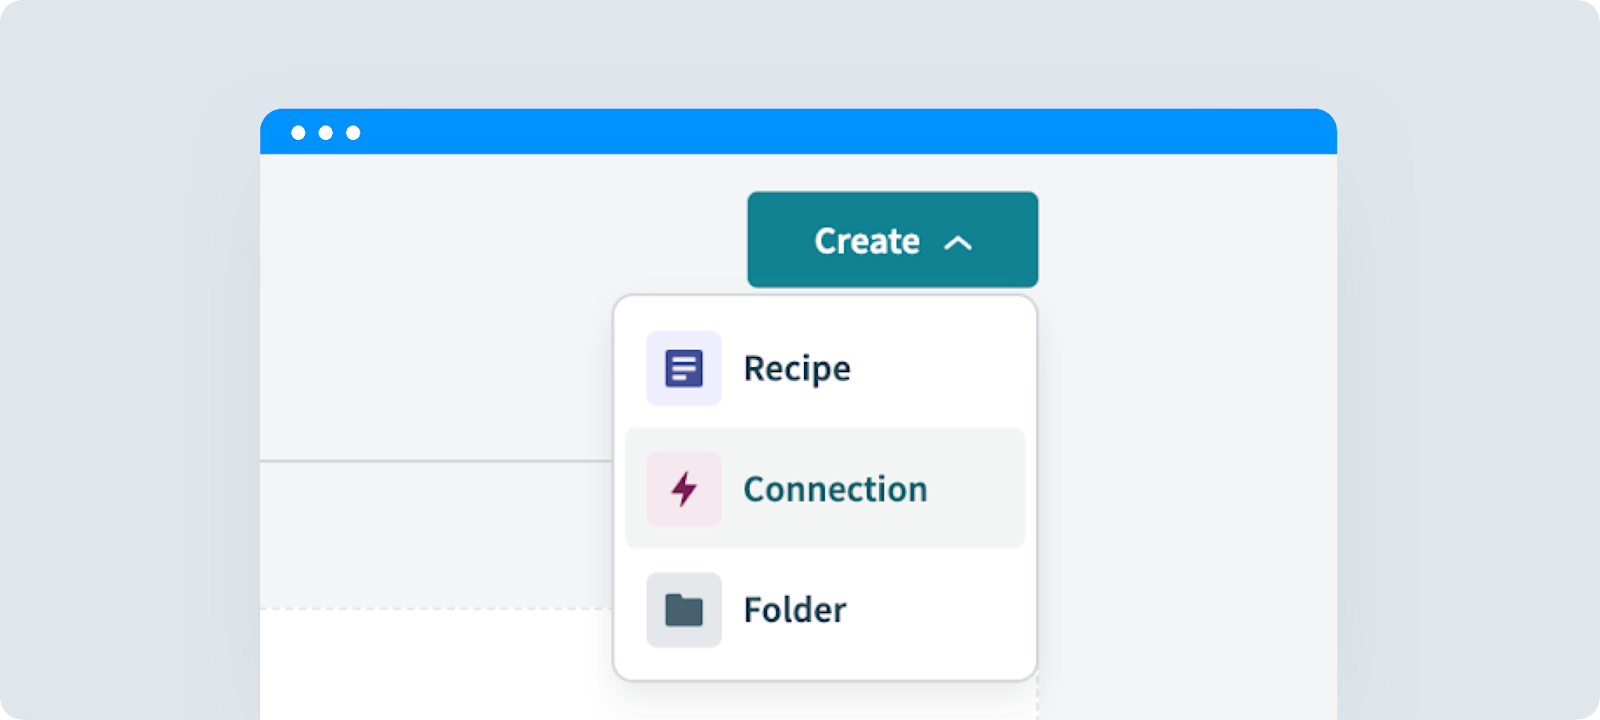
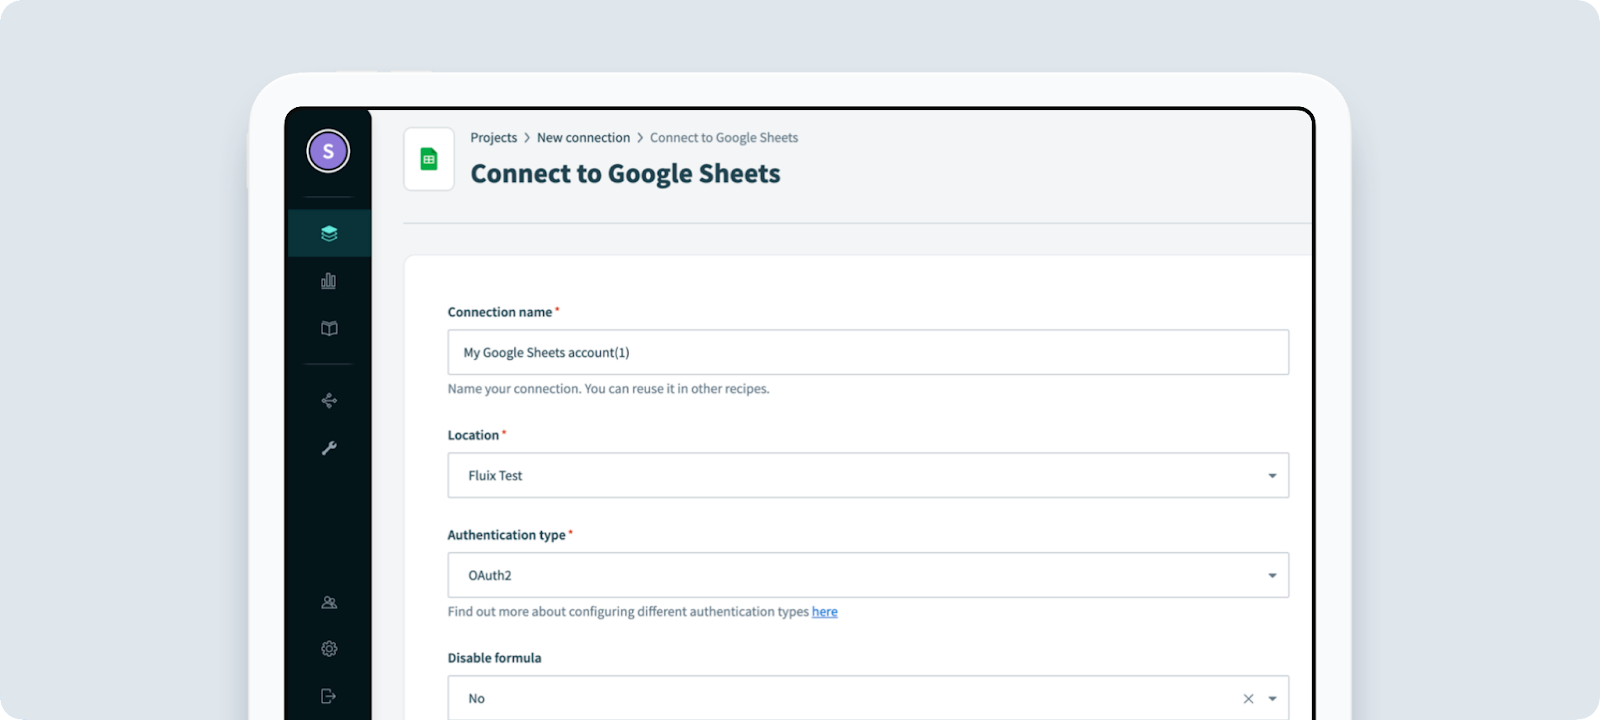
In the created project, click Create in the right upper corner and choose Connection.
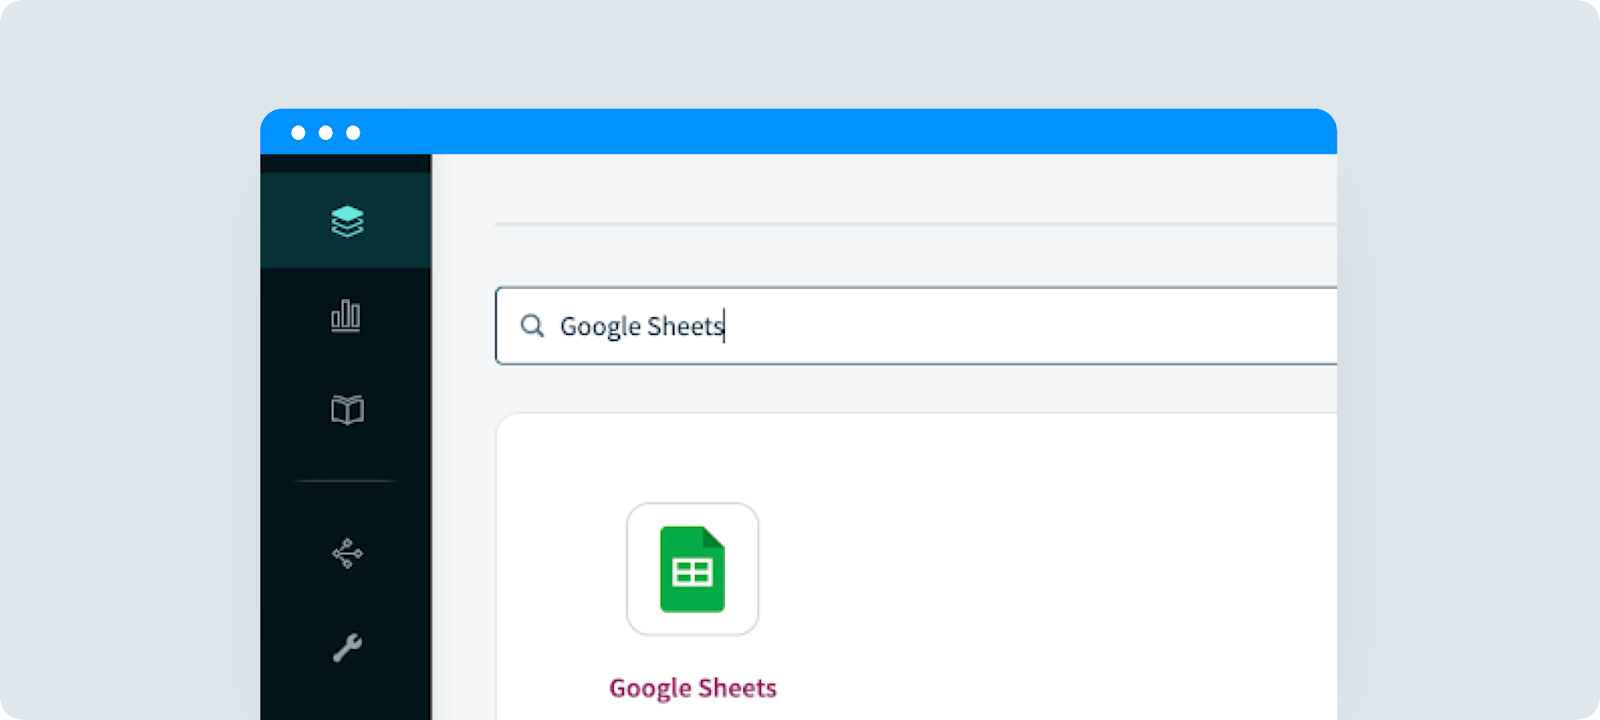
Search for Google Sheets and click on its icon.
Name the connection and sign into your Google account.
Step 3 – Setting up the webhook
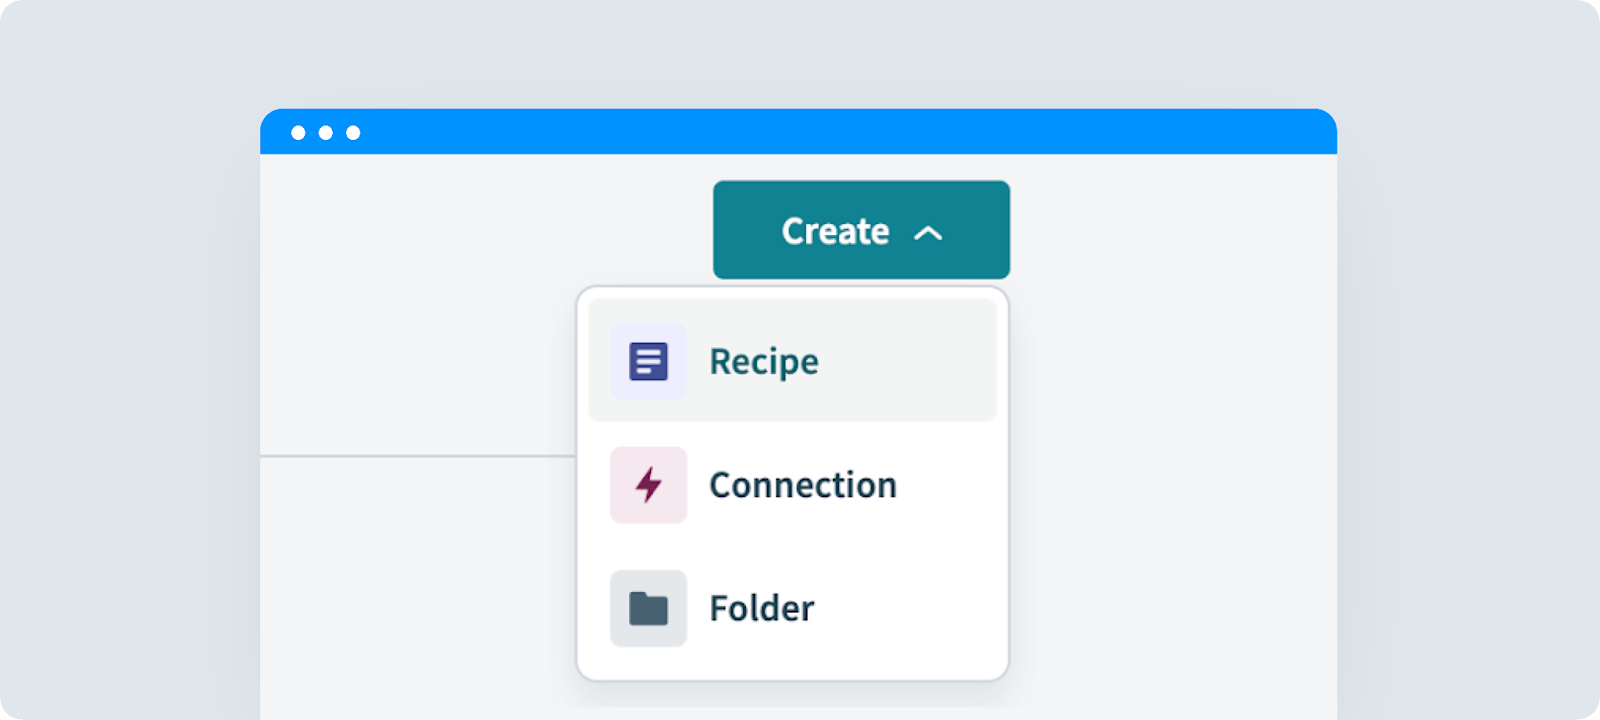
Click Create and choose the Recipe option.
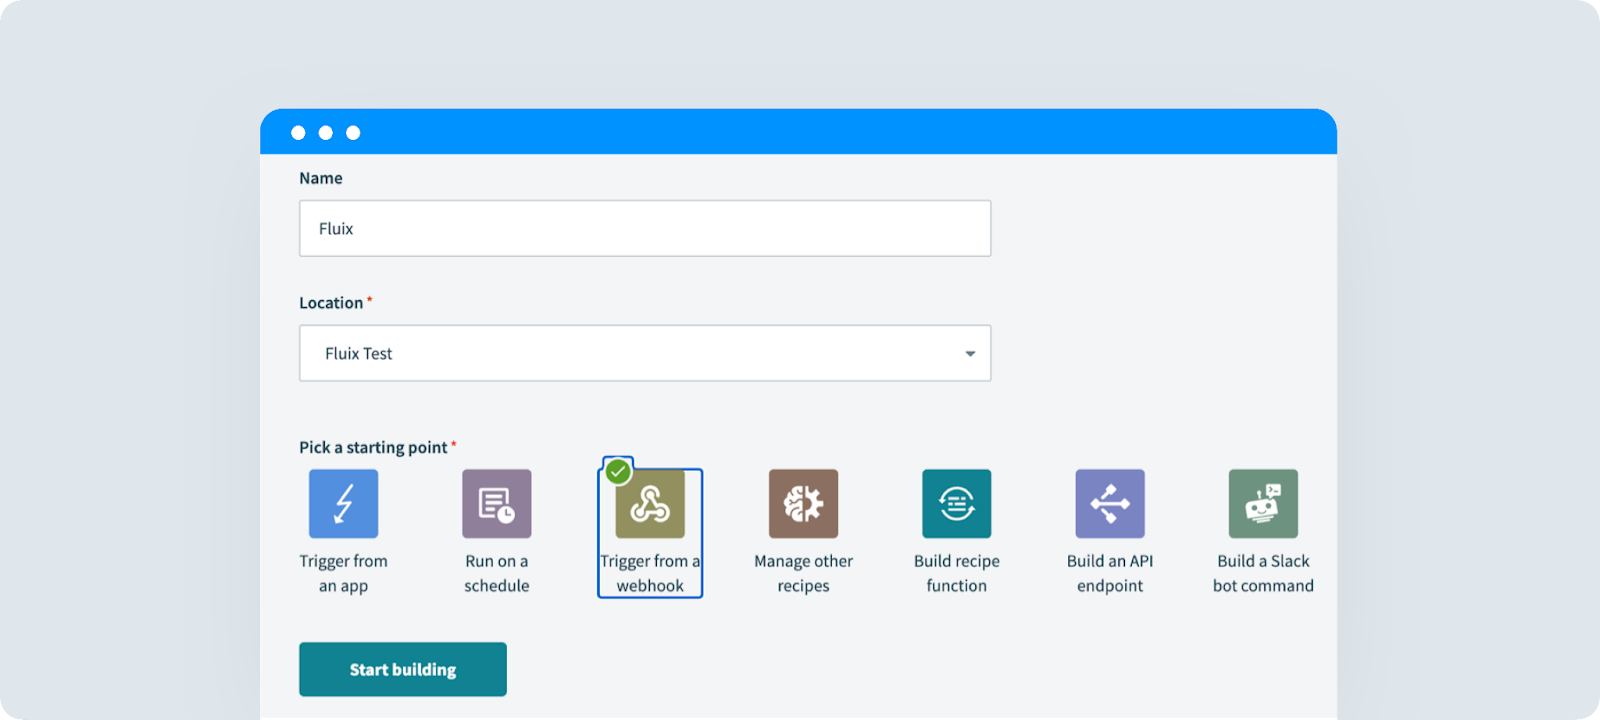
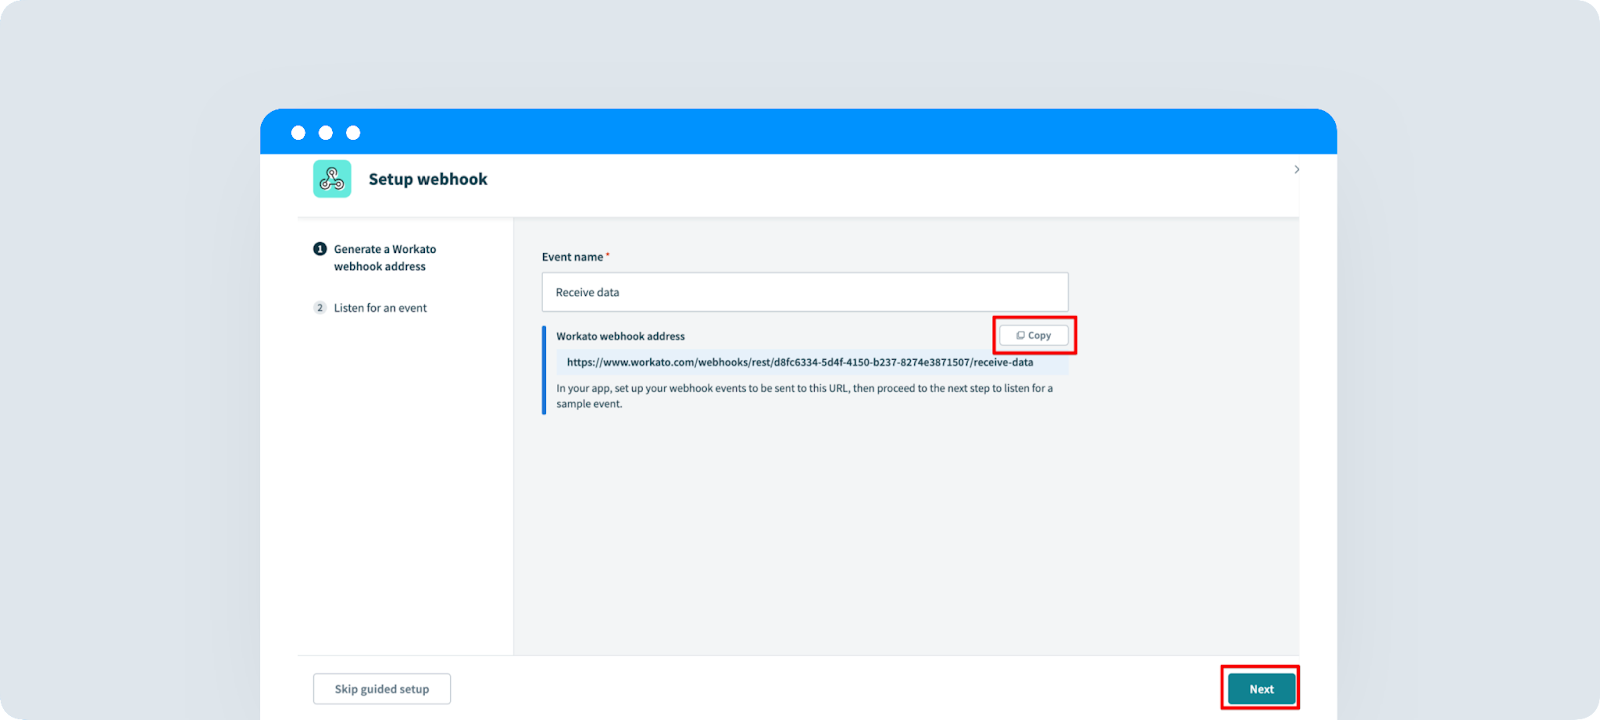
Name the recipe, choose the location, pick Trigger from a webhook as a start point and click Start building.
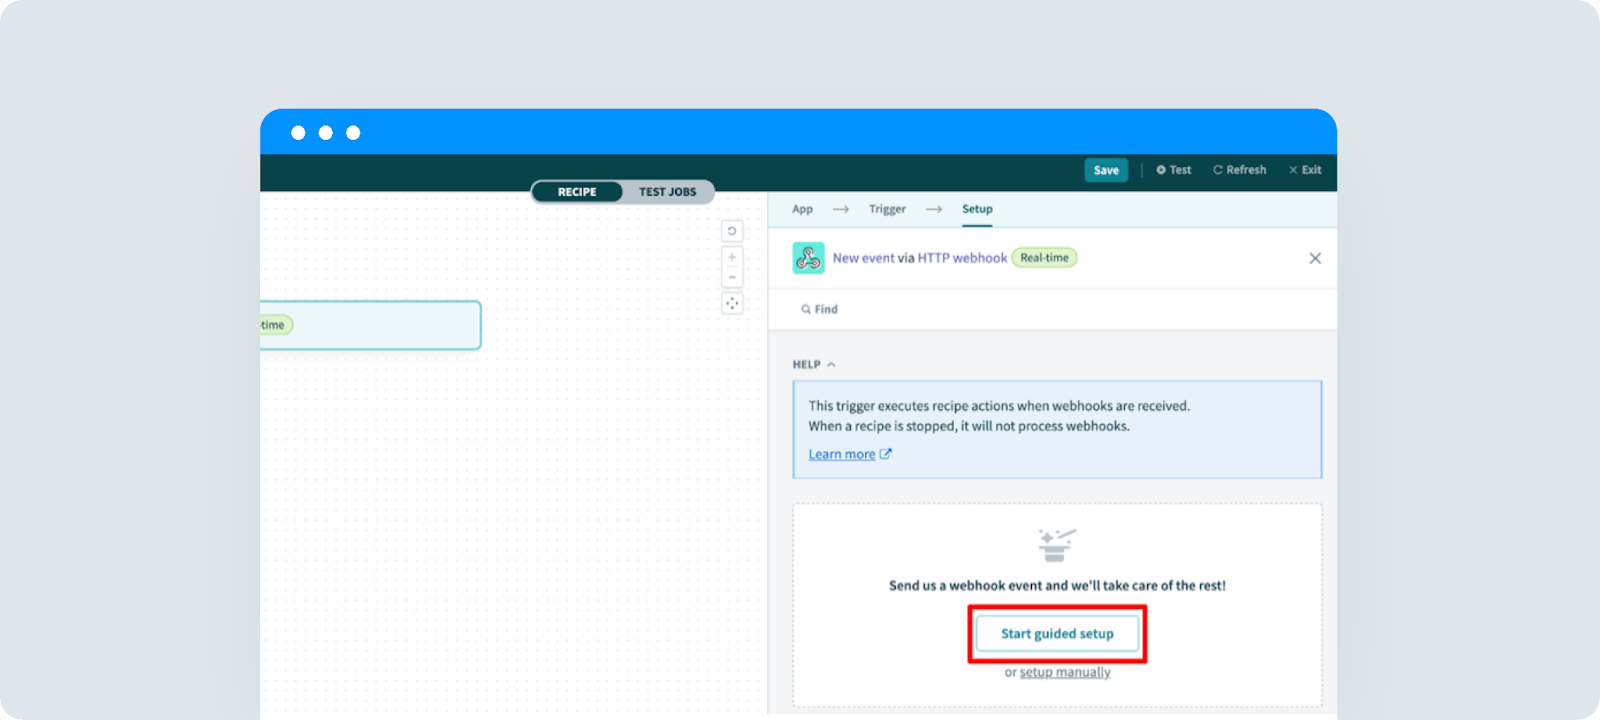
Click Start guided setup.
Copy the appeared webhook address and click Next.
Insert the link into your workflow in Fluix and save it.
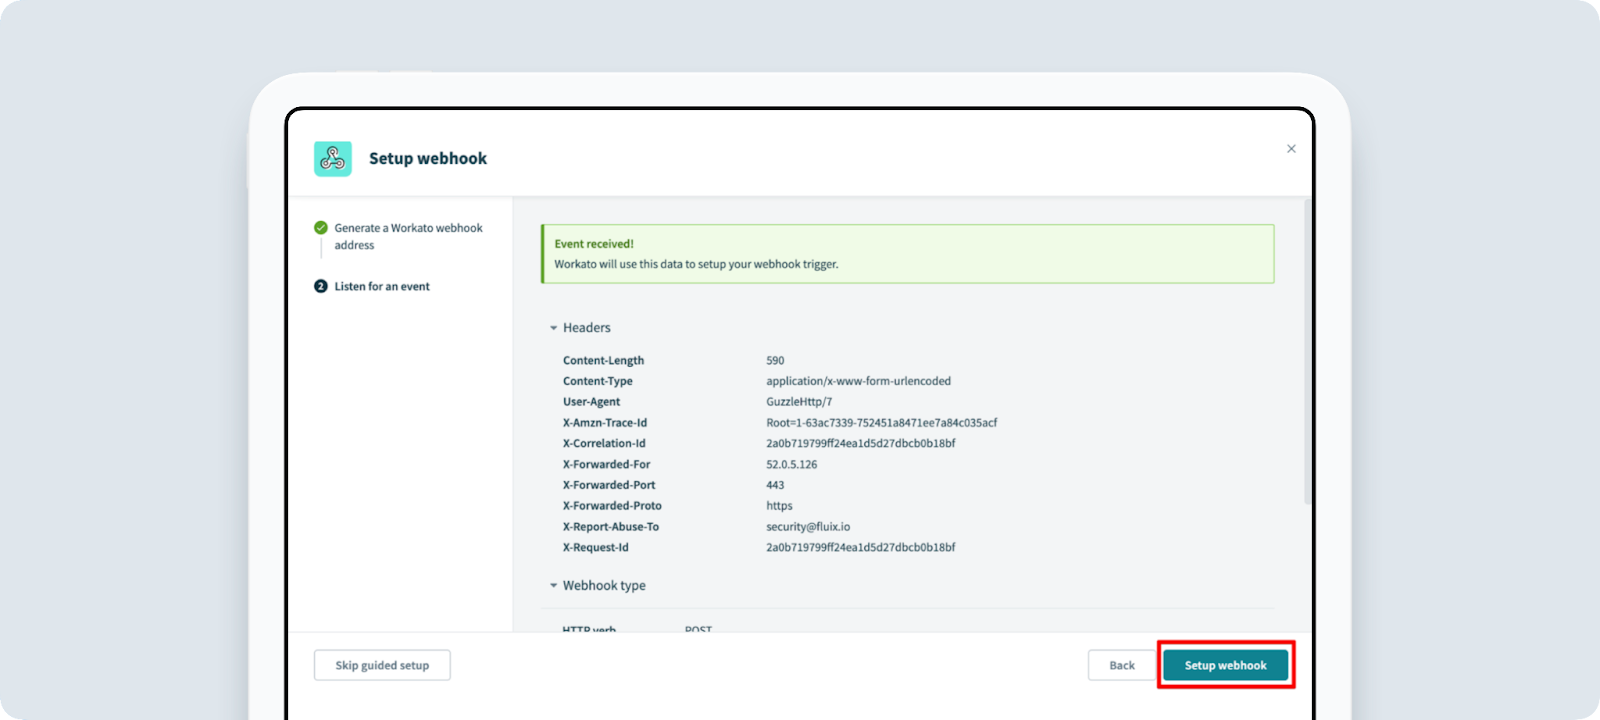
Submit the sample document through your workflow and click Setup webhook.
Step 4 – Configuring the data flow from Fluix to Google Sheets in Workato.
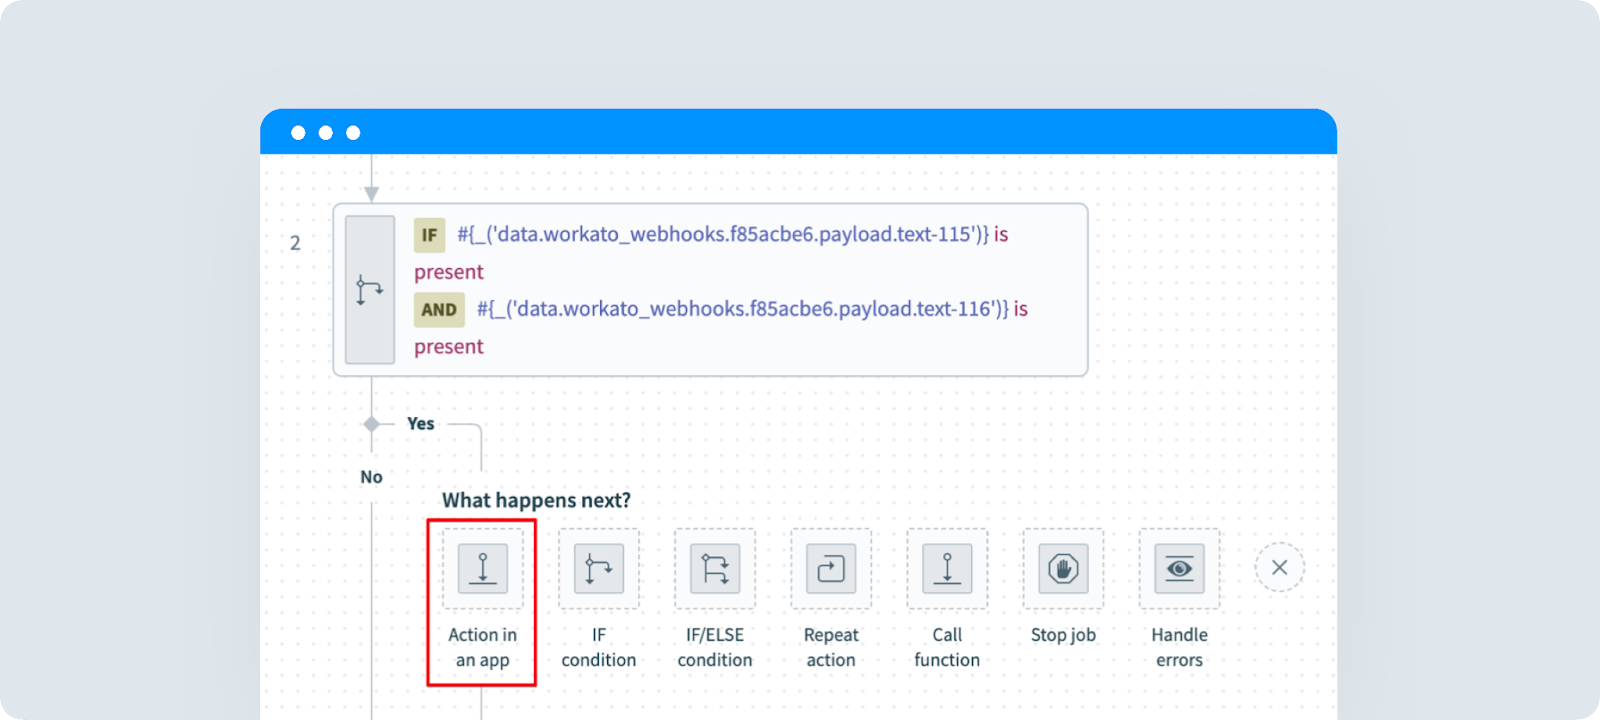
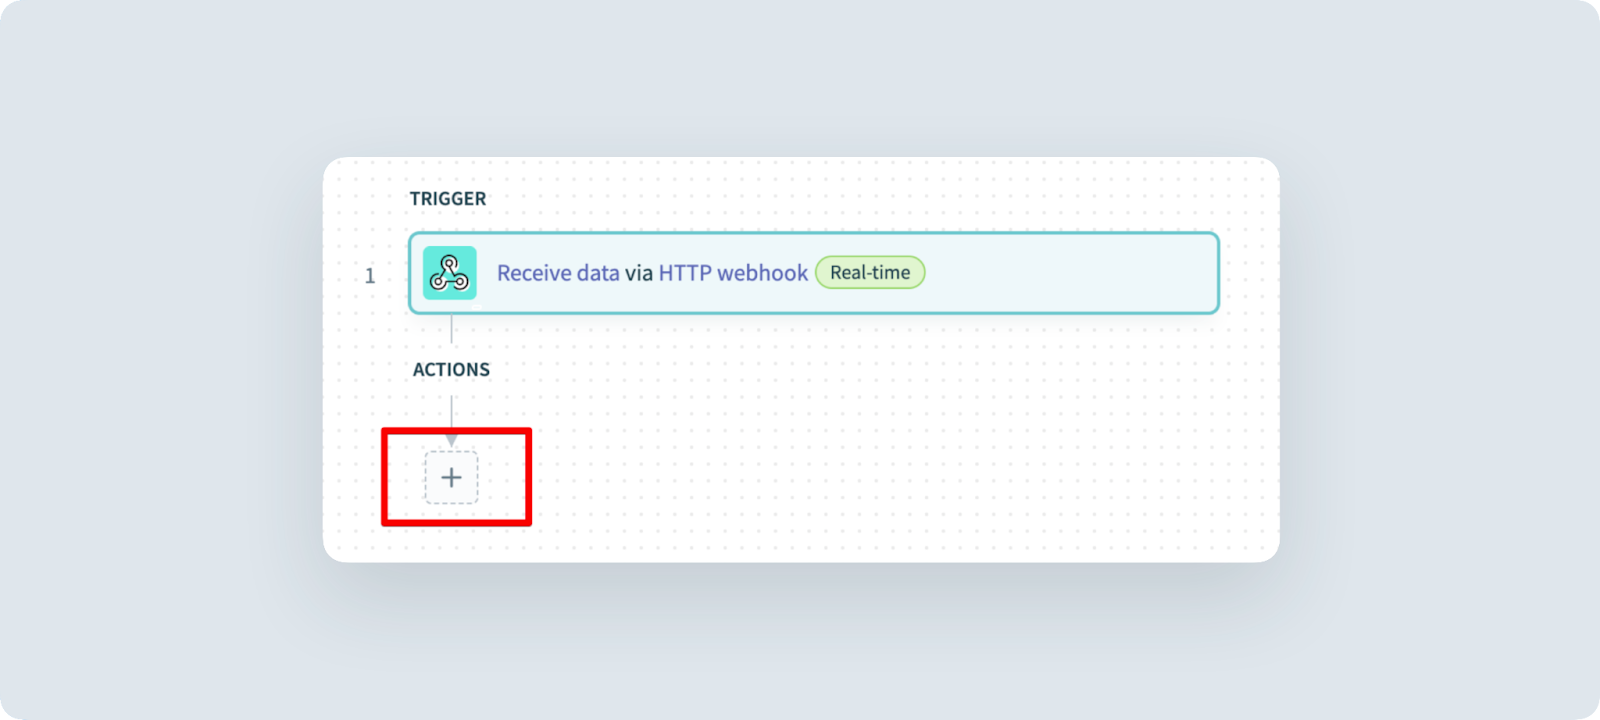
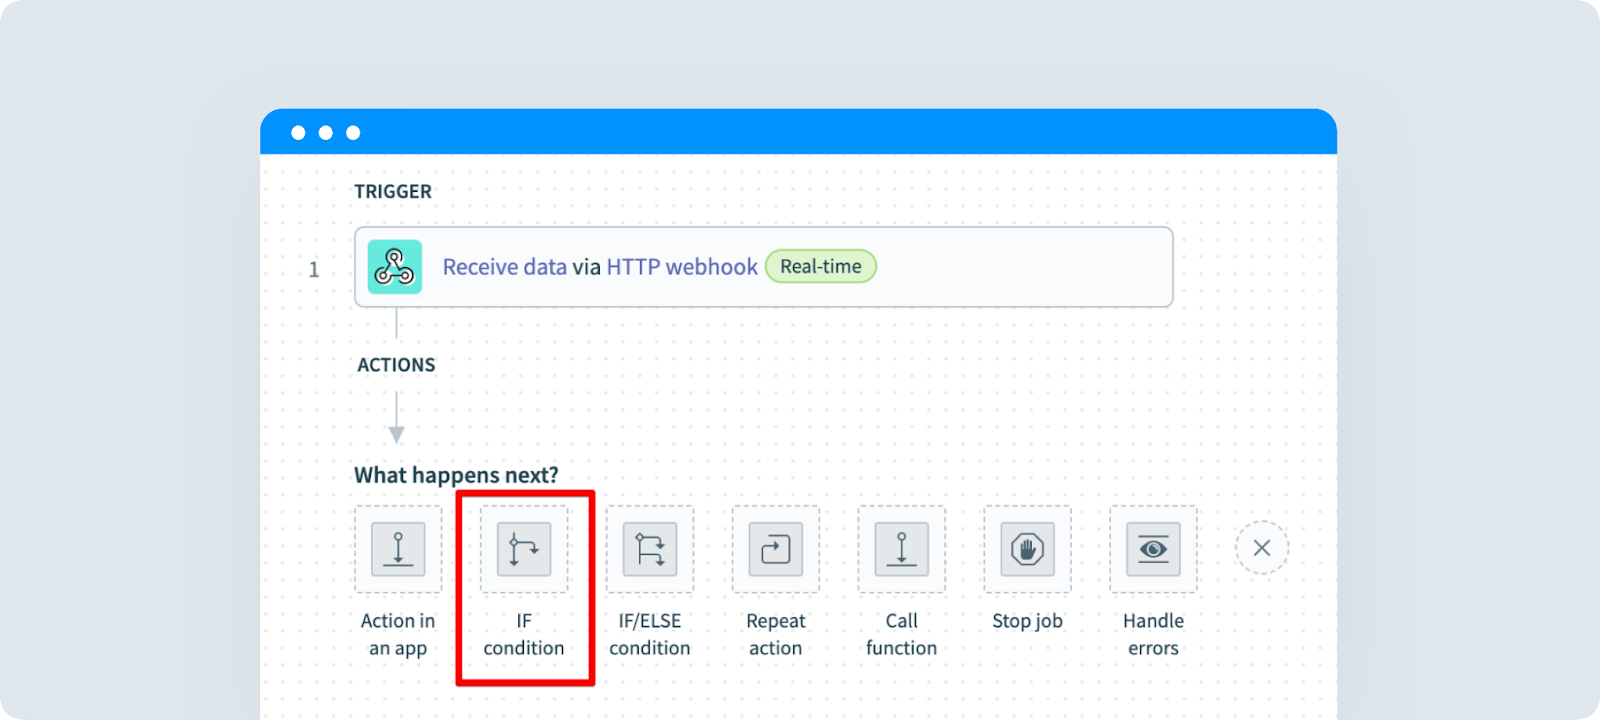
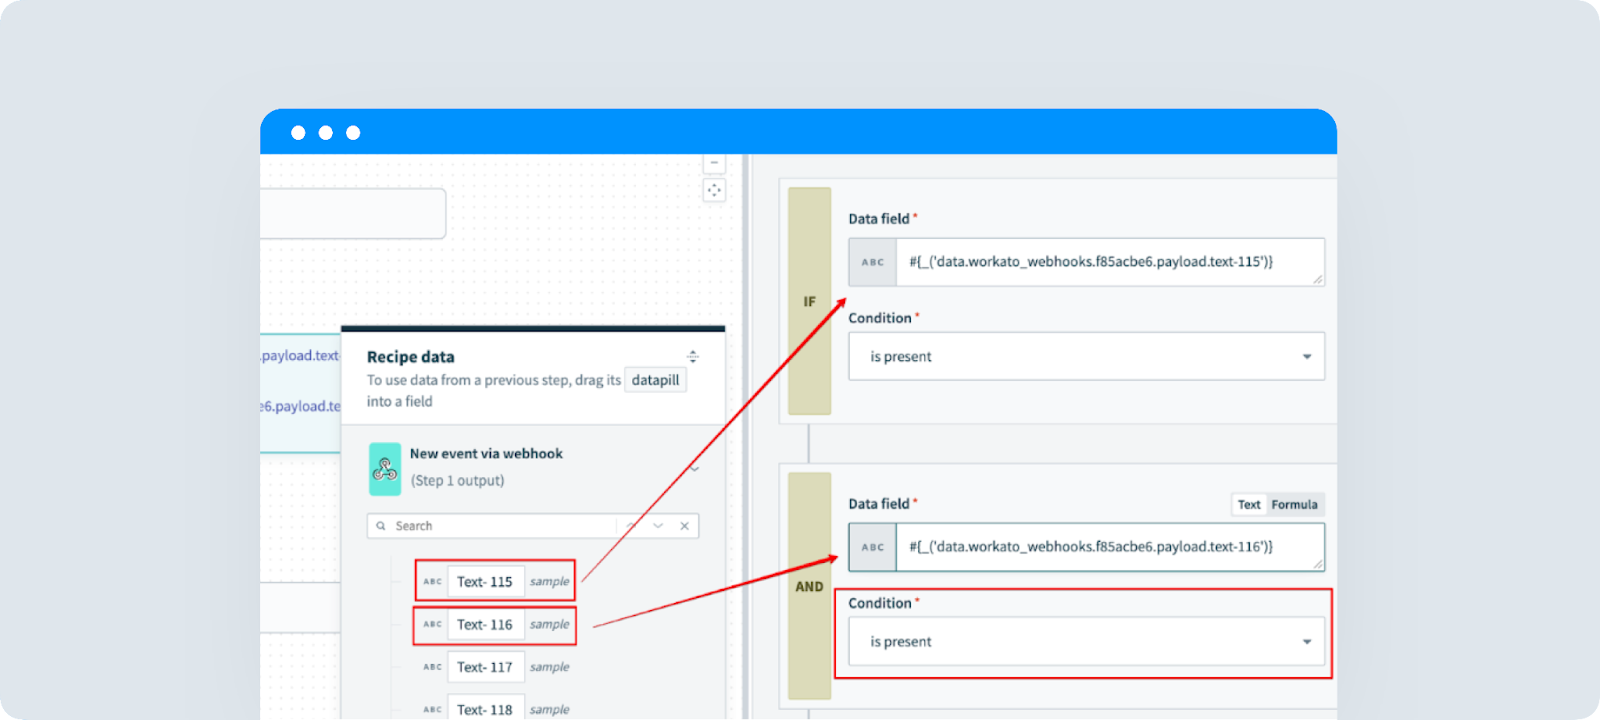
On the flowchart click the plus icon and choose the IF condition.
Configure the IF condition by mapping the required fields and choosing is present as a condition. Pick Action in an app as the next step and choose Google Sheets from the list of apps.
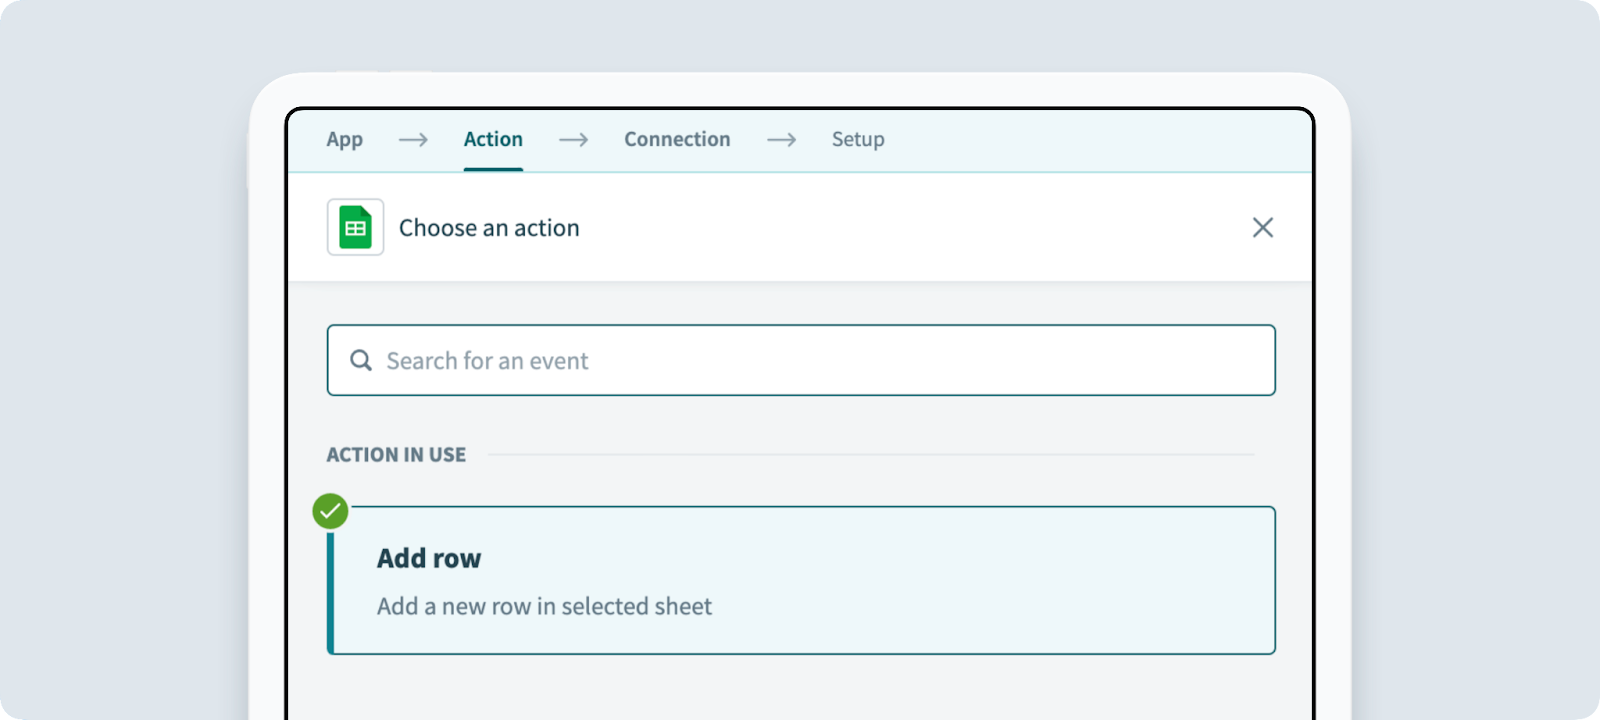
Choose the Add row action to be performed in the Google Sheet.
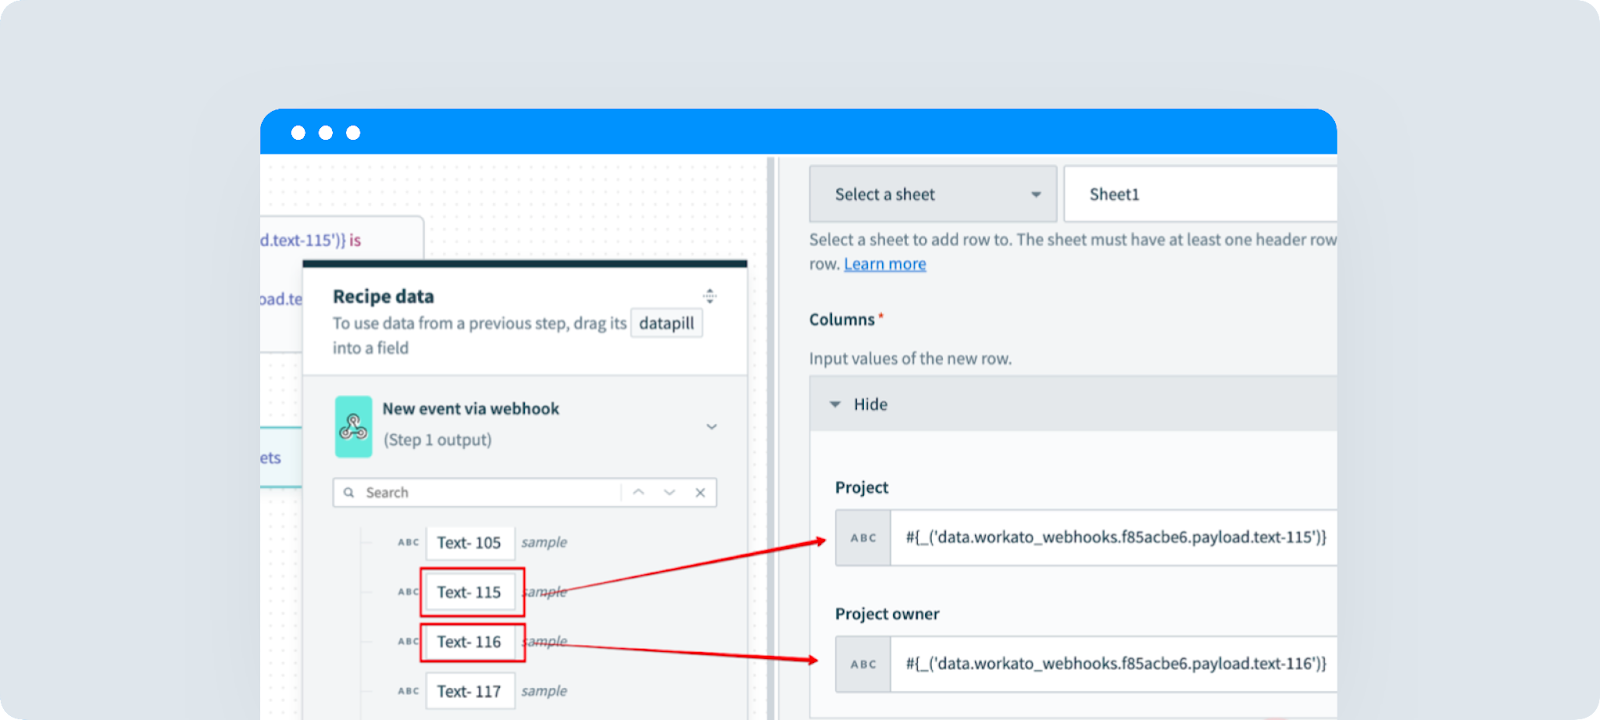
Choose your Google Sheets connection. Then pick the spreadsheet and sheet, map the columns to be filled in, and hit Save.
Step 5 – Testing the setup in the Fluix app
Log into the Fluix app on your device, fill in the fields previously chosen for the integration and submit the document.
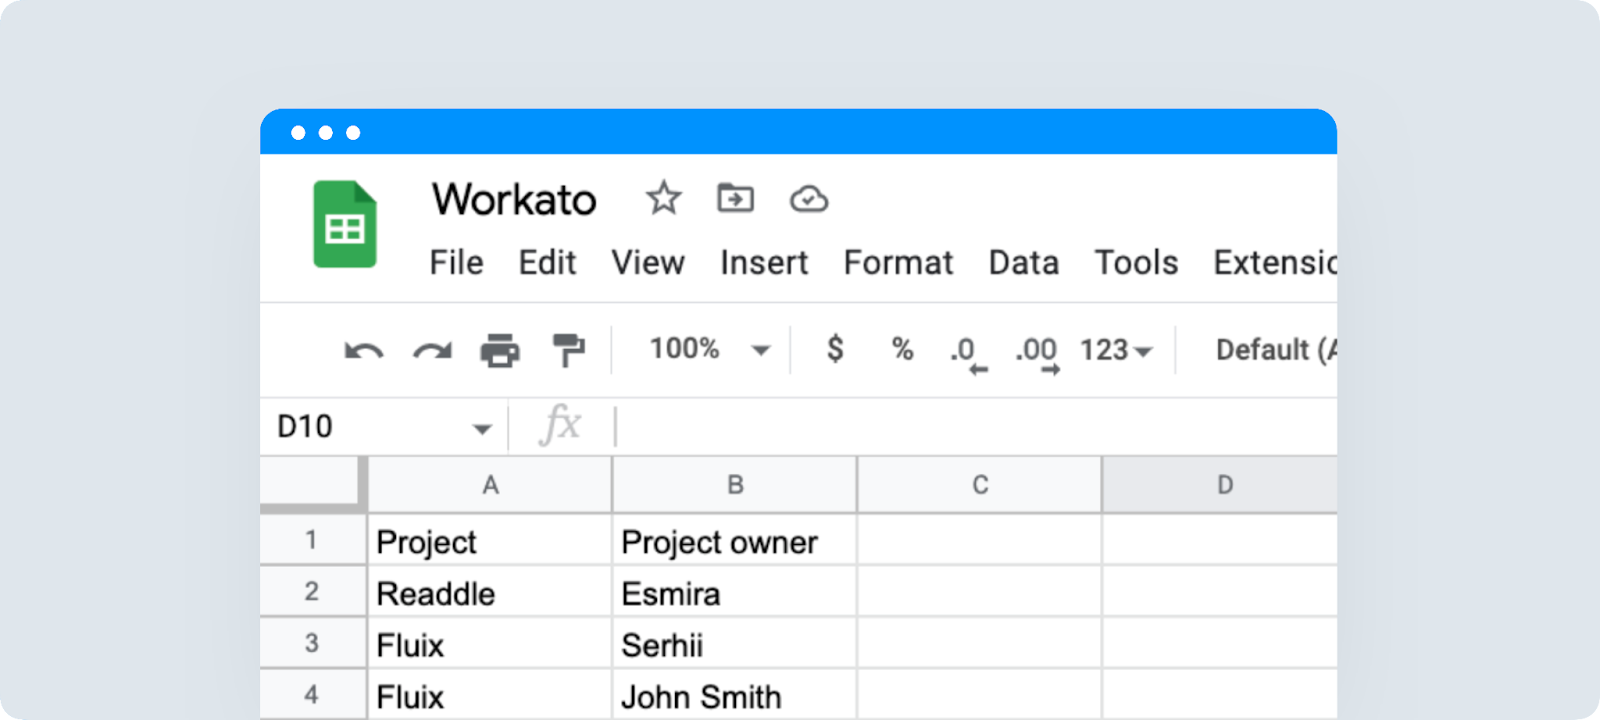
Data from the Fluix form fields appeared as a new row in Google Sheets.
In case you have any questions or difficulties with setup, contact our support at support@fluix.io and we’ll be happy to help you.
Pipedrive is a customer relationship management (CRM) cloud-based system that is also used as an account-management tool to drive the sales process.
By integrating Fluix and Pipedrive you will eliminate manual work and save time for your team by streamlining field-to-office collaboration. In particular, Fluix will automate the process of filling out documents on mobile devices and upload the completed forms and data to Pipedrive.
Note. Integration requires a Core account in Fluix and an account in Pipedrive.
Let’s look at how this integration works.
Step 1 – Preparing a fillable form
Before creating the integration, you will need to prepare a form that will be filled out by your field team in the Fluix app and then appear in Pipedrive. The common fields that need to be added to a form are:
Organization name
Client name
Client email address
Client phone number
Deal value
Currency of the deal
Some of the fields can be omitted, e.g. organization name if you’re not working with the organizations. Subsequently, the configurations below related to organizations can be skipped.
Keep the form at hand while configuring the workflow in Fluix since you will need to enter several form fields’ names.
Step 2 – Configuring the integration
In your Fluix account, go to Configuration -> Workflows. Select the workflow or create a new one for the forms that need to be filled out and then appear as attachments in a created Deal (Organization or Person) and the data that will be extracted from these forms and added to the relevant fields.
In the selected workflow, add a submit action called Upload to CRM/ERP. Since Deals can be associated with a Person, an Organization, or both, we will provide you with guidance on how to create all of them using Fluix. Therefore, you will need to configure 4 requests for each of the processes listed below:
1. Create an Organization
2. Create a Person
3. Create a Deal
4. Upload a document
Process 2.1 – Configuring a request for creating an Organization
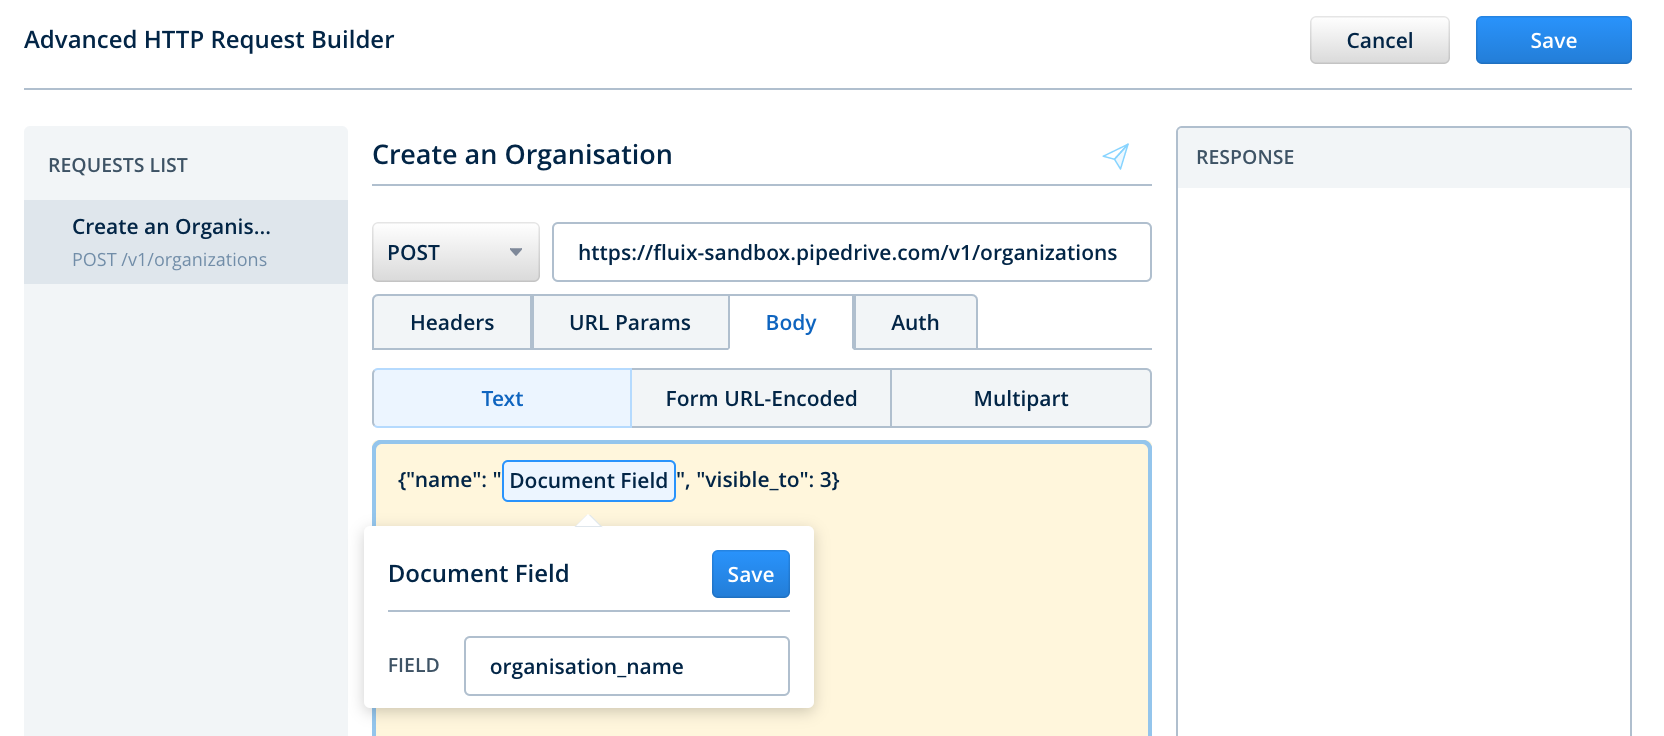
1. Configure the request name, let’s say “Create an Organization”, select POST as the data type, and add the following URL – https://%domain%/v1/organizations, where the parameter %domain% is your Pipedrive account’s address in the web app. You may find it in the address bar when the Pipedrive tab is opened:
For example, in our case, the URL will be the following – https://fluix-sandbox.pipedrive.com/v1/organizations
2. Go to the Header tab and enter the following:
Header name – Content-type
Header value – application/json
3. Go to the URL Params tab and enter the following:
Parameter name – api_token
Parameter value – Secure Value
Note: We recommend entering the value manually since it will allow adding already preset parameters from the dropdown list.
4. Once added, go back to your Pipedrive account, click on your account name, go to the Personal Preferences tab and open the API tab. Copy your personal API token that is going to be used to authenticate your Pipedrive account in Fluix.
5. Go back to Fluix, click Secure Value, add this copied token to the Value field, and click Save.
6. Go to the Body tab:
Enter the following in the Text tab: {“name”: “Document Field”, “visible_to”: 3}
Configure the Document Field value by clicking on it and specifying a field name from your form that can be taken for naming a new Organization in your Pipedrive account.
In our case, we have a field ‘organisation_name’ in our document that implies that the users will add the name of the company to this field while filling out a form in Fluix.
The parameter “visible_to”: 3 means that the created organization will be visible to the entire company. If you need to make it visible only to the owner & followers, add 1 instead of 3.
Click Save to apply the changes.
Process 2.2 – Configuring a request for creating a Person
1. Configure the request name, let’s say “Create a Person”, select POST as the data type, and add the following URL – https://%domain%/v1/persons, where the parameter %domain% is your Pipedrive account’s address in the web app.
2. Go to the Header tab and enter the following:
Header name – Content-type
Header value – application/json
3. Go to the URL Params tab and enter the following:
Parameter name – api_token
Parameter value – Secure Value
4. Click Secure Value, add your personal API token from your Pipedrive account to the Value field, and click Save.
5. Go to the Body tab:
Enter the following in the Text tab: {“name”: “Document Field”, “email”: “Document Field”, “phone”: “Document Field”, “org_id”: “Response Body”, “visible_to”: 3 }
Configure the Document Field values by clicking on them and specifying a field name from your form:
“name”: “Document Field” – the form field name that implies that the users will add the client name to this field while filling out the form in Fluix.
“email”: “Document Field” – the form field name that implies that the users will add the client’s email address
“phone”: “Document Field” – the form field name that implies that the users will add the client’s phone number
After specifying each of the Document Field values, click the save button to apply the changes.
Configure the Response Body parameter by clicking on it, selecting the Create an Organization request, and specifying the key path as ‘data.id’.
Click the Save to apply the changes.
Process 2.3 – Configuring a request for creating a Deal
1. Configure the request name, let’s say “Create a Deal”, select POST as the data type, and add the following URL – https://%domain%/v1/deals, where the parameter %domain% is your Pipedrive account’s address in the web app.
2. Go to the Header tab and enter the following:
Header name – Content-type
Header value – application/json
3. Go to the URL Params tab and enter the following:
Parameter name – api_token
Parameter value – Secure Value
4. Сlick Secure Value, add your personal API token from your Pipedrive account to the Value field, and click Save.
5. Go to the Body tab:
Enter the following in the Text tab: {“title”: “Document Name”, “value”: “Document Field”, “currency”: “Document Field”, “person_id”: “Response Body”, “visible_to”: 3 }
Configure the Document Field values by clicking on them and specifying a field name from your form:
“value”: “Document Field” – the form field name that implies that the users will add the value of a deal to this field while filling out the form in Fluix.
“currency”: “Document Field” – the form field name that implies that the users will add the currency of a deal.
After specifying each of the Document Field values, click the save button to apply the changes.
Configure the Response Body parameter by clicking on it, selecting the Create a Person request, and specifying the key path as ‘data.id’.
Click Save to apply the changes.
Process 2.4 – Configuring a request for Uploading a File
1. Configure the request name, let’s say “Upload a File”, select POST as the data type, and add the following URL – https://%domain%/v1/files, where the parameter %domain% is your Pipedrive account’s address in the web app.
2. Go to the URL Params tab and enter the following:
Parameter name – api_token
Parameter value – Secure Value
3. Сlick Secure Value, add your personal API token from your Pipedrive account to the Value field, and click Save.
4. Go to the Body tab and select the Multipart tab:
Part name – organization_id
Part value – Response Body
Configure the Response Body parameter by clicking on it, selecting the Create an Organization request, and specifying the key path as ‘data.id’.
Part name – person_id
Part value – Response Body
Configure the Response Body parameter by clicking on it, selecting the Create a Person request, and specifying the key path as ‘data.id’.
Part name – deal_id
Part value – Response Body
Configure the Response Body parameter by clicking on it, selecting the Create a Deal request, and specifying the key path as ‘data.id’.
Part name – file
Part value – Document File
Configure the Document File parameter by clicking on it, selecting the necessary document type.
After specifying each of the Part values, click the save button to apply the changes.
After all the requests were configured, click Save in the top right corner of the Advanced HTTP Request Builder. To save changes in a workflow, click Save & Apply to apply the changes to the workflow and go to test the setup.
Step 3 – Testing the integration
Go to the Fluix app on the device or User App in the web browser version. Open a test form, fill it out and submit it through the workflow.
In Pipedrive, you will see a new Deal added to the Pipeline in the first section on the left. A new Organization and a Person will be associated with this Deal as well as the filled-out document will be attached to each of these items.
In case you have any questions or difficulties with setup, contact our support at support@fluix.io and we’ll be happy to help you.
Automate.io is an integration platform where you can build custom integrations between your cloud apps. Project management, payment, and other business processes can be automated in minutes, with no IT help required.
You can connect Fluix with 200+ applications with the help of Automate.io, both one-to-one, or multistep integrations. Let’s check how it works on a simple integration of Google Sheets with Fluix. The data collected in mobile forms in the Fluix app will be automatically submitted to the spreadsheets for further processing and analysis.
5 steps to set up the integration
To test the integration, you’ll need a Fluix Core license, an Automate.io license starting from a Professional plan, and access to Google Sheets.
Step 1 – Creating a Bot in Automate.io: Trigger app
To start creating an integration (they call them Bots), you need to choose the apps you need to connect. Every Bot has one Trigger app (the one that starts the process) and one or more Action apps (where the action is performed). In our case, the trigger app is Fluix that sends the data from the submitted form to the Action app – Google Sheets.
Let’s start with adding Fluix as a Trigger App:
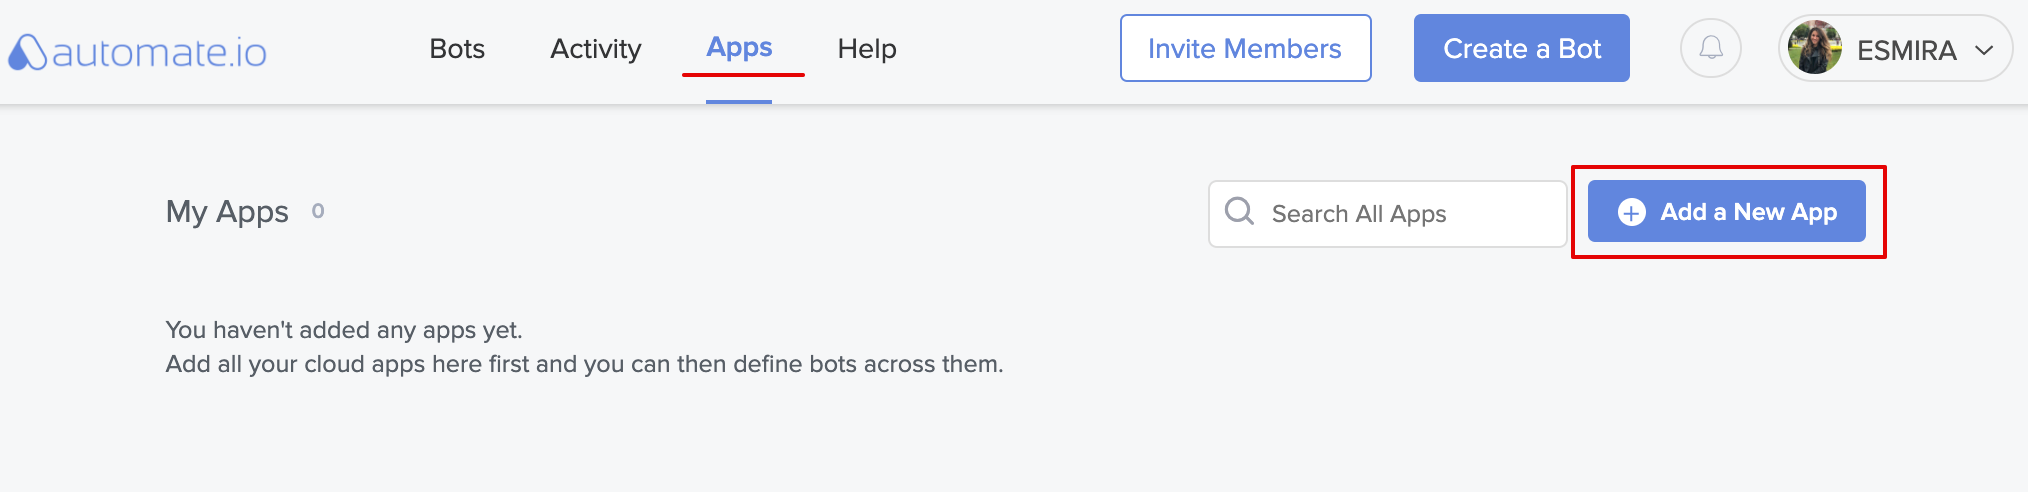
1. In your Automate.io account, open the Apps tab, click the Add a New App button in the top right corner and select Google Sheets app:
After selecting the app, you will be asked to authorize your Google Sheets account and allow Automate.io to access your Google account.
2. Go to the Bots tab and click the ‘Create a Bot’ button at the top of your dashboard:
3. Give a name to your Bot. Let’s say ‘Fluix leads to Google Sheets’, as we are using these two apps in this Bot.
4. Connect the Trigger app:
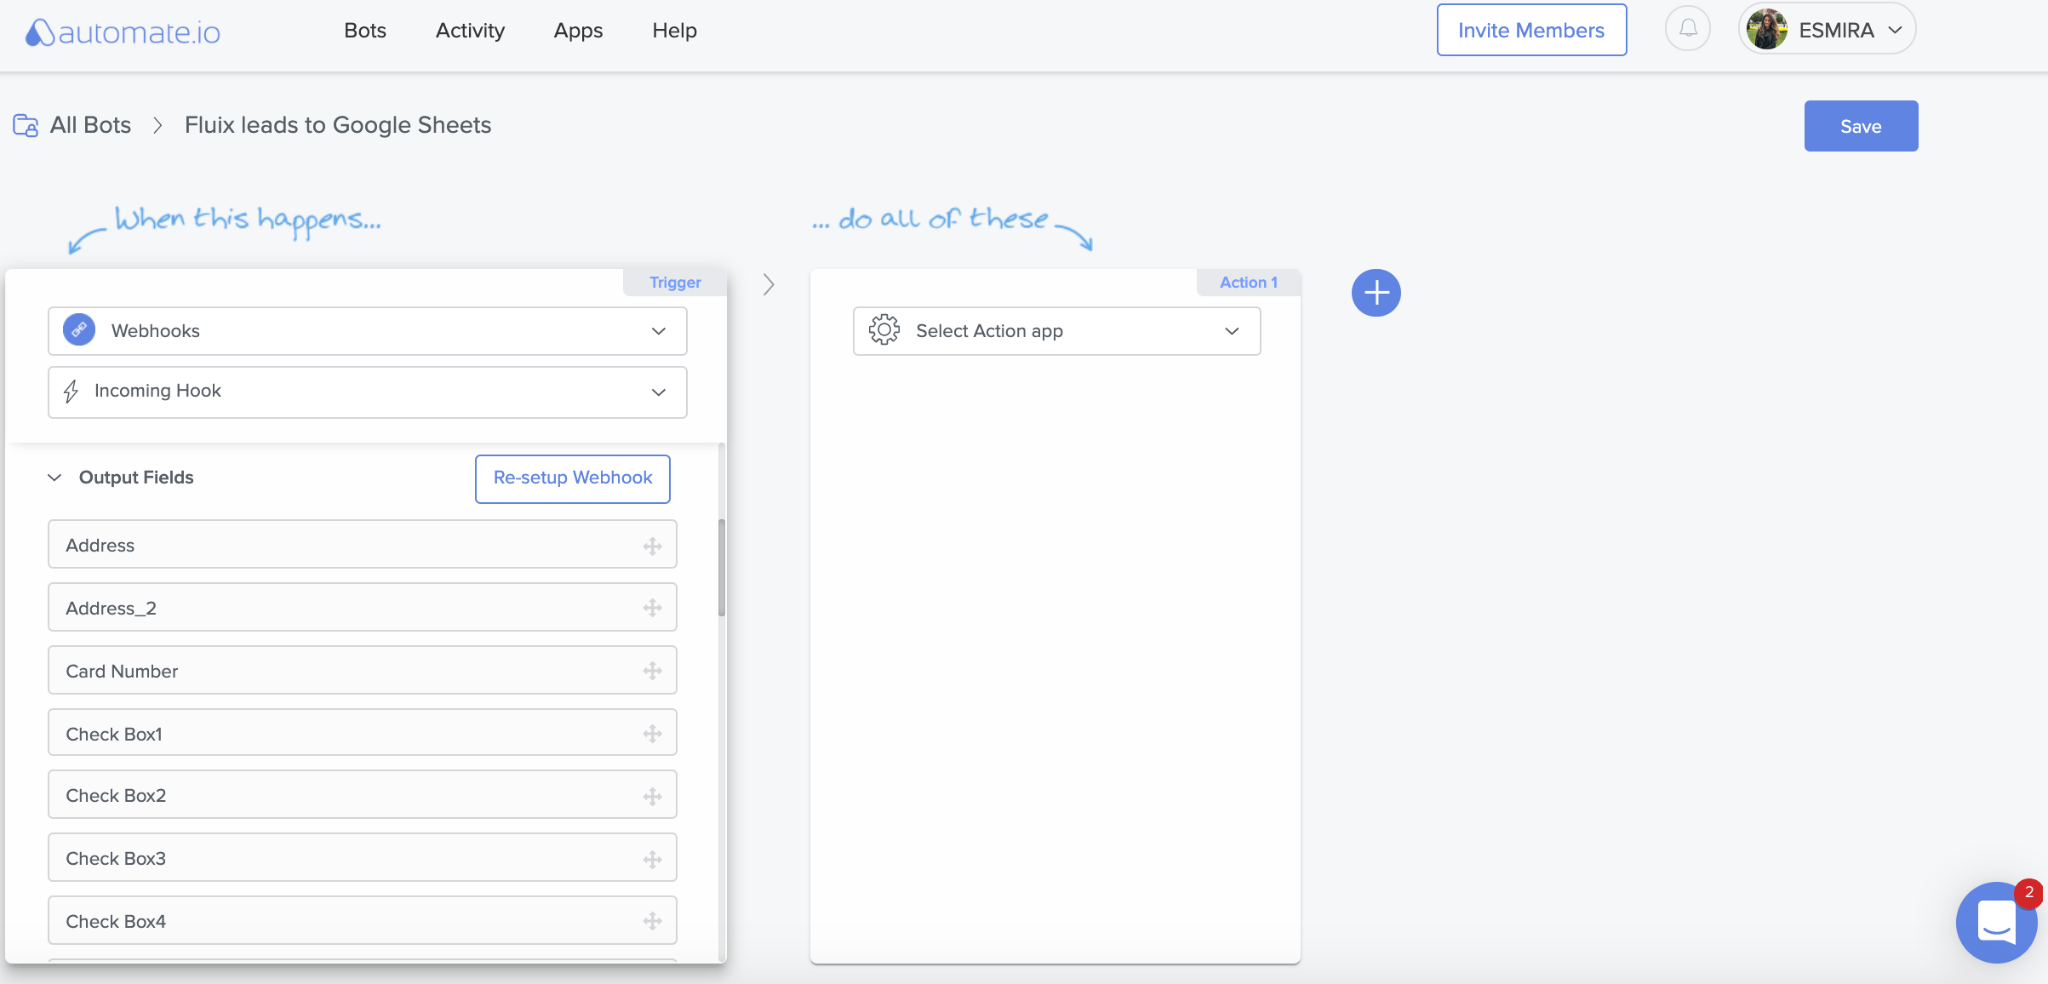
At this step, the Fluix app is added. Since Fluix is not available in the list of apps, it can be linked as a Trigger app via Webhook.
Select the Webhook from the list of the Trigger apps and Incoming hook to enable the ability to send data to Automate.io. Then click ‘Setup Webhook’.
The window with the webhook URL will appear. Copy the URL and go to your Fluix account to proceed with the integration.
Step 2 – Configuring a Fluix workflow
In Fluix, you’ll need to create a new or adjust an existing workflow that you use to collect data from forms and from where this data will be automatically extracted to Google Sheets.
1. In the selected workflow, add submit action called Submit by HTTP and select POST values as the data type:
2. Add the webhook URL to the submit action and click Save Changes to save the workflow.
3. Come back to Automate.io’s Setup Webhook window and click I’m done. You will be asked to send in some sample data from Fluix.
4. To send sample data from Fluix, go to the Fluix app on the iOS device or User App in the web browser, and submit a test document related to the workflow you’ve just configured.
Step 3 – Creating a Bot in Automate.io: Configuring the Webhook
1. After sending the sample data, your fields from the Fluix form will appear here. If everything looks good, click Looks Good. But if you find that some important fields are missing, click Refetch Data at the bottom of the fields list. This allows you to try sending the sample data once again.
2. The fields will now show up in your Trigger’s Output Fields.
Step 4 – Creating a Bot in Automate.io: Connecting the Action App
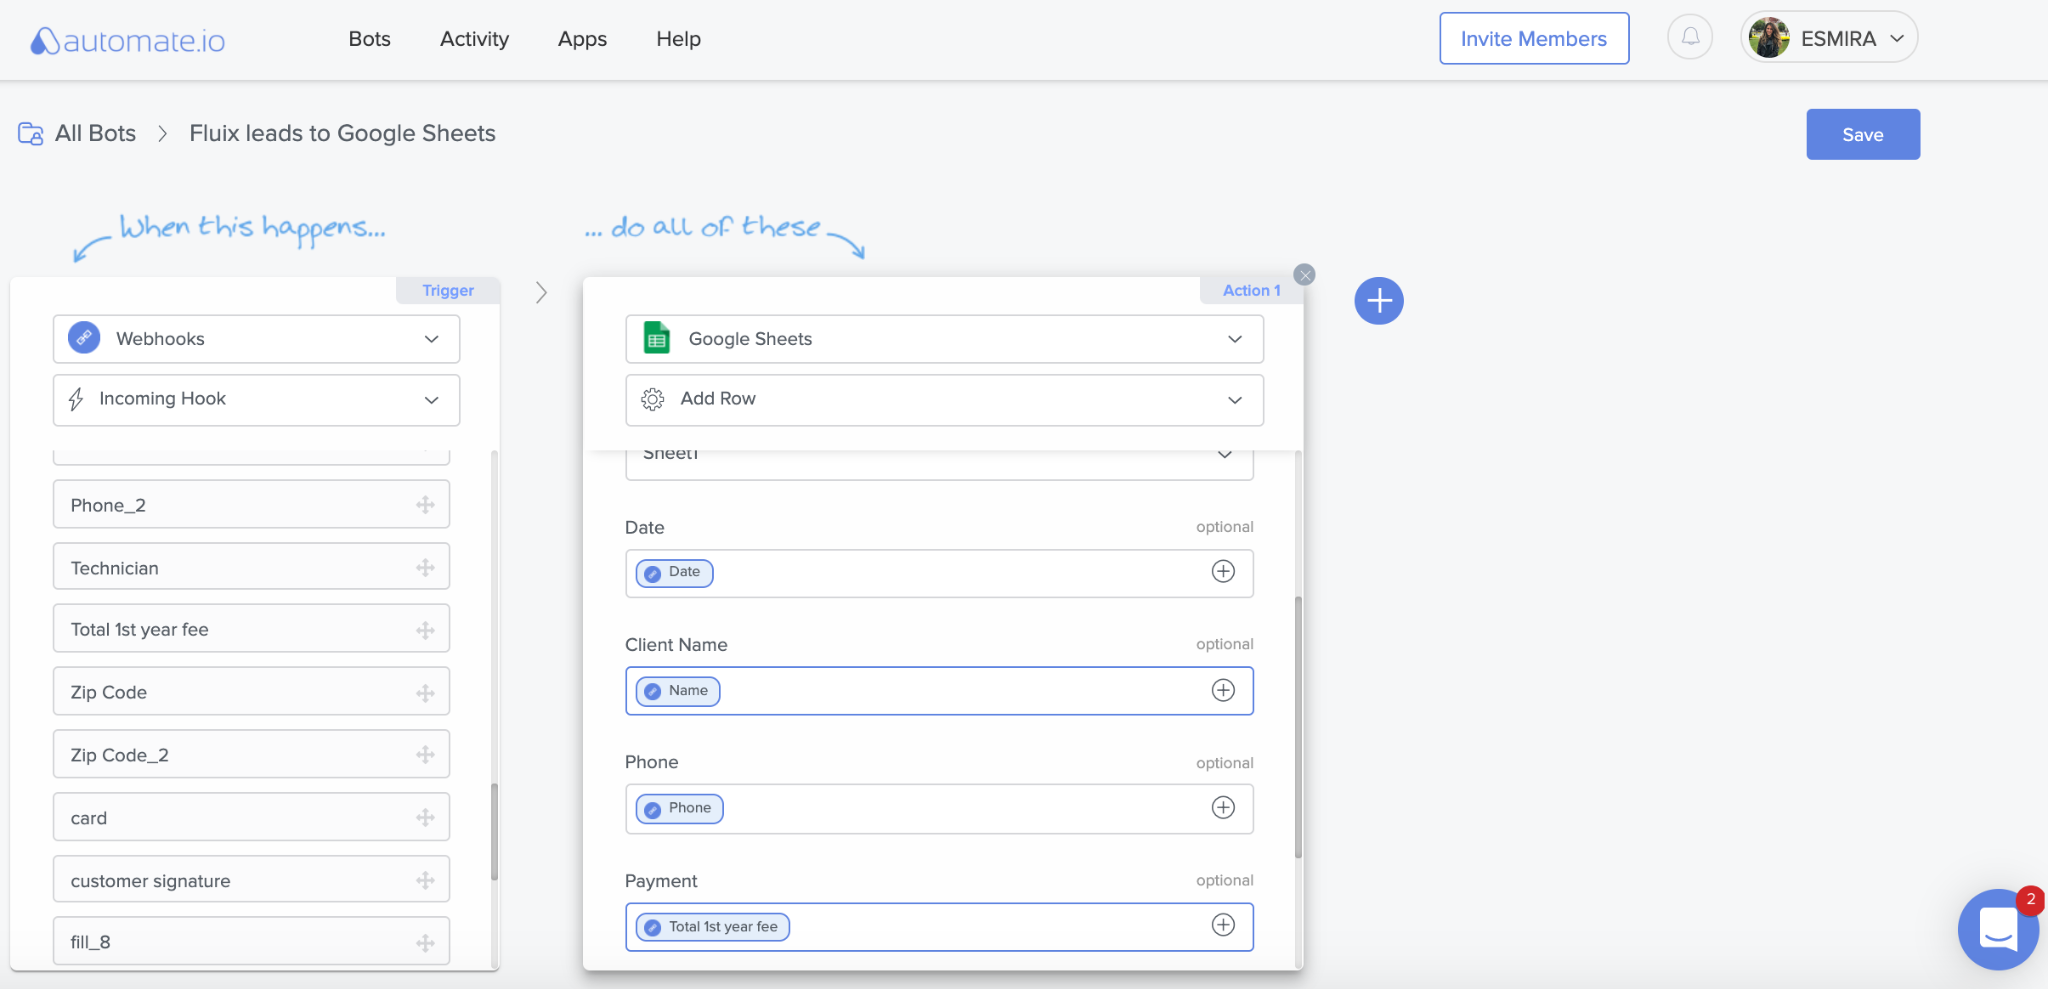
Now let’s connect Google Sheets as an Action app and choose the spreadsheet and fields that need to be imported from the forms in Fluix.
1. Connect the Action app:
The Action app performs an event in your Bot. In this case, it is Google Sheets.
Select the Action app from the ‘Select Action app’ drop-down.
Enter the login details in the window that appears.
Perform the steps that follow. You have now selected the Action app.
2. Select the Action to be done:
In the drop-down, select Add a Row. You will then see a list called Input Fields for this action.
Select Spreadsheet and Worksheet to which you would like the data to be added.
You will then see a list of columns of the Worksheet you’ve selected.
3. Drag and drop the required fields from Webhook’s Output Fields to the Input Fields of the Google Sheet app.
After you are done with creating your Bot, save it by clicking on the Save button on the top-right. You will see that your Bot is in an OFF state. You can turn it ON using the toggle button.
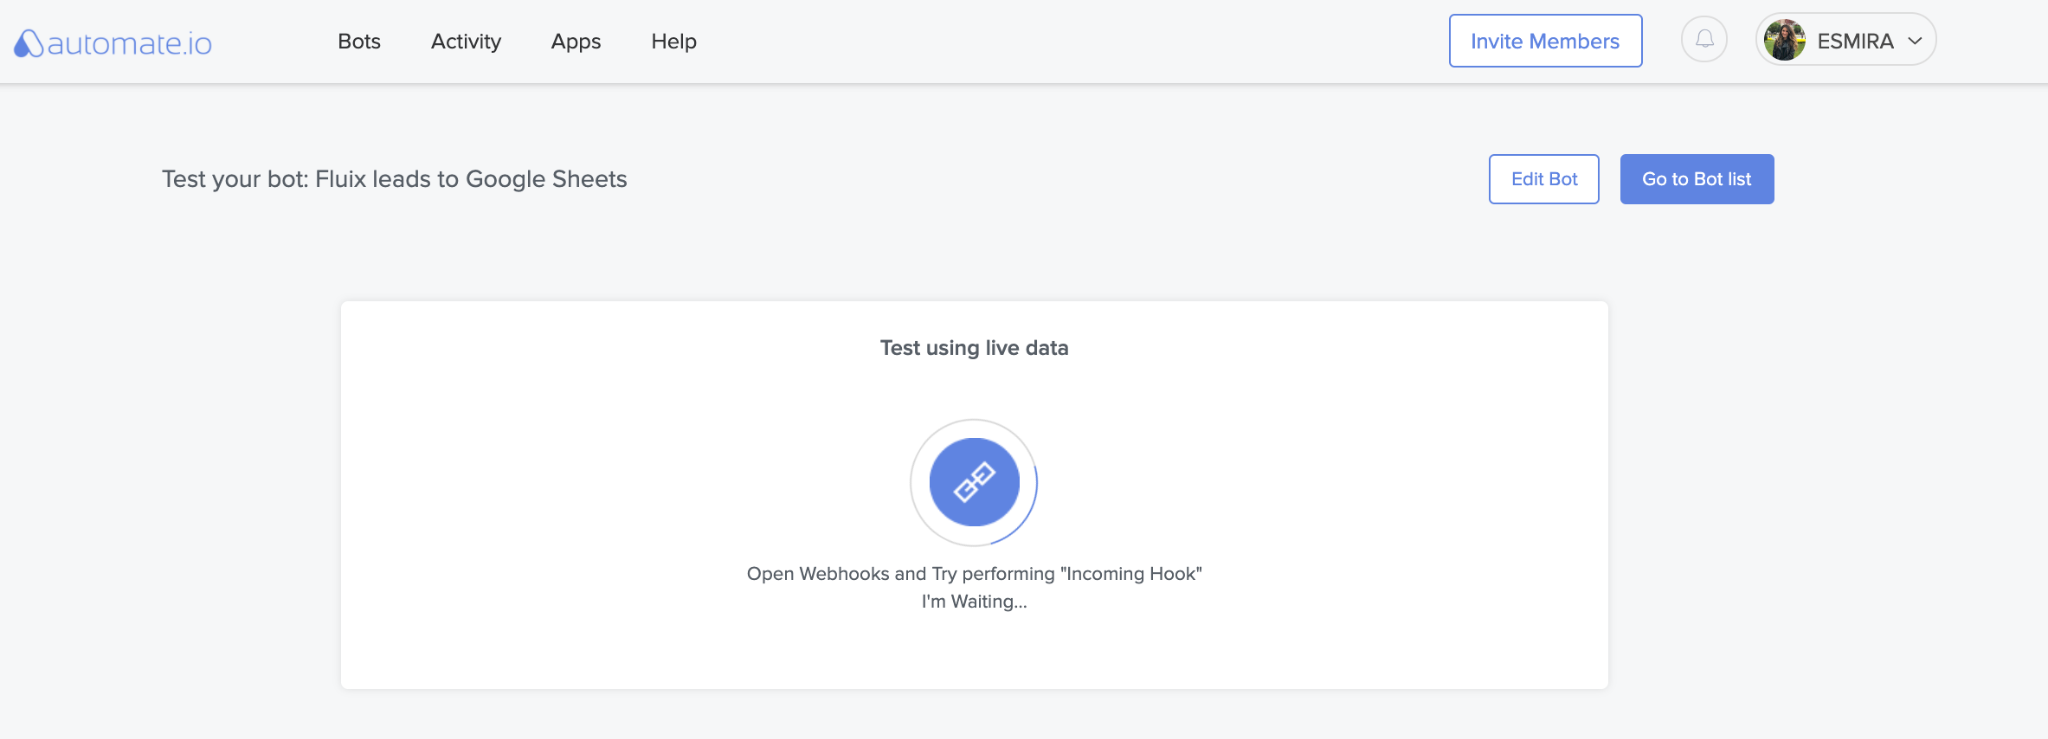
Step 5 – Testing
After Bot is switched on, you will be asked to test it using live data:
Go to the Fluix app and submit a test document through this workflow. Go back to Automate.io, when you see the success message, it means that everything went fine and the data has already been transferred from Fluix to Google Sheets via Automate.io.
In case you have any questions or difficulties with setup, contact our support at support@fluix.io and we’ll be happy to help you.
Fluix is a web and mobile-based cloud platform that helps teams with setting up digital document management and workflow automation on projects in various industries.
Zapier is a platform that allows you to connect different software tools with each other, without writing code.
With the help of Zapier you will be able to connect Fluix to pretty much any tool and automate any business process for your team.
Note: Integration requires a Core account in Fluix and an account in Zapier. However, to try the integration, you can register free trial accounts in all tools.
Examples of integrations
By connecting Fluix with Trello via Zapier you can automatically create Trello cards once the form is filled out and completed in the Fluix app.
Integration of Fluix with Google Sheets via Zapier lets your data flow directly to your spreadsheets without having to manually download and copy it.
Additionally, you may integrate Fluix through Zapier with any CRM, data analytics and project management tools, work collaboration and team communication platforms. Check the scenarios on how these integrations can be set using Fluix.
In case you have any questions or difficulties with setup, contact our support at support@fluix.io and we’ll be happy to help you.
Here are the short guidelines on the connection steps. Upon connecting your company storage to Fluix you will be able to use it both as a document source or document destination in the workflows.
We encourage you to consider and evaluate Fluix Built-in Cloud Storage as your primary document repository. Please note, that it can be connected as a network drive to your Windows or Mac workstations, and easily manipulated just like any other folder.
In case you have any questions or difficulties with setup, contact our support at support@fluix.io and we’ll be happy to help you.
Fluix is a software platform that helps you collect field data on mobile forms, and submit it for review, company storage, email, or any business analytics tools.
Airtable is a cloud collaboration service that allows to aggregate and visualize data extracted from forms.
Integration of Fluix and Airtable allows you to cover the whole flow from data collection to its visualization and further data-driven decisions.
Connecting these two tools will take you 30 minutes and doesn’t require coding. The integration is performed via the webhook – the automatically generated link that connects two services and allows data transfer between them.
Check out our video that displays how this integration is being utilized in the aviation industry.
Note. Integration through a webhook requires a Core account in Fluix and a Pro account with Airtable.
Step 1. Create a Base
Before getting started with integration, you need to create an Airtable base where the data from forms will be exported. If you are going to use the already existing base, go straight to Step 2.
1. Go to your Airtable account and click Add a base and select Start from scratch.
2. Enter the base name and optionally select the base background color and icon.
3. By default, a new base consists of one table, and you can add the necessary amount of tables. To do it, click Add table.
Note. For bases with multiple tables, you need to set the webhook integration individually for each table.
4. To edit the table, unroll the settings menu.
5. By default, each new table contains 4 fields: Name, Notes, Attachments, Status. To edit them, unroll the settings menu.
6. To add a new field, click the plus icon to the right of Status. You need to add as many fields as you are going to export from Fluix forms.
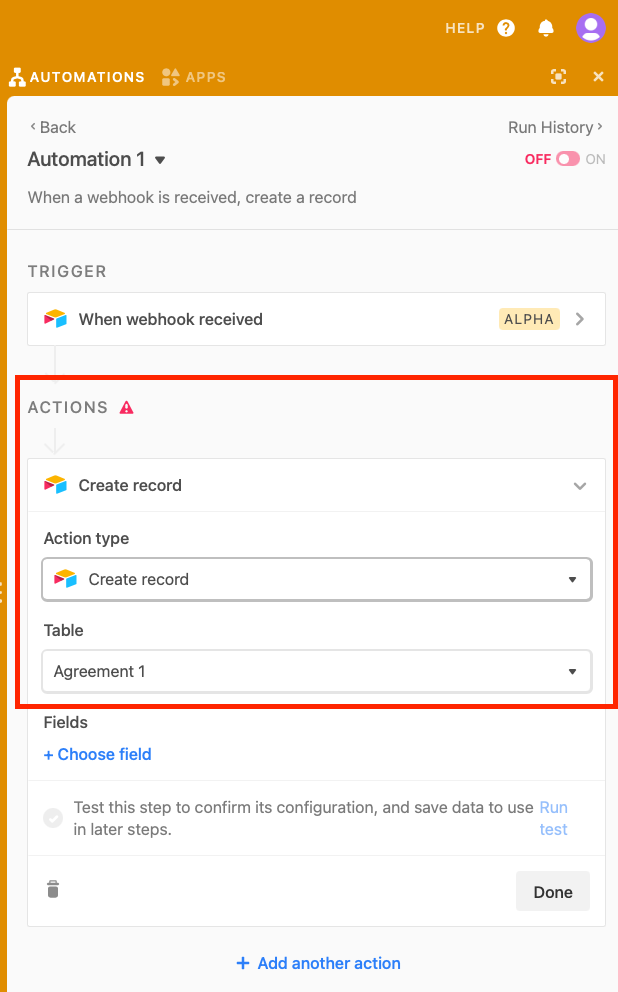
1. Click Automations and select Create a custom automation.
2. In Trigger type, select When webhook received and copy the generated webhook.
3. In your Fluix account, go to Configuration > Workflows. Select the workflow through which form used for data transfer to Airtable is submitted.
4. Open the workflow, click Edit Workflow in the upper right corner, and add the submit rule Submit by HTTP. Paste the generated webhook link and select POST values.
5. Click Save & Publish in the upper right corner.
6. Perform the sample submission of the document that is going to be further used for data extraction into the particular table. Don’t worry that the first submission fails, since it is a test submission to connect with the webhook.
7. In the Airtable account, click Run test. The status Test ran successfully means your webhook has been connected. You can’t proceed with selecting fields without the connected webhook.
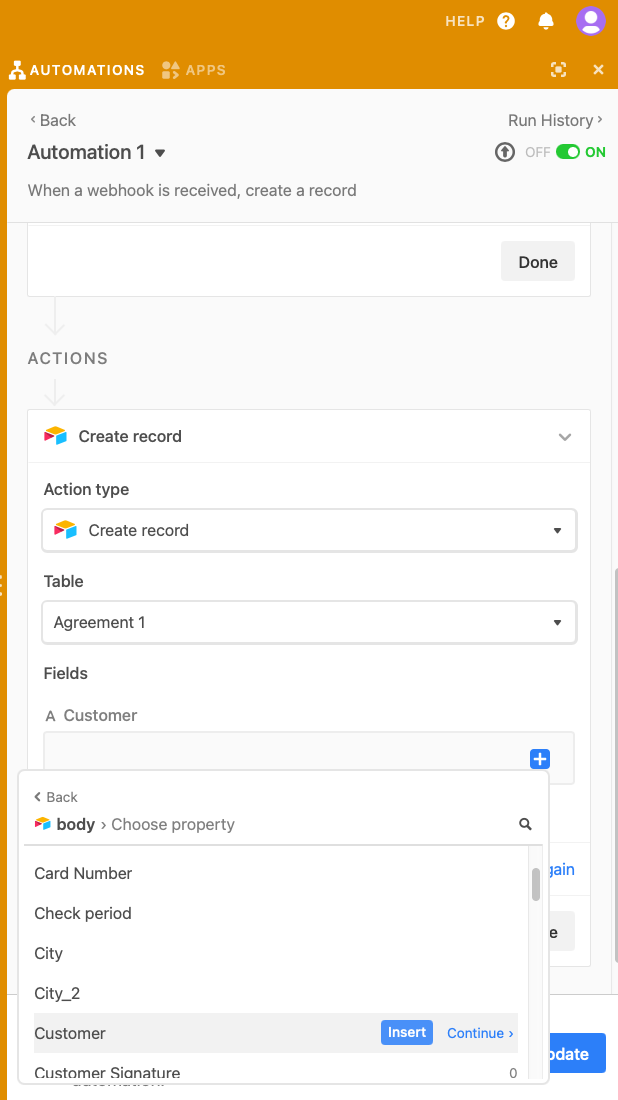
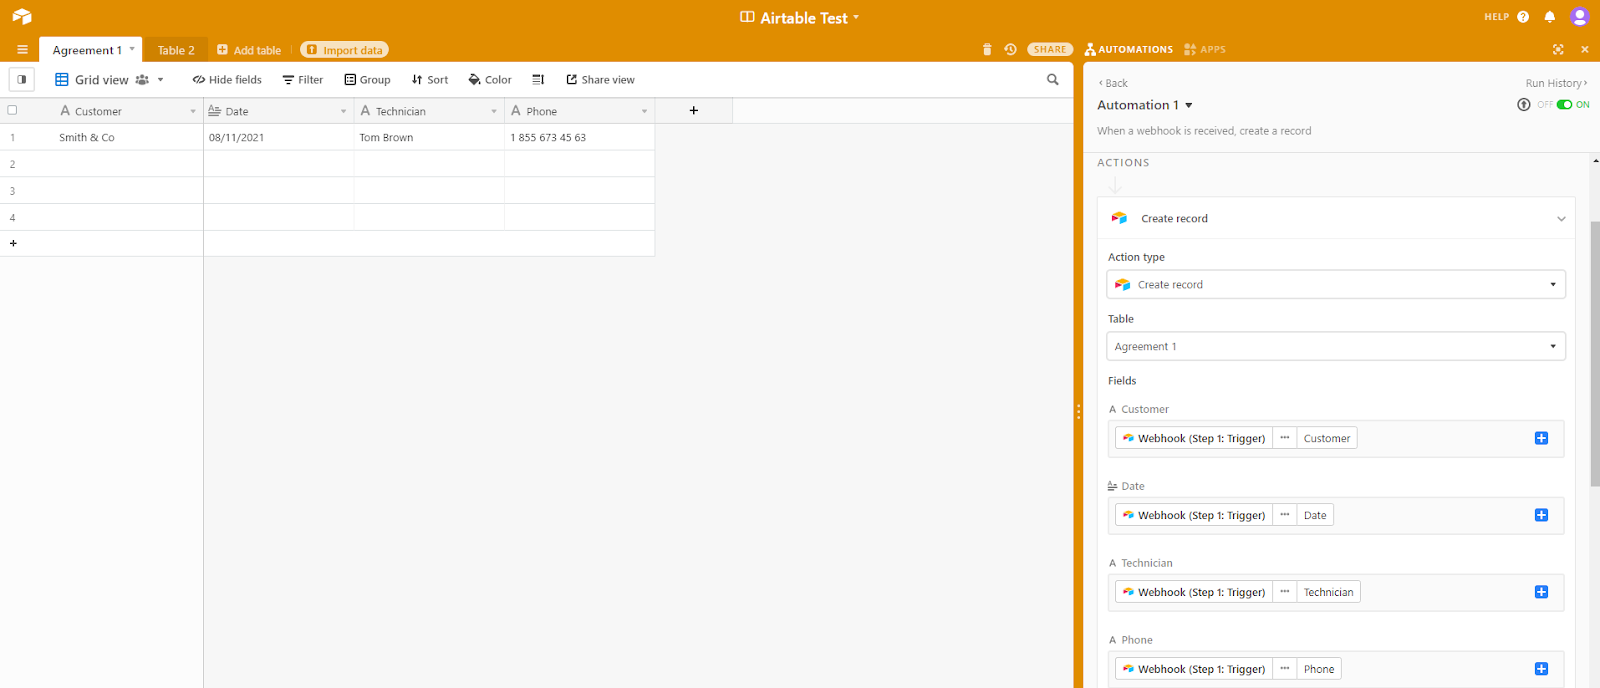
8. In Airtable, in Actions, select Create record in Action type and select the necessary table in Table.
9. In Fields, select fields where data will be added.
10. Map each field to the corresponding field in the Fluix form. Click the plus icon in the input line, select the webhook and click Continue. Select the body, click Continue and insert the necessary form field.
11. Switch the toggle to the On position on the top and click Run test.
Step 3. Export Data
1. Submit a form in the Fluix app.
2. The submitted data will be automatically transferred to the table in Airtable.
Note
You can create several automations for one table. In this case, select the new webhook and insert it into the new submit action in the Fluix workflow. The rest of the process will be similar.
In case you have any questions or difficulties with setup, contact our support at support@fluix.io and we’ll be happy to help you.
Wrike is a popular web and mobile-based project management application that helps teams from small size to enterprise to effectively manage their tasks and projects.
Fluix is a web and mobile-based cloud platform that helps teams with setting up digital document management and workflow automation on projects in various industries.
Make is a no-code solution that allows you to connect almost any popular tools together.
Nowadays it is very common that organizations use a handful of different tools to fulfill their internal requirements in terms of document management and task tracking to ensure timely and accurate project completion.
The integration of Fluix and Wrike through Make allows you to connect these two crucial parts of the working process.
Note: Integration requires a Core account in Fluix and an account in Wrike and Make. However, to try the integration, you can register free trial accounts in all tools.
Setup
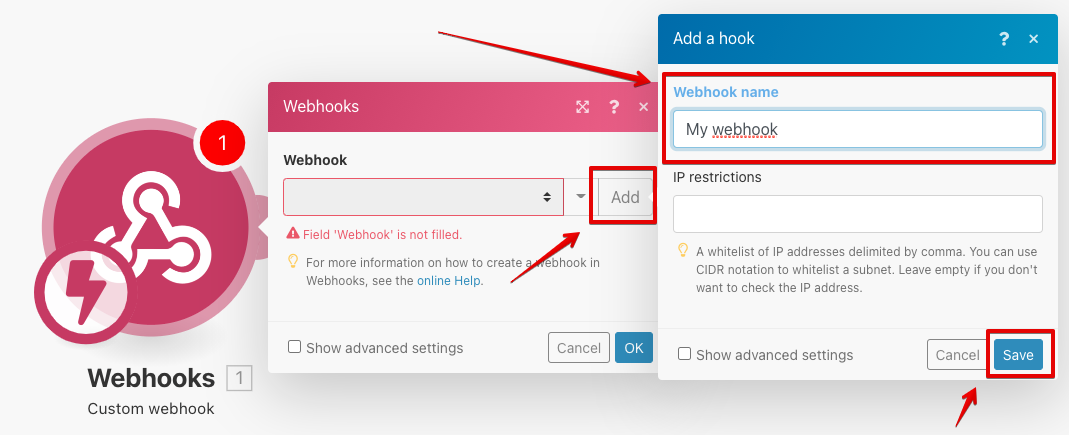
Step 1 – Creating scenario in Make
1. On the Make’s main dashboard click Create a new scenario in the upper right corner. 2. Hit the plus icon in the middle of the screen, choose the Webhooks option from the list of available integrations and select Сustom webhook as a trigger. 3. Click Add, rename the webhook according to your preference and click Save. 4. Copy the appeared webhook URL and go to your Fluix account.
Step 2 – Configuring Workflow in Fluix
In Fluix you’ll need to create / adjust a workflow that you use to submit forms in Fluix from where the data will be automatically extracted to create a task in Wrike.
In the selected workflow, add submit action called Submit by http and select POST values as the data type:
Add the webhook URL you copied earlier in Make to the submit action and click Save changes to save the workflow.
Step 3 – Setting up integration modules
Go to the Fluix app on device or web and submit a test document through the workflow you created.
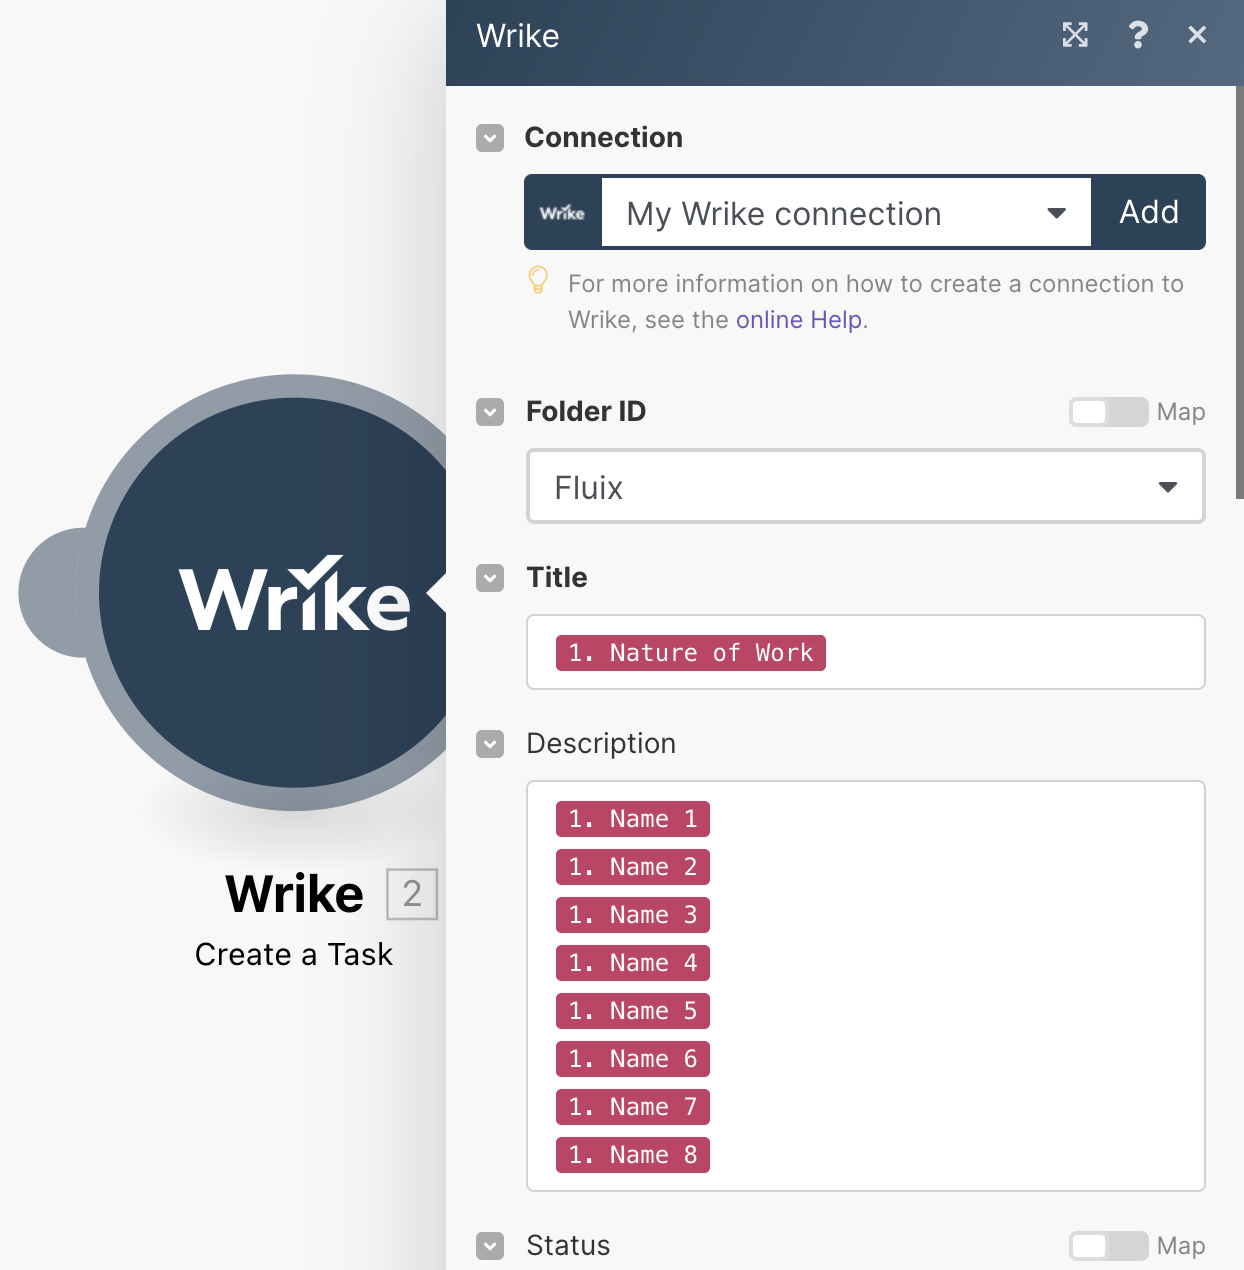
Once you see the success indicator in Make, click OK. 3. Hover your cursor over the webhook module and click on the appeared plus icon to create the destination module for the data that will be used for task creation in Wrike. 4. Click Add another module, select Wrike from the list of available integrations and select Create a Task:
Step 4 – Connecting Wrike
Click Add and Save in order to give access to your Wrike account. 2. Configure all the necessary parameters from the list on the integration setup page and click Ok to save.
Task’s title and description will be created based on the information taken from the particular fields in the submitted form that were predefined by you during the integration setup.
In the integration settings, you may predefine and further change the status and importance level of the tasks upon their appearance in Wrike after the document submission.
You may define the particular space and list stakeholders or teams for whom this task is visible by default.
3. Click Run Once in the left bottom corner and try submitting your document. Once done, you should see your tasks created in Wrike where description and title correspond to the data taken from the chosen form fields from the submitted document in Fluix. Then you will just need to activate the scenario in the left bottom corner.
Step 5 – Testing integration
Go to the Fluix app on the device or User App in the web browser version. Open a test form, fill it out and submit it through the workflow. In Wrike, you will see a new Task created.
In case you have any questions or difficulties with setup, contact our support at support@fluix.io and we’ll be happy to help you.
Qlik is a business analytics platform that helps companies deliver active, real-time data intelligence.
Fluix and Qlik integration automates data collection, processing and analysis. Your team members will stop printing out documents to compare numbers, there will be no need for manual data copying from one tool to another, and finally you will get business insights from the daily operations.
Fluix will automate the process of data collection in digital fillable forms and extraction of the aggregated data into Qlik for further visualization, analysis and sharing the results with the team and customers.
Let’s set up the integration between these tools and look at the benefits together.
Note. Integration requires a Core account in Fluix and an account in Qlik. To try the option, you can register for a free demo in Fluix and free trial in Qlik.
How to integrate?
Step 1 – Configuring workflow in Fluix
1. Go to the Fluix admin portal, Workflows section, and choose an existing workflow or create a new one for the business process where the data needs to be analyzed. Add a submit rule Extract data and create a Dataset for the data that will be extracted from the completed forms. You can also watch the video on how to create a workflow here
2. Fill out and submit a test form using a User app on a web or iOS device.
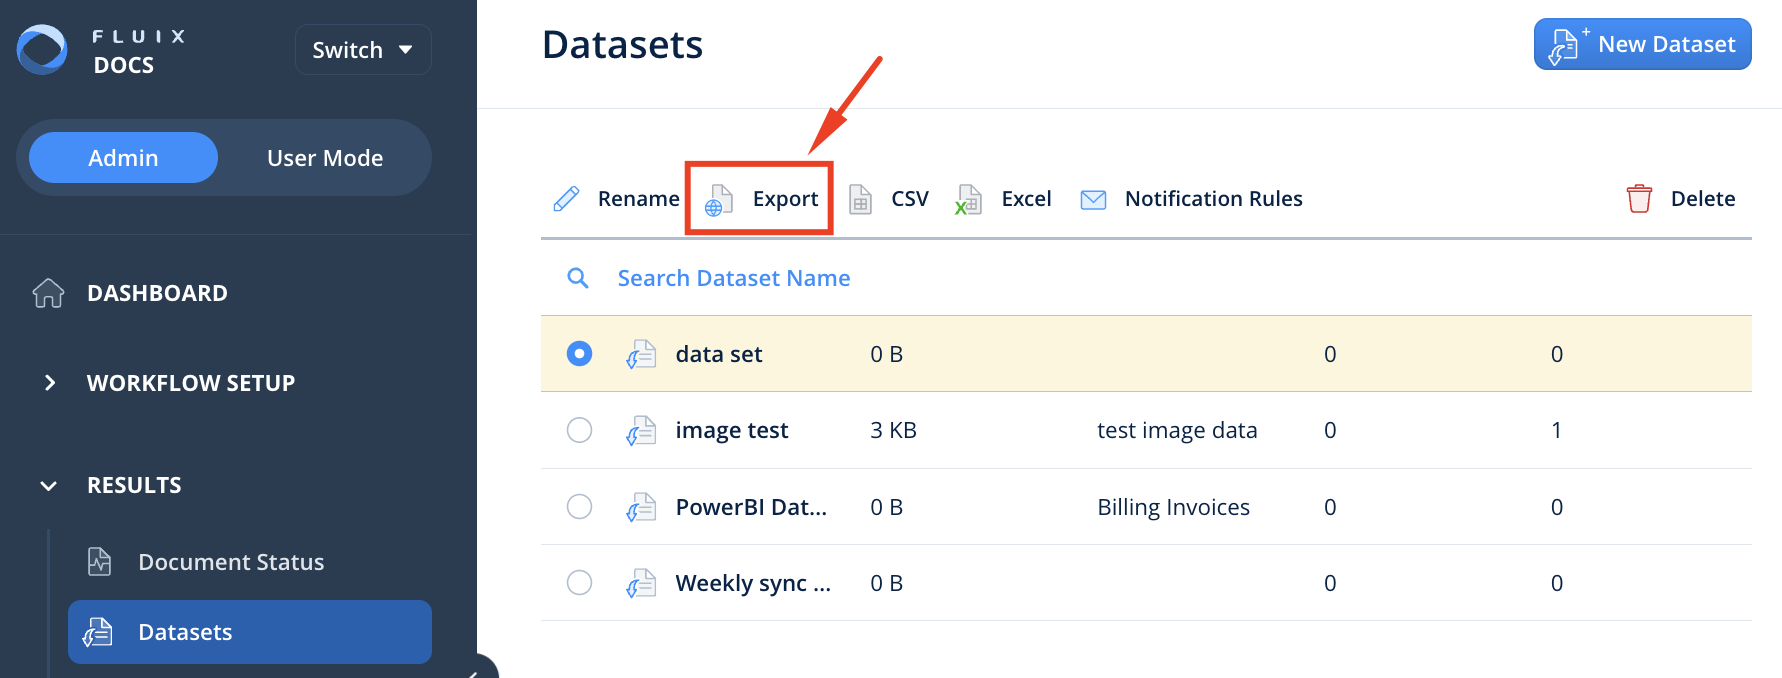
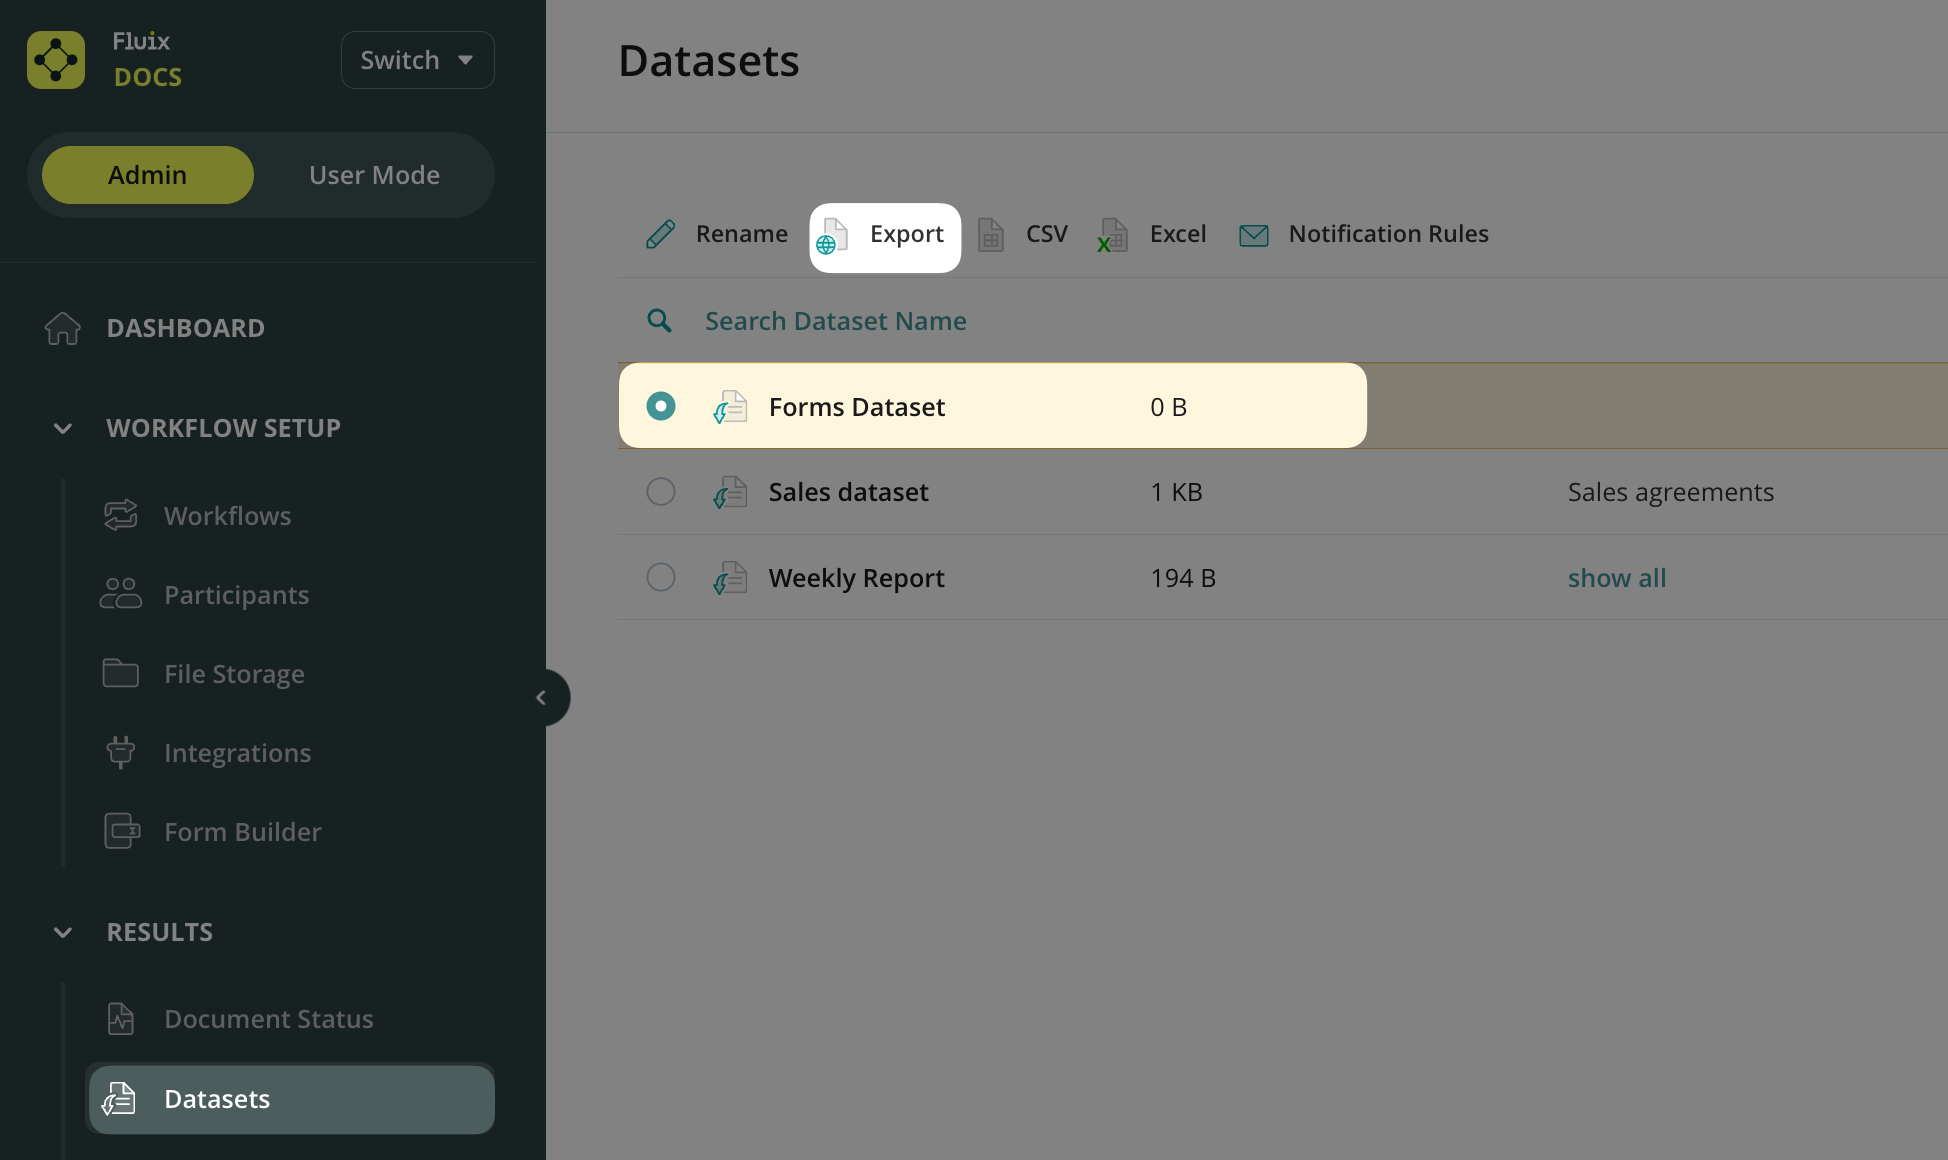
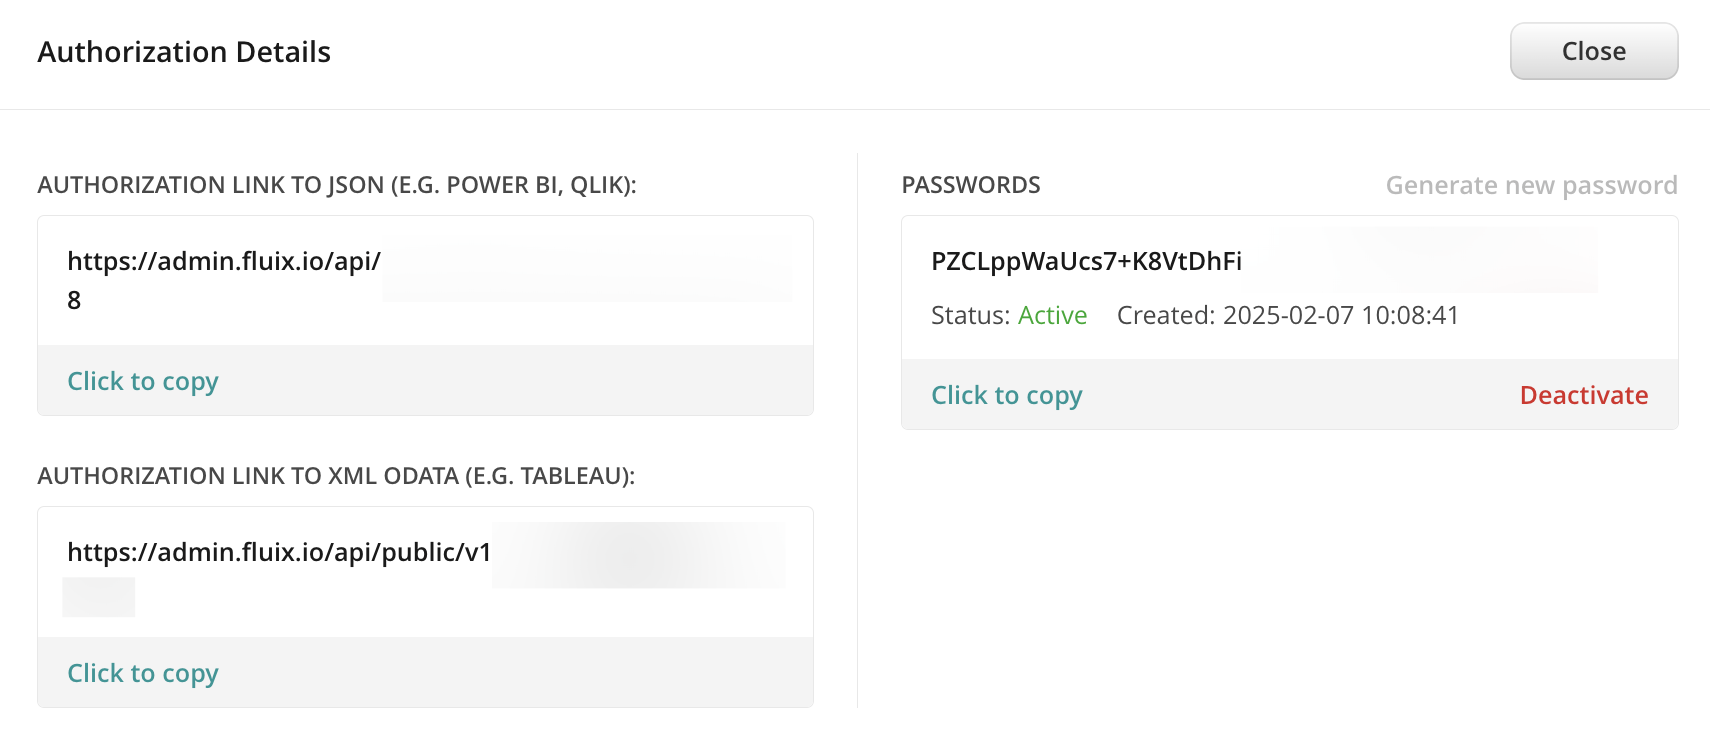
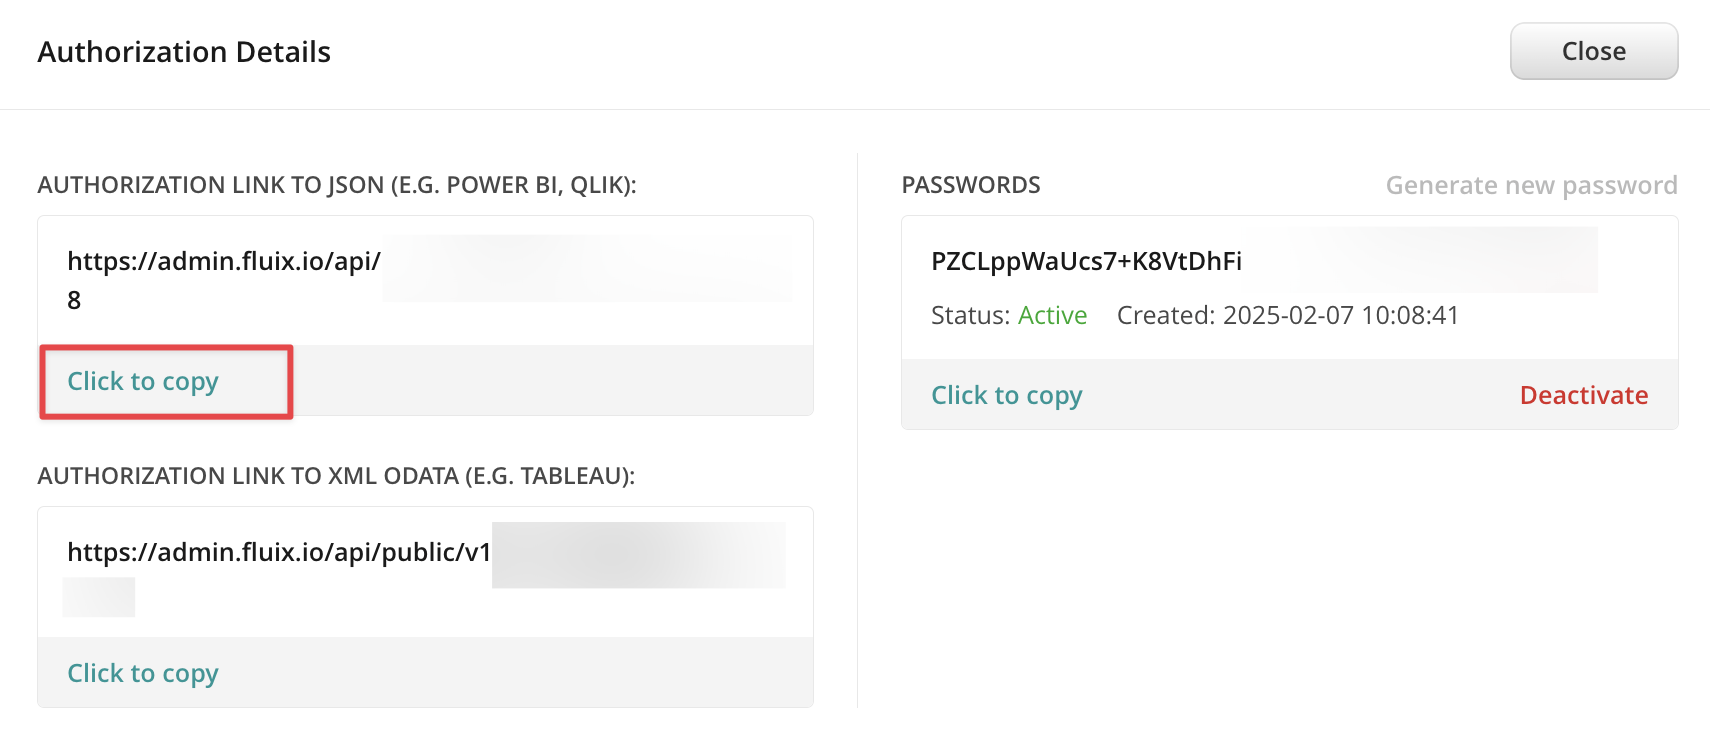
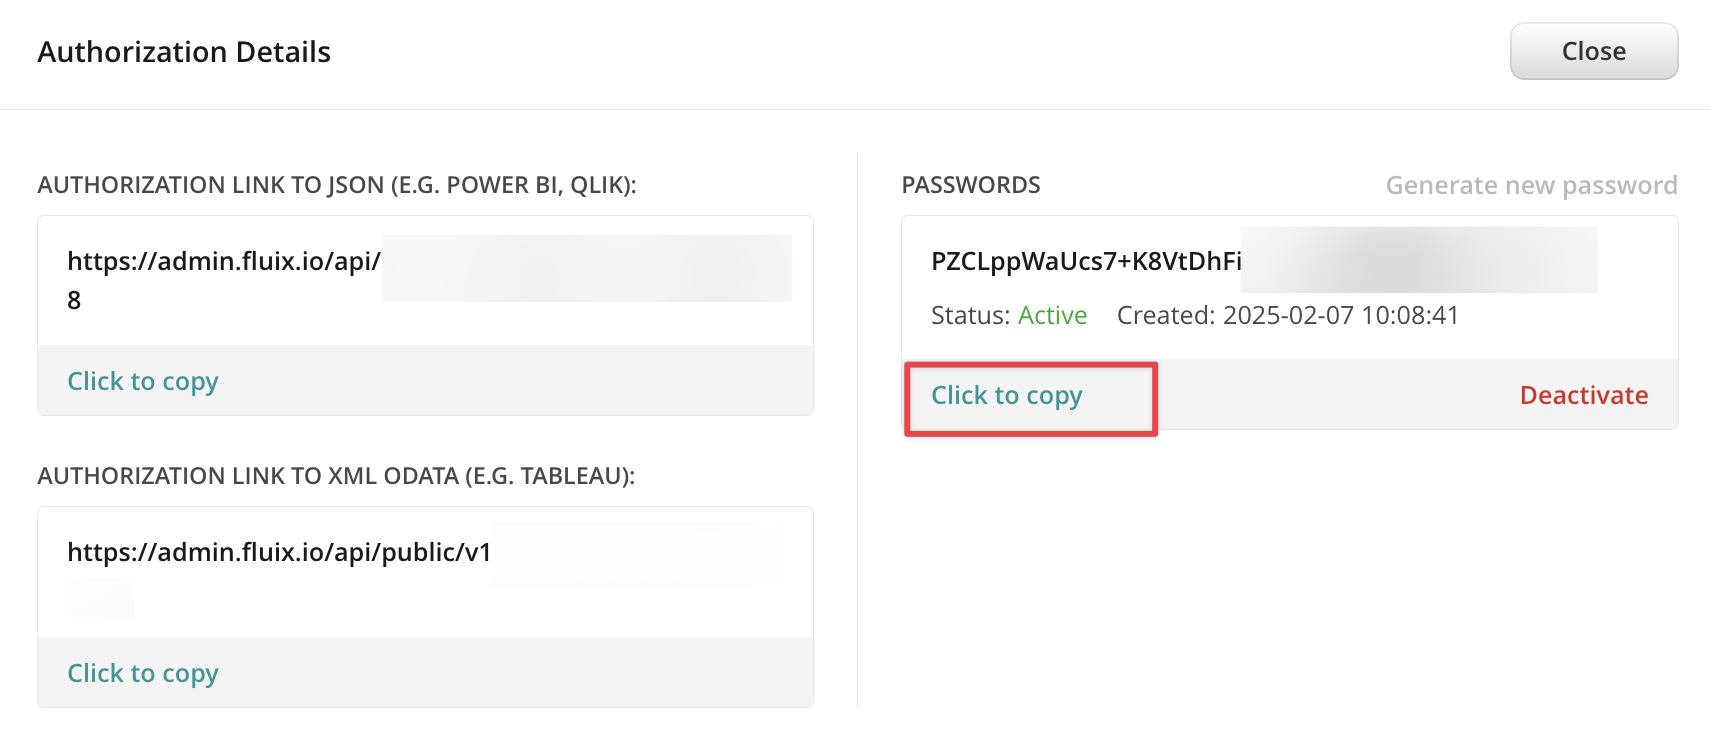
3. Go to the Results tab, choose Datasets, pick the one you’d want to export to Qlik and click the Export button on the toolbar to see the authorisation details.
Step 2 – Connecting Fluix and Qlik
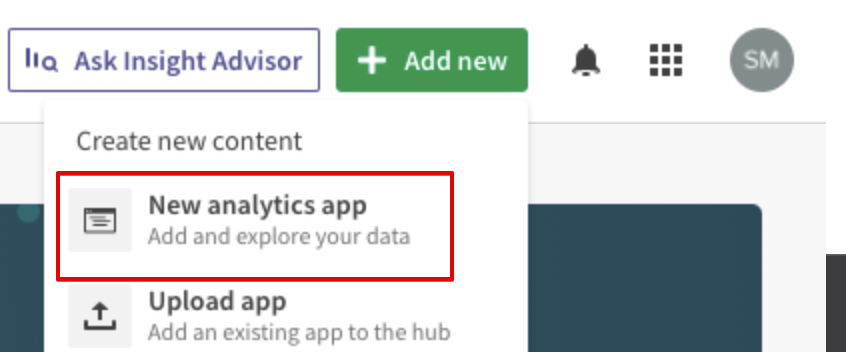
1. Log into your Qlik account, press Add new and choose New analytics app from the dropdown list. Name it and click Create.
2. Choose Add data from files and other sources.
3. Select the REST option from the list of available data connectors.
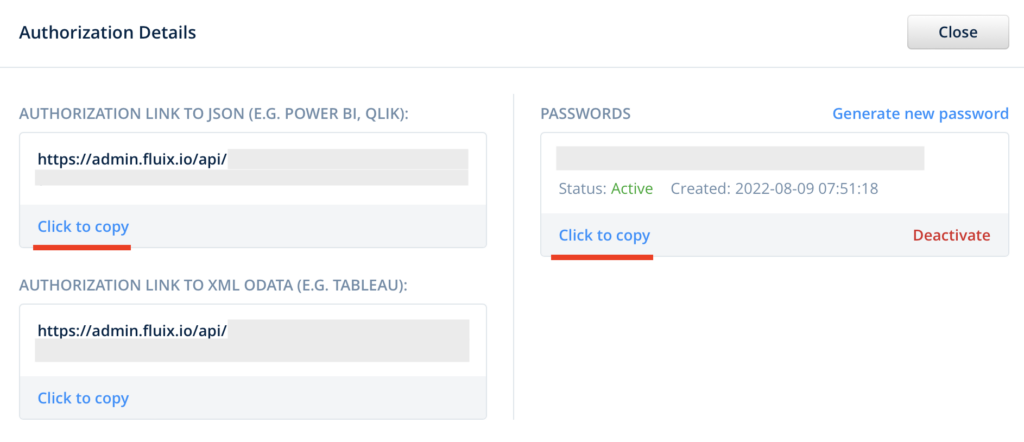
4. In the appeared window, enter the Power BI URL copied from the authorization details in Fluix.
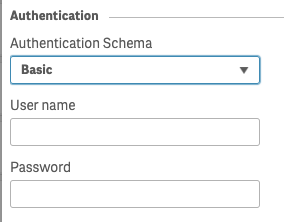
5. Scroll down and choose Basic authentication schema from the dropdown and enter username and password from authorization details in Fluix.
6. Click Test connection and in case it succeeded, rename your connection if needed and press Create.
7. Tick the collection checkbox and click Next.
Step 3 – Starting data analysis
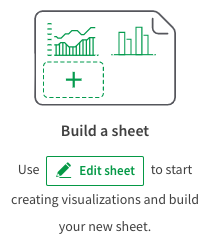
1. Choose Build a sheet option.
2. Now you can create multiple visualisations and gather business insights from your field data.
In case you have any questions or difficulties with setup, contact our support at support@fluix.io and we’ll be happy to help you.
Microsoft Excel is a spreadsheet software that allows users to organize, analyze, and manipulate data using a grid-like interface with a wide range of functions and tools that can perform calculations, create charts and graphs, and generate reports. With Excel, you can efficiently manage and track data, analyze trends, and make data-driven decisions.
What Fluix + Excel integration does
Fluix and Microsoft Excel integration streamlines the data transfer process, reduces manual effort, and ensures data consistency. Once you connect your Microsoft Excel account to Fluix, the data will be automatically pulled from forms that are completed by your team in the Fluix app into datasets in Excel in real-time. When the integration is active, the data export process will automatically transfer the selected Fluix dataset into the designated Excel sheet where the data can then be further analyzed, manipulated, or used for reporting purposes within Excel.
Note. Integration requires a Core account in Fluix and an account in Microsoft Excel. To try the option, you can register for a free trial account in both tools.
Before you start
The first step would be setting up the automated data extraction from the completed forms into the Fluix datasets. Here you can check how to configure them in Fluix Workflows and Taskstreams.
How to connect Fluix to Excel and start pulling data
1. In the Fluix admin portal, navigate to the Results section, Datasets tab. Select a dataset or subset in Fluix, and click on the Export button (in case you selected a subset, click the Export button there).
2. Copy the authorization link and password.
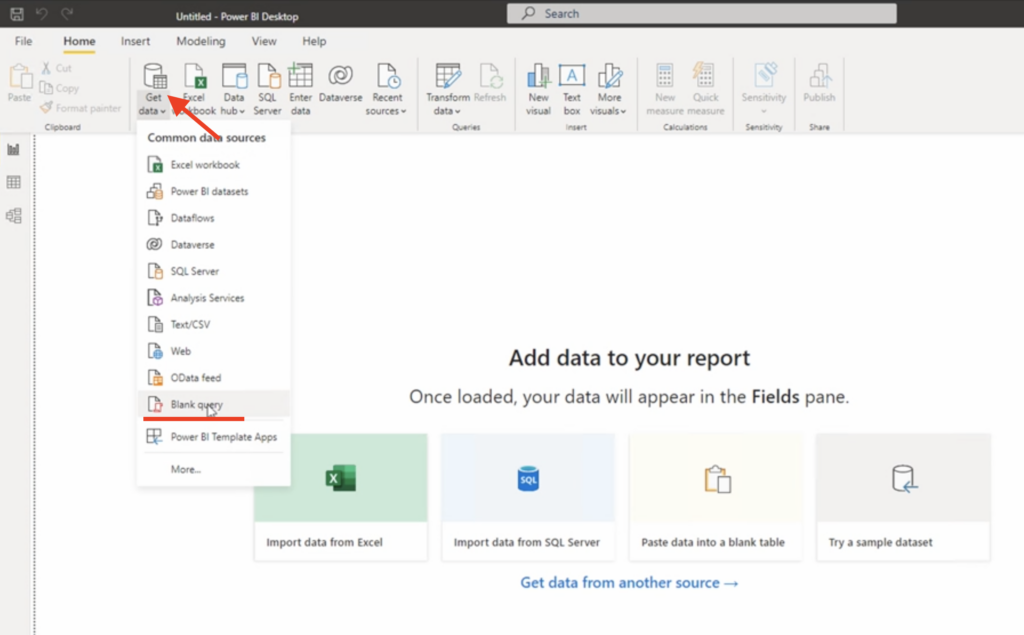
3. Open Excel, click on the Data section -> click on the Get Data button -> From Other Sources -> click the Blank Query option.
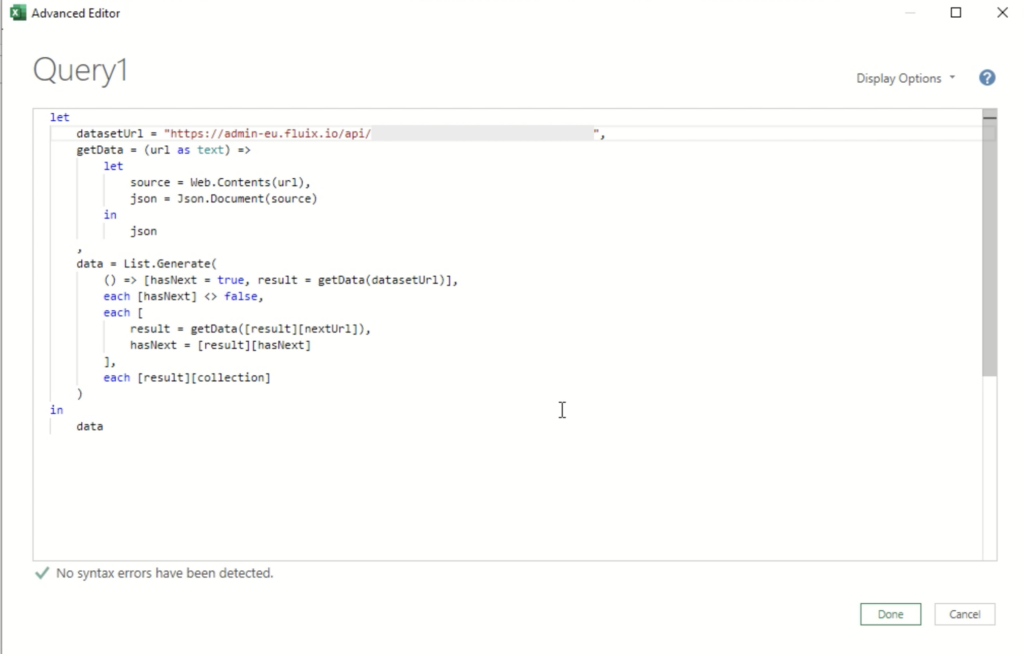
4. After that, a new page for Query 1 should be opened, click the Advanced editor button.
5. In the opened window paste the code below.
let
    datasetUrl = "{{ export url from admin portal }}",
    getData = (url as text) =>
        let
            source = Web.Contents(url),
            json = Json.Document(source)
        in
            json
    ,
    data = List.Generate(
        () => [hasNext = true, result = getData(datasetUrl)],
        each [hasNext] <> false,
        each [
            result = getData([result][nextUrl]),
            hasNext = [result][hasNext]
        ],
        each [result][collection]
    )
in
    data
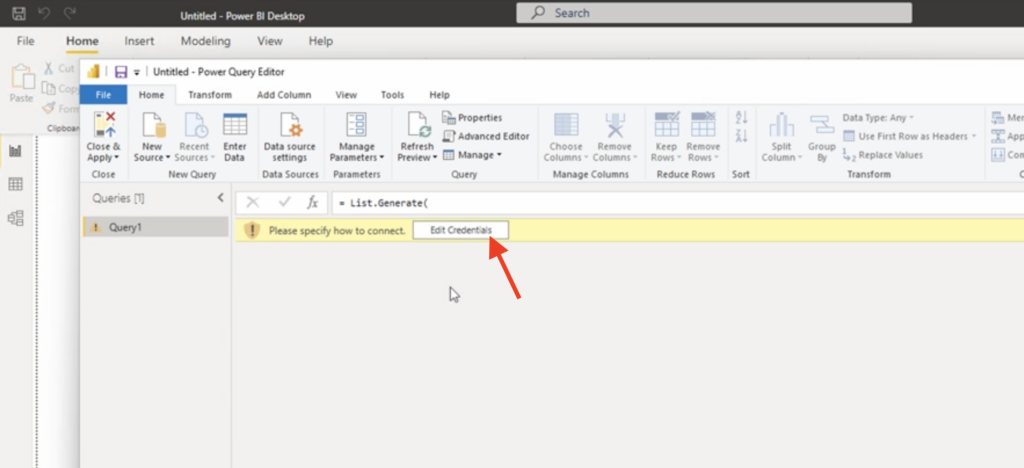
6. Replace {{ export url from admin portal }} with the authorization link copied from Fluix ( from the 2nd step).
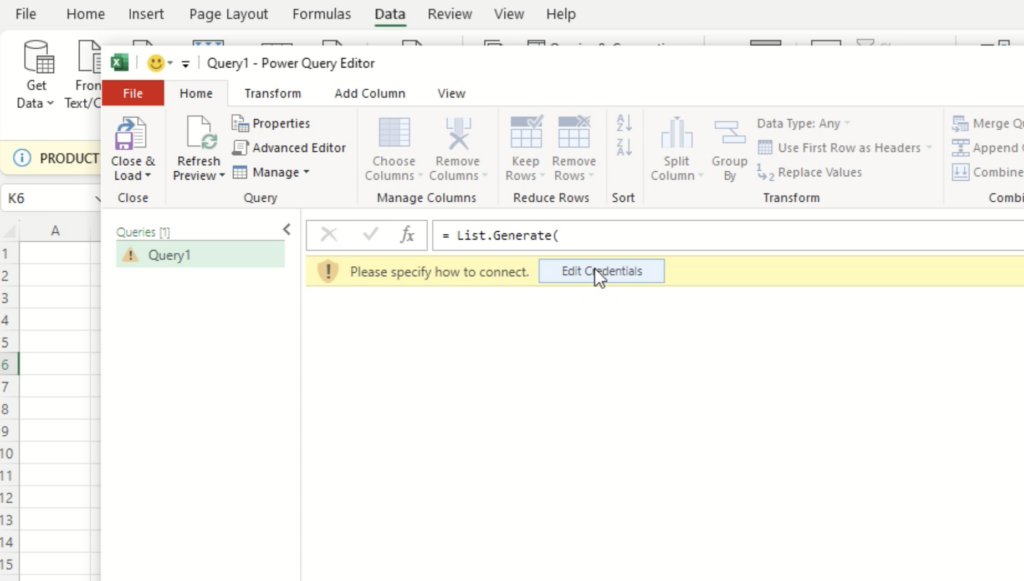
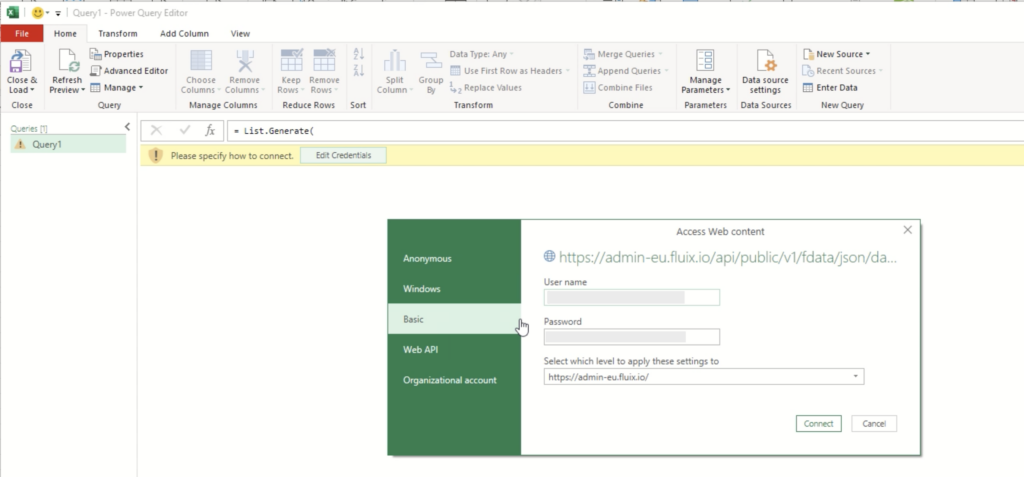
7. Click Done. 8. In the line Please specify how to connect, click on the Edit credentials button.
9. In the opened window, click on the Basic section, enter your user email from Fluix and the password copied from the authorization details, and click Connect.
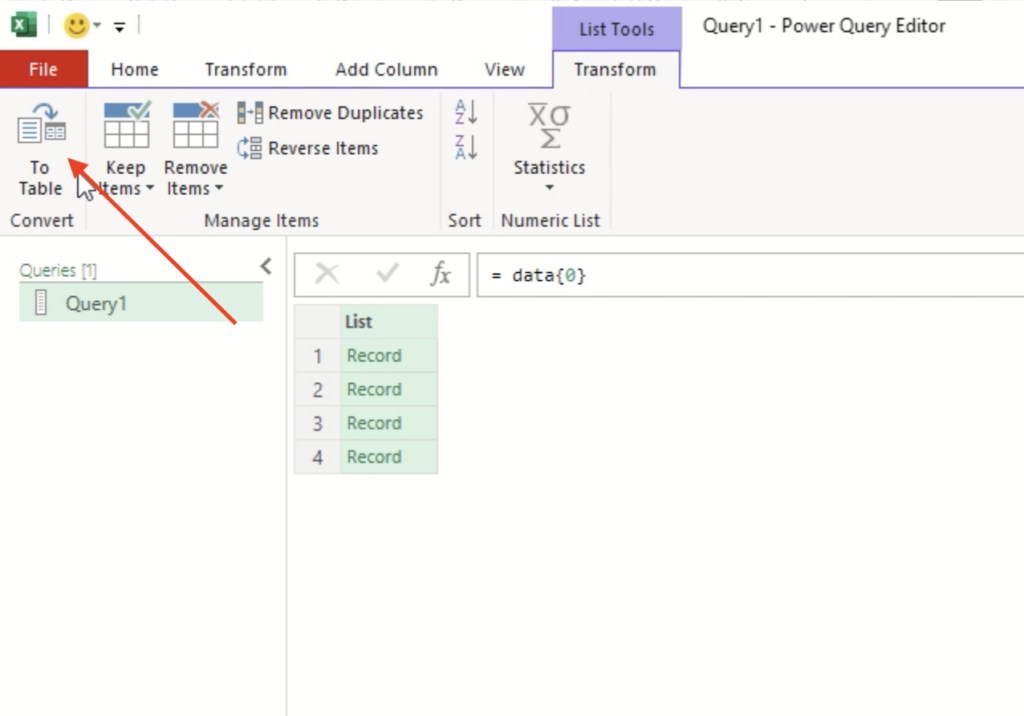
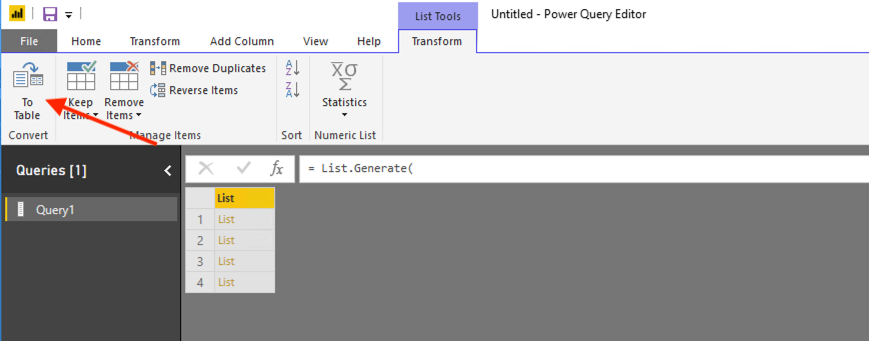
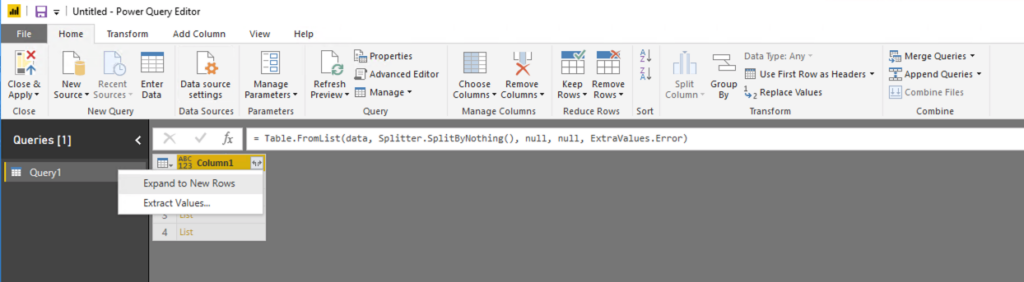
10. After that, click on the List that appeared on the page Query 1:
11. The list of the data contained in the dataset will be shown -> click on the To Table button:
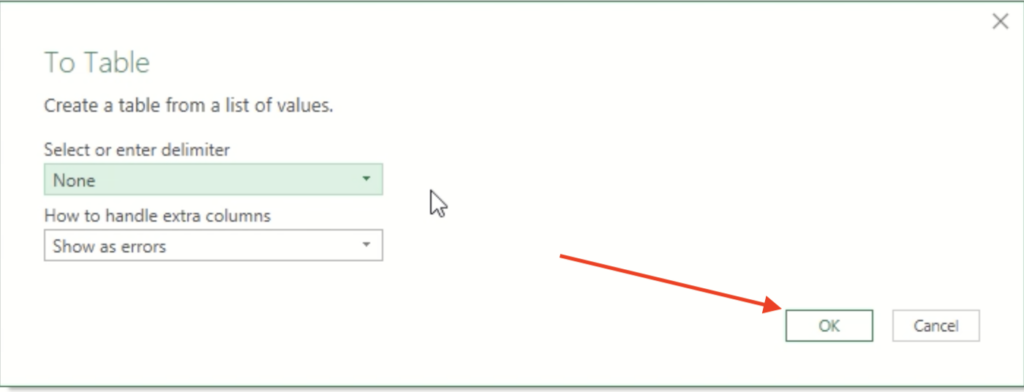
12. In the opened window To Table, just click OK:
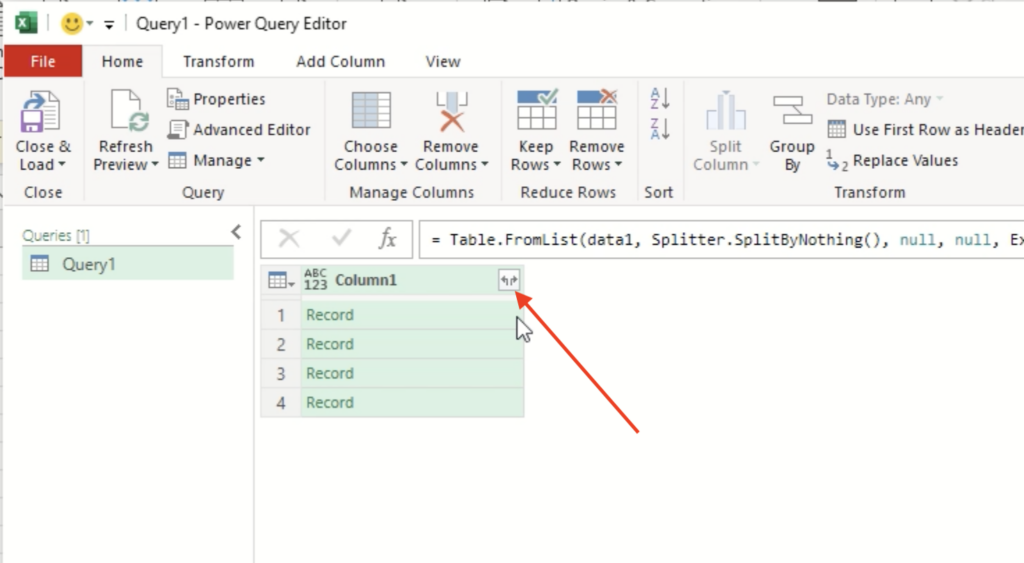
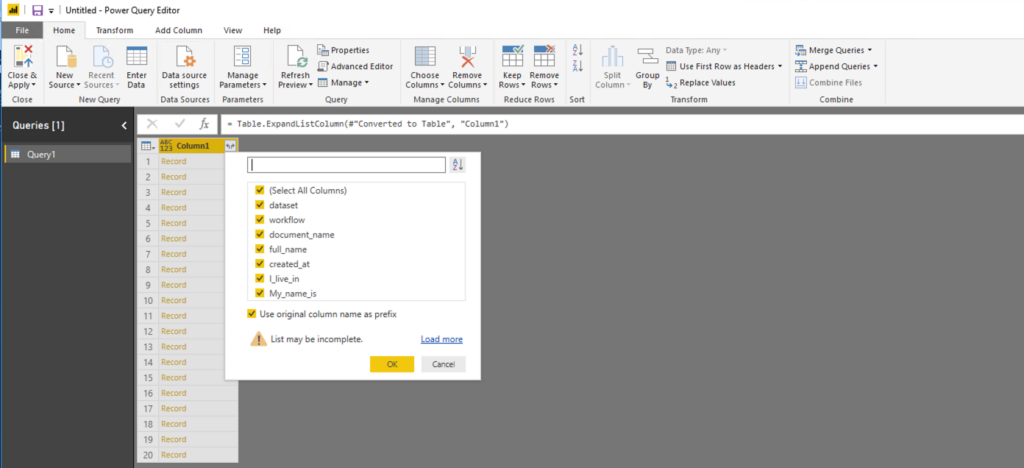
13. After that you’ll see Column1 where you’ll need to click on two arrows.
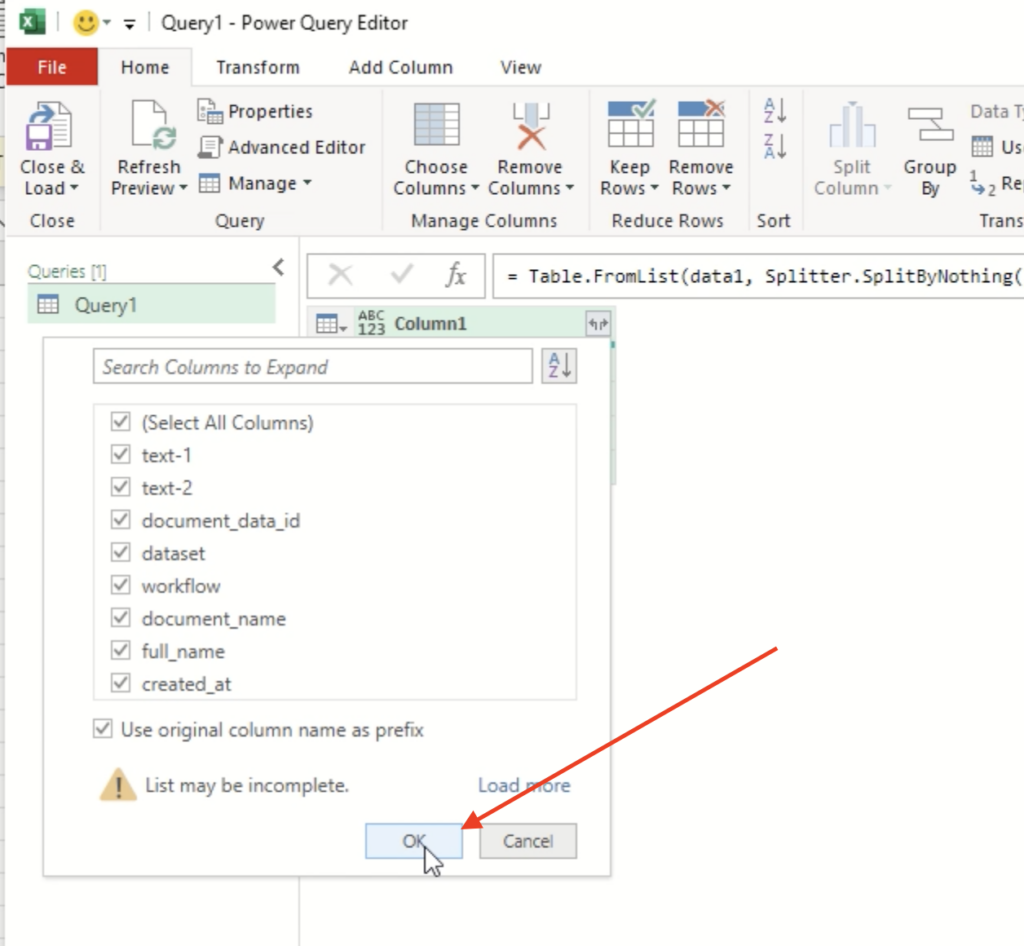
14. In the opened window select all the columns -> click Ok:
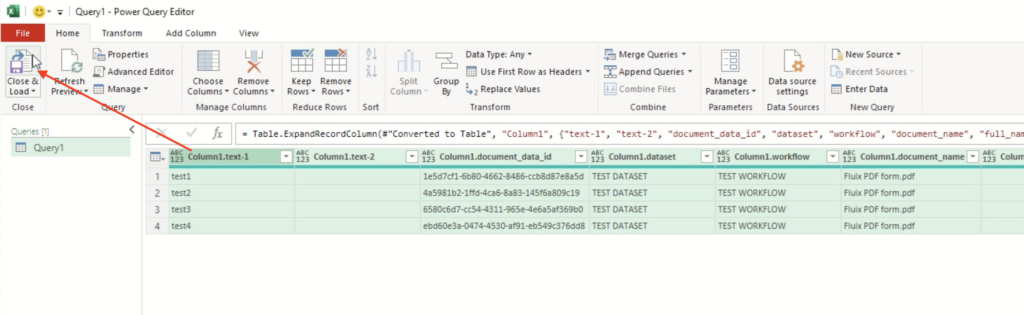
15. After that, click the button Close&Load.
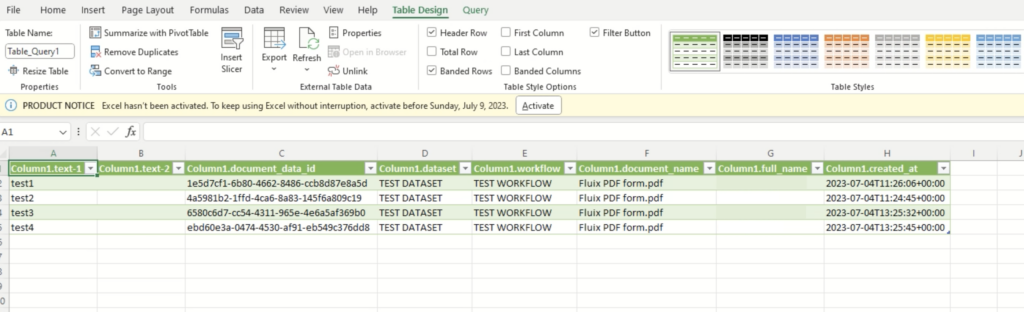
16. As a result, the exported dataset will be loaded accordingly:
In case you have any questions or difficulties with setup, contact our support at support@fluix.io and we’ll be happy to help you.
Was this article helpful?
Thanks for your feedback!
Oops, something went wrong. Please, try again later.
Thank you!
What details or examples would have made this article more helpful for you? We appreciate your insights!
By integrating Fluix and Azure storage the data flow in your company becomes fully automated. In the Fluix app your remote teams collect data on mobile forms, that are then sent to the Azure cloud storage in an aggregated structured way.
It is possible to connect Fluix to Azure Files and Azure tables. In this article let’s look at the first type when the forms completed in Fluix are then uploaded to the Azure storage.
Note. Integration requires a Core account in Fluix and an account in Azure Storage. To try the option, you can register for a free trial account in both tools.
Step 1 – Setting up Azure account
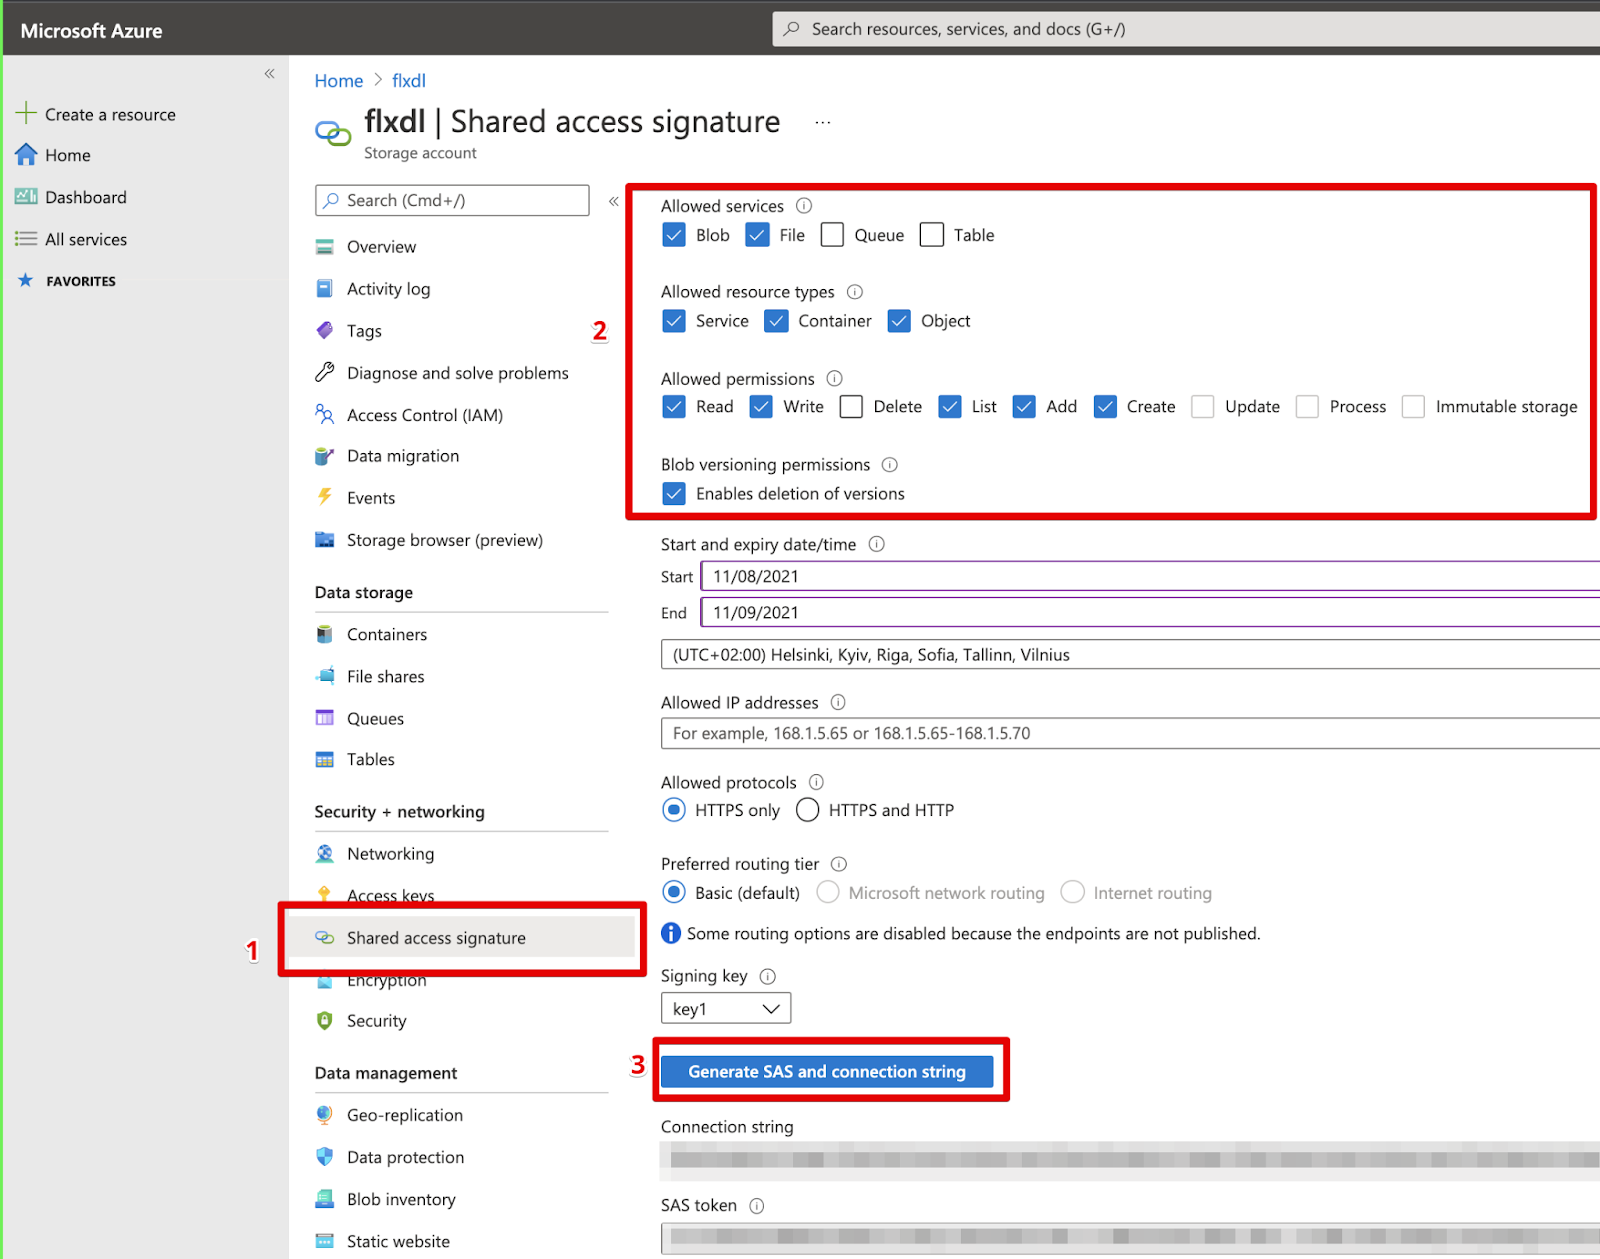
In your Azure account, go to All services→ Storage accounts→ Choose the required storage account→ Click on the Containers tab, and choose the required container. Choose the folder inside the container to which you want to upload documents from Fluix. In Step 2 you will need the information from these sections:
1.1 Storage account name
1.2 Container name
1.3 Destination folder path inside the container
1.4 Navigate to Shared access signature in your storage account→ put the checkmarks as shown on the screenshot and click Generate SAS and connection string:
Step 2 – Configuring a Fluix workflow
In your Fluix account, go to the Configuration section → Workflows tab. Select the workflow or create a new one for the documents that need to be filled out and then appear in Azure.
Important note:
Reach out to support@fluix.io in order to obtain the request URL and the Secure value.
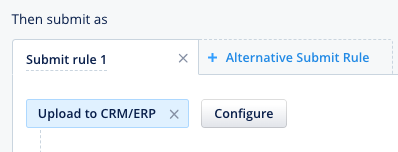
2.1 In the selected workflow, add a submit action called Upload to CRM/ERP and click Configure:
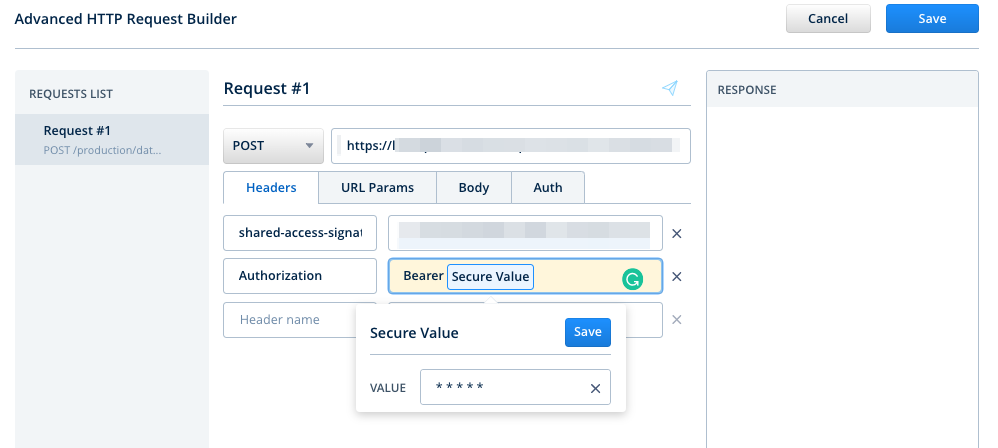
2.2 In the opened HTTP request builder, configure the request name, let’s say “Request #1”, select ‘POST’ as the request type, and add the request URL. Then create 2 headers as follows:
1)
Header name – shared-access-signature
Header value – refer to paragraph 1.4 and insert here the generated SAS token.
2)
Header name – Authorization
Header value – Bearer ”Secure Value”
Configure the Secure value parameter by clicking on it and entering the value provided by the Fluix team.
2.3 Go to the Body tab, choose “Multipart”and enter the parameters as follows:
1)
Part name – path
Part value – your folder path in the Azure container/Document name
2)
Part name – accountName
Part value – your Azure storage account name
3)
Part name – filesystem
Part value – your Azure container name
4)
Part name – file
Part value – Document file
Configure the Document File parameter by clicking on it and selecting the necessary document type.
5)
Part name – overwrite
Part value – 1 or 0 (1 – will overwrite documents having the same name, 0 won’t allow to have the document with the same name, submit will fail as a result)
2.4 Click the Save button to save the workflow.
Step 3 – Testing
Go to the Fluix app on the iOS device or User App in the web browser version. Open a test form, fill it out and submit it through the workflow.
In Azure, you will see that the file has appeared in the specified folder.
In case you have any questions or difficulties with setup, contact our support at support@fluix.io and we’ll be happy to help you.
Monday.com is a project management platform that provides dashboards to delegate tasks and track their progress. Besides that, monday.com can be used as a CRM tool that will allow you to manage leads or sales pipelines.
By integrating Fluix and monday.com, you will streamline the whole process: from collecting data by remote teams on mobile devices, to the automated creation of tasks, leads, or any other items on the monday.com dashboards, with the filled documents attached.
Note. Integration requires a Core account in Fluix and a Standard account in monday.com. To try the option, you can register for a free trial account in both tools.
Let’s look at how this integration works in case monday.com is used for managing the project.
Step 1 – Creating a Workspace and a Board in monday.com
Before building the integration with Fluix, you will need to have the Workspace and the Board created in monday.com. Upon each document’s submission in Fluix a task will be created on that Workspace and a Board with the respective document attached.
Workspace provides your account with a hierarchy of organization in order to better manage multiple departments, teams, and projects in one unified place. To proceed with the setup, join the relevant Workspace or create your own.
Each of the Workspaces consists of the Boards with tasks (or any other item terminology relevant to your board’s content). Add a Board to your Workspace and customize it in accordance with your business needs. Please find the example of the created Board below:
Step 2 – Creating a Fluix app in monday.com
During this step, you’ll need to create the Fluix App in monday.com that will be used for authentication and to specify how Fluix needs to access your monday.com account.
1. To register the Fluix App, please follow the link.
2. Click Create App, specify the name of the app, let’s say “Fluix App”, and click Save App.
3. Take note of the client ID and the client secret in the Authorization tab. These parameters will be used for authorization further.
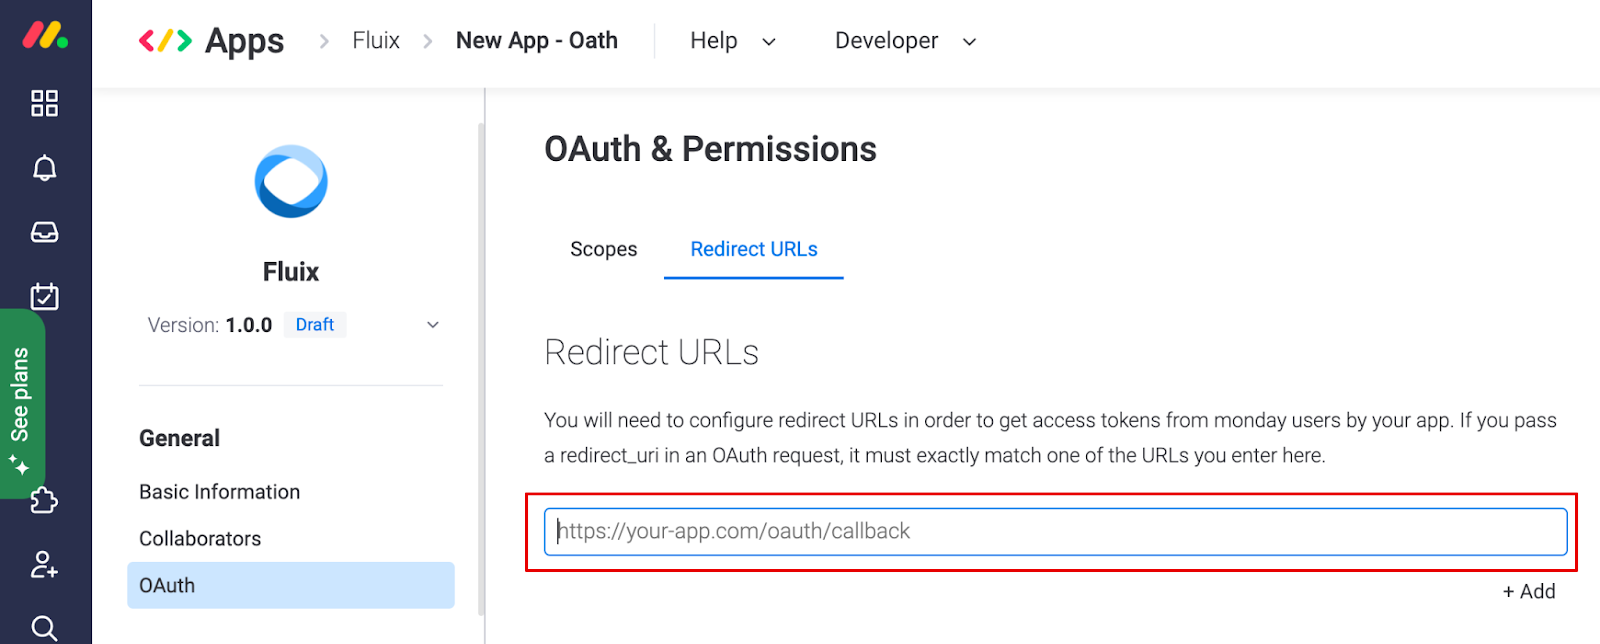
4. Go to OAuth – Scope tab and specify the permissions that Fluix will have in monday.com. For this type of integration, you will need three of them:
5. Specify the Redirect URL depending on the domain you’re using in Fluix (you can check it upon login to your Fluix account). Select the one from the list: https://admin.fluix.io/api/intg/oauth2/authorization-code https://admin-eu.fluix.io/api/intg/oauth2/authorization-code https://admin-eu2.fluix.io/api/intg/oauth2/authorization-code https://admin-aus.fluix.io/api/intg/oauth2/authorization-code https://admin-us-west.fluix.io/api/intg/oauth2/authorization-code
Once done, click Save Feature.
Step 3 – Configuring a Fluix Workflow
In your Fluix account, go to Configuration > Workflows. Select the workflow or create a new one for the documents that need to be filled out in the Fluix app and then appear as attachments on the dashboard in monday.com.
In the selected workflow, add a submit action called Upload to CRM/ERP. We will need to configure 2 requests for being able to create a task (or any other item terminology relevant to your business case and board’s content) and upload the file to it.
Process 3.1 – Configuring a request for creating a Task
1. Configure the request name, let’s say “Create a Task”, select POST as the data type, and add the following URL – https://api.monday.com/v2.
2. Go to the Header tab and enter the following:
Header name – Authorization
Header value – OAuth2
Header name – Content-type
Header value – application/json
Note: We recommend entering the value manually since it will allow adding already preset parameters from the dropdown list.
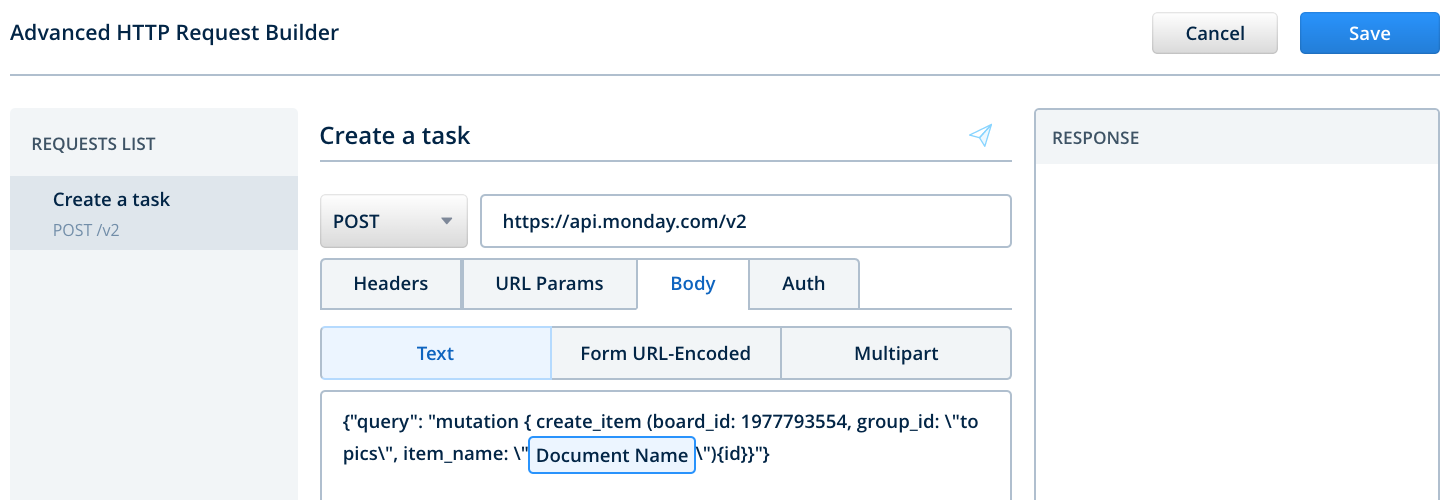
3. Go to the Body tab:
Enter the following in the Text tab: {“query”: “mutation { create_item (board_id: %board_id%, group_id: \”topics\”, item_name: \”Document Name\”){id}}”}
Replace the %board_id% parameter with the ID of the board to which the task needs to be added. You may find it in the address bar when the monday.com board tab is opened:
We recommend entering the value Document Name manually since it will allow adding already preset parameters from the dropdown list.
4. Go to the Auth tab and open the OAuth section:
Select ‘Authorization code’ in the Grant type field
Specify the client ID and the client secret in the relevant fields generated during step 2.
Add the link https://auth.monday.com/oauth2/authorize to the Authorization URL field.
Add the link https://auth.monday.com/oauth2/token to the Access token URL field.
5. Once done, click Get Access and you will be redirected to the page where you will be requested to provide permission to the Fluix app in monday.com. Click Allow to proceed. As an indicator that everything was set up successfully, you’ll see a green ‘Access Granted’ in the Auth tab.
Process 3.2 – Configuring a request for uploading a File
1. Configure the request name, let’s say “Upload a File”, select POST as the data type, and add the following URL – https://api.monday.com/v2/file.
2. Go to the Header tab and enter the following:
Header name – Authorization
Header value – OAuth2
Note: We recommend entering the value manually since it will allow adding already preset parameters from the dropdown list.
3. Go to the Body tab and select the Multipart tab:
Part name – query
Part value – mutation add_file($itemId: Int!, $column: String!, $file: File!) { add_file_to_column(item_id: $itemId, file: $file, column_id: $column) { id name file_size } }
Part name – variables
Part value – {“column”:”files”, “itemId”:Response Body}
Configure the Response Body parameter by clicking on it, selecting the necessary request and adding the key path – data.create_item.id:
Click Save to apply the changes.
Part name – map
Part value – {“document”:”variables.file”}
Part name – document
Part value – Document File
Configure the Document File parameter by clicking on it, selecting the necessary document type.
4. Go to the Auth tab and open the OAuth section:
Select ‘Authorization code’ in the Grant type field
Specify the client ID and the client secret in the relevant fields generated during step 2.
Add the link https://auth.monday.com/oauth2/authorize to the Authorization URL field.
Add the link https://auth.monday.com/oauth2/token to the Access token URL field.
5. Once done, click Get Access. You’ll see a green indicator ‘Access Granted’ in the Auth tab.
6. After all the requests are configured, click Save in the top right corner of the Advanced HTTP Request Builder. To save changes in a workflow, click Save & Apply to apply the changes to the workflow and go to test the setup.
Step 3 – Testing the integration
Go to the Fluix app on the device or User App in the web browser version. Open a test form, fill it out and submit it through the workflow.
In monday.com, you will see a new Task created with an attached file in it.
In case you have any questions or difficulties with setup, contact our support at support@fluix.io and we’ll be happy to help you.
The big number of companies prefer collecting field data for further export into an Excel spreadsheet in order to perform manual analysis afterward. Though there is a much more advanced and efficient method to benefit from the data collected into the Fluix datasets – by connecting Fluix to the data visualization platform. One of such platforms is Power BI.
Power BI is a market-leading data processing and visualization tool that helps to uncover meaningful insights of your current workflow using the data collected by your field team. You can utilize colorful and comprehensible graphs, histograms, and other visualization tools in Power BI to process your field data and get a wide picture of the current conditions and requirements of the different aspects of your business.
Use case examples
Besides saved time and eliminated manual effort, automatically aggregated and structured data can benefit in many processes, such as:
Ability to check what is going on on-site
Ability for local sites to immediately identify and fix issues
Access to granular data, for analyzing and comparing multiple sites in the field
Ability to identify trends to optimize efficiency
Resource planning
Revealing hidden bottlenecks, defects, and missing information
Reporting for compliance with regulations (e.g. OSHA).
Before you start
The first step would be setting up the automated data extraction from the completed forms into the Fluix datasets. Here you can check how to configure them in Fluix. Please note that the feature is available starting from the Core plan. Another point to mention is the Power BI license you will need to acquire.
If you don’t have Fluix account yet, you can register a free trial.
Once you connect your Power BI account to Fluix, the data will be automatically pulled from forms that are completed by your team in the Fluix app into datasets into Power BI in real time. There you will see insightful visualizations, filters, and process data based on your requirements with the powerful features of Power BI.
How to connect Fluix to Power BI and start pulling data
1. In the Fluix admin portal, navigate to Results section, Datasets tab. Select a dataset or subset in Fluix, and click on the Export button (in case you selected subset, click Export button and link to PowerBI)
2. Copy the authorization link and password.
3. Open Power BI, click Get Data, and select Blank Query.
4. In the left menu click the right button on Query 1 and select Advanced Editor.
5. In the opened window paste the code below:
let
    datasetUrl = "{{ export url from admin portal }}",
    getData = (url as text) =>
        let
            source = Web.Contents(url),
            json = Json.Document(source)
        in
            json
    ,
    data = List.Generate(
        () => [hasNext = true, result = getData(datasetUrl)],
        each [hasNext] <> false,
        each [
            result = getData([result][nextUrl]),
            hasNext = [result][hasNext]
        ],
        each [result][collection]
    )
in
    data
6. Replace {{ export url from admin portal }} with the authorization link copied from Fluix.
7. Click Done.
8. In the line Please specify how to connect: click on Edit credentials.
9. In the opened window, in Anonymus section select which level to apply these settings to – select the authorization link you used above.
10. In the Basic section, enter the password copied from the authorization details, and click Connect.
11. Click To Table as on the screenshot below.
12. In the appeared window just click OK 13. After that you’ll see Column1 where you’ll need to click Expand to new rows:
14. Click again on Column1 and select the fields you need and click OK:
In case you have any questions or difficulties with setup, contact our support at support@fluix.io, and we’ll be happy to help you.
Speaking about the data collected by the field teams on devices, you can stop at its storage in the cloud, or start processing it manually in Excel. But there is always a step for automation – to start analyzing the collected data and bring intelligence to your business through data-driven decisions.
Here is when Tableau comes into play.
Tableau is a leading visual analytics platform that helps you create any kind of charts, diagrams, and filters based on your business requirements.
Use case examples
Besides saved time and eliminated manual effort, automatically aggregated and structured data can benefit in many processes, such as:
Ability to check what is going on on-site
Ability for local sites to immediately identify and fix issues
Access to granular data, for analyzing and comparing multiple sites in the field
Ability to identify trends to optimize efficiency
Resource planning
Revealing hidden bottlenecks, defects, and missing information
Reporting for compliance with regulations (e.g. OSHA).
Before you start
The first step would be setting up the automated data extraction from the completed forms into the Fluix datasets. Here you can check how to configure them in Fluix. Please note that the feature is available starting from the Core plan. Another point to mention is the Tableau license you will need to acquire.
If you don’t have Fluix account yet, register a free trial.
Once you connect your Tableau account to Fluix, the data will be automatically pulled from the forms that are completed by your team in the Fluix app into datasets into Tableau in real-time. There you will be get insightful visualizations, and process data based on your requirements.
How to connect Fluix to Tableau and start pulling data
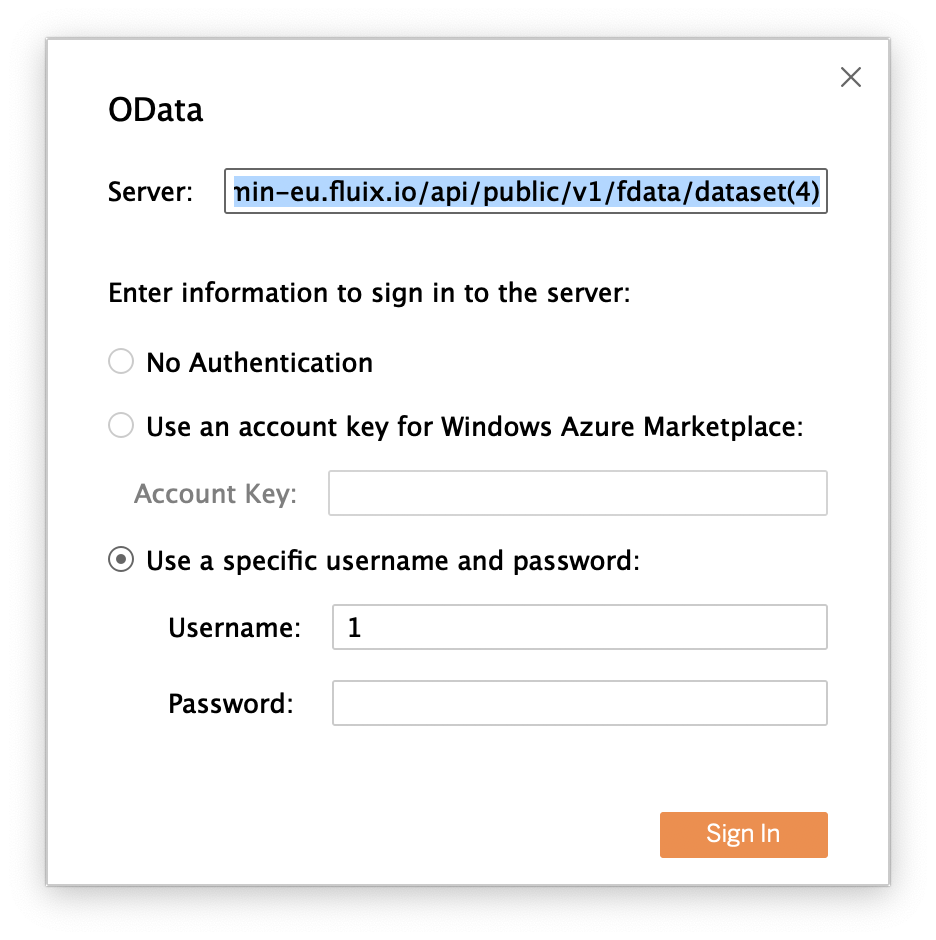
1. In the Fluix admin portal, navigate to Data section, Datasets tab. Select a dataset or subset in Fluix, click on the Export button (in case you selected subset, click Export button and link to Tableau) and copy authorization link, username, and password.
2. Open Tableau desktop version -> More -> OData
3. Paste there a link, username, and password and click Sign in.
In case you have any questions or difficulties with setup, contact our support at support@fluix.io and we’ll be happy to help you.
Asana is a project management tool that helps teams to organize and plan project tasks in one place – a dashboard. Asana is a web and mobile application.
By integrating Fluix and Asana, you will automate your team’s processes, stay on track of the tasks and keep the projects organized. In particular, Fluix will automate the process of filling out forms on mobile devices and creating tasks in Asana as well as uploading the completed forms to the task.
To start the integration, you’ll need to create the Fluix App in Asana that will be used for authentication purposes, and with the help of which you will be able to grant access to your Fluix account to perform the changes in your Asana account.
2. Click +New App, specify the name of the app, let’s say “Fluix App”, and add a checkmark to agree with the API terms and conditions.
Once done, click Create app.
3. Take note of the client ID and the client secret in the Authorization tab. These parameters will be used for authorization further. Specify the Redirect URL depending on the domain you’re using in Fluix. Select the one from the list: https://admin.fluix.io/api/intg/oauth2/authorization-code https://admin-eu.fluix.io/api/intg/oauth2/authorization-code https://admin-eu2.fluix.io/api/intg/oauth2/authorization-code https://admin-aus.fluix.io/api/intg/oauth2/authorization-code https://admin-us-west.fluix.io/api/intg/oauth2/authorization-code
4. Optional.Go to the Settings tab and add the app icon and the website. Click Save Changes once done.
Step 2 – Configuring a Fluix workflow
In your Fluix account, go to Configuration -> Workflows. Select the workflow or create a new one for the documents that need to be filled out and then appear as attachments on the Asana dashboard.
In the selected workflow, add a submit action called Upload to CRM/ERP. For creating a task in Asana and uploading the file to this task, we will need to configure 2 requests for each of these processes.
Process 2.1 – Configuring a request for creating a Task
1. Configure the request name, let’s say “Create a Task”, select POST as the data type, and add the following URL – https://app.asana.com/api/1.0/tasks.
2. Go to the Header tab and enter the following:
Header name – Content-type
Header value – application/json
Header name – Authorization
Header value – OAuth2
Note: We recommend entering the value manually since it will allow adding already preset parameters from the dropdown list.
3. Go to the Body tab:
Enter the following in the Text tab: {“data”:{“projects”:”%project_id%”,”name”:”%task_name%”}}
Replace the %project_id% parameter with the ID of the project to which the task needs to be added. You may find it in the address bar when the Asana project tab is opened:
Replace the %task_name% parameter with the title you would like to have a task created with. For example, “A new document ‘Document Name’ has been submitted”. In this case, the name of the document will be displayed in the task title.
4. Go to the Auth tab and open the OAuth section:
Select Authorization code in the Grant type field
Specify the client ID and the client secret in the relevant fields generated during step 1.
Add the link https://app.asana.com/-/oauth_authorize to the Authorization URL field.
Add the link https://app.asana.com/-/oauth_token to the Access token URL field.
5. Once done, click Get Access and you will be redirected to the page where you will be requested to provide permission to the Fluix app in Asana. Click Allow to proceed. As an indicator that everything was set up successfully, you’ll see a green Access Granted in the Auth tab.
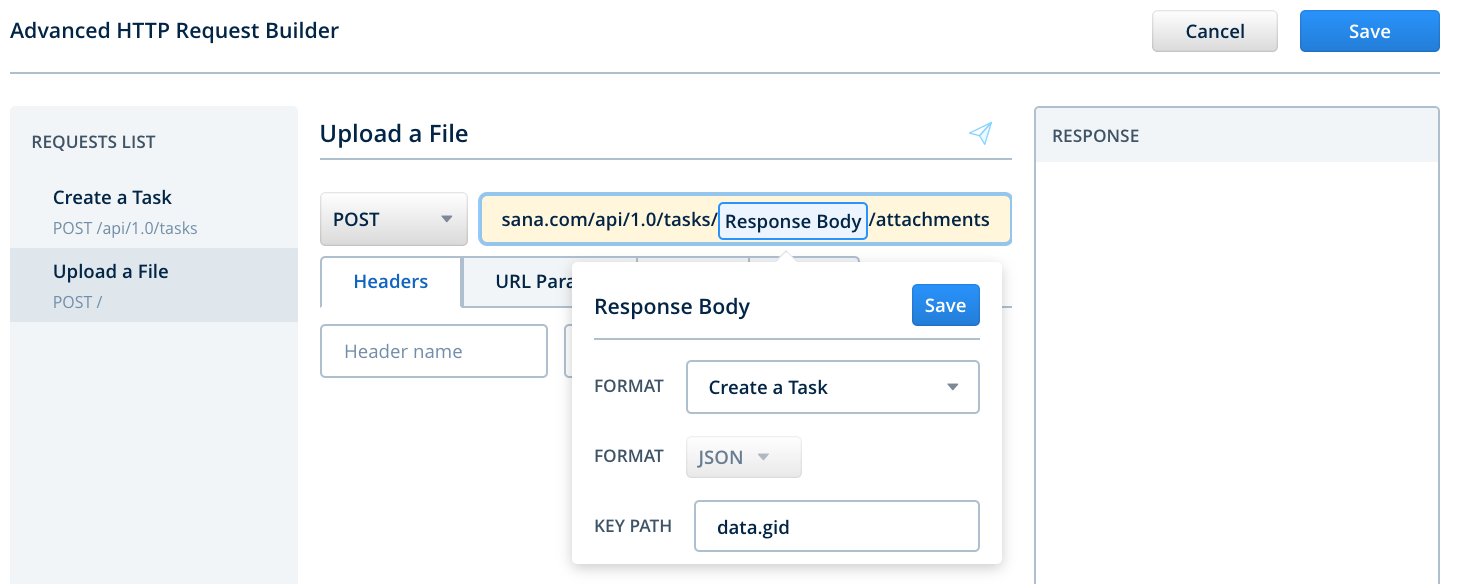
Process 2.2 – Configuring a request for uploading a File
1. Configure the request name, let’s say “Upload a File”, select POST as the data type, and add the following URL – https://app.asana.com/api/1.0/tasks/Response Body/attachment. Note: We recommend entering the value Response Body manually since it will allow adding already preset parameters from the dropdown list.
2. Configure the Response Body parameter by clicking on it, selecting the Create a Task request, and specifying the key path as ‘data.gid’.
Click the Save to apply the changes.
3. Go to the Header tab and enter the following:
Header name – Authorization
Header value – OAuth2
Note: We recommend entering the value manually since it will allow adding already preset parameters from the dropdown list.
4. Go to the Body tab and select the Multipart tab:
Part name – name
Part value – Document name
Part name – file
Part value – Document file
Configure the Document File parameter by clicking on it, selecting the necessary document type.
Click Save to apply the changes.
5. Go to the Auth tab and open the OAuth section (the settings are the same as in the first request for creating a task):
Select ‘Authorization code’ in the Grant type field
Specify the client ID and the client secret in the relevant fields generated during step 1.
Add the link https://app.asana.com/-/oauth_authorize to the Authorization URL field.
Add the link https://app.asana.com/-/oauth_token to the Access token URL field.
6. Once done, click Get Access. You’ll see a green indicator Access Granted in the Auth tab.
After all the requests are configured, click Save in the top right corner of the Advanced HTTP Request Builder. To save changes in a workflow, click Save & Apply to apply the changes to the workflow and go to test the setup.
Step 3 – Testing
Go to the Fluix app on the device or User App in the web browser version. Open a test form, fill it out and submit it through the workflow.
In Asana, you will see a new Task created with an attached file in it.
In case you have any questions or difficulties with setup, contact our support at support@fluix.io and we’ll be happy to help you.
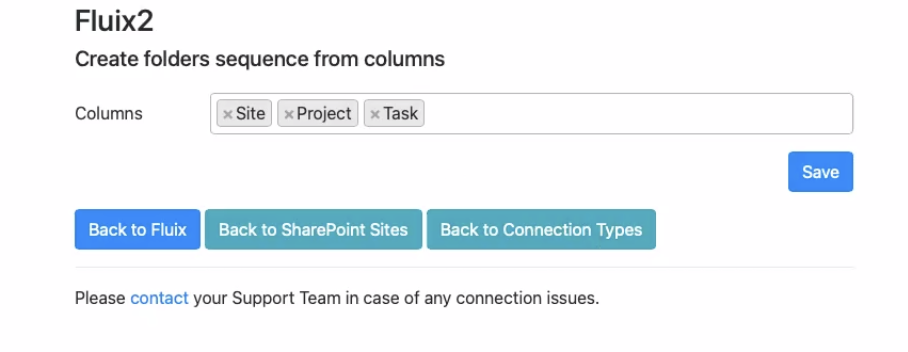
This article describes how to connect Fluix to SharePoint Lists. Such integration helps to better structure files that participate in Fluix workflows.
Files, located in any folders in SharePoint can be attributed with certain tags called Columns. When synced to Fluix workflows, these files are grouped in folders named by columns, regardless of the actual folder structure in Sharepoint.
Step 1 – Creating file and column structure in SharePoint
Open an existing SharePoint list or create a new one that you will use in Fluix workflows.
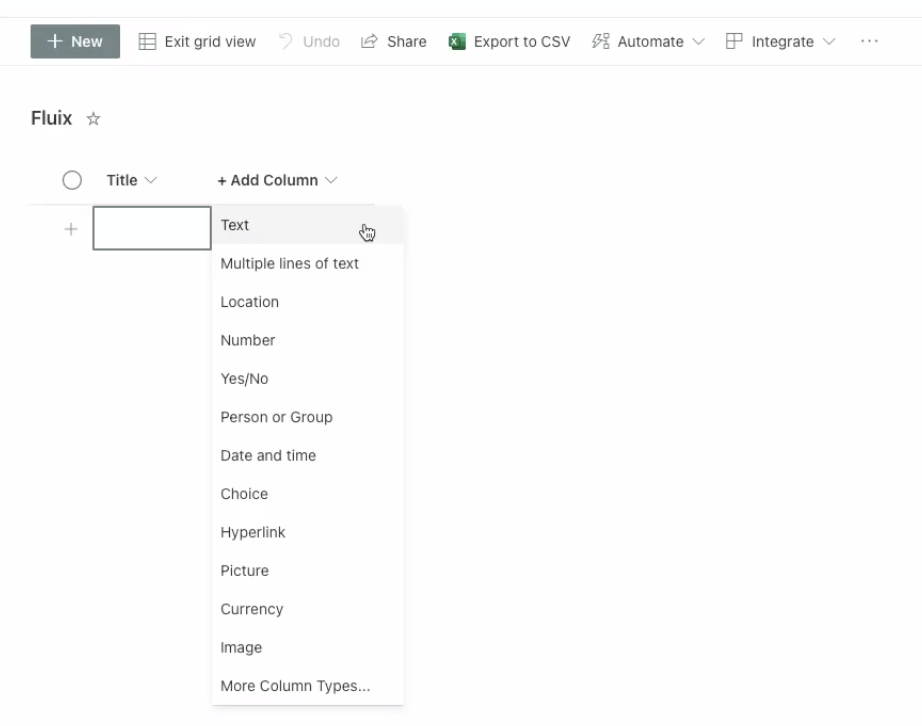
Create a list of columns (tags) that will be applied to files. To do this, click Add Column.
Type of columns supported in Fluix:
– Text. Limitation: 255 symbols by default, can be changed in tag settings;
– Number. Limitation: numbers only;
– Choice.
– MultiChoice. If several columns are selected for the file, it will sync to the respective folders in Fluix workflow
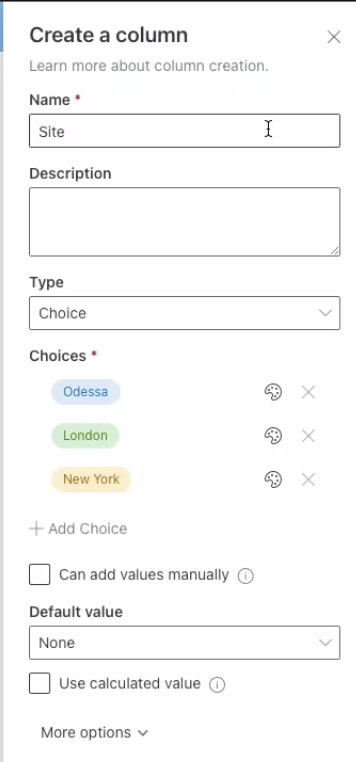
– Yes/No.
E.g. We chose the Text column and called it Site. In the type dropdown you can create a choice of sites and name them. In our example we called them Odessa, London and New York:
We also created two more columns called Project and Task.
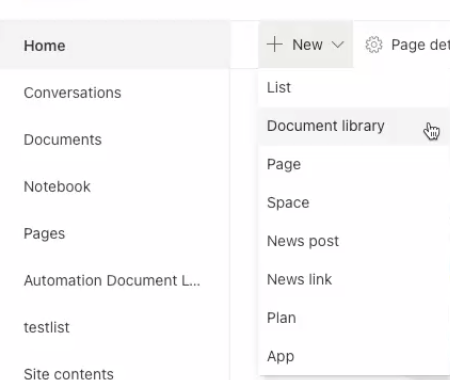
Create a Document Library and upload files there. To do that, click Home, New, Document library:
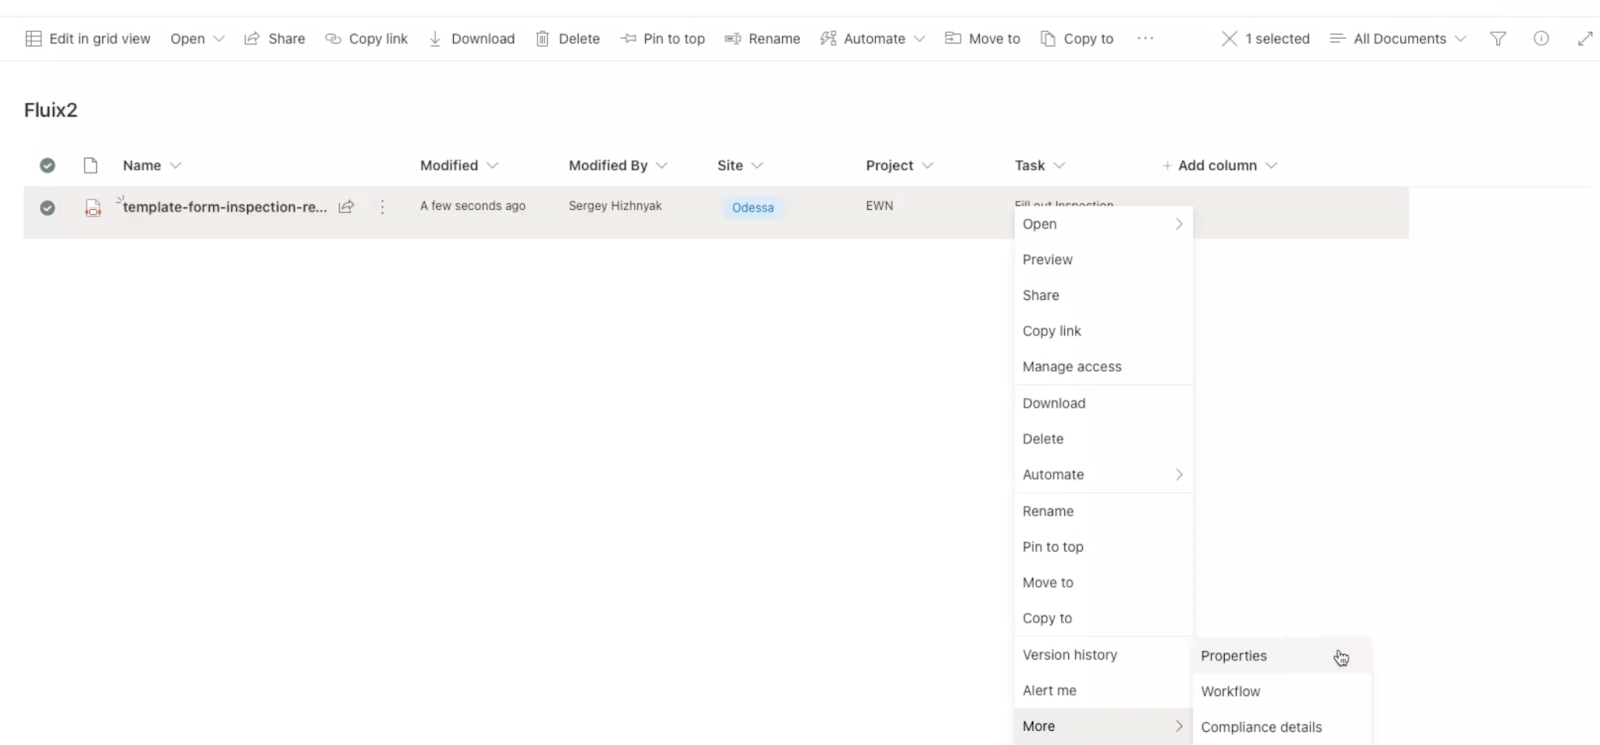
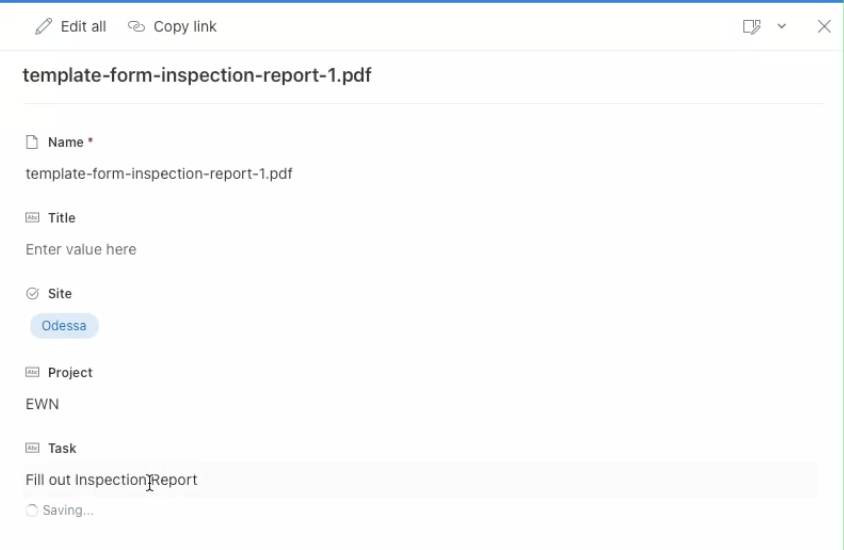
Once the files are uploaded, you can assign columns, or also called properties:
In our example, we used all three columns we created earlier: Site, Project and entered the Task name:
Step 2 – Connecting Sharepoint List storage to Fluix
Log into the Fluix admin portal and navigate to the Workflow Setup section, Integrations tab.
Click Connect Storage and choose SharePoint List.
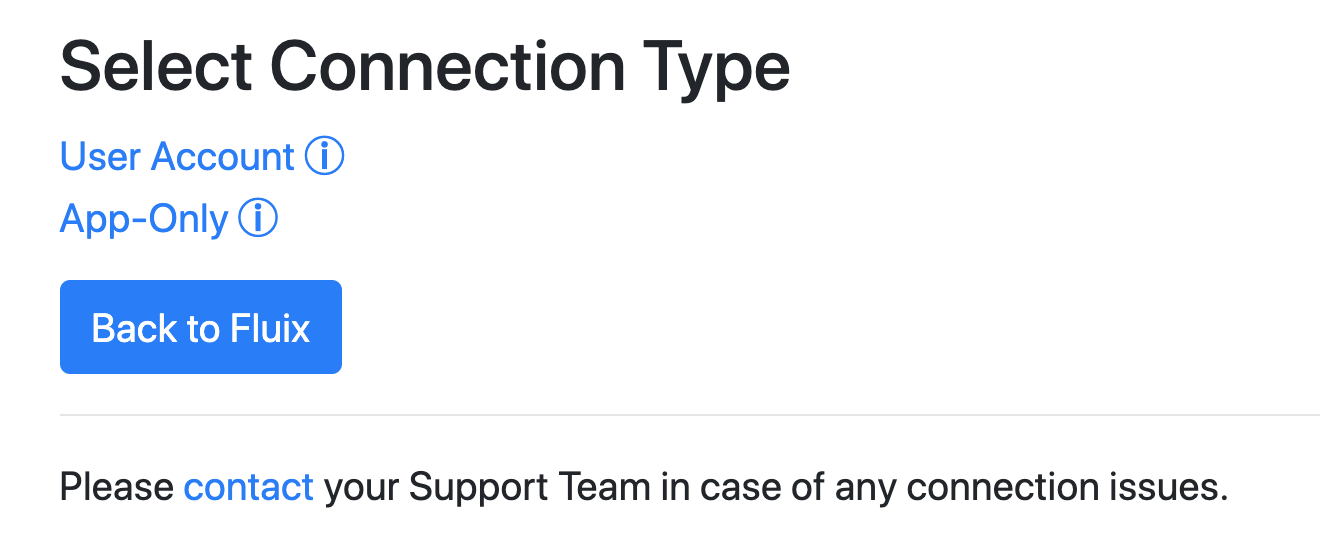
Select User Account (based on permissions of an individual user in SharePoint) or App-Only as a more secure one.
Enter credentials to your SharePoint account
Choose SharePoint Site.
Choose a list you created in SharePoint
Select columns names needed that will form the folder hierarchy and click Save
Step 3 – Configuring Workflow in Fluix
In the Fluix admin portal, in the Workflow setup section, the Workflows tab edit an existing or create a new workflow.
Choose SharePoint as document source or as destination point for the documents completed in Fluix.
If the folder is selected as document source:
Choose the file path. In our case we it is /Site/Odessa/Project/EWN/Task/Fill out Inspection Report/template-form-inspection-report-1.pdf
If the folder is selected as document source, the files completed in Fluix will be uploaded to SharePoint List with the respective columns (tags). In our case: Site – Odessa, project – EWN, Task – Fill out inspection report.
Click Save & Publish to save changes to a workflow.
Step 4 – Testing Setup
As a participant of a workflow, go to the User app in web browser, or app on device. There you will see an appeared folder with the form inside.
/Site/Odessa/Project/EWN/Task/Fill out Inspection Report/template-form-inspection-report-1.pdf
In case you have any questions or difficulties with setup, contact our support at support@fluix.io and we’ll be happy to help you.
Zapier is a platform that allows you to connect different software tools with each other.
Trello is a team collaboration tool that lets you organize everything to keep your projects on task. You can capture tasks for a project and create a board of ‘cards’ in the order they need to be completed.
By connecting Fluix with Trello via Zapier you can create Trello cards automatically once a form is completed in the Fluix app.
Smartsheet is a web and mobile based platform for project management, task assignment, tracking, and document sharing. Smartsheet products include team collaboration, content management and digital asset management.
Fluix is a web and mobile-based cloud platform that helps companies to manage documents, automate workflows, and manage business processes.
Automated data collection and analysis
In Fluix your team will be able to create a transparent document workflow: remote teams will easily collect data on mobile online and offline, or web version of the app, review and approve it remotely, and share with customers and office teams.
Example of a filled out form on iPad:
In Smartsheet you will see a new row created containing the data from the fields mapped in the form and file attached.
How to Integrate Your Fluix Account with Smartsheet
The whole process is no code but requires installation on your side. To start, please contact our Support team at support@fluix.io and we will guide you through. .
Note: Integration requires a Core account in Fluix and an account in Smartsheet. However, to try the integration, you can register free trial accounts in all tools.
Slack is a business communication software for organizations. It’s a messaging app, available both on desktop and mobile devices. Teams can securely chat and make calls, share files and sensitive information.
By integrating Fluix and Slack you can ensure the important data collected in Fluix mobile forms can be instantly shared in Slack with people who need this data.
To start the integration, you’ll need to create the App in Slack that will be added to your Slack Workspace and will be used for informing your team about submitted documents.
1. Go to https://api.slack.com/apps, click the Create An App button to start creating the app, and select the option to build your app From scratch:
2. Name your app, let’s say ‘Fluix’ (it can be changed at any point later) and pick a workspace (name of the corporate Slack account that you’re using) to develop your app in:
3. Once done, you will be redirected to a page with the Basic Information about building apps for Slack. At the stage of adding features and functionality to your app, you’ll need to configure permissions to allow your app to interact with the Slack API. For doing this, select the Permissions tab from the list below:
4. Find the Scopes tab, click the Add an OAuth Scope button and select the following permissions from the dropdown list:
channels:join – Join public channels in a workspace
channels:read – View basic information about public channels in a workspace
chat:write – Send messages as Fluix
files:write – Upload, edit, and delete files as Fluix Service
5. Once done, go back to the Basic Information tab, locate the Install your app tab and click the Install to Workspace option.
At this step, you will be asked to authorize this app after clicking an install option.
6. After completing this step, the application should appear in the list of the Apps in Slack. In case you want to provide your team with some information about the app and personalize it, go to Basic Information – Display Information and add a short description of the app as well as an app icon and background color.
7. The last step is to add the app to the desired channel in Slack where the notifications on submitted documents should appear. For doing this, open your Slack app, open the channel, open the list of members and participants in the top right corner, go to the Integration tab and click Add an App:
Once the created app is added, the notification that the app joined the channel will appear as a confirmation that everything was done correctly.
Step 2 – Configuring a Fluix workflow
Create a workflow in Fluix for the documents that need to be filled out and then appear as attachments in Slack notifications informing the members of the channel about new submissions.
1. In the selected workflow, add a submit action called Upload to CRM/ERP.
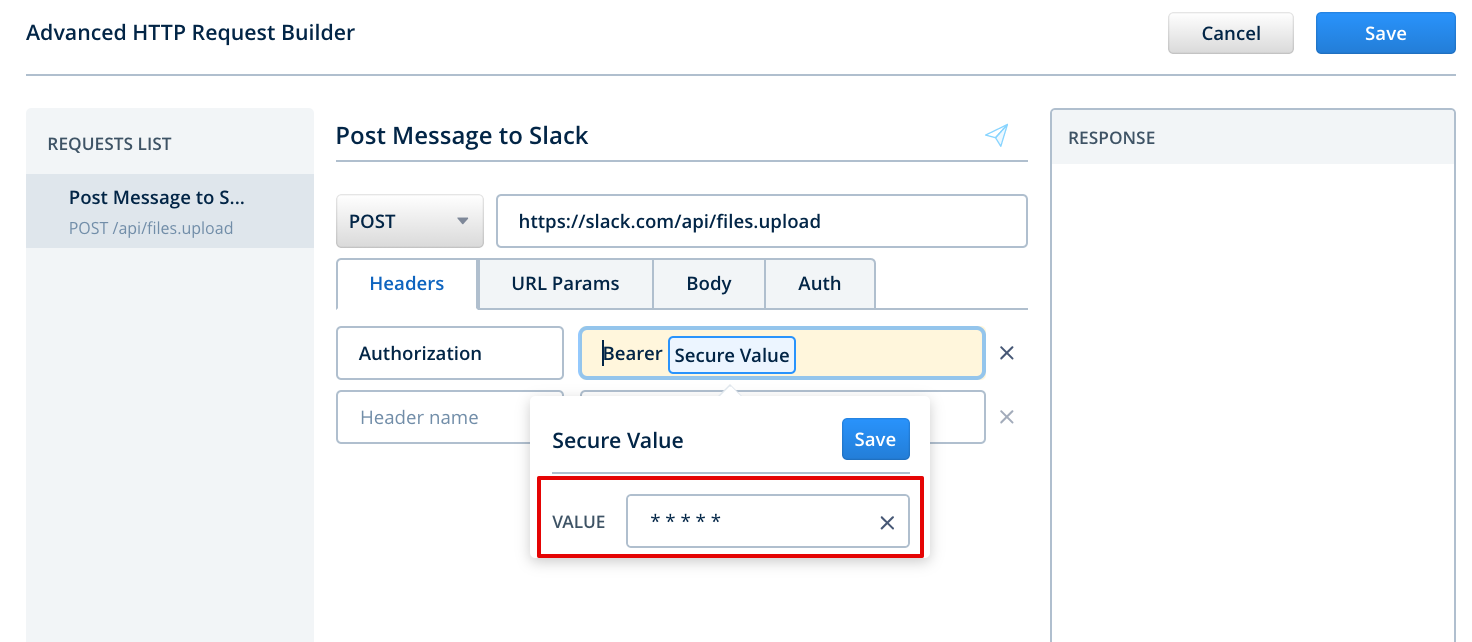
2. Configure the request name, let’s say “Post file to Slack”, select POST as the data type, and add the following URL – https://slack.com/api/files.upload.
3. Go to the Header tab and enter the following:
Header name – Authorization
Header value – Bearer Secret Value
Note: We recommend entering the value manually since it will allow adding already preset parameters from the dropdown list.
4. Once added, go back to the Slack page, open the OAuth & Permissions tab, and find the OAuth Tokens for Your Workspace tab. Copy the Bot User OAuth Token that is going to be used to authenticate your Slack app in Fluix.
5. Go back to Fluix, click on Secure Value, add this copied token to the Value field, and click the Save button.
6. Go to the Body tab, select Multipart and enter the following:
Part name “channels” and Part value “channel_name”. The value “channel_name” here is the name of the channel to which you want to receive the notifications. In our case, the channel name is ‘sandbox’.
Part name “initial_comment” and Part value “A new document ‘Document Name’ has been submitted”. This text will be shown in the channel once the document is submitted, therefore, you may put here any text you would like to.
Part name “file” and Part value “Document File”. This value will allow you to add the document to the notification in Slack. Please enter this value manually to be able to select it from the dropdown list.
7. Once done, click Save in the top right corner.
8. To save changes in a workflow, click Save & Publish in the upper right corner and go to test the setup.
Step 3 – Testing the integration
Go to the Fluix app on a device or User App in the web browser version. Open a test document, fill it out and submit it through the workflow. In Slack, you should get a message with the attached document.
In case you have any questions or difficulties with setup, contact our support at support@fluix.io and we’ll be happy to help you.
Many aviation companies use different software solutions to manage processes and paperwork. In most cases, data flow between tools is manually created by employees. This inevitably leads to occasional data loss and discrepancies as a result of human error.
In this article we’ll talk about how integrating the aviation management tool WinAir with Fluix can eliminate manual effort and make the entire document management process smoother, with full traceability.
What this integration does
Fluix is a web and mobile-based cloud platform that helps teams with setting up digital document management and workflow automation. In this integration, Fluix serves as an electronic data capture system.
WinAir is an aviation management software that helps track and manage aircraft maintenance and inventory control.
Integration between Fluix and WinAir allows you to automatically create flight log entries in WinAir for different types of aircraft, based on the values that have been filled into the flight record by the cabin crew members and submitted via Fluix.
The flow
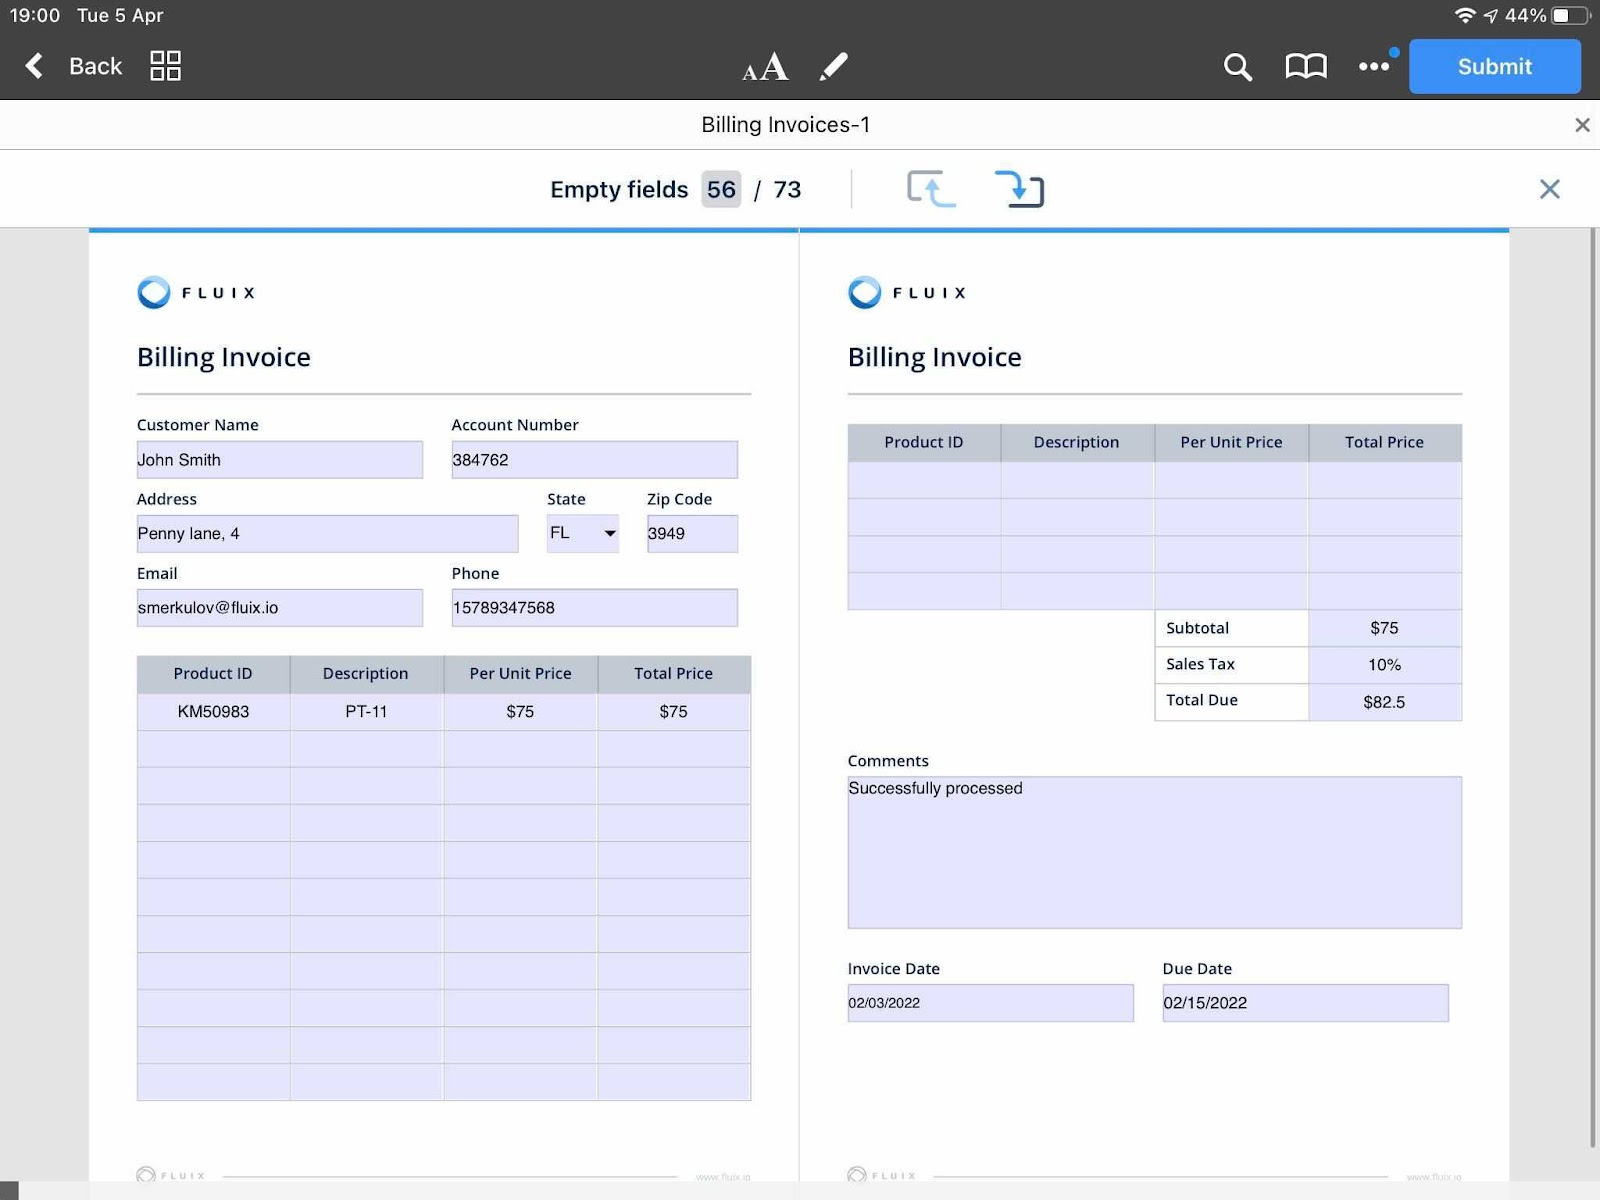
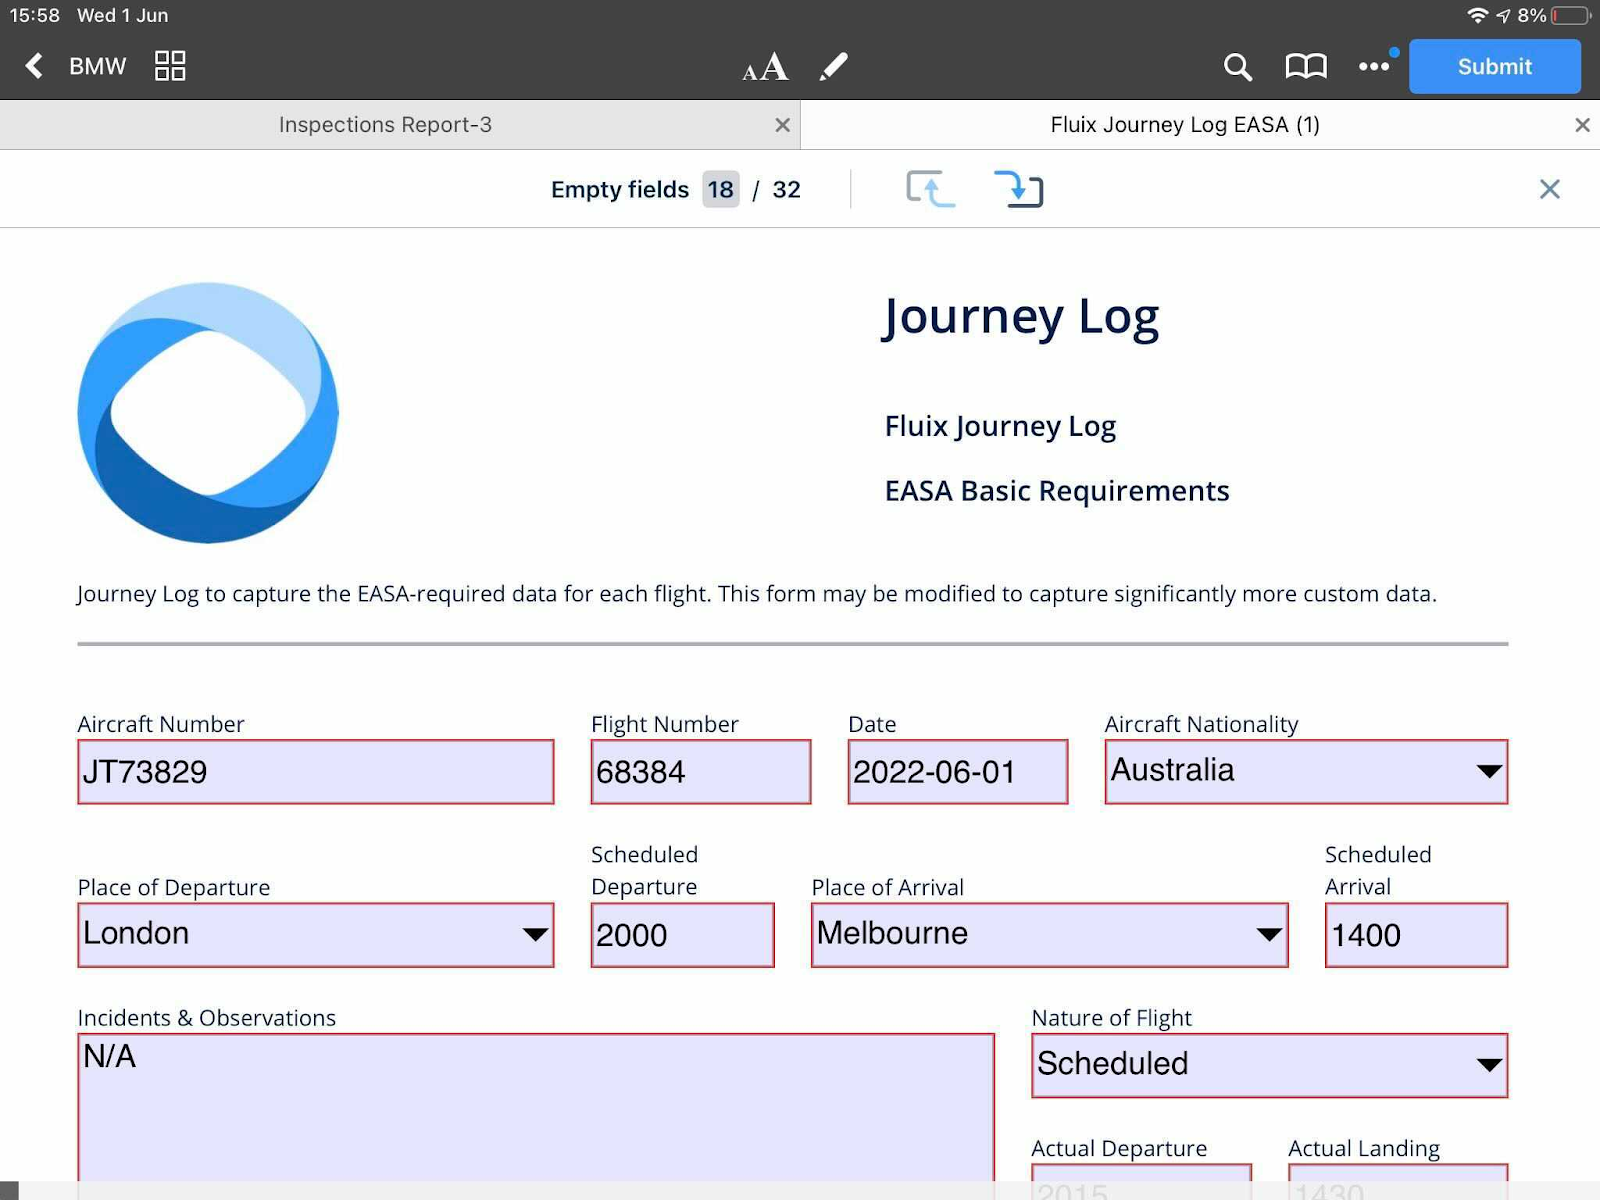
1.The pilot completes the fillable Journey Log PDF in the Fluix app. Both online and offline options are available.
Example of a filled out form on iPad:
2. Once ready, the pilot submits the form so that it is reassigned to CAMO (Continuing Airworthiness Management Organisation) within Fluix.
3. CAMO reviews the Journey Log and then submits the finalized form via Fluix down the predefined workflow rule, e.g. email to the office, archive to cloud storage or any other desired destination.
4. In parallel, the data flows through to WinAir, where the Flight Log entry is automatically created based on the data extracted from the submitted form.
How to start The integration doesn’t require special technical skills and months to configure it. Contact the Fluix team and we’ll help you to set up the integration, taking into account your project-specific requirements.
Note: To test the integration, you’ll need a Fluix Core license, or a free 14-day trial account, as well as a WinAir license.
Domo is a business intelligence and data visualization tool that allows companies extract business value from the field data they collect on a daily basis.
Fluix integration with Domo provides the full cycle, from its raw data collection in the field to its live visualization and analytics.
The integration of these two services is fast and simple since it doesn’t require coding or IT knowledge. Here below you will find the guidelines on how to connect the tools.
Note: to integrate Fluix with Domo, you’ll require Fluix Core license and Domo license. Though to try the integration capabilities, you can sign up for a free demo in Fluix and 30-day free trial in Domo.
Configuration
In your Domo account, click on the DATA section on the top menu and choose CONNECTORS:
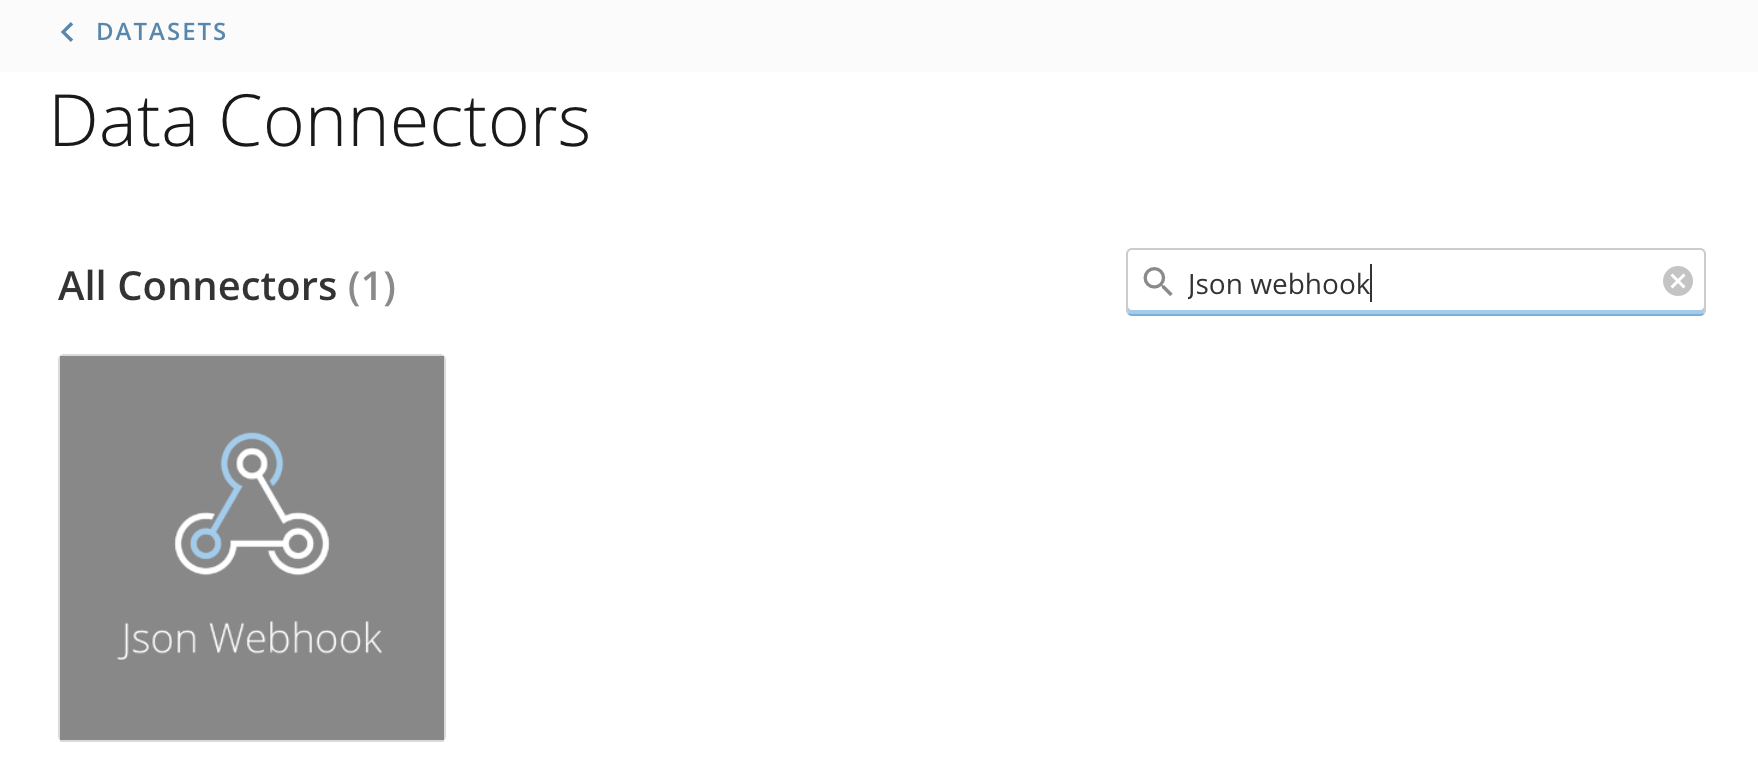
In the Search bar enter Json Webhook:
Press Get the Data in the right corner:
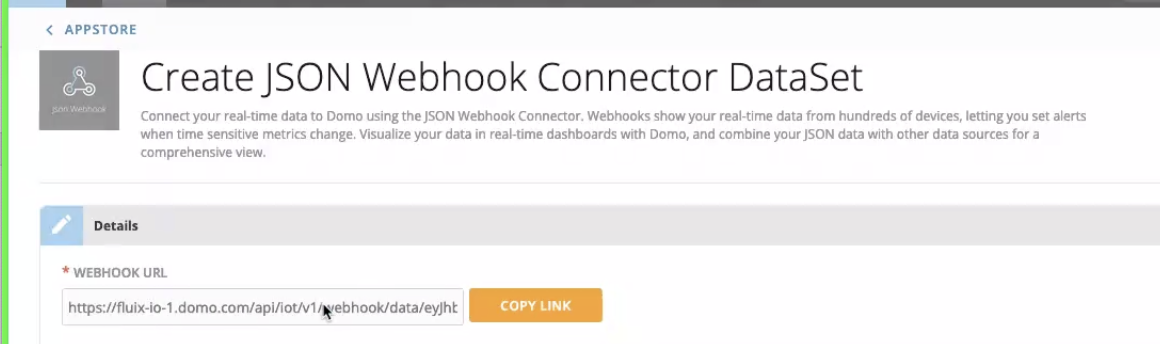
Copy link:
Open Fluix workflow that you need to export data from, and press Edit Workflow
Add Submit action Upload to CRM /ERP
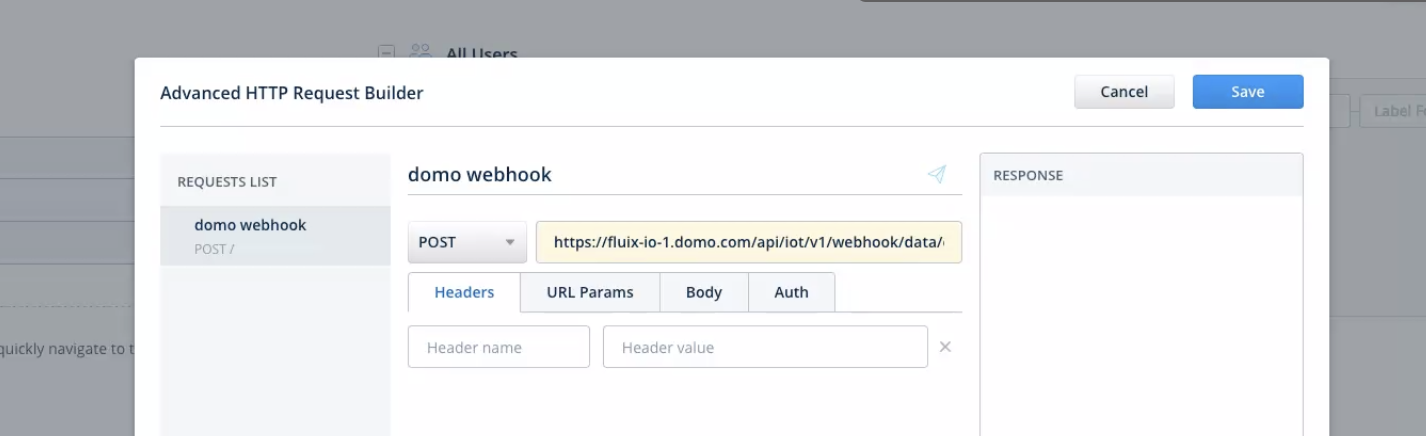
Paste the link copied from Domo to the field ‘Request URL’:
Under the Text section of the Body tab enter Document Form Data:
Click Save and then Save & Publish in the upper right corner of the workflow.
Testing
Fill out and submit a form in the Fluix app, either on iPad/iPhone or User App in web browser.
Once done, go to Domo, DATA section, to check the results.
Data Visualization
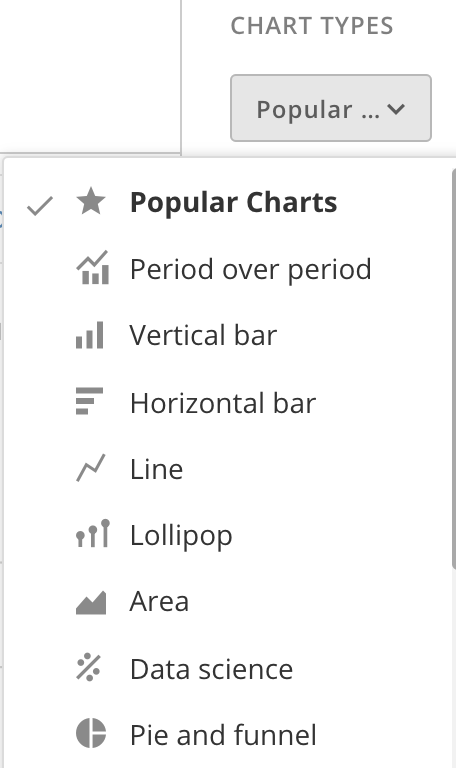
To visualize data, click on the report to open it, and then click Create a visualization:
On the right you’ll see a list of possible chart types:
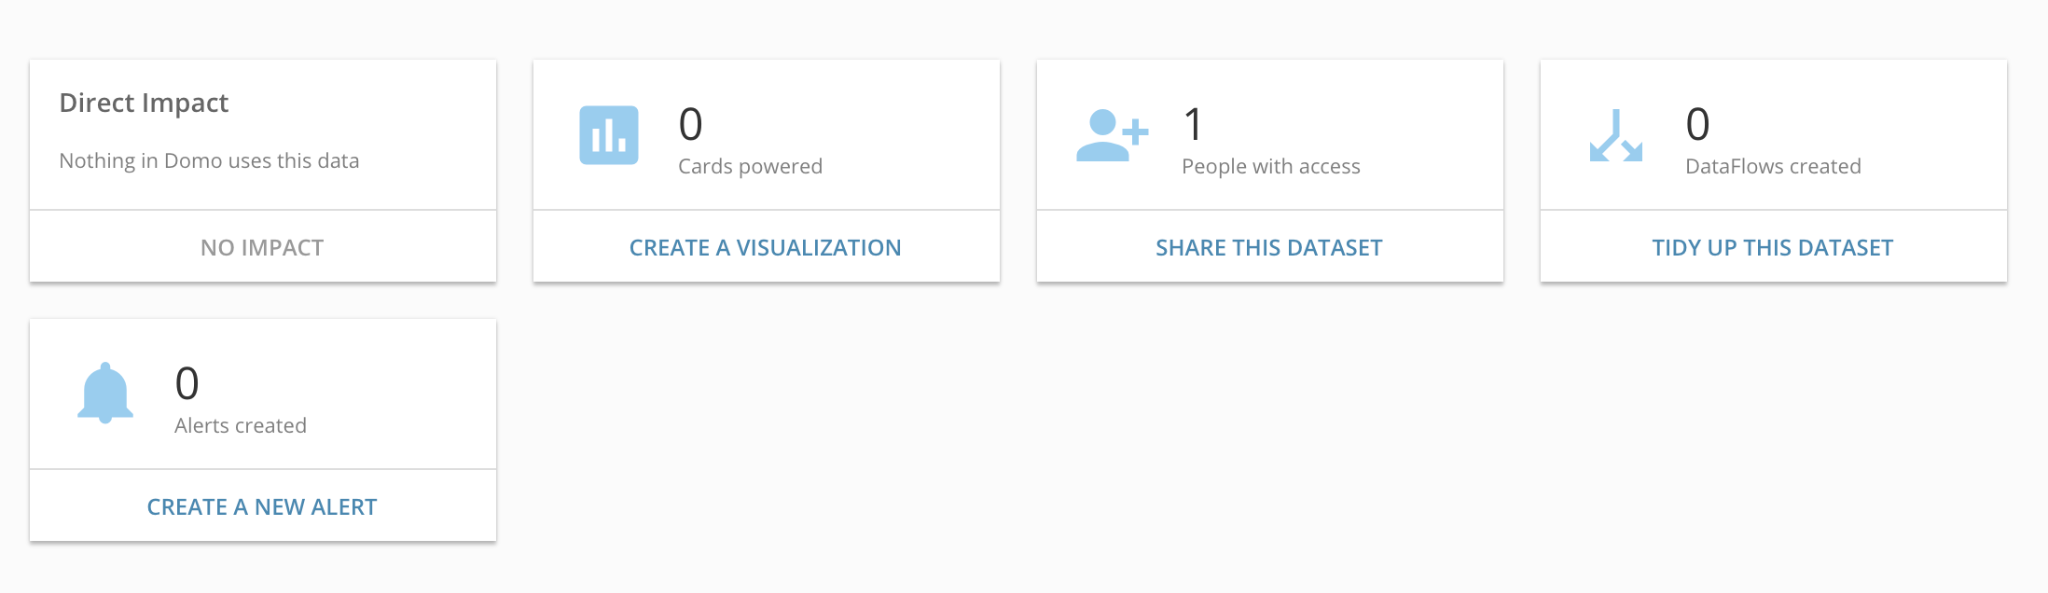
Once you are ready to save your chart, click Save in the upper right corner to save it on a Dashboard.
You can also configure alerts when data changes, and share the Dashboard with others.
In case you have any questions or difficulties with setup, contact our support at support@fluix.io and we’ll be happy to help you.
Stay up-to-date on your task list and be on the same page with your team by allowing Fluix to automatically create and organize cards in Trello.
Trello is a collaboration tool that organizes your projects into boards.
Integration of Fluix and Trello allows you to create new cards on a board automatically upon each submit of a form that is filled out in the Fluix app.
A 3-step integration is as simple as a piece of cake, you will need only two portions of it: the Fluix workflow and the Trello board.
Step 1: Create a Trello board
Before getting started with integration, you need to create a Trello board where the cards are going to be created. If you are going to use the already existing board, go straight to Step 2
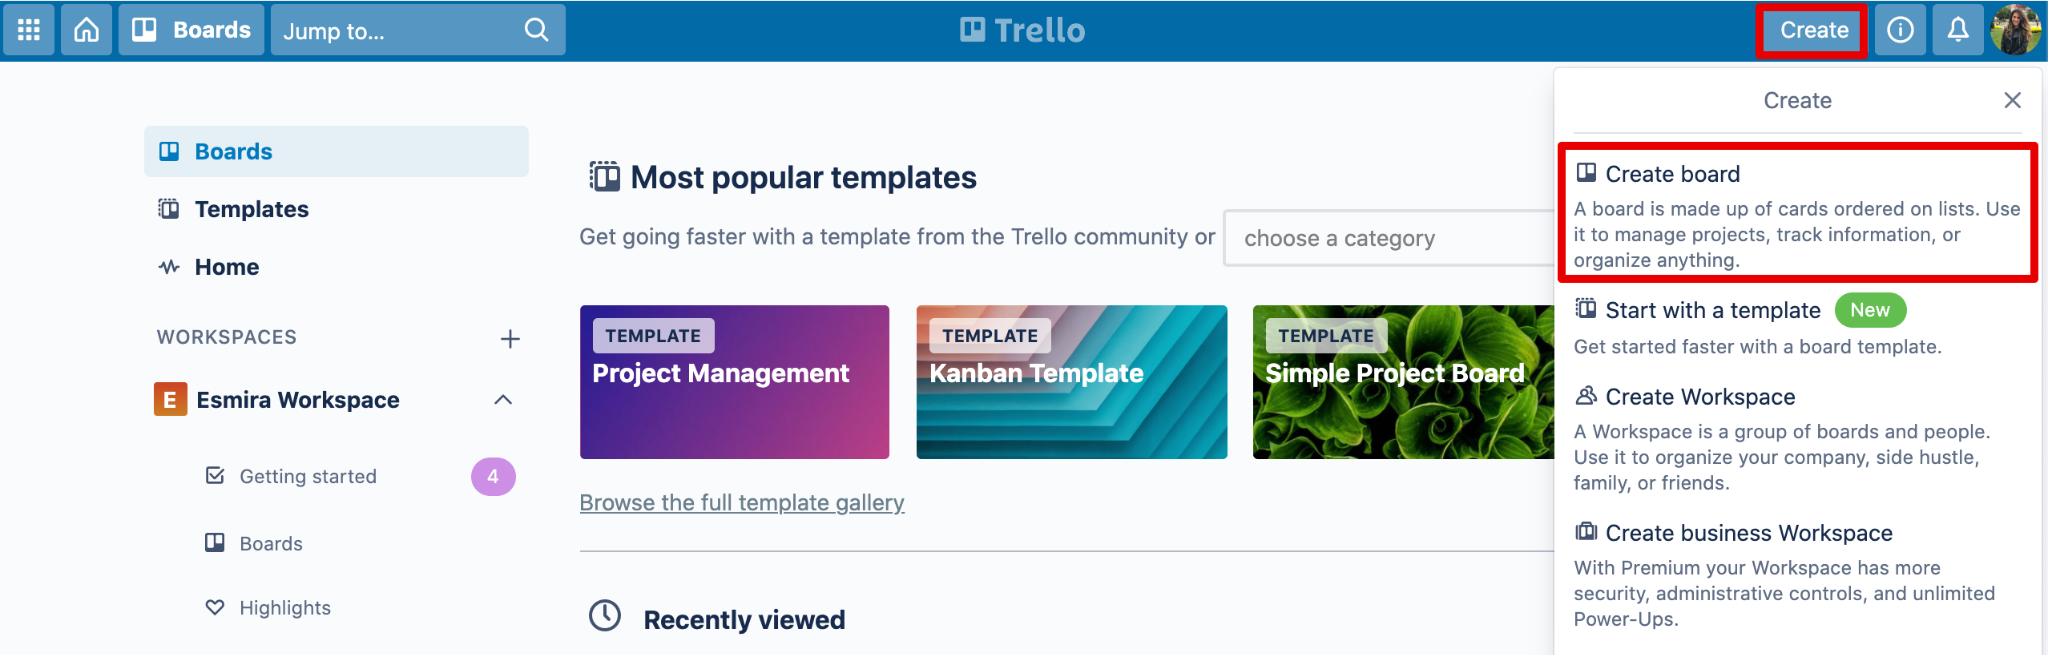
1. Click Create in the header and select Create Board in the drop-down menu.
2. Enter a name for your new board, select the Workspace that it should be associated with. You can select an existing Workspace for the board, or, create a new Workspace. Once done, click Create Board.
3. Click Add a list or double-click any open space on your board to add a new list.
Step 2: Configure an email address for the board
Each Trello board has a unique email address that will be used for connecting Fluix with Trello.
1. Open the Menu in the right sidebar, select More, and then Email-to-board settings.
2. The email address that was automatically generated by Trello, will be used in the Fluix workflow. Here you can also select the list in which the emailed card will be created and the position in which the cards will appear (on the top or at the bottom of the list).
Step 3: Configure a workflow in Fluix
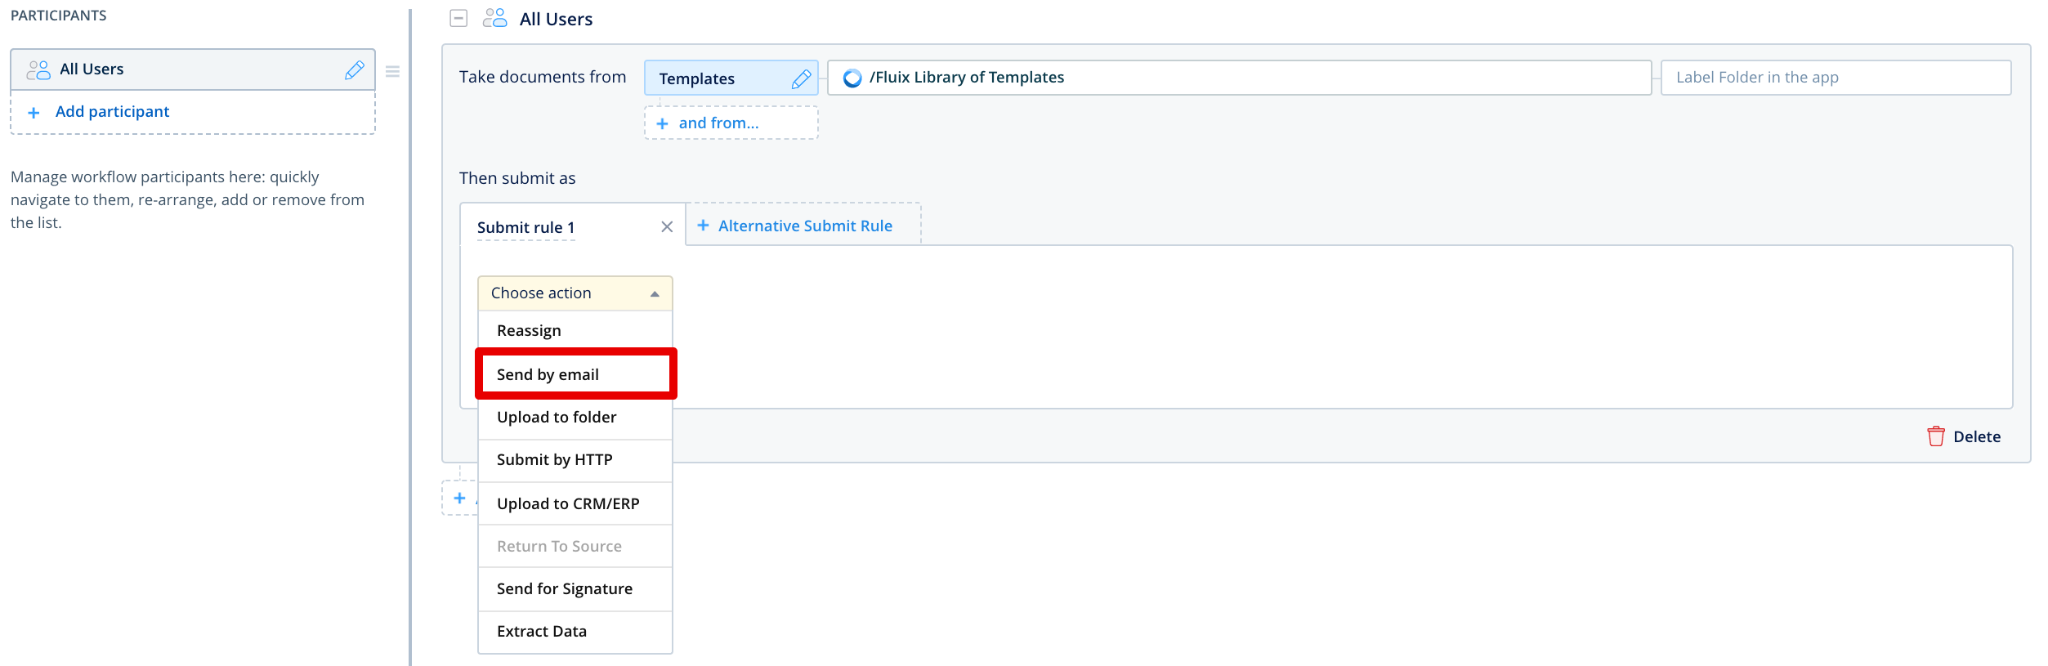
1. Create a workflow in Fluix for the documents that need to be filled out and then attached to the Trello cards. If you already have such a workflow, add a new Send by email submit rule:
2. Insert the email copied from the Trello board to the recipient’s field in the workflow and specify the subject of the email.
Note: The subject of the email becomes the card’s title, therefore, for your convenience, to be able to distinguish the cards you may use the keyword “%document%” that will transform the name of the form submitted in Fluix to the name of the card.
Additionally, the body of the email becomes the card’s description. Set a custom message in case you would like to add some more information to the description. The filled document will be added as an attachment to the card, thus, make sure to select the needed PDF format.
Additional Formatting tips
When the card is created in Trello, the labels and the members of your team can be added to the card automatically.
For adding labels to the cards, add #labelname, #labelcolor, or #labelnumber to the subject in Fluix.
If your label consists of two or more words, in the subject line either join the words or use underscores between the words. For example, if your label is named To Do in the subject line of your email either enter #ToDo or #To_Do for the label to render properly on your card.
If you have multiple labels on a board with the same color or the same name, emailing a board with #color or #name will only add the first label with that color or name to the card.
Members can be added to the card by putting @username in the subject or the body of the email on its own line. Trello users’ email addresses can be also added as “to” or “CC” addresses and they will be added as members of the card. However, in this case, they will also receive this email in their inboxes.
Most documents will be attached to Trello cards just fine. However, there is an overall email size limit (above 10MB) that will prevent documents from being attached to the card.
In case you have any questions or difficulties with setup, contact our support at support@fluix.io and we’ll be happy to help you.
Does your business process entail a need in DMS (Document management system) and CRM (Сustomer relationship management) systems, but you have to copy-paste data from one to another? There is a way to automate this process by integrating these tools.
How it works
While using Fluix as a DMS, you can automate the upload of data collected in mobile forms into the CRM of your choice, like Lead Perfection, MarketSharp, Salesforce, and other world-leading systems.
Gains from integration with CRM
Automated workflow. Assurance that documents are getting directly to CRM as soon as such are completed, eliminates time waste on manual upload of documents and data entry, reduces mistakes, and frees up your staff to focus on high value-added tasks.
Real-time control. The regular update of the document status in the system makes it easy to track the work progress.
Increased security. With a centralized place for data storage there is no need to control the data transfer across different platforms and keep completed documents on the external storage for an extended period of time.
Saved time. Service and production teams have instant access to completed documents on their mobile device, which significantly speeds up work on site. There is no need to search through shared folders anymore since company management can pull out any contract/item on any customer quickly.
To integrate Fluix with your CRM, please proceed to this article. Feel free to contact us at support@fluix.io if you have any questions or comments.
If you don’t have Fluix account yet, our experts will be happy to answer any of your questions.


 Pick Action in an app as the next step and choose Google Sheets from the list of apps.