Sections help you build smart and flexible dynamic forms faster, especially when you need to repeat groups of fields, add logic, or simplify long forms for your field teams.
Why Use Sections?
Here’s why Sections in Dynamic Forms can be helpful for you:
Build One Section, Use Anywhere through the Form
Instead of recreating the same fields over and over, create a Section and duplicate it in one click. Example: Inspecting 10 rooms with the same checklist? Create one Section and duplicate it 9 times.
Keep Long Dynamic Forms Easy to Navigate
Allowing Sections to collapse once filled to prevent unnecessary scrolling makes your forms cleaner and easier to use. This helps field teams focus on the necessary parts of the forms. Example: A technician can fold completed sections and stay focused on the next room.
Add Conditional Logic
Use conditional logic to show or hide entire Sections or just individual fields within a Section based on the user’s input. Example: If “Additional inspection needed” is selected, a Section with follow-up questions appears and becomes required.
How to Create a Section in a Dynamic Form?
Note: This feature is available in the Fluix Tasks app for iOS & Android starting from v. 2.5.
1.Navigate to your Admin Portal > Forms -> open an existing form or click New Form. 2.In the Form Builder, locate the Section under the Layout elements.
3.Drag and drop the Section into your form -> add the necessary fields inside it (e.g., checkboxes, dropdowns, comment boxes, image upload)
4.You can also:
Add a Section title and description or set its initial visibility (Visible or Hidden options).
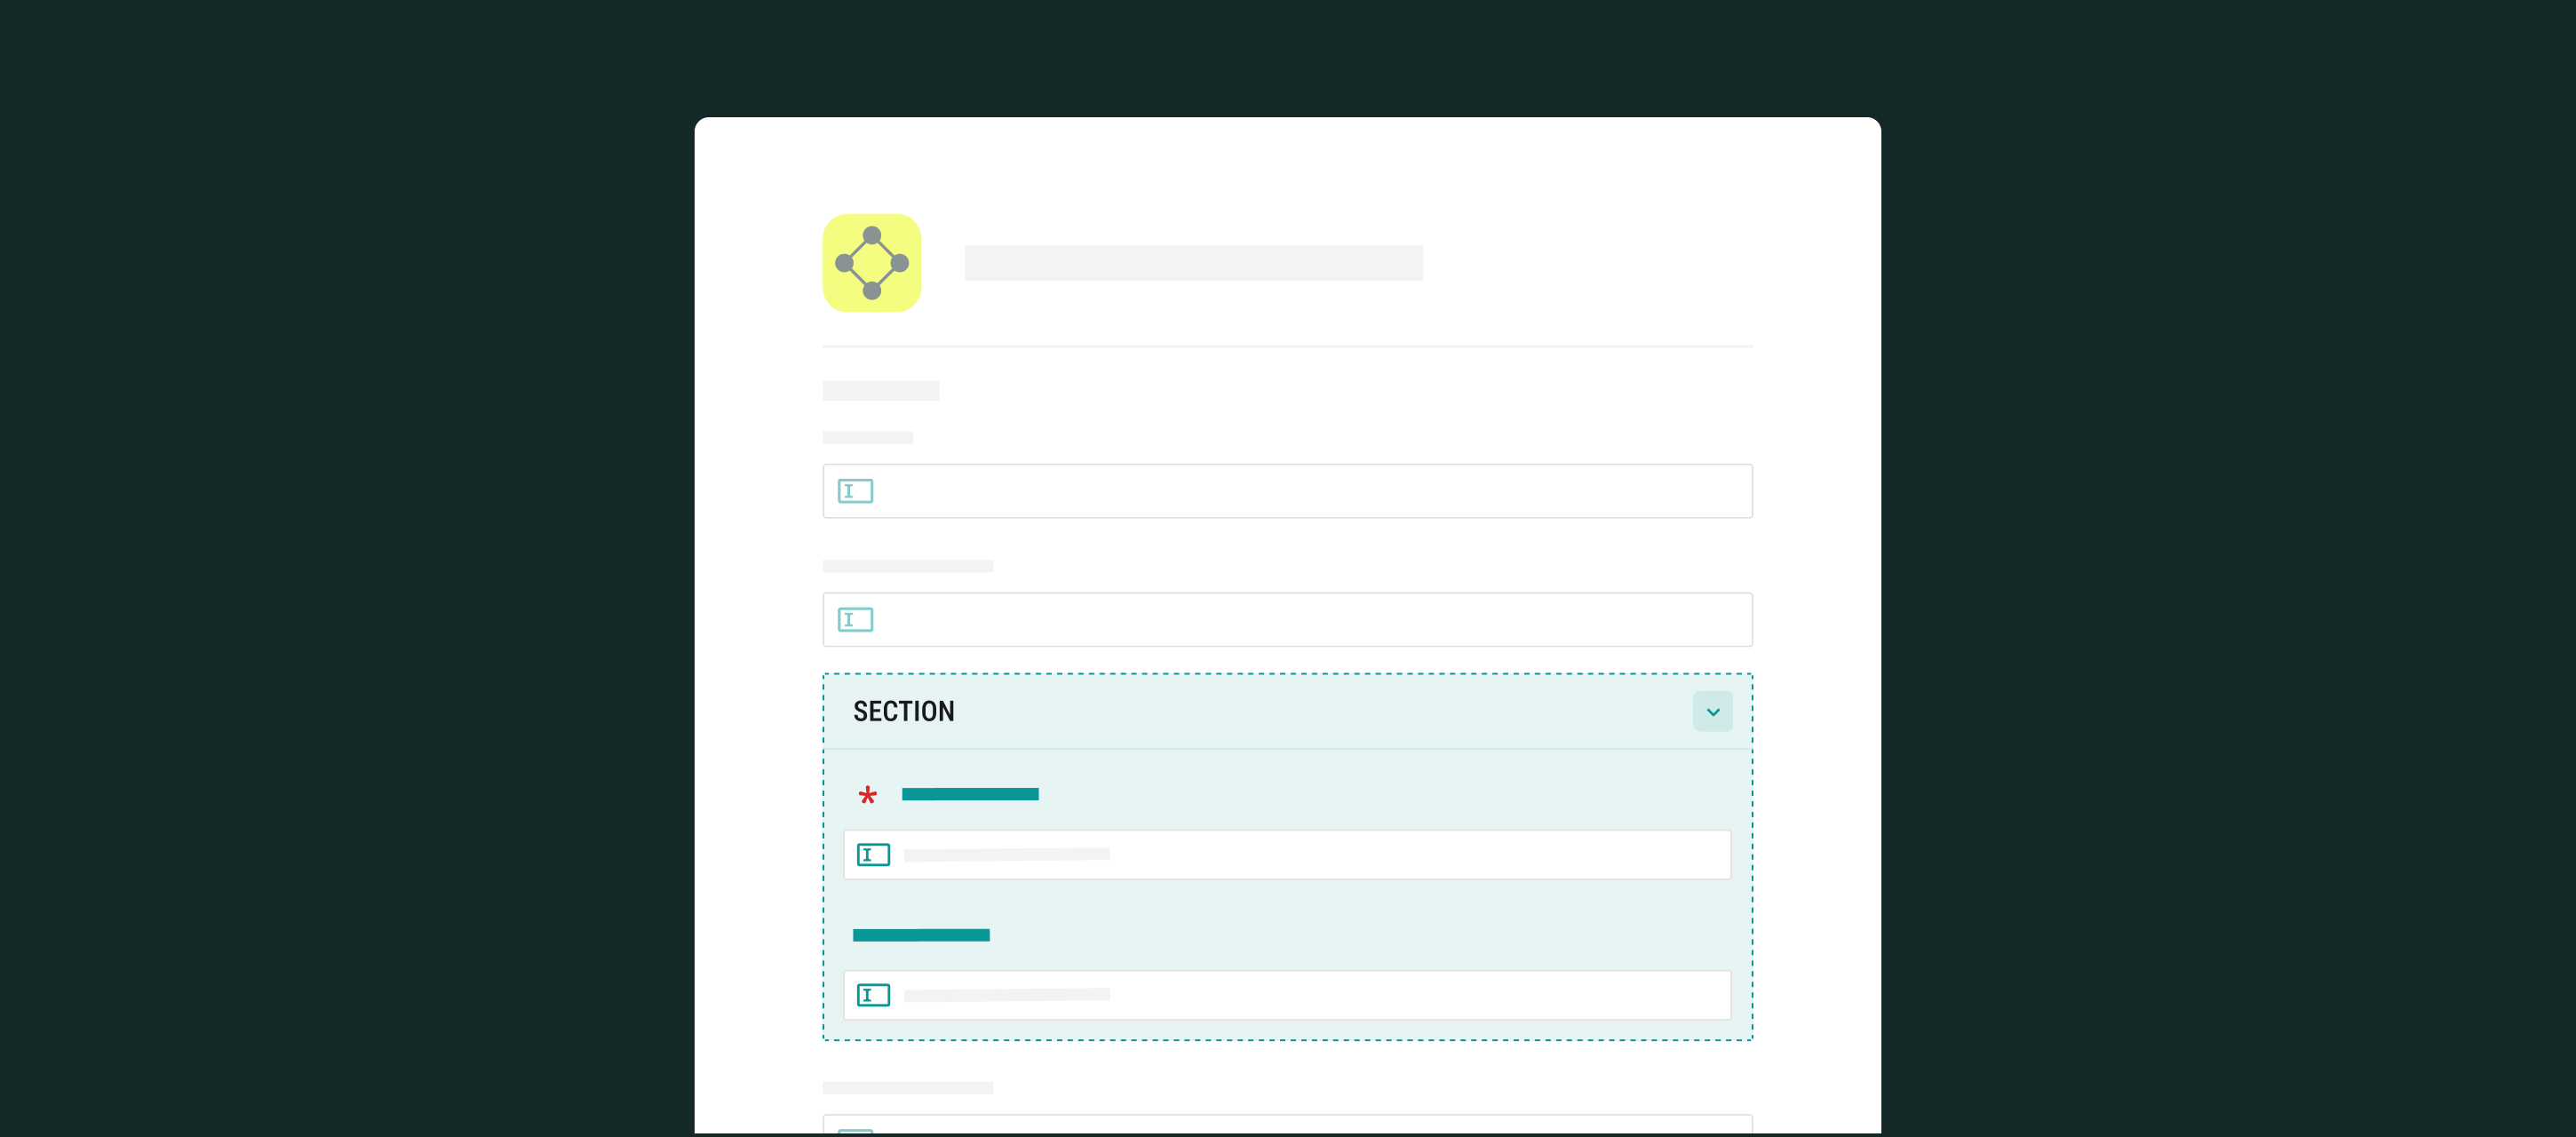
Make it collapsible for end users. Below, you can see how this function will look for the field team in the Fluix Tasks app.
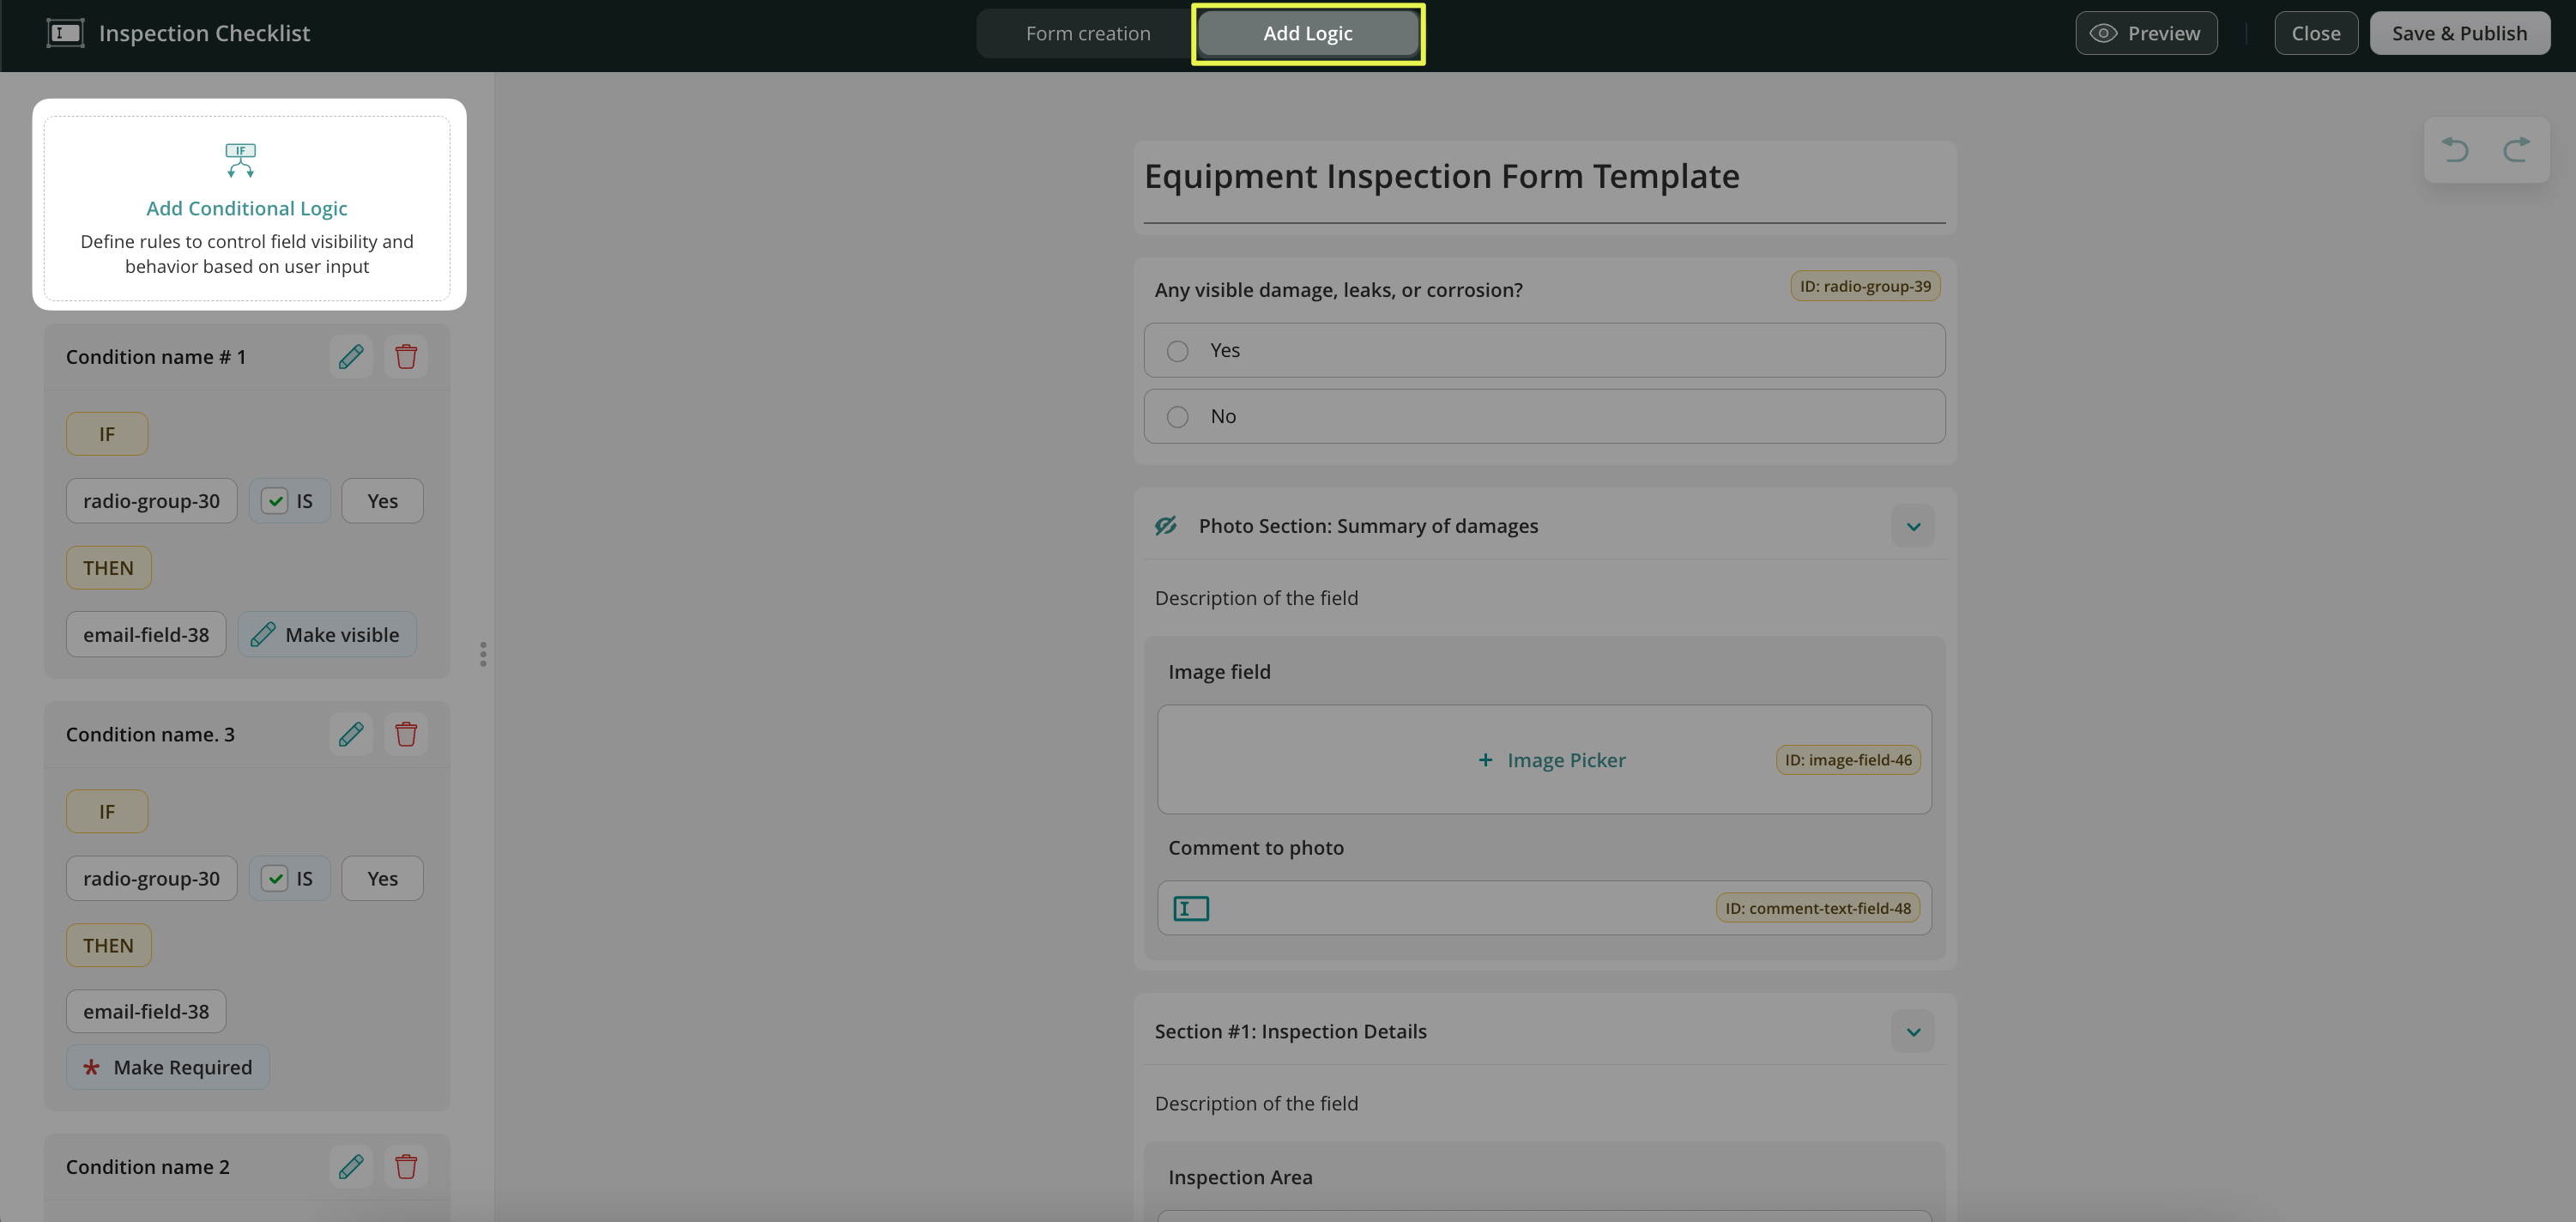
1.Go to the Add Logic tab in the Form Builder -> click Add Conditional Logic to configure the trigger field (e.g., a checkbox or radio button)
2. Set the action. Check an example of the possible logic in the examples below.
Add Logic to Fields within a Section
You may use this approach when specific answers should trigger additional input fields.
Example: If “Maintenance Required” is selected, show a field for Supervisor Email and make it required.
Add Logic to Entire Sections
You may use this when a group of related fields should appear based on earlier answers.
Example: If a user selects “Leak Detected,” show a Section with image upload + comment fields. Keep it hidden unless needed.
What appears in the Final version of the form?
To check the progress of tasks completed by the field team, navigate to the Dashboard in the Admin Portal and open the process to view the completed form.
Folded-but-visible sections in the forms will appear in the exported documents.
Hidden sections (never shown during the field team’s completion) will not appear in the form.
All required fields will still be filled before submission.
If you have questions about setting up Sections or conditional logic, contact us at support@fluix.io — we’re here to help!
Was this article helpful?
Thanks for your feedback!
Oops, something went wrong. Please, try again later.
Thank you!
What details or examples would have made this article more helpful for you? We appreciate your insights!
Fluix is a web and mobile-based cloud platform that enables teams to digitize document management and automate workflows across various industries.
With Fluix, you can:
Automate collaboration between technicians undergoing training and their reviewers.
Accelerate qualification processes.
Collect and analyze data related to training outcomes.
Fluix supports working with PDFs, Web Forms, and Dynamic Forms. You can use existing PDFs or create custom Web or Dynamic Forms using the Form Builder in the Fluix Admin Portal.
This guide will walk you through creating a Taskstream that facilitates collaboration between technicians during their training and reviewers who approve their certifications.
Example Use Case
Technician’s Input: The technician starts by completing questionnaires and uploading their existing qualification certificates.
Reviewer’s Validation: Reviewers assess the completed questionnaires and certificates to determine whether the technician passes the certification.
Completion: Finalized materials can be emailed to relevant recipients (e.g., the technician, their manager) and archived in Fluix File Storage, third-party cloud storage, or the company’s CRM.
Step 1 – Determine the participants of your process
The first thing to do in Fluix setup is to add users and organize them into groups for further participation in Taskstream.
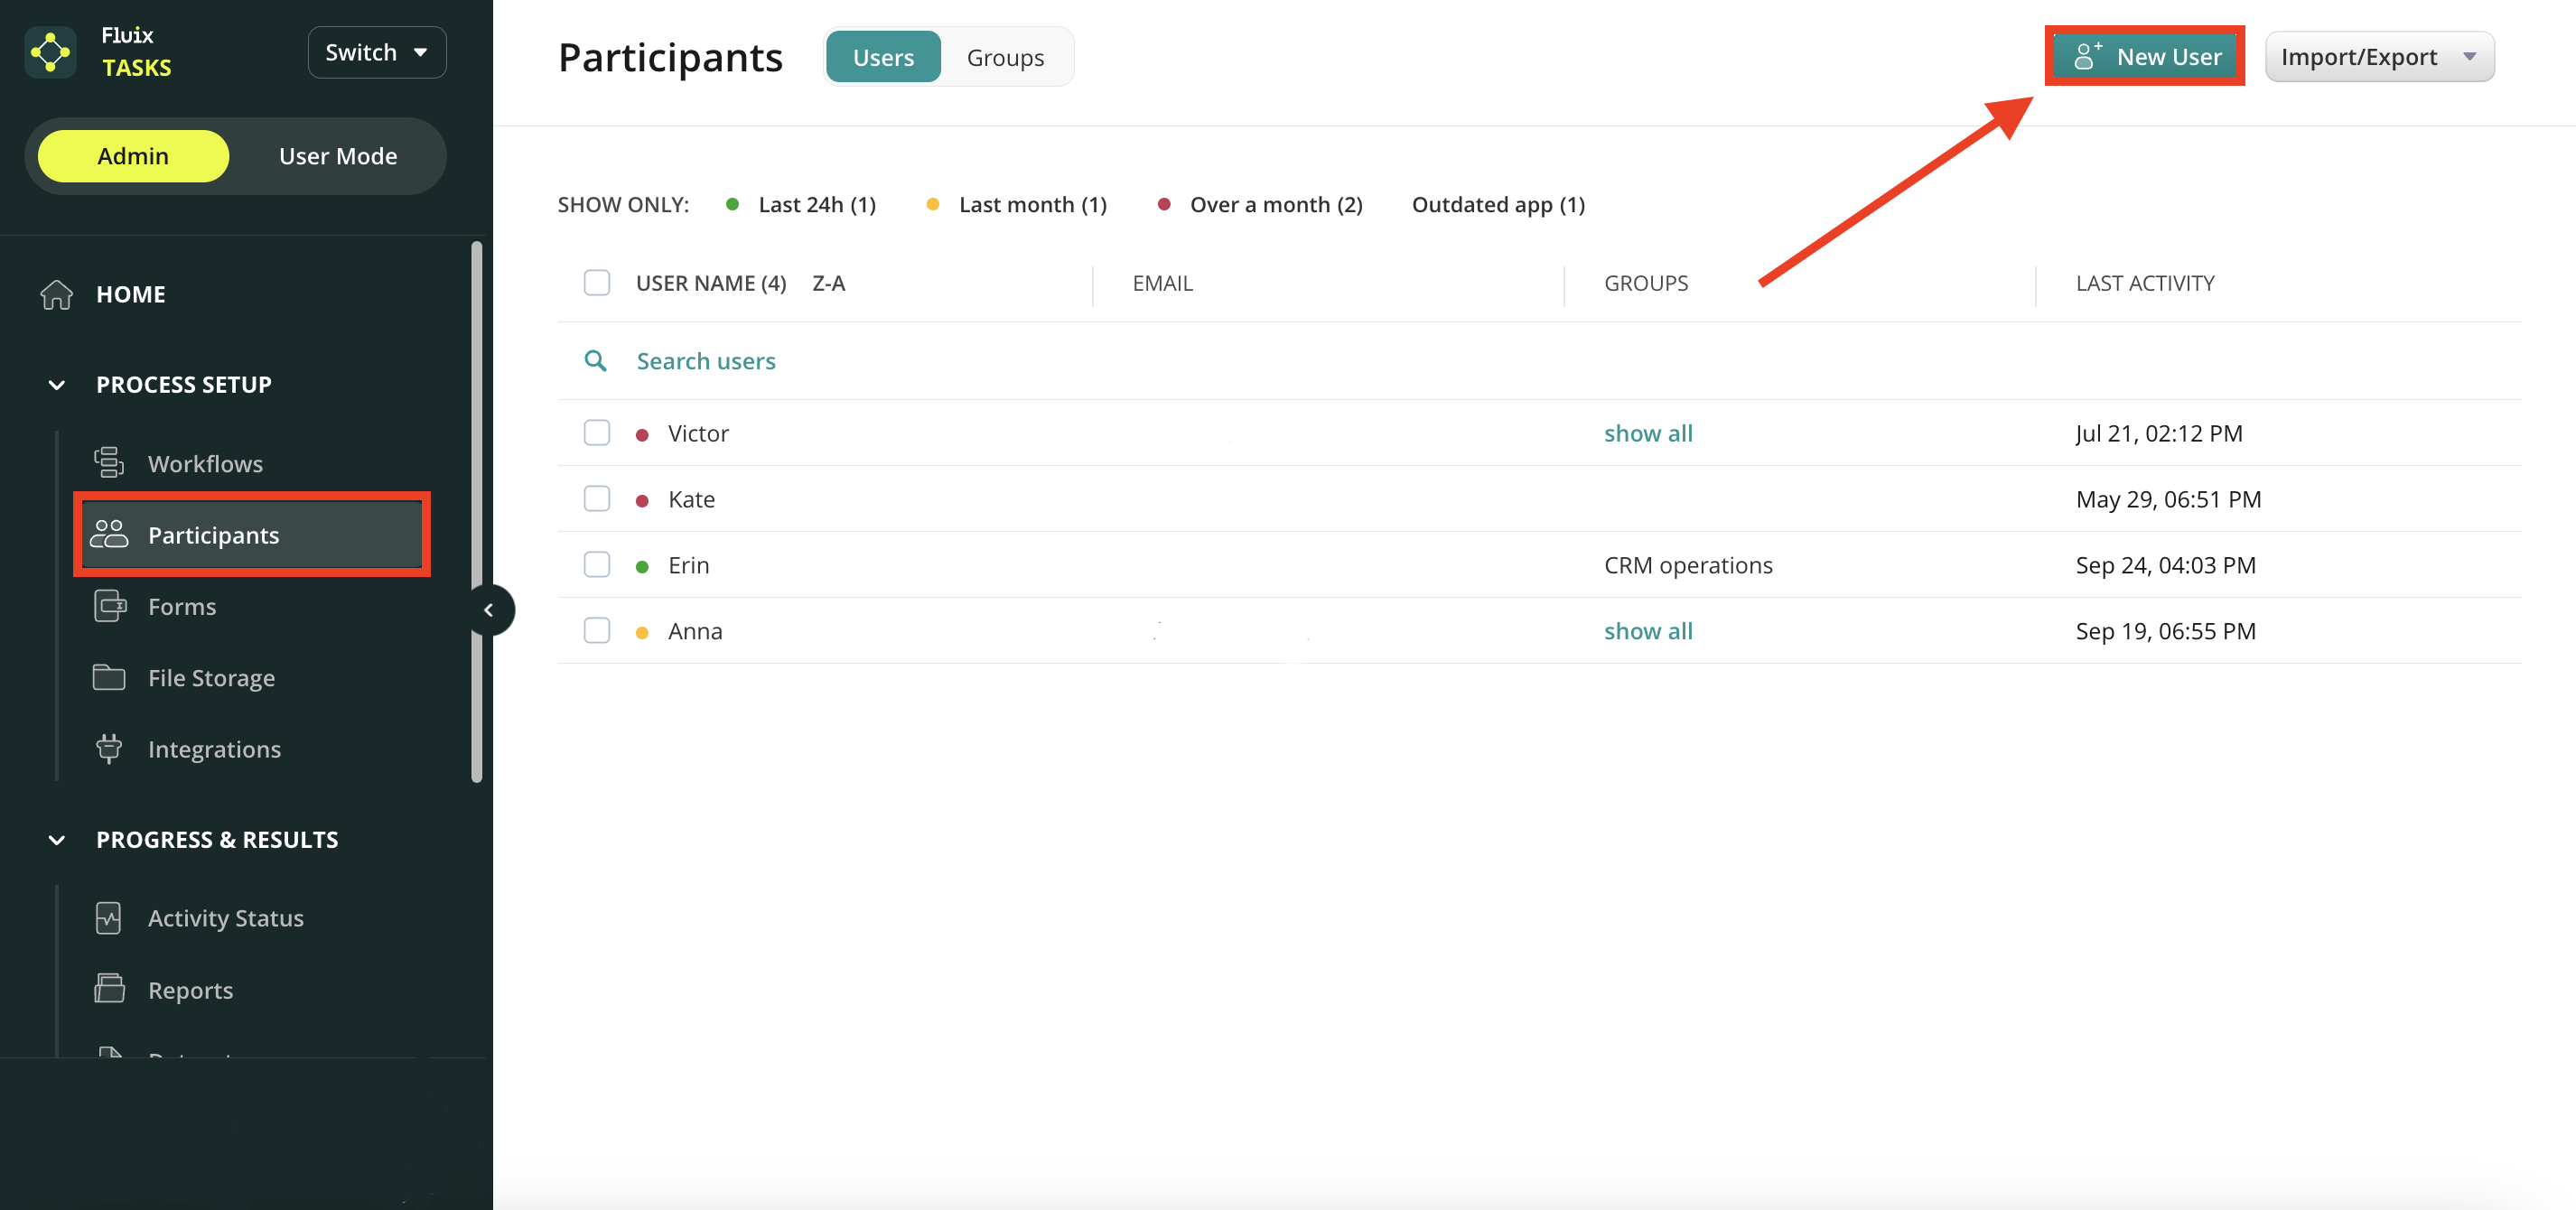
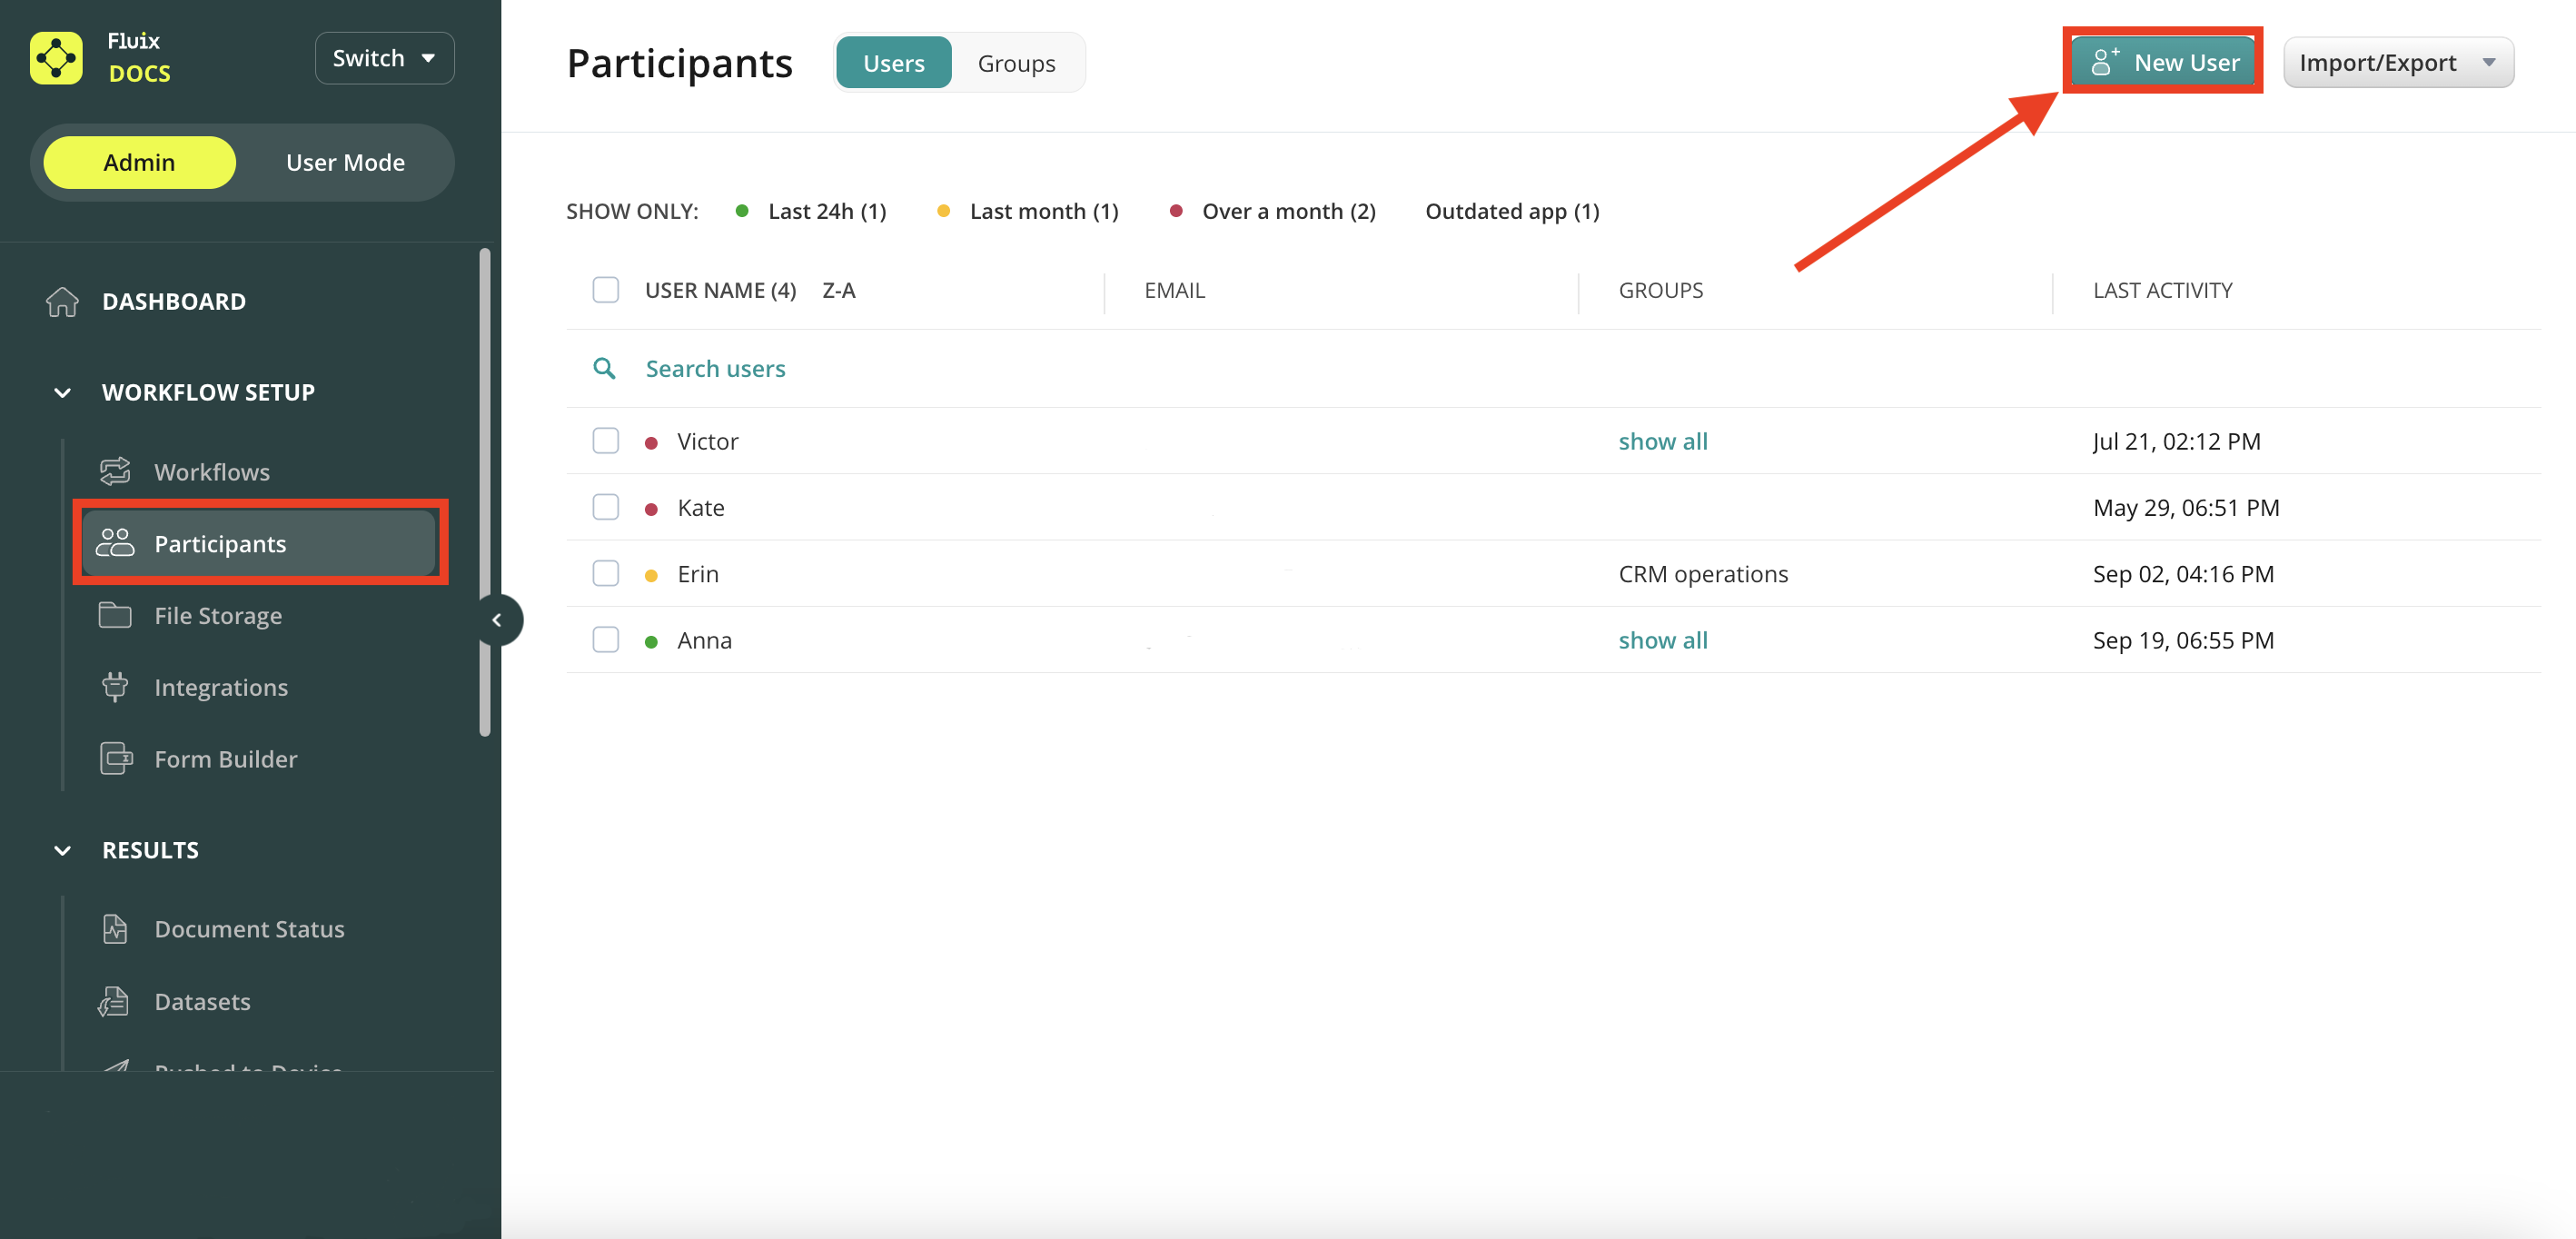
Navigate to the Participants section in the Admin Portal.
Open the Users tab and click New User.
Enter the user’s name and email, then click Create. The user will receive an email invitation to set up their password.
Go to the Groups tab and click New Group. Add a group name and assign users to the group.
Please note: by adding a user to the Groups in your Fluix account, you give the user access to all the documents that will be configured for this Group. To learn more about how to add users to groups, please follow this link.
Step 2 – Create the repetitive process in Fluix
Decide how to start the process:
By user: The process begins when a user initiates it in Fluix.
By third-party trigger: A third-party tool can trigger the process in Fluix. To learn more about how to configure the start of the process in Fluix from the Third-party platform, check Scenario 2 in the Forms Prefill in Fluix article.
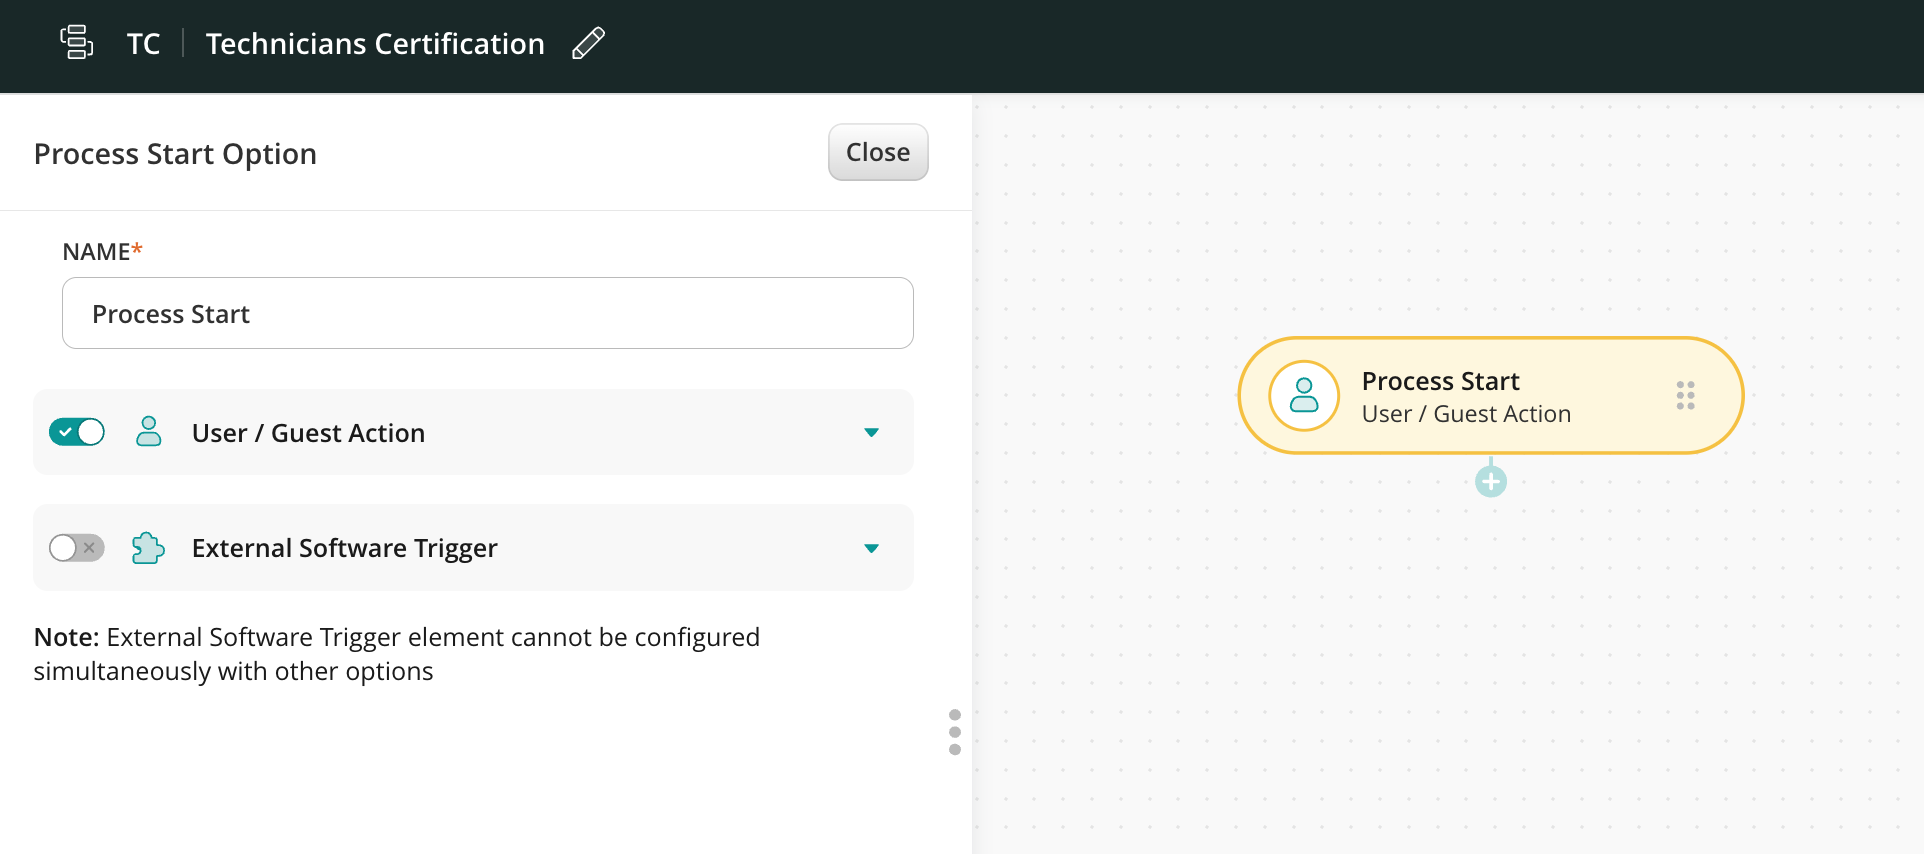
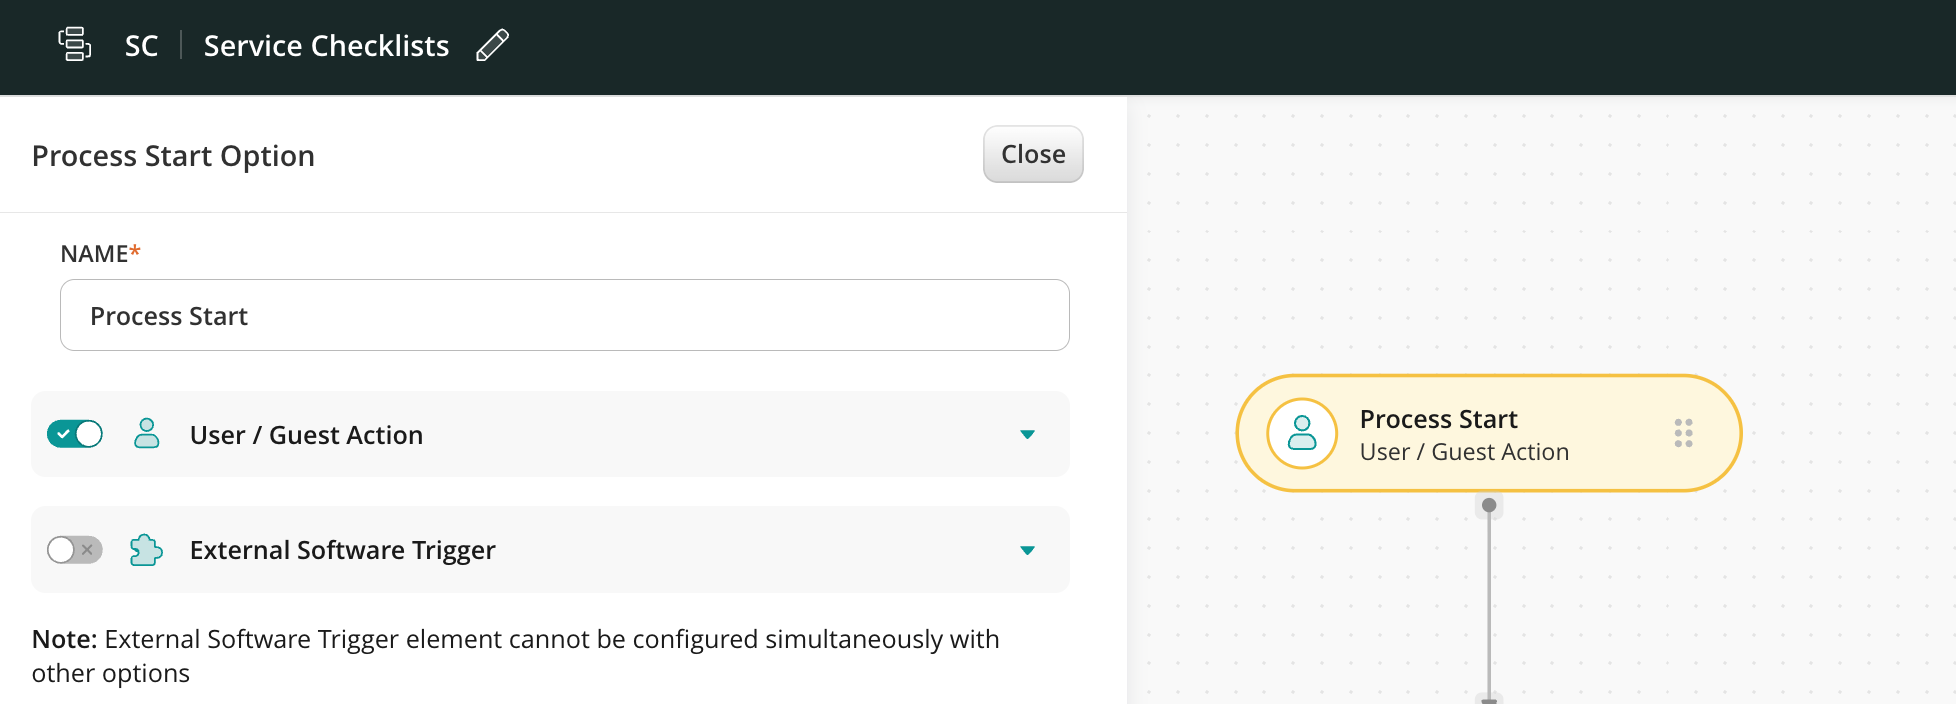
Drag and drop a Process Start event to the working area and select User / Guest Action.
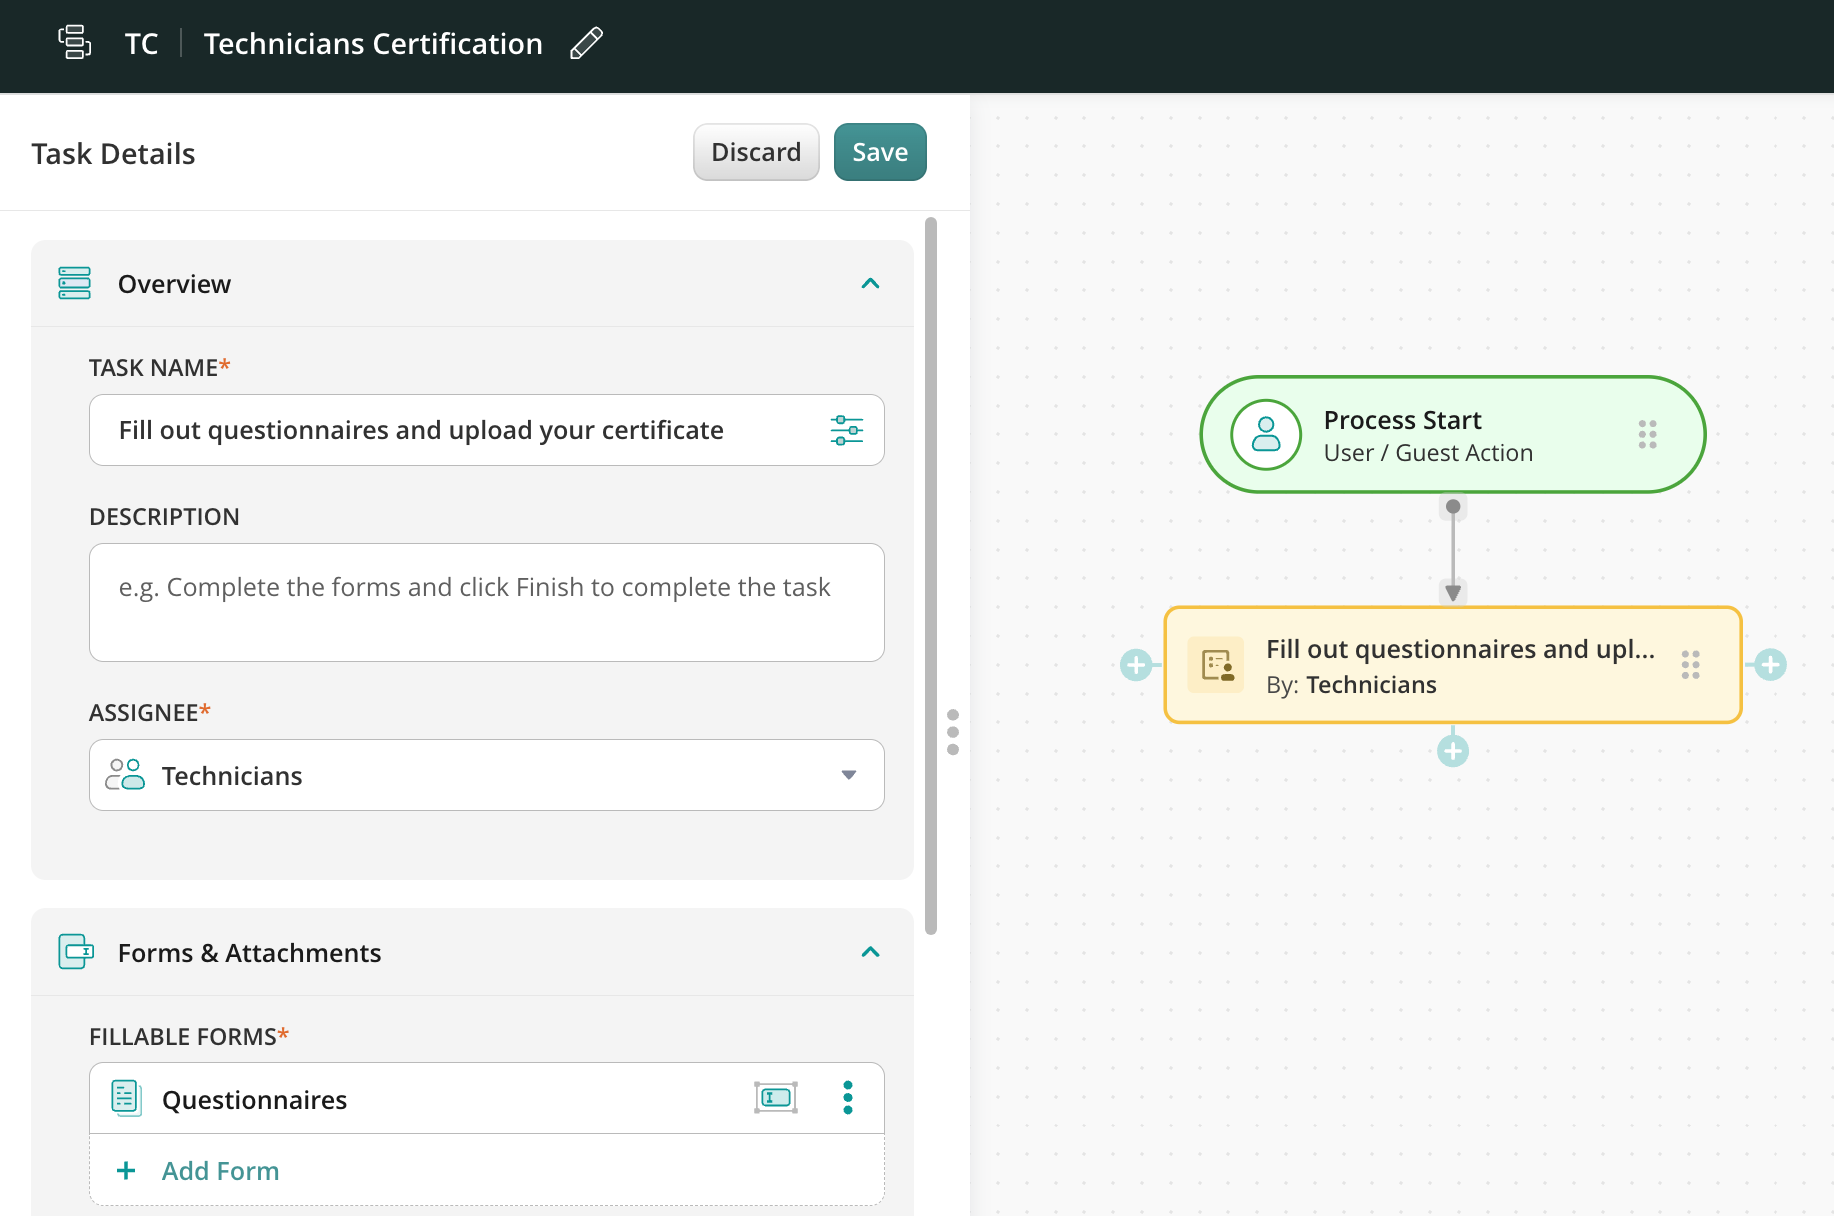
Add a User Task, including its name and what you would like Technicians to do within this task. Note: This description will later be available for the users working on this task in the Fluix Tasks app or Web User app.
In the Assignee who will perform the task, select the Technicians group from the list or click on the Create New Group button and add this group from scratch.
In the Forms & Attachments section, add the questionnaires and other documents you want Technicians to complete during their certification. You may upload them from your computer as PDFs, select the necessary form from the Forms section, or even create new questionnaires from the Taskstream builder.
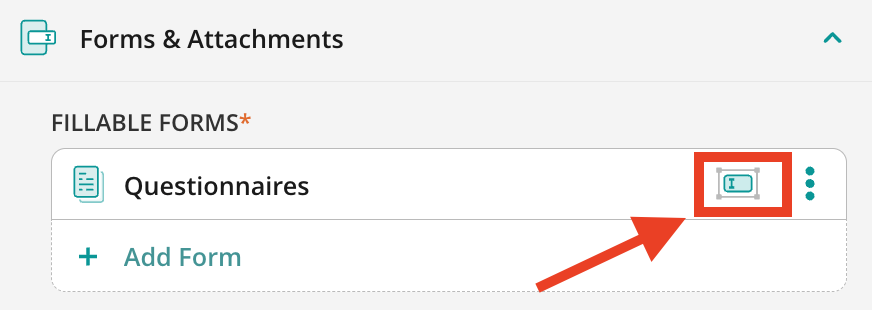
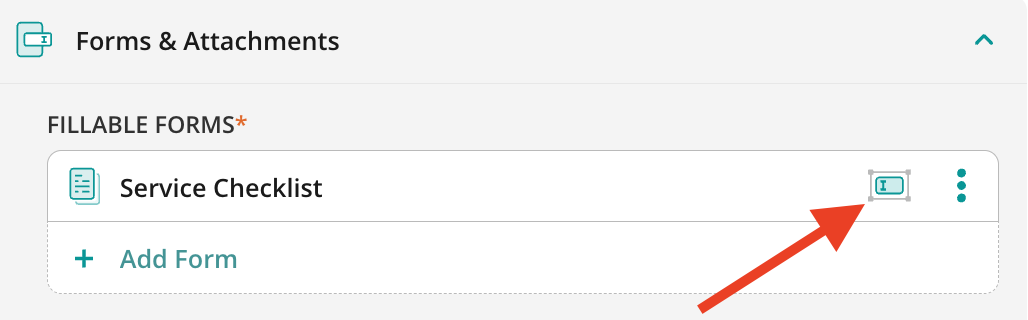
Note: Use the built-in Assignment configurator to mark specific fields in the attached form as required, read-only, or editable for participants of this flow.
While technicians can work with the files configured for them on the Taskstream level, they may also attach additional documents (certificates in this case) using the Files to review functionality in the Fluix Tasks app.
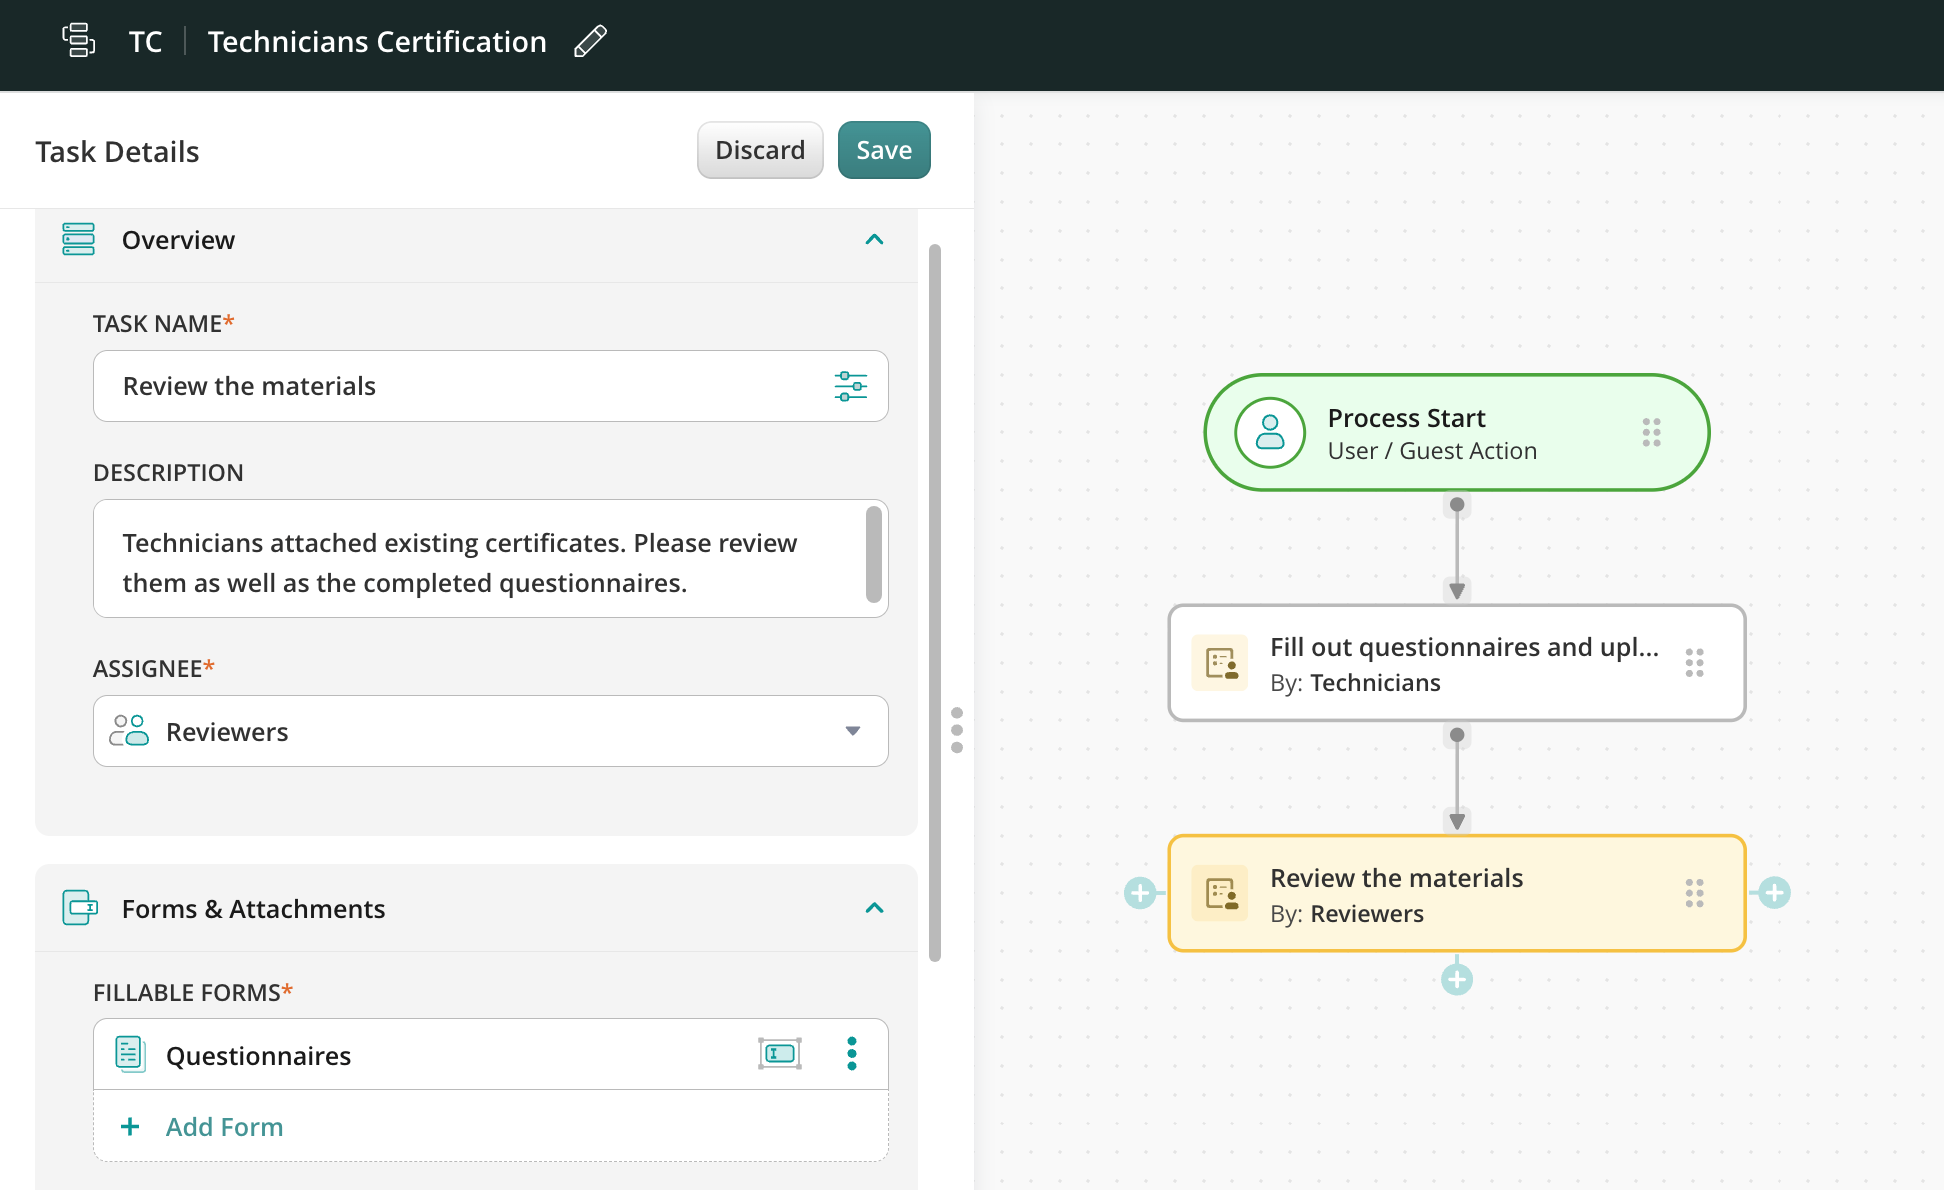
Drag and drop the next User task and configure it for the Reviewers group. In this task, the reviewers can quickly review the files that technicians filled out and attached in the previous task.
Step 3 – Configure the Approval process and submit actions
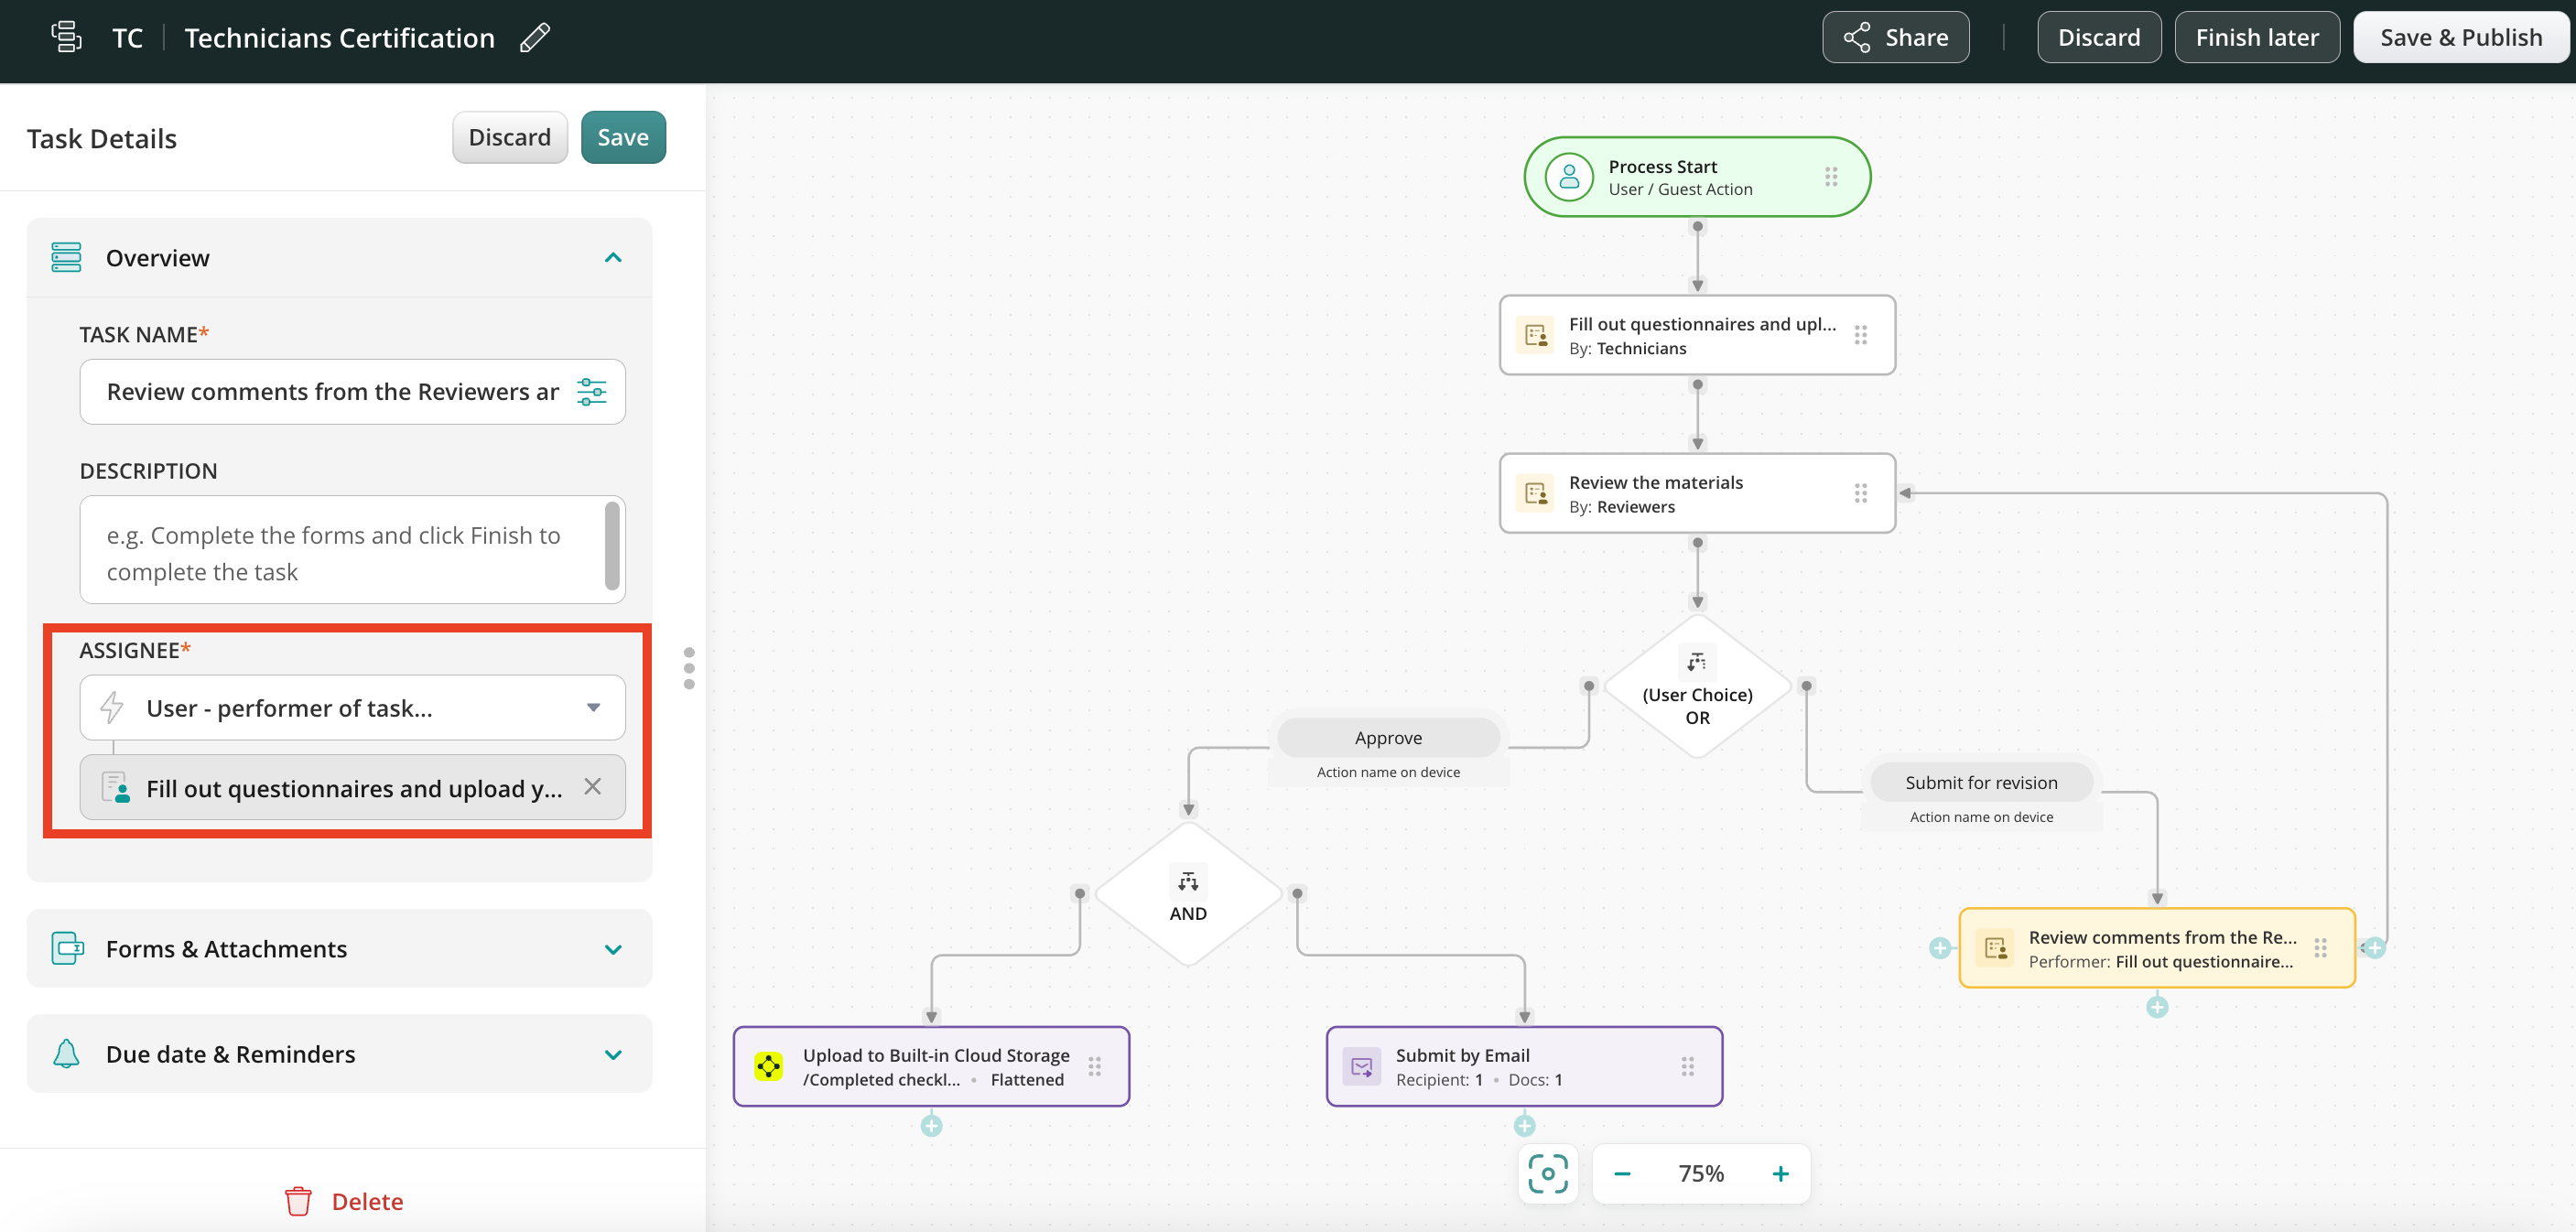
Drag and drop OR (User Choice) branch in the Taskstream chart to handle approvals and corrections, for example:
Approve action:—The Reviewer confirms the questionnaire has been passed.
Submission to Cloud storage
Use the Upload to Storage action to let the reviewer archive the documents and the provided earlier certificates in Fluix File Storage or third-party Cloud Storage.
Email submission
Drag and drop the Send by email action and configure it using the Dynamic values functionality to customize email content and/or recipients (e.g., the technicians, their managers, and whoever else needs to be informed about this) to auto-populate data from form fields.
Submit for revision:— The Reviewer gives the comments and submits the task back to technicians for additional consideration and edits.
Add one more user task for the revision. In this task, the user from the Technicians will correct the checklist if the Reviewer submits it back for revisions. Connect it with the previous task Review the materials to allow the technician to submit the form for edits again.
Use the User – Performer of the Task option to ensure corrections are sent directly to the original technician rather than the entire group.
Once you finish setting up your chart, click Save & Publish to activate the Taskstream.
Step 5: Configure Data Extraction
Extract and analyze data collected within this Taskstream and other forms:
Open the Datasets section and click New Dataset.
Name the dataset, select the Taskstream, tasks, and forms from which you would like the data to be extracted upon submitting the tasks.
Click Create.
You may then export collected data from datasets to BI platforms such as Power BI, Tableau, and many others.
Step 6: Test Your Setup
Add yourself to all participating groups for testing in the Participants section of the Admin Portal.
Use the Fluix app on your iOS or Android device, or test in the Web User App by switching to User Mode.
Locate the task in the Templates section, fill in the form, and complete it.
Feel free to contact us at support@fluix.io if you have any questions.
Was this article helpful?
Thanks for your feedback!
Oops, something went wrong. Please, try again later.
Thank you!
What details or examples would have made this article more helpful for you? We appreciate your insights!
Fluix is a cloud-based platform for web and mobile that enables teams to manage digital documents and automate workflows. With Fluix, you can:
Automate collaboration between field teams and back office.
Speed up approval processes.
Collect data to track the status of various tasks.
Fluix supports working with PDFs, Web Forms, and Dynamic Forms. You can either use your existing PDFs or create custom Web or Dynamic Forms using the Form Builder in the Fluix Admin Portal.
In this guide, we will show you how to create a Taskstream that improves collaboration between Field Technicians, Managers, Dispatchers, and the Billing team.
Use case example
Dispatcher Initiation: A Dispatcher begins the process by pre-filling the Service Checklist for a Field Technician.
Field Technician’s Role: The Field Technician conducts inspections (annual, quarterly, or monthly) and completes the checklist, submitting it to the Field Manager for approval.
Field Manager’s Review: The Field Manager reviews the completed work. They either send the checklist to the Billing team for further processing or return it to the Field Technician for revisions.
Completion: The finalized checklist can be emailed to relevant recipients and saved in Fluix File Storage, third-party Cloud Storage, or the company’s CRM.
How to Build a Taskstream
A Fluix account admin can set up Taskstreams without requiring IT expertise. Follow these steps to build one:
Step 1 – Determine the participants of your process
Add users and organize them into groups.
Go to the Participants section, open the Users tab, and click New User.
Enter the user’s name and email.
Click Create. The user will receive an invitation to set a password.
In our tutorial, we will build a setup in which a regular user initiates the start of the whole process in Fluix.
Go to the Taskstream section and click New Taskstream.
Select Blank Template from the list and name the taskstream (admins only will see this name).
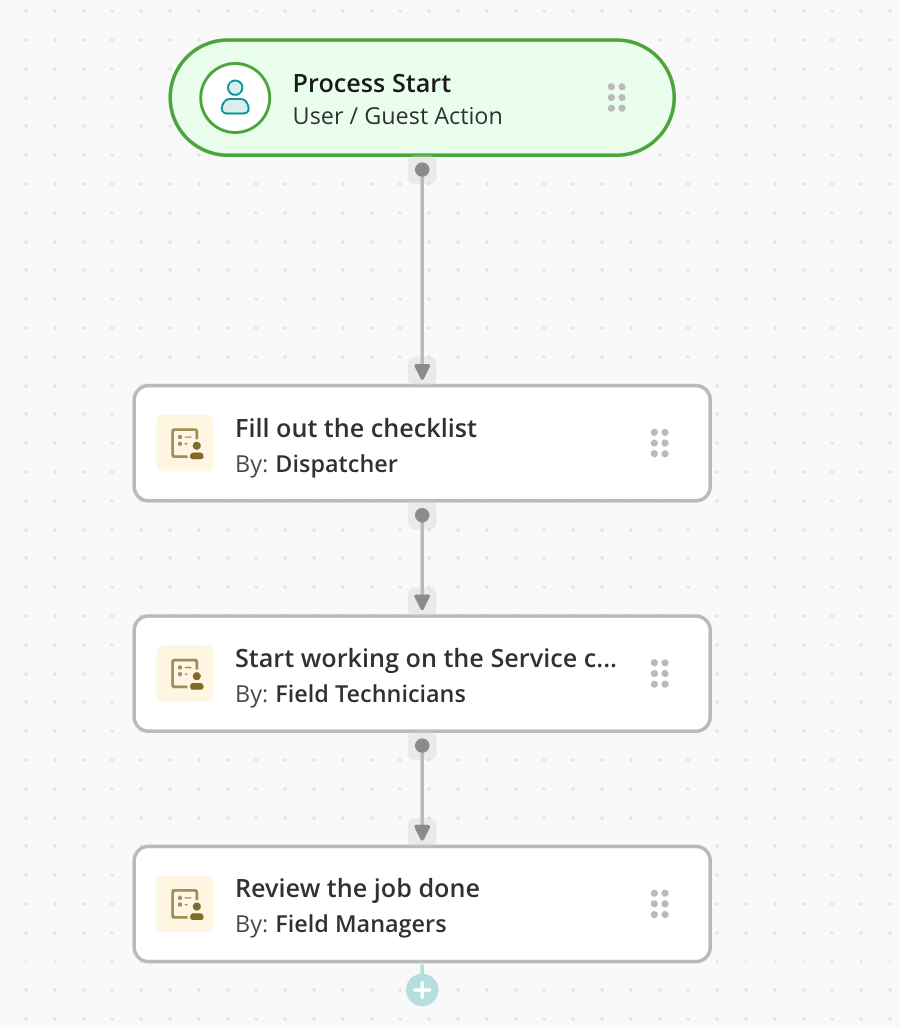
Drag and drop the Process Start event to the working area and select “User/Guest Action.”
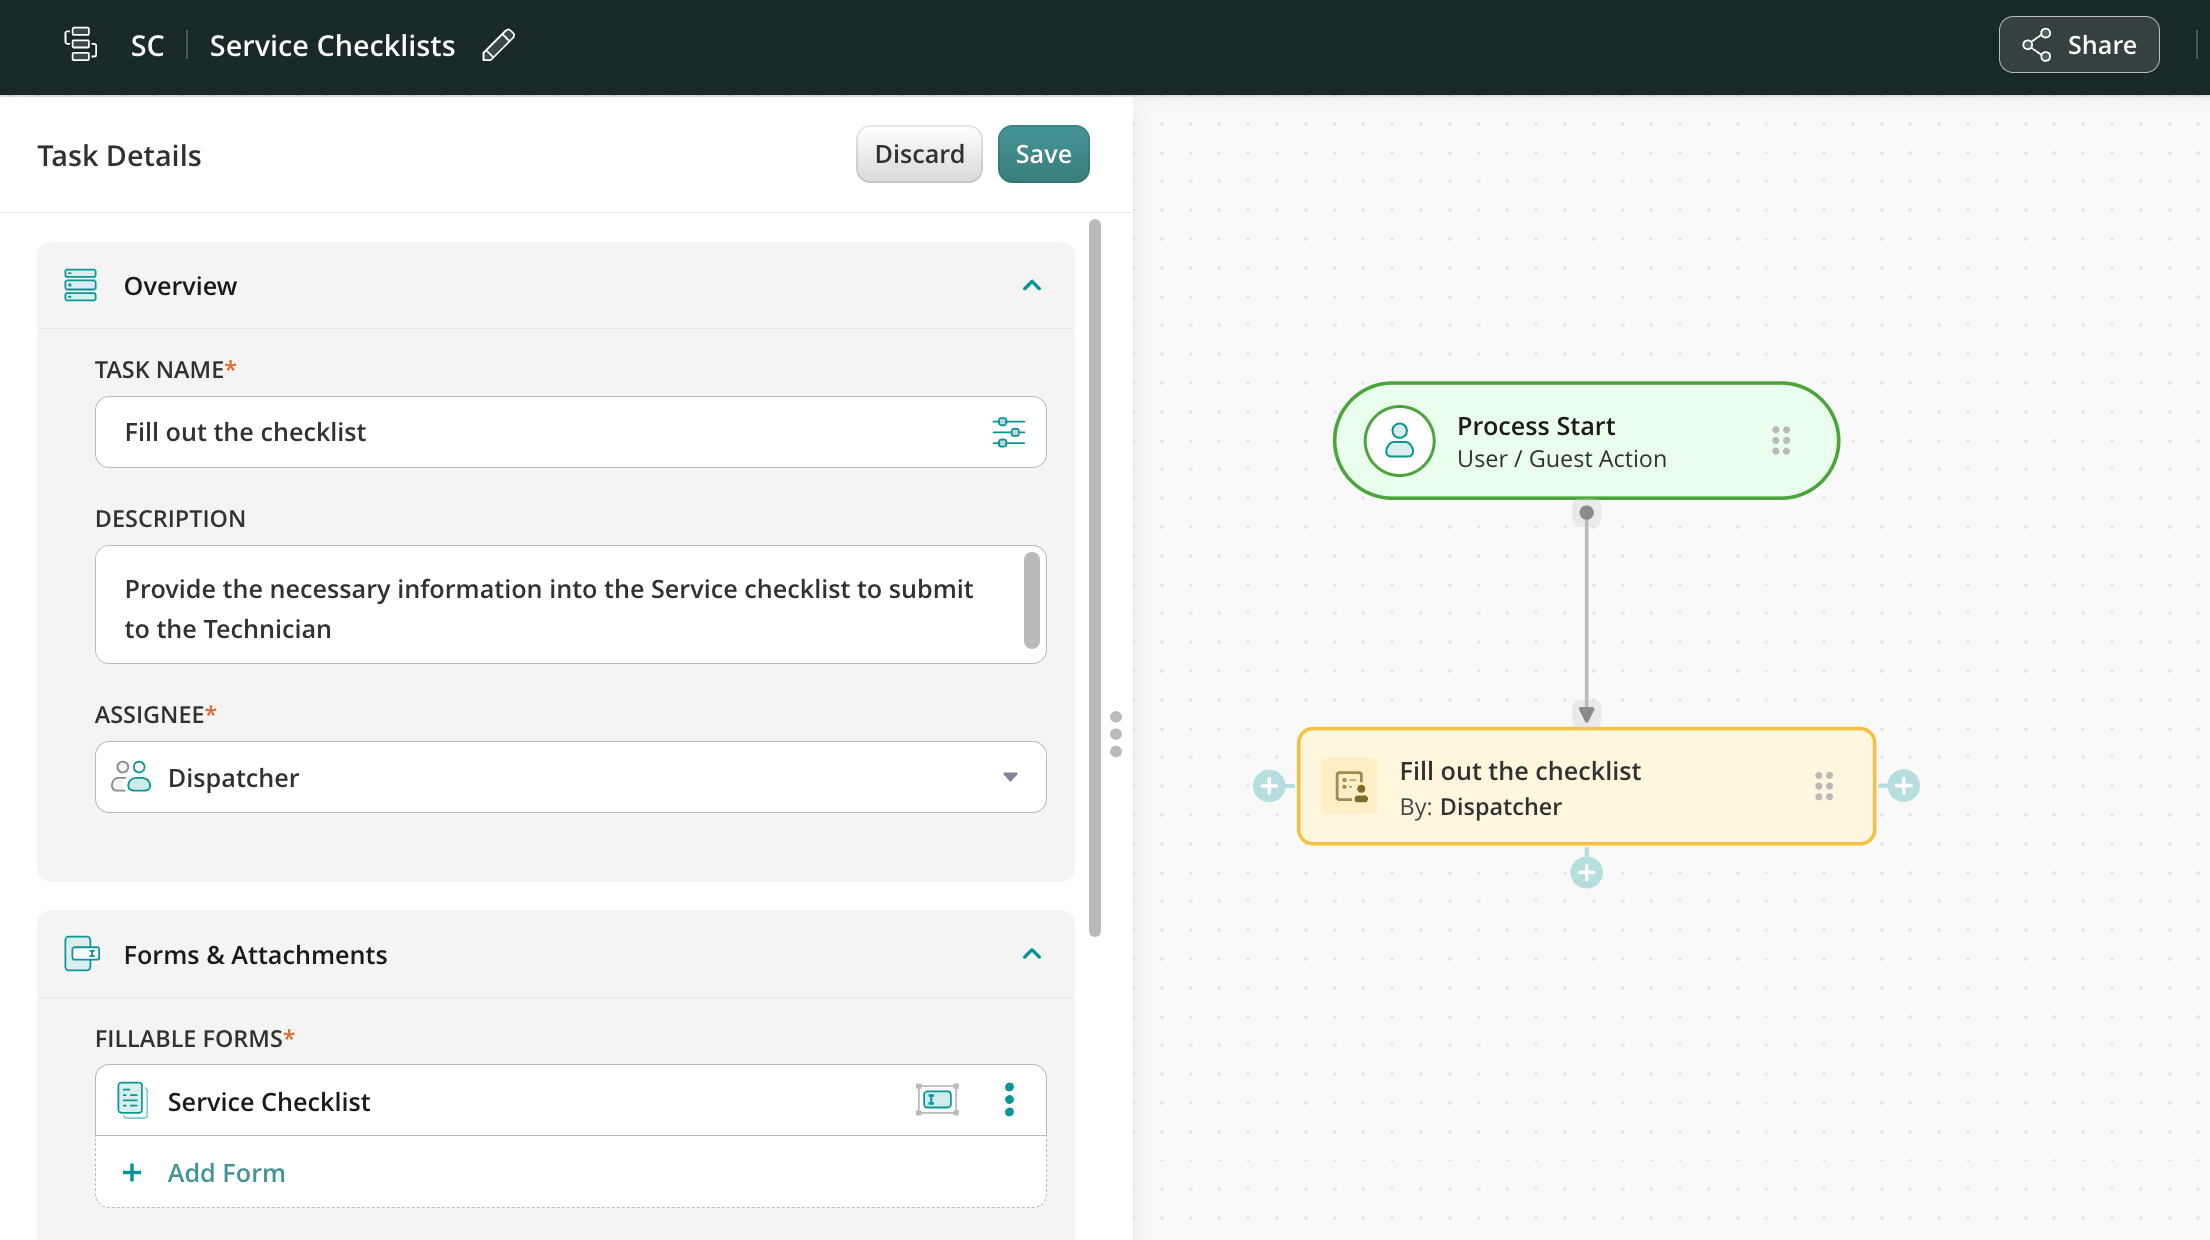
Add a User Task, including its name and task details. This description will later be available for the users working on this task in the Fluix Tasks app or Web User app.
In the assignee who will perform the task, select the Dispatchers group from the list or click on the Create New Group button and add this group from scratch.
In the Forms & Attachments section, add the Service checklist by uploading it from your computer as a PDF or selecting the necessary form from the Forms section in Fluix.
Note: Use the built-in Assignment configurator to mark specific fields in the attached form as required, read-only, or editable for the users from the Dispatchers group.
Using the same technique, add the user task for the Field Technicians and Field Managers to make them a part of this flow.
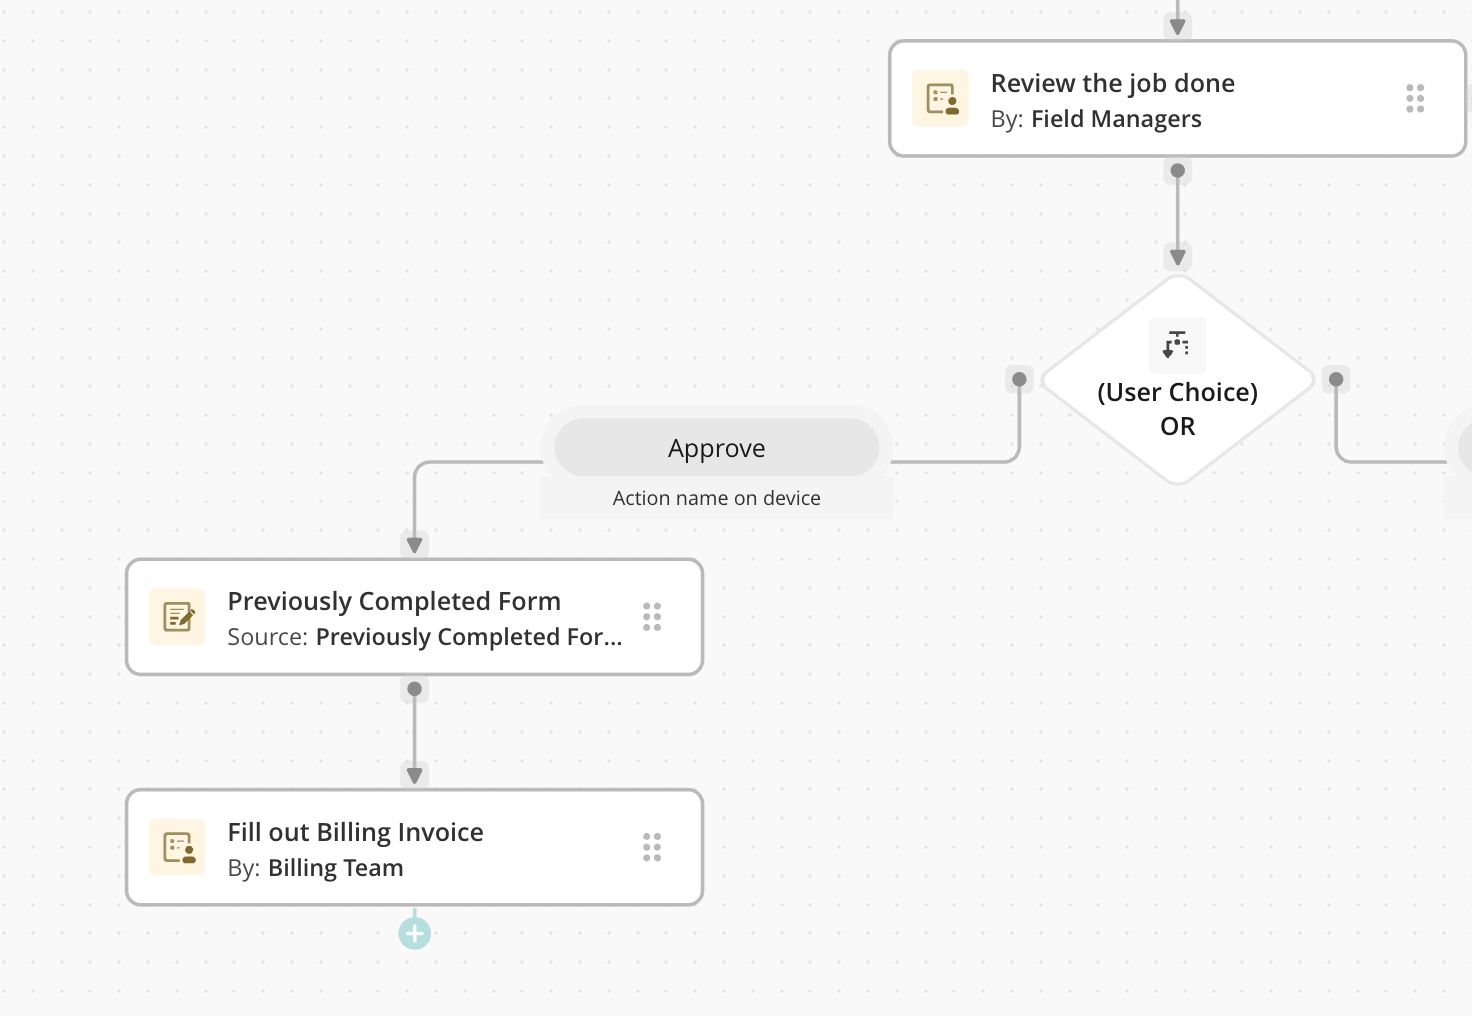
Step 3: Configure the Approval Process
Introduce an OR (User Choice) branch to handle approvals and corrections, for example:
Approve—Upon reviewing the checklist, the Field Manager confirms that everything is in place and submits the document to the Billing team. Tip: Utilize the Forms Prefill feature to automatically transfer data (e.g., customer info, hours worked, technician details) from the Service Checklist to the Billing Invoice. Drag and drop Forms Prefill action to the Taskstream chart, add a new user task, and configure them.
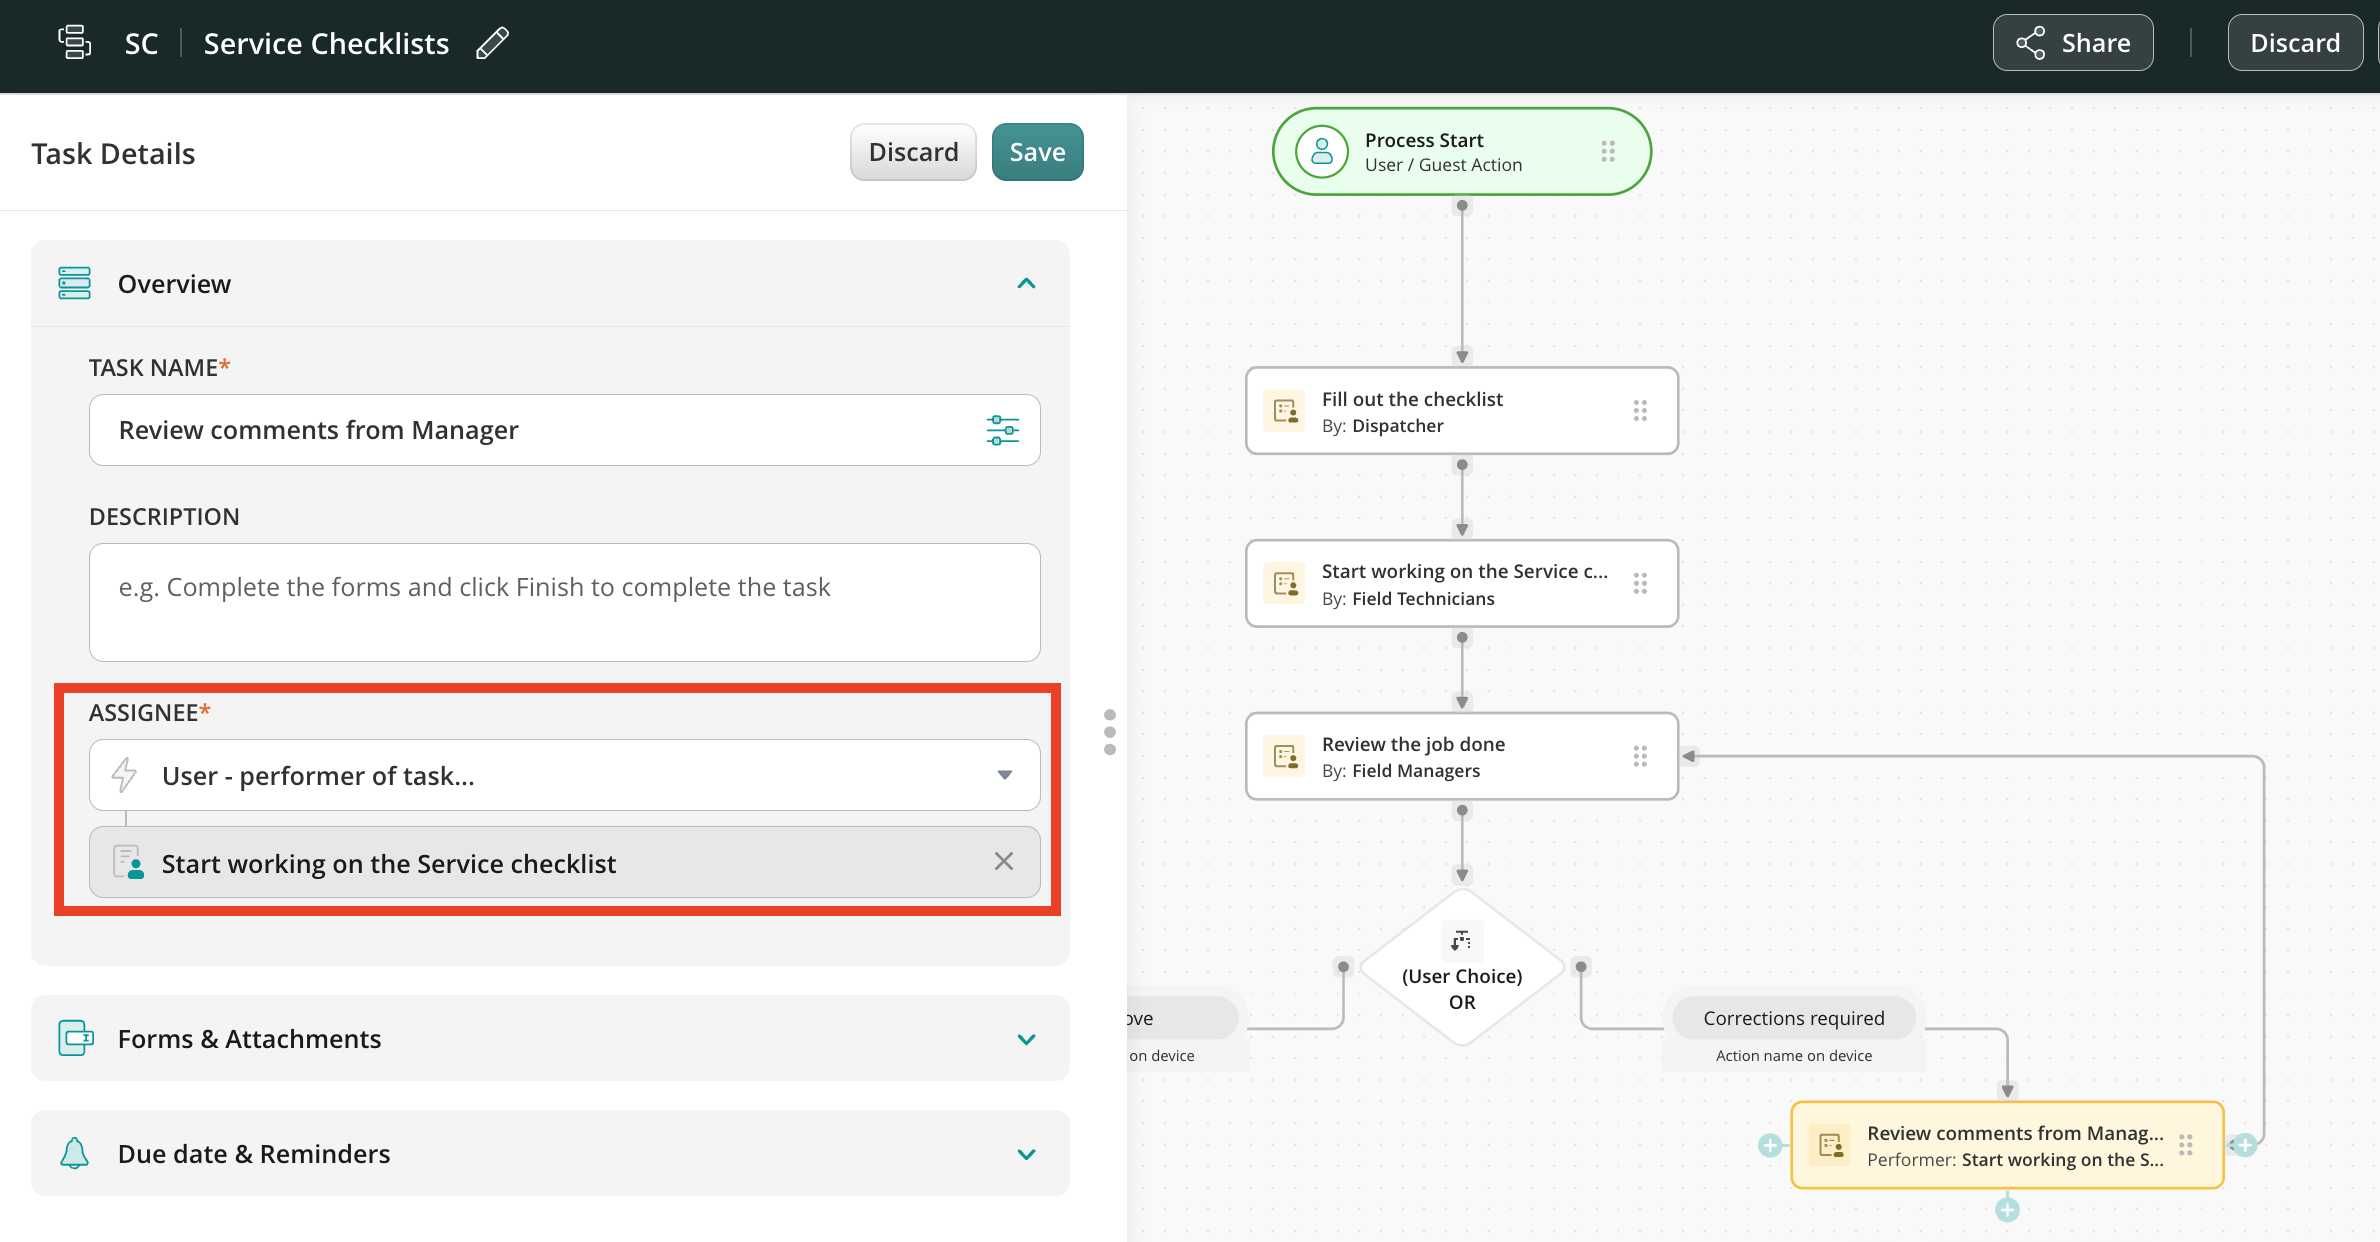
Corrections required—the Field Manager sends the document back to the Field Technician so he can make the necessary changes and send the document again for review.
Add one more user task for the revision. In this task, the user from the Field Technicians will correct the checklist if Field Manager submits it back for revisions. Connect it with the previous taskReview the job done to allow the technician to submit the form for edits again.
Use the User – Performer of the Task option to ensure corrections are sent directly to the original technician rather than the entire group.
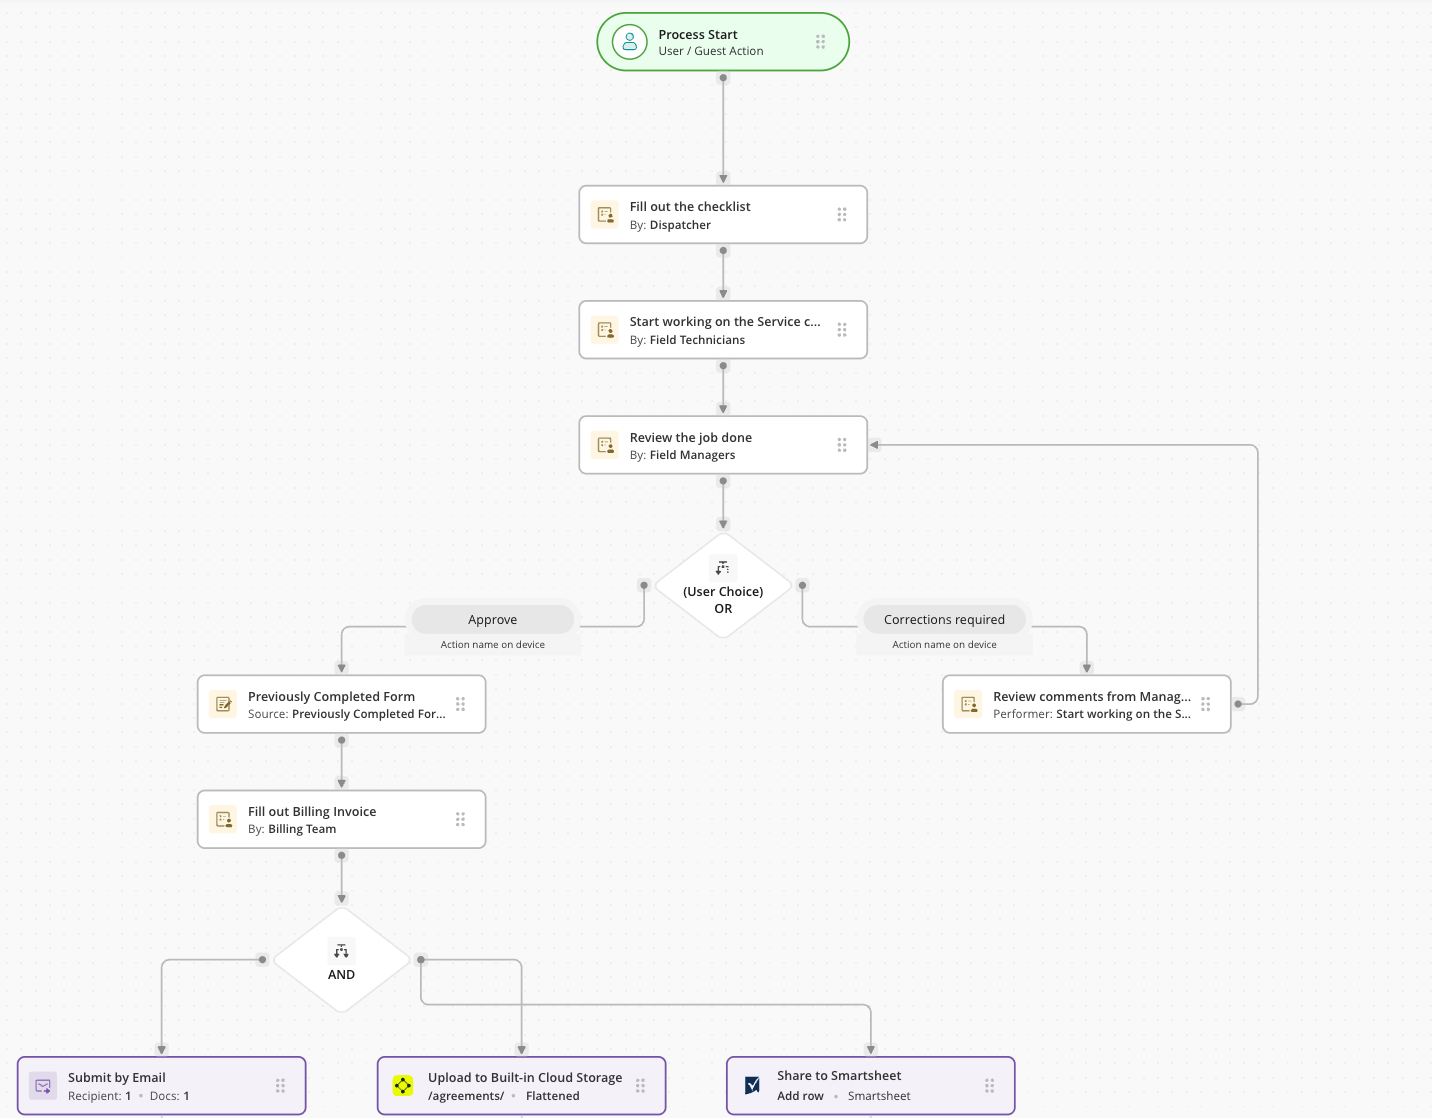
Step 4: Configure Final Submission
Use the AND branch to set up parallel submissions:
Email Submission:
Drag and drop Send by email action and configure it using the Dynamic values functionality to customize email content and/or recipients to auto-populate data from form fields.
CRM Integration: Additionally, any specific data from the completed forms could be populated to respective destination points in the CRM or sent to platforms like Smartsheet, Procore, etc., via Share to submit action. Check more information on the type of Integrations here.
Once you finish setting up your chart, click Save & Publish to activate the Taskstream. The final look of the Taskstream will be the following:
Step 5: Configure Data Extraction
Extract and analyze data collected in Service Checklists and other forms:
Open the Datasets section and click New Dataset.
Name the dataset, select the Taskstream, tasks, and forms from which you would like the data to be extracted upon submitting the tasks.
Click Create.
You may then export collected data from datasets to BI platforms such as Power BI, Tableau, and many others;
Step 6: Test Your Setup
Add yourself to all participating groups for testing in the Participants section of the Admin Portal.
Use the Fluix app on your iOS or Android device, or test in the Web User App by switching to User Mode.
Locate the task in the Templates section, fill in the form, and complete it. The task will advance to the next group in the workflow.
Feel free to contact us at support@fluix.io if you have any questions.
Was this article helpful?
Thanks for your feedback!
Oops, something went wrong. Please, try again later.
Thank you!
What details or examples would have made this article more helpful for you? We appreciate your insights!
Conditional routing functionality allows you to automate decision-making throughout the business process – based on the values entered in form fields by the field workers.
Example use cases
Conditional routing in Fluix routes completed forms to different emails, cloud storage and a CRM, or returns a task for another round of approval, and many other scenarios. Below we collected a couple examples for your convenience.
Checklists Instead of manually checking the checklist content, conditional routing automates the process based on predefined rules. Assuming a checklist has 10 checkpoints, if all 10 are set to be OK or the values are within a predefined range, the checklist will automatically be approved and saved on cloud storage, so no human interaction is required. In case one check is set to Not OK, the checklist will be reviewed.
Field inspections A similar case is when a fillable form contains a field Checked with dropdown options, Passed and Failed. If-then logic says: if Failed is chosen, then an email is sent to the responsible person.
Safety accident reports When an employee is injured on the job, the manager must submit an injury report to the office. If the manager chooses Yes next to Hospitalization required, conditional routing automatically sends the report to a safety director.
Employee COVID screening Before entering a workspace, all employees fill out a COVID-19 screening form. If a worker checks the Fever box, they need to either WFH or include their submitted report due to the symptoms.
Employee hiring & onboarding While hiring and onboarding a new person, each company sets up a list of steps and procedures to make the employee onboarding as smooth as possible. An employee’s new-hire or onboarding checklist would be among those forms that help both a newcomer and their manager to ensure all aspects are covered. For example, if the Info Security Agreement is not signed, the respective task is automatically assigned to the Info Security Director.
How to set up conditional routing in the business process?
Let’s examine a real-life safety injury reporting case as an example of utilizing conditional routing in Fluix workflows. An employee is injured on the job, and the supervisor must submit an injury report to the Safety Director.
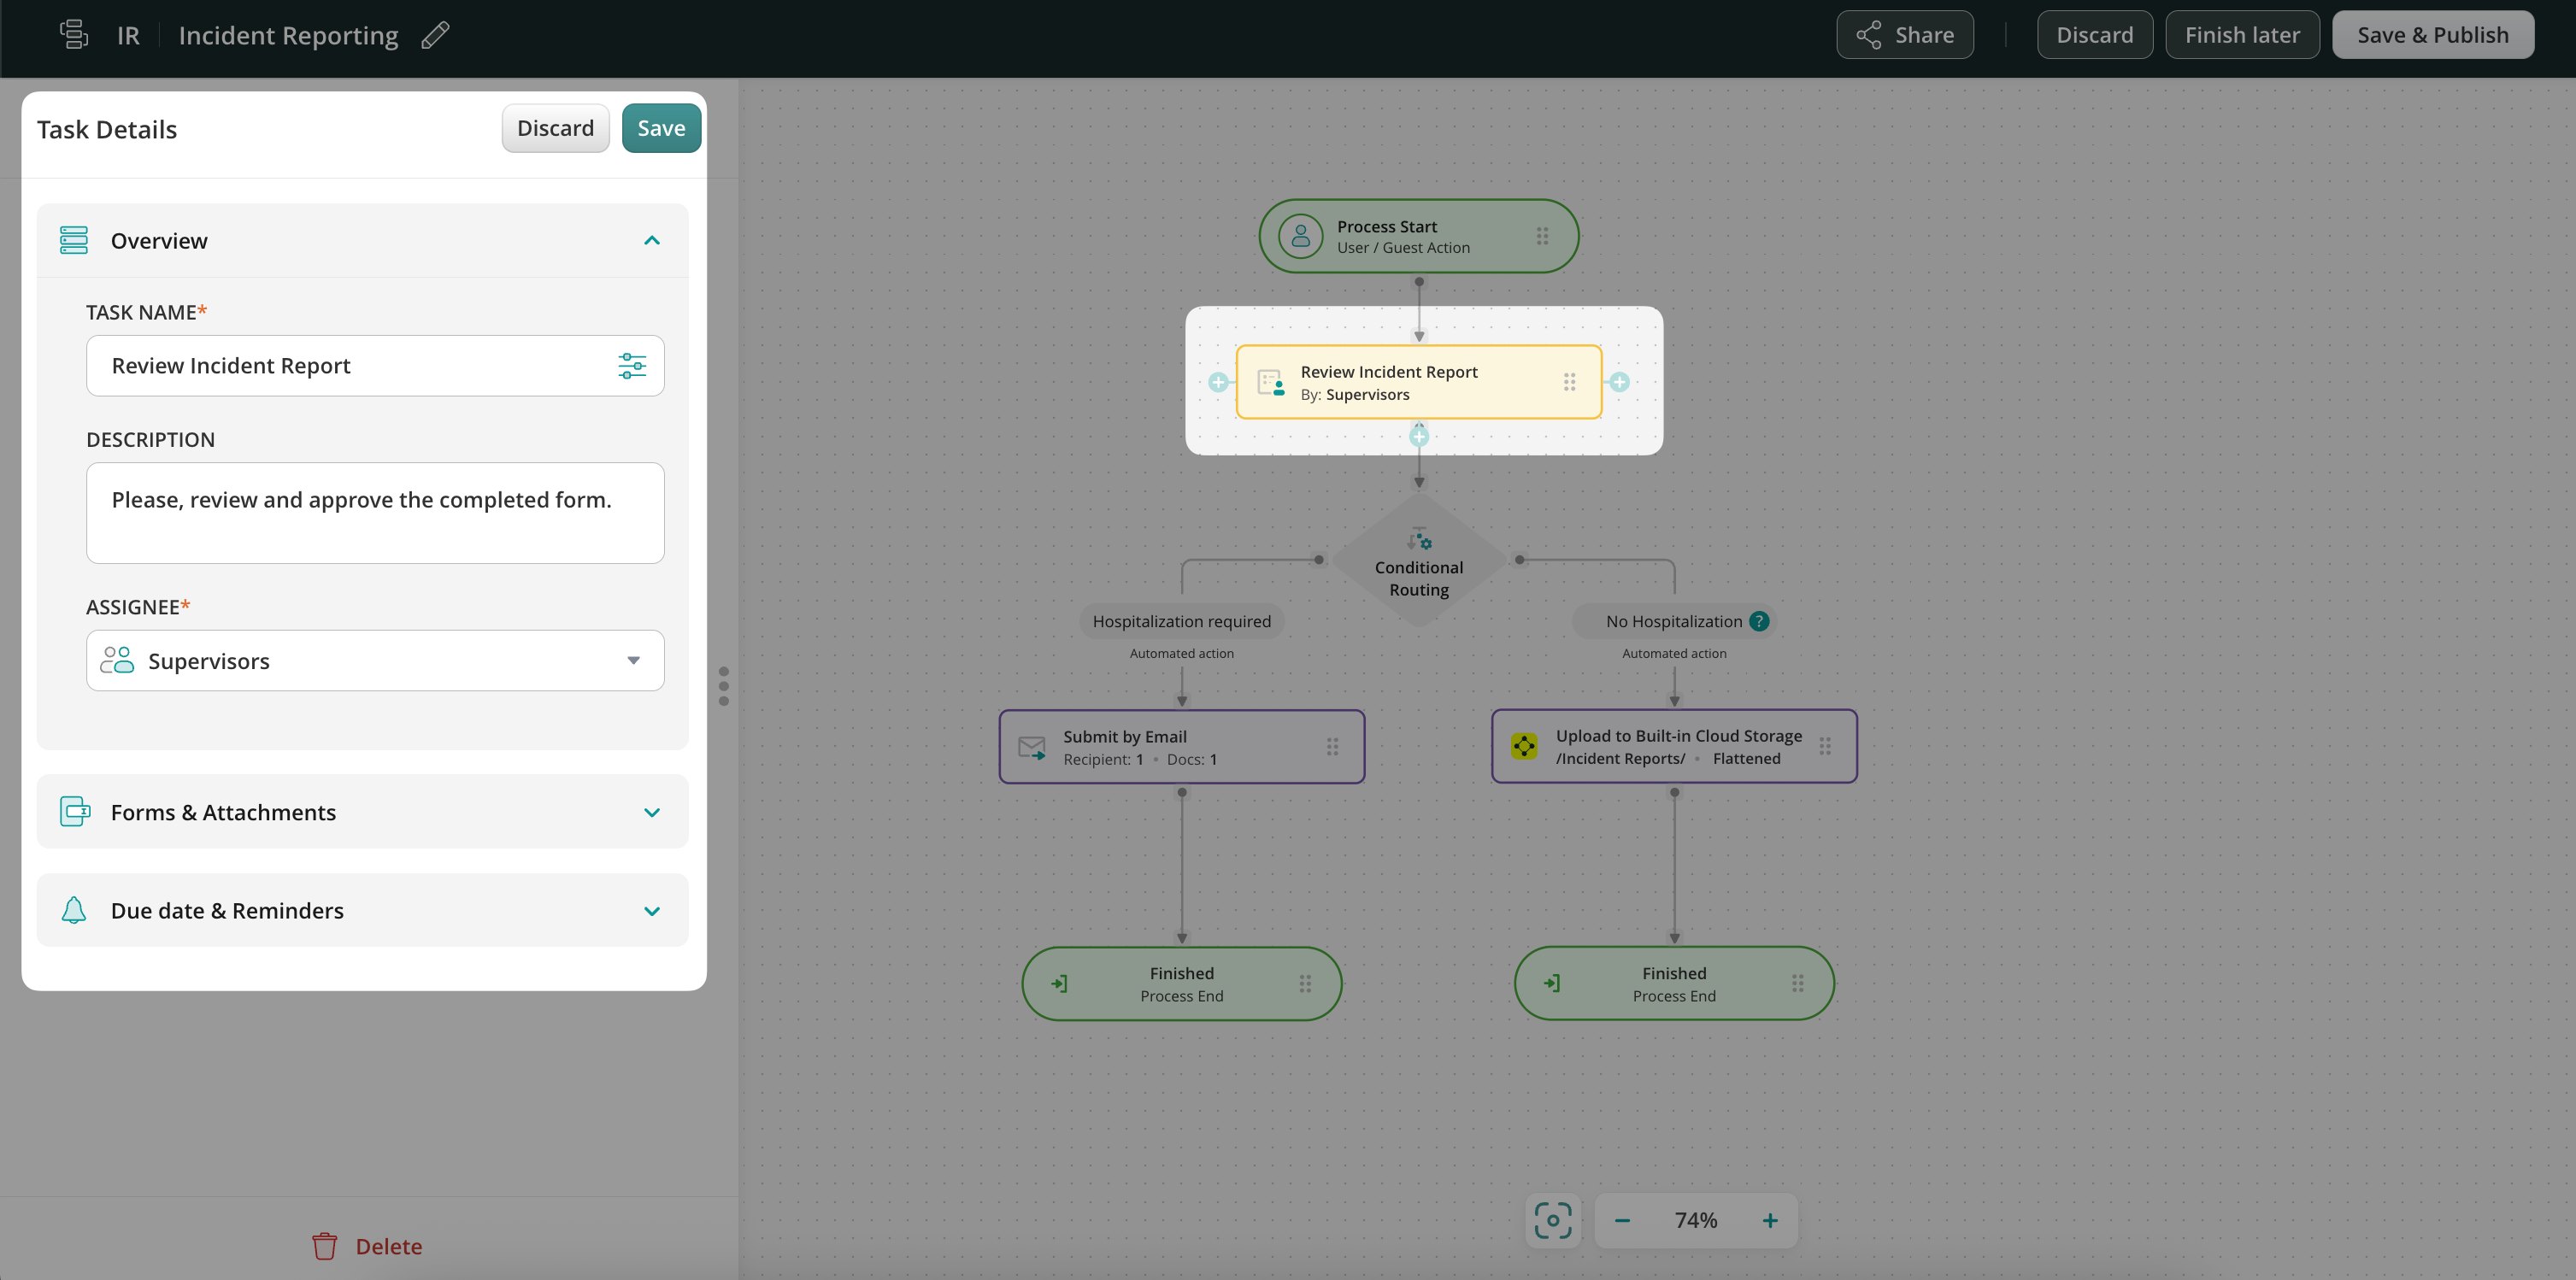
Step 1 – Create the first task and a form. Navigate to the Fluix admin portal, create a new workflow, and configure the first task for Supervisors who will fill out a safety incident report.
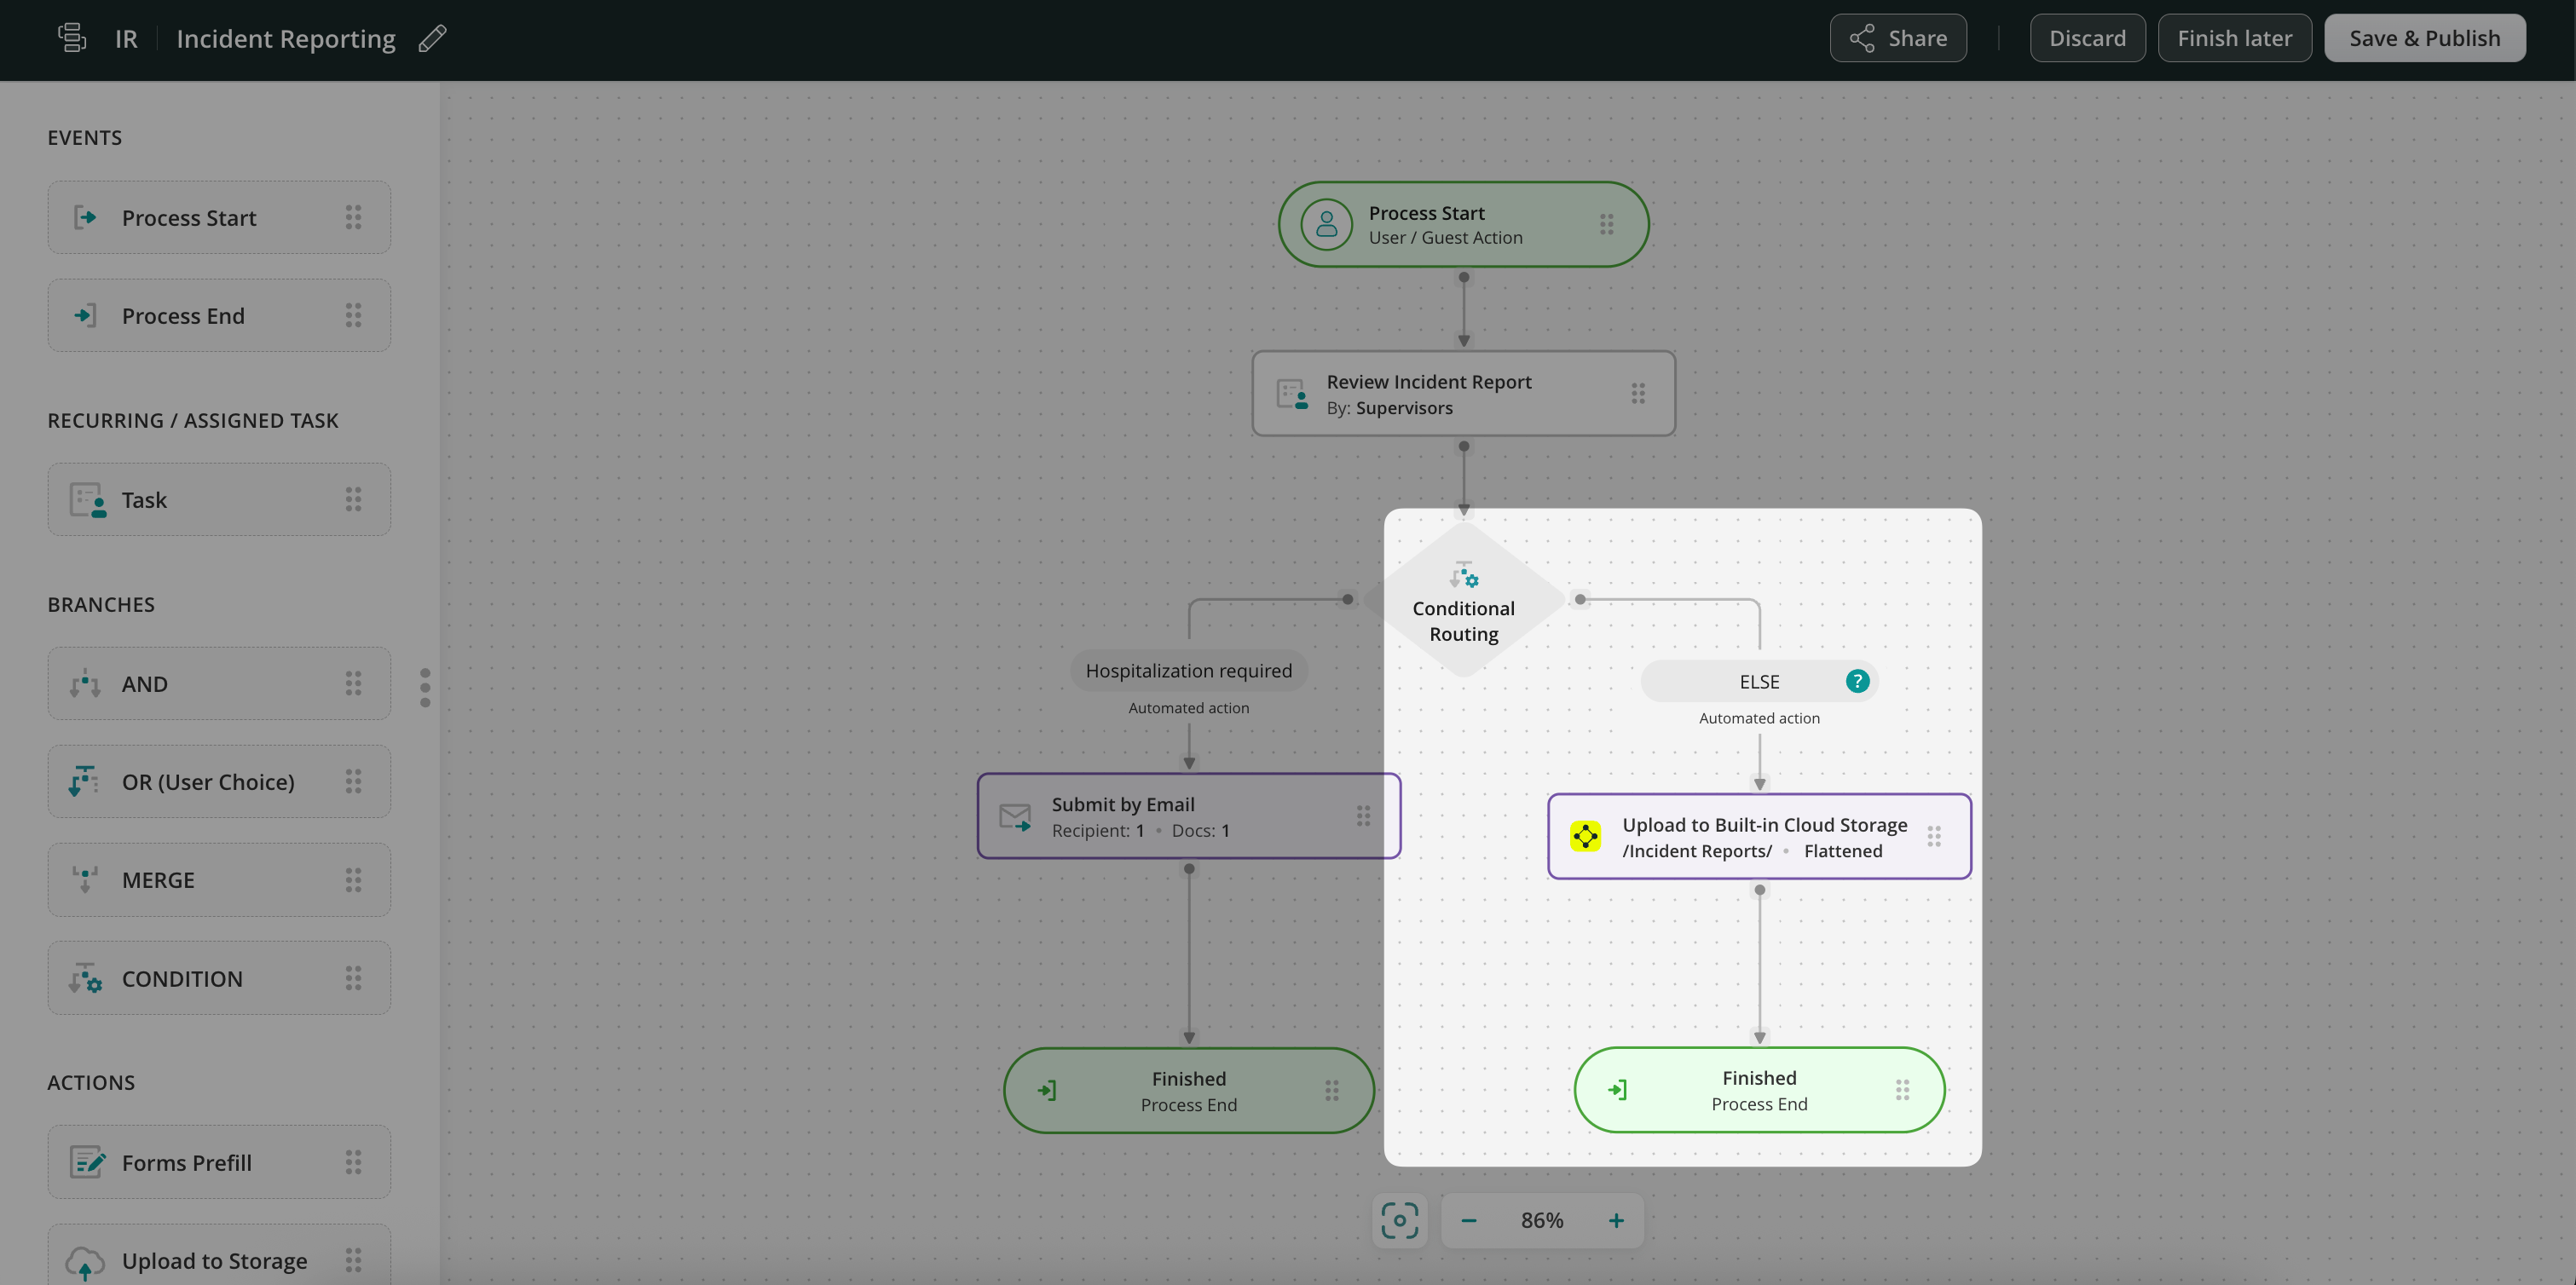
Step 2 – Configure the Conditional routing. Drag and drop the Conditional routing element to the workflow chart and connect it with the Supervisors’ task using an arrow. By default, the Conditional Routing element has two conditions: Condition 1 and Else. You may rename them as needed for more clarity. You can also add more conditions if needed (check the details in Step 3 below).
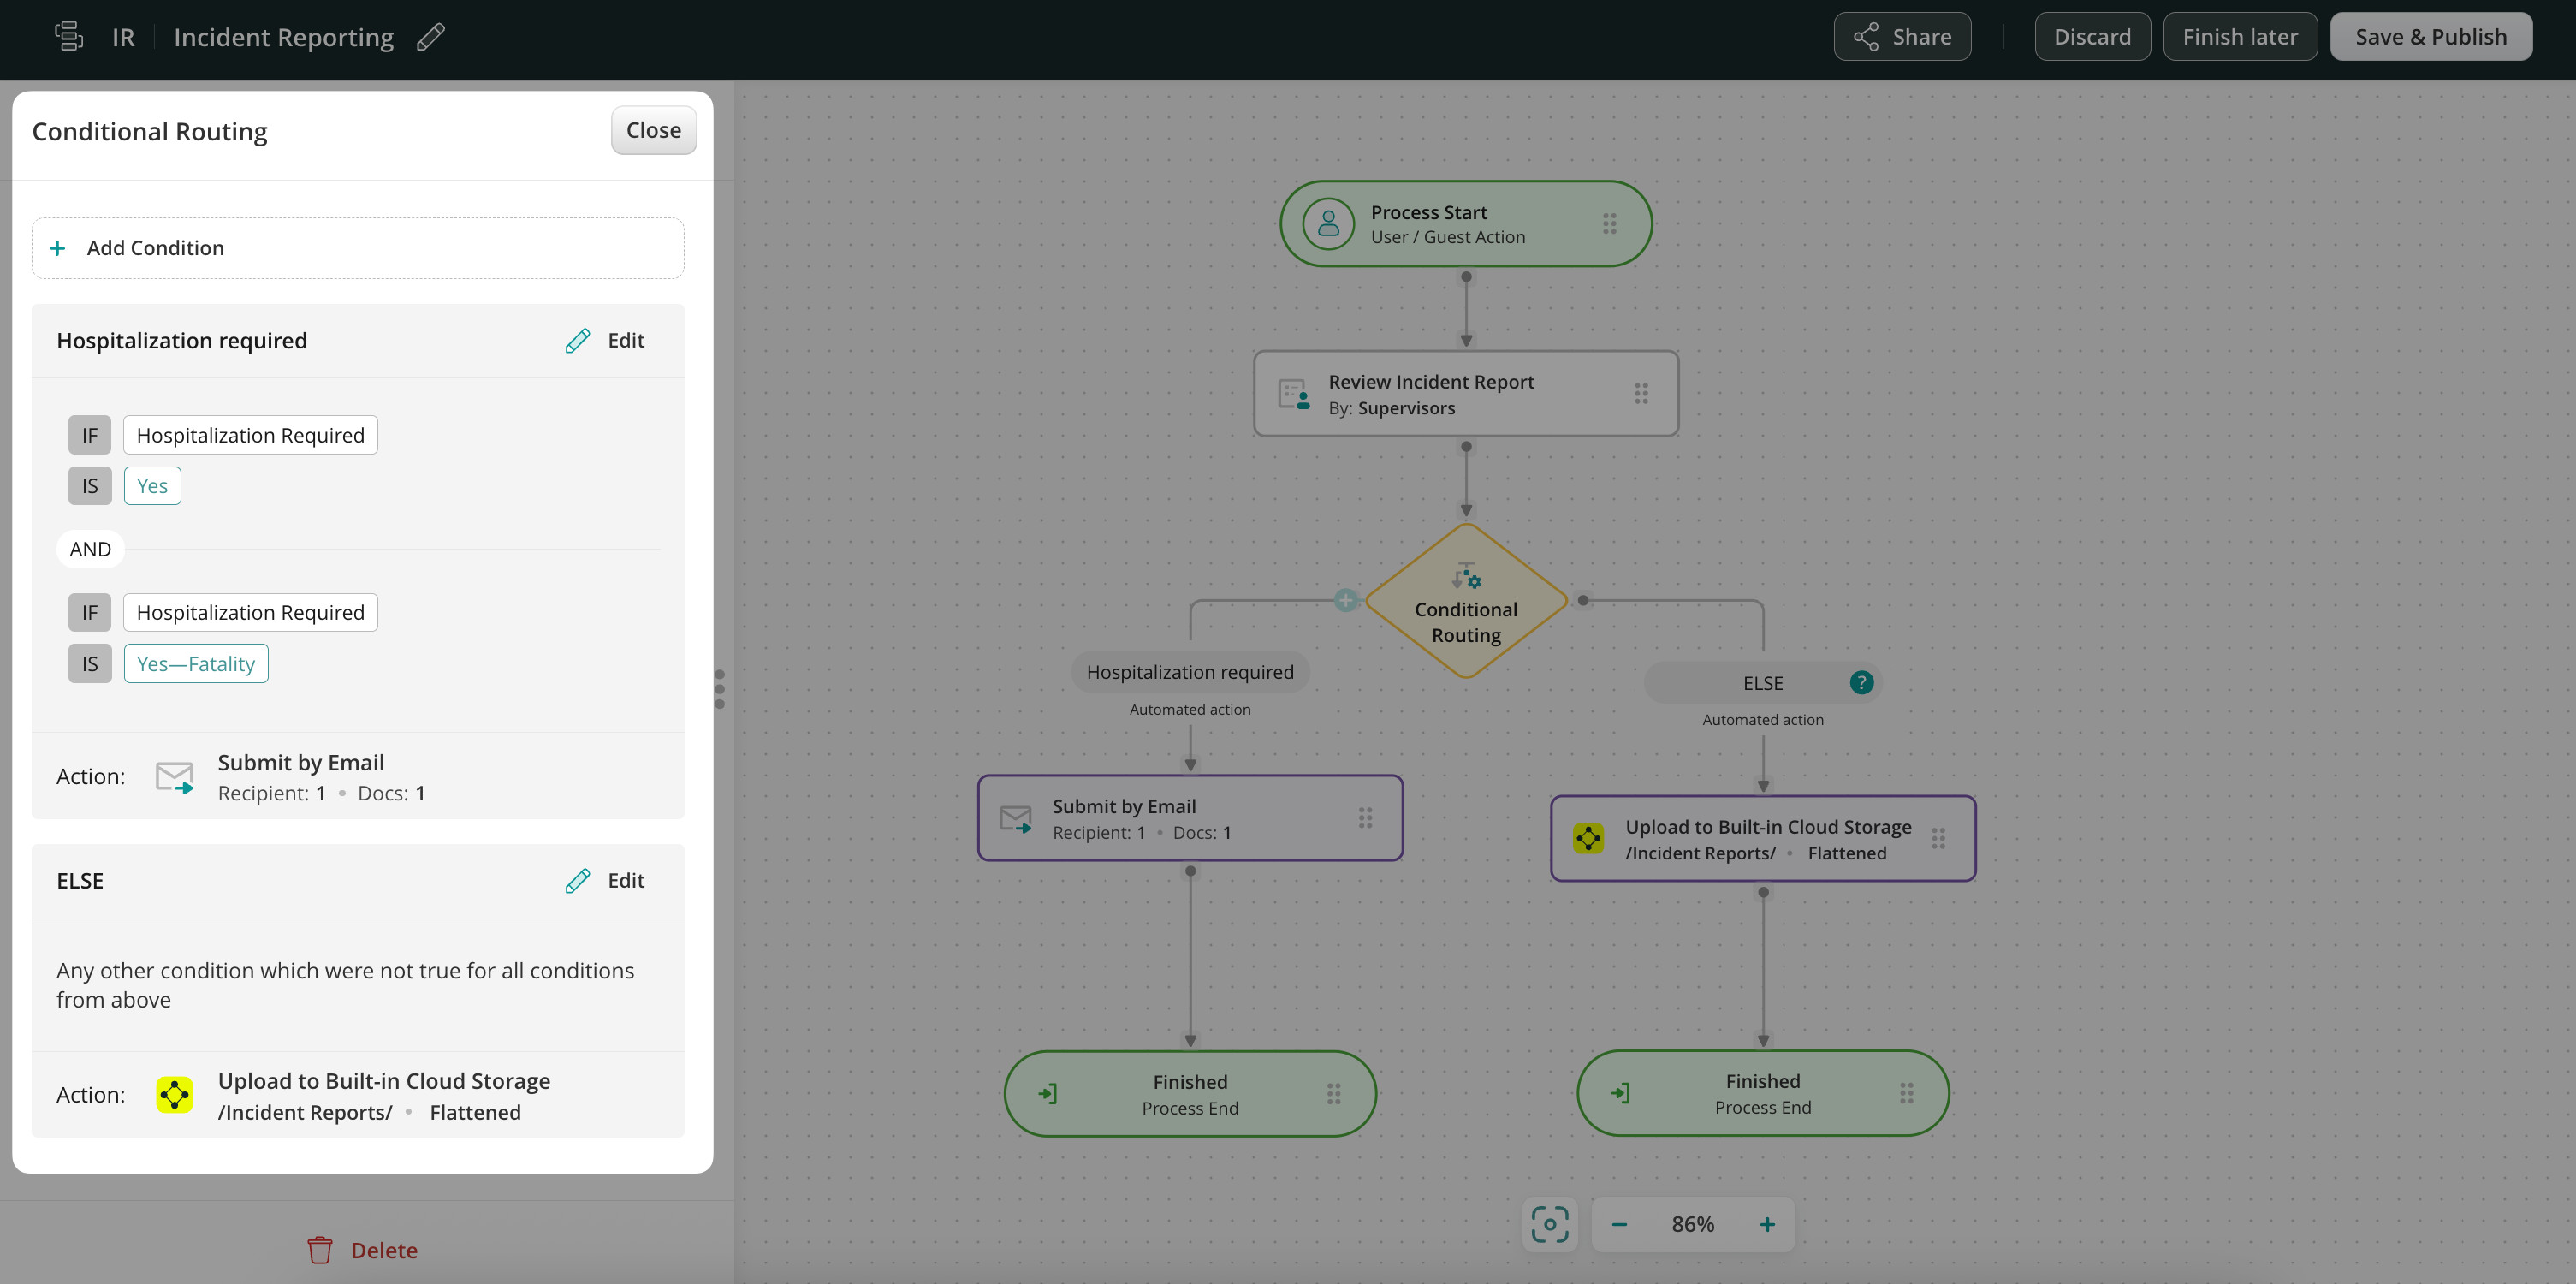
Click on the condition and configure it. In our example, the report will go down this branch of the workflow only if the site Supervisor enters Yes or Yes—Fatality into the hospitalization required field.
To select the field in a form, click on the configuration icon to open a dynamic values configurator. Here is what the preview of the configured condition looks like:
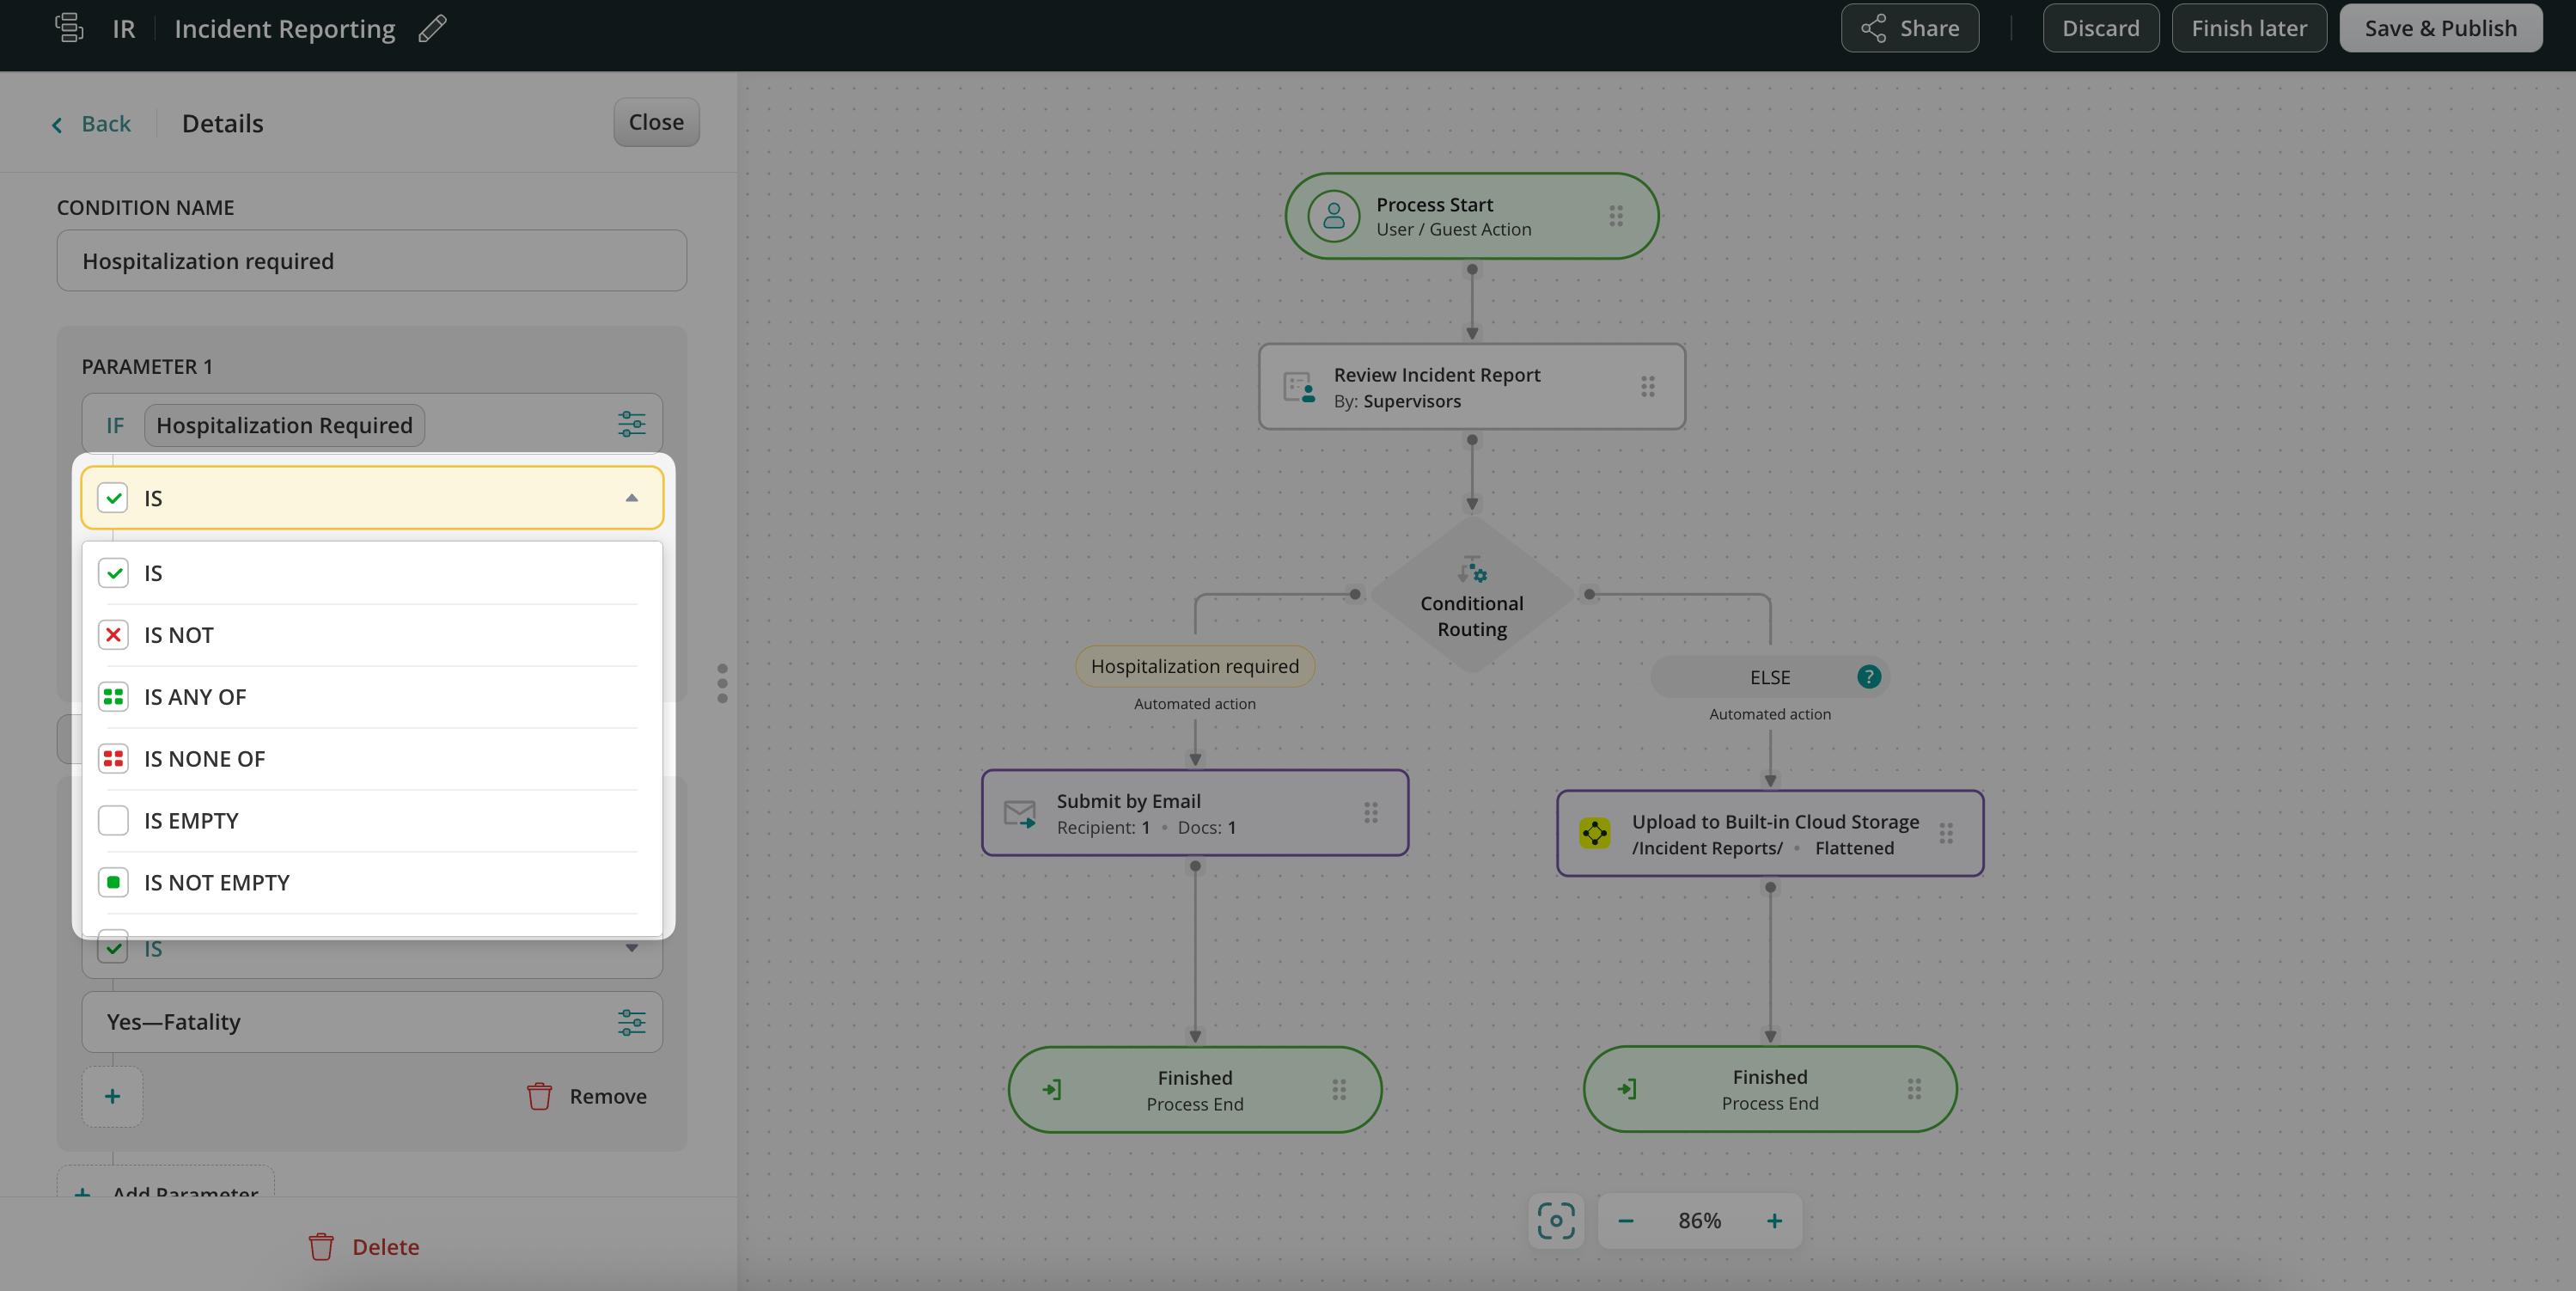
Besides IS the list includes other options:
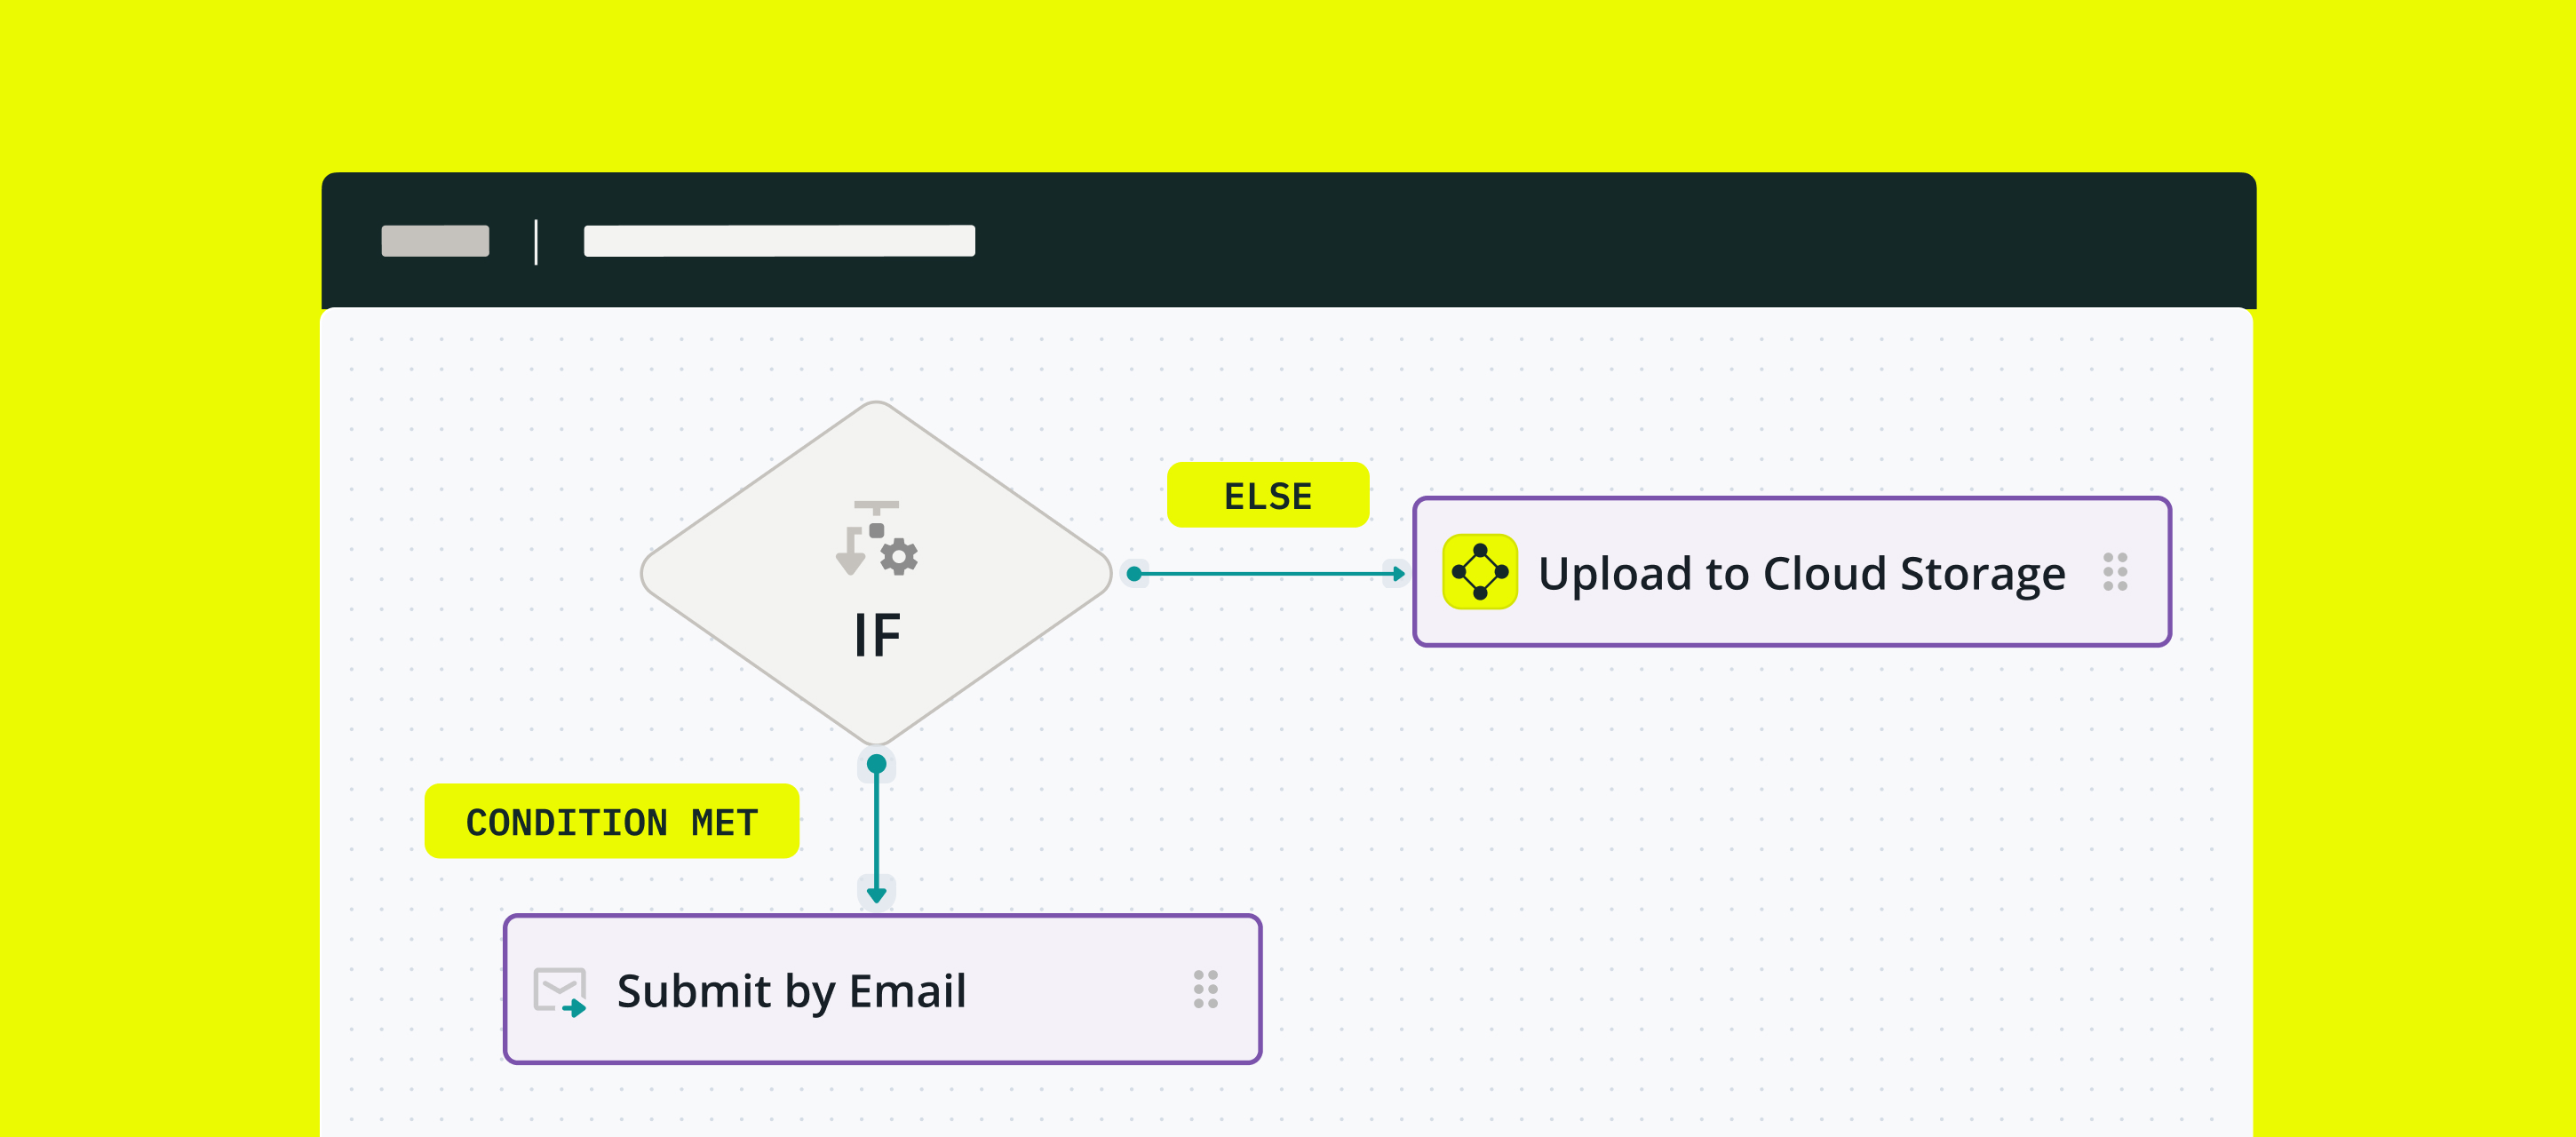
Step 3 – Decide on actions when the condition is met and not met.
In this example, when the condition is met – we chose submit action Send by Email, therefore, the report will be emailed to the Safety Director.
When the condition is not met, the form will go down the second branch of the conditional routing – in our scenario, the report will be uploaded to another folder on the cloud storage for record purposes.
In fact, you may add as many conditions as needed. Drag and drop a task or submit action and connect it with the Conditional Routing element by stretching an arrow from the latter.
Step 4—Save changes and proceed to testing. To try the setup, add yourself to the Group of Supervisors in the workflow, open the app on an iOS or Android device or a web-based User app, and complete the task.
Benefits of Conditional Routing
Saved time: Conditional Routing in a business process cuts off unnecessary workflow steps, like several rounds of manual review and approval, thus allowing the team to deliver their work faster and reducing the administration effort.
Streamlined processes: Your users see only the tasks and forms required for their project. The system navigates them to the next workflow steps based on their input in the forms.
Automated notifications: Conditional routing helps your users receive only relevant notifications based on the data they enter.
Reduced error: As an admin, you have full control over the route the completed form and task will take down the workflow, which eliminates human error.
Conditional Routing is a powerful tool for streamlining documents, tasks, and workflows. Creating automated branching based on conditional inputs can help you bring the expected logic to a business process of any complexity.
Feel free to contact us at support@fluix.io if you have any questions about the setup.
Was this article helpful?
Thanks for your feedback!
Oops, something went wrong. Please, try again later.
Thank you!
What details or examples would have made this article more helpful for you? We appreciate your insights!
Sign Up to Our Product Newsletter
The latest updates from our Product team, straight to your inbox