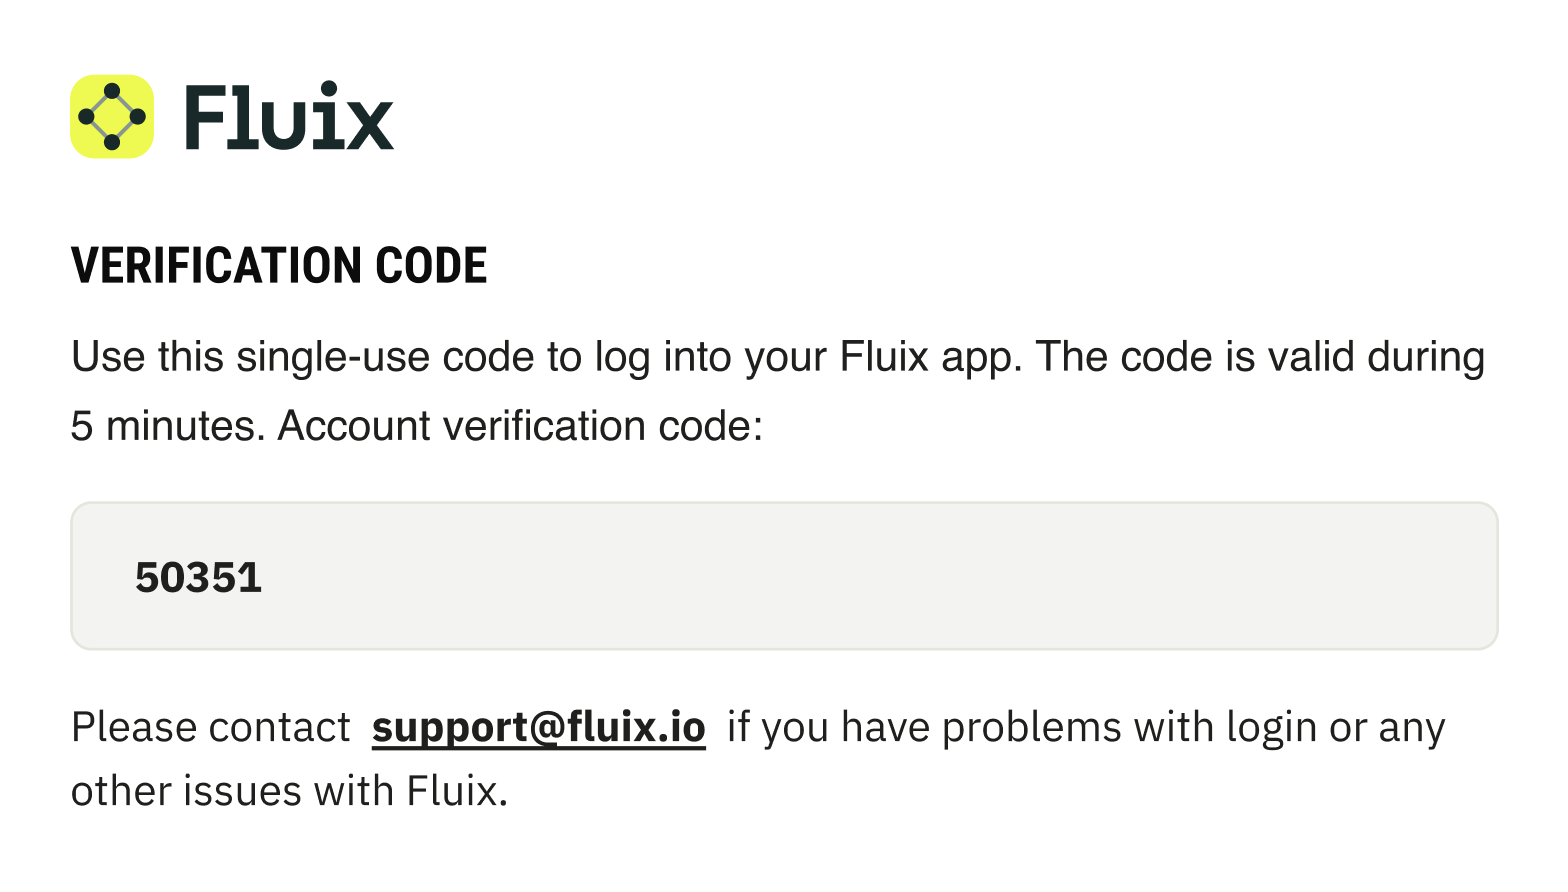
To simplify user management, admins can enable Email Two-Factor Authentication (2FA) for app users. This way, an extra verification step is added during login for the end users by sending a one-time security code to the user’s email.
When Email 2FA is enabled, users must enter their email address and password, along with a one-time security code sent to their email, before they can sign in to the Fluix Docs app or the Web User App. A new security code is sent each time the user logs in, and it remains valid for 5 minutes before expiring.
Note: If Single Sign-On (SSO) is enabled, Email 2FA for app users does not apply. Additionally, Two-Factor Authentication is not required when the app is used in Offline Mode.
Admins can enable this feature in the Admin Portal by following this guide:
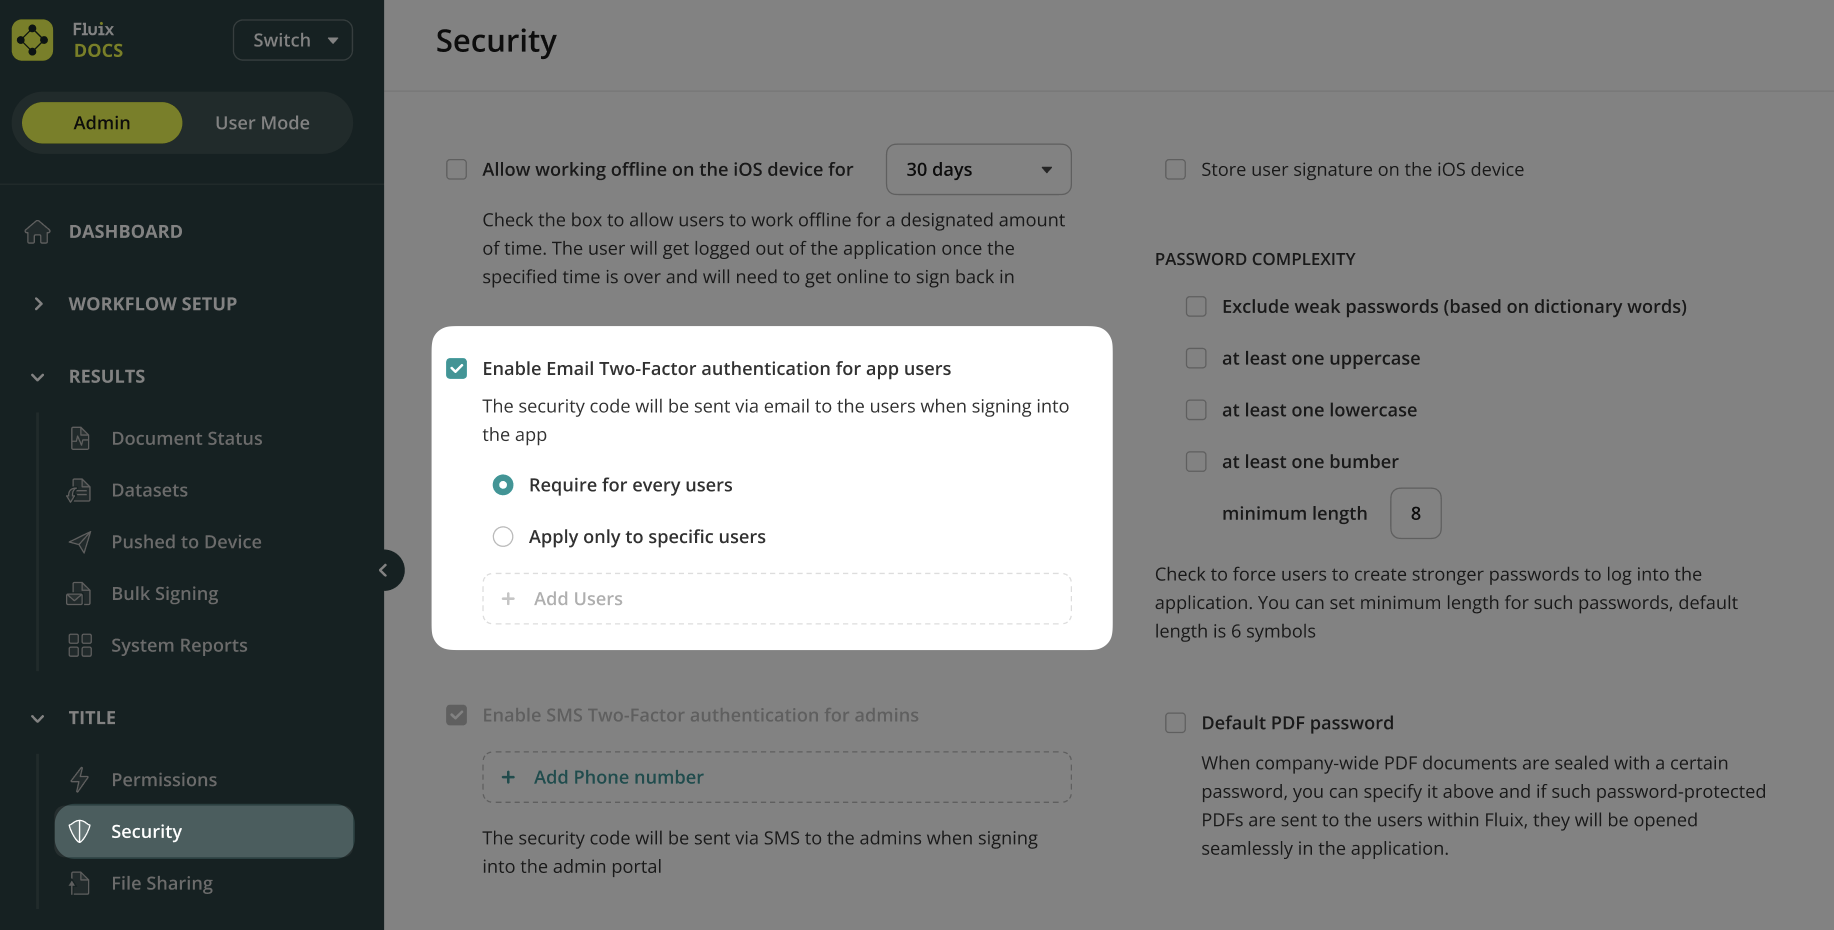
1. Go to the Admin Portal, the Security tab.
2. Select the checkbox “Enable Email Two-Factor authentication for app users.”
3. When switching it ON, a confirmation pop-up will appear, warning that:
The change will affect users.
All users will be logged out.
4. Click “Save changes”.
When the Email 2FA is enabled, all users are automatically logged out, forcing them to log in again with an Email 2FA verification code. On the next login, the user follows the same 2FA process as a first-time login.
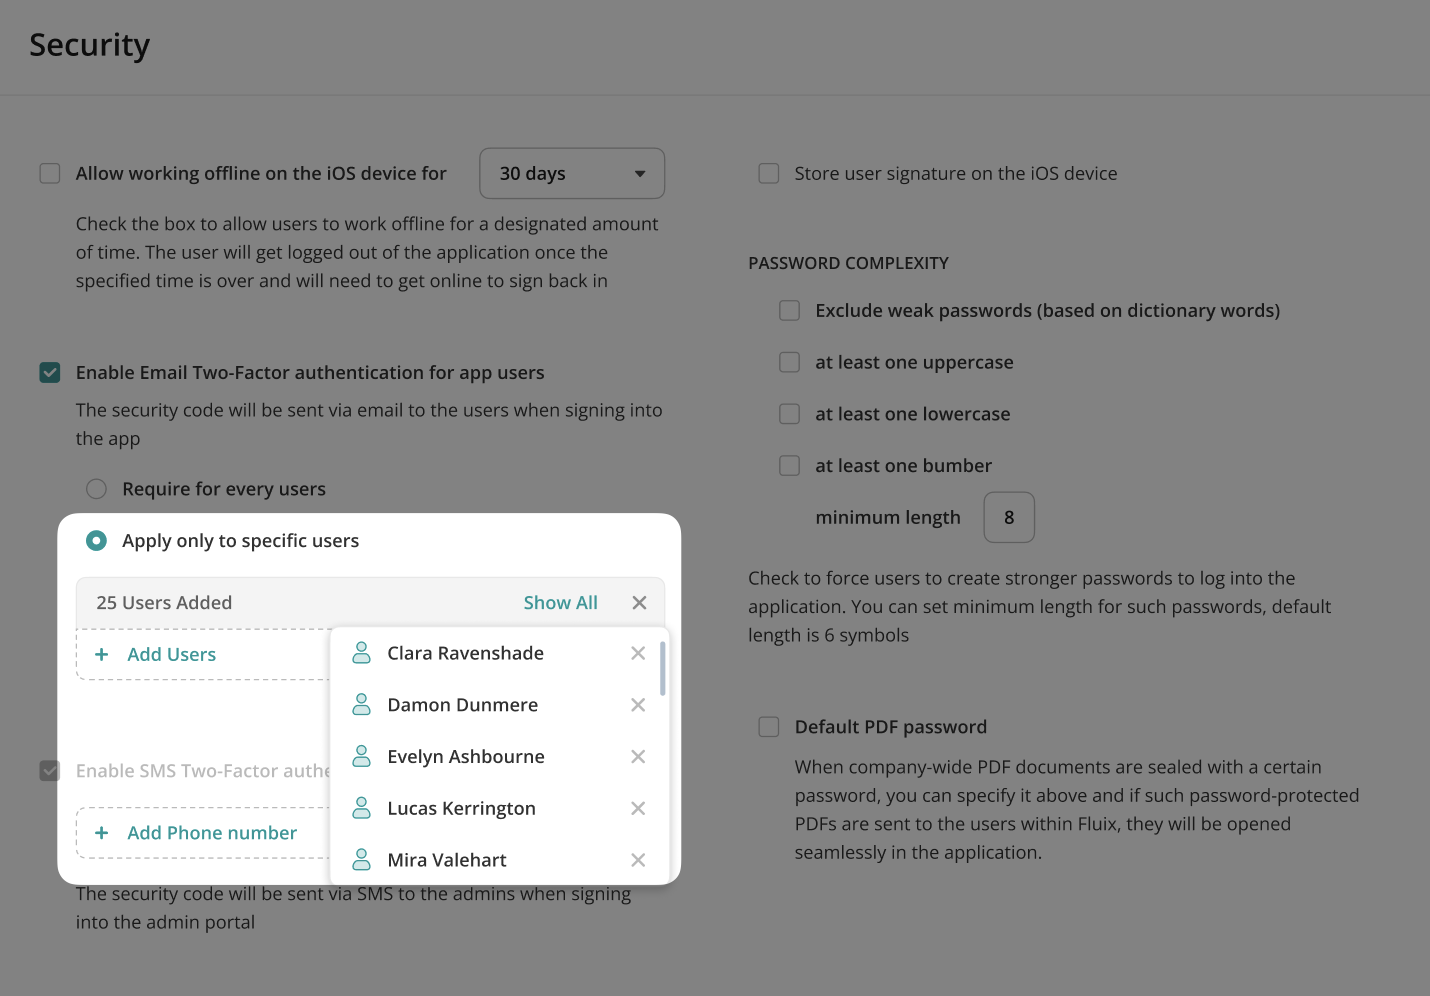
Email 2FA for app users is disabled by default. When enabled, it can be applied either to all users, which is the default behavior, or only to specific users. Admins have the ability to add users to the specific users list and remove them from that list at any time.
Note: If admins have both 2FA via SMS and email enabled, the SMS option will be used by default.
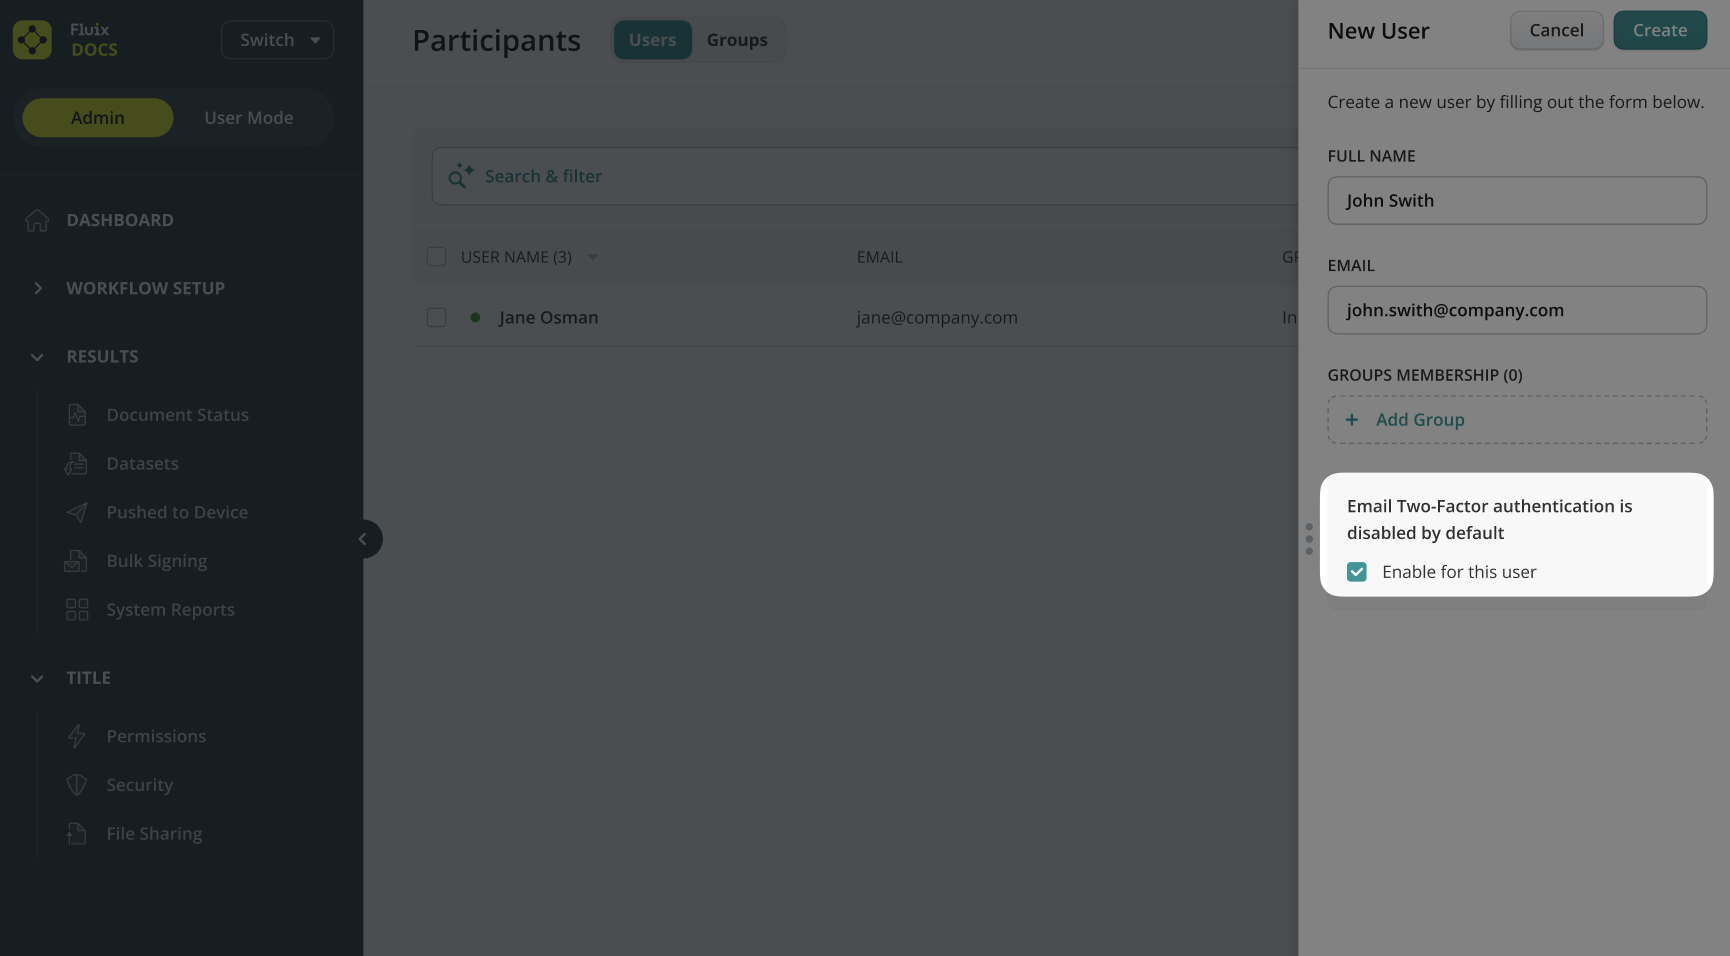
If Email 2FA for app users is disabled, admins can still manually enable 2FA for a new user during the account creation process. If Email 2FA is already enabled for all users, the admin will be informed during new user creation that 2FA is active automatically.
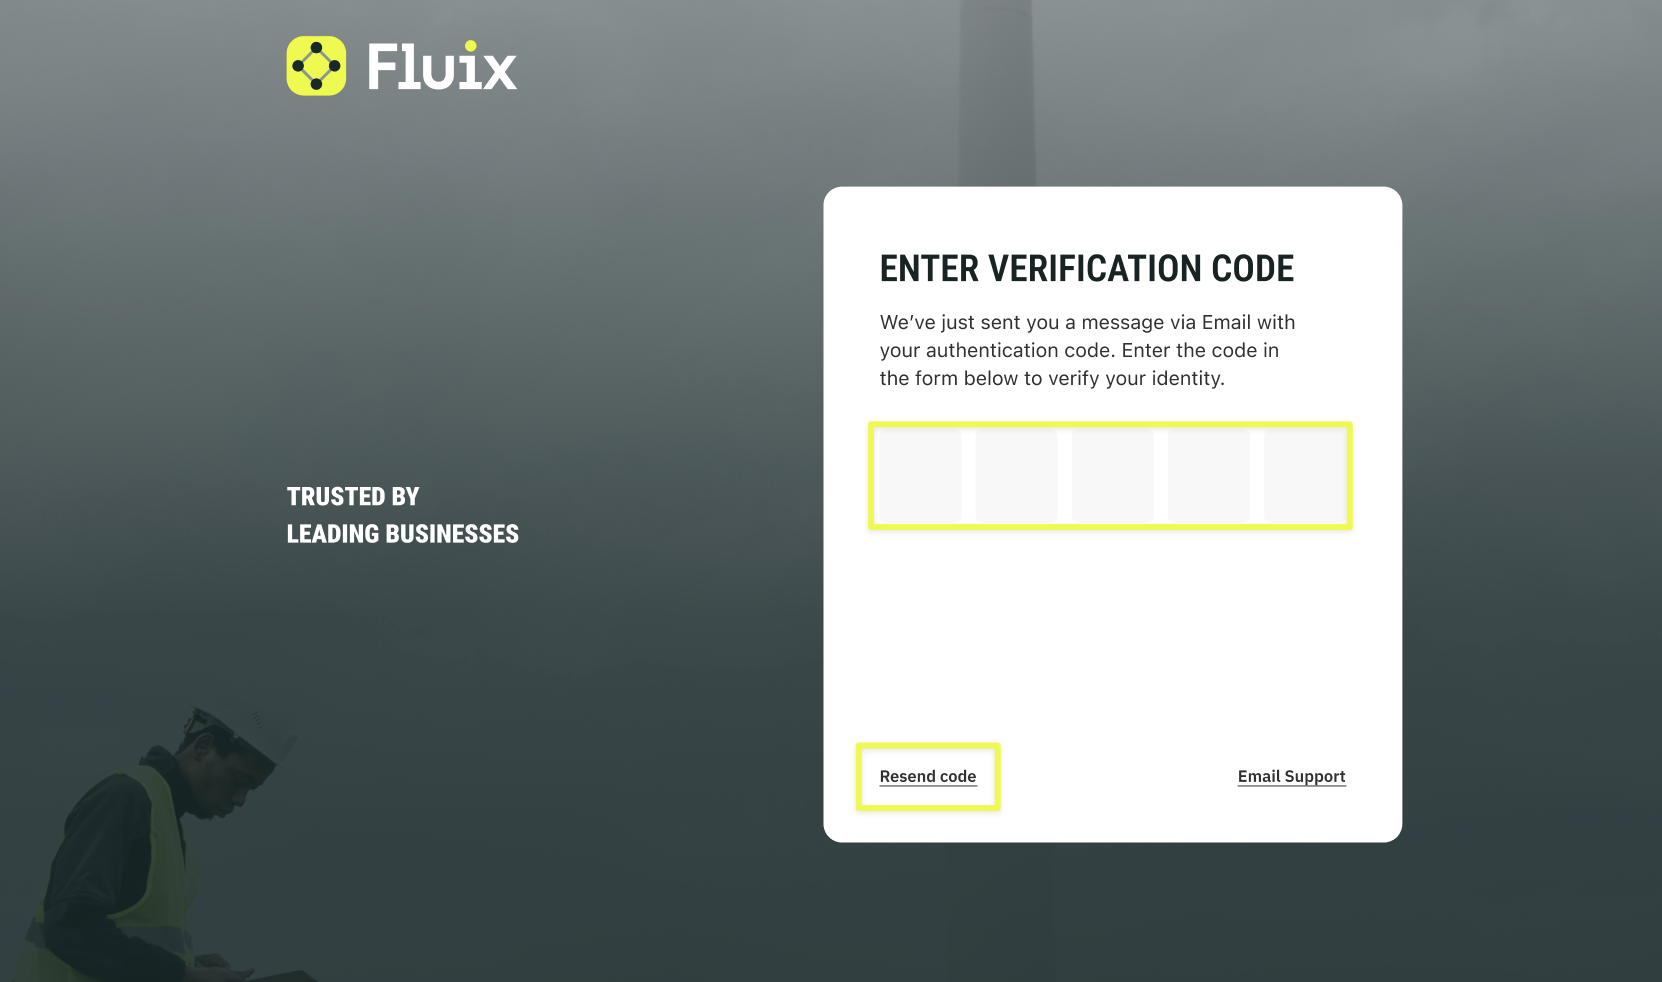
When the user opens the Fluix Docs app or the Web User App and enters their email and password on the login page, a screen appears requesting a two-factor authentication (2FA) security code. A one-time code is then sent to the user’s email. The user enters the code in the app and successfully logs in.
Users also have a chance to use the “Resend code” option in case their verification code has expired.
Feel free to contact us at support@fluix.io if you have any questions or comments.
Was this article helpful?
Thanks for your feedback!
Oops, something went wrong. Please, try again later.
Thank you!
What details or examples would have made this article more helpful for you? We appreciate your insights!
When a document is sent to you for signature from Fluix, you may be asked to enter a one-time password (OTP) before signing. This extra step helps keep documents secure. In this article, we will explain the process in detail.
When is OTP required?
The OTP will be requested if:
The document was sent using the Send for Signature submit option in Fluix Docs
The document is being signed by an external recipient (you don’t need a Fluix account)
Step-by-step: How to sign a document with OTP
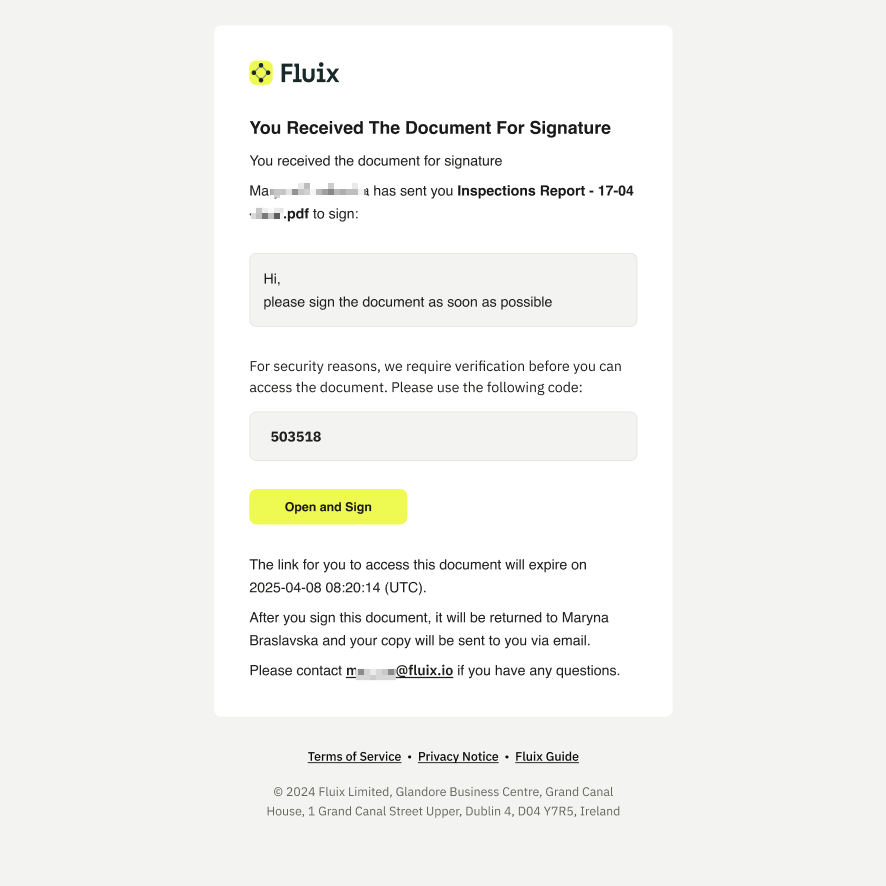
1.Check your email You’ll receive an email with a button to open the document and one-time password (OTP):
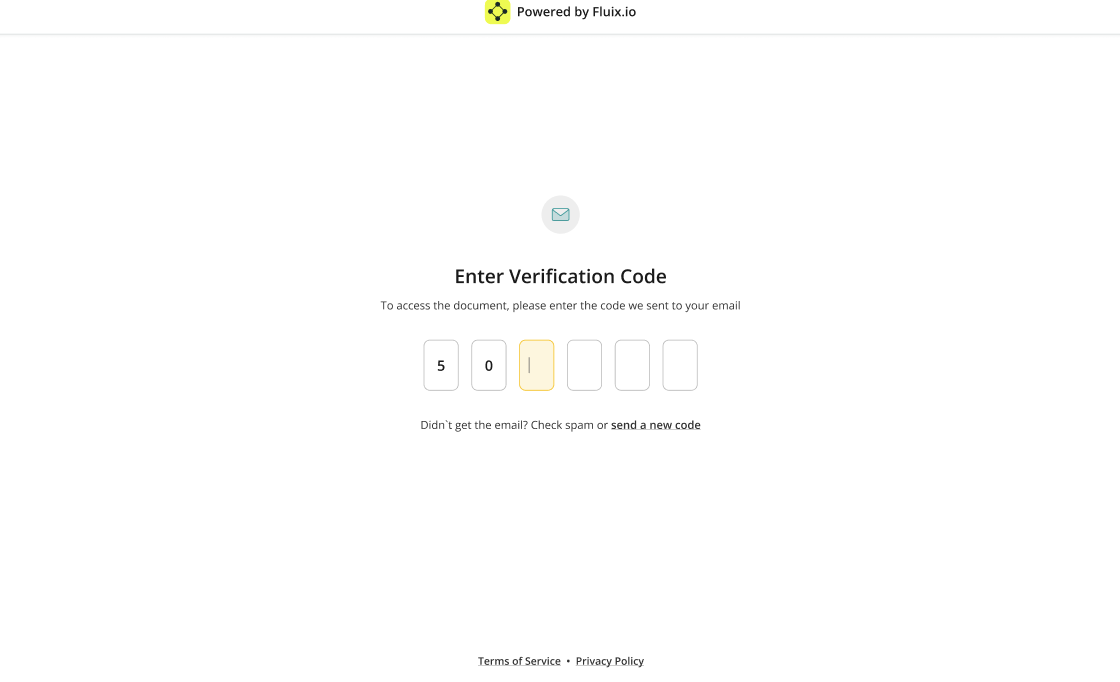
2.Copy the code and open the document. A window will appear asking for the one-time password.
3.Sign the document Once the OTP is confirmed, you can review and sign the document as usual.
If you need any assistance, feel free to contact the person who sent you the document or contact the Fluix Support team at support@fluix.io.
Was this article helpful?
Thanks for your feedback!
Oops, something went wrong. Please, try again later.
Thank you!
What details or examples would have made this article more helpful for you? We appreciate your insights!
App Sidebar Shortcuts enable field teams to quickly switch between the Fluix Docs app and other work-related apps installed on the same device. This provides fast access to essential tools used in daily operations without disrupting workflows.
Shortcuts are created and managed by an admin in the Admin Portal and appear automatically on users’ devices.
Note: App Shortcuts in the sidebar are available starting from the Fluix Docs 4.8 app version.
How it works
Admin creates appshortcuts in the Admin Portal.
Shortcuts appear in a dedicated Shortcuts section in the Fluix Docs app sidebar.
Users can open another app or webpage with a single tap.
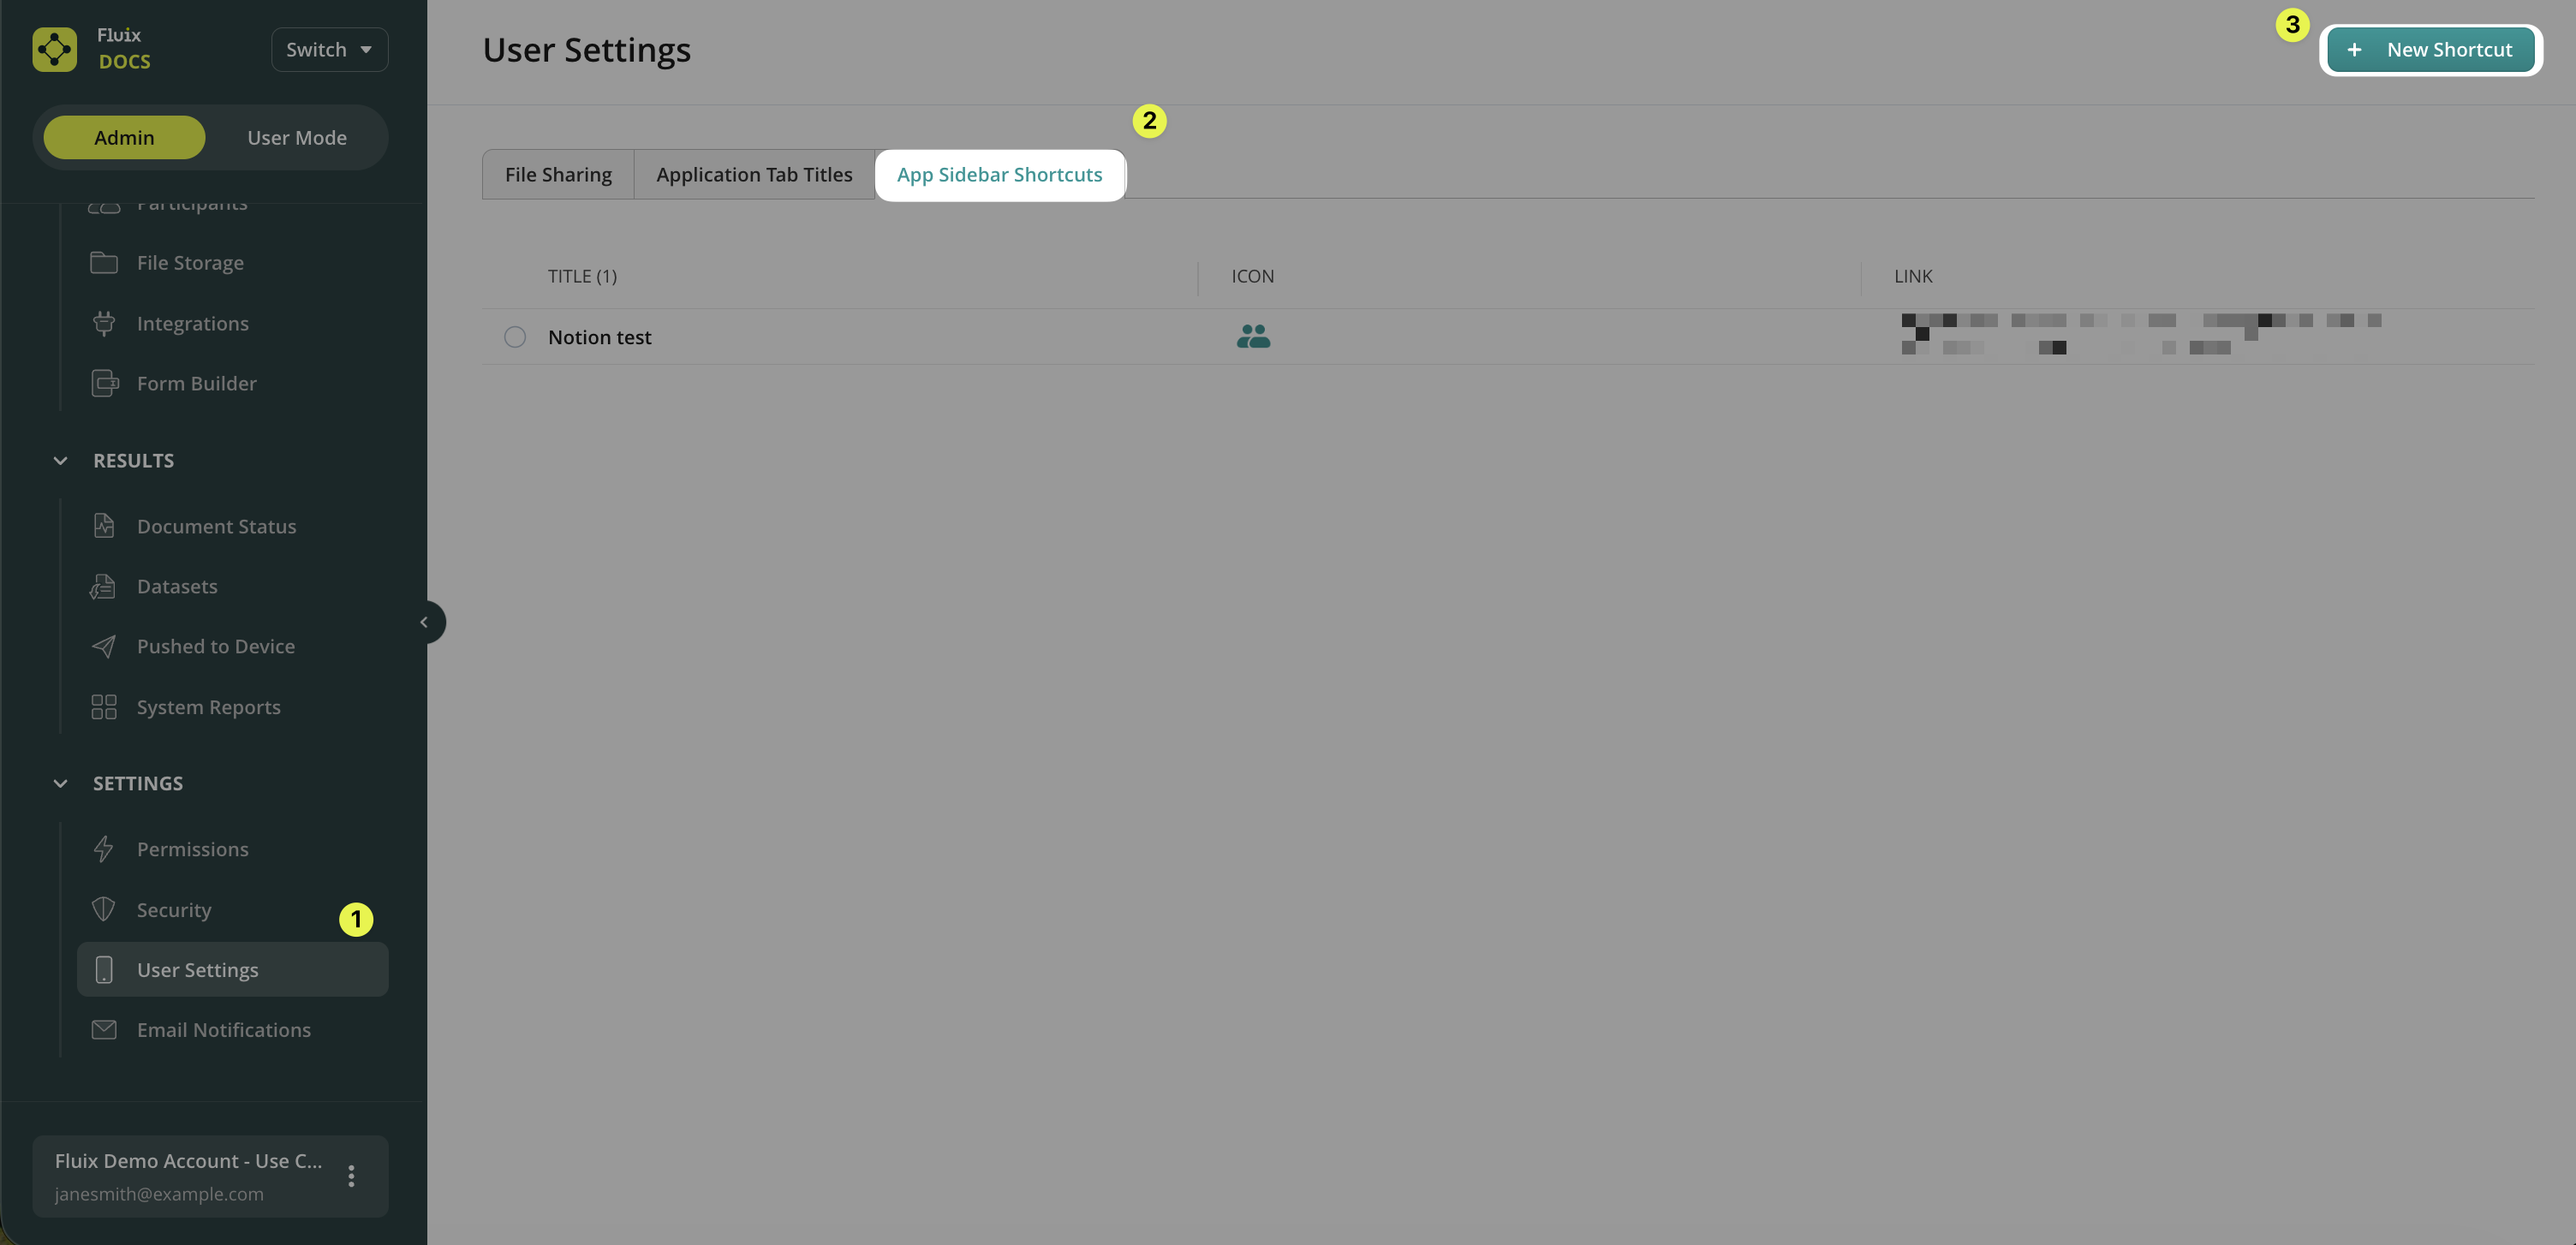
How to Configure Shortcuts in the Admin Portal
In the Admin Portal, navigate to User Settings.
Open the App Sidebar Shortcuts tab.
Click Add Shortcut.
In the modal window, fill in all required fields.
Shortcut settings
Link requirements Fluix supports one of the following formats:
Universal Link: Enter a full URL that opens an app or webpage.
Example: https://example.com
Custom Link: Enter the app scheme for an installed application.
Example: myapp://
Iconrequirements A default icon is pre-selected. However, you can:
Choose from preset icons, or
Upload a custom square image in JPEG or PNG format.
Maximum size: 1 MB
How to Manage Shortcuts in the Admin Portal
You can see all shortcuts appear in a table in the App Sidebar Shortcuts tab. You can perform the following action with the shortcuts.
Edit – update shortcut details
What will the Fluix Docs Users’ experience be?
Where to find shortcuts
Admin-created shortcuts are displayed in a separate Shortcuts section within the app sidebar. If no shortcuts were created by an admin, this section is not shown.
Open a shortcut
Tap a shortcut to open the linked app or webpage.
If the end user is unable to open the link, please contact the Fluix account manager or Fluix Support at support@fluix.io.
Notes and limitations
Custom links work only if the linked app is installed on the device.
All shortcuts are managed centrally by the admin.
Device users cannot add or edit shortcuts.
Feel free to contact us at support@fluix.io if you have any questions or comments.
Was this article helpful?
Thanks for your feedback!
Oops, something went wrong. Please, try again later.
Thank you!
What details or examples would have made this article more helpful for you? We appreciate your insights!
The Fluix app is a tool for filling out PDFs, collecting signatures, uploading images, and seamlessly submitting documents according to your business processes. It also enables you to track the progress of your documents, showing when and by whom they were submitted to their final destination. Let’s explore how to use the Document Activity feature in the Fluix app. The Document Activity feature provides a clear overview of the progress of documents you are working on or have worked on, including their status, the name of the current assignee, comments if any were added, all that directly from the app.
How does it work?
Note: this feature is available starting from Fluix app version 3.22. You may upgrade the app through the App Store.
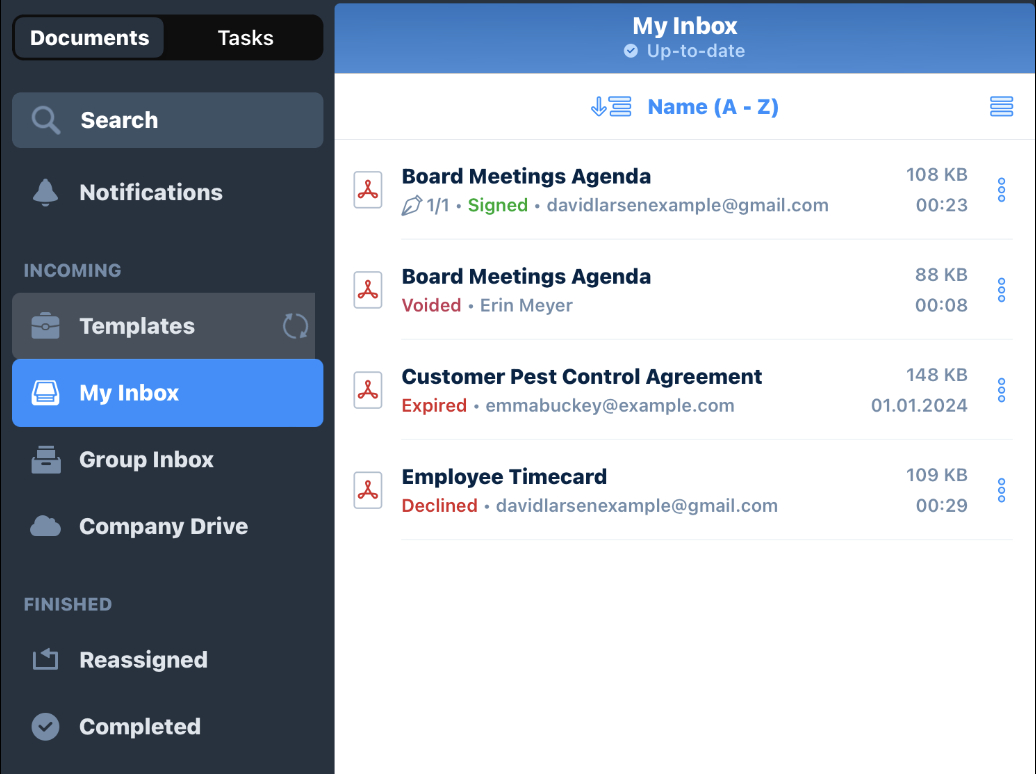
This feature is available in the following sections of the Fluix app:
Group Inbox
My Inbox
Drafts
Sent for Signature
Reassigned
Completed.
The Document Activity works online and offline, but its functionality depends on whether your app is synced with the latest updates.
Online Mode: If your Fluix app is synced with the most recent updates, the Document Activity window will display accurate and up-to-date information about the document’s history.
Offline Mode: If you’ve been working offline, the Document Activity data may not reflect the latest updates. To ensure you see the most current information, connect to a stable internet connection and allow the app to complete the sync. For detailed instructions on syncing, refer to this article.
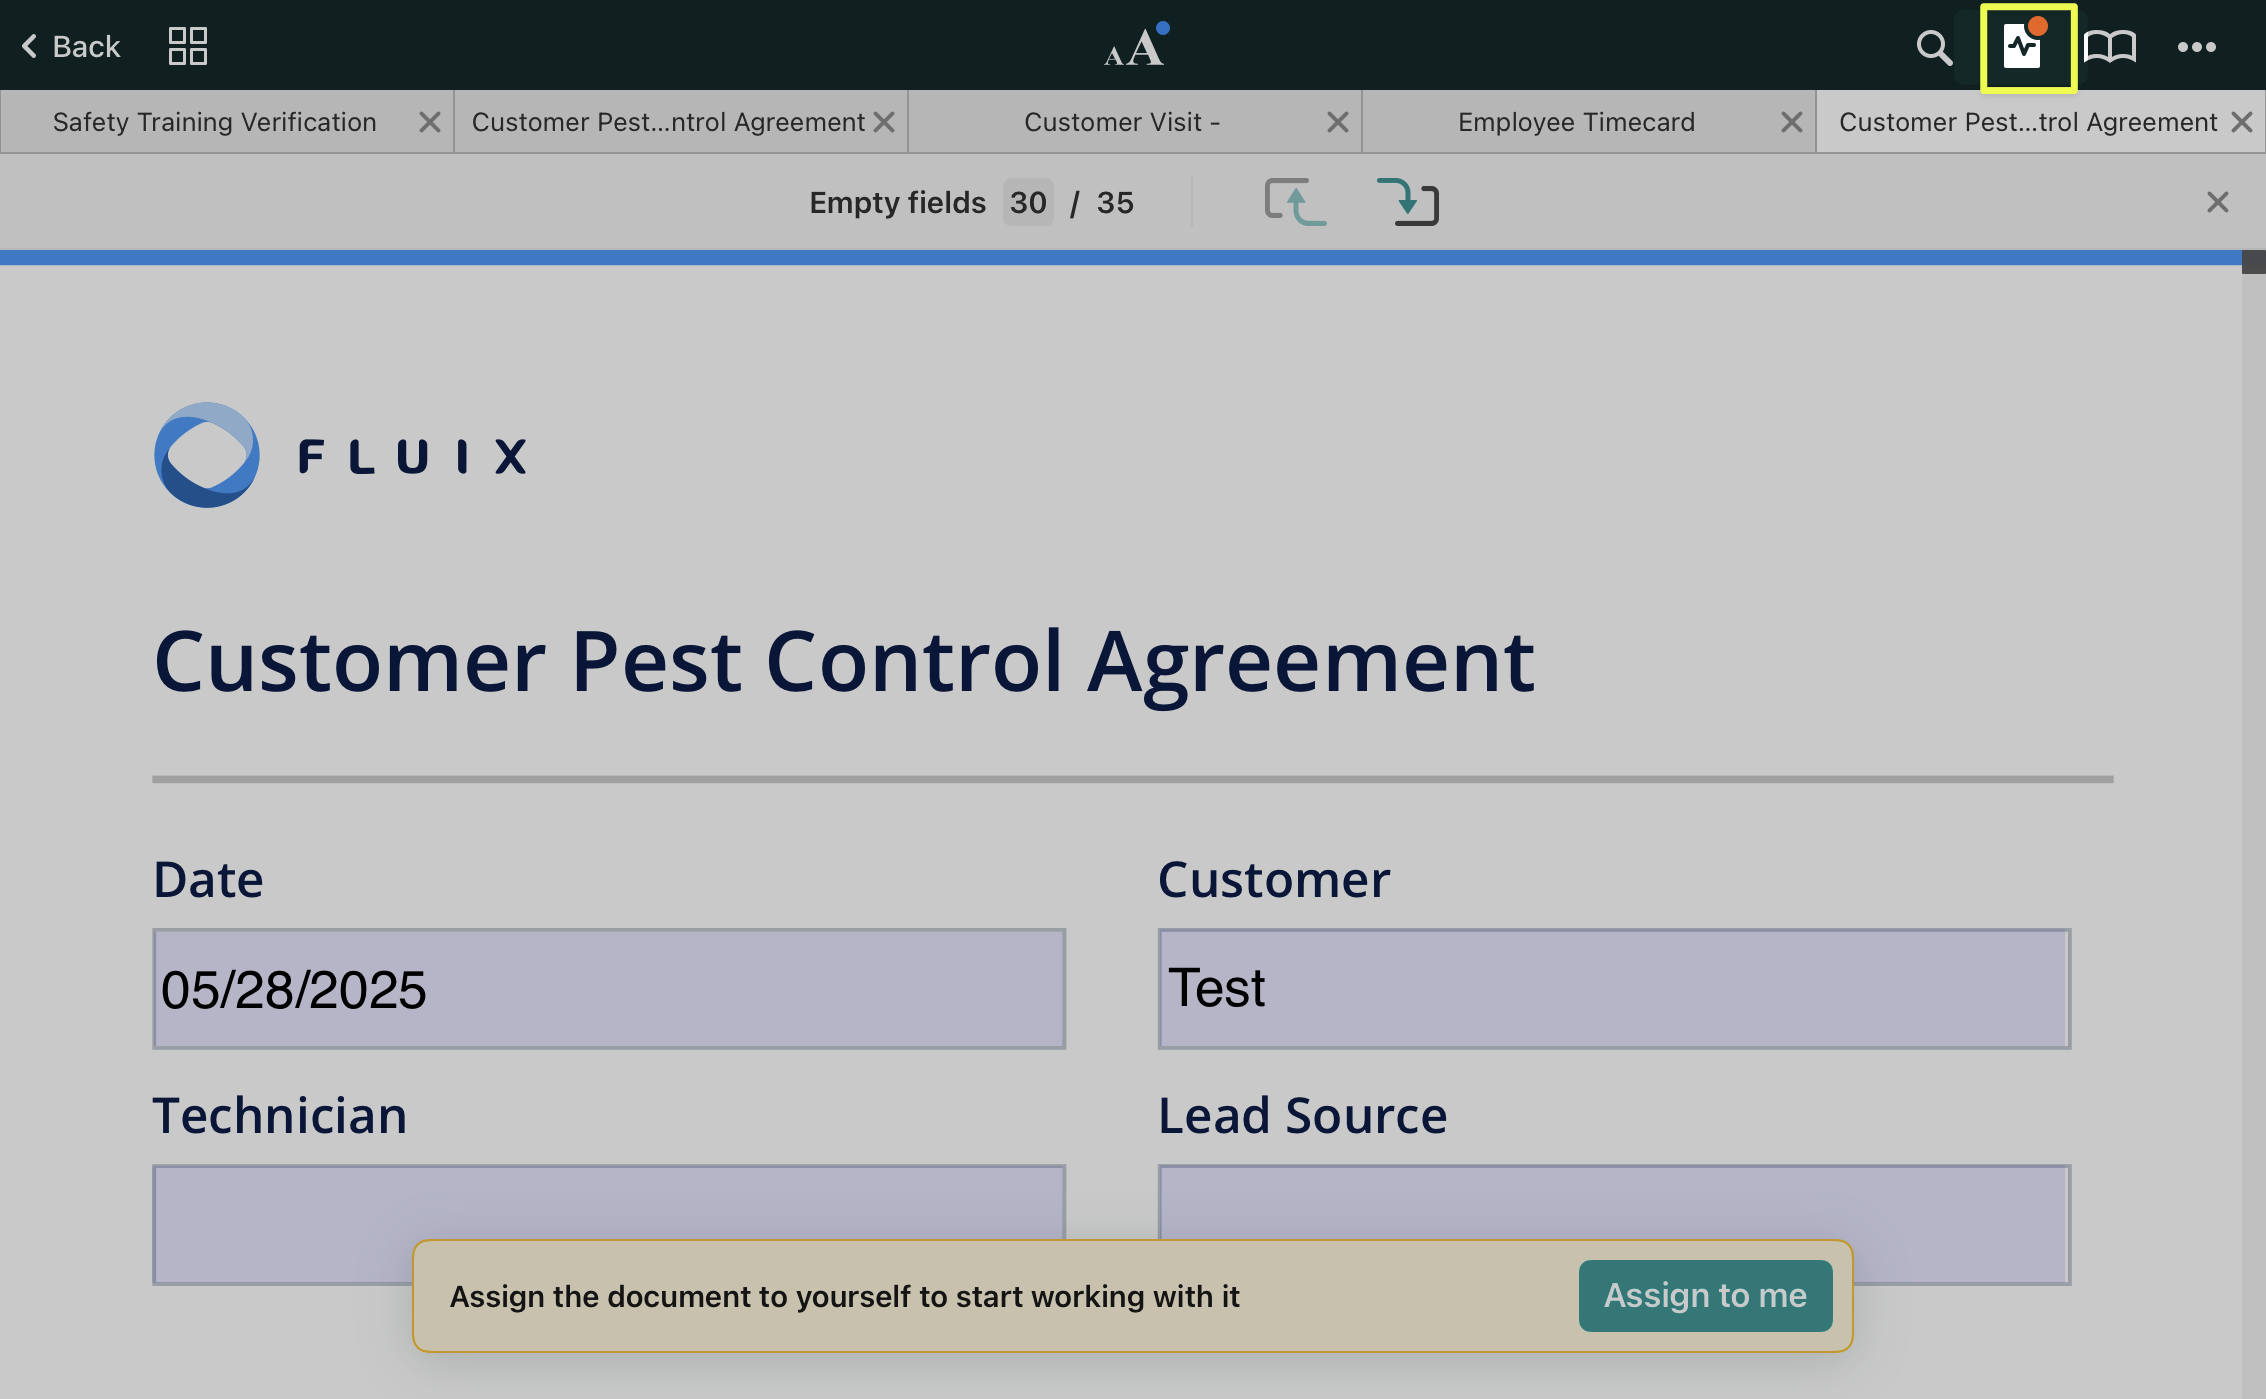
Navigate to the desired section of the Fluix app (e.g. Group Inbox, My Inbox, etc.). Open the document for which you want to view the activity.
You’ll notice a dot next to the Document Activity icon if the document has a recent activity.
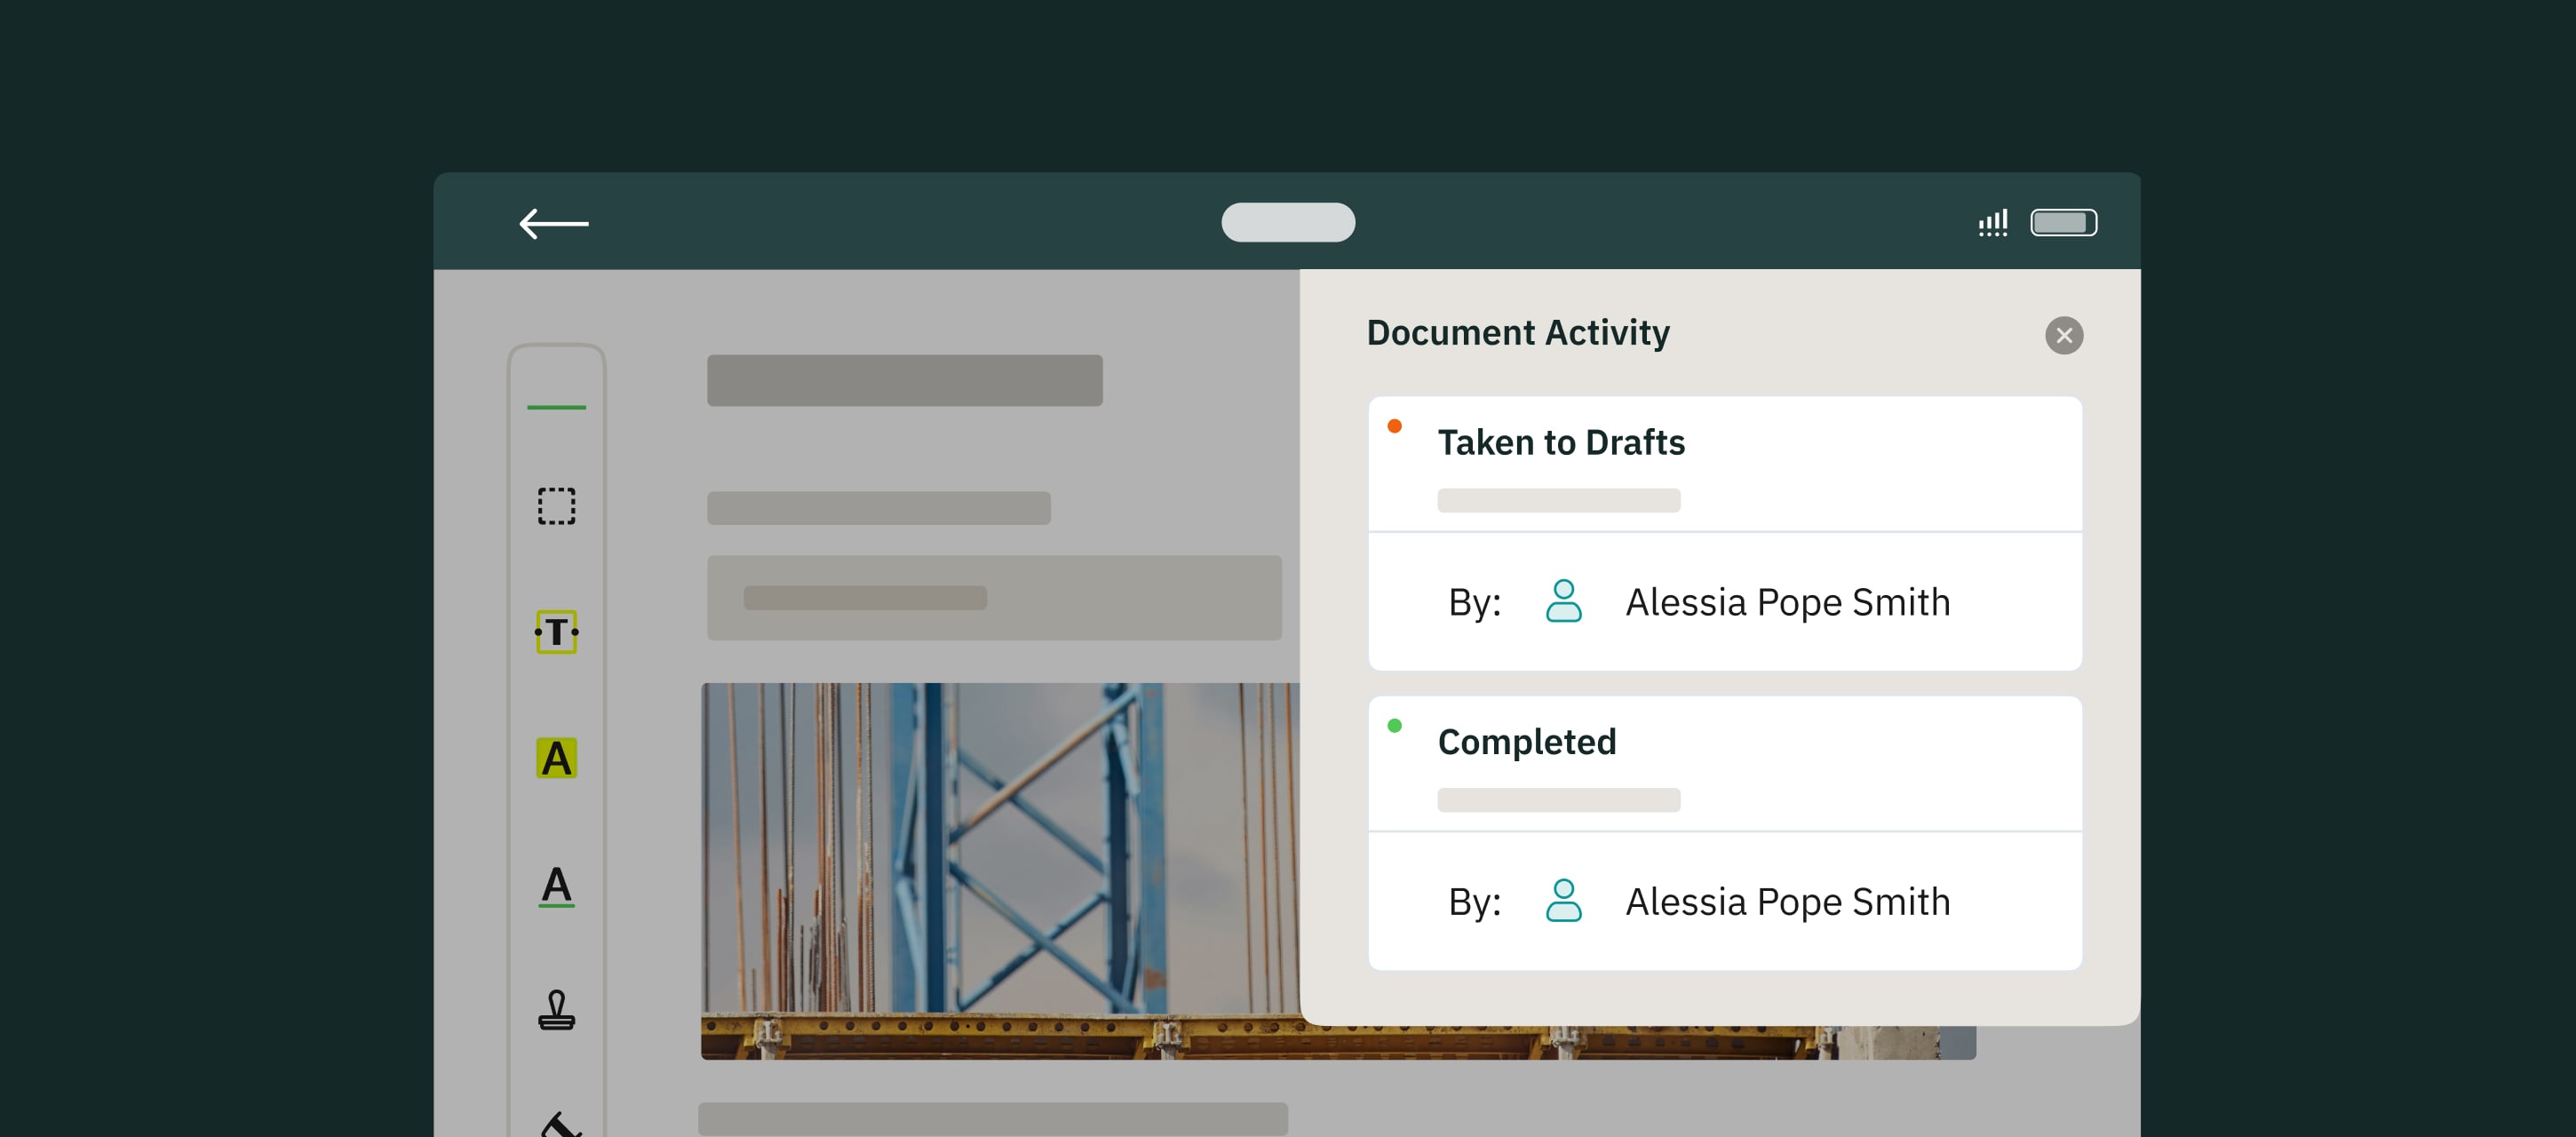
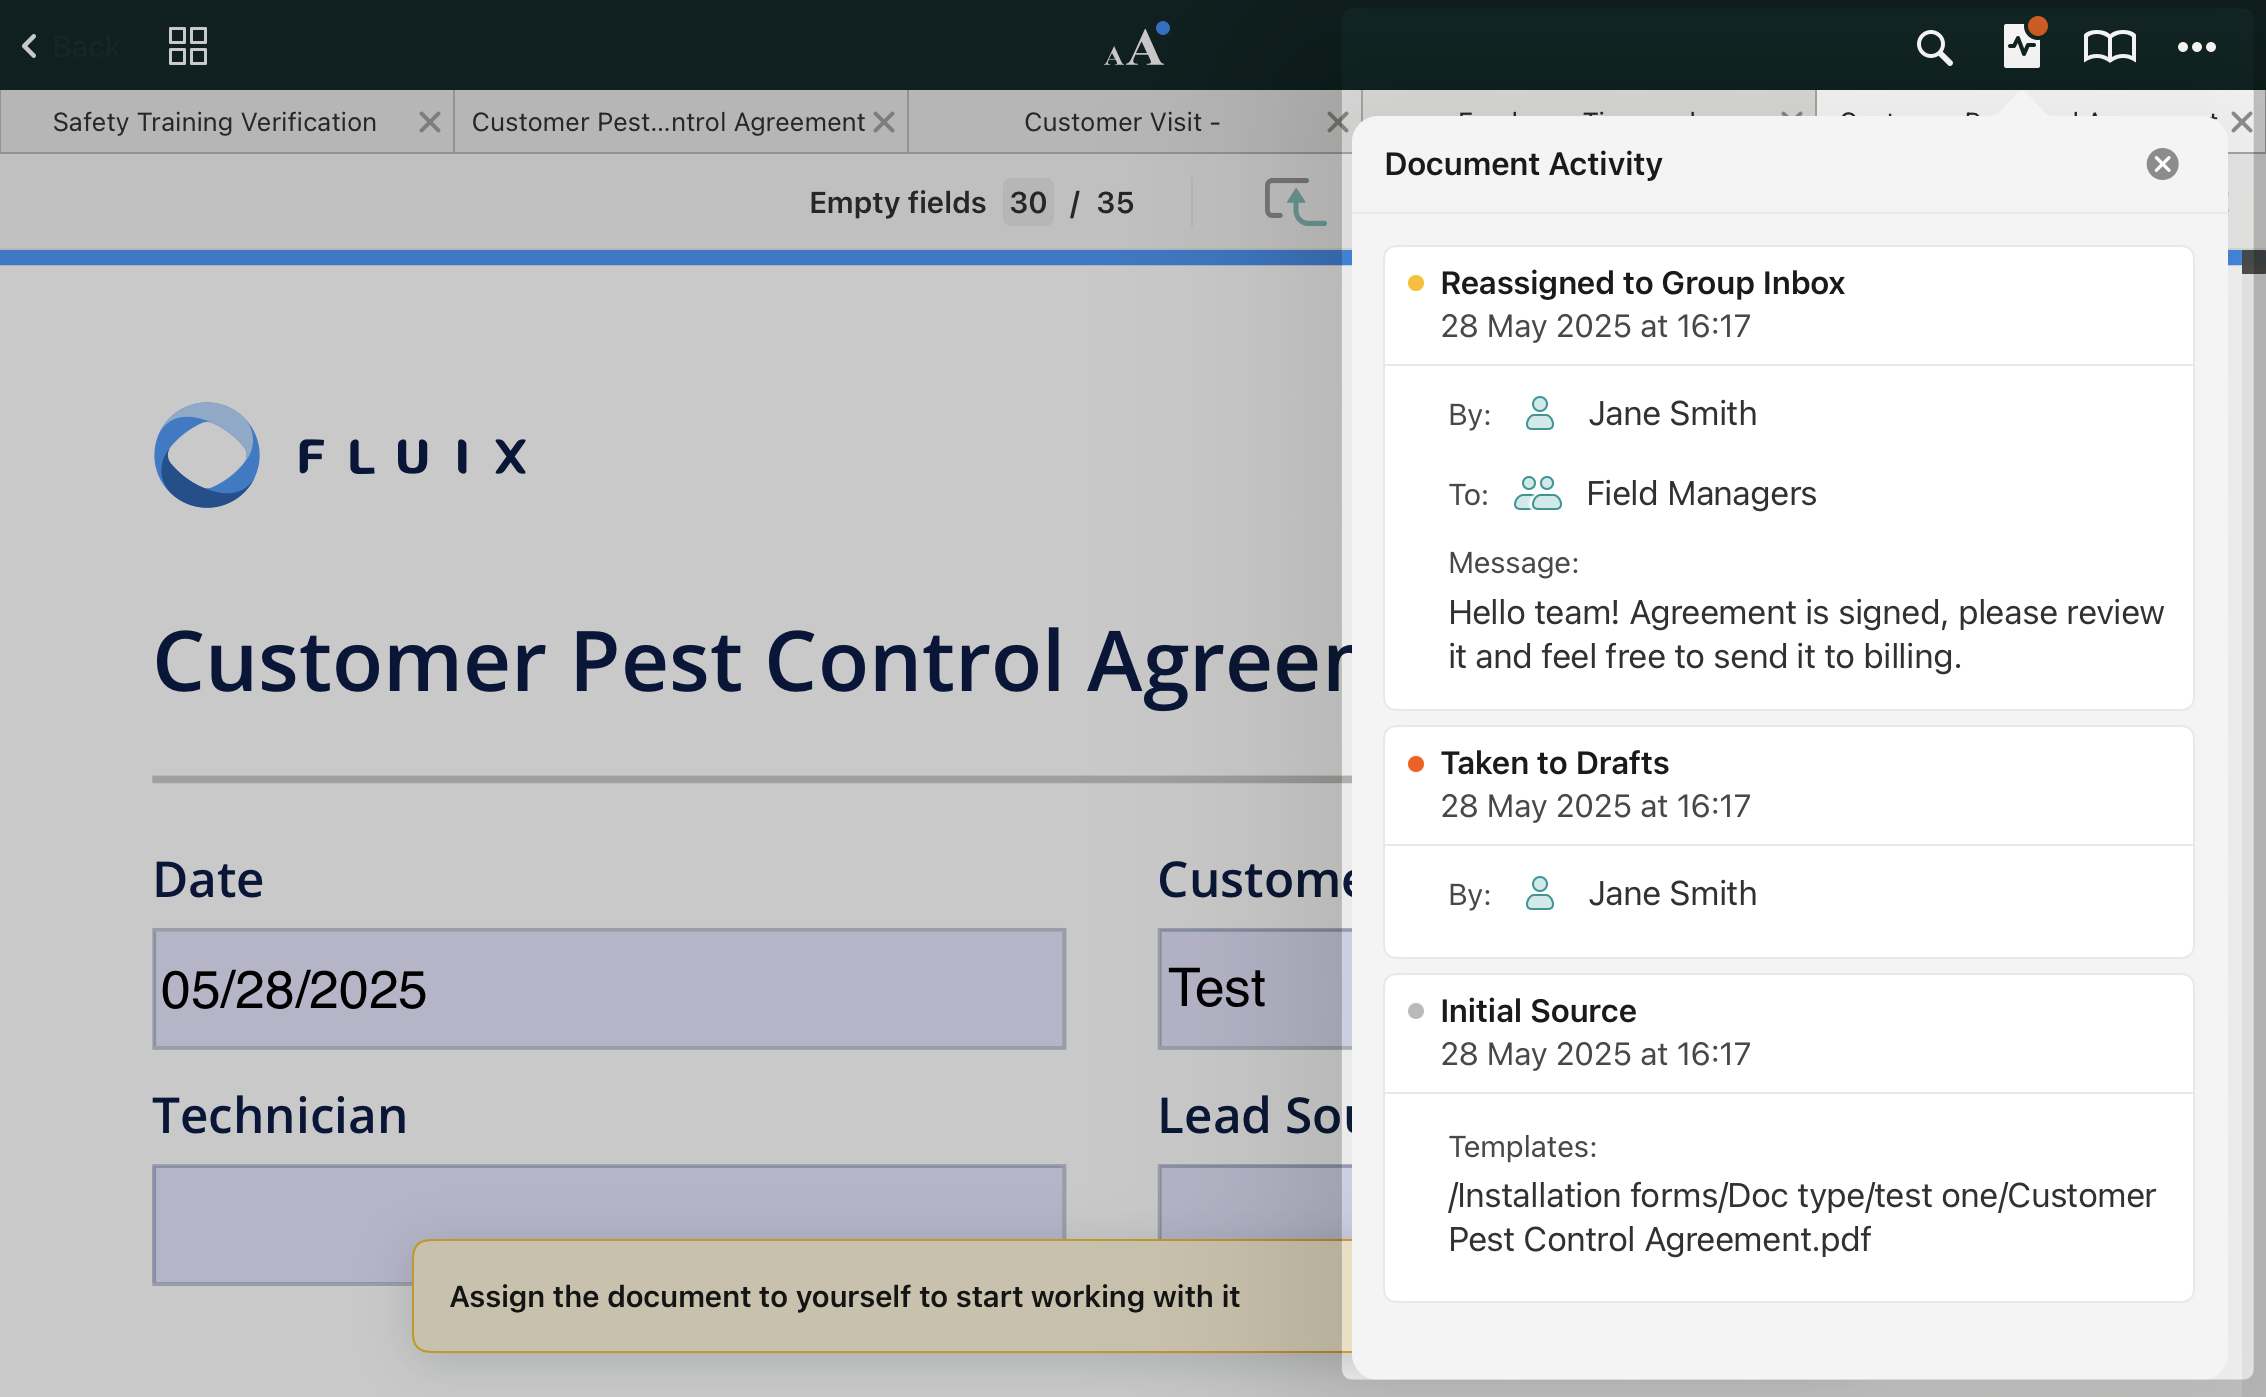
Tap the Document Activity icon to open the window displaying the last 50 events related to the document. These events include:
The initial source of the document
Time and details of document modifications
Current status
The group or user working on the document
Please note: 1. Comments exchanged among team members while collaborating in the Group Inbox will be displayed in the Message section of the Document Activity.
2. If you submit the documents via email (as per the workflow set by your admin) and manually add recipients to the list, the Document Activity section will display only those recipients you added. Preconfigured email addresses set by your Fluix admin will not appear.
In case you need our assistance, feel free to contact us at support@fluix.io, we are always here to help!
Was this article helpful?
Thanks for your feedback!
Oops, something went wrong. Please, try again later.
Thank you!
What details or examples would have made this article more helpful for you? We appreciate your insights!
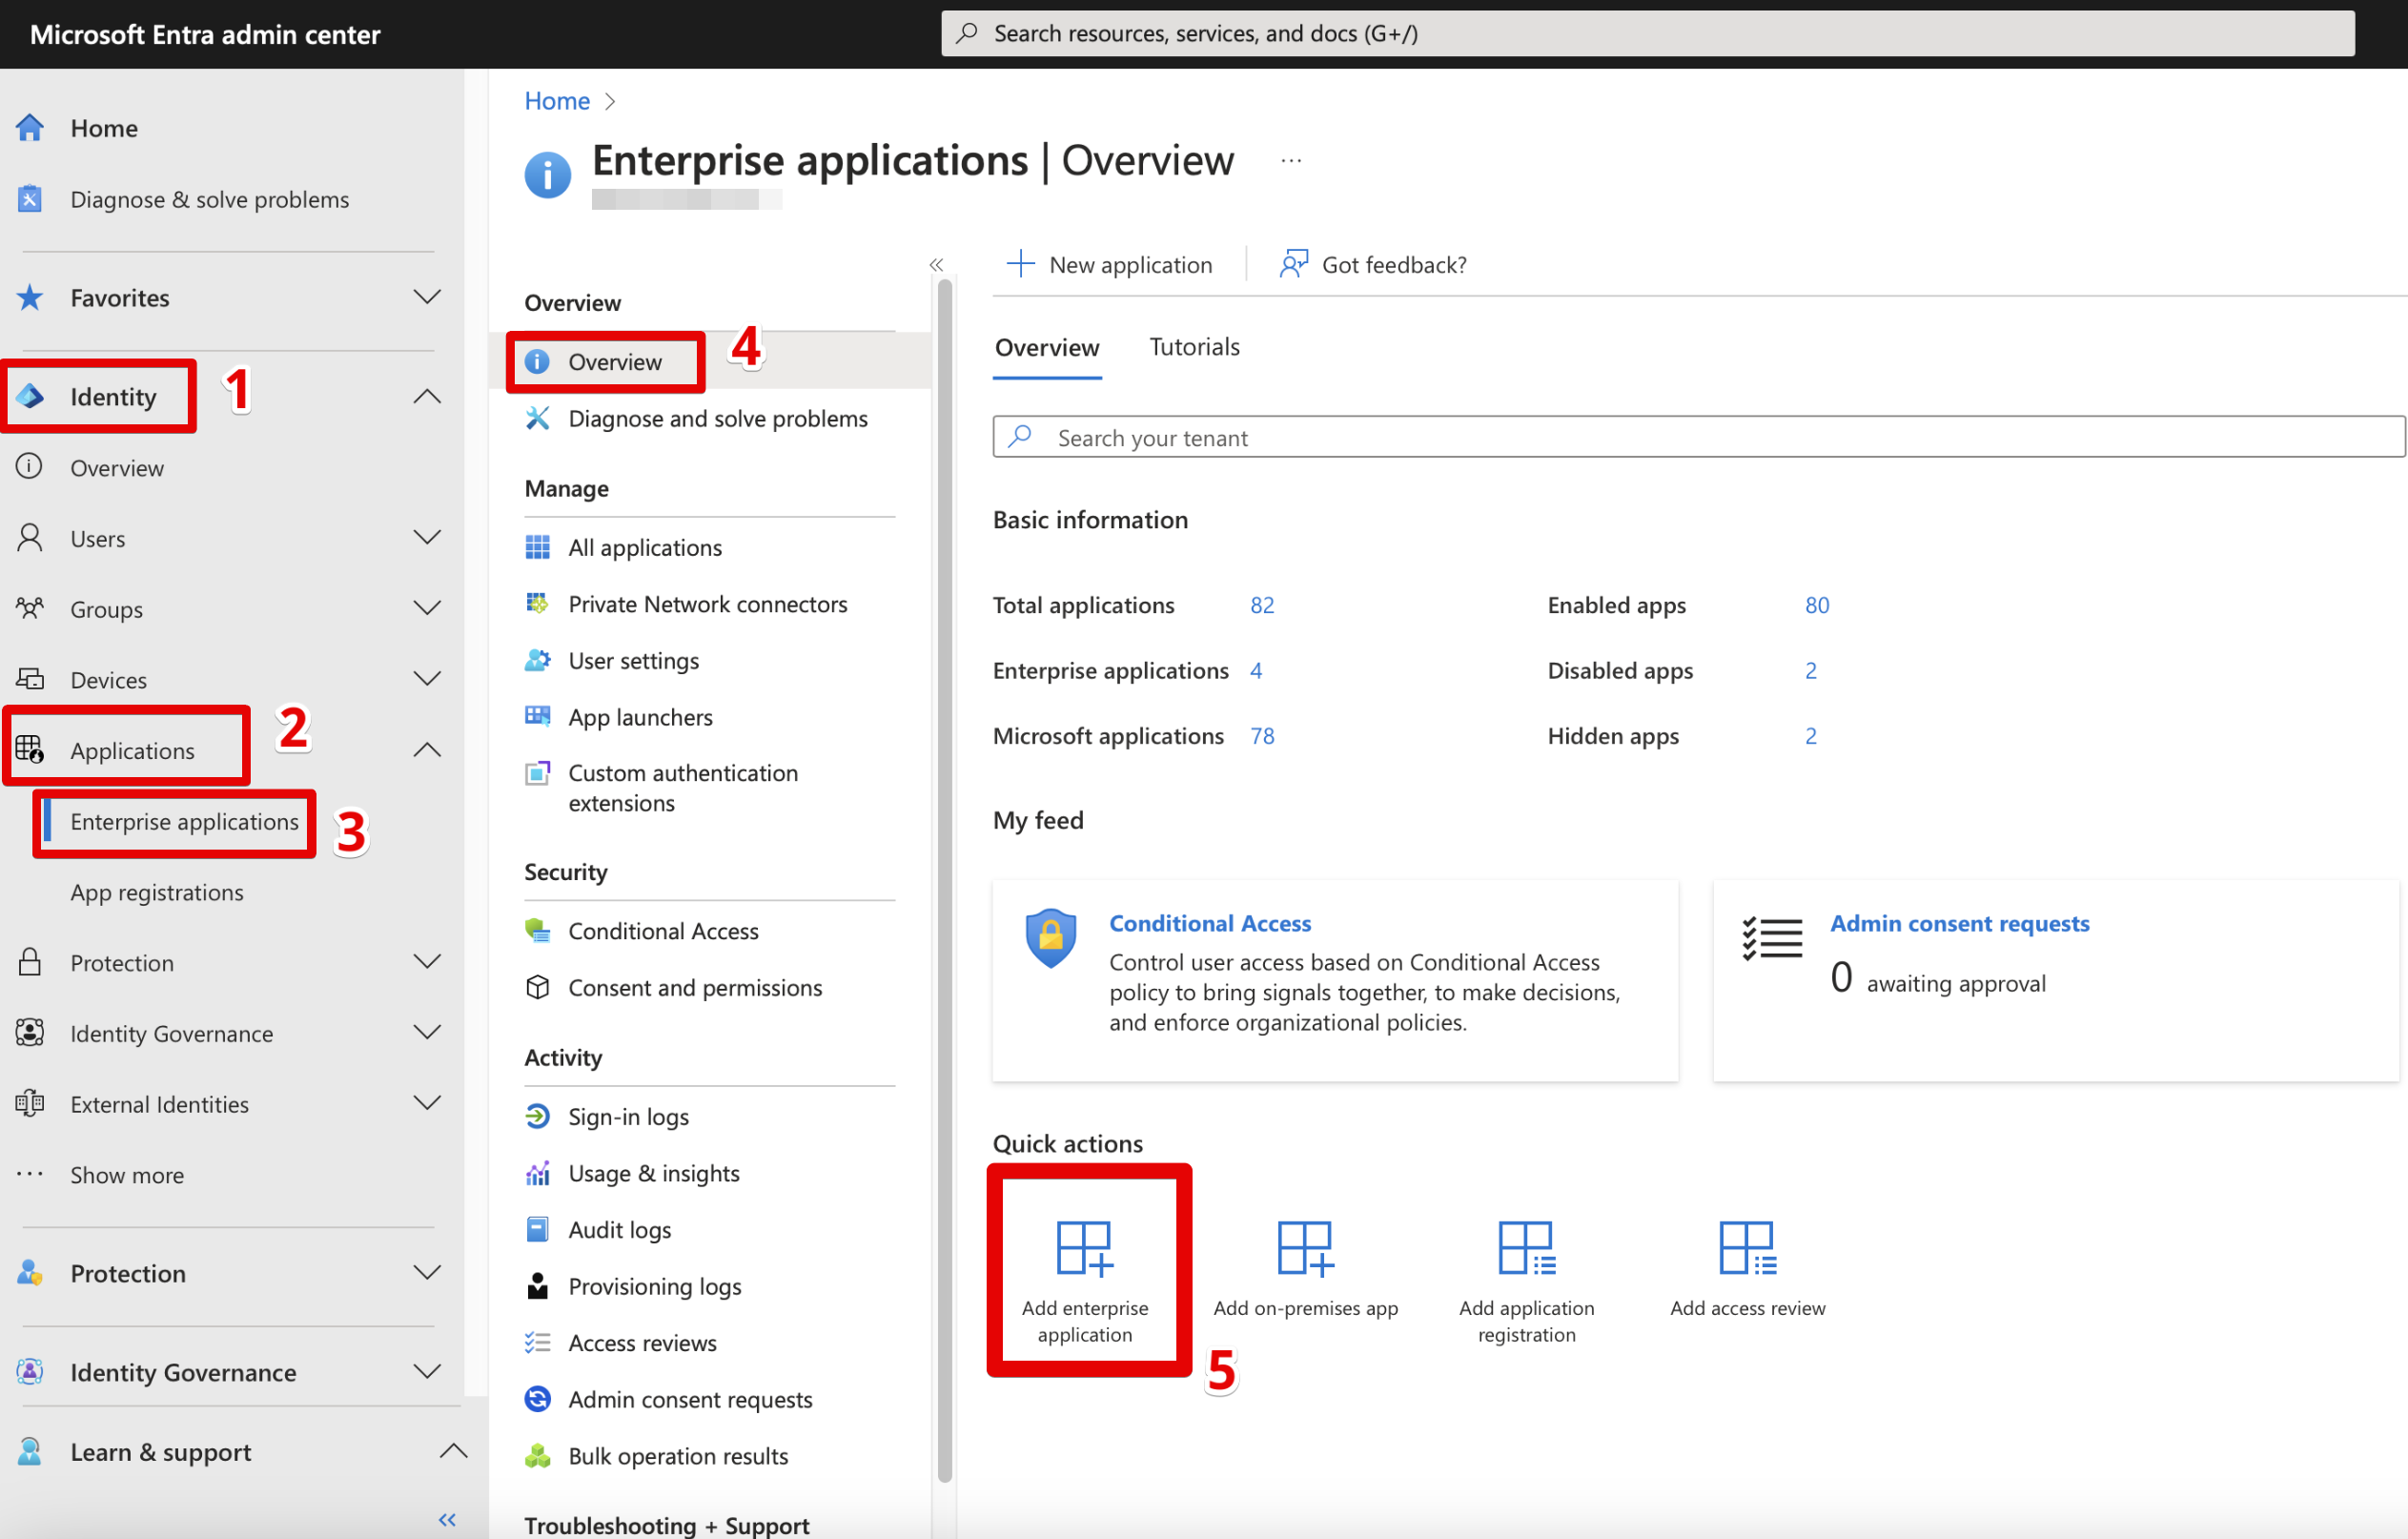
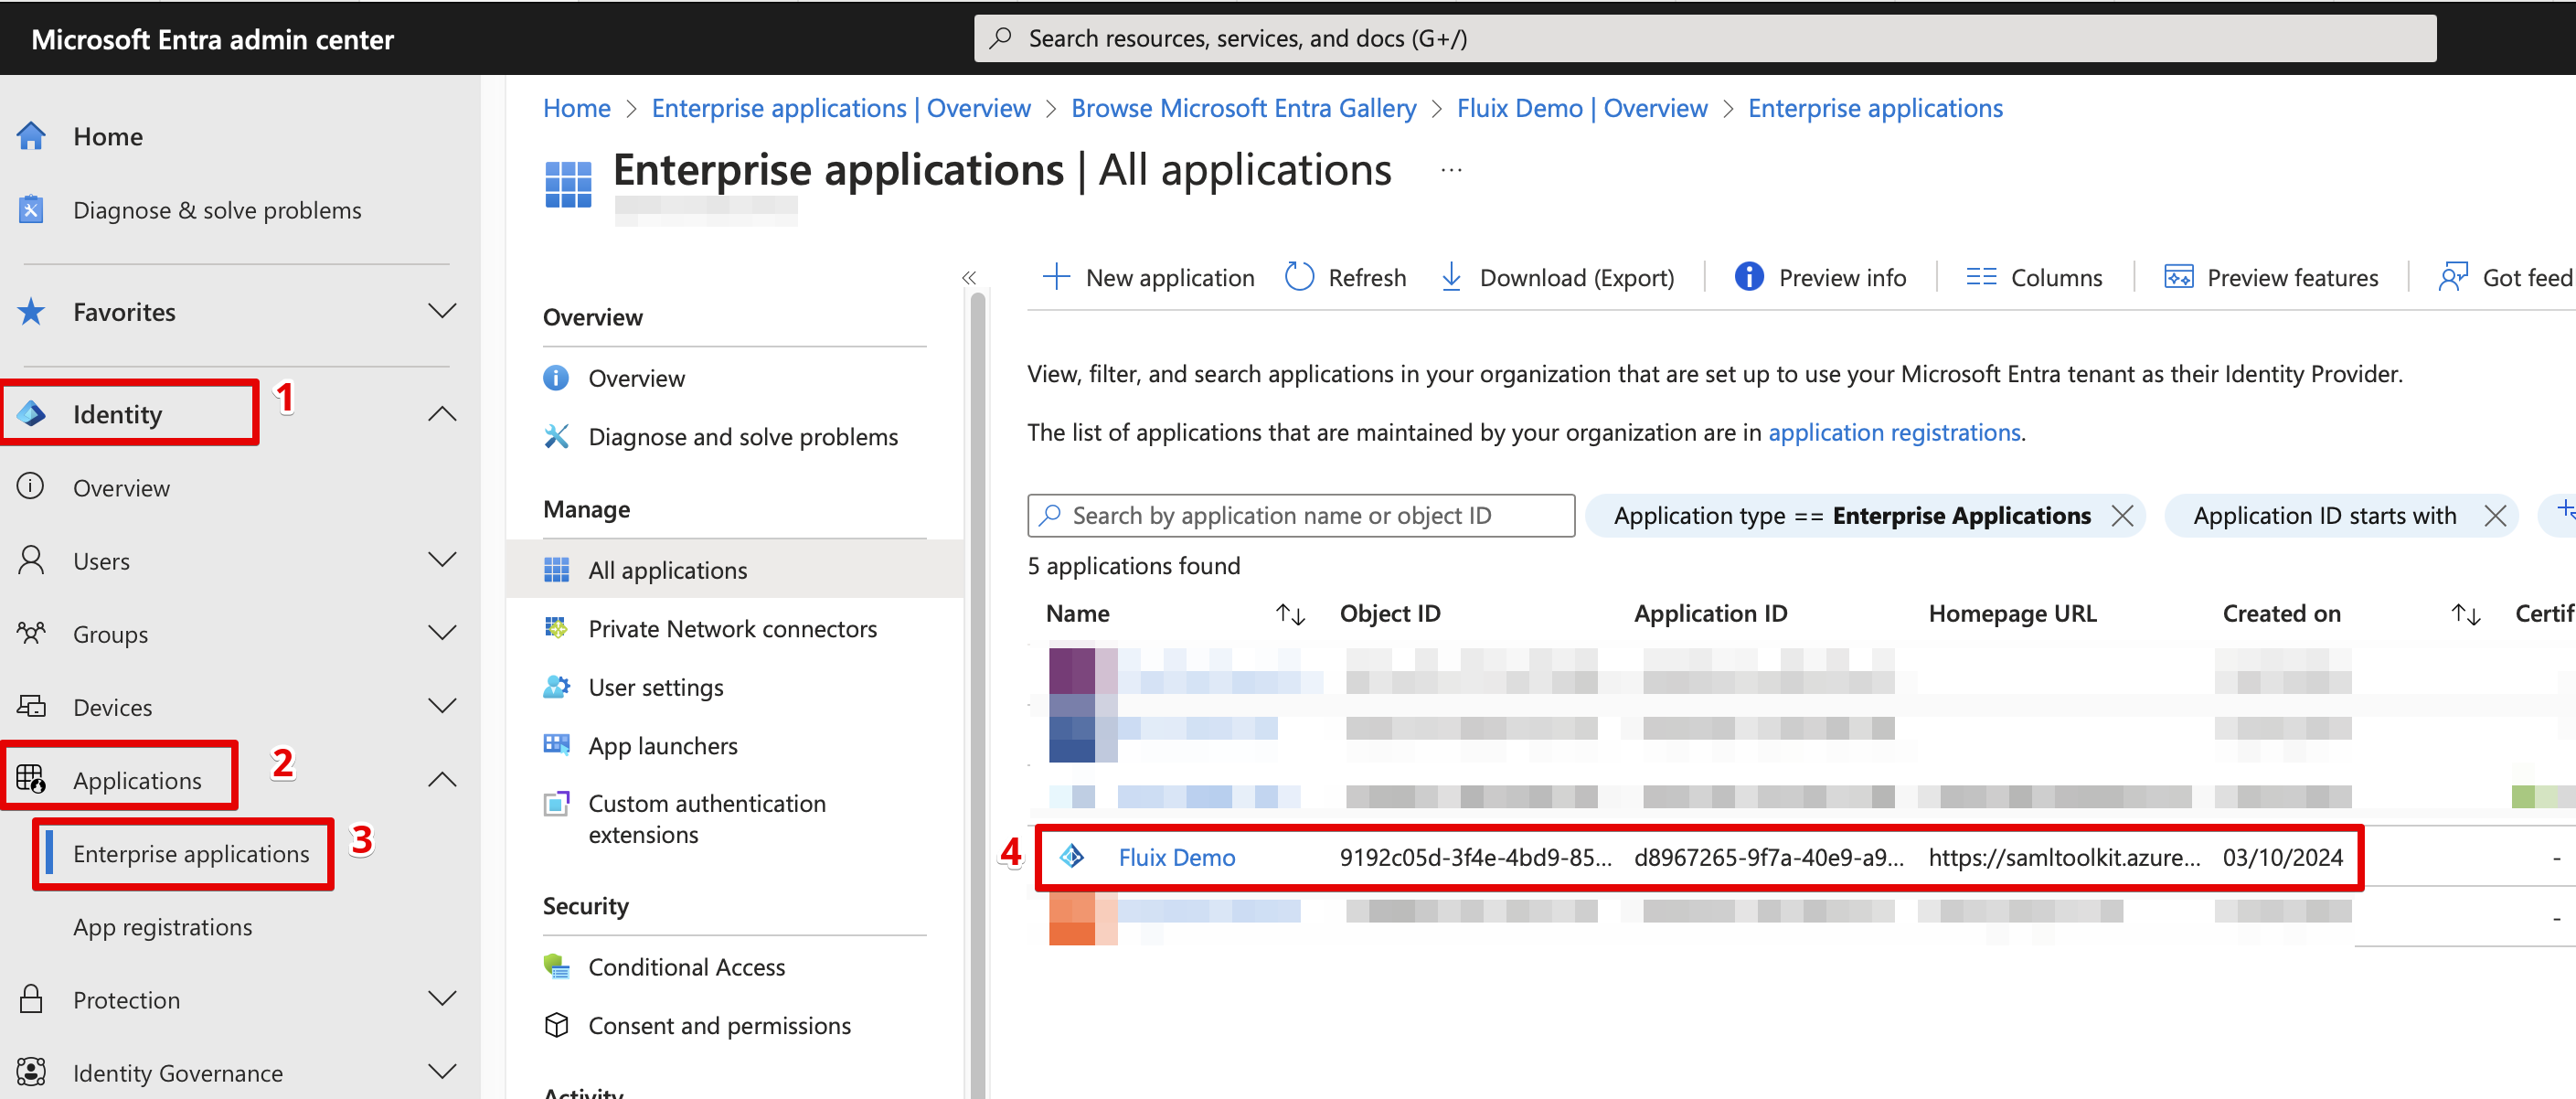
Open Identity → Applications → Enterprise applications → Overview and choose Add enterprise application.
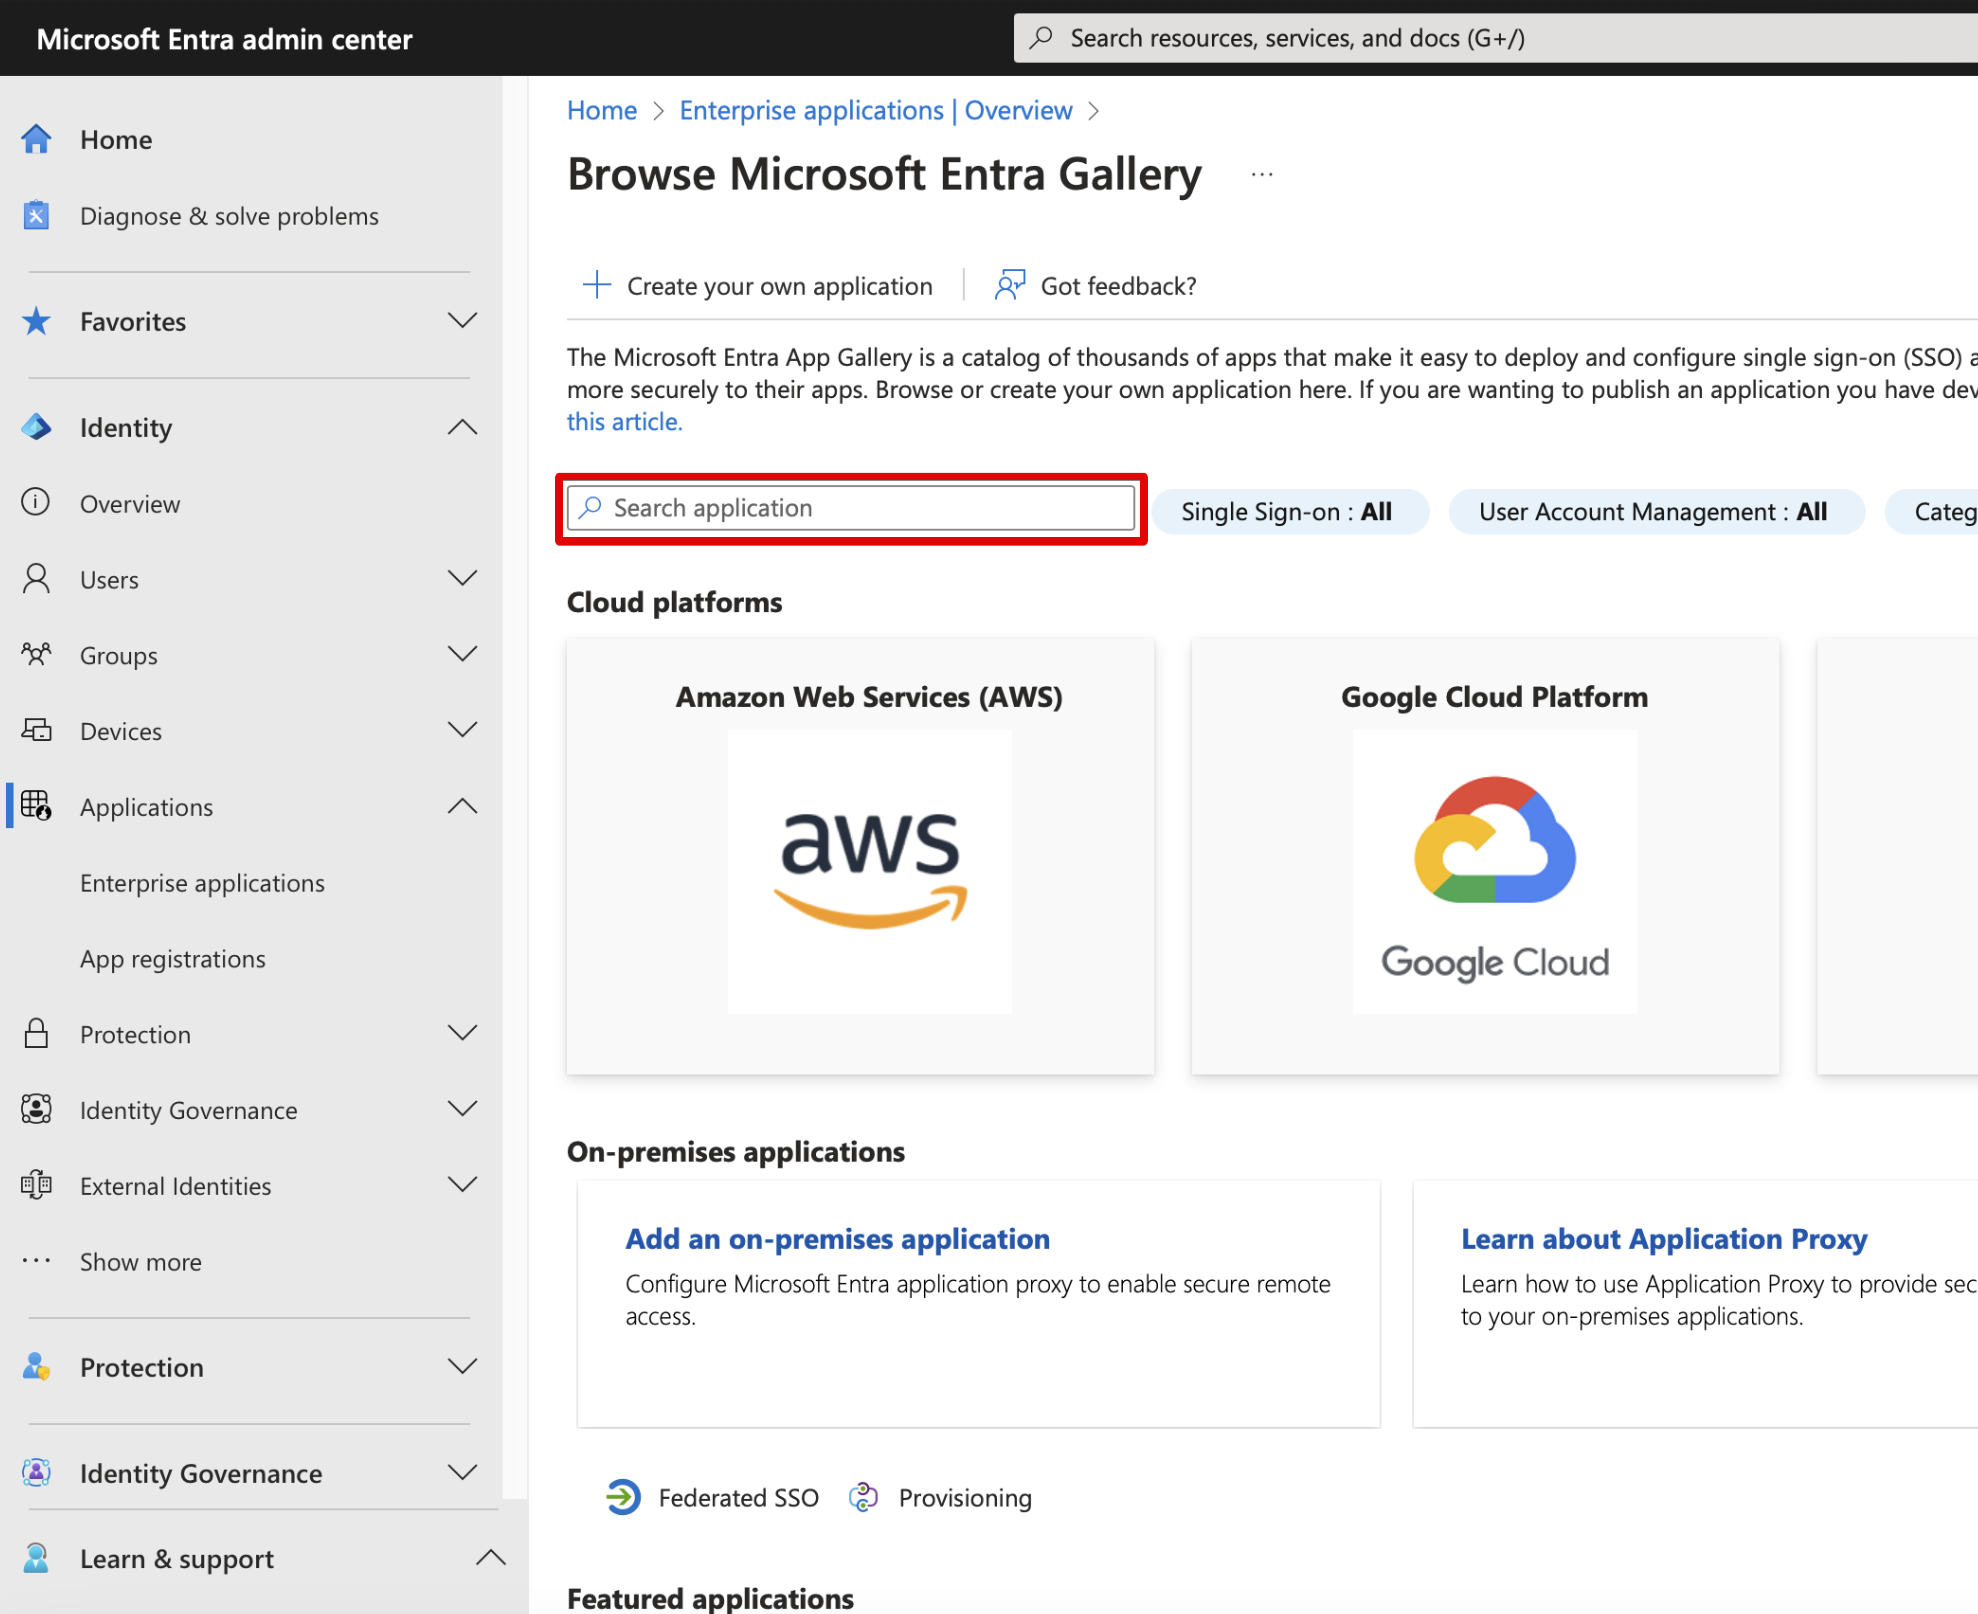
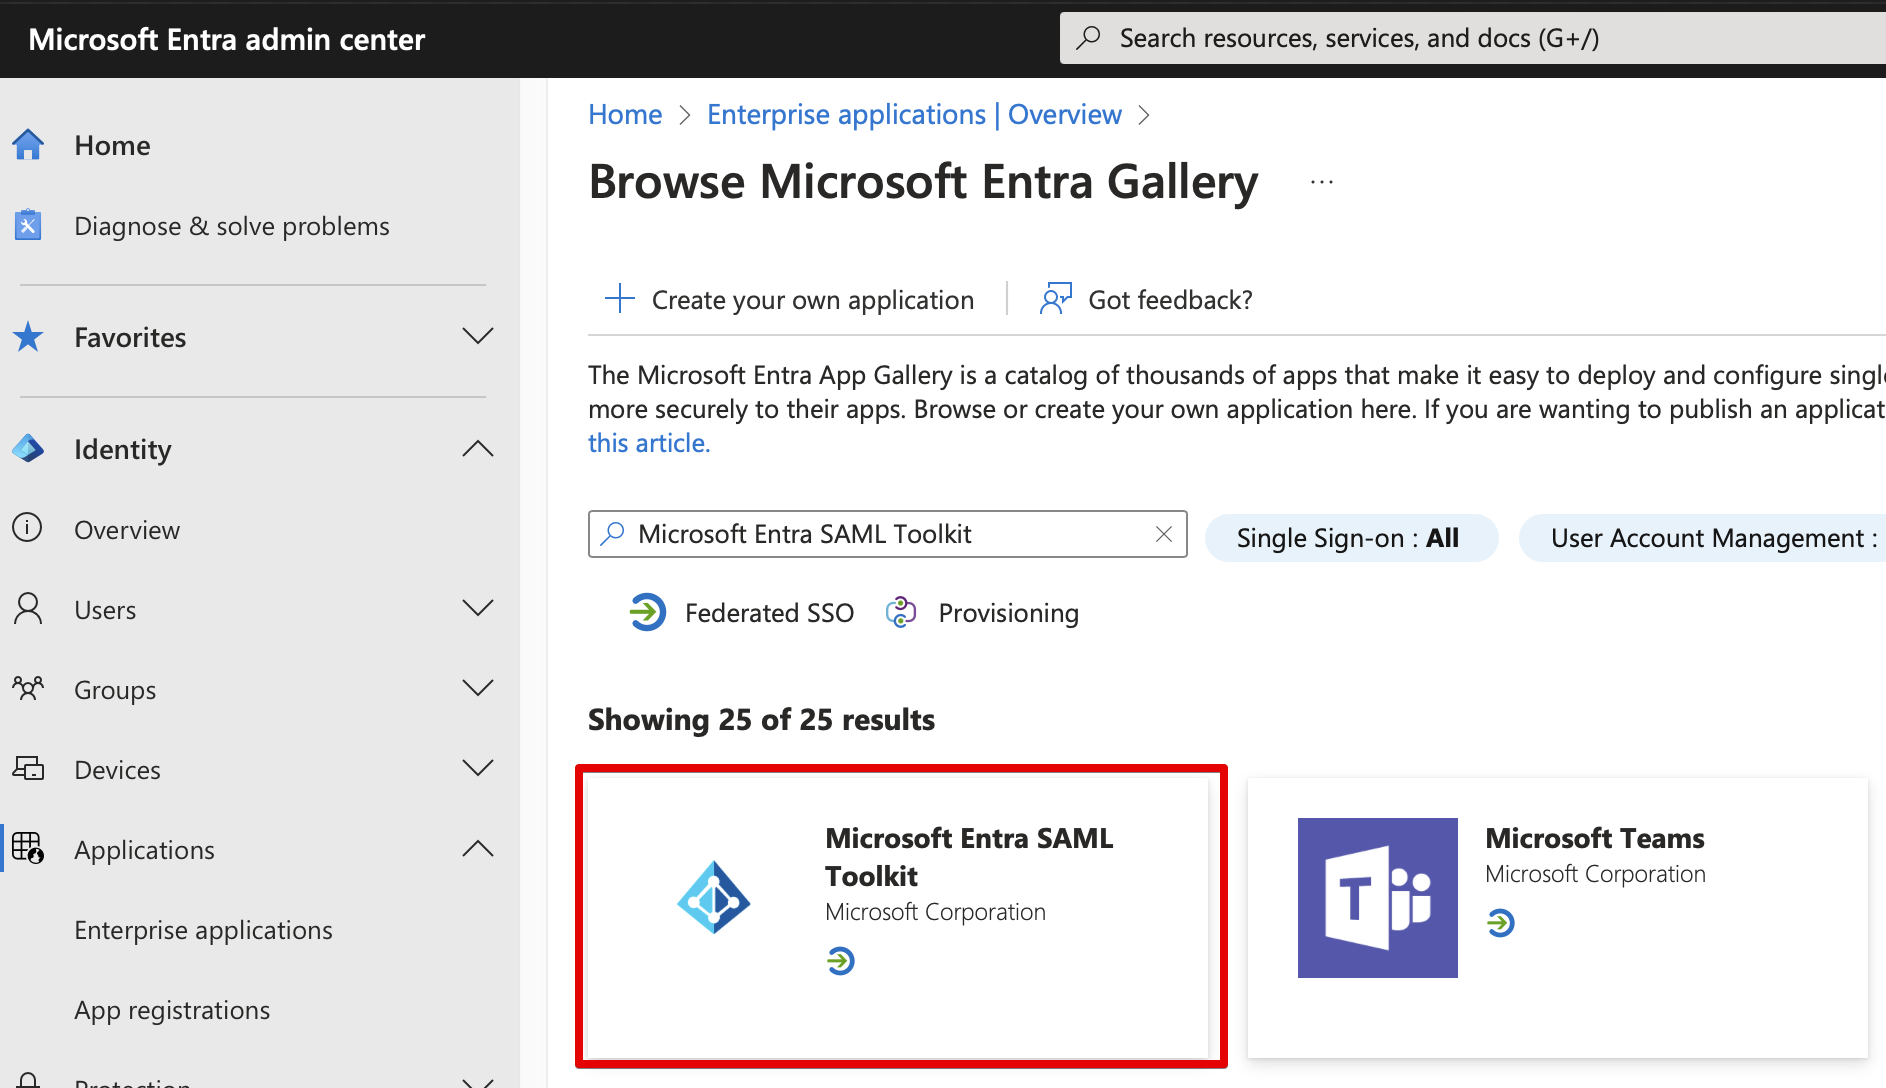
Type “Microsoft Entra SAML Toolkit” in the Search application.
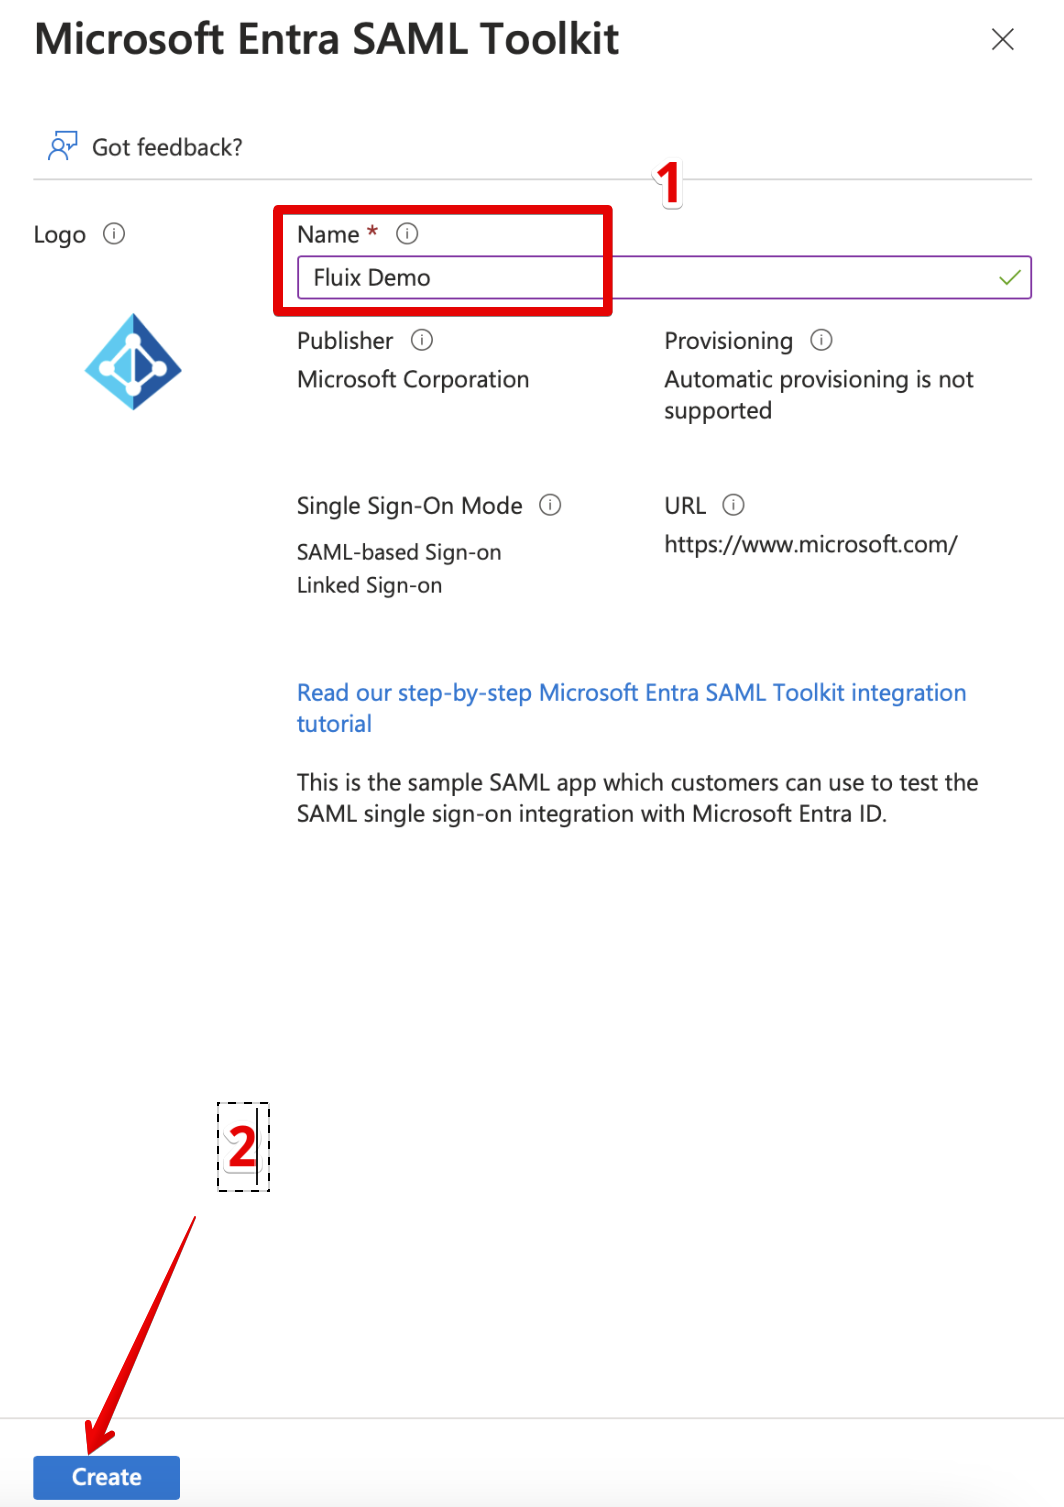
Click on the founded toolkit:
Type the name in the opened window and press Create.
After that, open your application page: (It may be opened automatically after pressing “Create” – this step can be skipped) Identity → Applications → Enterprise applications and selected created by you Application from the list.
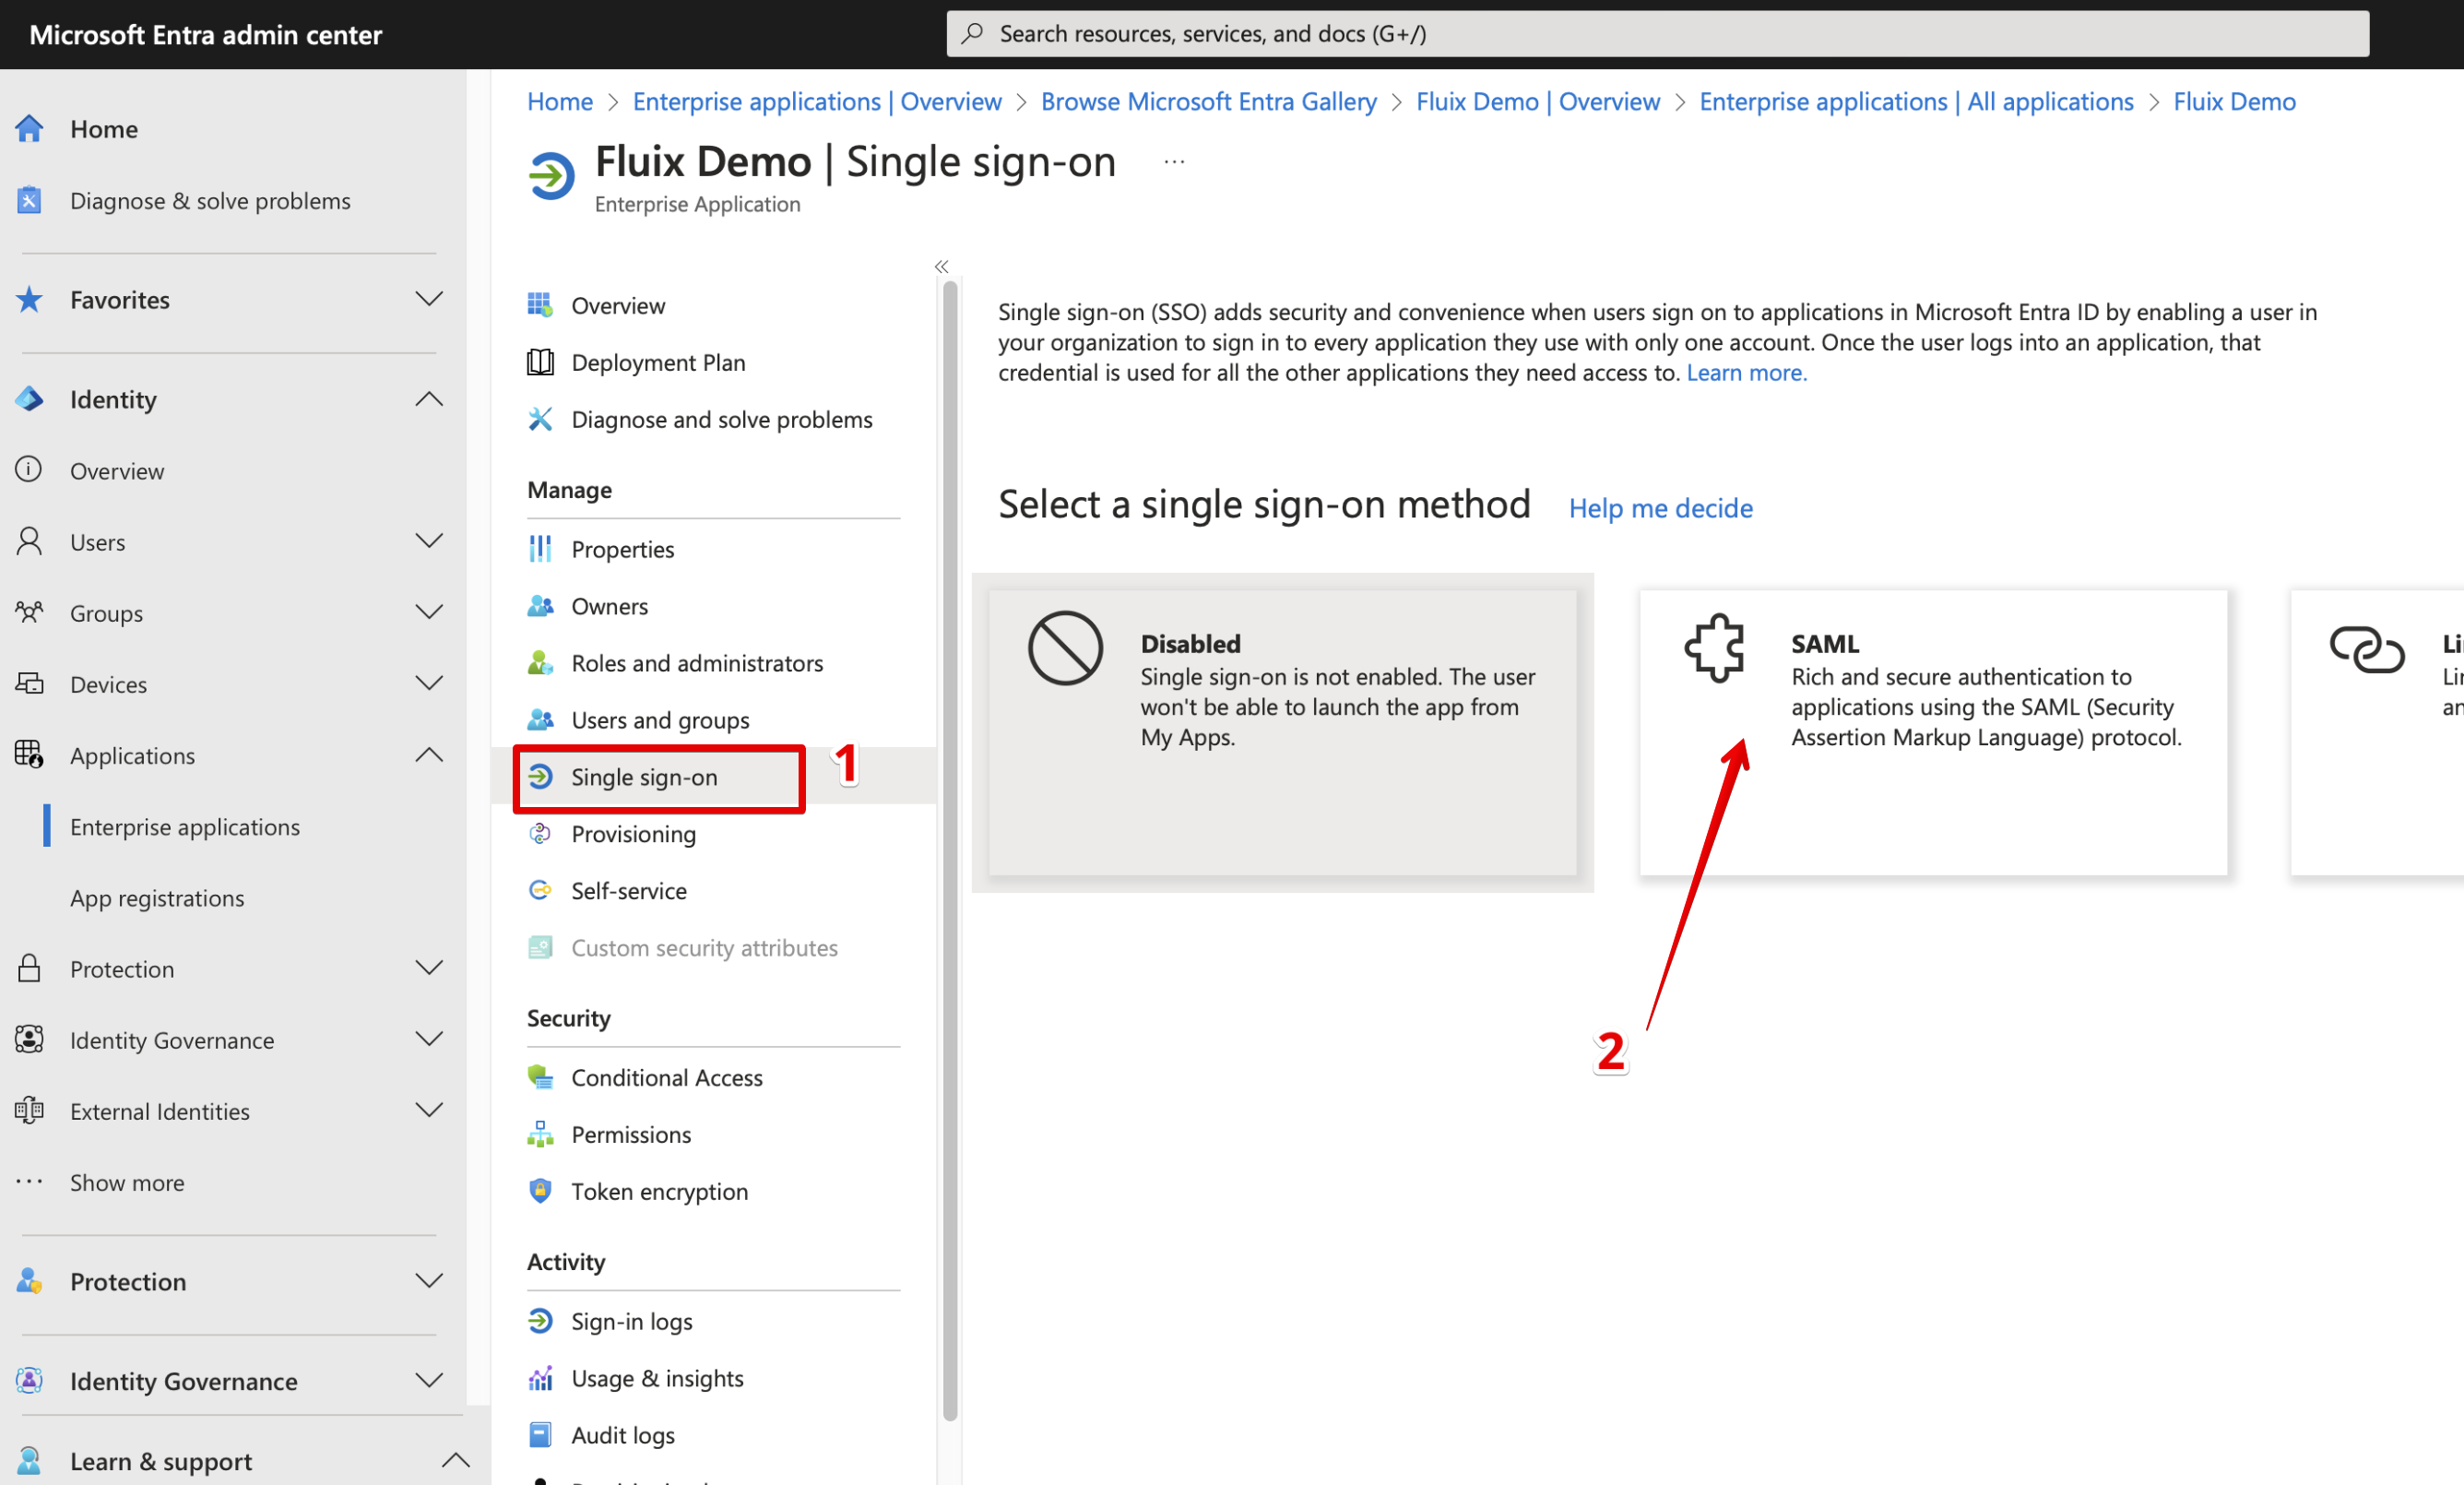
Navigate to Single Sign On menu and select SAML.
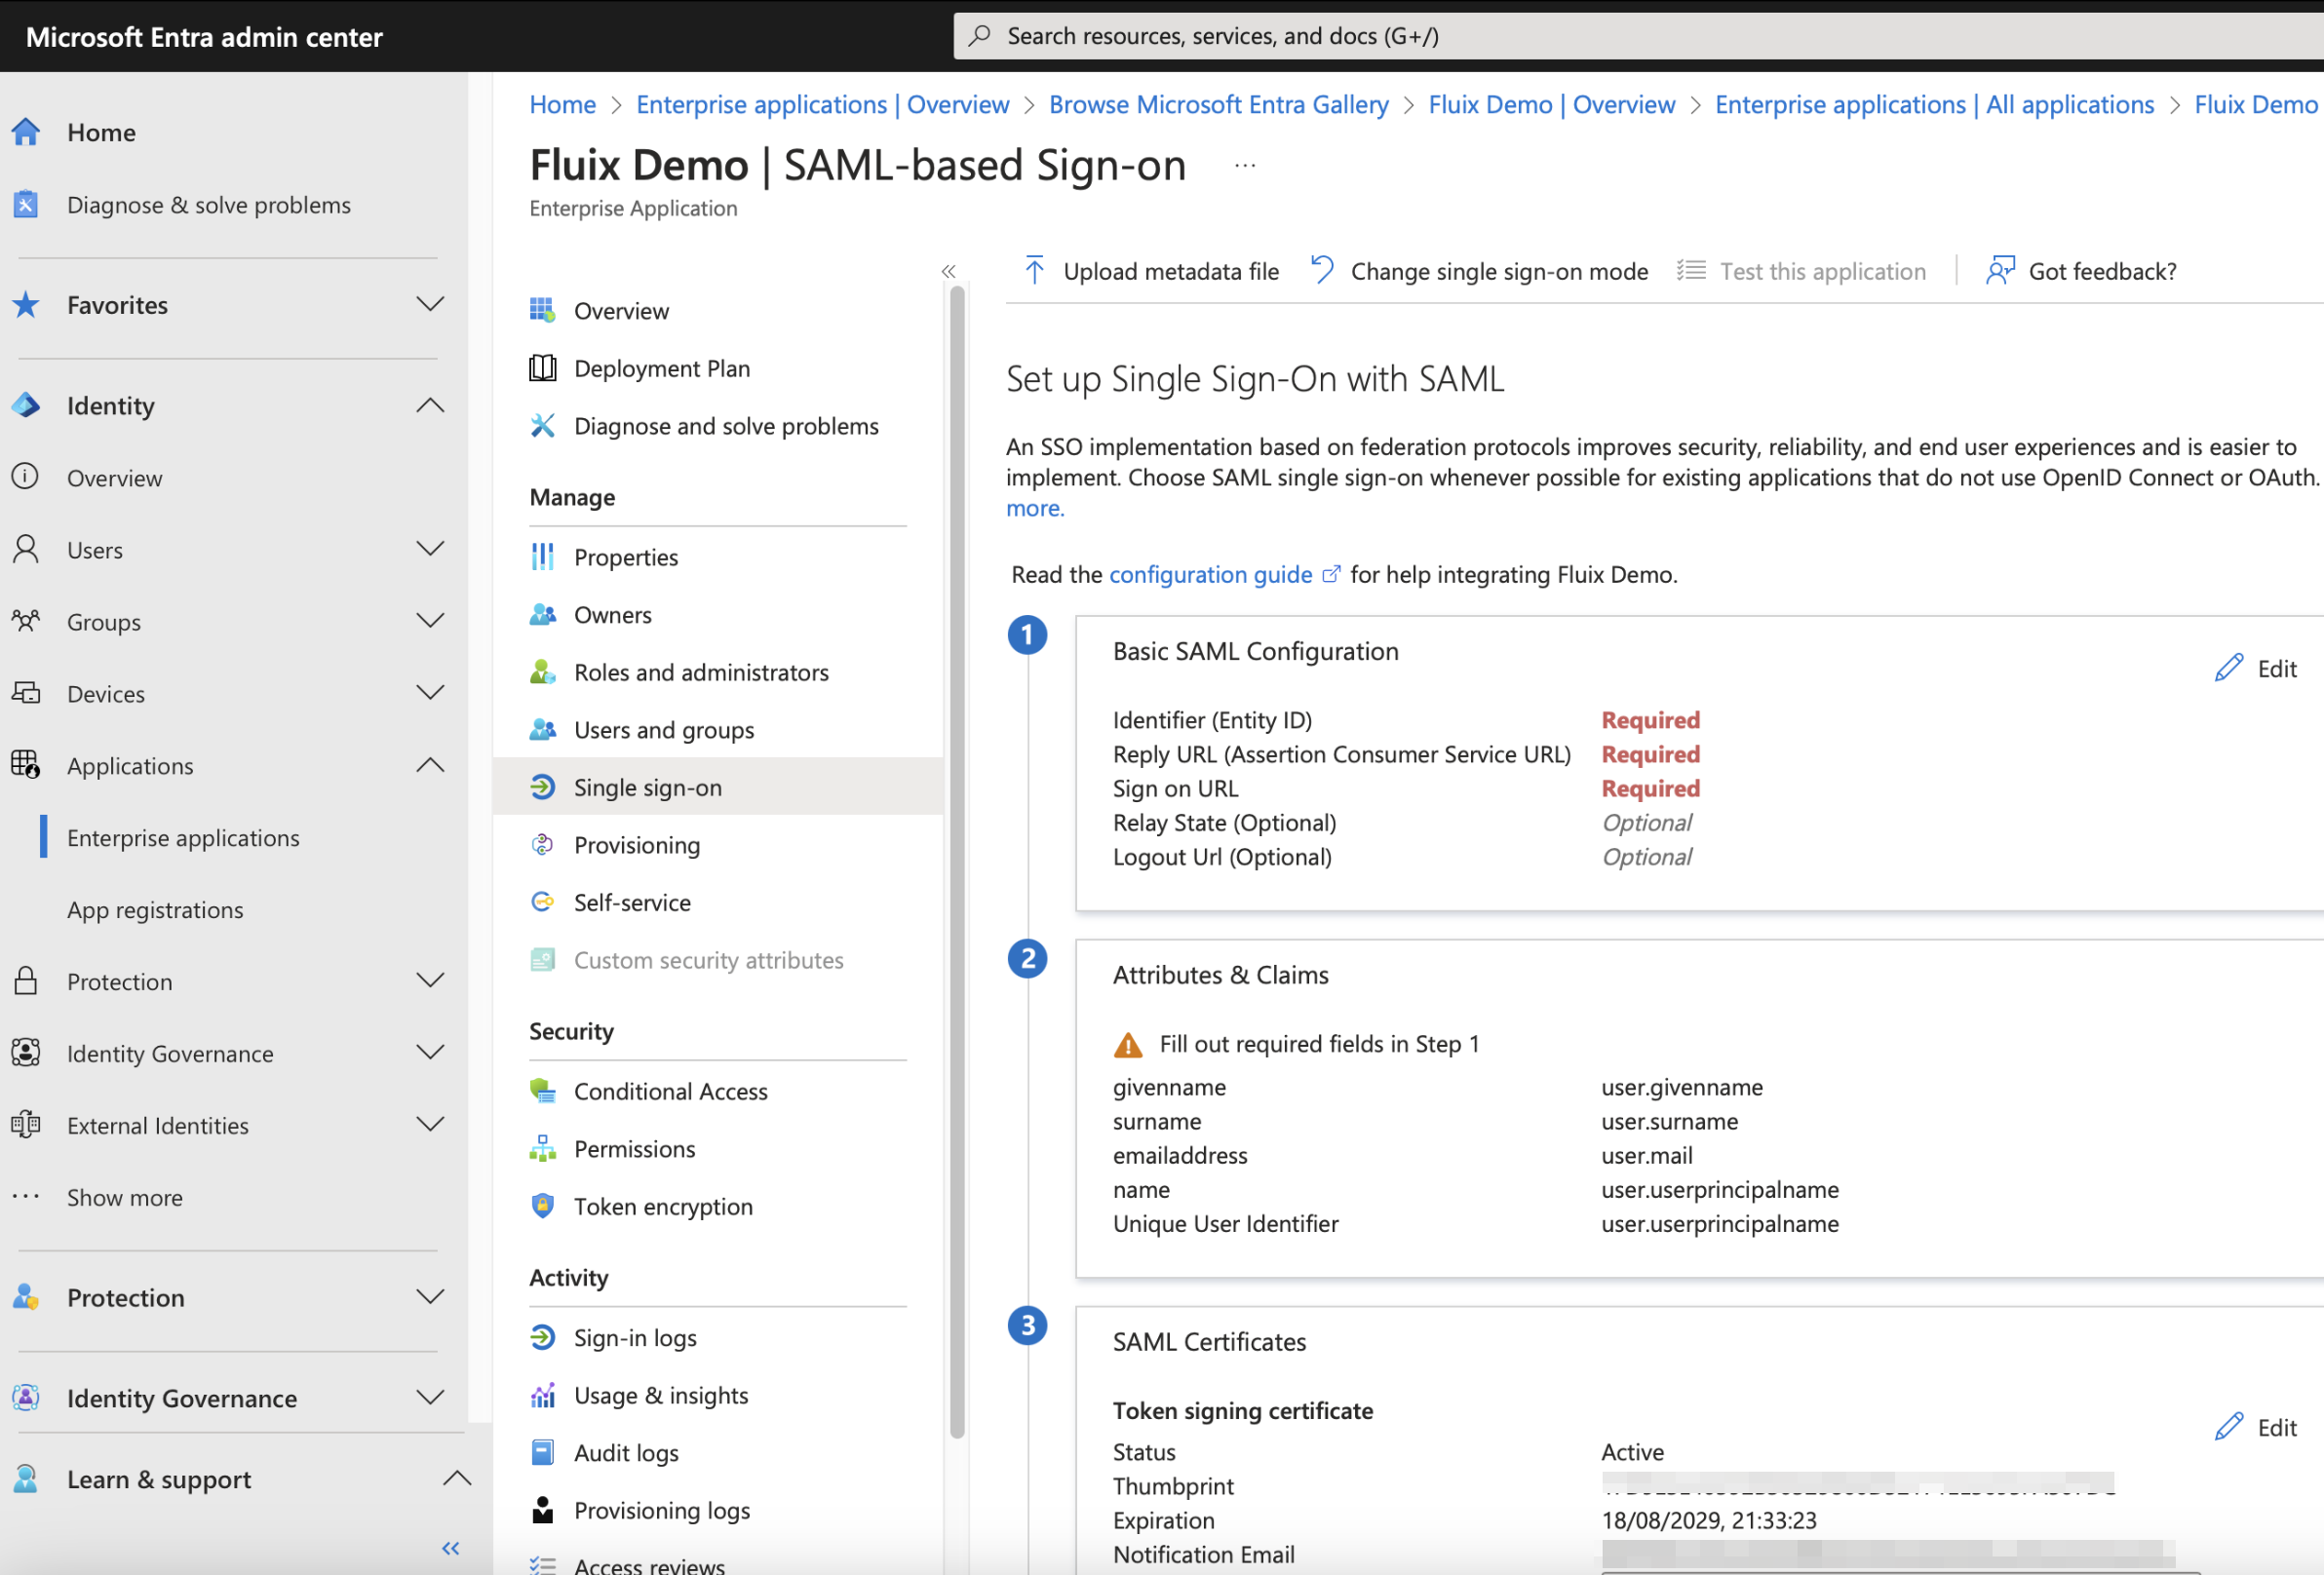
It will lead you to Application SAML configuration page:
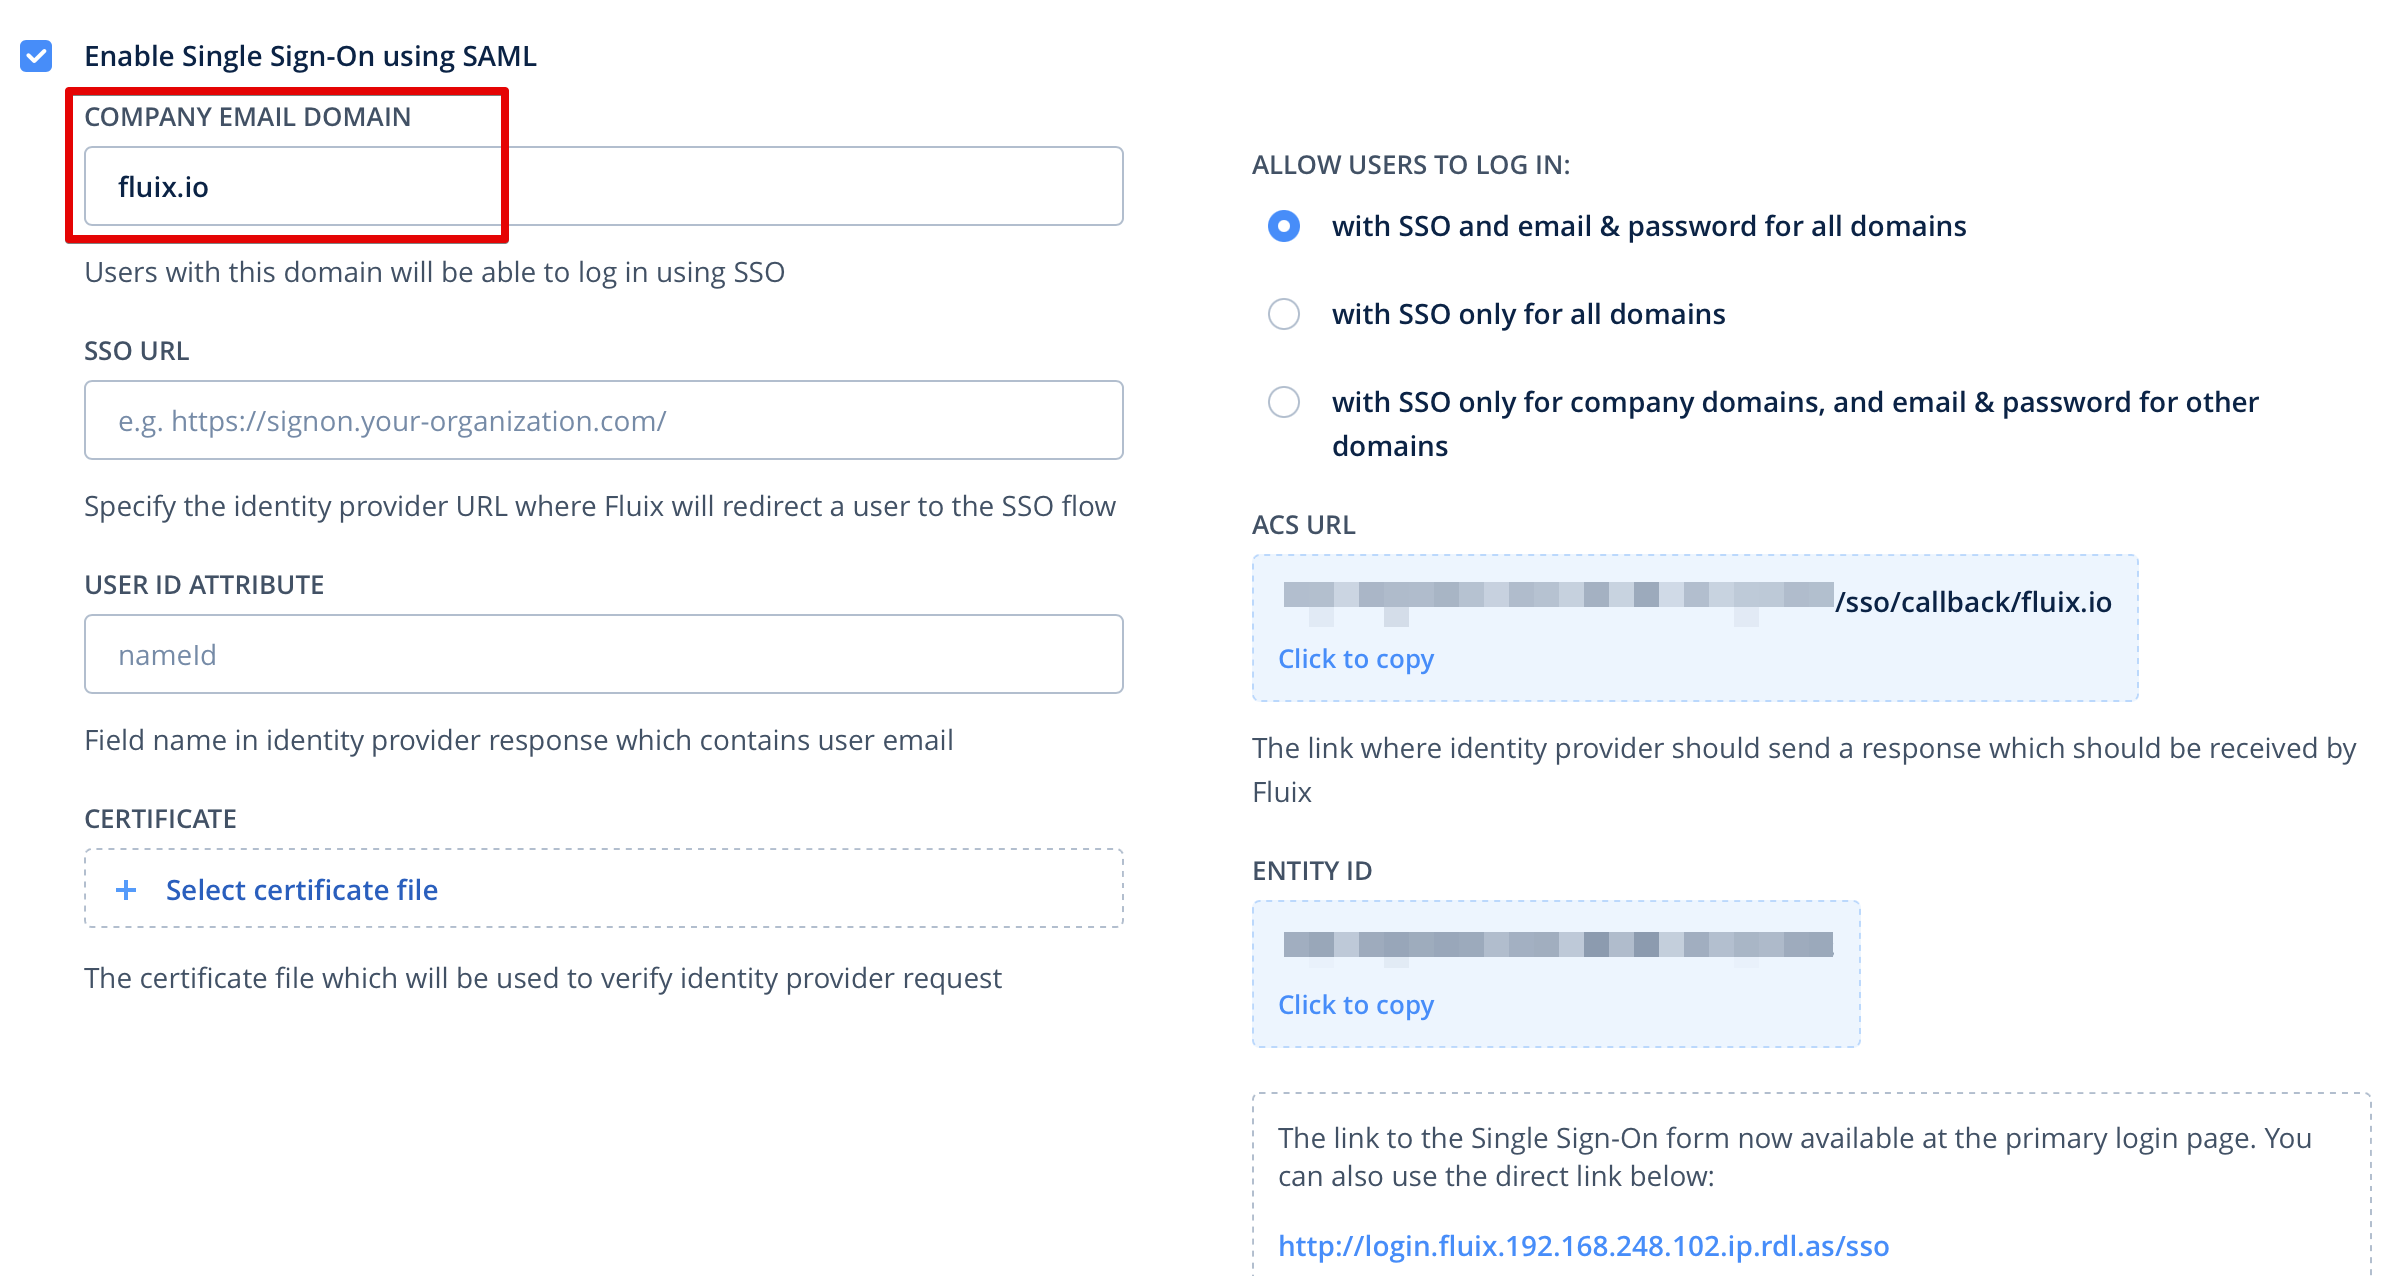
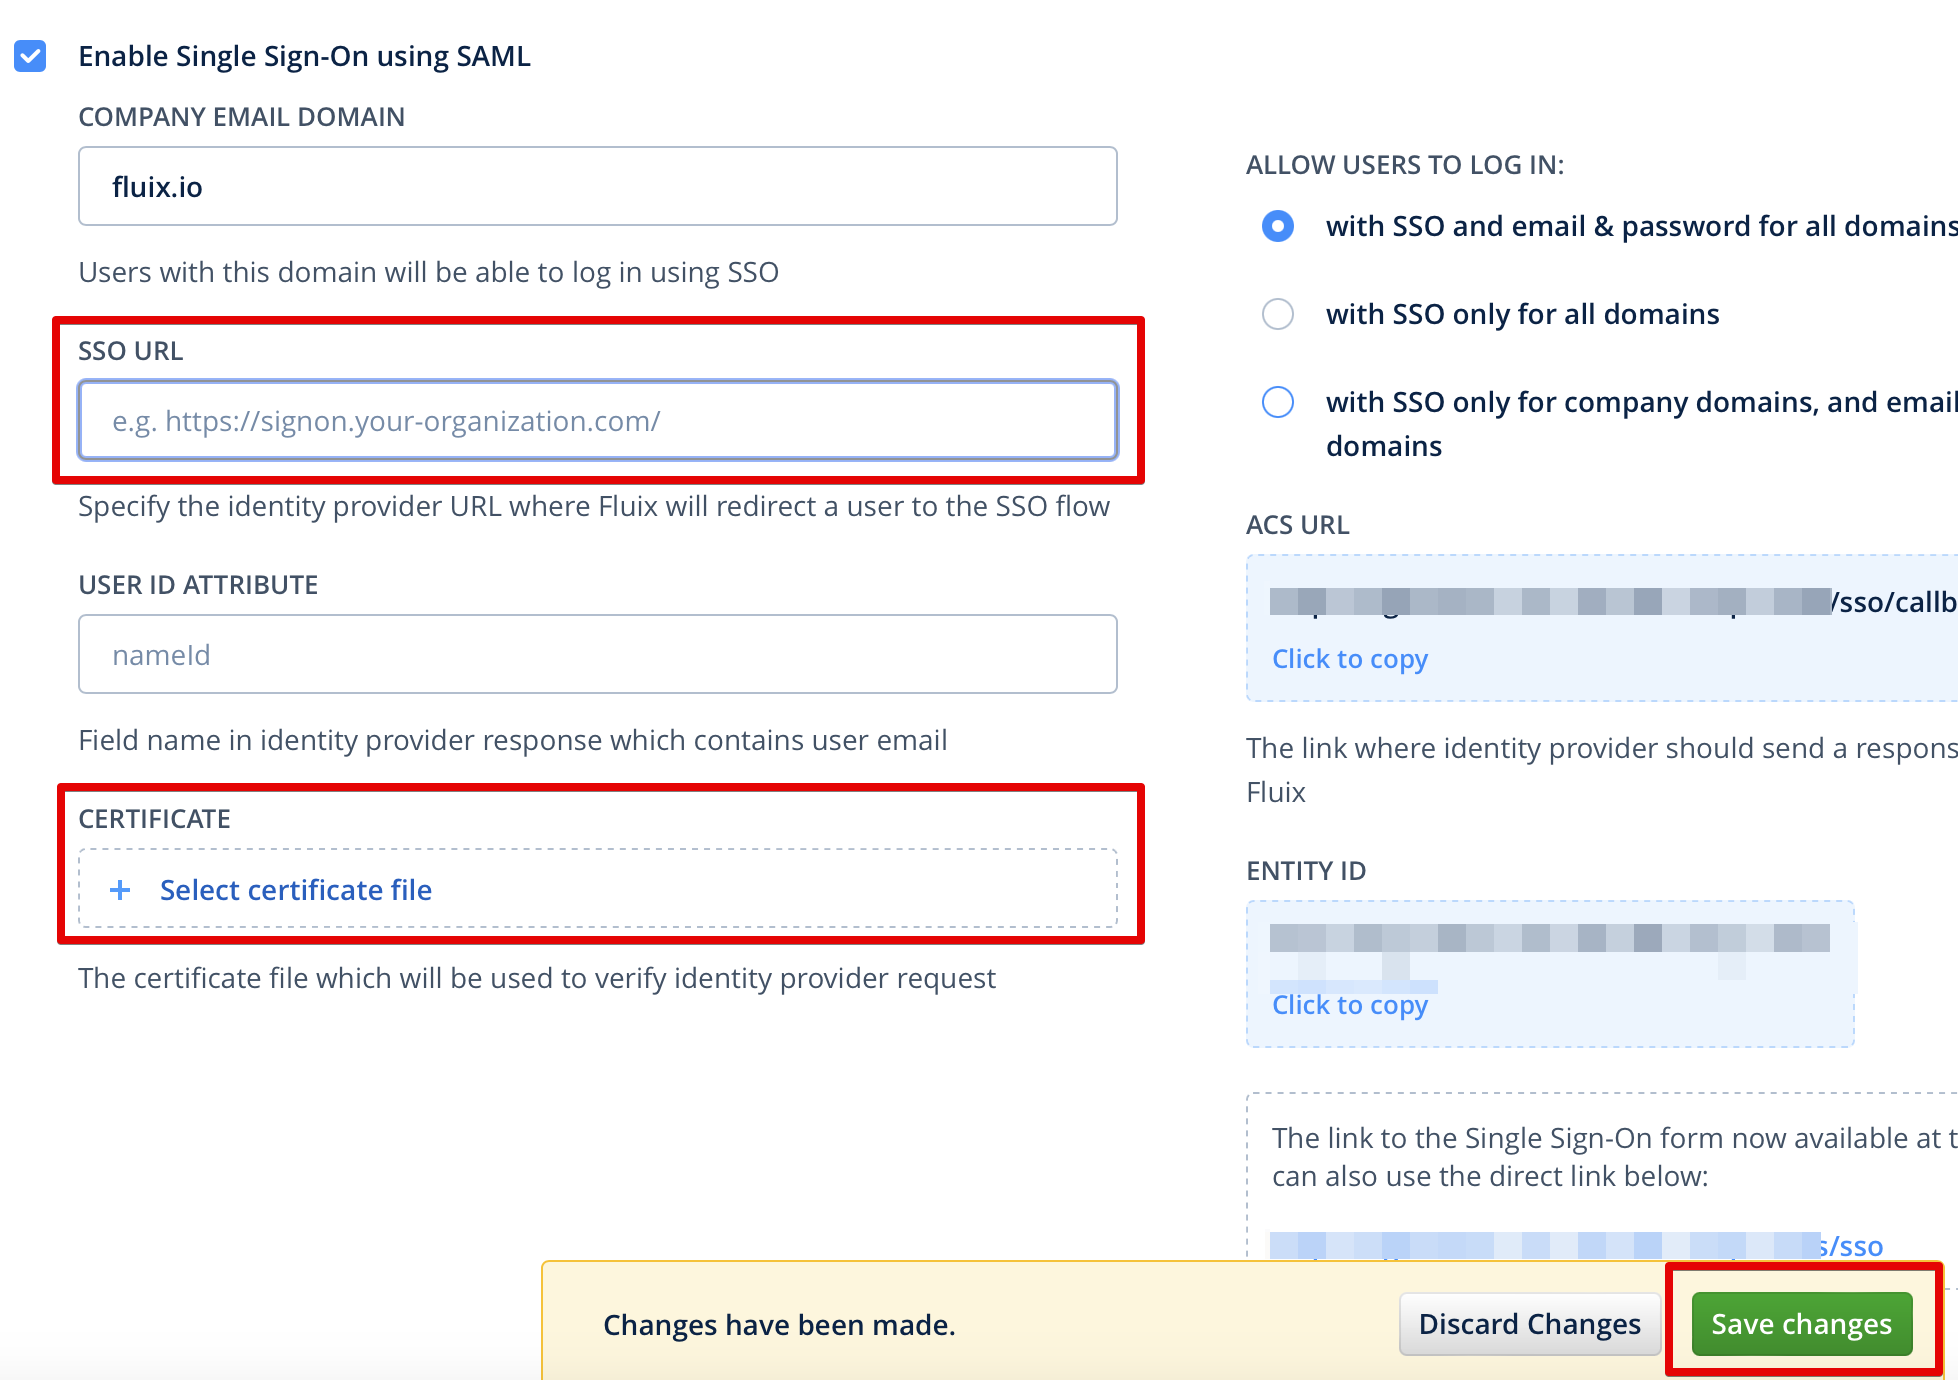
On this step, open in the separated tab Fluix Admin Portal -> Settings -> Security -> enable Enable Sign On using SAML and fill out Company Email Domain field:
After that, ACS URL will change and consist of the entered “Company Email Domain”.
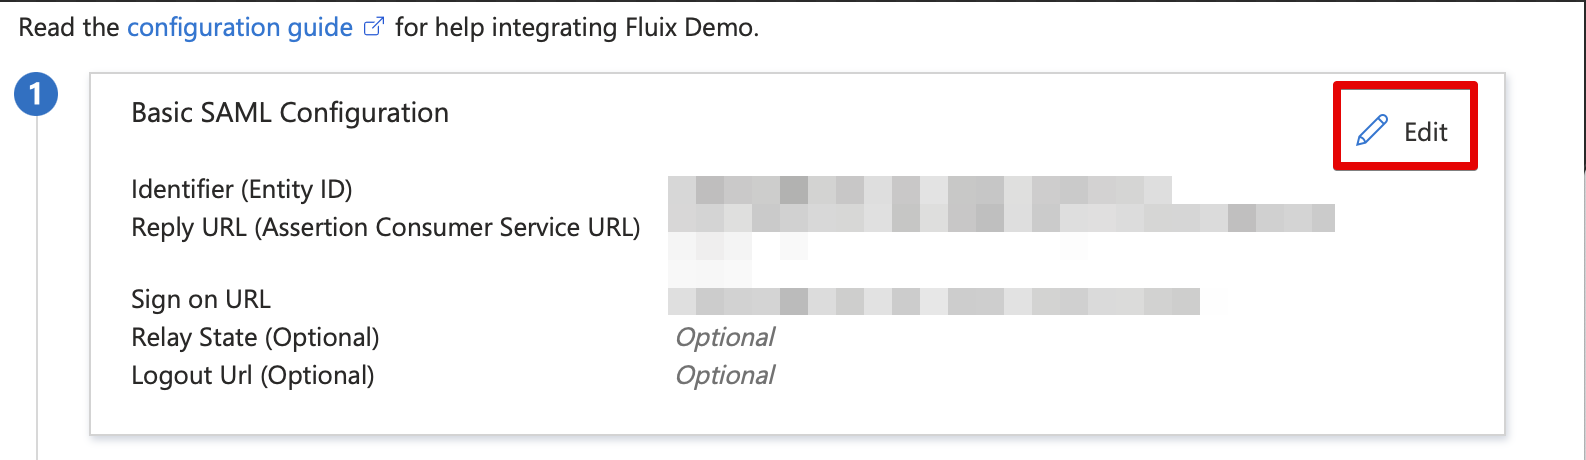
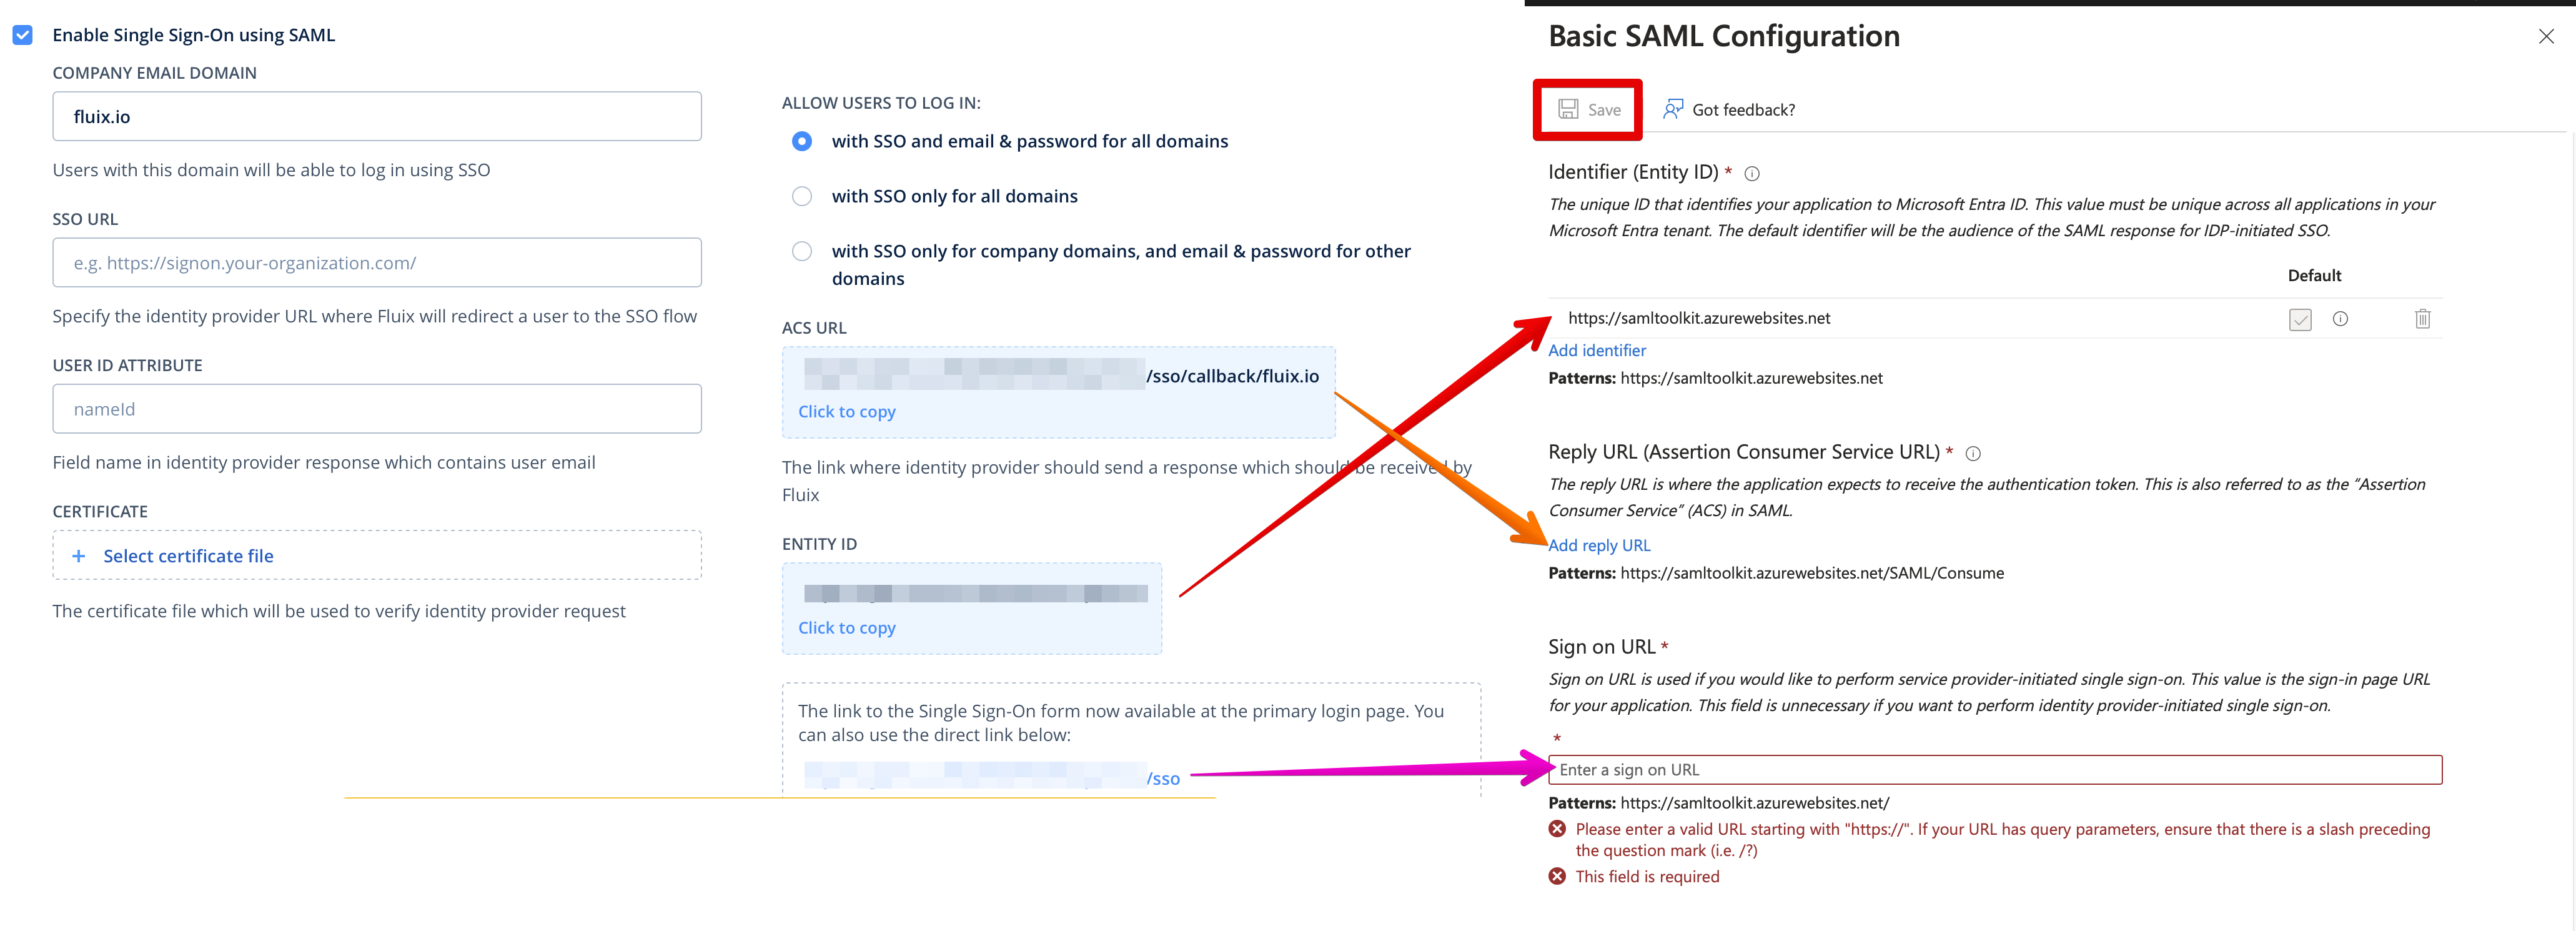
Navigate back to your Microsoft account and click Edit on the first block step:
Add from Fluix to Microsoft the following settings, and click Save:
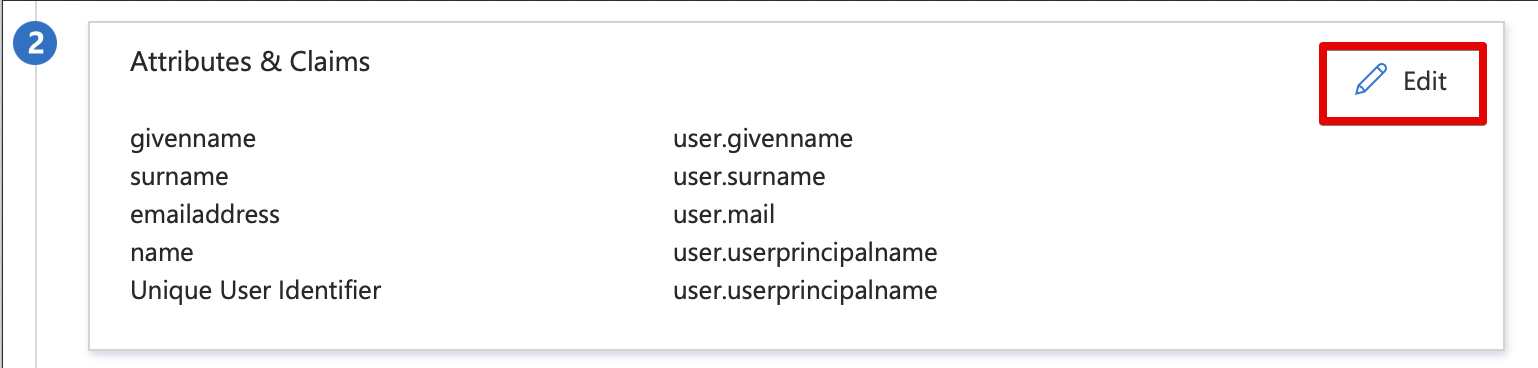
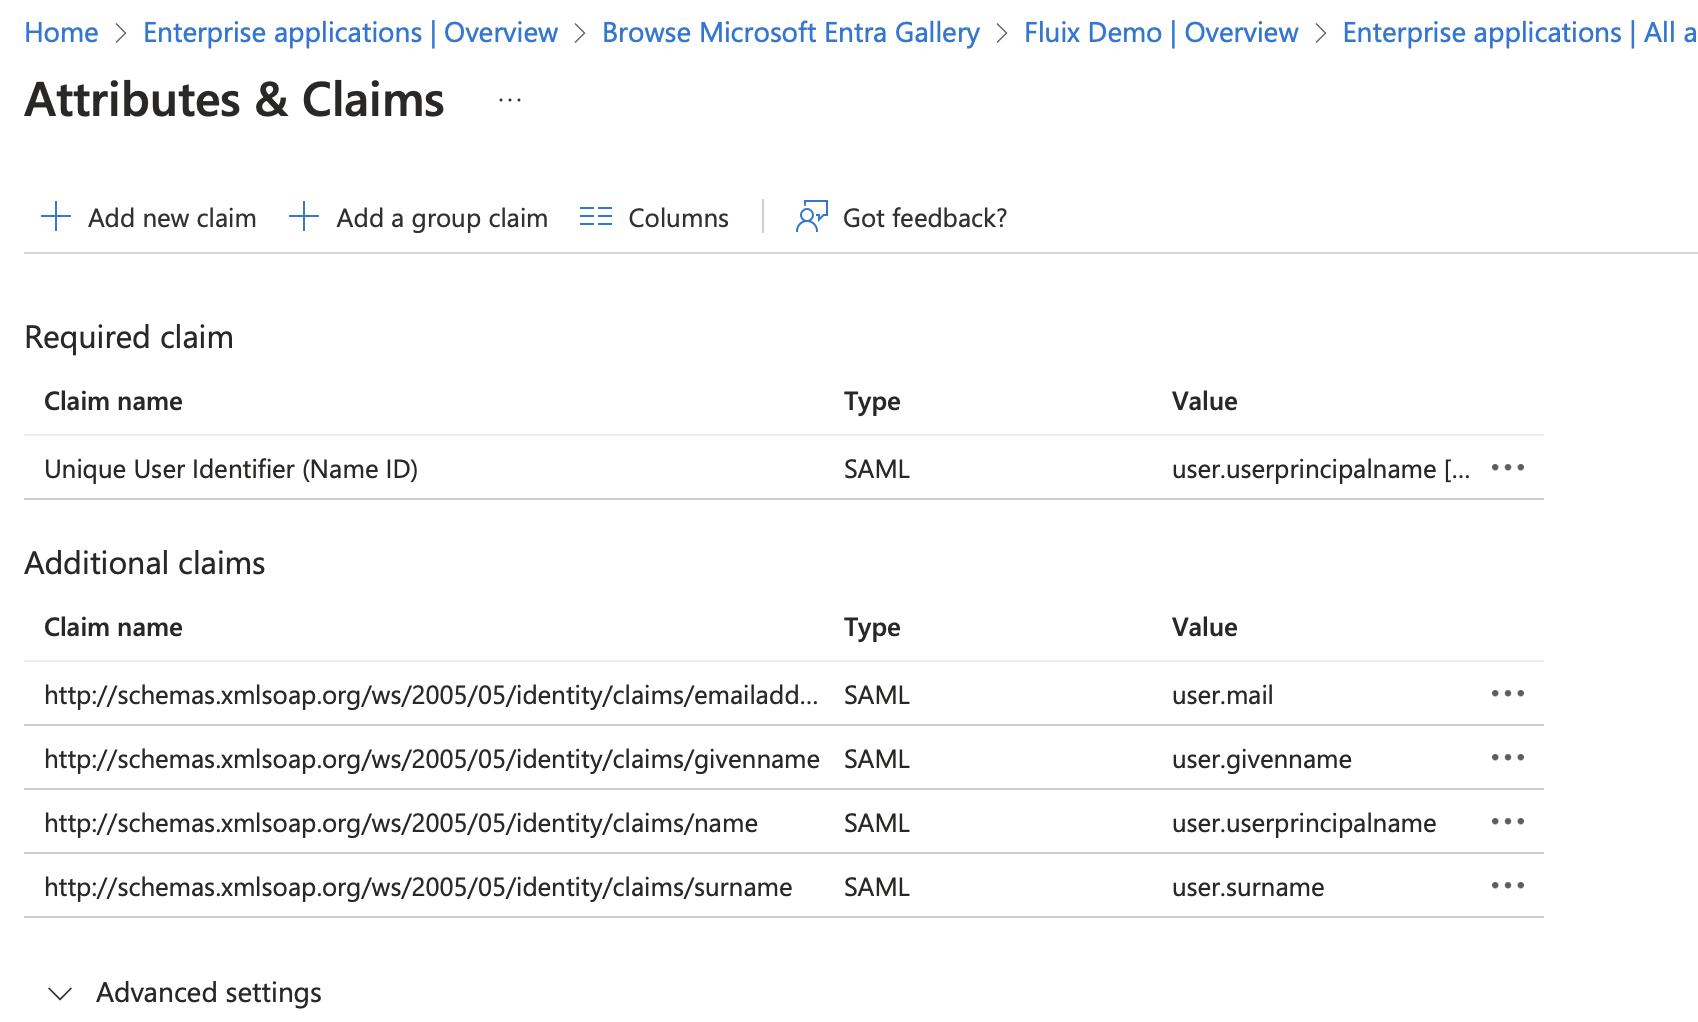
Navigate in Microsoft to the next block 2 and click Edit:
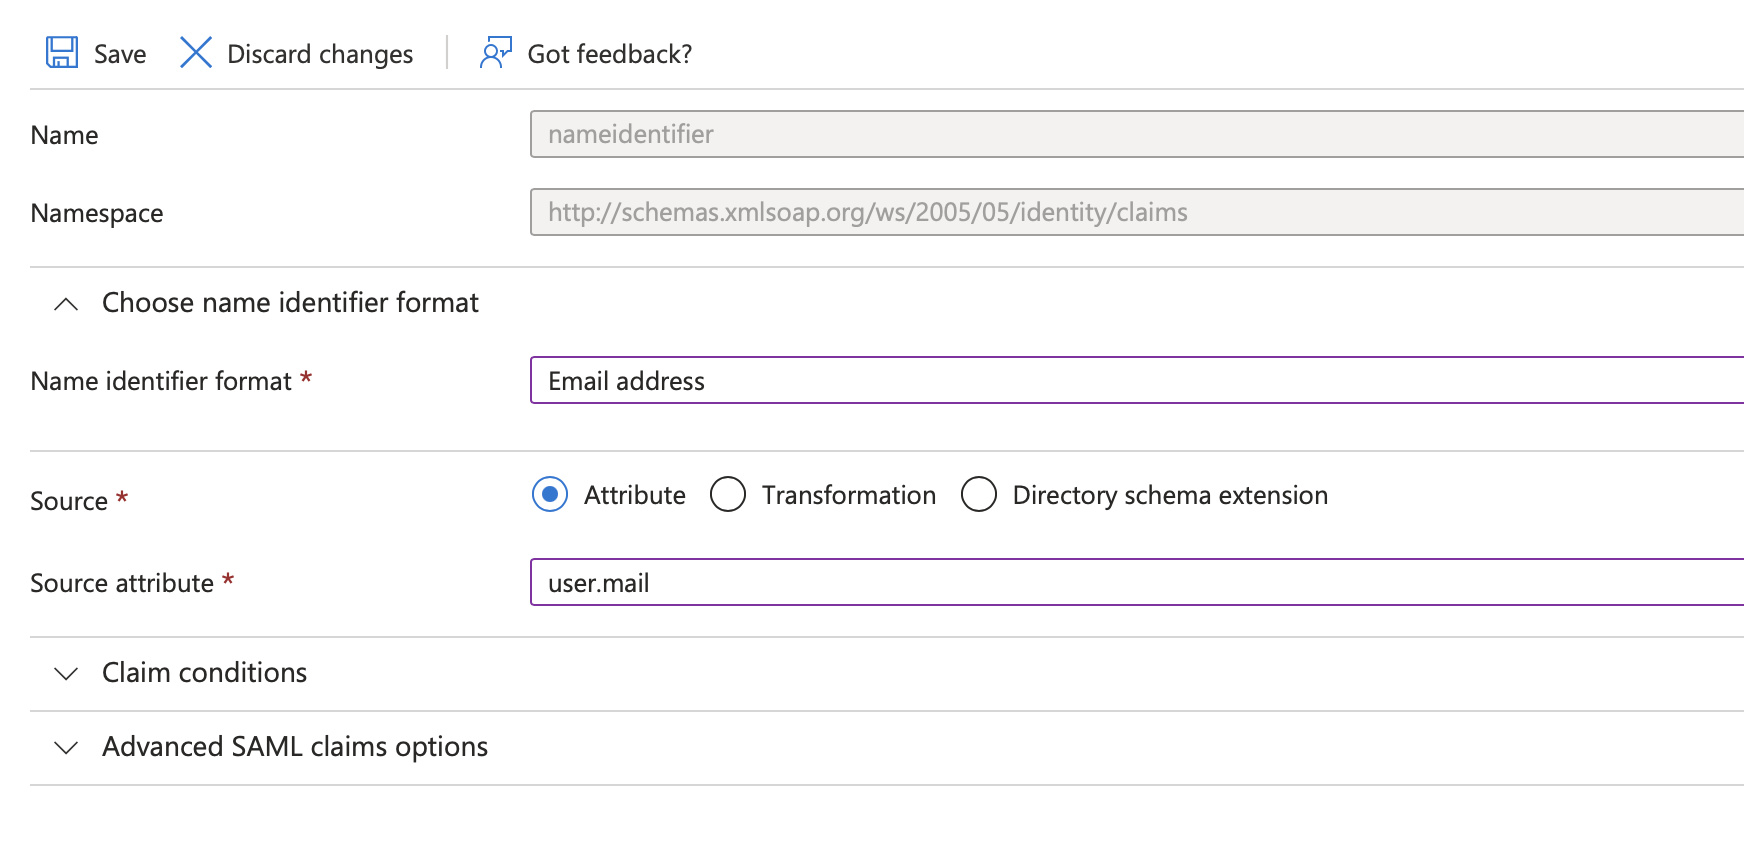
On the opened page:
delete all additional claims
change value of Unique User Identifier (Name ID) to the user.mail or any other source attribute which consists of user email (this email will be used to authenticate a user in Fluix) and press Save.
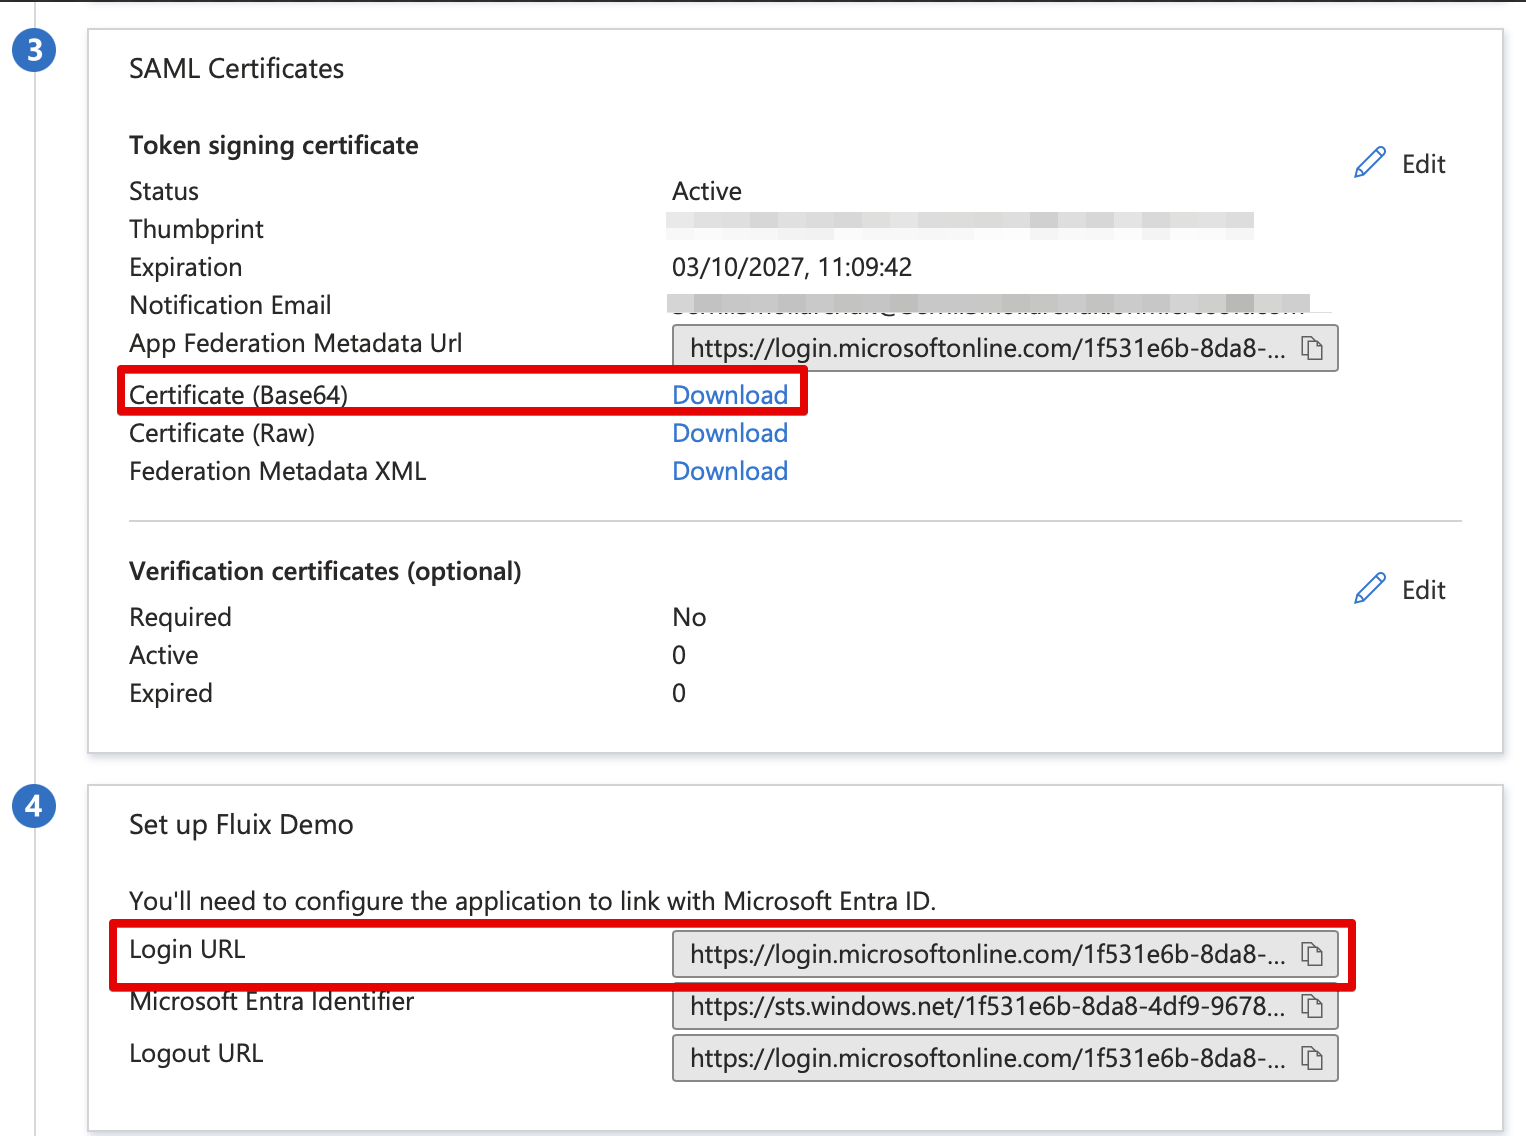
Return back to Microsoft SAML Configuration:
copy Login Url from Microsoft to Fluix SSO Url download Certificate (Base64) to Fluix certificate keep USER ID ATTRIBUTE in Fluix empty (it’s an advanced option to receive email from SAML Response using additional claims) press Save Changes in Fluix.
Once the configuration is done, you should be able to login Fluix using SSO from the page: https://login.fluix.io/sso
Feel free to contact us at support@fluix.io if you have any questions or comments.
Was this article helpful?
Thanks for your feedback!
Oops, something went wrong. Please, try again later.
Thank you!
What details or examples would have made this article more helpful for you? We appreciate your insights!
Data collection in forms is an integral part of front-line staff’s jobs, while data review and analysis are everyday tasks for office staff. To ease the task for both teams, managers try to make digital forms easy to fill in and advanced enough to collect all the needed data.
Fluix is a platform that covers all the mentioned aspects:
Form creation
Form filling
Workflow automation
Data reporting
In this article, we will see how to create a fillable form in Fluix Form Builder. Fluix allows you to create a form in PDF or web format, depending on your preferences and needs.
How to create a fillable form in Fluix?
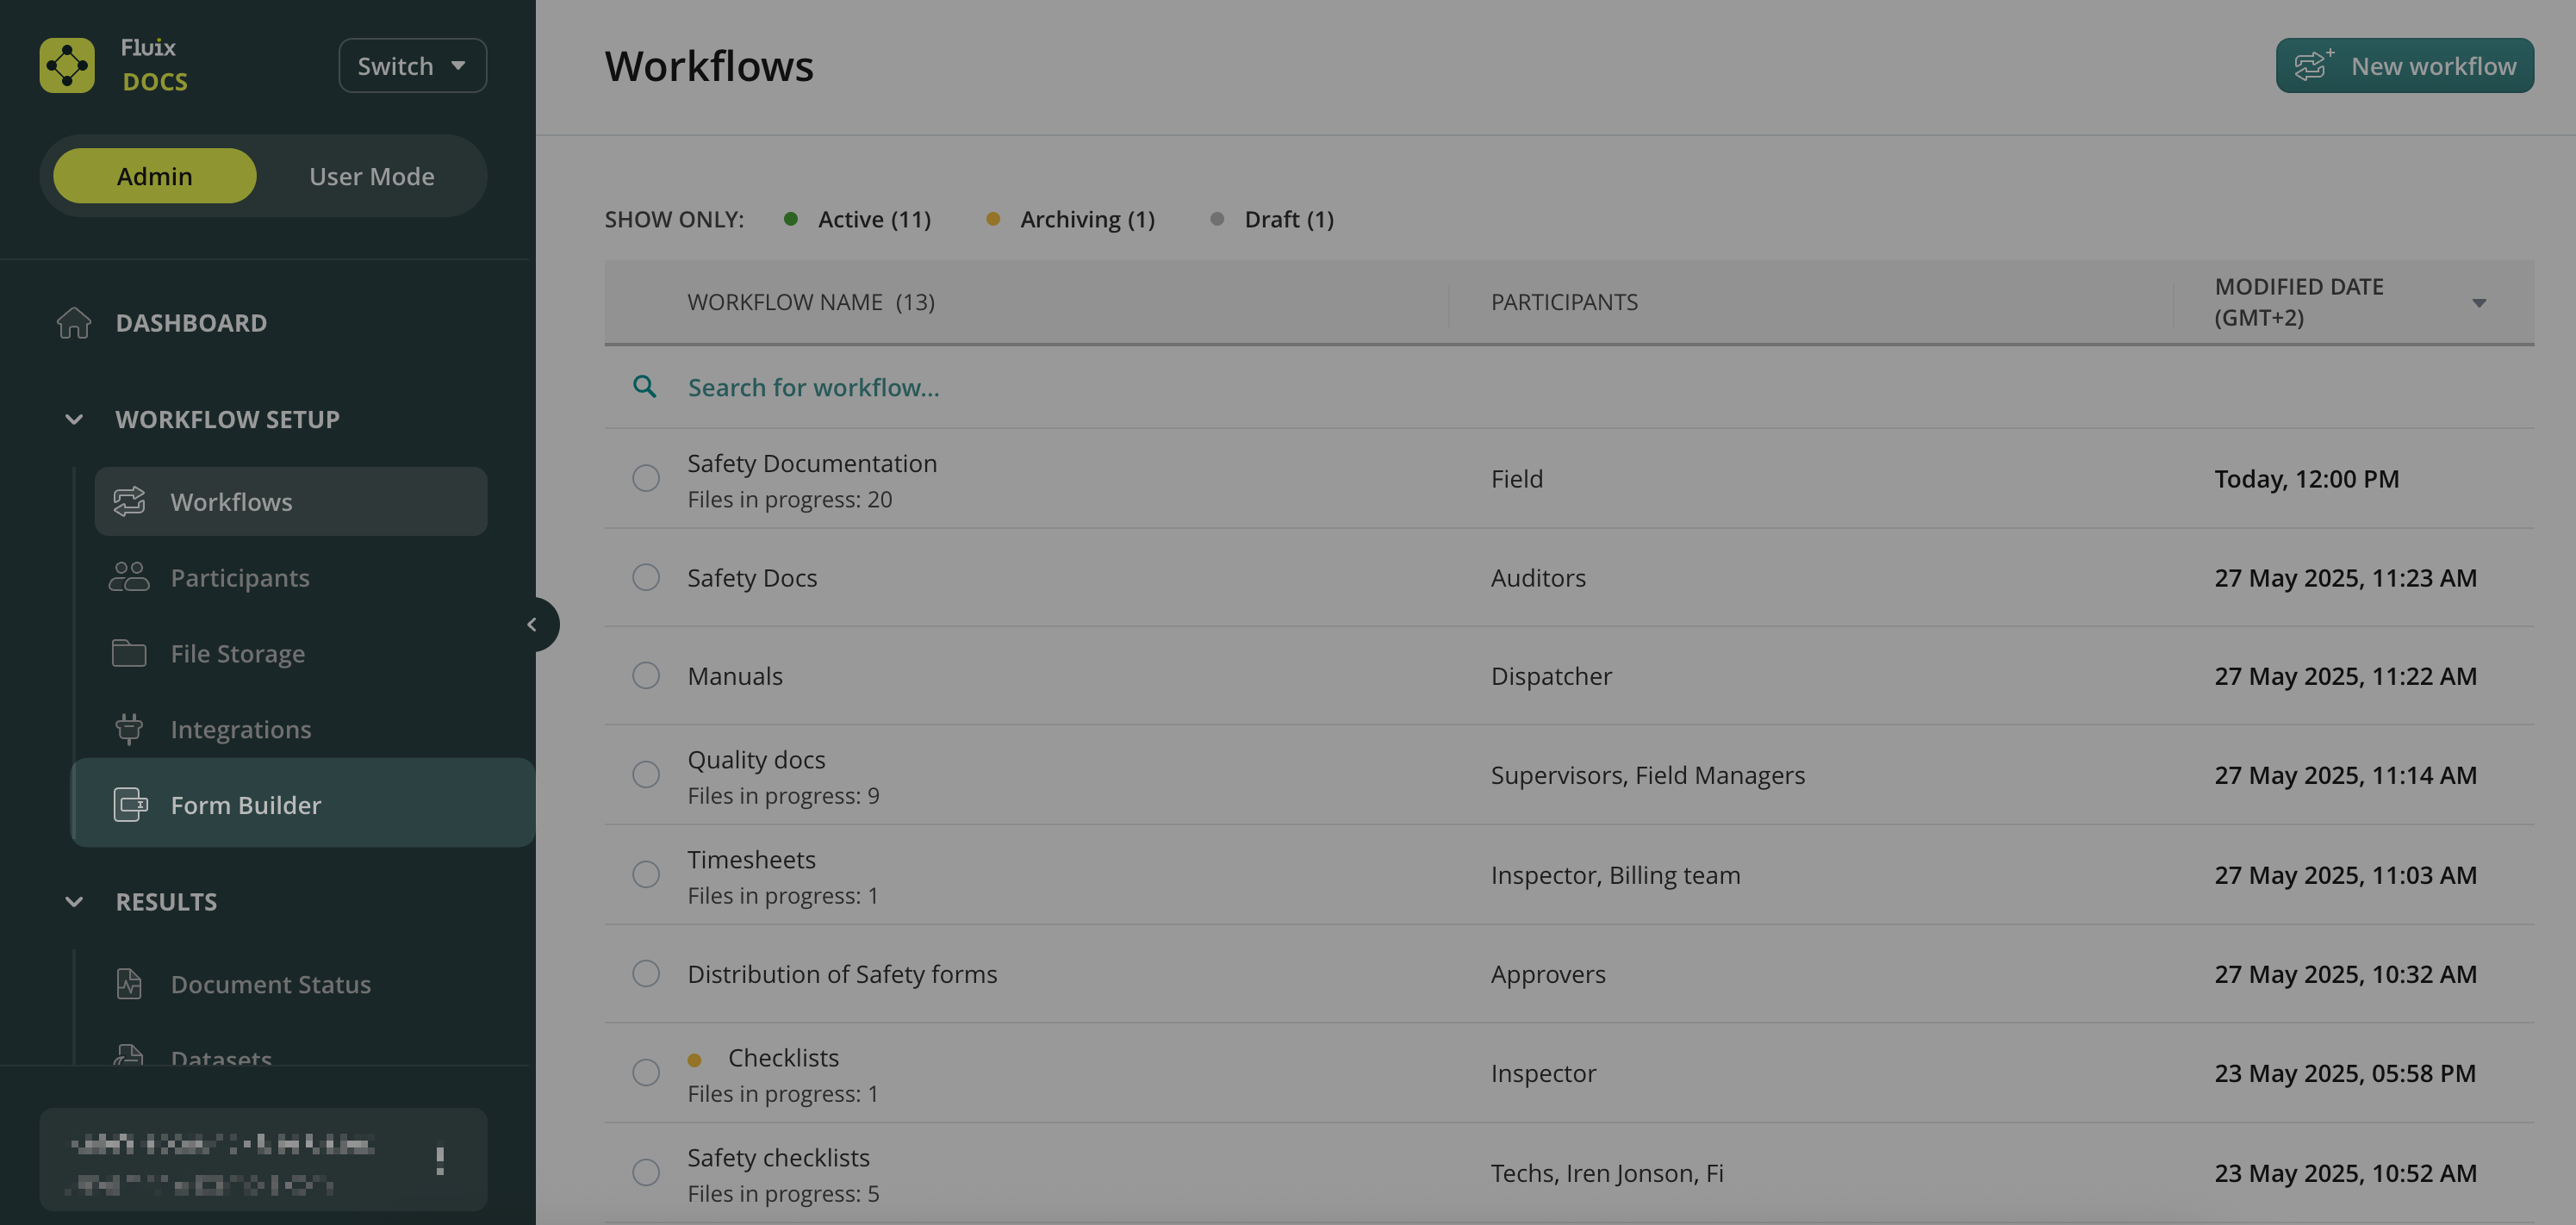
To create a web form in Fluix Docs, navigate to the Workflow setup section -> Form Builder.
The left menu contains a list of elements that can be added to your form by clicking on each.
The elements are divided into three different groups:
Blocks – allow using presets of the most commonly used fields combined into blocks for your convenience.
Layout – lets you customize your forms by adding the text, your company’s logo, and a divider.
Fields – displays the different types of fields to allow users to fill out the most relevant information.
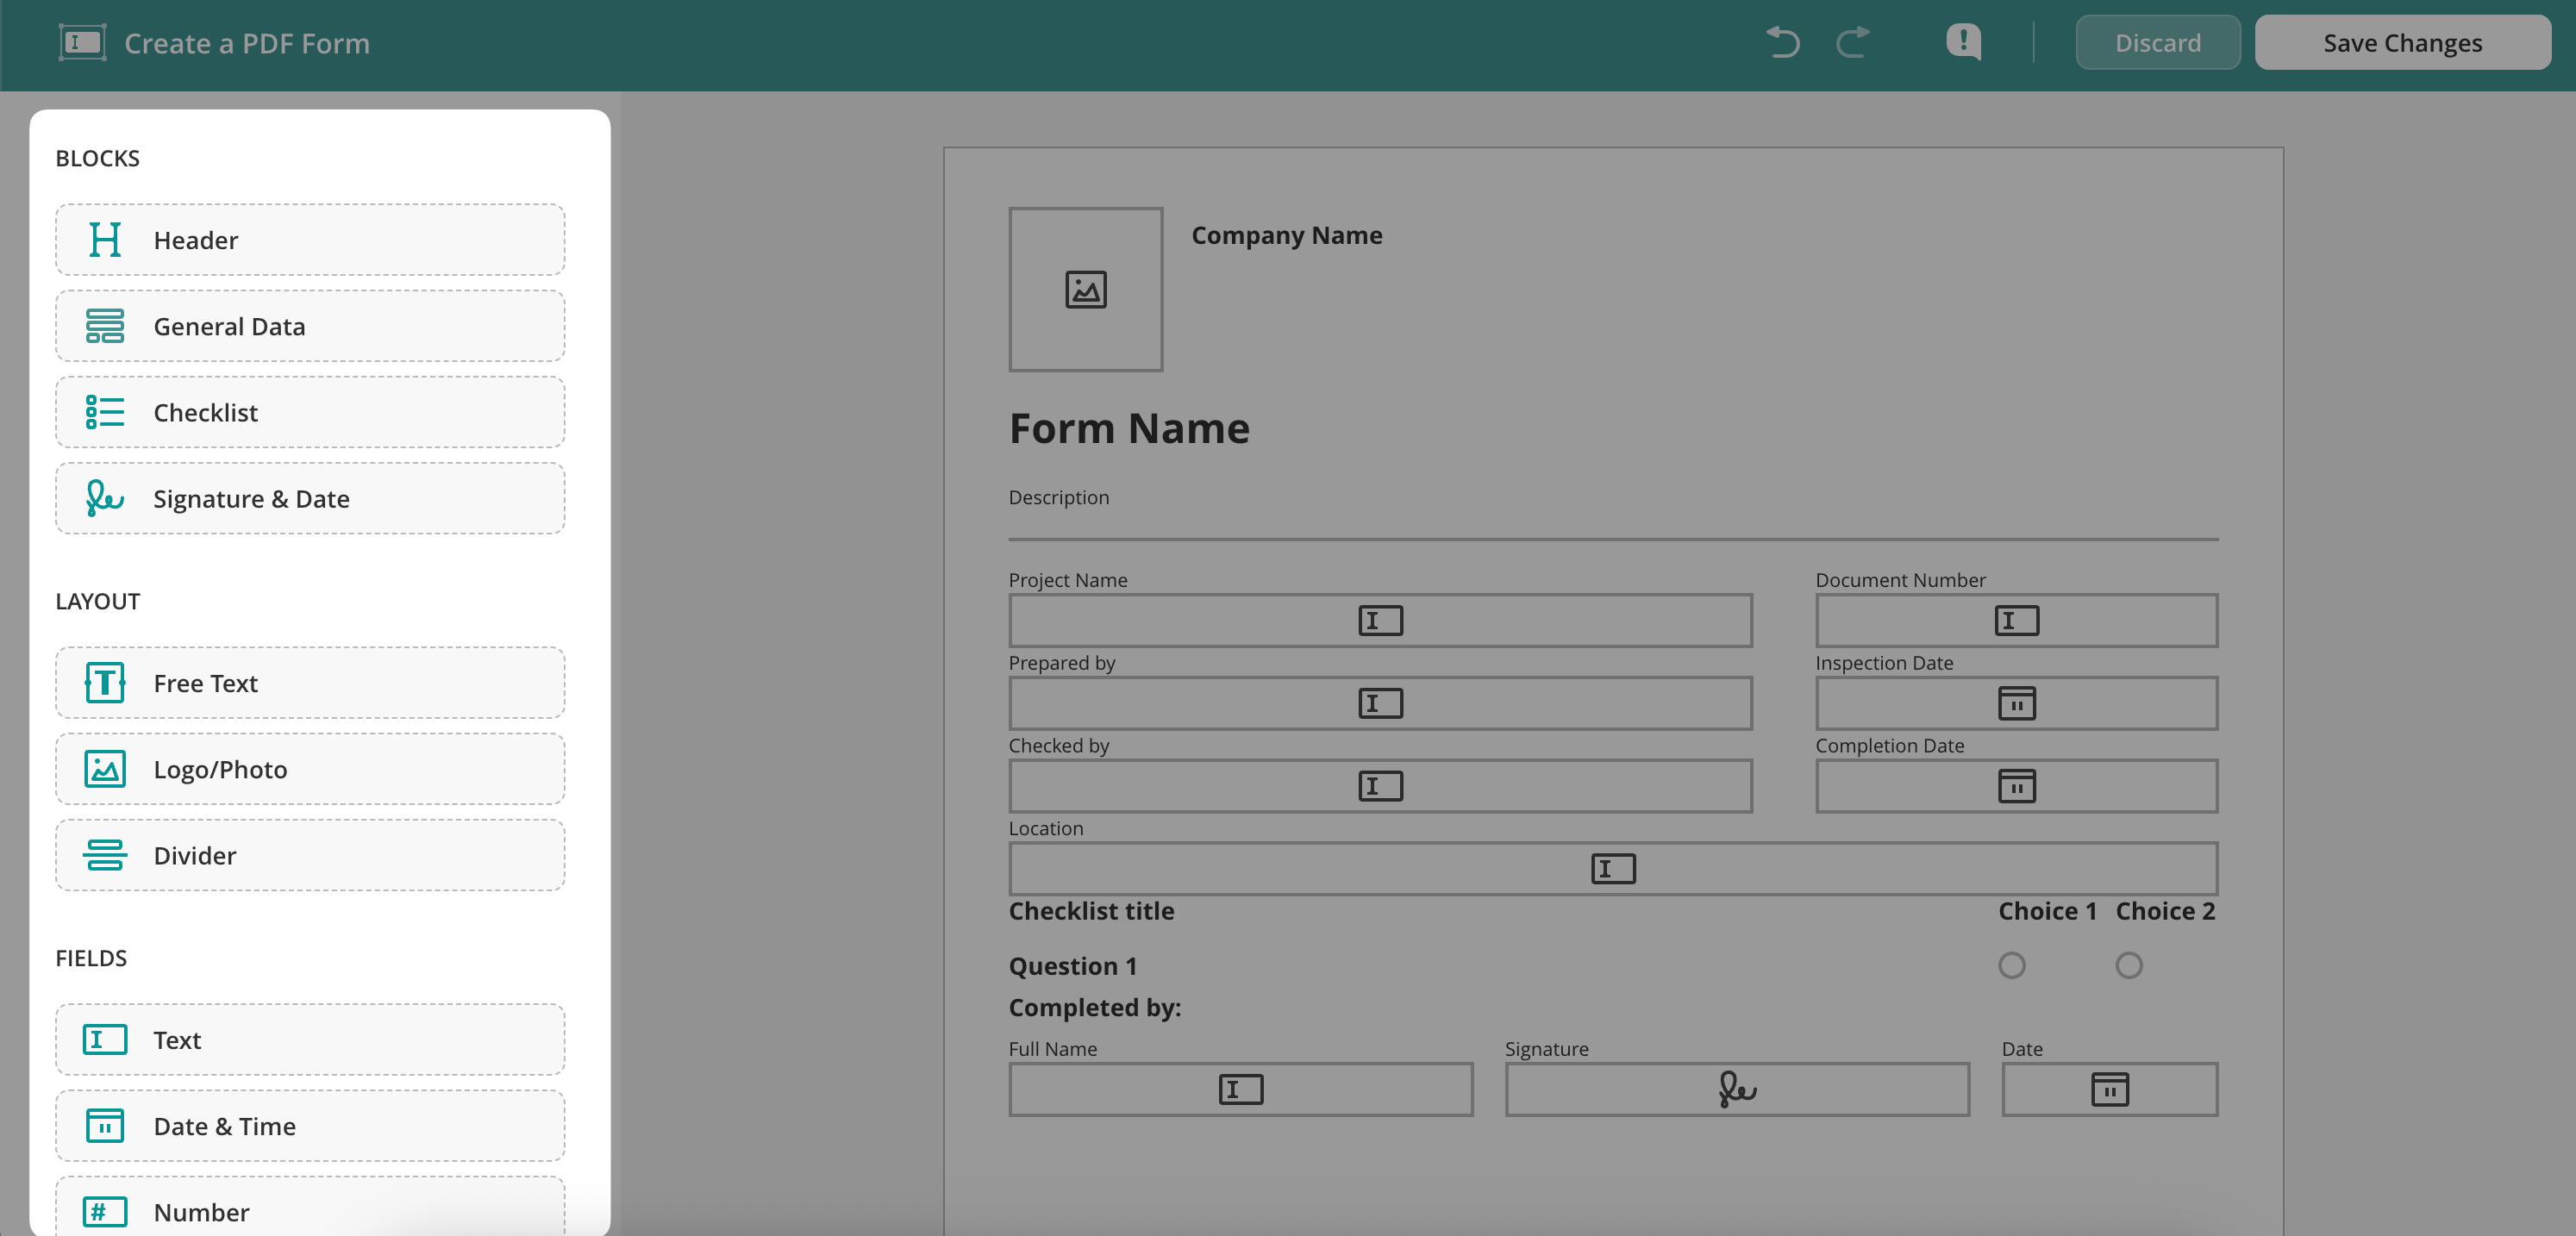
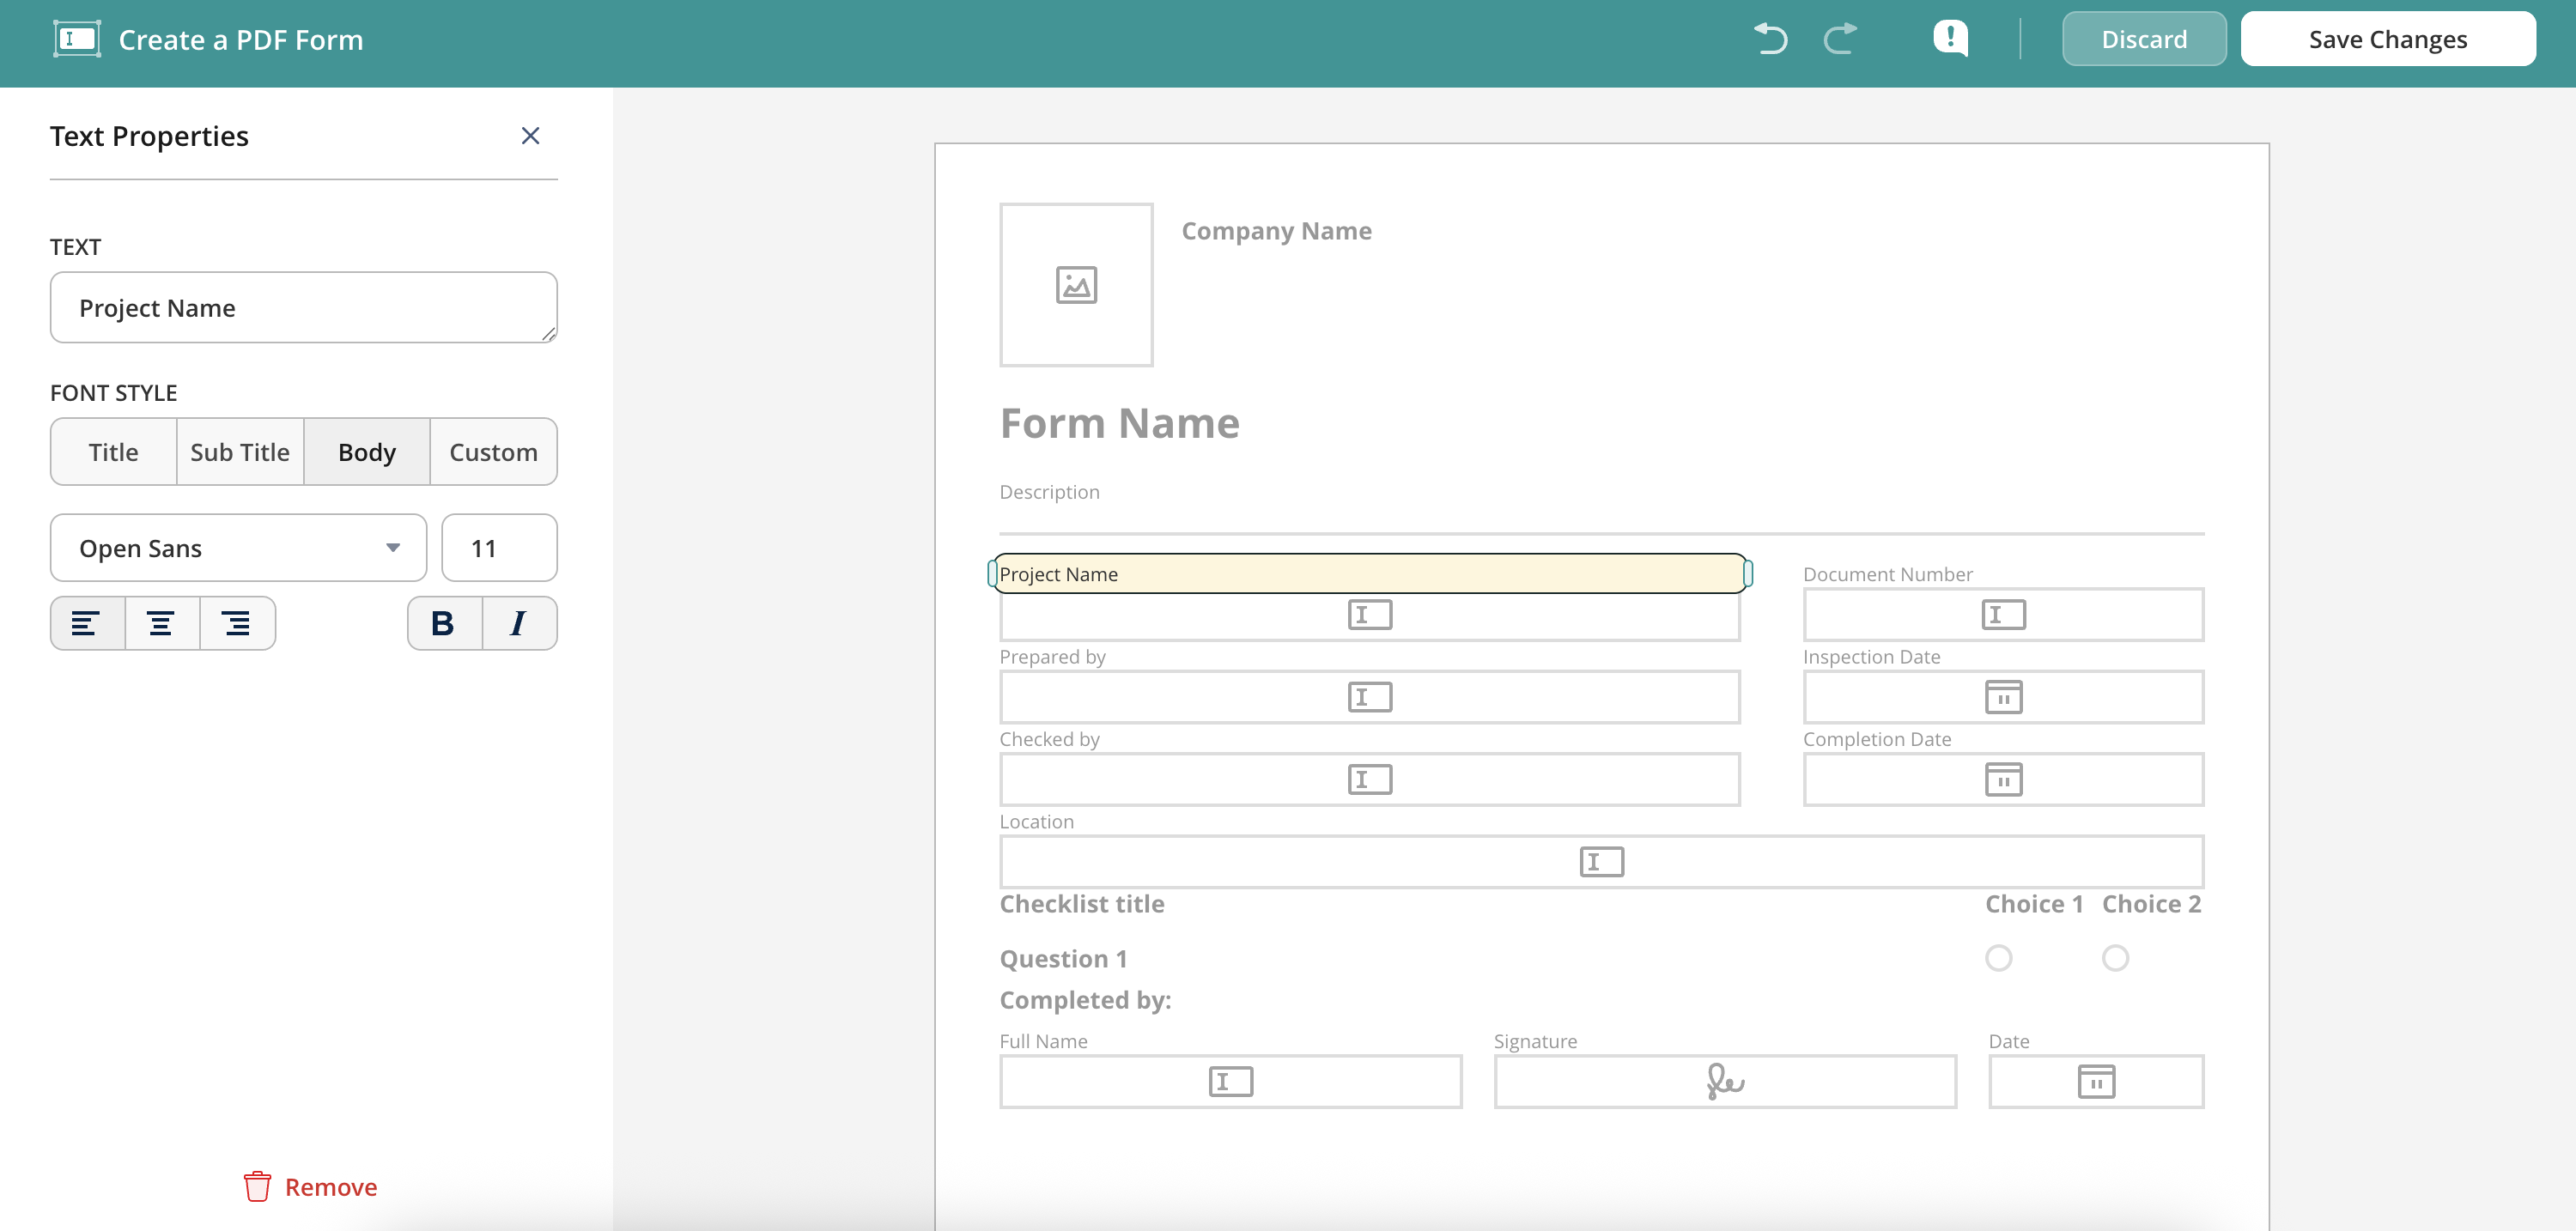
Once the element is added, you may do the following:
Modify its properties by clicking on it on the page.
Duplicate or delete the element by hovering over it and selecting the option.
Select one or multiple elements by clicking on it/them, continuing to hold down to draw a selection box, and selecting the necessary element(s).
Move one or multiple elements through the page with a simple drag-and-drop.
Additionally, you may modify the pages of your form:
To add a new page, click Add Page at the bottom of the last page.
To delete the page, click the garbage icon on the top right side of the page.
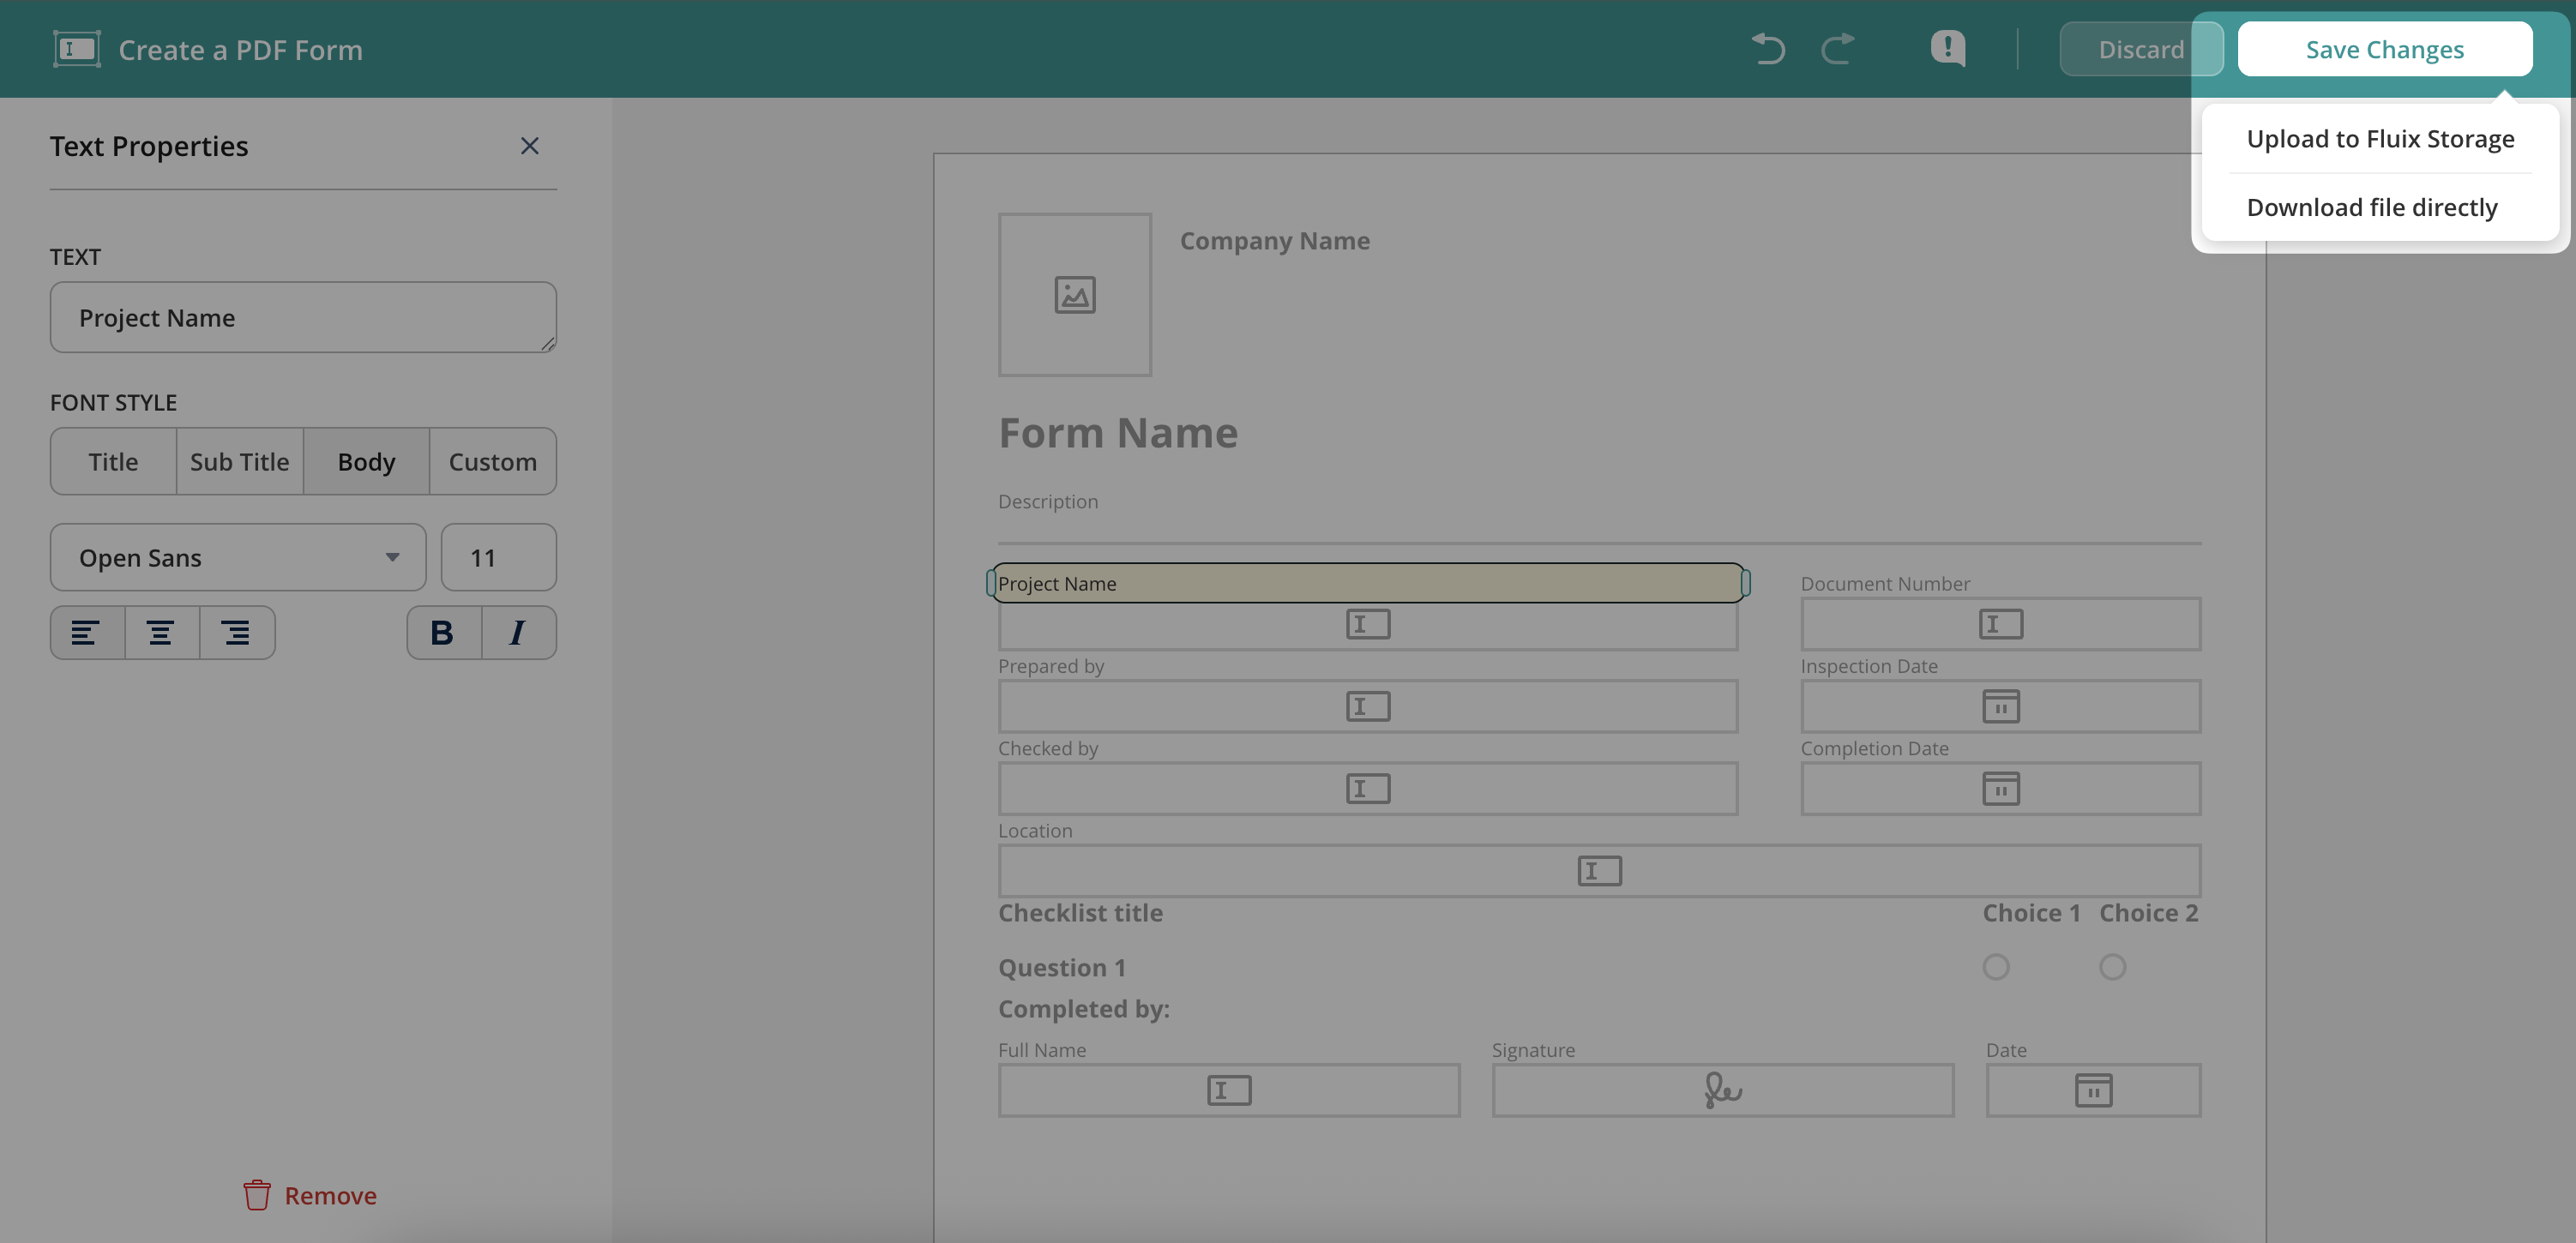
Once the form is ready, click Save Form in the upper right corner. You will be prompted to select how you would like to save the form: Upload to Fluix Storage or Download file directly.
In case you have any questions on setup, contact our team at support@fluix.io and we’ll be happy to help you.
Was this article helpful?
Thanks for your feedback!
Oops, something went wrong. Please, try again later.
Thank you!
What details or examples would have made this article more helpful for you? We appreciate your insights!
It is hard to imagine a business day without searching and viewing documents on mobile devices. According to a McKinsey report, employees spend 1.8 hours every day searching and gathering information. The situation is much better when it comes to your documents in the Fluix Docs app.
In this article, we will review how the Global Search feature on iPad and iPhone can make your working day more productive. Even with a massive list of files located in different folders, you will be able to find any document quickly and easily.
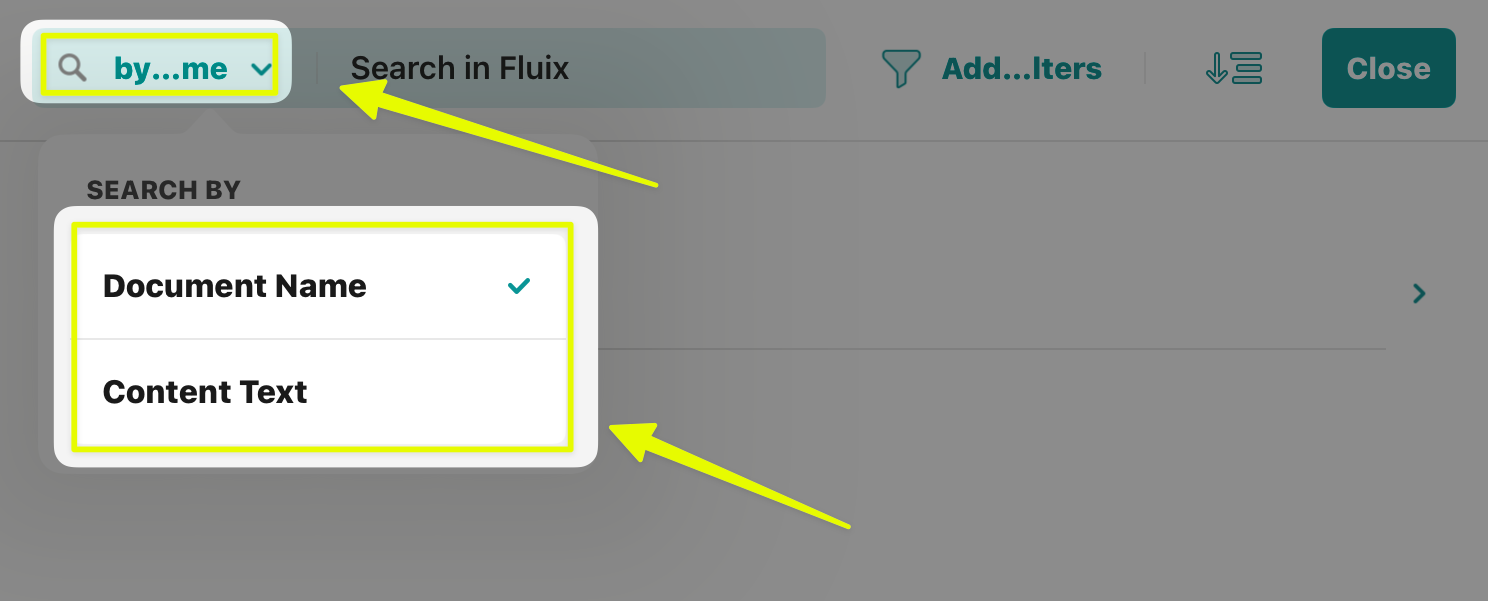
Tap the Search button on the sidebar and enter the text.
You can find the files by either the Document Name or the Content Text.
– Content Text query allows searching for words inside the PDFs and TXT documents. – The Document Name option allows you to search for all file types supported in Fluix.
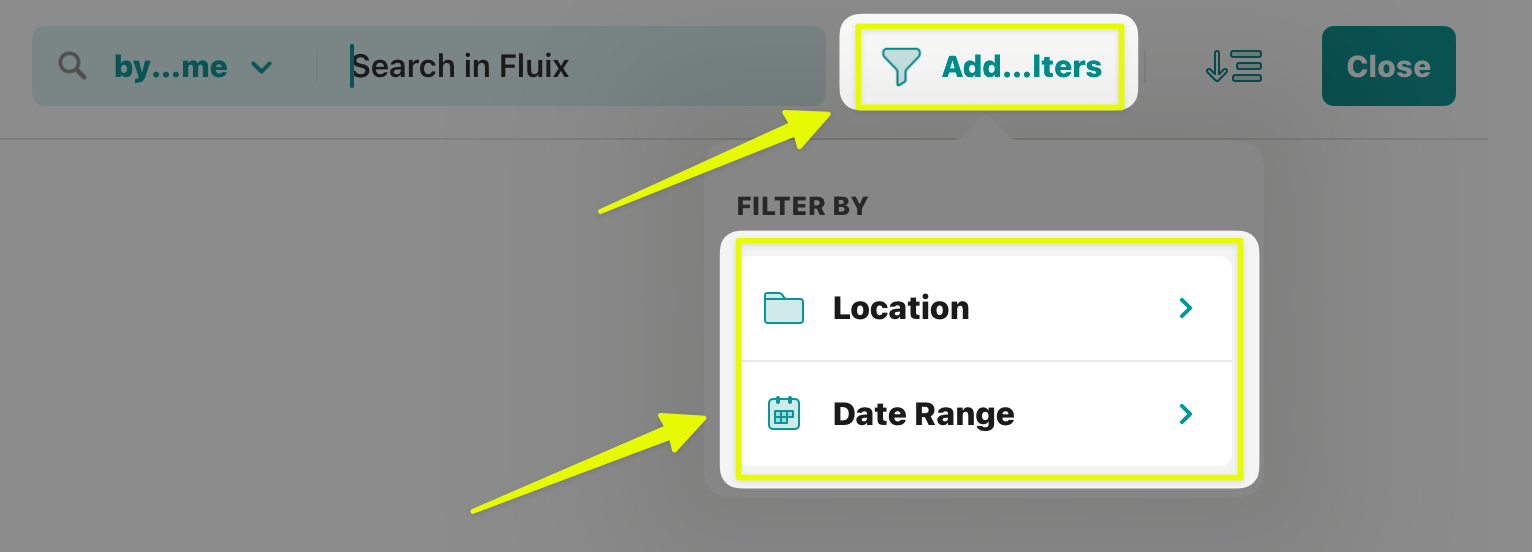
To ensure the most precise result, you may filter the search by Location or Date Range if you know the section where the document you are looking for is located or when it was last edited.
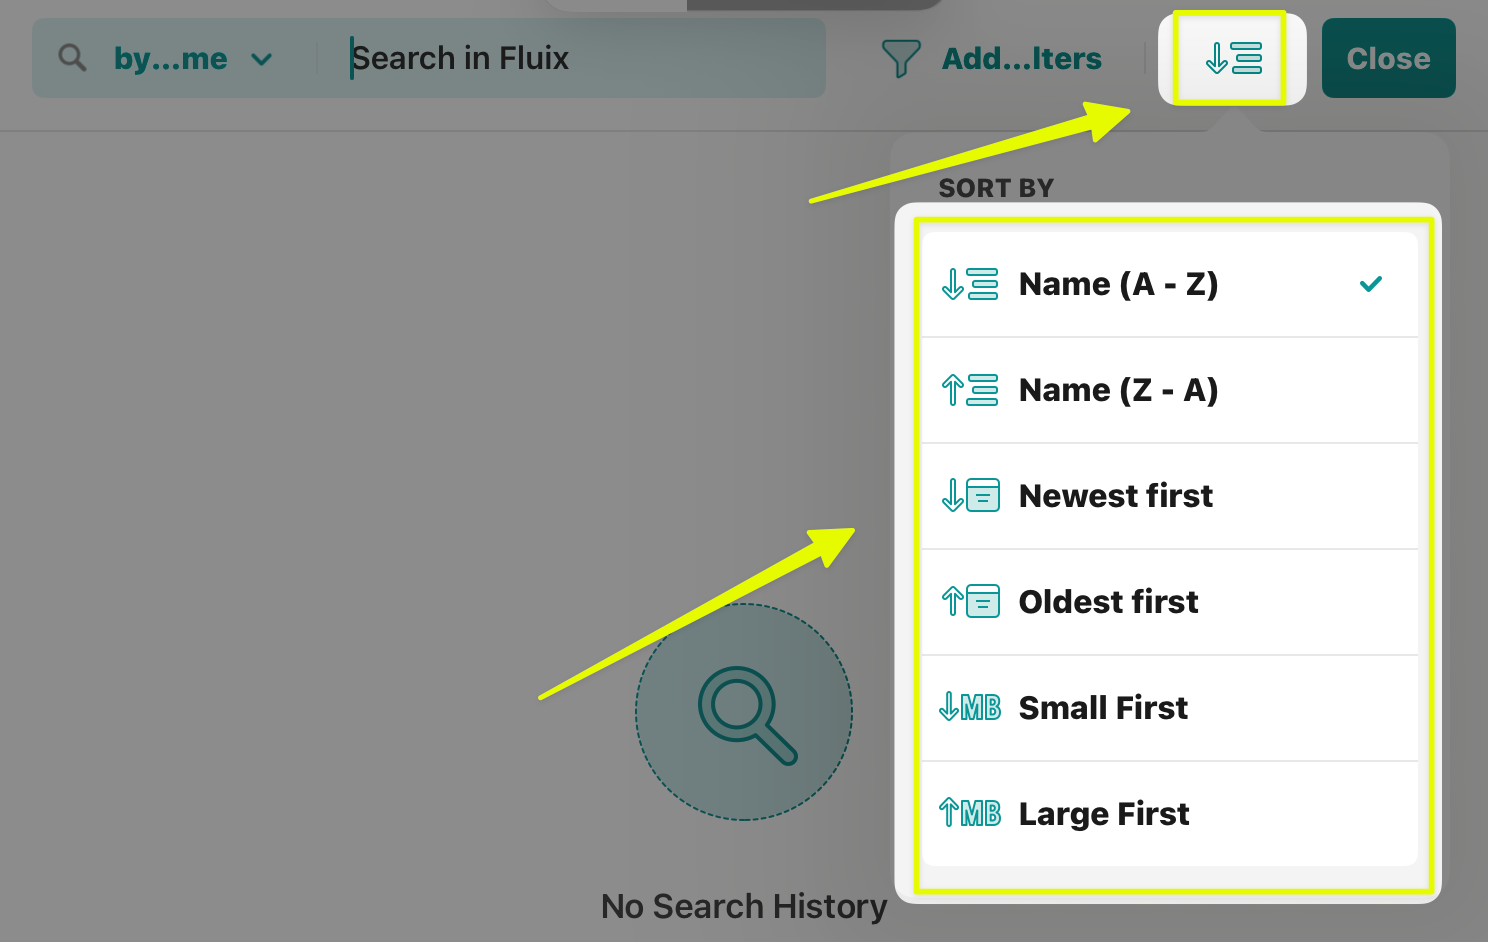
The results of your search can be sorted alphabetically, according to the size of the file, or arranged depending on how new or old the documents are:
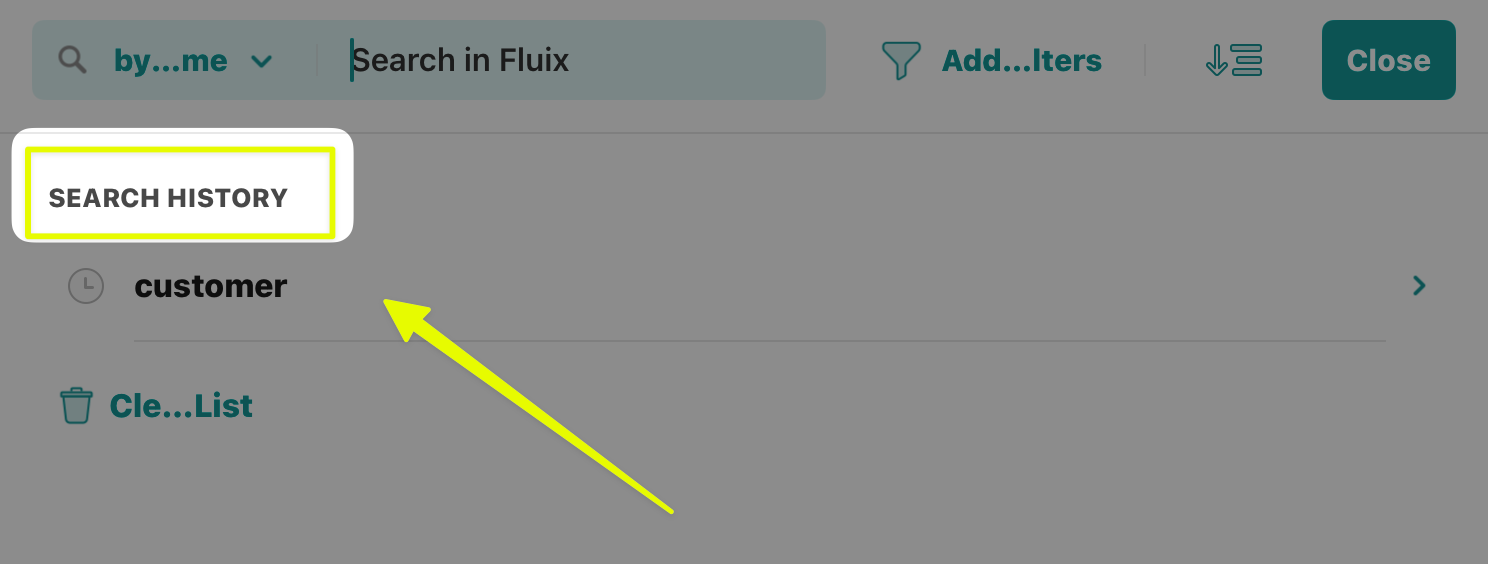
Additionally, the search criteria are automatically saved in the search history, which remembers everything you need, from the document name to the date range or location you were searching. Search history will allow you to save time in the future and review your previous search results:
As you can see, searching for documents becomes easier and faster than ever with the Global Search functionality
In case you have any questions or comments, contact us at support@fluix.io, and we’ll be happy to help you.
Was this article helpful?
Thanks for your feedback!
Oops, something went wrong. Please, try again later.
Thank you!
What details or examples would have made this article more helpful for you? We appreciate your insights!
Frequently, it happens that you need to merge PDF files you’re working on and share one single document with others.
Here is a step-by-step guide to show you how to combine PDF files on iPad or iPhone in the Fluix app.
Note.The functionality is enabled by the Admin of the Fluix account in File Sharing Settings. Therefore, in case you don’t have this option on your iOS device, please reach out to your company’s Fluix admin for assistance.
3 steps to merge PDF files on iPad/iPhone
1. Open a document that you would like to merge with another one(s).
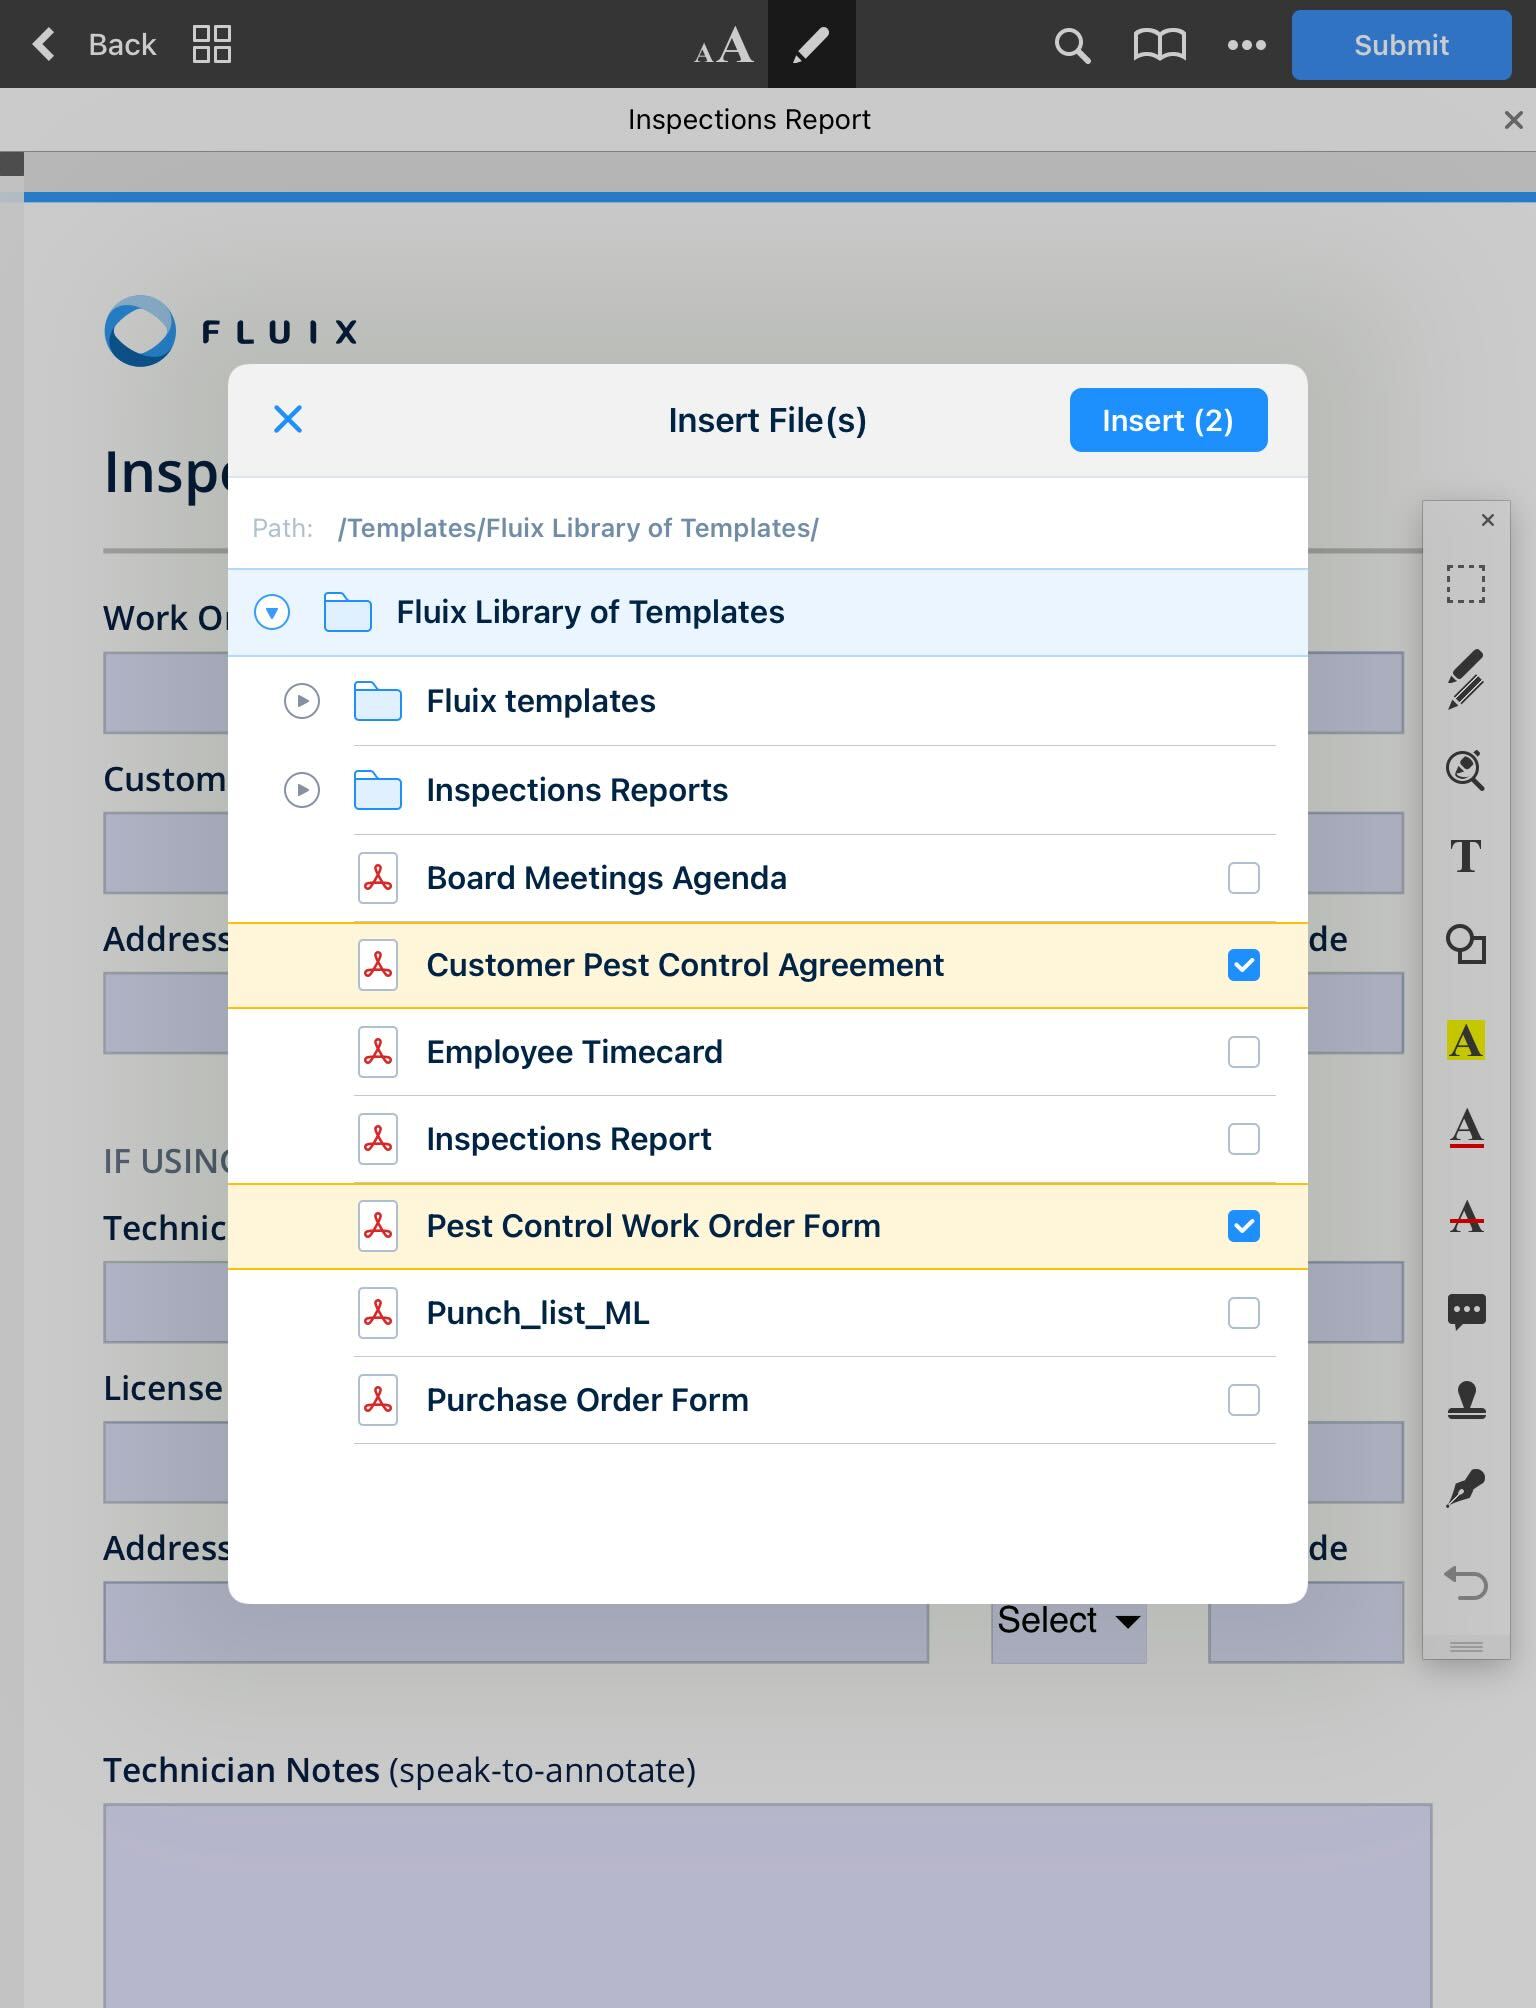
2. Tap … in the top right corner and select Insert File.
3. Select the document(s) that you would like to insert to the current one from the list and tap Insert.
Note. Amaximum of 5 documents can be added at a time.
The merged document will inherit the name of the first document where the ones were inserted.
What workflow documents can be merged in Fluix?
Can be:
1. Documents from different folders.
2. Documents from Templates, Drafts, Company Drive, and Personal sections.
Cannot be:
1. Signed documents. For being able to merge PDFs that were signed, you’ll need to remove the signature first. This is made to protect the signed document from changes.
2. Documents from My Inbox, Group Inbox, Cabinet, and Pinned sections.
3. Already finished documents from the Completed and Reassigned sections.
Picture this: One of your users walking up to a QR code, scanning it with the camera on their iOS device, and instantly accessing a checklist to complete and turn in.
If you have dozens or even hundreds of documents you share with your team, this would make yet another aspect of their jobs that much faster and frustration-free. It would also make accuracy even more certain, as you ensure that users access the right document for the job. Where would this come in handy? For any form or reference material you want your team to have instant, offline access to when working in a specific area — whether it’s a cockpit, on a remote wind turbine, inside a manufacturing facility, on at an outdoor job site.
First, Let’s Talk About Deep Links
Each PDF in your Fluix account that is shared as a ‘Templates’ workflow can be turned into a link. We’ve got a help article on it here.
Deep links are special links that open a native app on your smartphone or tablet. In the case of Fluix, they’re a little different from traditional links because they’re meant to open a PDF within the Fluix app, without needing to be online to use the link. If you were to see one, they don’t start with “https://” like you’re used to seeing at the beginning of a link. They start with “pdfexfile://“ instead. For now, Fluix deep links can only be shared with other users within your Fluix account. With Fluix deep links, you can share one-click access for your users to open PDFs that are already in your Fluix account with a workflow associated. While the help article I linked above outlines how to manually create them, we’re testing out a slightly more automated way to do that here.
Creating your custom deep link is the first step in the process.
2. Turn Your Deep Link into a QR Code
Now that you’ve got your deep link created (and you’ve tested it on an iPhone or iPad to make sure it works properly), you’ll want to turn it into a QR code, so your user doesn’t need to remember or save the unique link.
Use this super simple QR code generator by pasting your deep link into the proper spot on that website. We like this QR code generator because not all QR code generators support creating deep link QR codes.
You’ll notice that on the right side of the page the QR code image will be updated after you’ve pasted your link in. You can then download that PNG file.
3. Print and Post Your QR Code
Now, simply print and post your QR code wherever you want your employees to access it and begin using. Your users will point their iOS camera at the QR code. A popup notification will ask them if it’s okay to open the link in Fluix (this is a security precaution Apple has built into iOS). Your user confirms, and the PDF will instantly open up for them to use in the Fluix app.
Got questions about this?
Let us know at sales@fluix.io.
Was this article helpful?
Thanks for your feedback!
Oops, something went wrong. Please, try again later.
Thank you!
What details or examples would have made this article more helpful for you? We appreciate your insights!
Sometimes, there are cases when you need to duplicate pages in the document you are working on to include some additional data. In this article we are going to show how it can be accomplished in the Fluix app on mobile device.
1. Open the document.
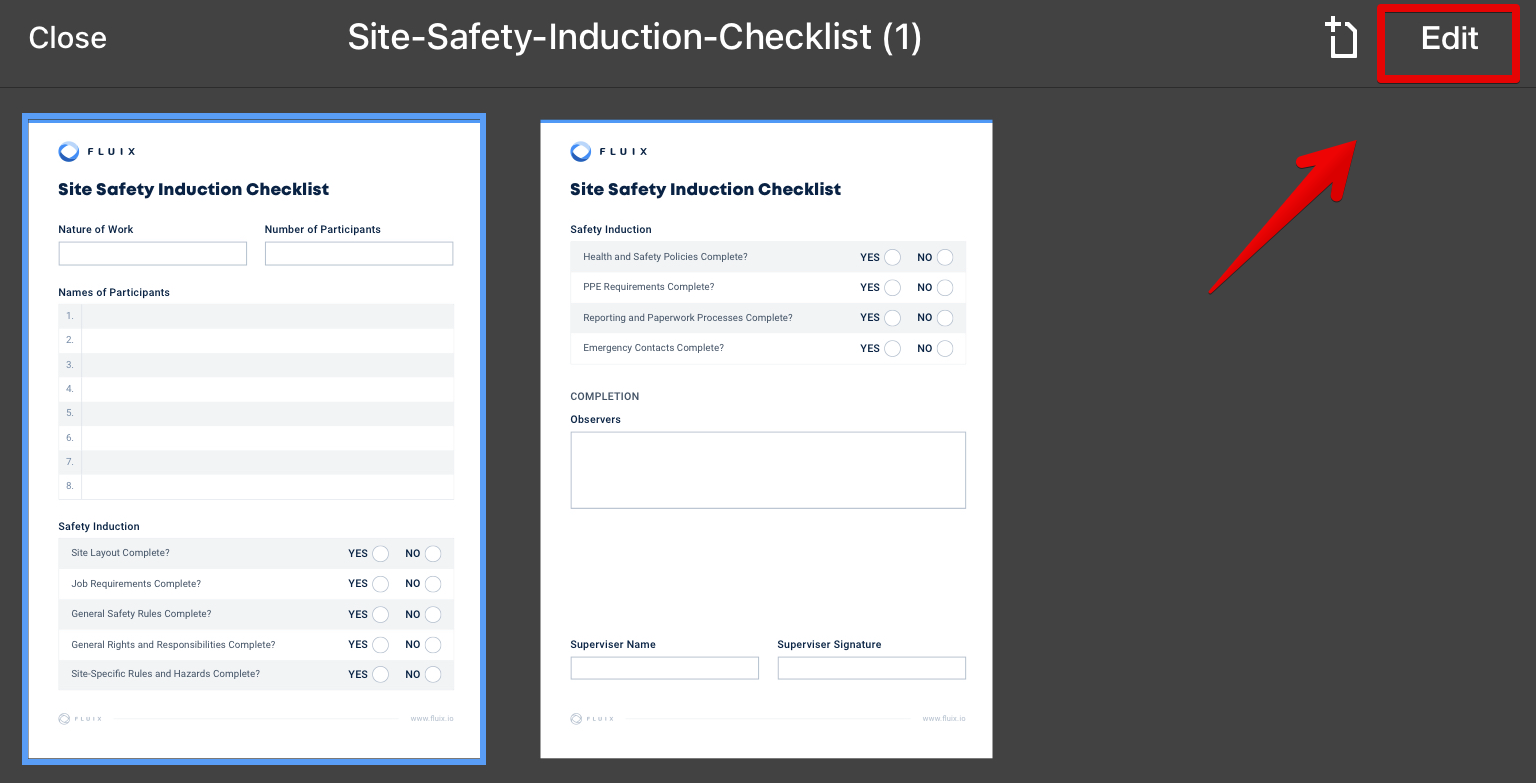
2. Tap on the thumbnail view.
3. Tap Edit in the upper right corner
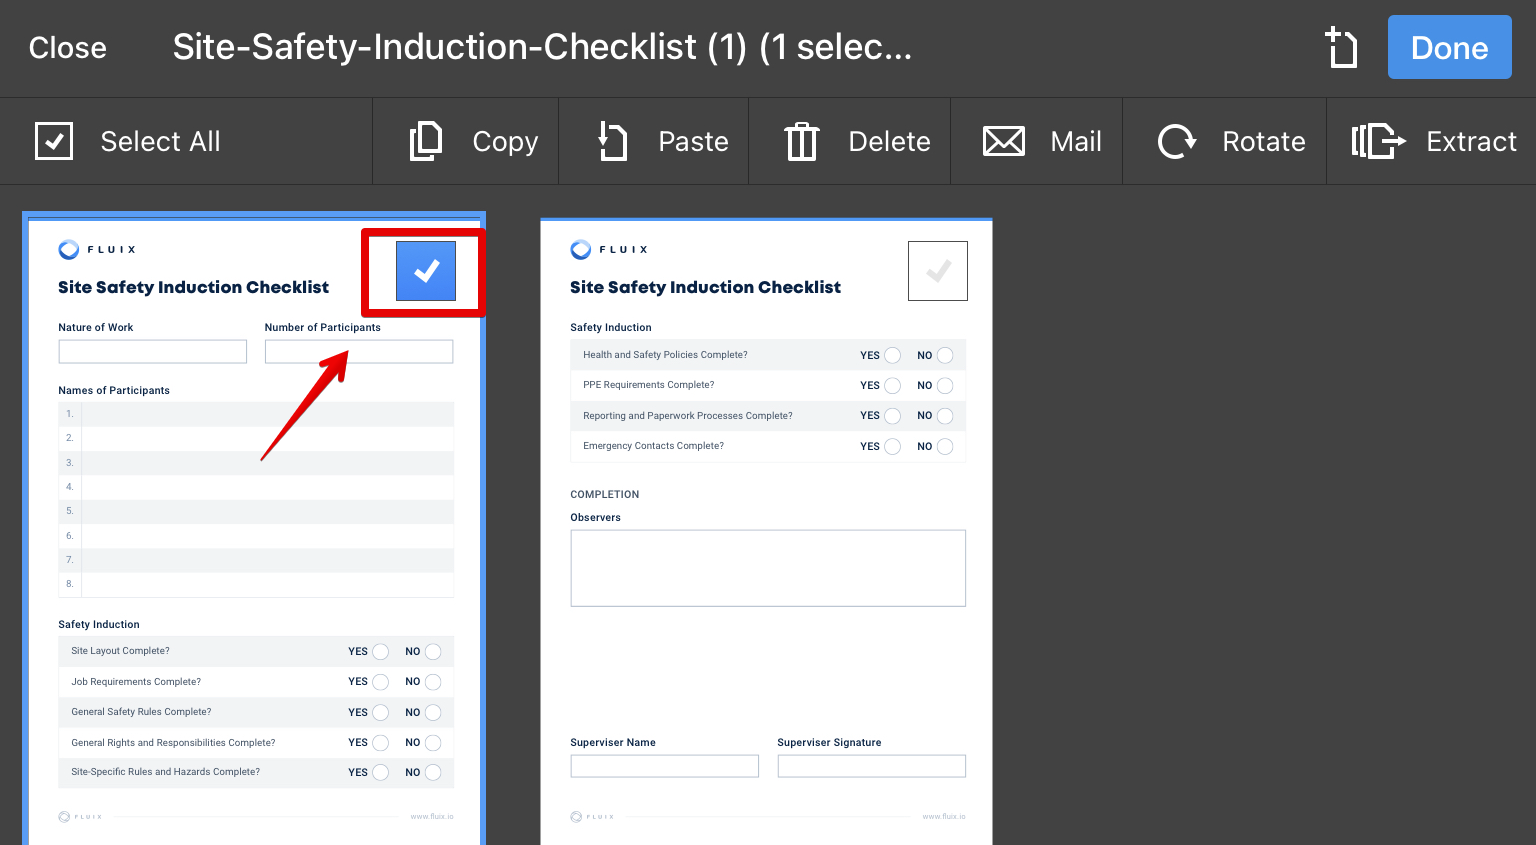
4. Check the boxes to select the pages you want to copy.
5. Tap Copy.
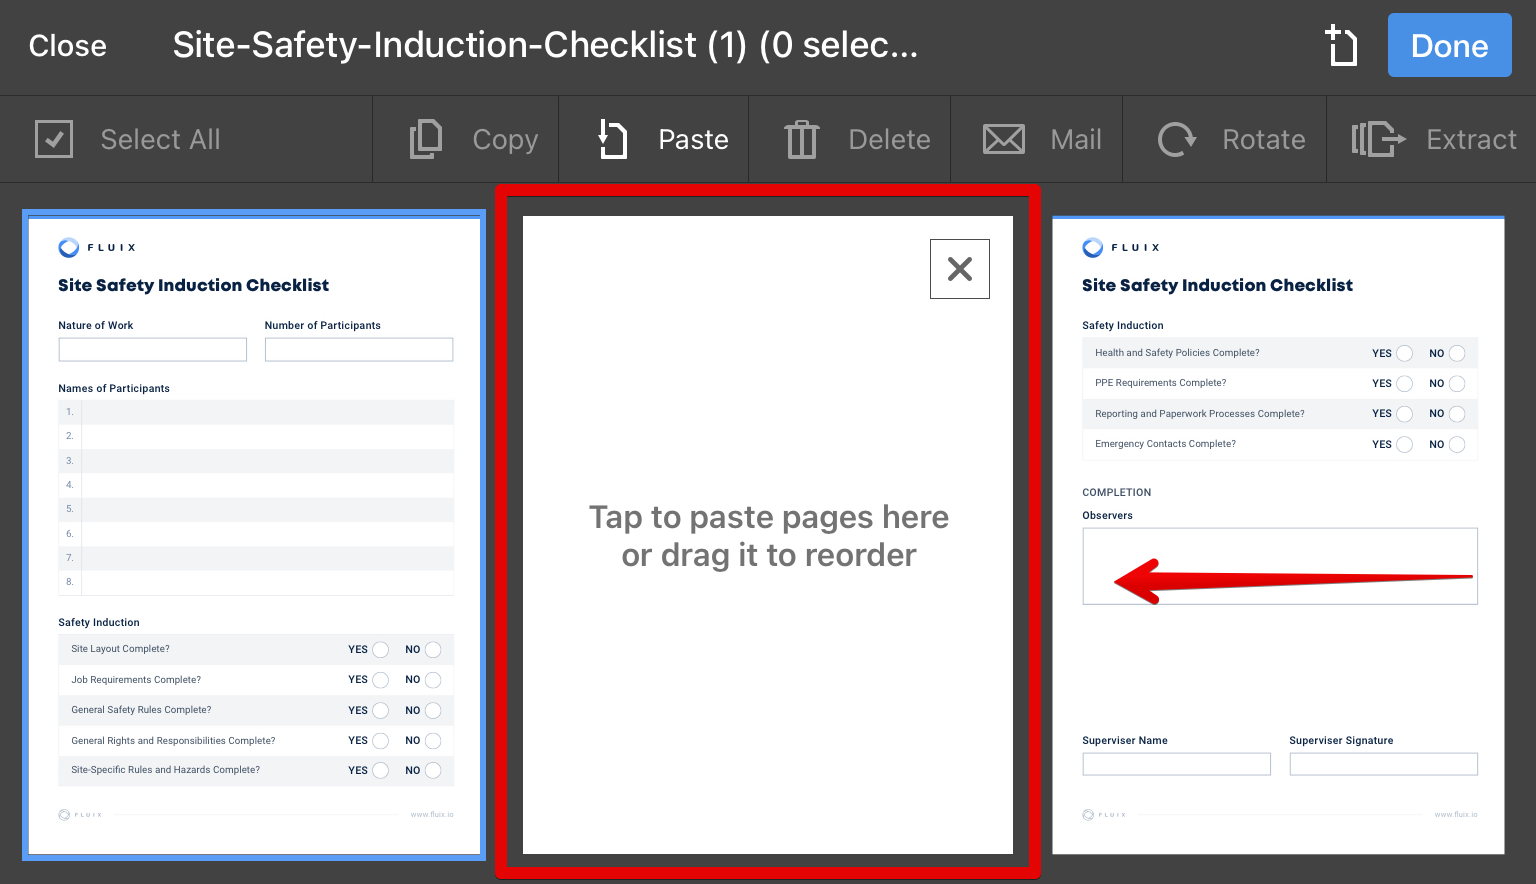
6. Tap Paste
7. A new page will appear. Tap on it to insert the copied pages, or if needed – drag the new page first to the right place in a document.
8. Now you should be seeing the added page. In case you require to add more pages, repeat the process starting from the 4th step. Once everything is copied, tap Done.
Was this article helpful?
Thanks for your feedback!
Oops, something went wrong. Please, try again later.
Thank you!
What details or examples would have made this article more helpful for you? We appreciate your insights!
Here is how to view user information in your Fluix account.
To view user information, click ‘Configuration’, and then select ‘Users’ from the sub-menu that opens on the left side of your screen.
You’ll now see an overview of all of the users in your Fluix account. You can filter users by those who have logged into Fluix in the past 24 hours, over a month ago, or those who haven’t ever logged in.
For those who haven’t yet logged into Fluix, you can resend an invitation email by selecting the user from the list of user names and clicking ‘Resend invite’.
You can also use filters to see the users who are running an outdated version of the Fluix app on their devices. Selecting a user will allow you to edit their details, add them to a group, or delete them from the Fluix account.
Clicking on a user’s name will open a detailed view of their details, activity and the status of documents they’re working with. Here you can reset their password, manage their group and workflow memberships, see which devices they have connected to Fluix and log them out of any device in the list. You can also delete the user by clicking ‘Delete this user’.
Selecting ‘User activity’ from the sub-menu will show the user’s last login date, the device they logged in from, and all of the actions made by the user in Fluix.
If a user has an admin role in Fluix, you will be able to check and edit their access rights in the Role Permissions sub-menu.
The ‘Document Status’ sub-menu option shows all of the documents that this user has worked on, as well as their current status.
Back in the main user list view, if you need to you can export the entire list of users in your Fluix Account, select all users and then click ‘export to CSV’ to download the list of users, groups they participate in and last login date.
Was this article helpful?
Thanks for your feedback!
Oops, something went wrong. Please, try again later.
Thank you!
What details or examples would have made this article more helpful for you? We appreciate your insights!
At Fluix, we understand the importance of finding secure Cloud storage for your documents.
We offer reliable, built-in cloud storage that makes it easy for you to organize and manage your company documents.
Documents are encrypted and securely stored, without any time limitation. You can also view document history and download previous versions of documents. Deleted files can be stored for up to 999 days, ensuring full traceability for compliance purposes.
Access to documents housed in Fluix Storage is managed directly via the Fluix Admin Portal. You can provide your team member their role.
When you create workflows in Fluix, you can use Fluix storage as the source for the files your teams will work with in the field, and as a destination place for submitted documents.
Businesses around the world trust Fluix with their documents – 91% of our customers are using Fluix storage to power their team’s productivity.
Our Security white paper details our commitment to data security and is available on our website.
A workflow is a series of tasks performed by your team to complete an overall project or to achieve a specific outcome for your business.
In Fluix, you can create custom workflows that will help you to route documents with ease, automating many time-consuming processes, such as:
Collecting and submitting field data via mobile devices, saving you time and money versus using paper, while also helping you to make data-driven decisions.
Streamlining Managers’ approvals, to minimize the time spent going back-and-forth to the office. Your approvals process can be as simple or as complex as you need – including multi-level approvals.
Capturing customer e-signatures to close deals onsite.
Amending and instantly distributing up-to-date documents, ensuring your team always works with the correct version.
Workflows in Fluix are flexible and scalable – from small teams to thousands of participants – and can be published when you’re ready with just a couple of clicks.
You can make changes to the workflow at any time to update document versions, monitor team activity in real-time, or add or remove users from the workflow.
Here is how to copy and edit an existing workflow in your Fluix account.
To edit an existing workflow, navigate to ‘Configuration’ from the main menu in the Fluix Admin portal and select ‘Workflows’. Next, find the workflow you’d like to make a copy of from the list of existing workflows.
When you’ve found it, click the small circle to the left of the name of the workflow. You’ll see options appearing above the main list of workflow names – click ‘Duplicate’ to make a copy of the workflow.
Now you’re in the workflow builder section of Fluix. From here, you can modify the workflow’s participants and connected folders, as well as making any other necessary edits or changes.
In the top left corner of your screen, you’ll notice that the word ‘duplicate’ has automatically been placed before the workflow name so that you can easily distinguish between the copy and the original. If you like, you can rename the workflow by clicking into the name field.
It’s important to note that as this workflow is a direct copy of the original, the participants are also exactly the same, so remember to edit or remove them if you need to, or add more participants as required.
The same goes for submit rules – please ensure that you have checked these before saving this new workflow. When you’ve finished making your edits, make the workflow live by clicking ‘Save and Publish’ in the top right corner of your screen.
For more detailed information on the various options available in the workflow builder section of Fluix, please watch our ‘How to Create a Workflow’ tutorial.
Was this article helpful?
Thanks for your feedback!
Oops, something went wrong. Please, try again later.
Thank you!
What details or examples would have made this article more helpful for you? We appreciate your insights!
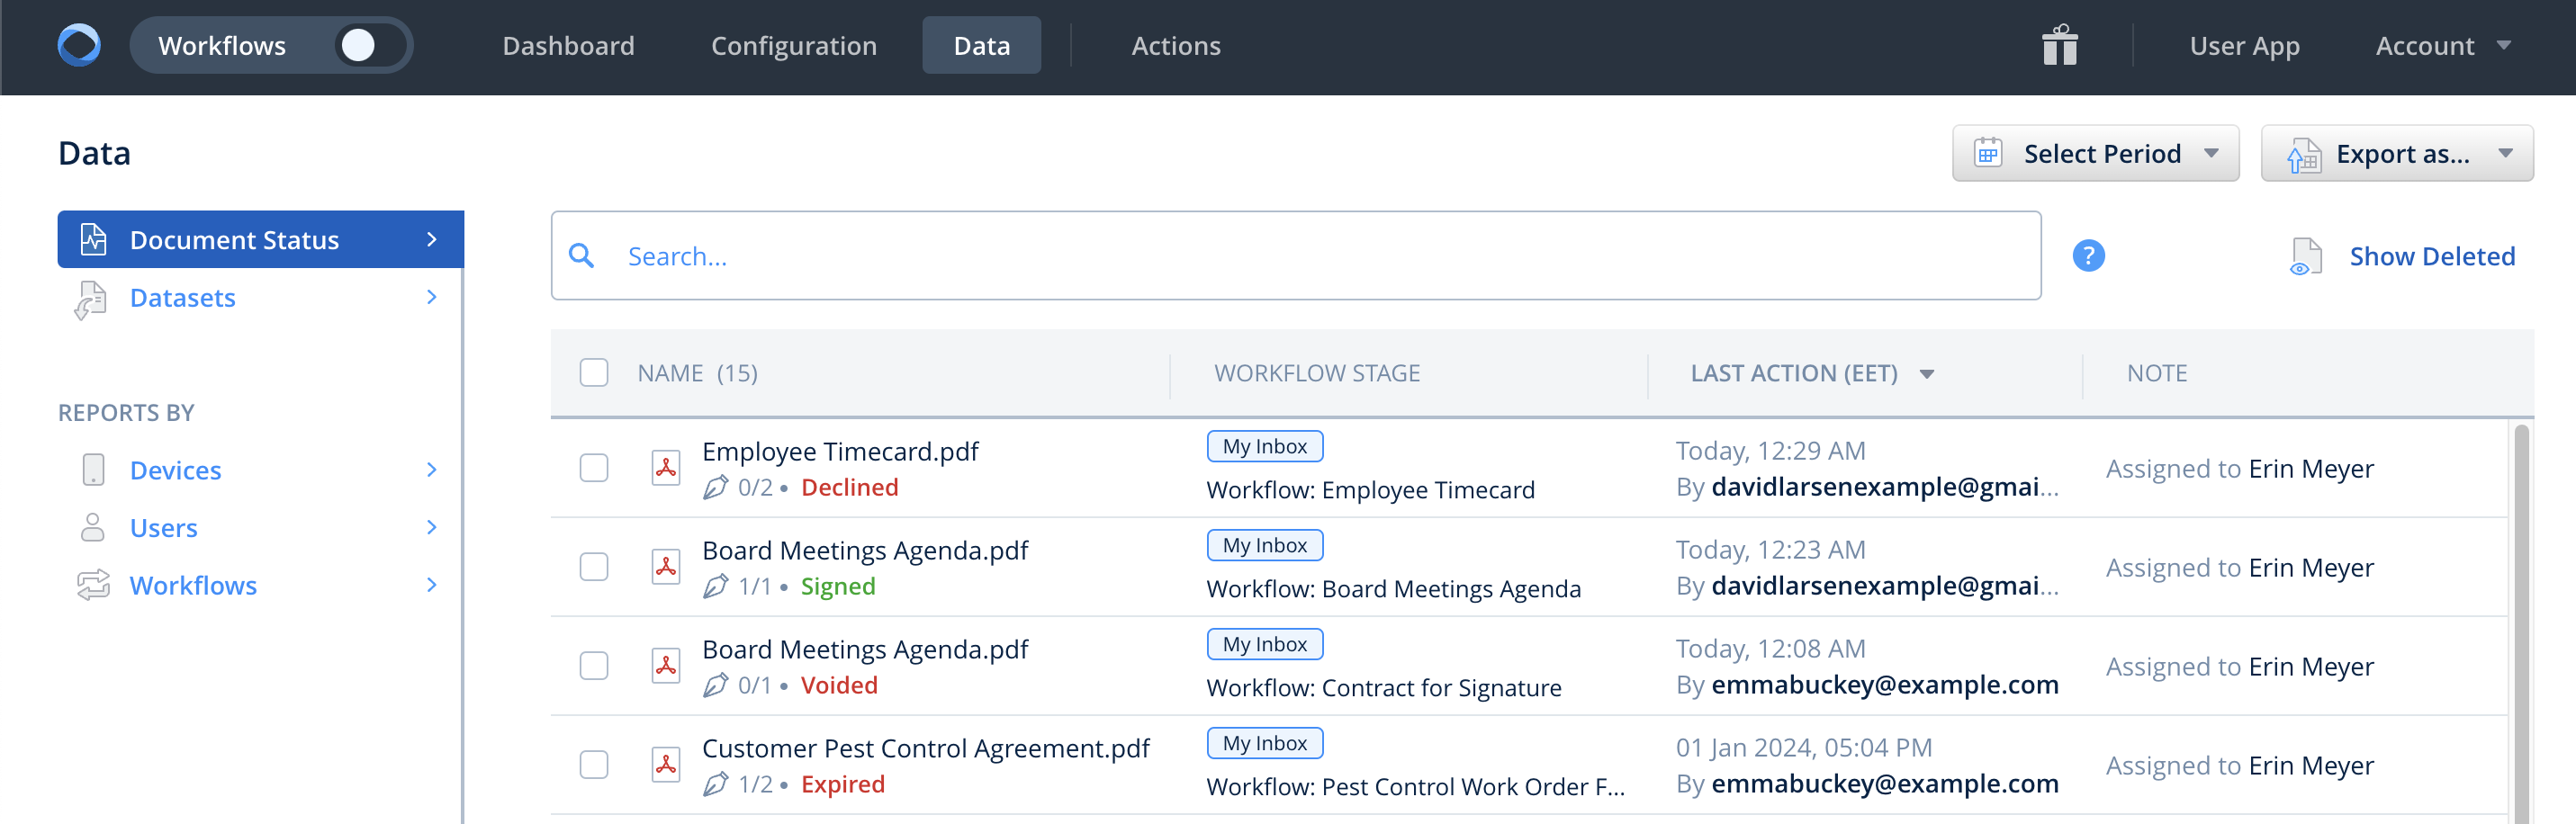
Here is how to check Document status in your Fluix account.
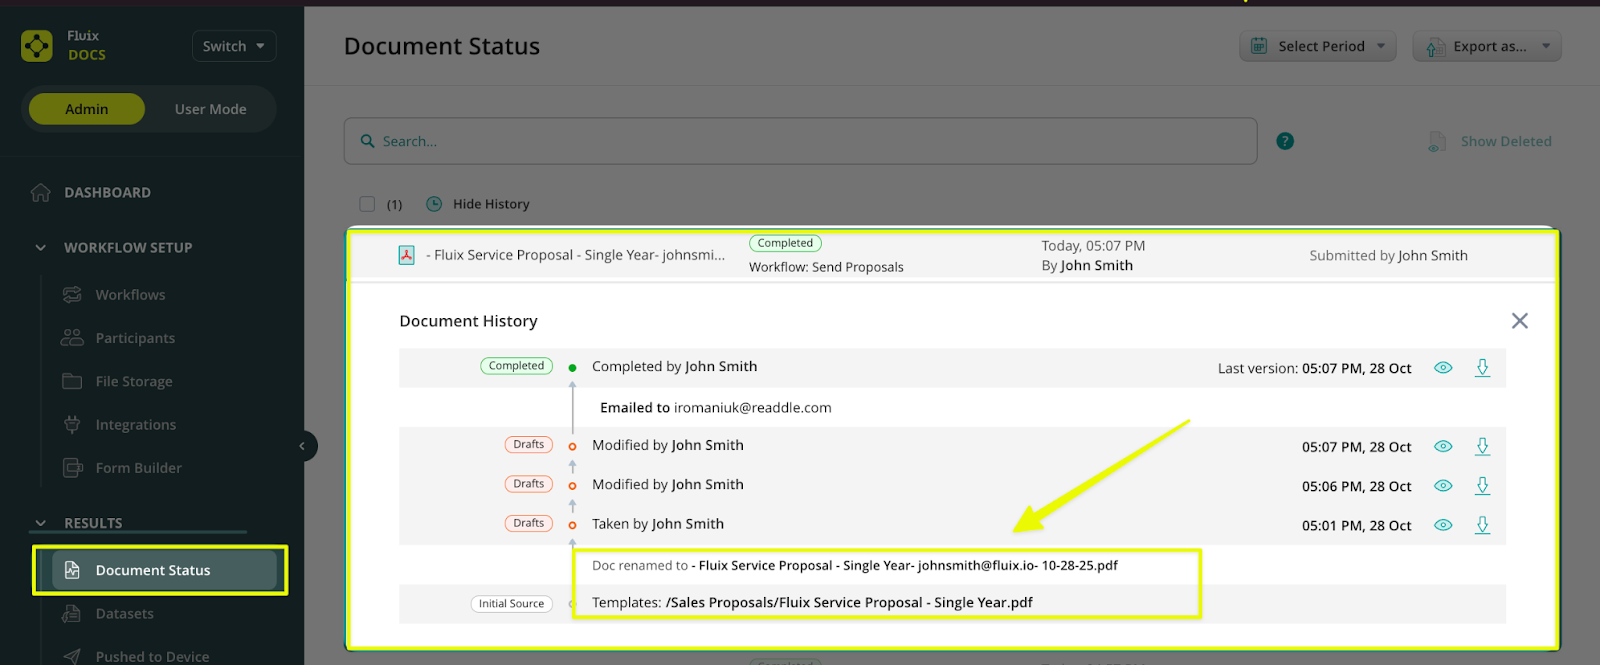
From the main menu in the Fluix Admin portal, click ‘Data’, and then click ‘Document Status’. This overview shows all document names and the workflow stage each one is currently in, as well as the most recent activity on the document and the user who worked on it.
To filter the documents by their status, simply click on any status on top. You can also select the time period you need by clicking ‘Select range’.
You can open any of the documents by clicking on their name.
To view more information about the history of a document, select it and click ‘Show History’. To open or download a historic version of a document, just hover on it and choose the option you need.
By selecting any document you can also open and view it, download it, reassign it to another user or group, or delete it.
To restore a deleted document, click ‘Show Deleted’, then click on the filter ‘Deleted’, select the document you need and click ‘Restore’.
Was this article helpful?
Thanks for your feedback!
Oops, something went wrong. Please, try again later.
Thank you!
What details or examples would have made this article more helpful for you? We appreciate your insights!
Fluix eSign workflows is the perfect way to go paperless and collect customer signatures in-person on iPad or remotely. Remote eSigning allows your team to send documents to people outside the company, whether they are customers or third-party providers. Anyone can sign documents online in any browser, on any device, and no Fluix account is required.
eSign workflow
eSign workflow is a repetitive series of actions that will happen in the order configured by you according to your business needs. To create such a workflow in Fluix, please follow the steps below.
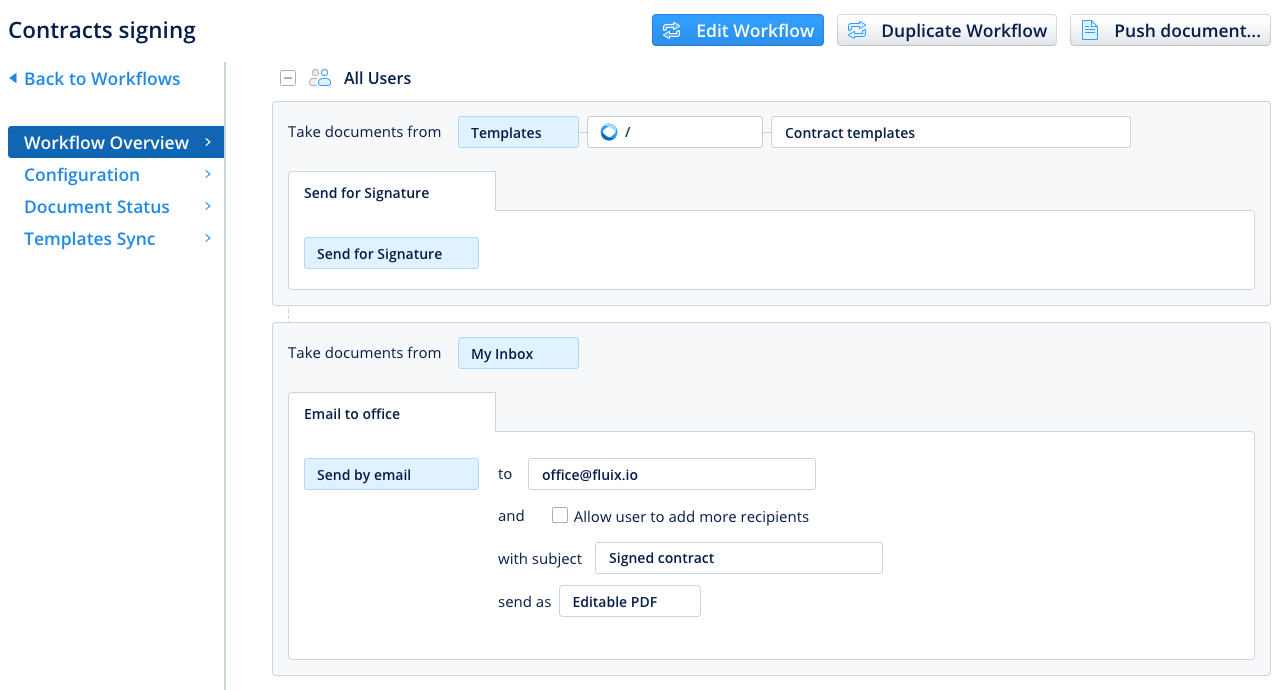
1. Proceed to the Configuration section and create a new workflow.
2. Select users who can send documents for signature.
3. Add document source Templates and select a folder with contract templates. Ensure that the template has a signature field.
4. Choose Send for Signature as submit action.
5. Once the documents are signed, they should be returned back to the user. Add the second document source, MyInbox, for the same user.
6. After the user reviews the signed document, they email their office or archive the document. To configure that option, add the final submit action, e.g. Send by Email or Upload to a folder.
7. Click Save & Publish.
Here is an example of a workflow:
eSign workflow in action
After the e-sign workflow was created, its participants get access to the template contracts and other documents they need to work with.
The user needs to follow the next steps:
1. Log into Fluix on the iPad, iPhone, or web browser.
2. Select a document from Templates and fill out the information required.
3. Tap the Submit button in the top right-hand side corner.
NOTE: Only documents with a valid signature field can be sent for online signing. If there is no such field in the form, user won’t be able to email the document for signature and will see the error message: ‘There is no signature field in this document, hence the recipient won’t be able to sign it and return to you afterward.’
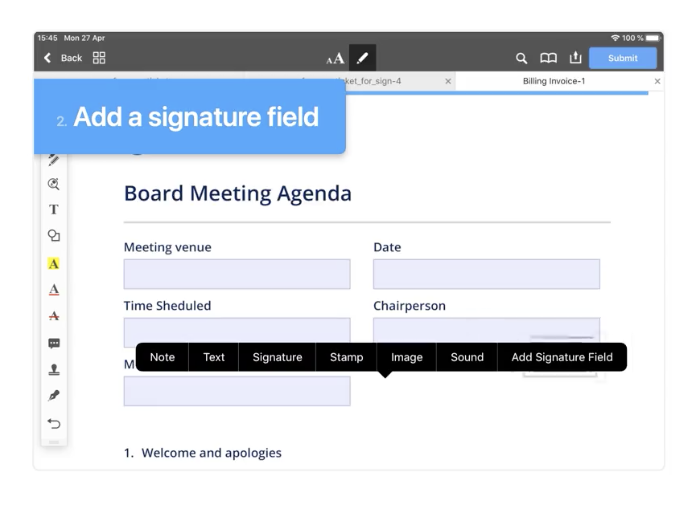
How to add a signature field in a PDF form on iPad/iPhone
1. Tap and hold on the document and select Add Signature Field:
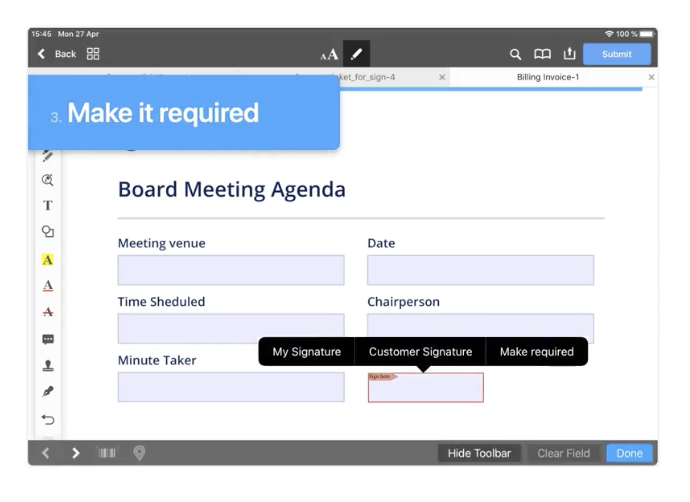
2. Drag and drop it to the designated place. 3. Tap and hold on the document and select Make required.
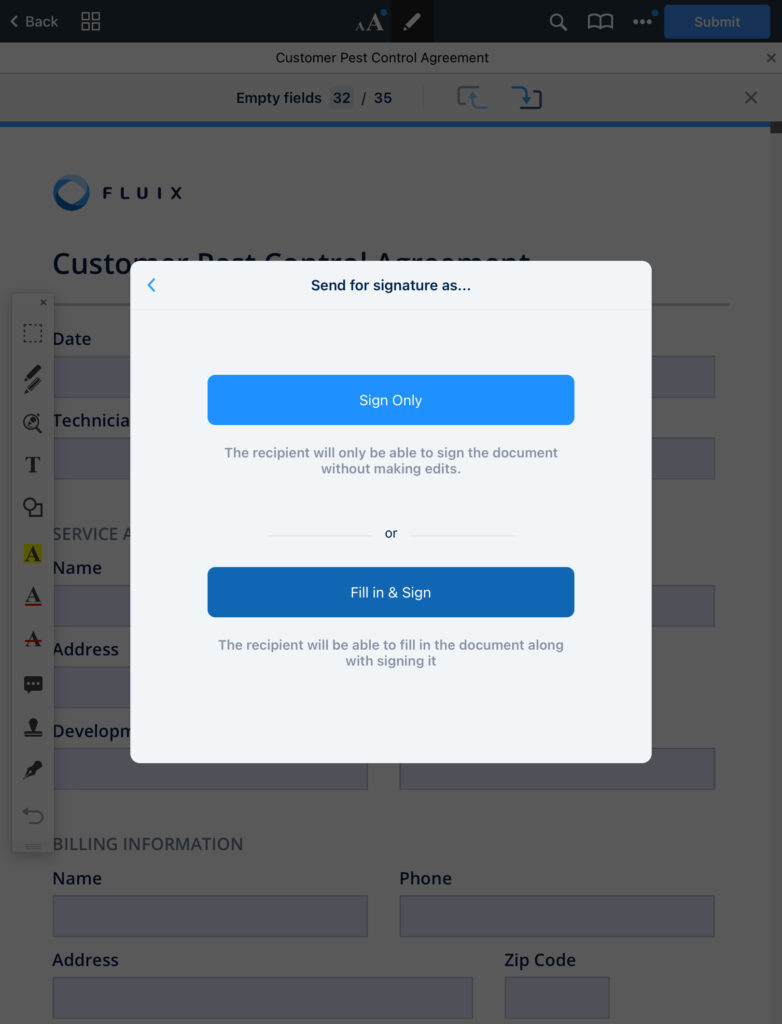
In case a signer has only to sign a document and is not expected to make any changes, choose Sign Only to restrict the editing option of the document. If the user wants the signer to fill out other fields, they choose the Fully Editable option:
4. In the popup window, enter the signer’s email address. Please note that only one recipient can be added per document.
If an error was made in the email address, upon every next entering of address the dropdown list will include it. To avoid that, it can be deleted by swiping left on the address.
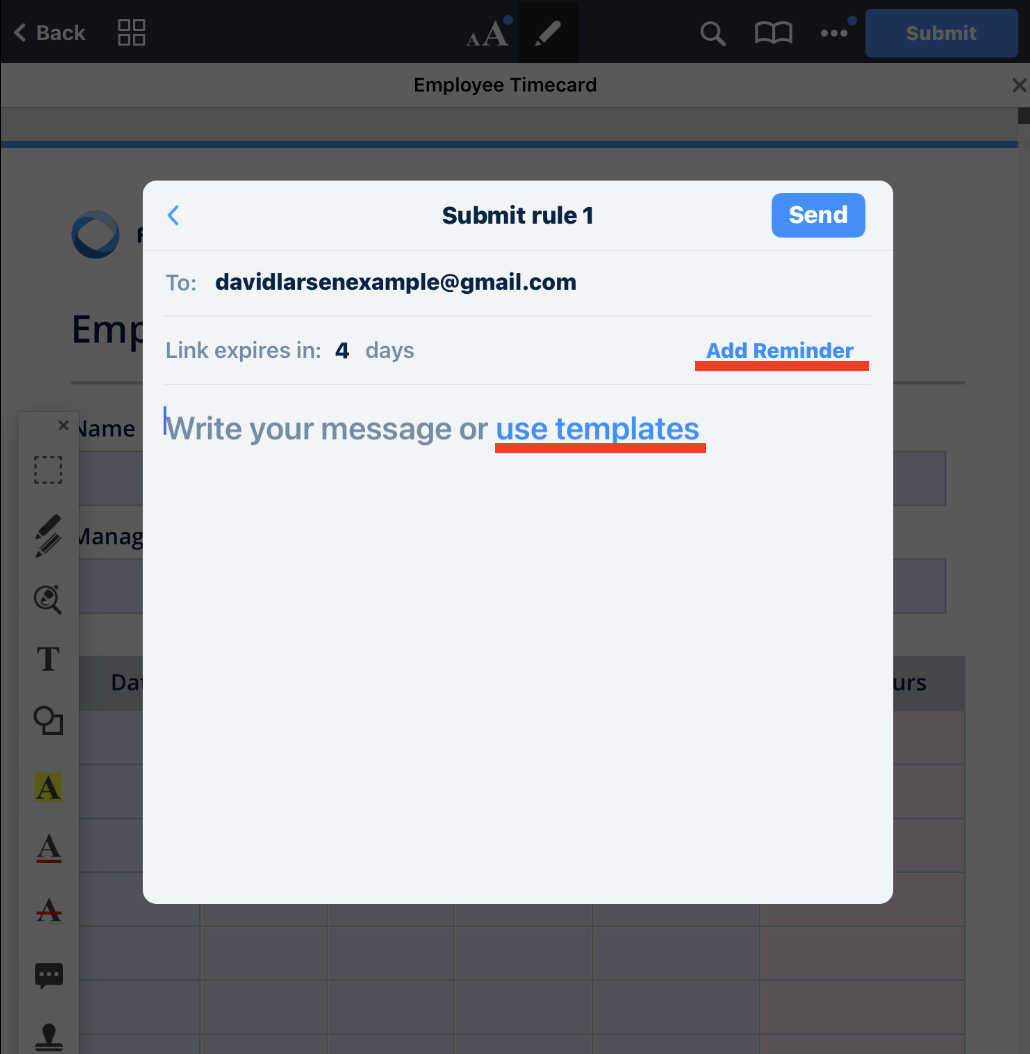
5. The signer will receive an email with the link to the document to be signed. By default, the link is available for 4 days. One day prior to expiration, the signer gets the reminder. But you can change the link expiration period by tapping on Reminder.
6. Also, you add a personal comment to accompany the document. In case you send similar comments to your customers, you can save them to Templates and use each time you send a document. Please note that the templates are saved on the device locally and are not synced between your devices you use to work with Fluix.
7. Tap Send.
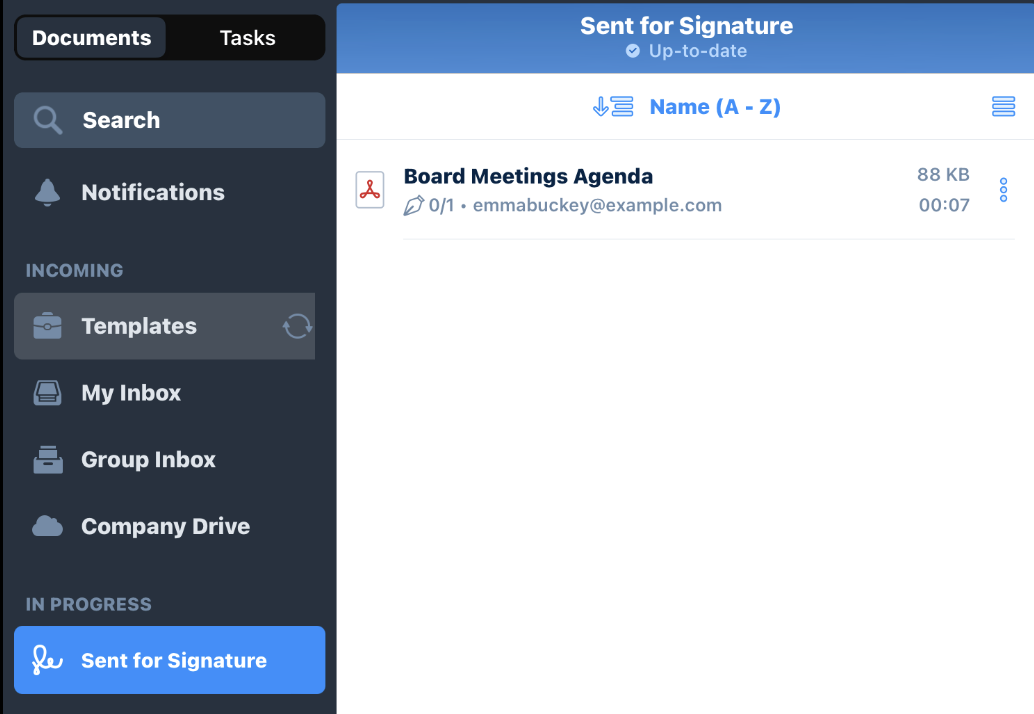
After the document has been dispatched, you will see a new tab, Sent for Signature, where a copy of the sent file is stored:
Signer Online Experience
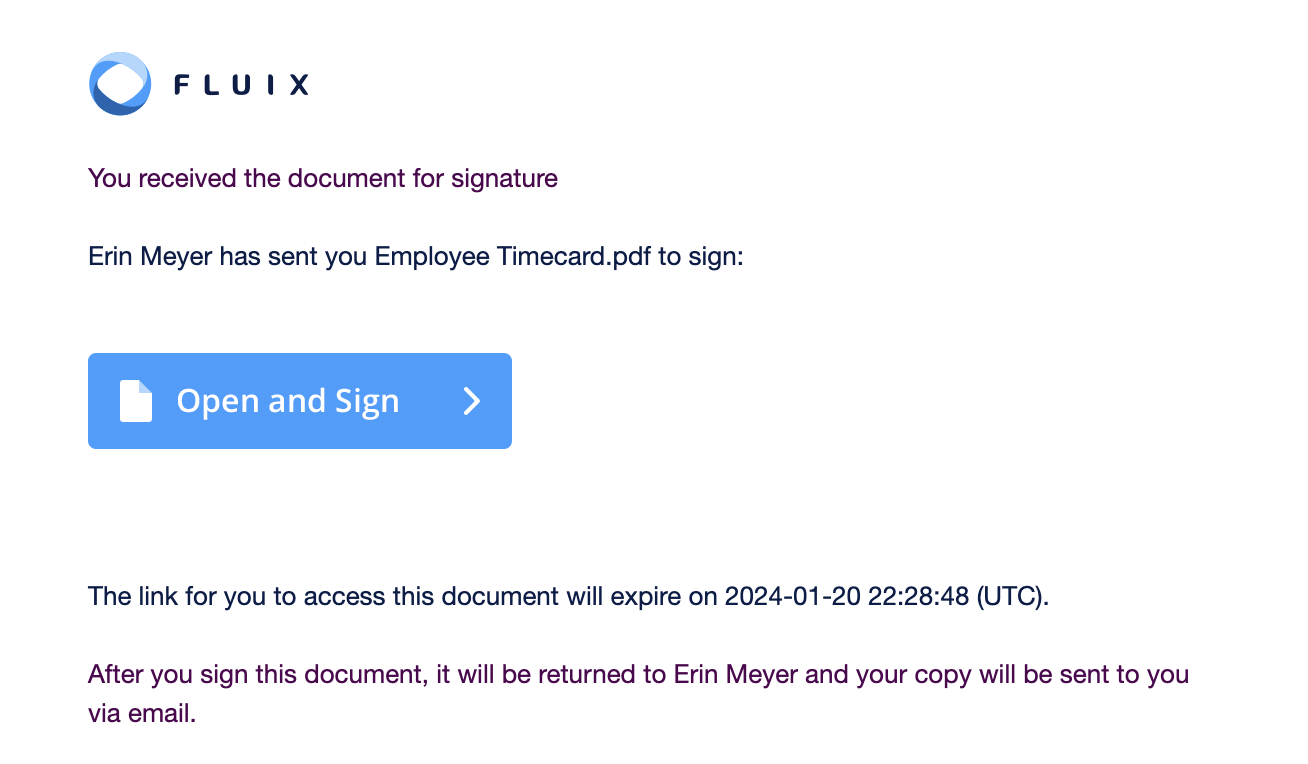
A signer will receive the following email about a document that needs to be signed:
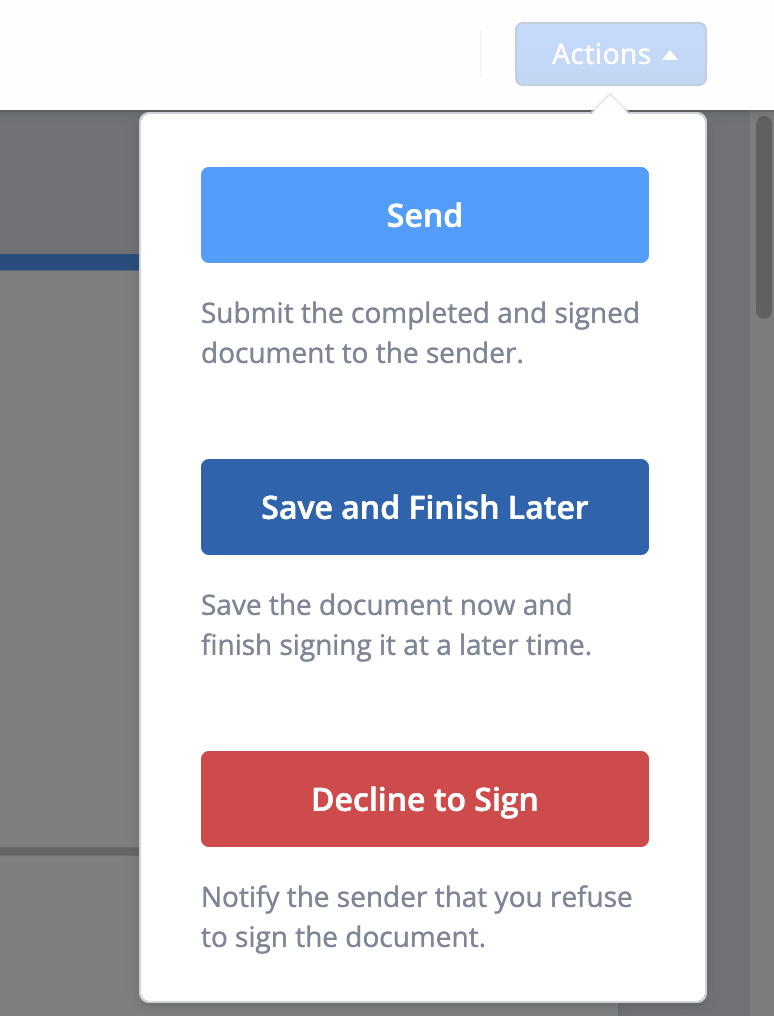
Once the signer clicks Open and Sign, the document is opened in the browser on any device. To sign a document, the signer needs to type the name in the signature field. From there, the signer has 3 choices under actions: Send the document back, Save and Finish Later, or Decline to Sign.
When the document is signed, it is returned to Fluix and appears in My Inbox marked as Signed. Both the signer and the sender get the email notification.
If the signer declines to sign the document, it is pushed back to My Inbox and marked as Declined.
In case the signer didn’t have a chance to sign and return the document back before the link in the email expires, the document will be returned to the sender’s app, My Inbox section marked as Expired. In that case, a user can send the document to sign once again.
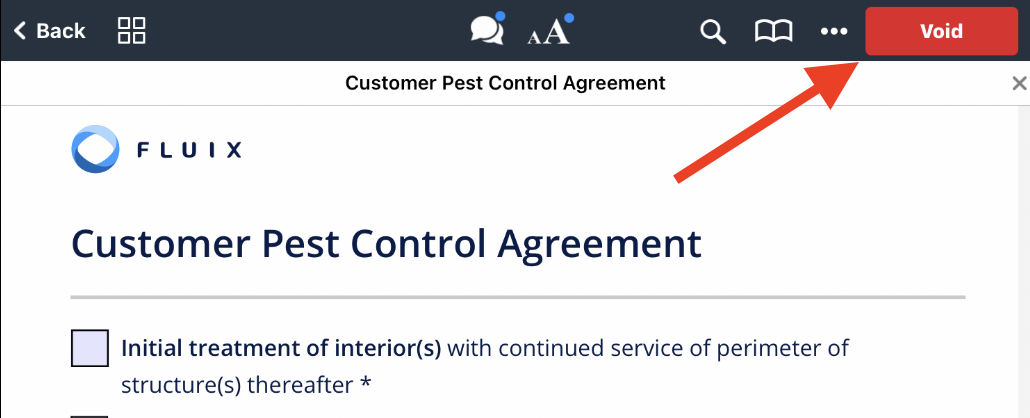
Document retraction
If a document needs to be retracted, proceed to the Sent for Signature section > select the file > tap Void:
There, the admins can also void the documents from the Admin Portal, in the Document Status section.
The retracted file will no longer be available for the signer and will appear in My Inbox.
Continue with signed documents in the workflow
Once the document returns to the sender to My Inbox, it can be sent further as per preconfigured workflow rule: emailed to other participants of the workflow, uploaded to company cloud storage, etc. Once the document is submitted to its final destination, it will land in the Completed tab on the device.
Admin’s control over all documents in progress
Admins can see all the documents sent for signatures in Admin Portal > Configuration > Workflows > particular workflow > Document Status:
Contact us at support@fluix.io to get more information or sign up for a personalized demo.
Was this article helpful?
Thanks for your feedback!
Oops, something went wrong. Please, try again later.
Thank you!
What details or examples would have made this article more helpful for you? We appreciate your insights!
You can open documents located in any app on your device, in the Fluix app and immediately push them to a pre-configured workflow.
To see how it works, set up the workflow on the Fluix Admin portal. You’ll need to create a new workflow by selecting Other Apps as a document source. Then, choose the submit rule. Once the workflows are created, click Publish to activate them.
If there is more than one workflow configured to accept documents from Other Apps, then users will get a list of the workflows to choose from on the iPad or iPhone. Just name the workflows accordingly so that the user could distinguish the necessary one among the others.
Document flow on the device
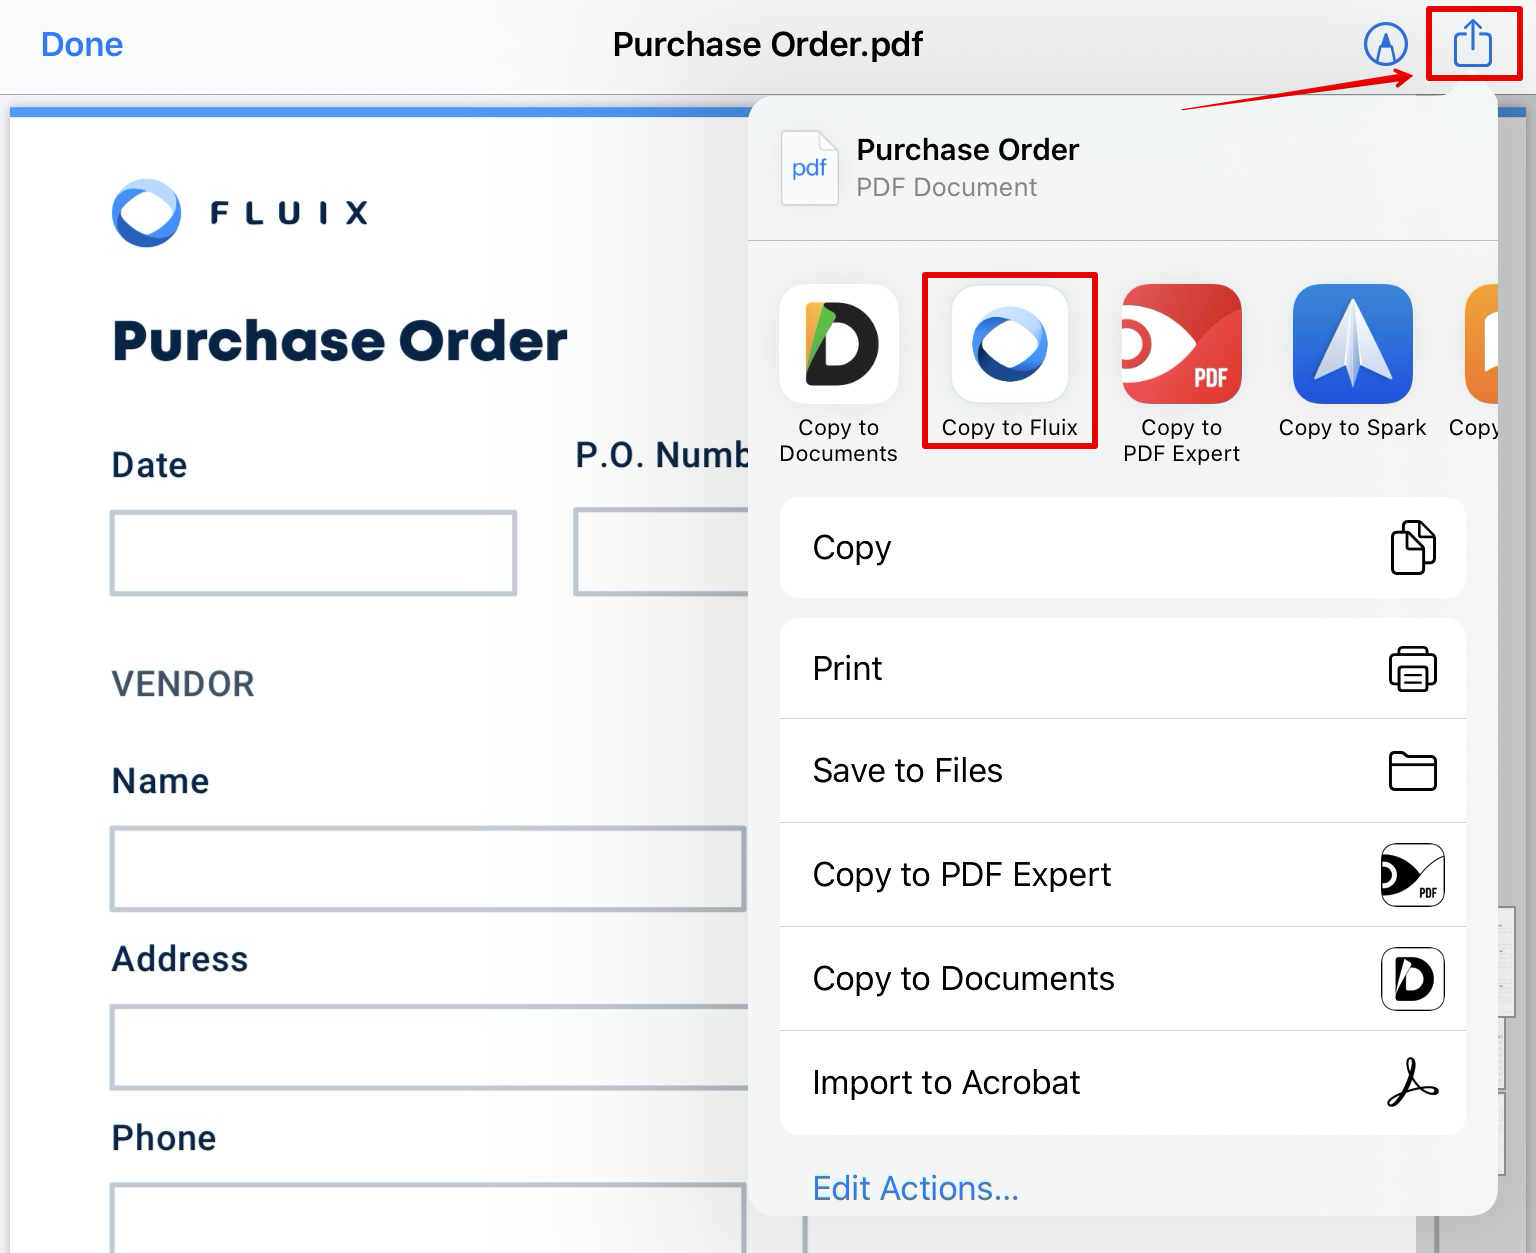
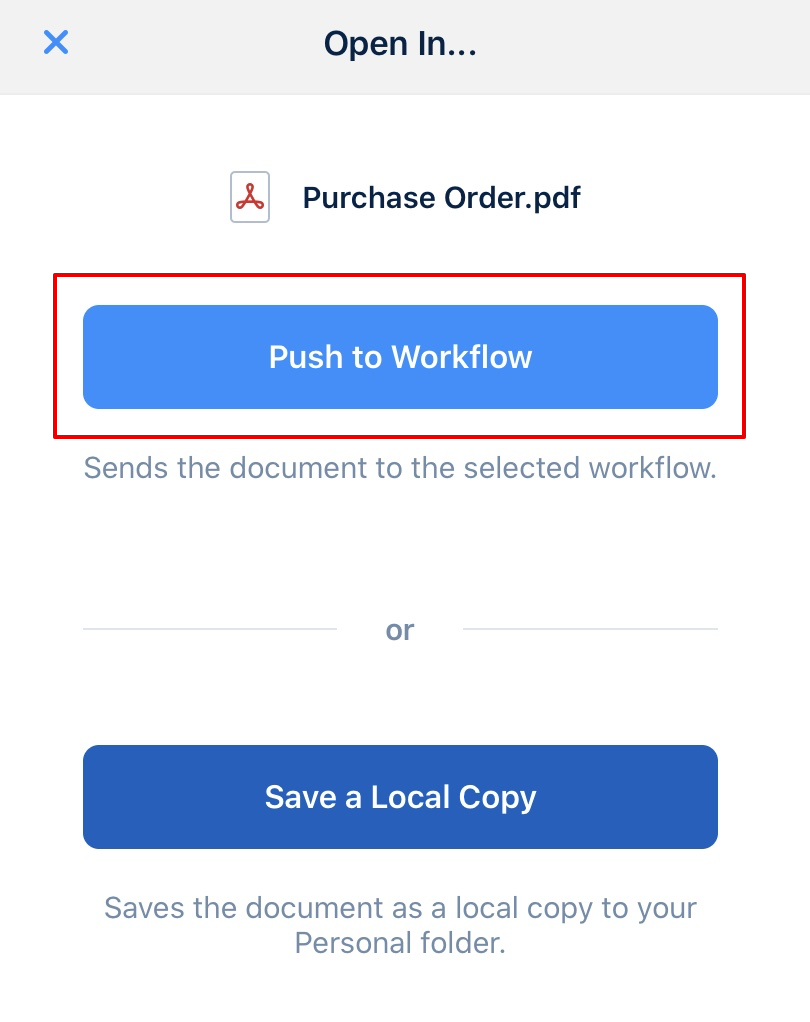
Select a document on your iPad or iPhone that you want to push to Fluix. The document might come from any mobile app (Email app, Cloud storage app, etc. ), or web app. Tap the sharing icon in the upper right corner and choose ‘Open in Fluix’.
In the pop-up message select Push to Workflow.
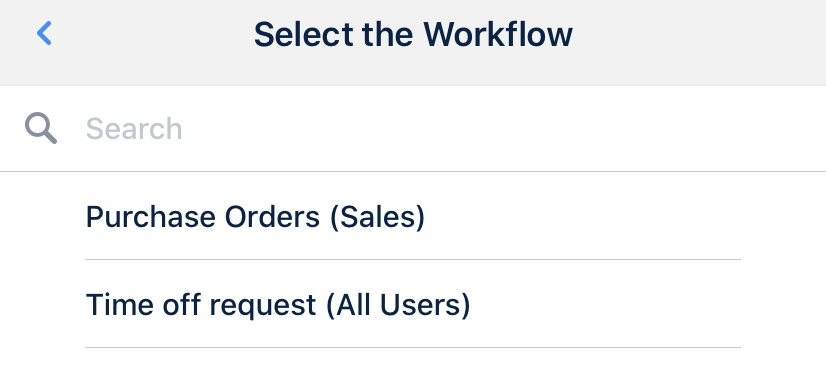
If there is more than one workflow configured for this user to accept documents from external applications, then the user will get a list of such workflows to choose from:
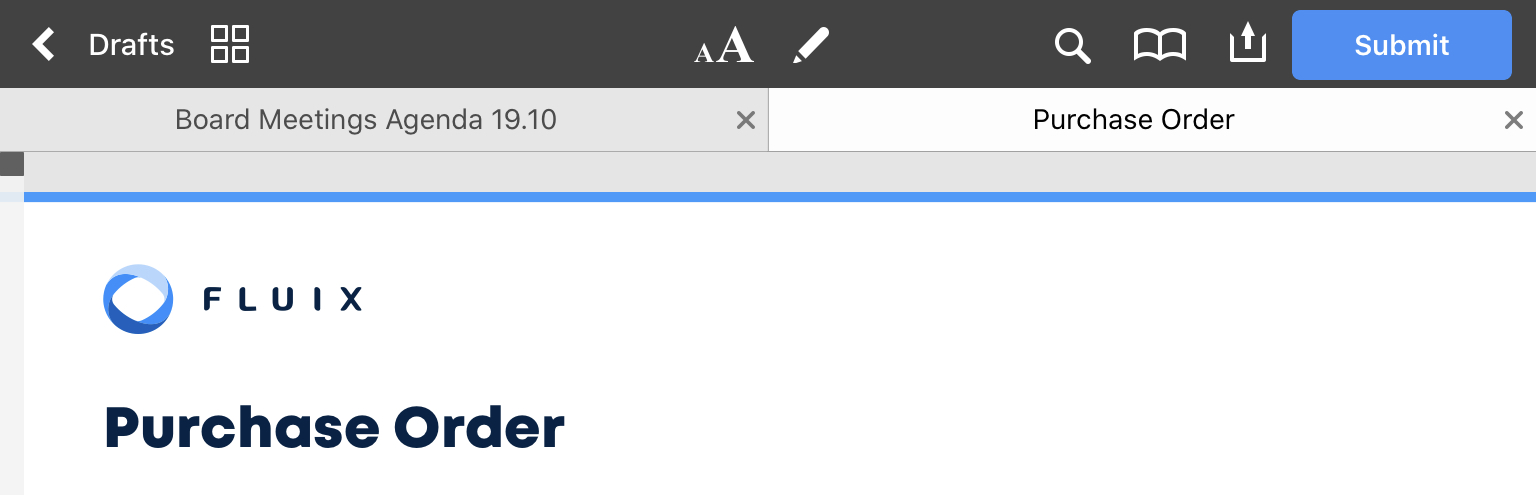
The document will then be placed under the ‘Drafts’ tab.
Once you open the document, Submit button will appear in the upper right corner with the submit actions pre-configured by your company administrator.
Once the document is submitted, it will then be moved to Completed or any other section in accordance with the configurations made in this workflow.
If you choose a ‘Save a Local Copy’ option on the pop-up message above, the document will be saved to the ‘Personal’ tab and the automatic submit actions won’t be applied to it.
Fluix allows for the electronic signing of contracts, agreements, NDAs, forms and other documents. Such paperless contract execution can save companies money on labor, printing, scanning, faxing, mailing and the storage of paper documents.
With Fluix, it is easy and intuitive to capture handwritten signatures on iPad, much like traditional signatures on paper, while still maintaining the same sense of security.
Digital Signature Process
Fluix’s digital signature process makes PDF-based e-signing secure and reliable for both the customer and the company. It solves crucial problems that can arise with the use of e-signatures in PDF documents:
Discourages changes being made to the document after being signed.
Prevents signatures being copied for use in another document.
Once a signature is captured, the document is sealed with a digital certificate. Any subsequent change to the document will result in the signature being invalidated. A document signed in Fluix can be validated to prove its authenticity by using the free Adobe Reader software.
Capturing eSignatures in Fluix
Fluix provides several ways to reach your customers and colleagues according to their signee role and available tools:
• In person: The simplest scenario is when a signature is captured in the field, most often produced with the finger on iPad/iPhone screen. This is a modern and convenient way to seal the deal both visually and electronically. Locking documents with a digital certificate ensures security and helps to identify invalidated documents, when changes are made after signing.
• Via workflow: Another method is to reassign a document to an existing Fluix user according to a pre-defined workflow. Signee might already have his own signatures stored on the device, and even apply company’s digital certificate to fully authorize decisions. Signing documents via workflow will help you save multiple signatures for repeated use, accelerate time to document completion and streamline approval processes.
• Via email: Most recently added capability allows anyone with an email addresses and a web browser to officially sign documents. Fluix user fills in a document and submits it for signing to a person outside the Fluix system. Signee receives email notification, opens a secure link, types in the name in the signature field, and the document is automatically returned to the workflow.
Offering your customers, suppliers and contractors the capability to receive documents from you, fill in required information, and sign digitally provides your business with even further back-office efficiencies from a digital workflow, now extended to non-employees.
Digital Signature Technical Specifications
Fluix uses proven cryptographic technology to ensure a document’s validity and protects it from forgery or misuse. This technology enhances Fluix deployment with a Digital Identity (a pair of private and public 2048 bit key).
As a document is signed, Fluix generates a Document Digest by computing a SHA-1 hash of the PDF content. A Document Digest is a set of characters (letters and numbers) that corresponds to a given document. Altering anything in the document will cause an immediate and dramatic change in the Document Digest value.
To create the Digital Signature, Fluix uses a Digital Identity private key to RSA encrypt the Document Digest. In the final step, the Digital Signature and Digital Identity public key are put into the document.
Whoever receives the document can then use the embedded Digital Identity public key to decrypt the Digital Signature and retrieve the Document Digest corresponding to the original document. Then, the receiver can compare the Document Digest with the SHA-1 hash of the received PDF content. If these two digests match, it means that the document has not been changed after being signed and the content is valid. In case of any difference, the document will be marked as invalid.
In order to digitally sign documents in Fluix, you will need to have:
A valid Digital Signature Certificate
Signature fields in your PDF form
There are two ways a document can be signed with a Digital Certificate in Fluix:
Using Fluix certificates. Fluix automatically generates and deploys unique certificates (RSA algorithm, 2048 bit). No iPad user interaction is required.
Manually create Digital Signature Certificates. Adobe Acrobat Pro enables formal signer’s verification through powerful encryption and public key infrastructure support. This kind of certificates have to be deployed by manually copying files to the iPad/iPhone (Signature section).
Fluix Signatures Are Legal & Secure
Electronic signatures created through Fluix are legal and secure. Digital Signatures support allows both the company and the customer to check the authenticity of a document signed on the iPad with Fluix. The document is also sealed to ensure that it can’t be changed after it is signed.
All these Fluix security enhancements remove the worry of document validity, allowing you to focus on more important business activities.
Fluix as eSigning solution helps collect eSignatures both onsite and online. With the Bulk Signing tool in Fluix you can send multiple documents as a package to collect eSignatures from a list of people and then automatically upload executed documents to your company archive, or email them to the back office.
Watch the video, or read below how to set up the process.
How to create and send a package with documents
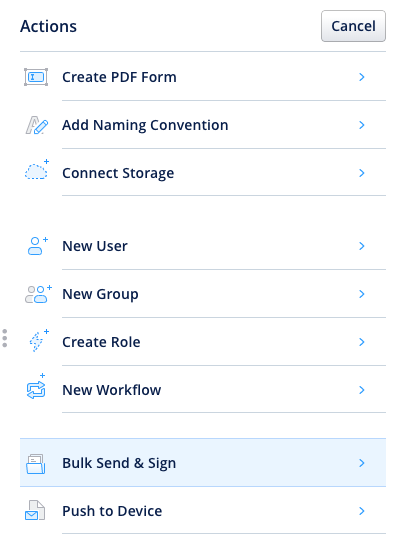
In the Fluix Admin Portal navigate to Actions — Bulk Send & Sign:
Select the way you’d like to the document(s) to be signed:
1 Option — Collect signatures in sequential order
Recipients will sign the designated fields in the same document(s) 1-by-1
2 Option — Get a signed copy from each recipient
Each recipient will receive a unique copy of documents to sign and complete
1 Option — Collect signatures in sequential order:
Step 1.
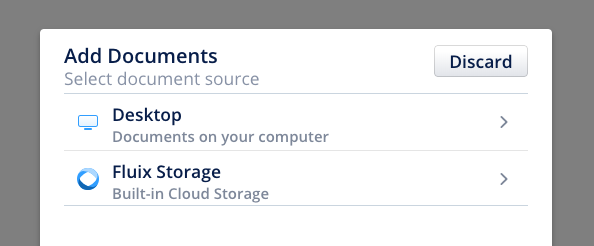
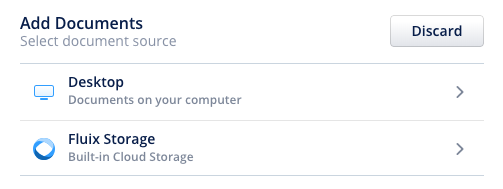
Add the documents you need to be signed to the package. You can upload them from your computer, or from Fluix cloud storage:
Once the documents are selected, click Next.
Step 2.
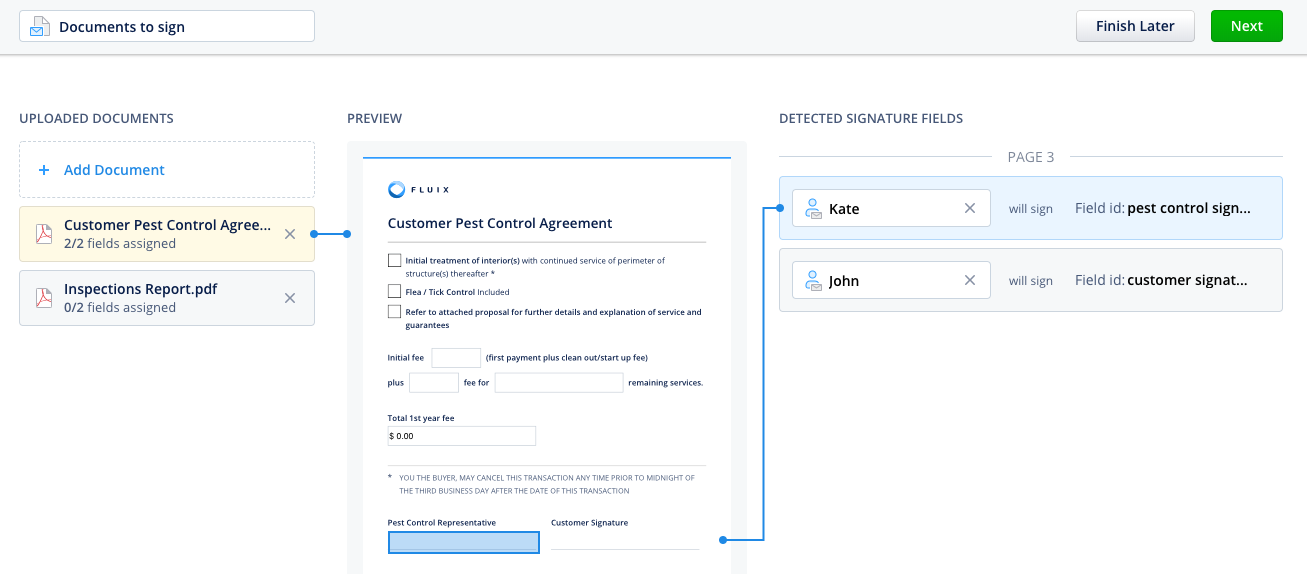
In the upper left corner, give a name to the package for your convenience.
In the menu on the left you’ll see the list of documents that were added and number of signature fields in each document. If the document has no signature field, you can add it using Fluix PDF Builder (navigate to Tools).
On the right there is a list of signature fields in each document. Click Add Signer to add signer’s details for each field.
Once done, click Next, or Finish Later to save a draft package.
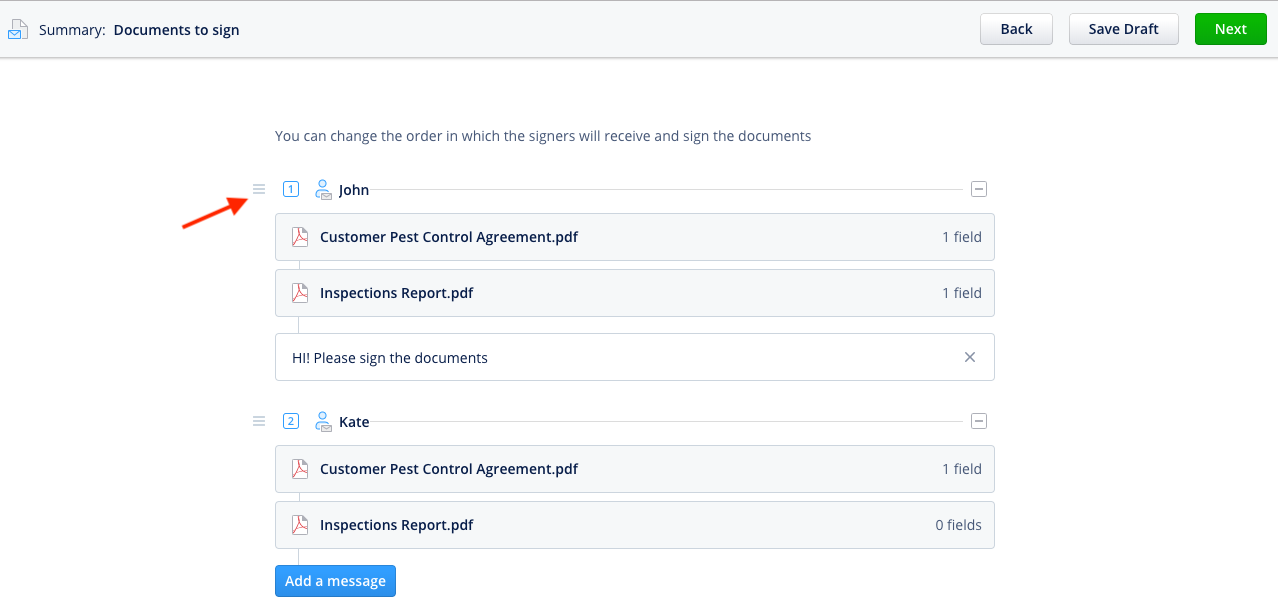
Step 3.
Once done, you can change the order in which the signers will receive and sign the documents and add a message to the recipients:
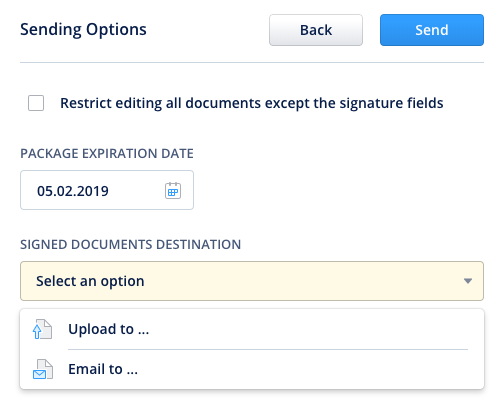
Step 4.
At the final step:
— restrict or allow document editing by signers
— set up the deadline for the documents to be signed
— configure the destination for the signed documents (upload to Fluix storage or email)
Once ready, click Send and you are done! Choose Send Later if you need more time.
Option 2 — Get a signed copy from each recipient:
Step 1.
Add the documents you need to be signed to the package. You can upload them from your computer, or from Fluix cloud storage:
Once the documents are selected, click Next.
Step 2.
In the upper left corner, give a name to the package for your convenience.
On the left you can move the documents in the order you prefer.
On the right you can uncheck the fields that you don’t need to be signed.
If the document has no signature field, you can add it using Fluix PDF Builder (navigate to Tools).
Once done, click Next, or Finish Later to save a draft package.
Step 3.
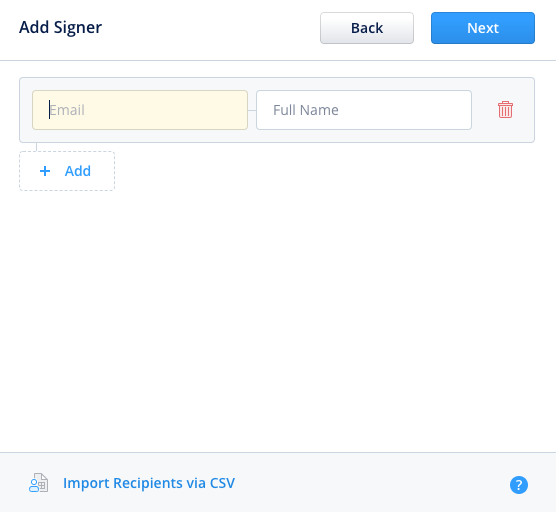
Assign each signature field in every document within the package to a specific signer. Add the signer to each document by adding the signer’s email and full name, or upload a CSV list of contacts:
Step 4.
At the final step:
— restrict or allow document editing by signers
— set up the deadline for the documents to be signed
— configure the destination for the signed documents (upload to Fluix storage or email)
Once ready, click Send and you are done! Choose Send Later if you need more time.
How to track documents statuses
As soon as you send the package, your recipients will get an email with your message and the link to the documents to be signed. The links can be opened from any device in any browser.
The recipient will have a choice to fill out highlighted fields and sign the documents, just sign the documents, finish later, or refuse signing.
The signer can also add a comment before returning the documents to you.
Finally, there is an ability to track the documents at every stage. You can easily do that in the Fluix Admin Portal:
From there you can also download any document or the whole package, resubmit it, send a reminder to a signer, void the package, or make any other actions you need.
Access to Bulk Signing
To give access to Bulk Signing to your admins, please proceed to Configuration -> Roles -> Global Permissions -> Allow Access to Bulk Signing in the web -> save changes.
Feel free to contact your Customer Success Manager with any questions or comments, or via email at support@fluix.io. We’re always glad to hear from you.
Was this article helpful?
Thanks for your feedback!
Oops, something went wrong. Please, try again later.
Thank you!
What details or examples would have made this article more helpful for you? We appreciate your insights!
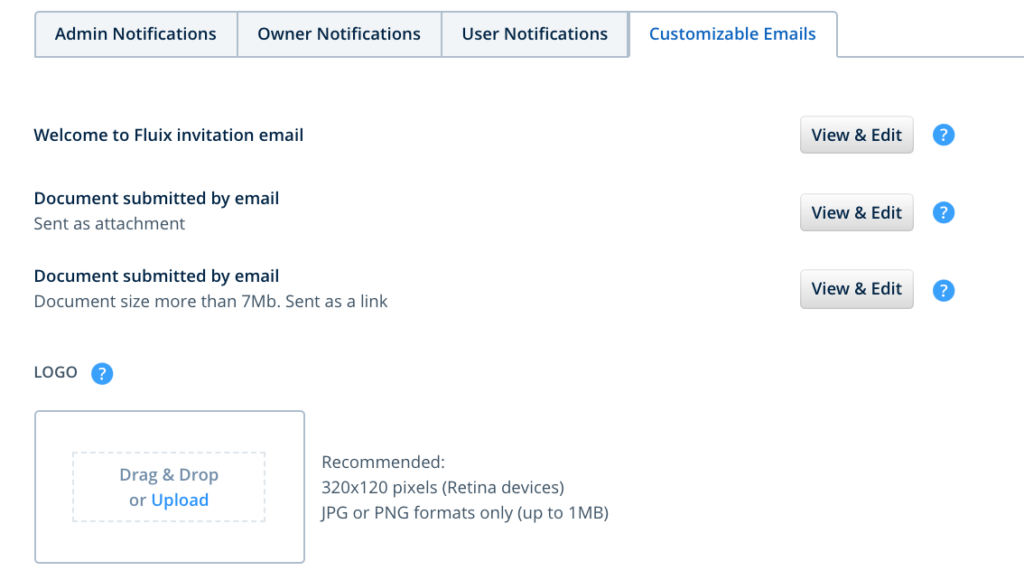
Depending on the goal, in the following subsections you can customize the Fluix invitation emails sent to your users to join the Fluix platform or any email submitted by your users from Fluix that are participating in workflows with “Send by email” submit action:
In order to provide the recipients with the specific data about the users, documents, or any other information in the emails sent form Fluix, you can use the keywords in the Fluix platform.
To select the type of email that is going to be customized, click the ‘View and Edit’ button to open the email template.
The keywords can be used in any custom message and can be placed anywhere. Those serve as identifiers of the text (URL, name, title, etc) that is needed to be sent by email.
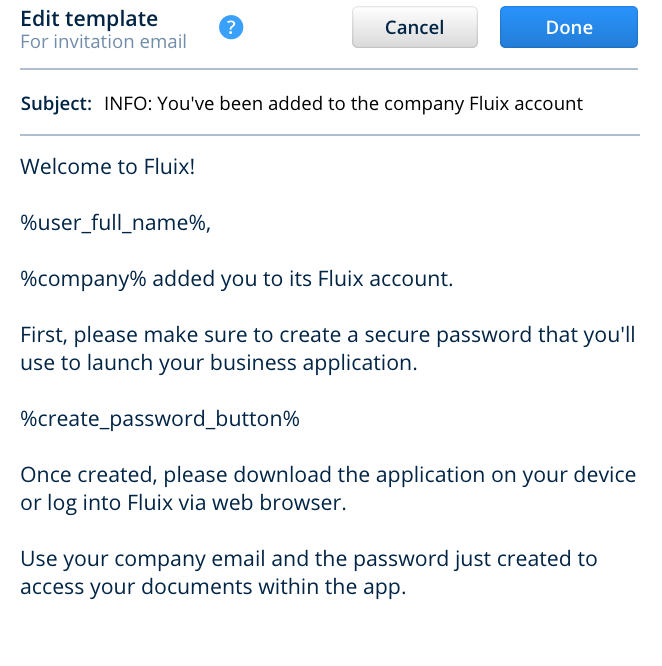
Welcome to Fluix invitation email
Use the following keywords in order to include user-specific data:
%user_full_name% – user’s name
%company% – name of your company’s Fluix account configured by Fluix team
%product_title% – the product title is set by default and will be displayed in the email as Fluix. In this case, it can be used in the following way: you have been added to %product_title% account.
%web_activation_url% – a link to create a password that is generated by our system, that will be displayed as a link.
%create_password_button% – a HTML button with an activation link to create a password, that will be displayed as a button that leads to the activation link.
Please note that only one of the keywords either %web_activation_url% or %create_password_button% should be used in the invitation email in order not to duplicate them since each of them provides a user with the same link.
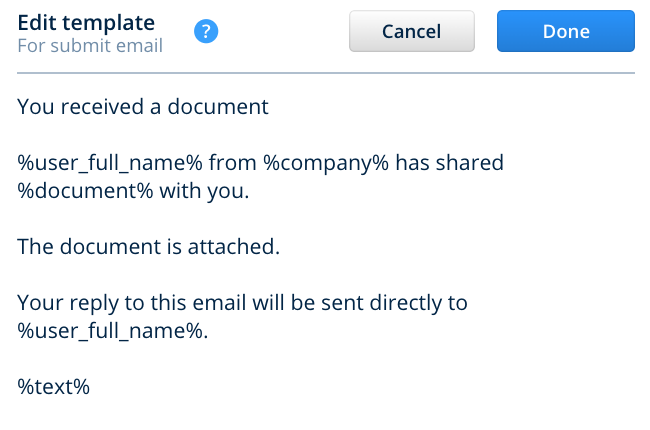
Document submitted by email (when the document sent as an attachment)
Use the following keywords in order to include user-specific data:
%user_email% – user’s email fixed in Fluix platform as a login
%user_full_name% – user’s name
%company% – name of your company’s Fluix account configured by Fluix team
%support% – the email that is configured as support email for the account (by default support@fluix.io)
%text% – custom message configured at the workflow level for “Send by email” submit action
%document% – the name of the form submitted in Fluix
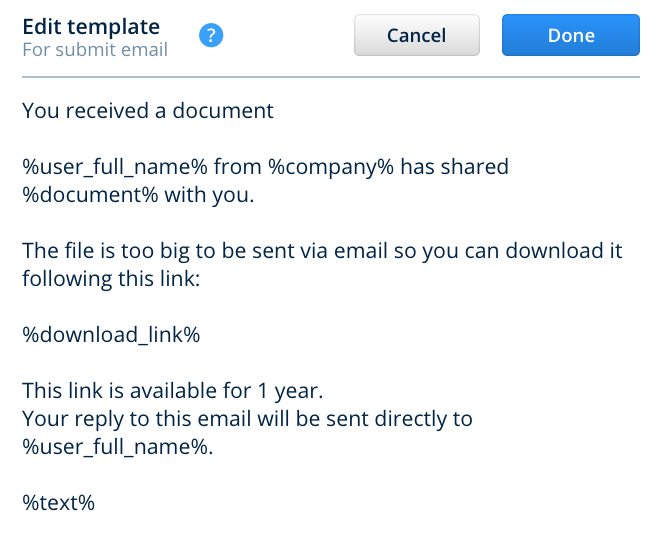
Document submitted by email ( when the document is sent as a link due to the reason that it is more than 7Mb)
The same keywords as when the document is sent as an attachment can be used. Additionally, the keyword %download_link% has to be included to the list to provide the recipients with the link to download the submitted document, that is available for 1 year.
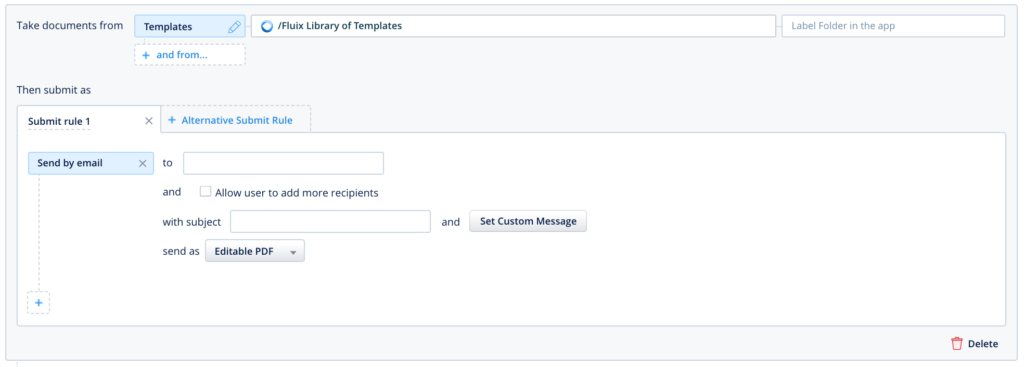
Other than that the email message and its subject of any workflow for “Send by email” submit action can be customized.
To specify the subject of the email and its custom message you can use the following keywords:
%document% – the name of the form submitted in Fluix
%user_full_name% – user’s name
%company% – name of your company’s Fluix account configured by Fluix team
%product_title% – the product title is set by default and will be displayed in the email as Fluix
%user_email% – user’s email fixed in Fluix platform as a login
%text% – in this case, all the text specified in the Custom Email Message will be added to the subject
However, all these keywords will be added after the main text of the email sent to the recipient.
Was this article helpful?
Thanks for your feedback!
Oops, something went wrong. Please, try again later.
Thank you!
What details or examples would have made this article more helpful for you? We appreciate your insights!
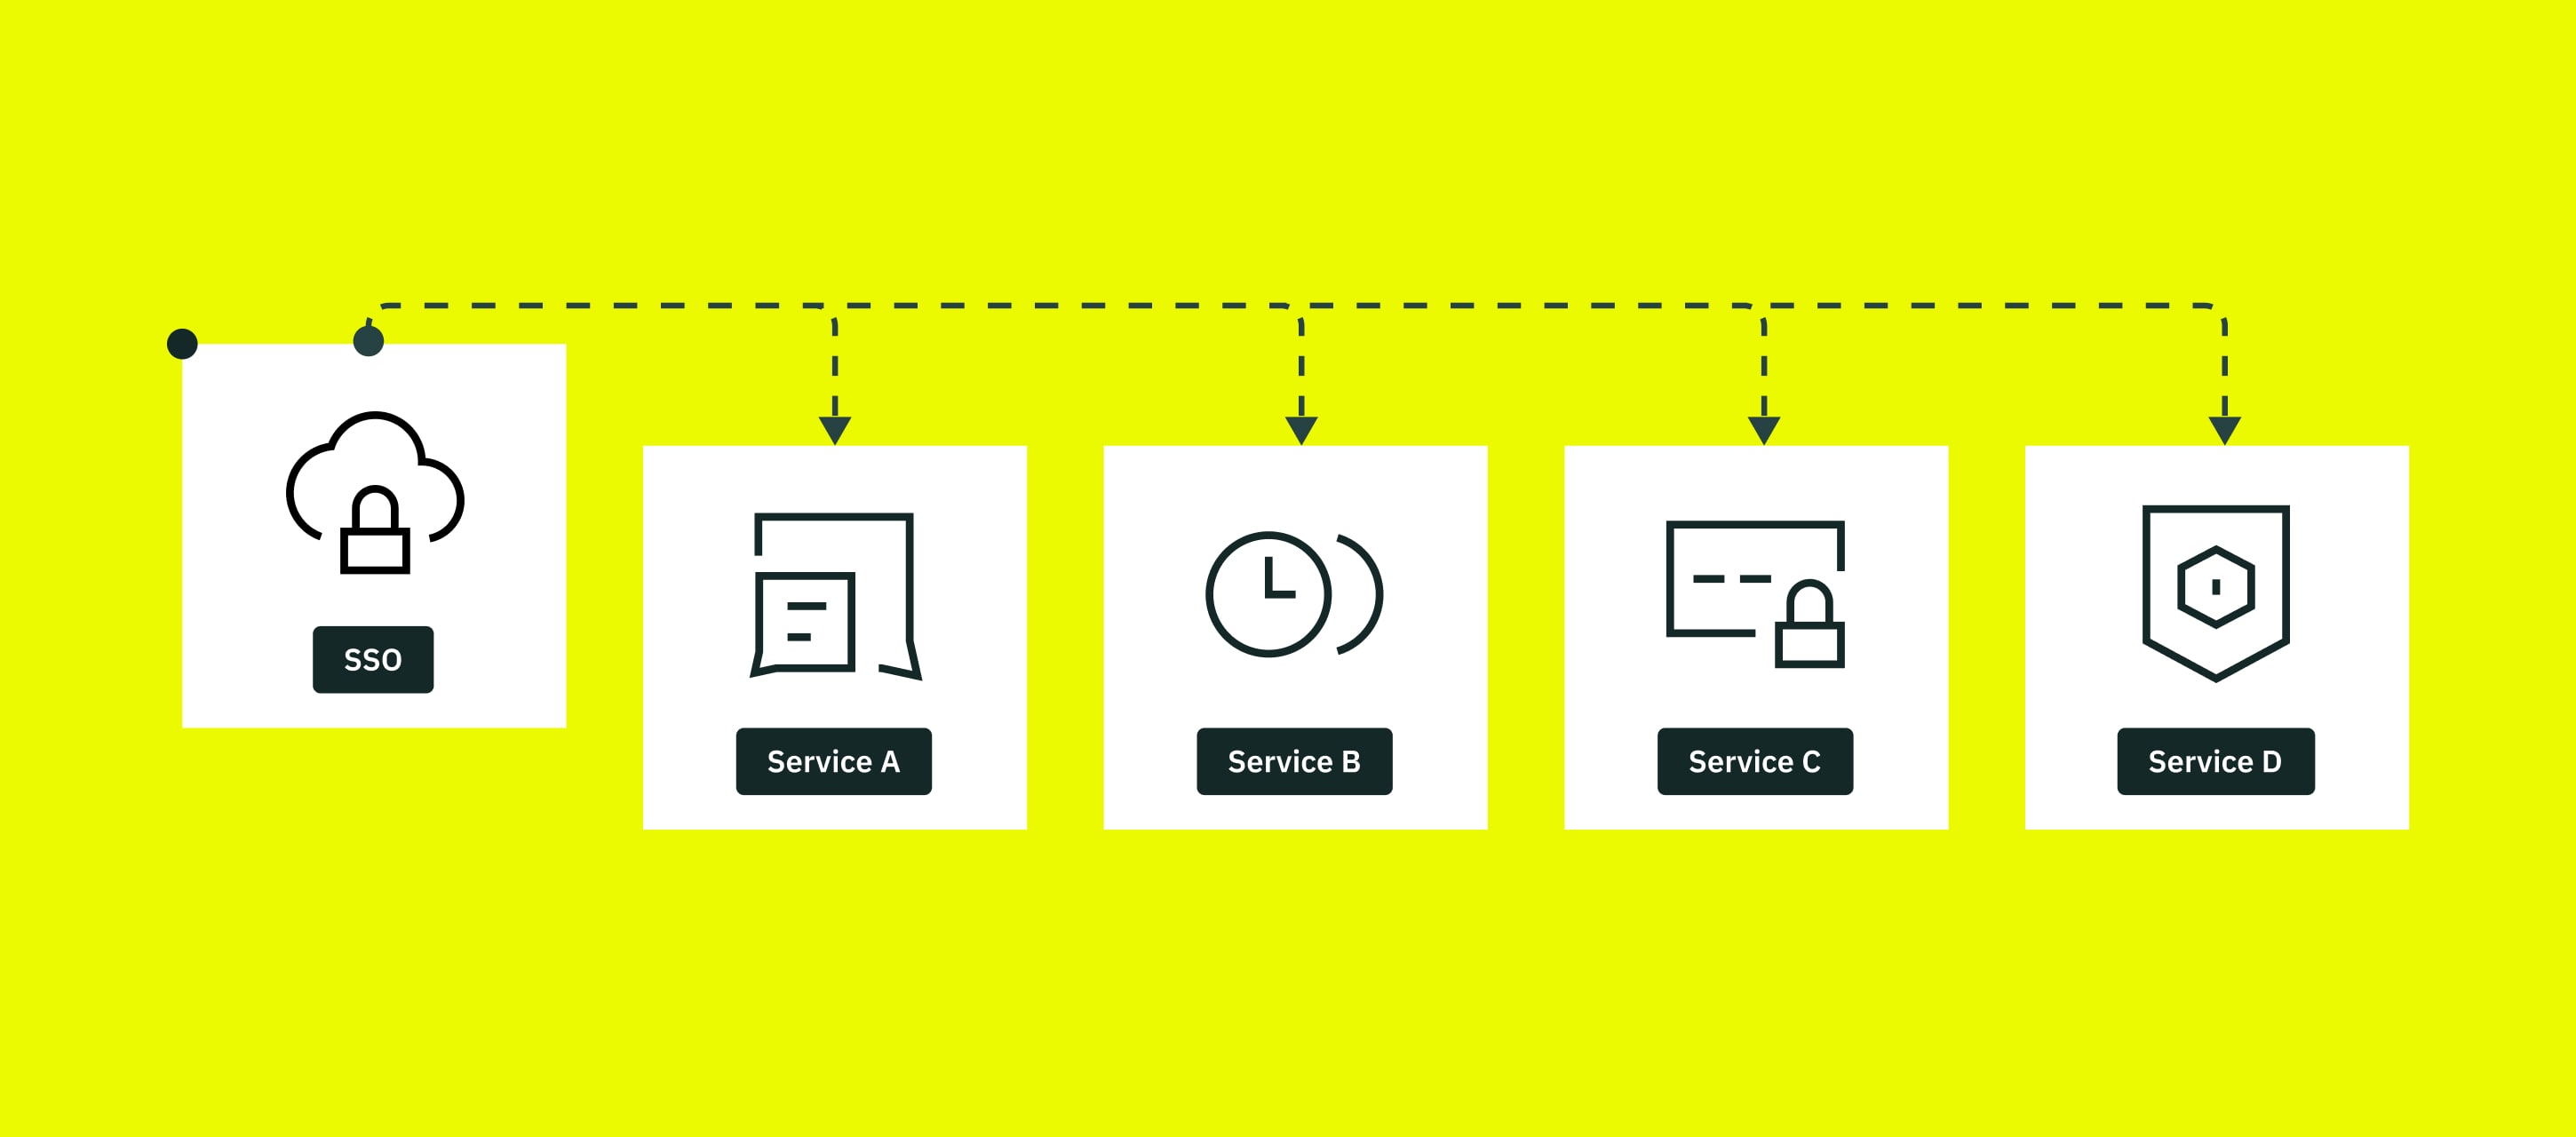
Single Sign-On (SSO) is one of the ways of authentication that enables users to use one set of login credentials to securely access multiple applications.
In addition to being much simpler and more convenient for users, SSO is widely considered to be more secure. The full list of the advantages of using SSO are the following:
Reduces password fatigue Remembering one password instead of many makes users’ lives easier. As a tangential benefit, it gives users a greater incentive to come up with strong passwords.
Streamlines the user experience SSO saves time and effort because users do not have to repeatedly log into, and since the repeated logins are no longer required, customers can enjoy a modern digital experience.
Relieves admin and support team workloads It saves admin and support team time by reducing the number of tickets sent to the support regarding access issues such as misplaced or forgotten passwords.
Simplifies username and password management When changes of personnel take place, SSO reduces both IT effort and opportunities for mistakes. Employees leaving the organization relinquish their login privileges.
Improves network and application security SSO can uniquely identify a user, and it, therefore, complies with the most demanding safety standards. Information provided by SSO moves encrypted across the network.
Additionally, the tech requirements listed below should be met in order to set the Single Sign-On functionality successfully:
User management. The user is needed to be added to Fluix in advance by the admin to be able to login in using SSO.
Corporate domain integration. The company’s domain needs to be specified in Fluix and it should match the email domain of the users for the particular company. Let’s say, the domain that was specified by Admin in Fluix is readdle.com, therefore, the emails of the users who are going to login to Fluix account using SSO should be corresponding with this domain, e.g. user@readdle.com, user2@readdle.com, etc.
Multi-accounts restriction. In case there are some users who have different email domains within the same company account (e.g., user@readdle.com, user2@fluix.io, user3@gmail.com) the company Admin will need to select only one email domain that will be used for the SSO. Other users having different email domains will not be able to login in using SSO.
SAML authentication standard. The identity provider, which specifies the user name, is required to return the NameID value of the user email address in Fluix. There could be also another attribute that may contain the email address, though, a custom attribute name will be needed to be configured on the company’s end in Fluix settings.
Identity Provider Compatibility. Any identity provider for authentication (Okta, Auth0, Microsoft AD, etc) can be used in Fluix, and any of them are compatible with our system.
Verification certificate. The certificate file that will be added on the company’s end needs to contain the public key so that Fluix could verify sign-in requests and the SAML response sent to Fluix in order to make sure that SSO assertion was received from a particular company’s account and wasn’t modified during transmission.
If you already have Fluix account, learn how the Single Sign-On functionality works and the way it can be implemented for your Fluix account in the article about Security Settings.
Was this article helpful?
Thanks for your feedback!
Oops, something went wrong. Please, try again later.
Thank you!
What details or examples would have made this article more helpful for you? We appreciate your insights!
Deep linking is the practice of directing users deeper into a web page or mobile app through the use of uniform resource identifiers (URI). With deep links you can easily direct Fluix users to the files within the app. Specifically, creating a direct link to a file will significantly help to save employee’s time on digging through complicated folder structures of your corporate cloud storage by pointing him/her directly at the required file instead, whether it is Site Attendance Register, Safety checklist or any other document.
Before starting, please note that the below instruction is applicable only for Templates and Personal sections of the Fluix app, having some specifics for each.
How to build the link:
The deep link should consist of initial prefix ‘pdfexfile://’ and the folder path itself /folder2/folder3/file.pdf
As a result, the link pointing to a PDF document should look like the one below.
pdfexfile:///folder2/folder3/file.pdf
Important Notes
1. The link is case sensitive, meaning that the spelling of the folder path in your deep link must be identical to the spelling of the actual path of your folder structure in Fluix. Therefore please make sure that upper and lower cases correspond to one another.
2. The path should not contain the first (root) folder. (This rule is applicable only for the Templates section, while for Personal section the path should stay as it is)
Example for Templates: When the file is accessible at such folder path /Folder1/Subfolder2/File.pdf; the link to the file should be as shown below:
pdfexfile://Subfolder2/File.pdf
Example for Personal: When the file is accessible at such folder path /Folder1/Subfolder2/File.pdf; the link to the file should be as shown below:
pdfexfile:///Folder1/Subfolder2/File.pdf
3. Spaces should be percent-encoded (put %20 instead of space)
Example for Templates: When the file is accessible at such folder path /Folder1/Subfolder2/Important Document.pdf; the link to the file should be as shown below:
pdfexfile://Subfolder2/Important%20Document.pdf
Example for Personal: When the file is accessible at such folder path /Folder1/Subfolder2/Important Document.pdf; the link to the file should be as shown below:
Please note that the method described above will work only in case your folder path contains Latin letters, numbers, and spaces only. In case if your folder path contains some special characters eg. ü, ö, backslashes, underscores, other punctuation marks, etc, we recommend checking how to percent-encode them by following the link below.
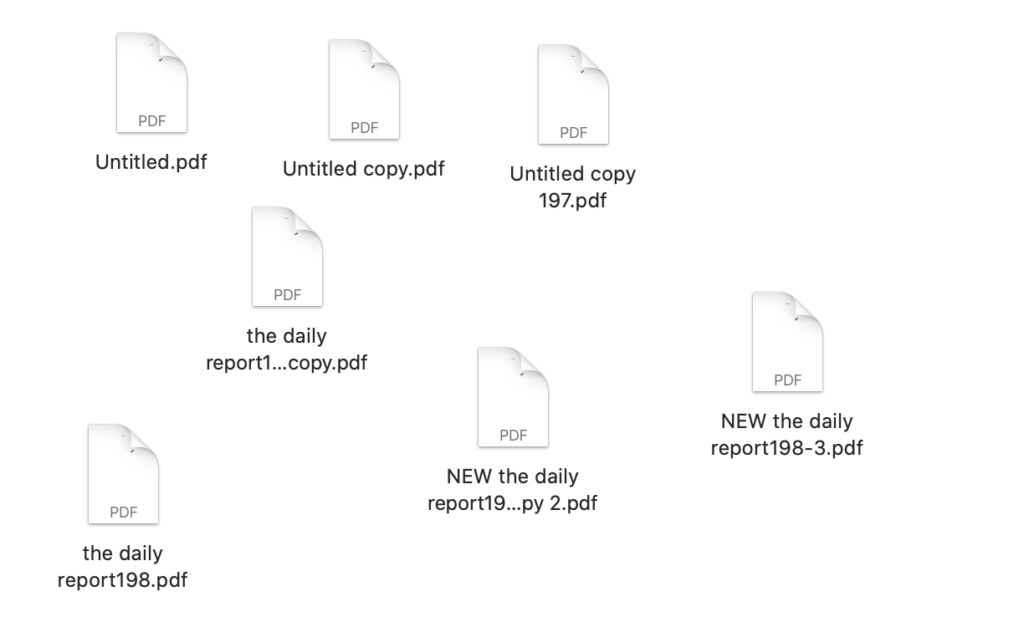
The more documents your team creates, the more your company’s storage starts to resemble a tangled web. Before you know it, a folder filled with “Untitled” files looks less like a workspace and more like a junk drawer.
The untitled, horrible beauty looks familiar to you, doesn’t it? The reason for this management weakness is quite natural — people lack the time to manually type names each time a document is submitted.
That’s where a Naming Convention swoops in to save the day — keeping things tidy, searchable, and stress-free.
So, what is a Naming Convention?
The file Naming Convention is an automation that allows you to add a systematic way of naming files by your field teams. Adding a file naming convention to your files not only prevents the problem of file disorganization but also opens up a wide range of benefits for both you and your team:
Saved time on manual file entry on the device. If you just calculate all the time your team spends on naming, renaming, or organizing documents, and then trying to find them, it will be at least 2 hours per day, or even more.
Eliminating human errors. When people are working in the field, they may not always pay attention to how they name their files and could make many mistakes by chance.
Quick file search. File naming convention helps to identify the document content even without opening it.
Unified file structure. You can store your files and documents in a single folder without losing the logic and context. The relationships between your files will be coherent and cohesive.
No twins. The naming convention prevents file duplicates.
How does the Naming Convention work?
The way everything works in Fluix isn’t about rocket science. The main principle can be described in just two sentences:
First – You set up a Naming Convention in the file template and upload it to your storage folder, which is used in your workflow.
Second – Every time your team worker fills out fields in your pre-configured naming convention, the file gets its name automatically. Just easy!
Let’s take a closer look at how the Naming Convention can be set up for a particular document:
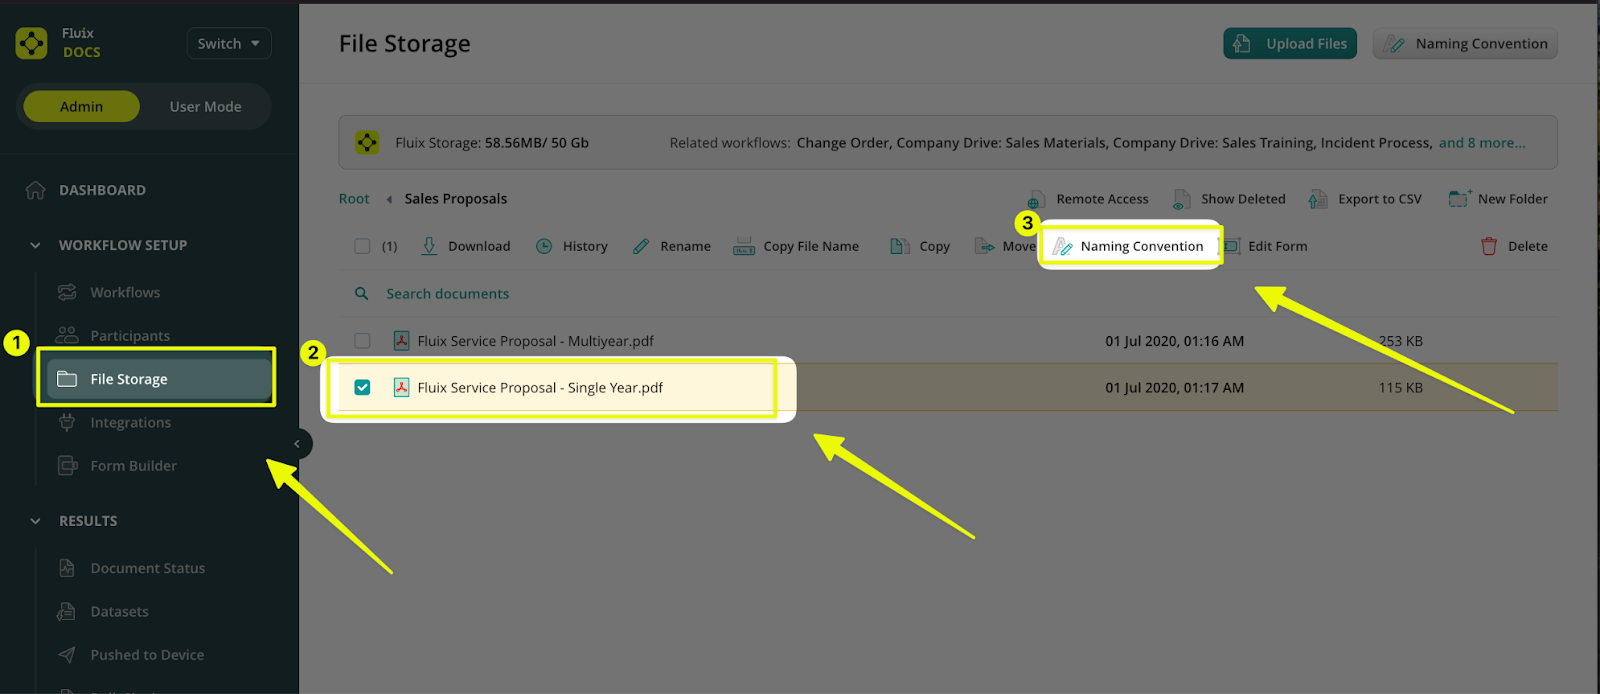
Navigate to the File Storage -> Select the checkbox at the left of the respective document ->Click on the Naming Convention button.
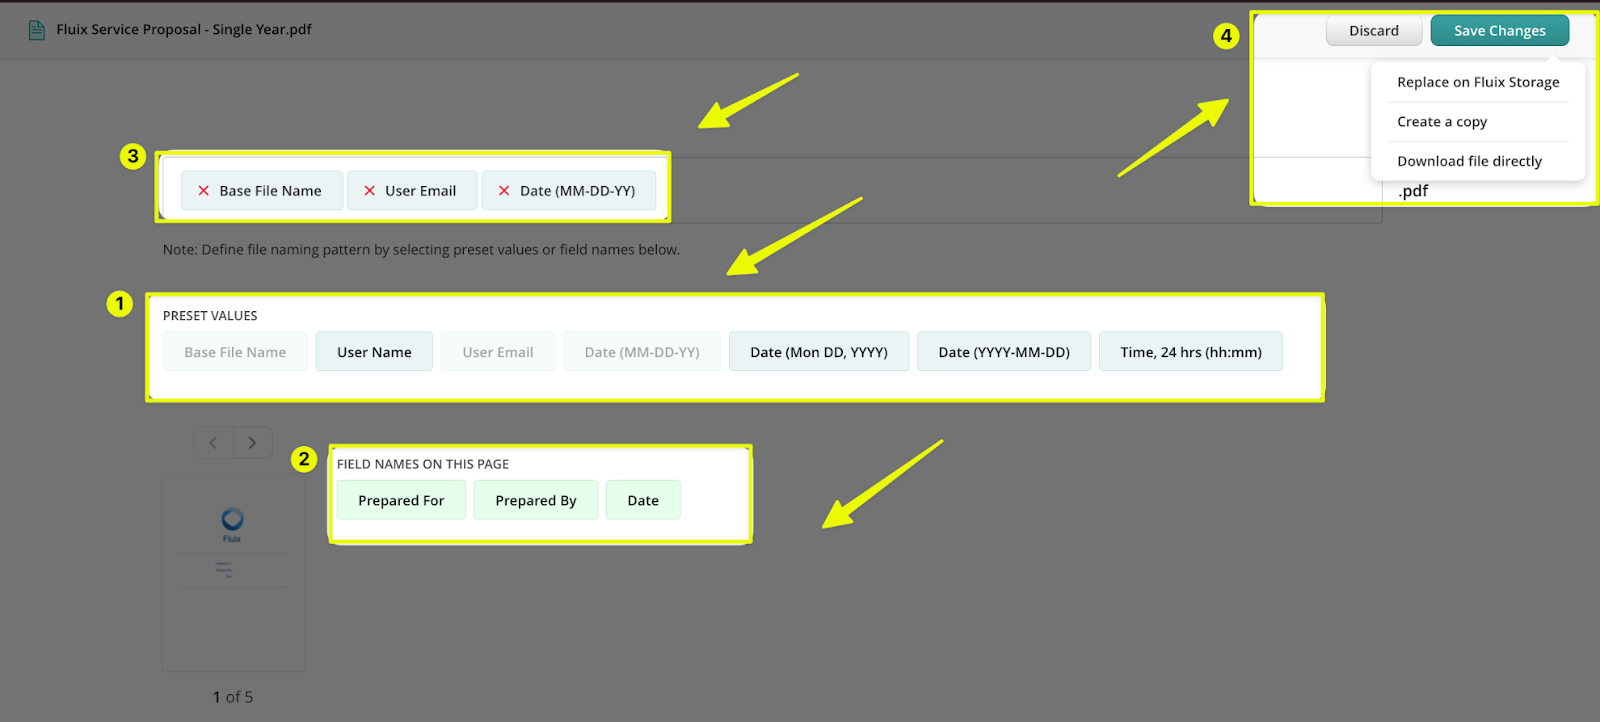
Choose either the Preset Values or Field Names from the file to set the preferred automatic file naming -> Choose whether to replace the file in Fluix Storage, Create a Copy, or Download directly -> Click on Save Changes to apply the configurations
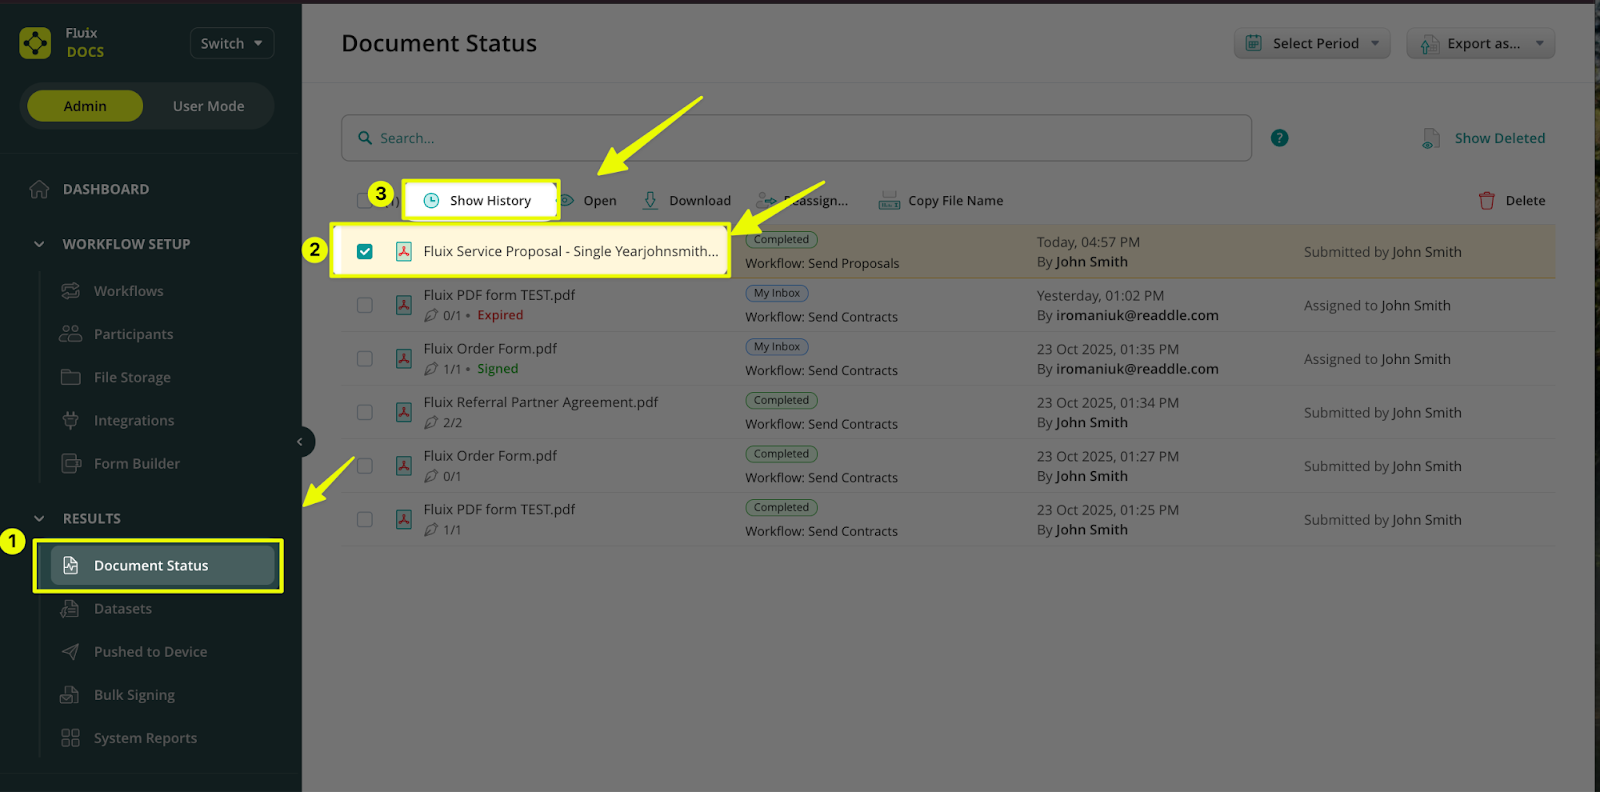
After the user submits the document, you can easily find the respective document in theDocument Statusby using either the smart search or scrolling down the list of submitted documents.
By pressing Show History, you can review all the historical data, including the actions taken on the document, along with specifications such as User, Date, Document Status, and other details.
Do you already have a Fluix account? Then learn how to set up a file naming convention in Fluix in our step-by-step tutorial ‘File Naming Conventions’.
Can’t find what you’re looking for? Feel free to contact us at support@fluix.io if you have any questions or comments.
If you have a complicated folder structure on your cloud storage and your team spends time searching for the necessary folder or file while working in the Fluix app on a mobile device or in the User Web App , there is a way to improve the user experience.
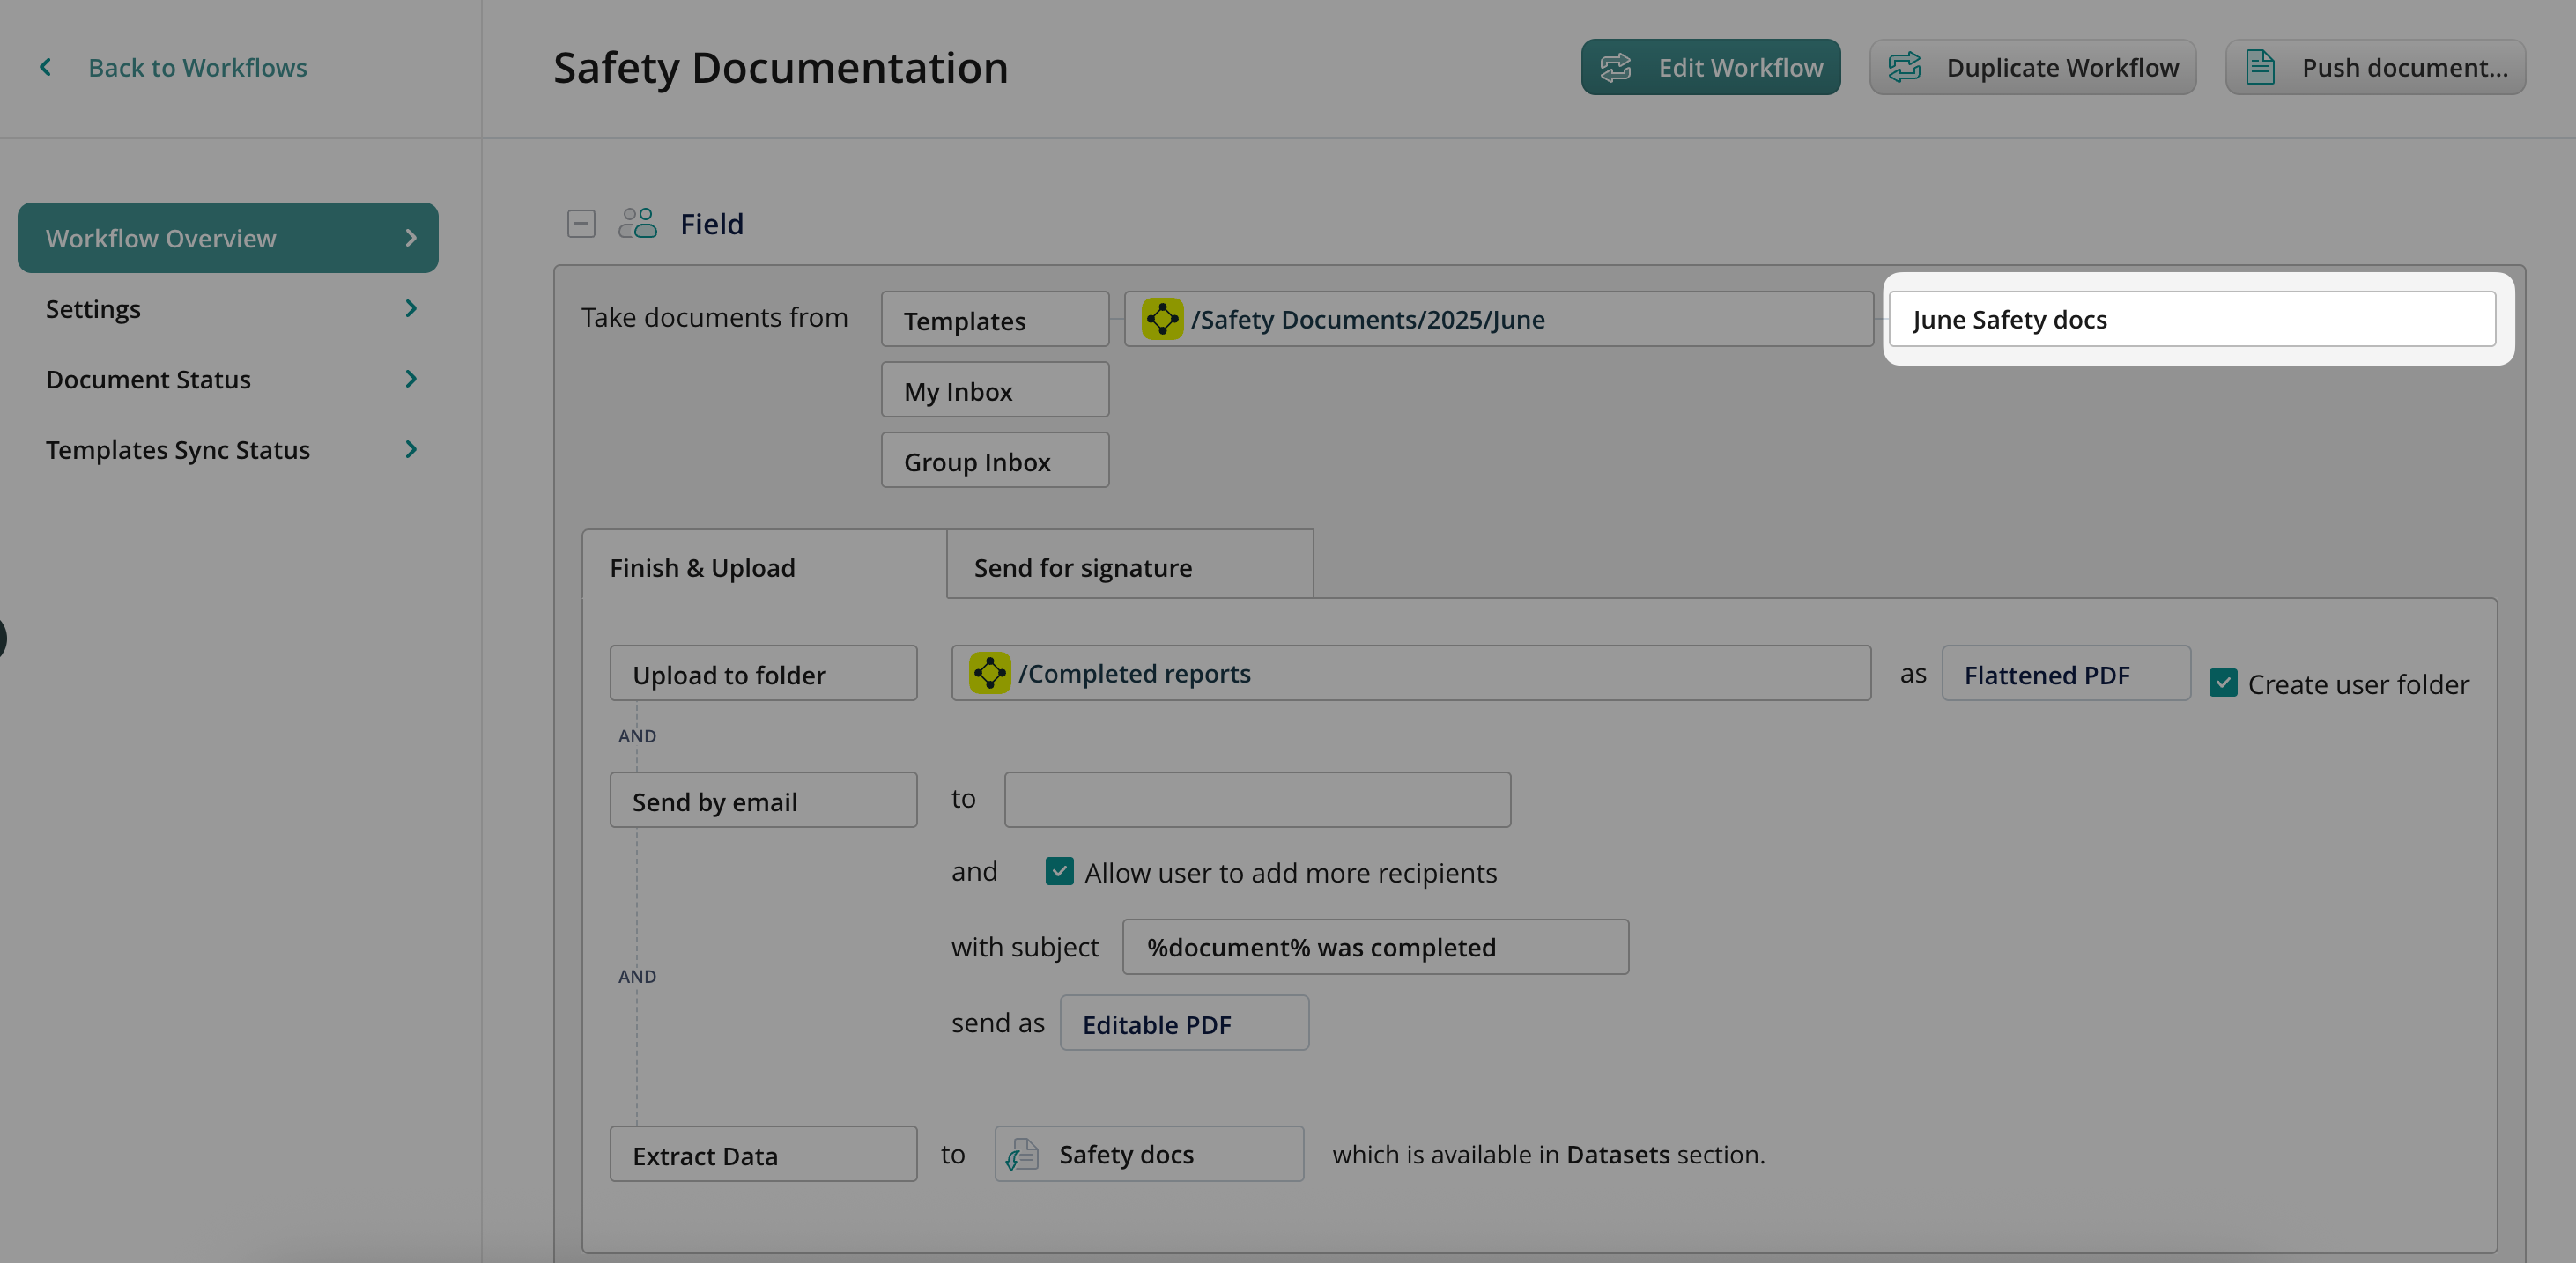
In Fluix, you can create a Virtual Folder Structure and Label Folders for end-users, so that they can access the required folder without having to click through the entire path from the root folder to the subfolder they need. Such a virtual folder structure can be created on the level of Templates, Cabinet, Company Drive, and Group Inbox. To do this, the Fluix admin needs to create the label folder on the workflow level:
In this case, the end-user will see the June Safety docs in the Templates section on their device, without the necessity to click and open the folders through the entire path from the root folder to the subfolder they need. As a result, the actual folder structure is Templates/Safety Documents/2025/June, while the virtual folder structure, which is displayed to the user, is Templates/June Safety docs.
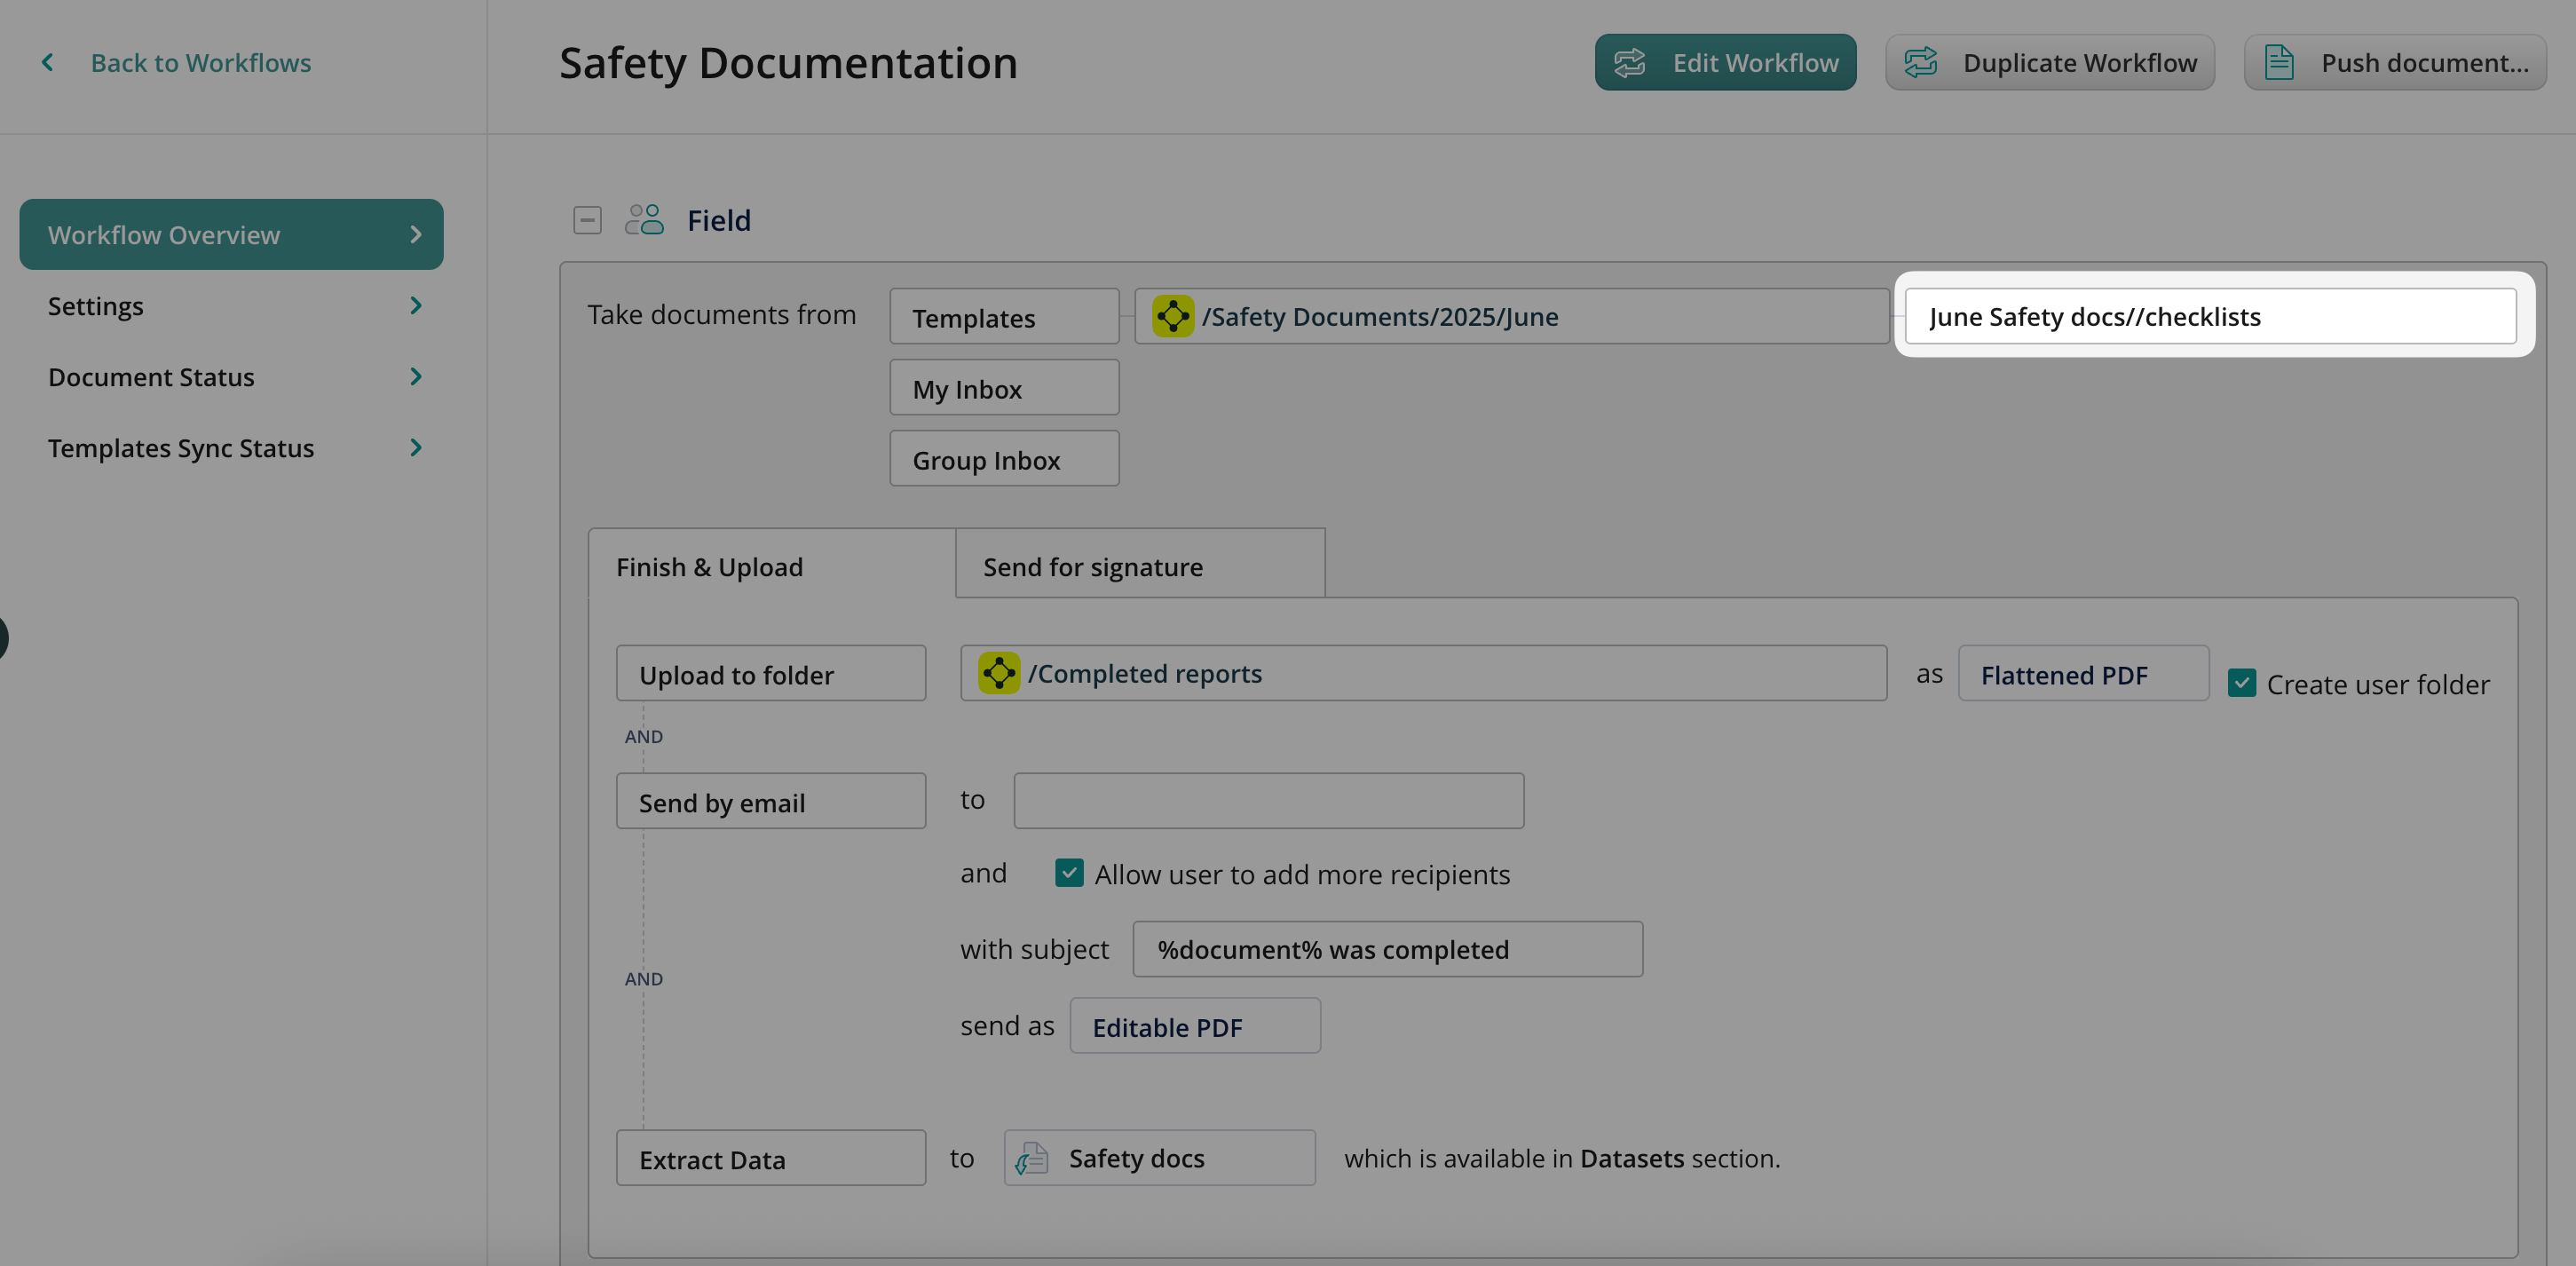
How To Set Up Multi-Level Virtual Folder Structure
You may also set up a multi-level virtual folder structure on the level of the Templates, Cabinet, and Company Drive document sources. To achieve this, the Fluix admin needs to configure the path, which directs the user to the necessary folder by adding two slashes (//) to the path itself. This creates a subfolder in the parent folder to the left of the // symbols. Virtual folders can be created indefinitely and contain multiple levels (3, 4, 5, etc.); for example, Folder//Subfolder//Subsubfolder//…//Subsubfolder.
As an example, the following path can be used for creating the multi-level virtual folder structure:
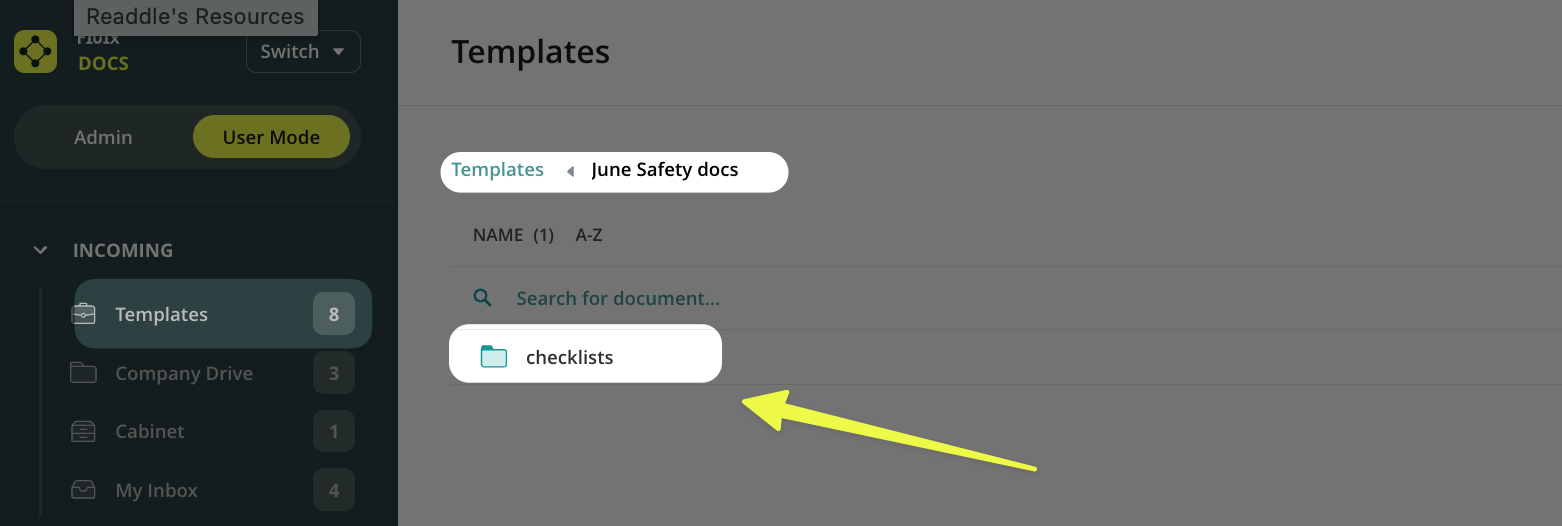
As a result, the actual folder structure is Templates/Fluix Library of Templates/Safety Documents/2025/June/June Safety docs//Checklists.
While the virtual folder structure, which is displayed to the user, is Templates/June Safety docs//Checklists.
This configuration offers significant advantages for your end users by enhancing the overall document experience:
First, it ensures zero disruption to your existing storage setup, serving as a more intelligent layer for displaying files without altering the underlying data.
Second, it facilitates more straightforward navigation, providing a more intuitive and streamlined interface that allows users to locate the information they need with much greater efficiency.
Feel free to contact us at support@fluix.io if you have any questions.