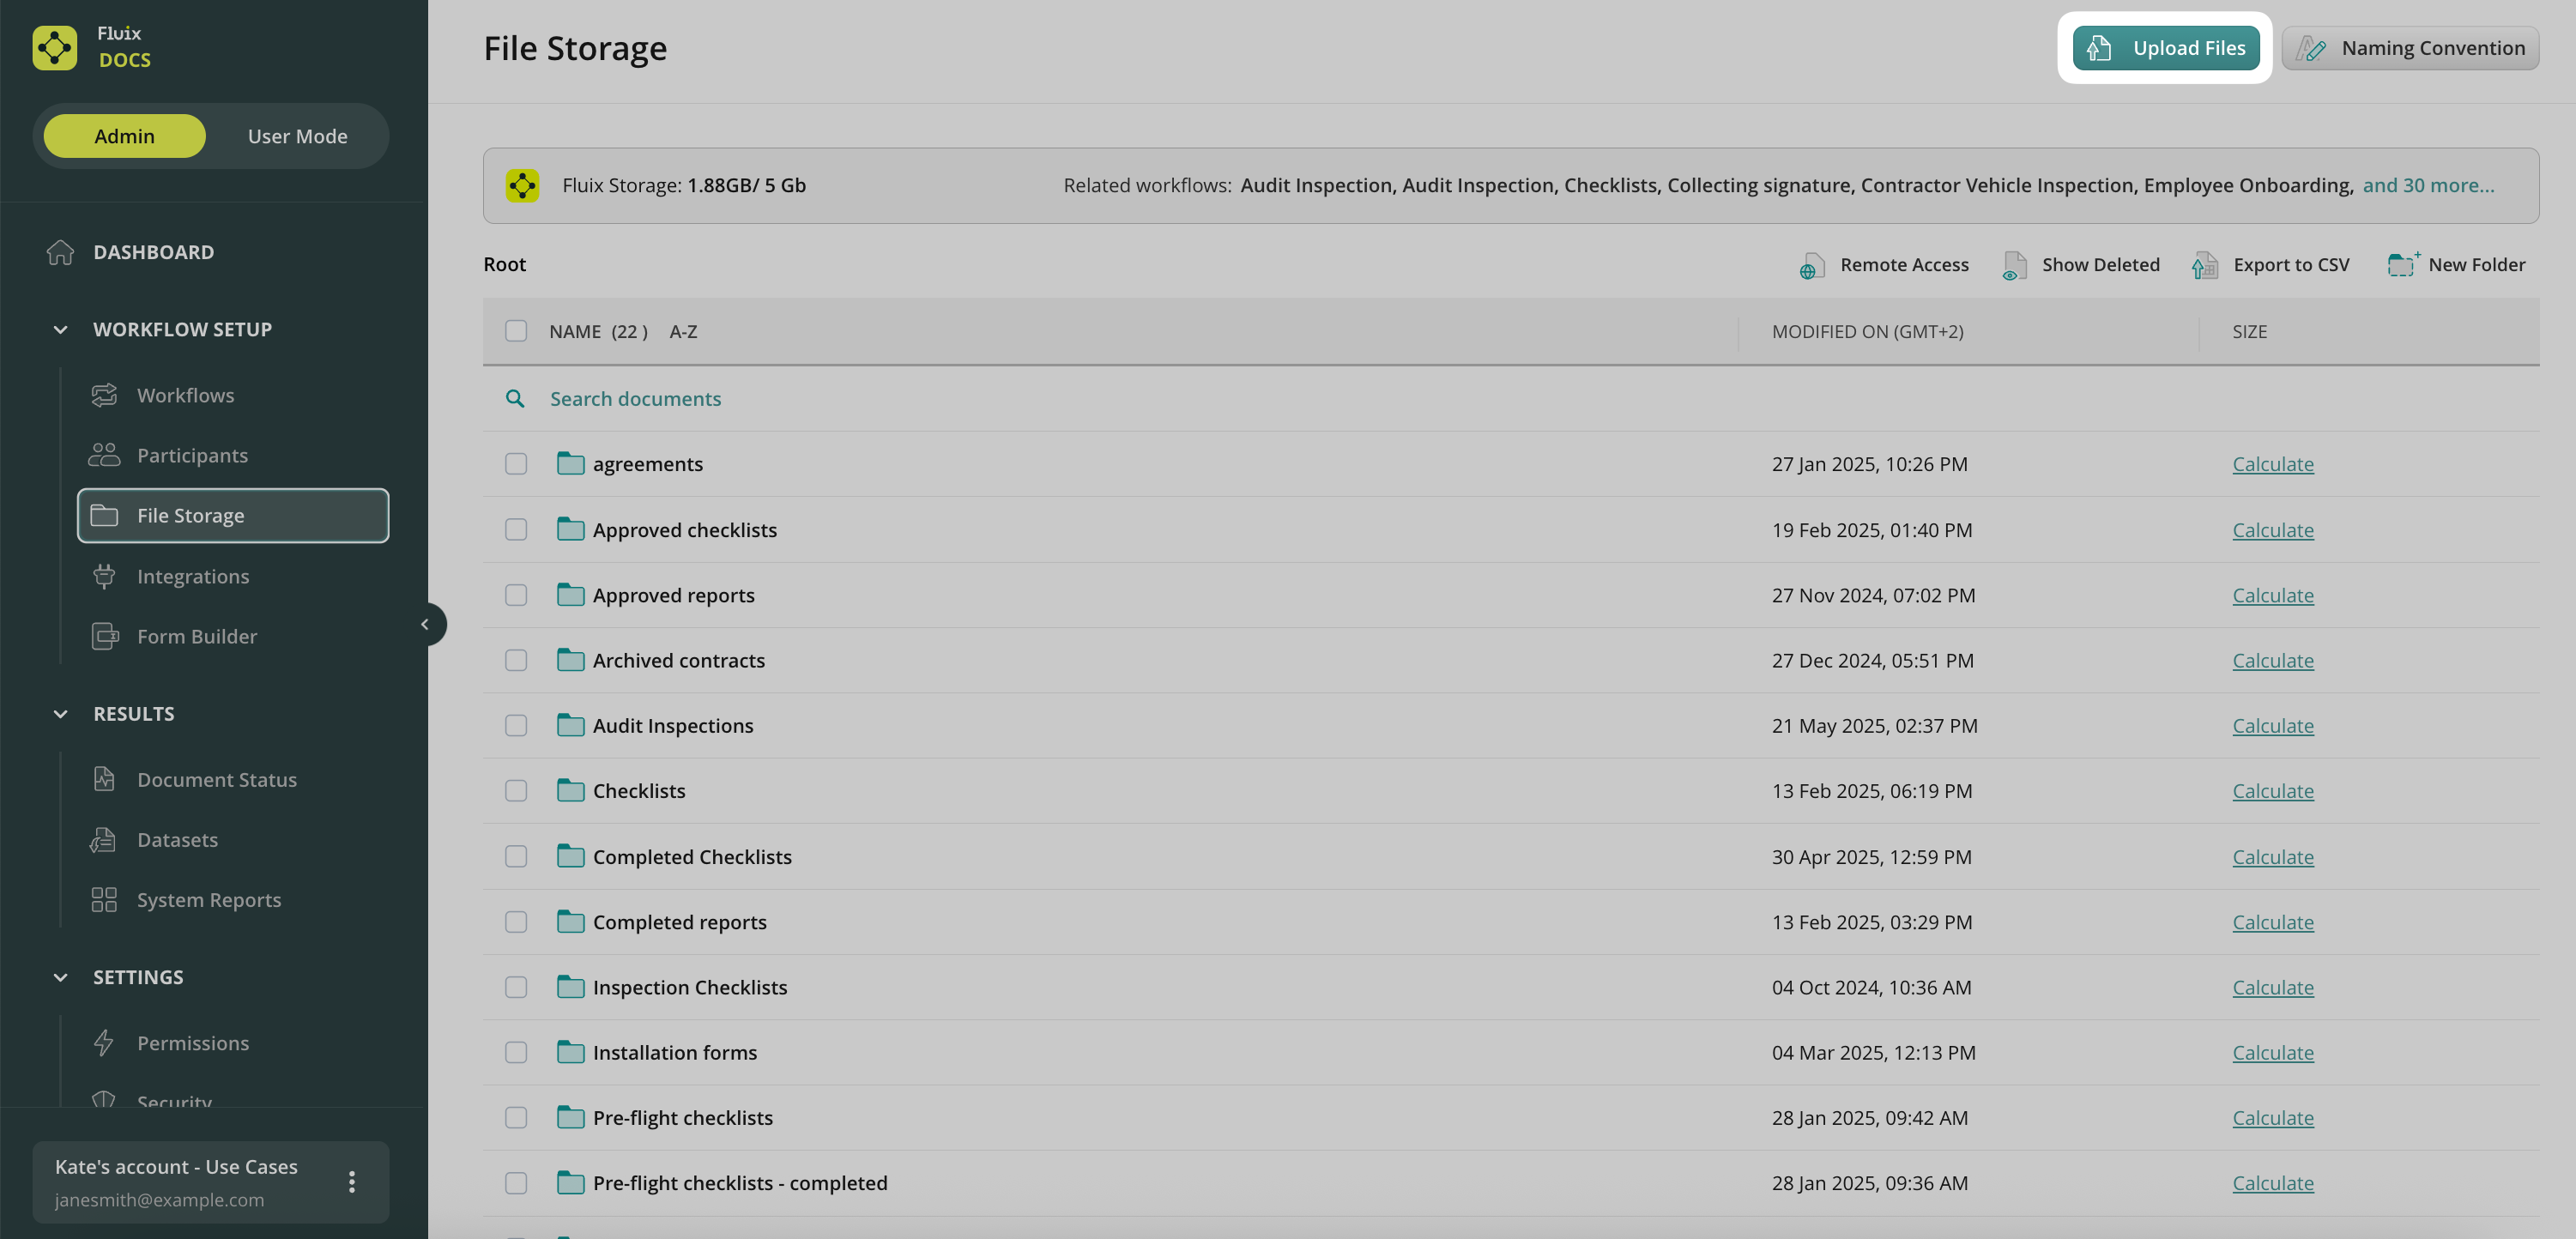
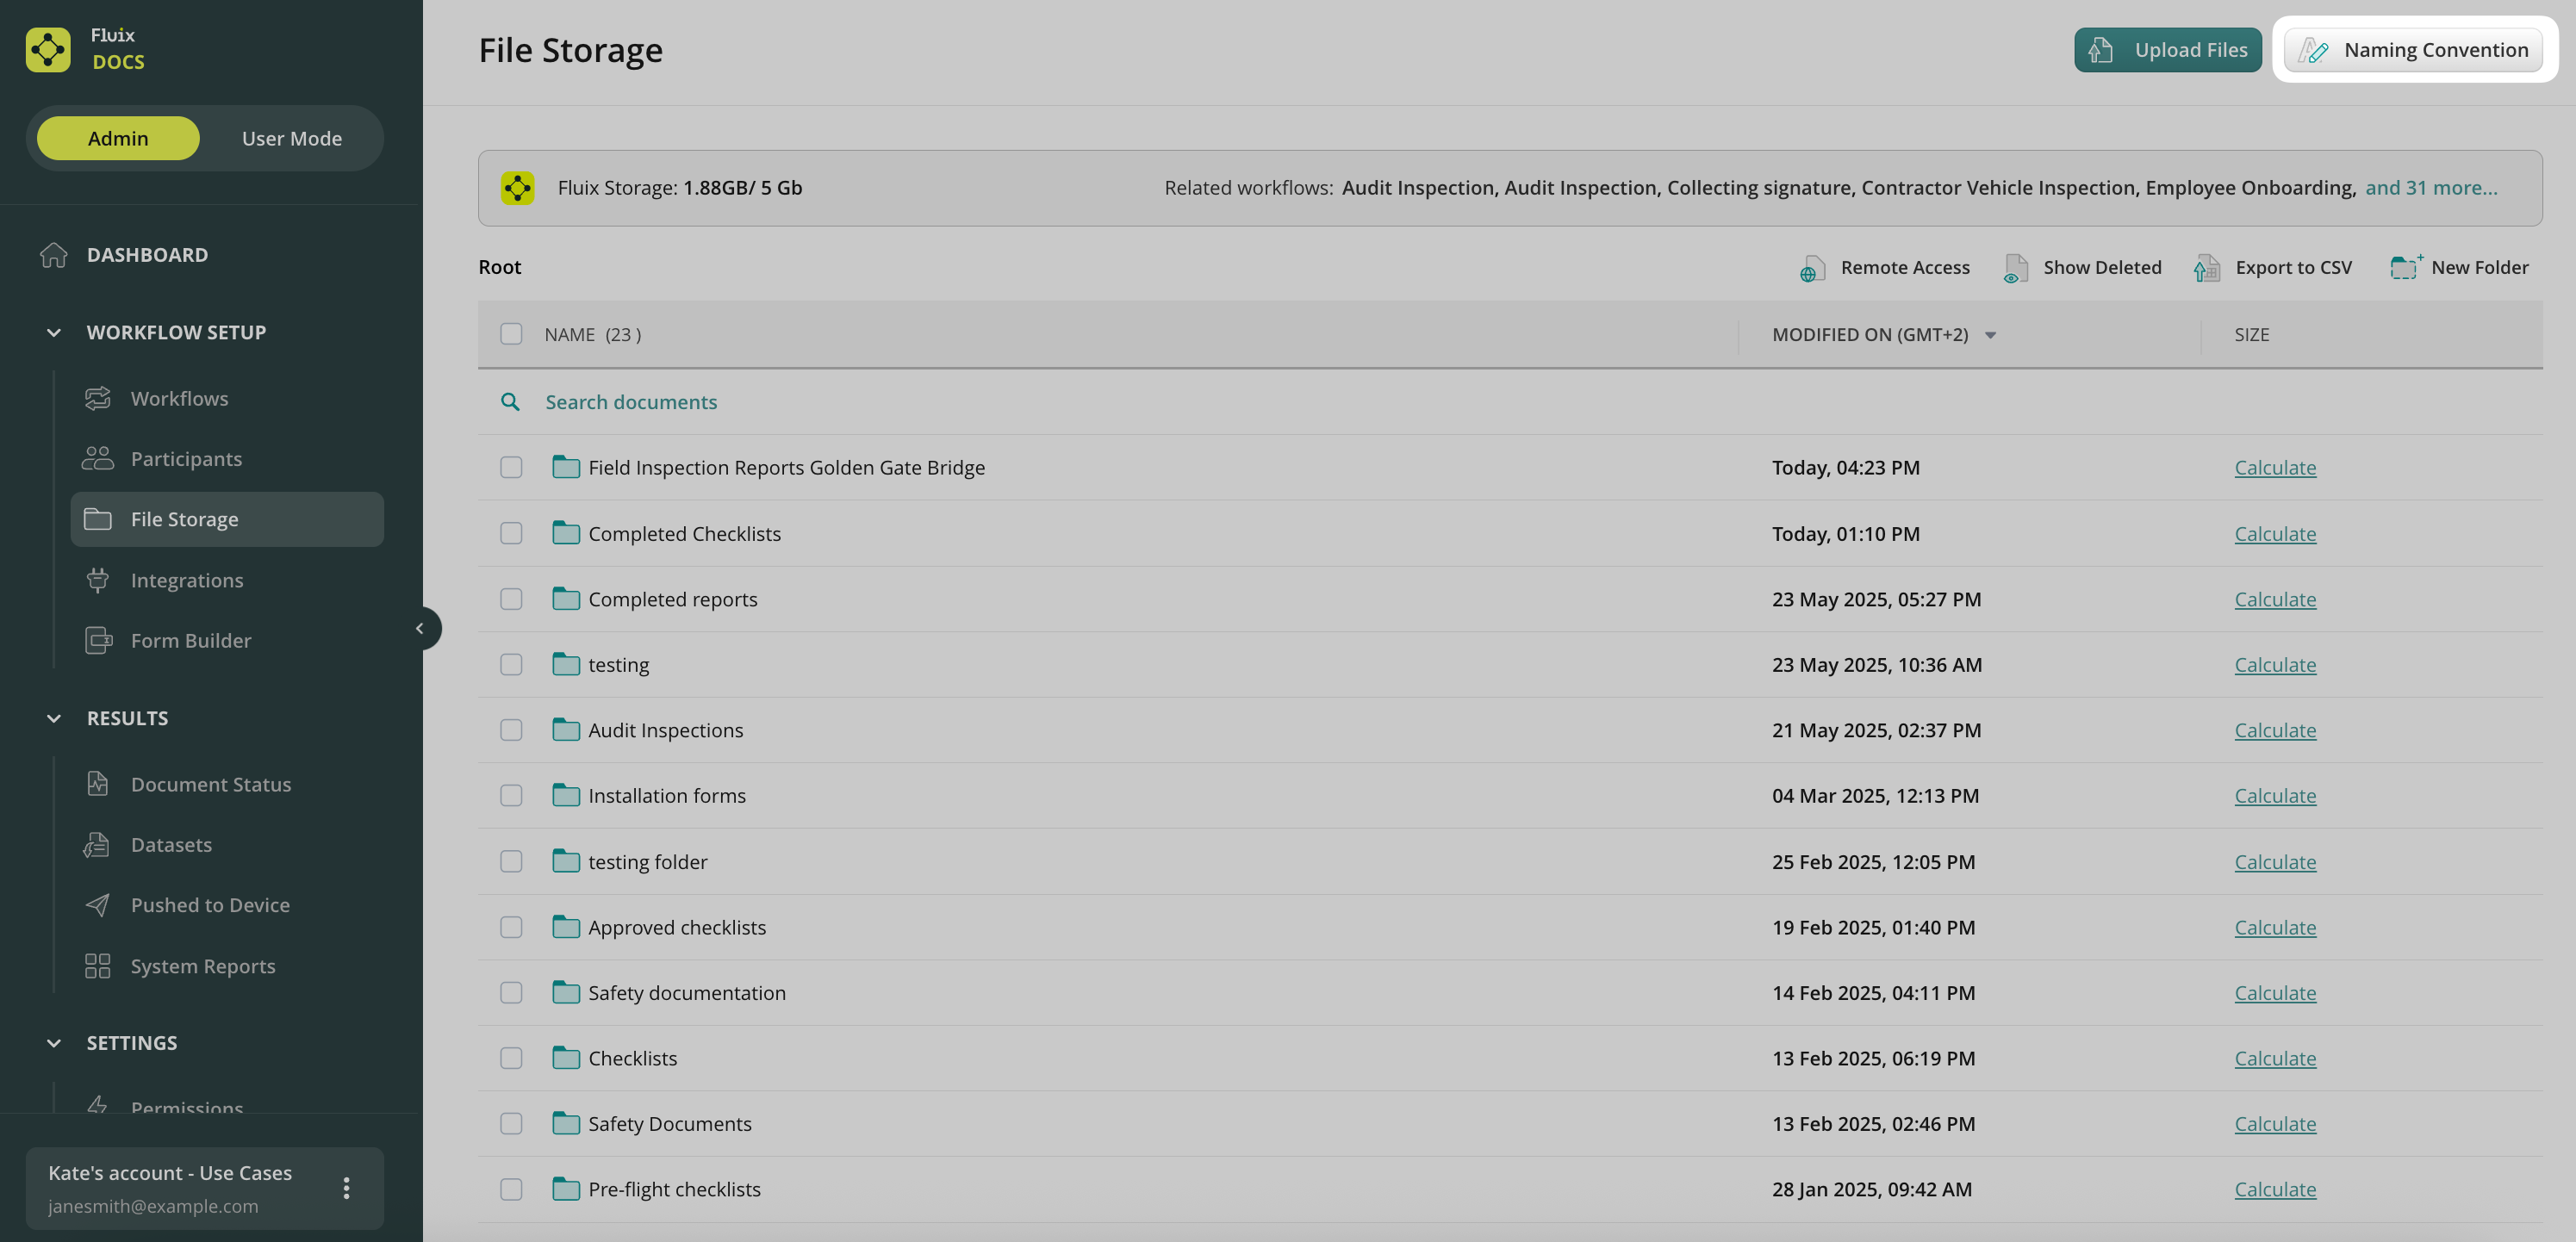
Fluix’s built-in cloud storage makes it easy to organize and manage documents in your department or the entire organization. You can use Fluix storage in the workflows as a document source for templates and as a destination for submitted documents.
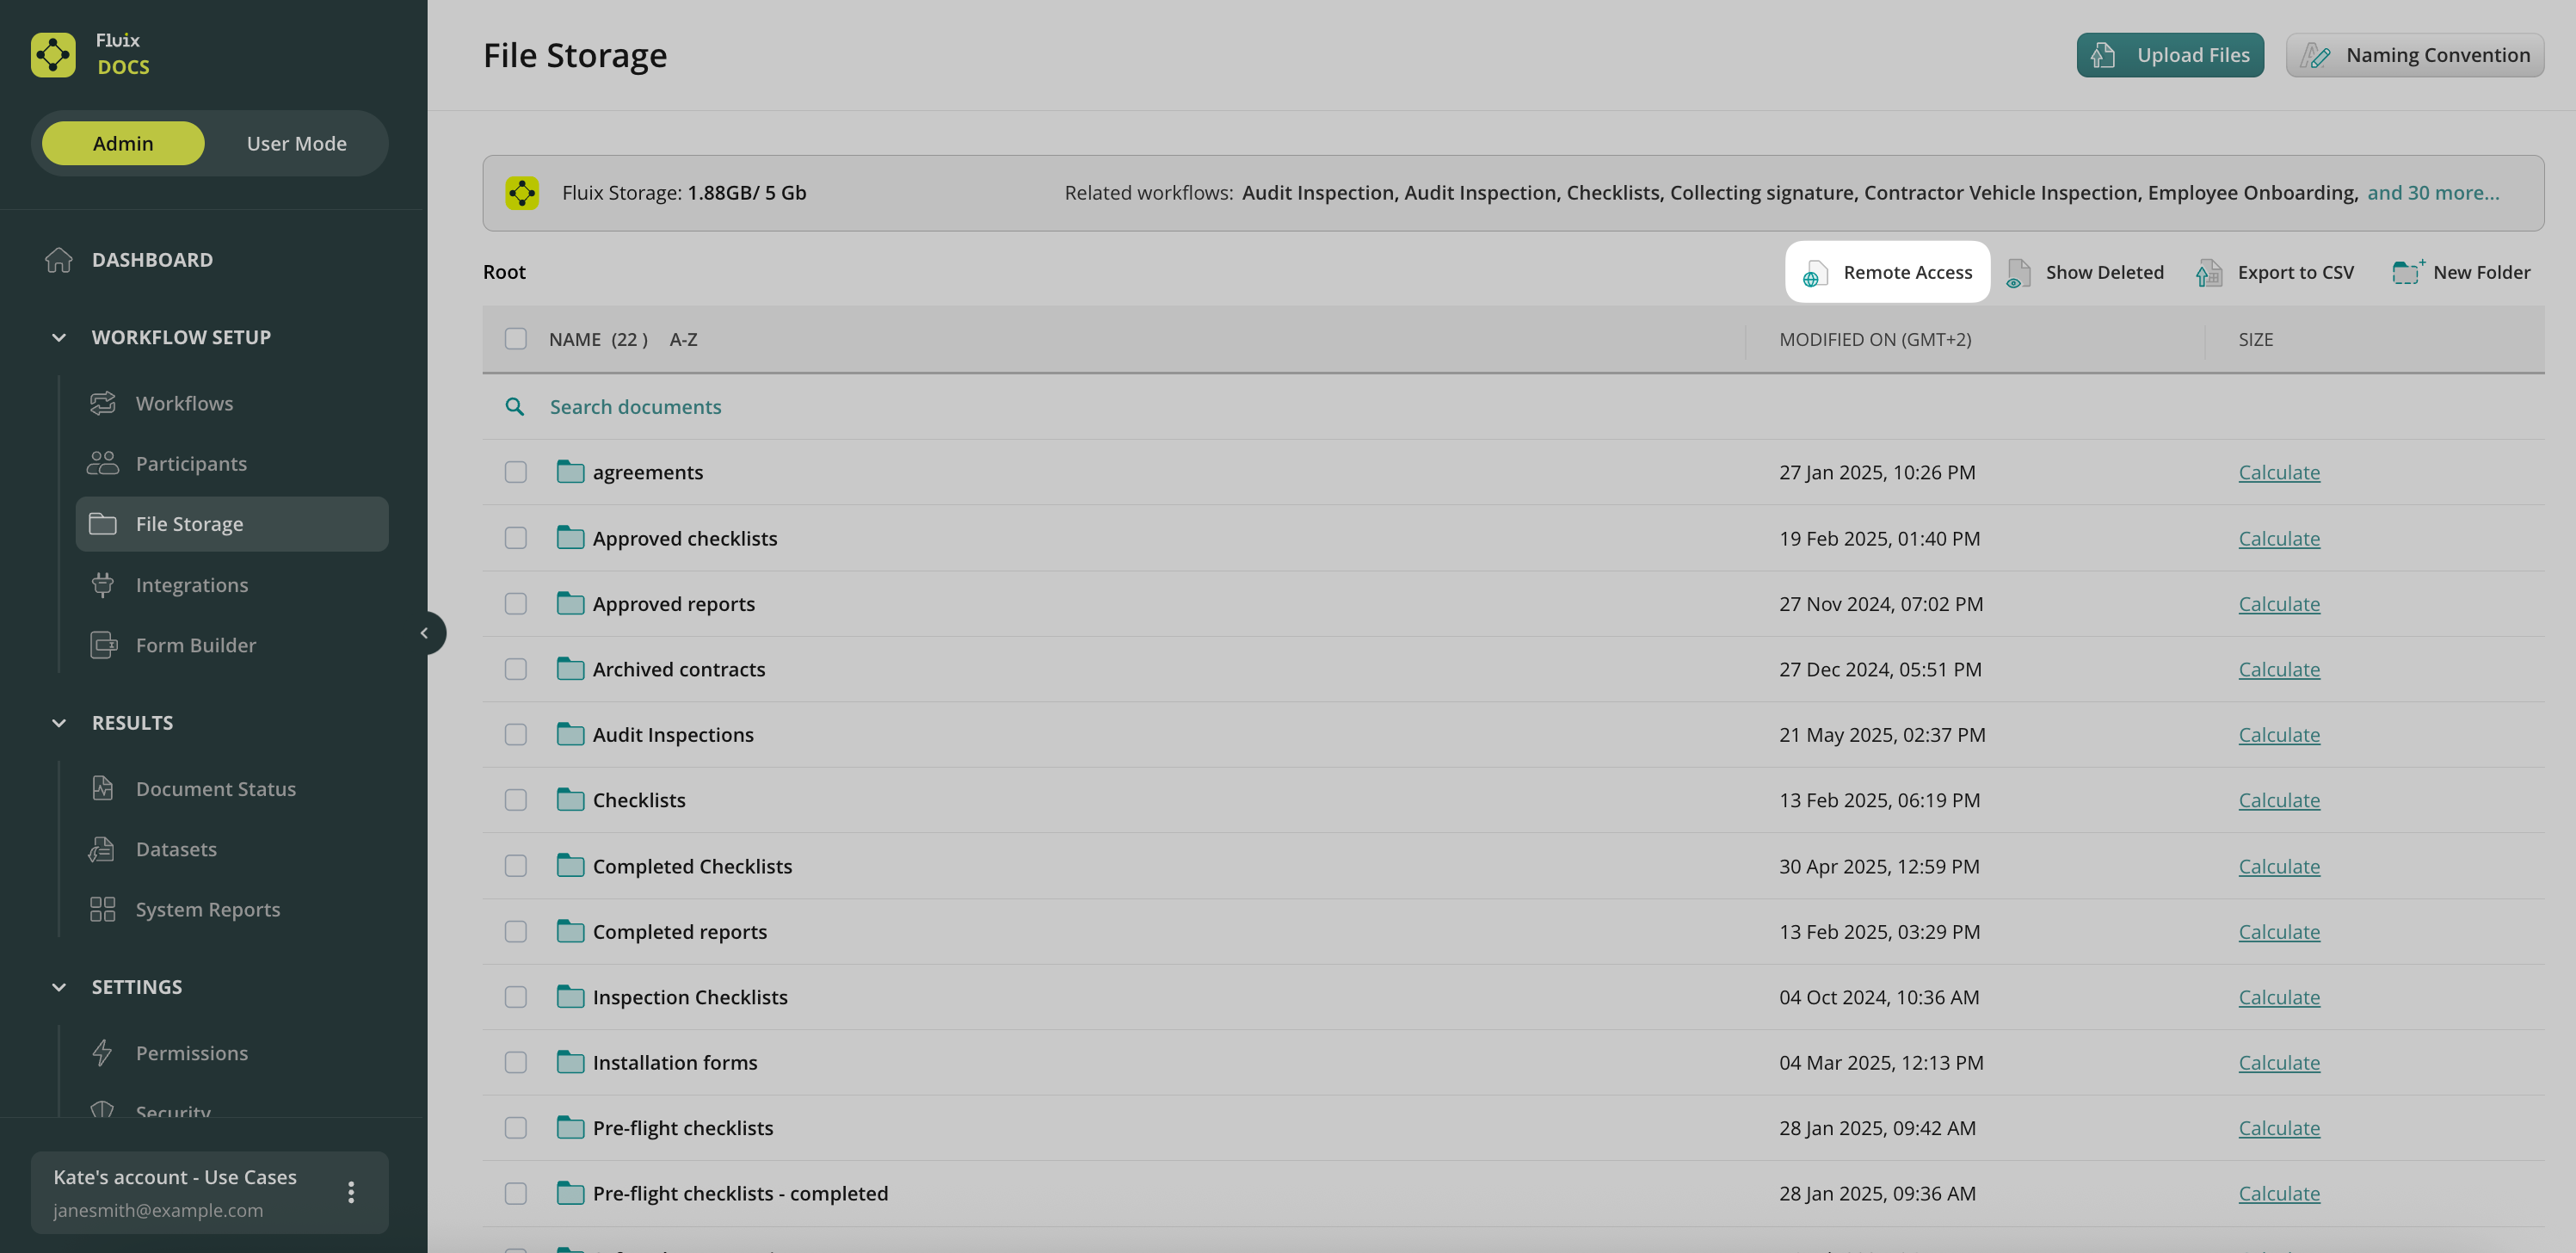
Fluix storage is managed directly via the Fluix Admin Portal under the Workflow Setup -> File Storage section.
First, you can use the template forms in the Form Library folder or upload your documents, which will later be used in the workflows and circulated between users.
How to Upload and Manage Documents
To upload your files, click the Upload Files button in the top right corner or drag & drop them from your computer. To build your folder structure, create different folders with the New Folder button in the top right corner.
Please note that upon folder renaming, its modification date will be changed accordingly, along with other folders and files inside the renamed folder.
The maximum allowed file size is 400 MB. If a file exceeds the maximum allowed size limit (400 MB), it will not get synced to the users’ app.
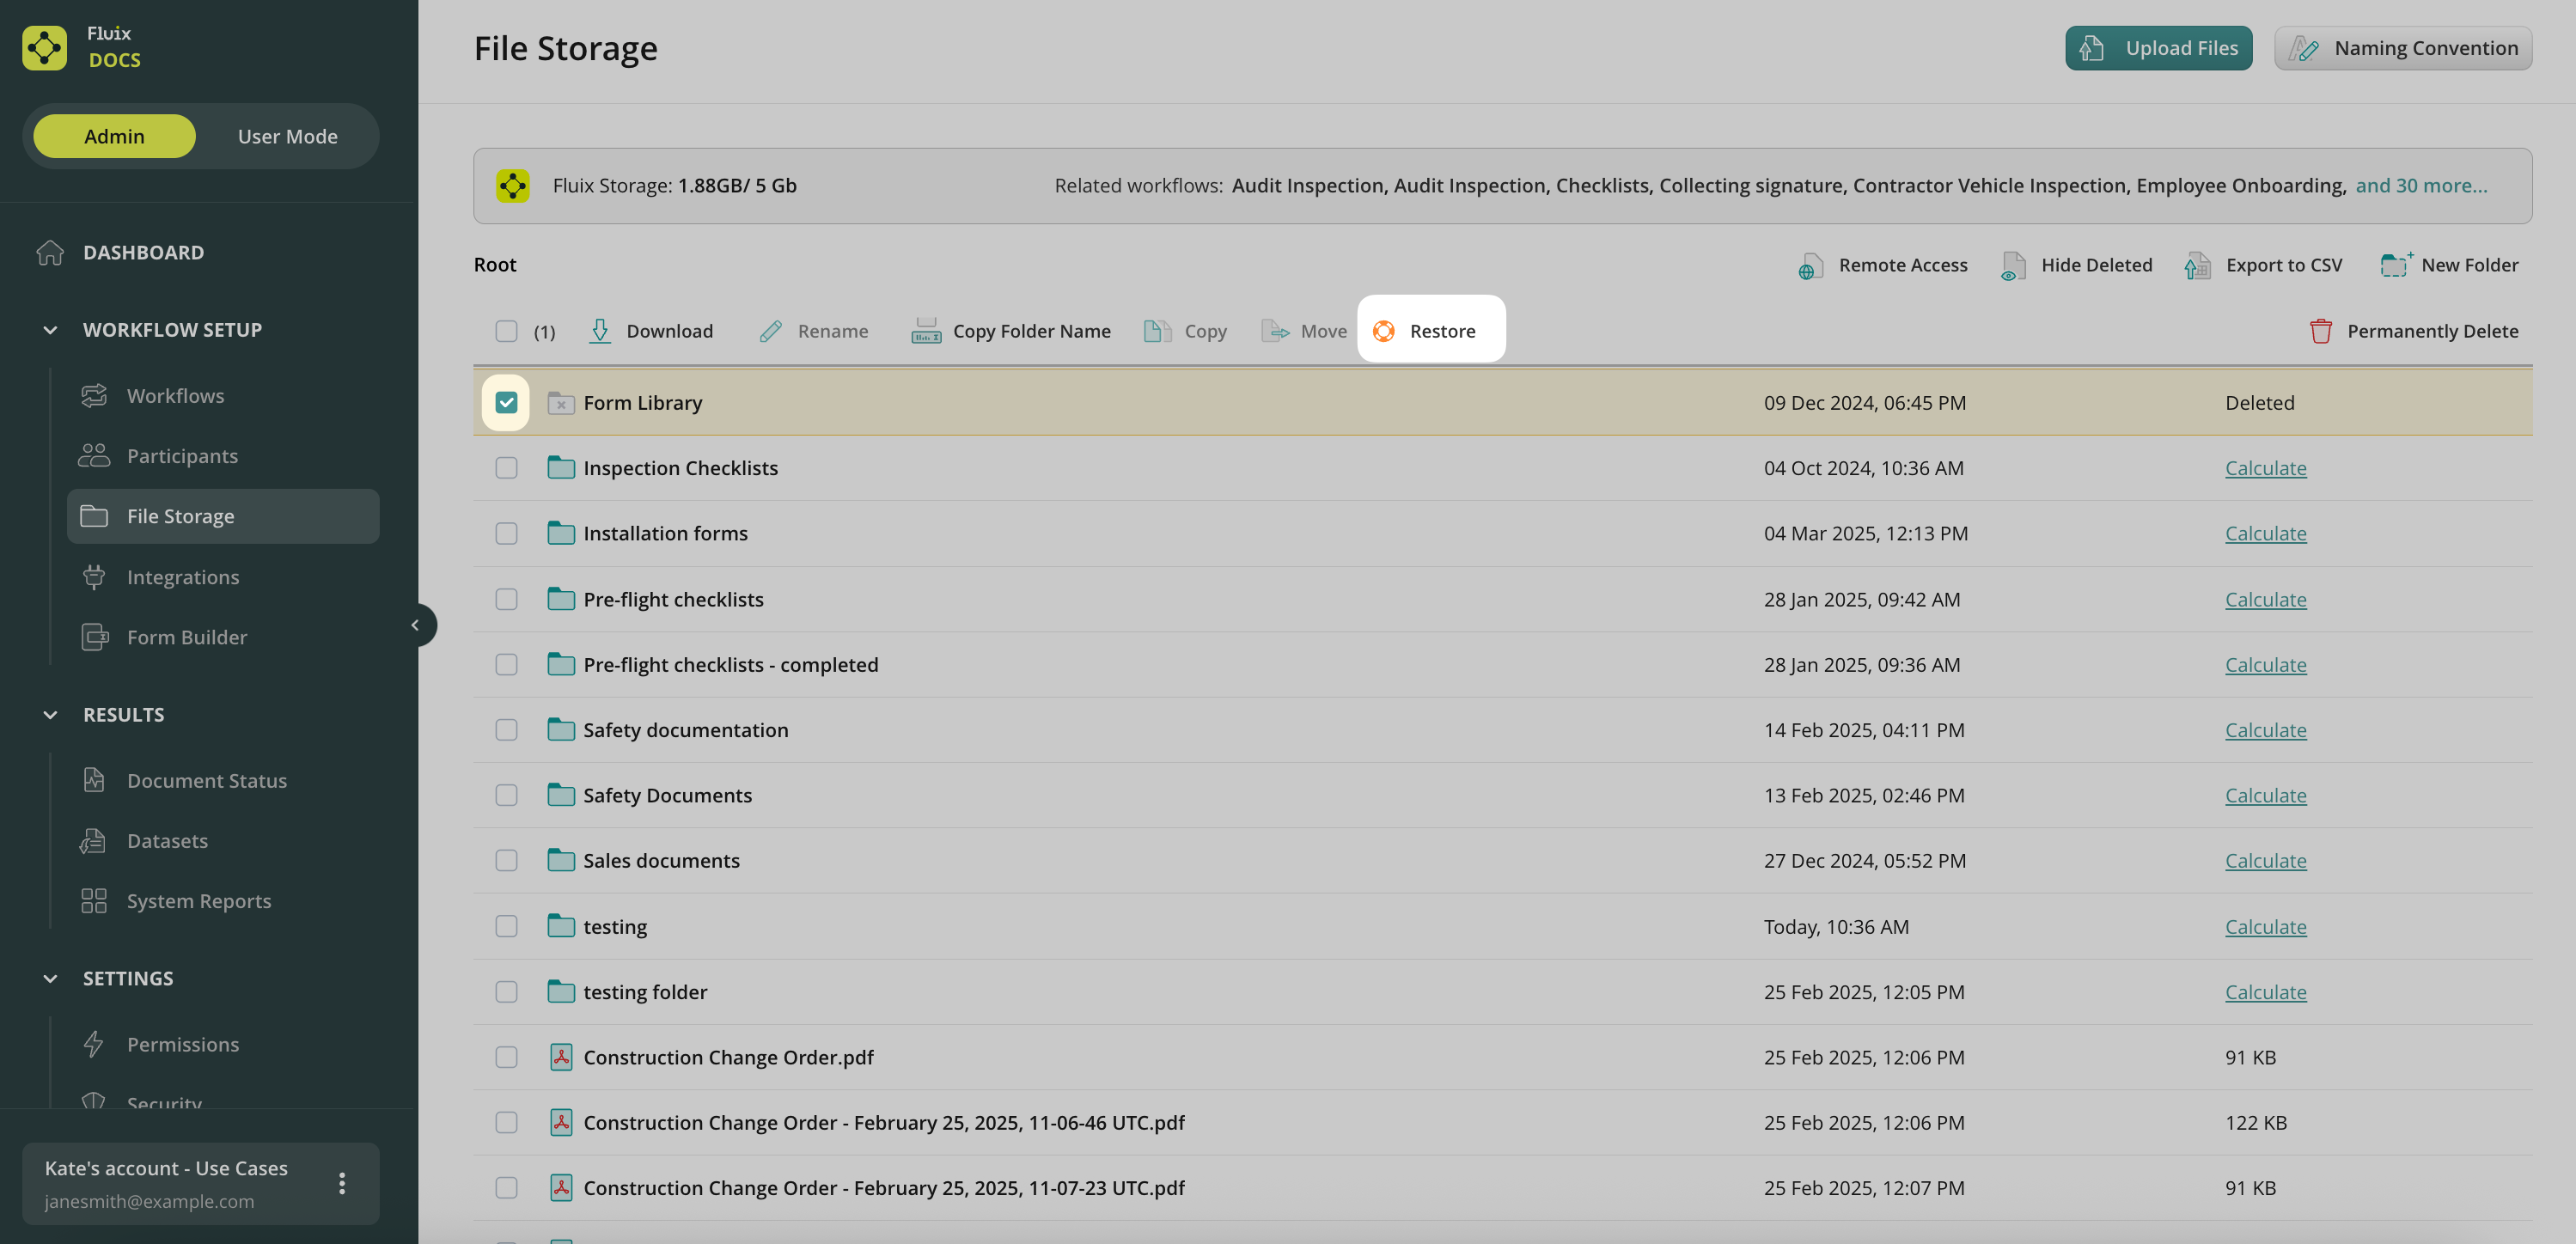
How to Restore Deleted Documents
Click on the Show Deleted button to see the documents or folders with the deleted documents, either by the admin or the user with the respective access rights. The deleted documents or folders will appear greyed out on the list. To restore the deleted document, select it and click Restore. You can also delete it permanently:
The deleted documents are stored on Amazon servers for a number of days, configured in your account’s Security Settings (under the Configuration section). By default, they are stored for 365 days. Caution: permanently deleted documents can not be restored.
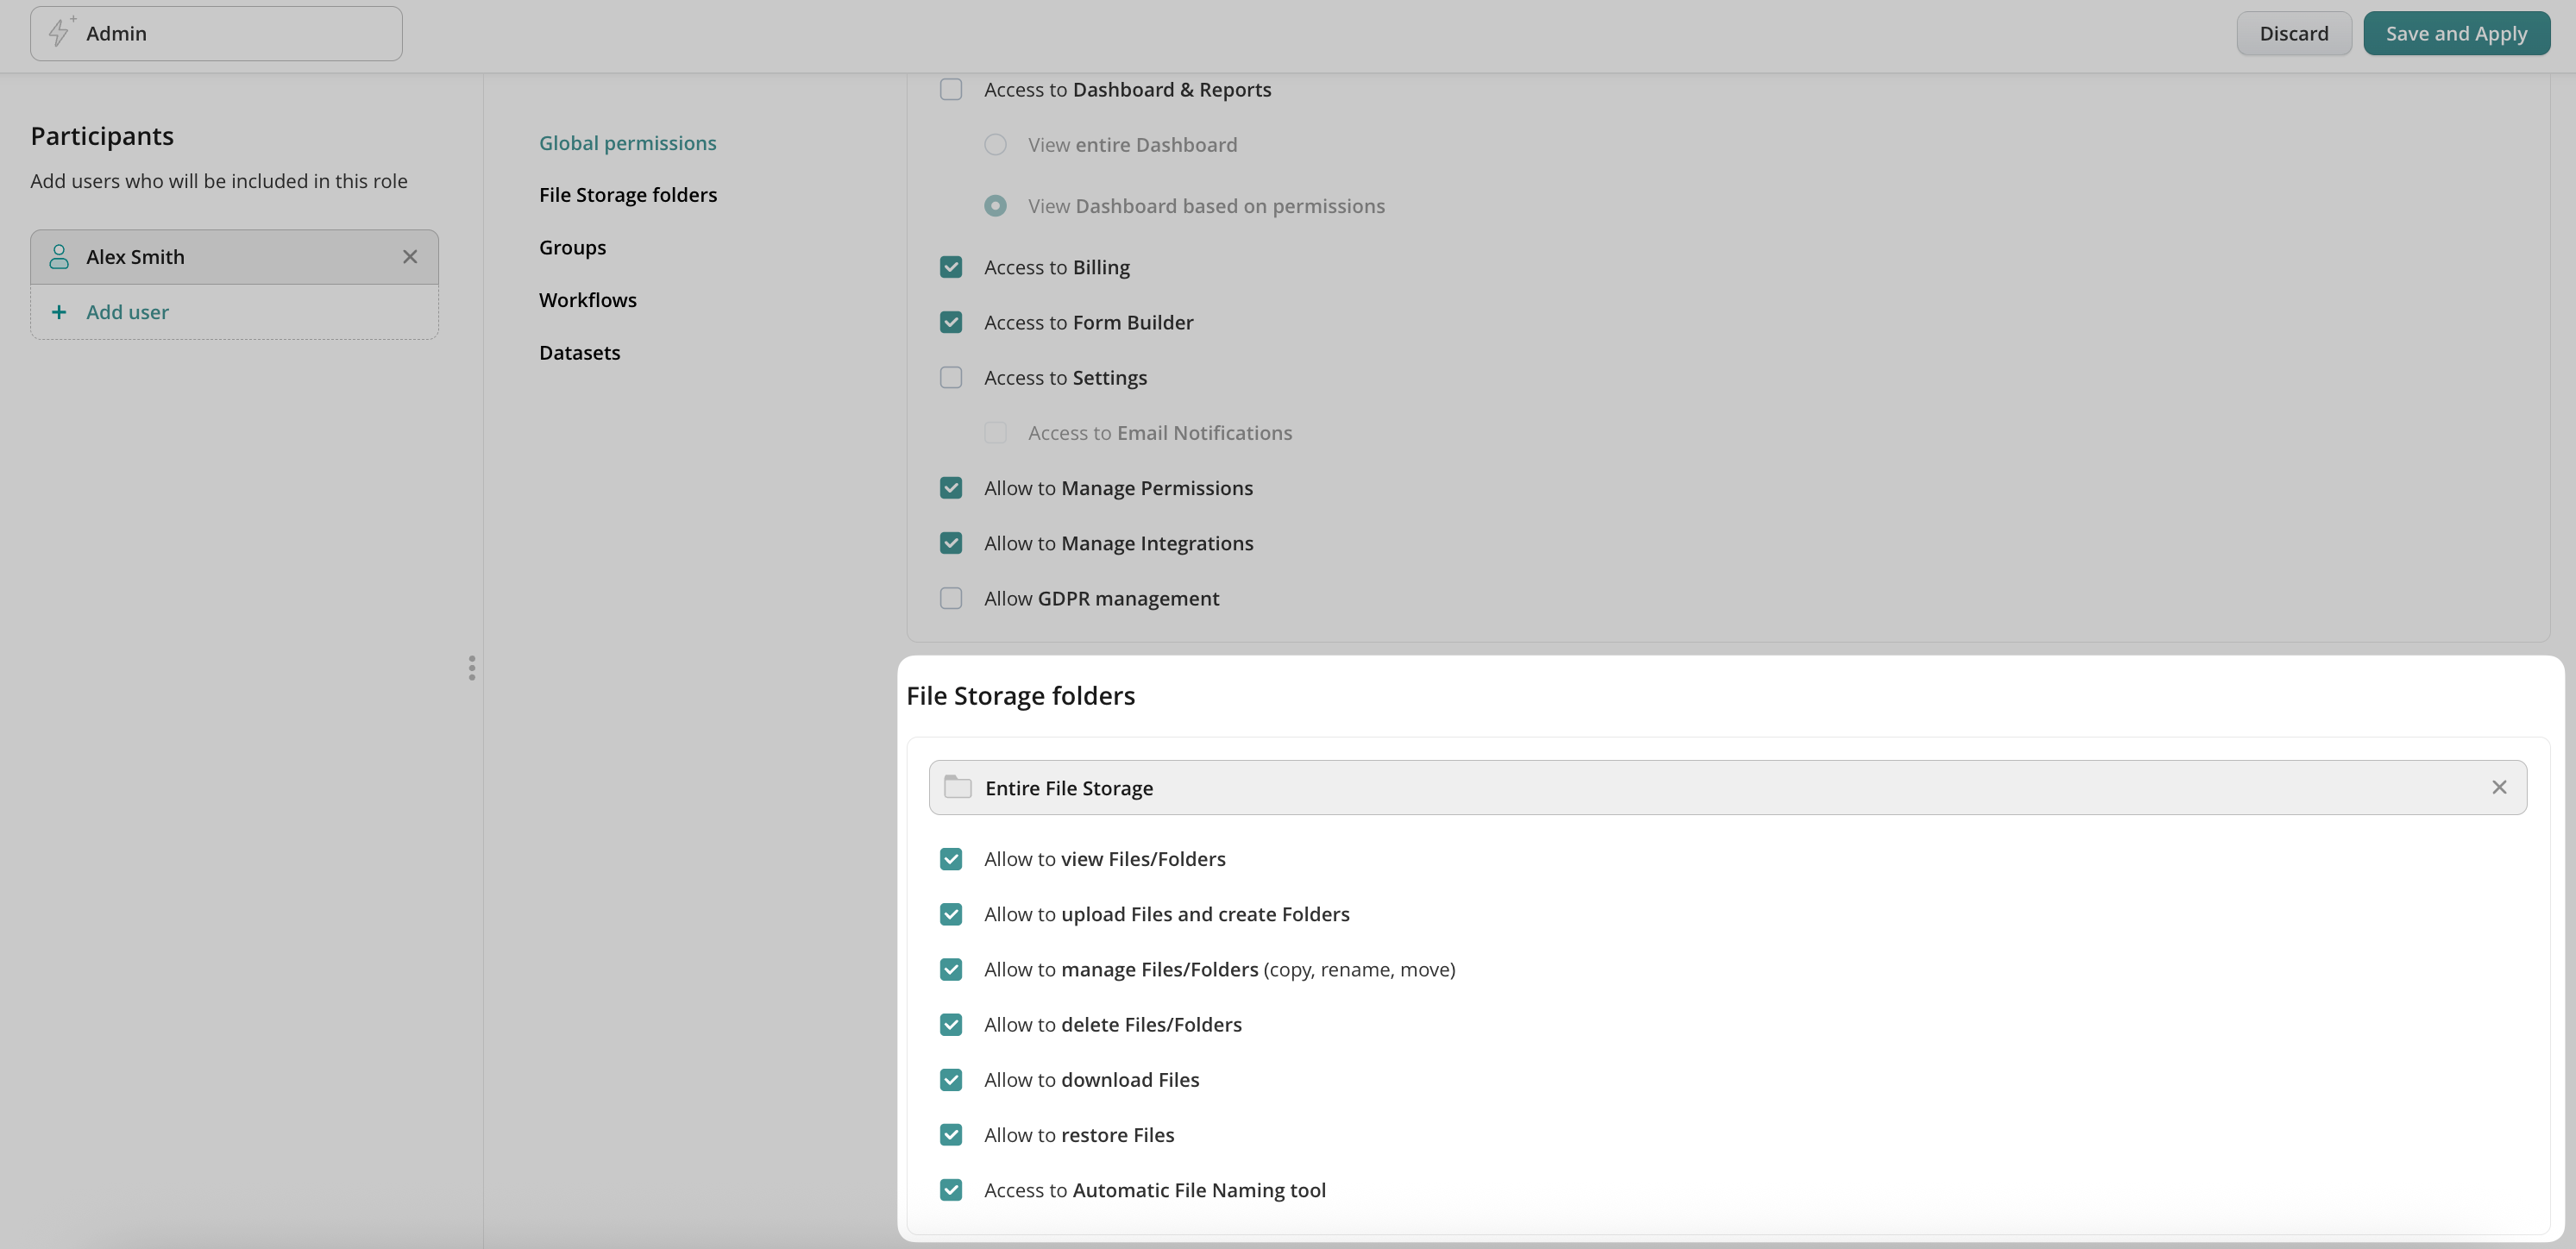
Access to Storage
Access to the Fluix Storage is regulated in the Roles tab under the Configuration section of the admin portal. Simply add a New Role -> select Storage Manager from the list -> select a user -> choose whether the user will have access to the entire storage or just particular folders, check the actions the user will be authorized to take, and save the change.
Users provided with the rights above can access Fluix Storage by logging into the Fluix browser version at fluix.io.
Pricing
Storage space is part of our solution and is included in all plans, so you can actually save money on paying for external cloud storage. The Starter plan has 5 GB of available space, the Core plan has 10 GB, and custom terms are agreed upon in the Advanced plan. The space used can be checked in the Remote Storage tab under the Configuration section. You can get more space if needed; just drop us a line at support@fluix.io.
Was this article helpful?
Thanks for your feedback!
Oops, something went wrong. Please, try again later.
Thank you!
What details or examples would have made this article more helpful for you? We appreciate your insights!
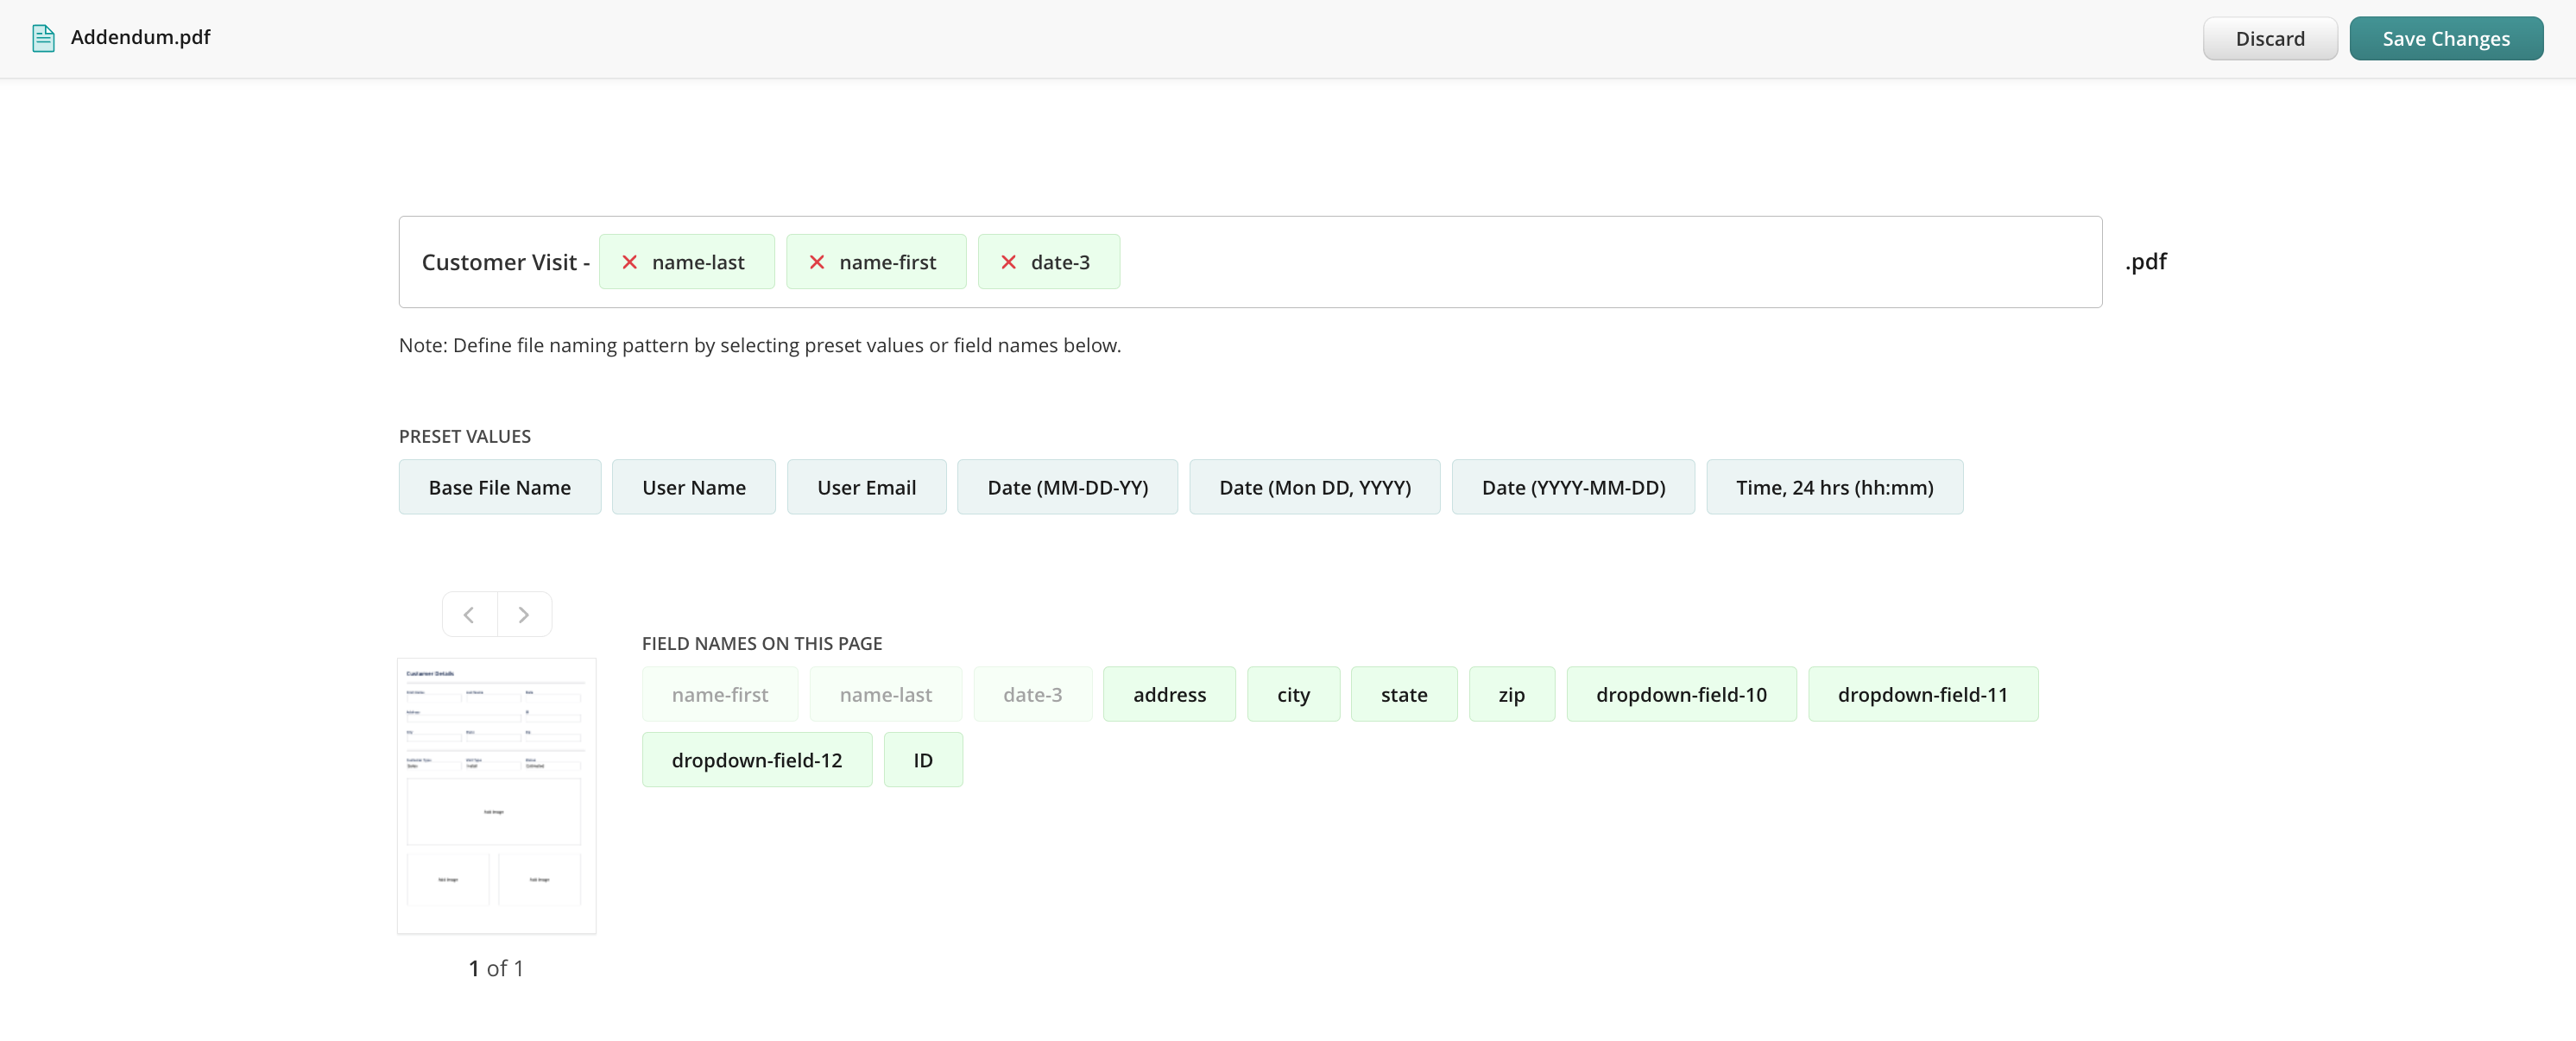
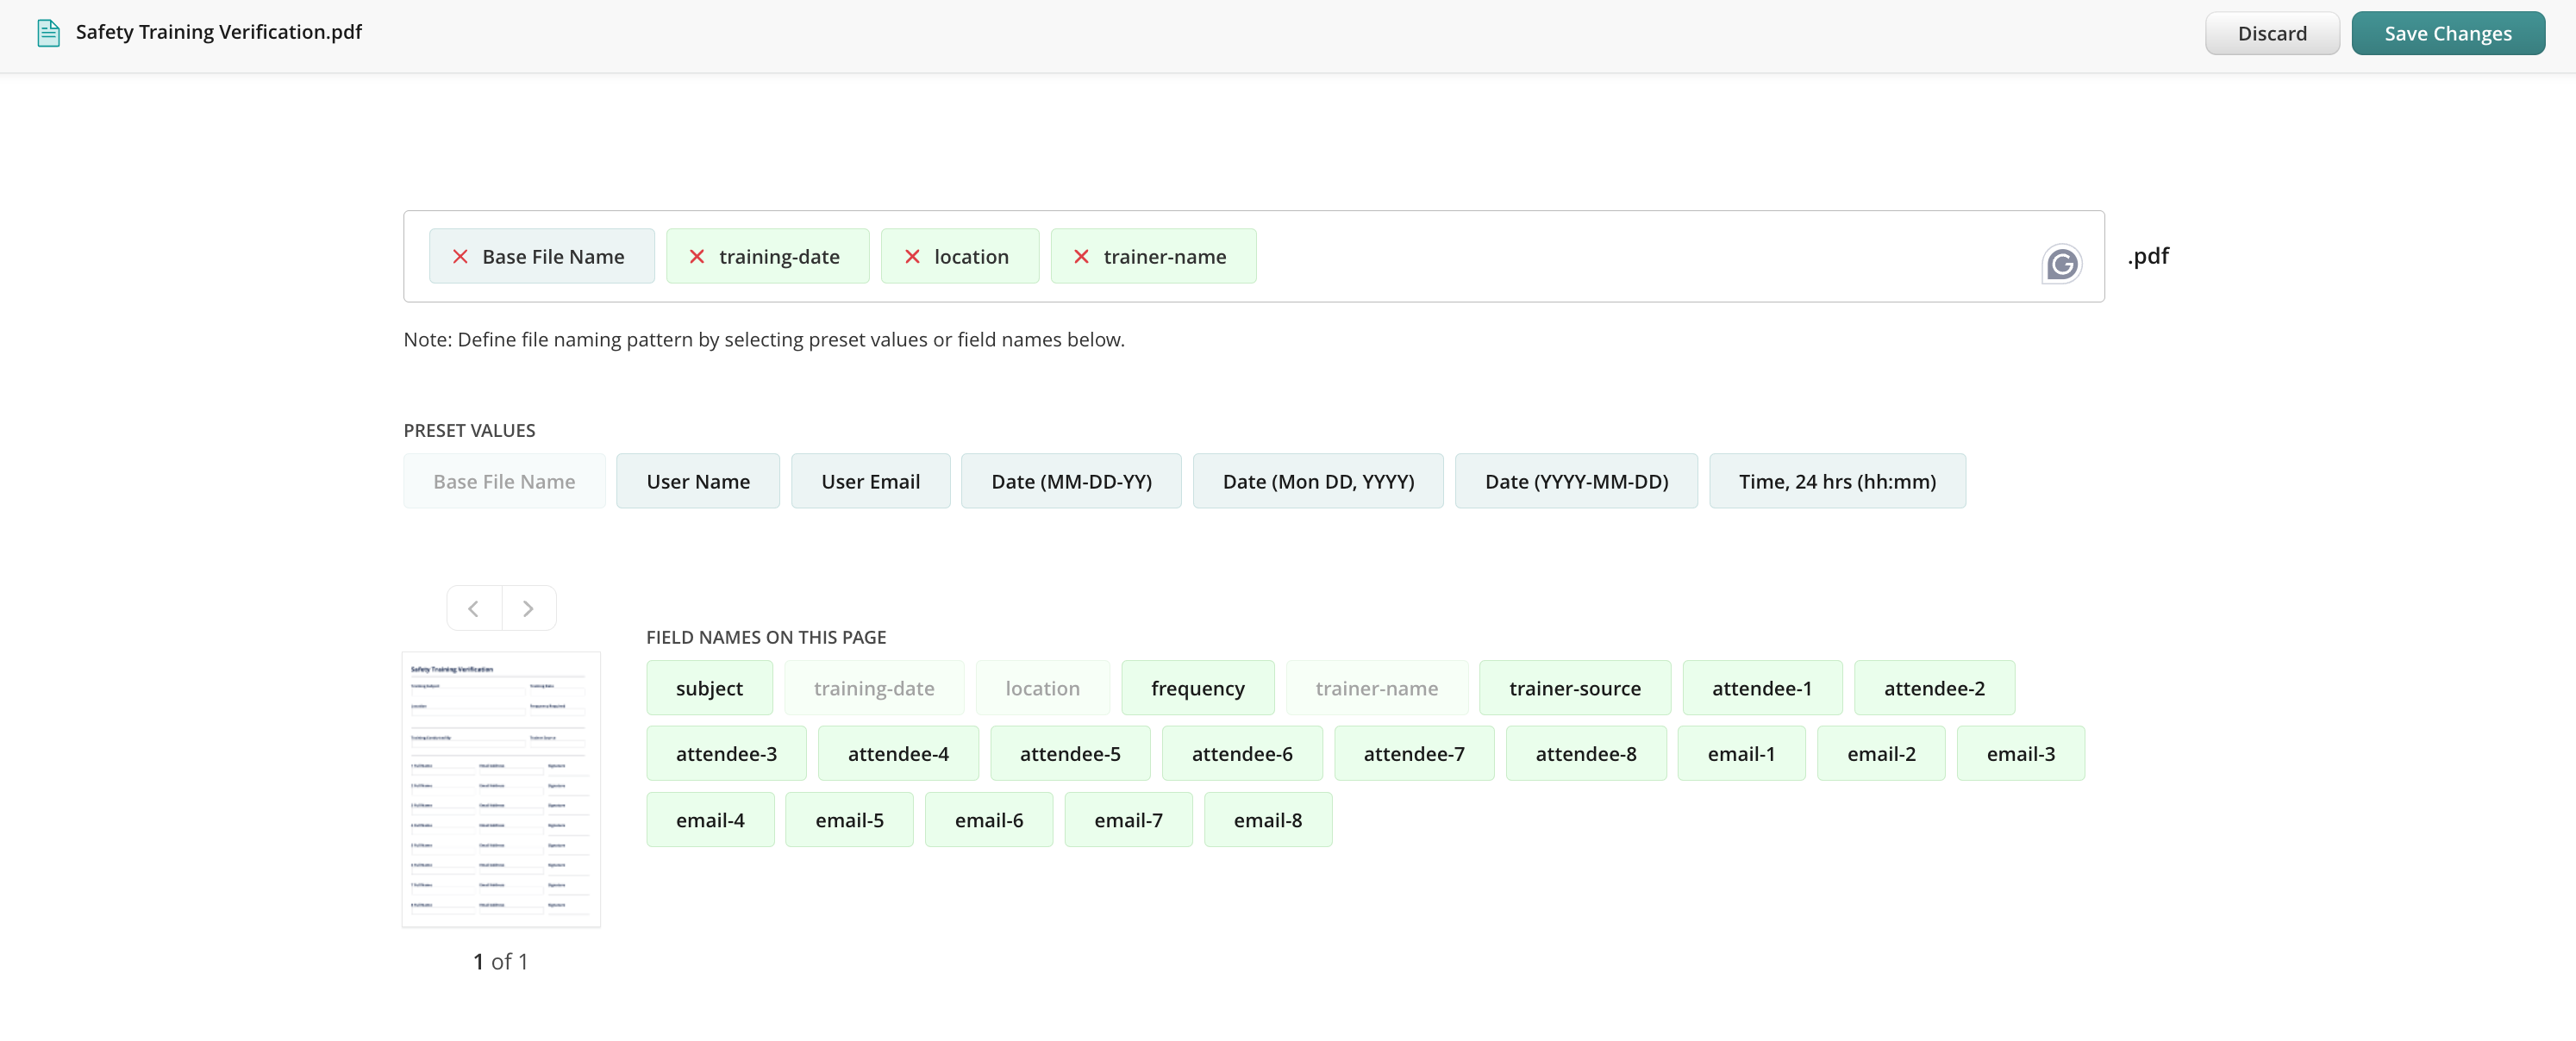
File naming convention is a framework that adds automatic naming to the documents, which your field team works with on their devices. The key benefit of this feature is the unified way of file names across all documentation.
Here’s how you can add a file naming convention in Fluix:
1. In Fluix Admin Portal go to the File Storage tab on the Workflow Setup section.
If the document is already in the File storage, select it and choose Naming Convention. If you need to upload a new document first, click on Naming Convention on the top menu and upload a PDF form you want to add a naming convention to.
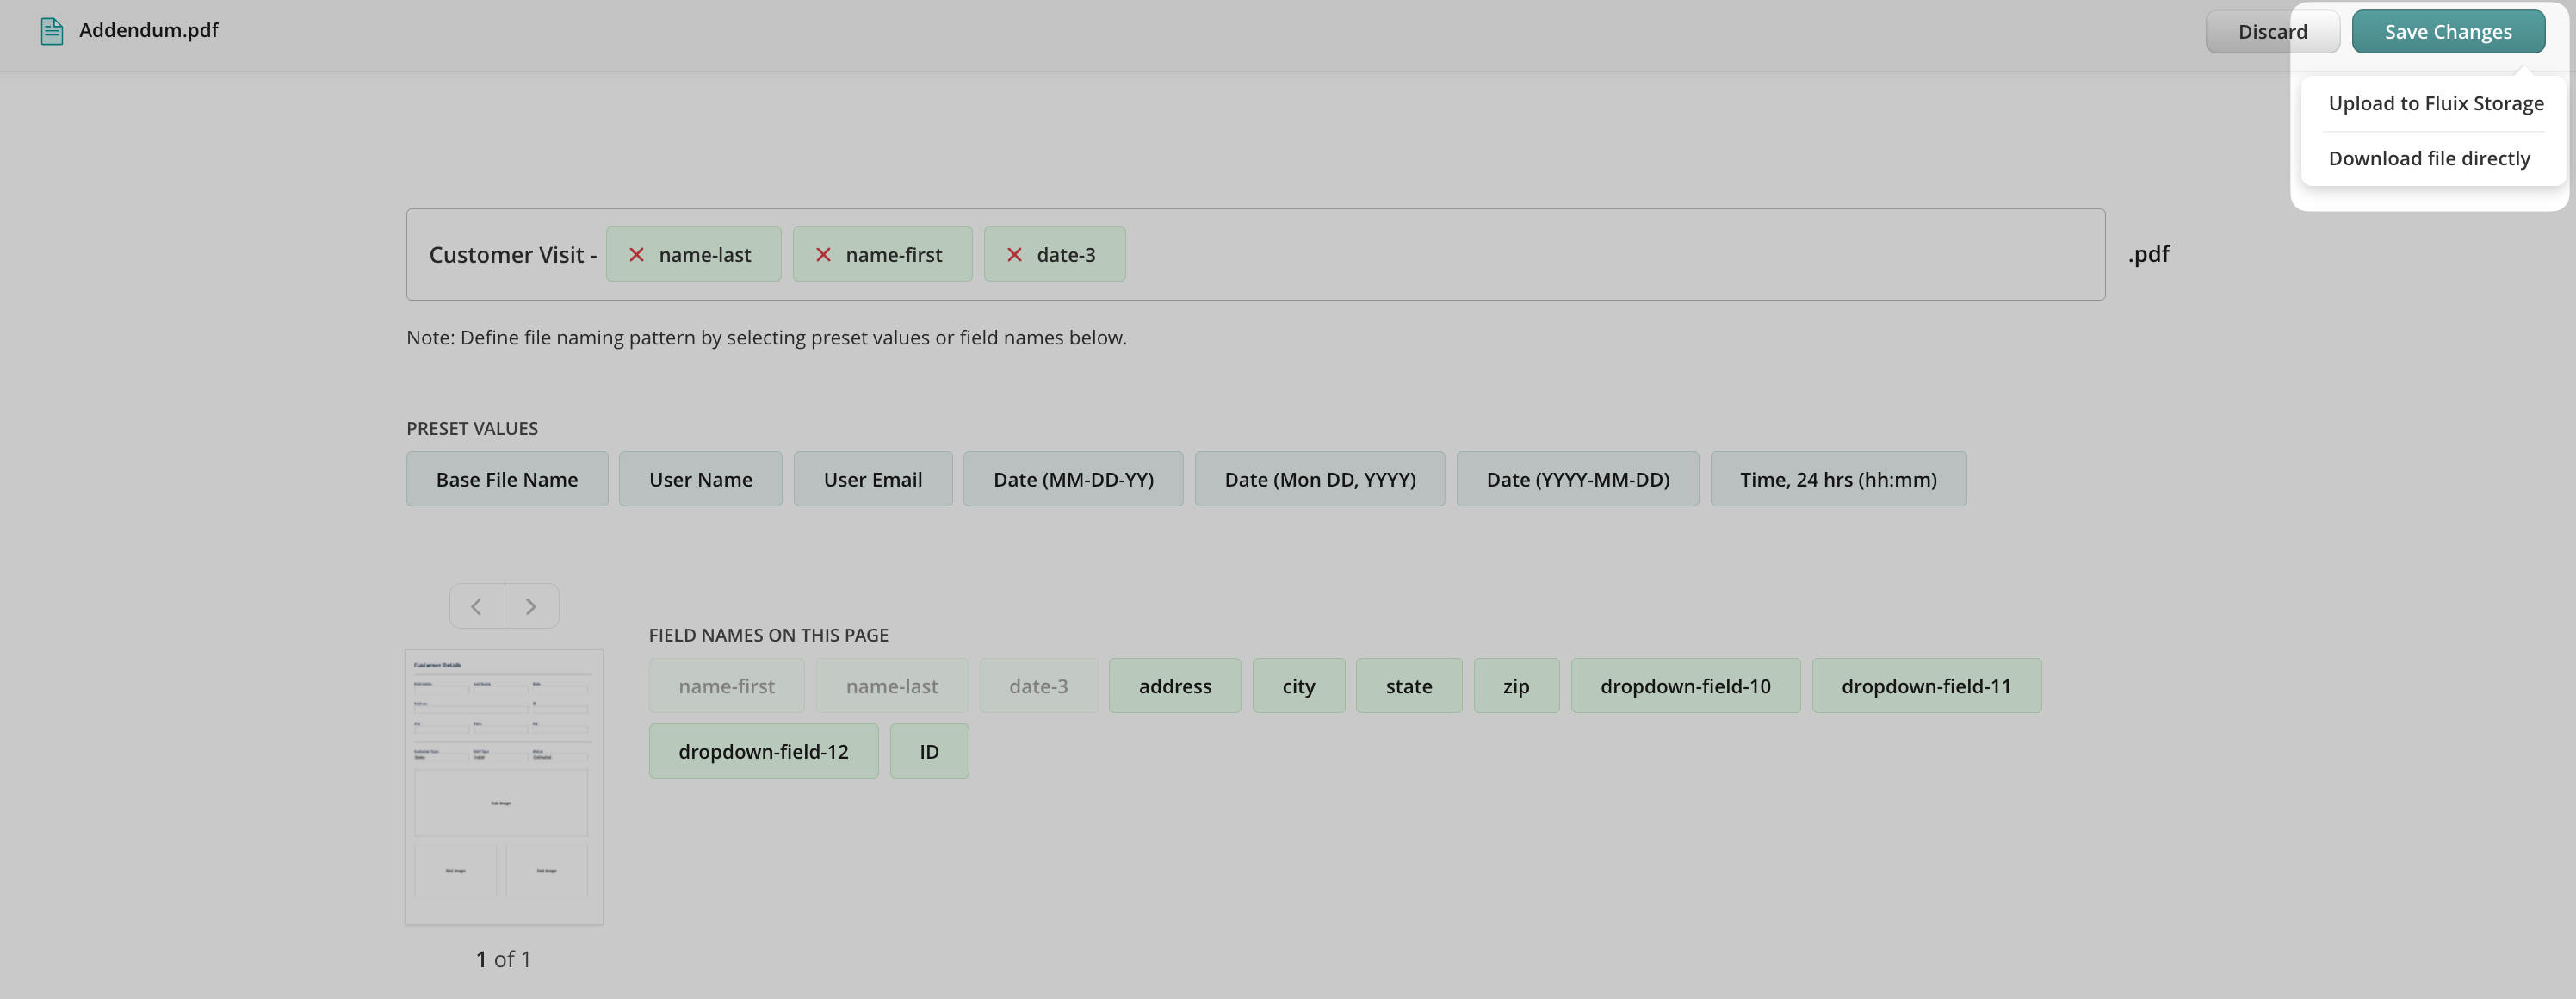
2. In the open document, you will see a list of preset field names that are commonly used to create file naming, and the list of all other document fields. Select the ones you want to be used in the file name.
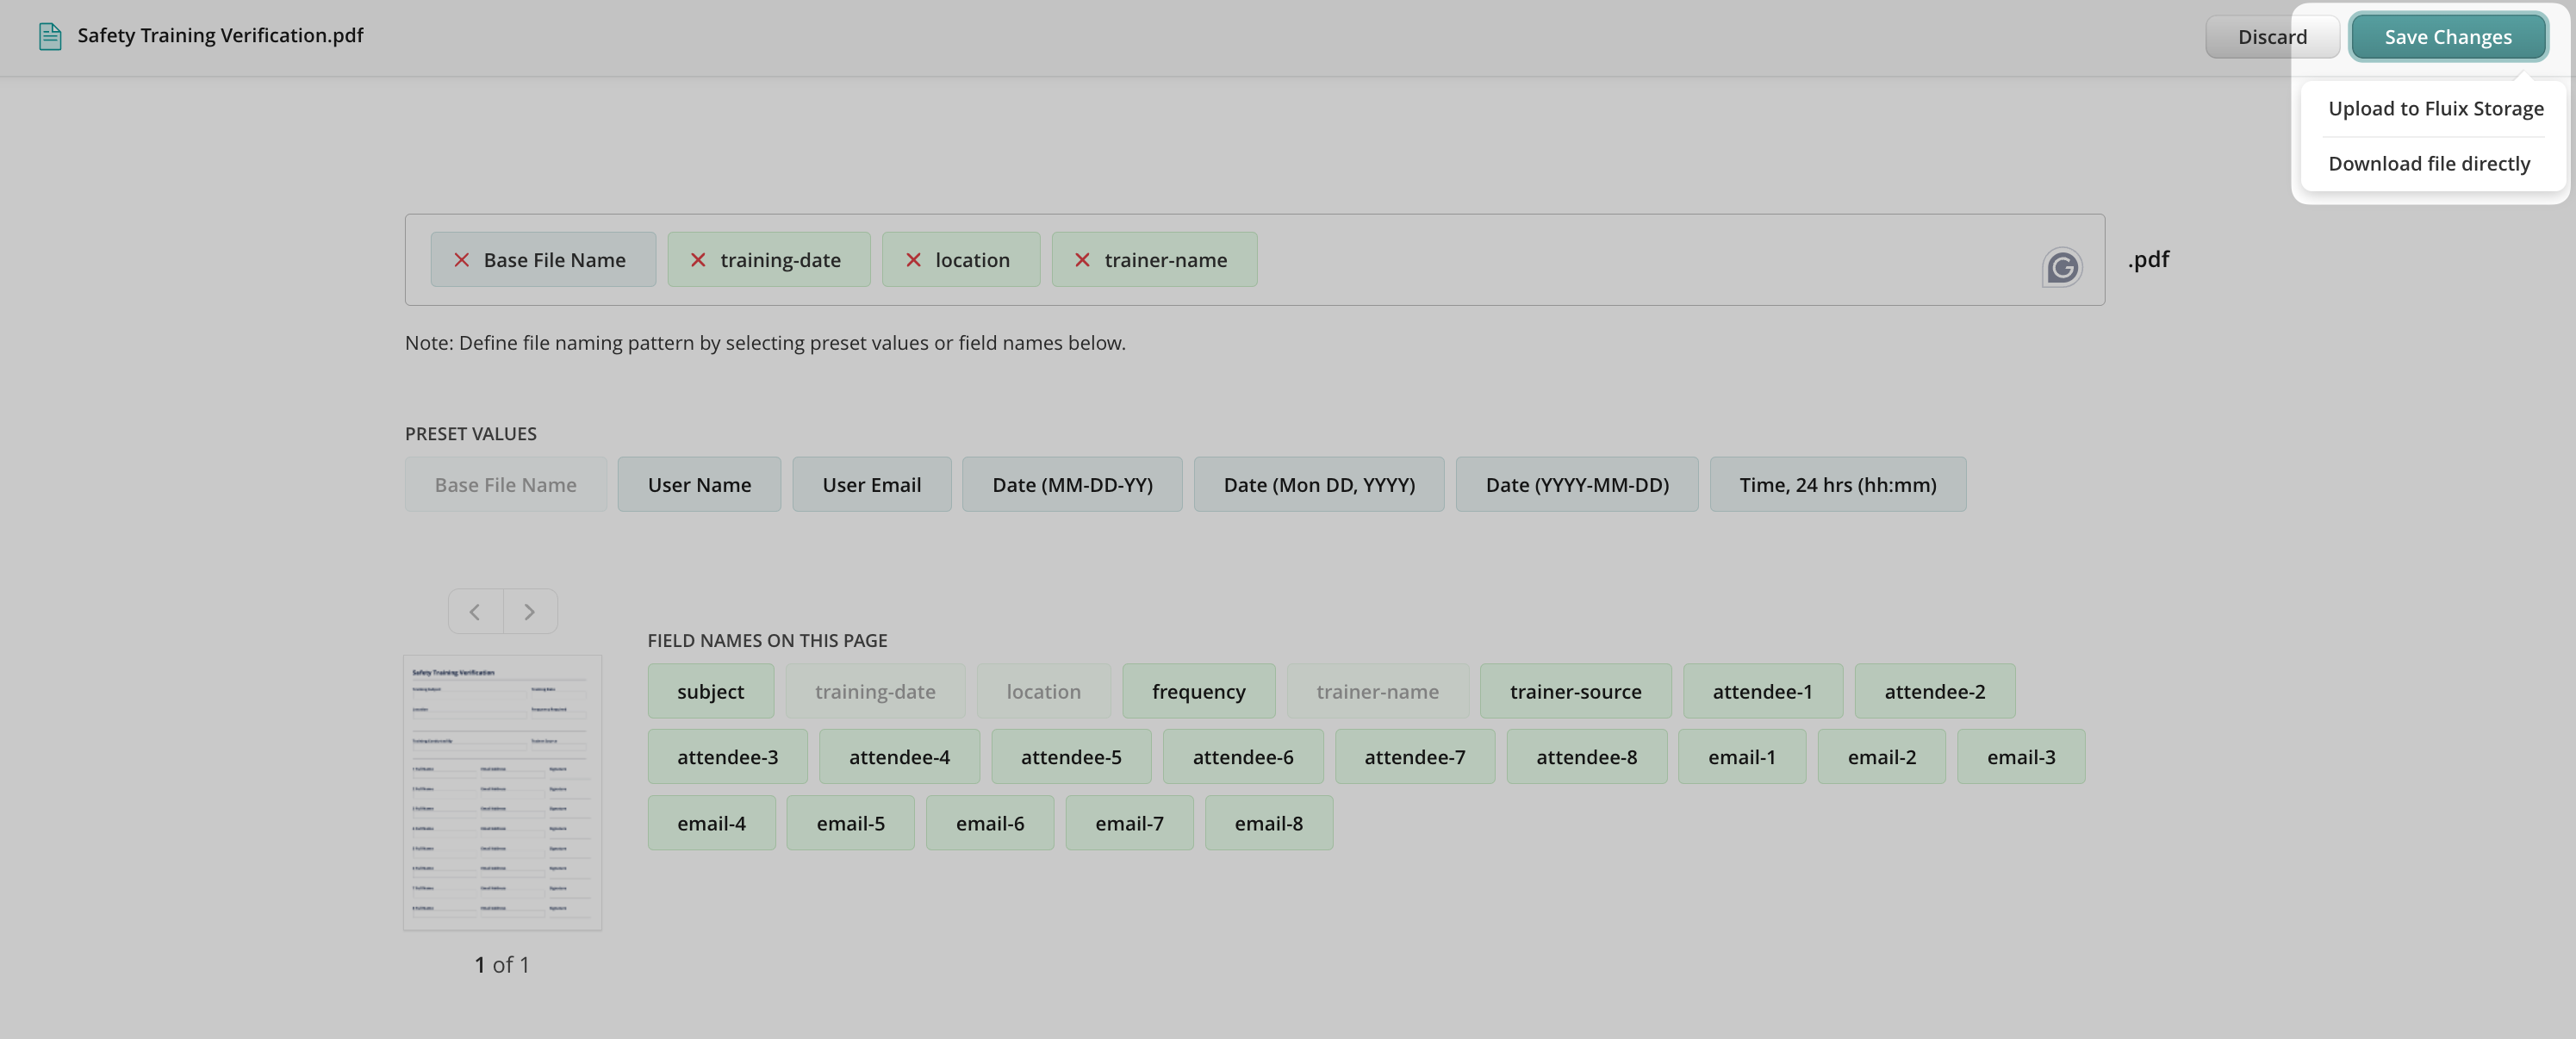
3. When done, click Save Changes and choose to either save the document in Fluix Storage or download it right to your computer.
4. Upload the document to a folder that is used as a source in a workflow.
From now on, your field workers can use this document as a template form on their devices. Each time they fill out fields that are used in the naming convention, the document name will be changed automatically. If a user tries to manually rename the document before submitting it, the error message appears saying, ‘You’re not allowed to rename this file due to company policy, please contact your Fluix admin for more details if needed’.
Was it helpful? Whatever questions, we’re around support@fluix.io.
Was this article helpful?
Thanks for your feedback!
Oops, something went wrong. Please, try again later.
Thank you!
What details or examples would have made this article more helpful for you? We appreciate your insights!
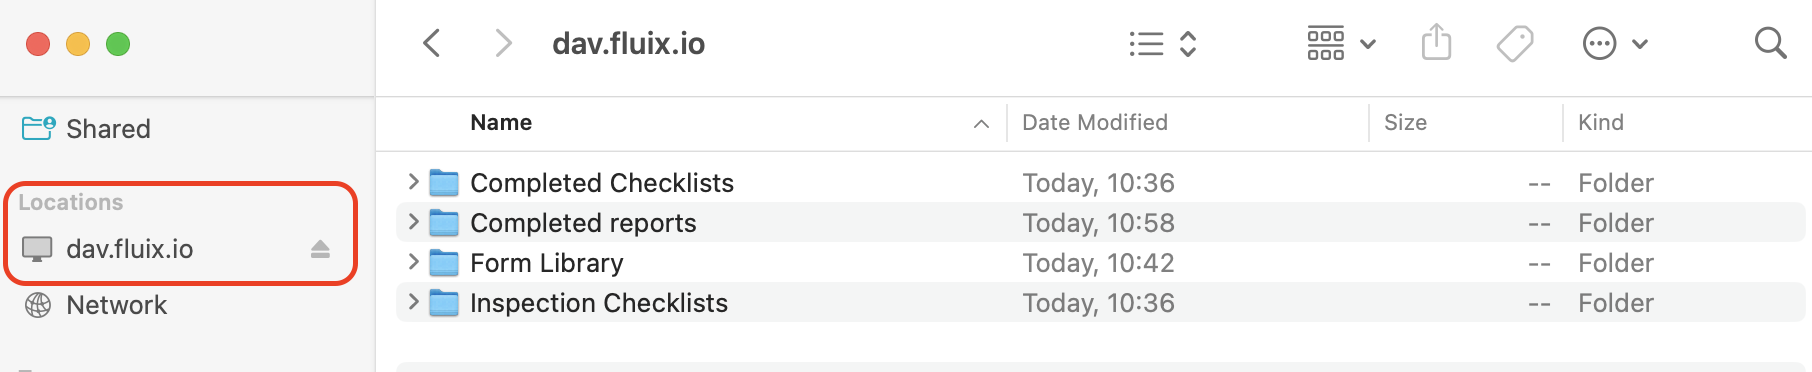
Fluix File Storage can be connected as a network drive for Mac OS-based workstations.
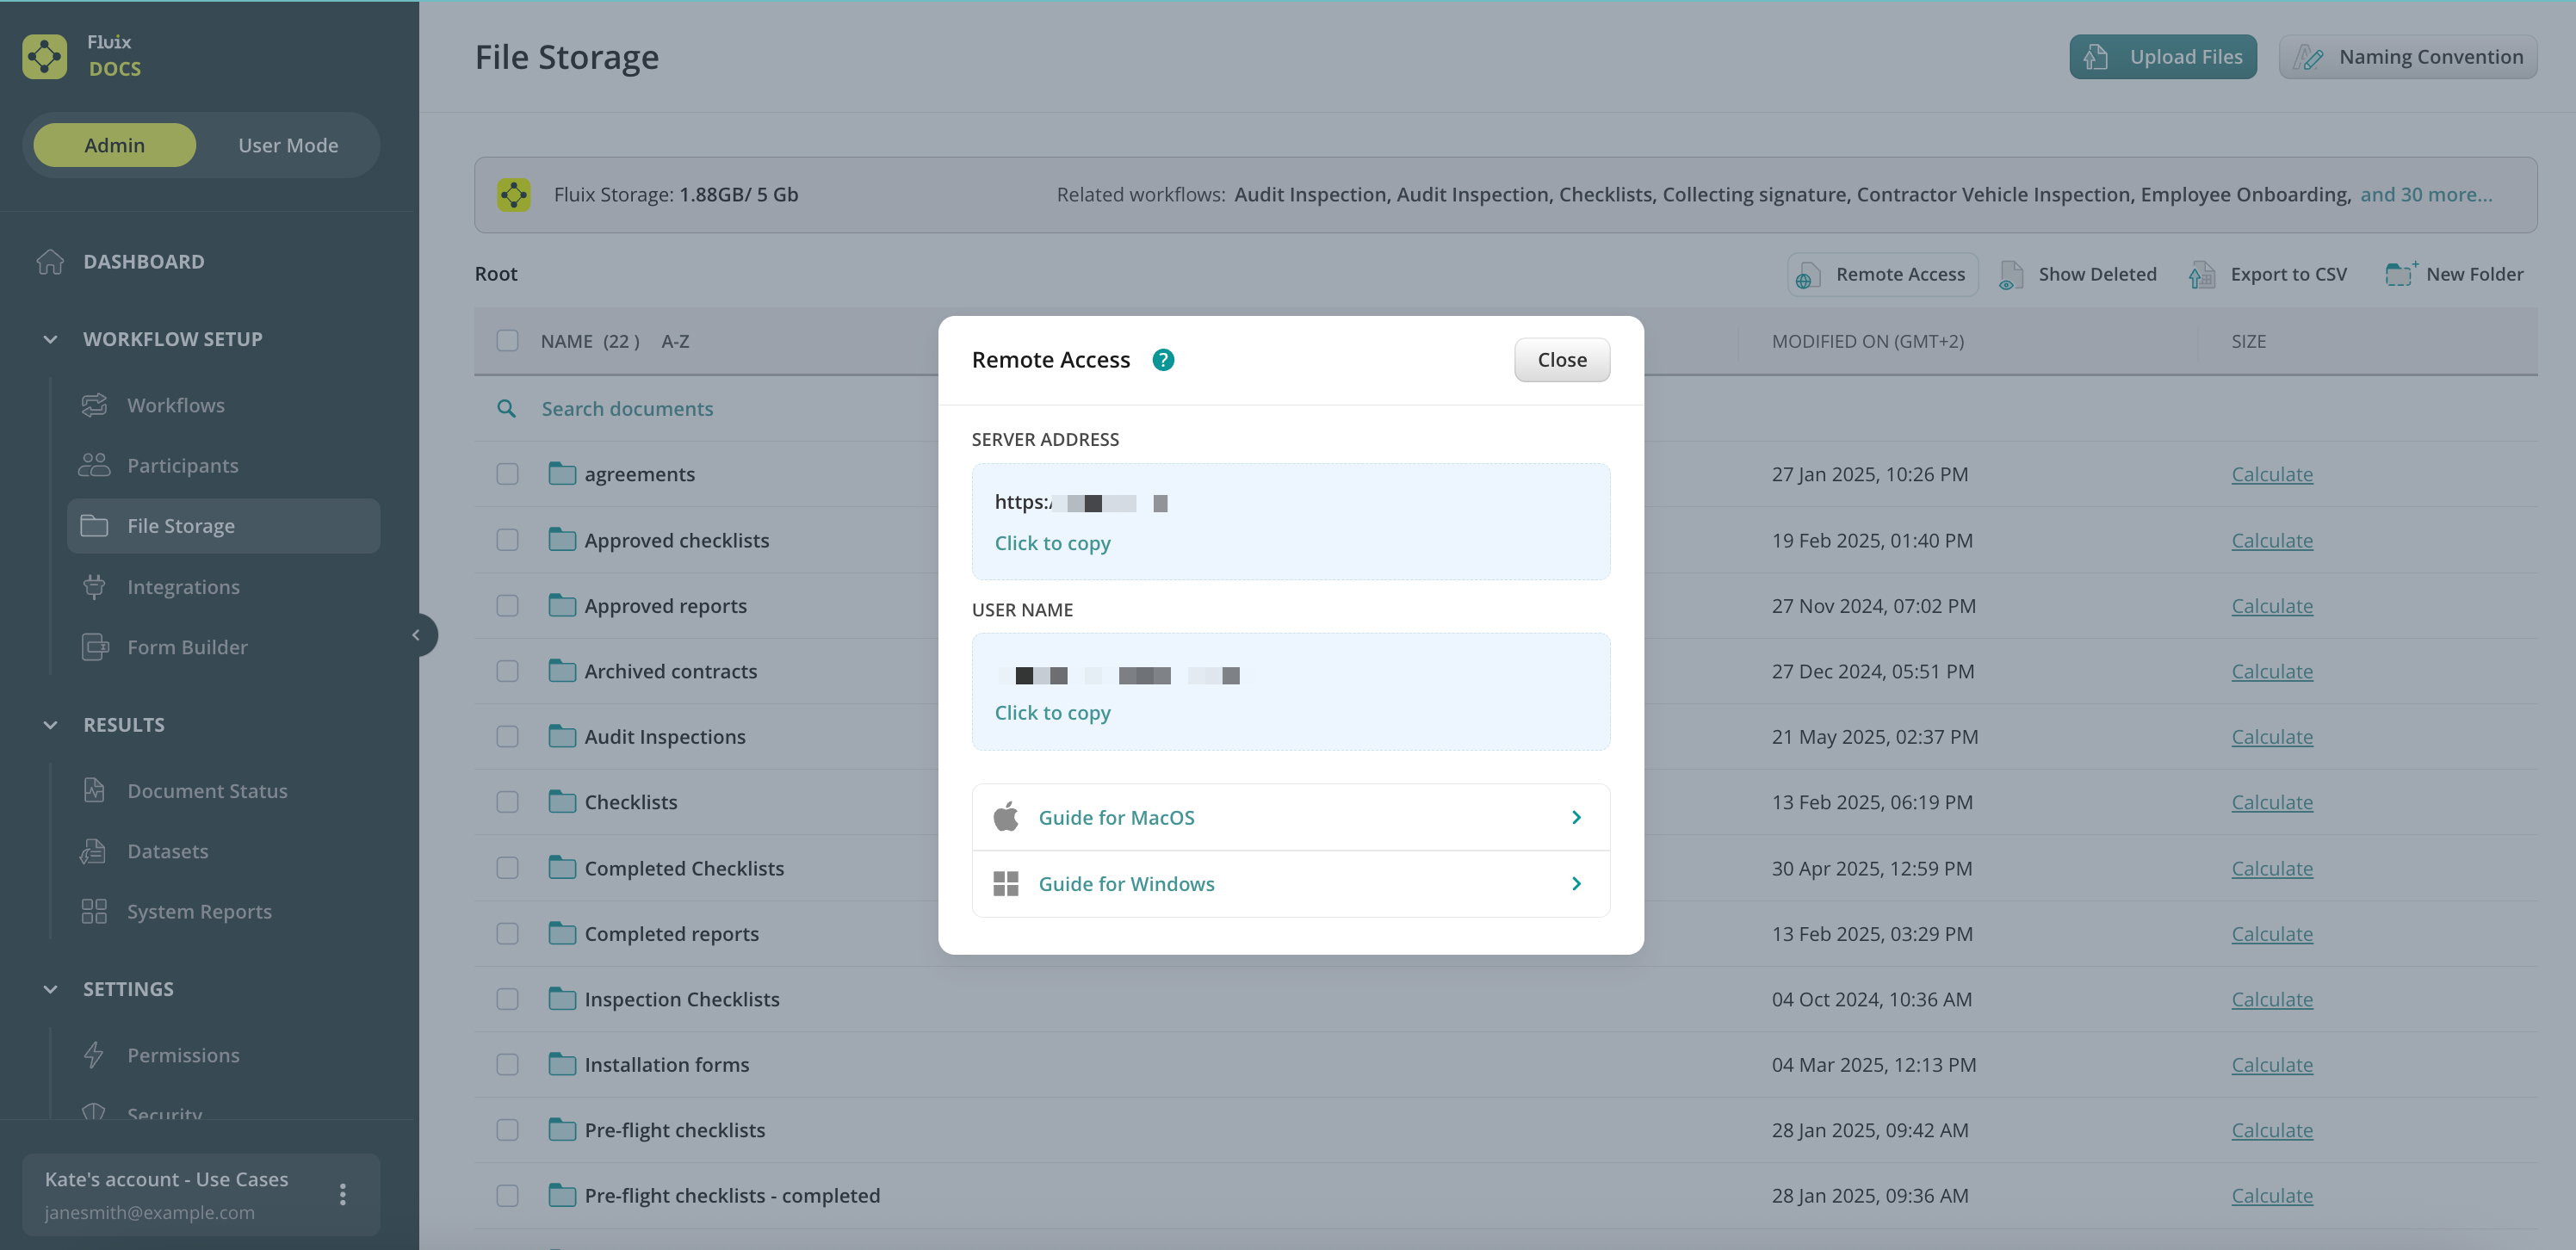
1. In the Fluix Admin Tab, navigate to the Workflow Setup -> File storage section and click on Remote accessto obtain a unique user name identifier.
2. Copy the server address and the user name.
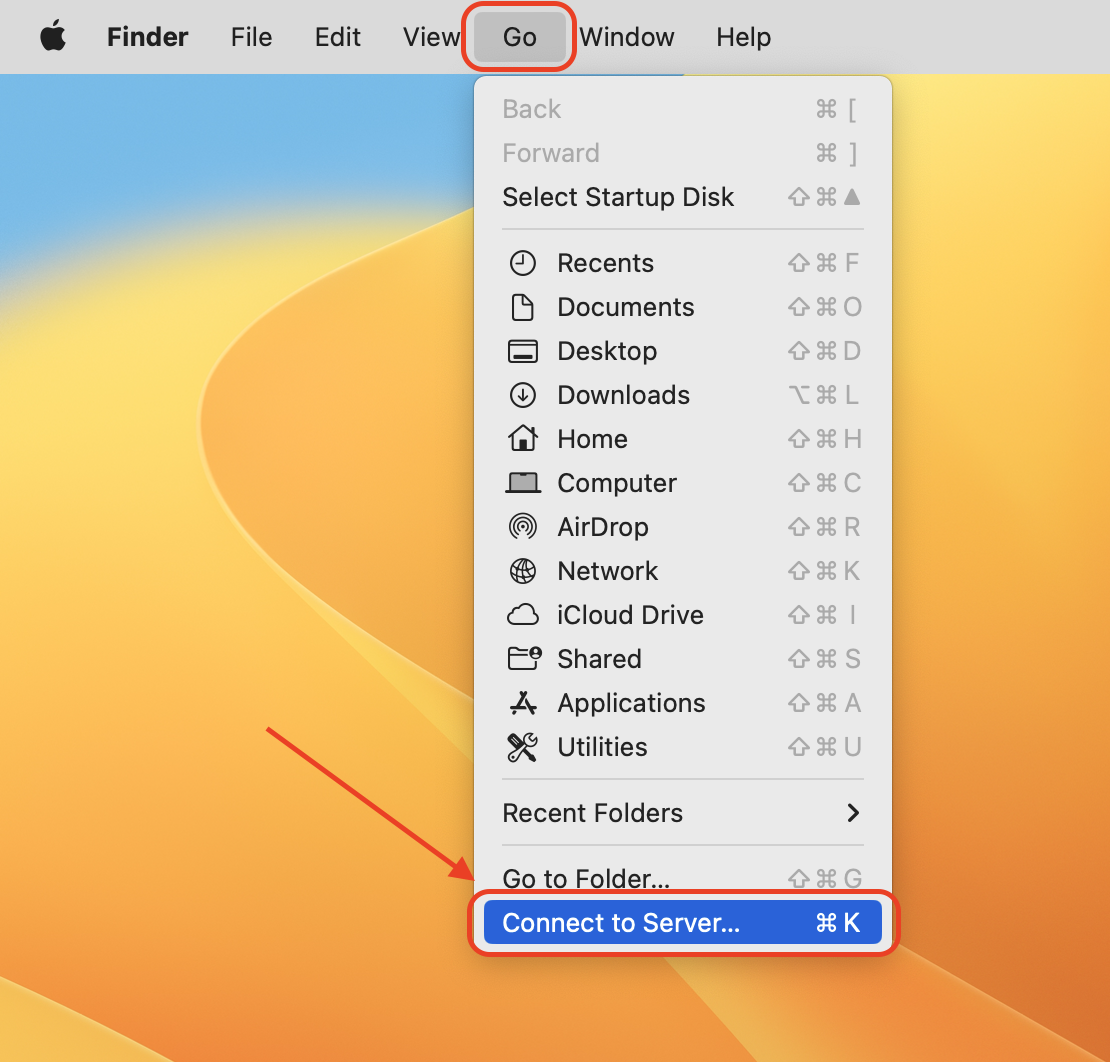
3. In Finder, open the Go menu and select Connect to Server.
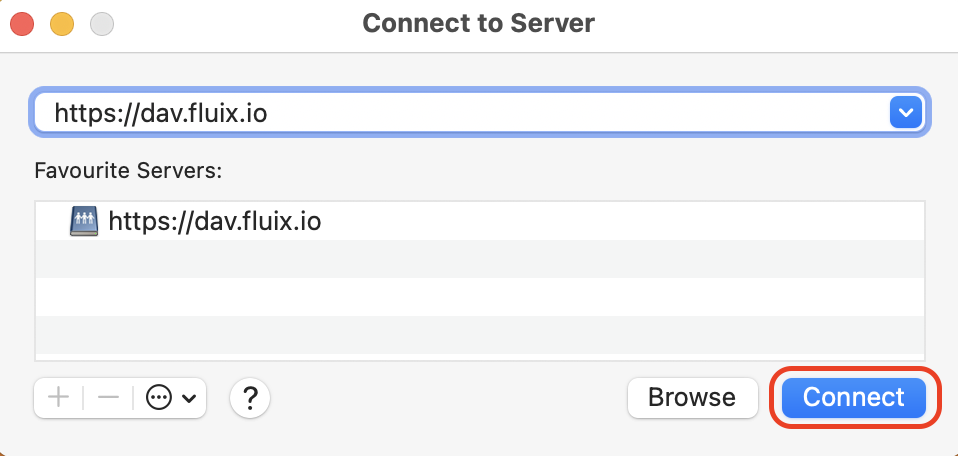
4. Fill out the Server address from Step 2 as a Folder URL and click Connect.
5. In the popup window, enter the Username that you copied earlier in Step 2 and the Fluix password that you use to log into the Fluix Admin Portal for the Password line. Then click Connect.
6. Once done, Dav connection will be available from Finder in the Locations section.
Feel free to contact us at support@fluix.io if you have any questions.
Was this article helpful?
Thanks for your feedback!
Oops, something went wrong. Please, try again later.
Thank you!
What details or examples would have made this article more helpful for you? We appreciate your insights!
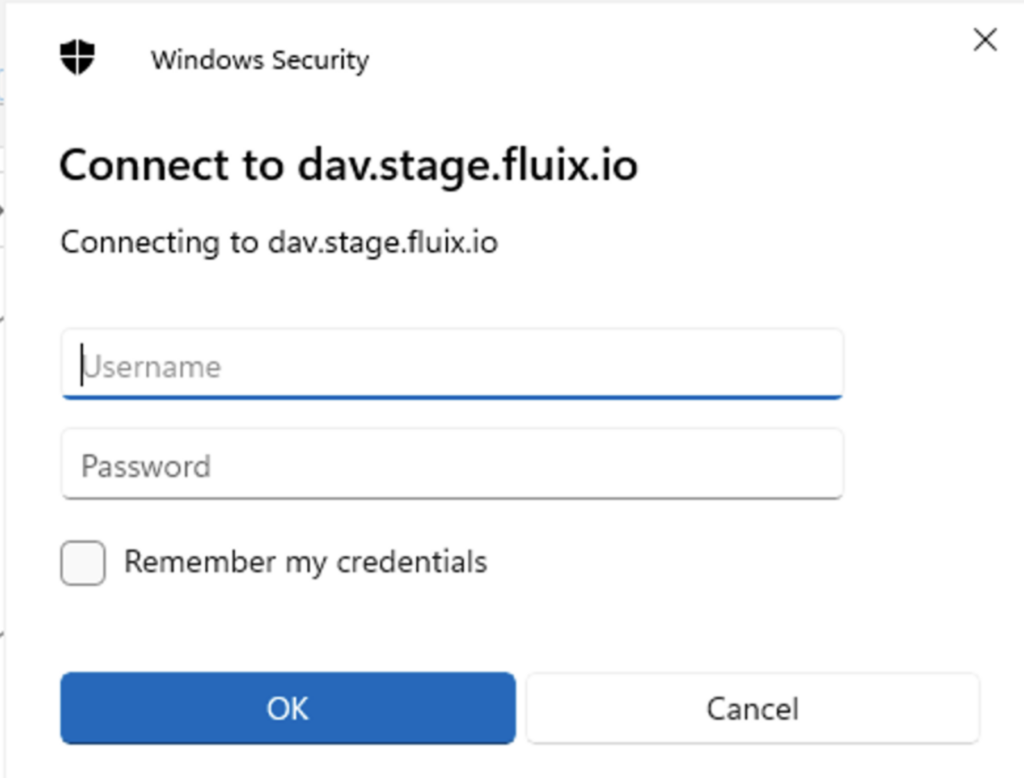
Fluix File Storage can be connected as a network drive for Windows-based workstations.
1. In the Fluix Admin Tab, navigate to the Workflow Setup -> File storage section and click on Remote access to obtain a unique user name identifier.
2. Copy the user name and server address.
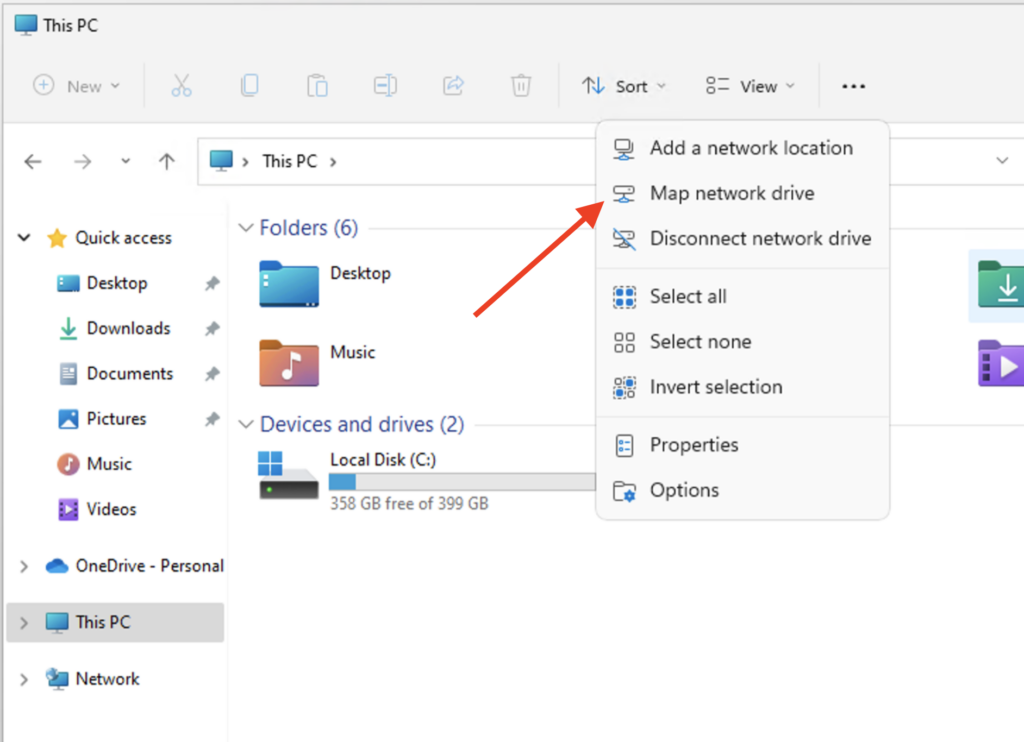
3. Open My PC -> Map Network Drive
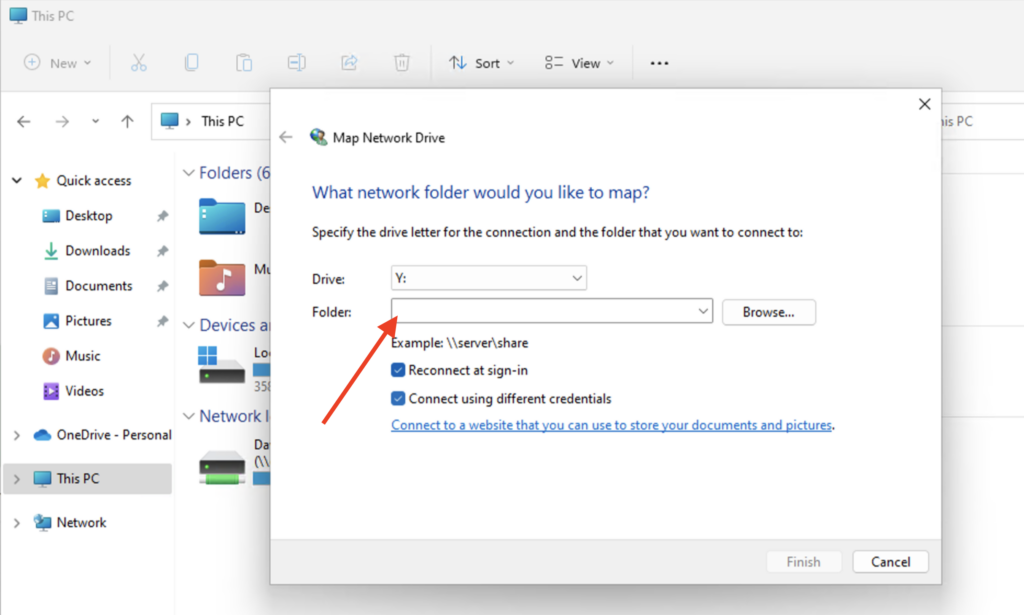
4. Fill out the Server address from Step 2 in the Folder URL and click Finish.
5. In the pop-up window, enter the Username that you copied earlier in Step 2 and the Fluix password that you use to log into the Fluix Admin Portal for the Password line. Then click OK.
6. Fluix storage will appear in My PC -> Network Locations.
Feel free to contact us at support@fluix.io if you have any questions.
Was this article helpful?
Thanks for your feedback!
Oops, something went wrong. Please, try again later.
Thank you!
What details or examples would have made this article more helpful for you? We appreciate your insights!
Fluix Built-in Storage uses Amazon S3 to store the files. Amazon S3 redundantly stores your objects on multiple devices across multiple facilities in an Amazon S3 Region. The service is designed to sustain concurrent device failures by quickly detecting and repairing any lost redundancy. Amazon S3 also regularly verifies the integrity of your data using checksums. Storage meta-data is stored in Fluix databases. Fluix databases are backed up nightly and the backup is reliably stored for the two weeks.
Security
Fluix Storage Service uses 256-bit Advanced Encryption Standard (AES) encryption for data at rest. The storage employs strong multi-factor encryption. Each document is encrypted using a unique key. As an additional safeguard, the key itself is encrypted with a master key, which is rotated regularly. All requests to storage service need to be signed by the Application Service.
Compliance Certifications
The IT infrastructure that AWS provides to Readdle is designed and managed in alignment with security best practices and a variety of IT security standards, including:
SOC 1/SSAE 16/ISAE 3402 (formerly SAS 70), SOC2, SOC3
In addition, the flexibility and control that the AWS platform provides allows customers to deploy solutions that meet several industry‐specific standards, including:
Cloud Security Alliance (CSA)
Motion Picture Association of America (MPAA)
AWS provides a wide range of information regarding its IT control environment to customers through white papers, reports, certifications, accreditations, and other third‐party attestations. More information is available in the Risk and Compliance whitepaper available on the website.
Was it helpful? Feel free to contact us at support@fluix.io if you have any questions or comments.
File naming convention helps you add automatic file naming to the documents that your team works with on their mobile devices. This tool will save you a lot of time compared to typing a document name each time it is submitted.
Here’s how to add file naming convention in Fluix:
1. Follow to the File Storage of Admin Portal and click on Naming Convention in the upper right corner.
2. Upload a PDF form that you want to add a naming convention to.
3. Once the file is uploaded, you will see all the fields from the form available to create a naming convention. Select the ones you want to use in the file name:
4. You can also add system variables, such as Base File Name (the initial name of the template that will be used on devices), User Name, Email, Date, and Time when the document was submitted by a user.
5. When done, click Save Changes and choose to either save the document in the Fluix Storage or download it locally to your computer:
6. Upload the document to a folder that is used as a source in a workflow.
Now your field workers will use this document as a template form on their devices. Each time they fill out fields that are used in the naming convention, the document name will change automatically. If a user tries to manually rename the document before submit, he will get an error message saying You’re not allowed to rename this file due to company policy, please contact your Fluix admin for more details if needed.
Was it helpful? Feel free to contact us at support@fluix.io if you have any questions or comments.
Was this article helpful?
Thanks for your feedback!
Oops, something went wrong. Please, try again later.
Thank you!
What details or examples would have made this article more helpful for you? We appreciate your insights!
Sign Up to Our Product Newsletter
The latest updates from our Product team, straight to your inbox