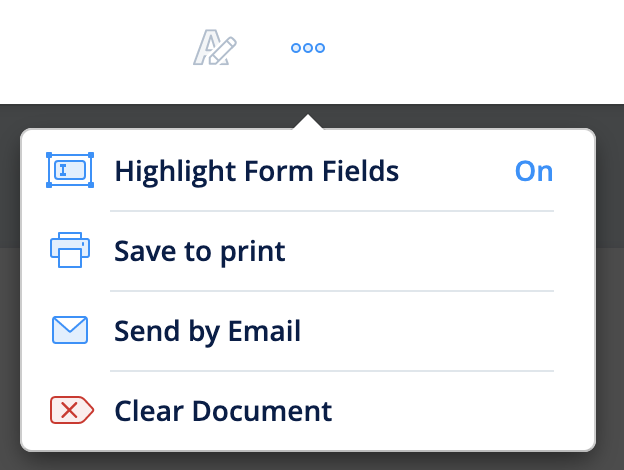
Besides the submit option, you can also share the document in the ways, configured by your company’s Fluix account admin:
Highlight Form Fields – this option is available only for fillable PDF forms. All fields will be highlighted for your convenience.
Save to print – ability to download the document on your computer and will be able to print it. Note: the option is available if configured by your company Admin.
Send by Email – to email the document, add the recipient, subject and message. To protect the document from changes, you can flatten it. Note: the option is available if configured by your company Admin.
Clear Document – option to delete all information in the fillable fields.
Feel free to contact us at support@fluix.ioif you have any questions or comments.
Was this article helpful?
Thanks for your feedback!
Oops, something went wrong. Please, try again later.
Thank you!
What details or examples would have made this article more helpful for you? We appreciate your insights!
The ability to collect digital signatures remotely is covered in the eSign workflow that is configured by your company Admin. If such a workflow is set up, you can proceed to the Fluix app.
Fluix Application
To send a document for signature, please follow the next steps:
1. Log into your Fluix account and open a document to be signed, fill it out and tap the Submit button in the top right corner.
Only documents containing a valid digital signature field can be sent for signing. If such a field is not present in the form, you won’t be able to email the document for signature and you’ll see the error message: ‘There is no signature field in this document, hence the recipient won’t be able to sign it and return to you afterwards.’
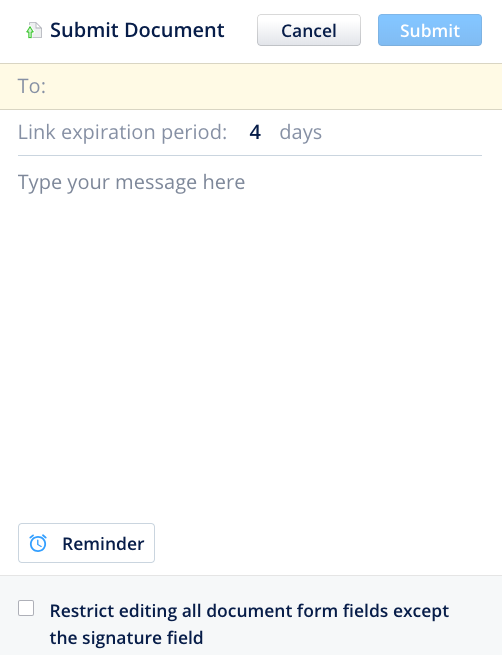
2. In the popup window you’ll need to:
enter signer’s email address. Please note that only one recipient can be added per document.
change an expiration period for the link to the document. By default, the link is available during 4 days. One day prior to expiration the reminder will be sent to the signer. However, you can add custom period for reminders by tapping on Reminder.
add a message if needed:
In case a signer has to only sign a document and is not expected to make any changes, choose Restrict editing all document form fields except the signature field.
3. Tap Submit in the upper right corner.
After the document is dispatched, you will see a new tab Sent for Signature where a copy of the sent file is stored.
External Signer
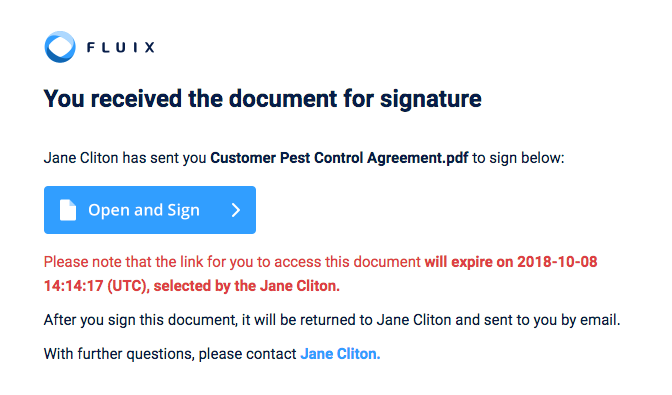
A signer will receive the following email about a document that needs to be signed:
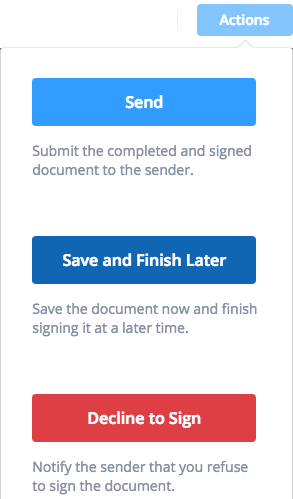
Once the signer clicks Open and Sign, the document is opened in the browser on any device. To sign a document, the signer will need to type the name in the signature field, or draw a handwritten signature. From there, signer has 3 choices under Actions:
Send document back to sender,
Save and Finish Later,
Decline to Sign.
Document retraction
Until the document is signed, it can be retracted. Proceed to the Sent for Signature section-> select the file -> tap Void.
The admins can also void the document from the Admin Portal, in the Document Status section.
The retracted file will no longer be available for signer and will appear in My Inbox of the app.
Document Status in the App
After the document is successfully signed, a signed version of the document is returned to Fluix and appears in My Inbox marked as Signed.
In addition, the email is sent both to the signer and sender of the document.
If signer declines signing of the document, it is pushed back to My Inbox and marked as Declined.
In case the signer didn’t have chance to sign and return the document back before the link in the email expired, the document will be returned to your app, My Inbox section, with status Expired. In that case you can send the document for signature once again.
Further steps for the signed documents
Once the document returns to the sender to My Inbox, it should be sent further as per preconfigured workflow rule: emailed to other participants of the workflow, uploaded to company storage, etc. Once the document is submitted to its final destination, it will land in the Completed tab on your device.