Navigate to Workflow setup > File Storage in the Fluix Admin Portal.
Click Upload Files to add the training materials. The files can be incorporated into workflows and distributed among users.
Fluix’s built-in cloud storage simplifies document organization and management. You may utilize it as a source for document templates and a destination for submitted documents in workflows.
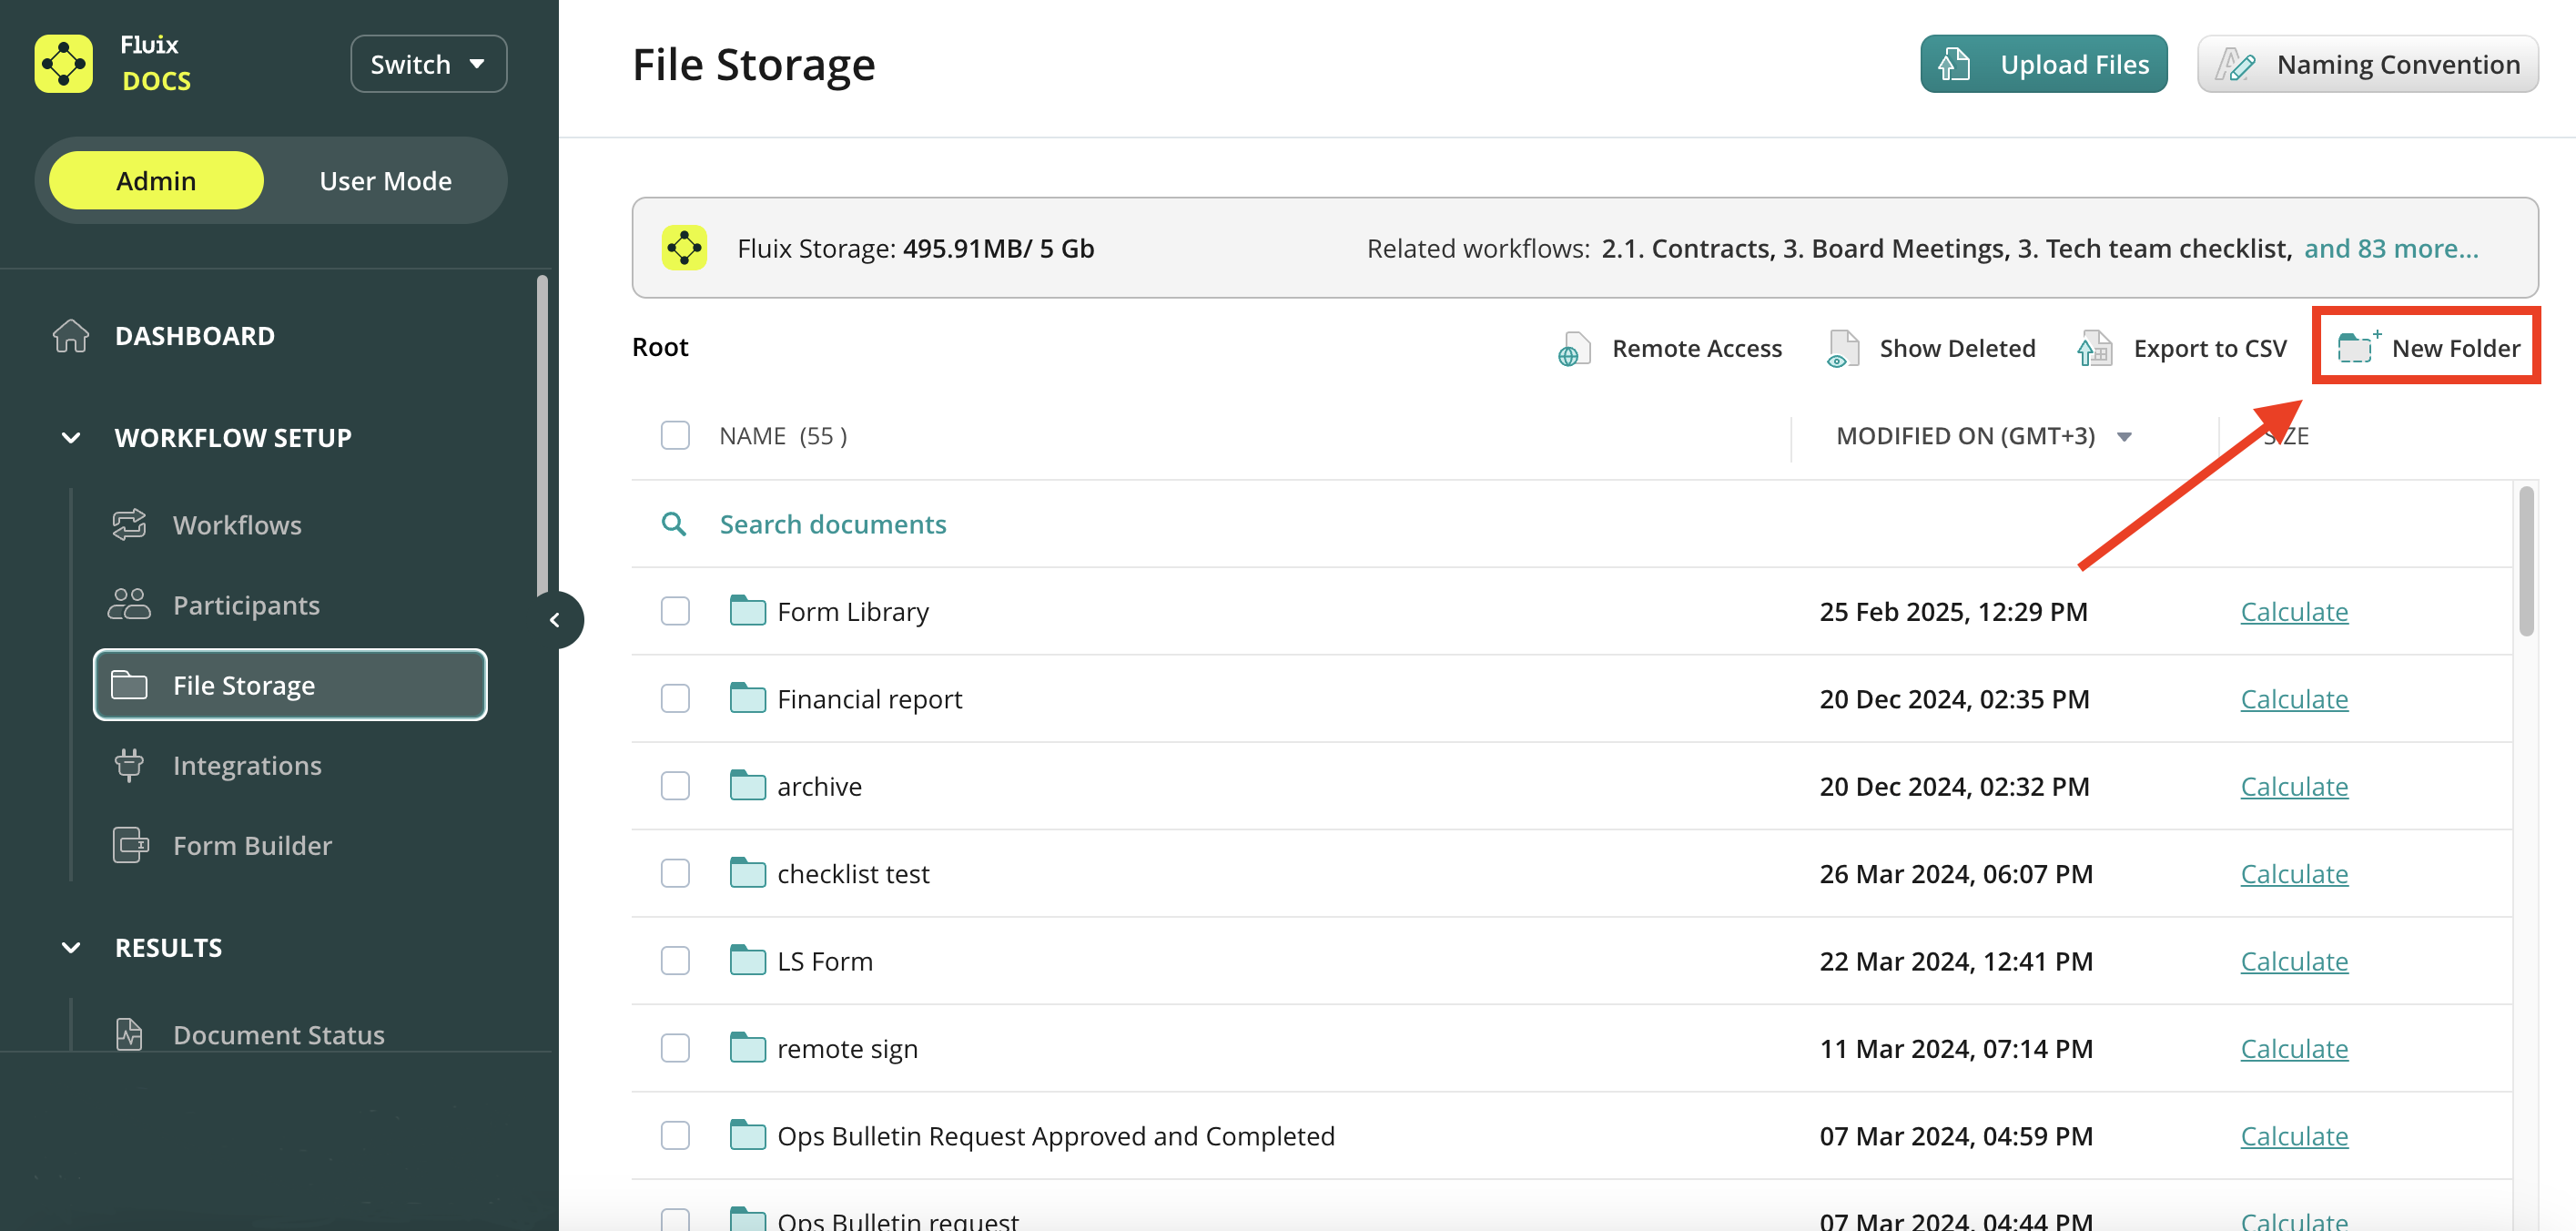
Step 2: Organize Materials into Folders
Create folders for different training programs with the New Folder button in the top right corner.
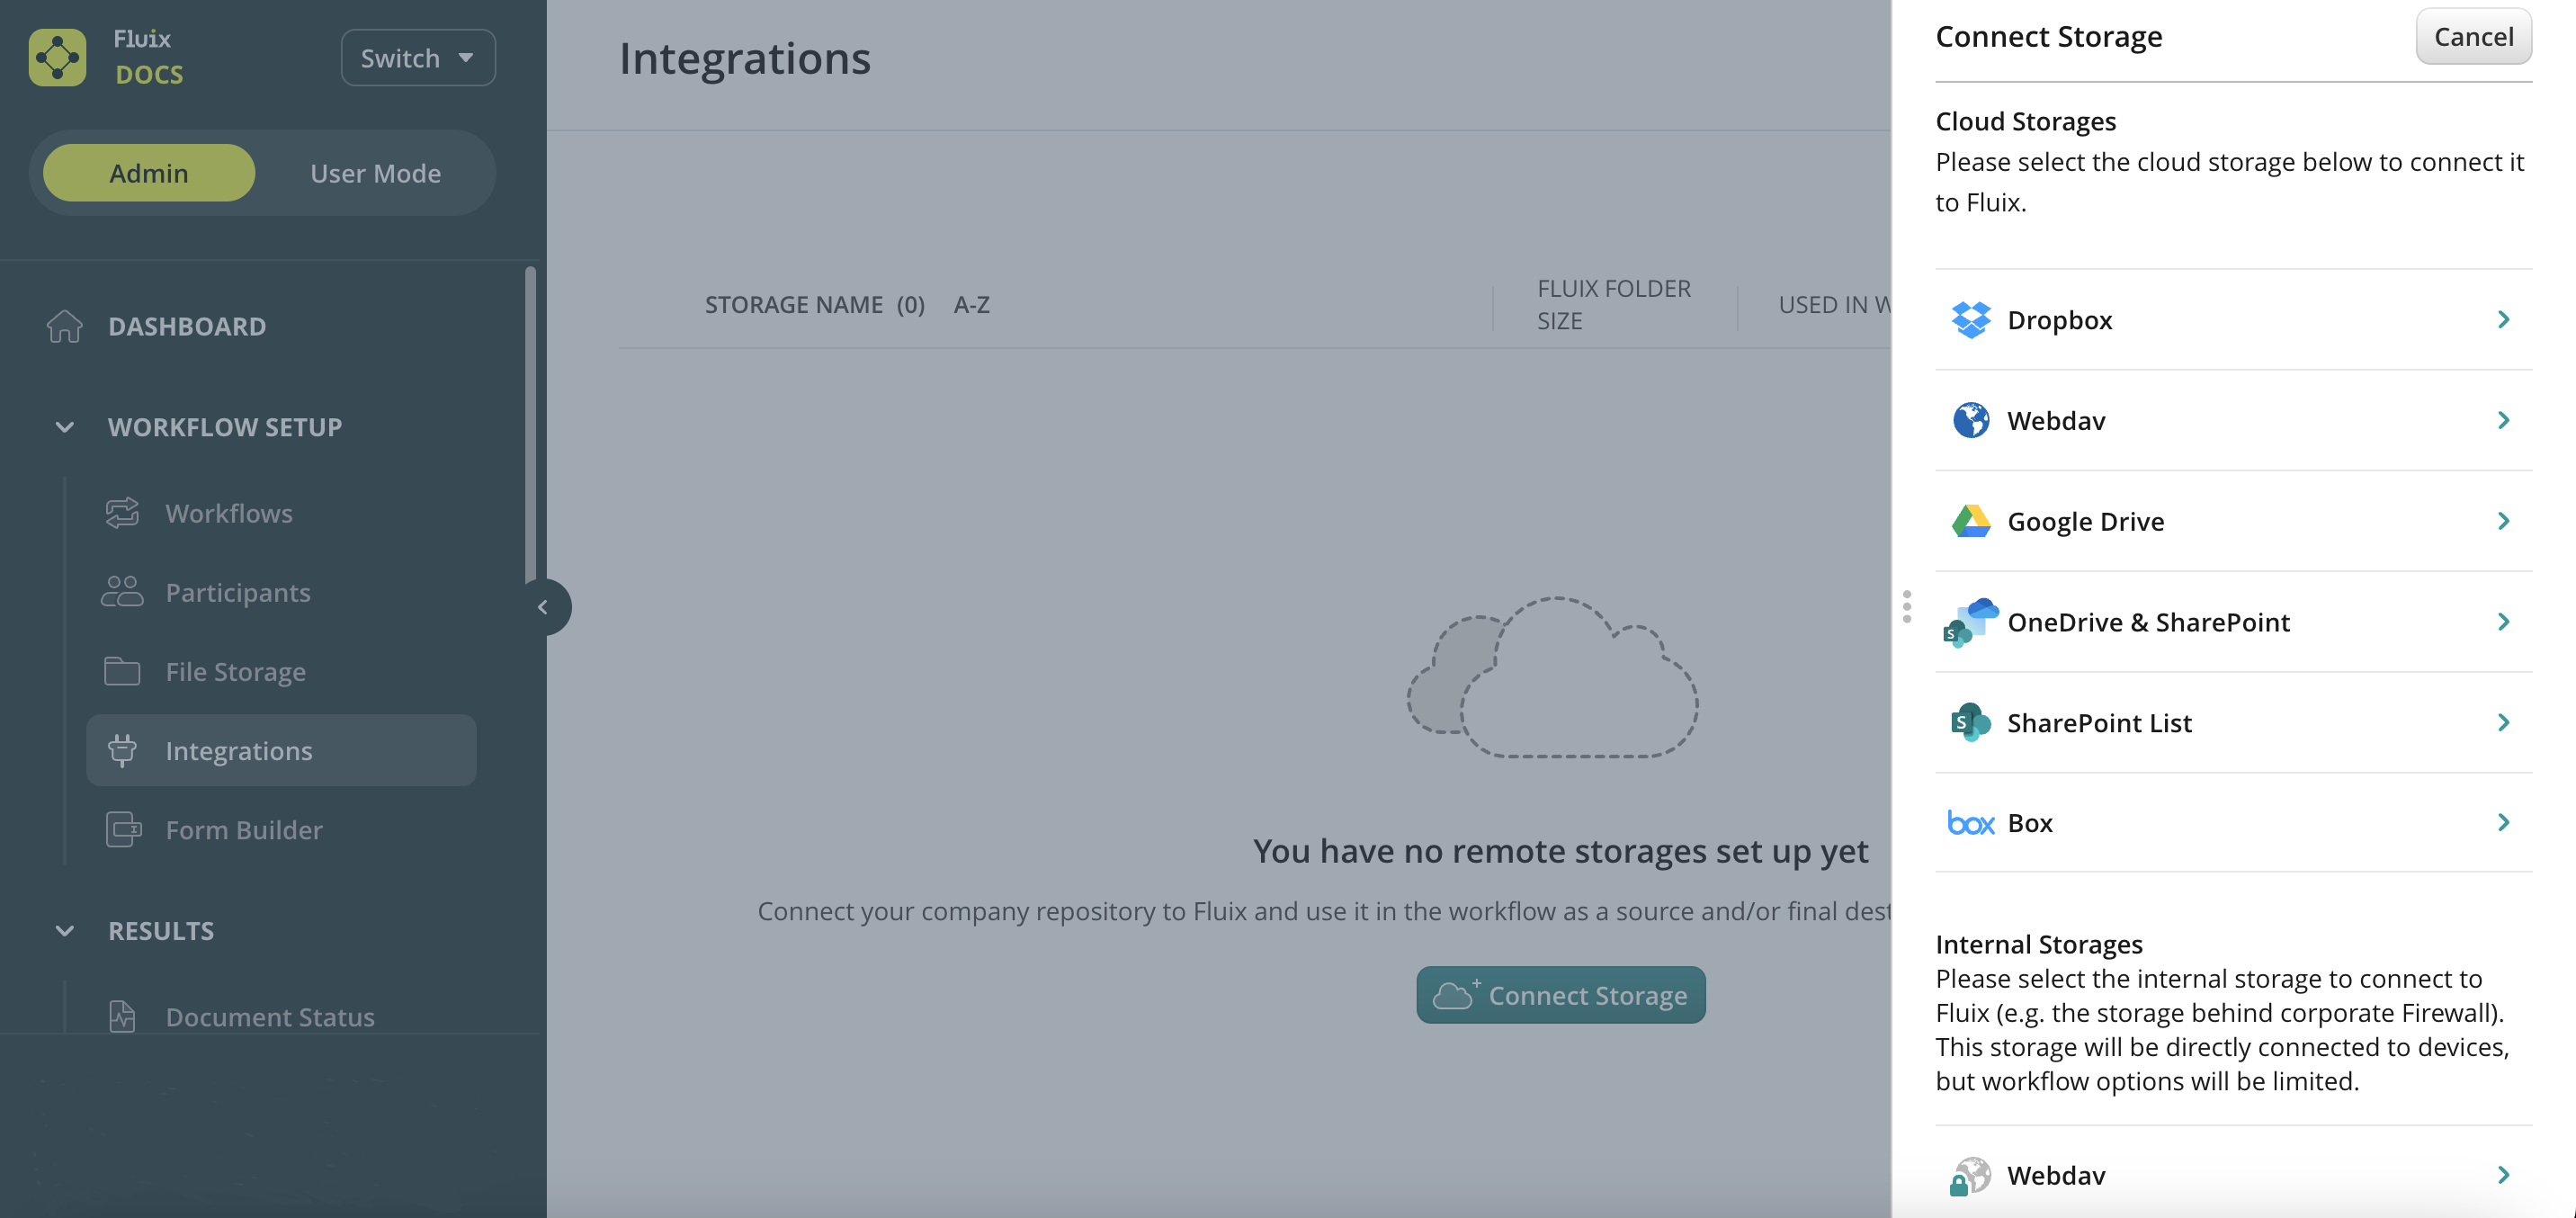
Navigate to Workflow setup > Integrations section;
Click on Connect Storage button, and select the storage you want Fluix to grant access to. You will see a sidebar with all the available storages to connect:
Step 2: Configure Remote Storage
Once connected, storage may have different statuses:
Not in Use: The storage is not yet assigned to a workflow. Create a workflow and add the storage as a document source or destination.
Error: Indicates connectivity issues. Check and resolve the error before proceeding.
OK: Storage is active and properly configured.
Reauthorization Required: The storage has been disconnected. To restore access, select the storage and click Reauthorize.
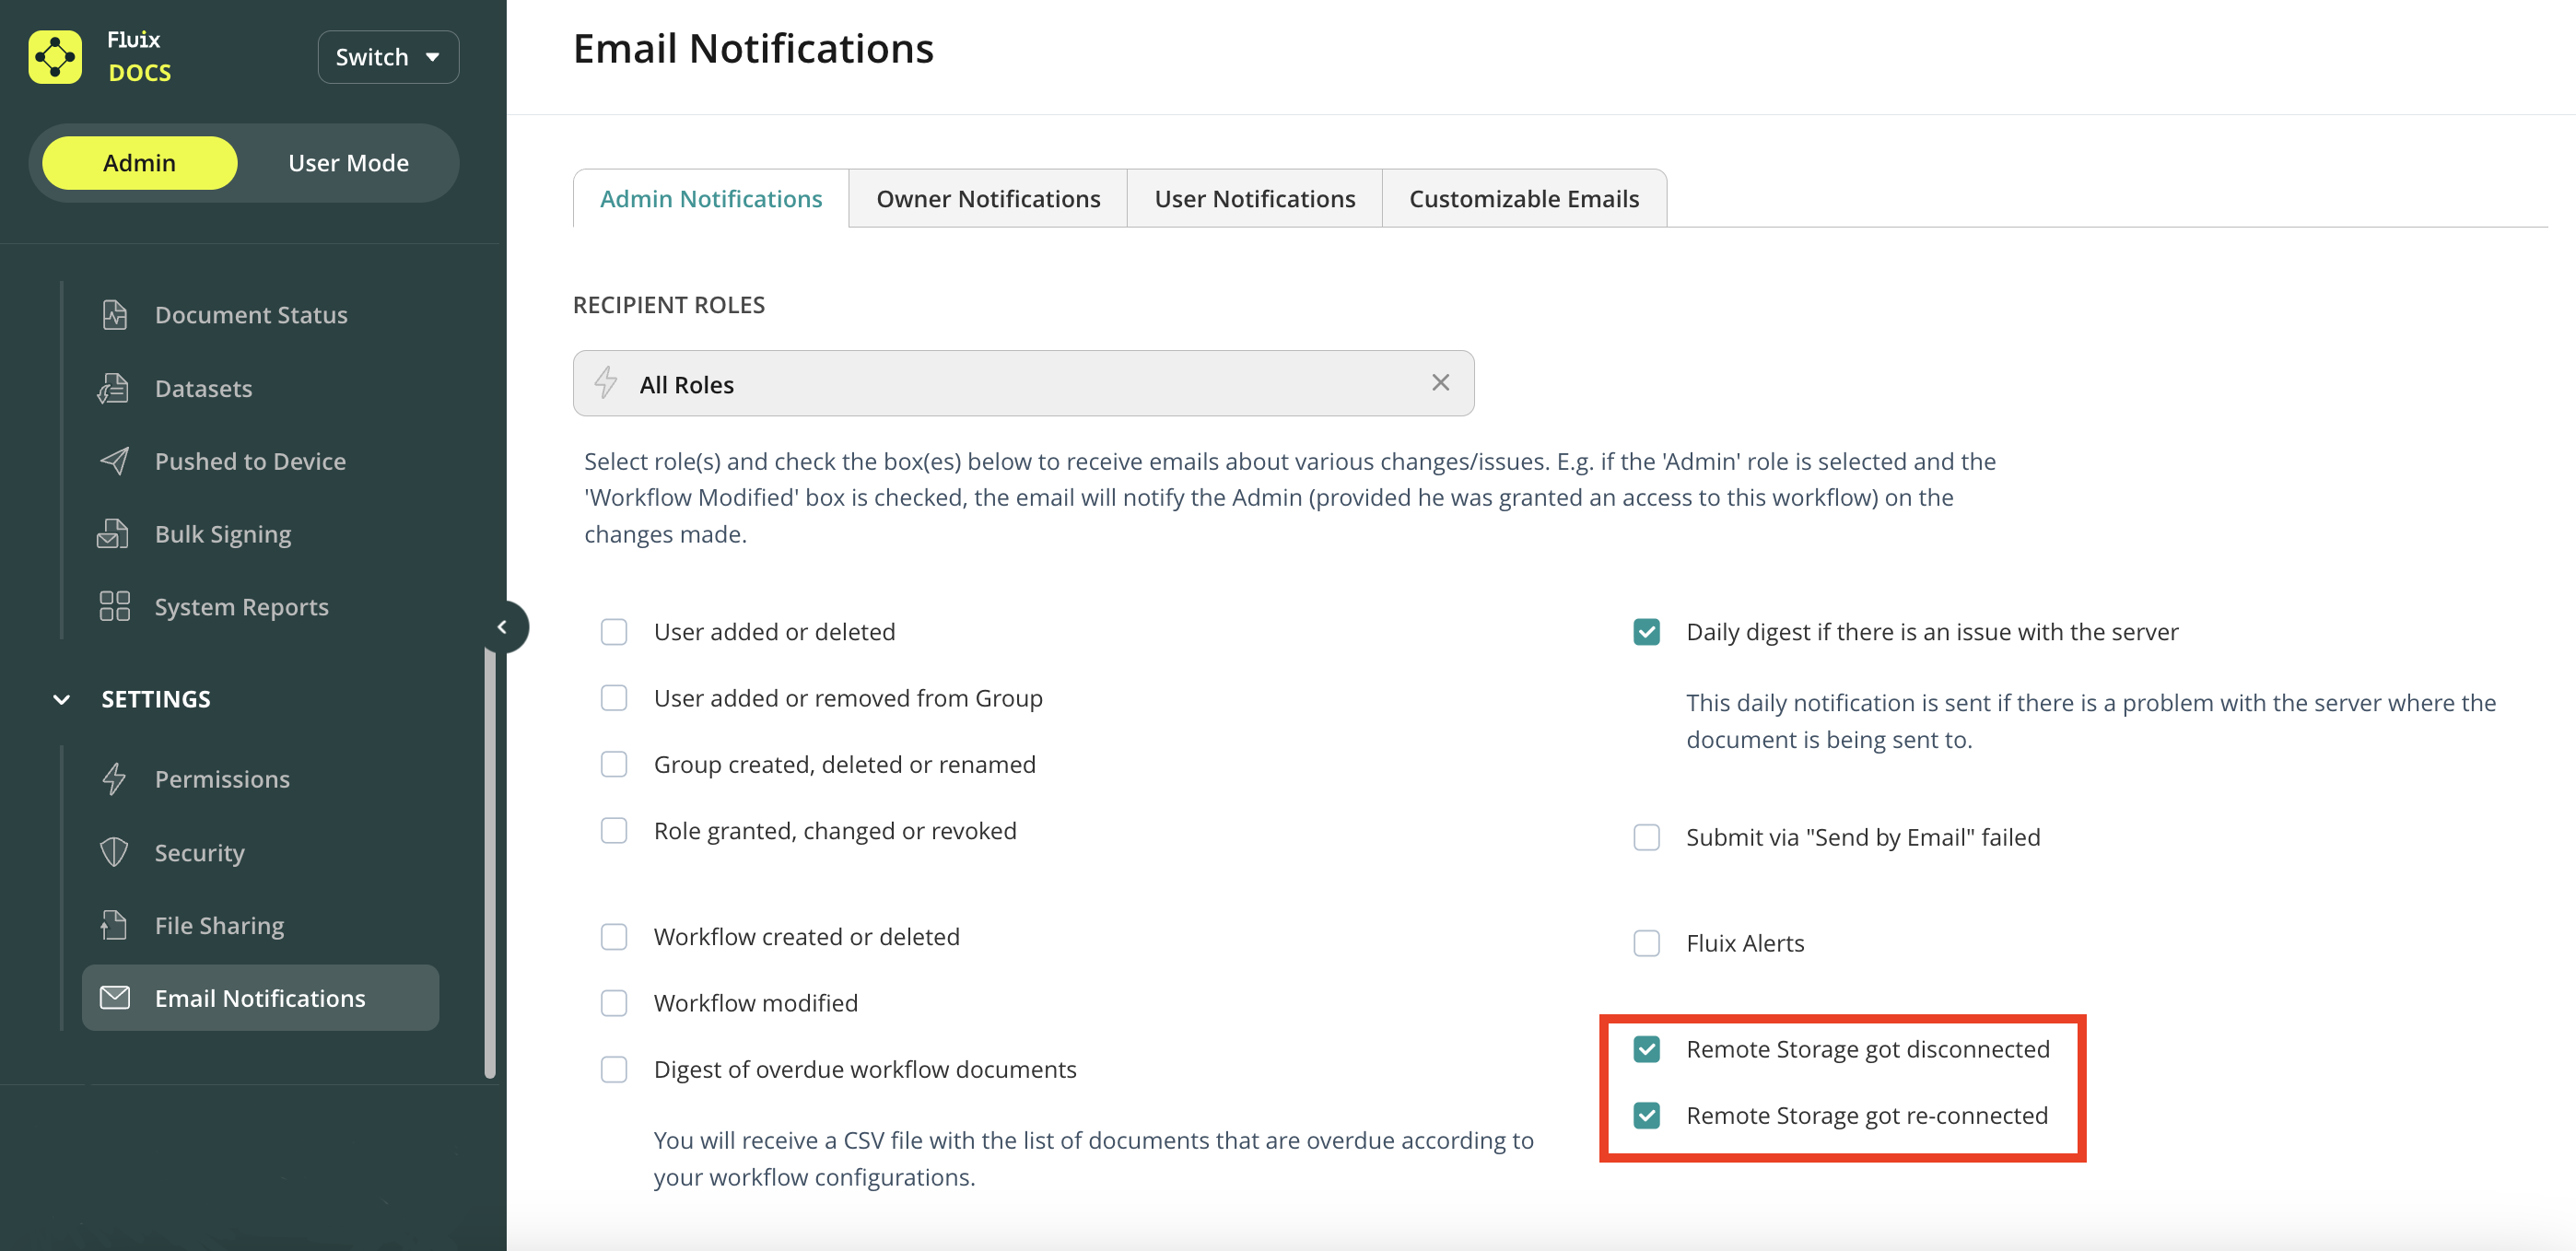
Enable email notifications under Settings > Email Notifications section to receive notifications if storage disconnects.
Step 3: Create a Workflow and Add Participants
You can assign workflows to individual users or groups. In this case, two groups will participate:
Pilot Trainees
Pilot Trainers
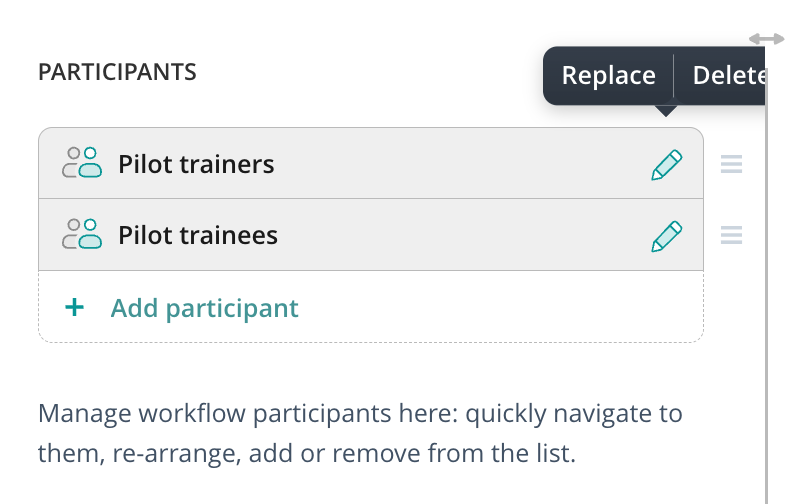
Once participants are added, a list will appear in the left-hand sidebar. You can rearrange, replace, delete, or add new participants as needed.
Document Distribution to Pilot Trainees
The training forms are distributed to the Pilot trainees to ensure they receive the necessary educational materials. This process helps standardize training procedures and guarantees all trainees have access to the same information.
The Cabinet document source is ideal for distributing the files that are stored on remote storage, making them accessible for a group of users. When documents appear via Cabinet, they are available for viewing to the entire group, however, only 1 user can start working on it by assigning it to himself. Once assigned to a particular user, the document becomes unavailable to the rest of the group.
Step 4: Configure the Cabinet Document Source
Select Cabinet as the document source.
Choose the connected storage and specify the root folder.
The selected path will be displayed next to Cabinet.
Fluix is a go-to software for managing documents related to maintenance and operations.
Pre- and post-flight inspections ensure aircraft safety and airworthiness in aviation operations.
Let’s explore one of the scenarios on how you may automate the evaluation process and manage maintenance records efficiently with Fluix:
You configure the workflow in Fluix Admin portal.
Enable Maintenance Technicians to send digital pre-flight checklists directly to Pilots.
Pilot fills out the checklist and submits it to the company storage.
Fluix supports working with PDF forms. You can use your existing PDFs or create custom ones using the Form Builder in the Fluix Admin Portal.
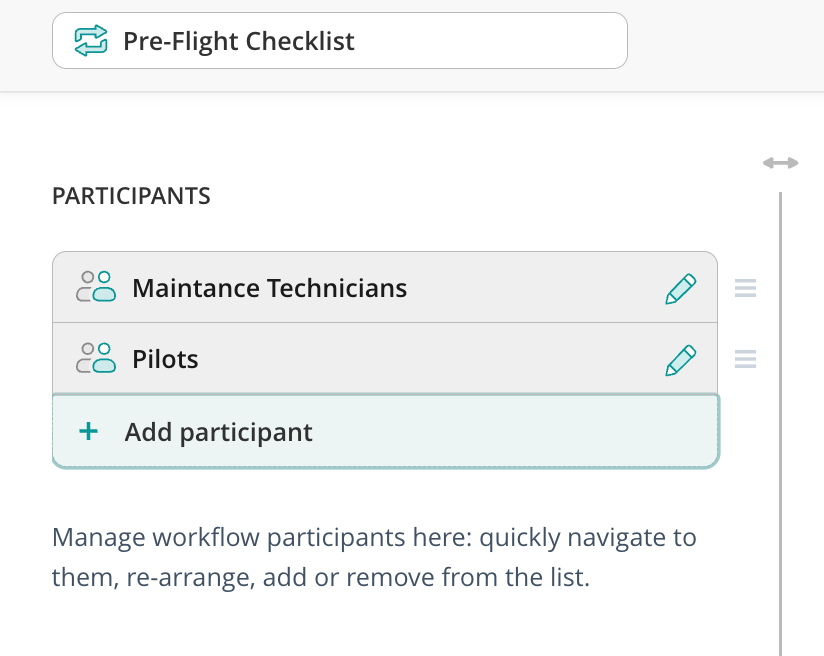
Step 1: Define Participants in Your Workflow
Identify the users or groups involved in the document workflow. In our tutorial, we’ll use two groups of users who will be working within one process:
Maintenance Technicians
Pilots
Once you add participants, you can organize and manage them in the workflow builder. The left-hand sidebar displays a list of participants, which you can adjust by dragging, replacing, or adding new ones.
Note: Users in a group will have access to all documents configured for that group in different workflows. Learn more about user groups here.
Step 2: Mapp and build a Workflow
Create the document source
Use a Template document source as the basis for your checklists that Maintenance Technicians will access and fill out. This ensures the original files remain unchanged while distributing blank forms to users.
Choose the storage location for your templates. You may select Fluix Storage as a document source or your third-party storage. To learn more about supported third-party storages, check these articles.
Specify the root folder or build a path with the offered templates. For example, in Fluix storage, create a Pre-Flight Checklists root folder.
Once selected, the path will appear next to the Templates section in the workflow setup.
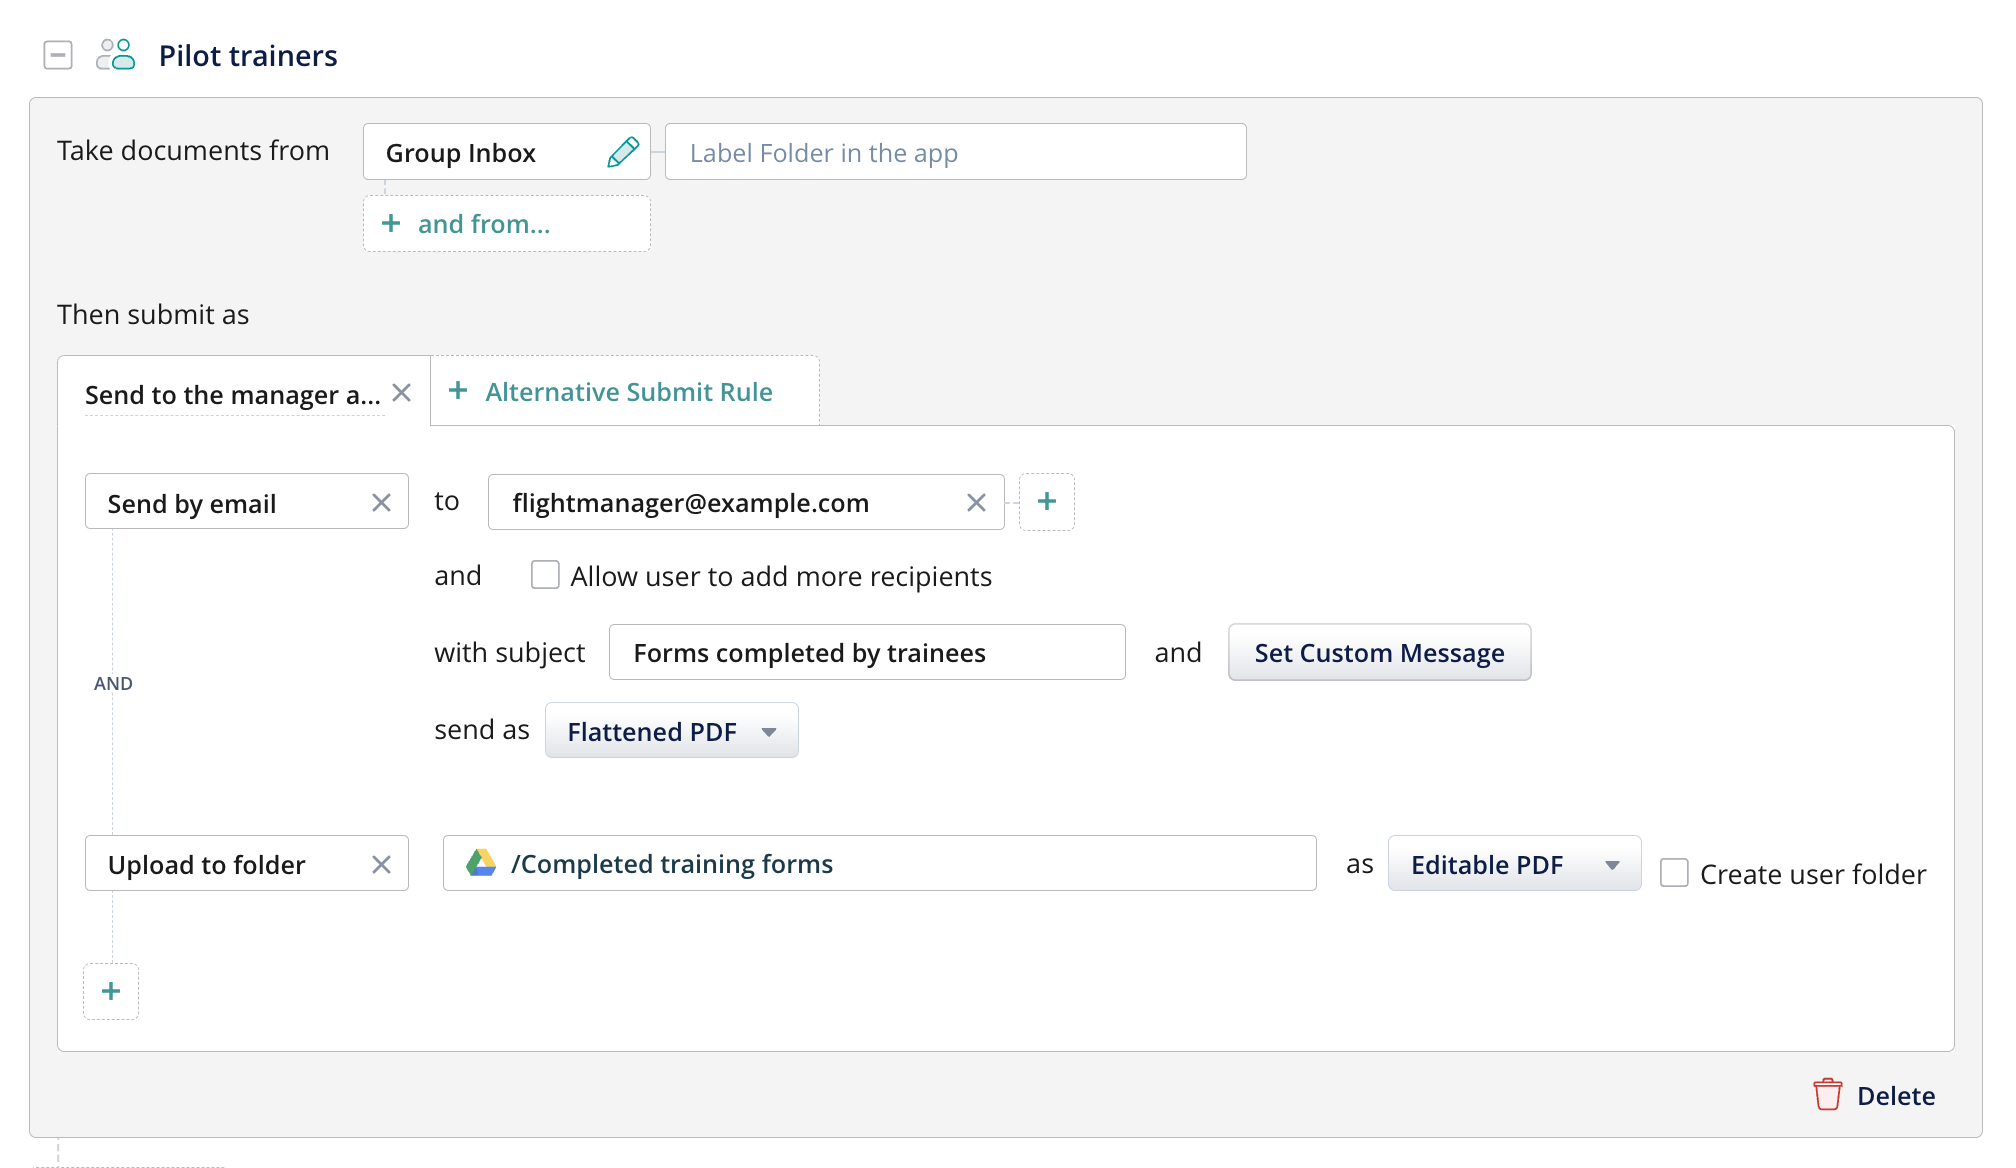
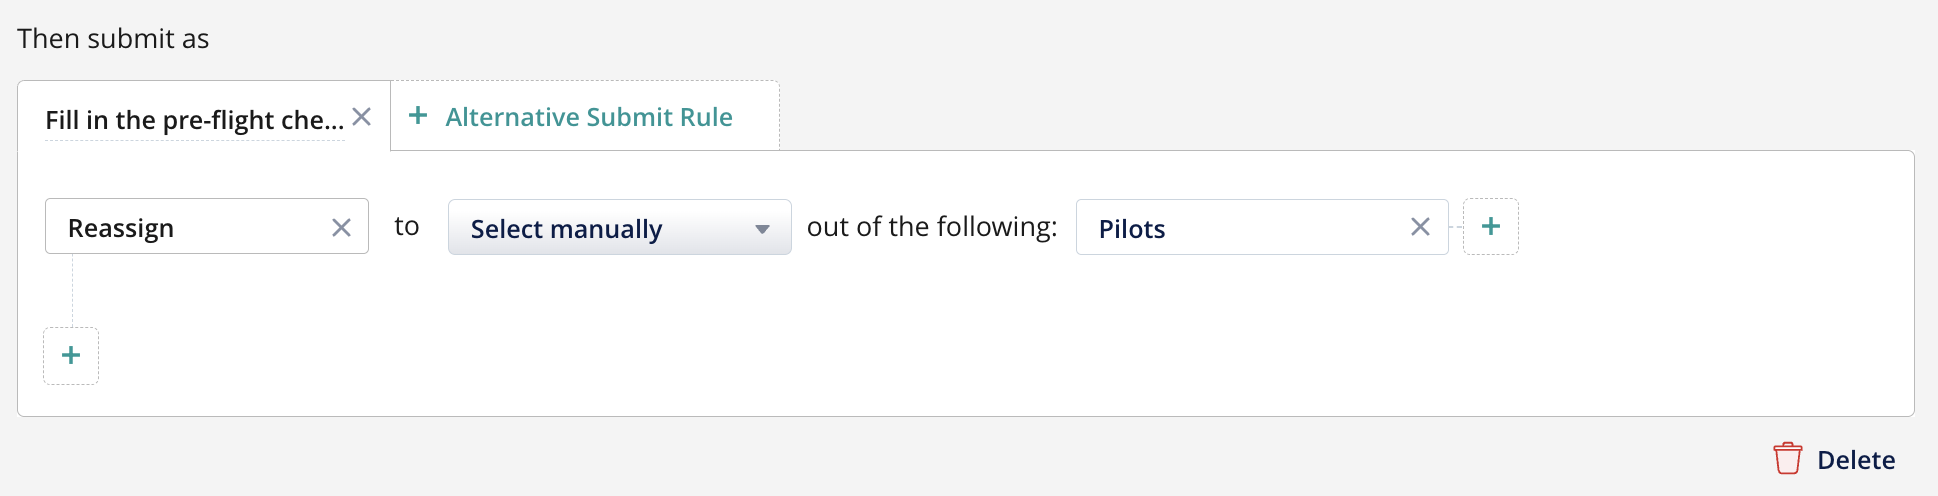
Configure Submit Actions for the Checklist
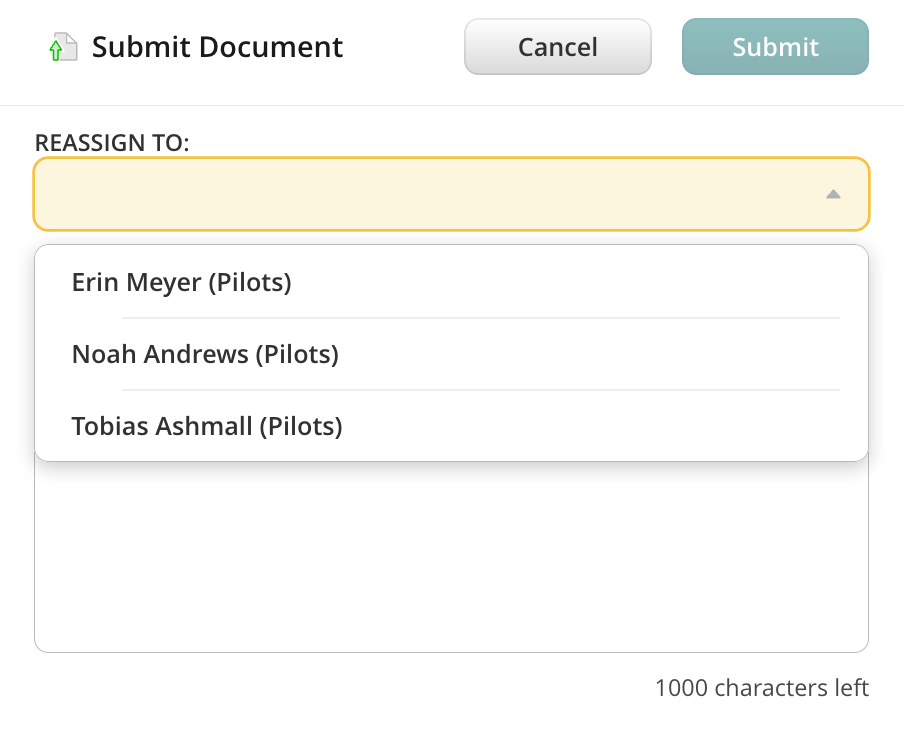
Establish how documents will flow between Maintenance Technicians and Pilots. You may usethe Reassign submit action to let the Maintenance Technician submit documents to a specific Pilot within the workflow.
Use the Select Manually option to allow the Technician to choose the recipient (a specific Pilot from the group). Below is an example of how the Maintenance Technician will see the reassign with dropdown.
The reassigned document will arrive in the My Inbox section of the Pilot’s Fluix account.
Final Submission and Archiving
Once the Pilot fills in the checklist, it can be stored for further action. Add a final submission step where Pilots archive completed documents:
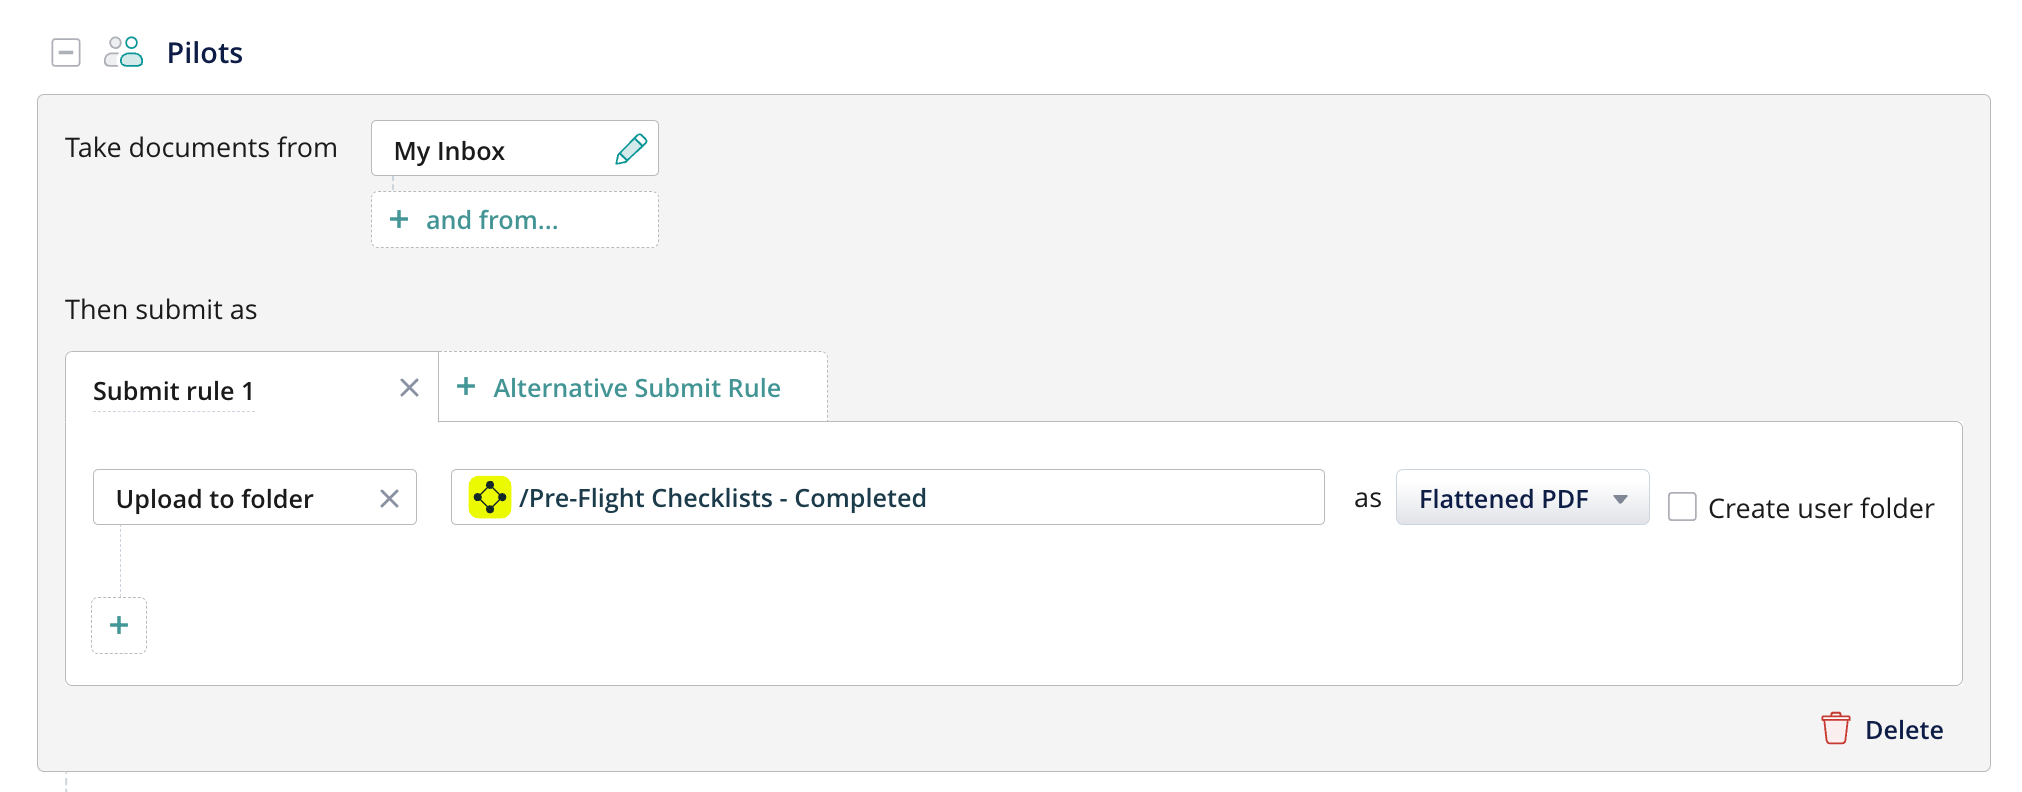
Use the Upload to Folder rule to save the completed checklist to the appropriate folder in Fluix Storage or your third-party storage.
Choose a file format for the submit rule:
Editable PDF: Keeps forms editable.
Flattened PDF: Submits non-editable forms (digital signatures will not be editable).
XFDF: Submits form data only.
Step 3: Activate and Test the Workflow
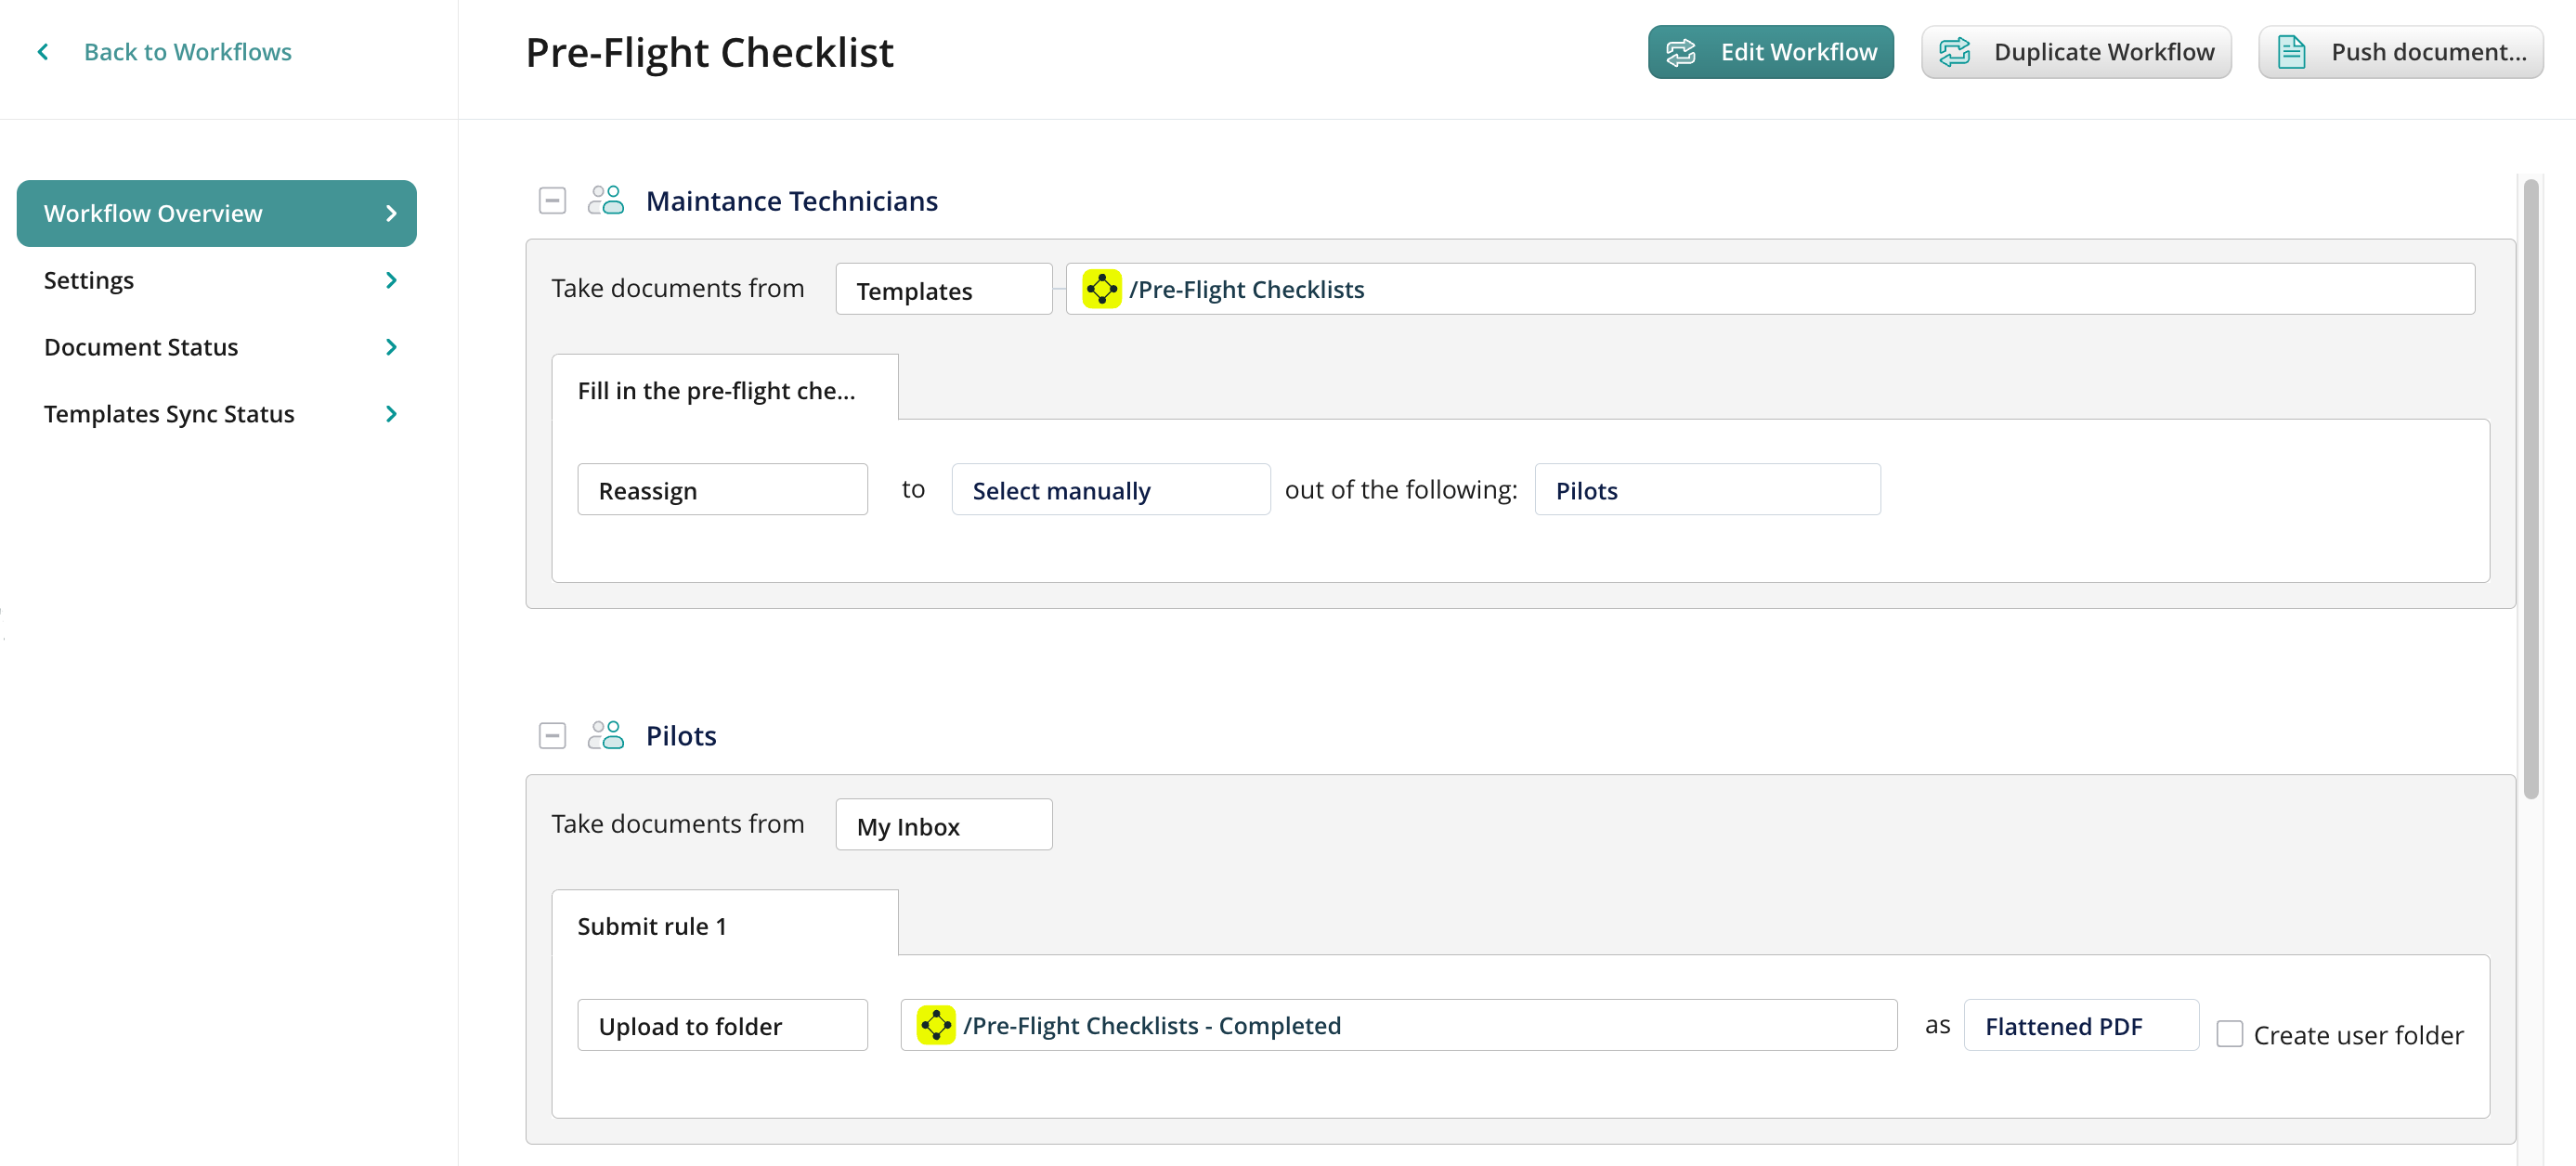
Save and publish the workflow. The final look of the workflow draft will look like this:
2. Add yourself to the group that participates in the workflow and test it:
Open the Fluix app on an iOS device or switch to User Mode in the admin portal in the web browser.
Navigate to the Templates section, open the folder you configured as a document source, complete a form, and submit it.
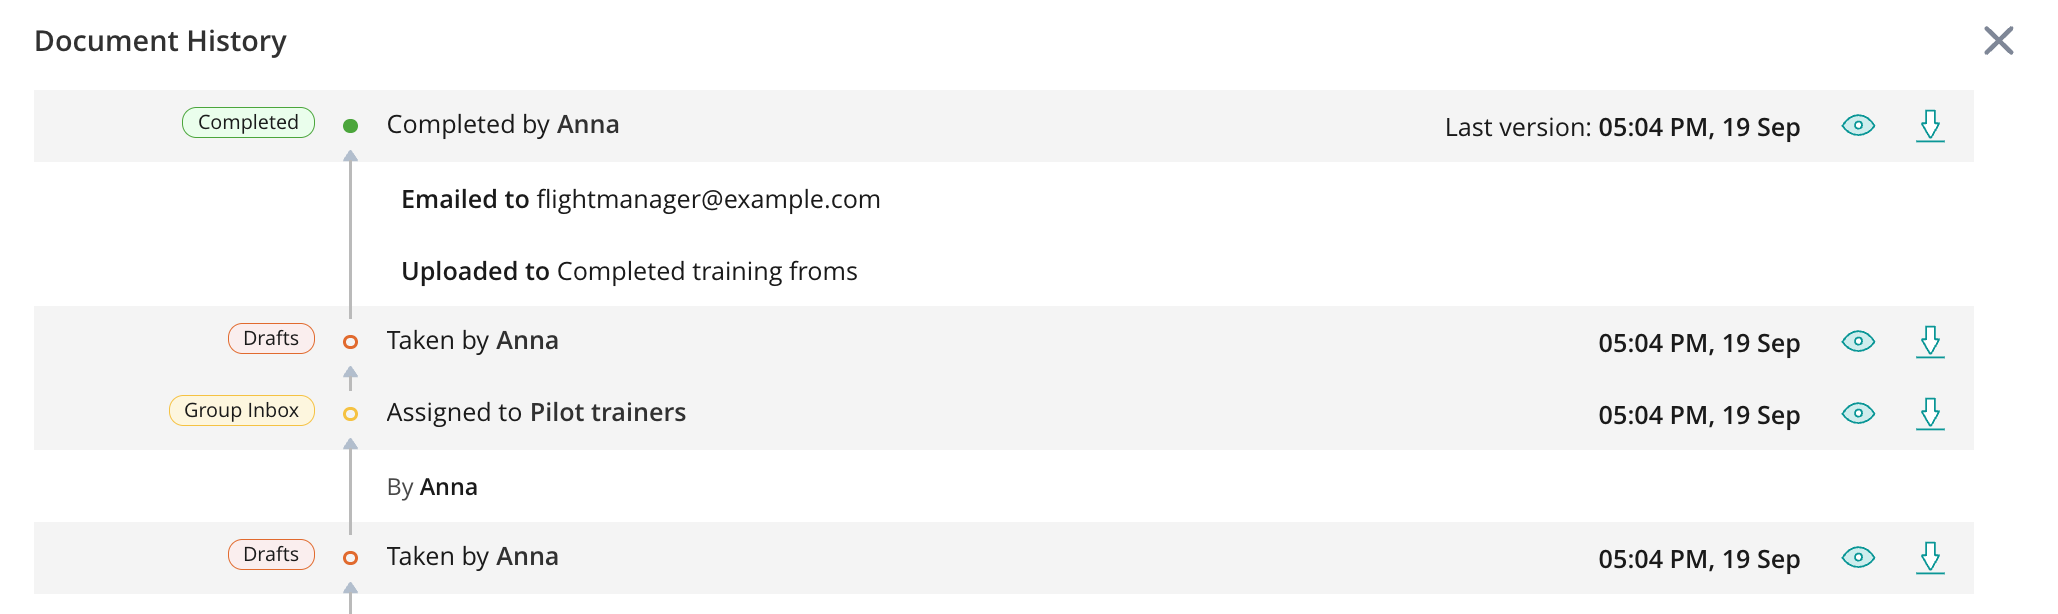
Step 4: Track Document Status
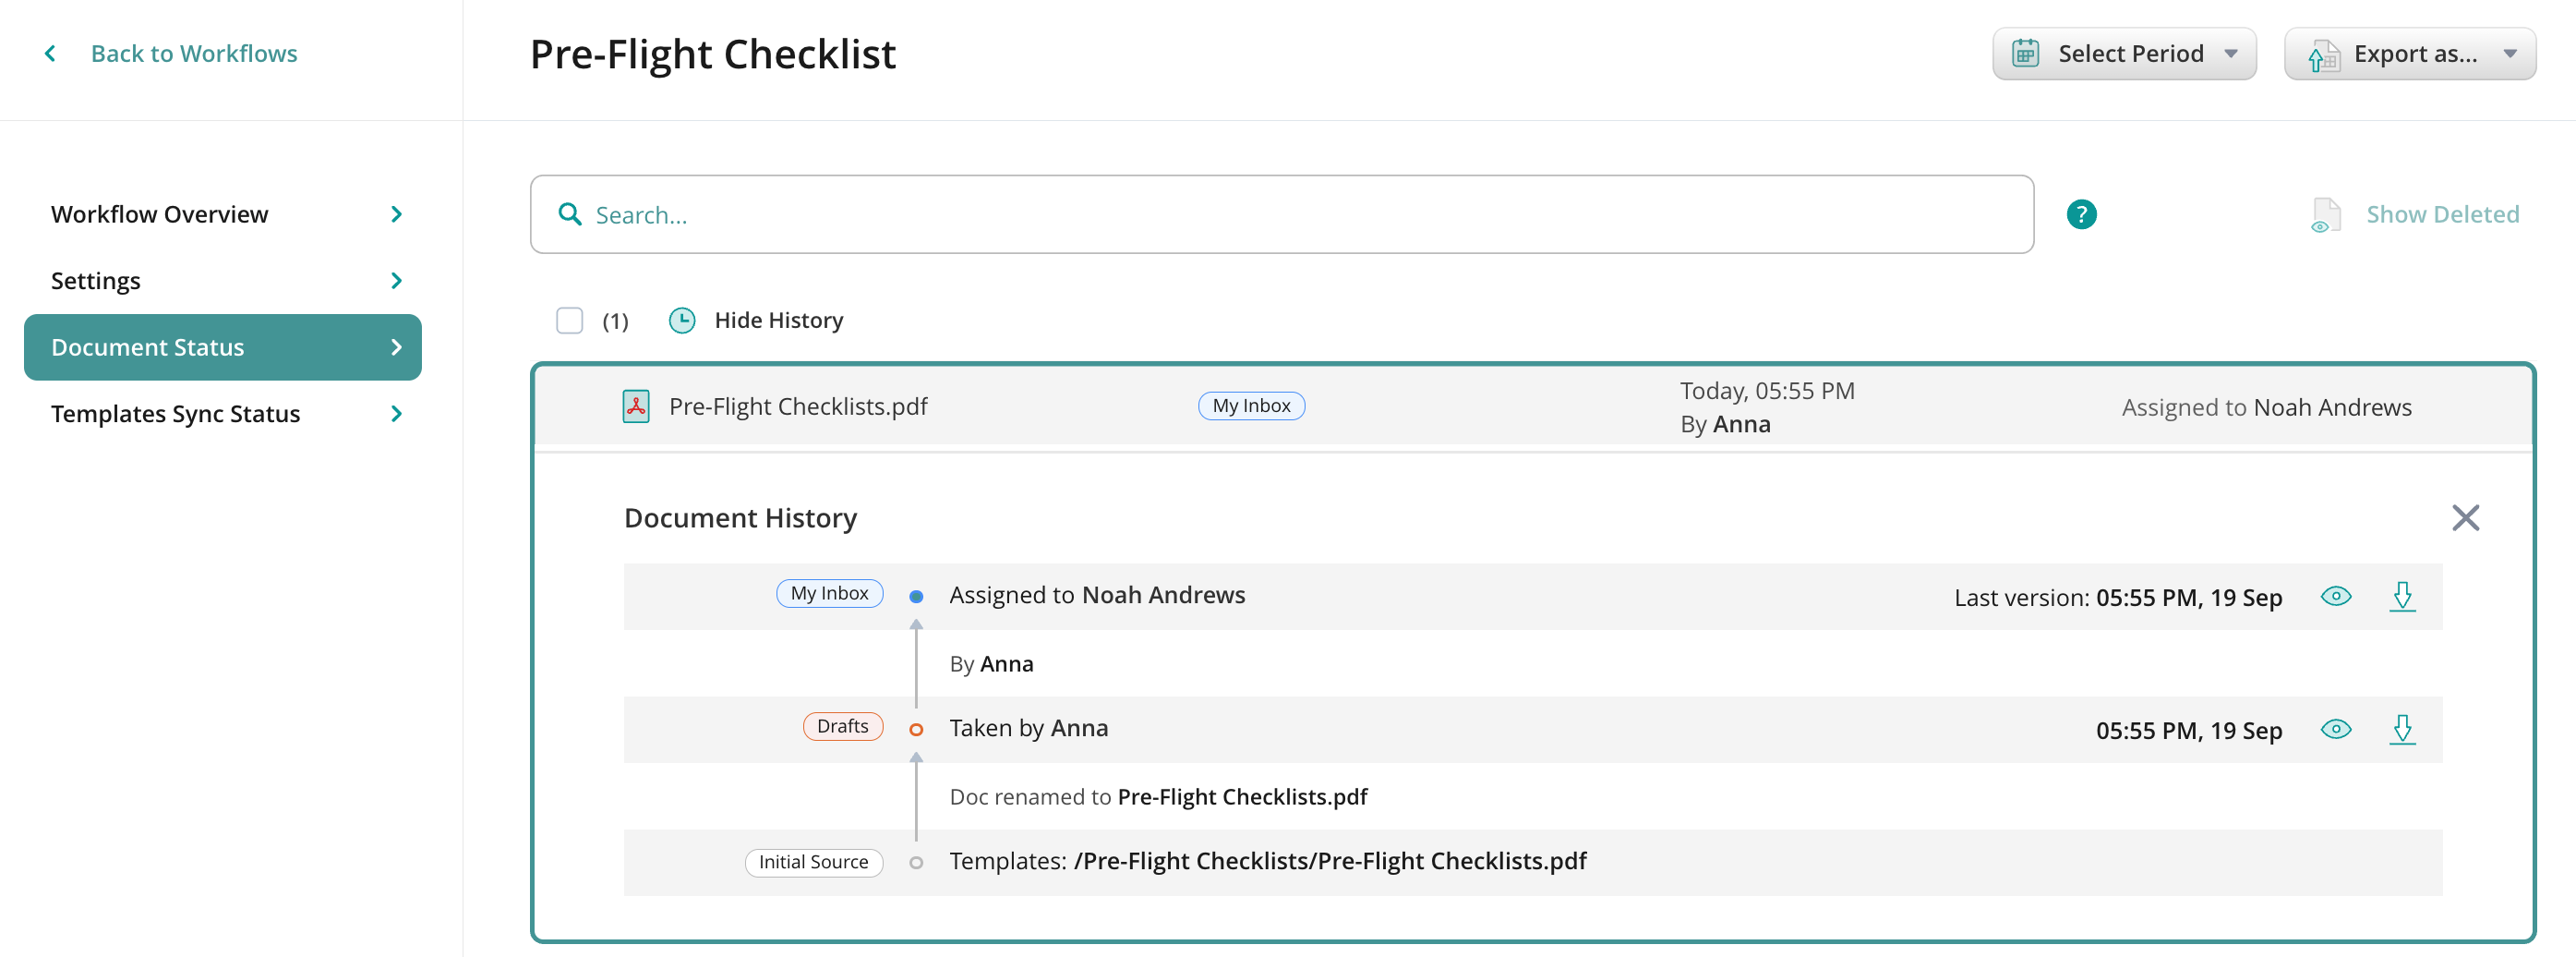
In the Document Status section of the workflow, you can track each step of the document distribution.
Who worked on the document;
The date and time of submissions;
Saved versions of the file;
Reassign the document to another user from the group in case the current one is not able to finish work on it;
Track the deleted workflow documents;
In the Template Sync Status section of your workflow, check if all group members have synced their devices with the workflow. This will ensure that the users have access to the latest versions of the documents they need for work.
Step 5: Configure Security Settings
In addition to the workflow customization, you may set up various levels of security settings for the workflow documents.
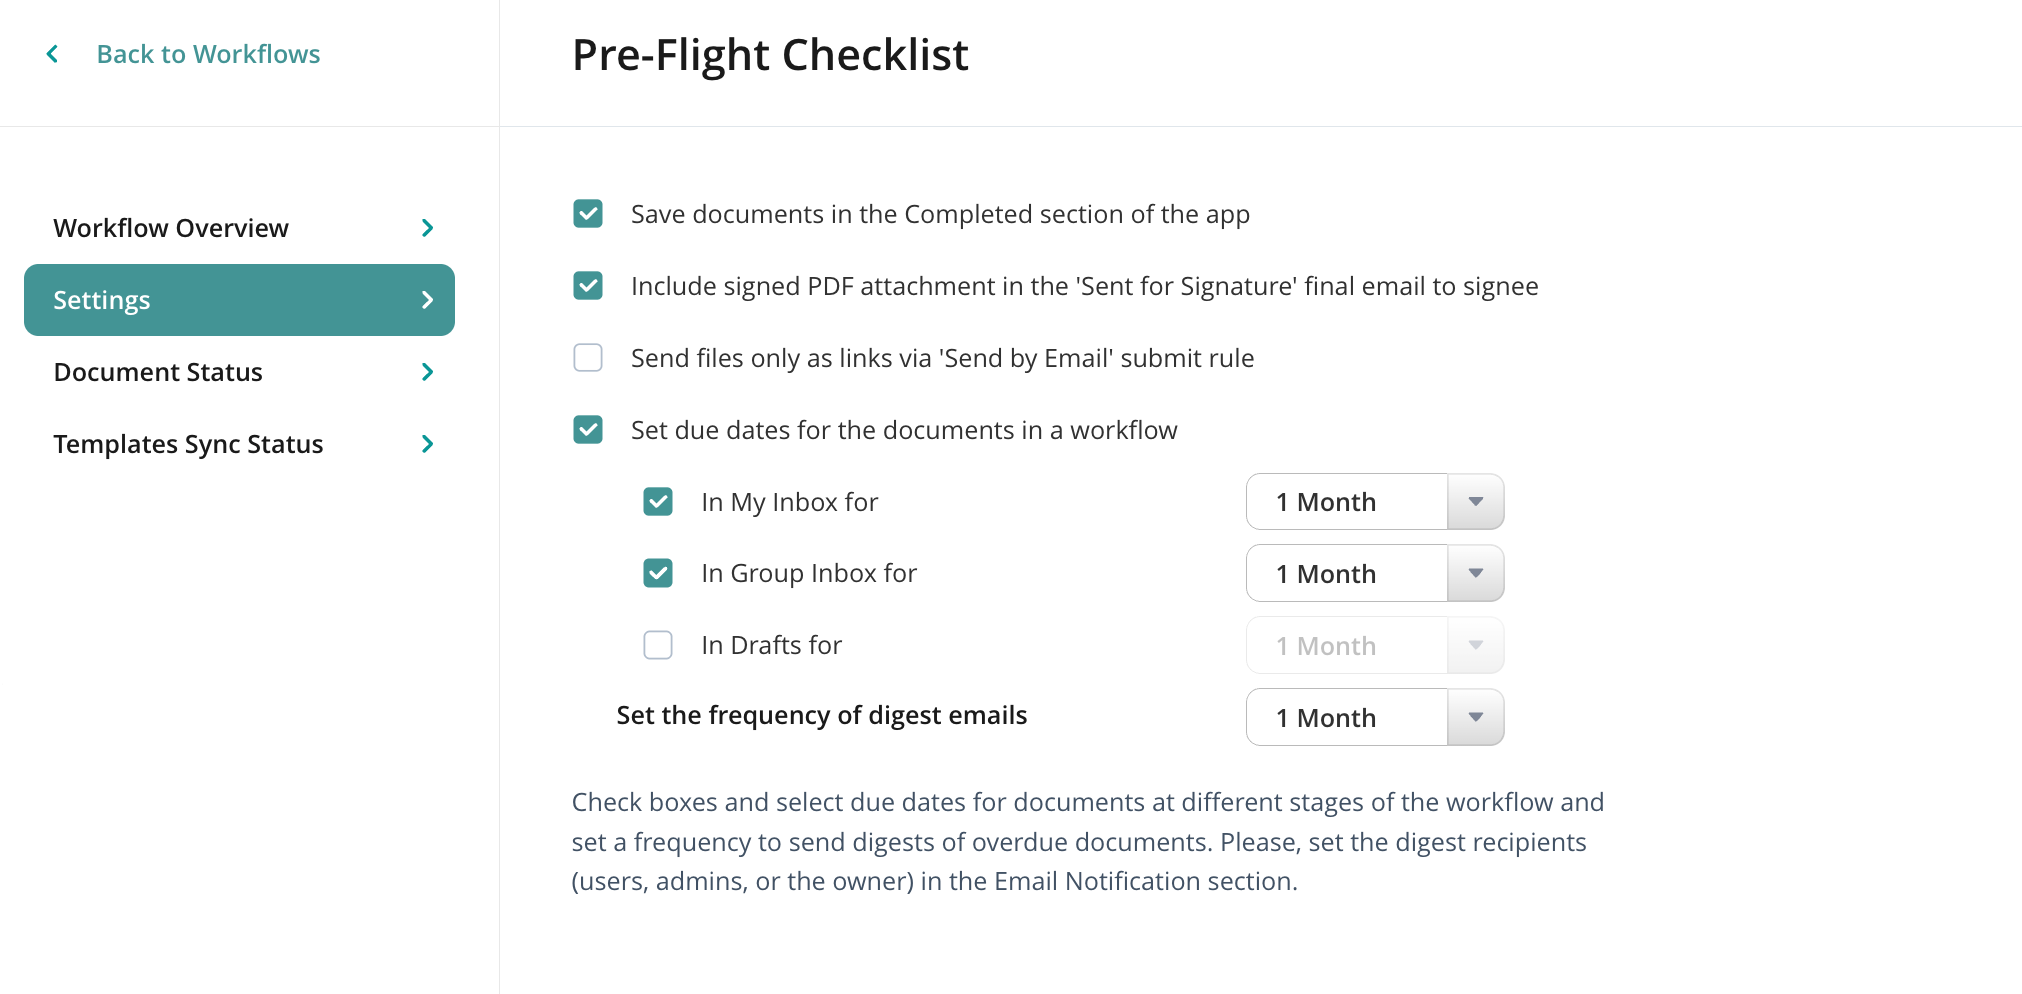
Save documents in the Completed section of the app & due dates for the documents:
To control these settings, open theSettings section of the workflow, and check the box next to both options accordingly:
Decide whether you want the workflow participants to store the submitted documents in the Completed section on their devices.
Select due dates for documents at different stages of the workflow, e.g., My Inbox or Group Inbox, and set a frequency for sending digests of overdue documents.
2. Offline access and keeping the completed workflow documents
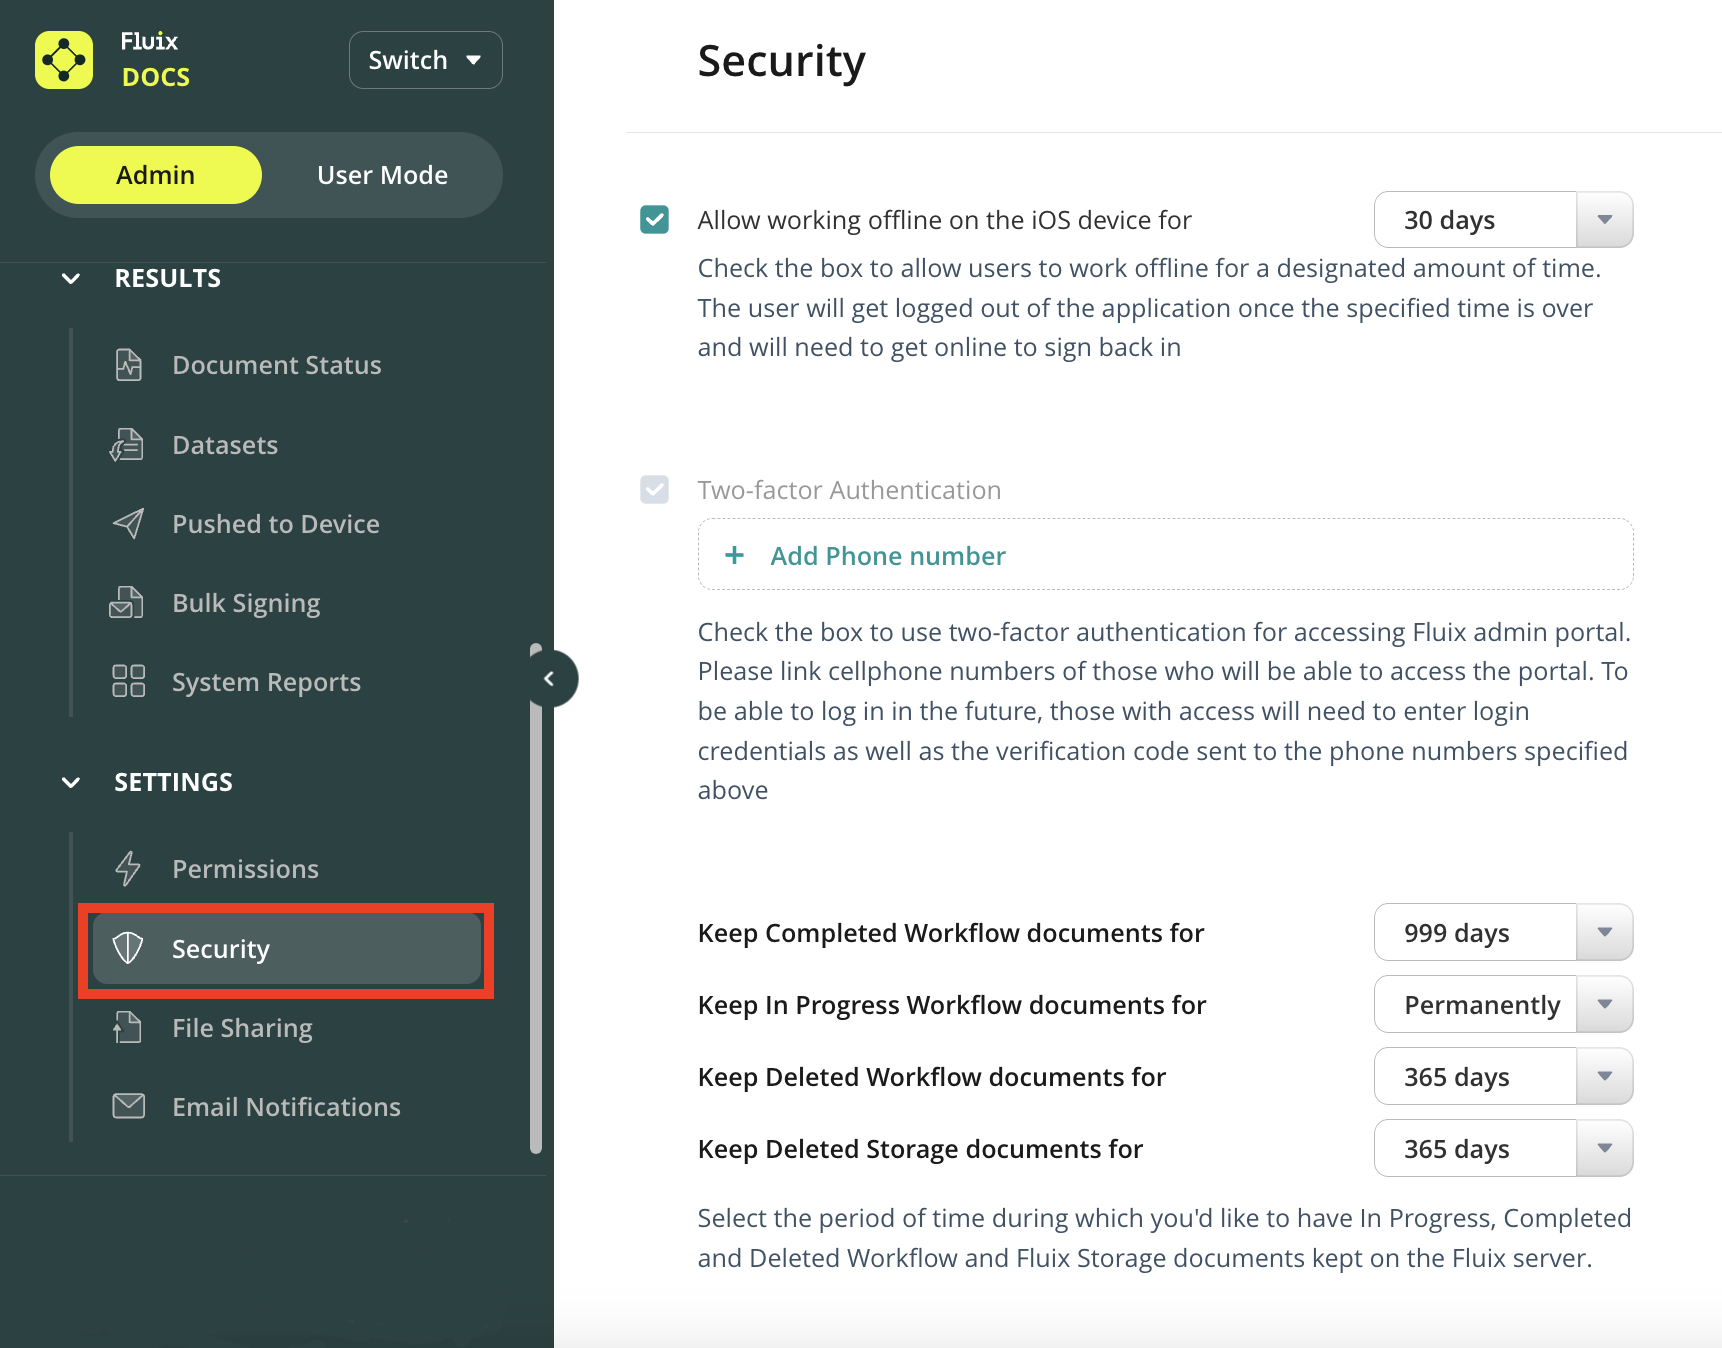
In the Security section of the Admin Portal, you may configure the additional settings, such as:
Allow working offline on the IOS device.
Retention policy– is the amount of time during which all workflow documents on different stages (e.g. Drafts, My Inbox, Group Inbox, Sent for Signature, Completed, Deleted) will be stored on Fluix servers. Ensure you configure the retention policy for documents on different stages according to regulatory compliance, verifying adherence to safety and operational standards. These documents serve as a valuable historical reference for investigating incidents and reviewing operational procedures.
Feel free to contact us at support@fluix.io if you have any questions or comments.
Was this article helpful?
Thanks for your feedback!
Oops, something went wrong. Please, try again later.
Thank you!
What details or examples would have made this article more helpful for you? We appreciate your insights!
Fluix is a web and mobile-based cloud platform that simplifies digital document management and workflow automation. It helps teams automate the distribution of critical safety documentation, such as:
Weekly Safety Messages: Topics might include Working Safely Checklists, Incident Reviews, and Safety Training Verification.
Toolbox Talks: Record attendance and collect signatures for pre-start talks or safety meetings.
Job Hazard Analysis: Document job and safety analyses for specific projects. For tasks like excavation, scaffolding, or equipment operation.
Let’s explore one of the scenarios on how you may configure the Safety Documents Distribution in Fluix:
You configure the workflow process in Fluix Admin portal.
Field technicians complete preconfigured Safety forms on their iPads.
Once completed, they upload the forms to Fluix or third-party storage to archive and email them to the back office.
Fluix extracts data from the forms to improve project visibility. Your Data Analysts can also export this data to tools like Power BI to enhance safety response times and detect potential issues.
How to Build a Workflow in Fluix
Creating workflows in Fluix doesn’t require IT expertise. Admins can configure workflows in a few steps:
Step 1: Define Participants of this flow
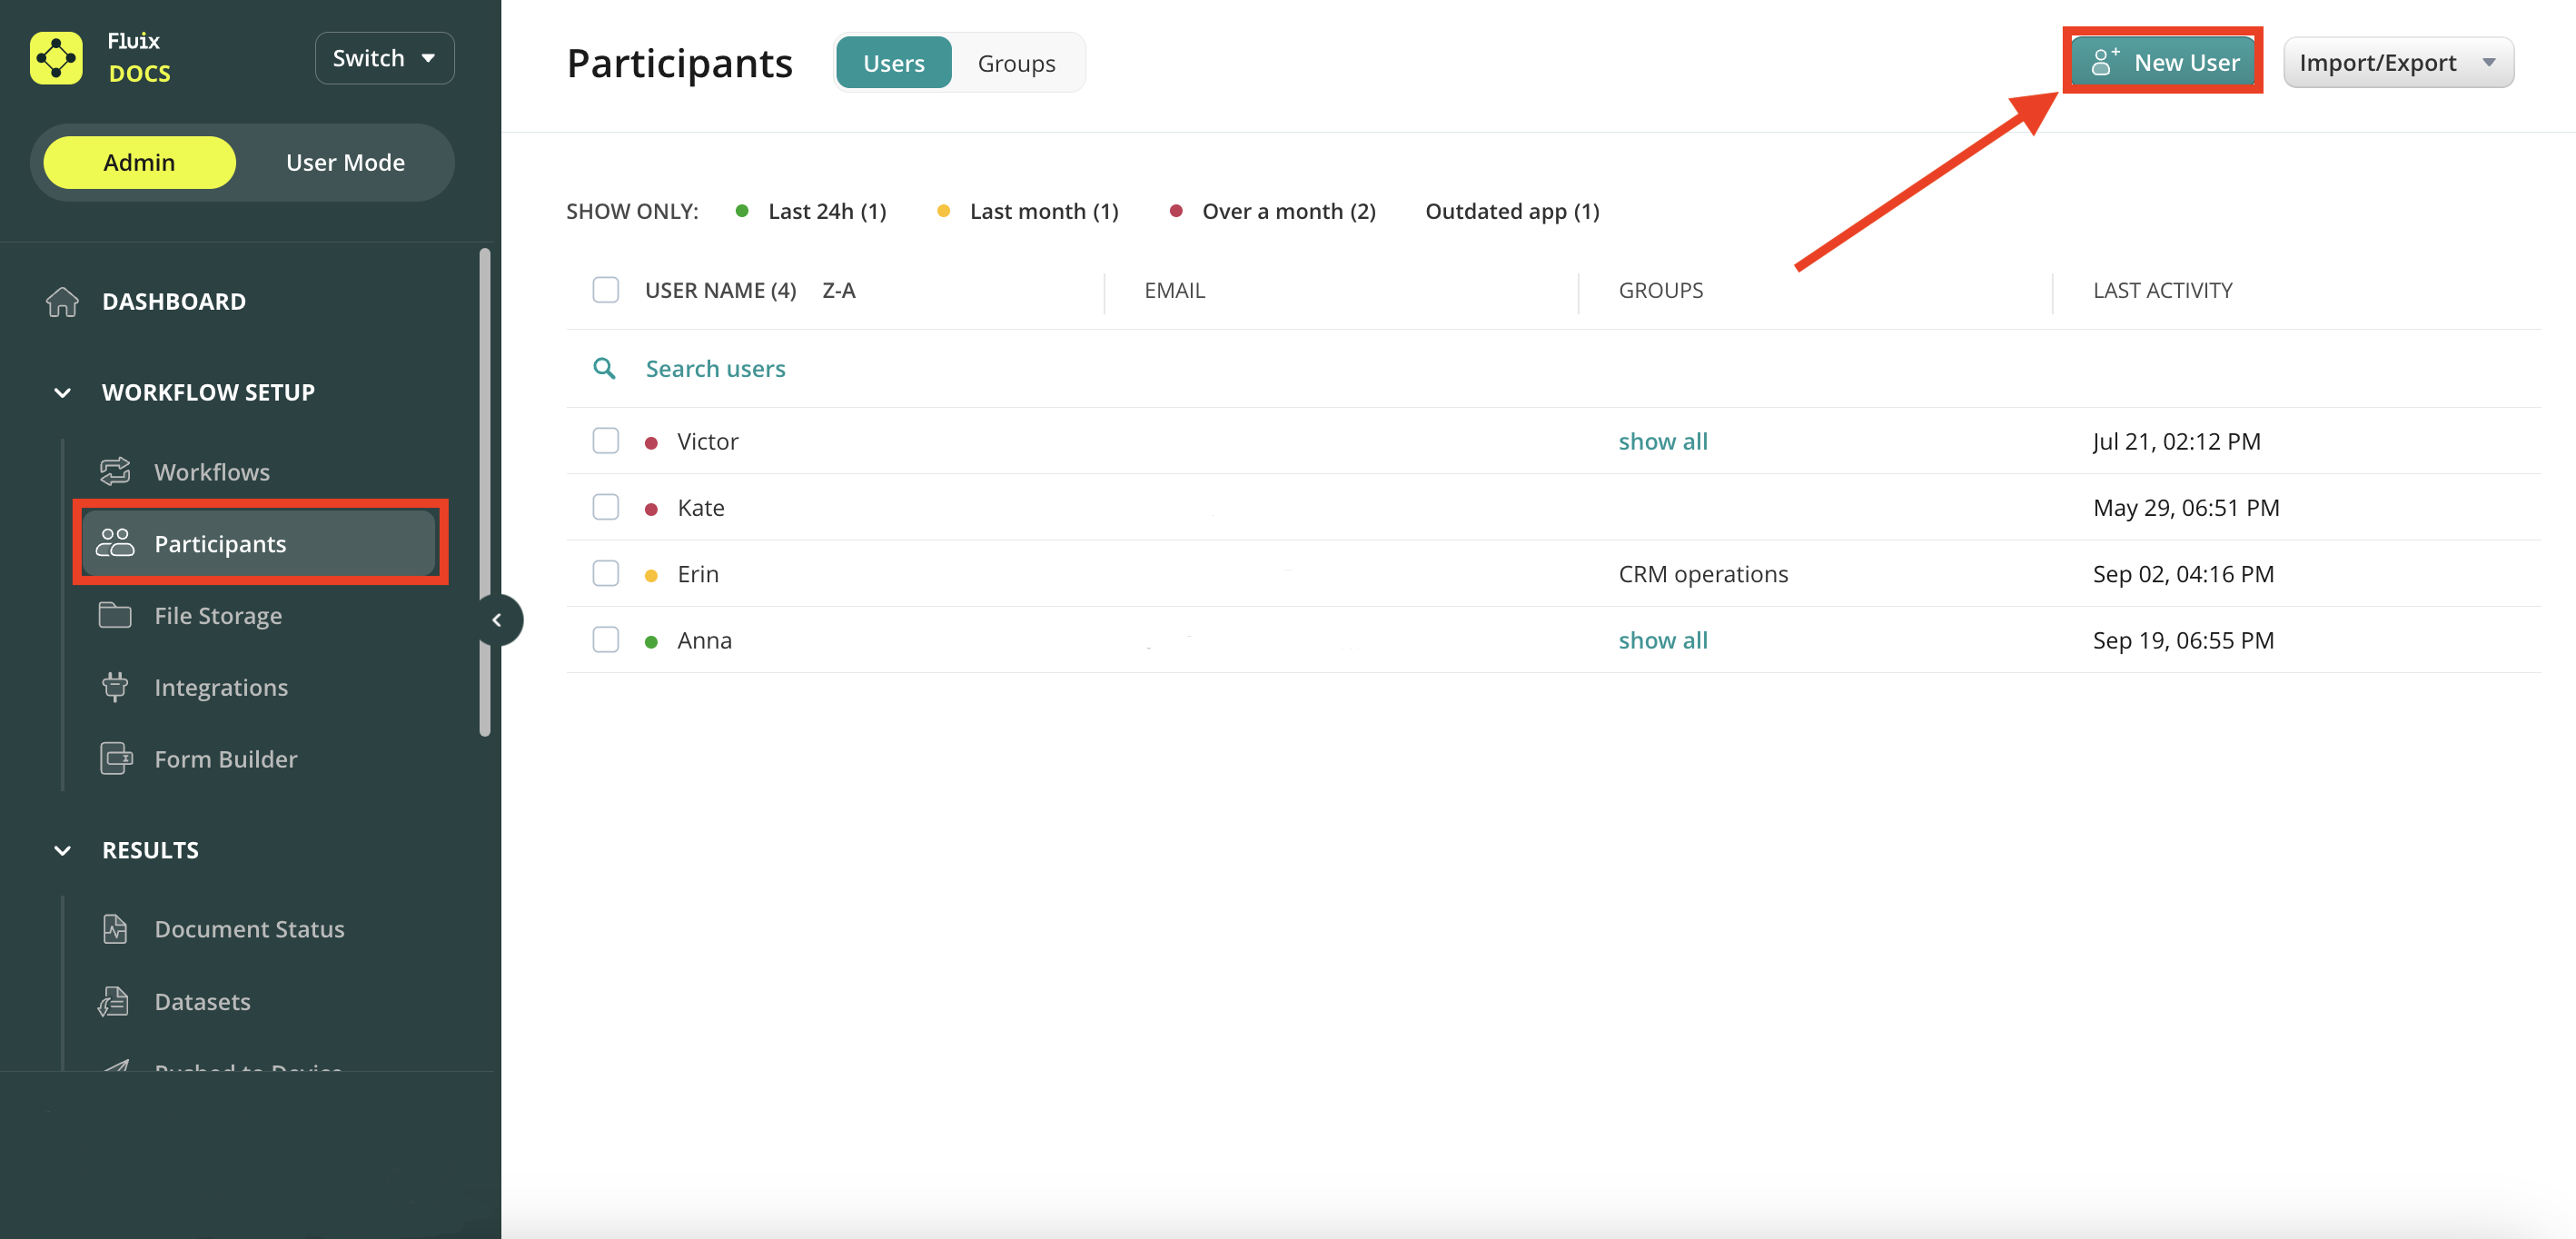
Start by defining the participants of your flow. For this, navigate to the Participants > Groups tab and create the Groups you want to be involved in the built workflow.Then, add users to your account and organize them into groups:
Go to Participants > Users tab and click New User button.
Enter the user’s details and select the group to which you would like to add them, then click Create. The user will receive an email invitation to set up their password.
Note: Users in a group will have access to all documents configured for that group in different workflows. Learn more about user groups here.
Step 2: Mapp and build a Workflow
A workflow is a way to automate the distribution of your safety documents. To start building a workflow:
Go to Workflows section and click New Workflow.
Name the workflow in the upper left corner of the workflow builder (admins only will see this name).
In the Participants section, select existing group e.g. Field Technicians, individual users, or all users working with the documents within this workflow.
Note: You may create a new group of users or add a userright from the workflow builder by clicking Add participant -> Create New Participant -> in the opened window select the preferred option.
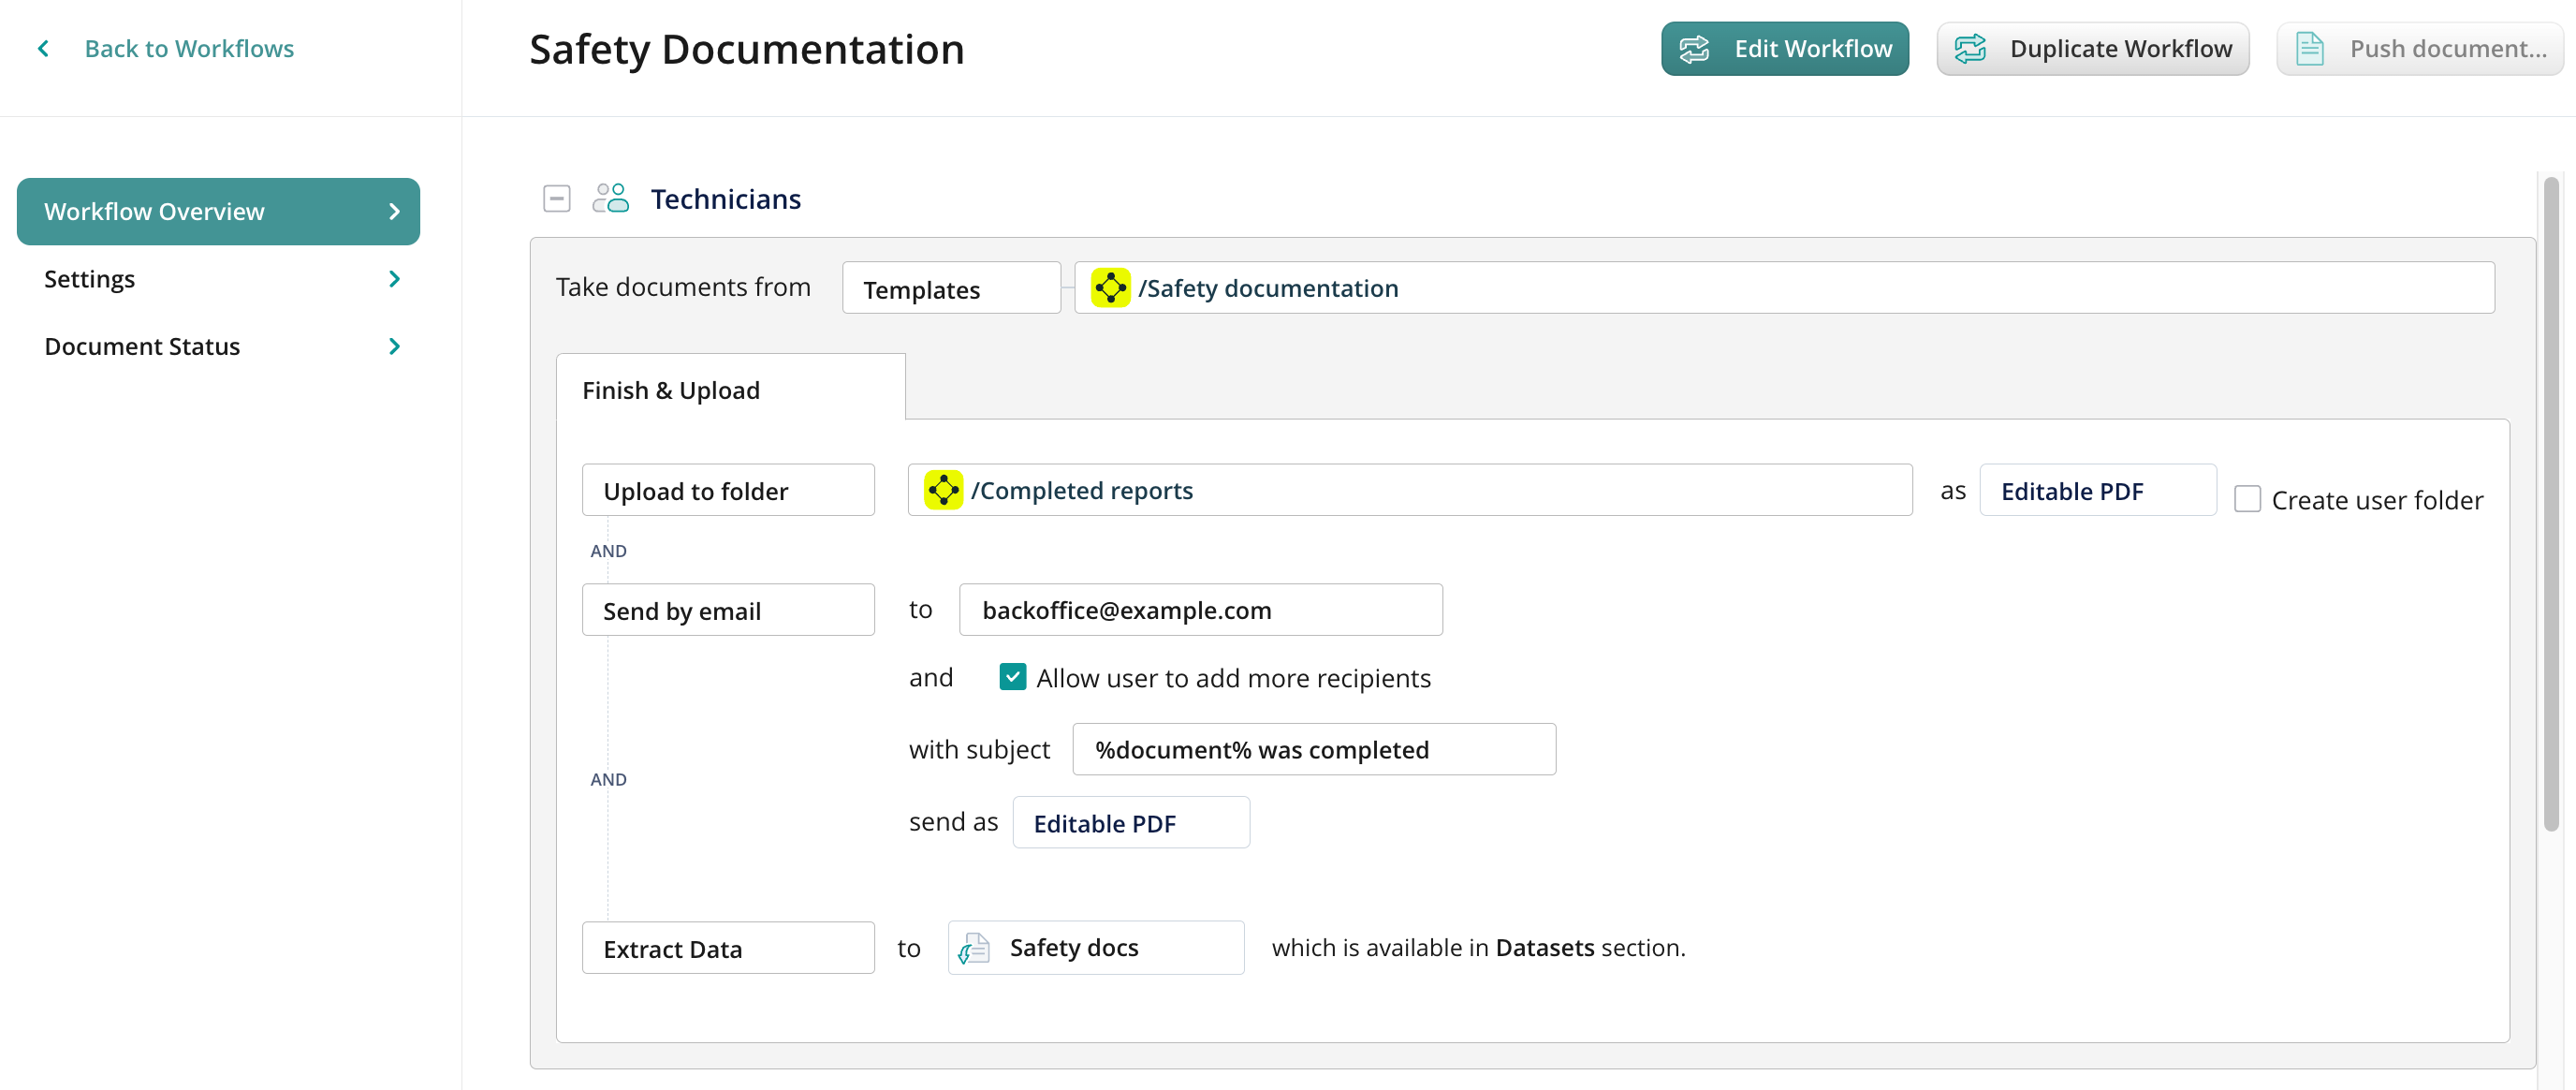
Choose the document source, the path where the initial Safety document version will be stored and distributed to the users. You may select Fluix Storage as a document source or your third-party storage. To learn more about supported third-party storages, check these articles.
Template document source: Ideal for distributing blank forms and protecting the original files on your storage from being overwritten. Users work with a new revision of the file while the original one stays intact. Upload safety forms to the designated folder (e.g., Safety Documents) via Workflow Setup > File Storage section so your users can access these documents later on their devices.
5. Set up how and where the users submit completed forms.
Submission to the storage to archive the documents
Click Choose Action and select Upload to Folder as one of the submit rules.
Map the folder path in Fluix or your third-party storage. This is where your users’ safety documents will be stored after they are submitted on their devices.
Optionally, enable automatic subfolders for each user by checking the box Create user folder.
Submission by Email
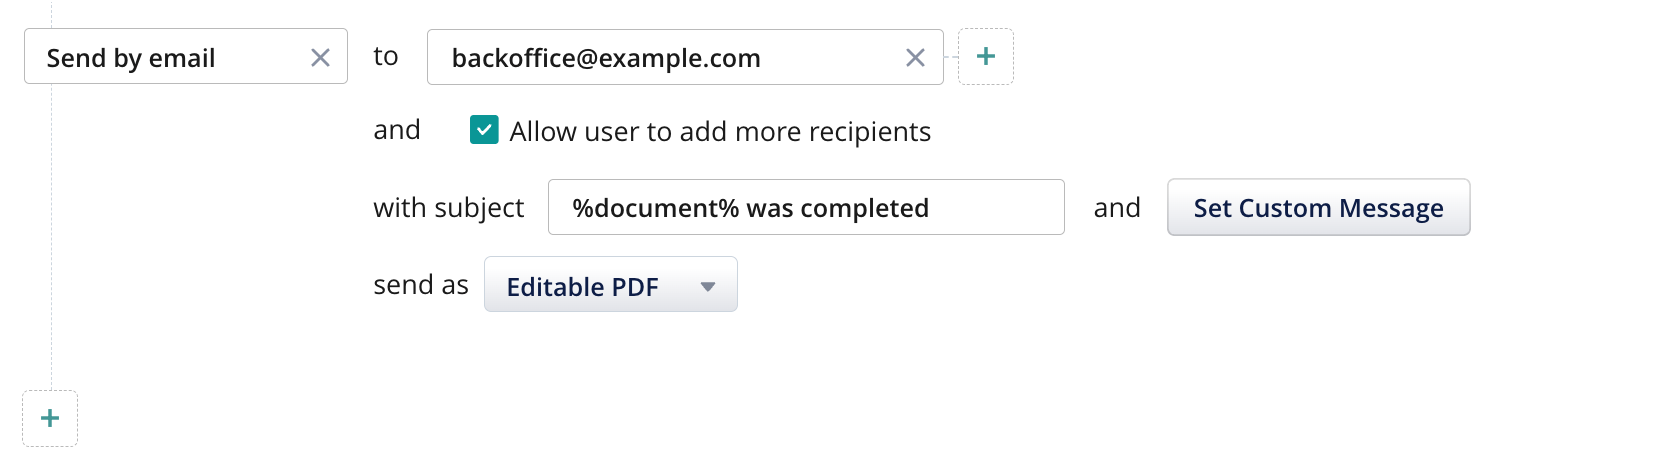
Add a Send by Email action.
Predefine recipient email addresses (this can be your shared backoffice email or any other recipient who should be notified about all the safety documents that are being submitted within this workflow).
By selecting the box Allow user to add more recipients you may let your users add more recipients to the email copy when they submit the documents.
Configure the subject of the email: you may use the following trick %document% to pull out the name of the completed file to the subject line upon submission of the file.
Choose a file format for both submit rules:
Editable PDF: Keeps forms editable.
Flattened PDF: Submits non-editable forms (digital signatures will not be editable).
XFDF: Submits form data only.
Data Extraction
Add an Extract Data action to retrieve form data into Fluix datasets. Data collected from the forms will be available in the Results -> Datasets section of the Admin Portal.
Step 3: Activate and Test the Workflow
The final look of the workflow draft will look like this:
Save and publish the workflow.
Add yourself to the group that participates in the workflow and test it:
Open the Fluix app on an iOS device or click User App in the admin portal in a web browser.
Navigate to the configured Templates section, open the folder that you configured as a document source, complete a form, and submit it.
Verify the form in the preconfigured destination and check the collected data in the Datasets section of the Admin portal.
Step 4: Monitor and Manage Documents submitted by your users
Use the Document Status tab to track document progress under different statuses (e.g Drafts, Completed).
Track the documents’ history by clicking Show History to check all the changes done with the file;
Download completed forms in editable format if necessary;
Reassign the document to another user from the group in case the current one is not able to finish work on it.
Track the deleted workflow documents;
In the Template Sync Status section, check if all group members have synced their devices with the workflow. This will ensure that the users have access to the latest versions of the documents they need for work.
Feel free to contact us at support@fluix.io if you have any questions or comments.
Was this article helpful?
Thanks for your feedback!
Oops, something went wrong. Please, try again later.
Thank you!
What details or examples would have made this article more helpful for you? We appreciate your insights!
Sign Up to Our Product Newsletter
The latest updates from our Product team, straight to your inbox