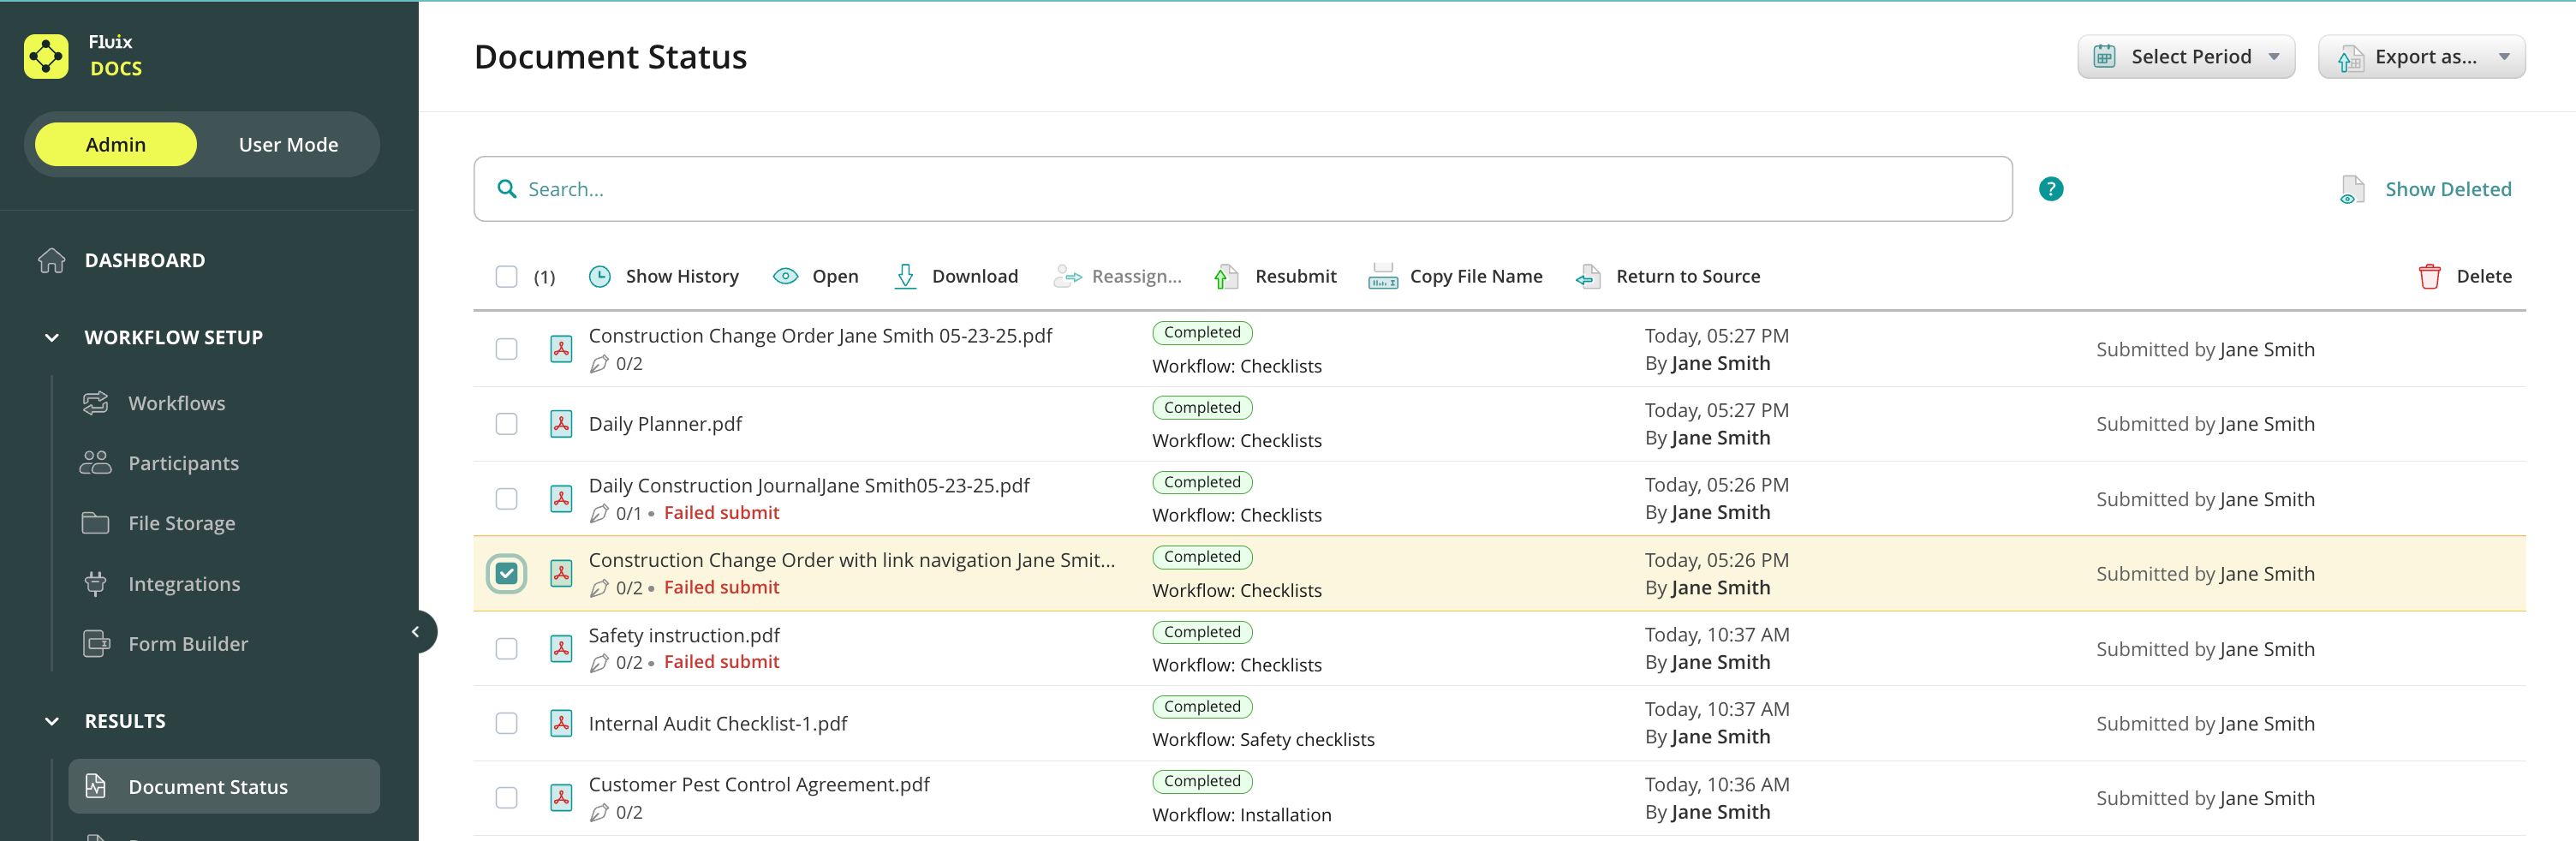
Under the Results section, you can find the Document Status tab, which provides a full audit trail for all documents and their statuses in all workflows.
The documents can be sorted by their names or by the last action done with a document by clicking on the column header.
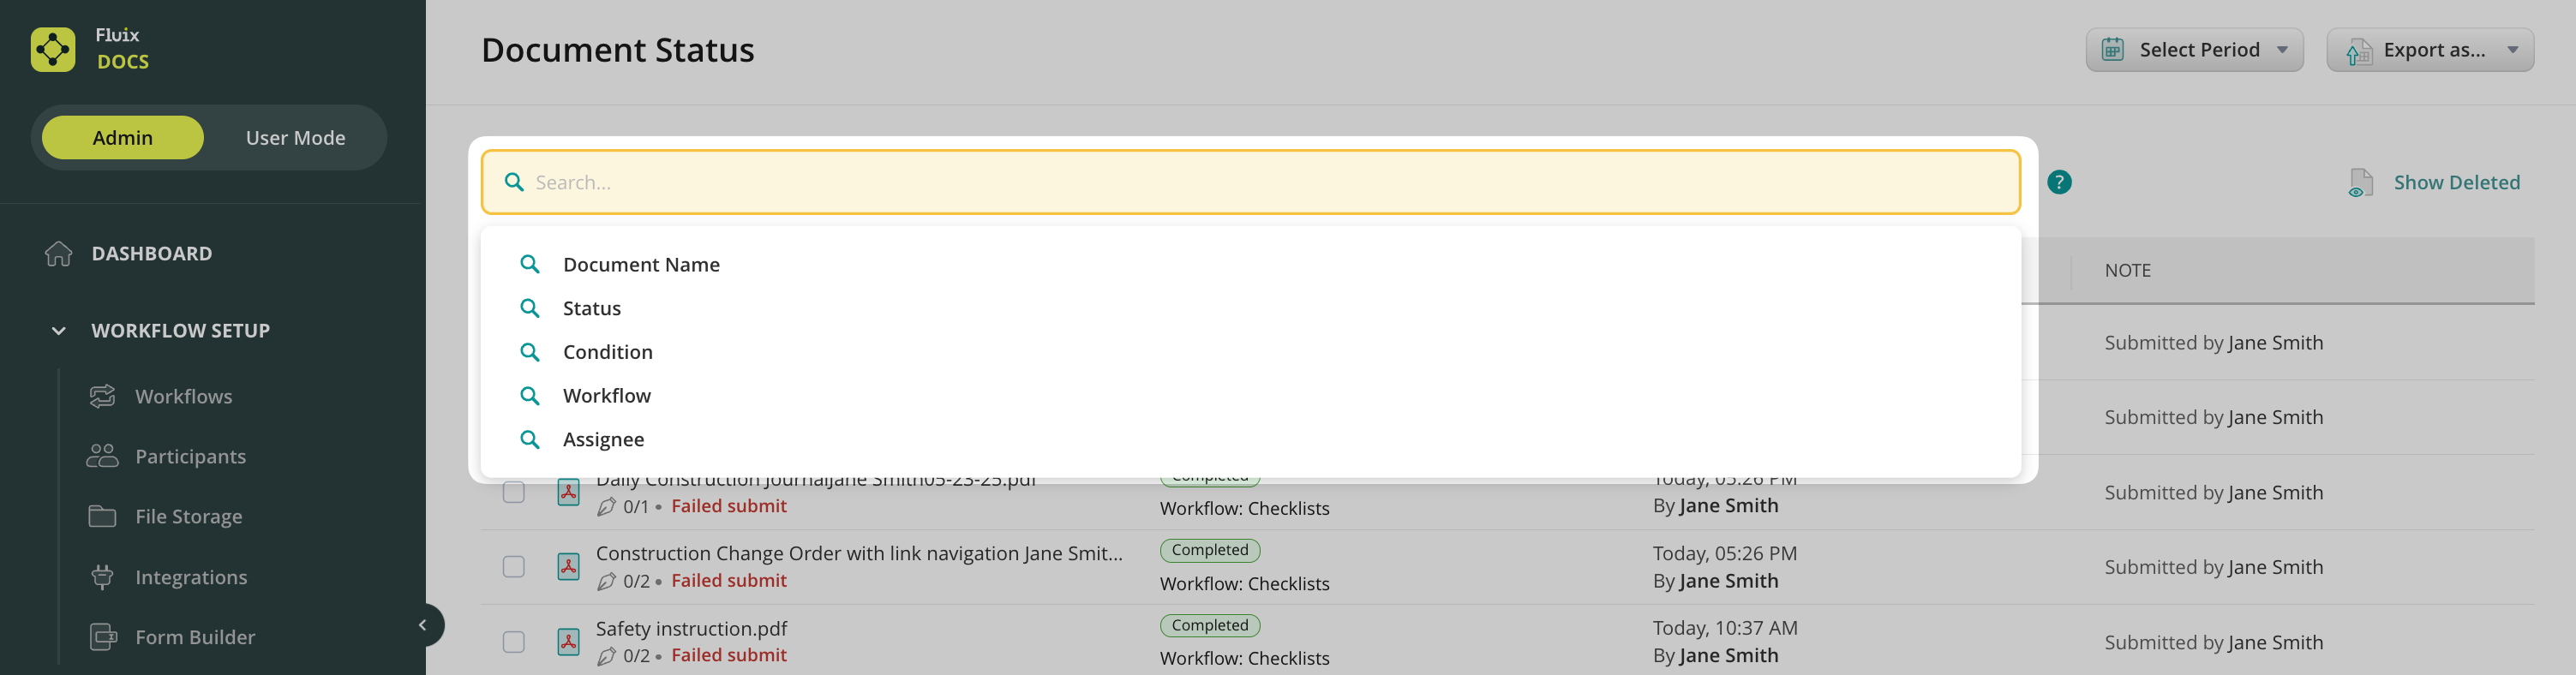
Smart Search
To see the criteria under which you can do a search for the necessary document, simply make a click in the search field and you will find five criteria in the dropdown:
In order to perform the search, select the necessary criteria among the list along with the desired tab:
Document Name – in case you would like to search for a specific document using its name.
Status criteria is used for sorting out the documents under “Drafts”, “Completed”, “My Inbox”, “Group Inbox” and other sections. The detailed information regarding each of the sections is below.
Condition filtercan be used to find out whether the document was signed or voided, or let’s say still overdue.
Workflow – in case you would like to check document status within the specific workflow. You may select the workflow in the dropdown menu.
Assignee filter for finding out the document to which the particular user or group was assigned. The list of users and groups can be selected in the dropdown menu.
The search can be performed using several filters at the same time in order to narrow down the search and make it as granular as needed:
Document Statuses
A document can have one of the following statuses:
My Inbox.The document has been assigned to a user but he or she has not started working on it yet or the document was signed via remote signing and returned to the user to submit it according to the next workflow rule.
Drafts. The document is currently being worked on by a particular user but hasn’t been submitted yet. Please, note that the document in the Outgoing tab on the iPad will be listed under Drafts on the Admin Portal until it is submitted from the iPad.
Group Inbox. The document has been assigned to a particular group but none of the group members has started working on it yet.
Sent for Signature. The document was sent for signature but hasn’t been signed yet.
Completed.The document has gone through the complete workflow.
Failed Submits.In case a submitted document hasn’t been delivered e.g. to the company storage, it lands in Failed Submits. Once the connection with the storage is restored, the document can be resubmitted by the company Admin or Fluix Support team.
The documents can be sorted by their names by clicking on the column header.
The list includes 100 last documents. To see the older documents, please scroll down.
Actions
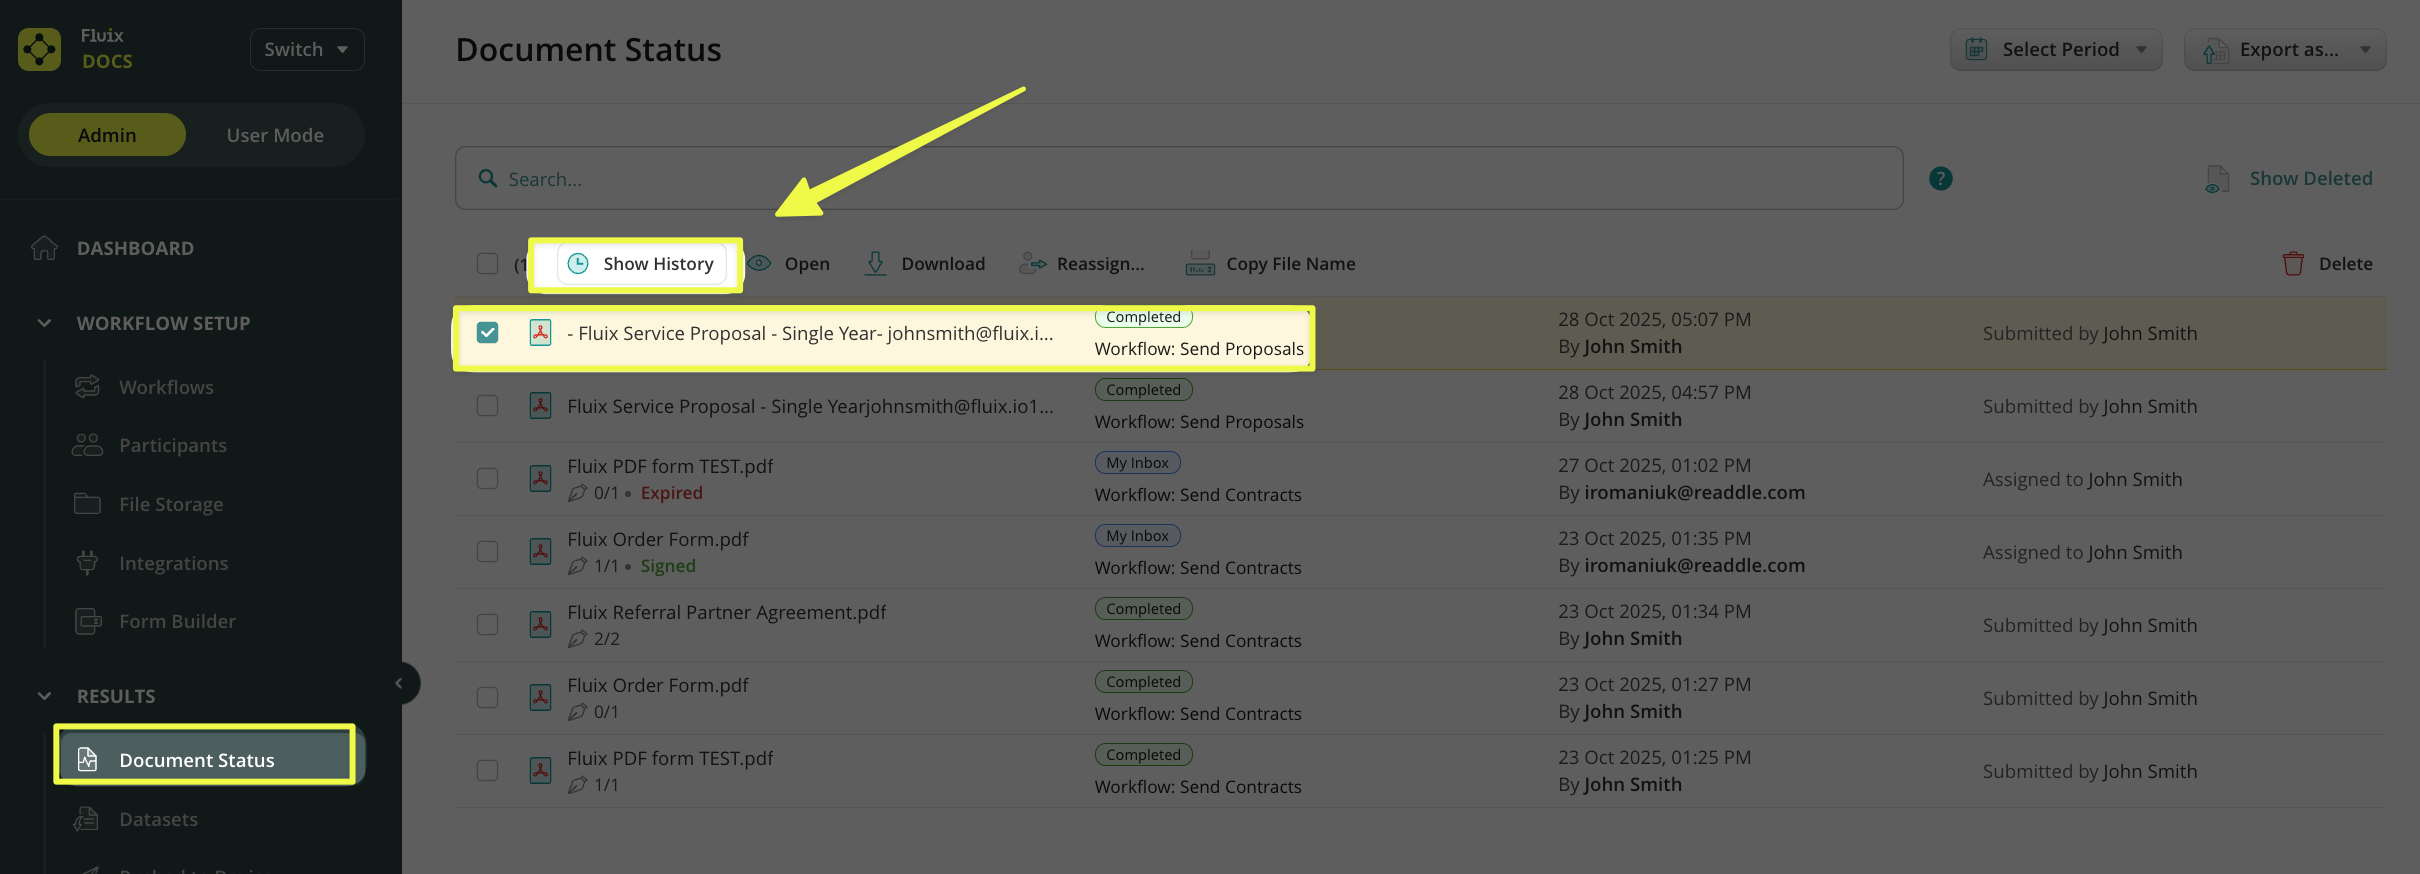
By selecting any document you can perform the following actions:
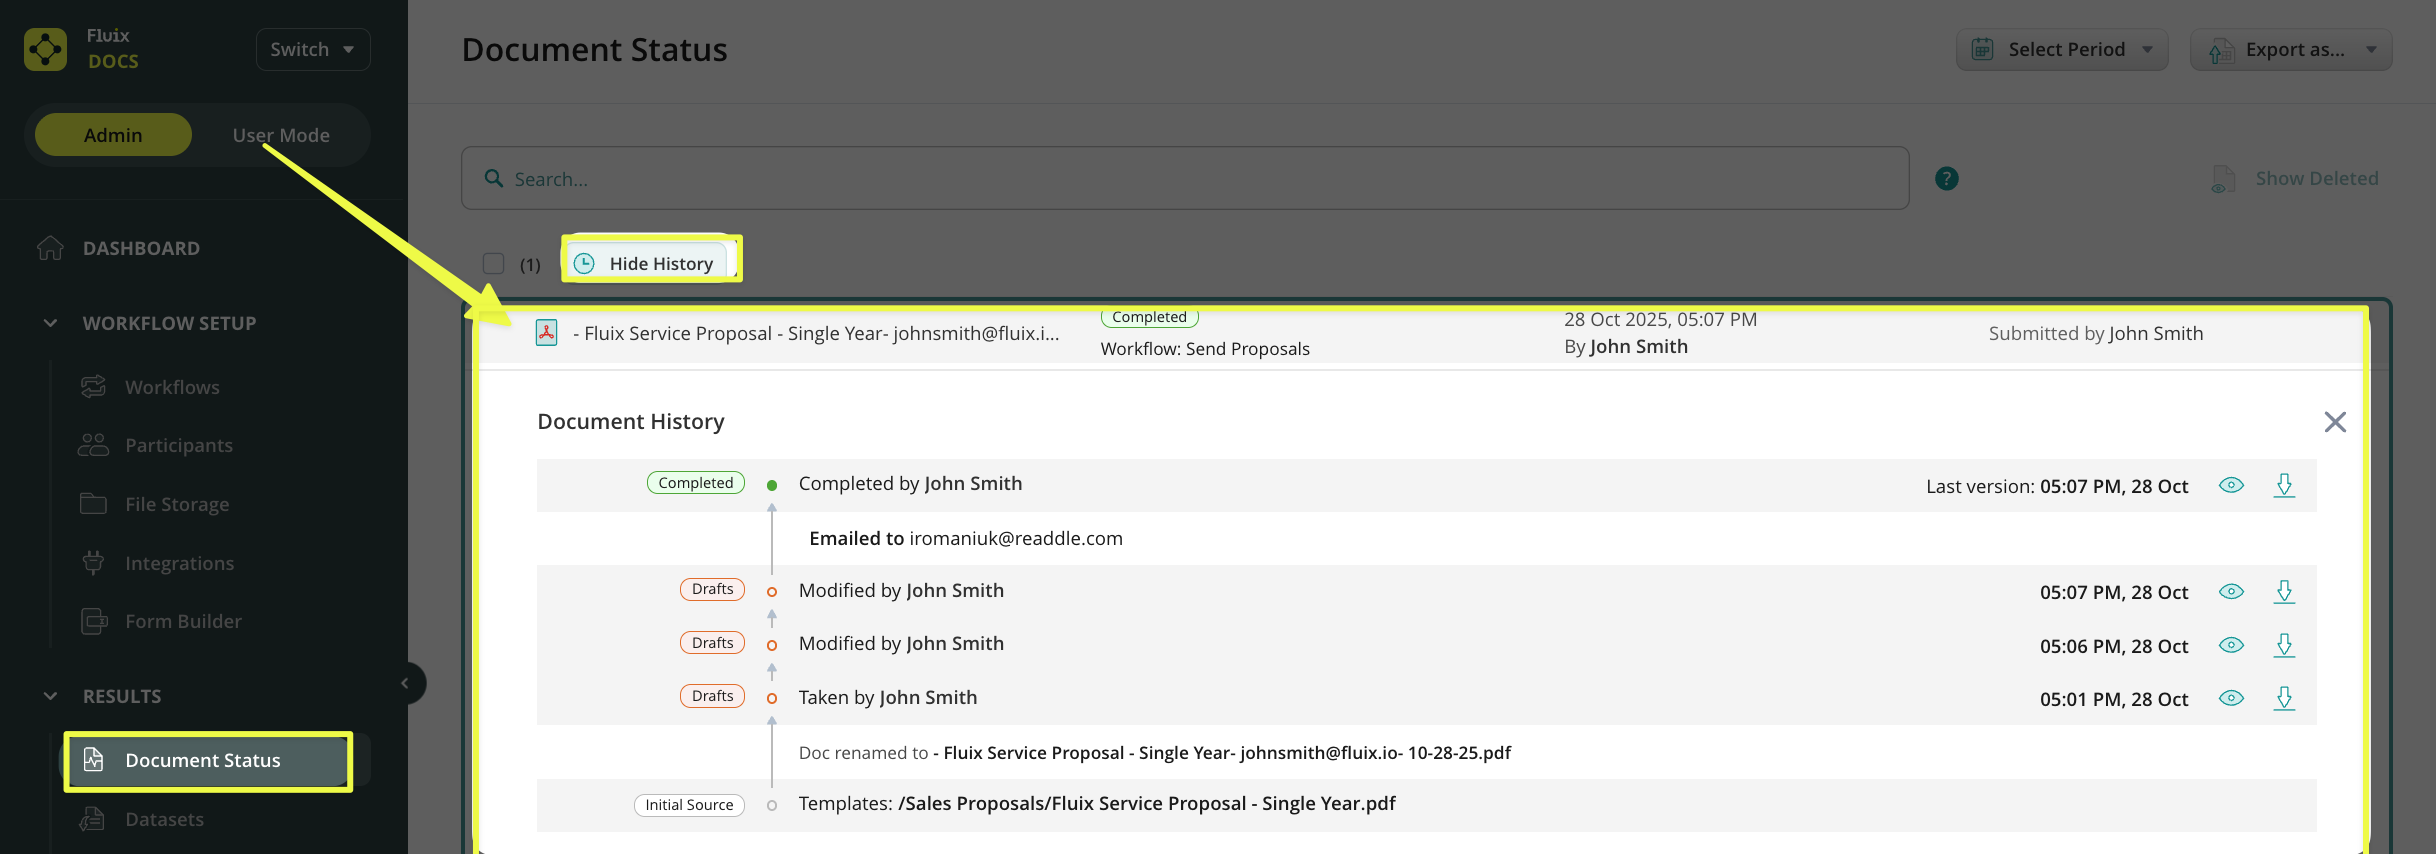
Show Historyto see the initial document source, time of document modifications with its status and assignee, open or download the document revision if needed.
Openthe document to view it.
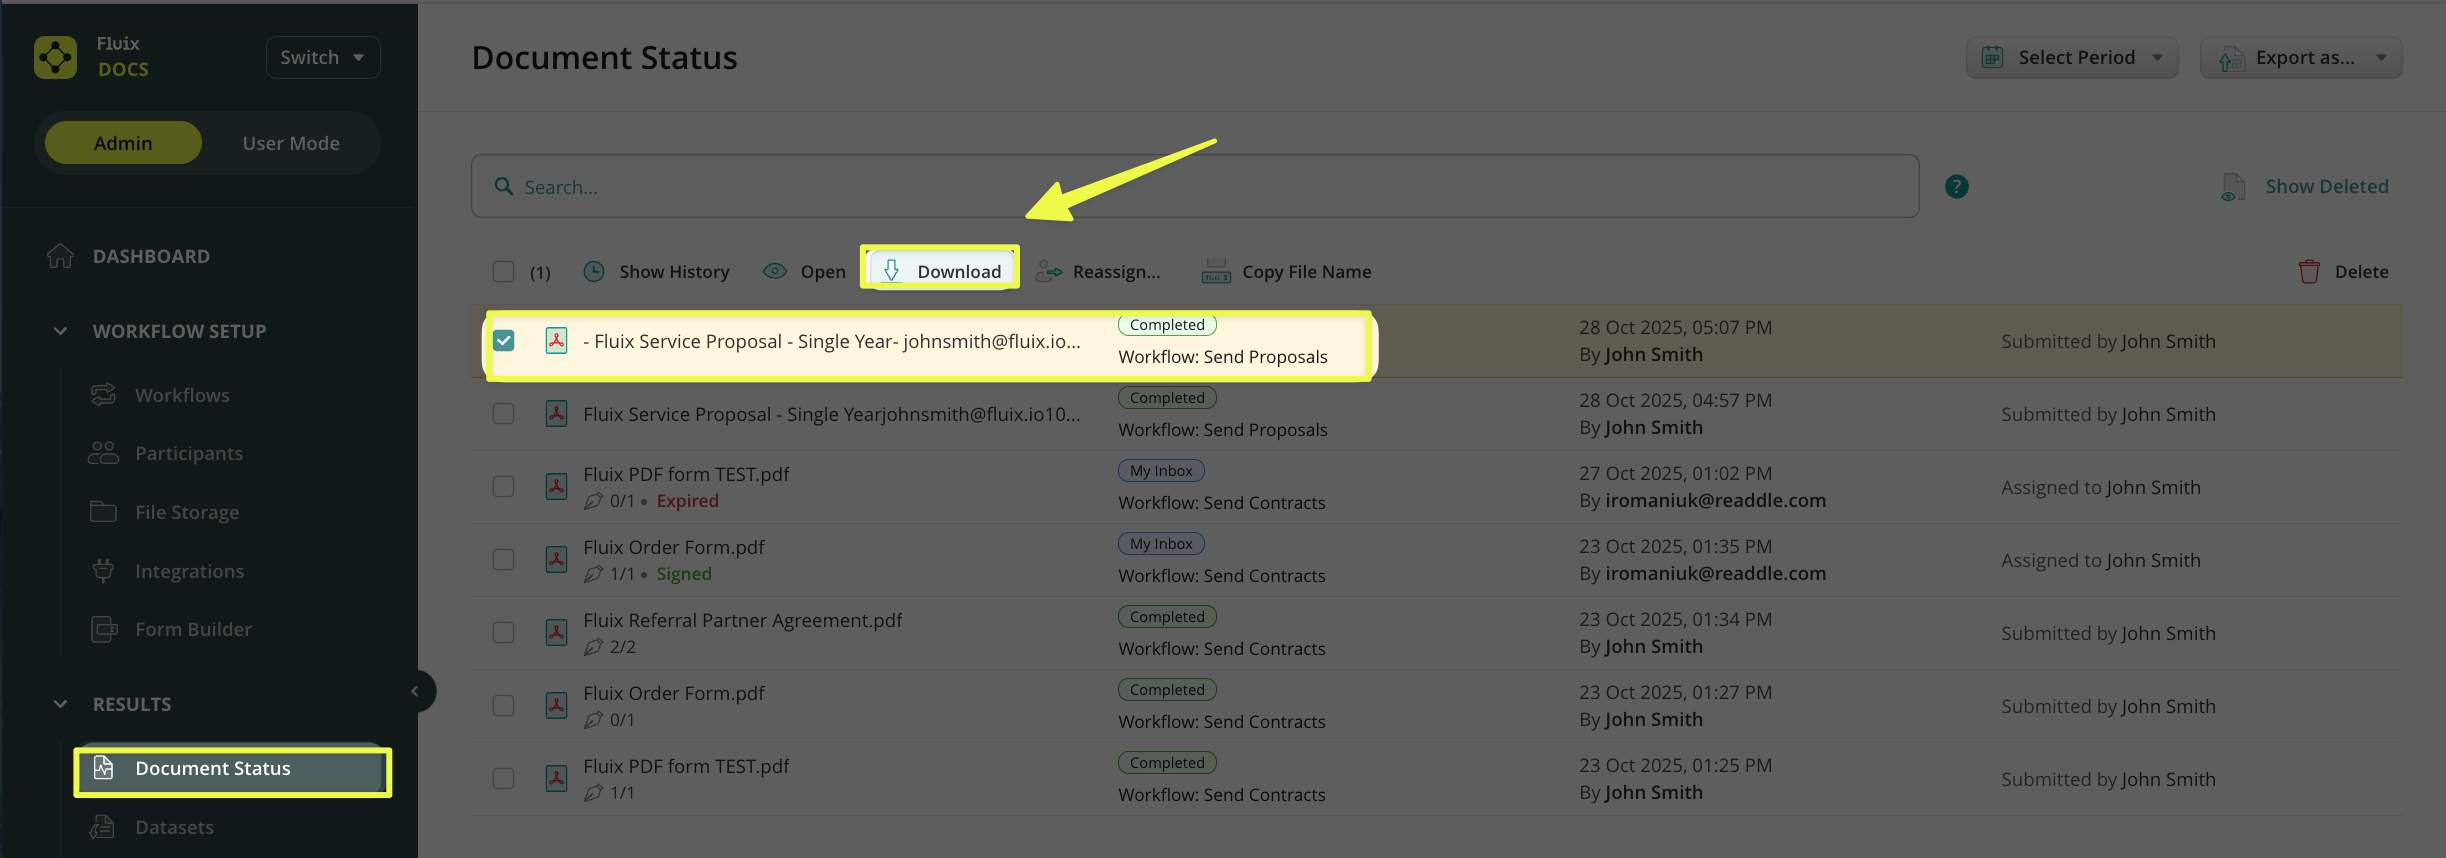
Download the document to the Admin’s computer without removing it from the workflow.
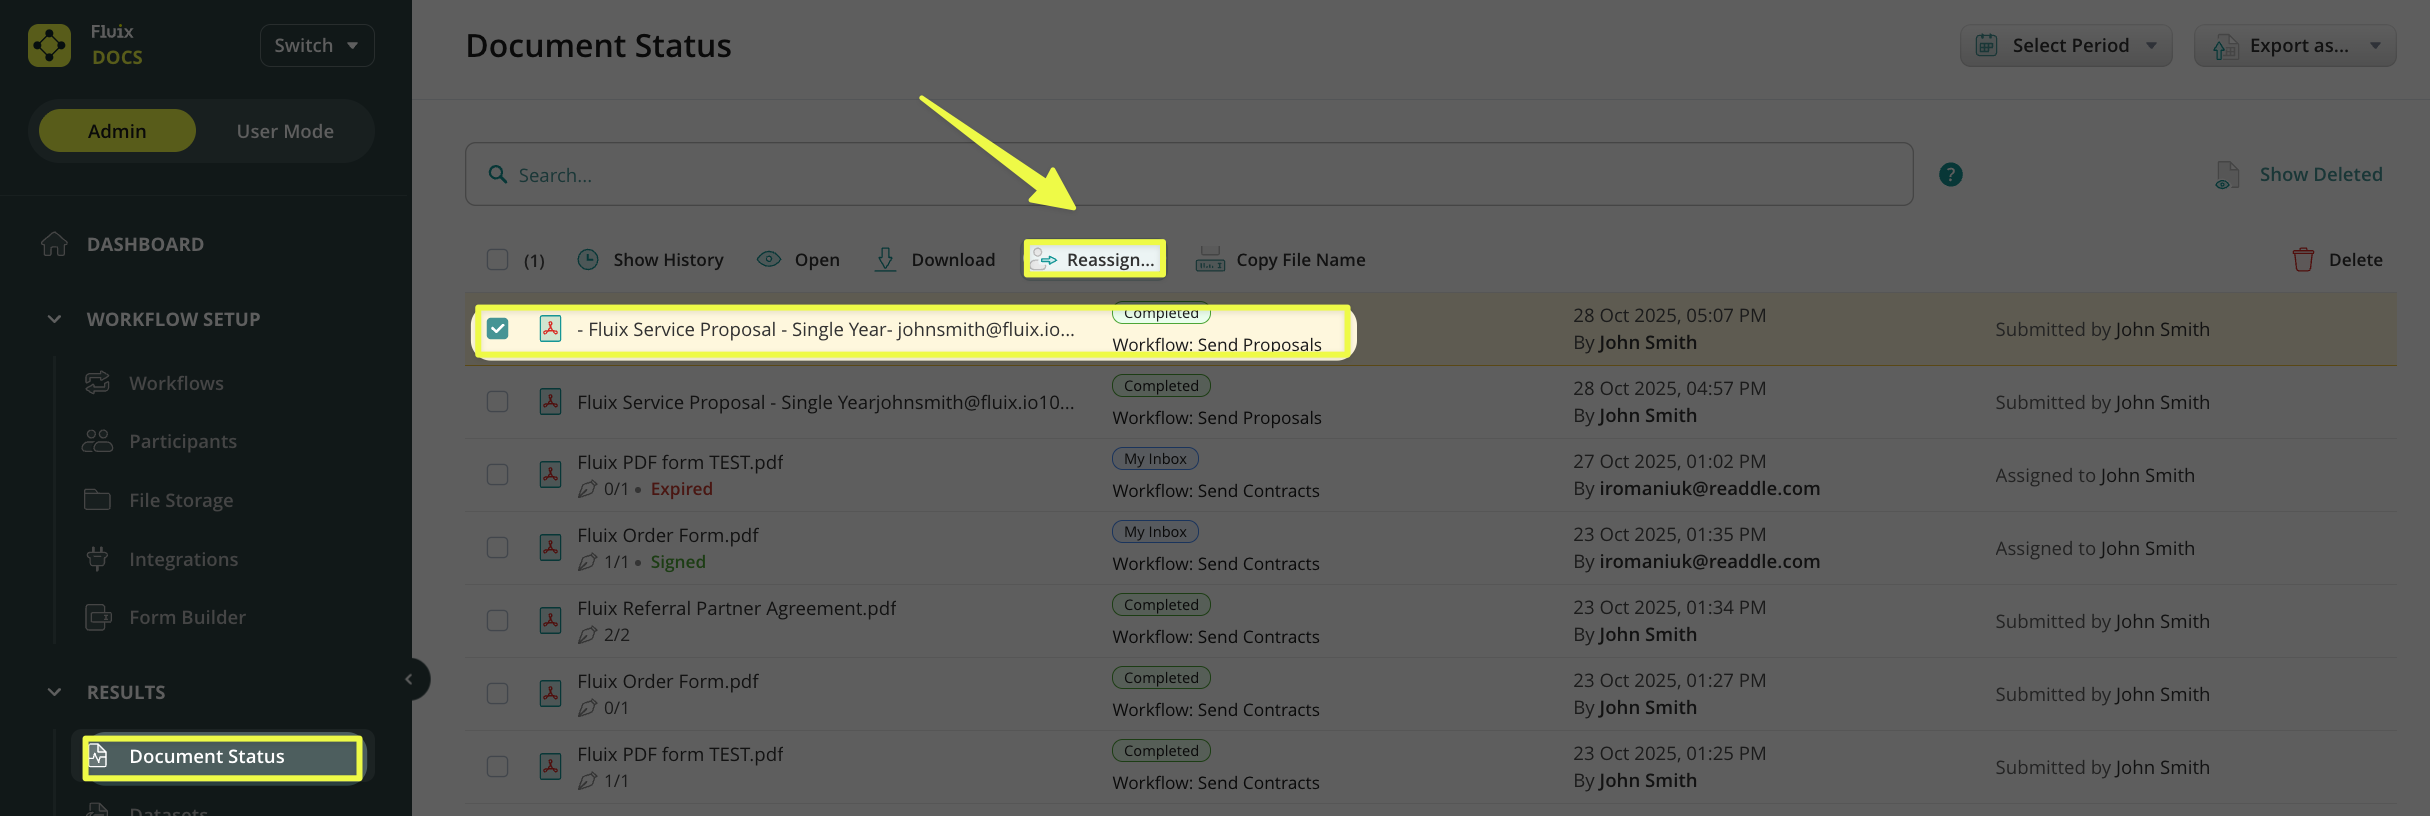
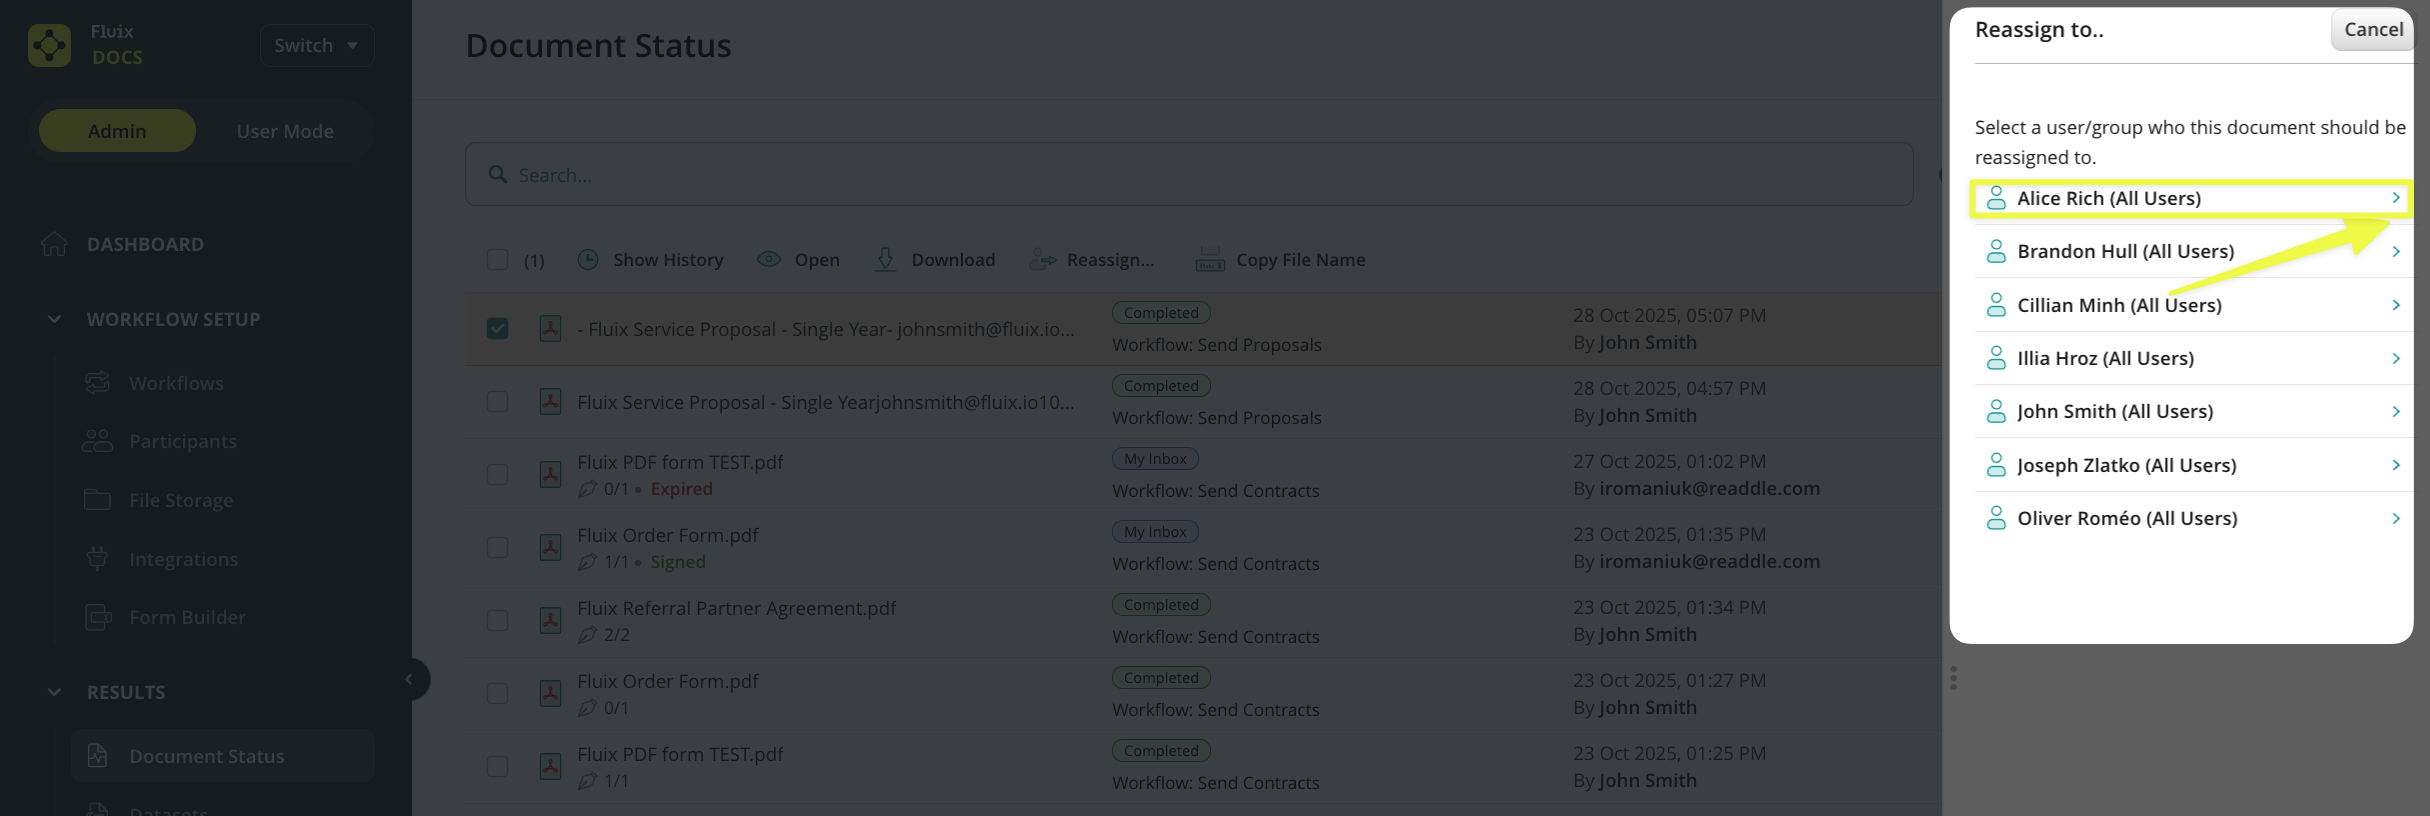
Reassignthe document to move it from one workflow participant to another (user or group). This will remove the document from the current assignee’s device and transfer it to the new one, with changes made by the current one saved.
Resubmit the document is available for the completed documents that for some reason failed to be uploaded from the first attempt. If after resubmitting the document, it fails again, contact us at support@fluix.io and we will be glad to look into your specific case more precisely.
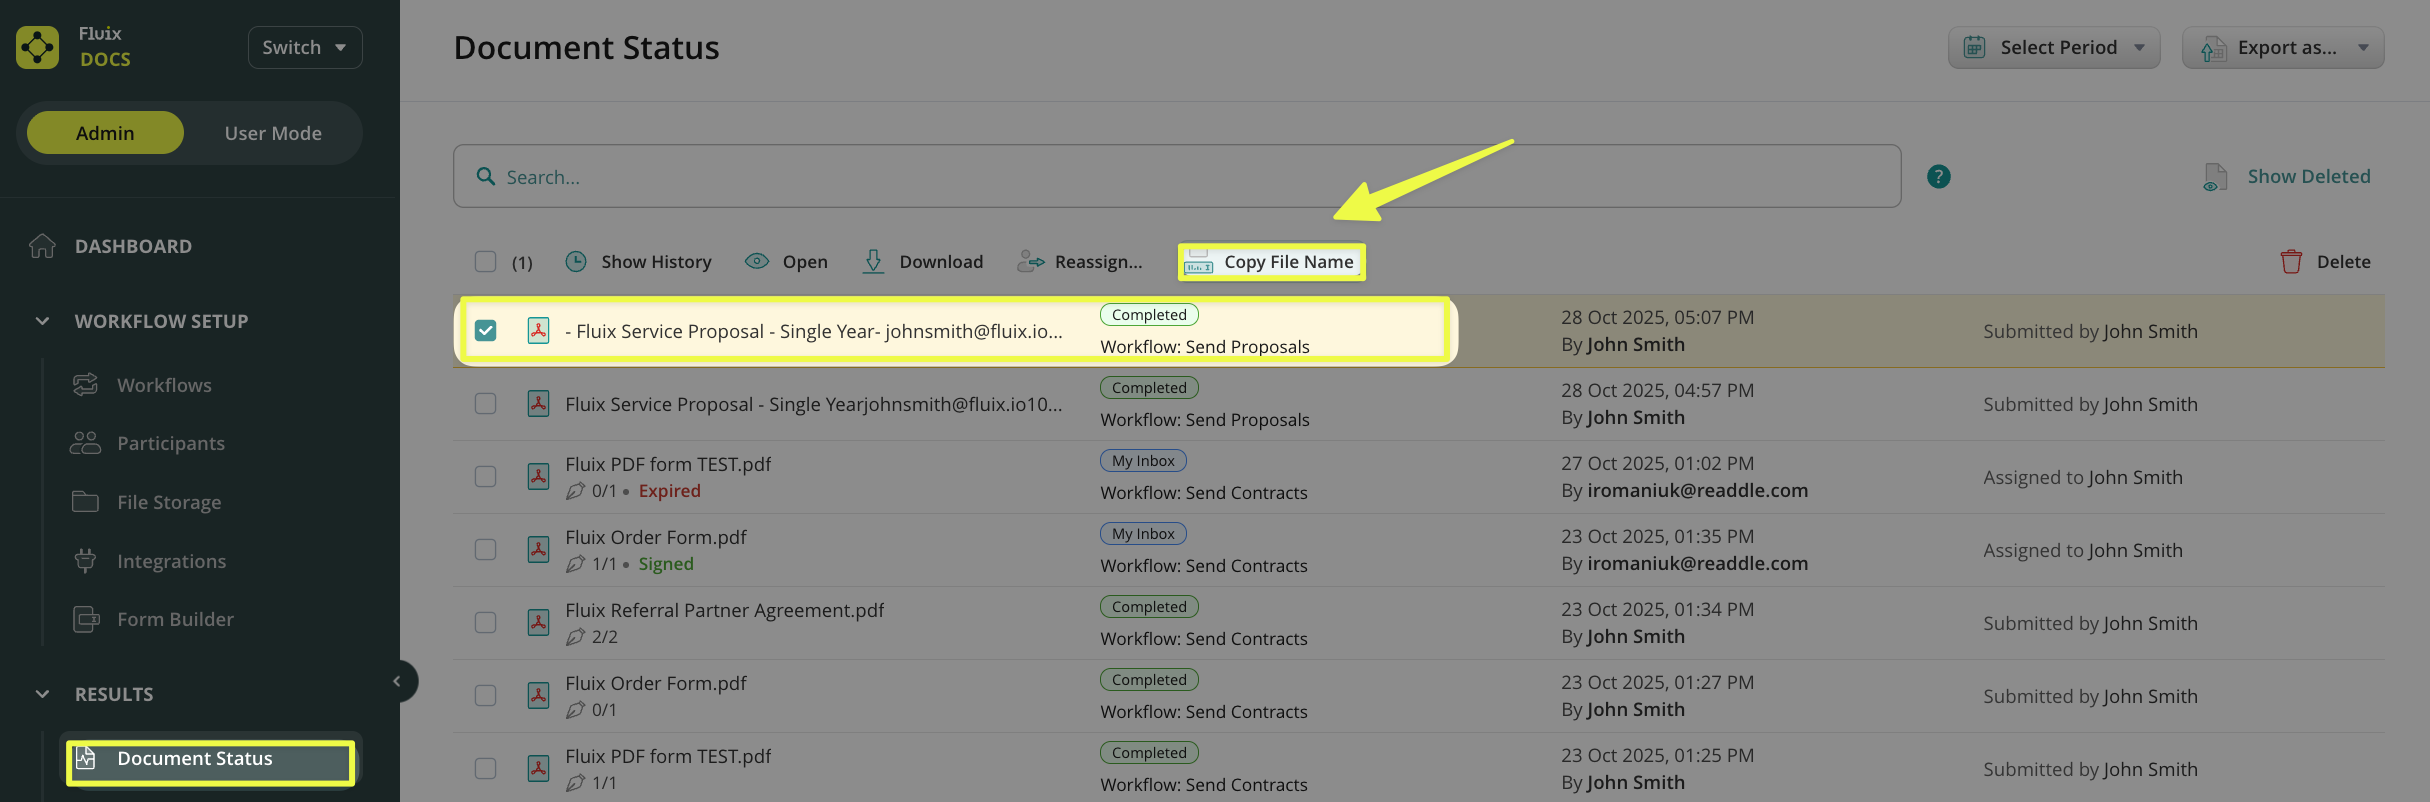
Copy File Name for easy file management in case the admin needs to paste the file name.
Return to Source action is available for the admins to be able to submit the documents from Cabinet document source back to the root destination in cases when the users could not perform such actions from their end.
Voidthe document that was sent for signature and needs to be returned to the user’s My Inbox tab on device.
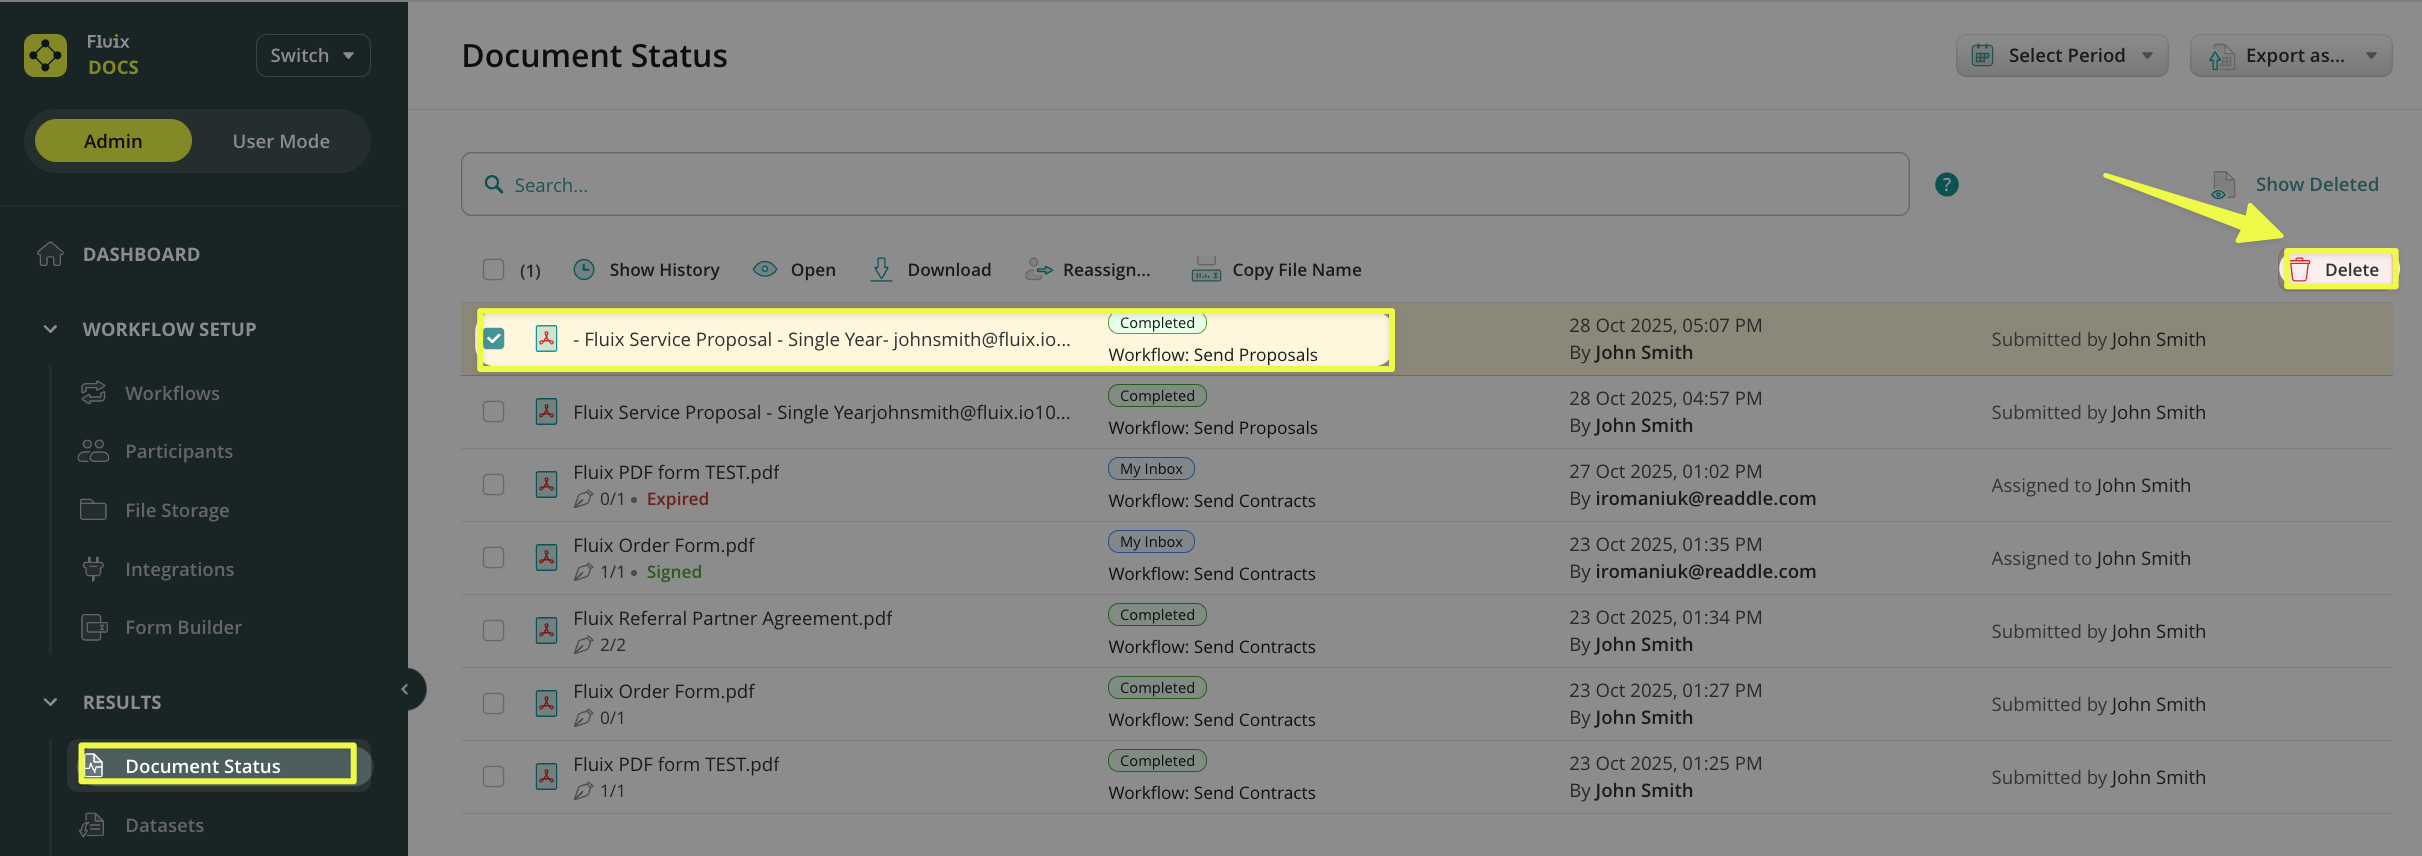
Deletethe workflow document both from the user’s device and the web admin portal.
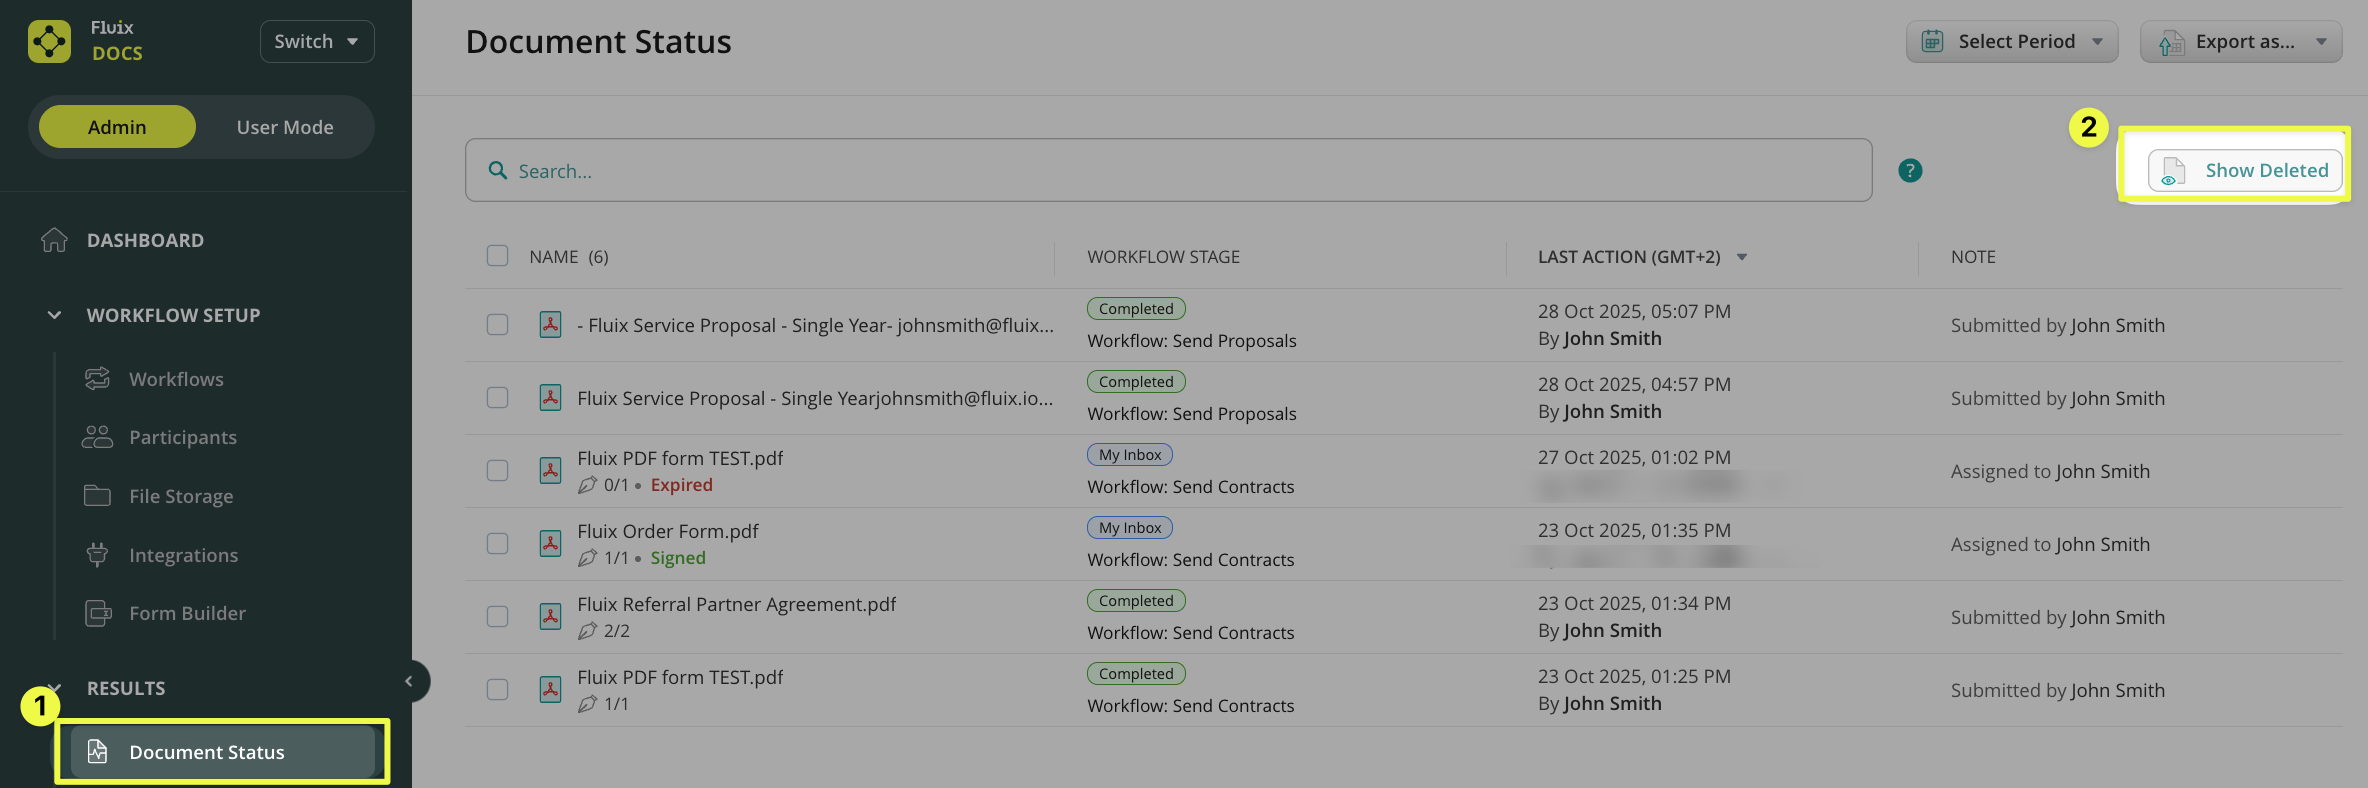
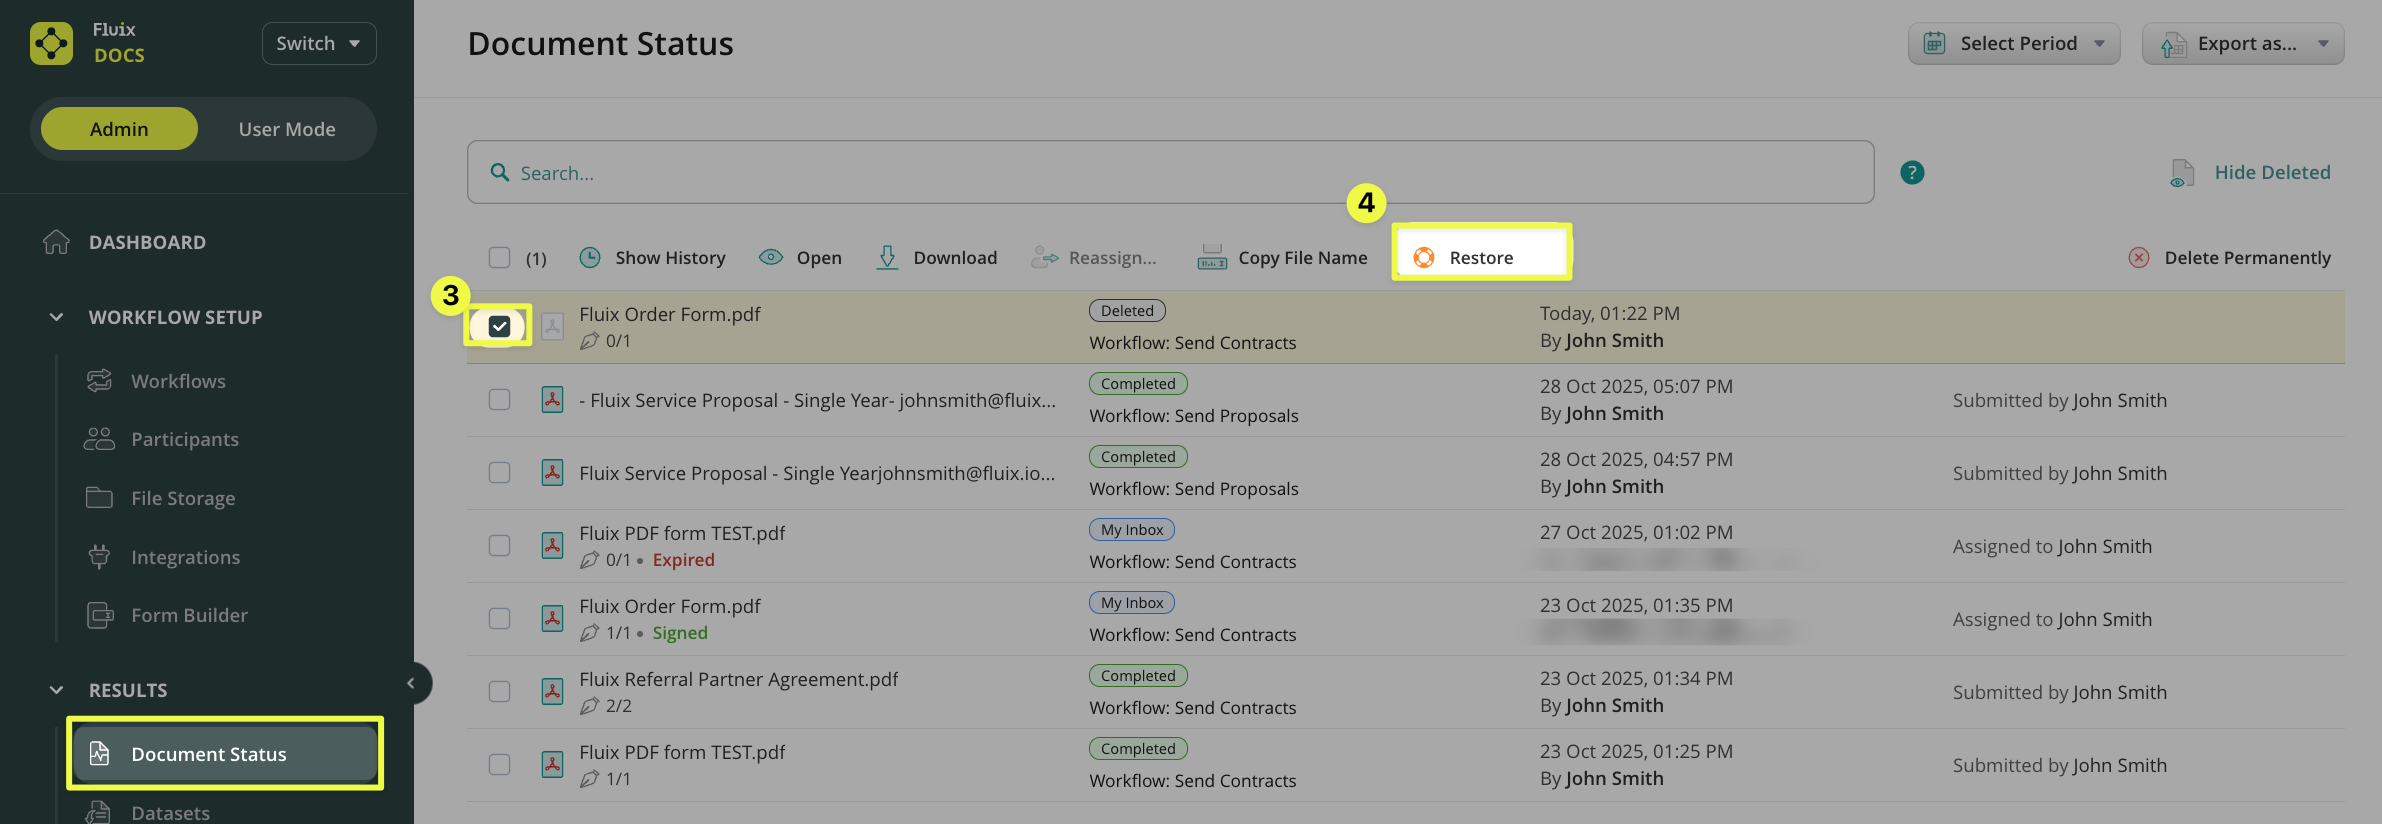
Deleted Documents
To see the documents that were deleted by an Admin or a user, click Show Deleted.
As an Admin, you will also be able to restore a deleted document if, for example, a user in your company’s account accidentally deleted it.
Please navigate to the Admin Mode -> Document Status section
Click on the ‘Show Deleted‘ button
Select the check mark on the left of the document name -> Click on the ‘Restore‘ button
Once done, the document will be transferred to the location from which it was deleted (e.g., the “Drafts” section of the user’s account).
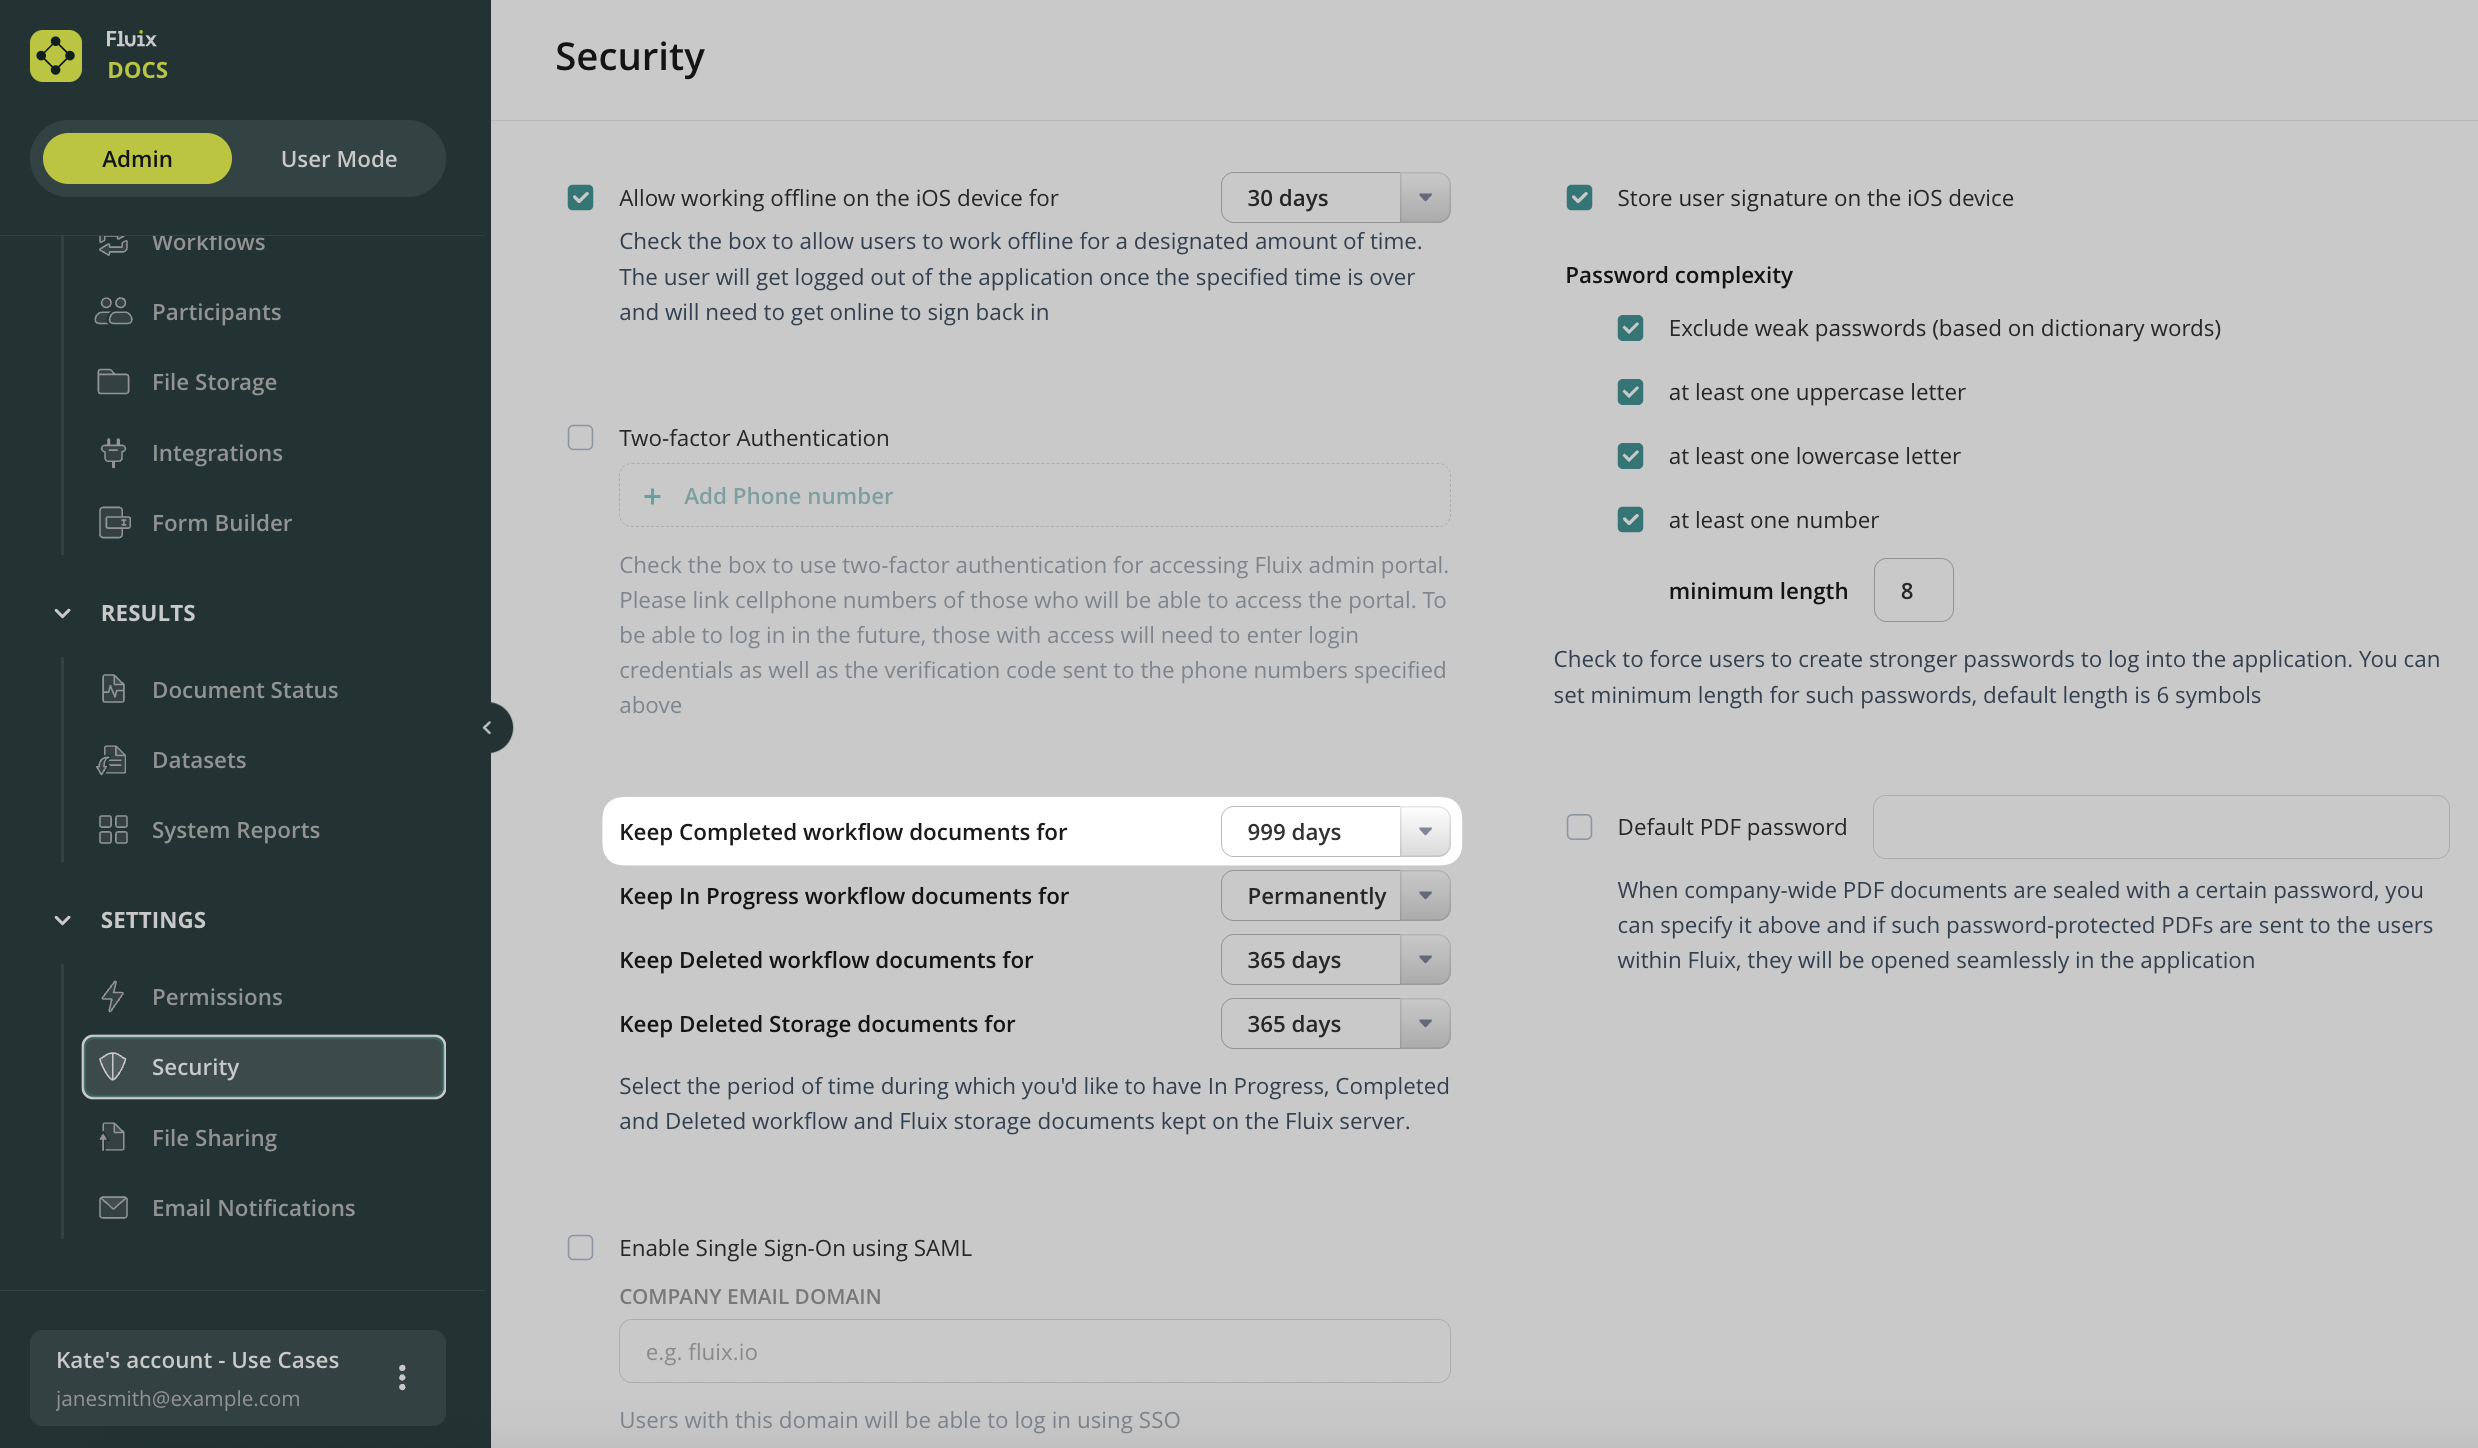
Please note that the list will not include those documents that were deleted according to the retention policy. A similar policy is applied to the completed workflow documents. The default value is 365 days (check Security Settings under the Configuration section for details).
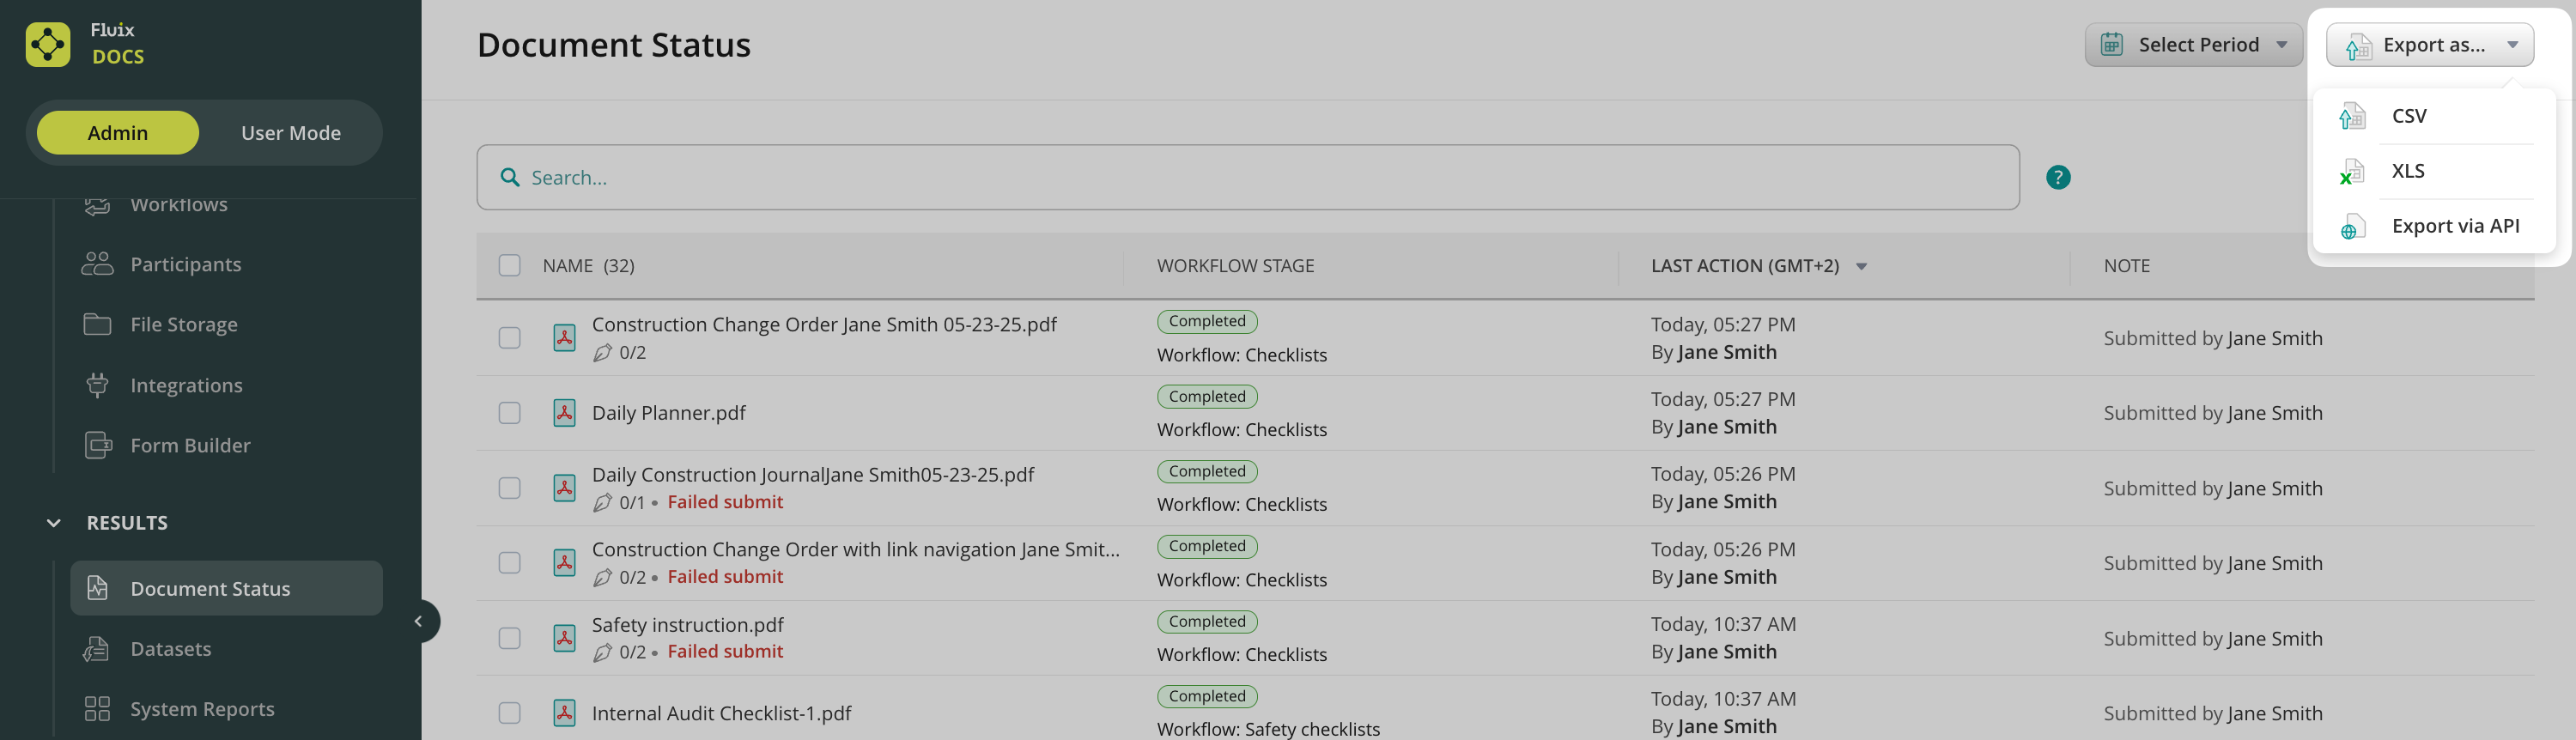
You can also export the list of documents with or without document revision history. You may export this data in the following formats:
Download CSV or XLS – This option lets you download all the data or a selected part from Document Status to a file in the respective format for further manual analysis.
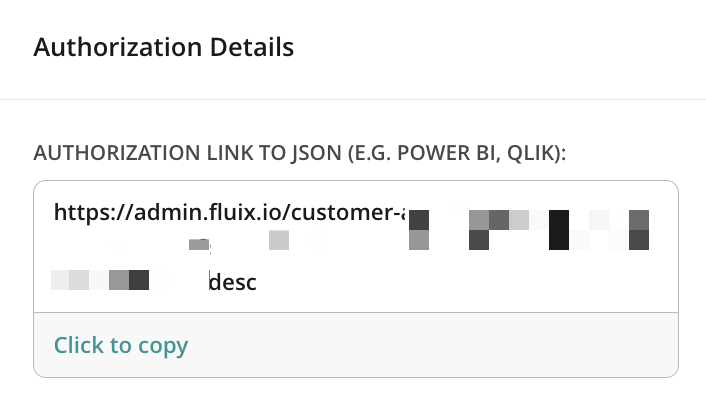
Export via API – This option lets you export data directly to the external software you use, e.g., Power BI, Tableau, and other services that help analyze and visualize data. By selecting the Export via API optionfrom the list, the window with Authorization Details will be opened, allowing you to copy the authorization link for further export. Learn more about this functionality in the tutorial How to export data from Fluix Document Status to third-party platforms.
Was it helpful? Feel free to contact us at support@fluix.io if you have any questions or comments.
Was this article helpful?
Thanks for your feedback!
Oops, something went wrong. Please, try again later.
Thank you!
What details or examples would have made this article more helpful for you? We appreciate your insights!
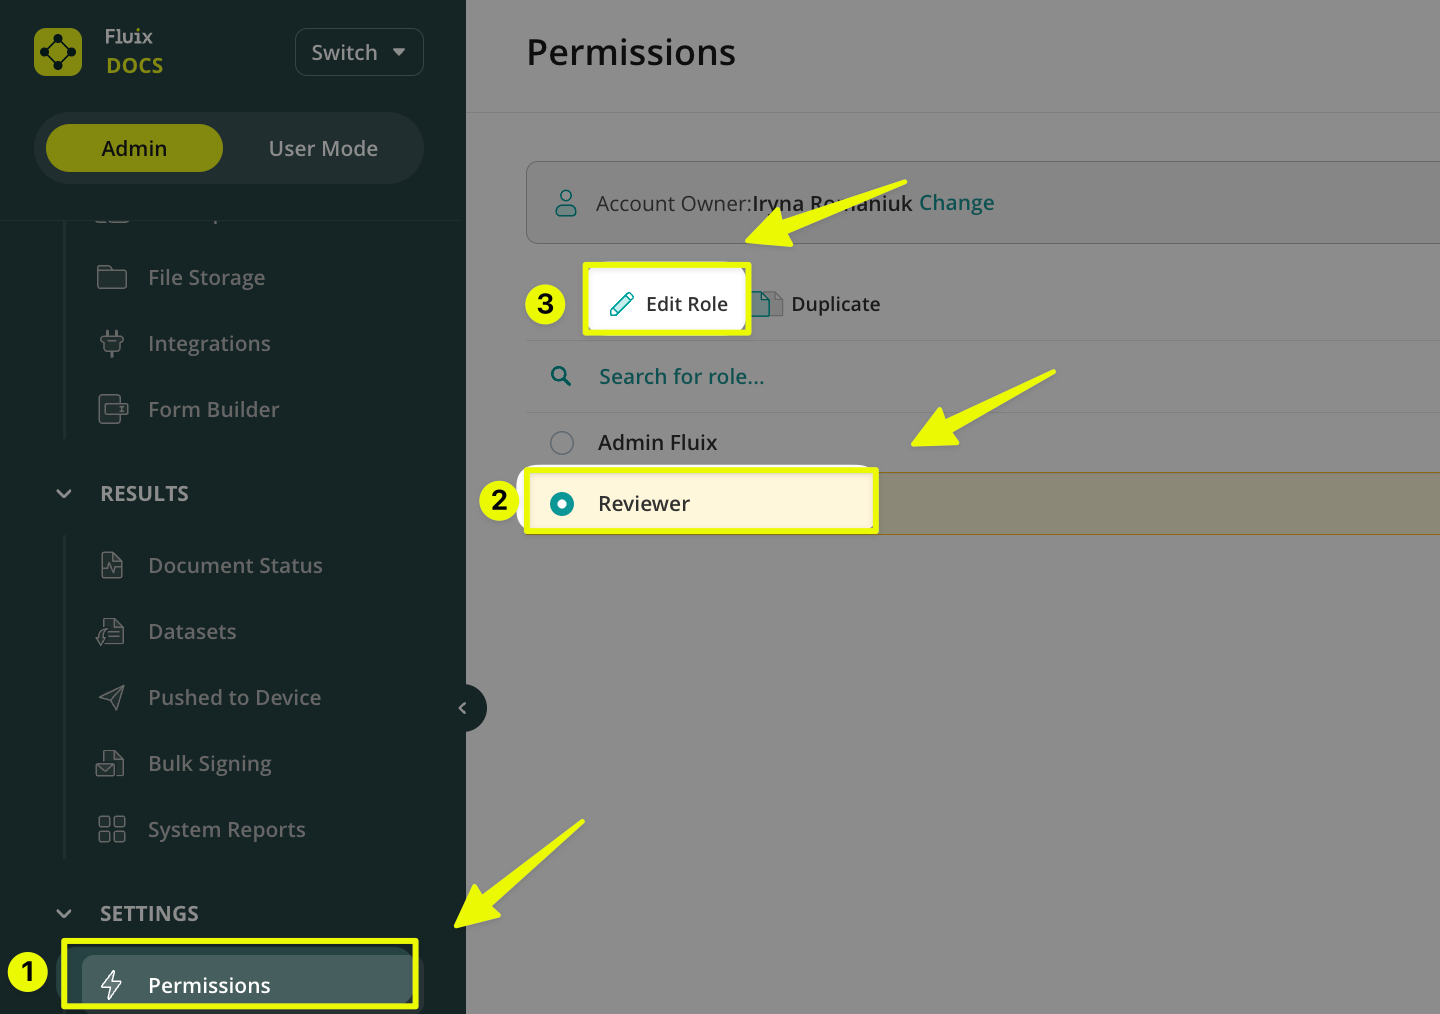
Let’s explore how you can provide access to the Document Status:
Navigate to Permissions -> Click on the role name -> Choose Edit Role to edit its permissions.
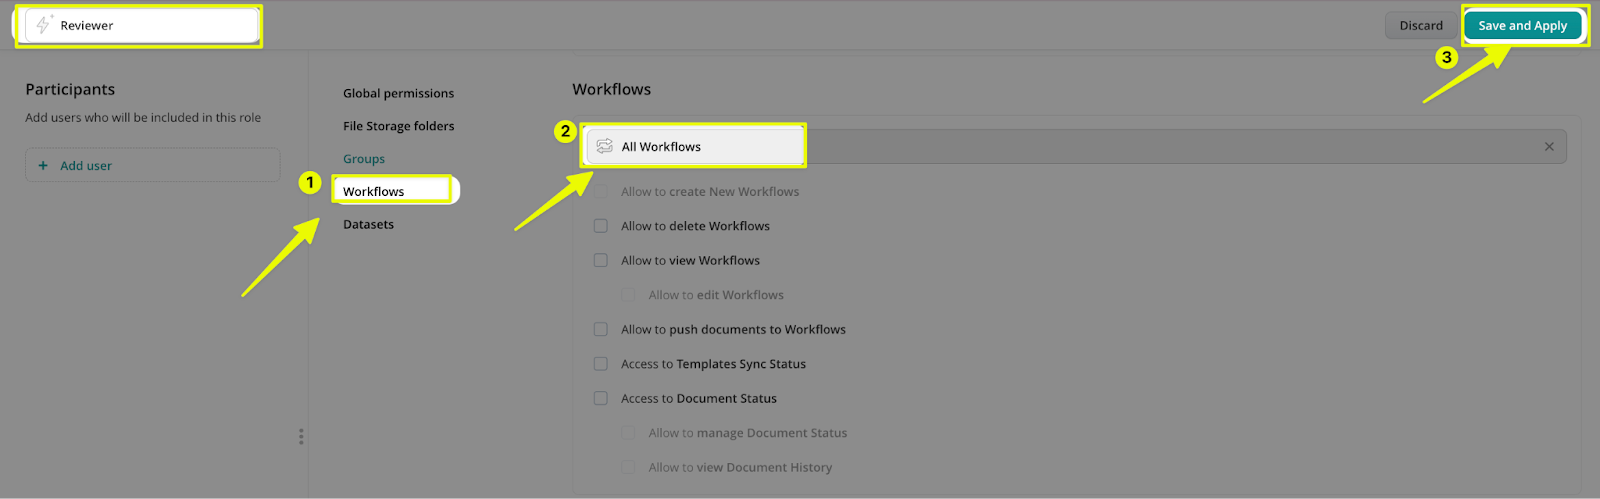
Once you open the respective role,navigateto the Workflows section -> choose All Workflows from the list or select the specific workflows to which your admins should have access. Once ready, click Save and Apply in the upper right corner.
Can’t find what you’re looking for? Feel free to contact us at support@fluix.io if you have any questions or comments.
In the Fluix Admin Portal, the ‘Document Status’ section offers several essential actions to help admins effectively organize and manage the completed documents in your company’s Admin Portal. Below, we will review the specific functionalities available to admins in this section, which are designed to support your day-to-day document management tasks.
Note: The actions that you can perform with the Completed Documents in the Document Status section are determined by specific admin permissions. These capabilities are based on the configuration set by your company’s Fluix Account Admin. Therefore, if you require more admin permissions for your daily operations, please contact the Fluix admin with higher permissions to enable additional actions for your profile.
Show History You can access a comprehensive history of all actions taken on a document, including precise timestamps, status updates, and the identities of the users responsible. This provides a clear and reliable way to monitor exactly what has happened throughout the document’s lifecycle, ensuring accountability and simplifying tracking for your daily workflows.
Open To review the submitted document, click the ‘Open’ button. This will display the file, allowing you to review the details at your convenience.
Download You can easily download all the necessary documentation directly to your computer for offline access from the ‘Document Status’ section. This allows you to keep a personal copy of the files and review them whenever you need, even without an internet connection.
Reassign You can move the document from one workflow participant to another (user or group). This will remove the document from the current assignee’s device and transfer it to the new one, with changes made by the current one saved.
Copy File Name You can easily copy the file name to your clipboard, allowing you to paste it into another application or search bar quickly.
Delete You have the option to delete the document if necessary; however, please be aware that deleted completed documents will remain stored in your account according to the specific timeframe defined in yourRetention Policy. This ensures that your data management aligns with your account’s pre-configured security and storage settings.
Can’t find what you’re looking for? Feel free to contact us at support@fluix.io if you have any questions or comments.
Was this article helpful?
Thanks for your feedback!
Oops, something went wrong. Please, try again later.
Thank you!
What details or examples would have made this article more helpful for you? We appreciate your insights!
Document Status provides a full audit trail for all documents, a clear overview of the progress and current state of any document within a workflow in your company’s Fluix account. Here are the key details that you may find helpful to track the progress of projects you are working on with your team in Fluix:
The current state of the document allows you to see the file’s progress at a glance: whether it is “Finished” and submitted to the preconfigured destinations or “In Progress ” by a member of your team.
Timestamp and Date Information: By selecting the specific document and tapping the Show History button, you can see the dates and times when the document moved to each stage. This will allow you to see how long each part of the process is taking.
Users working on the document: In Document Status, you will see the names of the users or groups in Fluix responsible for the document at that stage which helps track accountability.
How to export data from Document Status to third-party platforms?
In Document Status, in the top right corner, you will see the Export button, there will be three options available for you:
Options Download CSV and Download XLS let you download all the data or the selected part from Document Status to a file in the respective format for further manual analysis afterward. Export via API lets you export data directly to the external software you use, e.g. Power BI, Tableau and other services that help analyze and visualize data. By selecting Export via API optionfrom the list, the window with Authorization Details will be opened, allowing you to copy the authorization link for further export.
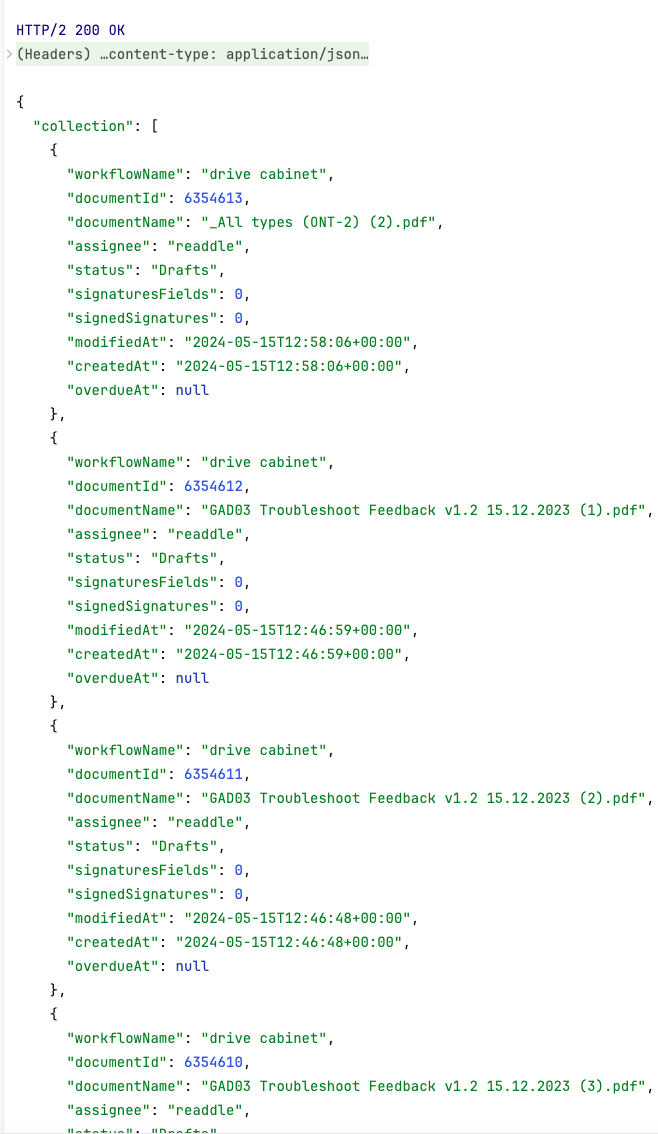
After that, you may use this link to create a request in the third-party platform to an endpoint to receive a response (data from the Document Status).
Example of the request:
Example of the response from Fluix with data from Document Status:
Feel free to contact us at support@fluix.io if you have any questions or comments.
Was this article helpful?
Thanks for your feedback!
Oops, something went wrong. Please, try again later.
Thank you!
What details or examples would have made this article more helpful for you? We appreciate your insights!
Data collected by your field teams in checklists, time sheets, work orders, and other forms in the Fluix app can be automatically aggregated and extracted into datasets for further export and analysis. To start collecting data, please follow the steps below or watch the video tutorial.
How to start extracting data?
Data is extracted from documents that are filled out and submitted by your end users within Fluix workflow. The data is saved to a report called Dataset and can be then downloaded in Excel/CSV format, sent directly to third-party data visualization software services, such as Power BI,Tableau, Domo, Qlik, etc, or exported via Zapier, Integromat, or any other integration platform, or to your database via API.
To start extracting data:
Navigate to the Workflows tab under the Workflow Setup section of the Fluix Admin Portal
Open the workflow where you’d like to extract data from and click Edit Workflow
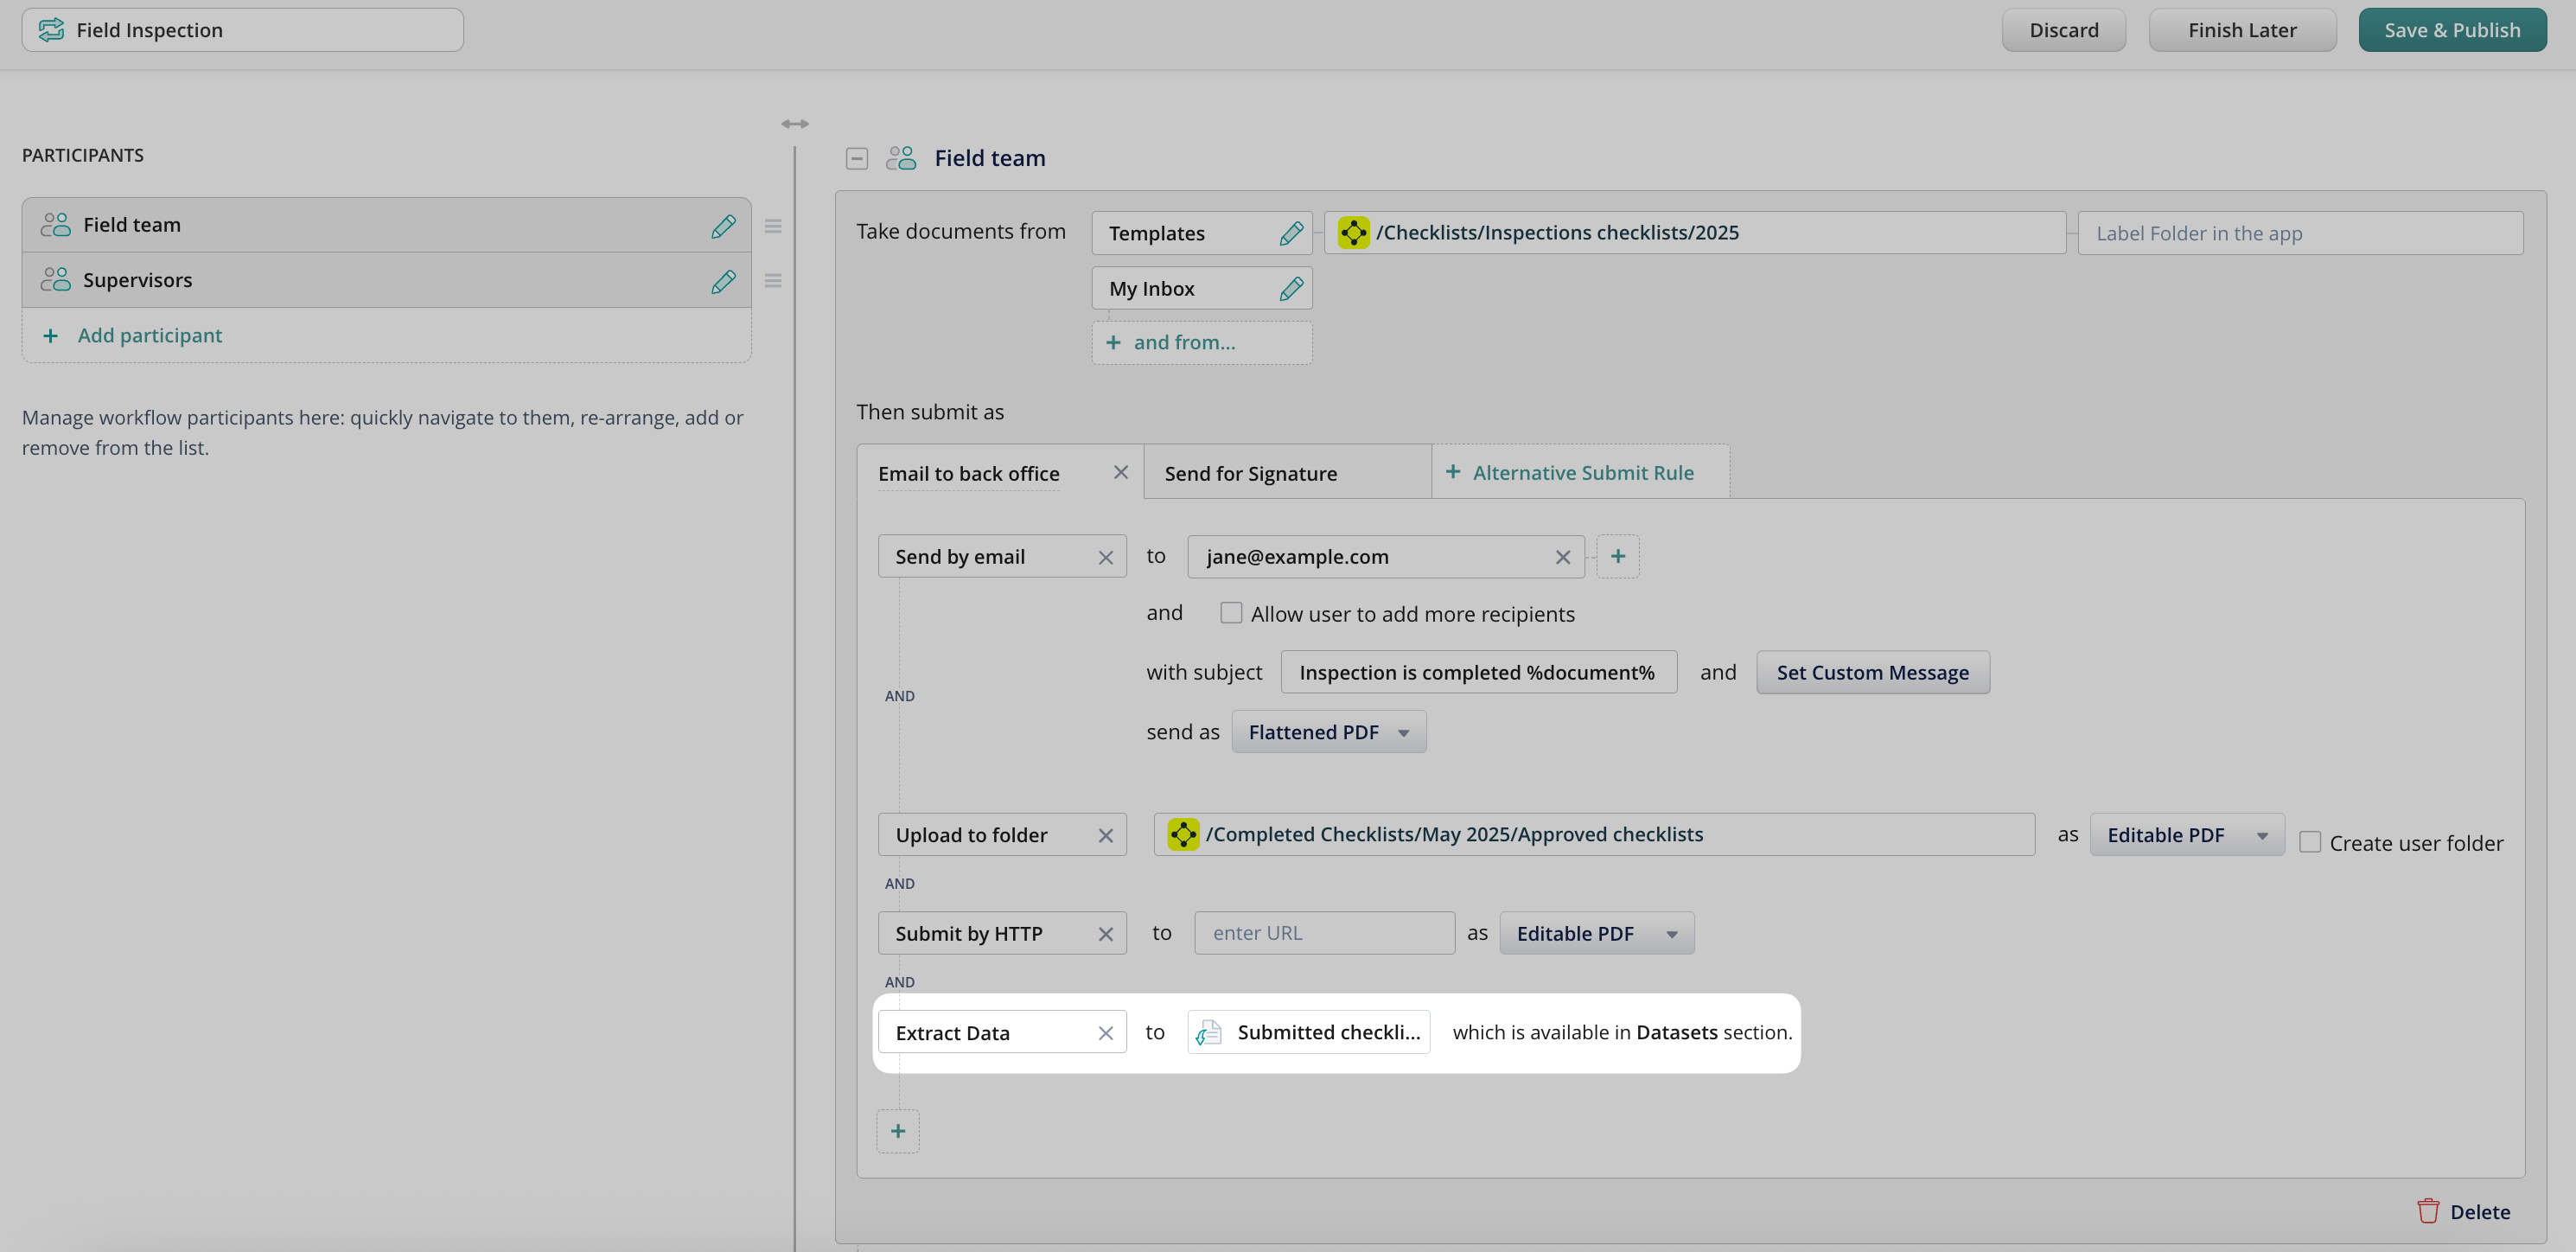
Find the final submit rule for the documents (e.g. ‘Upload to folder’) and click ‘+’ to add a parallel submit action Extract Data:
4. Add a new dataset (or select an existing one) where the data will be extracted to, and click Done:
5. Save changes to the workflow.
From now on all the data that is entered into fillable PDF forms within this workflow will be saved into the dataset each time the document is submitted. Photos that were inserted into the image fields in your form will be also saved into the dataset as a download link.
Each dataset will include the list of submitted documents, columns with the fields and data that was filled out in the documents:
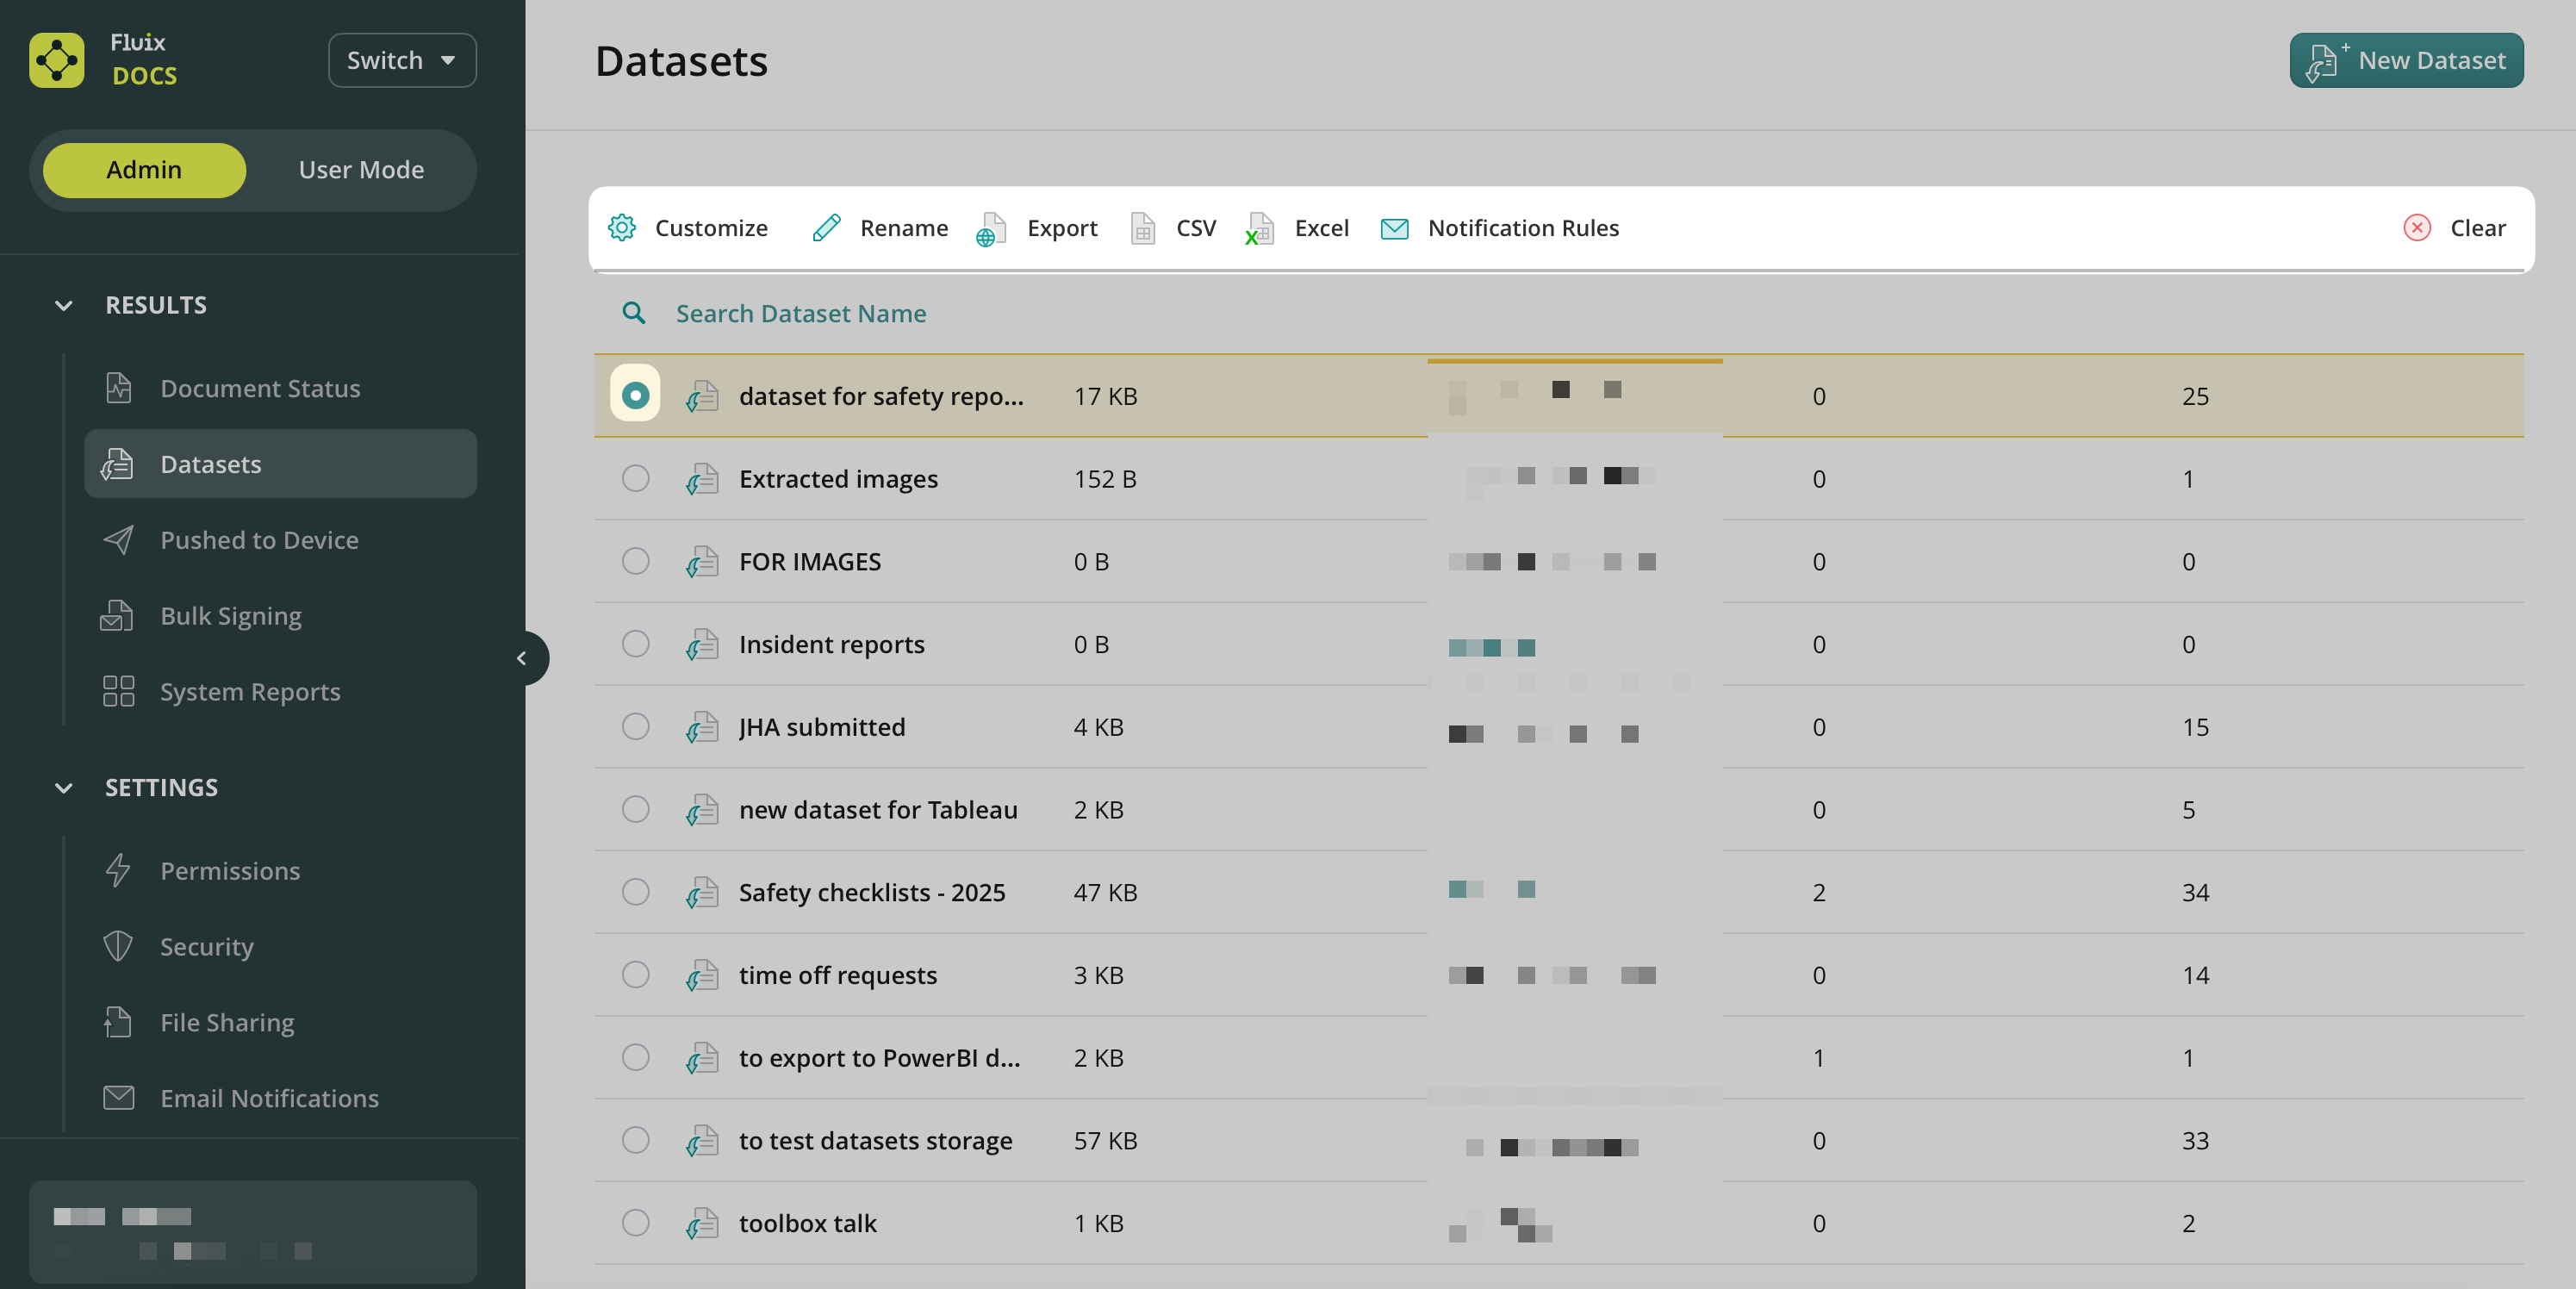
The list of datasets can be found in the Datasets tab of the Results section:
To create a dataset to be used in a workflow, click the New Dataset button in the top right corner.
Subsets with Filtered Views
By default, the dataset includes all the fields that are present in the submitted documents and the fields are named exactly as in PDFs. By creating filtered views (subsets), you can configure what fields to extract and rename them in a way you prefer.
Here are the steps:
1. Select the dataset and click Customize
2. Create New Subset and name it
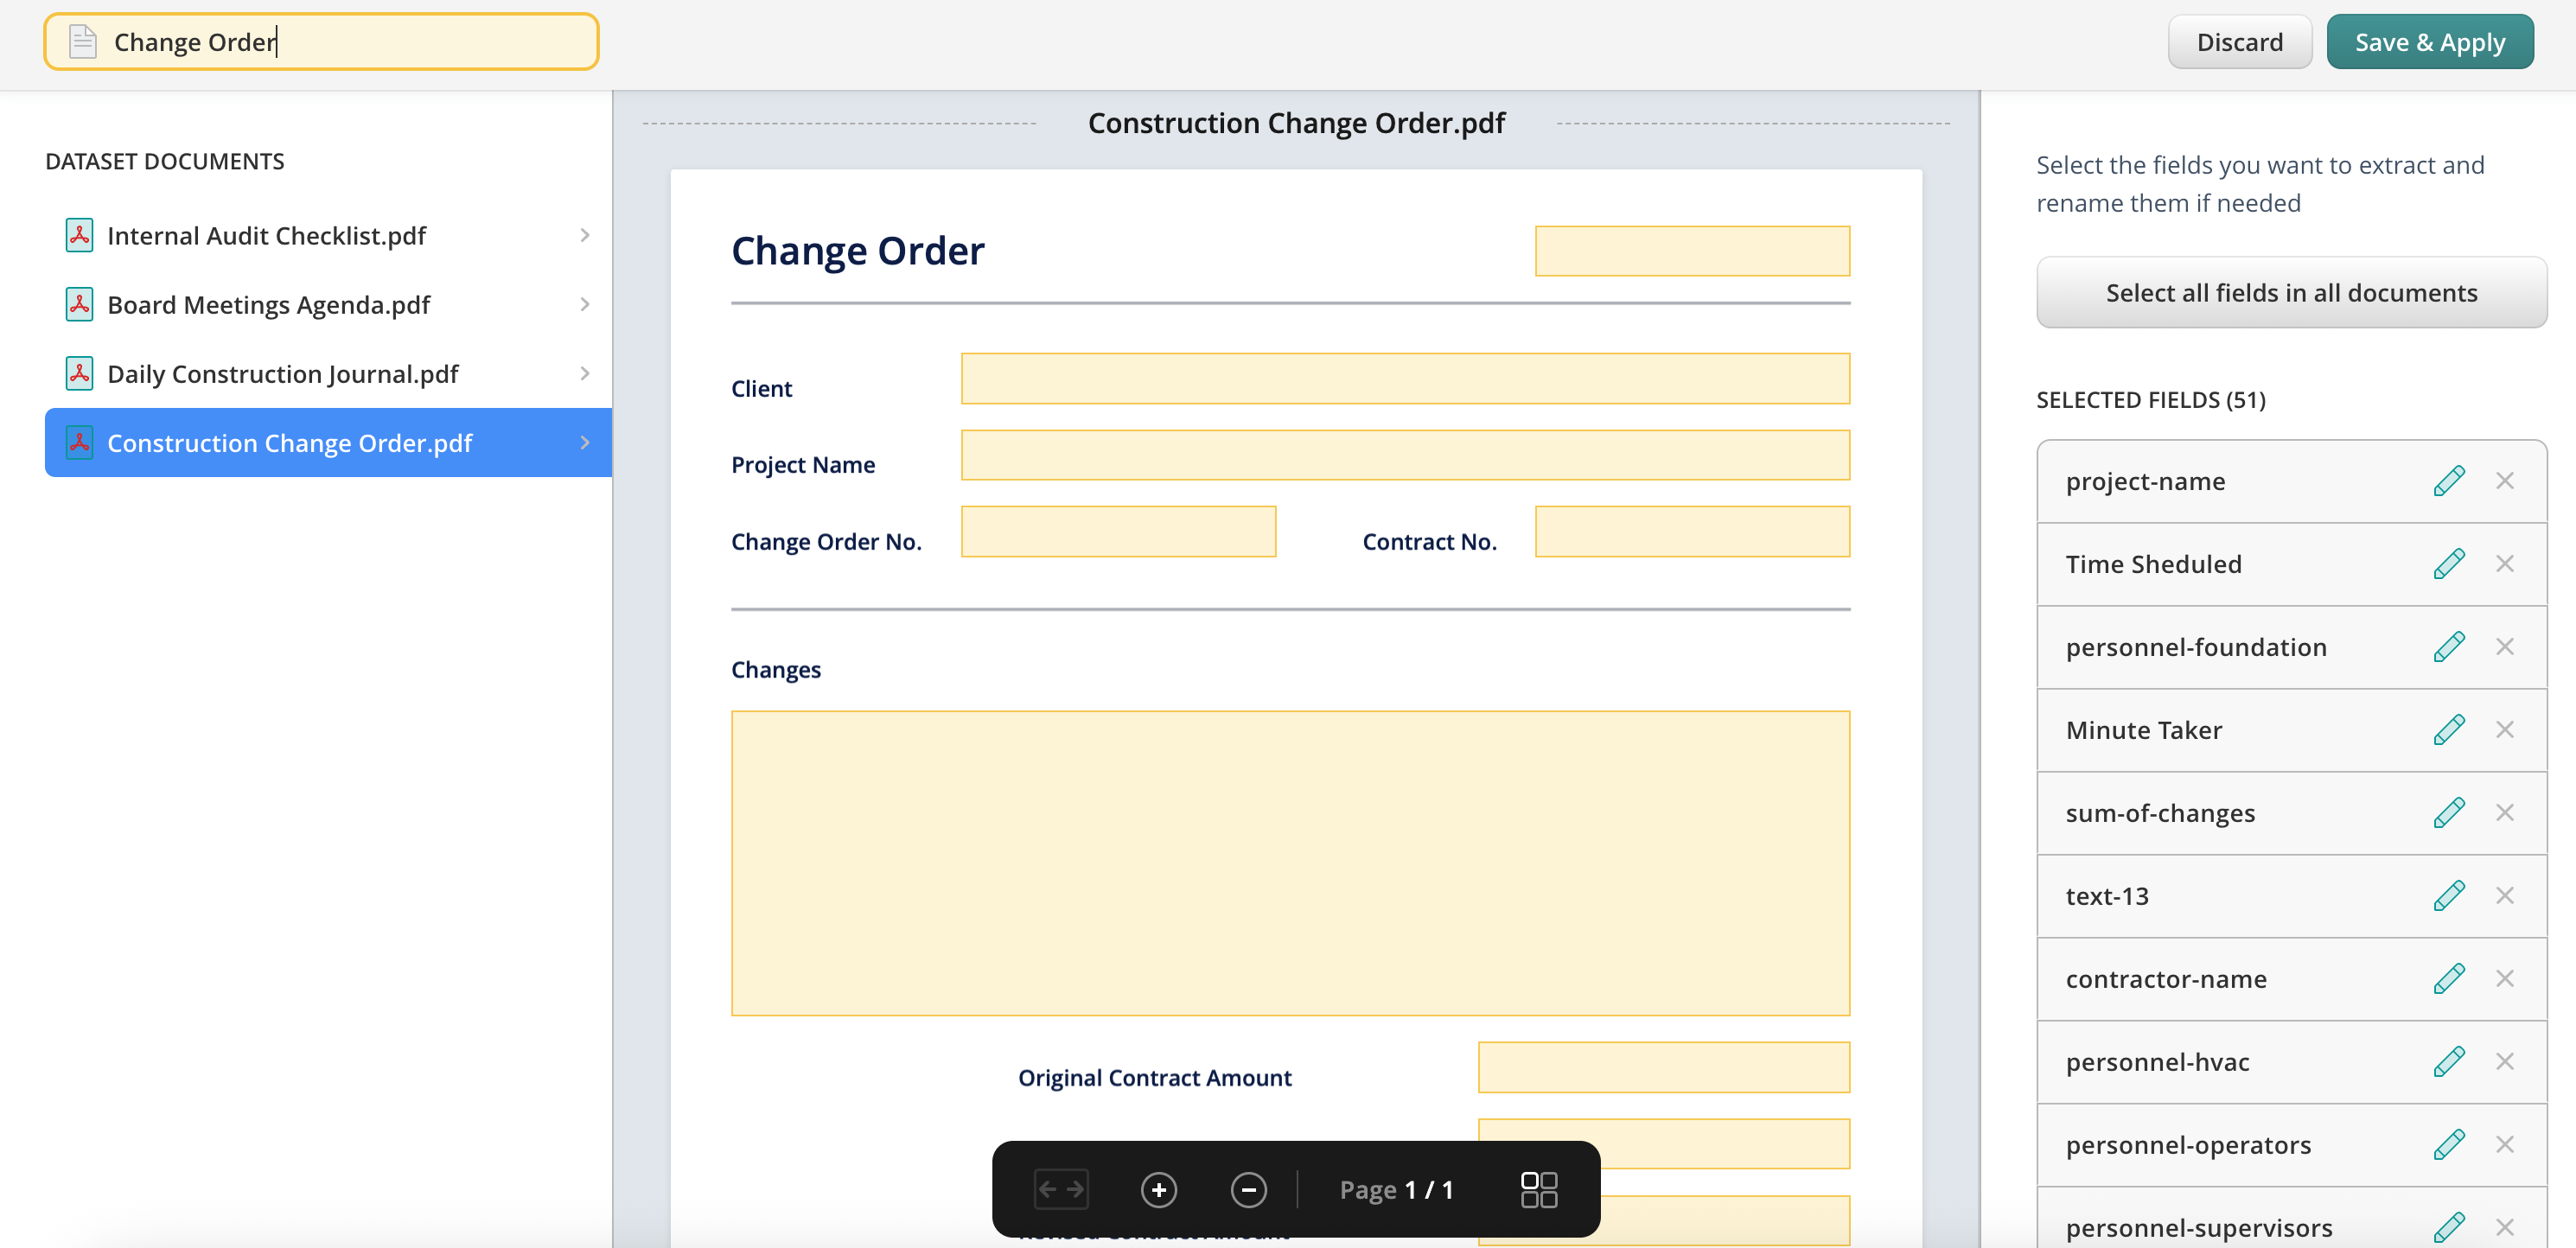
3. On the left, you will see the list of documents that have already been collected in the dataset. On the right, there will be a list of fields from the collected documents. By default, all fields are deselected. You can select them by clicking on the button ‘Select all fields in all documents’ in the menu on the right.
4. To select a particular field, simply click on it on the document preview.
5. If the field names are generic (e.g., Text1, text2, etc.), navigate on the field to see its name, or navigate on its name in the list on the right, and it will be ‘linked’ to the right field in the document:
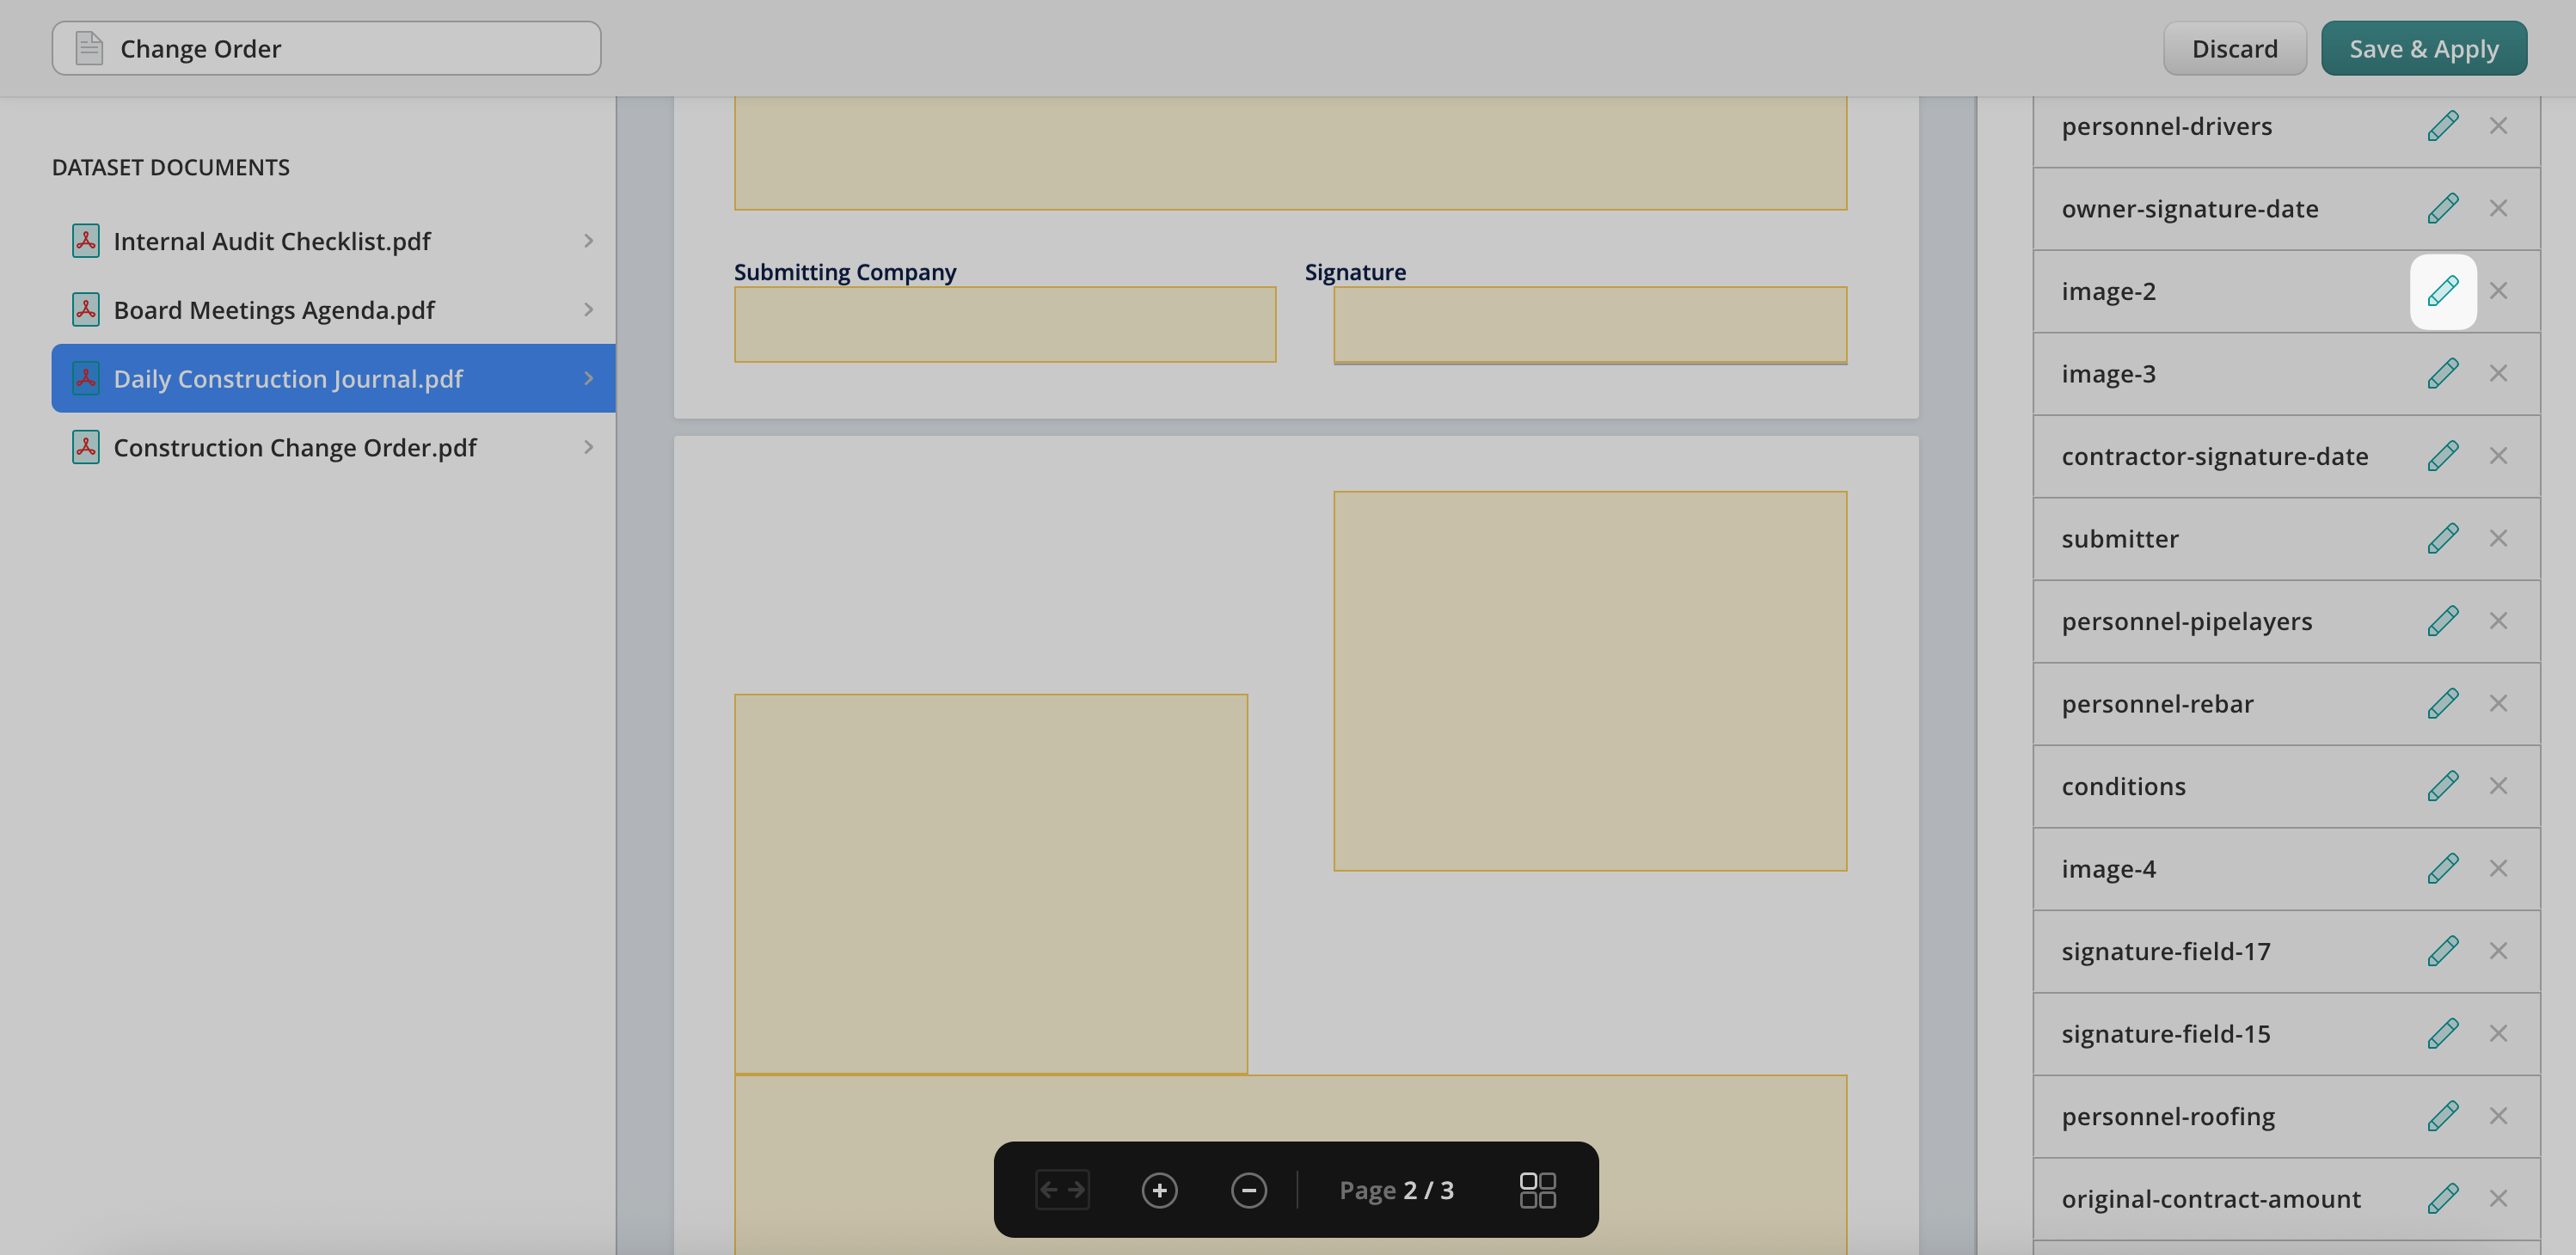
5. Here, you can also rename the fields by clicking on the pencil:
6. Type in a report name in the top left corner and save changes.
Filtered views can be exported, edited, or deleted.
Notification Rules
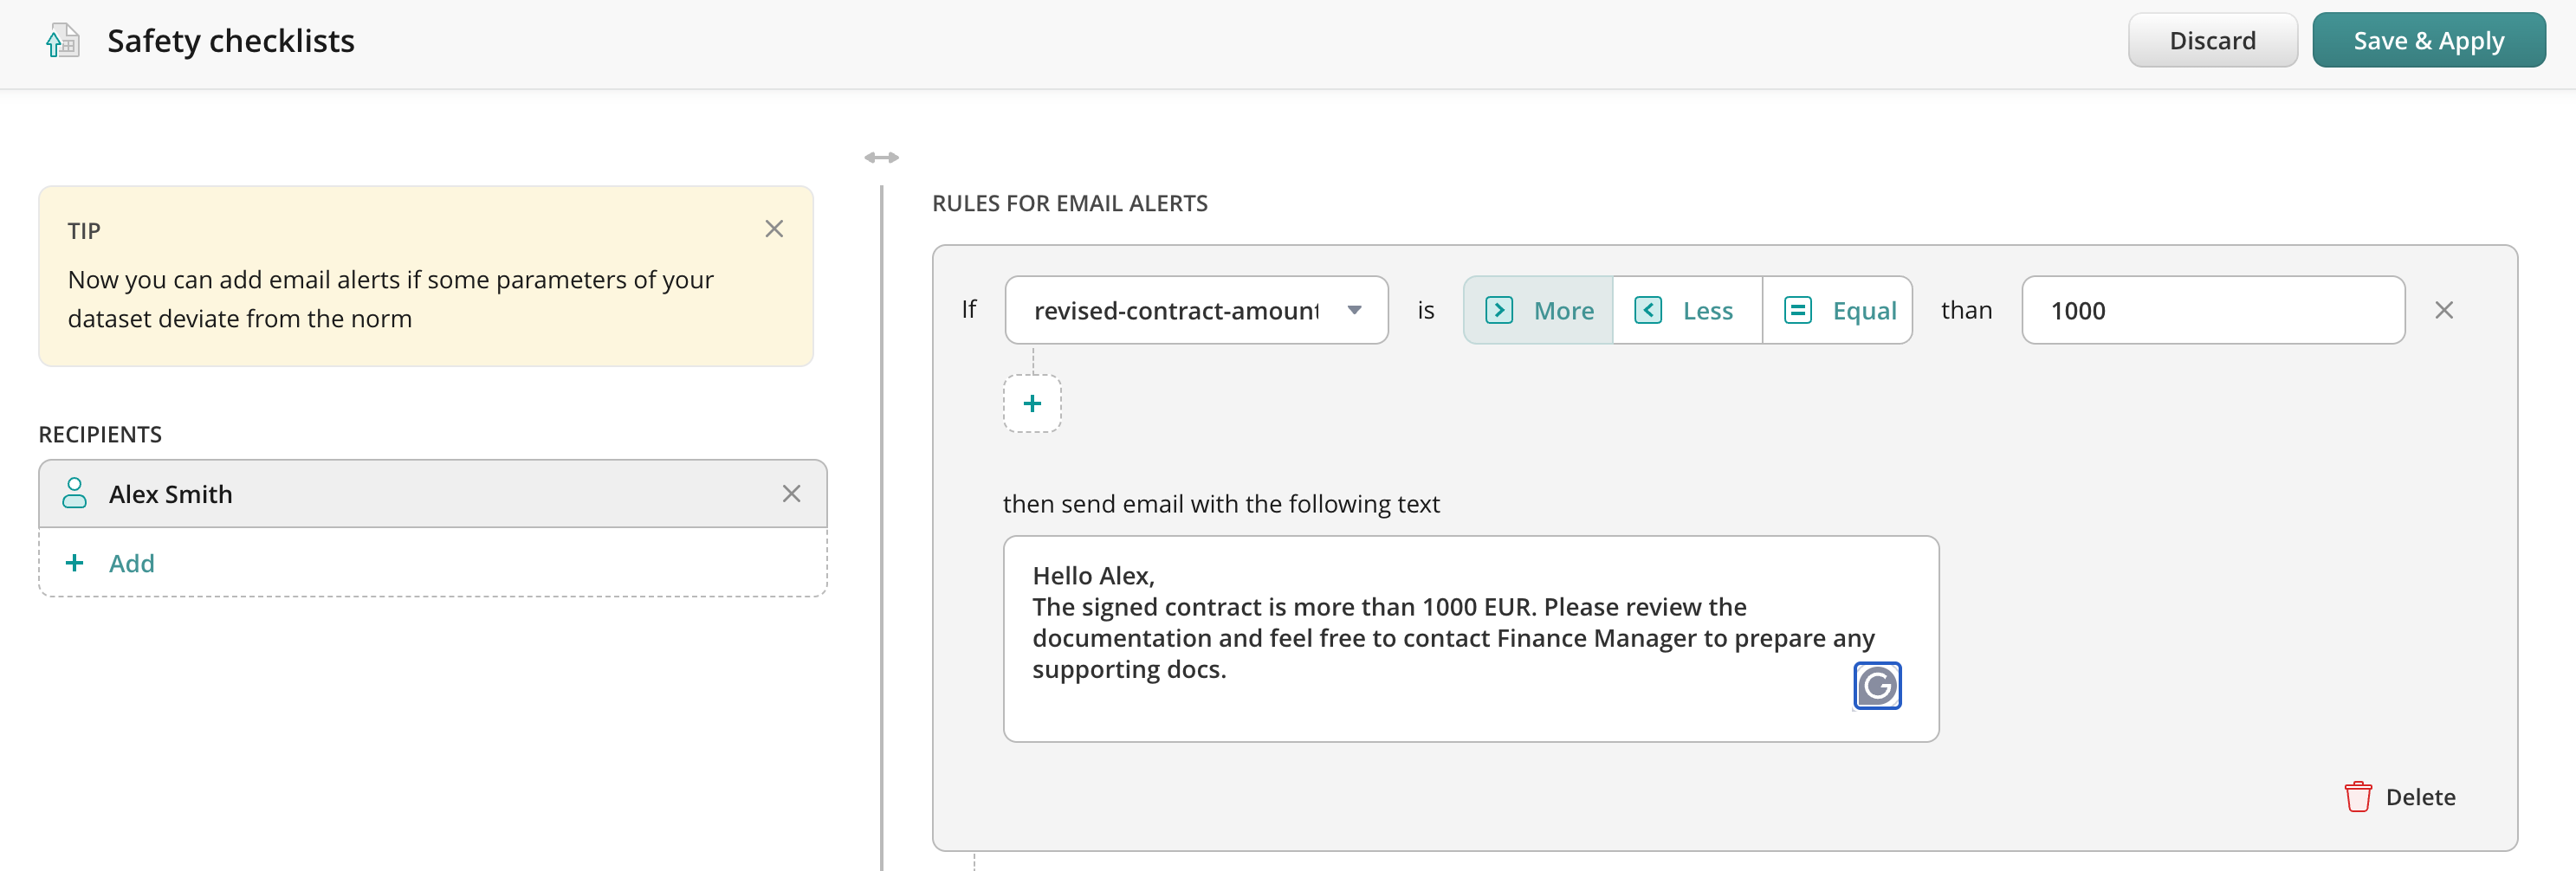
Besides extracting data, you can also track the deviations from the expected values in your documents and receive email alerts in real time. To proceed, you need to create rules for email alerts:
1. Select the Dataset and click on Notification Rules 2. On the left sidebar, add recipients of the email alerts 3. Click on Add Rule to create a rule for email alert 4. Add a field name, select the condition More, Less, or Equal to and specify the value 5. Add a message to be emailed 6. Save changes
Once the specified values deviate from the norm you expect, the respective email will be automatically sent to the recipients.
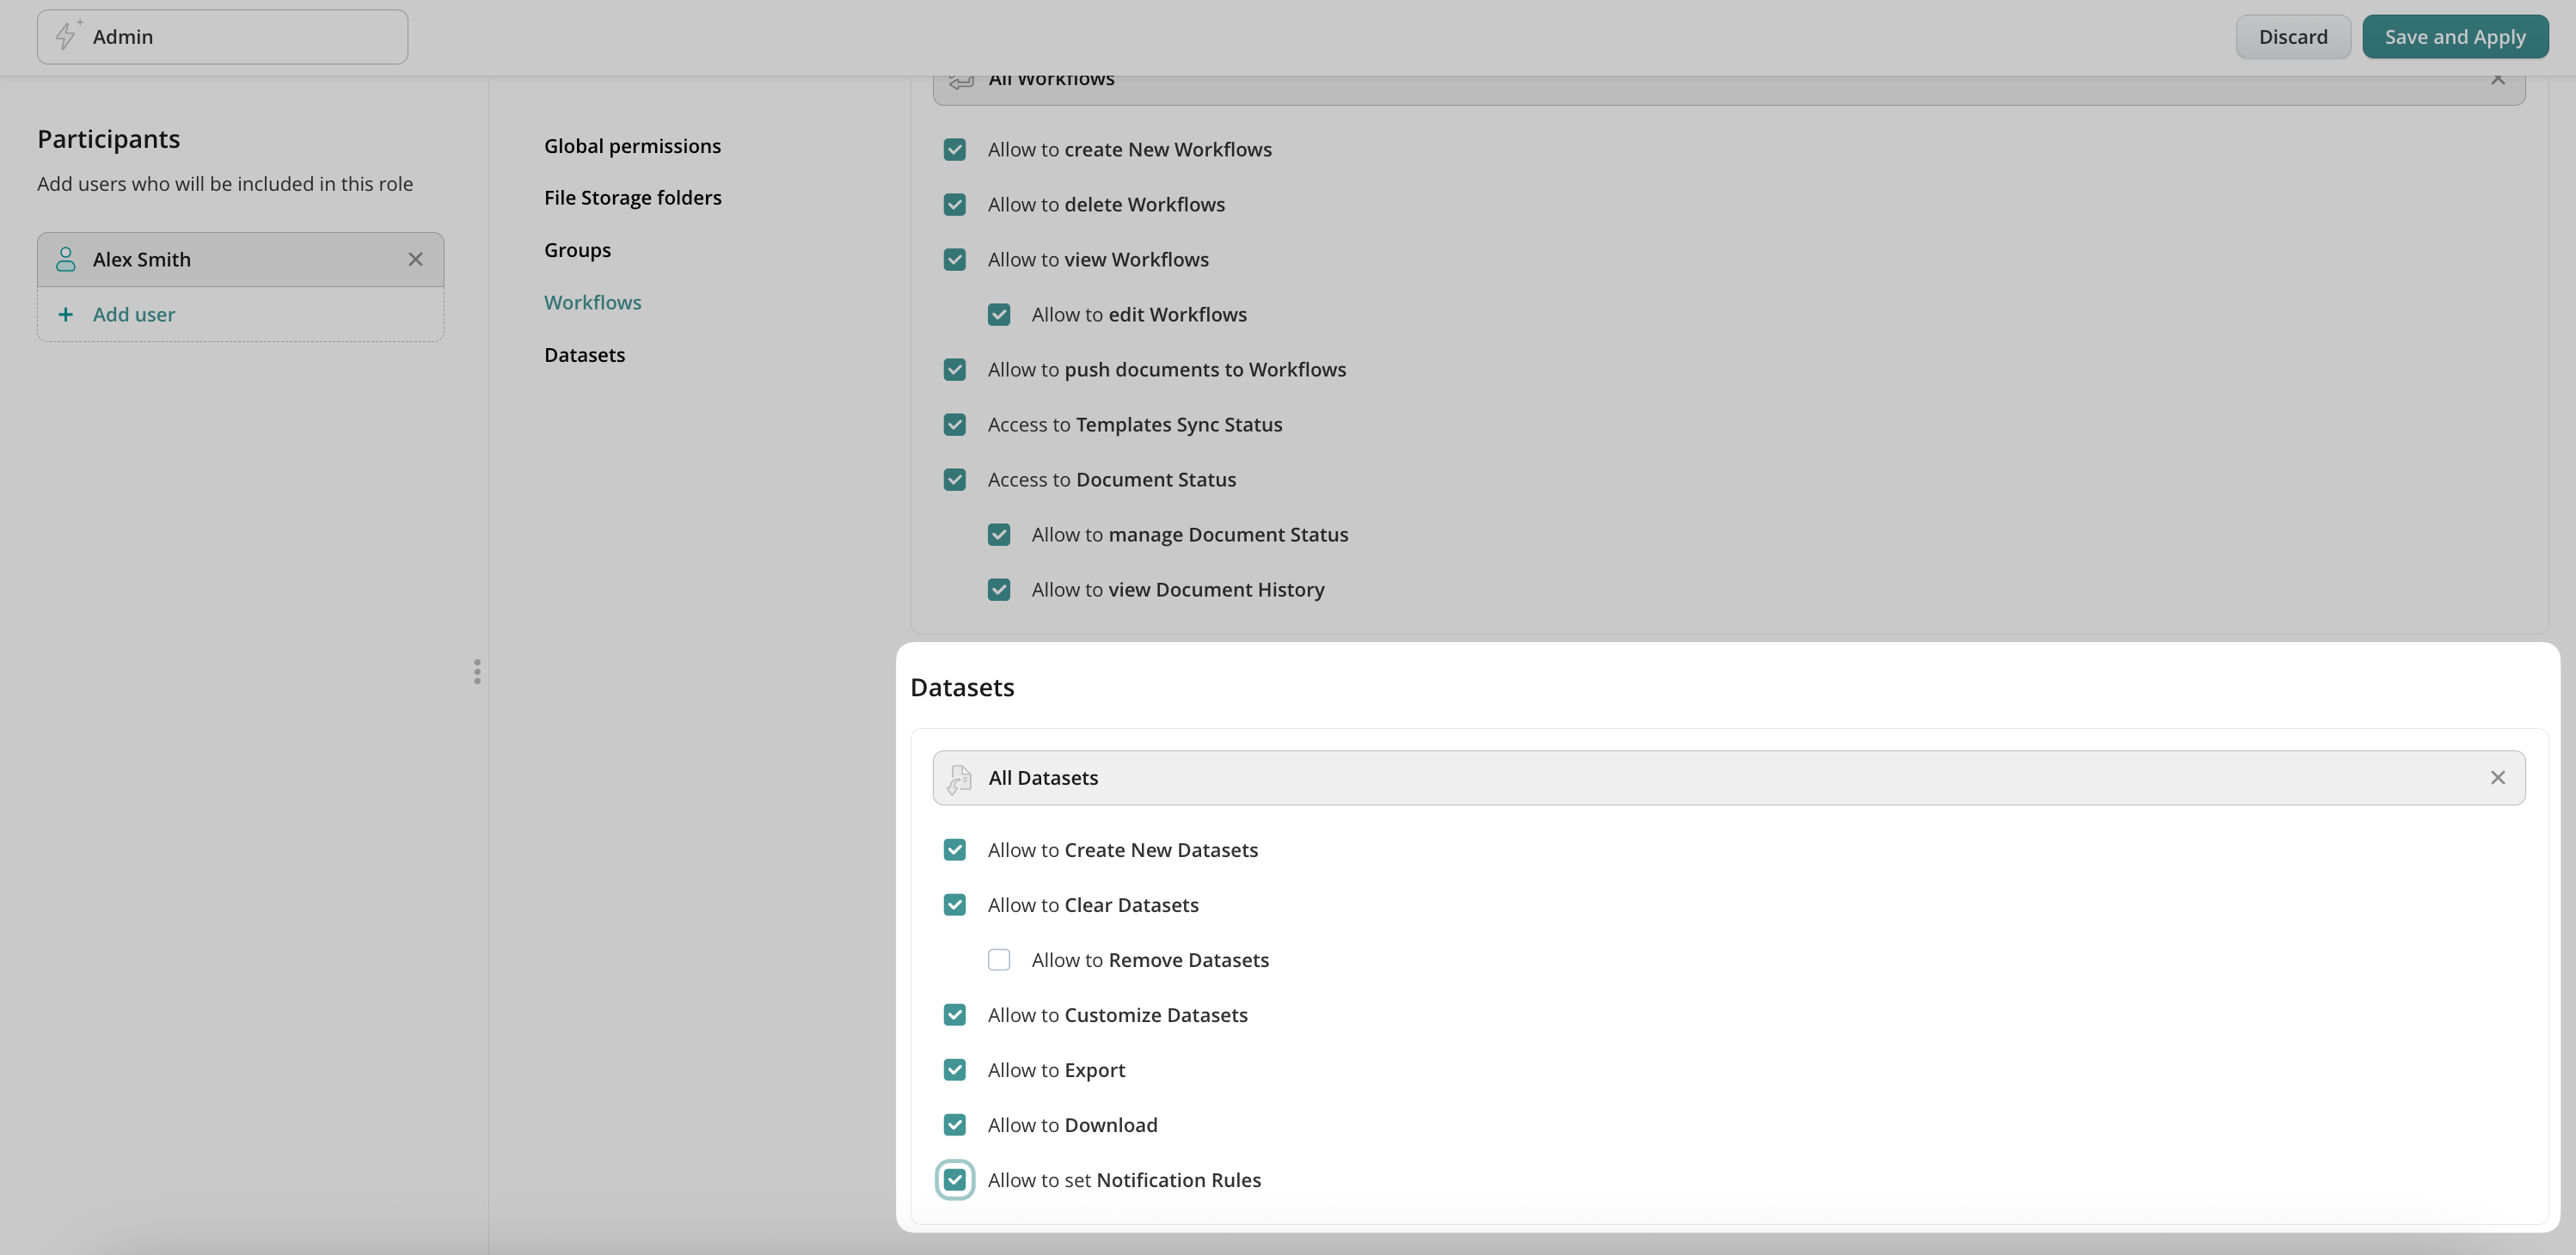
Access to Datasets
In case you do not see some of the options mentioned above, you can request access from your account owner. The permissions are regulated in the Permissions tab under the Settings section of the Admin Portal:
Finding bottlenecks and benchmarking in your business processes is now very easy.
Feel free to contact us at support@fluix.io if you have any questions or comments.
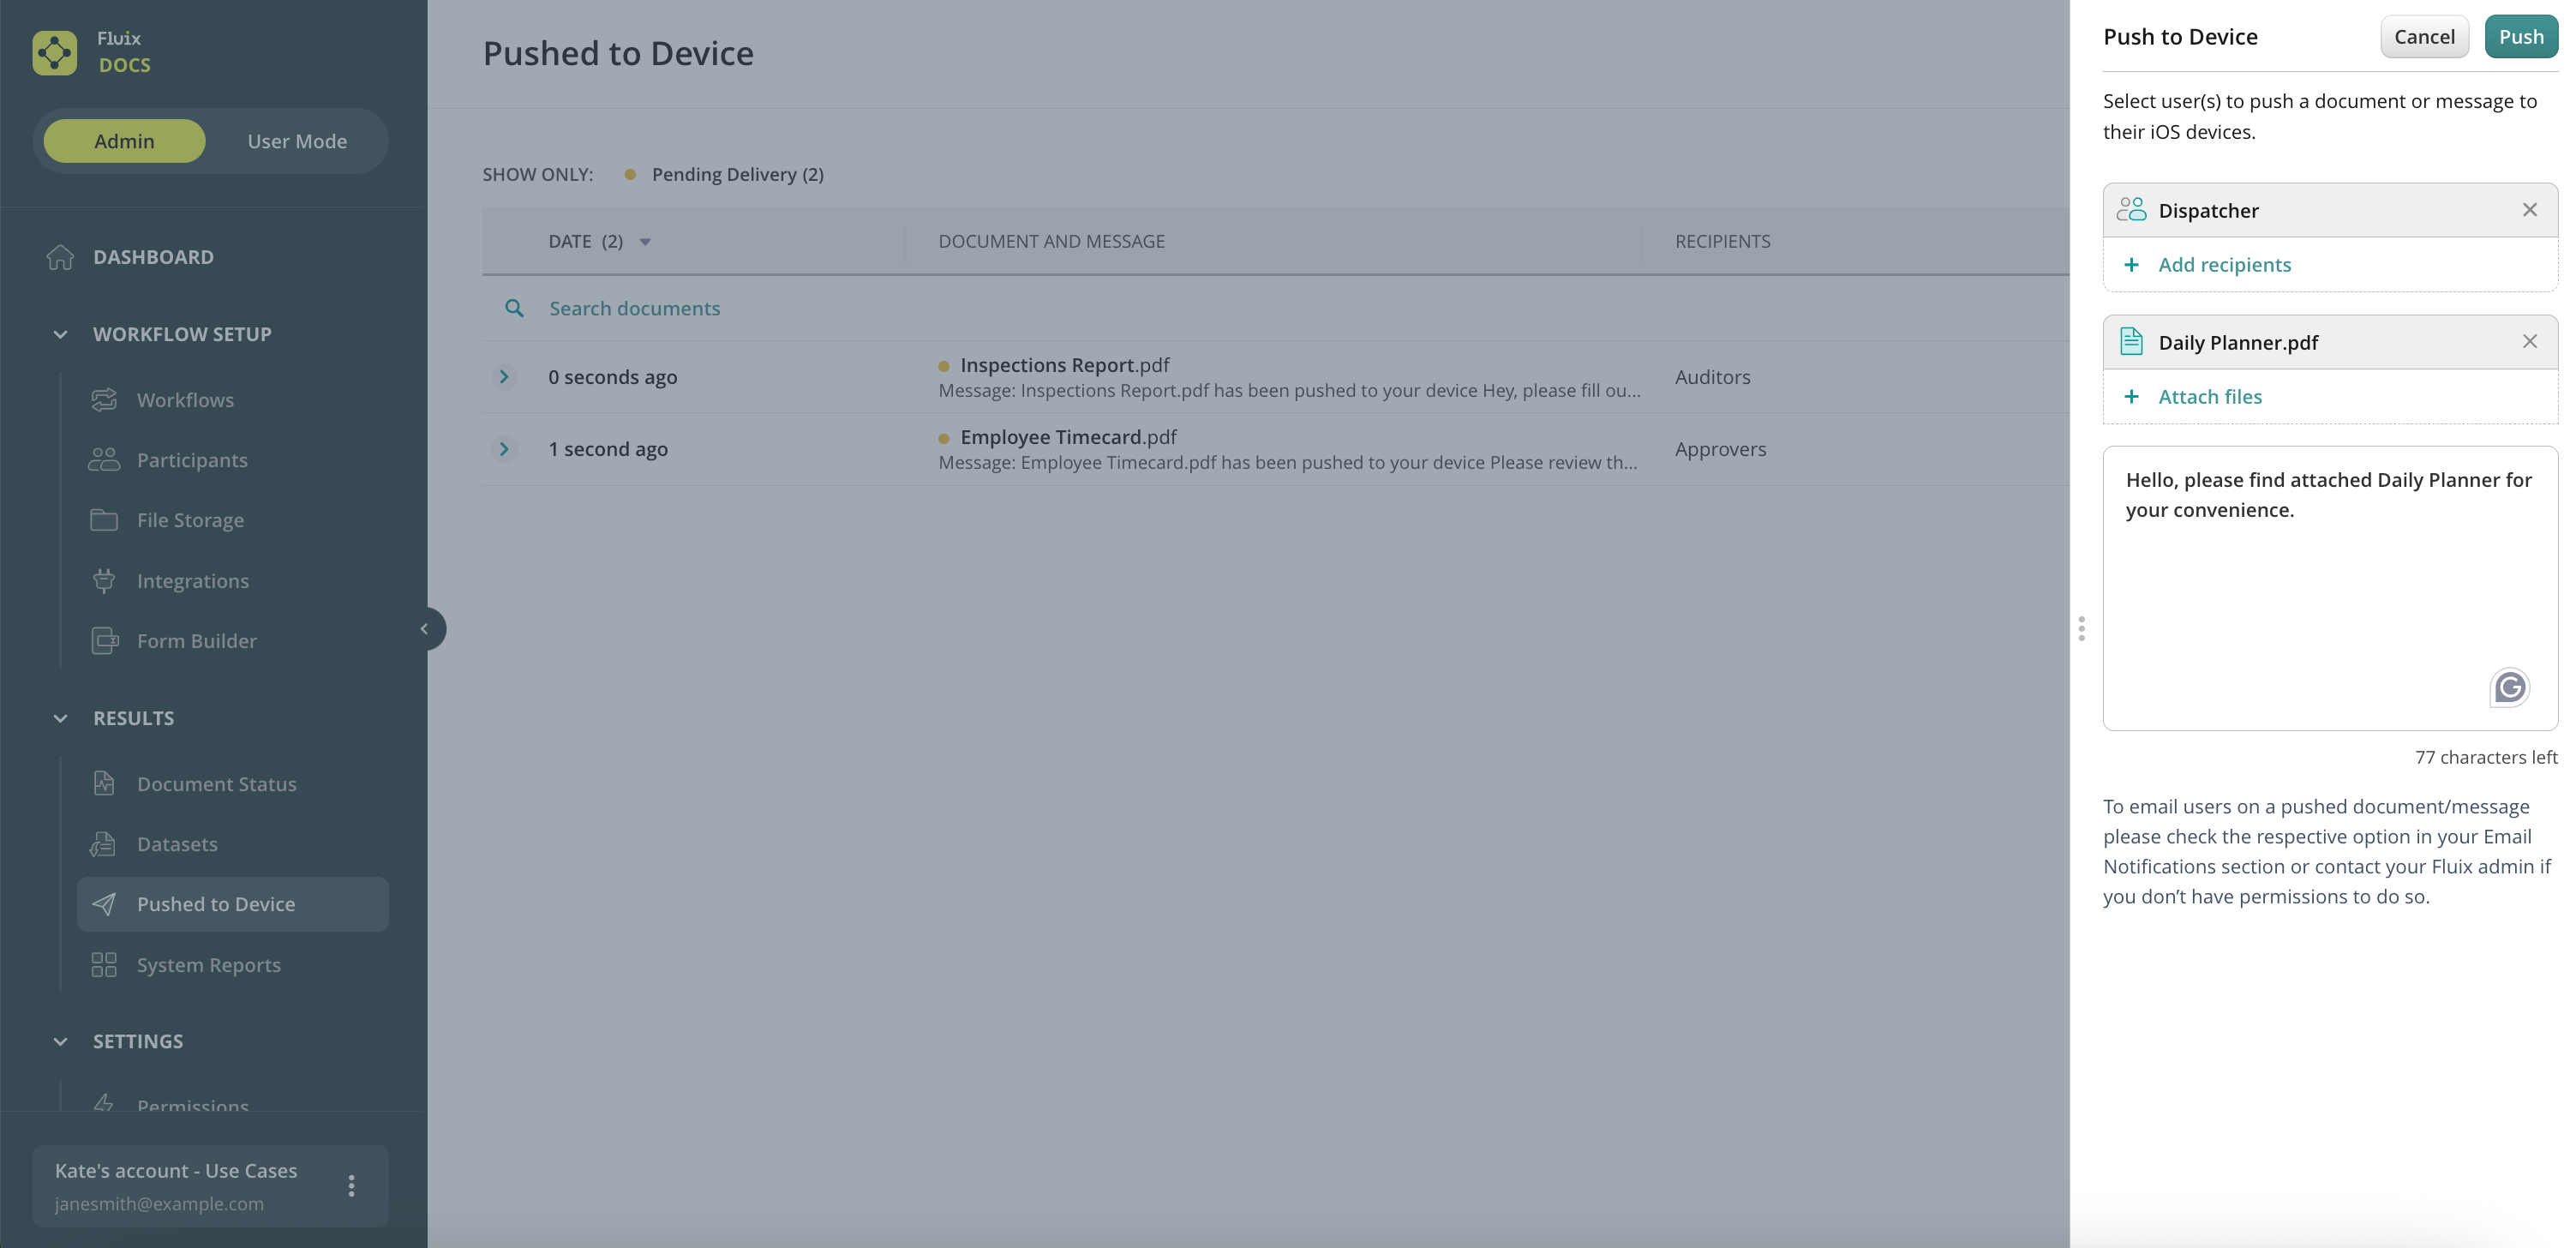
Aside from sharing documents via Workflows, you can also push documents and messages to your users using the Push to Device option under the Resultssection.
To proceed, click on ‘Push to Device’, select the recipients, attach documents, add a message and press the Push button.
In case you’d like to notify your recipients on pushed documents by email, go to the Email Notification tab under the Settings section, Users tab, and check the boxes ‘Document/message pushed to device’ and/or ‘Document/message pushed to a user, who never logged in’.
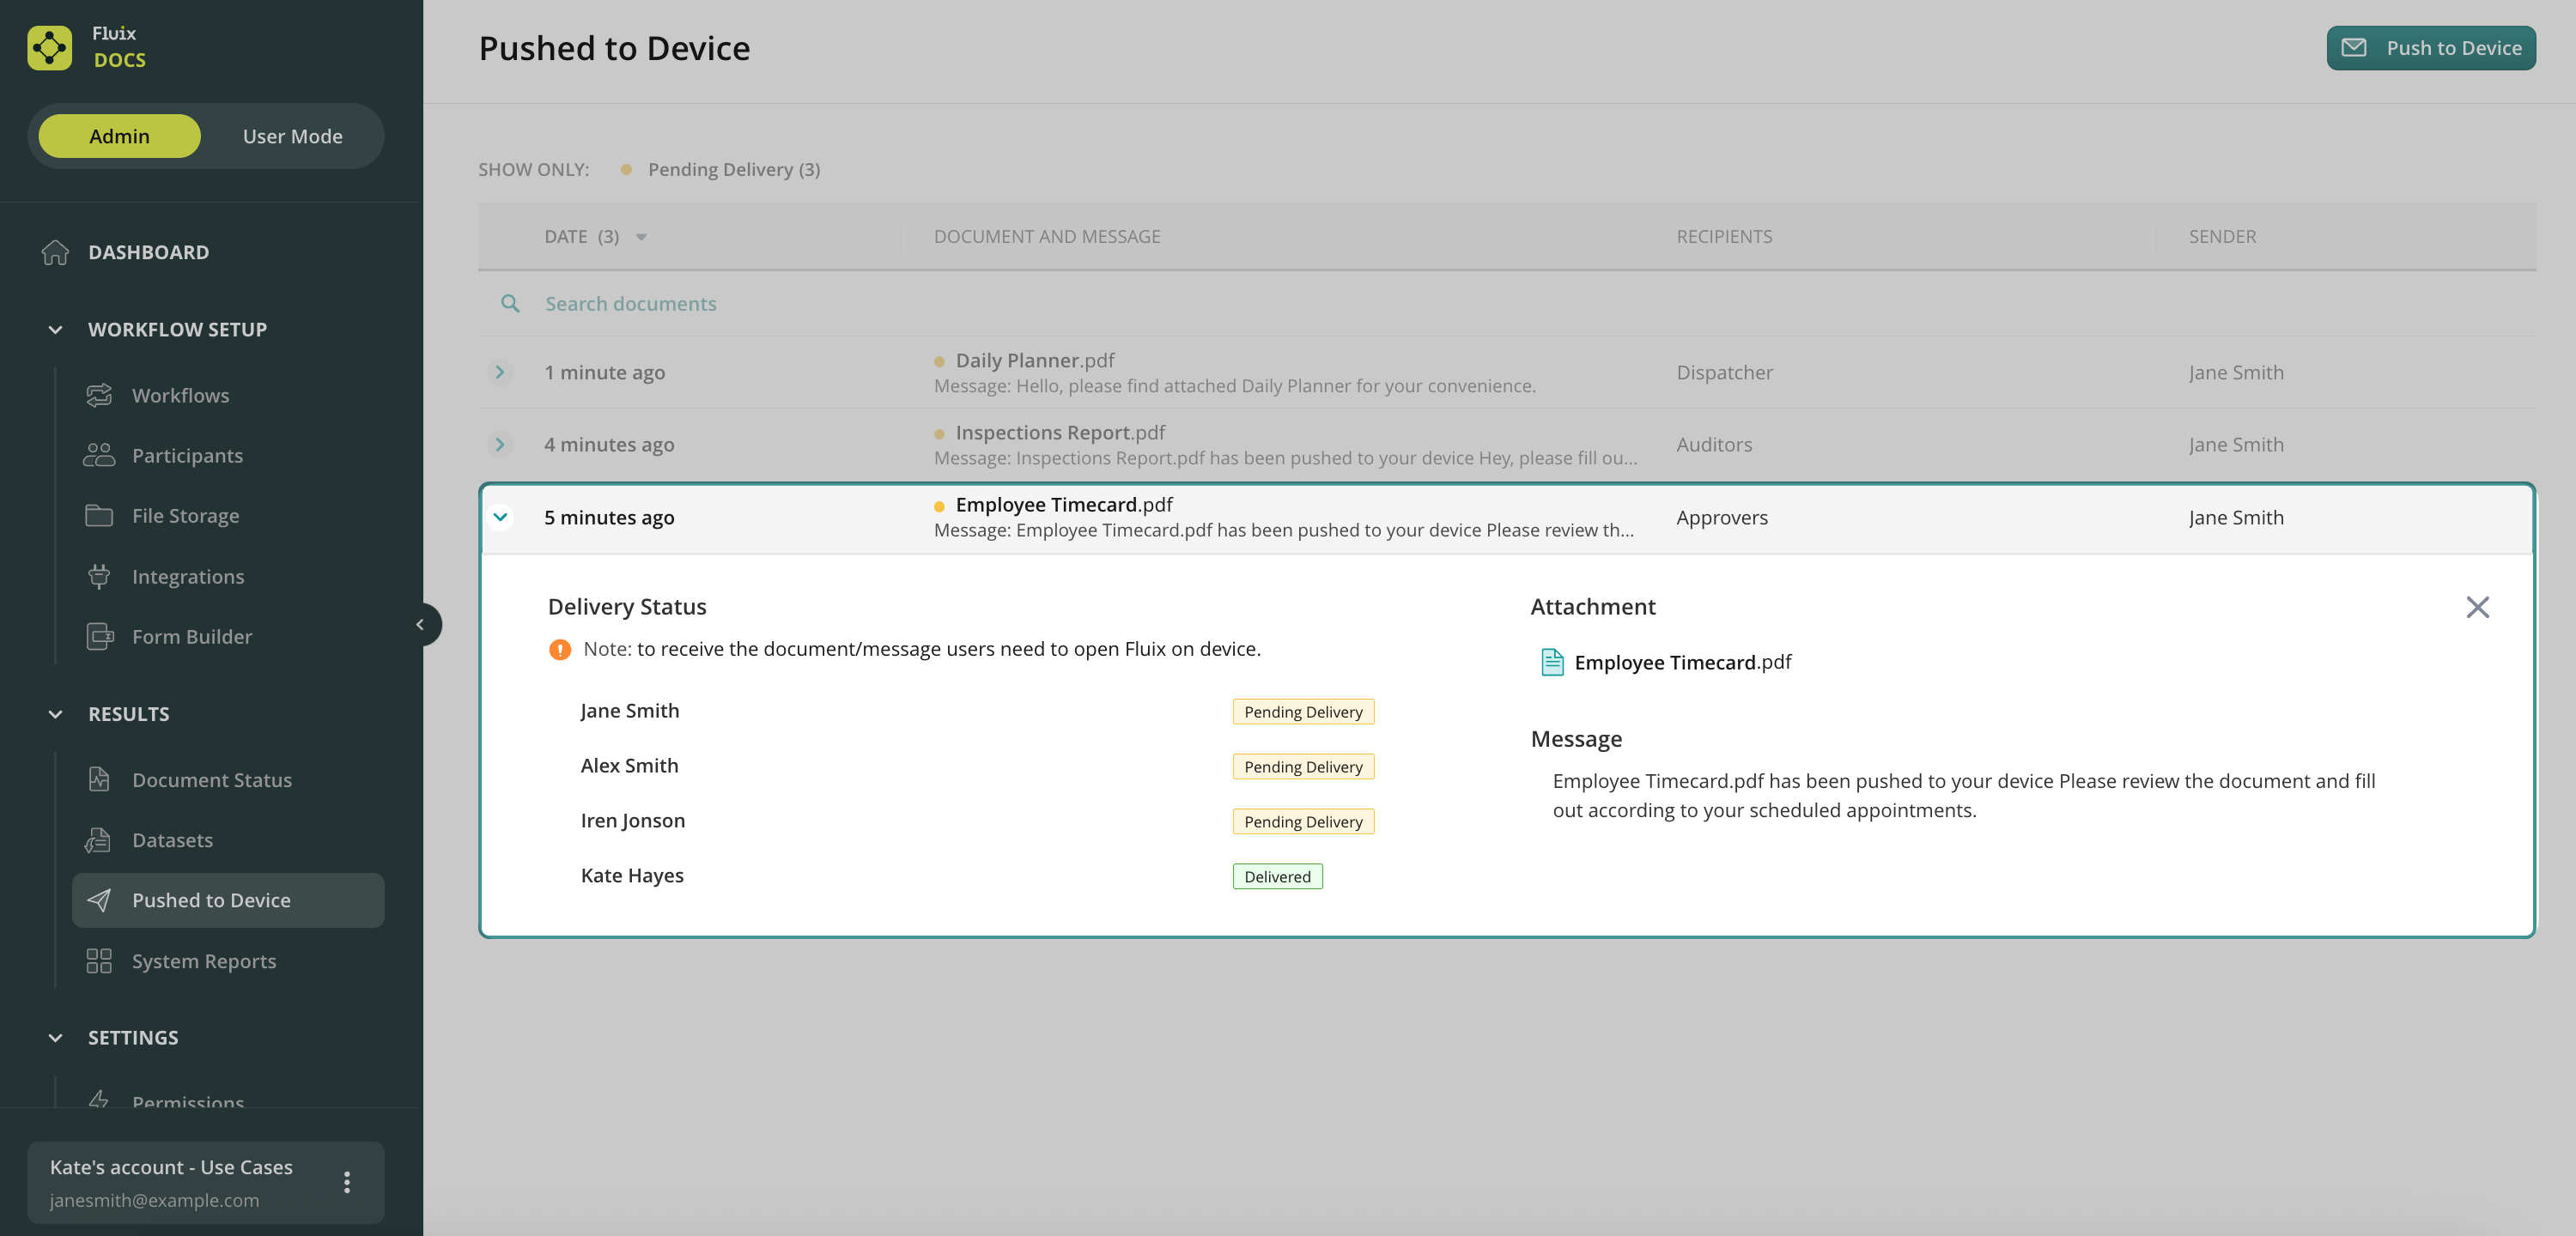
Once the document or message is pushed, users can find them in the notification bell on device, the documents are then stored under the Personal tab. In web application, the documents land in the Documents tab, while the messages are not available.
To track the delivery status and other details, simply click on the document:
Once the document or message is pushed, it is getting the Pending Delivery status. Once a user logs into Fluix, the status changes to Delivered.
Please, note that the pushed document can’t be withdrawn or deleted. While, you can overwrite it by the document with the same name. The respective option called ‘Overwrite pushed documents with the same name in the app’ can be enabled in the File Sharing settings under the Configuration section.
The system is trying to deliver the document during 30 days, then it becomes unavailable and stays in the system with the status ‘Pending Delivery’.
Was it helpful? Feel free to contact us at support@fluix.io if you have any questions or comments.
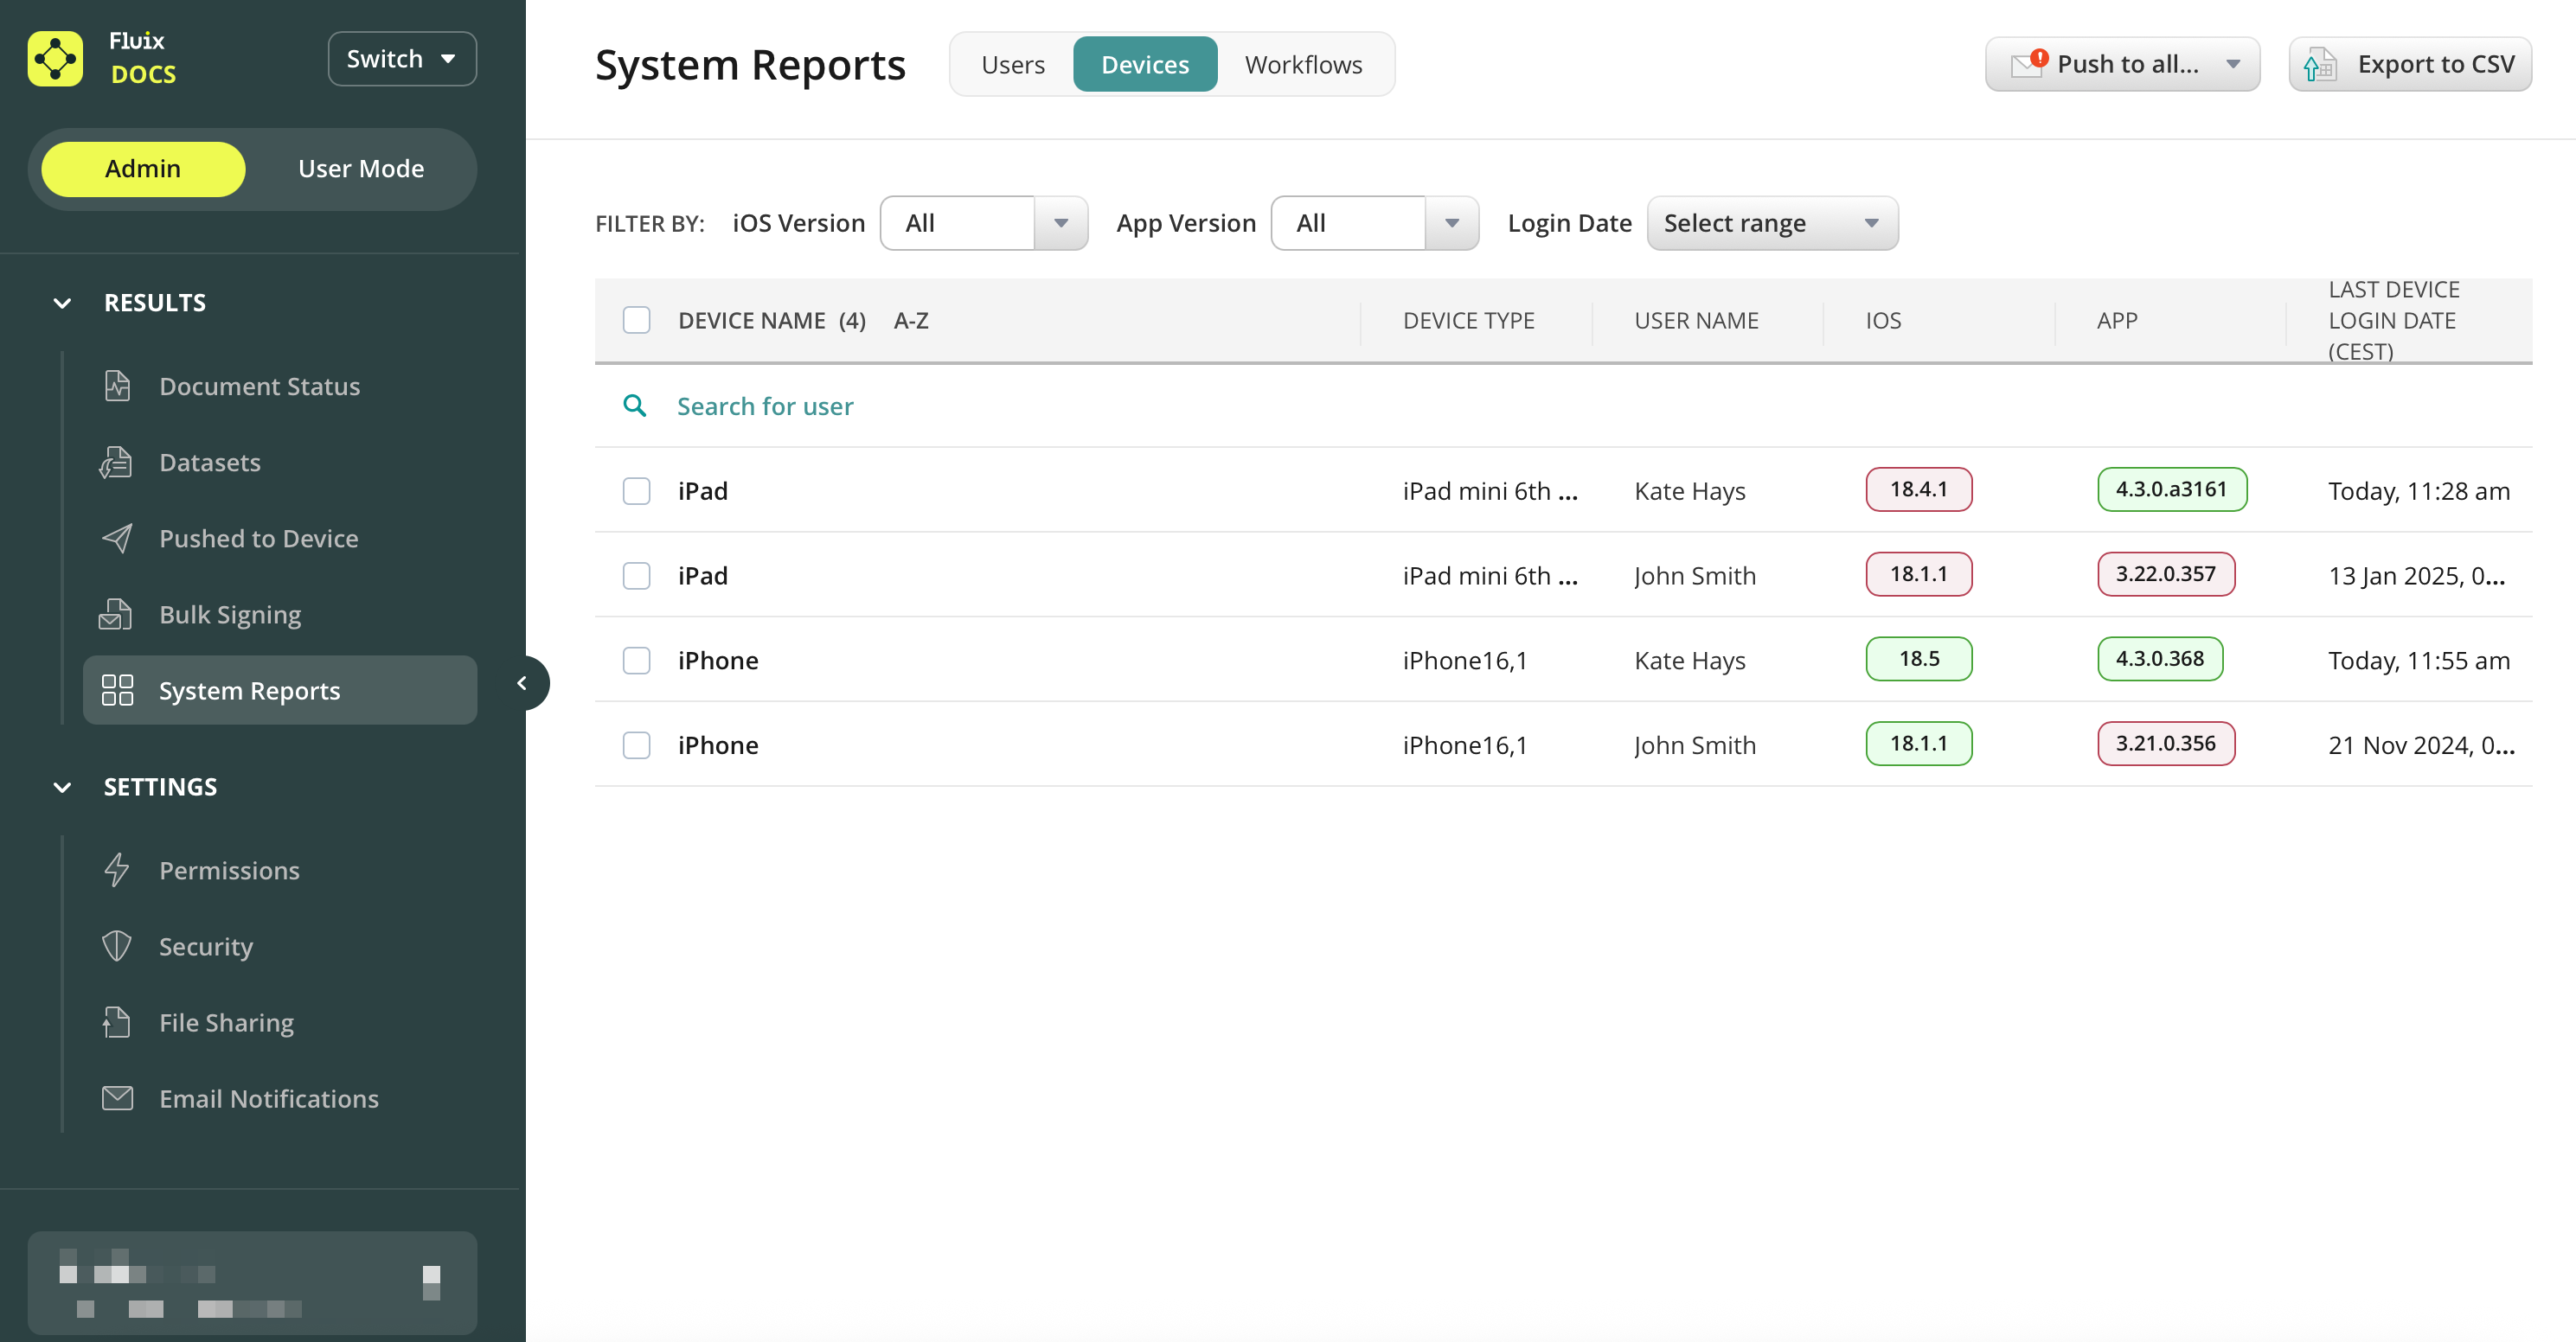
Devices section is aimed to keep your users devices always up-to-date. Here you can check the device Fluix app and iOS version, last login date, and push a message to the user’s device to update.
The versions that are in green are up-to-date, the red ones are outdated. Please, note that the old devices that cannot be updated to the latest iOS or Fluix version (e.g. the latest available iOS for iPad 2 is 9.3 and the latest Fluix app version is 2.24.3), then 9.3 and 2.24.3 are considered to be the latest one for such a device and it is marked in green.
The latest supported Fluix app version is 2.19. All devices, running the version below 2.19 were logged out and won’t be able to log in until they update.
The devices can be sorted by iOS version, Fluix app versions and login dates.
To remind users to update, you can push a message via Push to all option or select a particular user and push him a reminder. The reminder will be sent to the device as a system message, even if Push notifications are disabled in the device Settings.
Was it helpful? Feel free to contact us at support@fluix.io if you have any questions or comments.
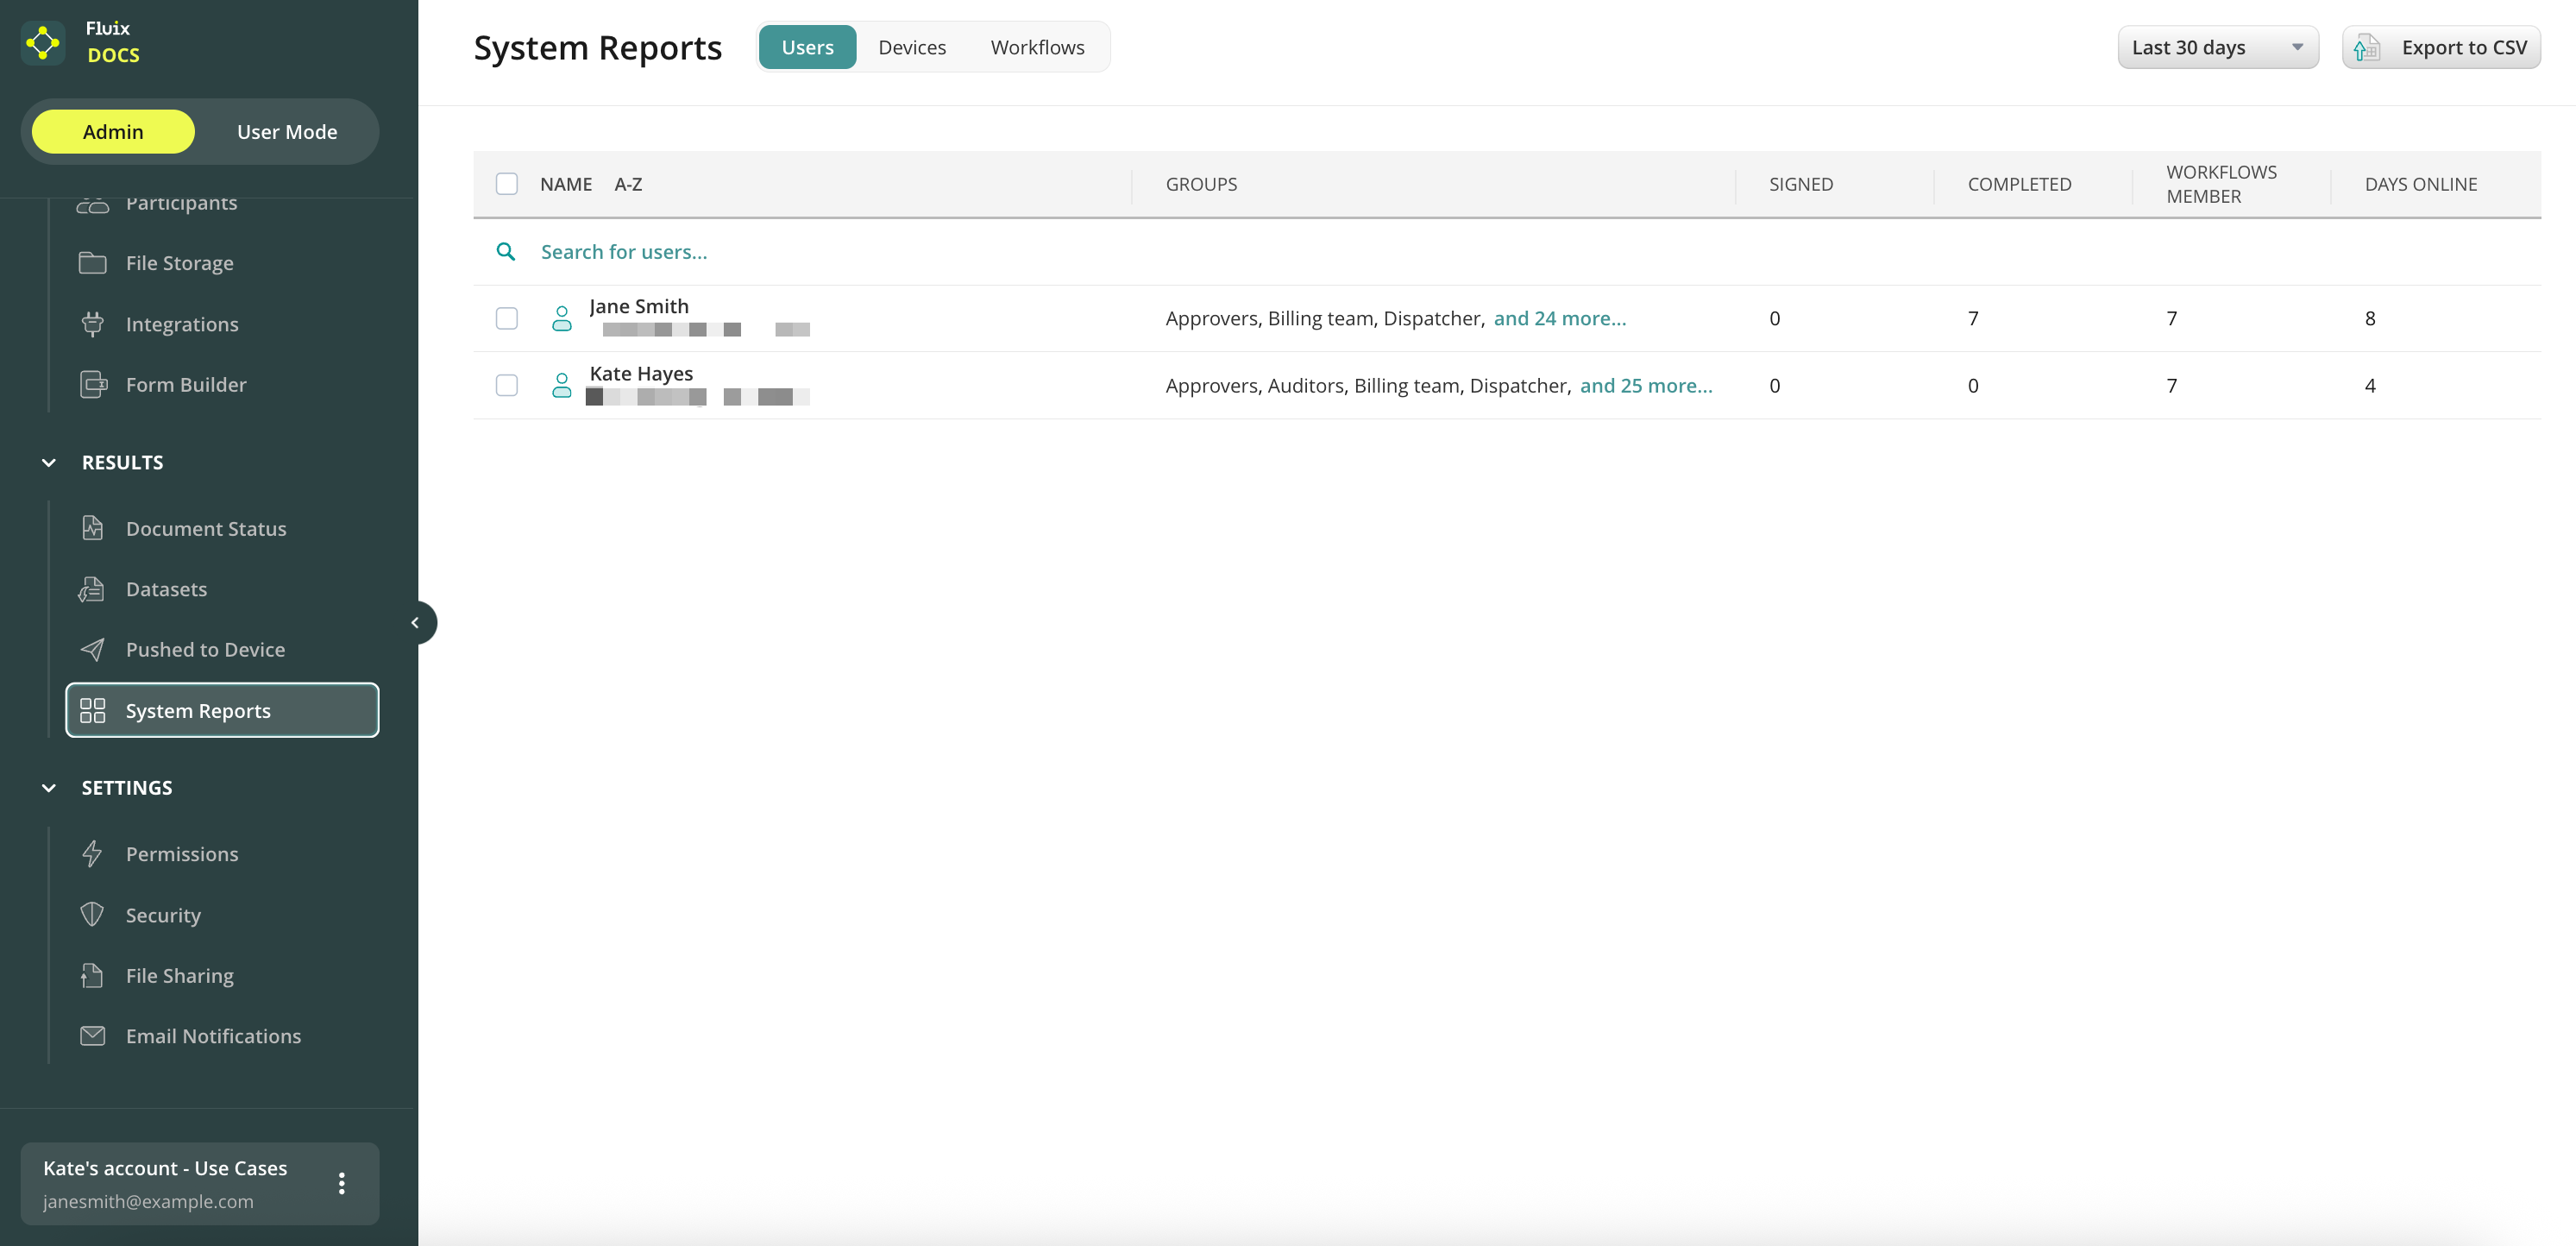
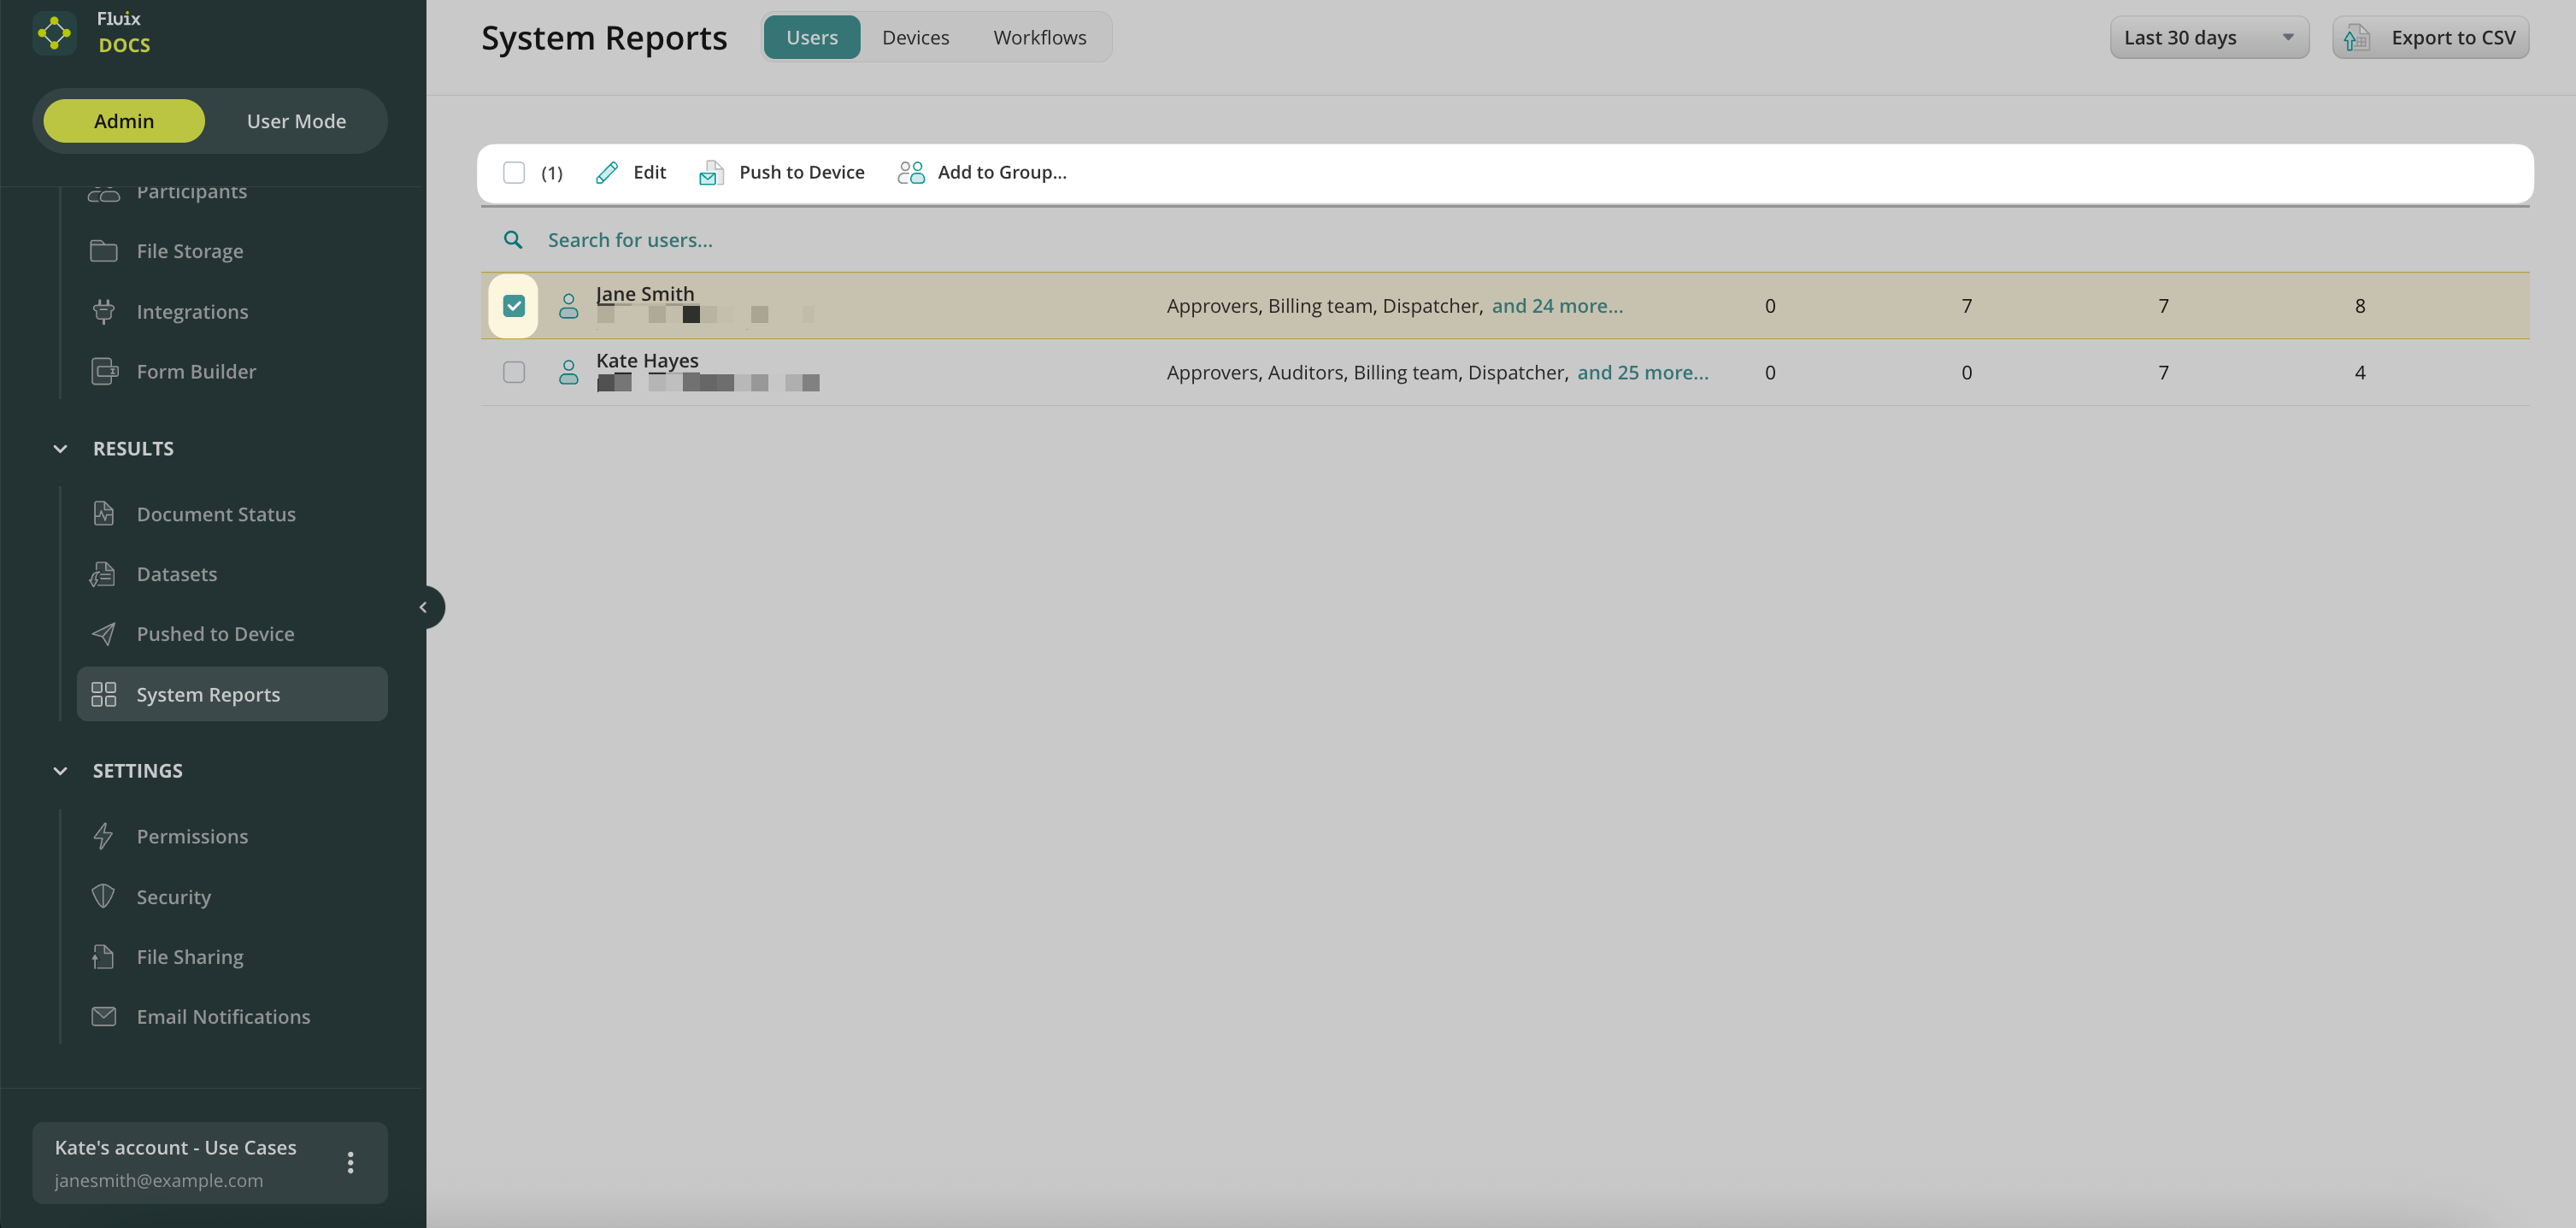
In the System Reports tab of Results section, you can check certain user-related metrics e.g. the number of signed and completed documents, how many workflows each user participates in, last login date. To make the report more specific, you can select the period of time in the top right corner.
Upon selecting a user, such options as Edit, Push to Device, Add to Group or Delete are available:
Feel free to contact us at support@fluix.io if you have any questions or comments.
Was this article helpful?
Thanks for your feedback!
Oops, something went wrong. Please, try again later.
Thank you!
What details or examples would have made this article more helpful for you? We appreciate your insights!
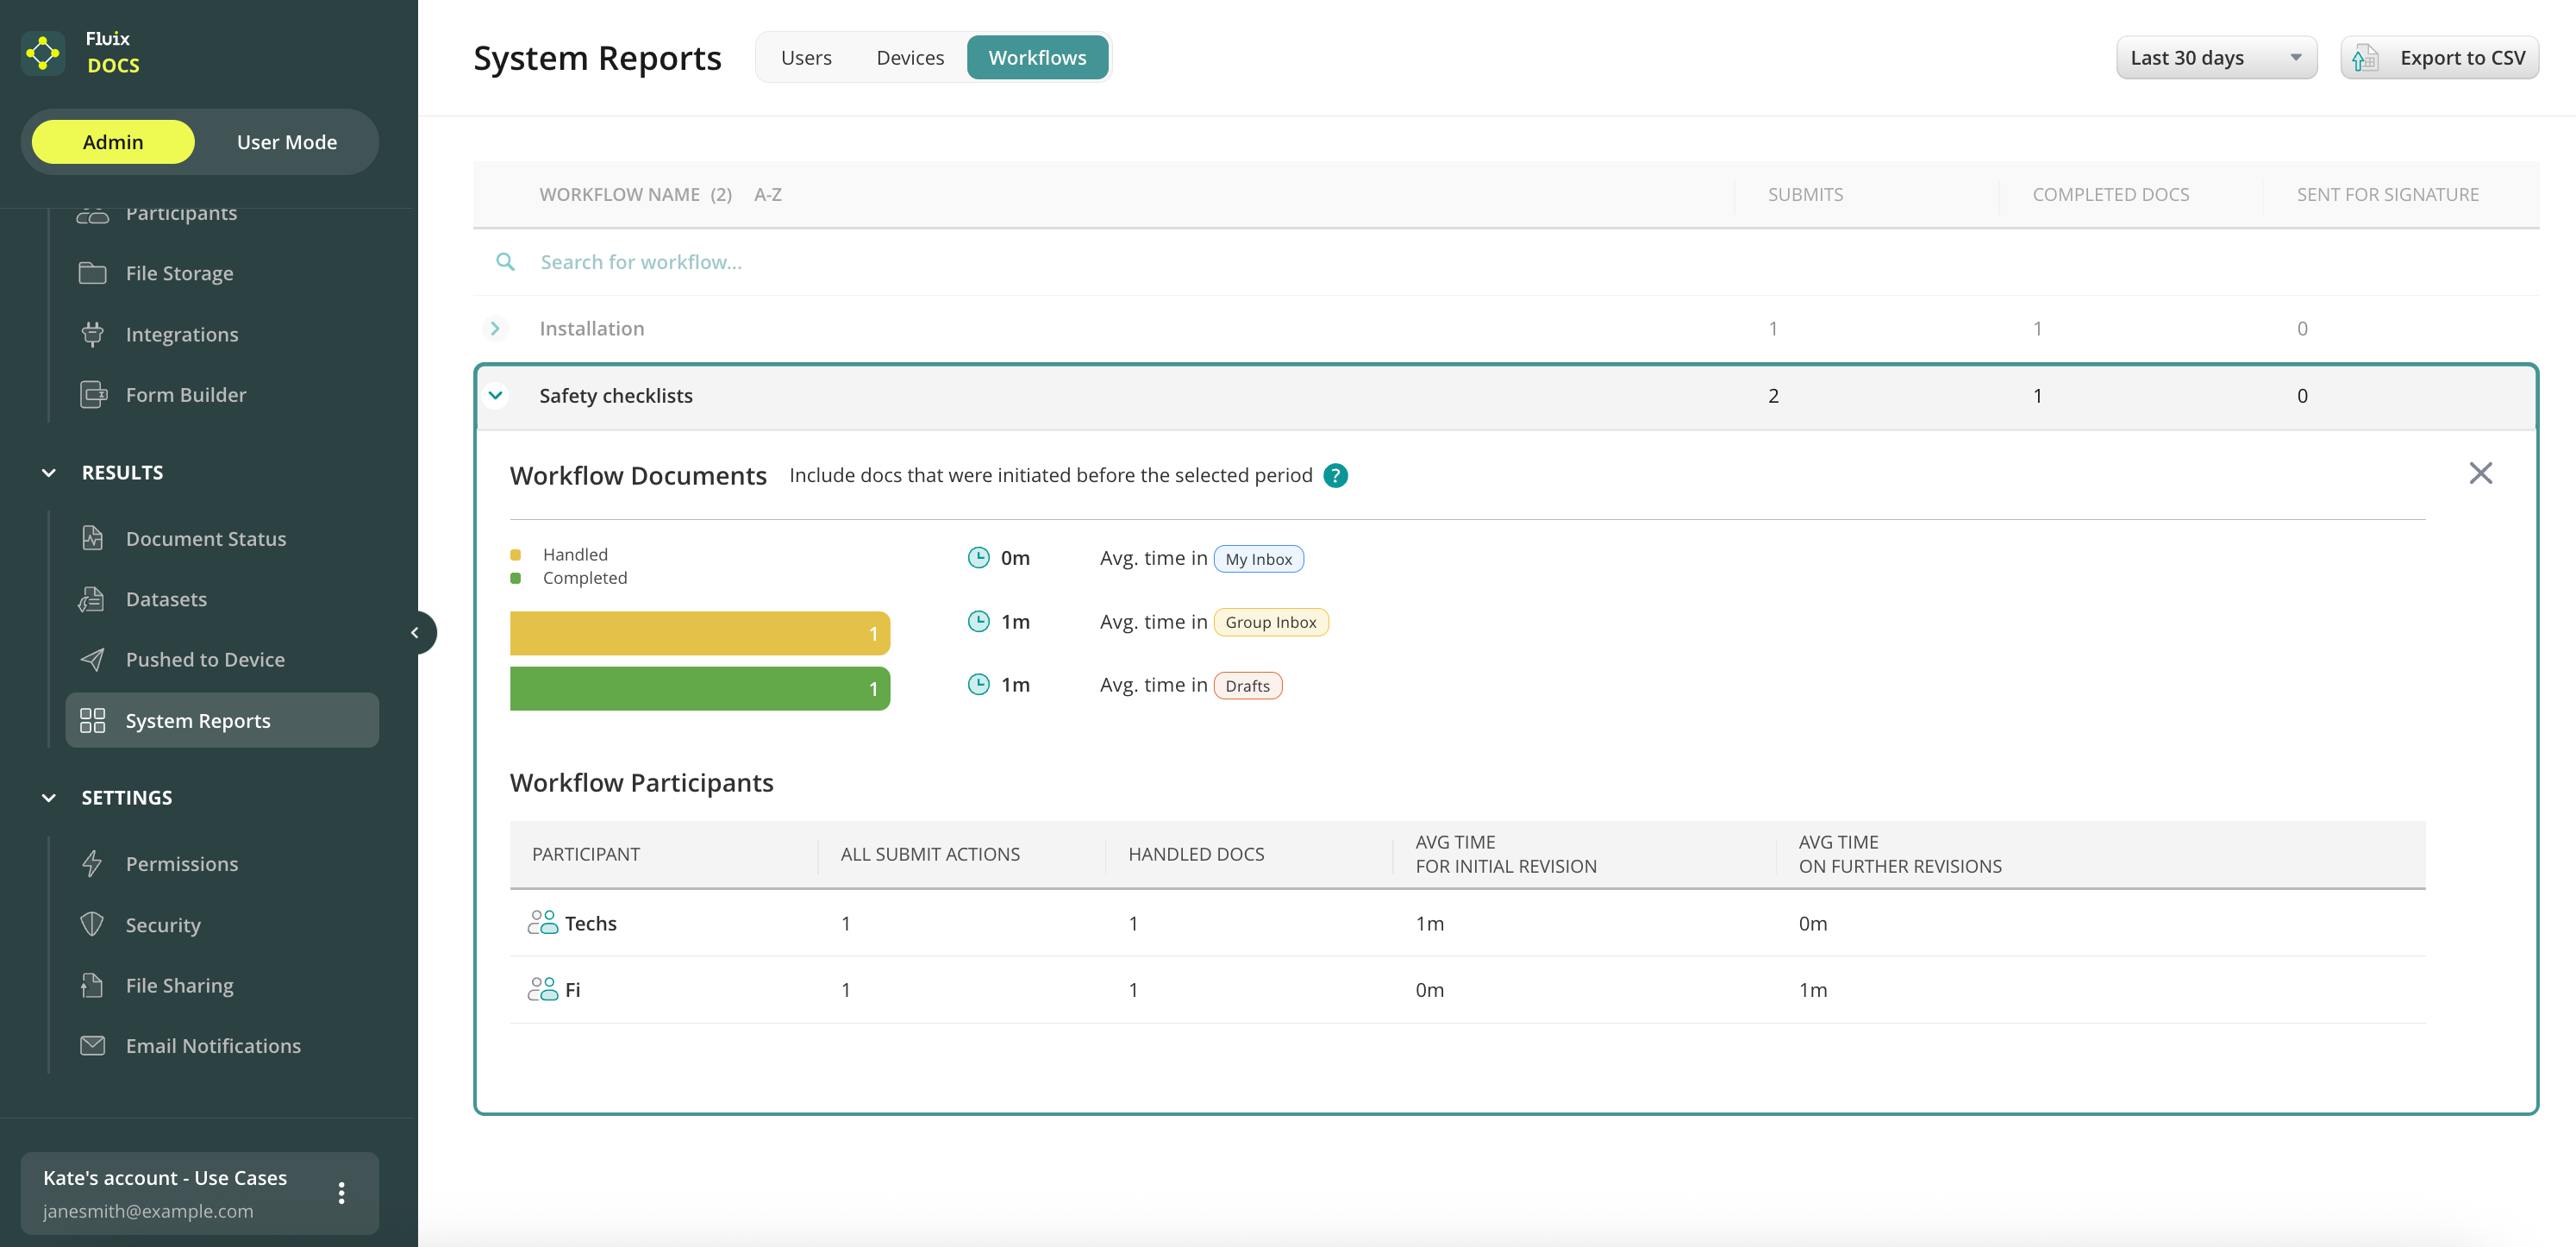
In the System Reports tab of the Results section you can see the list of workflows in your account and their main parameters like number of submits, completed and sent for signature documents. The period of time can be selected in the top right corner.
By clicking on any workflow you will get more details on documents routed within a workflow.
Handled are the documents that were changed at any stage for the period selected.
Completed are those documents that were submitted to the final destination (uploaded to storage, emailed to office, etc.).
Workflow Participants table includes:
Participants — users and groups that participated in a workflow.
All Submit Actions — include all reassigns, submits to completed state, resubmits from completed, documents sent for signature.
Avg Time For Initial Revision — this is the average time a document in this particular workflow stays from the initial stage (Templates, My Inbox, Group Inbox, Cabinet) until its submit to further stage.
Avg Time on Further Revisions — shows the average time of the document that was taken for the second time and afterwards, e.g. from the Completed tab to Drafts.
Feel free to contact us at support@fluix.io if you have any questions or comments.
Was this article helpful?
Thanks for your feedback!
Oops, something went wrong. Please, try again later.
Thank you!
What details or examples would have made this article more helpful for you? We appreciate your insights!
Sign Up to Our Product Newsletter
The latest updates from our Product team, straight to your inbox