


Asana is a project management tool that helps teams to organize and plan project tasks in one place – a dashboard. Asana is a web and mobile application.
By integrating Fluix and Asana, you will automate your team’s processes, stay on track of the tasks and keep the projects organized. In particular, Fluix will automate the process of filling out forms on mobile devices and creating tasks in Asana as well as uploading the completed forms to the task.
Note. Integration requires a Core account in Fluix and an account in Asana.
Let’s look at how this integration works.
Step 1 – Creating a Fluix app in Asana
To start the integration, you’ll need to create the Fluix App in Asana that will be used for authentication purposes, and with the help of which you will be able to grant access to your Fluix account to perform the changes in your Asana account.
1. To register the App, please follow the link.
2. Click +New App, specify the name of the app, let’s say “Fluix App”, and add a checkmark to agree with the API terms and conditions.

Once done, click Create app.
3. Take note of the client ID and the client secret in the Authorization tab. These parameters will be used for authorization further. Specify the Redirect URL depending on the domain you’re using in Fluix. Select the one from the list:
https://admin.fluix.io/api/intg/oauth2/authorization-code
https://admin-eu.fluix.io/api/intg/oauth2/authorization-code
https://admin-eu2.fluix.io/api/intg/oauth2/authorization-code
https://admin-aus.fluix.io/api/intg/oauth2/authorization-code
https://admin-us-west.fluix.io/api/intg/oauth2/authorization-code
4. Optional. Go to the Settings tab and add the app icon and the website. Click Save Changes once done.
Step 2 – Configuring a Fluix workflow
In your Fluix account, go to Configuration -> Workflows. Select the workflow or create a new one for the documents that need to be filled out and then appear as attachments on the Asana dashboard.
In the selected workflow, add a submit action called Upload to CRM/ERP. For creating a task in Asana and uploading the file to this task, we will need to configure 2 requests for each of these processes.
Process 2.1 – Configuring a request for creating a Task
1. Configure the request name, let’s say “Create a Task”, select POST as the data type, and add the following URL – https://app.asana.com/api/1.0/tasks.
2. Go to the Header tab and enter the following:
- Header name – Content-type
- Header value – application/json
- Header name – Authorization
- Header value – OAuth2

Note: We recommend entering the value manually since it will allow adding already preset parameters from the dropdown list.
3. Go to the Body tab:
- Enter the following in the Text tab: {“data”:{“projects”:”%project_id%”,”name”:”%task_name%”}}
- Replace the %project_id% parameter with the ID of the project to which the task needs to be added. You may find it in the address bar when the Asana project tab is opened:

- Replace the %task_name% parameter with the title you would like to have a task created with. For example, “A new document ‘Document Name’ has been submitted”. In this case, the name of the document will be displayed in the task title.

4. Go to the Auth tab and open the OAuth section:
- Select Authorization code in the Grant type field
- Specify the client ID and the client secret in the relevant fields generated during step 1.
- Add the link https://app.asana.com/-/oauth_authorize to the Authorization URL field.
- Add the link https://app.asana.com/-/oauth_token to the Access token URL field.

5. Once done, click Get Access and you will be redirected to the page where you will be requested to provide permission to the Fluix app in Asana. Click Allow to proceed. As an indicator that everything was set up successfully, you’ll see a green Access Granted in the Auth tab.
Process 2.2 – Configuring a request for uploading a File
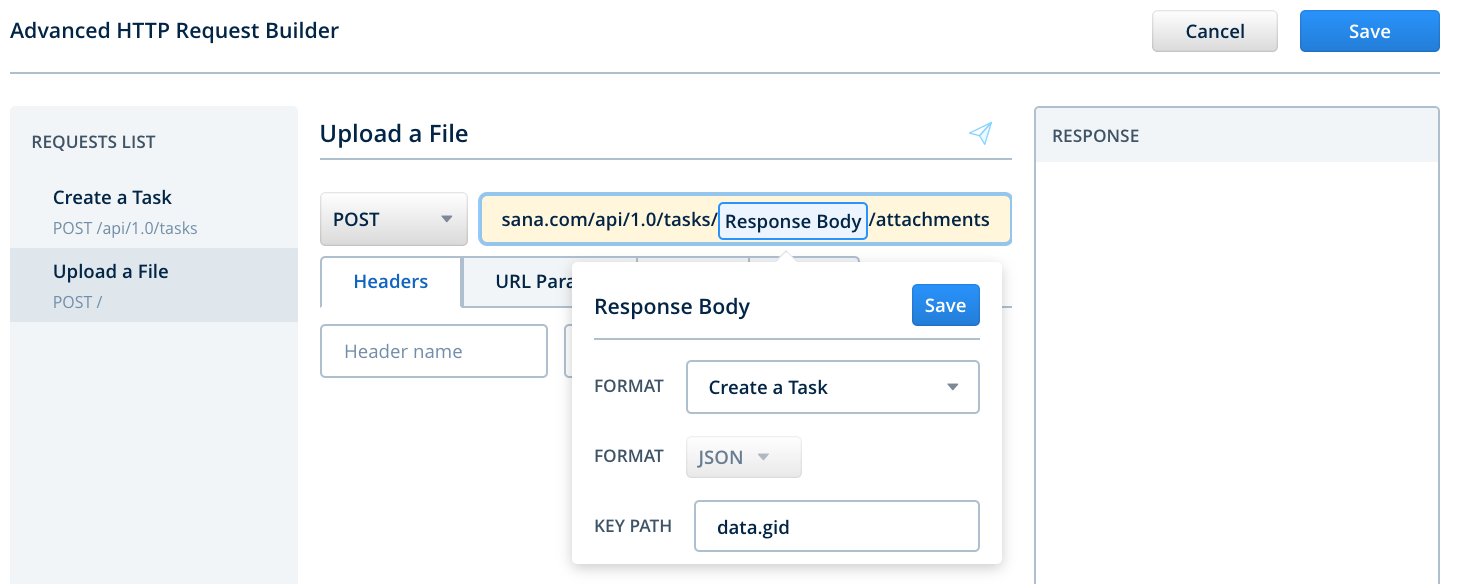
1. Configure the request name, let’s say “Upload a File”, select POST as the data type, and add the following URL – https://app.asana.com/api/1.0/tasks/Response Body/attachment.
Note: We recommend entering the value Response Body manually since it will allow adding already preset parameters from the dropdown list.
2. Configure the Response Body parameter by clicking on it, selecting the Create a Task request, and specifying the key path as ‘data.gid’.
Click the Save to apply the changes.
3. Go to the Header tab and enter the following:
- Header name – Authorization
- Header value – OAuth2

Note: We recommend entering the value manually since it will allow adding already preset parameters from the dropdown list.
4. Go to the Body tab and select the Multipart tab:
- Part name – name
- Part value – Document name
- Part name – file
- Part value – Document file
- Configure the Document File parameter by clicking on it, selecting the necessary document type.
- Click Save to apply the changes.

5. Go to the Auth tab and open the OAuth section (the settings are the same as in the first request for creating a task):
- Select ‘Authorization code’ in the Grant type field
- Specify the client ID and the client secret in the relevant fields generated during step 1.
- Add the link https://app.asana.com/-/oauth_authorize to the Authorization URL field.
- Add the link https://app.asana.com/-/oauth_token to the Access token URL field.
6. Once done, click Get Access. You’ll see a green indicator Access Granted in the Auth tab.
After all the requests are configured, click Save in the top right corner of the Advanced HTTP Request Builder. To save changes in a workflow, click Save & Apply to apply the changes to the workflow and go to test the setup.
Step 3 – Testing
Go to the Fluix app on the device or User App in the web browser version. Open a test form, fill it out and submit it through the workflow.
In Asana, you will see a new Task created with an attached file in it.
In case you have any questions or difficulties with setup, contact our support at support@fluix.io and we’ll be happy to help you.
Check other business integrations here.