Does your business process entail a need in DMS (Document management system) and CRM (Сustomer relationship management) systems, but you have to copy-paste data from one to another? There is a way to automate this process by integrating these tools.
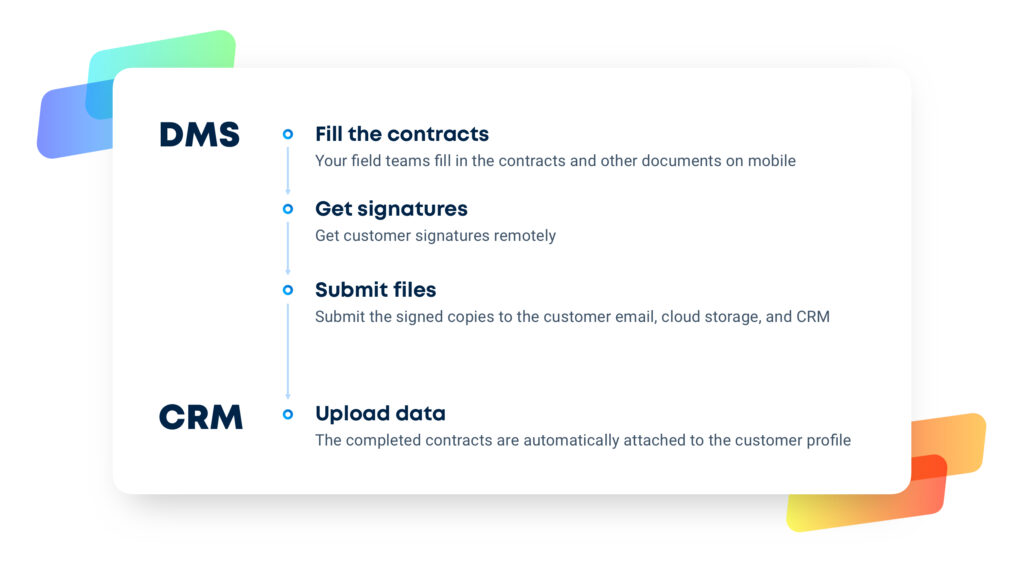
Automated workflow. Assurance that documents are getting directly to CRM as soon as such are completed, eliminates time waste on manual upload of documents and data entry, reduces mistakes, and frees up your staff to focus on high value-added tasks.
Real-time control. The regular update of the document status in the system makes it easy to track the work progress.
Increased security. With a centralized place for data storage there is no need to control the data transfer across different platforms and keep completed documents on the external storage for an extended period of time.
Saved time. Service and production teams have instant access to completed documents on their mobile device, which significantly speeds up work on site. There is no need to search through shared folders anymore since company management can pull out any contract/item on any customer quickly.
To integrate Fluix with your CRM, please proceed to this article. Feel free to contact us at support@fluix.io if you have any questions or comments.
If you don’t have Fluix account yet, our experts will be happy to answer any of your questions.
Fluix is a web and mobile-based cloud platform that helps teams set up digital document management and workflow automation. In this integration, Fluix serves as an electronic data capture system.
Salesforce – is a cloud-based software system that provides CRM (Сustomer relationship management) service which gives you the ability to track and analyze customer data including contact and account information.
What Fluix + Salesforce integration does
The integration allows for seamless synchronization of data between Fluix and Salesforce. This means that customer details and data entered into the document can be shared and updated in real-time across both systems, ensuring data consistency and accuracy. It eliminates the need for manual data entry and reduces the risk of errors.
With Fluix and Salesforce integration, businesses can automate sales processes and streamline document flows. Sales representatives can access and update sales contracts, quotes, and work order forms directly from their mobile devices on the go in Fluix, and right away notify the responsible team members about the deals by automatically updating the data in the work order in Salesforce.
Note. Integration requires a Core account in Fluix and an account in Salesforce. To try the option, you can register for a free trial account in Fluix and register the account in Salesforce.
In order to set up Salesforce integration in Fluix taskstream, please follow the instructions below.
Step 1 – Create the repetitive process in Fluix
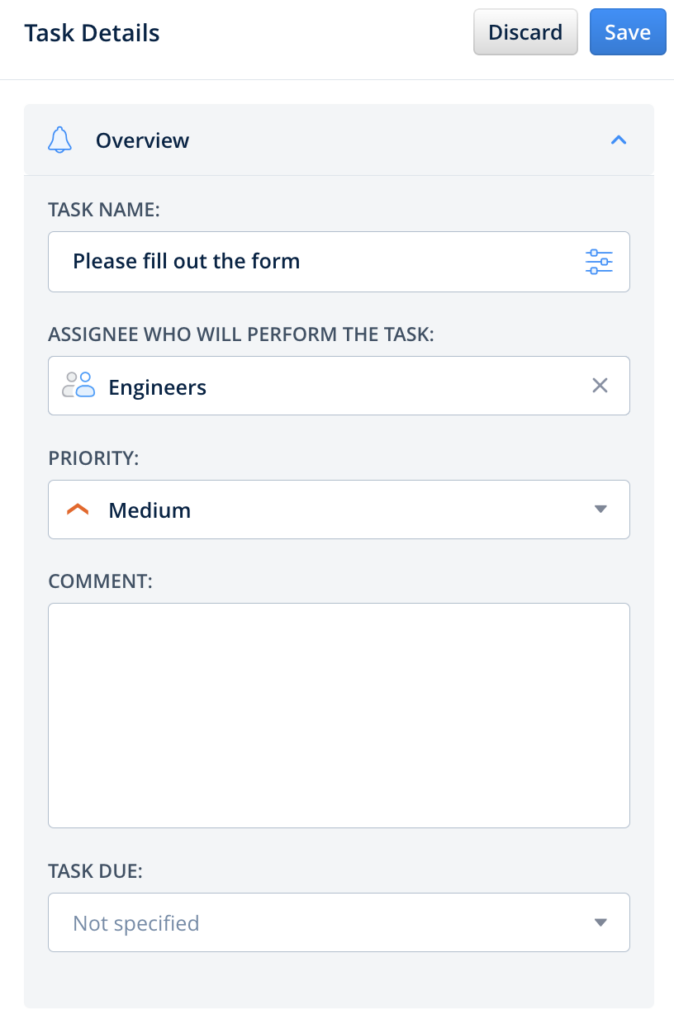
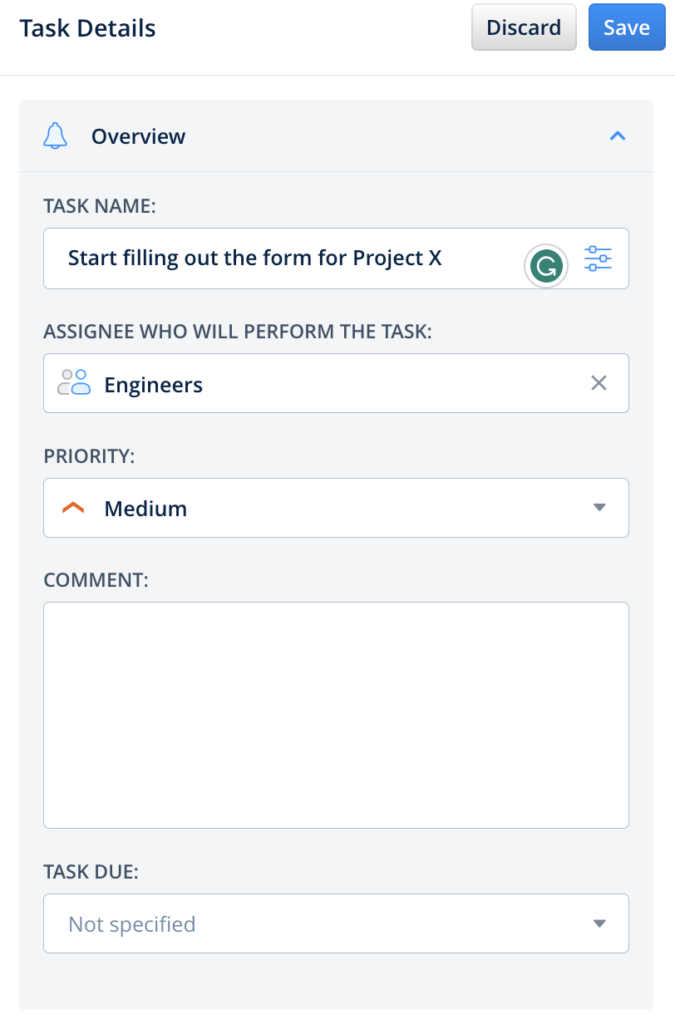
Navigate to the Fluix admin portal, Taskstreams section, to create a new taskstream. Drag-n-drop a User task to the working area and configure it by adding fillable forms and assigning it to the team that will work on it on a regular basis. Make sure that you have added yourself to the group of users in order to test the setup later.
Step 2 – Configure Share to Integration in Fluix
Drag and drop Share to submit action to the Taskstream chart and connect it with the User task that your team will be working on.
Click on the Share to element and select Salesforce among the list of third-party tools. You will be redirected to the Salesforce authorization page where you’ll need to provide Fluix with the permissions to access it.
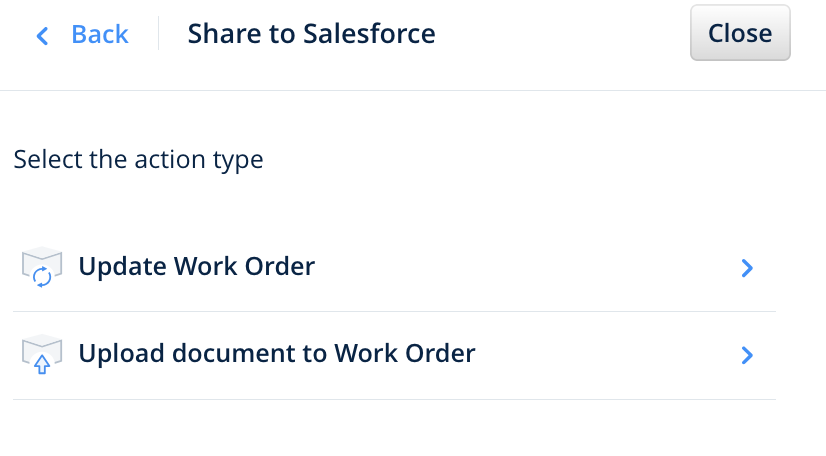
Once done, select the action that you would like to be triggered upon completion of the respective process in Fluix.
Step 3 – Configure the data extraction
Let’s look into 2 real-life scenarios as examples of configuring the automation of processes between Fluix and Salesforce. Firstly, to integrate Salesforce with Fluix, you’ll need to know the domain name and the work order number in your Salesforce account.
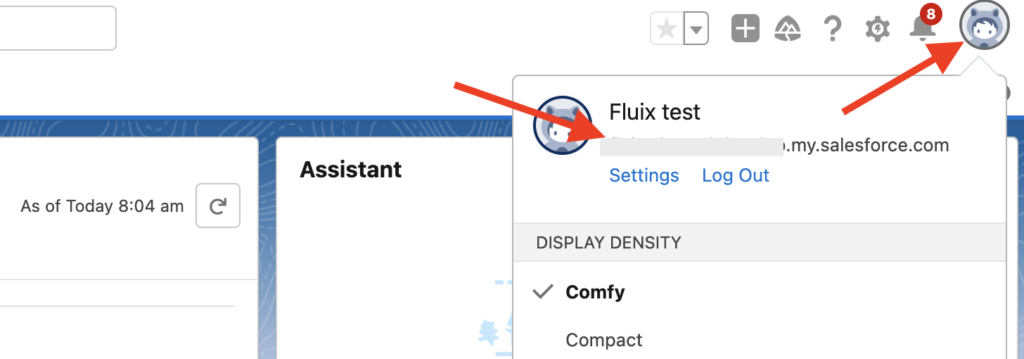
In order to find the domain name, please open your Salesforce account, tap on your avatar in the upper right corner, and copy your Salesforce company name before my.salesforce.com.
The Work order number is generated automatically when you create a new order in Salesforce.
Scenario 1: Updating the existing work order in Salesforce
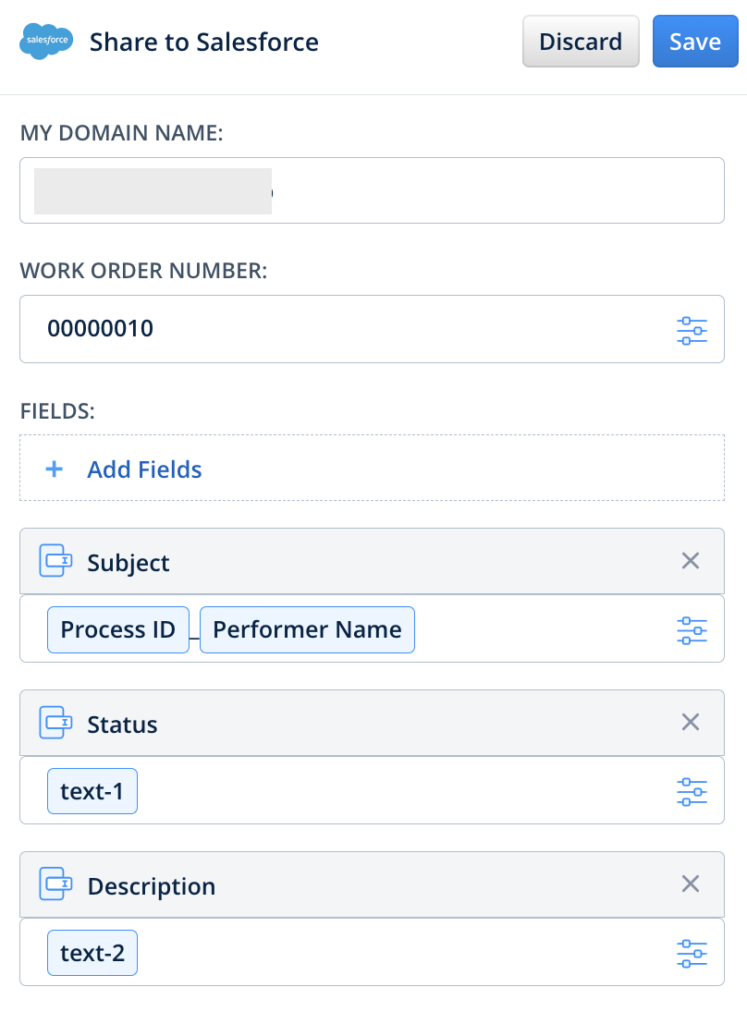
Click on the connected Salesforce account, and select the Update work order option from the list. Fill out both My domain name and Work order number fields. Click Save in order to save the changes in the submit action. After that, the ability to add fields will become available.
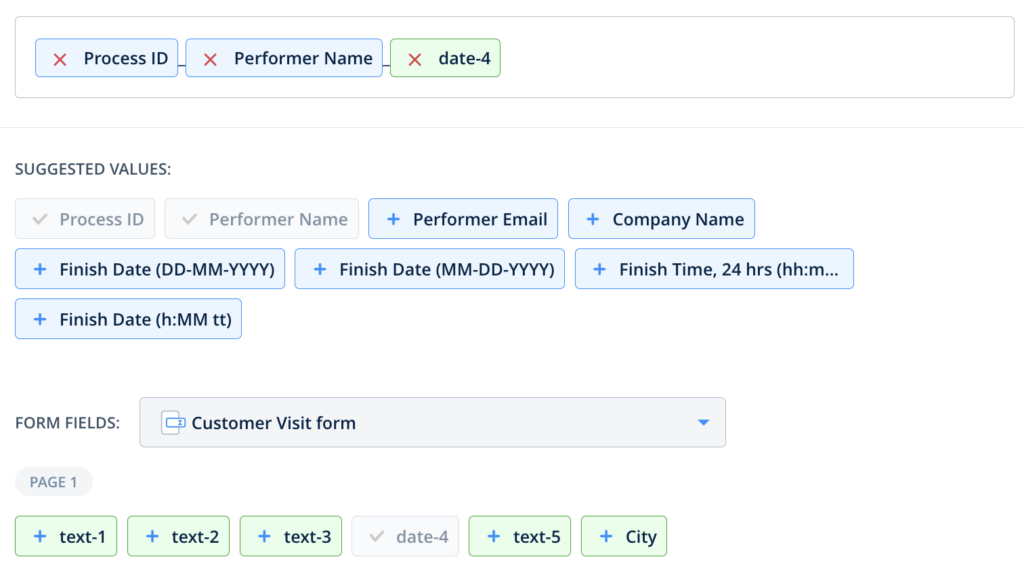
Add the fields that need to be updated upon form submission in Fluix.
Ensure that the dynamic values in the newly added fields are set up so that upon submission of the form in Fluix, the entered data will be retrieved from the selected fields and populated accordingly in the work order within the Salesforce account.
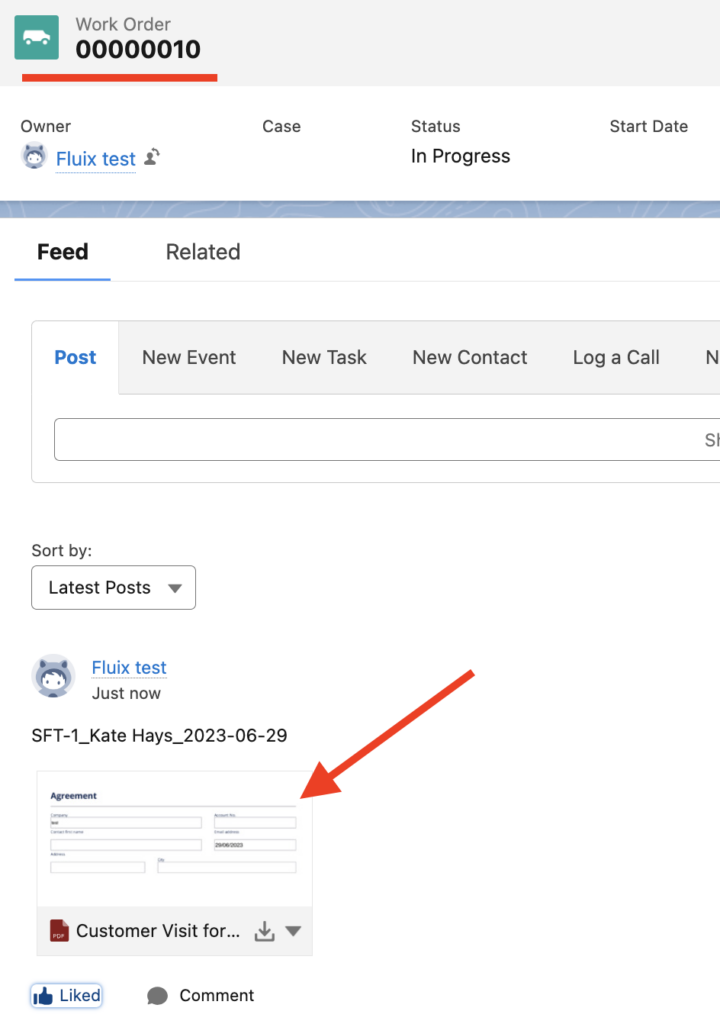
Once the Fluix user submits the form in Fluix, the data will be pulled out of the form in Fluix to the work order in Salesforce.
Scenario 2: Uploading the documents from Fluix in the specific work order.
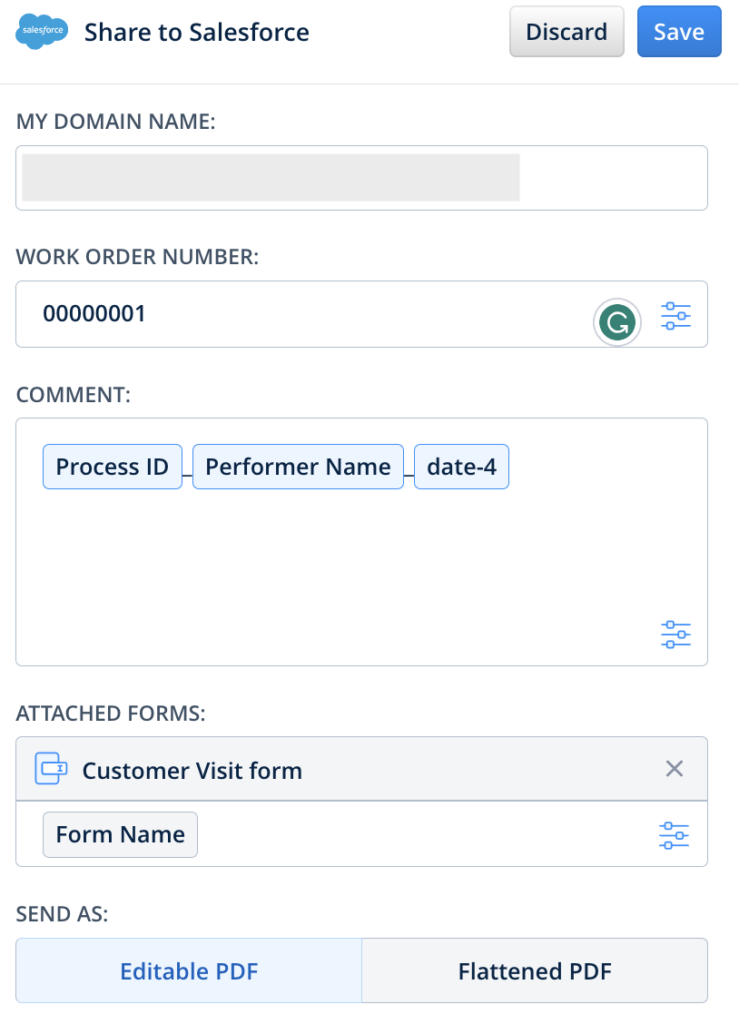
Click on the connected Salesforce account, and select the Upload documents to work order option from the list.
Fill out My domain name and Work order number fields. In the Comment section, configure the text that will be added along with the finished form in Fluix.
Upon form submission in Fluix, it will be automatically attached to the pre-configured work order in Salesforce.
Step 4 – Save and test the setup
Once you fill out all the fields, click Save&Publish to activate the Taskstream. Open the user app on the mobile device, or click User App in the right corner of the admin portal. Navigate to the task that you created, fill in the form, and finish it.
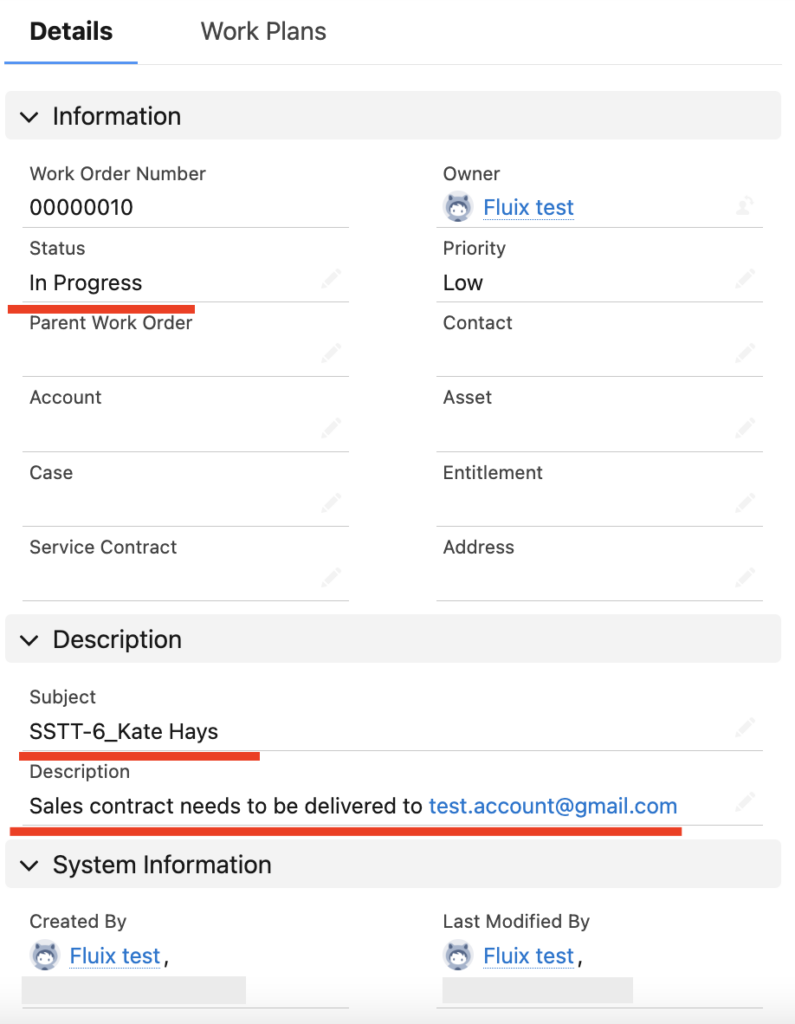
Once the task is submitted in Fluix, entered data automatically appears in the pre-configured work order in your company’s Salesforce account.
In case you have any questions or difficulties with setup, contact our support at support@fluix.io and we’ll be happy to help you.
Was this article helpful?
Thanks for your feedback!
Oops, something went wrong. Please, try again later.
Fluix is a web and mobile-based cloud platform that helps teams set up digital document management and workflow automation. In this integration, Fluix serves as an electronic data capture system.
Monday.com is a project management platform that gives the ability to shape business processes, delegate tasks and track their progress. Besides that, monday.com can be used as a CRM tool that will allow you to manage leads or sales pipelines.
What Fluix + monday.com integration does
By integrating Fluix and monday.com, you can create a seamless flow of information and automate various steps in your business processes. This helps to reduce manual effort, improve data accuracy, and enhance collaboration across teams. For example, once your team member completes the form in the Fluix app, the integration with Monday.com comes into play and a new task in monday.com for your team will be created. Alternatively, you may configure the process, that will upload the completed documents in Fluix in the selected Board in your monday.com account.
Note. Integration requires a Core account in Fluix and an account in monday.com. To try the option, you can register for a free trial account in both tools. In order to set up the monday.com integration in your Taskstream, please follow the instructions below.
Step 1 – Create the repetitive process in Fluix
Navigate to the Fluix admin portal, Taskstreams section, to create a new Taskstream. Drag-n-drop a User task to the working area and configure it by adding fillable forms and assigning it to the team that will work on it on a regular basis. Make sure that you have added yourself to the group of users in order to test the setup later.
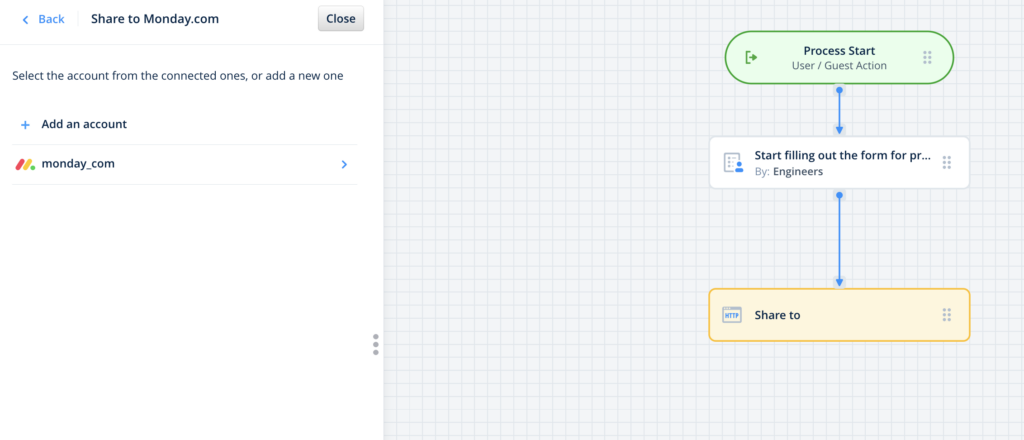
Step 2 – Connecting Fluix with monday.com
Drag and drop Share to submit action to the Taskstream chart and connect it with the User task that your team will be working on.
Click on the Share to element and select monday.com among the list of third-party tools.
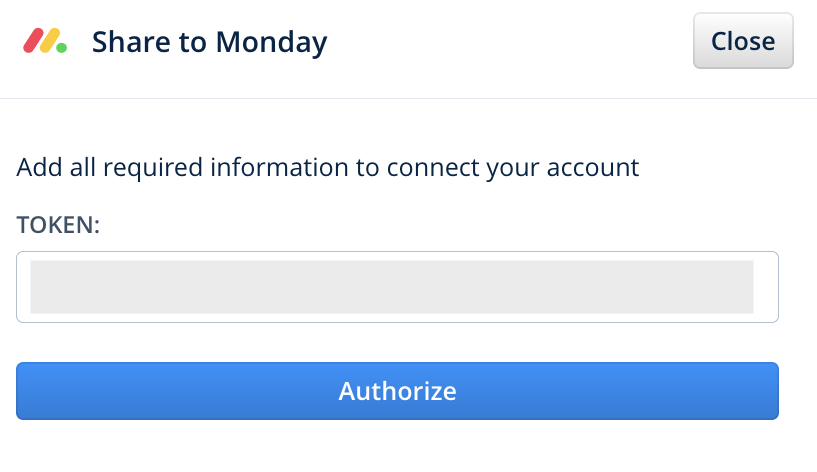
In order to locate token, please follow the instruction below:
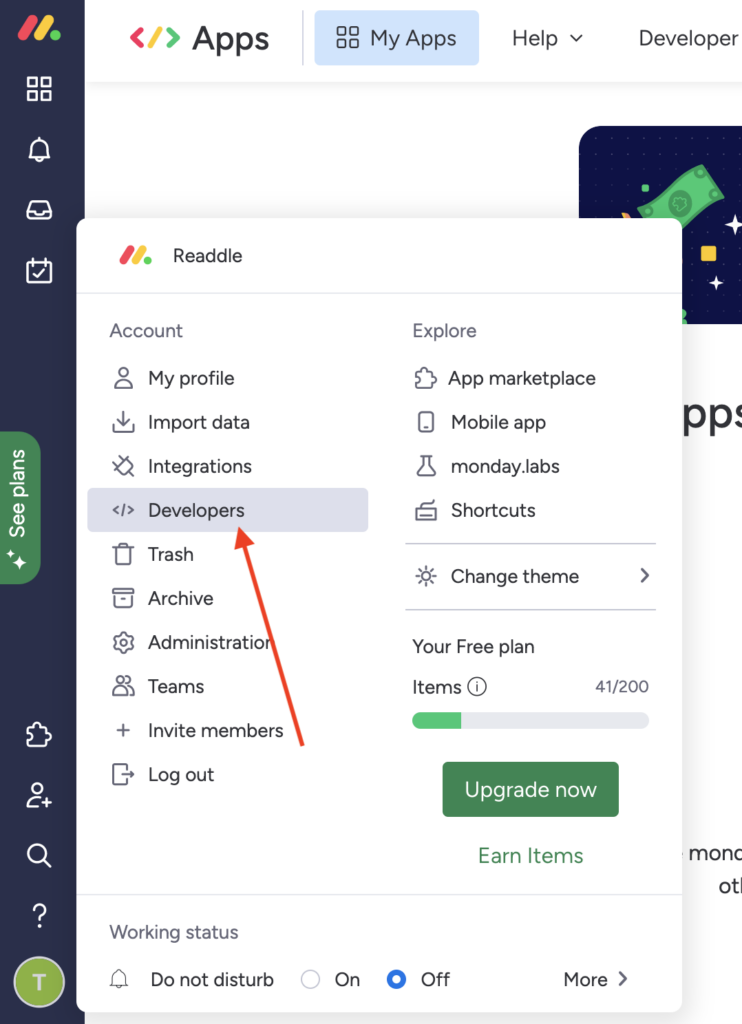
Go to your monday.com account, click on your avatar in the bottom left corner, and select the Developers section.
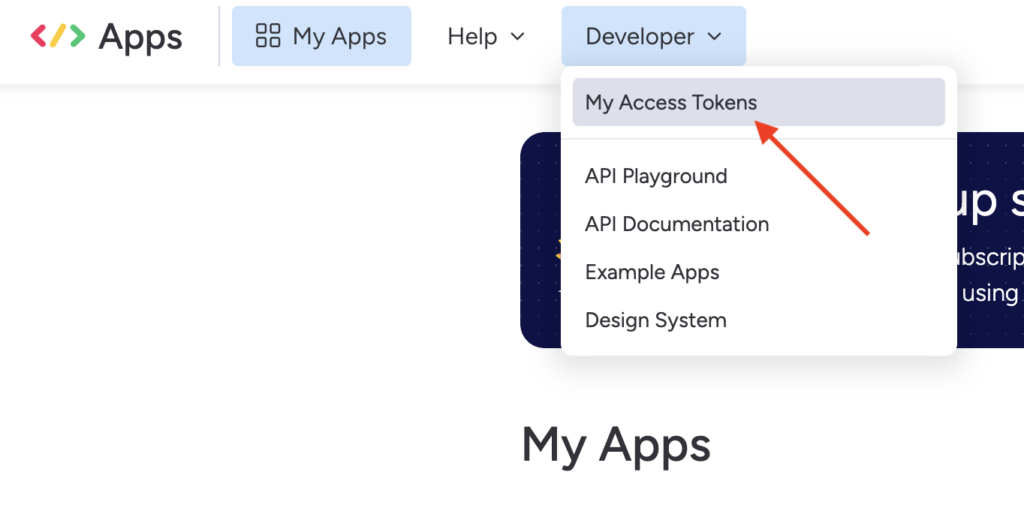
In the upper menu, select Developers and click My Access Tokens
Copy the token from the monday.com account and paste it to the Token section in Fluix and click the Authorize button.
The connected monday.com account will be automatically added to the accounts:
Step 3 – Configure the data extraction
Let’s look at 2 real-life scenarios as examples of configuring the automation of processes between Fluix and monday.com.
By implementing this automation, we can eliminate the need for excessive internal communication between teams regarding task statuses, resulting in significant time savings.
Here’s how it works: When a Fluix user fills out and submits a form within the Fluix platform, the automated process will trigger the creation of a new task (referred to as an “Item”) or the document distribution in the pre-configured Item in monday.com. This eliminates the need for manual updates or notifications, as the automation takes care of this process.
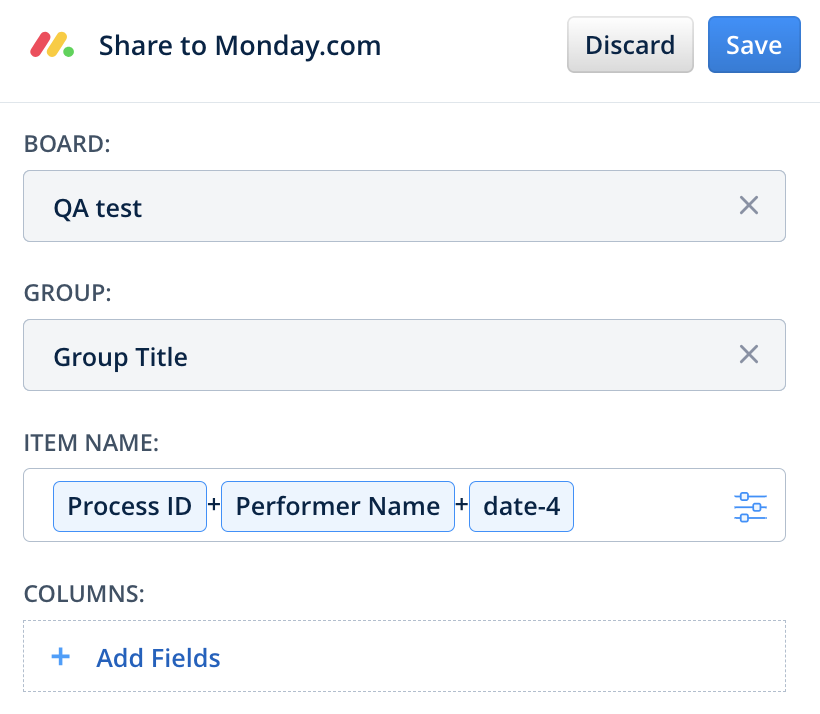
Scenario 1: Createa new task (item) in monday.com once the process finished in Fluix
Click on the connected monday.com account, and select the Create Item option from the list. Click the Board fieldand select the board (table)from the list of available optionsin which you would like to automatically create new Items upon submission ofthe forms. Select the Group to which the item will be added.
By using the dynamic values, configure the Item name that will be created in the selected Board. Select the form from the Taskstream under the Attached forms section. Add the columns from the selected board that should be filled out accordingly upon the submission of the form.
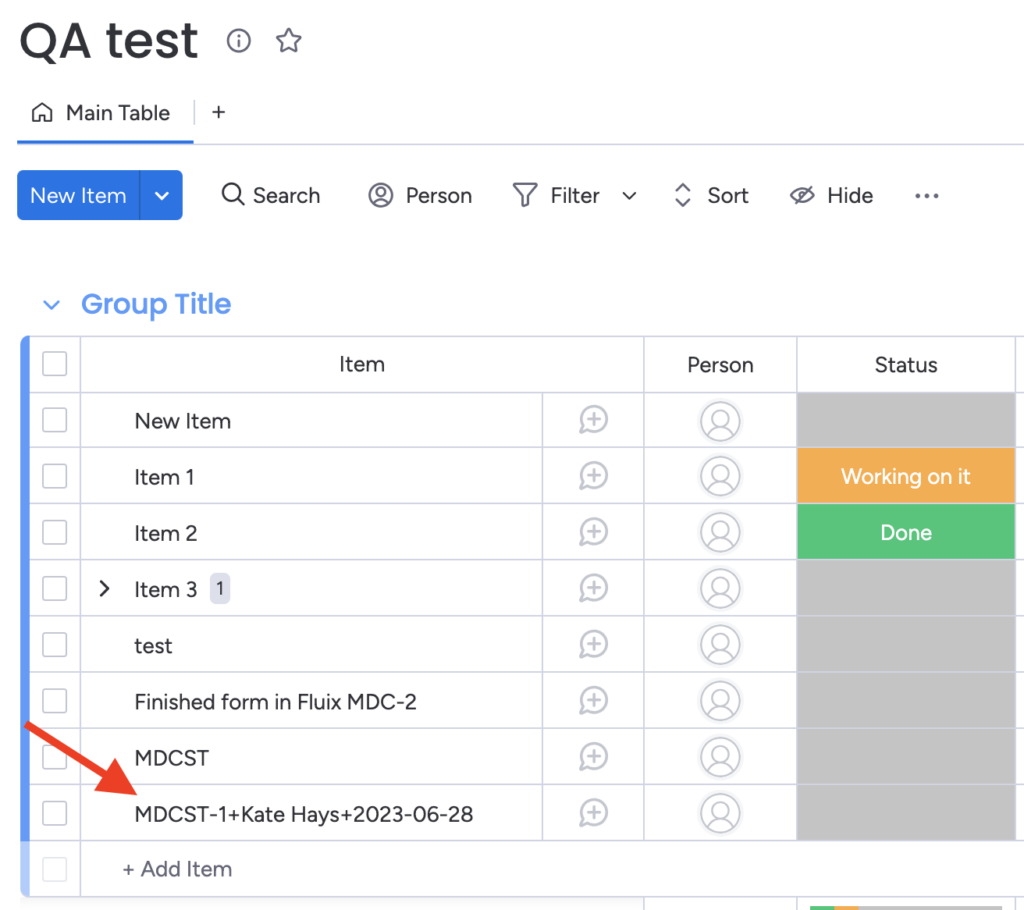
Therefore, once the Fluix user finishes the respective process in Fluix, a new task on the pre-configured board will be created taking into account the dynamic values that are selected for the Item name.
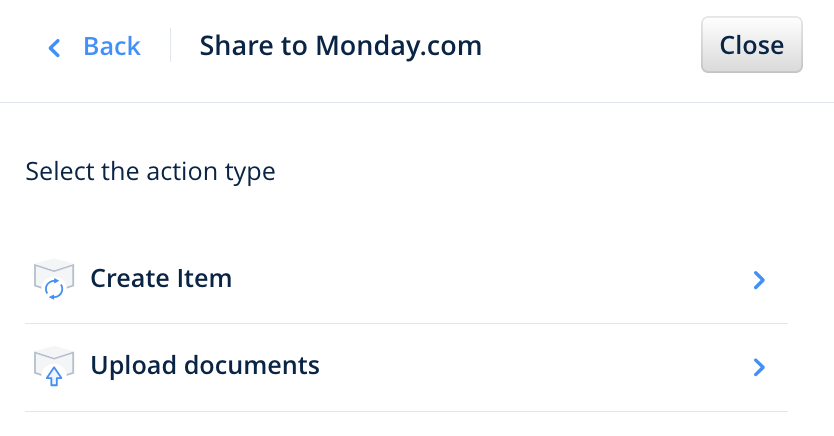
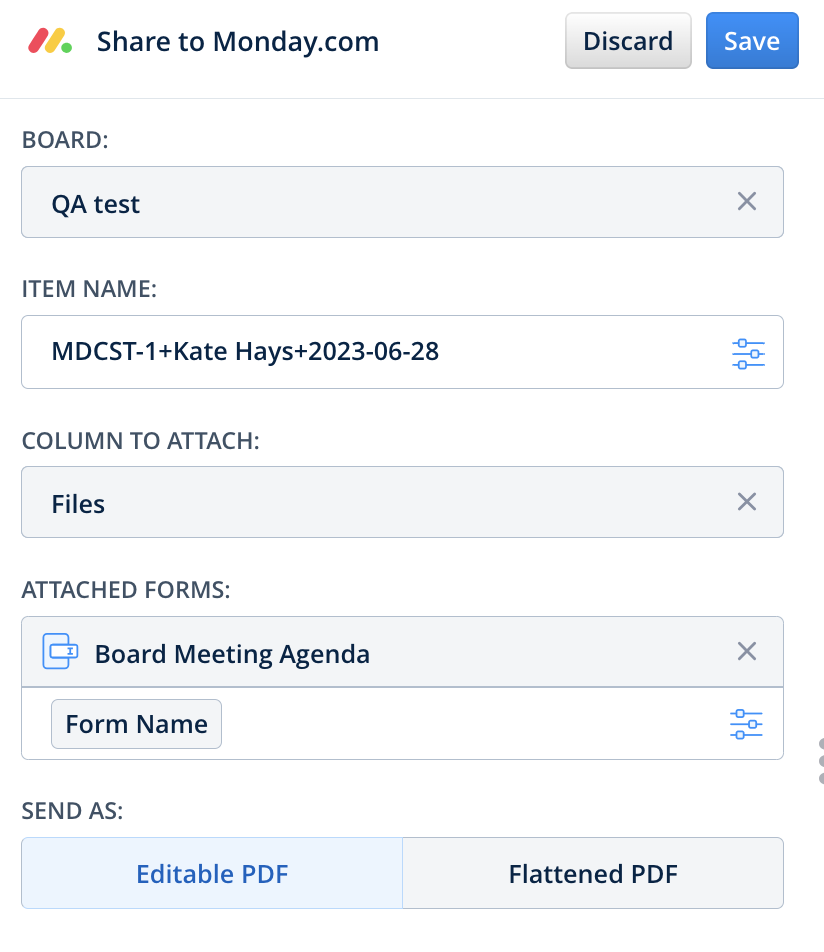
Scenario 2: Upload the completed documents in Fluix to the respective item in monday.com
Click on the connected monday.com account, and select the Upload documents option.
Select the Board from monday.com to which you would like to upload the completed in Fluix documents.
Copy and paste the name of the Item from the Board in monday.com to which you would like the completed documents to be submitted. Please note that the Item should have a column that can contain a file.
Select the Column in the Item to which the files will be attached and select the form that will be attached. Make sure you add the dynamic values to the name of the form and select in which format the form should be submitted: editable PDF or flattened PDF. Save the submit action by tapping the Save button.
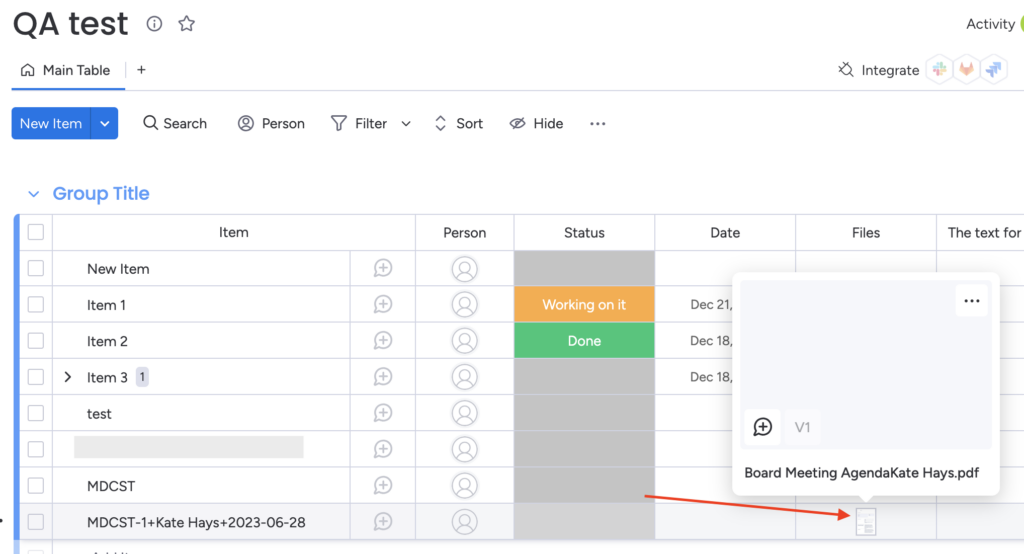
Once the user submits the form in Fluix, the document will be added to the pre-configured Board and Item in the Taskstream.
Step 4 – Save and test the setup
Once you fill out all the fields, click Save&Publish to activate the Taskstream.
Open the user app on the mobile device, or click User App in the right corner of the admin portal. Navigate to the task that you created, fill in the form, and finish it. Once the task is submitted in Fluix, the new item will be created in the respective board or the submitted form will be attached to the selected board in your company’s monday.com account.
In case you have any questions or difficulties with setup, contact our support at support@fluix.io and we’ll be happy to help you.
Was this article helpful?
Thanks for your feedback!
Oops, something went wrong. Please, try again later.
Fluix is a web and mobile-based cloud platform that helps teams set up digital document management and workflow automation. In this integration, Fluix serves as an electronic data capture system.
HubSpot is an all-in-one marketing, sales, and customer service platform that helps businesses attract, engage, and delight customers. It includes tools for website design, email marketing, social media management, lead generation, customer relationship management (CRM), and more.
What Fluix + HubSpot integration does
By integrating Fluix and HubSpot, salespeople can save valuable time when closing deals with prospects. This is achieved by automatically populating customer data to Fluix forms based on the information that is stored in your HubSpot account. As a result, the sales process becomes more streamlined and efficient, enabling HubSpot to focus on building relationships and closing deals faster rather than manually filling out the form.
Example of Fluix + HubSpot integration
Let’s look into a real-life scenario as an example of configuring the Integration.
Your HubSpot account contains all the information about your prospects and customers. When the salesperson changes the specific field of the customer card in HubSpot, it triggers a webhook and pre-fills the pre-configured form inFluix Taskstream. A new task is created for the salesperson in Fluix where he/she fills out the rest of the Customer Agreement form and sends it for e-signing using theGuest task in Fluix. The prospect signs the contract and the completed document is uploaded directly to Fluix or your company’s storage.
Note: Integration requires a Core account in Fluix and a HubSpot account.
Step 1 – Create the Start event in Fluix
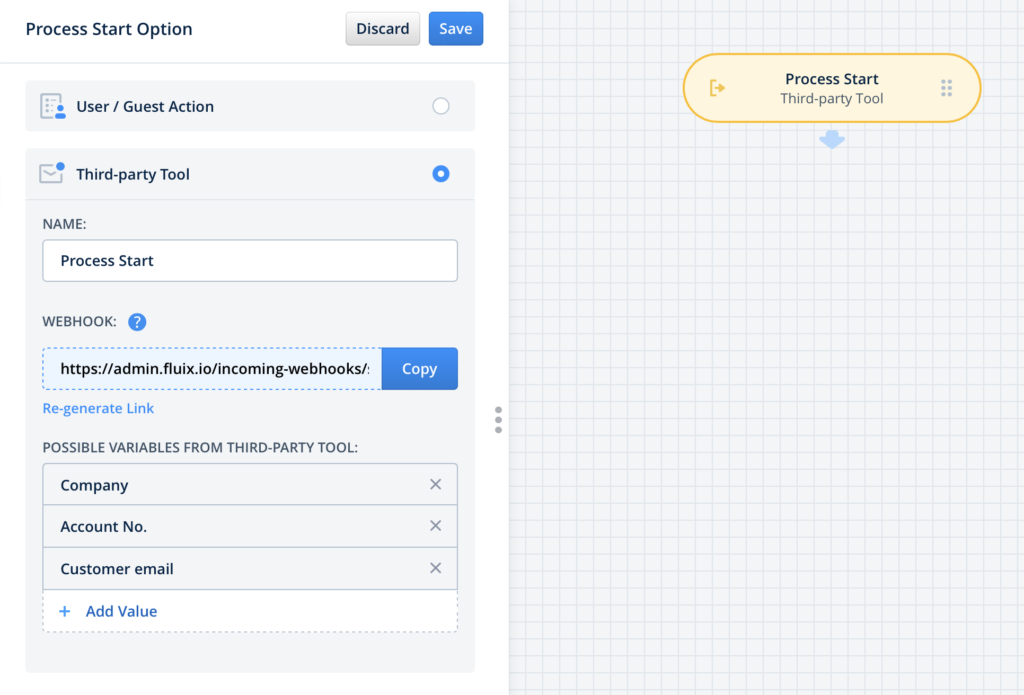
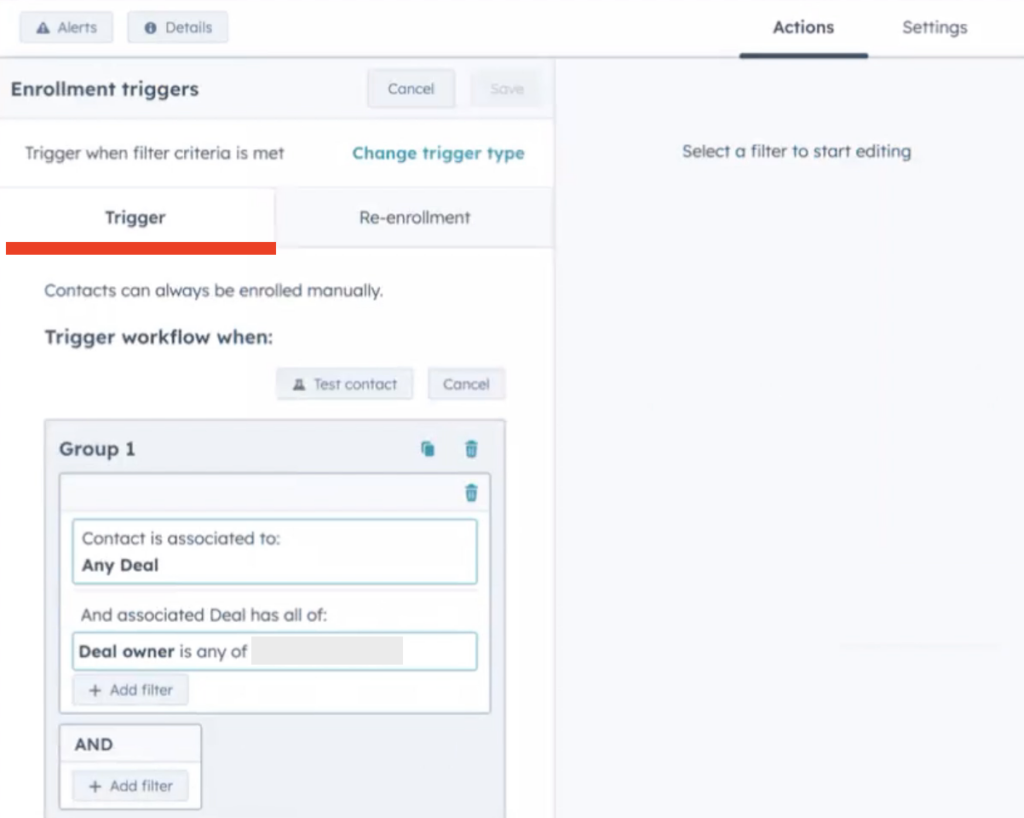
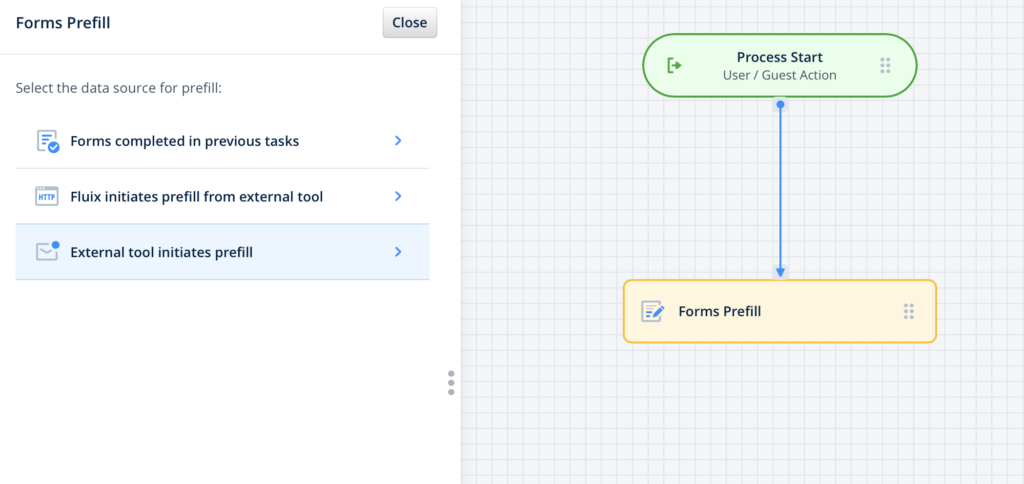
Navigate to the Fluix admin portal, Taskstreams section, to create a new Taskstream. Drag and drop the Process Start eventand select External tool initiates prefill from the list of options.
Add the Possible Variables (property names) from HubSpot. When the respective fields are changed in your HubSpot account, the process will be triggered automatically.
Step 2 – Create a Workflow in HubSpot
Navigate to your HubSpot account, and open the Automation > Workflows section from the main Dashboard.
In the upper right corner tap the button Create workflow and select if you would like to proceed with creating it from scratch or using the workflow template. Configure the trigger that will start the prefill action in Fluix. As an example, the following configurations can be set up in your HubSpot workflow:
To learn more about creating the workflow in HubSpot, please follow this link.
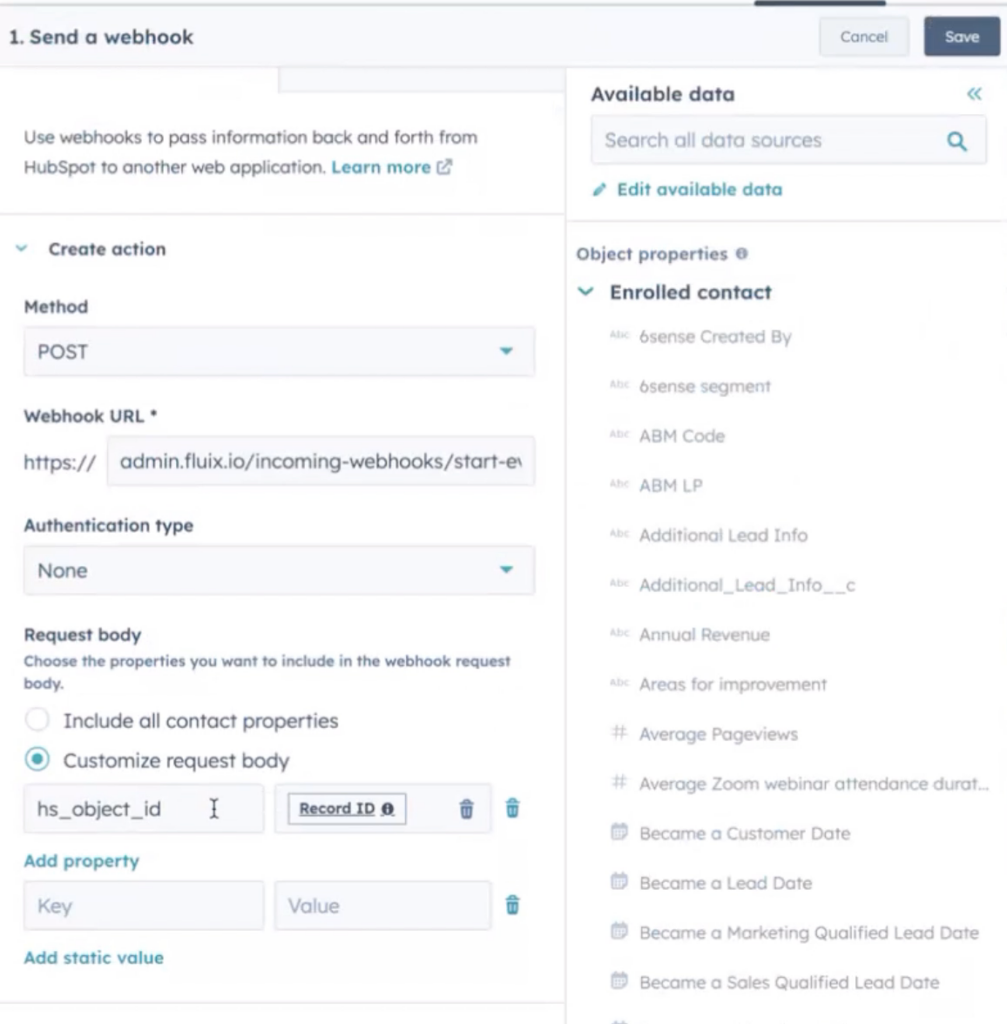
Once the trigger is configured, add the submit action in HubSpot. In our scenario, it will be a Send a webhook action. To configure the Send a webhook action, in the Method section select POST from the dropdown list. In the Webhook URL section paste the webhook available in the Start Event action from Step 1.
In the Request body sectionselect the properties that you would like to send in the webhook request. These properties are the possible variables that you configured in Step 1 in the Start Event.
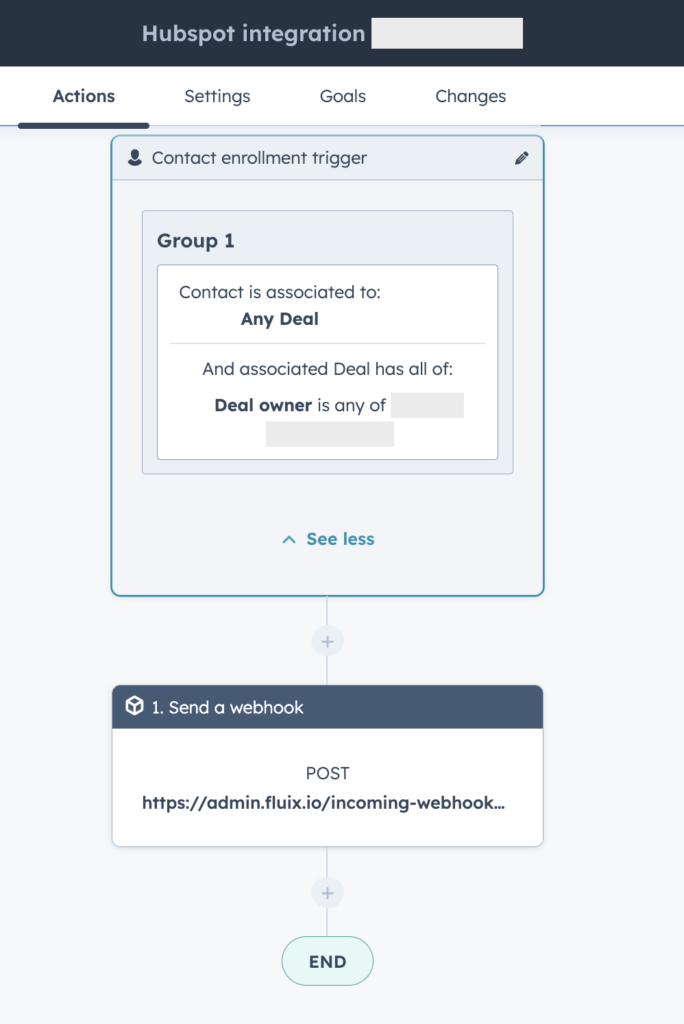
Once done, save the changes in the submit action Send a webhook. The final configurations of the workflow in HubSpot should look like in the image below.
Step 3 – Create a form pre-fill from a third-party tool submit action
Drag and drop Form prefill submit action to the Taskstream chart and connect it with the User task that your team will be working on.
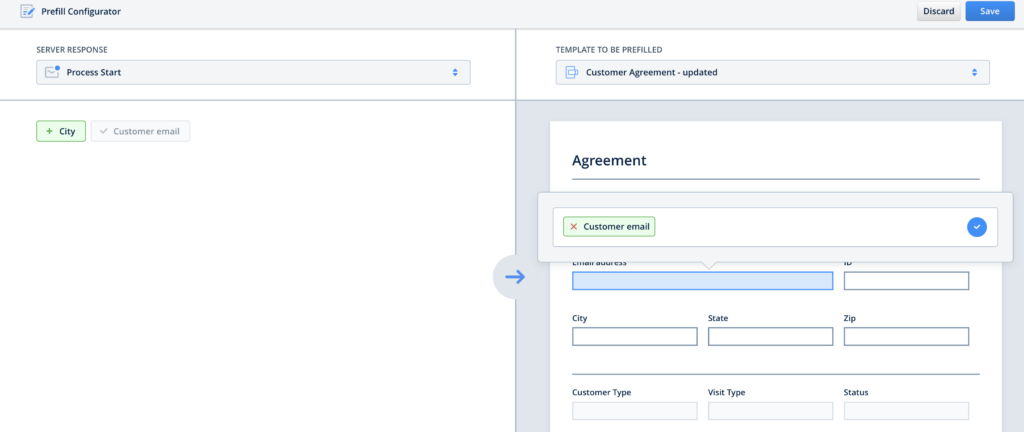
Click on the Form prefill element and select the External tool initiates prefill optionfrom the list.
Add form that you would like to be pre-filled for the salesperson and click on the configuration icon to open Prefill Configurator. After that, map the fields (the possible variables from Step 1) from HubSpot with a Customer Agreement form that will be prefilled, and click the Save button.
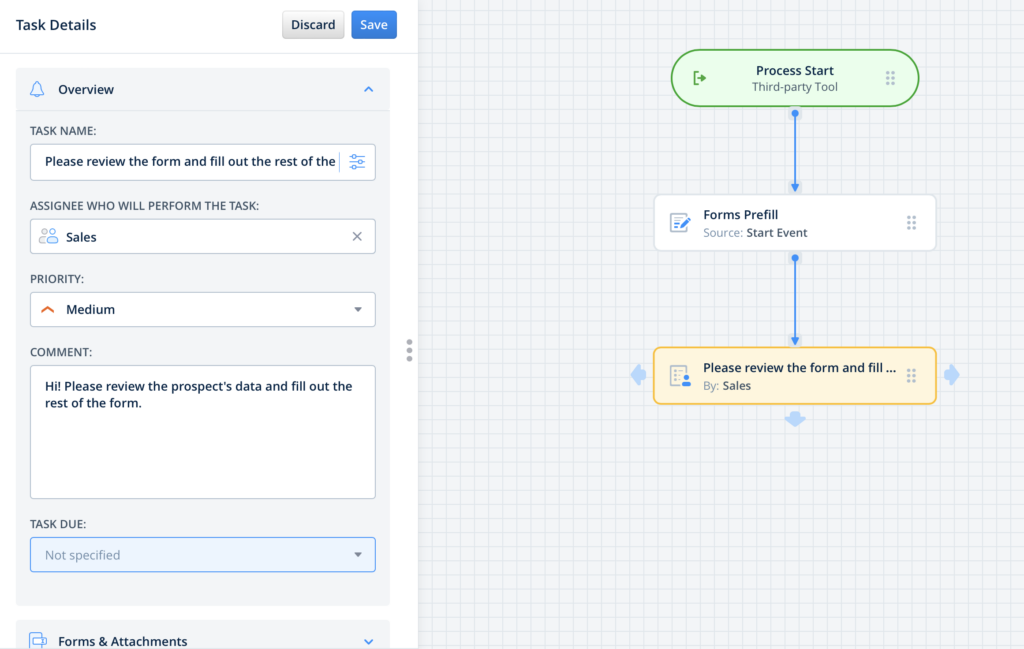
Step 4 – Create the User task
Drag and drop the User task, connect the task with the previous action, and configure it: add the description of the task, and add the Group to whom this task will be assigned. In the Forms and Attachments section, add the form by selecting the Used in the Taskstream option. Make sure that you have added yourself to the group of users in order to test the setup later.
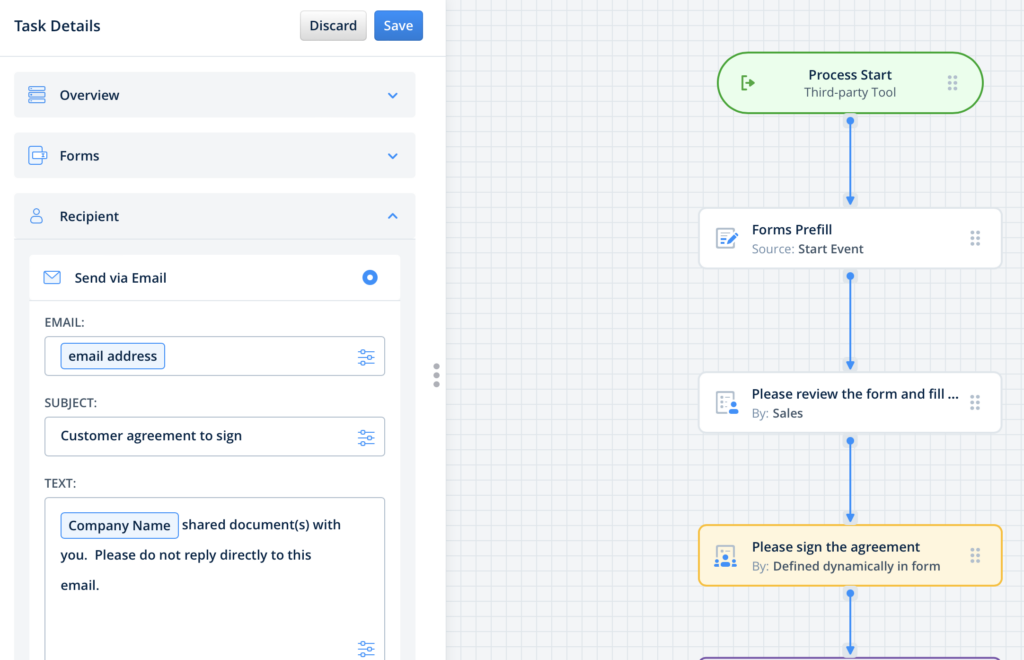
Step 5 – Creating the e-Sign task
Drag and drop the Guest task and connect it with the User task action. Fill out the task name and the description of the task that will be displayed to the Guest and specify the due date if needed. Add the form that will be sent to the prospect by clicking “Used in this taskstream” in the Forms section and add the email address to the Recipient section by configuring thedynamic values.
Step 6 – Configure the final destination for the form
When the Guest completes the task, it will be automatically pushed down the process. For example, the document can be sent to the salesperson for review, and after getting approval, it can be uploaded directly to your company’s cloud storage or any other tool, the data from it can be extracted for further analysis or the document can be simply shared by email.
In case you have any questions or difficulties with setup, contact our support at support@fluix.io and we’ll be happy to help you.
Was this article helpful?
Thanks for your feedback!
Oops, something went wrong. Please, try again later.
Fluix is a web and mobile-based cloud platform that helps teams set up digital document management and workflow automation. In this integration, Fluix serves as an electronic data capture system.
Pipedrive is a web-based customer relationship management (CRM) platform that helps businesses to manage their sales activities and monitor contacts, leads, and deals and automate the sales process.
What Fluix + Pipedrive integration does
Fluix and Pipedrive integration is the perfect solution to seamlessly automate your business flow. With Fluix, your sales teams can easily fill out and sign documents such as quotes, contracts, and proposals, and all the data along with the documents is automatically pushed to Pipedrive for smooth data management. This eliminates the need for manual document handling and minimizes the chance of human error.
This integration simplifies the sales documentation process, ensuring that everyone on your team has access to the latest information, improving communication and collaboration across teams. Save time and effort, allowing your sales teams to focus on what they do best – selling and closing deals.
Note. Integration requires a Core account in Fluix and an account in Pipedrive. To try the option, you can register for a free trial account in both tools. In order to set up Pipedrive integration in your Taskstream, please follow the instruction below.
Step 1 – Create the repetitive process in Fluix
Navigate to the Fluix admin portal, Taskstreams section, to create a new taskstream. Drag-n-drop a User task to the working area and configure it by adding fillable forms and assigning it to the team that will work on it on a regular basis. Make sure that you have added yourself to the group of users in order to test the setup later.
Step 2 – Connecting Fluix with Pipedrive
Drag and drop Share to submit action to the Taskstream chart and connect it with the User task that your team will be working on.
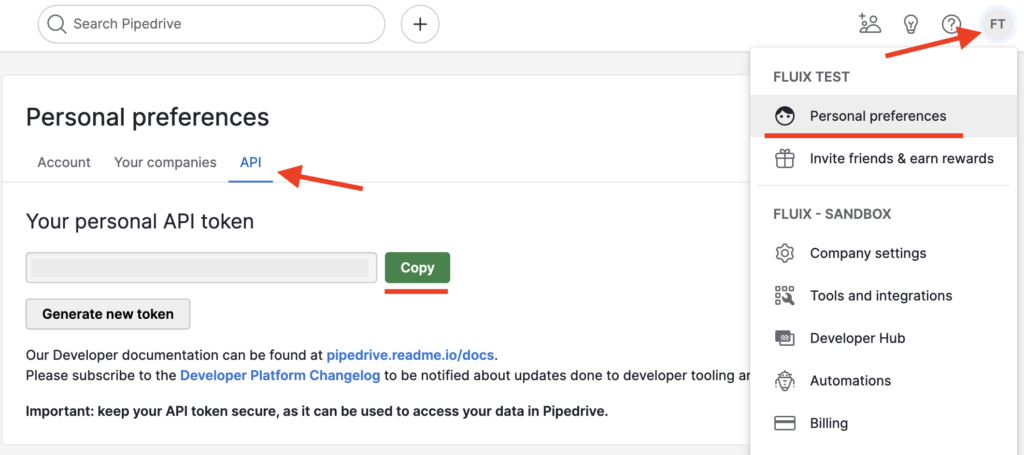
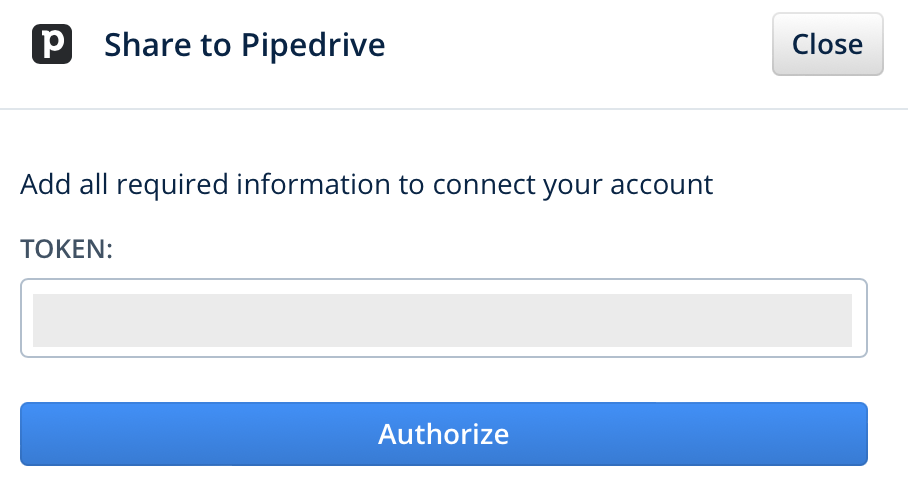
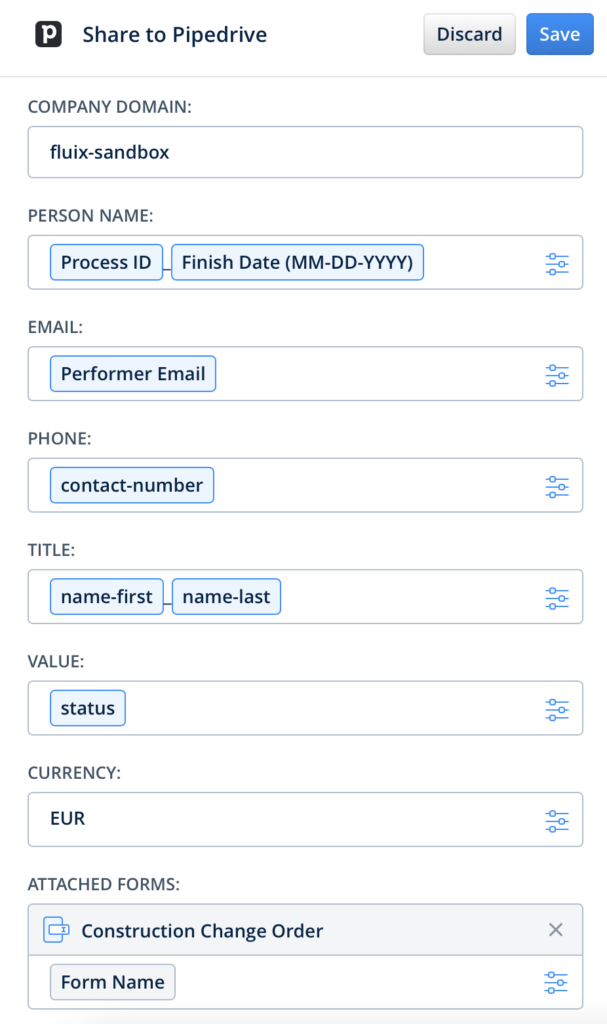
Click on the Share to element and select Pipedrive among the list of third-party tools. To authorize your Pipedrive account in Fluix, you will need to enter the API token from Pipedrive.
To get an API token, log into your Pipedrive account. Click on your account name in the top right corner, go to the Personal Preferences section, and open the API tab. Copy your personal API token that is going to be used to authenticate your Pipedrive account in Fluix.
Go back to Fluix, paste it to the token field in the Taskstream, and click Authorize.
Step 3 – Configure the data extraction
At this step, you will need to map the fields data from which will be collected and shared from Fluix directly to your Pipedrive account.
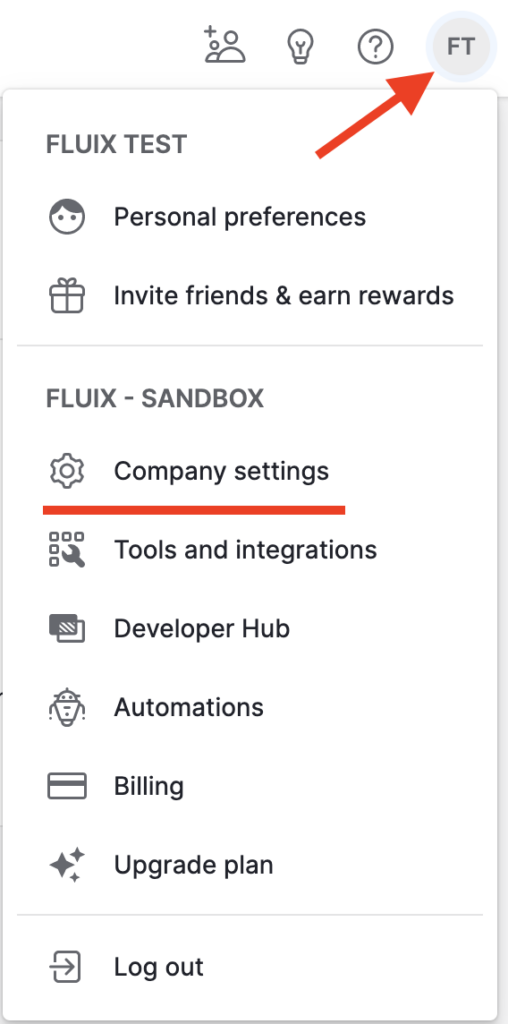
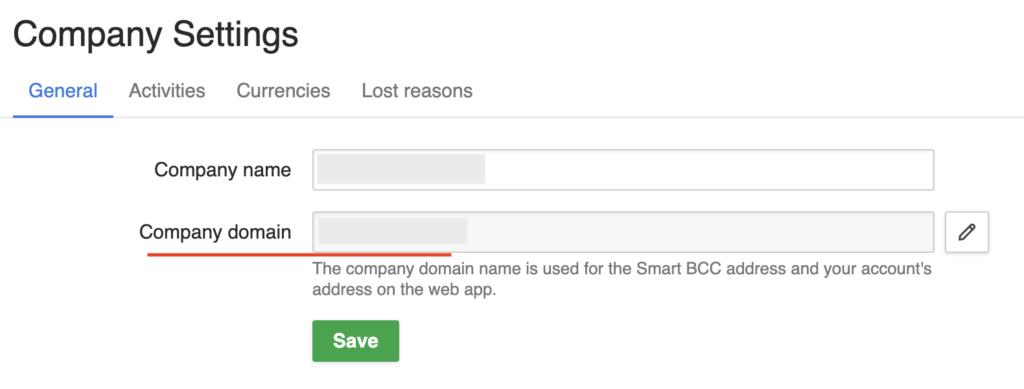
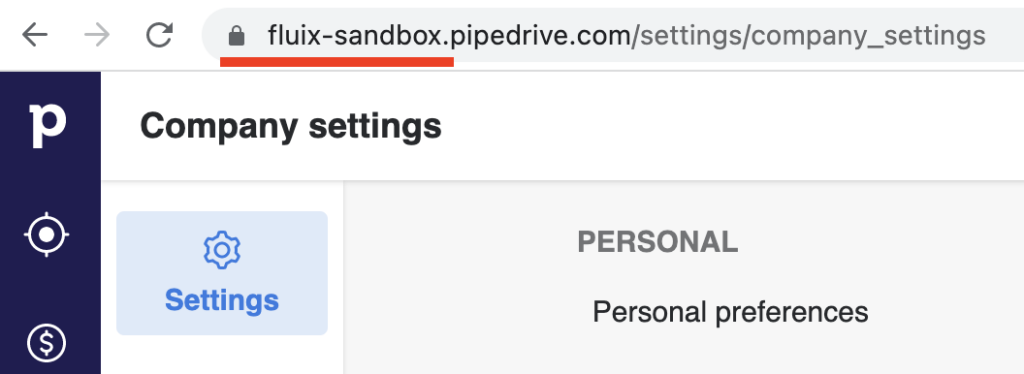
Let’s start by filling out the Company Domain field which stands for your Pipedrive account name. This information can be found by clicking on your account name in Pipedrive in the upper right corner and navigating to the Company Settings.
In the General tab, you will see the Company domain that is assigned to your company’s account, ensure to copy and paste this information without any spaces since the incorrect company domain may influence on extraction of the respective data during the submission of the form in the Taskstream.
Alternatively, the company’s domain can be copied from the address bar when the Pipedrive tab is opened:
Person Name, Email, Phone, and Title can be configured using the dynamic values, by selecting the values from the suggested list.
In the Attached Form field, add a form that you’d like to upload to the Deals tab in Pipedrive by clicking Add a form button. Consider adding the Dynamic Values to the name of the form to make it easier to distinguish them.
Confirm your actions by clicking Save in the upper right corner of the sidebar.
Step 4 – Save and test the setup
Once you fill out all the fields,click Save&Publish to activate the Taskstream. Open the user app on the mobile device, or click User App in the right corner of the admin portal. Navigate the task that you created, fill in the form, and finish it.
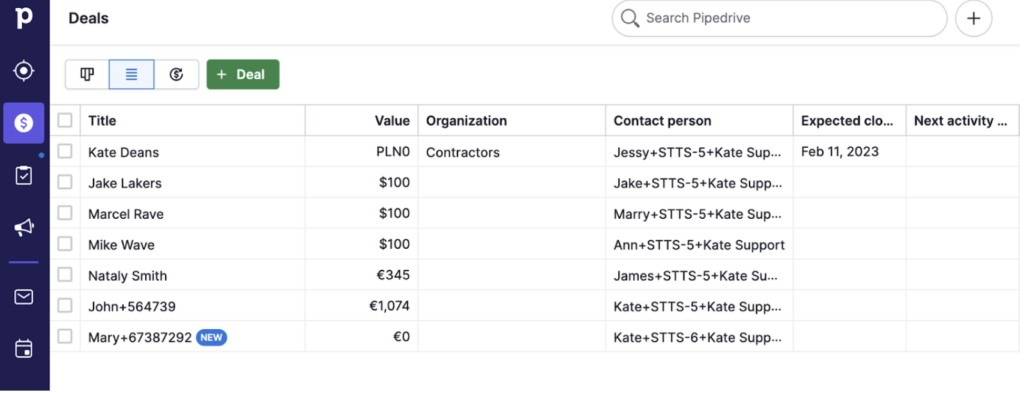
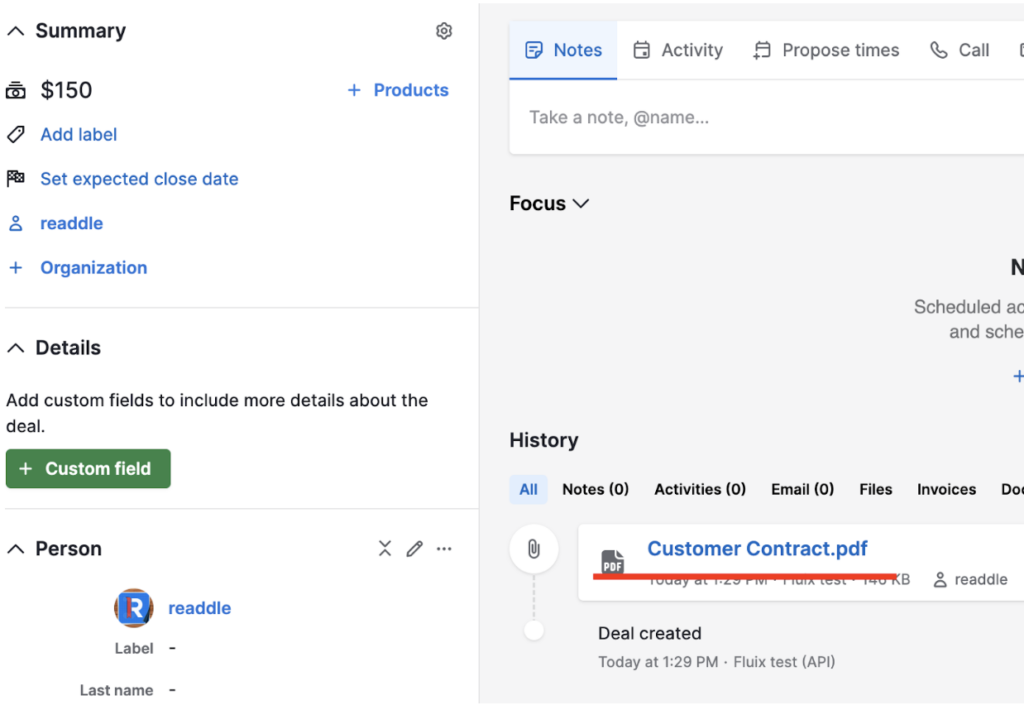
Once the task is submitted in Fluix, entered data automatically appears in your company’s Pipedrive database.
The submitted form will be attached to each deal that is recorded in the table. In order to check the form, click on the respective cell with the Dealname to open it. The form can be located in the Files section.
In case you have any questions or difficulties with setup, contact our support at support@fluix.io and we’ll be happy to help you.
Was this article helpful?
Thanks for your feedback!
Oops, something went wrong. Please, try again later.
Fluix is a web and mobile-based cloud platform that helps teams set up digital document management and workflow automation. In this integration, Fluix serves as an electronic data capture system.
HubSpot is an all-in-one marketing, sales, and customer service platform that helps businesses attract, engage, and delight customers. It includes tools for website design, email marketing, social media management, lead generation, customer relationship management (CRM), and more.
What Fluix + HubSpot integration does
By integrating Fluix with HubSpot, you’ll create a solution that will help bridge the gap between marketing, sales, and document management. It streamlines lead and contact data management, document distribution, and workflow automation, leading to more efficient processes and improved customer interactions. With this integration, you may automate your sales process by setting up the flow when the completed agreement is extracted automatically to the relevant HubSpot Deal record.
Additionally, you may also configure the setup when the flow is started in HubSpot by prefilling the form and pushing it to Fluix. In order to set up such an integration, please follow this guide.
Example of Fluix + HubSpot integration
Let’s check a real-life scenario that you may cover within your company processes.
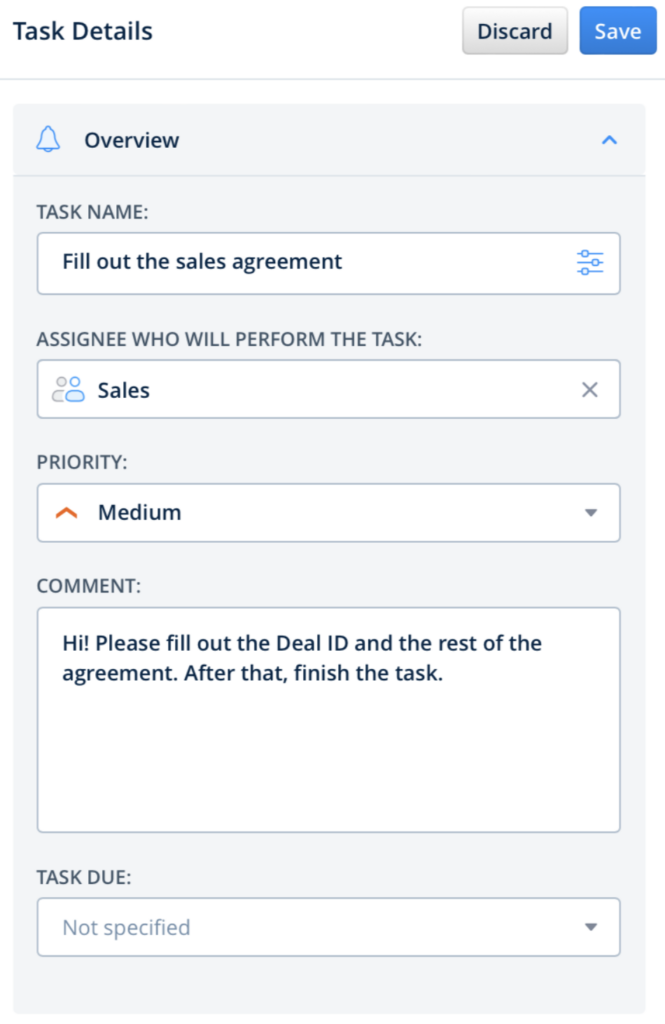
Imagine the case when a new Deal is created in your company HubSpot account and your salesperson receives the Deal ID in order to prepare the respective sales agreement. The salesperson opens up the document in Fluix and fills out the required information along with the Deal ID to the preconfigured field in the form. Upon finishing the process in Fluix, the sales agreement is submitted to the Attachments section of the respective Deal in the HubSpot account for further processing and data storage.
Note. Integration requires a Core account in Fluix and an account in HubSpot. To try the option, you can register for a free trial account in Fluix and register the account in HubSpot.
In order to set up HubSpot integration in Fluix Taskstream, please follow the instructions below.
Step 1 – Create the repetitive process in Fluix
Navigate to the Fluix admin portal, Taskstreams section, to create a new Taskstream. Drag-n-drop a User task to the working area and configure it by adding fillable forms and assigning it to the team that will work on it on a regular basis. Ensure you have added yourself to the group of users to test the setup later.
Step 2 – Connect Fluix with HubSpot
Drag and drop Share to submit action to the Taskstream chart and connect it with the User task that your team will be working on.
Click on the Share to element and select HubSpot among the list of third-party tools. You’ll be redirected to the authorization page to log in to your HubSpot account.
Step 3 – Configure the data extraction
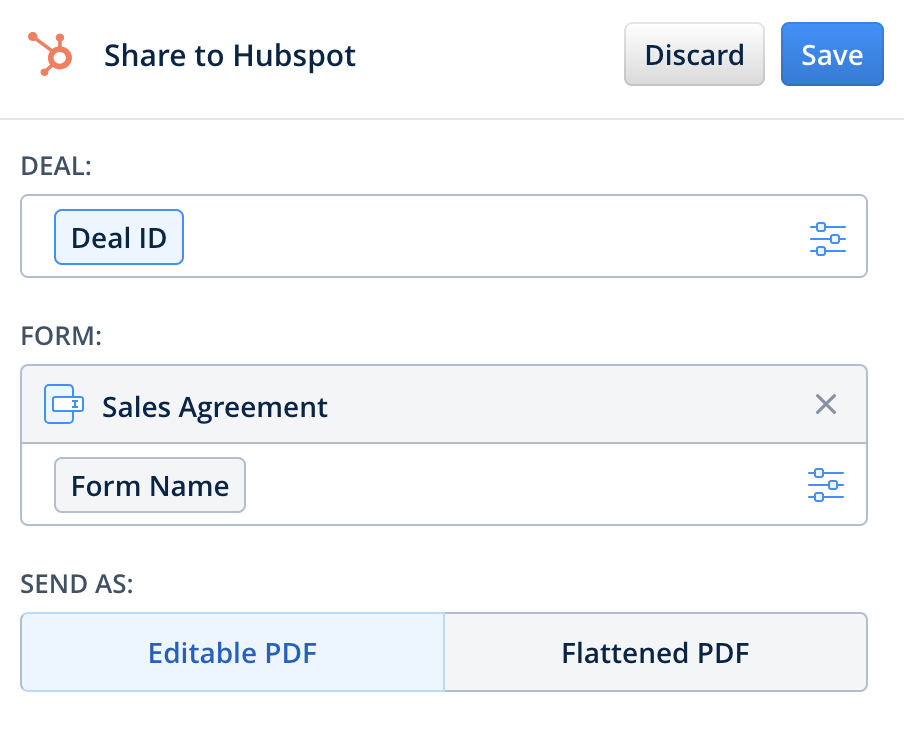
At this step, map the field in the form where the salesperson will be filling out the Deal ID using the Dynamic Values so that the form can be shared further from Fluix directly to your HubSpot account.
In the Form field, add a form that you’d like to upload to the Deals tab in HubSpot by clicking the Add a form button. Consider adding the Dynamic Values to the name of the form as well to make it easier to distinguish them. Confirm your actions by clicking Save in the upper right corner of the sidebar.
Step 4 – Save and test the setup
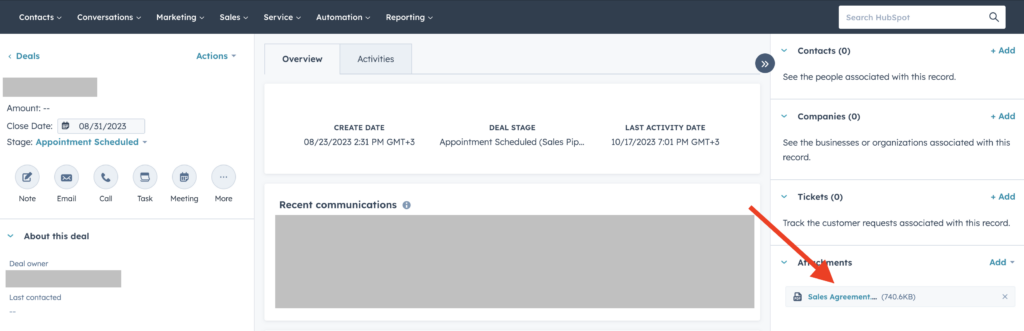
Once you fill out all the fields, click Save&Publish to activate the Taskstream. Open the user app on the mobile device, or click User App in the right corner of the admin portal. Navigate to the task that you created, fill in the form, and finish it. Once the task is submitted in Fluix, entered data automatically appears in your company’s HubSpot database, under the Attachments section of the respective deal that the salesperson filled out in the form.
In case you have any questions or difficulties with setup, contact our support at support@fluix.io and we’ll be happy to help you.
Was this article helpful?
Thanks for your feedback!
Oops, something went wrong. Please, try again later.
Fluix is a web and mobile-based cloud platform that helps teams set up digital document management and workflow automation. In this integration, Fluix serves as an electronic data capture system. improveit 360 – is a business management software platform that is based on Salesforce specifically designed for home improvement and remodeling companies. It is meant to streamline various aspects of the business, helping companies manage their operations more efficiently.
What Fluix + improveit 360 integration does
The integration between Fluix and improveit 360 enables the smooth exchange of information, ensuring a seamless synchronization of data across both platforms. It promotes data consistency and accuracy, eliminating the necessity for manual data entry and minimizing the potential for errors. Through this integration, businesses can automate their remodeling and renovating processes and enhance the efficiency of document workflows. Sales representatives can effortlessly upload finalized documents directly to the Notes&Attachments section of the respective project, streamlining operations and facilitating a more persistent workflow.
Note. Integration requires a Core account in Fluix and an account in improveit 360.To try the option, you can register for a free trial account in Fluix and register the account in improveit 360.
To set up improveit 360 integration in the Fluix taskstream, please follow the instructions below.
Step 1 – Create the repetitive process in Fluix
Navigate to the Fluix admin portal, Taskstreams section, to create a new taskstream. Drag-n-drop a User task to the working area and configure it by adding fillable forms and assigning it to the team that will work on it regularly. Make sure that you have added yourself to the group of users to test the setup later.
Step 2 – Configure Share to Integration in Fluix
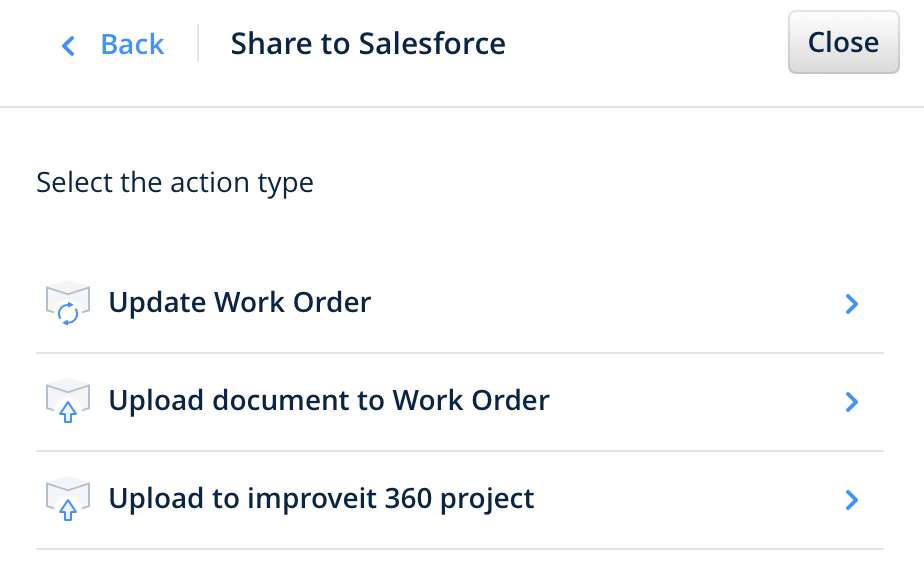
Drag and drop Share to submit action to the Taskstream chart and connect it with the User task that your team will be working on. improveit 360 is a software platform based on Salesforce hence the authorization to improveit 360 is configured under the Salesforce tool. Click on the Share to element and select Salesforce among the list of third-party tools. You will be redirected to the Salesforce authorization page where you’ll need to provide Fluix with the permissions to access it. Once done, select the action Upload to improveit 360 project that you would like to be triggered upon completion of the respective process in Fluix.
Step 3 – Uploading the documents from Fluix in the specific project
Let’s look into a real-life scenario as an example of configuring the automation of processes between Fluix and improveit 360.
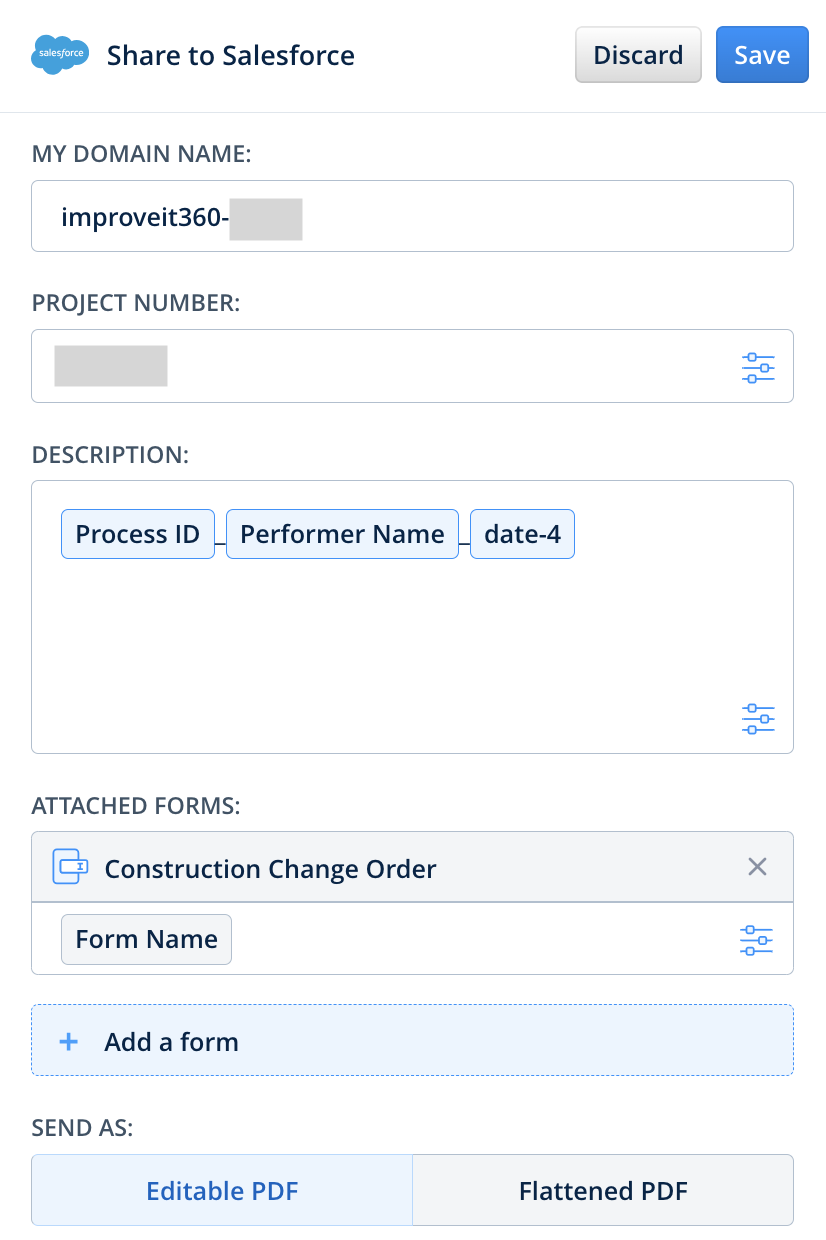
Firstly, to integrate improveit 360 with Fluix, you’ll need to know the domain name and the project number in your improveit 360 account. To find the domain name, please open your improveit 360 account, and copy your improveit 360 company name and ID (e.g. improveit360-2453) before my.salesforce.com from the web address (URL section).
The project number can be found in the Projects tab of your account. When you open the specific project, its number will be written right under the project’s name.
Scenario example
Click on the connected Salesforce account, and select the Upload to improveit 360 project option from the list. Fill out My domain name and Project number fields. In the Description section, configure the text that will be added along with the finished form in Fluix. We suggest using the dynamic values to configure the Description.
Upon form submission in Fluix, it will be automatically attached to the Notes&Attachments of the pre-configured Project in improveit 360 account.
Step 4 – Save and test the setup
Once you fill out all the fields, click Save&Publish to activate the Taskstream. Open the user app on the mobile device, or click User App in the right corner of the admin portal. Navigate to the task that you created, fill in the form, and finish it.
Once the task is submitted in Fluix, entered data automatically appears in the pre-configured project in your company’s improveit 360 account.
In case you have any questions or difficulties with setup, contact our support at support@fluix.io and we’ll be happy to help you.
Was this article helpful?
Thanks for your feedback!
Oops, something went wrong. Please, try again later.