Zapier is a platform that allows you to connect different software tools with each other.
Trello is a team collaboration tool that lets you organize everything to keep your projects on task. You can capture tasks for a project and create a board of ‘cards’ in the order they need to be completed.
By connecting Fluix with Trello via Zapier you can create Trello cards automatically once a form is completed in the Fluix app.
Asana is a project management tool that helps teams to organize and plan project tasks in one dashboard. Asana is used by businesses of all sizes to optimize project management and enhance team collaboration.
What Fluix + Asana integration does
Fluix and Asana integration allows you to keep track of the project details, be well aware of all the stages your team is working on, and store project documentation in one place. With this integration, you may ease project management by automation the process of creating tasks.
Once your team member completes the form in the Fluix app, the specific data is transferred to the Asana project along with the respective form and added to the newly created task so that everyone across your team can have access to the documents and related data in Asana projects.
Note: Integration requires a Core account in Fluix and an account in Asana. To try the option, you can register for a free trial account in both tools.
In order to set up Asana integration in Fluix Taskstream, please follow the instructions below.
Step 1 – Create the repetitive process in Fluix
Navigate to the Fluix admin portal, Taskstreams section, to create a new taskstream. Drag and drop a User task to the working area and configure it by adding fillable forms and assigning it to the team that will work on it on a regular basis. Make sure that you have added yourself to the group of users in order to test the setup later.
Step 2 – Connecting Fluix with Asana
Drag and drop Share to submit action to the Taskstream chart and connect it with the User task that your team will be working on.
Click on the Share to element and select Asana among the list of third-party tools.
Upon redirecting to the Asana authorization page, fill out your company’s credentials. Click on the button Allow in order to give Fluix permission to access your account. The connected Asana account will be automatically added to the accounts:
Step 3 – Configure the data extraction
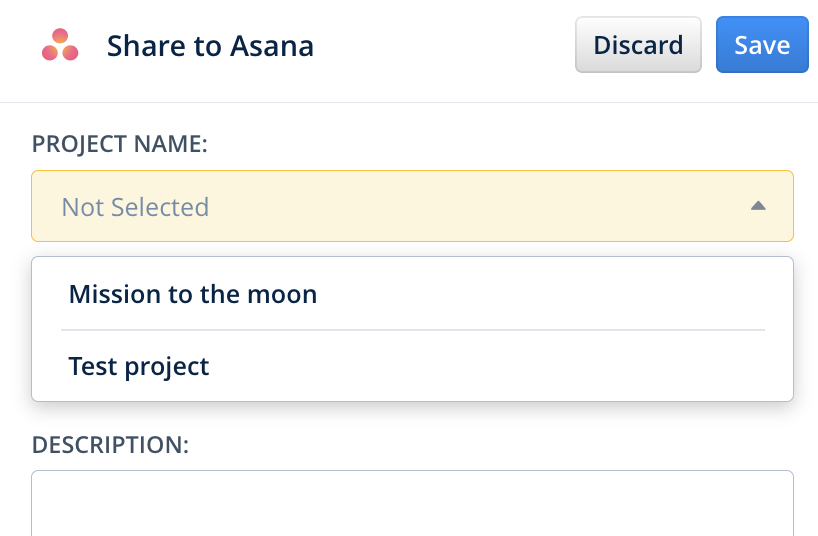
Configure the data that will be extracted to the connected Asana account upon the submission of the task. Tap on the connected Asana account and select the Project name to which the data values pre-configured in Fluix will be exported upon submission of each task.
In the New Task Name section, you may configure the respective information that will be submitted to the chosen earlier Asana project. By clicking on the configuration icon in the New Task Name section, you may select which specific details will be exported to the project upon task submission.
Step 4 – Save and test the setup
Click Save & Publish in the upper right corner to save the taskstream. Open the user app on the mobile device, or click User App in the right corner of the admin portal. Navigate the task that you configured, fill in the form, and finish it.
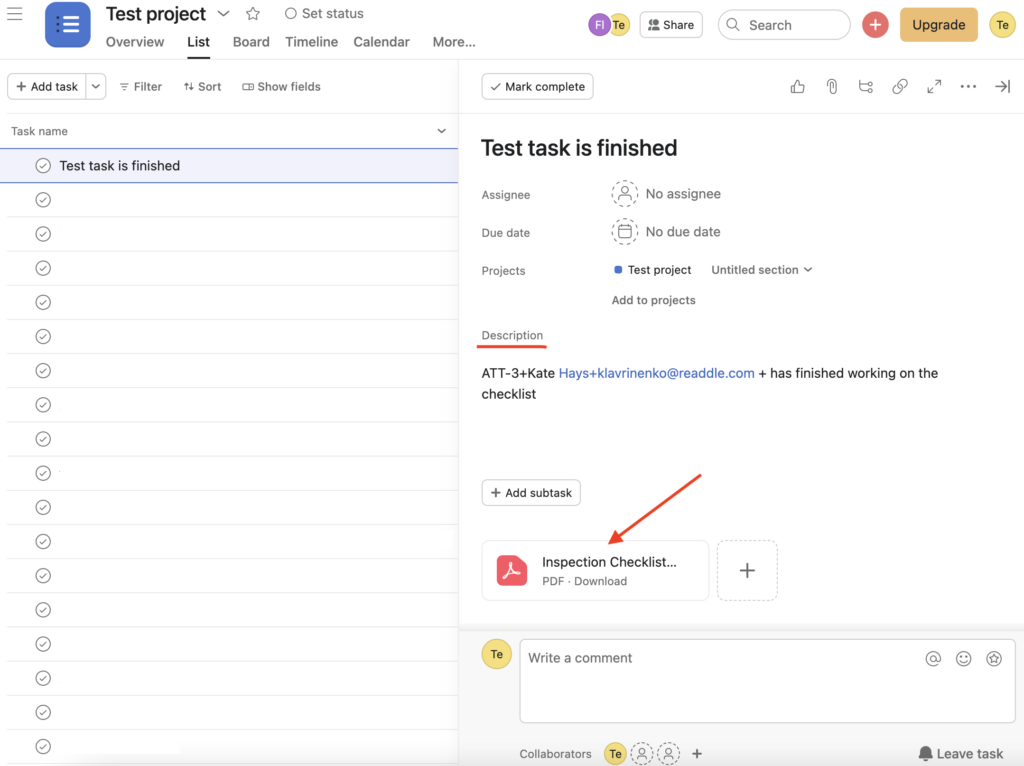
Once the task is finished, a new row in the project’s table will appear in your Asana account taking into consideration the dynamic values pre-configured in the Taskstream. The submitted form could be found by clicking on the Details button next to the name of the submitted task.
Here is an example of how the finished task is displayed in Asana’s project:
In case you have any questions or difficulties with setup, contact our support at support@fluix.io and we’ll be happy to help you.
Was this article helpful?
Thanks for your feedback!
Oops, something went wrong. Please, try again later.
Procore is a leading construction management cloud-based platform that provides a wide range of tools and features for managing construction projects. It provides a centralized hub for all project-related information and allows your team to collaborate in real-time, access project documents, track project progress, manage project budgets, and communicate with team members.
What Fluix + Procore integration does
Fluix and Procore integration provides a seamless solution for automating your business flow. With Fluix, your project manager completes a form containing detailed notes, plans, and images related to a specific project. Upon submission, the form is automatically uploaded to the Documents section of the designated Procore project.
This streamlined process enables efficient and organized document management within the project team and ensures that all relevant information is easily accessible in a centralized location.
Note. Integration requires a Core account in Fluix and an account in Procore. To try the option, you can register for a free trial account in Fluix and register the account in Procore.
In order to set up Procore integration in Fluix taskstream, please follow the instructions below.
Step 1 – Create the repetitive process in Fluix
Navigate to the Fluix admin portal, Taskstreams section, to create a new taskstream. Drag-n-drop a User task to the working area and configure it by adding fillable forms and assigning it to the team that will work on it on a regular basis. Make sure that you have added yourself to the group of users in order to test the setup later.
Step 2 – Connecting Fluix with Procore
Drag and drop Share to submit action to the Taskstream chart and connect it with the User task that your team will be working on.
Click on the Share to element and select Procore among the list of third-party tools.
Upon redirecting to the Procore authorization page, fill out your login and password in order to authorize. The connected Procore account will appear in the list of accounts.
Step 3 – Configure the data extraction
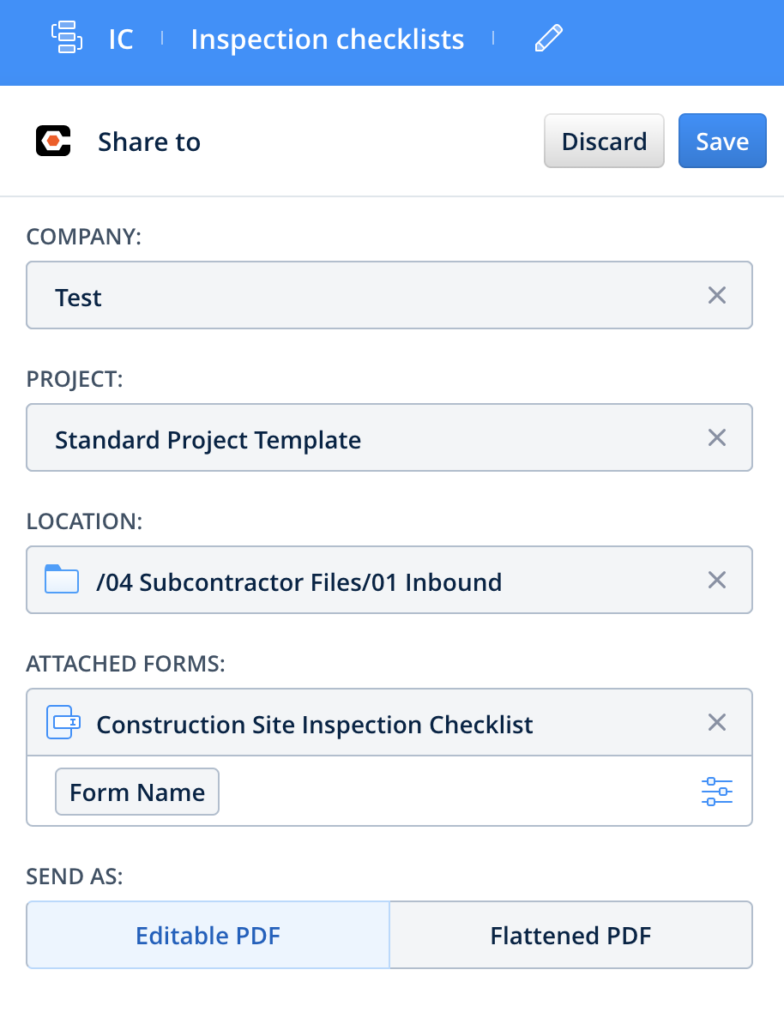
Under the Company and Project sections, you can select the exact place in Procore where you would like to keep a record of documentation submitted from this Taskstream.
Under the Location section, select the folder in your Procore account to which you would like the submitted form to be uploaded.
Select the form used in this Taskstream and add dynamic values by opening a dynamic values configurator and selecting the values that you would like to be added to the document name upon its submission. Additionally, select the format of the uploaded document – editable or flattened PDF.
Step 4 – Save and test the setup
Once you fill out all the fields,click Save&Publish to activate the Taskstream. Open the user app on the mobile device, or click User App in the right corner of the admin portal. Navigate the task that you created, fill in the form, and finish it. Once the task is submitted in Fluix, entered data automatically appears in the pre-configured Project in your company’s Procore account, under the Documents section.
In case you have any questions or difficulties with setup, contact our support at support@fluix.io and we’ll be happy to help you.
Was this article helpful?
Thanks for your feedback!
Oops, something went wrong. Please, try again later.
Fluix is a web and mobile-based cloud platform that helps teams set up digital document management and workflow automation. In this integration, Fluix serves as a mobile app for data capture, review, and approval. UpKeep is an asset operations management platform, and in the integration it serves as a purchase order and work order management system.
What integration does
By integrating Fluix and UpKeep, the full process from Work Order/Purchase Order initiation to its completion is automated.
As an example, let’s take the incident reporting process.
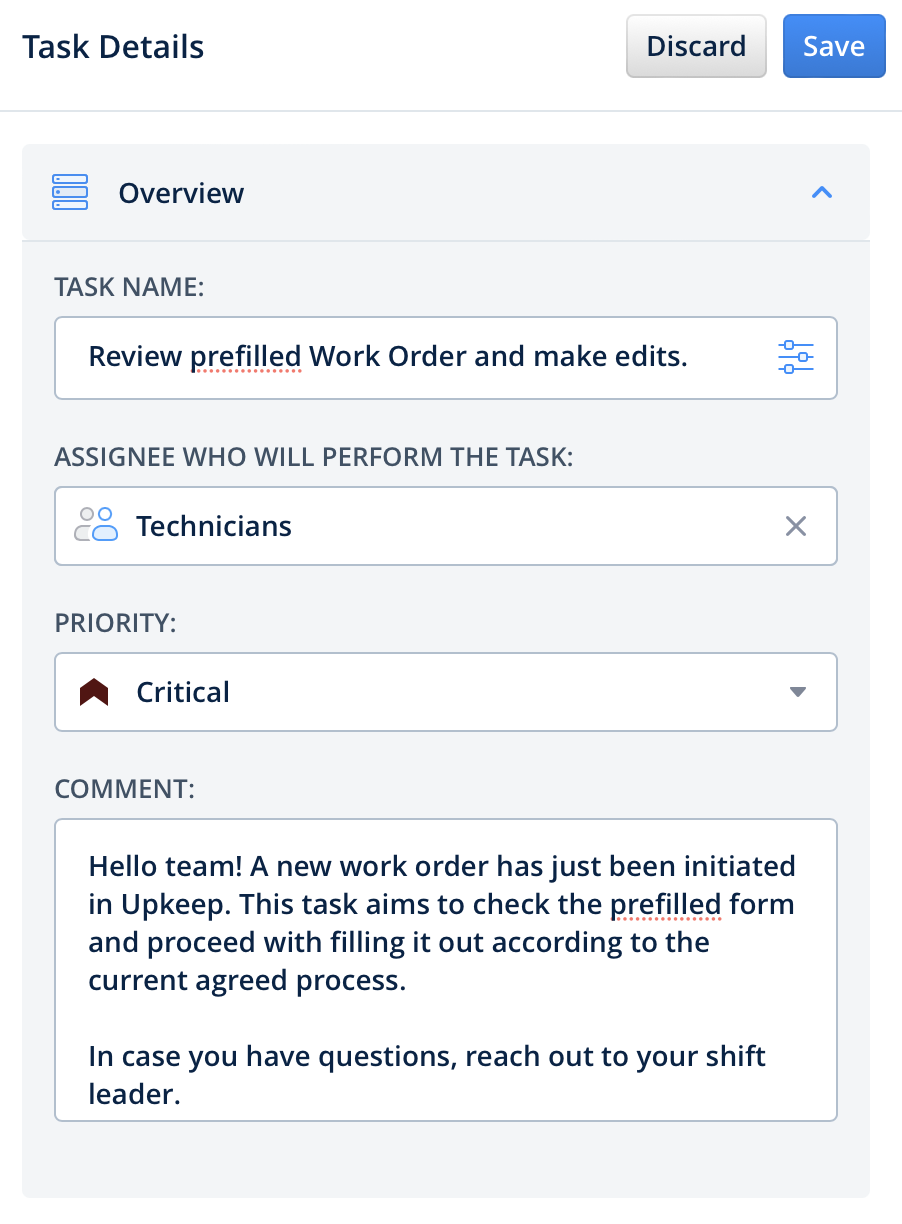
Scenario 1: Once the Work Order is initiated in UpKeep, it automatically triggers the task for the employee in the Fluix app with the prefilled form.
Scenario 2: Once the Incident Report is completed in the Fluix app, a new Work order is automatically created in Upkeep.
Note: Integration requires a Core account in Fluix and an account in UpKeep.
In order to set up UpKeep integration in Fluix, please follow the steps below.
Scenario 1: Automatic task creation in Fluix after Work Order was initiated in UpKeep.
Step 1 – Create the recurrent business process for your team in Fluix
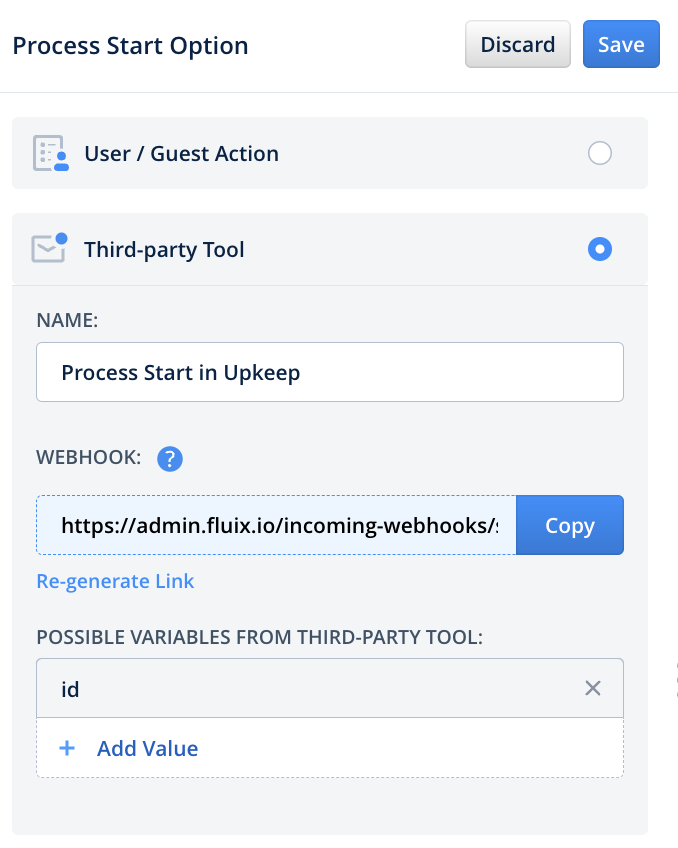
Navigate to the Fluix admin portal, Taskstreams section, to create a new taskstream. Drag-n-drop a Process Start, click to open it, and select Third-party Tool Option. Add the id value to export data from Upkeep. You may also add other variables available in the work order.
Step 2 – Activate Fluix Webhook in Upkeep account
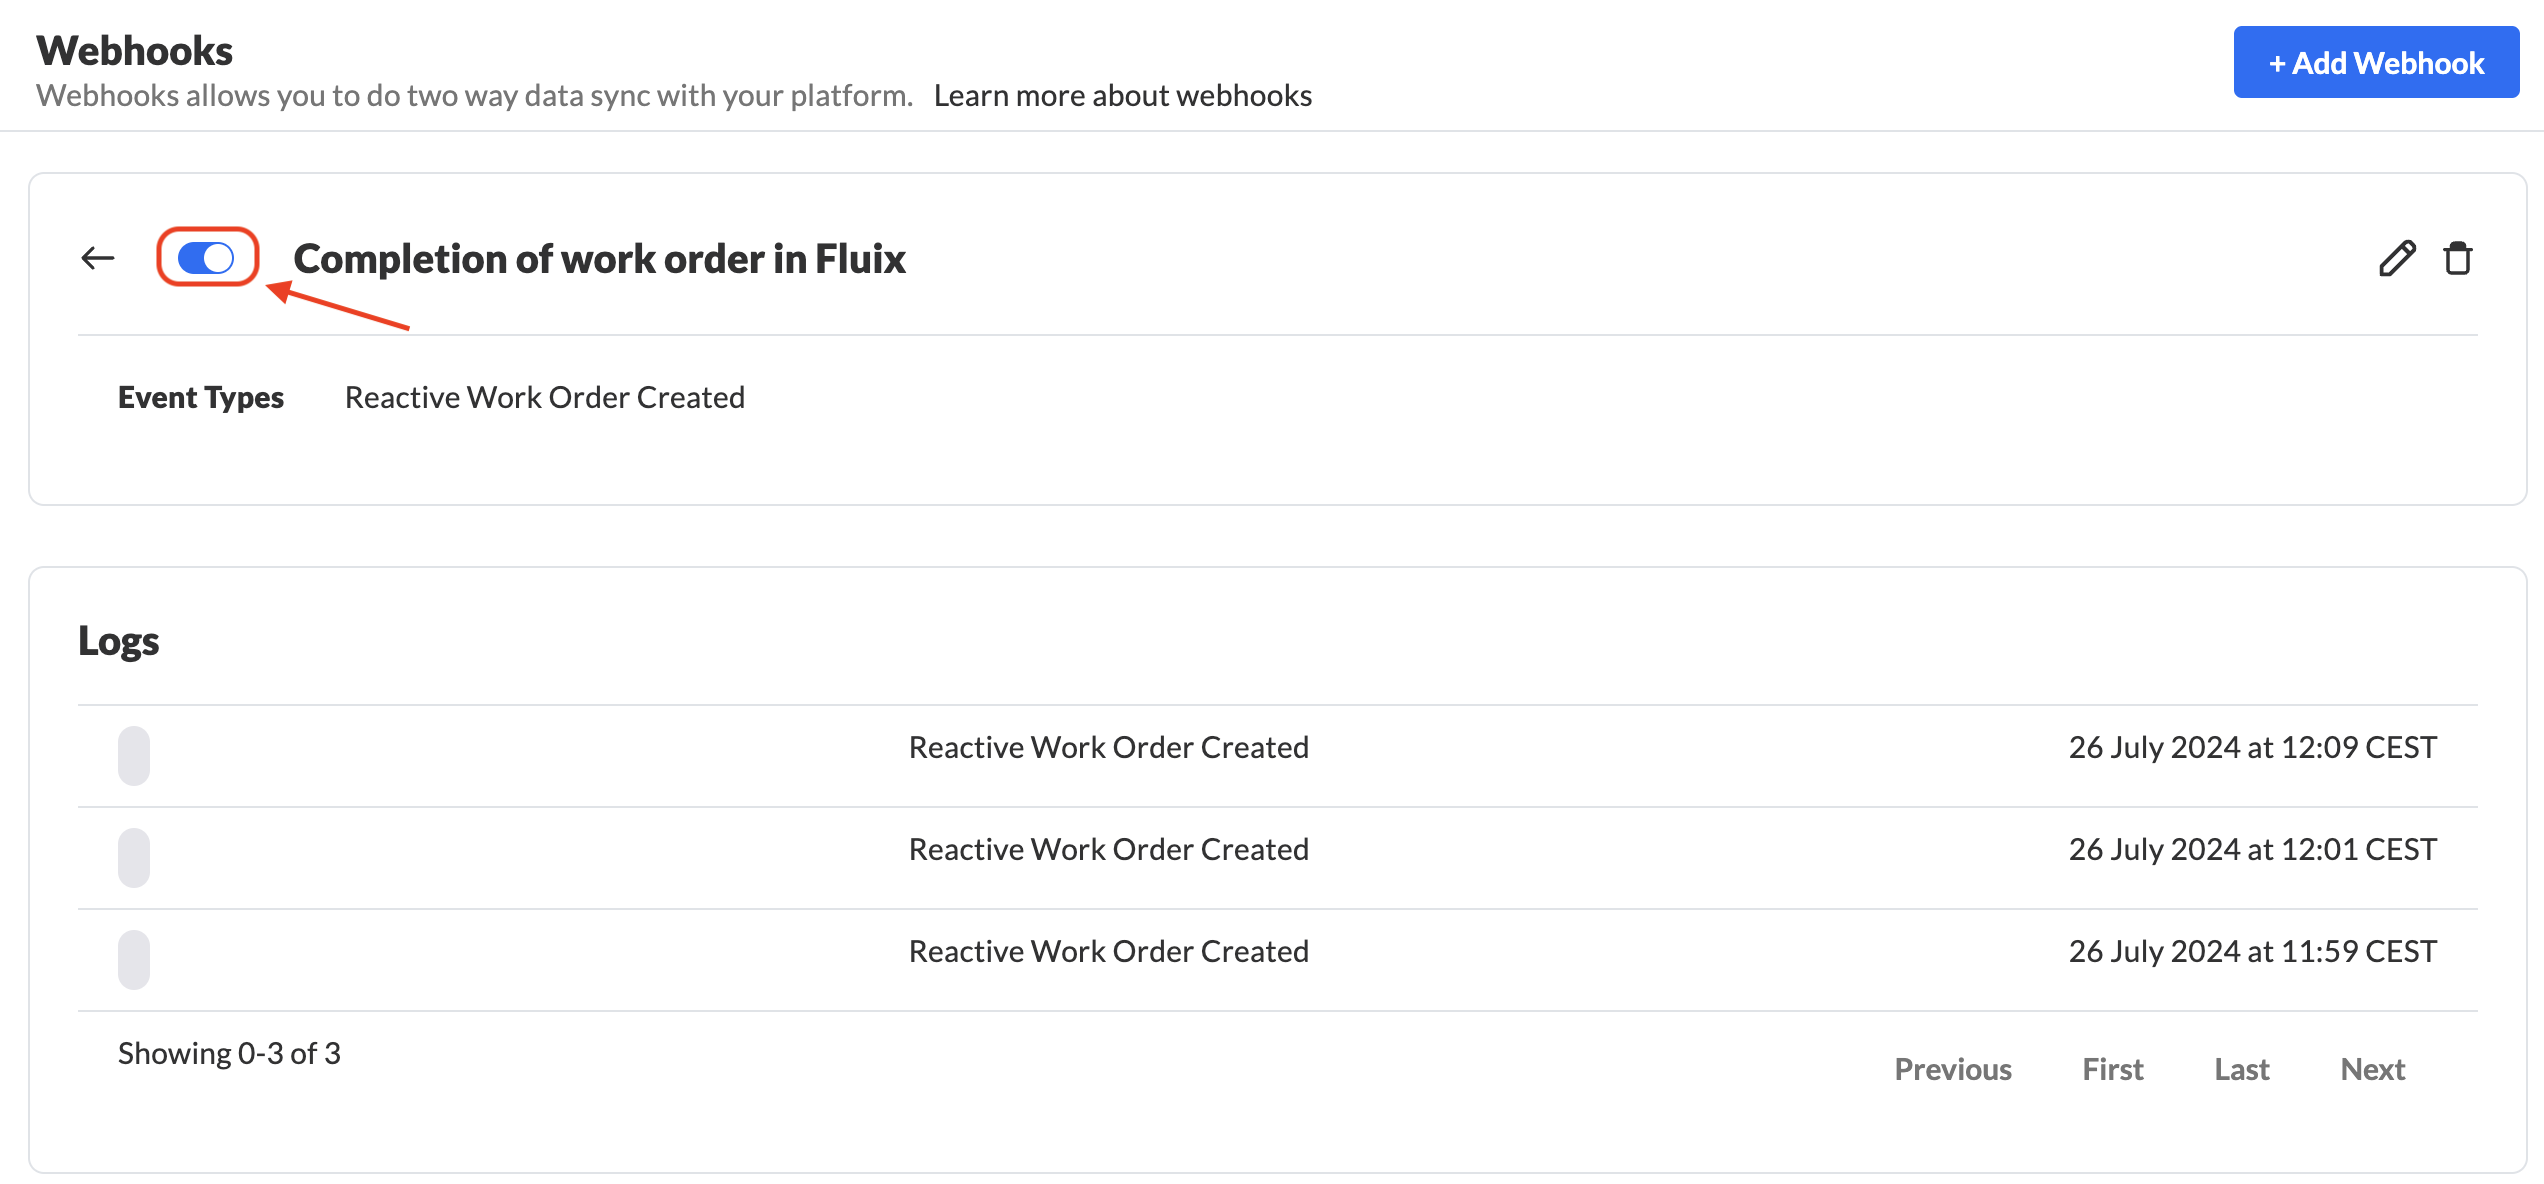
Open the Upkeep account and navigate to the Settings -> Webhooks section. Click Add Webhook, name it accordingly and paste the Fluix Webhook from the process start there. Select the event type Reactive Work Order Created or any other of your choiceand click Add Webhook. After that, open the webhookand activate it.
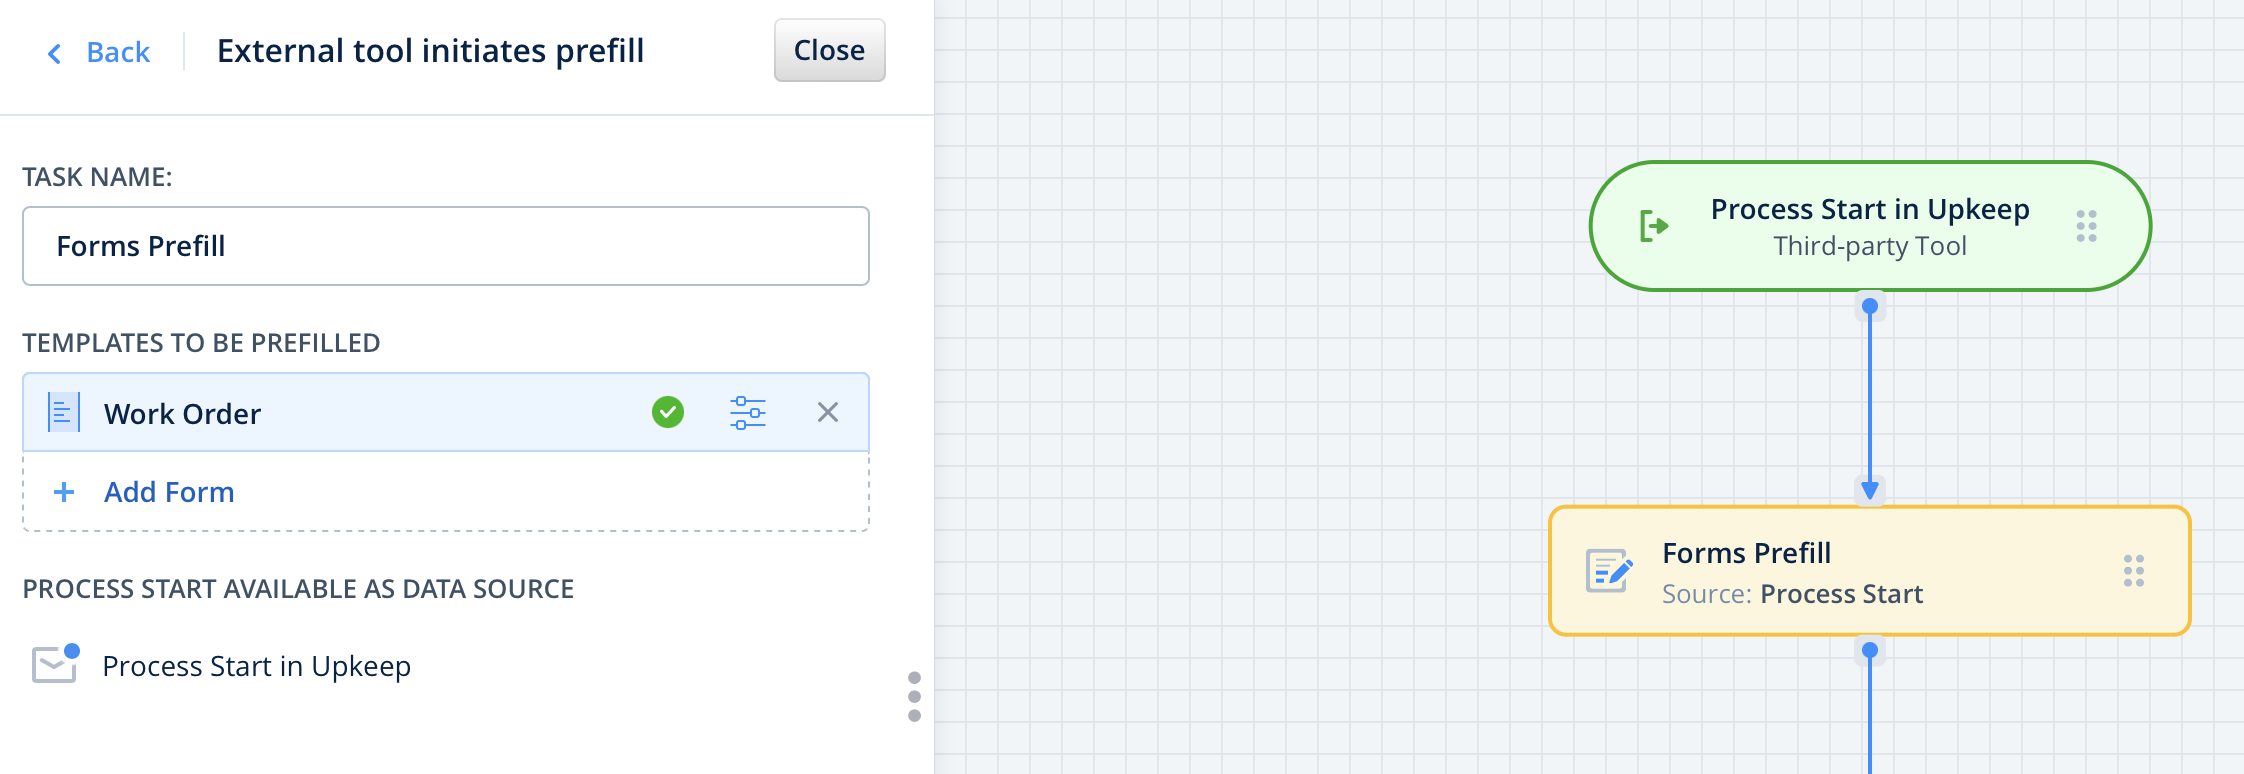
After that, drag-n-dropForms Prefilltask and connect it with Process Start in the working area, configure it by mapping the fields in the form that should be filled in the form with data from Upkeep.
Drag-n-drop a User task to the working area and configure it by adding fillable form from previous tasks and assigning them to the team that will work on it on a regular basis. Connect it with the Forms Prefill task. Make sure that you have added yourself to the group of users in order to test the setup later.
Step 3 – Configure the final submit action
Select what the final submit action will be done with the form initiated by work order creation. Drag-n-drop the respective submit action to the Taskstream chart and connect it with the User task that your team will be working on. Click on it to open it and configure it accordingly.
Step 4 – Save and test the setup
Click Save & Publish to activate the Taskstream. Once the Work order is initiated in UpKeep, a new task will be created in Fluix. Open the Fluix Tasks app or the User App in the right corner of the admin portal. Navigate to the Assigned section in the ToDo tab to find a new task. Fill in the form and finish it once it is ready. The completed form will be submitted according to the preconfigured destination.
Scenario 2: Automatic creation of a new Work Order in Upkeep once a document is submitted in Fluix.
Step 1 – Create the recurrent business process for your team in Fluix
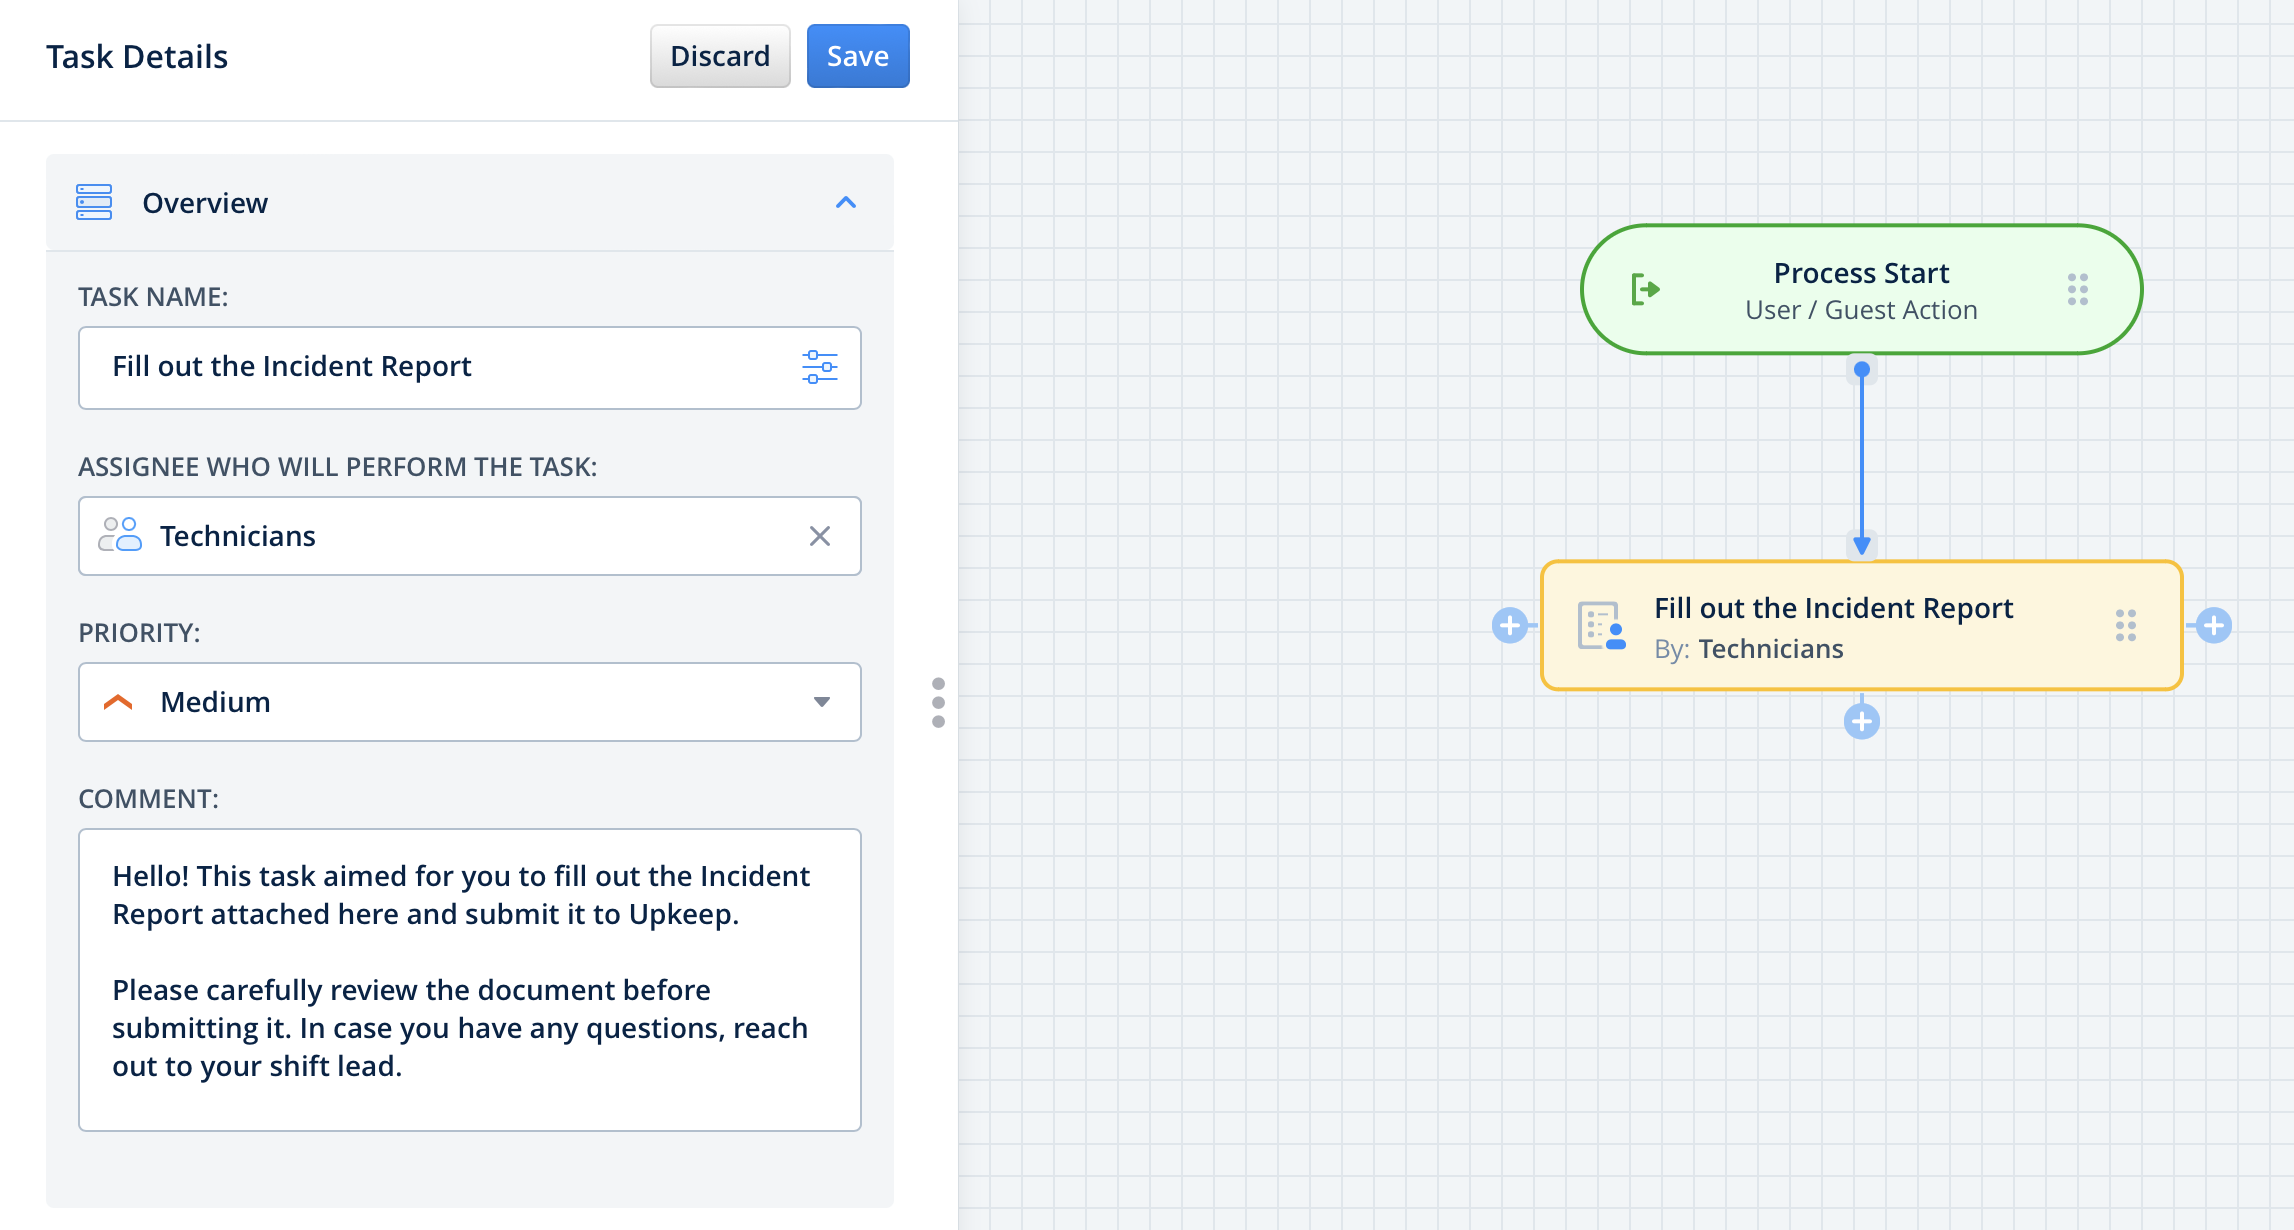
Navigate to the Taskstreams section in the Fluix admin portal to create a new taskstream. Drag-n-drop a Process Start—User / Guest Action eventandthe User task to the working area. Configure it by adding fillable forms and assigning it to the team that will work on it regularly. Make sure that you have added yourself to the group of users in order to test the setup later.
Step 2 – Configure the connection between Fluix and Upkeep
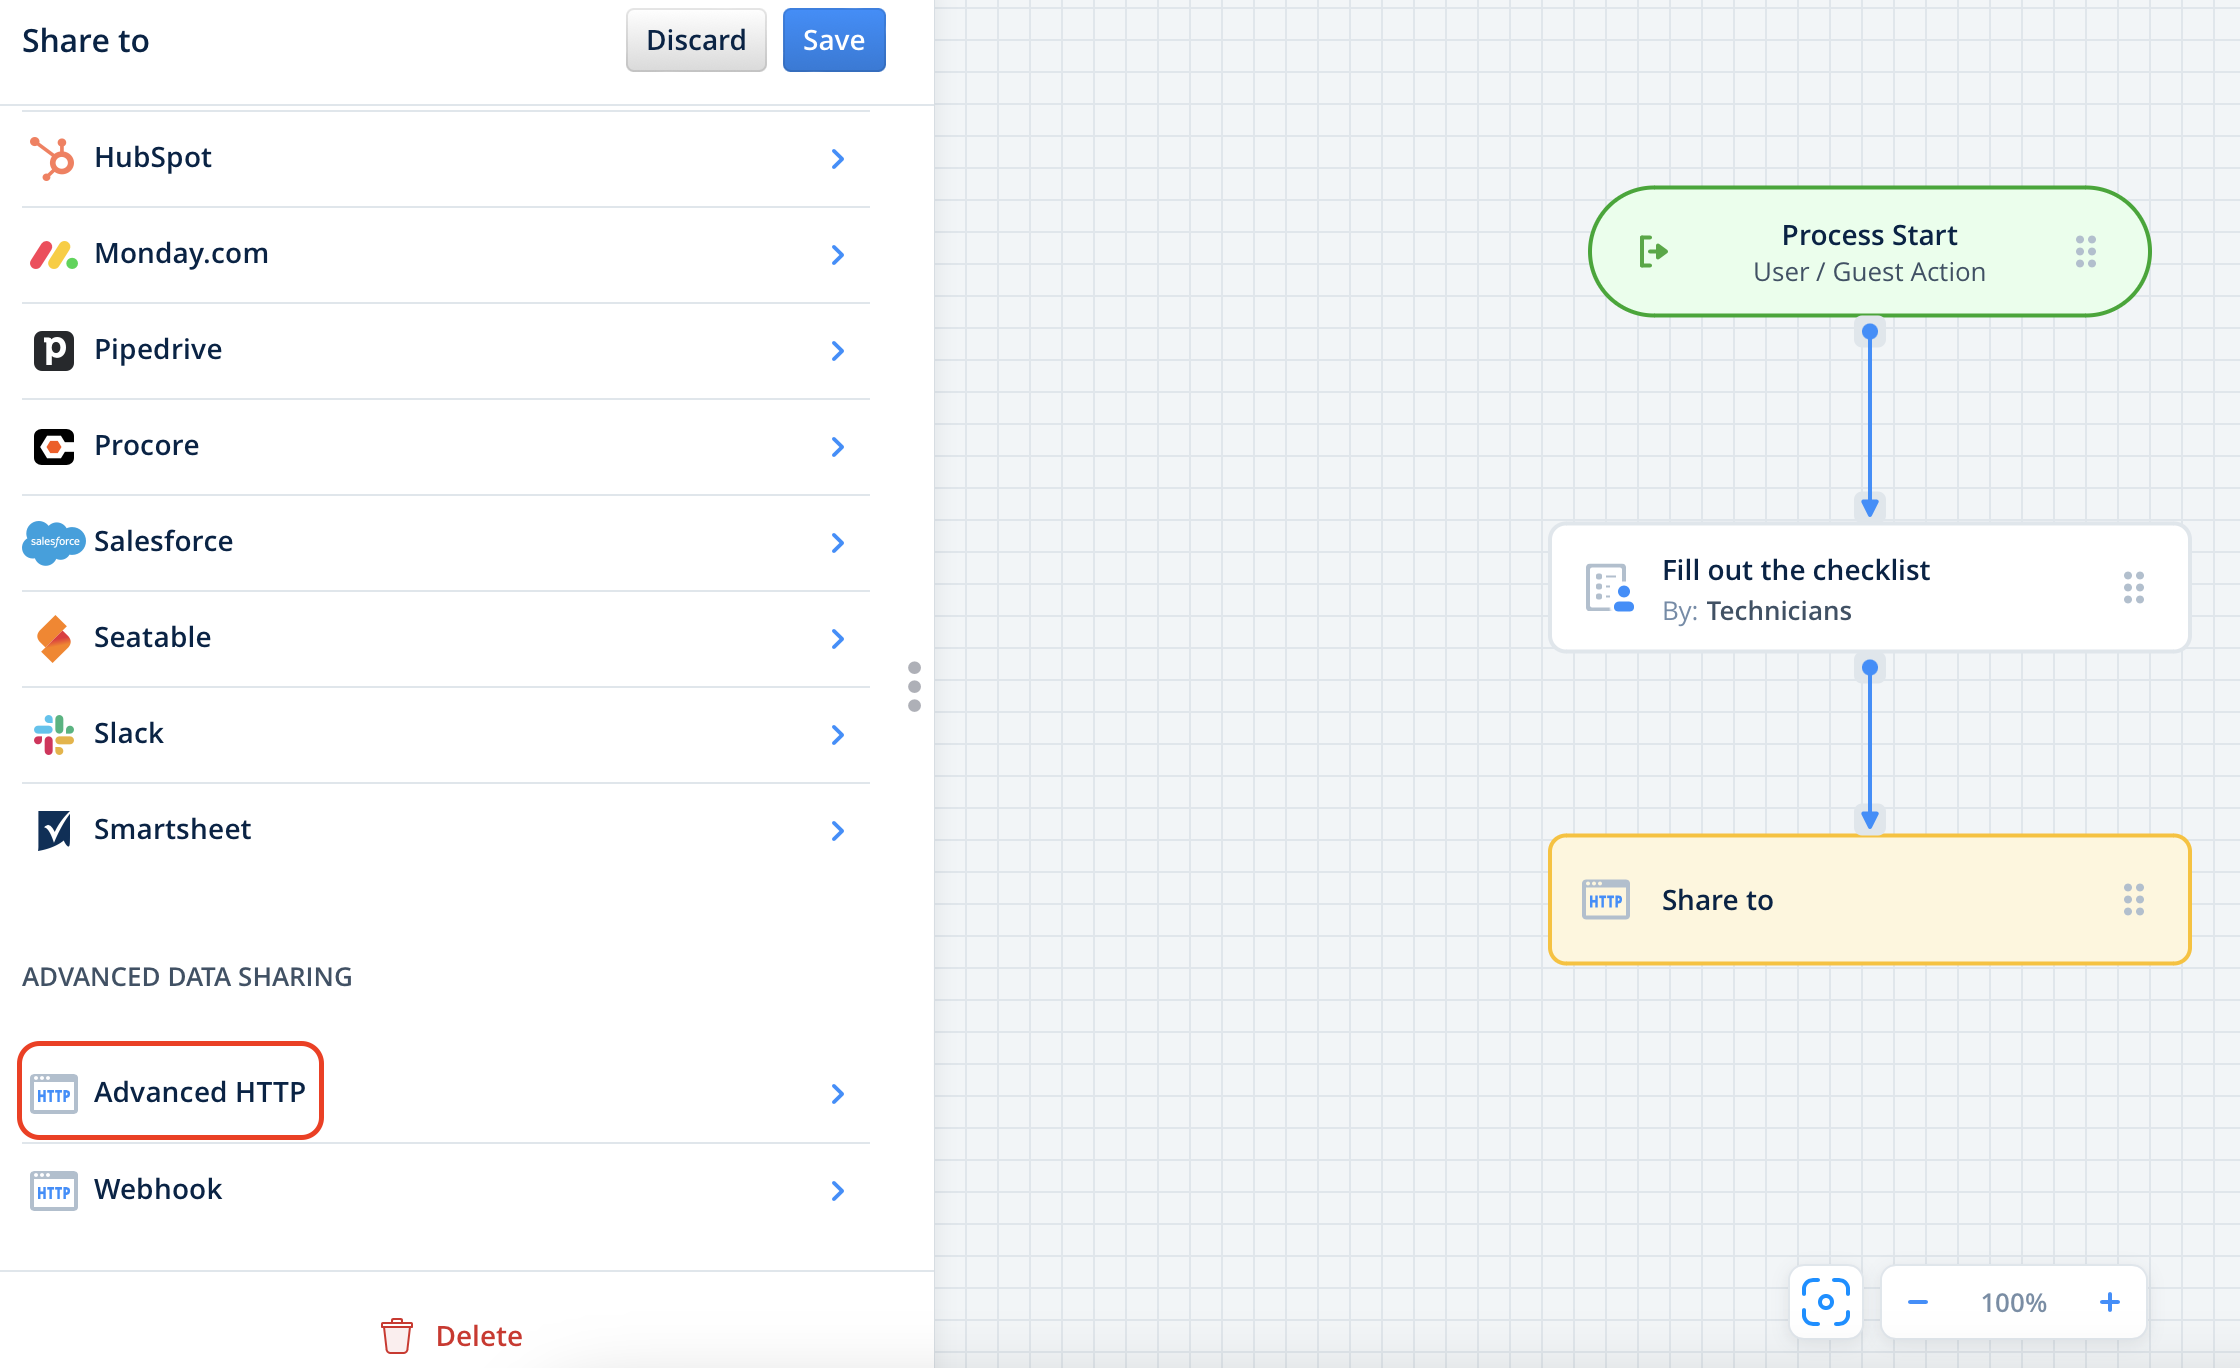
Drag-n-drop Share to submit action to the Taskstream chart and connect it with the User task that your team will be working on. Click on the Share to element, select Advanced HTTP from the options in the Advanced Data Sharing section, and click Configure. To activate the setup, we’ll need to set up two different requests.
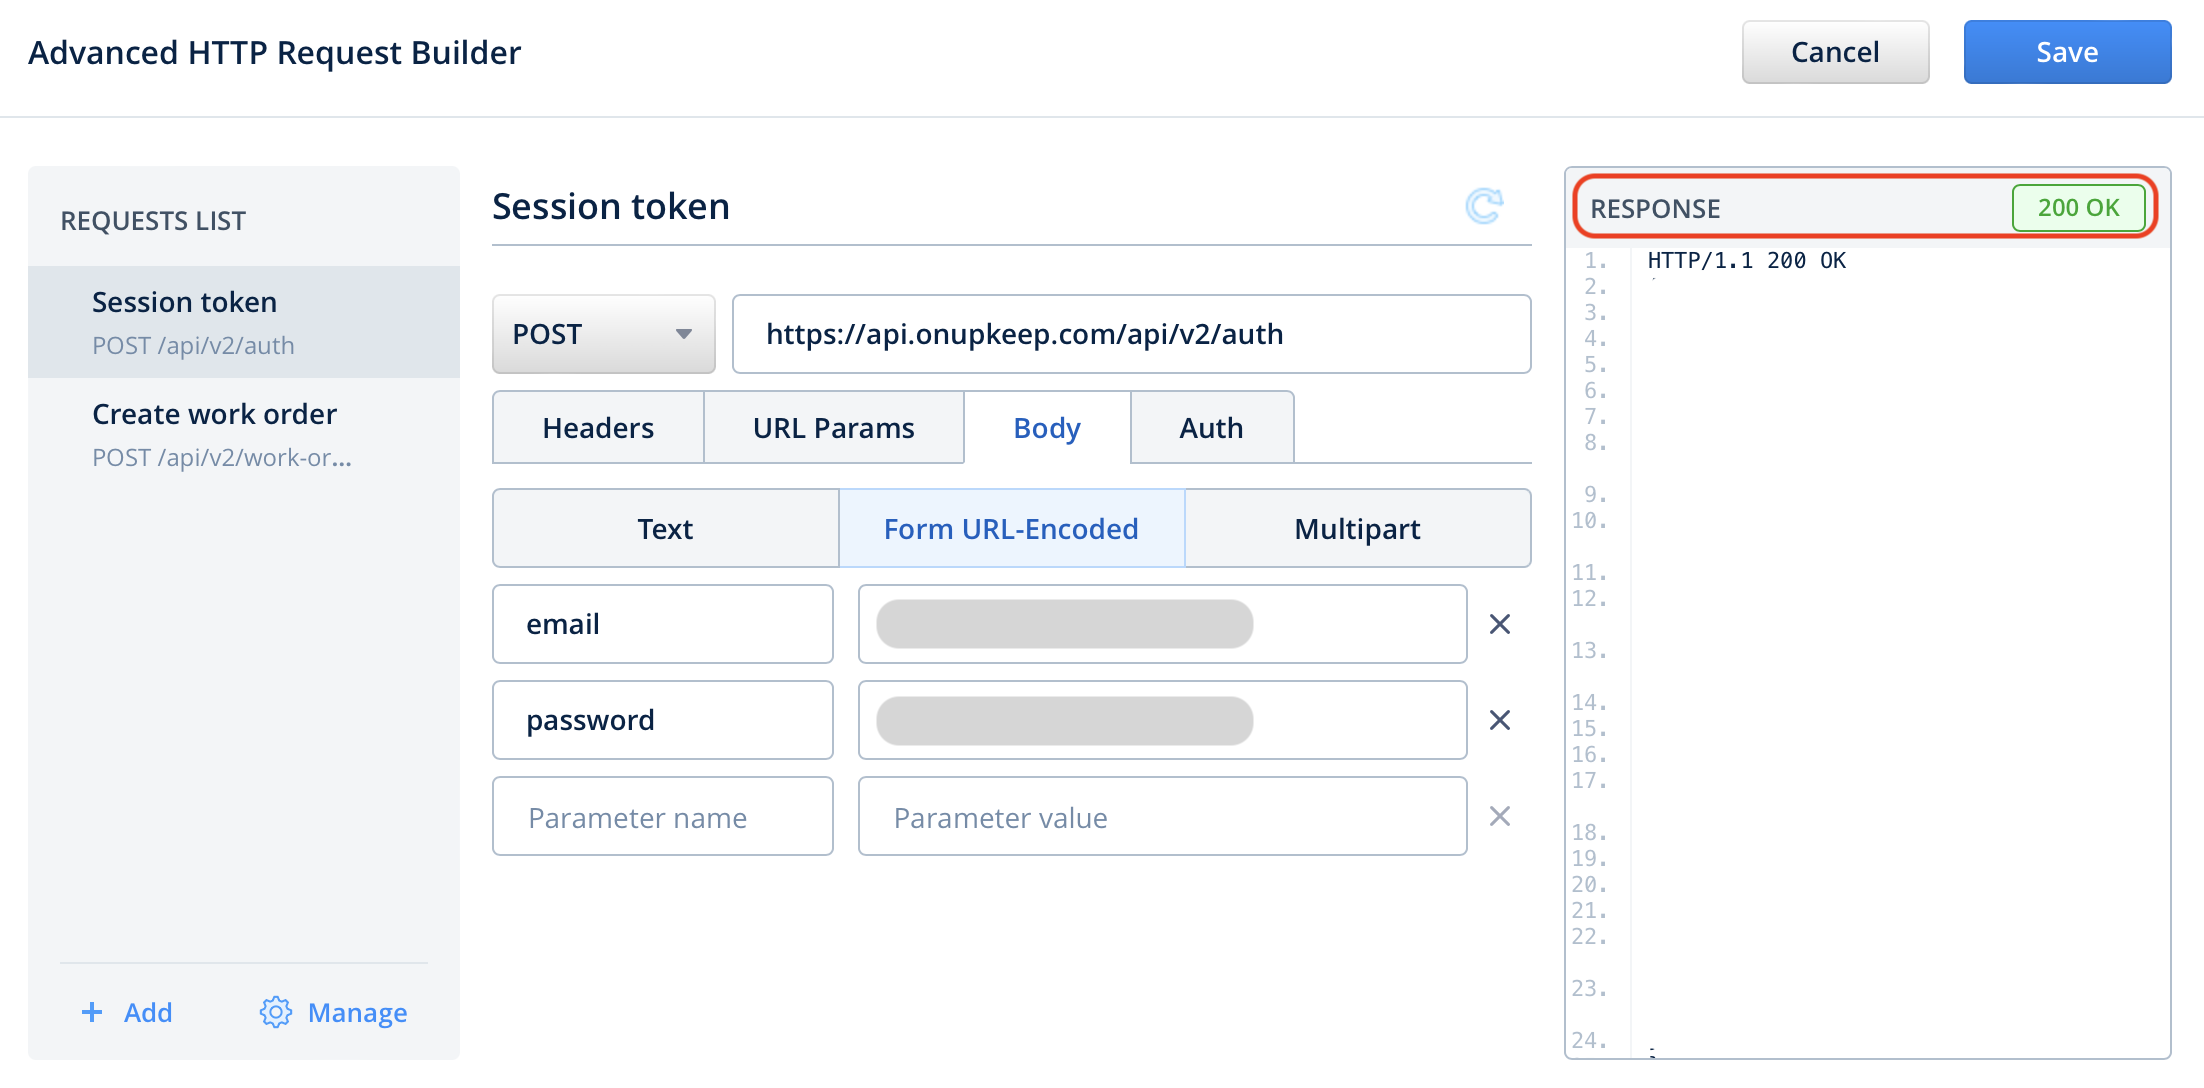
Configuring the first request
In the opened Advanced HTTP Request Builder, configure the first request name, let’s say “Session token”, select ‘POST’ as the request type, and add the request URL that can be found in the Upkeep API documentation in the Authentication Section. Paste https://api.onupkeep.com/api/v2/auth/ link into the Request URL field. Open the Body section and in the Form URL-Encoded sectionadd the email and password of your Upkeep account. After that, click on the arrow in the Request name field to receive a response from UpKeep. The positive response will be 200 OK.
Configuring the second request
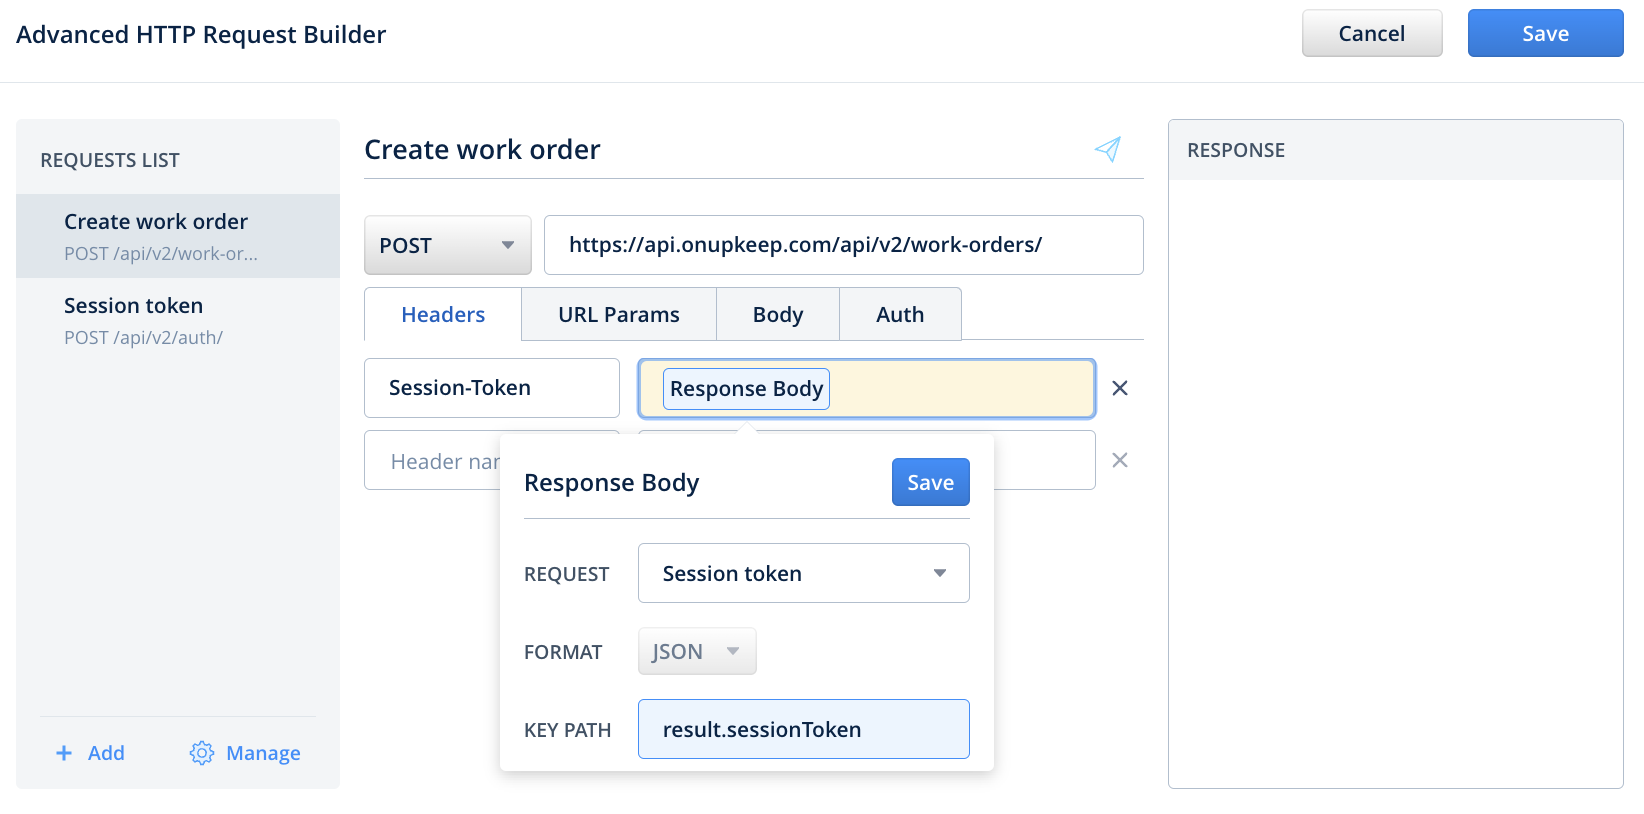
Click Add in the Requests List panel, name the request e.g. “Create work order” and paste the link https://api.onupkeep.com/api/v2/work-orders/ that can be found in the UpKeep API documentation as well. In the Headers section, fill out the following details:
Session-Token—Start typing Response Body so that the Fluix engine suggests using the dynamic value. After that, configure it as demonstrated in the screenshot.
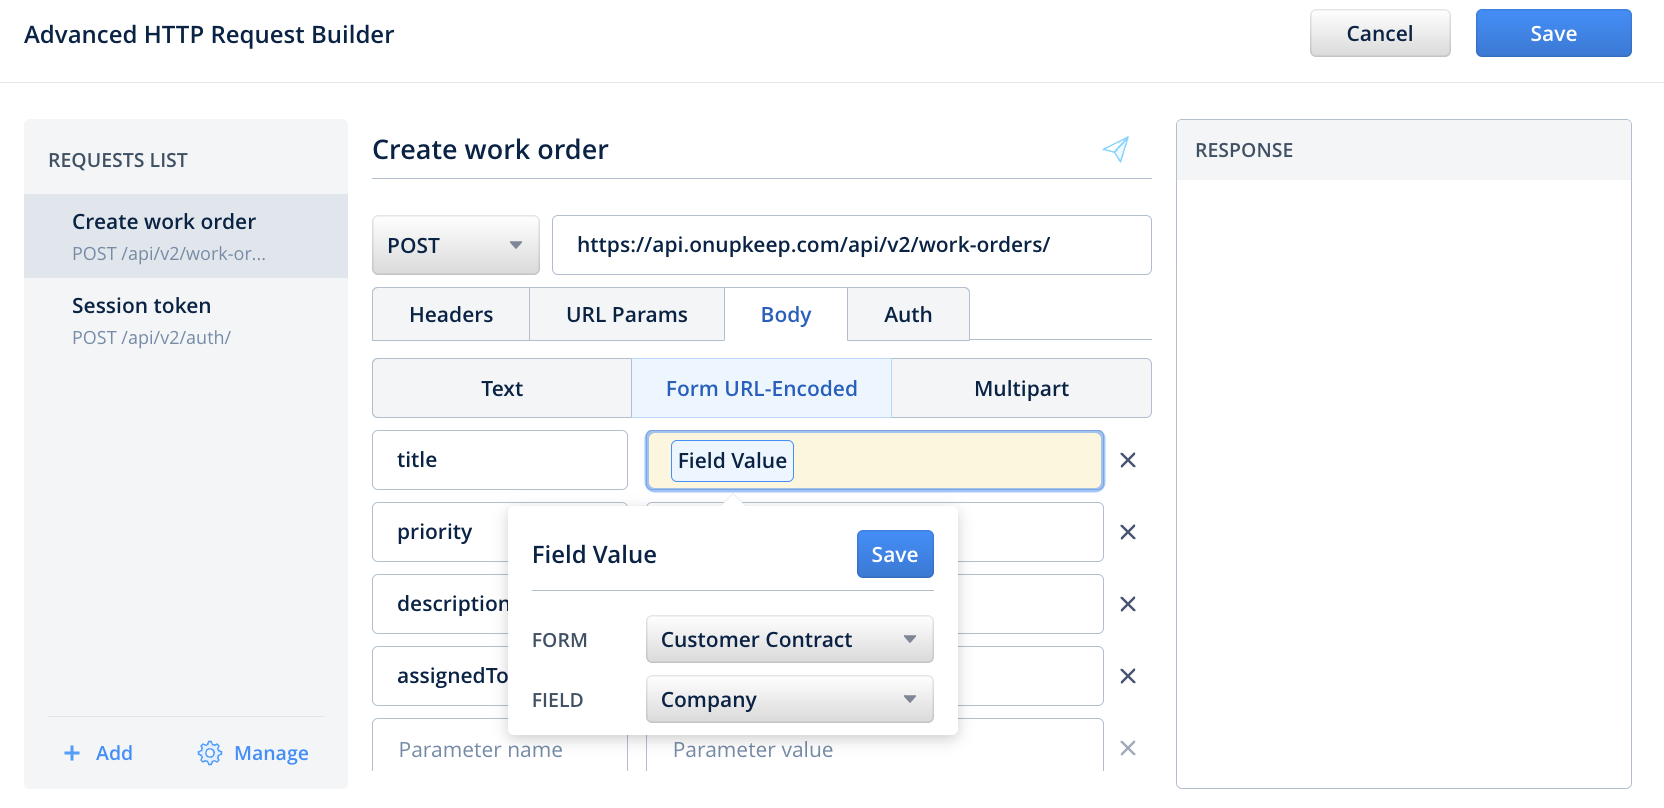
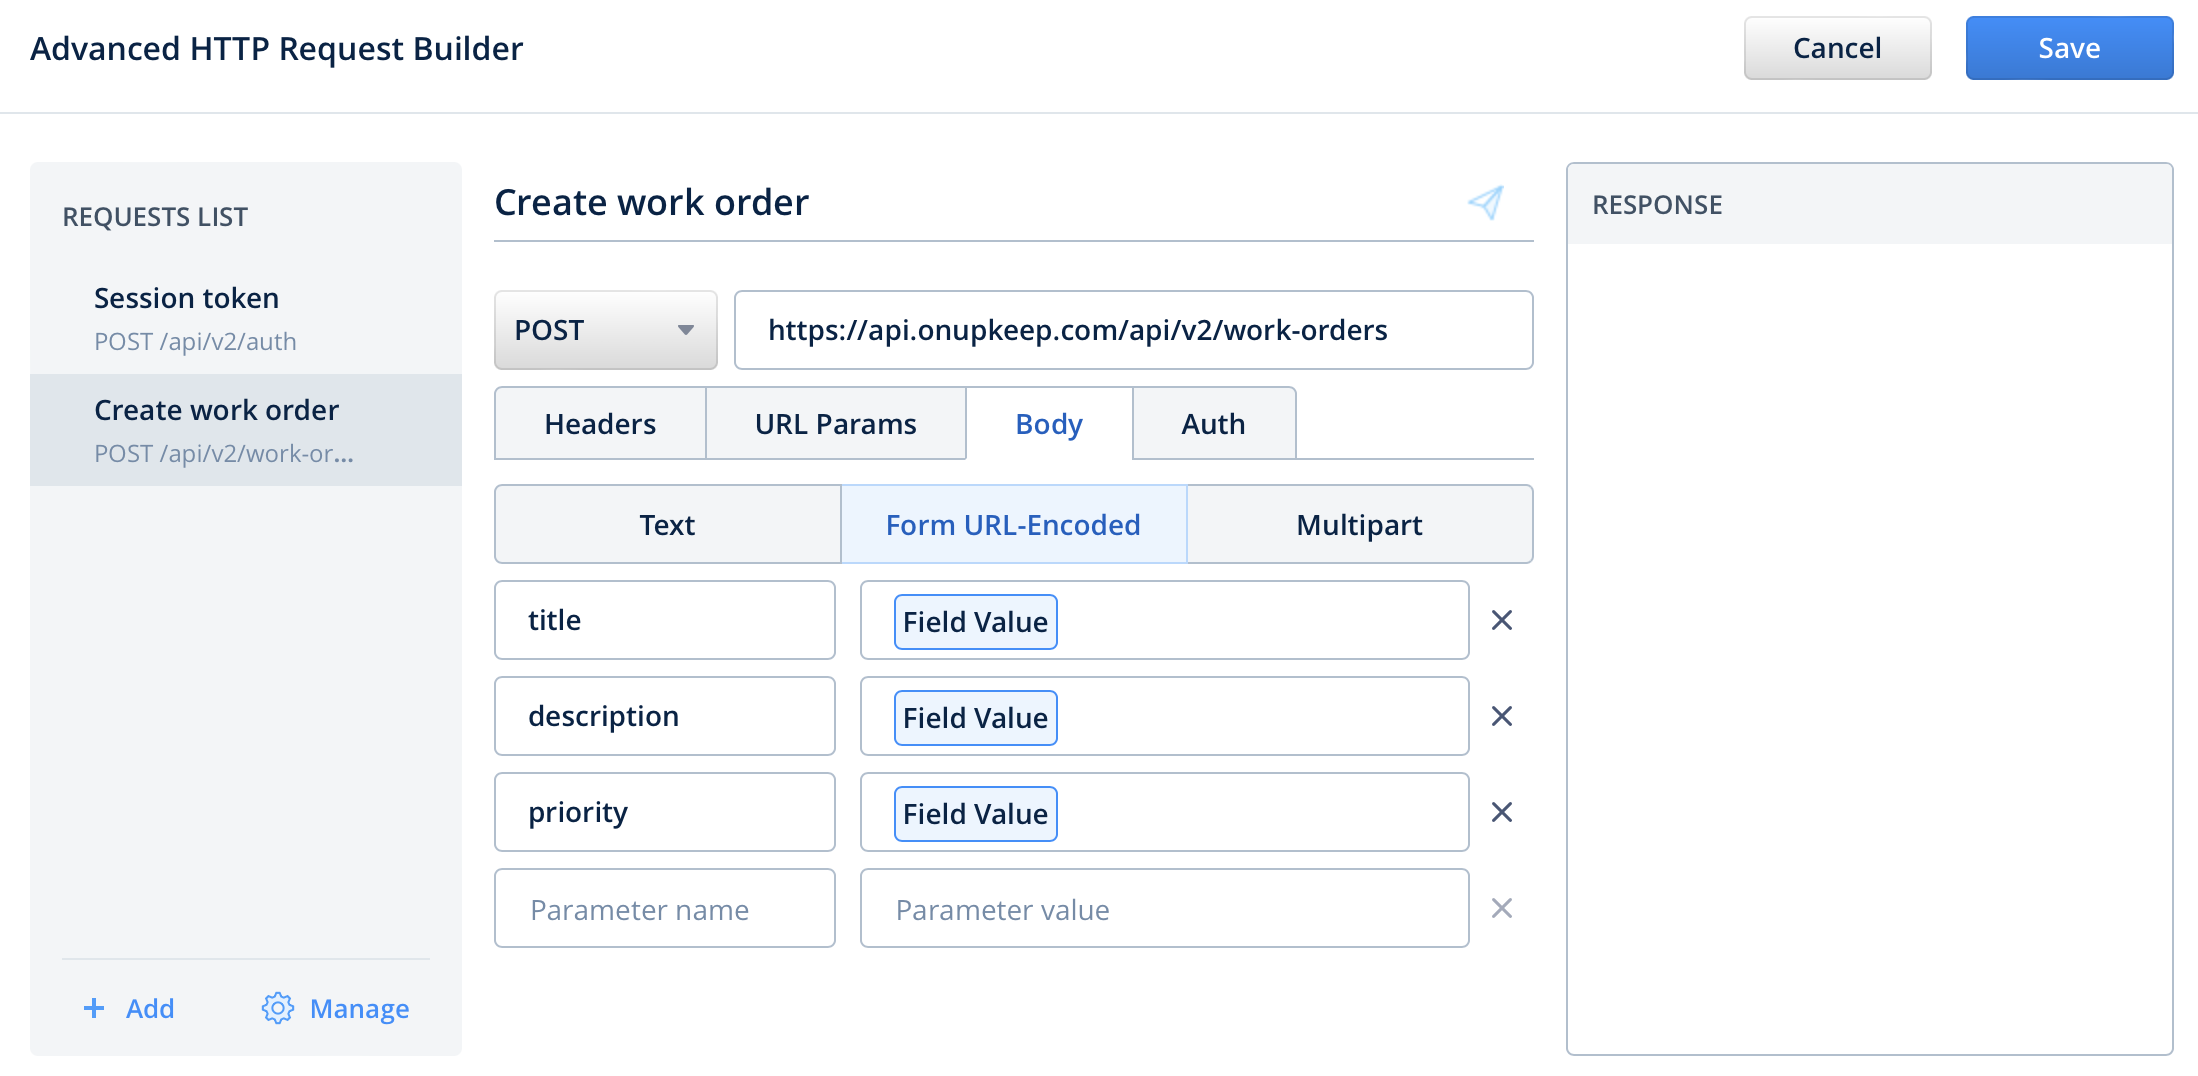
In the Body -> Form URL – Encoded, configure the fields from the form from which the work order’s details in UpKeep will be generated, for example title – start filling out Field value so that Fluix will suggest you use the dynamic value. After that, configure the form and the fields from the form that should be pulled out to the Work order’s title.
priority – Field value; description – Field value;
Step 3 – Save and test the setup
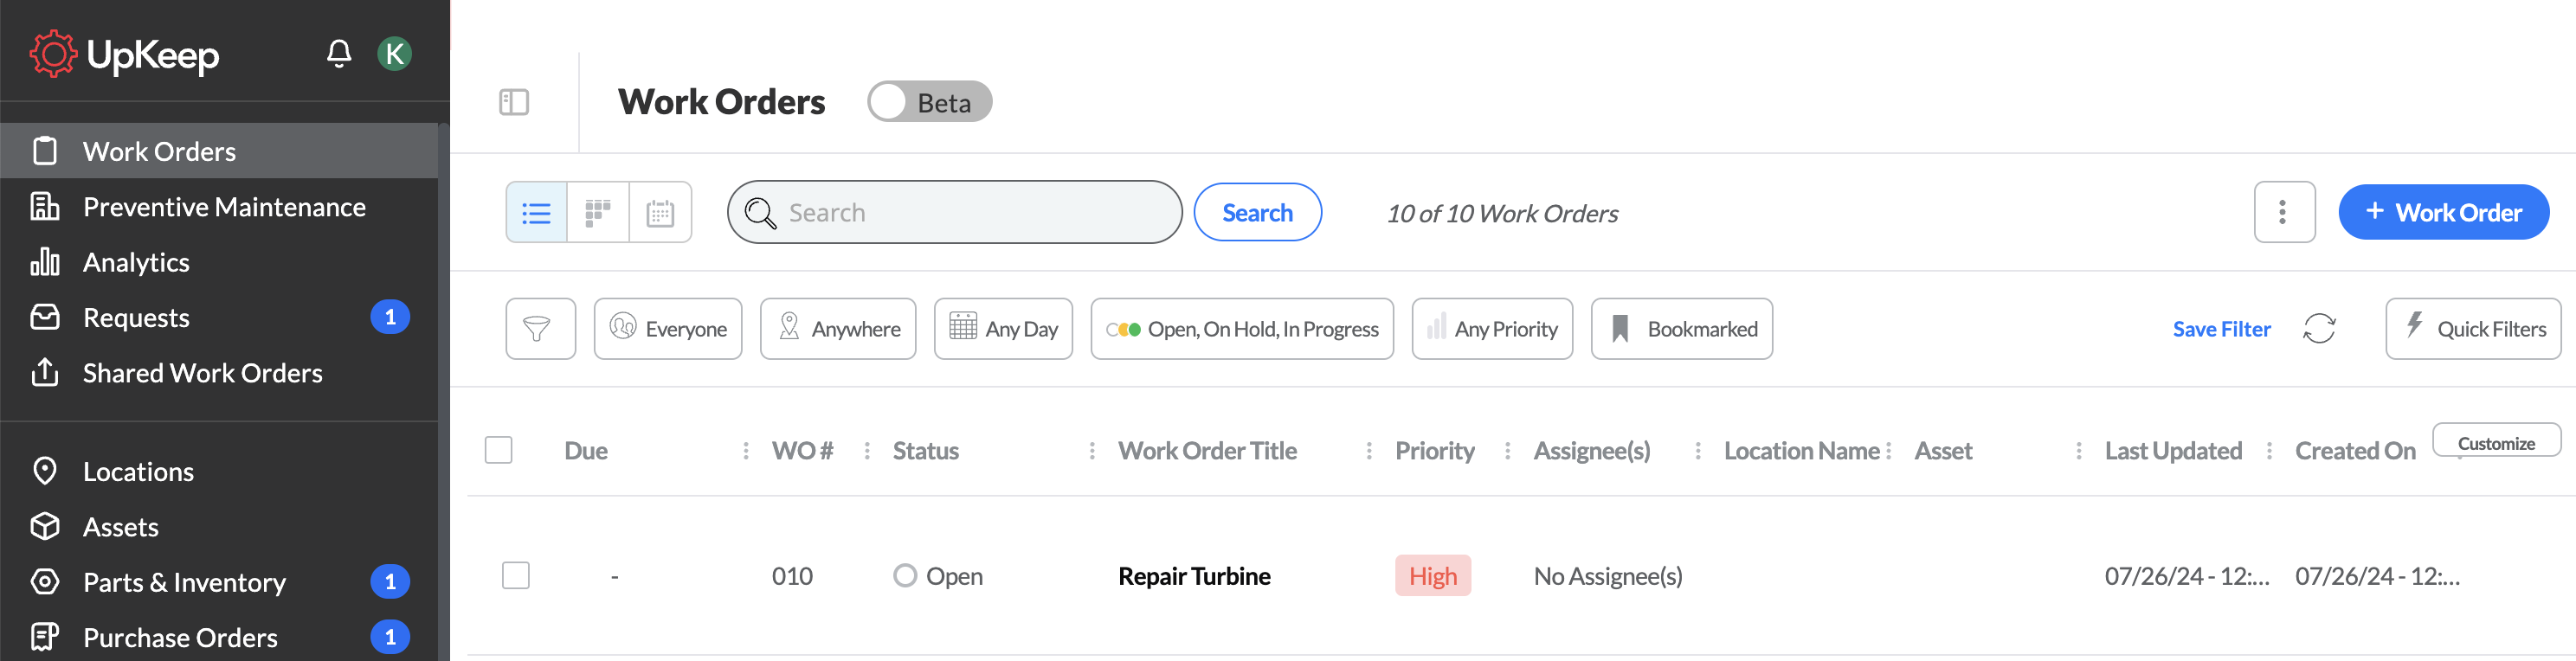
Click Save & Publish to activate the Taskstream. Open the Fluix Tasks app on the mobile device, or click User App in the right corner of the admin portal. Navigate to the task that you configured, fill in the form, and finish the task. Once the task is finished, a new Work order in Upkeep will be created with data pulled out from the form.
In case you have any questions or difficulties with setup, contact our support at support@fluix.io and we’ll be happy to help you.