

To make sure your digital work instructions improve safety and consistency, you need to build them around how field technicians actually work: from work release and pre-task briefings to inspection sign-off and audit-ready storage.
In this guide, you’ll learn how to build work instructions that fit real wind energy operations:
- turn a paper-based form into a usable template
- structure instructions around real turbine maintenance workflows
- what to include for safety, compliance, approvals, and offline execution
You’ll also see how Fluix helps teams build, deploy, and manage those instructions without heavy IT work.
And before we dive into the step, watch this quick walkthrough to see how digital work instructions come together in practice.
Step 1: Define the job outcome and trigger point
Start with one question: what exact job should this instruction help complete, and when should it be used?
Be specific. “Maintenance” is too broad. “Complete gearbox oil inspection during scheduled turbine service” is much better.
You also need to define the trigger point. When does this instruction appear in the workflow? After work release? During a planned maintenance window? Only when a specific fault code is raised?
This keeps your work instruction focused and prevents it from turning into a bloated document that tries to cover everything.
Example:
A wind operations team creates a digital work instruction for main bearing lubrication on a new turbine model. The instruction is triggered only after the technician receives the assigned work order and confirms the turbine is in the correct maintenance status.
Step 2: Map the real field process before digitizing it
Do not start by rebuilding the existing PDF. Start by observing how the job is actually done in the field. Walk through the task with technicians, site supervisors, and safety leads. Look for what really happens between the official steps:
- where teams pause to verify conditions
- where decisions change based on what they find
- where technicians rely on memory or side notes
- where documentation is delayed until after the job
- where signatures, photos, or safety checks get missed
Example:
Before digitizing a turbine inspection, the manager shadows technicians during an actual site visit. They notice the team checks anchor points in a different order than the paper checklist suggests, simply because it reduces climbing and backtracking. That insight changes how the digital instruction is structured.
Learn How to Build Work Instructions Around Real Turbine Maintenance Workflows, not Just Static Documents
Step 3: Break the task into clear workflow stages
Once you understand the process, divide it into logical stages. In wind energy, digital work instructions are often easier to use when they mirror the way a job unfolds on site.
A common structure looks like this:
- Work release and access verification
- Pre-task briefing and hazard review
- Isolation and LOTO
- Task execution
- Inspection findings and defect capture
- Supervisor review
- Final sign-off and record storage
This structure gives technicians a clear path and helps operations leaders track progress without chasing paperwork.
Example:
For a service lift inspection, the digital work instruction is organized into sections for turbine access, pre-use checks, statutory inspection items, defect photo capture, and supervisor approval. That makes the process easier to follow than one long checklist.
Step 4: Verify technician competency and access before work begins
Not every technician can perform every task. Some jobs require specific certifications, authorizations, or role-based access.
Your digital work instruction process should reflect that from the start. Before a technician opens the instruction, the system should confirm they are the right person for the job or that the work has been assigned correctly.
Example:
A site manager assigns a high-voltage switching-related instruction only to technicians with the proper authorization level. Other team members can view related safety information, but they cannot execute or sign off the controlled task.
Step 5: Build pre-task briefings and hazard acknowledgment into the workflow
This is where many static work instructions fall short. They describe the task, but skip the safety conversation that needs to happen before the first tool comes out.
But pre-task briefings, toolbox talks, and hazard identification are not optional extras. They are part of the work itself.
Build that into the digital instruction with required fields for:
- task assignment by team lead
- site-specific hazard checks
- TRIC or equivalent risk review
- PPE confirmation
- technician acknowledgment and signatures.
Example:
Before a blade inspection begins, the lead technician uses the digital work instruction to assign roles, confirm weather conditions, review dropped-object risks, and collect signatures from each crew member to confirm the toolbox talk is complete.
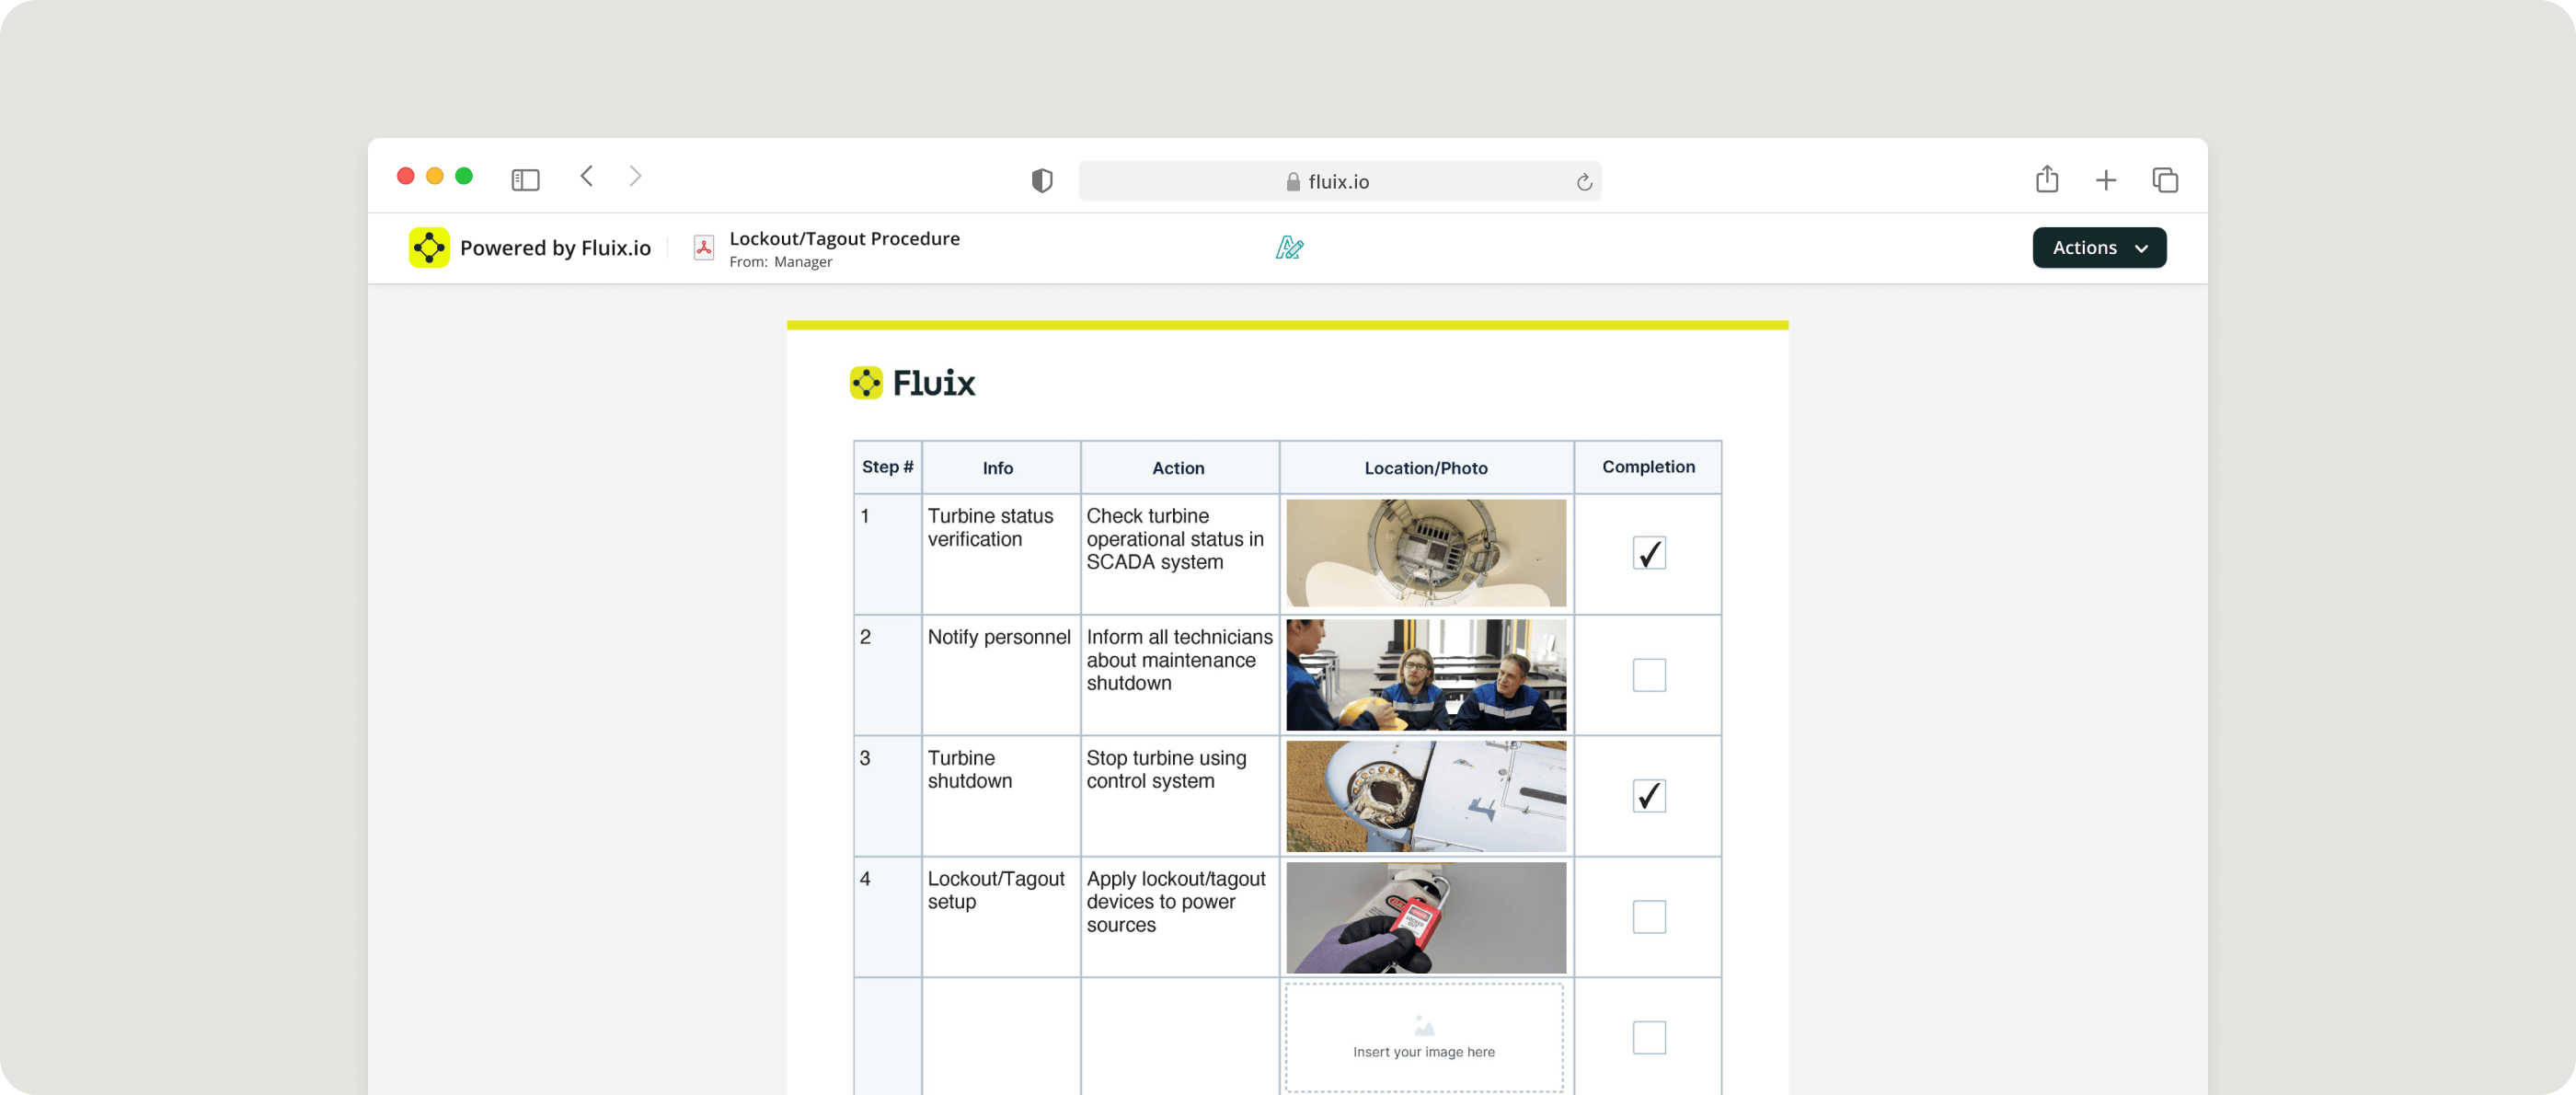
Step 6: Turn LOTO and isolations into guided, controlled steps
This part of your digital work instruction should be tightly controlled. Use step-by-step sequences, mandatory confirmations, and clear authorization logic. Avoid vague instructions like “isolate equipment.” Spell out what the technician must check, confirm, document, and sign.
You may also need different versions based on region, site rules, or regulatory requirements.
Example:
A digital work instruction for converter maintenance includes:
- confirmation of the approved switching schedule
- permit or limitation of access reference
- lockout steps by component
- technician-specific lock application
- a required photo of the lock and tag
- final confirmation before the execution stage unlocks
That prevents crews from skipping ahead and improves audit traceability.
Step 7: Write short, action-based steps for use on mobile devices
Each step should be short, direct, and written in the active voice. One action per step is a good rule. When needed, use supporting notes for detail instead of packing too much into the main instruction.
Good step copy usually sounds like this:
- Confirm turbine ID matches work order
- Inspect grounding cable for visible damage
- Apply personal lock to isolation point
- Capture photo of the brake caliper
- Record oil level reading
Bad step copy tries to explain everything at once.
Example:
Instead of writing:
“Before proceeding with the inspection, the technician should verify that all anchor points in the upper internal platform area are free from visible signs of corrosion or structural compromise.”
Write:
Inspect upper platform anchor points for corrosion or damage.
That is easier to read, faster to act on, and better for mobile use.
Read Success Story Read Success Story “The fact that you can use Fluix offline is an absolute must for us.” James Bird, Maintenance Engineer, RWE Renewables
Step 8: Add visuals that remove ambiguity
In wind energy, many tasks are easier to show than describe.
That is why visuals matter. Use them where they help technicians identify the right part, understand the correct condition, or confirm what a defect looks like.
Useful visual formats include:
- annotated photos
- short step videos
- diagrams
- equipment labels
- component reference images
- example defect photos
Do not add visuals for decoration. Add them where they reduce confusion or rework.
Example:
A nacelle fire extinguisher inspection instruction includes a photo showing the correct pressure gauge range and a second image showing what counts as a failed condition. That helps technicians make faster, more consistent calls in the field.
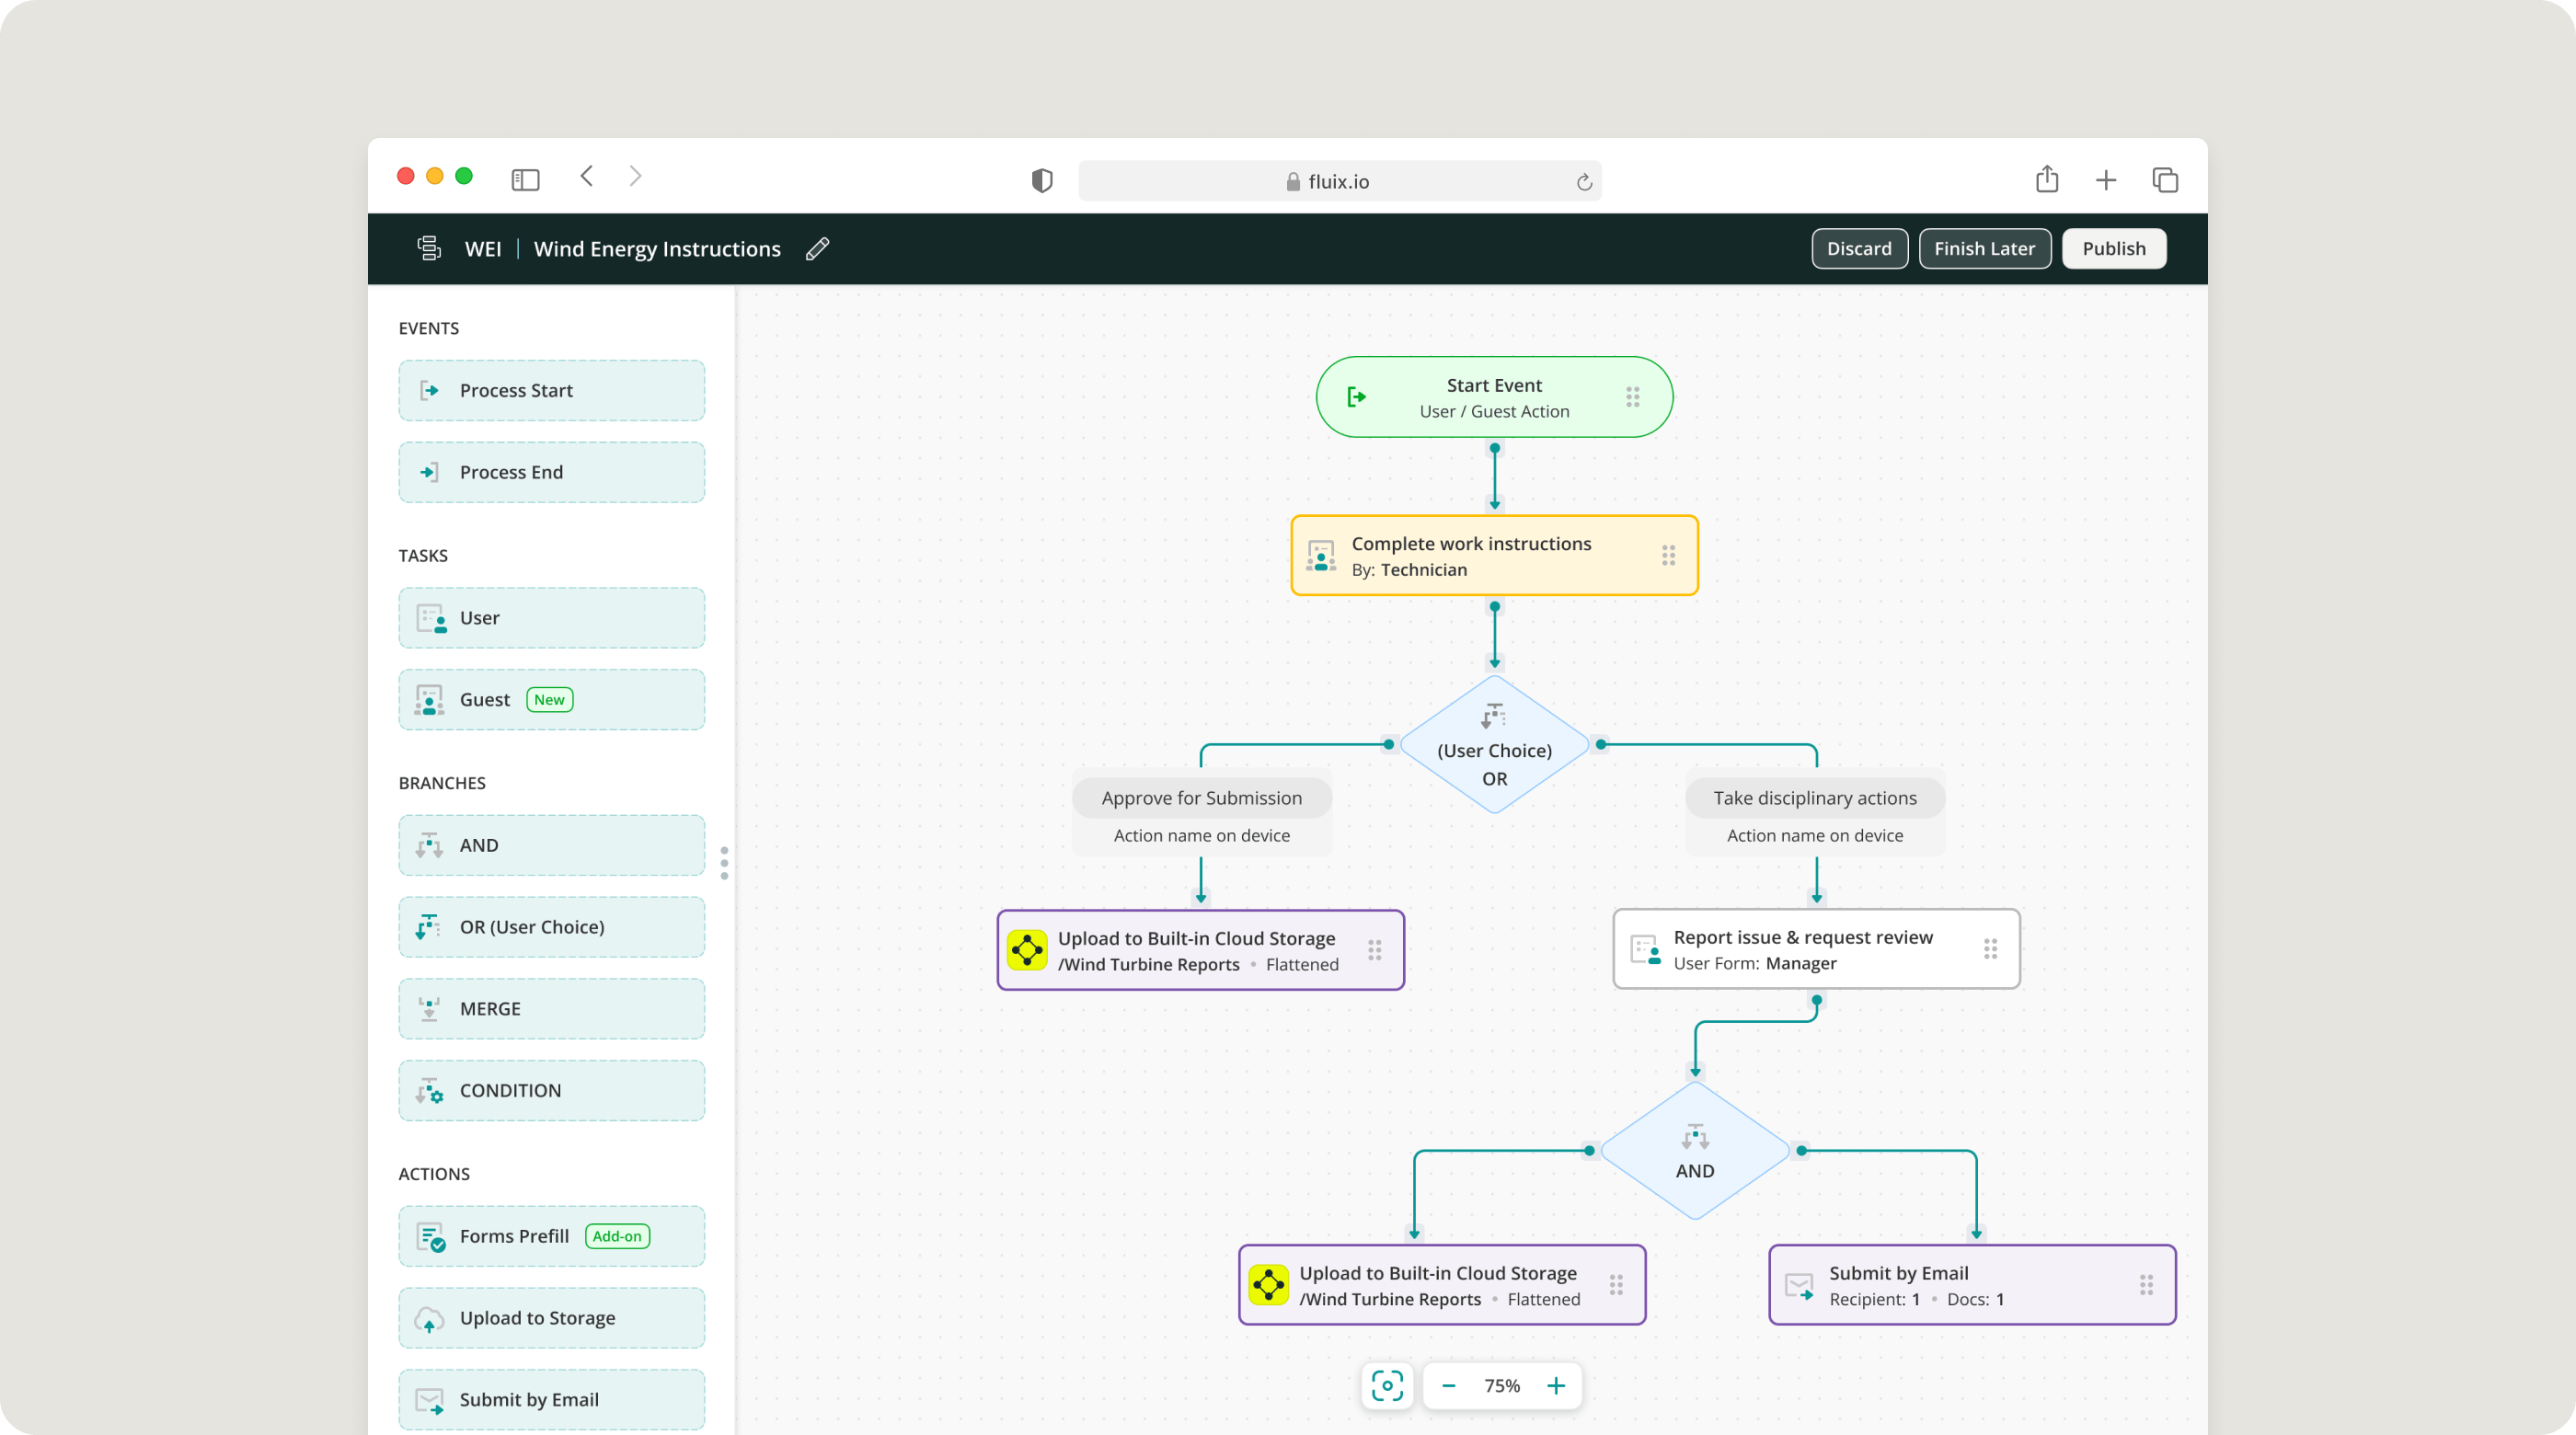
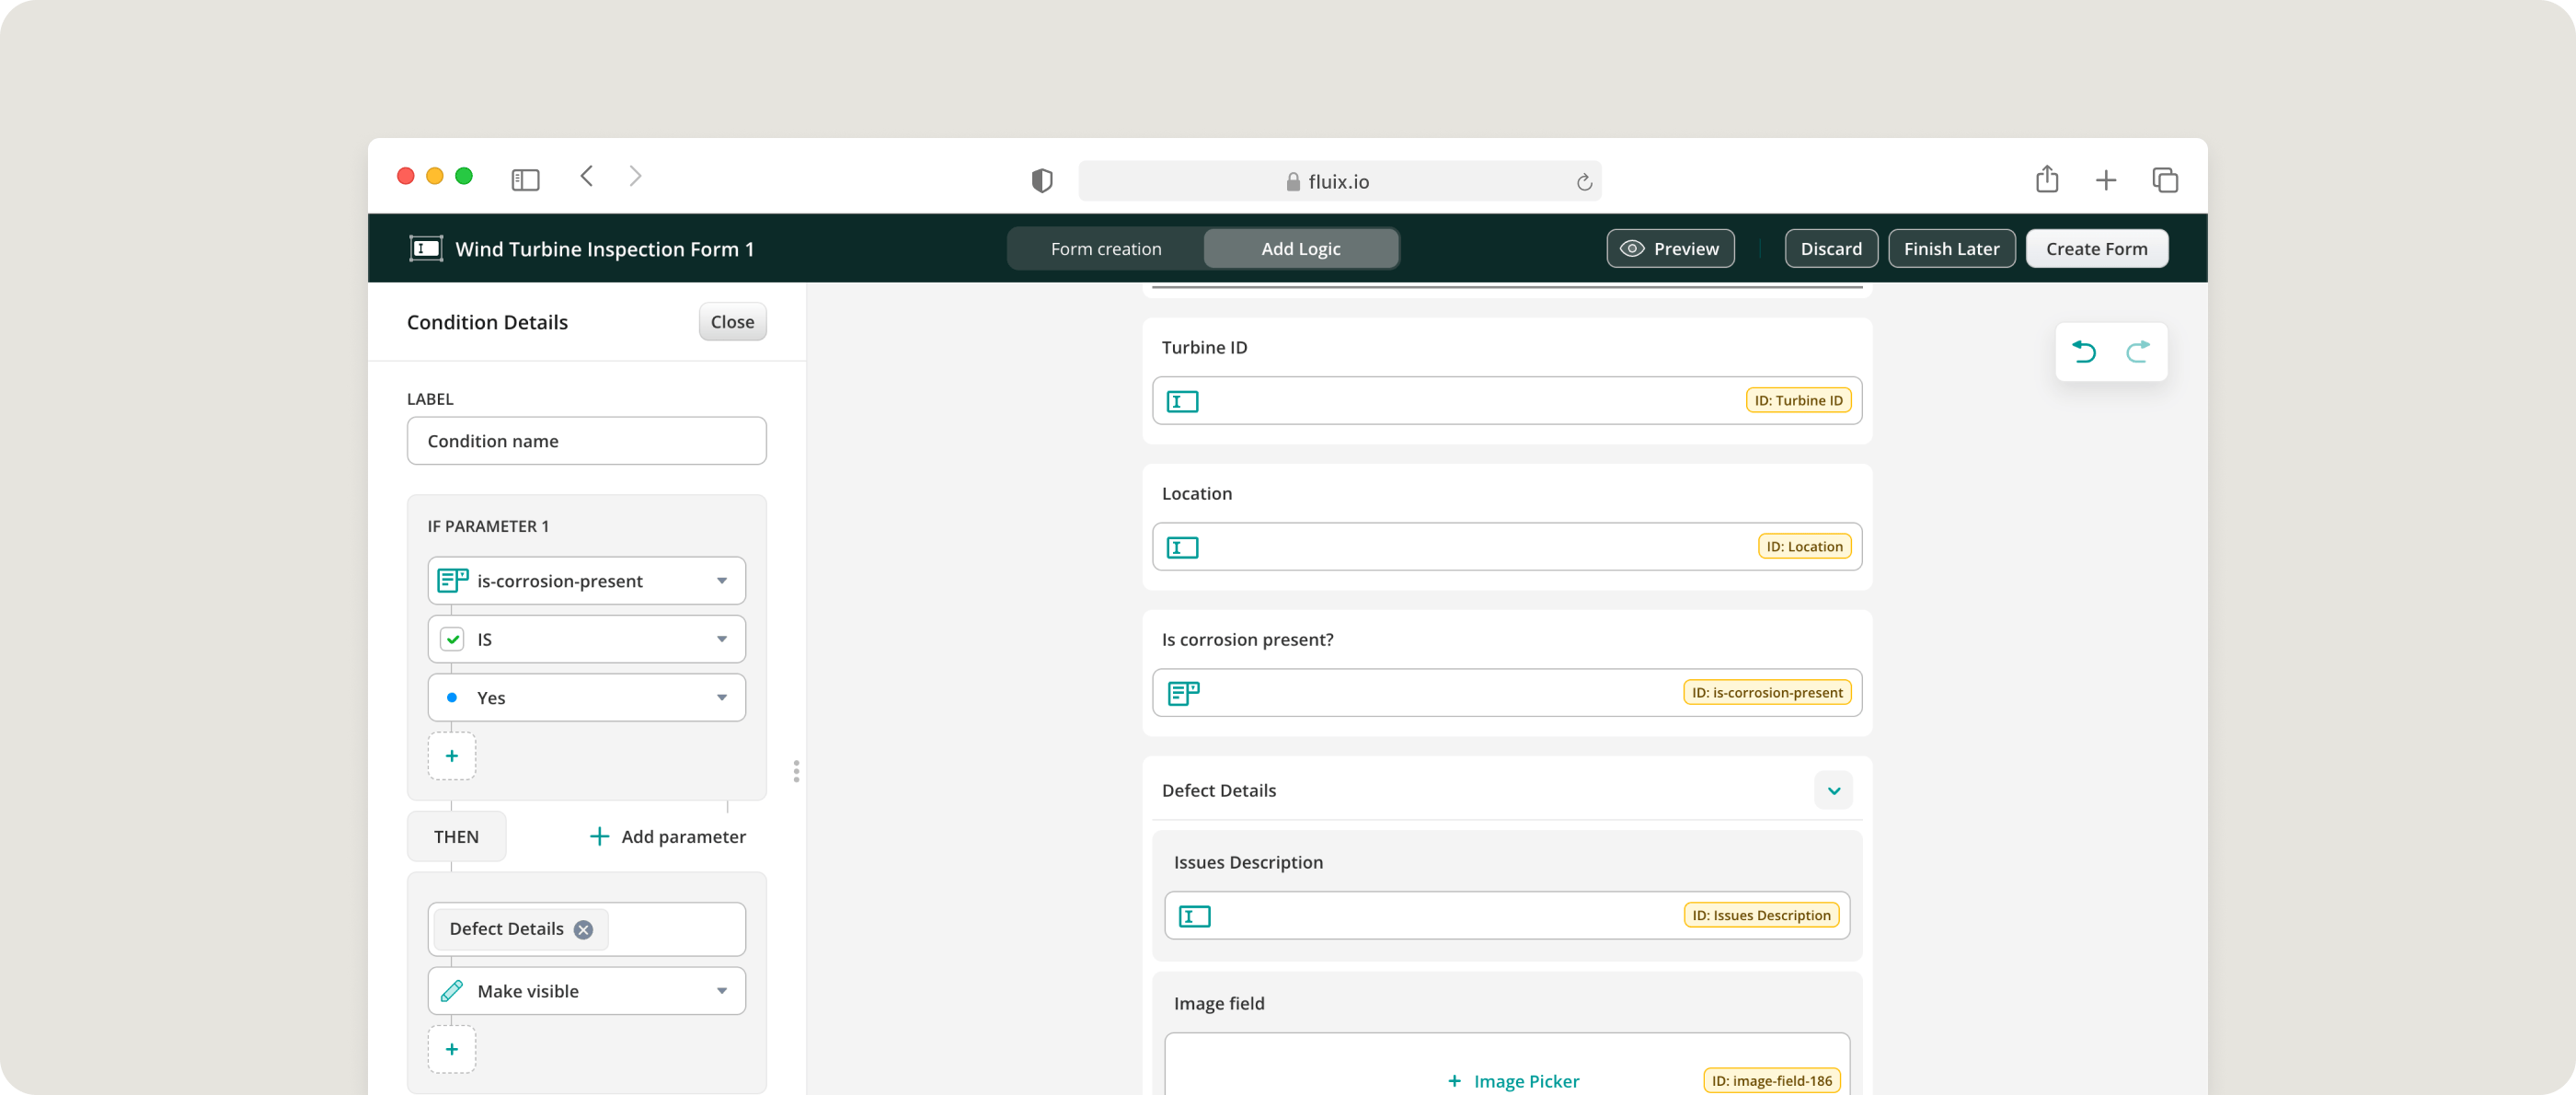
Step 9: Use conditional logic to adapt the instruction to field conditions
Not every job goes as planned. A smart digital work instruction should respond to what technicians enter, not force them through irrelevant steps.
Conditional logic helps you do that.
For example, if a technician reports a pass condition, the workflow can move forward. If they report damage, the instruction can request extra documentation, trigger a defect escalation path, or notify a supervisor.
This keeps the workflow efficient while still capturing the right information when something goes wrong.
Example:
During a tower inspection, the technician answers “Yes” to “Is corrosion present?” The digital instruction immediately opens a defect section, requires a photo, asks for severity, and routes the issue to the maintenance manager after submission.
Step 10: Make the instruction work offline
Wind farms are not office environments. Connectivity is often patchy, especially across remote sites, offshore settings, or internal turbine spaces.
Your digital work instructions need to work without a stable connection. That means technicians should be able to:
- open assigned instructions offline
- complete steps without signal
- capture photos and signatures
- sync automatically once reconnected
If offline performance is weak, adoption will be weak too.
Example:
A technician completes a full external inspection on a tablet in an area with poor reception. The digital instruction stores all entries, timestamps, and photos locally and syncs them once the device reconnects at the site office.
Need Digital Work Instructions that Work Offline?
See how Fluix supports remote wind sites with offline-first field execution.
Step 11: Build review and approval into the workflow
In wind energy, work instructions rarely end with technician submission. Most jobs need a second layer of review from a supervisor, site manager, or control room.
Make that part of the process explicit. The reviewer should be able to:
- confirm all required fields are complete
- check that hazards and isolations were acknowledged
- review photos and comments
- reject incomplete work back to the technician
- approve completed records with a digital signature
This closes the loop and keeps documentation clean before it reaches storage or the client.
Example:
A technician submits a completed statutory inspection. The site supervisor notices that one mandatory anchor-point photo is missing, rejects the form with a note, and the technician receives it back in their inbox for correction before final approval.
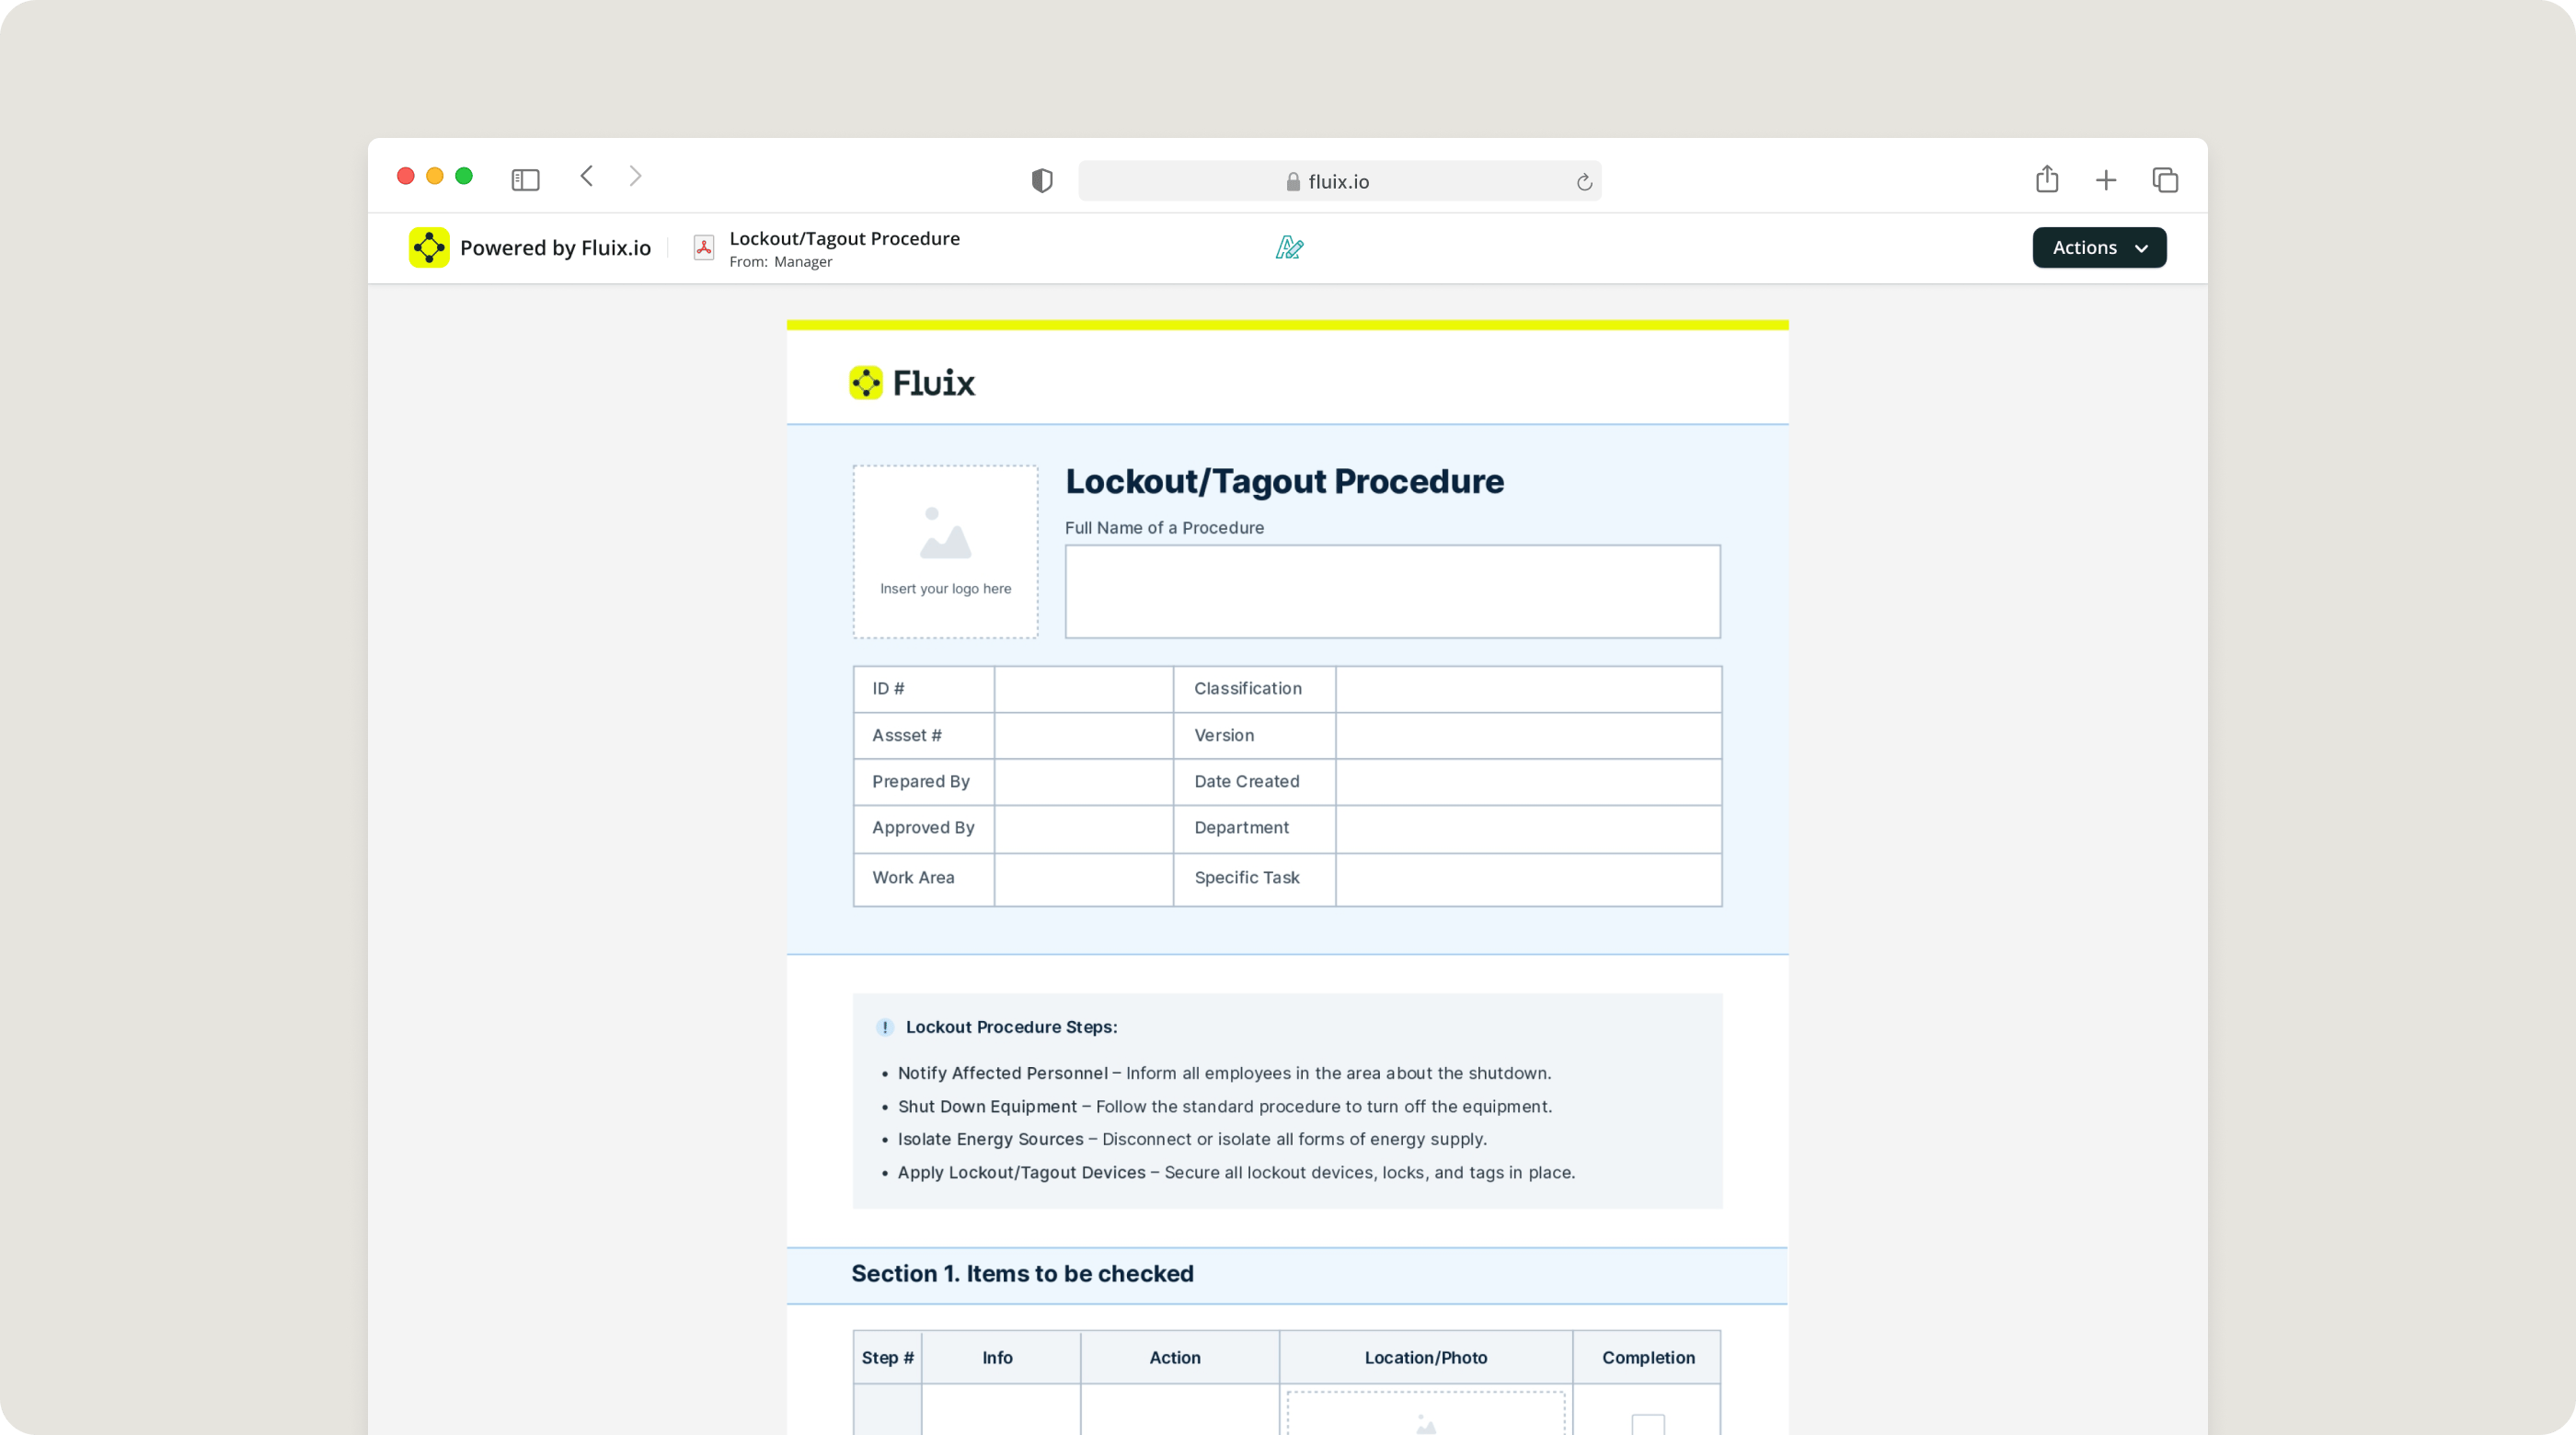
Step 12: Lock records and store them for audits and reporting
Once approved, the work instruction should become a final record.
That record needs to be easy to retrieve, hard to alter, and structured enough to support reporting. In practice, that often means generating a flattened PDF, routing it to the right folder, and connecting data to the systems your teams already use.
This is where digital work instructions stop being just operational tools and start becoming part of your compliance and reporting engine.
Example:
After a gearbox inspection is approved, the final record is automatically stored in the turbine’s maintenance folder in SharePoint, with the signed report, defect photos, timestamps, and technician details ready for the client and for future audits.
Step 13: Create a feedback loop so instructions improve over time
The first version of a digital work instruction should not be the last.
Your technicians will spot unclear steps, unnecessary fields, bad sequencing, and missing edge cases quickly. Make it easy for them to report what is not working, and review that feedback regularly.
Example:
After a few weeks, technicians report that a yaw system inspection instruction asks for duplicate entries in two sections. The process owner removes the duplication, republishes the instruction, and pushes the update across all service teams instantly.
Why Fluix Is a Strong Choice for Creating Digital Work Instructions
If your team wants to create digital work instructions without heavy custom development, Fluix gives you a practical way to do it.
Fluix is built for field operations, which makes it a strong fit for renewable energy teams managing inspections, maintenance, safety workflows, and compliance records across distributed sites.
With Fluix, you can:
- build digital work instructions using no-code tools
- guide technicians through step-by-step workflows on mobile devices
- collect signatures, timestamps, and photo evidence in the field
- support offline execution in remote locations
- route completed work to supervisors for review and approval
- store finalized records in connected systems like SharePoint
- maintain version control across teams and sites
- standardize recurring maintenance and inspection processes at scale
For wind energy operators and service providers, that means less paperwork, faster updates, cleaner audit trails, and better visibility into what is happening across turbines and teams.