Fluix Taskstream is a way to automate the daily routine work your team has.
A Taskstream is a template for repetitive tasks and paperwork performed by your team members. The Administrator’s job is to model such a sequence of tasks to achieve a business goal, while users only need to follow the configured processes. This separation allows everybody to focus on their core competence according to their role in a company and current Taskstream step, and automate the technical routine of in-between transitions.
In other words, the Taskstream itself is a flow of tasks to be performed, forms to be filled out, and work to be reviewed and approved.
Through Taskstreams, field workers receive tasks on their mobile devices, with descriptions of jobs to be done, fillable forms, and attachments for review. Users can fill out data and eSign, add photos and scan barcodes, and submit tasks to the next step in the process.
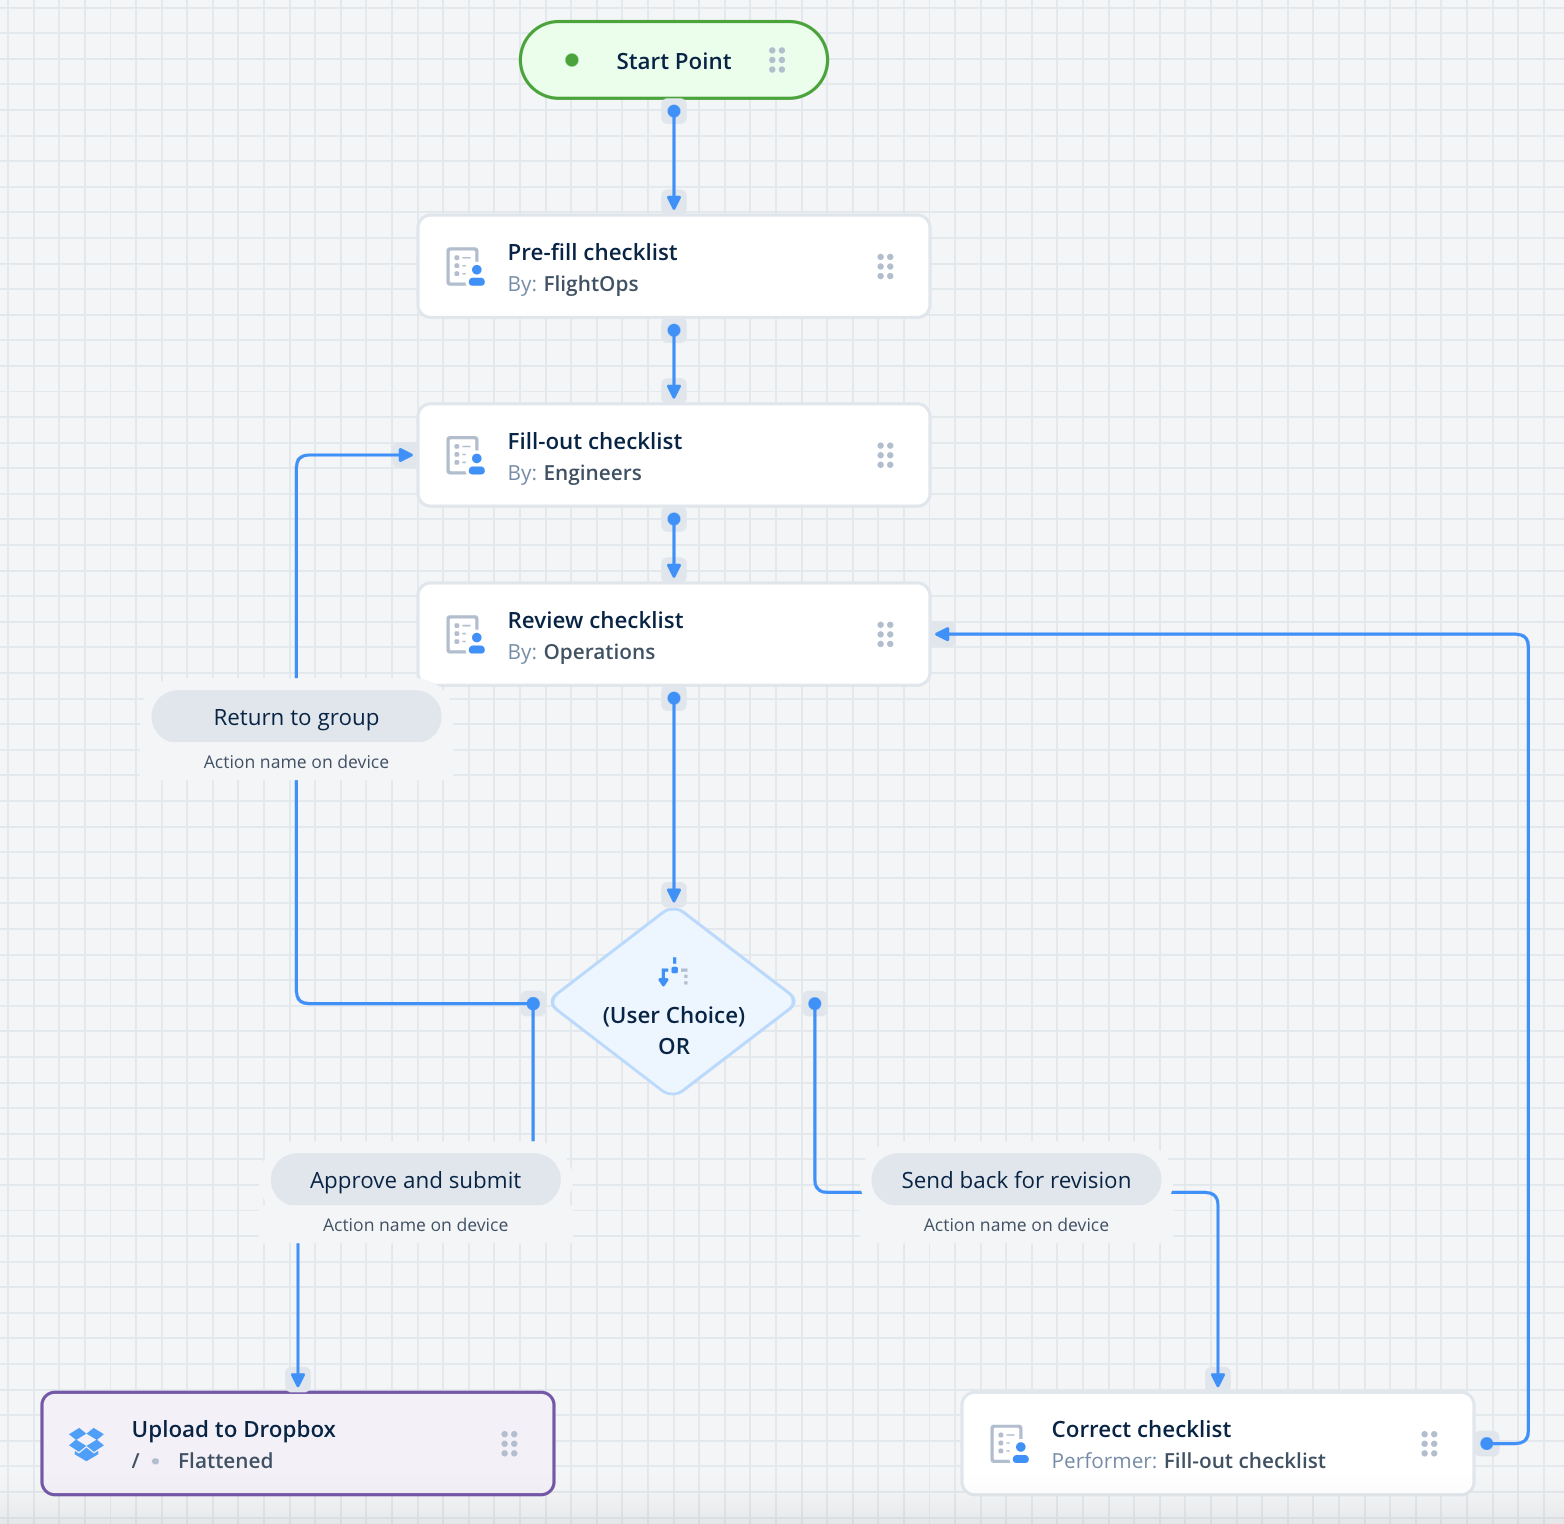
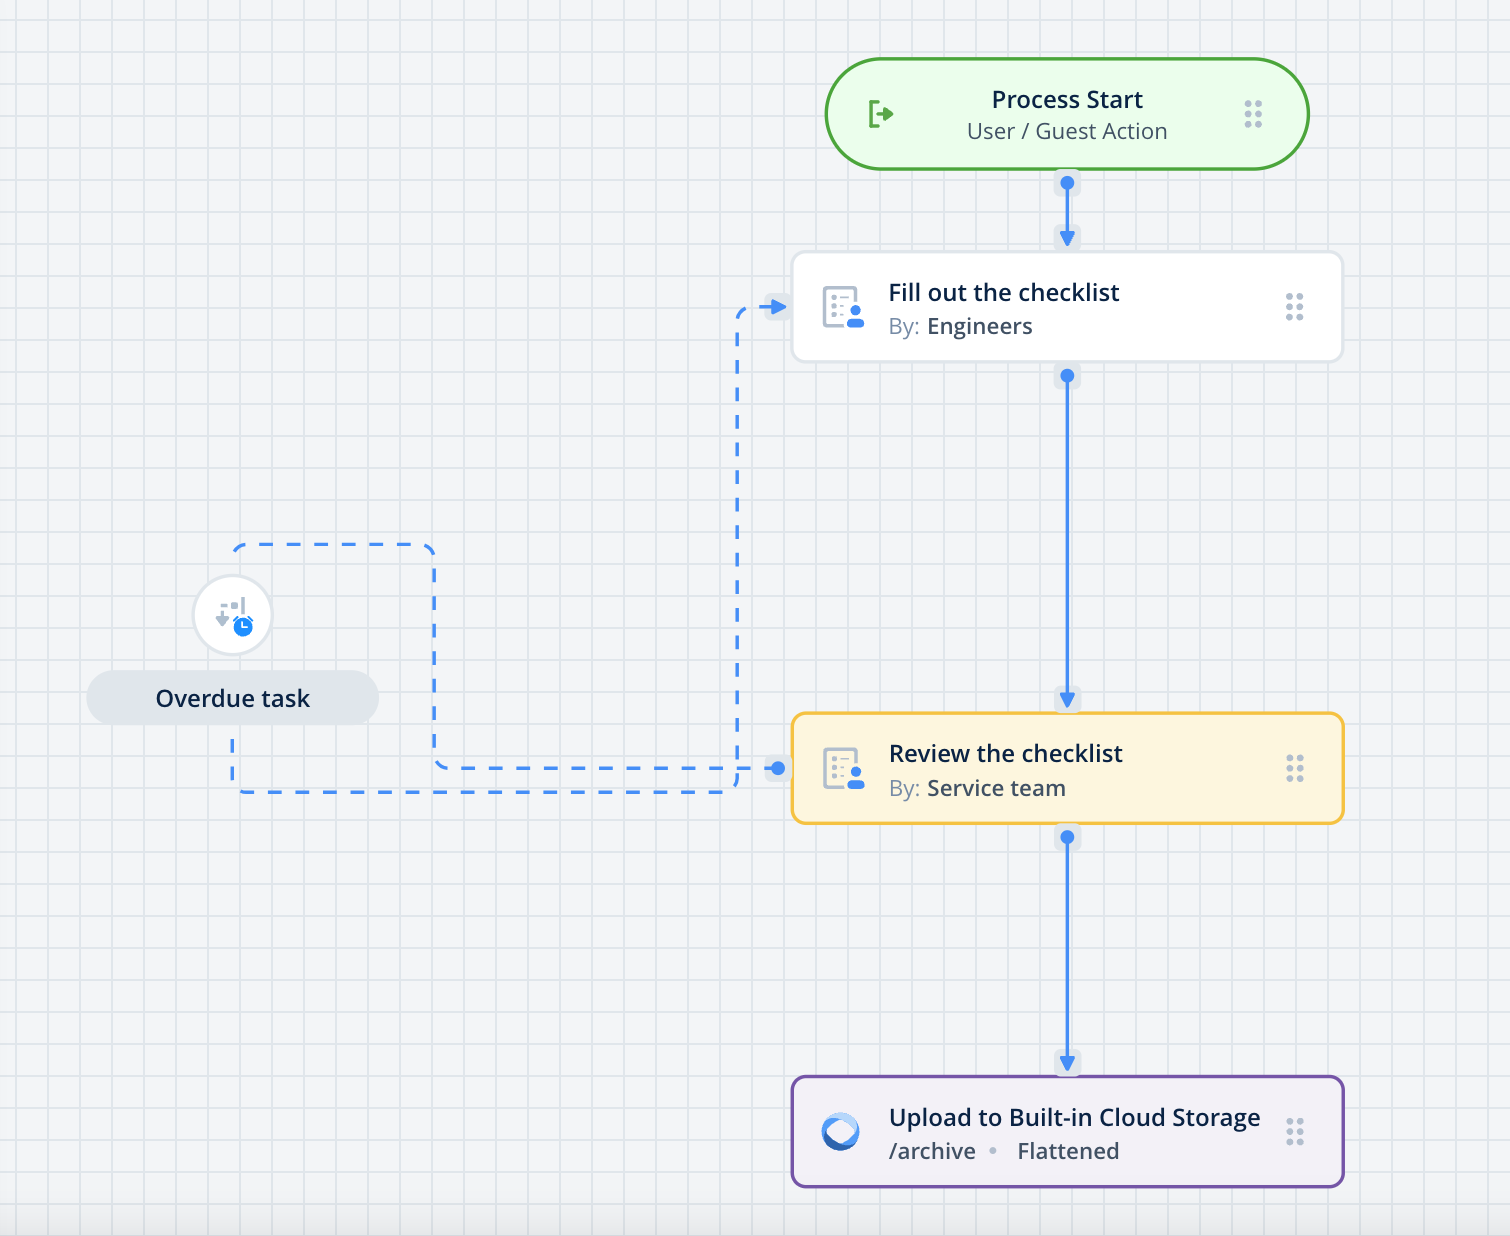
Flowchart example
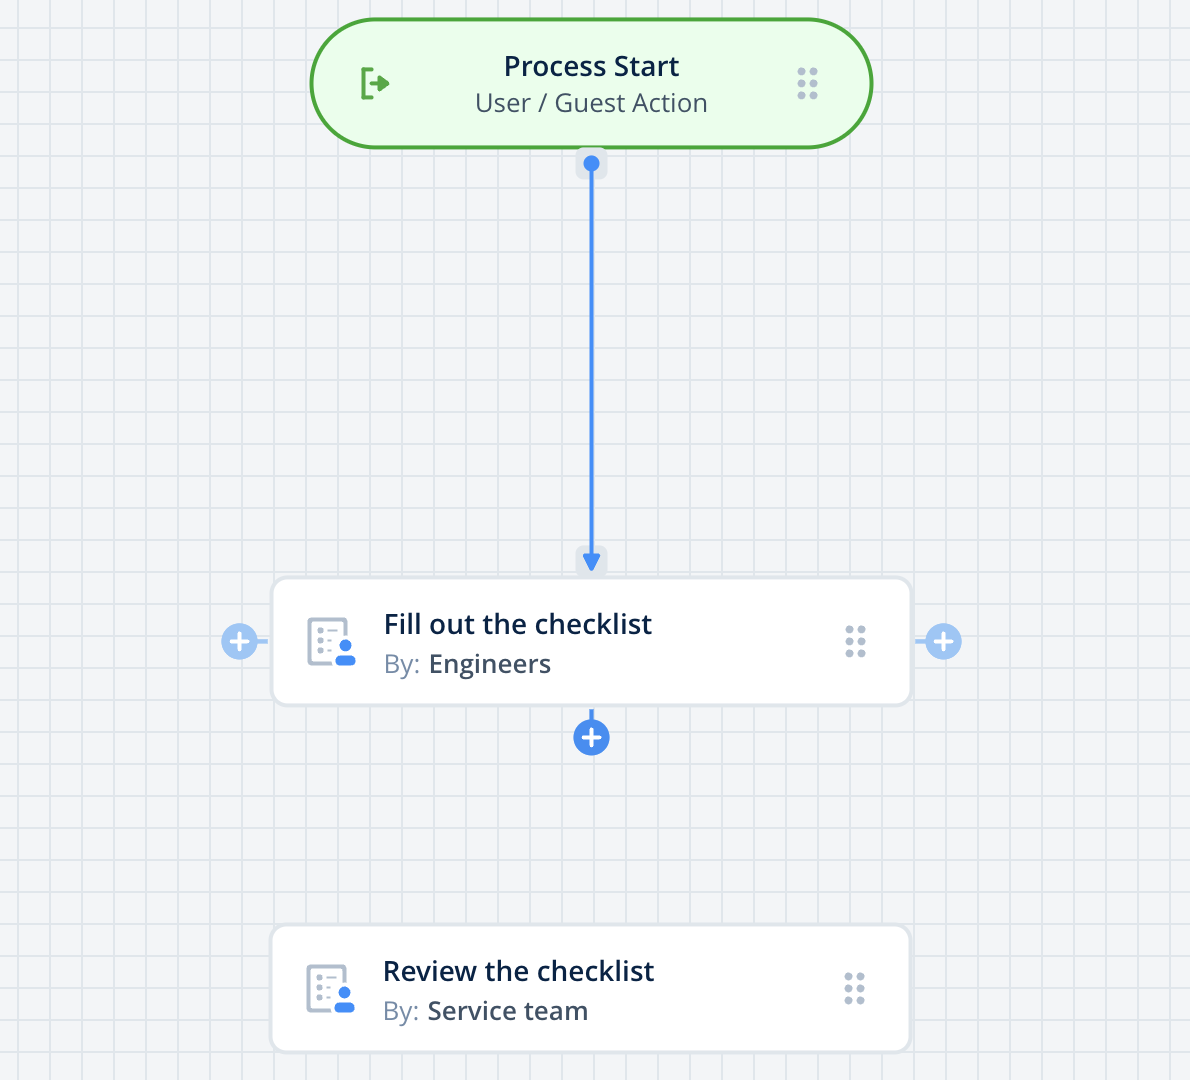
Below is the basic flowchart showing how Engineers fill out checklists, Supervisors review them, and send them to your company storage and office team.
In terms of a Taskstream, it will look like a number of steps:
Team view
1) Engineer picks up a task on their mobile device, fills out the checklist form with all of the necessary information from the site, and submits it to the site Supervisor for review.
2) In case any rework is required, Supervisor returns the checklist to the Engineer for rework. If no corrections are needed, the site Supervisor signs the checklist and approves it. The completed checklist is automatically uploaded to your company storage and emailed if needed.
Starting points to model a process
Before you proceed with a Taskstream, here are the starting points to begin modeling your process:
1) Process
What is the business goal of the process?
Do you know the precise flow of actions to achieve the goal?
2) Participants
Who will work on each specific task?
Can you organize users in groups to make Taskstreams role-based?
Do you offer users to select the cases to work on, or directly assign them?
3) Forms
Do you have digital or spare form templates that will be used in a flow?
Does your company currently use any cloud storage to store completed forms?
Do you know the answers to the above? Then we invite you to the next article.
In case you need our assistance, feel free to contact us at support@fluix.io, we are always here to help!
Was this article helpful?
Thanks for your feedback!
Oops, something went wrong. Please, try again later.
Prior to creating a Taskstream itself, please make sure to have the main elements ready:
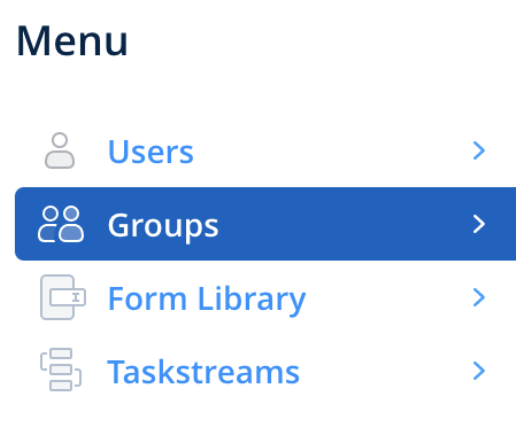
1)User Groups that will participate in a Taskstream. Navigate to Menu -> Groups section, to create the Groups and add their users:
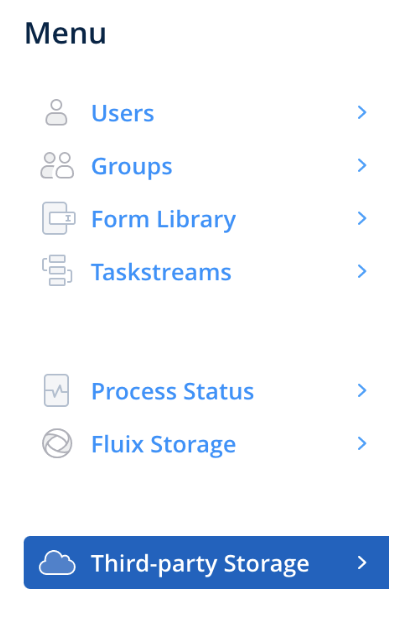
2) Cloud storage. In case you want to store the forms/documents that are completed in the Fluix app, at a cloud storage and you already use some service, you can connect it to Fluix in the Third-party Storage section:
If you don’t use any storage provider, you can use our Fluix built-in cloud storage while creating a Taskstream.
To start creating a Taskstream, let’s get familiar with its elements.
Was this article helpful?
Thanks for your feedback!
Oops, something went wrong. Please, try again later.
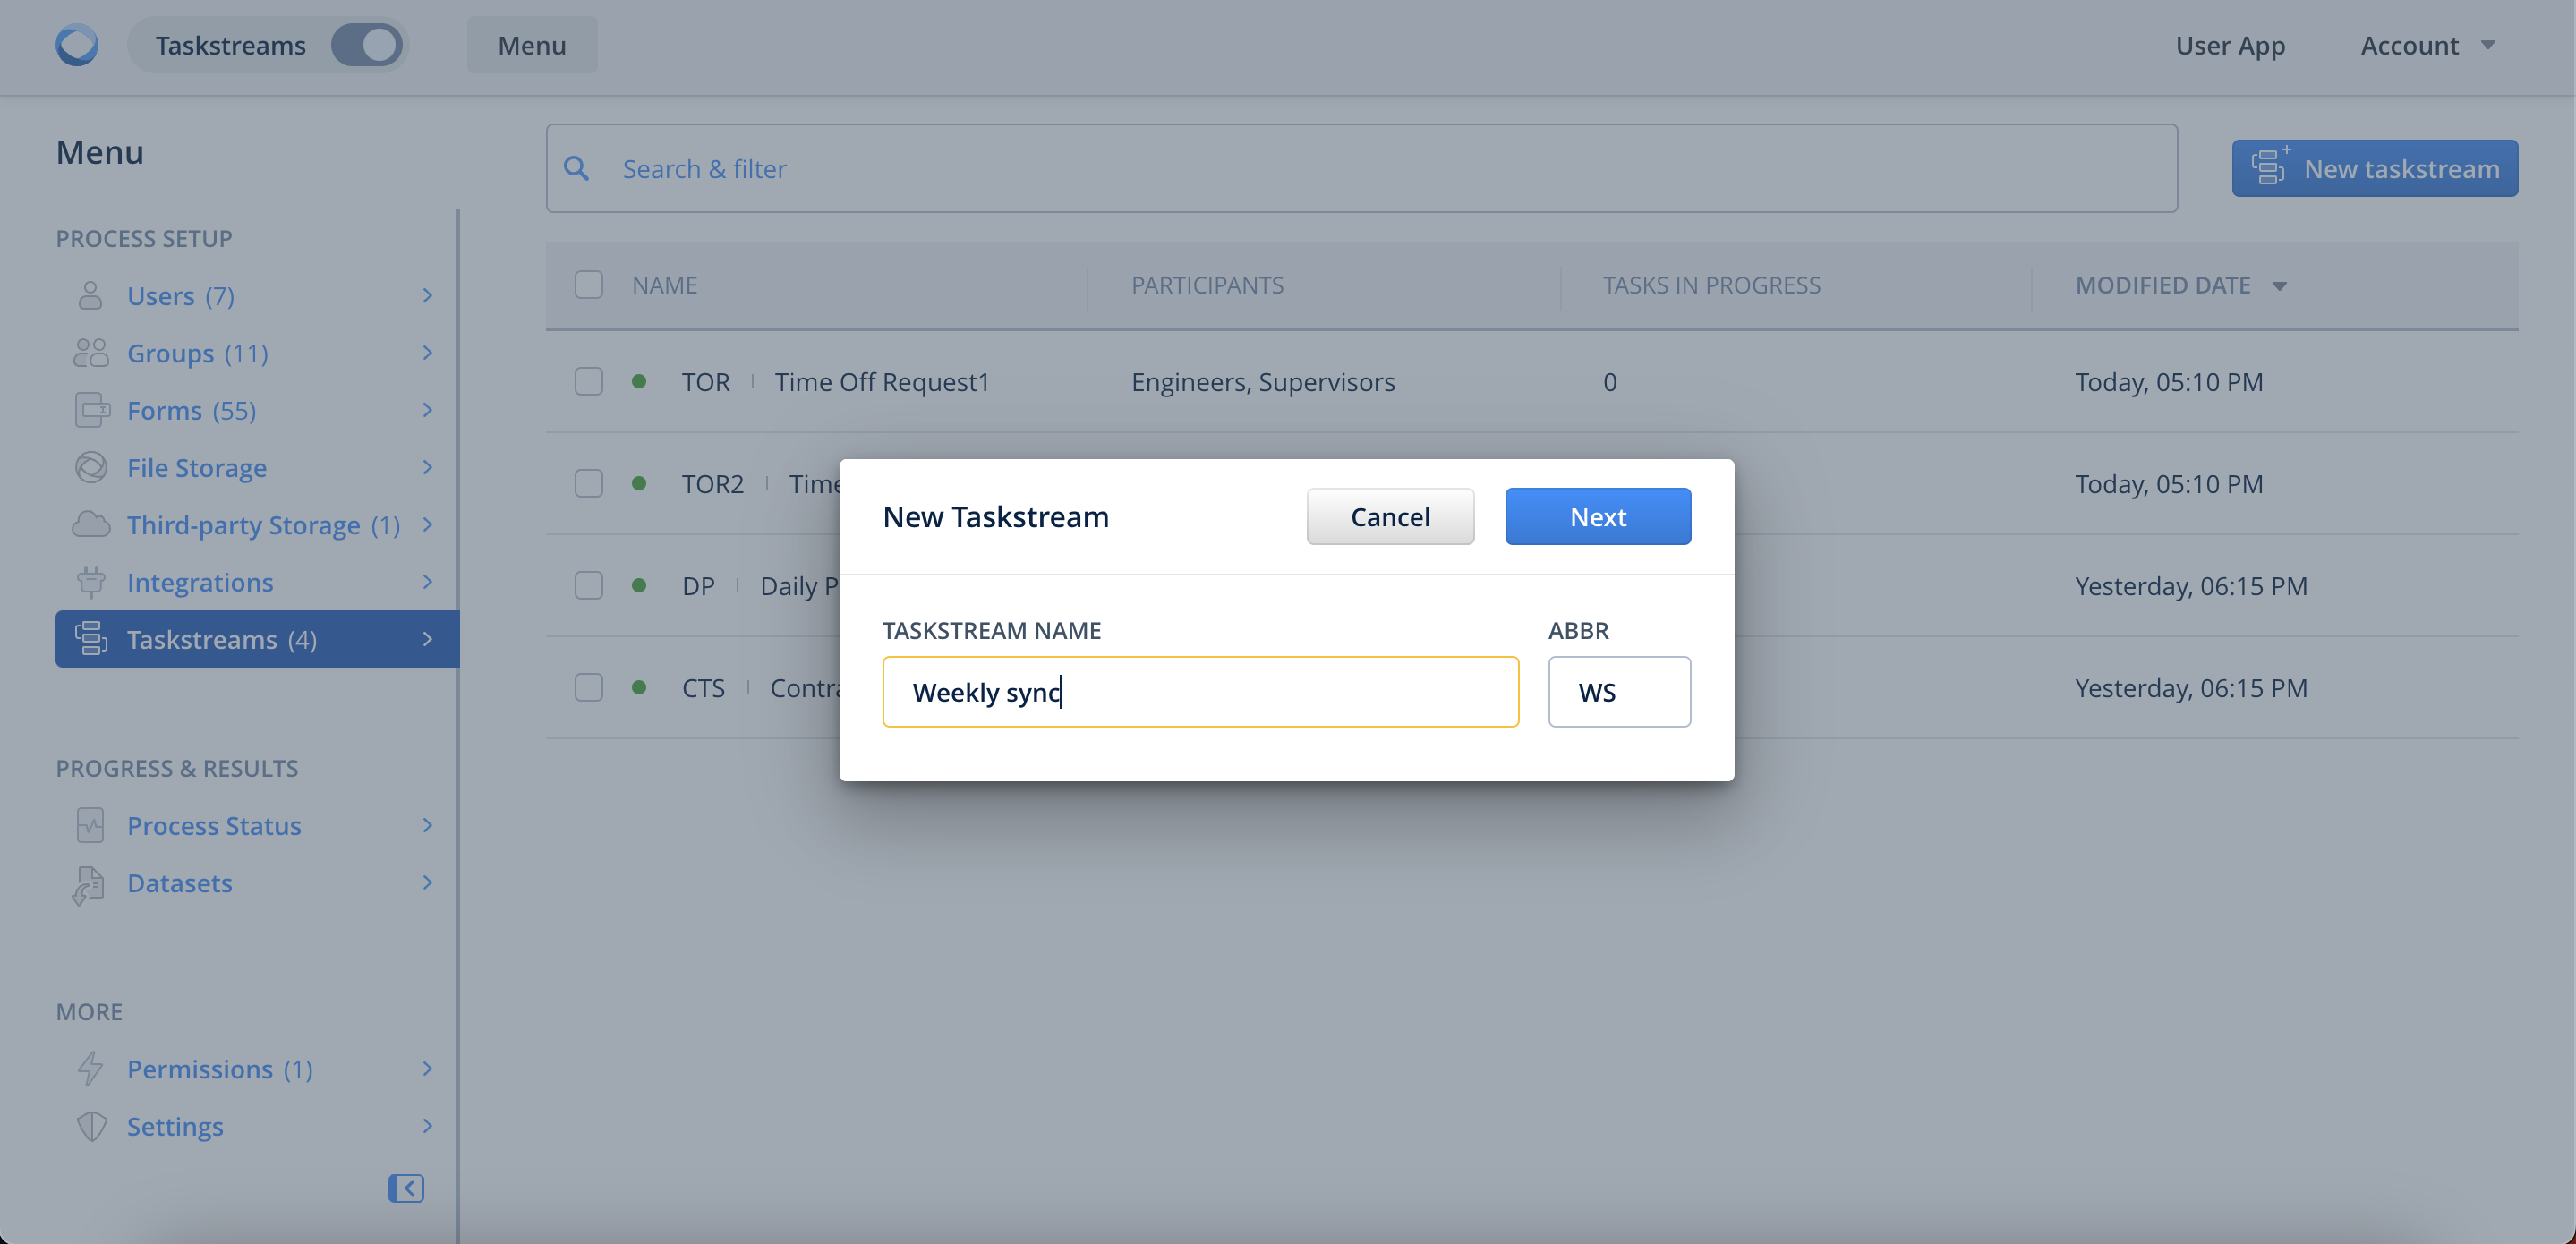
To start building a Taskstream chart, go to the Taskstreams section and click New Taskstream in the upper right corner of your screen. The dialogue will suggest you name a Taskstream. The abbreviation of the name will be automatically generated and then used for better sorting tasks in the user app on a device.
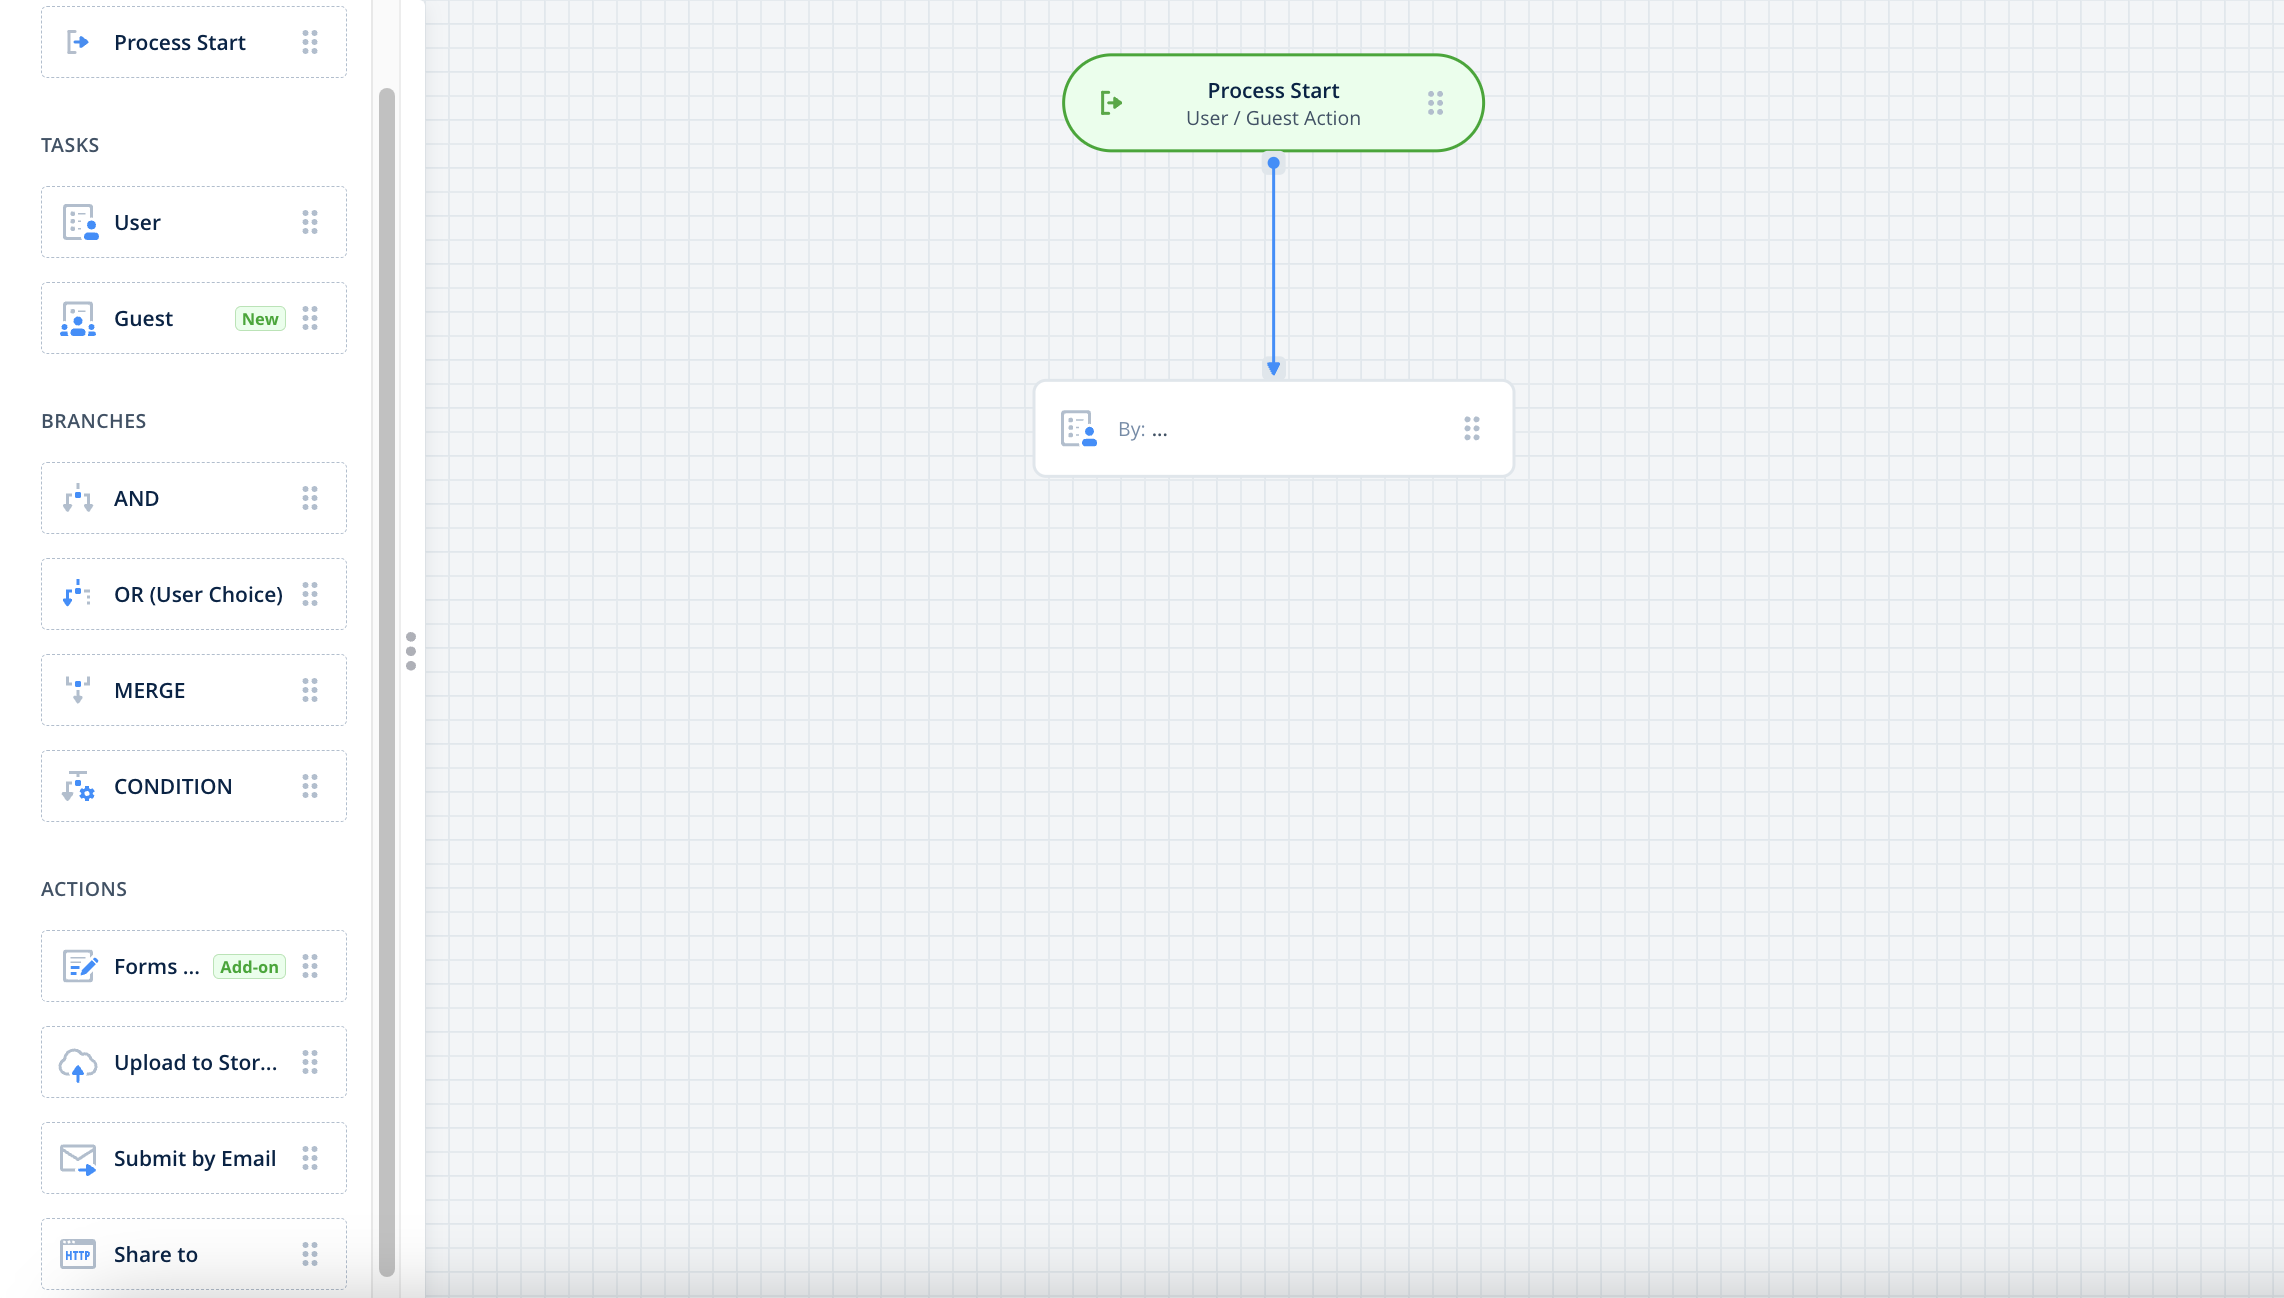
In the Taskstream builder, you will see the menu of elements on the left. In the previous article, you can check what each element does.
In order to create the very first task, click on the empty task under the Start Point, and its menu will appear on the left. We’ll return to the Task details in the next article.
You will also see 3 blue arrows surrounding the task. By clicking and dragging any of these arrows, you will connect elements with each other:
This way you will be able to add and connect any other Taskstream elements between each other.
You also have the ability to use the shortcuts. By clicking on the blue “+” icon, you may connect elements with each other or add a new flow.
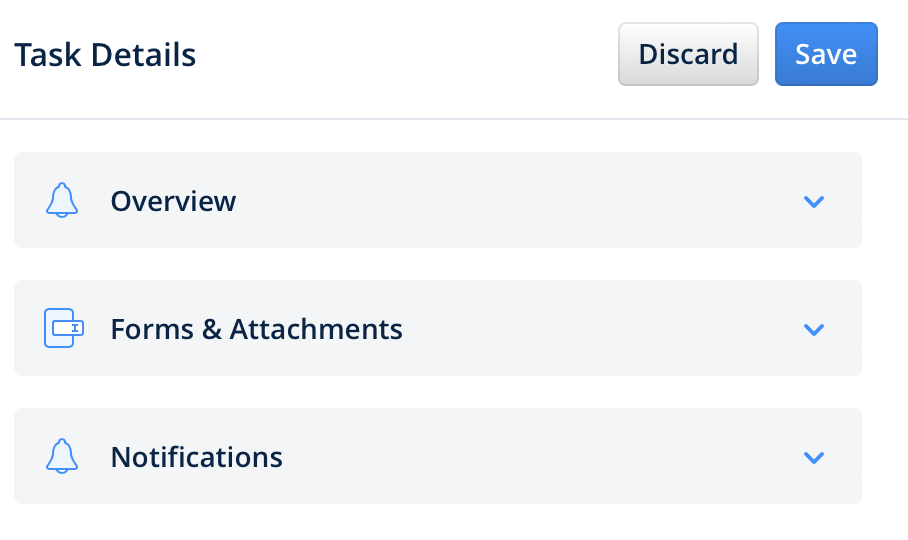
Task configuration menu has 3 main tabs: Overview, Forms & Attachments, and Notifications.
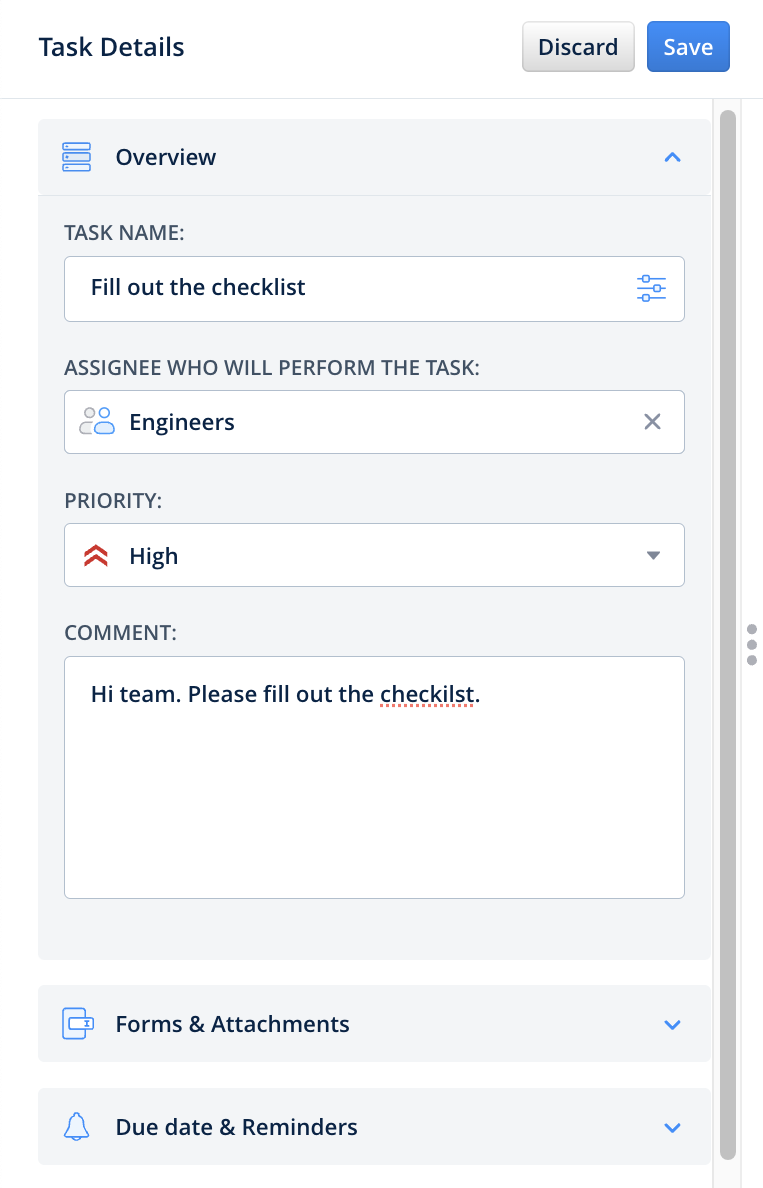
Overview
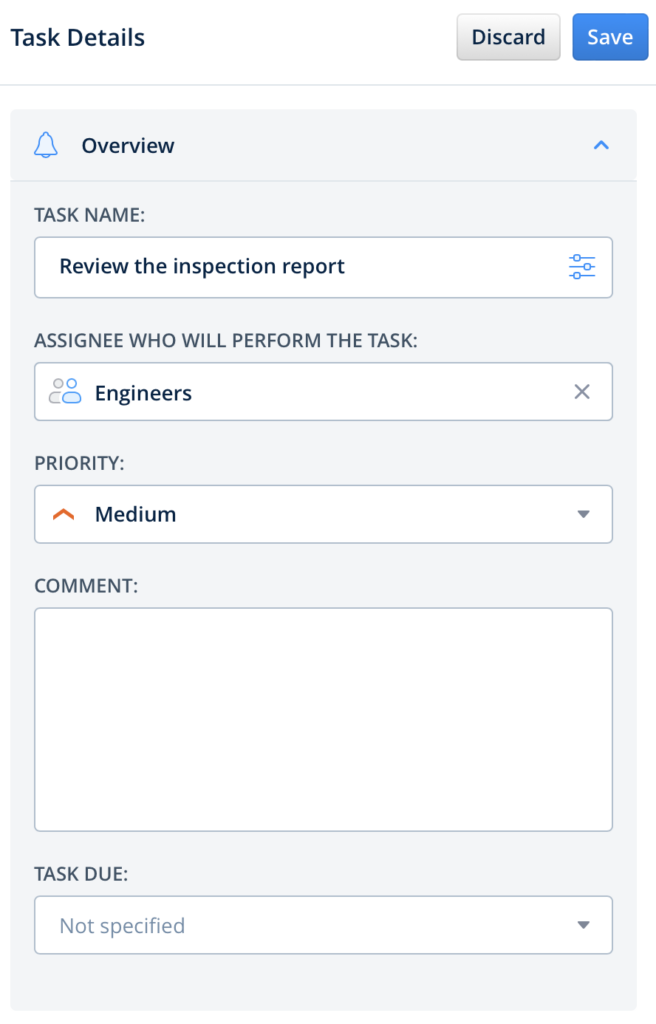
Overview tabcontains basic information about the task.
Task Name suggests you fill out the name of the task that the user will see on his/her device. By clicking on the Dynamic Values icon on the Task Name field, in the input configurator, you may select the list of fields, values from which you’d like to see in the task name after it is completed by the user.
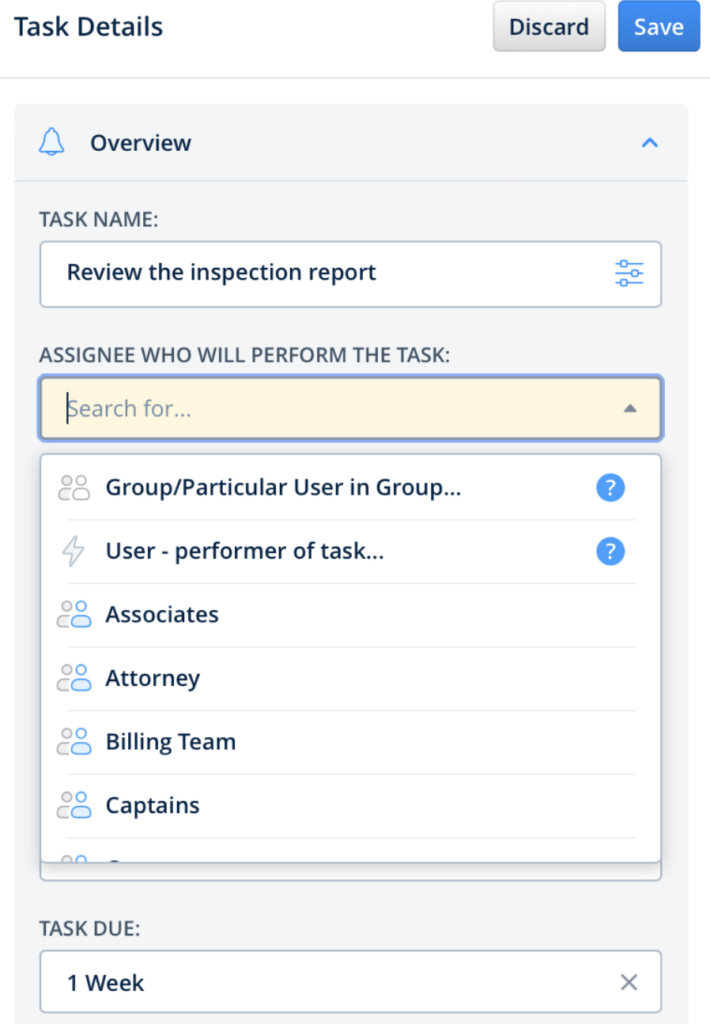
Assignee who will perform the task gives the ability to select the respective group/user who will perform the task. Let’s take a closer look on how you may configure the assignee for the task:
Group option automatically assigns the task to the group that is preconfigured by the account admin. In this case, the user who submits the task will not be able to select the specific user. The task will be available for all the participants of the preconfigured group.
Group/Particular User in Group option lets the performer of the previous task select the particular user from the Group to whom the task will be assigned. In this scenario, the account admin selects the Group while building the Taskstream from which the user will be able to select a particular user in order to assign a task to him/her upon submission.
User – performer of the task option automatically assigns the task to the particular user who performed any of the previous tasks.
Please note: both Group/Particular User in Group and User – performer of the task options can be configured starting from the second task in the Taskstream.
Priority is a section where you can set a task priority for the end user that will be displayed on their device. Contains the next states: critical, high, medium, and low. By default the priority is medium.
Comment is a section where you can add a list of actions or a simple description that accompanies the task. These actions are for viewing purposes of the end users and will be shown on their devices.
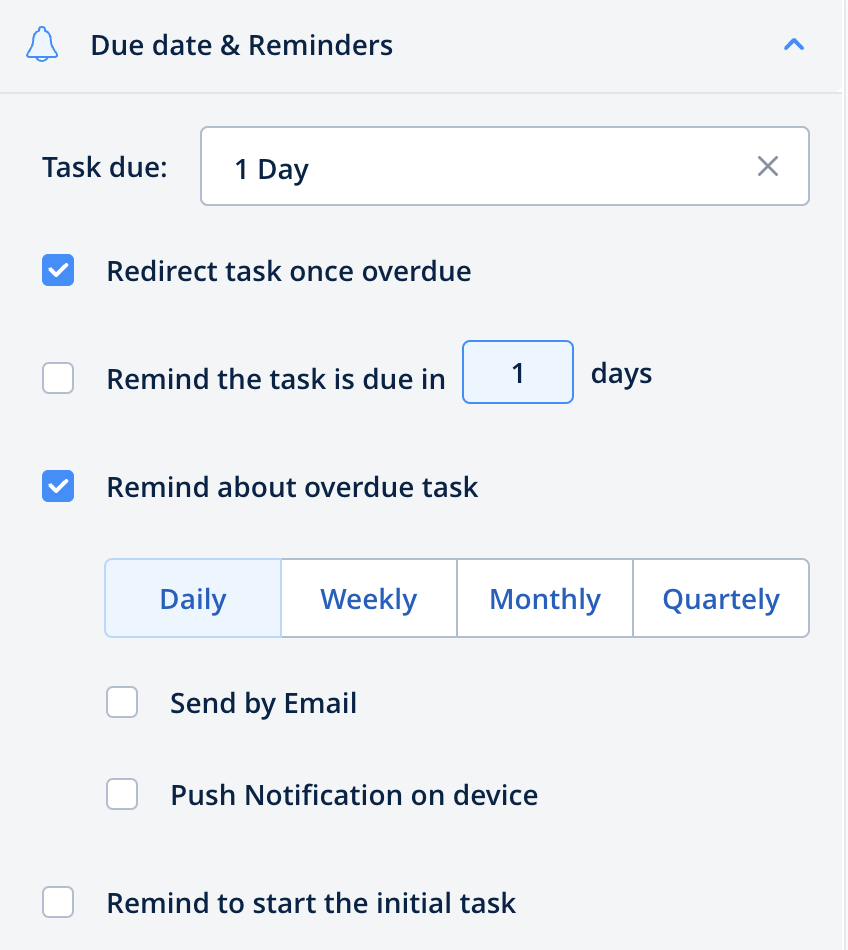
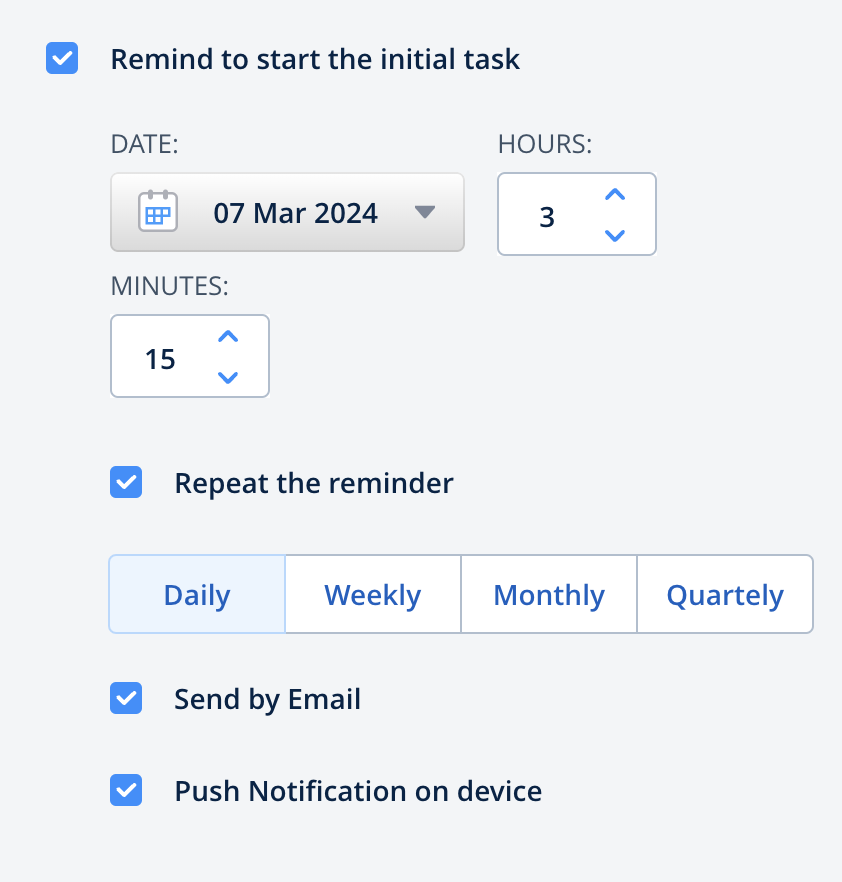
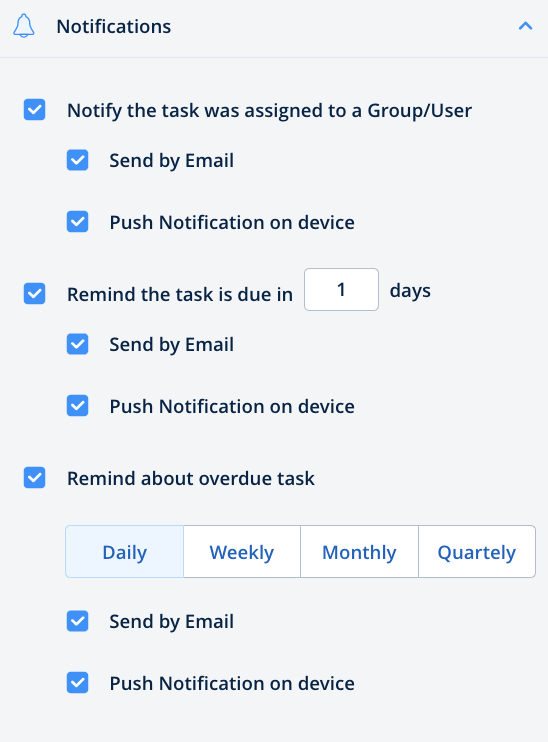
Due Date & Reminders is a tab where you can set the execution duration of a particular task and configure the reminders that the performer of the current task can receive. By setting execution durations, the end users will be notified about Task timelines and overdue status. This allows you to manage the redirection of both User and Guest Tasks in case they are not completed on time. If a Task becomes overdue, it will be automatically redirected to prevent any potential disruptions in the process.
You may set the date and time in order for the user to receive a notification to start the initial task. To do this, put the checkmark next to the “Remind to start the initial task” option, select the preferred time and how you would like the notification to be sent to the user: via email or by pushing the reminder to their device.
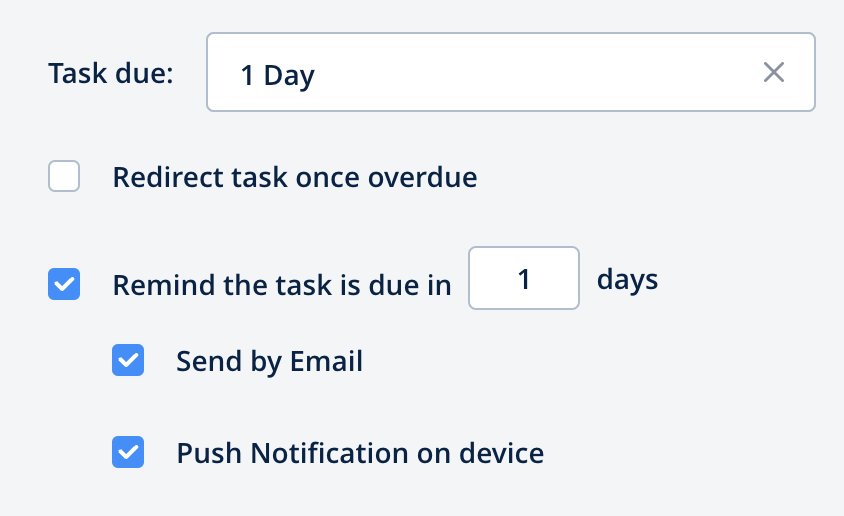
You can specify the due date for a particular Task and set a reminder for when it’s due by selecting the checkbox next to “Remind the Task is due in x days” and selecting how you would like the user to receive the notification: send by email or to push the reminder to the user’s device.
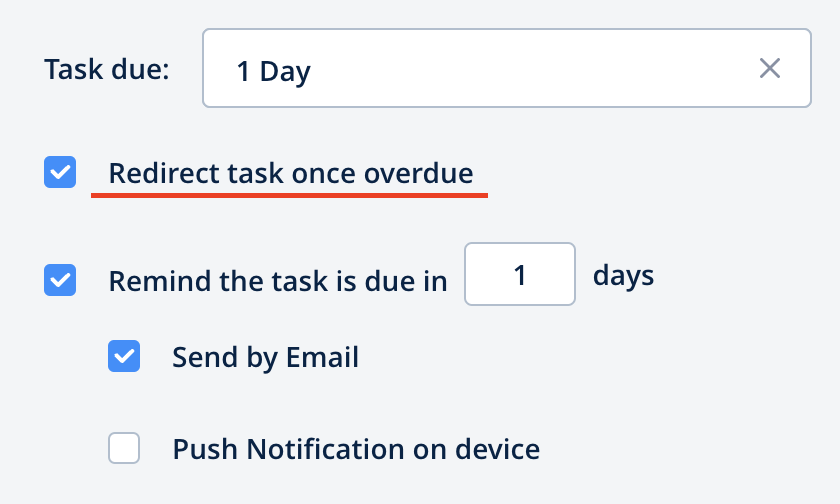
There is an option to settle the redirection of the Task in case it becomes overdue by putting the checkmark next to the “Redirect the Task once overdue.” You will see an element “Overdue task” appear. You can link this element to another Task, and it will be automatically redirected if the original task becomes overdue.
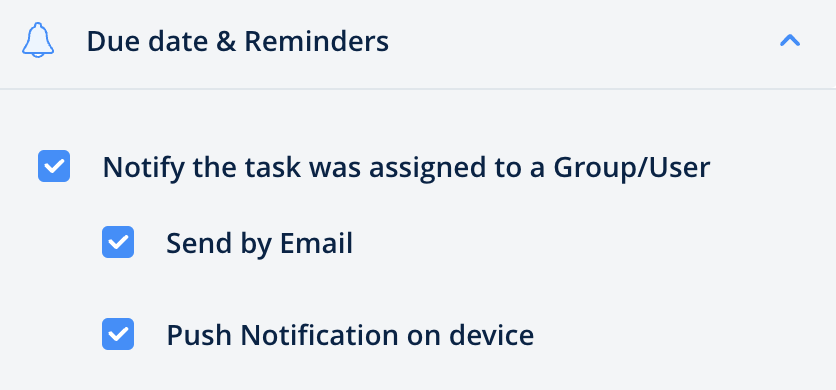
Users can also receive a reminder regarding the Group/Task they were assigned to. The notification may be set by checking the mark next to the “Notify the task was assigned to a Group/Task” and choosing how the notification will be sent.
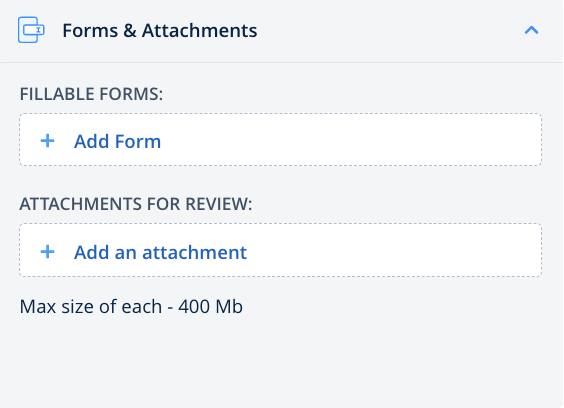
Forms & Attachments
Forms & Attachments tab was designed to add forms and attachments to the task to be performed.
Web forms are primary elements of work in a task. A web form contains inputs, checkboxes, etc. that will be further filled in by the user.
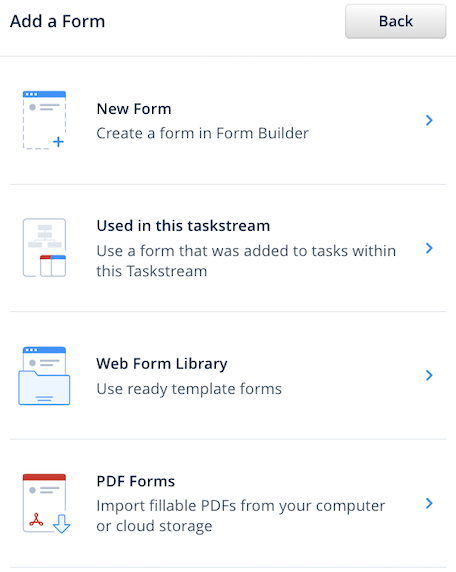
You can select a form from the Fluix Form Library, create a new one in the Form Builder, reuse the already used one from other tasks in this taskstream, or import the fillable PDF from your cloud storage or your computer:
If you choose a form from the Fluix Library, and the same form has been already used in one of the tasks in the current taskstream, you will see it as a new form while the form name will stay the same.
Number of forms in one task is unlimited, thus you can select as many as you wantand add them to the task.
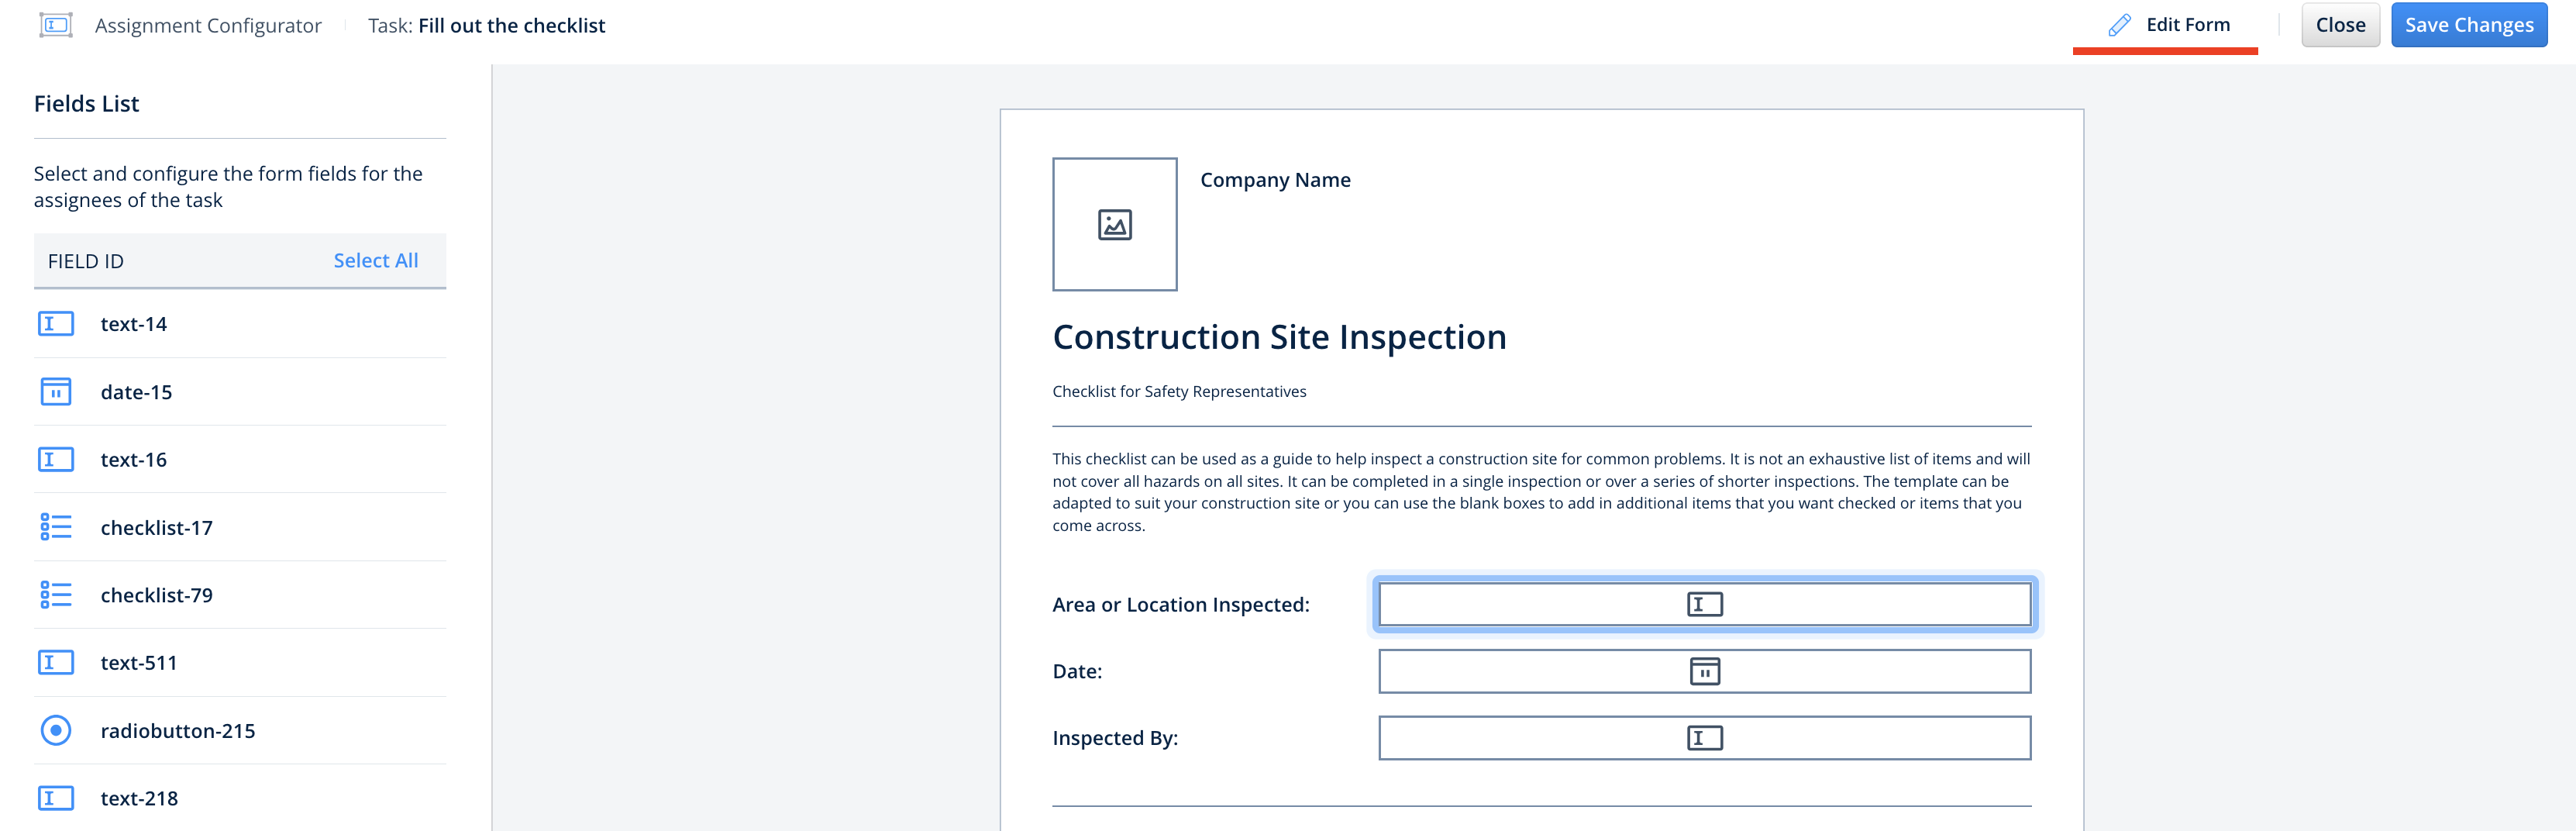
Next to the name of the added form, you will see the Assign form fields, and Remove from the list options:
By assigning form fields you define the particular fields in a form for the Group-Assignee of the current Task. You can make particular fields required or view only for this Group. If the same form should be filled out by different Groups, you can assign the respective fields in this form in each task.
You may also edit the web form created in the Form Library in the Assignment mode by clicking the Edit form button.
Attachments do not travel within a taskstream, they serve as materials for review in a particular task (usually these are manuals, instructions, or handbooks).
Notifications
Notifications tab contains the list of possible notifications which can be received by the performer of the current task. Here you can select how to send notifications to your end users: by email, or pushing it directly to the app on a user’s device.
In addition, there is an option to notify a user about a task that due in a certain amount of days or is already overdue:
In case of any questions feel free to contact us at support@fluix.io
Was this article helpful?
Thanks for your feedback!
Oops, something went wrong. Please, try again later.
Let’s get familiar with the list of taskstream elements available in the menu on the left-hand side of the taskstream builder:
Task – a task that should be performed by the Assignee – Group of users. A task consists of a description of the job to be done, fillable forms, and attachments for review. The priority, duration, and reminders can be set up for each task.
Upload to Storage – choose this action to upload completed forms to the preconfigured cloud storage(s).
Submit by Email – this action is used to send documents from Fluix to any email without wasting time manually entering the email address and message in the field. You can preconfigure the recipients’ addresses, and email subjects and add custom messages.
Share to – this action allows to share the completed documents or the data from them to any third-party software.
And Action – an element that helps to configure two and more parallel branches of the process.
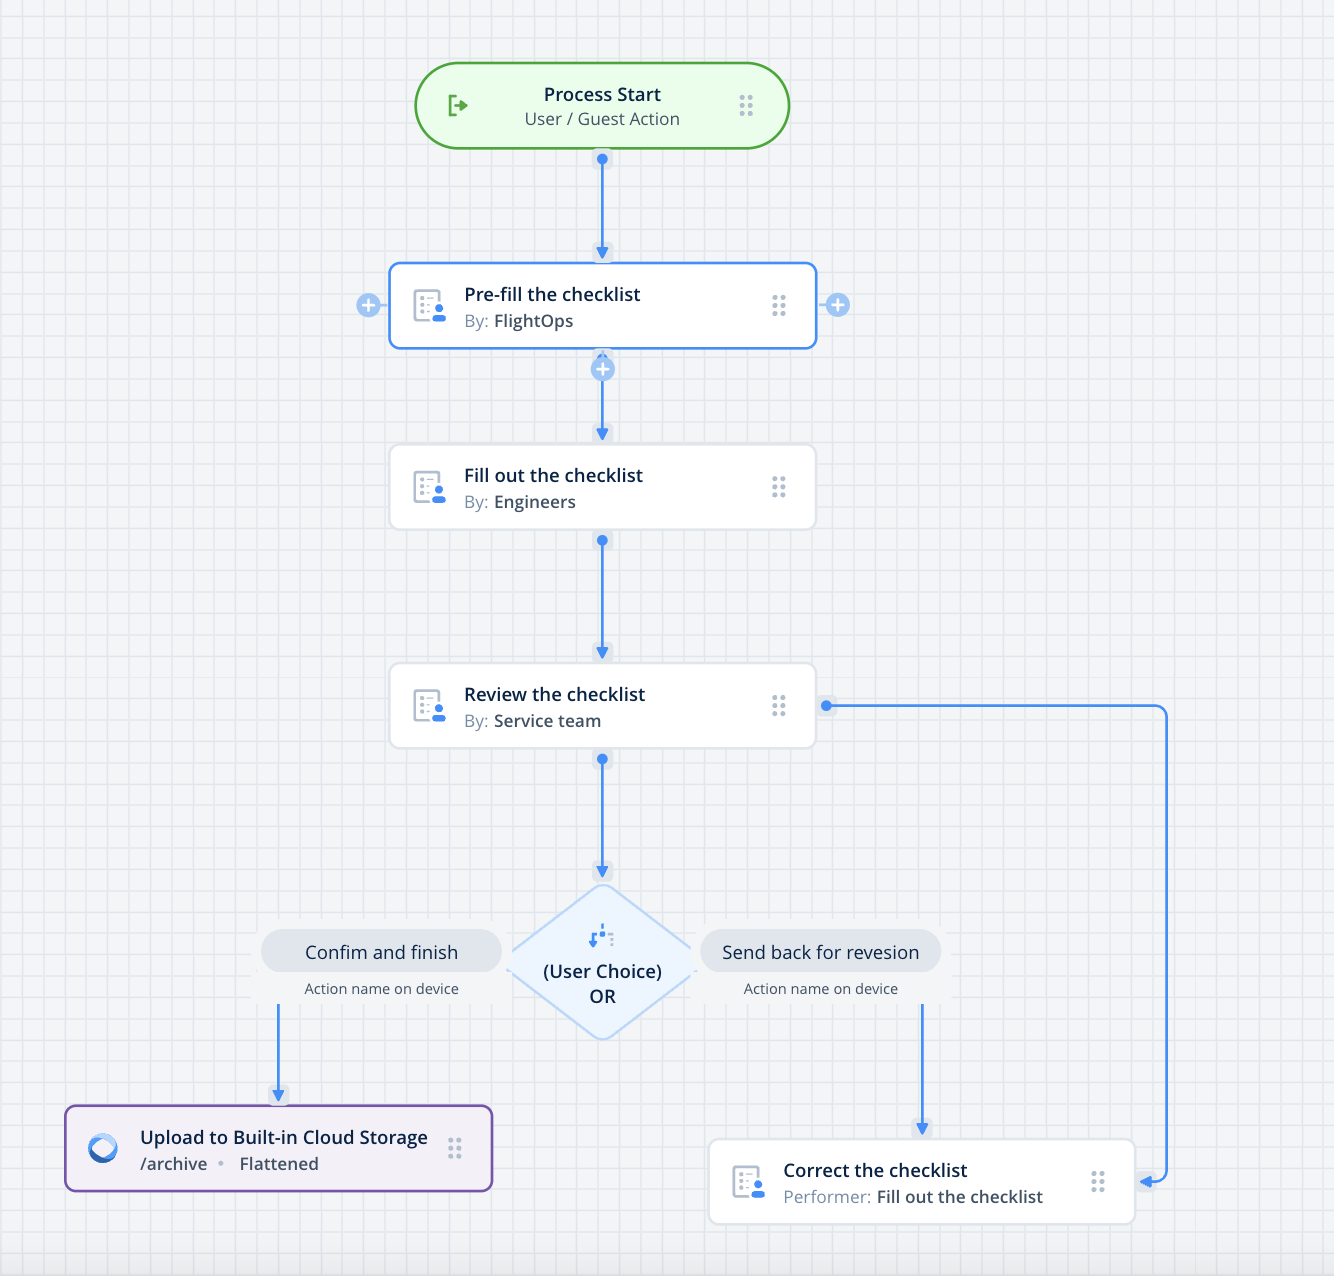
Or (User Choice) Action – an element to configure two or more branches of the process while a user on the device will choose manually which action to take for the task.
Merge Action – an element needed to ensure the parallel user tasks (e.g. simultaneous completion of different parts of one form) pass to the next step (e.g. manager’s review).
Condition Action –an element that allows admins to define the task flow based on the data that is filled out in a particular field in the form of a task.
Redirect Overdue Task Action – an element that allows automatic redirect of the Task to another predefined flow in case it was not completed on time by the user.
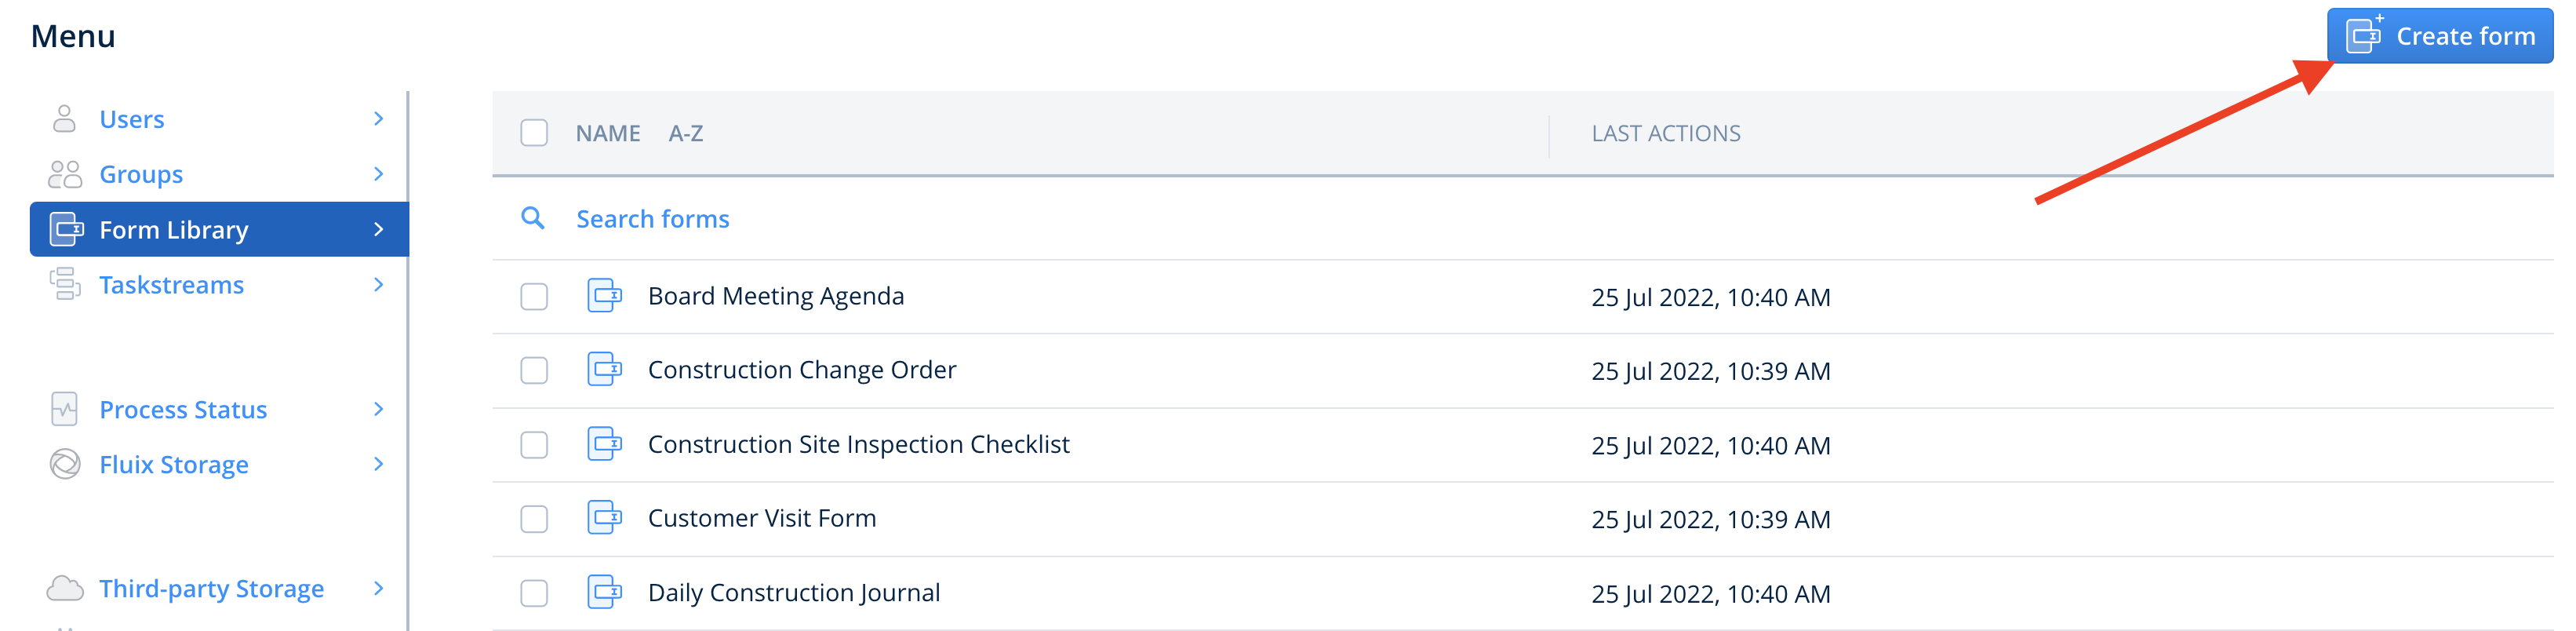
Form Library consists of a list of forms-templates, created by Fluix, and forms that will be created by you as an admin in Fluix Form Builder.
To create a new form, click Create form in the upper right corner. Later you will be able to use it while creating a Taskstream.
Upon selecting any form you will see how the list of available actions that can be performed with a form appears. In particular, you will see Edit, Rename, Duplicate, and Delete actions:
In case of any questions feel free to contact us at support@fluix.io
Was this article helpful?
Thanks for your feedback!
Oops, something went wrong. Please, try again later.
The Activity Status section was built to help you track the progress of the work done, oversee the site team’s activity, and take action if something is delayed or goes wrong. Activity status is also tailored to provide a comprehensive overview of the current state of data flow in your Fluix account.
What tasks does Activity Status solve?
This functionality’s primary advantage is empowering Fluix Admins with project management and reporting tool that enhance efficiency in data compilation, filtering, and generating actionable insights. Explore a detailed overview of this feature below.
Data Compilation and Filtering. Search and filter data in your account quickly using the date period picker. This will also help you better understand the status of various projects or tasks your team is involved in, providing an in-depth analysis of overall team performance.
Tracking Process Details. You may check the process history, track the task completion time, download the forms submitted within the task, troubleshoot, or take action if needed.
Customizable Reports. Customize reports to explore more detailed information about processes or forms, including initiation times, task stages, participants, etc.
Sharing Data with Your Team. Activity Status offers a simple method to share default or customized reports to add more transparency within your team.
Reassigning Tasks to other team members. Specific tasks within the ToDo or InProgress stages can be reassigned to either the entire group responsible for their completion or to an individual within that group. This action is typically taken when a task assigned to a specific user encounters circumstances due to which they may not be able to finish them (e.g. sickness, absence).
Suspending and Resuming the Process. In the Fluix Admin portal, you can temporarily Suspend and subsequently Resume specific processes for all users as required. This feature is beneficial, especially when clients need to temporarily pause ongoing processes to await final responses or decisions pertaining to deals.
Activity Status overview
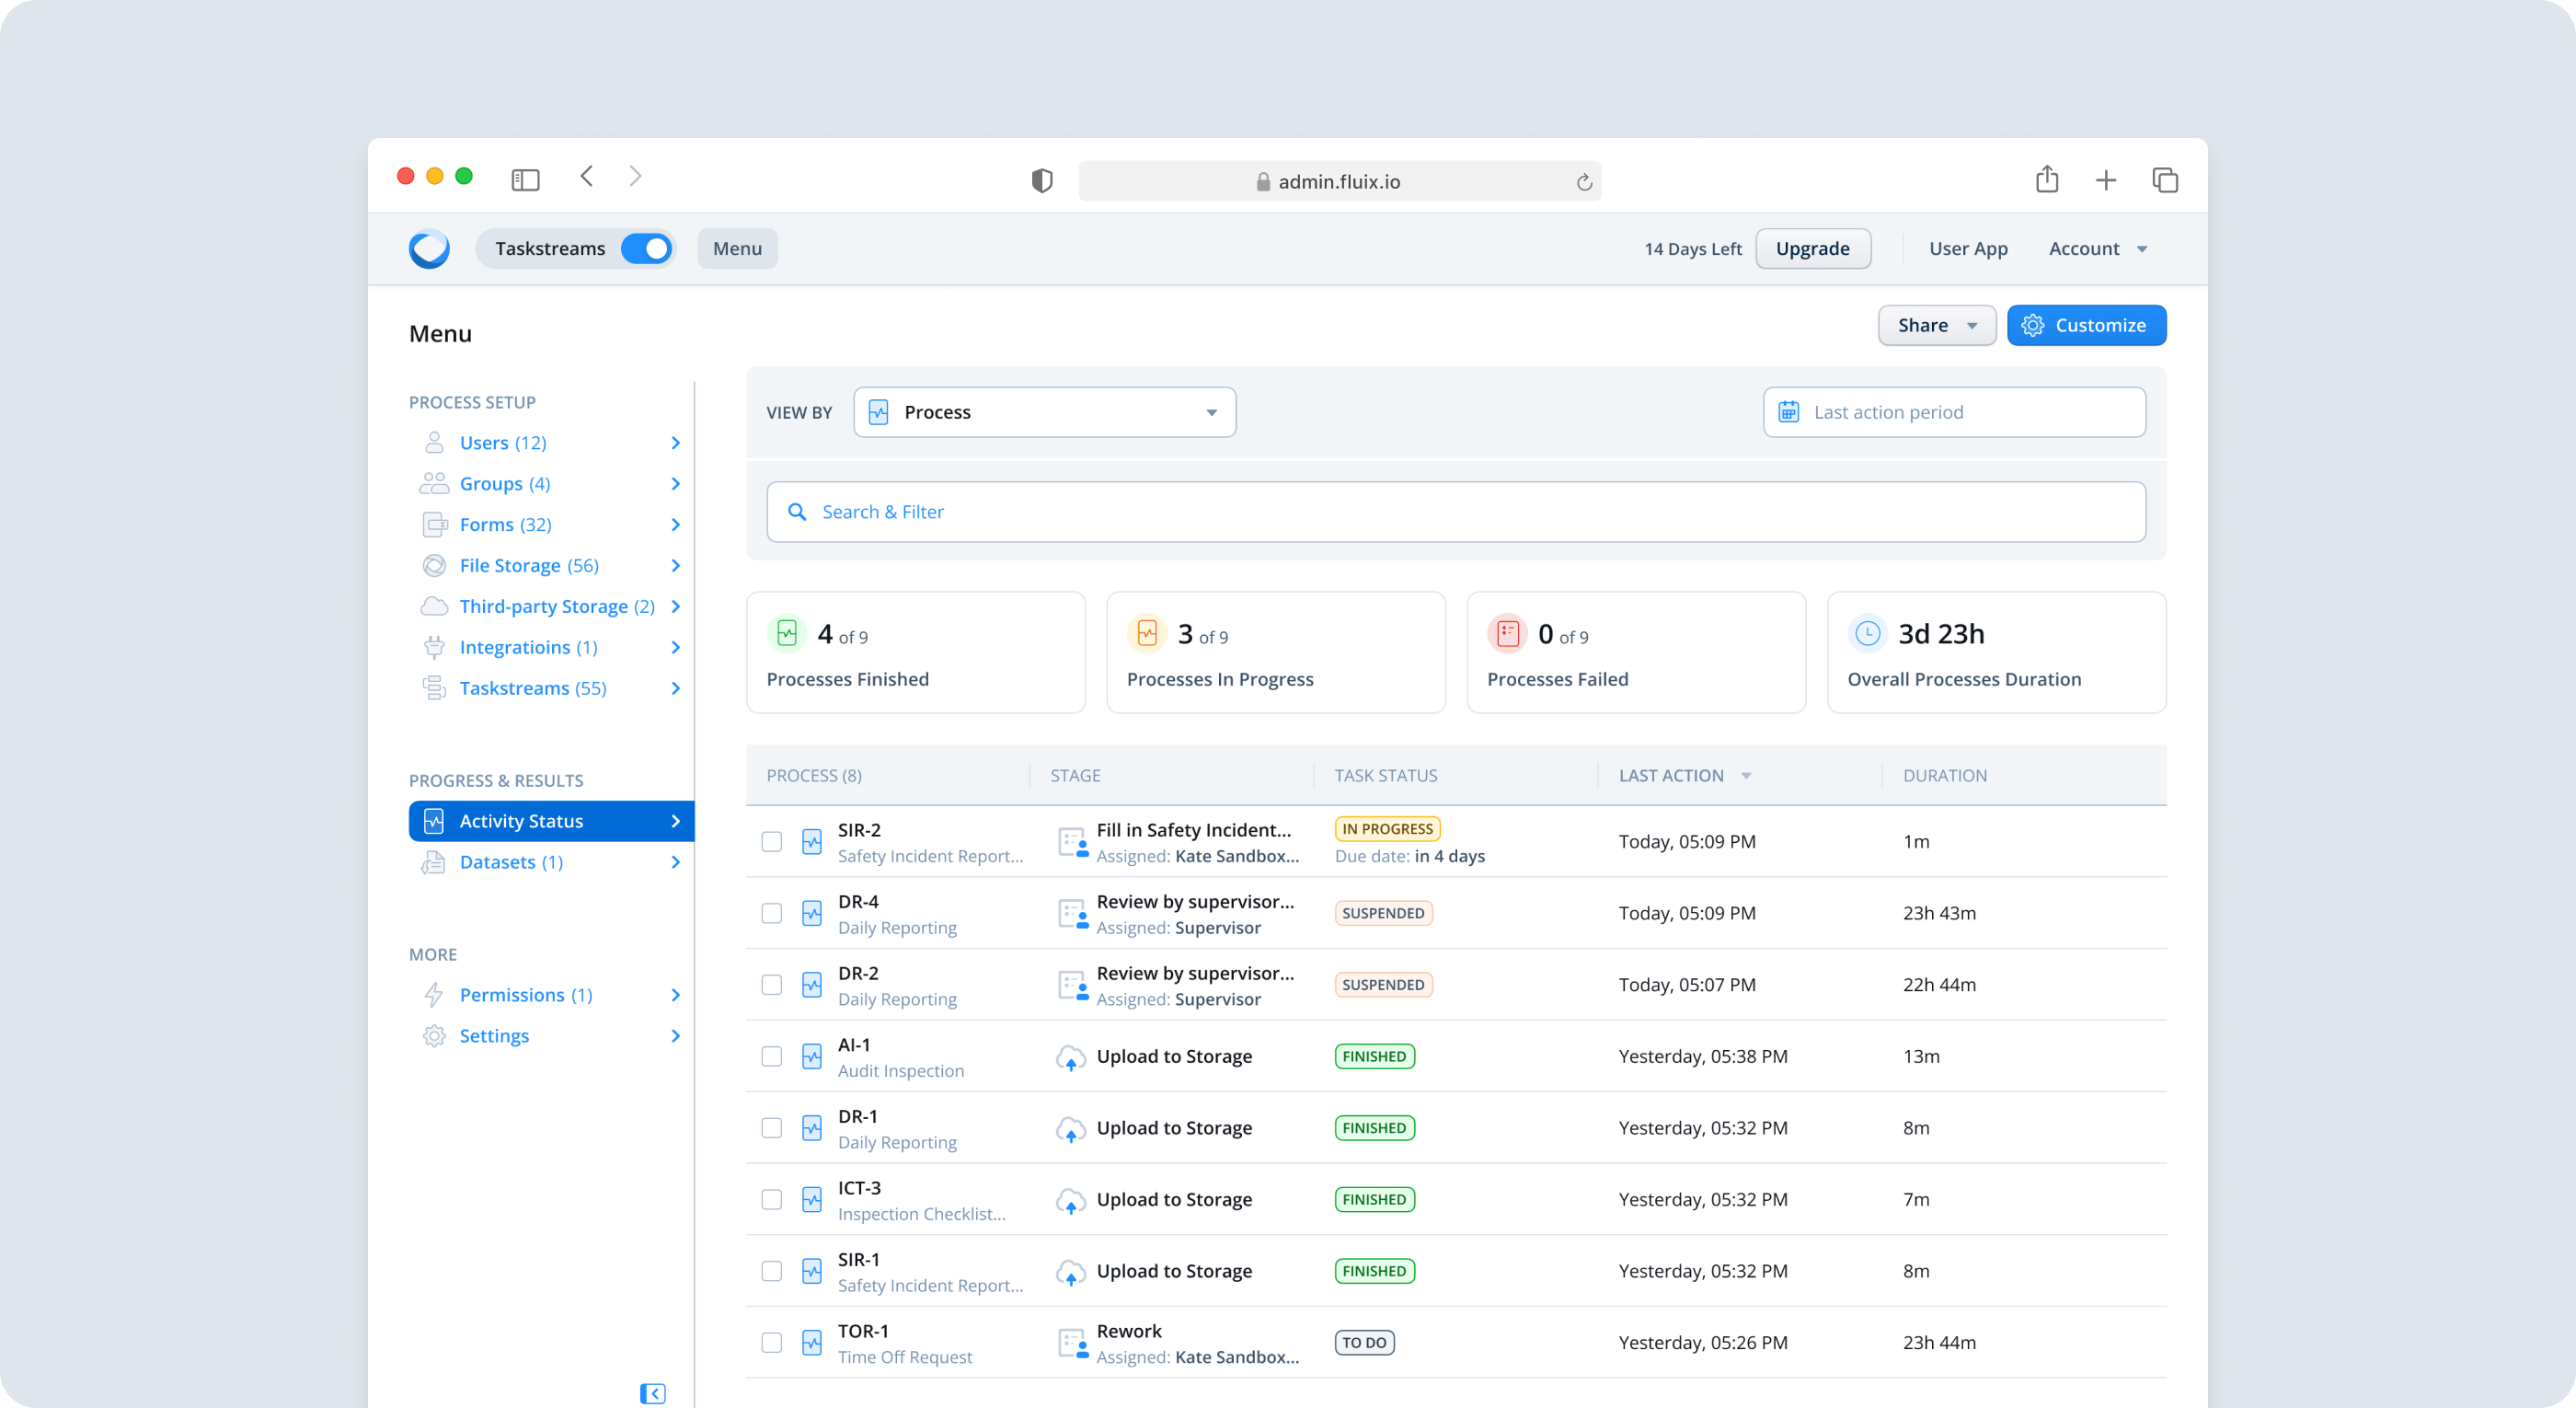
The Activity Status tab of the Admin Portal tracks progress and oversees site team activity if something is delayed or goes wrong. Additionally, it analyzes the current project’s overall workload and shares this data with your team members for further analysis.
By default, the Activity Status section shows the current state of things based on the Processes in your account. In such a scenario, data will be filtered to show the processes from all the Taskstreams in your account. This section contains the following information by default:
– Process. The ID of the process and the name of the Taskstream where this process was initially started. The ID contains the first letters of the Taskstream name and numbers.
– Stage. The name of the form’s current task and assignee information (group/user name/guest name).
– Task Status. The status of the current tasks from the process (in case there are parallel tasks, few statuses will be displayed at the same time):
ToDo. The task was assigned to a group and is not in progress;
In Progress. The task was taken by any of the users from the group;
Finished. All tasks from the Taskstream were finished;
Failed. One of the service tasks has failed (upload to folder/send by email);
Overdue. The Due time has expired.
Suspended. The process was temporarily paused by Admin. In such cases, the tasks disappear from the users’ User app and return if the Admin resumes the process by selecting them and clicking the “Resume” button in the Activity status section.
– Last Action. The latest time when there was any action with the chosen task.
– Duration. A timeframe between the beginning of the process and the current time or until the finished status of the whole process.
Additionally, it is possible to customize the table in the Activity Status section by adding specific columns and deleting those that may seem unnecessary.
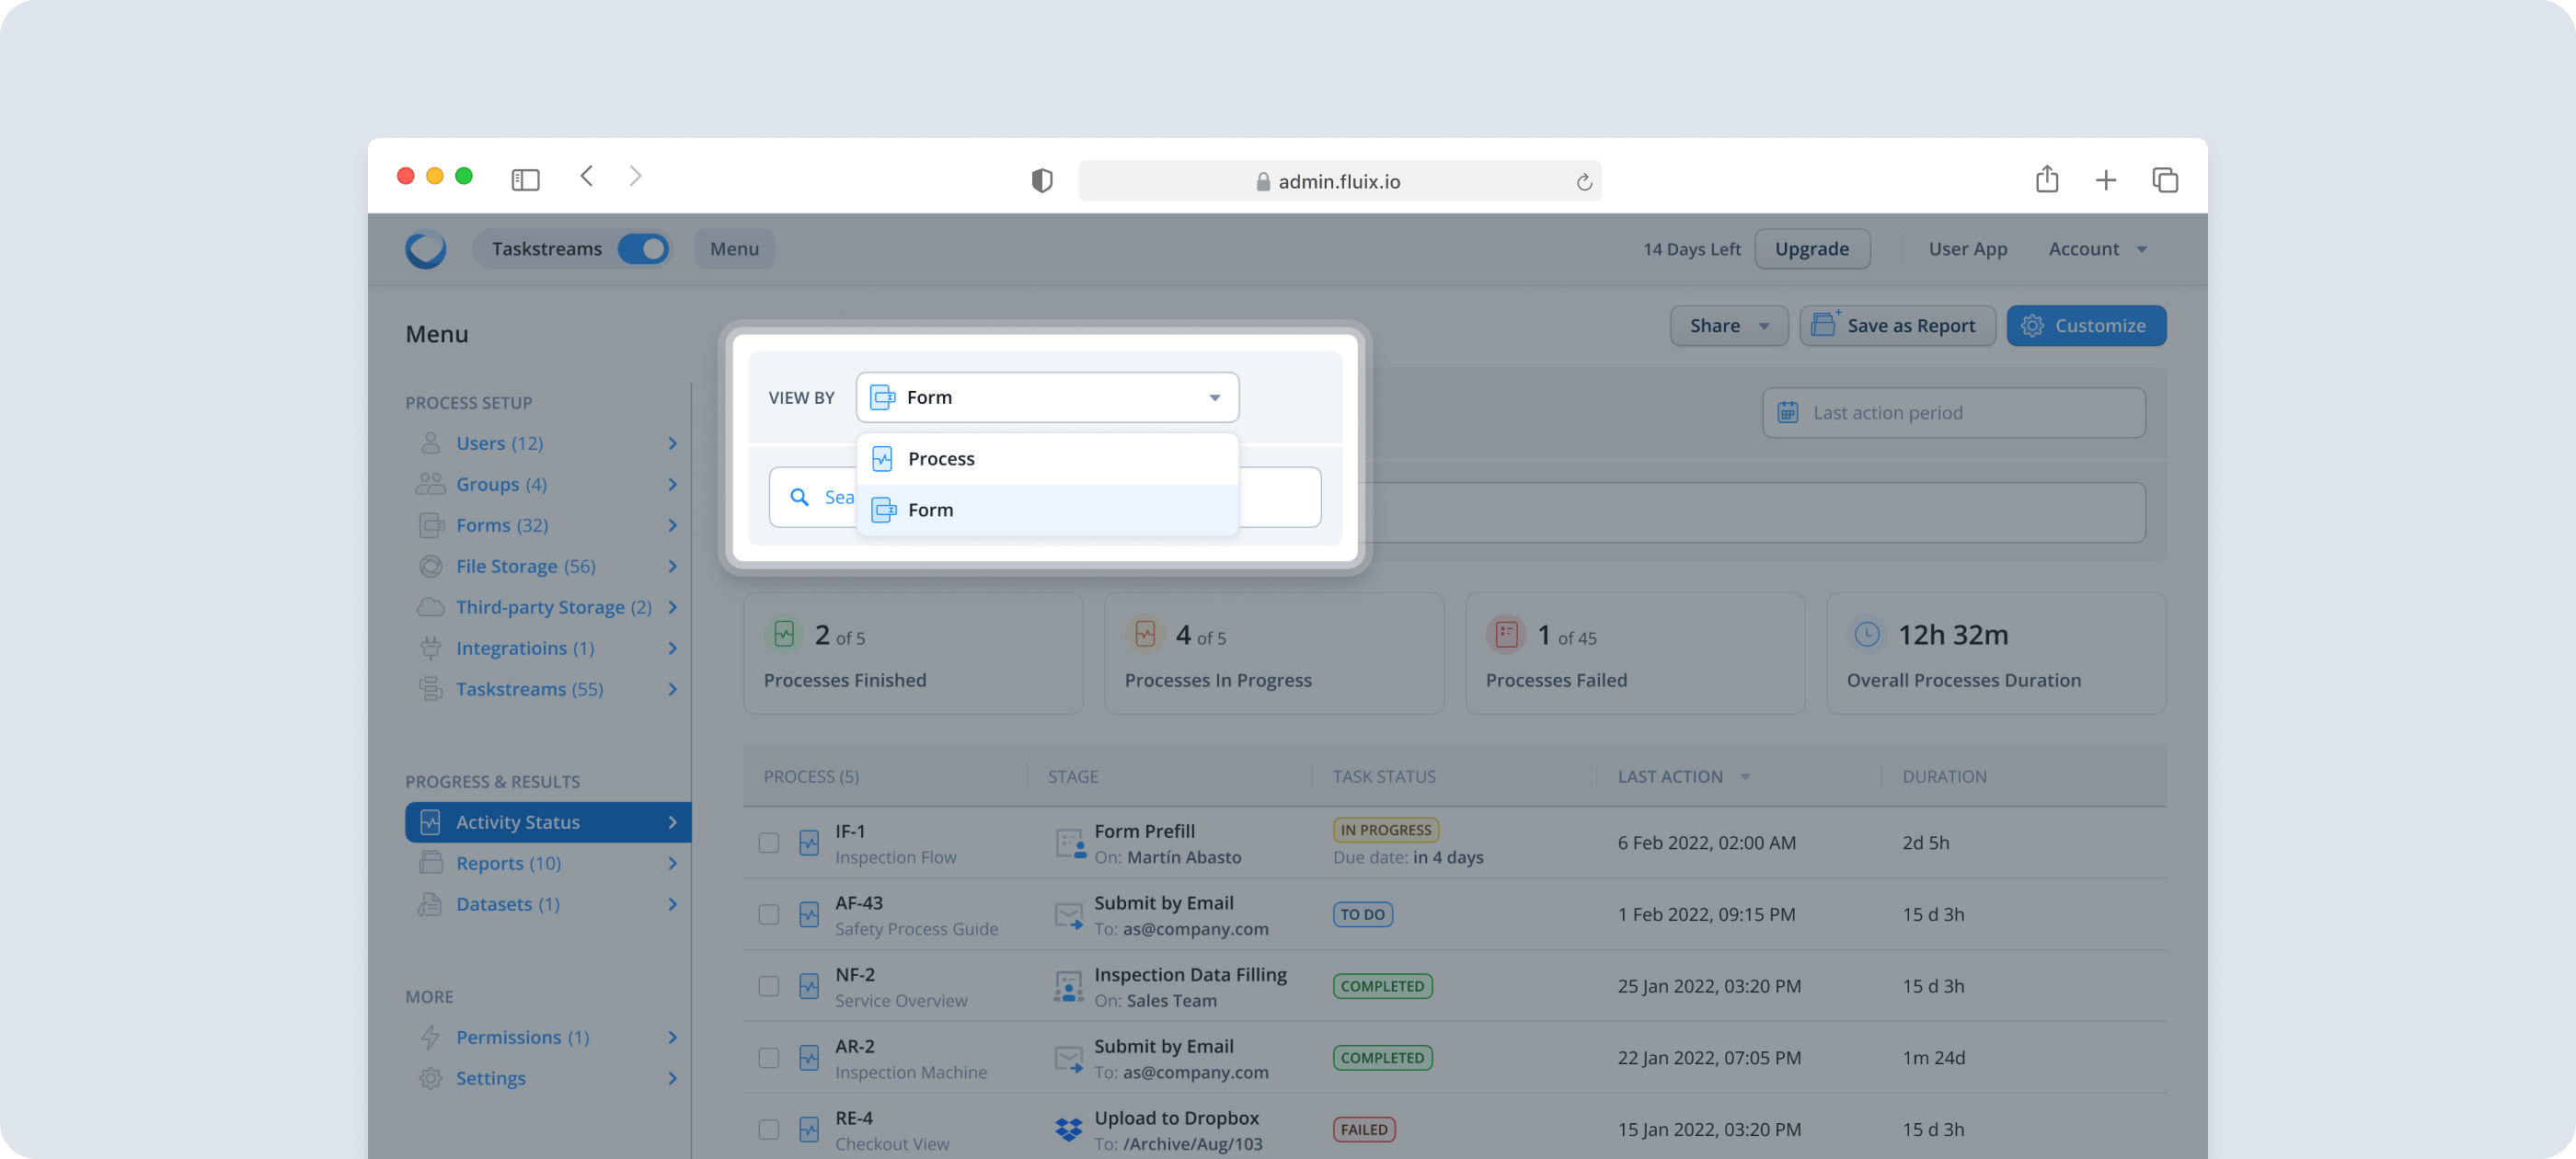
You may also change the view type of the data in the Activity Status:
By Process – to check the data based on the whole process that your team is working on;
By Form – to track actions done with the form configured in the respective Taskstream.It also provides our admins with an additional angle of view to monitor progress done on forms and identify bottlenecks or other issues on time.
Widgets in Activity Status
Widgets with the results of your team’s activity in Fluix will significantly help since they provide admins with the ability to check data at a glance without the need to dive into the table view of the report. By default, there are four widgets related to the Process view on the screen:
Processes Finished means the total number of finished processes added to the report according to the selected filters.
Processes In Progress means the number of processes that were assigned to groups, users, or guests and are now in the ToDo and InProgress stages.
Processes Failed means that specific service tasks within the process have failed to be uploaded to the configured paths, sent by email, or shared to third-party platforms like HubSpot, Salesforce, etc and these processes require the admin’s attention.
Overall Process Duration is calculated as the total time users or guests spent working on the processes in the report.
In case you have any additional questions about the functionality, contact us at support@fluix.io to learn more about it.
Was this article helpful?
Thanks for your feedback!
Oops, something went wrong. Please, try again later.
In Fluix Form Builder, you can create fillable forms and add them to Taskstreams, so that your team will be able to collect data on mobile devices and submit it down the flow.
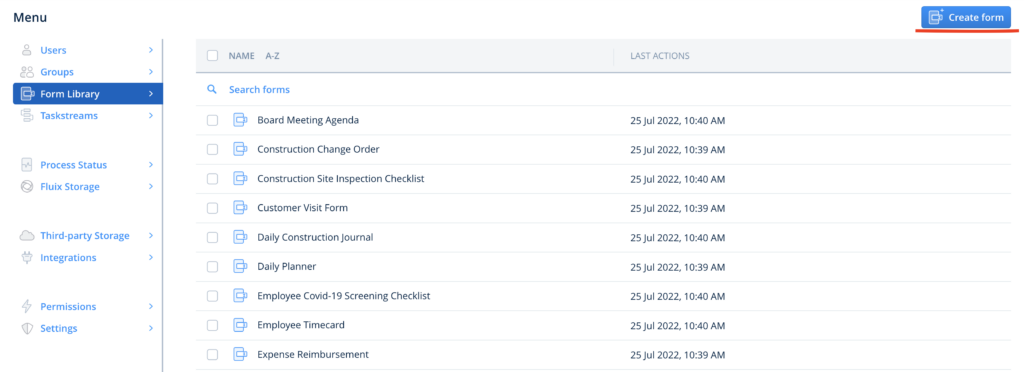
To create a fillable form, navigate to Menu -> Form Library, and click Create Form.
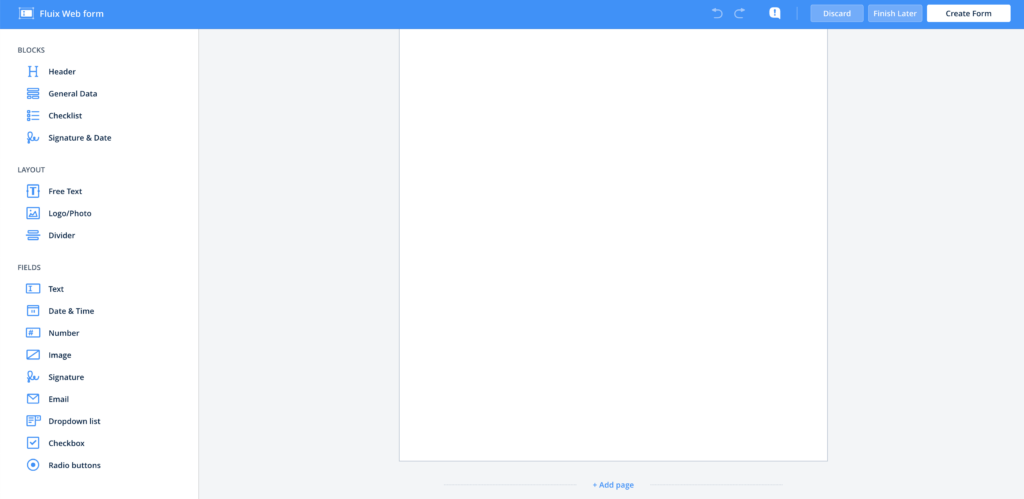
On the left, you will see a menu with a list of elements that can be used to create a form. Click on the element to add it.
The elements are divided into three different groups:
Blocks – allow using presets of the most commonly used fields combined into blocks for your convenience.
Layout – lets customizing your forms by adding the text, your company’s logo, and divider.
Fields – provide you with the fields of different types to allow users to fill out the most relevant information.
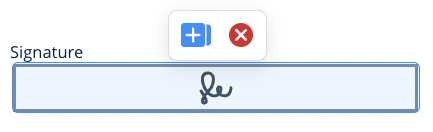
Once the element is added, you may do the following:
Modify its properties by clicking on it on the page.
Duplicate or delete the element by hovering it over and selecting the option.
Select one or multiple elements by clicking on it/them, continuing to hold down to draw a selection box, and selecting the necessary element(s).
Move one or multiple elements through the page by a simple drag-and-drop.
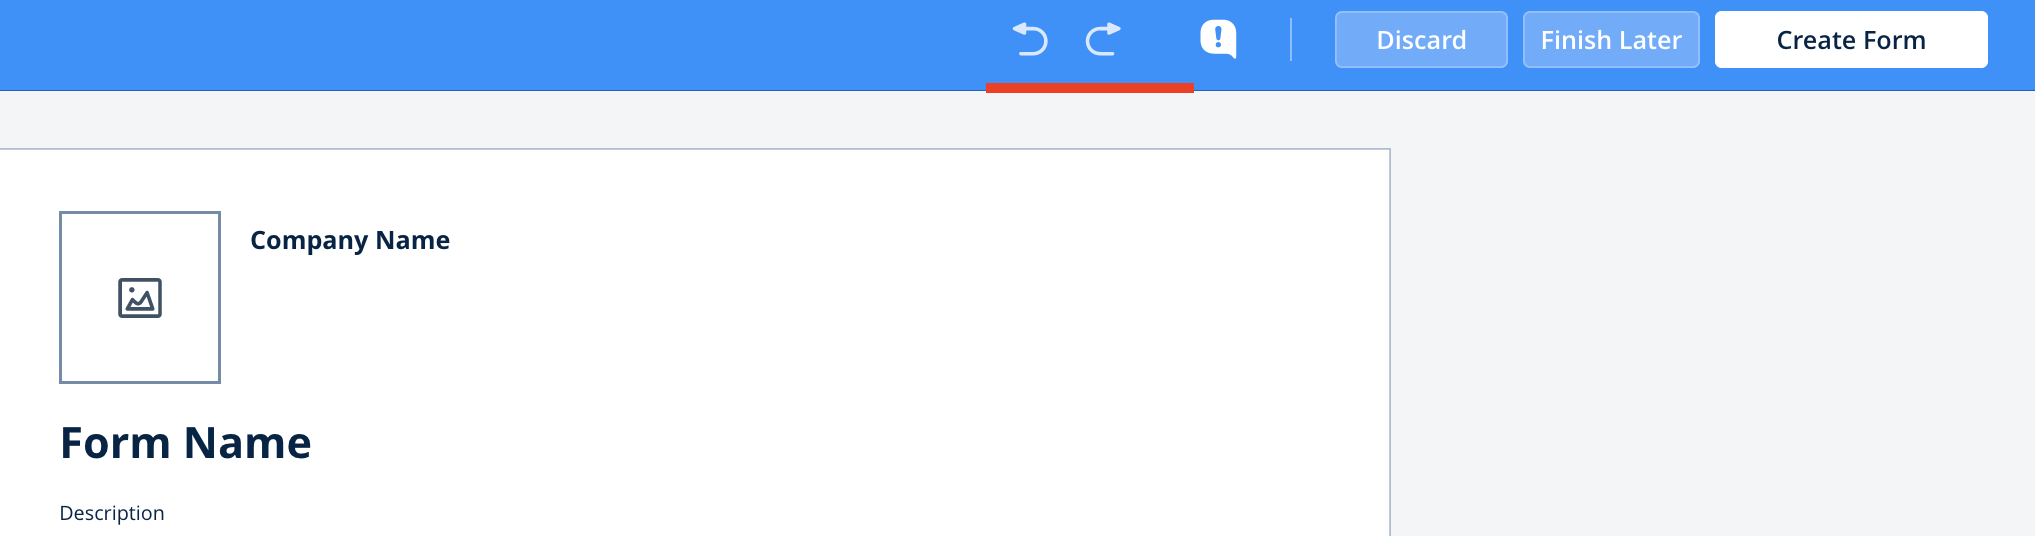
Undo the action done earlier or redo it to discard the results of the last Undo action by clicking on the arrows.
Report a problem by clicking on the exclamation mark near the Discard button.
Additionally, you may modify pages of your form:
To add a new page, click Add Page at the bottom of each page.
To delete the page, click a garbage icon on the top right side of the page.
Once the form is ready, click Save Form in the upper right corner, specify its name and click Save.
Once done, the form will appear in the Form Library from where you may select it while configuring a Taskstream.
In case you have any questions on setup, contact our team at support@fluix.io and we’ll be happy to help you.
Was this article helpful?
Thanks for your feedback!
Oops, something went wrong. Please, try again later.
Data collected by remote teams in forms in the Fluix app can be automatically aggregated and extracted into spreadsheets for further export and analysis.
How to start extracting data?
Data is extracted from forms that were filled out and submitted by your end-users within Fluix taskstreams. The data is saved to a report called Dataset and can be then downloaded in Excel/CSV.
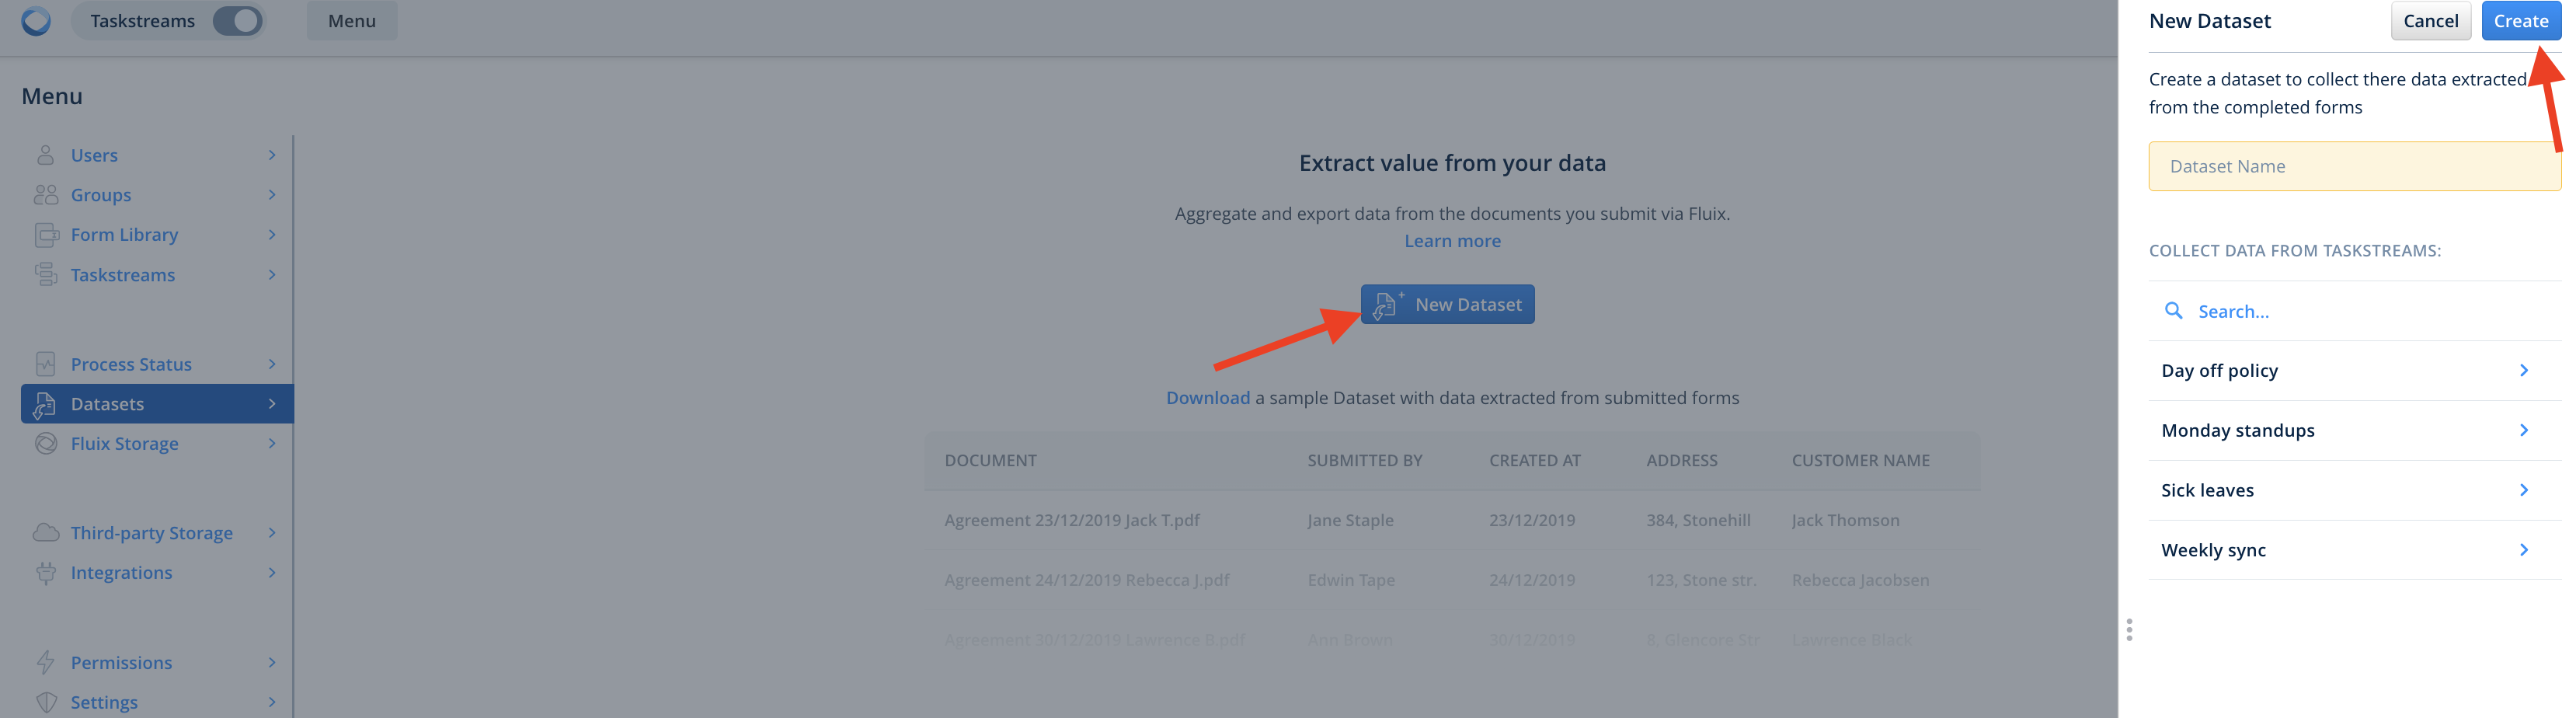
To create a dataset:
Navigate to the Data section of Fluix admin portal, tab Datasets.
Click New Dataset, name it, and click Create.
Note: If there are no taskstreams yet, create one first, with the forms that you would like to extract data from.
Select the taskstreams and then the forms you need the data from.
Each dataset will include the list of submitted forms, columns with the fields, and data that was collected in the forms.
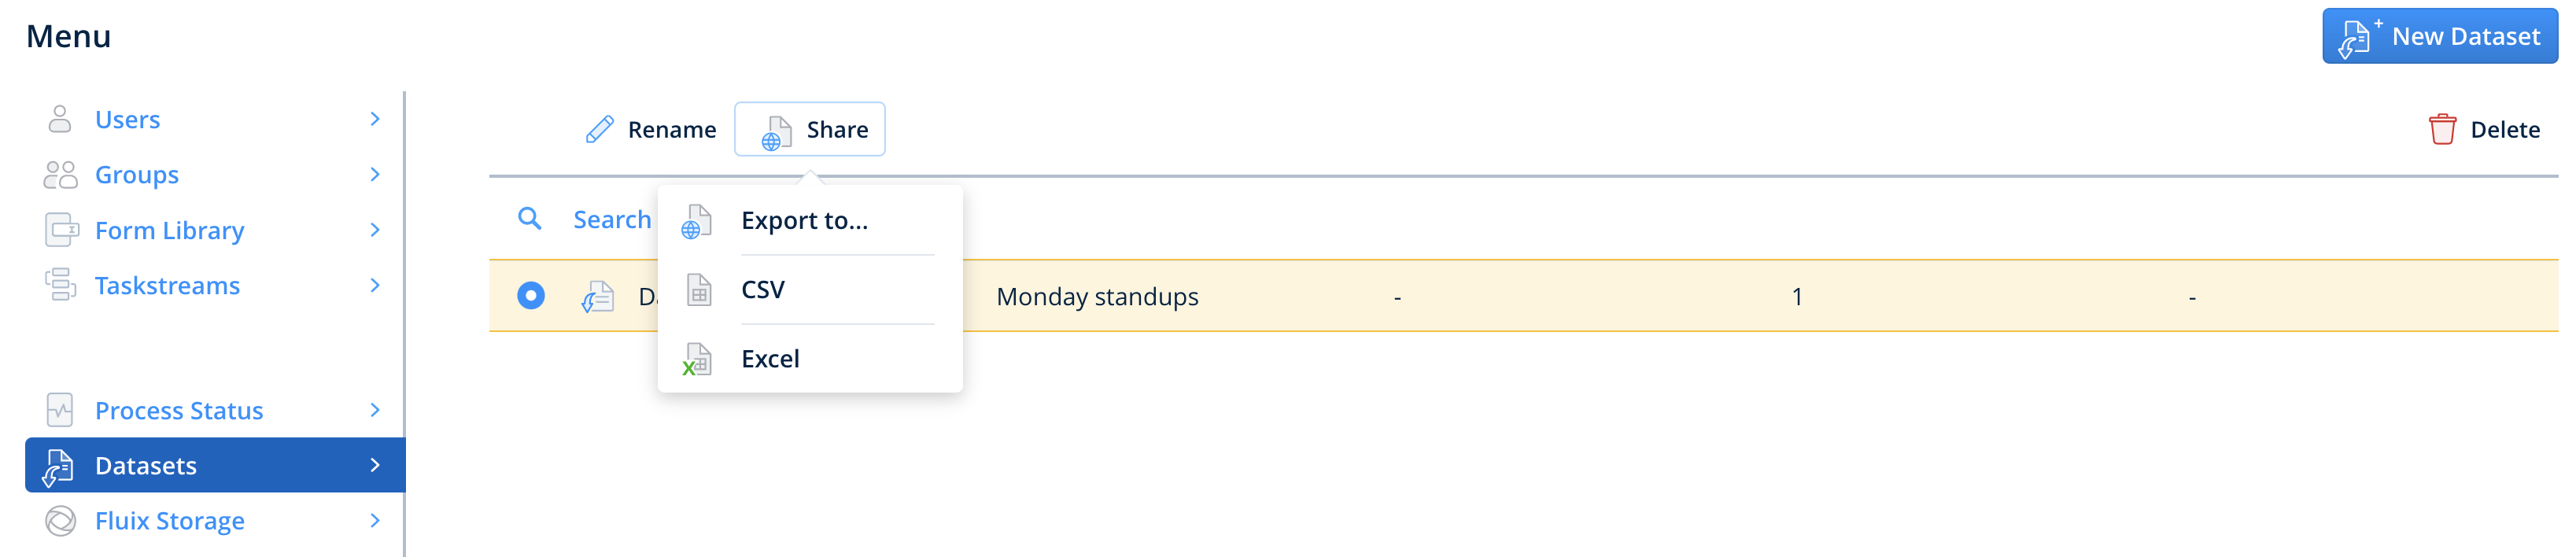
By selecting any dataset, you can Rename, Share as CSV/Excel, or Delete it.
Feel free to contact us at support@fluix.io if you have any questions or comments.
Was this article helpful?
Thanks for your feedback!
Oops, something went wrong. Please, try again later.
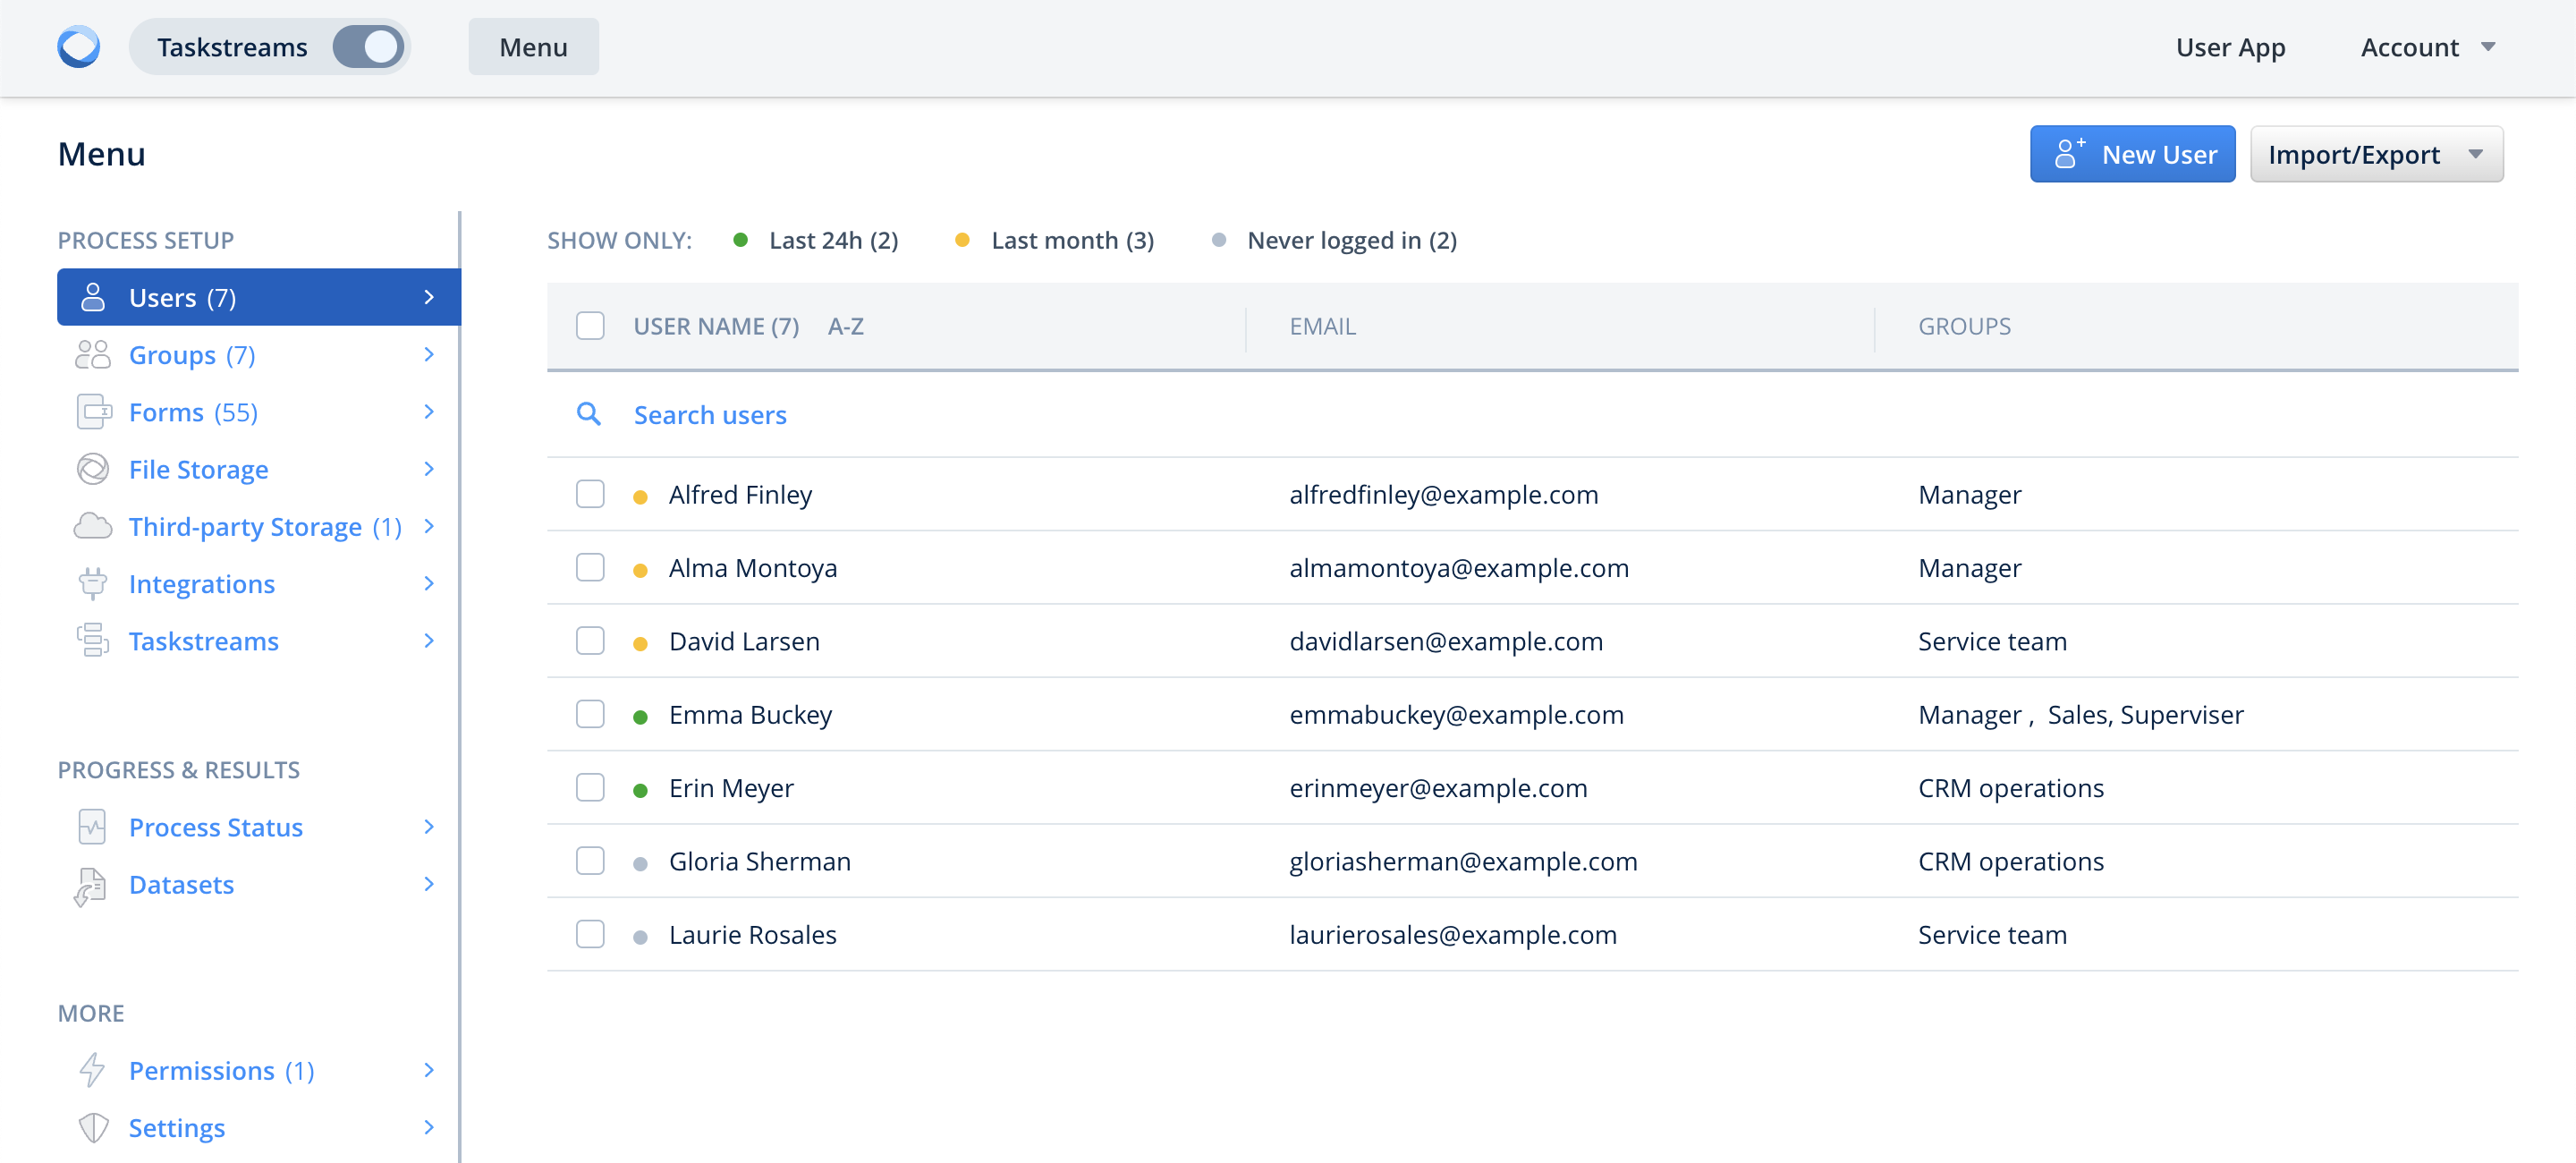
Users are your team members that will participate in Taskstreams, namely will be assigned tasks to fill out forms, review, approve each other’s work and submit the completed work through the process.
Users are managed on the Admin Portal under the Menu section:
The first step in Fluix setup is adding users and organizing them into groups for further participation in taskstreams.
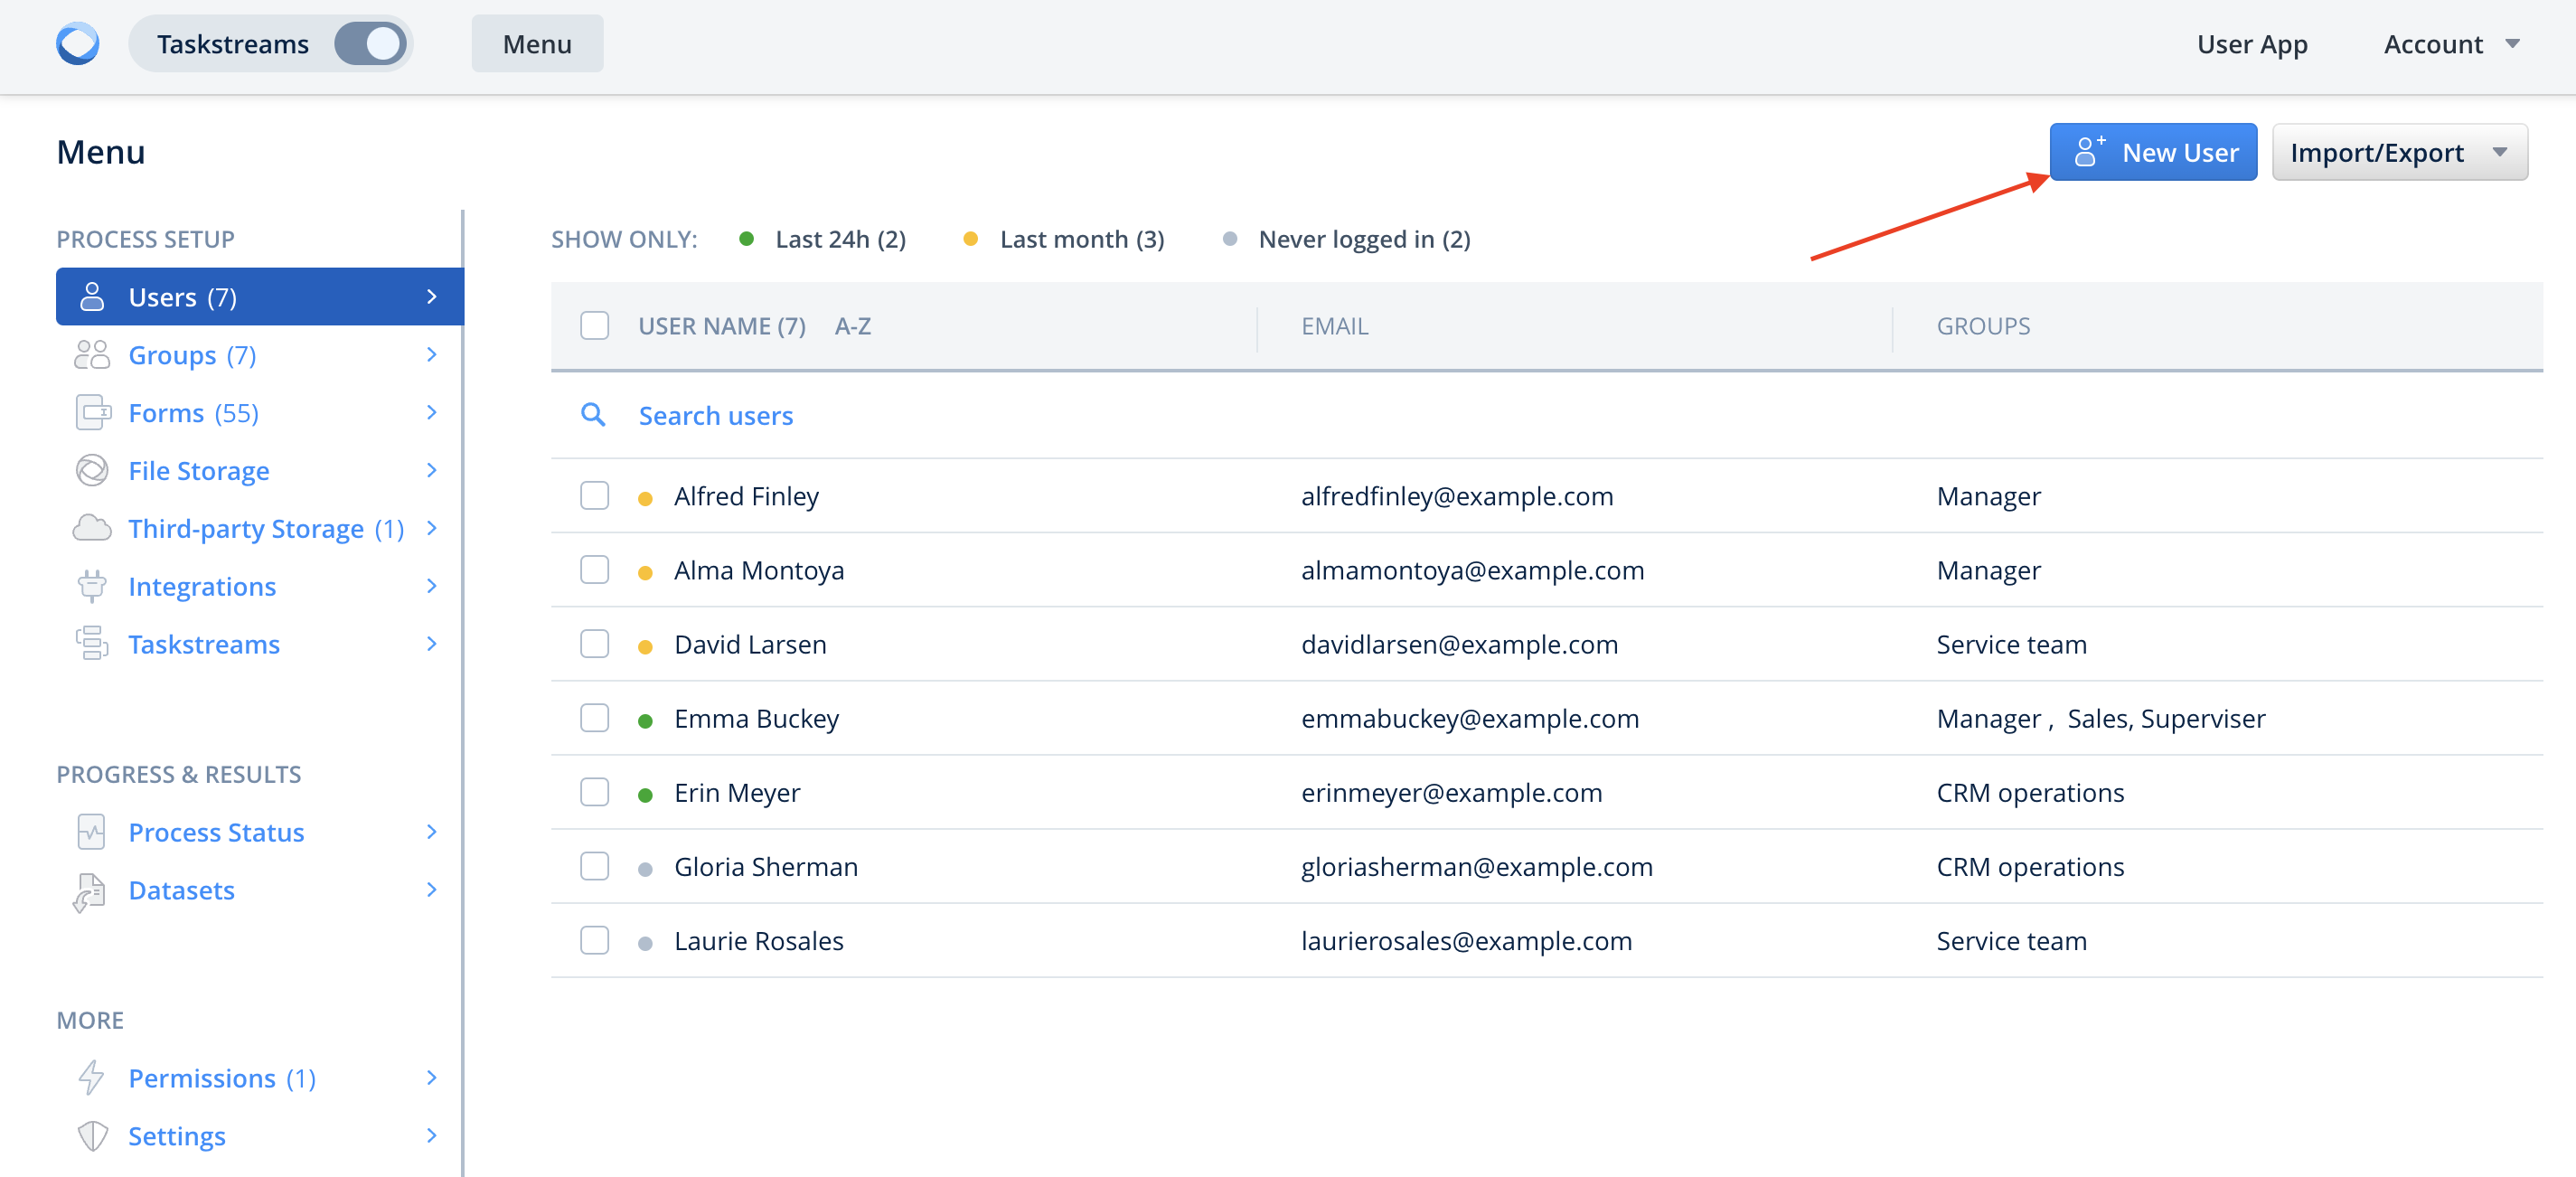
How to Add Users
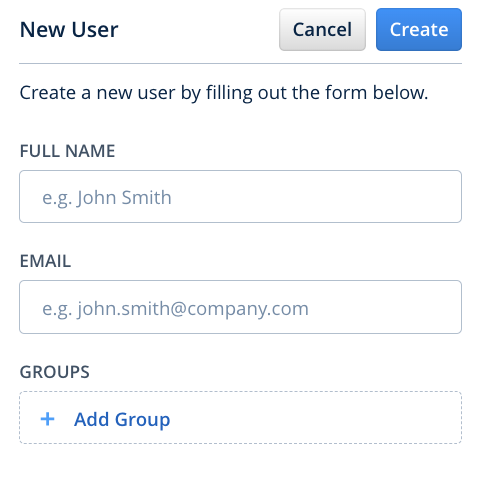
You can add a user by clicking on the New User button:
And then simply fill out the form below:
Please note that you can define the password complexity for the users’ passwords. This option is available in Menu -> Settings tab.
If a user participates in a couple of accounts, then they will use one password for all accounts.
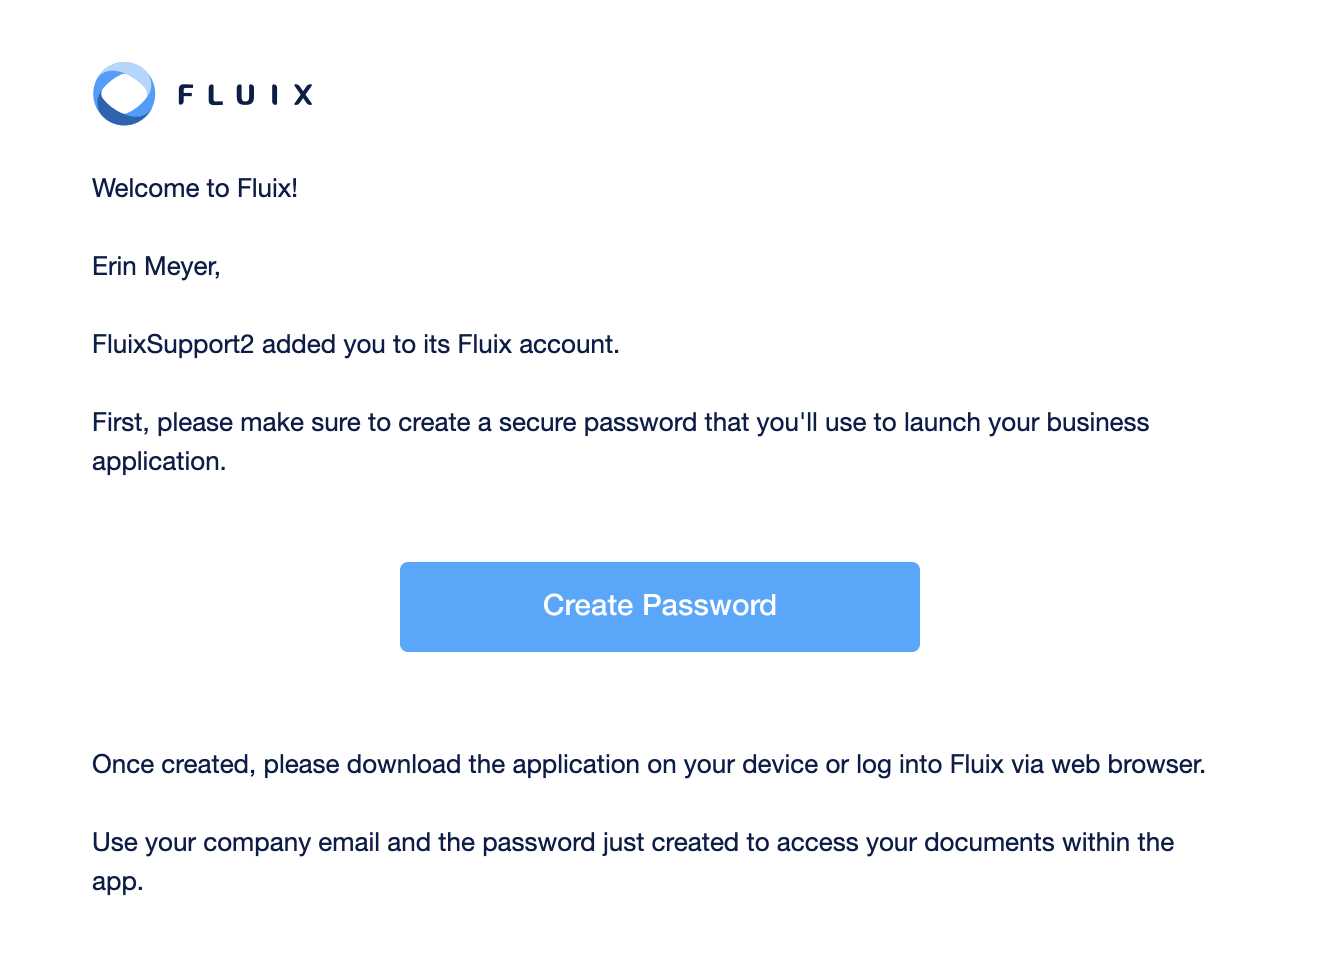
Invitation Email
Once added to the Fluix account, a user will be sent an email invitation to access Fluix via iPad, iPhone, and web application.
In case the added user didn’t receive the invitation email, you will receive an automatic email notification saying that the system didn’t accept the email address. Please, double-check the address and if that didn’t help, email us at support@fluix.io for assistance.
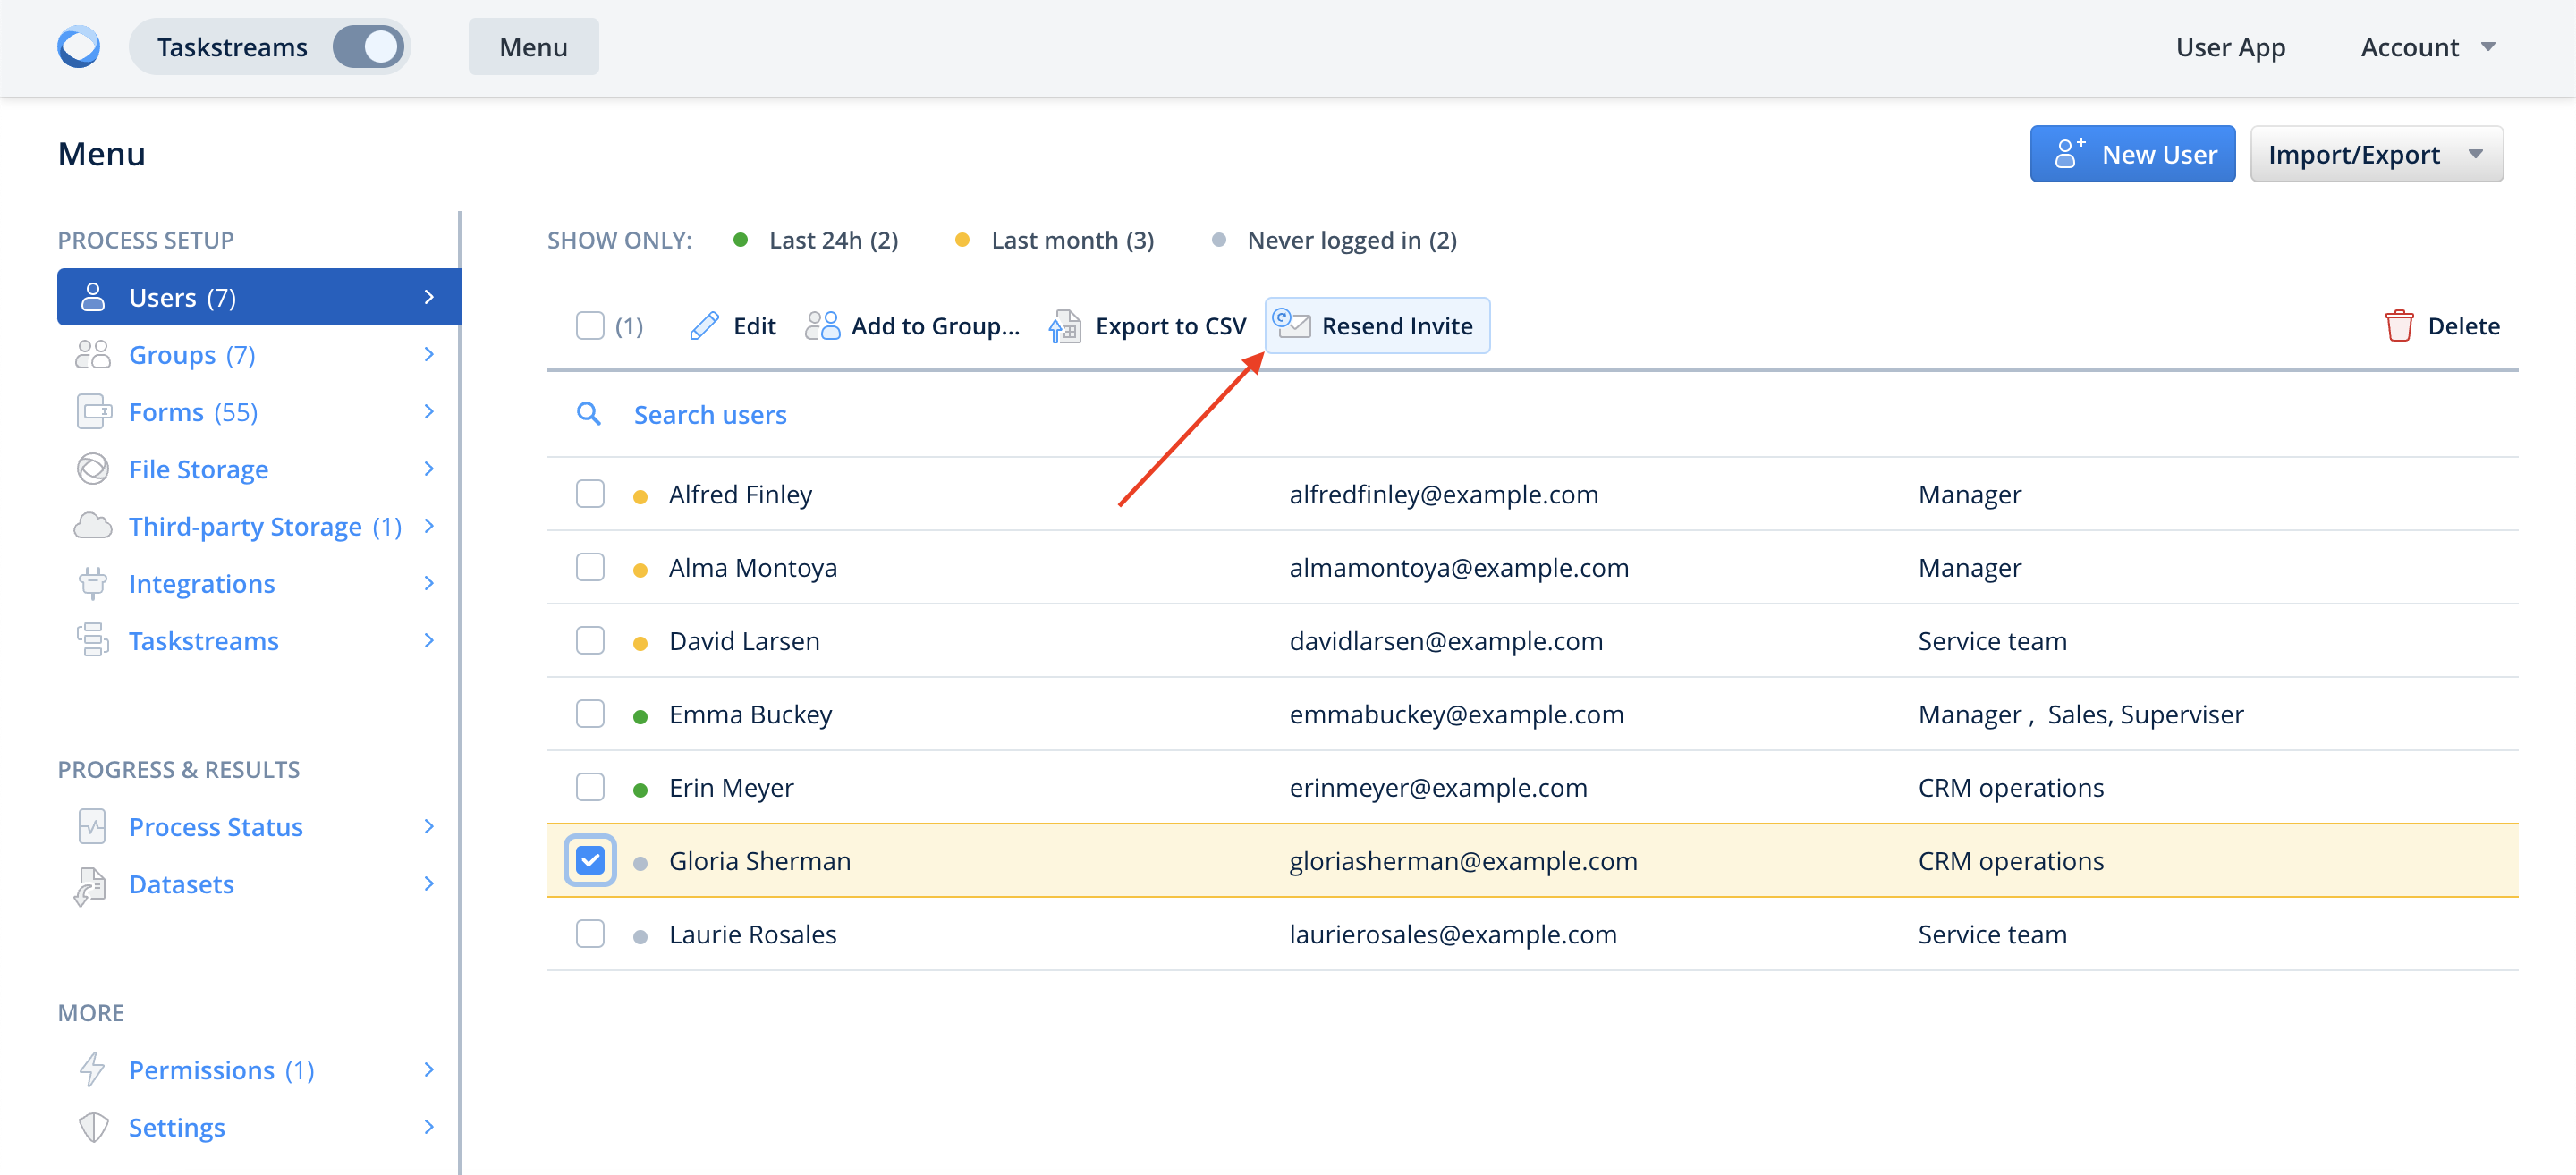
Resend Invite
If you need to resend the invite to a user who never logged into his account, you can do that from the Users section. Simply check the user to whom you would like to resend the invite and click on Resend Invite button:
The invitation to access Fluix will be sent again to the selected user who hasn’t logged into the application yet.
Learn how to add Users in bulk in the next article or contact us at support@fluix.io if you have any questions or comments.
Add Users in Bulk
To save time on adding users to Fluix, we recommend doing it by uploading a CSV file.
Here’s a detailed guide:
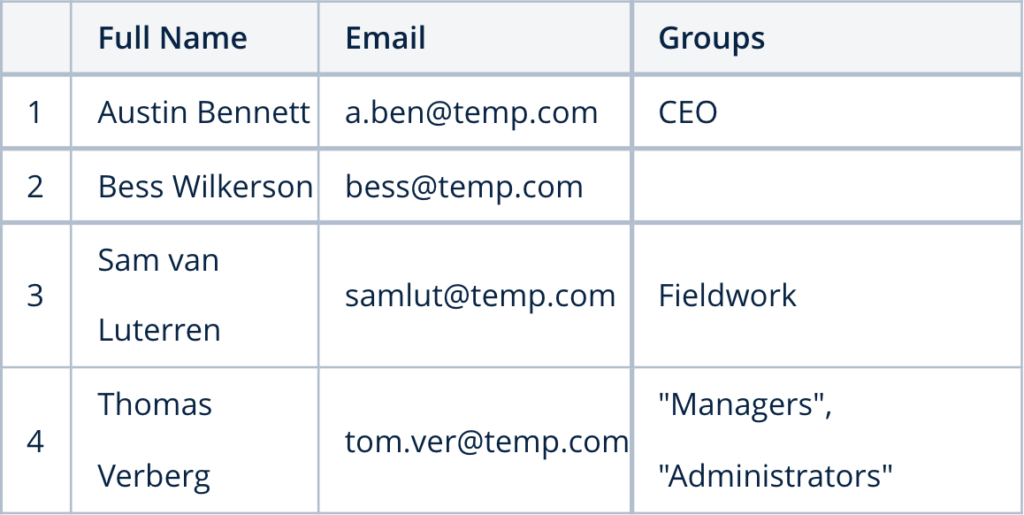
1. Collect users’ names and last names, email addresses, and groups they have to belong to (optional).
2. Open a Google Spreadsheet (or any other tool that can export this file in a CSV format) and create 2 columns: User Name and Email. If you would like to assign users to groups automatically, add a third column – Group Name (optional). Fill the document in with users’ information.
3. Download the file in CSV format (in Spreadsheets via File -> Download As – CSV)
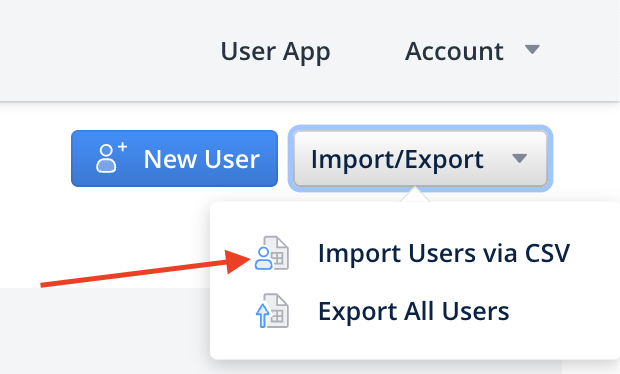
4. In Fluix admin portal go to Menu -> Users -> Import/Export dropdown -> Import Users via CSV button:
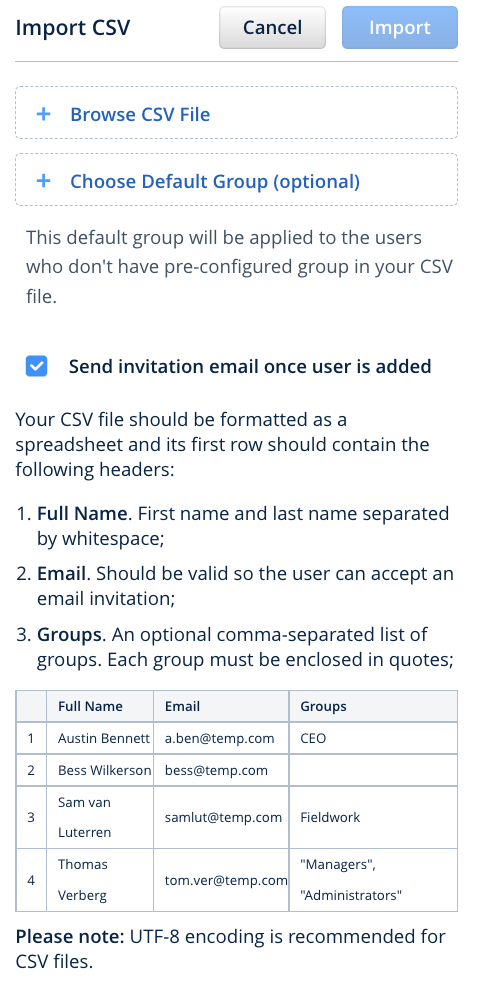
5. In the right sidebar upload the CSV document by clicking onBrowse CSV File:
6. Once the CSV file is uploaded, you will see a list of users from the document, select the ones you want to add or click on Import all.
Learn more about User Details in the next article or contact us at support@fluix.io if you have any questions or comments.
User Details
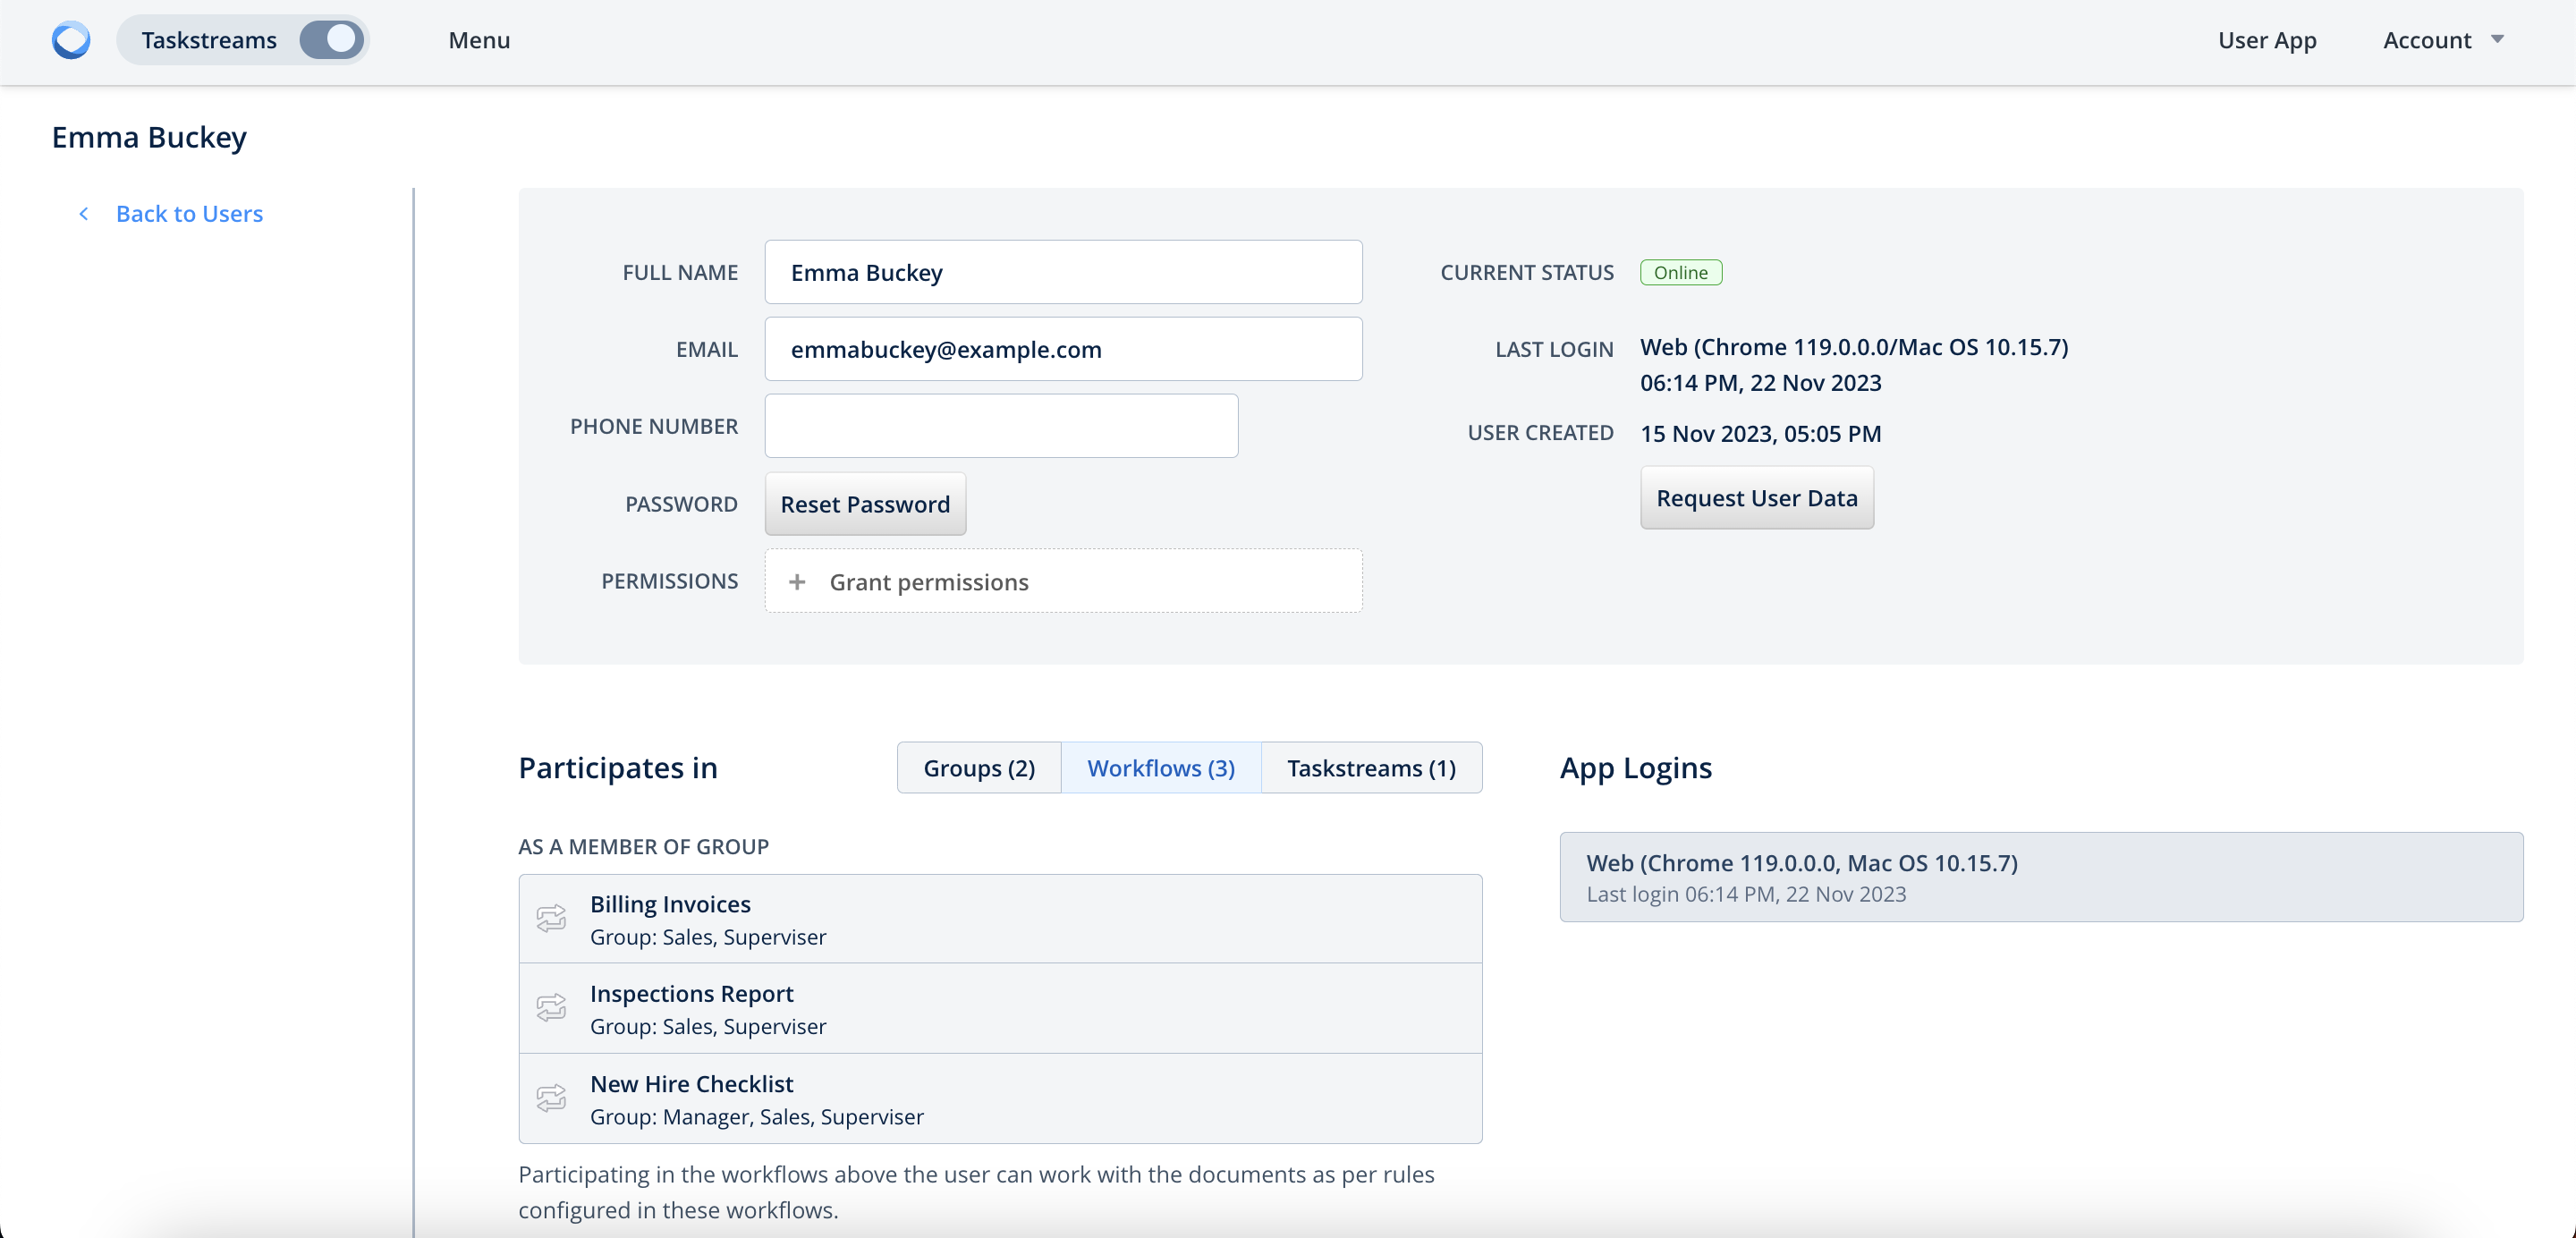
In this section, you can view and edit all user details such as name, email address, Groups and Taskstreams a user belongs to, and other details:
User Password
From here you can change a user password manually by using the Reset button to send an email request to a user asking to change a password.
Groups
Here you can assign a user to a group or groups of users that participate in a Taskstream.
Taskstreams
Once you add a user to any taskstreams, he/she will access the documents within this taskstream. The list of the taskstreams the user participates in is listed here.
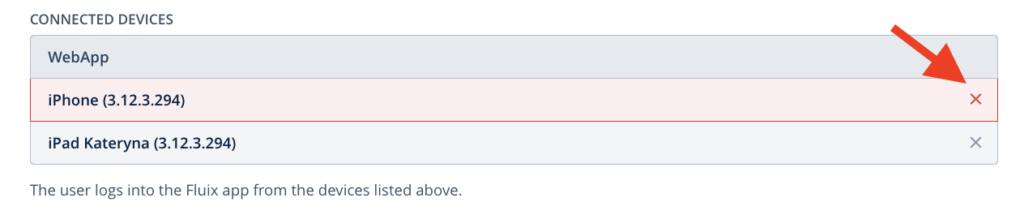
Connected Devices
This part shows the list of devices a user used to log into Fluix and the app version on each device. If there’s a need to log out from a specific device, simply click on the cross sign next to the device name.
By default, a user can be logged into 3 devices. Once the number is exceeded, the user is logged out of the first device. To limit or increase the number of devices, please contact your Customer Success Manager.
Request User Data
This is an option to email the user the details of his/her activity.
Learn more about Export of Users in the next article or contact us at support@fluix.io if you have any questions or comments.
Export of Users List
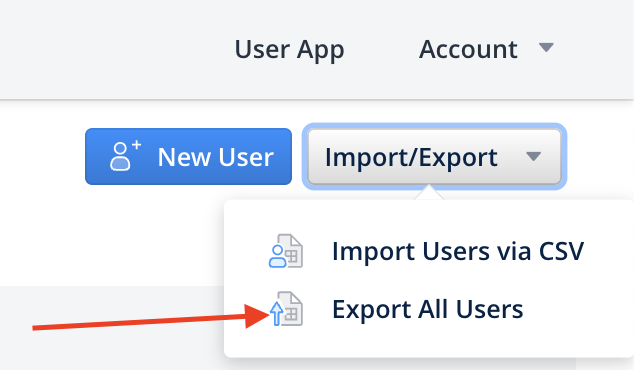
To export the list of all or selected Fluix users, please go to Users in the Menusection and follow the steps for each option below:
Option 1. To export the list of all the Users, click on Import/Export button in the top right corner of your screen and select Export All Users from the drop-down menu:
Option 2. To export the list of selected users, select them by checking a box next to the User’s name and then click on the Export to CSV button. The list of selected Users will be downloaded as a CSV file to your computer.
Feel free to contact us at support@fluix.io if you have any questions or comments.
Pre-fill of user’s email on login page
In case you use the MDM solution to manage your users’ devices, you can ease the login process for your end-users by pre-filling their email addresses on the Fluix login page. Here are the steps to proceed:
1. Add device to MDM
2. Set test user email for ‘com.fluix.mdm.userEmail’ key in MDM
3. Install Fluix via MDM
4. Run Fluix, check if the email is in the ‘username’ field
Feel free to contact us at support@fluix.io if you have any questions or comments.
Delete Users
You can delete users in Fluix that no longer need to have access to the platform.
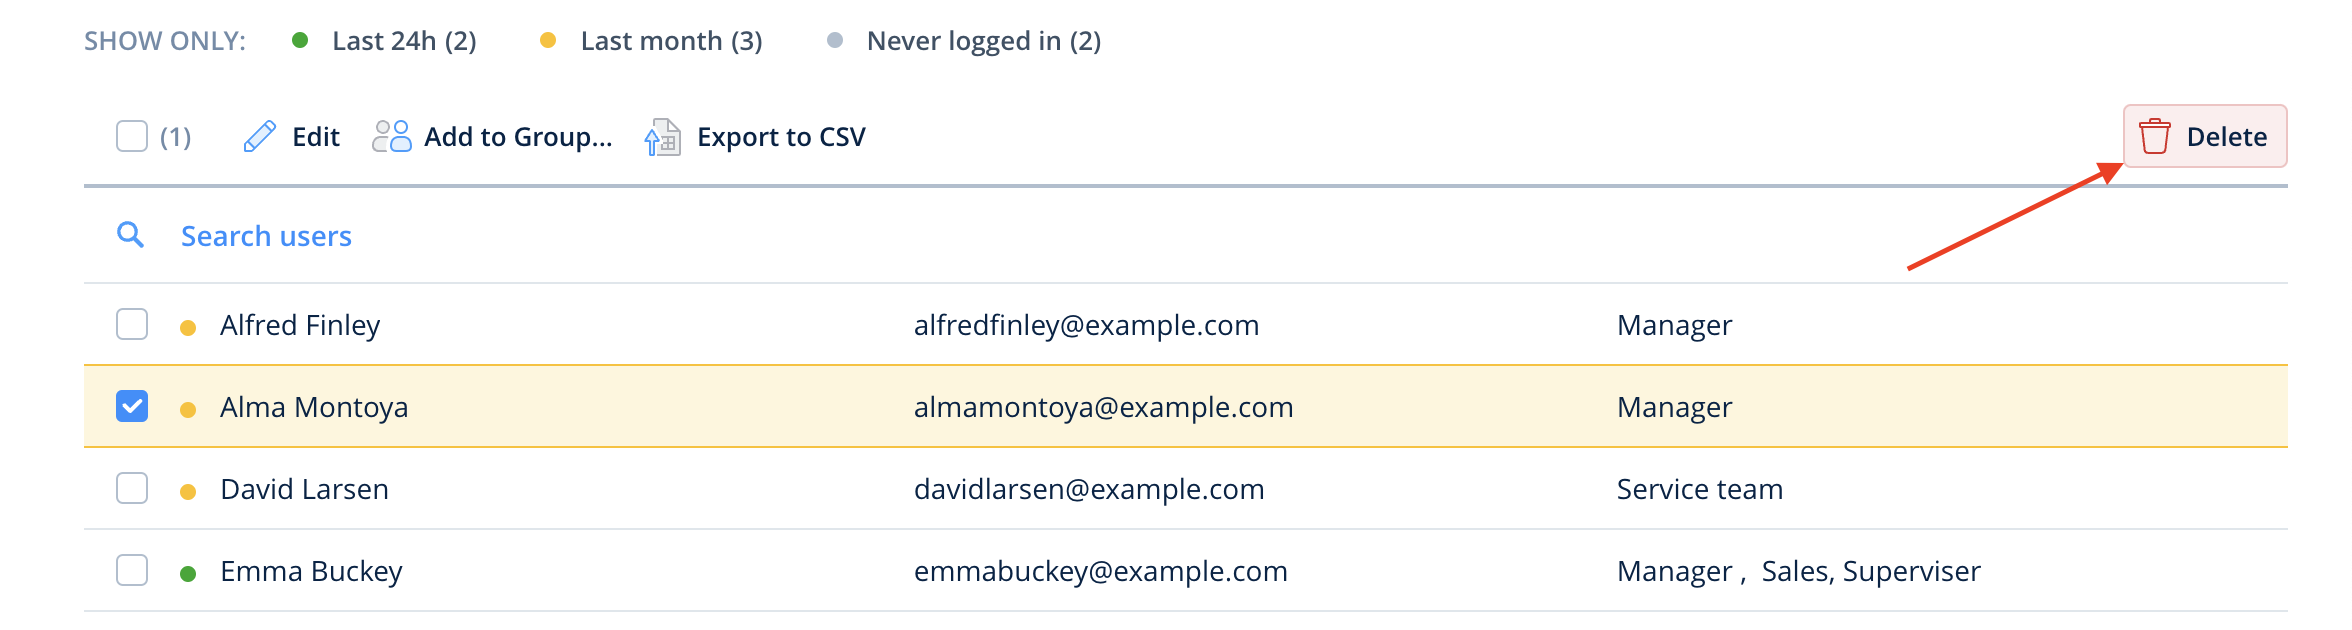
To delete a user, please proceed to Users in the Menu section and follow the steps below:
1. Select a User or multiple Users you want to delete by checking the box next to the User’s name.
2. Click on the Delete button in the right corner of the screen. Confirm the selection and the user’s account will be removed.
Please, note that there is a couple of instances where a user deletion cannot be completed until certain modifications are made:
the user who participates in the taskstream and whose deletion might affect the whole setup and logic of the task.
user has administrative rights.
IMPORTANT: According to the GDPR requirements, the data on the deleted user is stored for 30 days. So, in case you deleted a user by mistake, you can recover him/her within the next 30 days by recreating him as a new user and asking Fluix Support Team to recover his setup.
Feel free to contact us at support@fluix.io if you have any questions or comments.
Was this article helpful?
Thanks for your feedback!
Oops, something went wrong. Please, try again later.
In Taskstreams, participants of the flow are Assignees that are chosen among Groups of users.
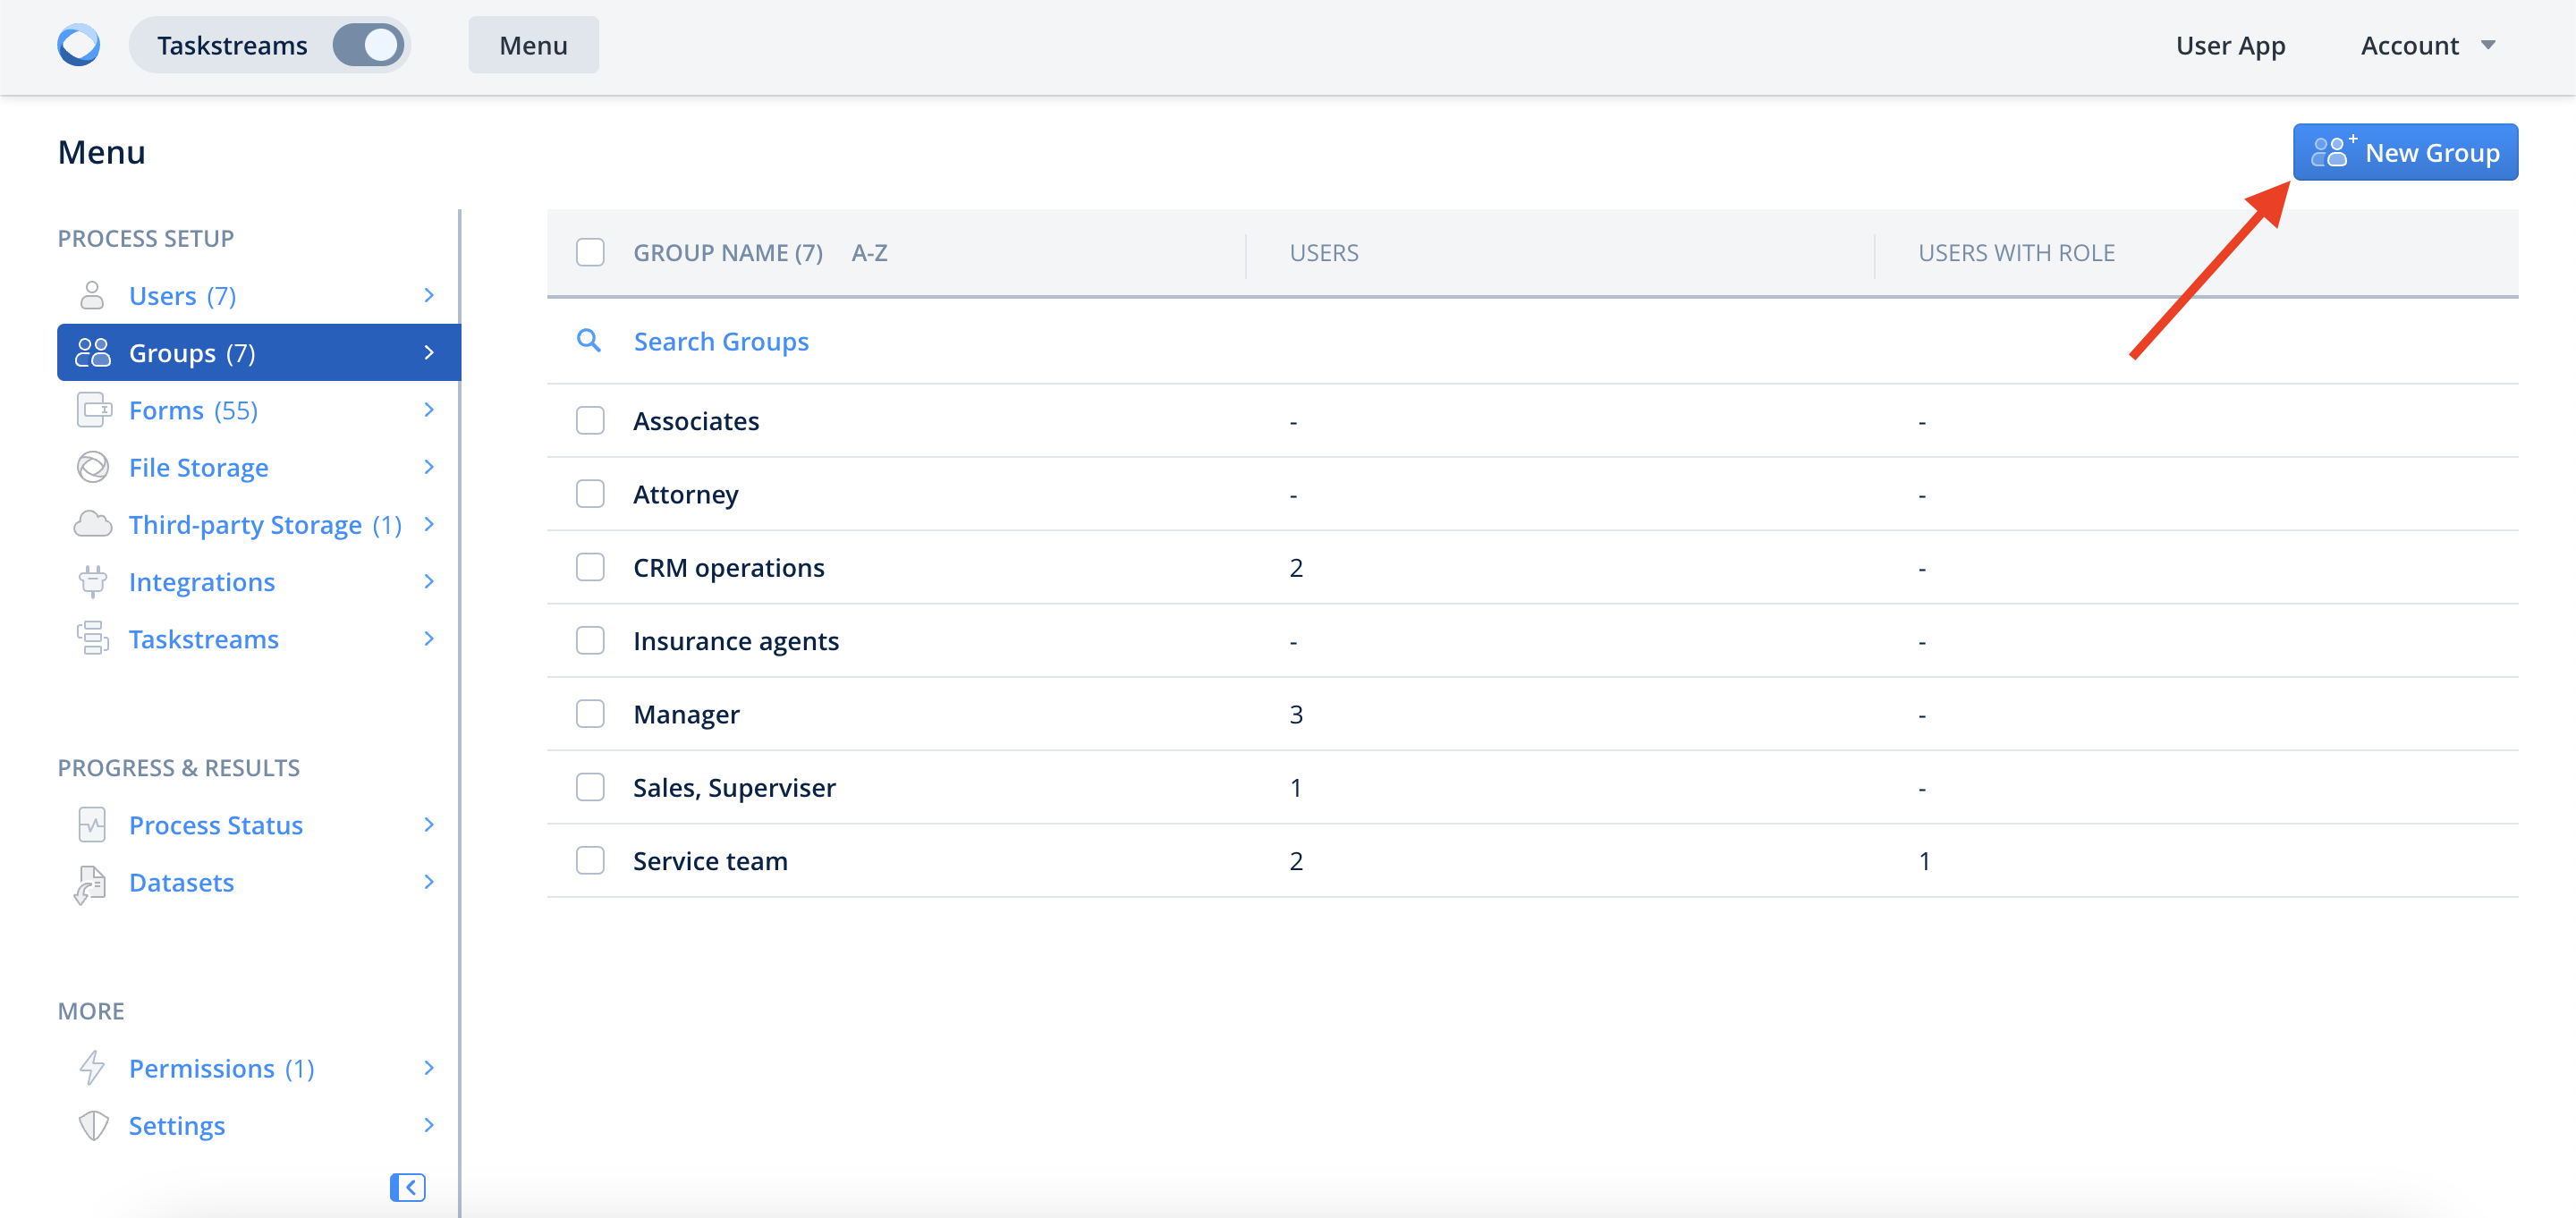
To create a new group in Taskstreams navigate to the Menu -> Groups section and click New Group. In the appeared sidebar name the group and add the users who’ll be its members:
How to Add Users to Groups in Taskstreams
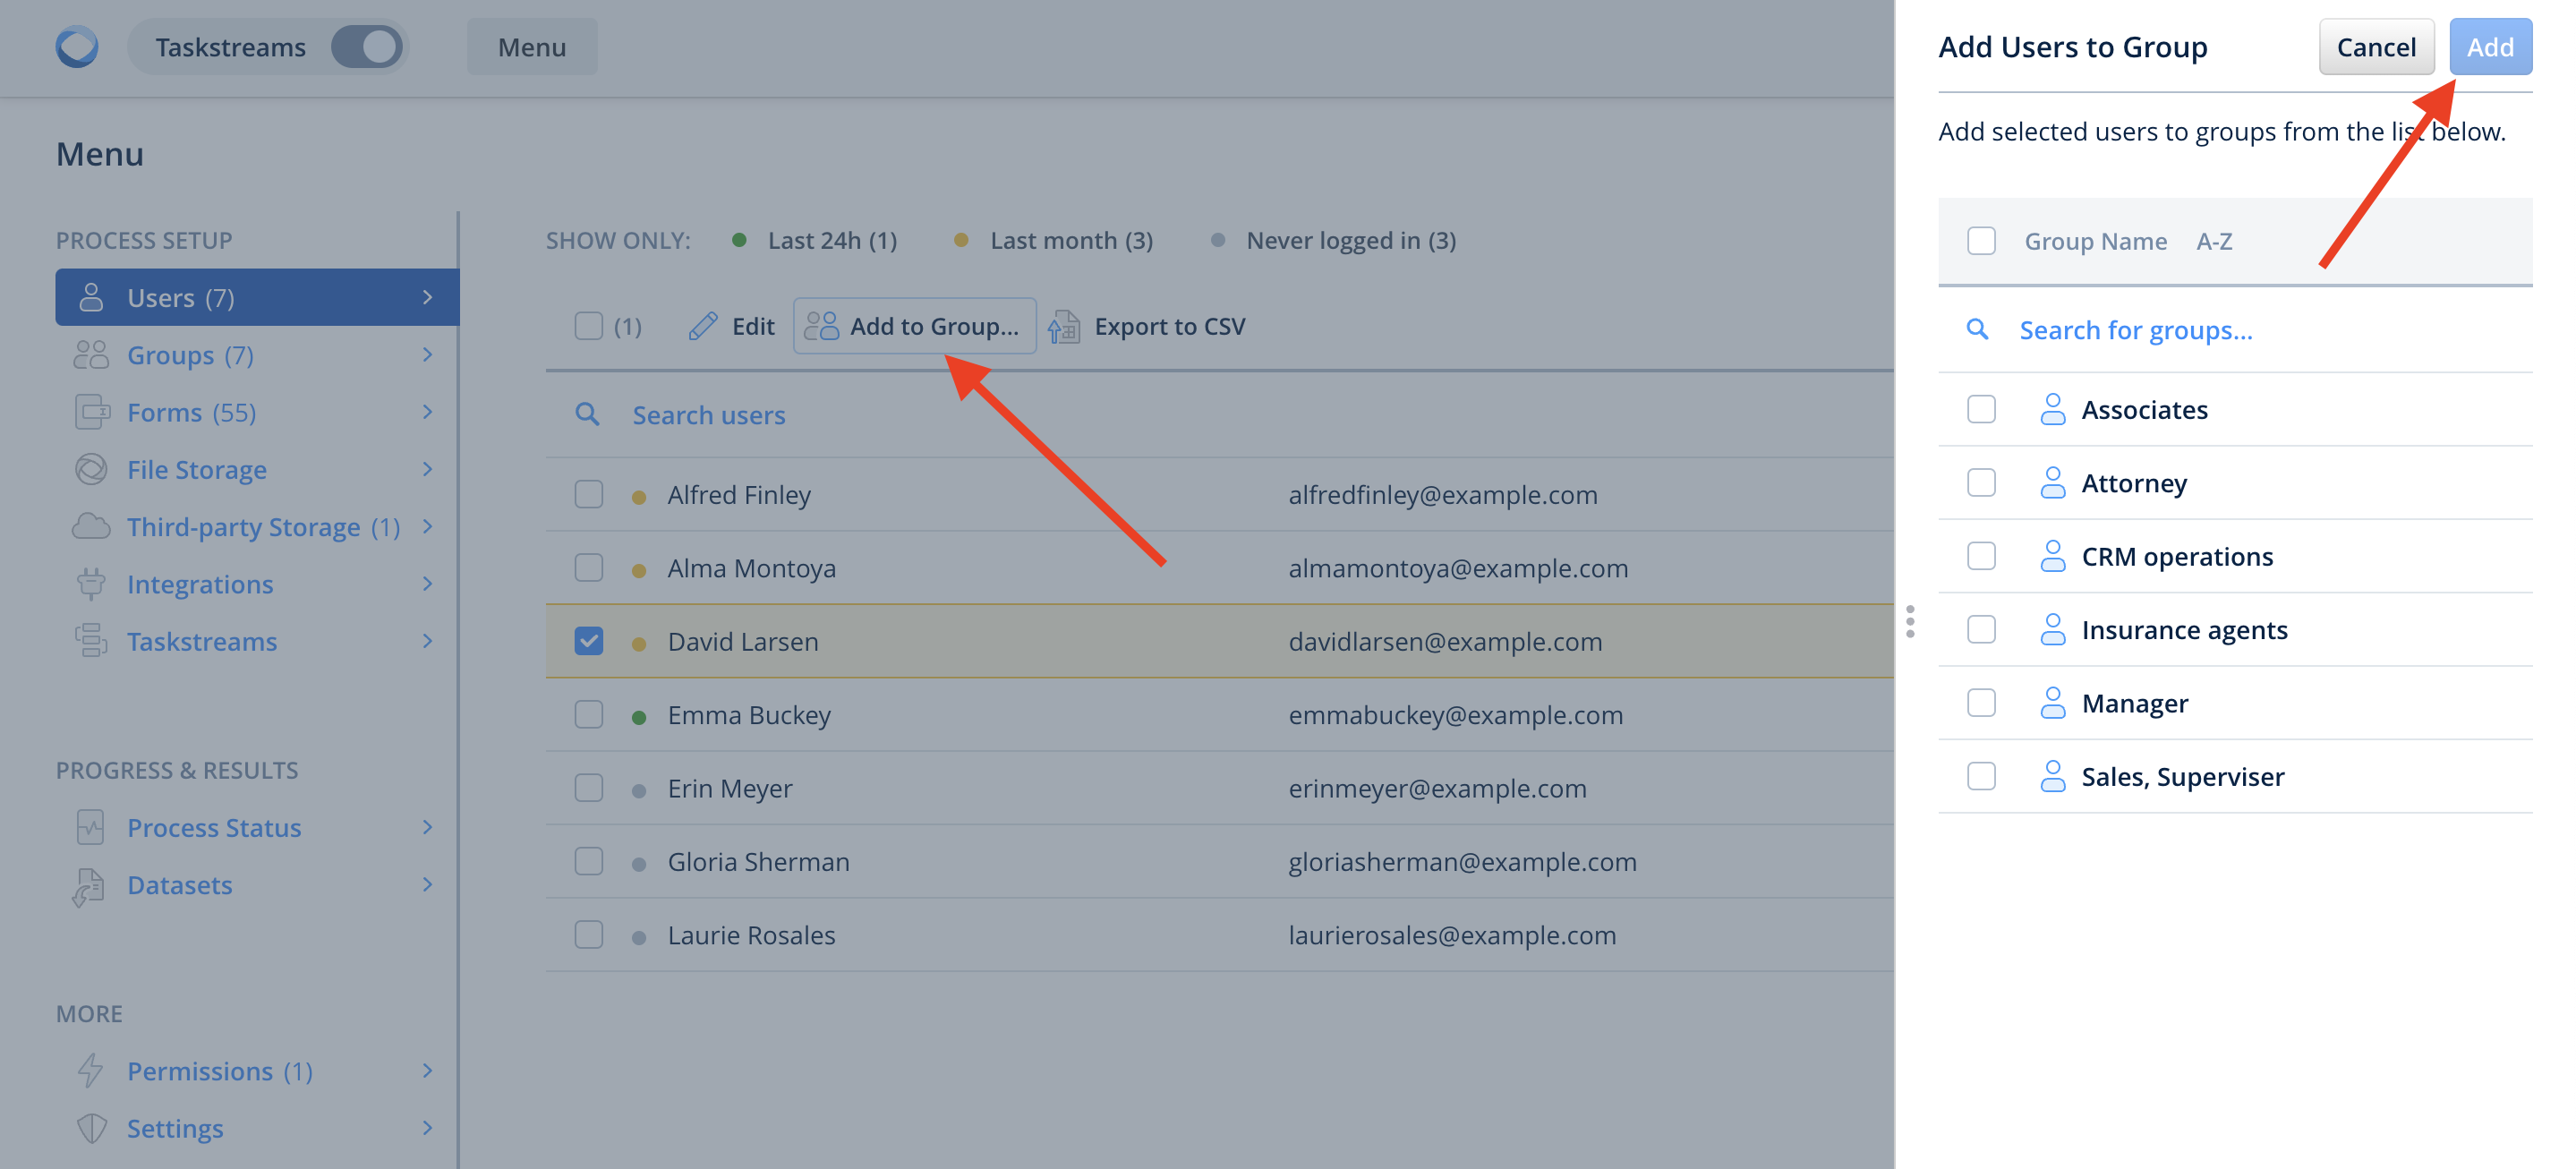
You can add users to Groups in three ways:
1. From the Users section:
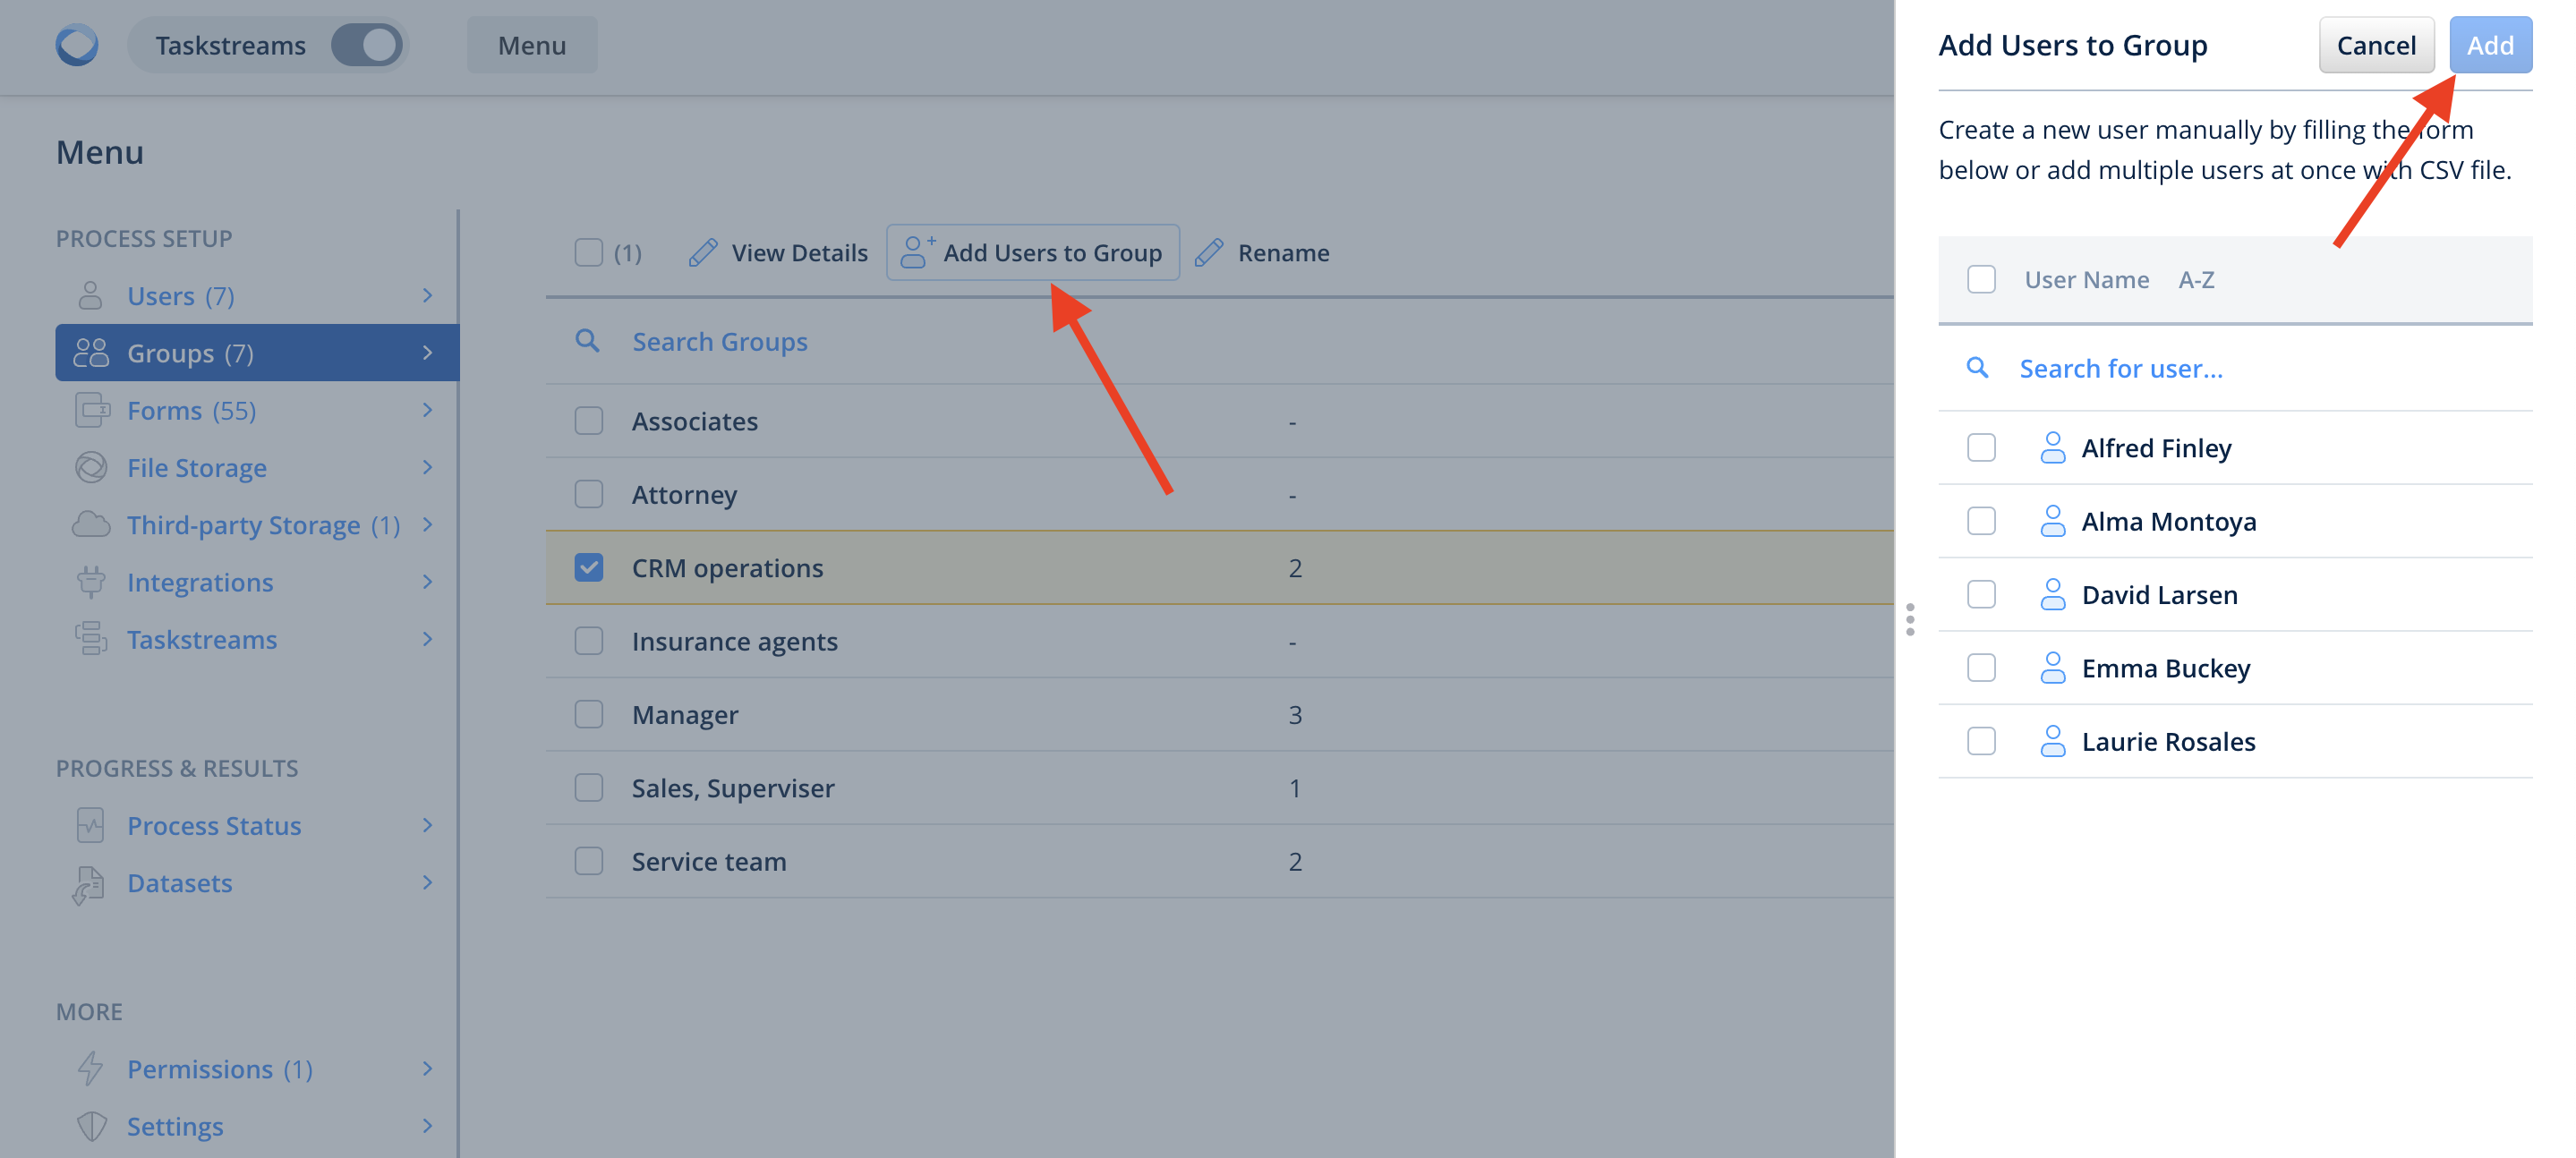
2. From the Groups section to an existing group:
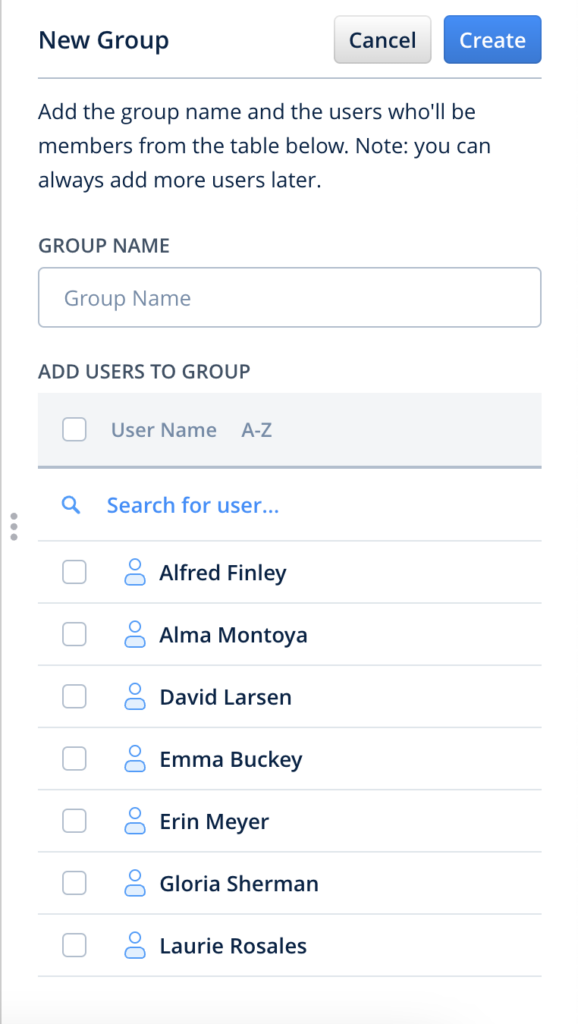
3. By adding the users to a new group that is being created. Navigate to Menu -> Groups -> New Group:
Fluix Cloud Storage makes it easy for you to organize and manage documents in your organization. You can use Fluix Cloud Storage as a destination place for the documents submitted through Taskstreams. Additionally, you can use it for storing fillable PDF files that can be added to Tasks as template forms.
Fluix storage is managed directly via Fluix Admin Portal under the Menu section.
How to Manage Documents
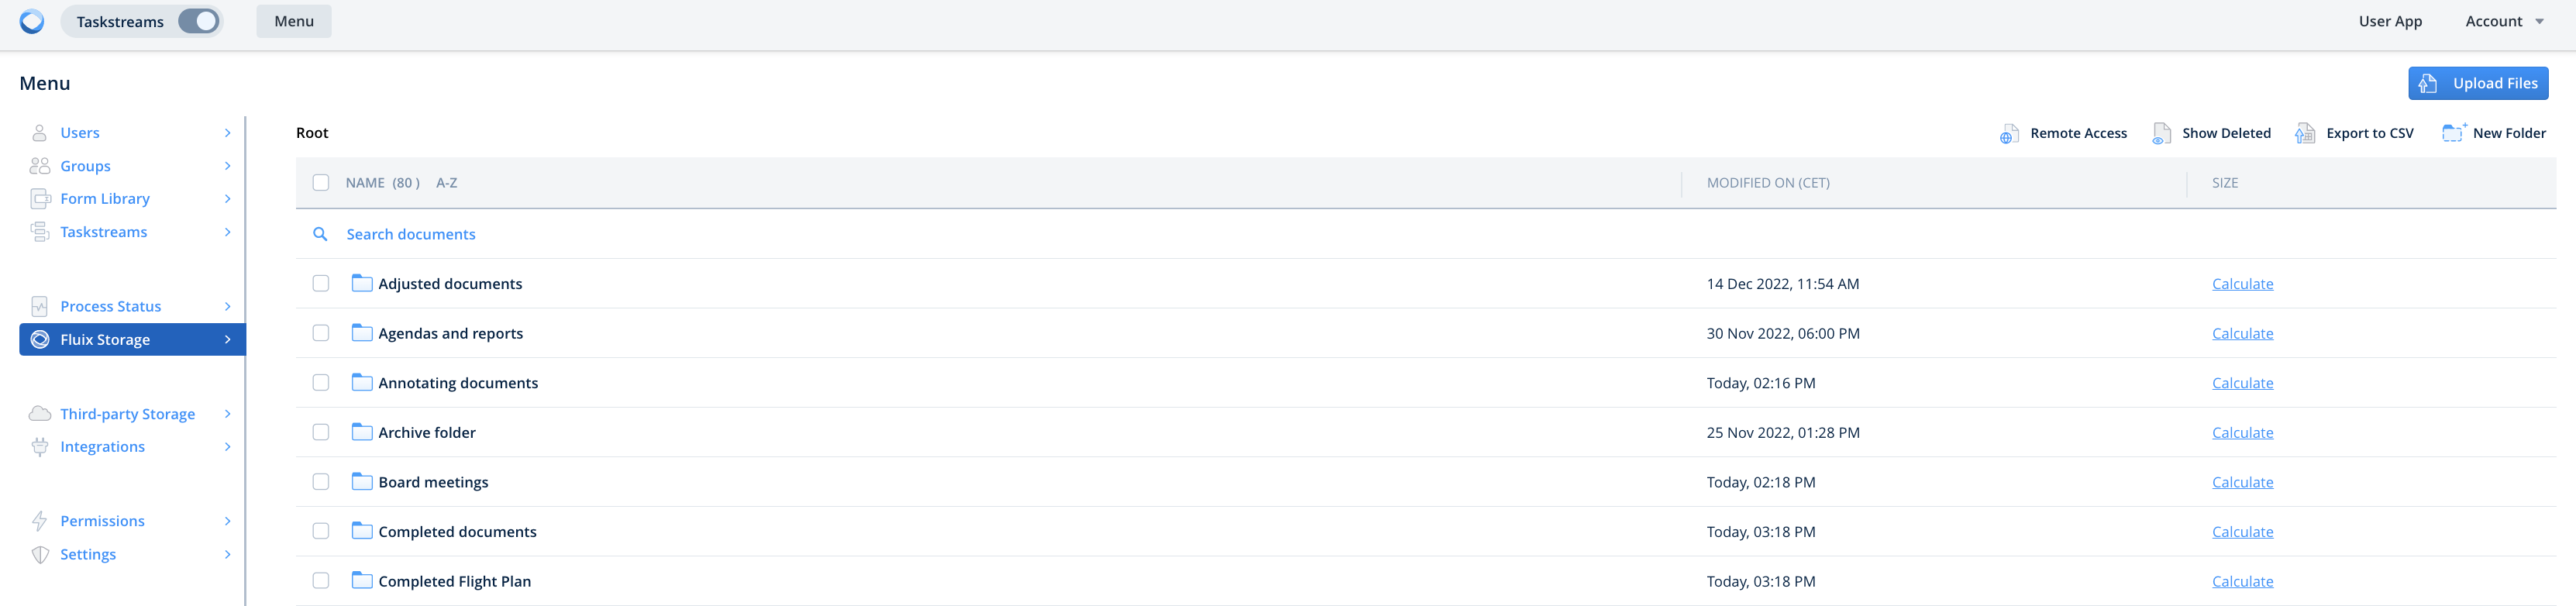
To build your folder structure, create different folders with the New Folder button in the top right corner. Please note that upon folder renaming, its modification date will be changed accordingly along with the modification date of other folders and files inside the renamed folder.
In case you need to upload your own files to one of the folders to use it further in the Taskstreams, open the necessary folder and click on the Upload Files button in the top right corner, or simply drag & drop them from your computer.
The maximum allowed file size is 400MB.
To copy or move the existing document to another folder, select the document, click the Copy or Move button depending on your choice, and select the necessary folder. Please note that you may copy the document to several folders at once.
To track the changes that were made to this document, select the necessary one and click the History button. Version history will allow you to see by whom and when the changes were implemented and review or download this version of the document.
In case you need to analyze your Fluix storage and see the size of all the files in folders, you may use the Export to CSV button. The list containing all the folder paths, the number, and the size of the files will be downloaded as a CSV file to your computer.
How to Restore Deleted Documents
Click on the Show Deleted button to see the documents that were deleted either by the admin or the user. The deleted documents will appear in the list marked Deleted. To restore the deleted document, select it and click Restore. You can also delete it permanently by clicking the Delete Permanently button:
The deleted documents are stored on the Amazon servers for a number of days, configured in the Security Settings of your account (under the Menu section). By default, the deleted documents are stored for 365 days.
Caution: permanently deleted documents can not be restored.
Access to Storage
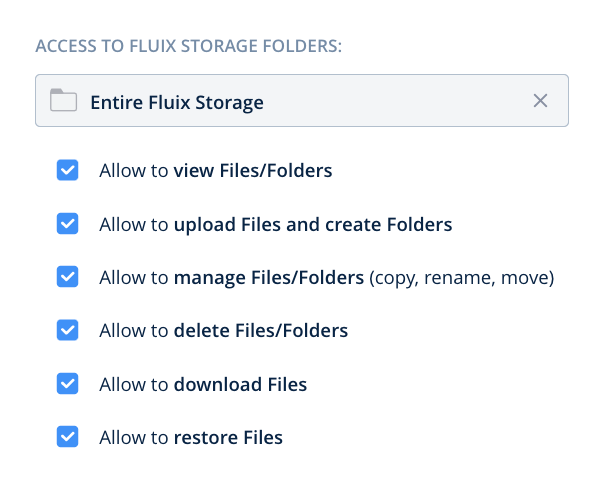
Access to Fluix Storage is regulated in the Permissions tab under the Menu section. Simply add a New Role -> select Storage Manager from the list -> select a user -> choose whether the user will have access to the entire storage or just particular folders or subfolder, also check the actions the user will be authorized to take, and save changes.
In case you would like to provide the user with access to the subfolder, simply click on Add Storage Folder button and select the folder which contains the respective subfolder.
The users provided with the rights above will be able to access Fluix Storage by logging into the Fluix browser version at fluix.io.
Pricing
Storage space comes as a part of our solution and is included in the Core plan — 10 GB. Used space can be checked in the Third-party Storage tab under the Menu section. You can get more space if needed, just drop us a line.
Feel free to contact us at support@fluix.io if you have any questions.
Was this article helpful?
Thanks for your feedback!
Oops, something went wrong. Please, try again later.
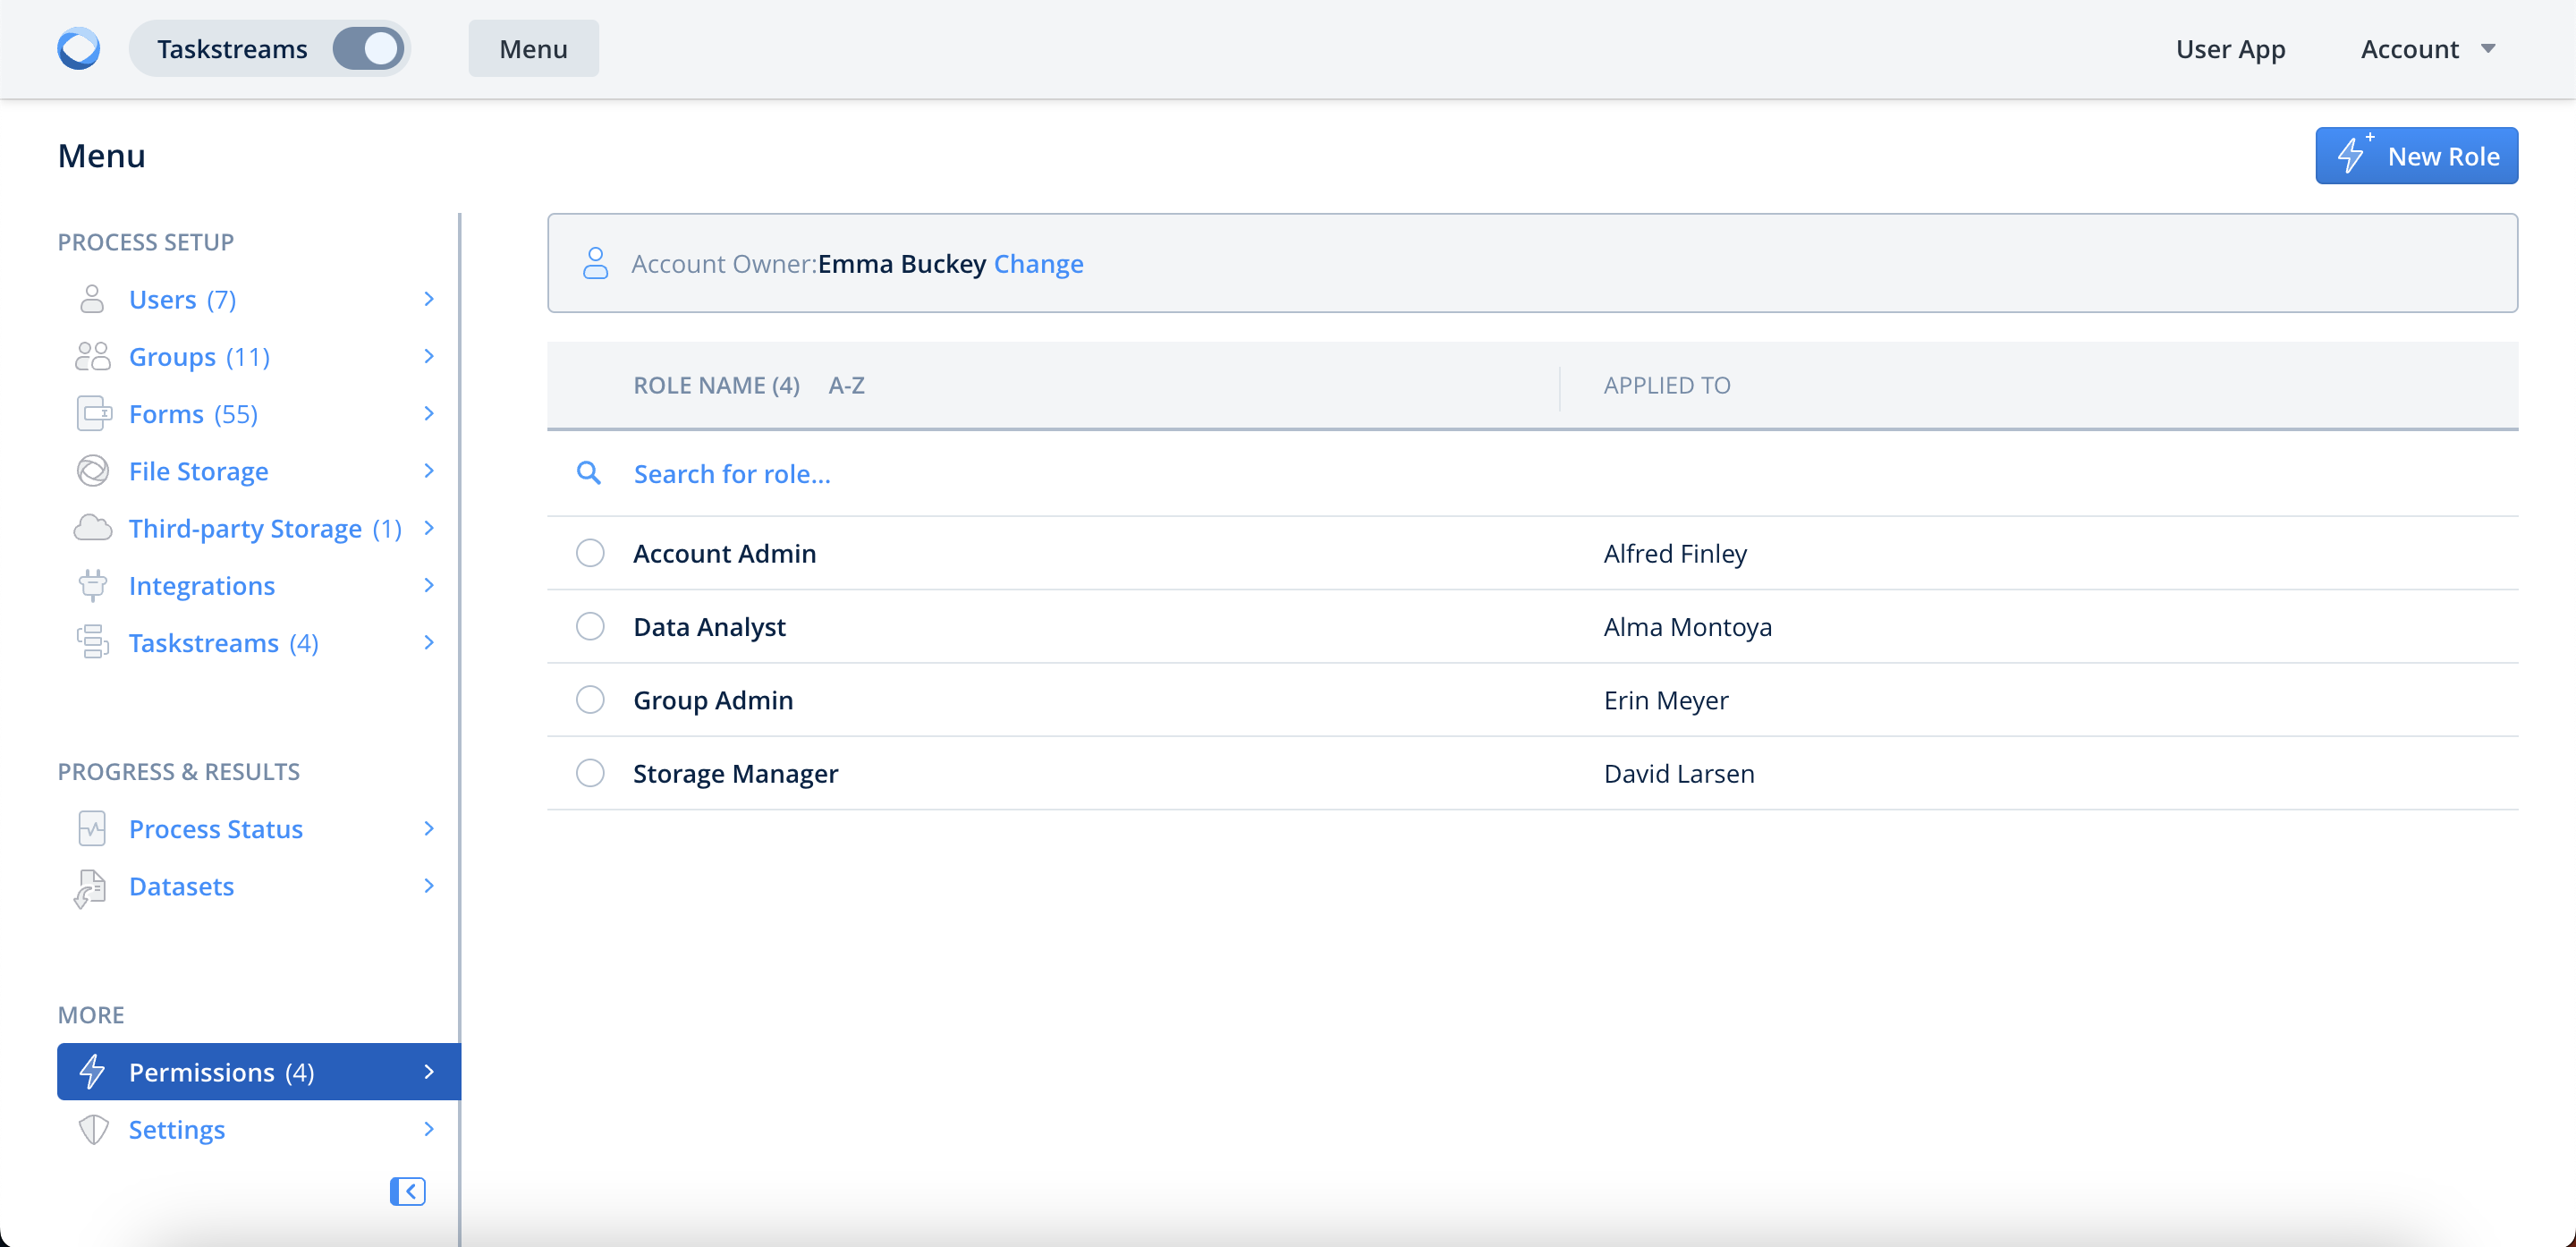
Permissions allow being very specific in providing your Fluix team members with the rights to access the Fluix Admin Portal and manage its specific components.
Permissions are managed on the Admin Portal under the Menu section:
Account Owner
On top of the section, you can see the Fluix Account Owner name, a person who registered the Fluix trial account. By default, the Account Owner has full access to all sections and data in the Fluix account.
In case the owner of your Fluix account has changed, reach out to your Customer Success Manager or support@fluix.io who will update the records for your account.
Account Admins
The Account Admins can be provided with the permission to access specific sections or components of the Admin portal (let’s say, access to Billing or being allowed to add new users to the account) or given full access same as an Account Owner.
The Account Owner and Admins with access to Roles can grant roles to the users. By providing a user with any role, you make him an Admin. There is no limitation on the number of admins in Fluix, but each user can be granted one role only. After doing that, you will not see this user’s name in the list upon creating or modifying a role.
Let’s see how to create an Admin role, edit, duplicate, and delete it. To proceed, please go to the Permission tab under the Setup section of the Admin Portal.
How to Configure and Manage Permissions
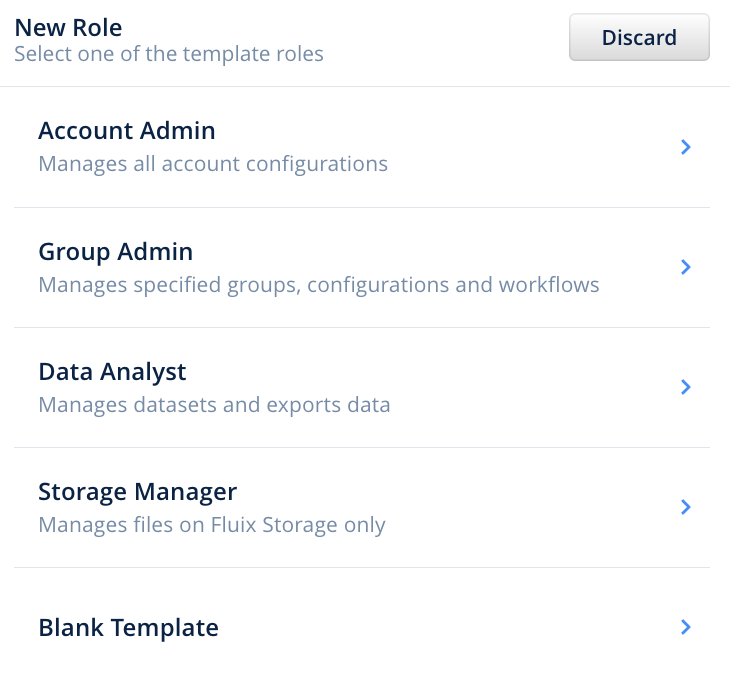
Step 1. Click on the New Role button and select a template from the list or create a custom role from scratch by selecting a Blank Template.
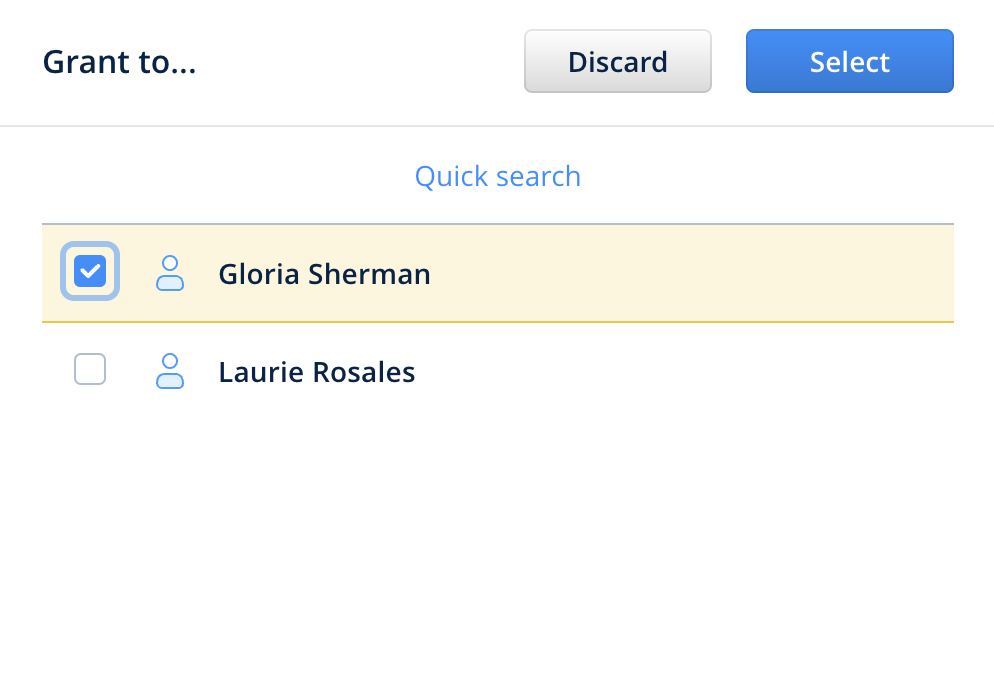
Step 2. Select users to whom the role will be applied. You can choose 1 or multiple users at once.
Step 3. Give a role name in the top left corner.
Step 4. Grant access rights. Depending on the role you have in mind, you can select the areas in Admin Portal you want your Admins to have access to.
Global Permissions: This section gives access to the main areas in Admin Portal such as Form Builder, Billing, Security settings, Permissions, Third-party Storages, and GDPR.
Access to Fluix Storage: If you use Fluix Storage, you can give users access to either the full storage or just certain folders:
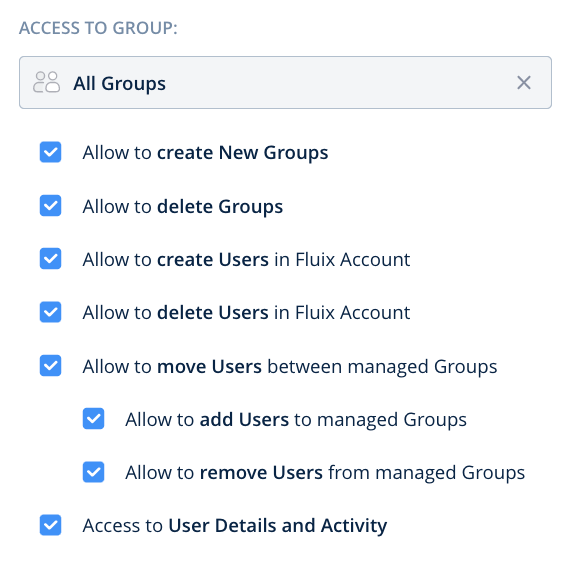
Access to Groups: This section provides control over all or selected Groups of users that your admins can manage.
Step 5. Save and apply changes.
How to Edit, Duplicate and Delete Permissions
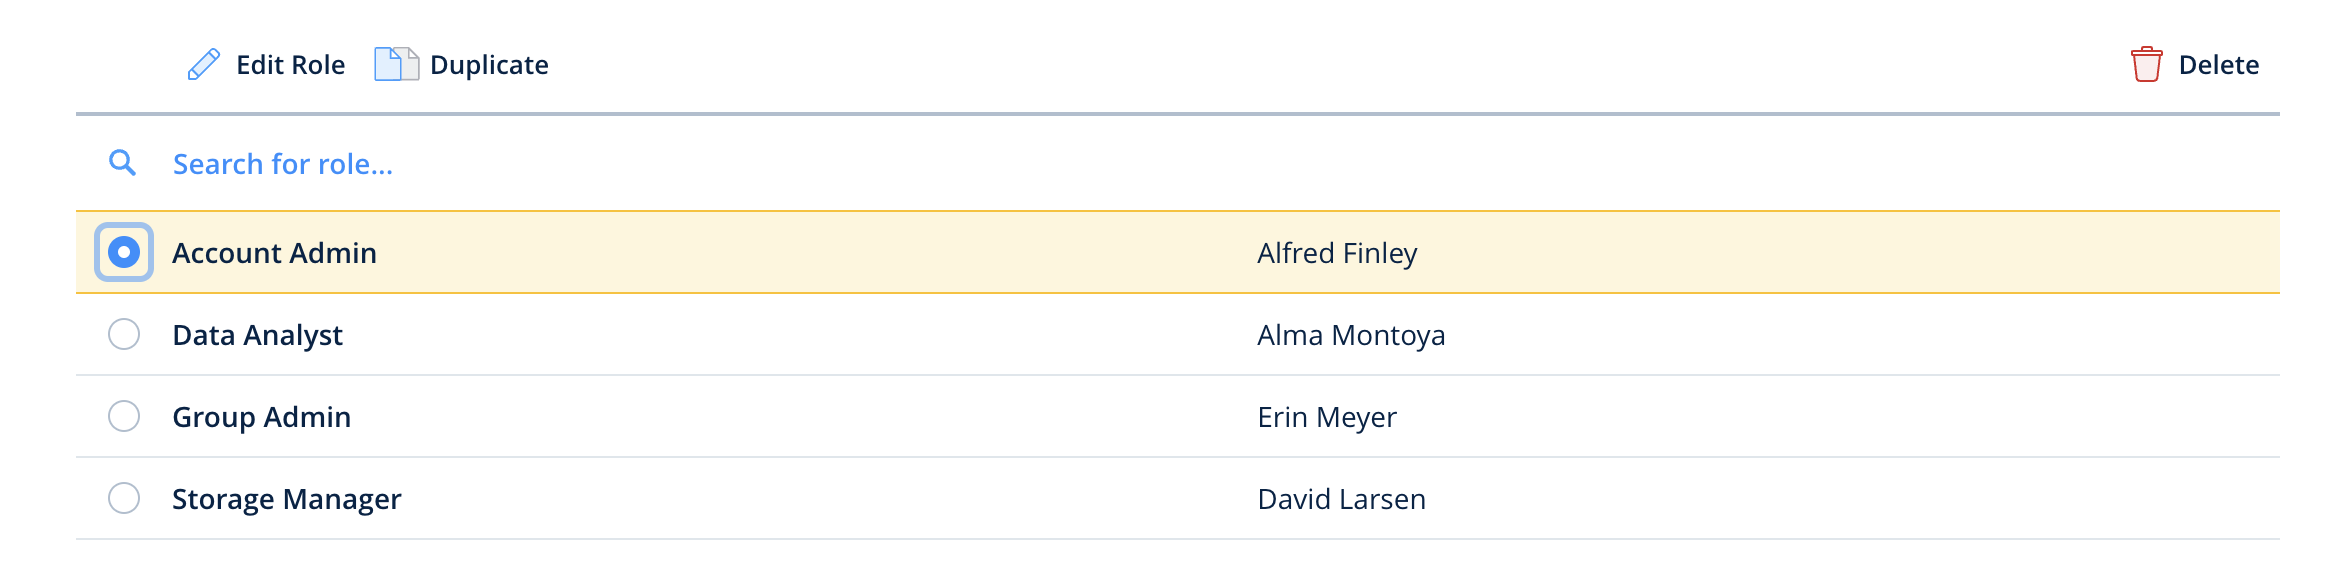
To edit a role, select it and click Edit Role:
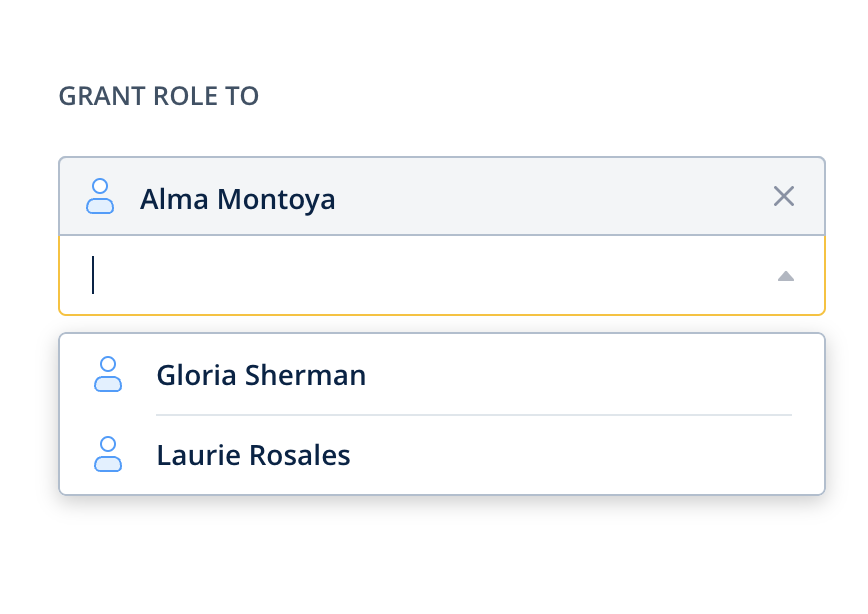
To add a user to an existing role, open a role and select one on the left-hand side under Add User:
To duplicate a role with the same list of permissions, select it and click Duplicate Role. A new role will be created with the clone tab in the name. Rename it and add users to finish the setup.
To delete a role, select it and click Delete.
In case you have any questions on setup, contact our team at support@fluix.io and we’ll be happy to help you.
Was this article helpful?
Thanks for your feedback!
Oops, something went wrong. Please, try again later.
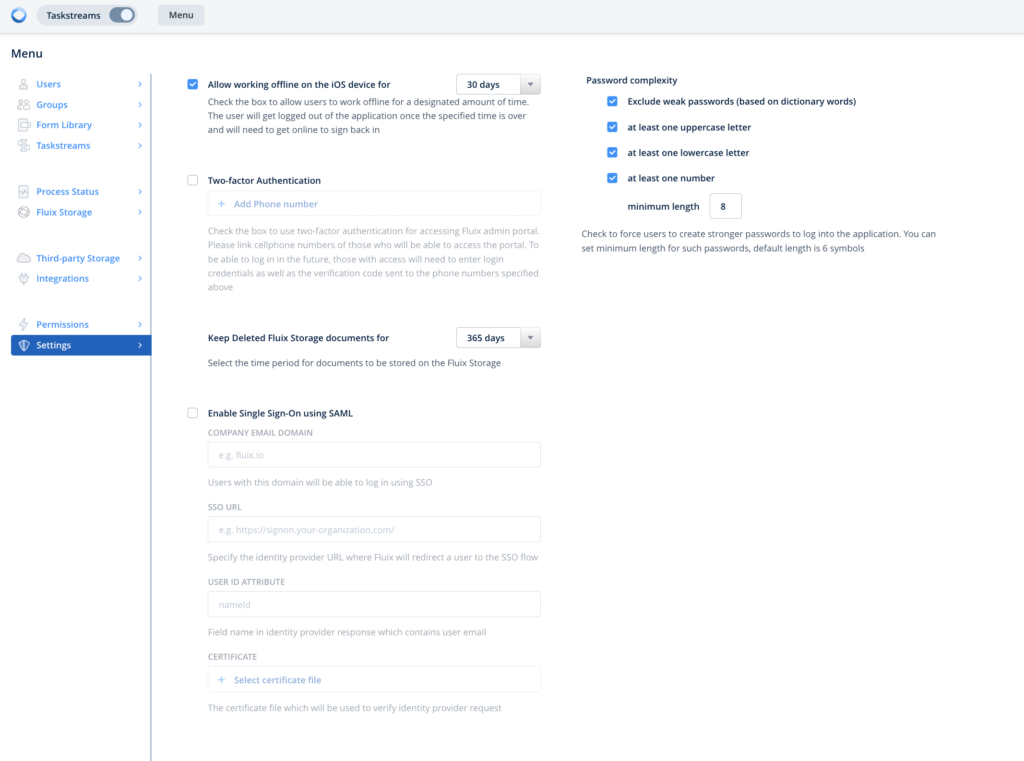
To manage access to the account, please follow the Security tab under the Menu section of the Admin Portal:
Allow working offline for the iOS device — this feature allows you to determine whether your end users can work on their mobile devices offline. If activated, users can open the app with no Internet connection and access documents they’ve previously synced. The setting allows working offline for the number of days you determine, past which users will be logged out of the application and will need to connect to the Internet to sign back in.
Two-factor Authentication — an extra level of security for Fluix account admins. If enabled, Admins will be prompted to enter a login, password, and unique pin that will be sent to a cell phone each time the Admin is trying to access the Admin Portal.
Keep Deleted Fluix storage documents for — the amount of time during which you’d like Fluix to keep documents that were deleted from Fluix cloud storage on our servers.
Password complexity — allows you to define the level of complexity of passwords that end users choose to log into the app.
Enable Single Sign-On (SSO) using SAML — allows users to use one set of login credentials to securely access multiple applications. To enable SSO for your account, contact your Success Manager or write to us at support@fluix.io.
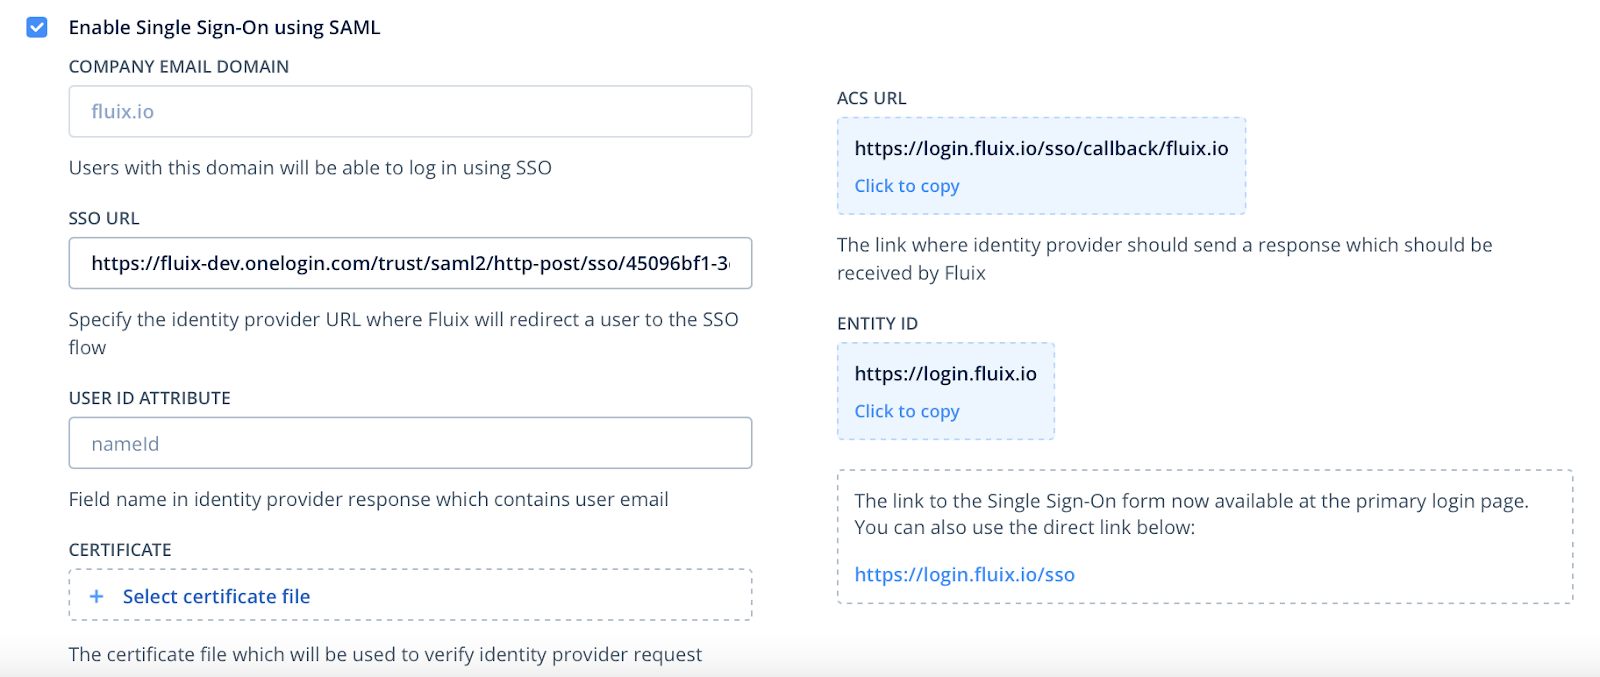
After SSO functionality is being enabled for your account, the check box for selecting SSO will become active, and the fields will become fillable:
Company email domain — the domain name of the sign-in URL which is used for logging in using SSO.
SSO URL — the identity provider URL to which the user will be redirected from Fluix upon selecting the SSO authorization.
User ID Attribute — the field name in the response of the identity provider which contains the user email.
Certificate — certificate file which is used to verify the identity provider’s request.
On the right, you may find links that should be implemented in your SSO solution, such as ACS URL and Entity ID.
Once the changes are made, to save and implement them, click the Save changes button.
In case you have any questions on setup, contact our team at support@fluix.io and we’ll be happy to help you.
Was this article helpful?
Thanks for your feedback!
Oops, something went wrong. Please, try again later.
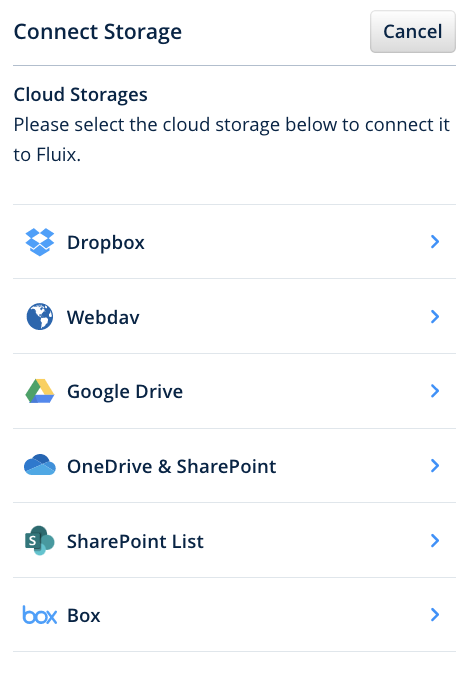
Fluix integrates with the following cloud storage providers:
Dropbox
WebDAV
Google Drive
Office 365 (OneDrive and SharePoint)
SharePoint List
Box
Select the required storage as a destination place for the documents submitted through Taskstreams. Additionally, you can use it for storing fillable PDF files that can be added to Tasks as template forms.
We encourage you to consider and evaluate Fluix Built-in Cloud Storage as your primary document repository. Please note, that it can be connected as a network drive to your Windows or Mac workstations, and easily manipulated just like any other folder.
To connect your company storage to Fluix taskstreams, please proceed to the Third-party Storage tab under the Menu section, click on the Connect Storage button and select the storage you want Fluix to grant access to.
You will see a sidebar with all the available storage providers to connect:
Upon choosing storage, you will be redirected to the storage authorization page to confirm granting access to Fluix.
Once done, navigate to the Taskstreams tab under the Menu section to create a task in which the files from your storage will be involved.
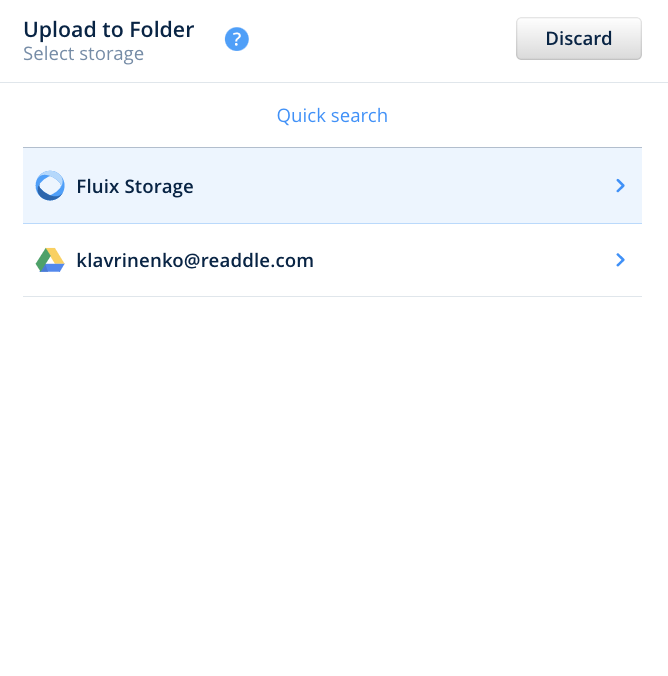
Connect storage to your taskstream directly while creating a new task. If the submit action Upload to Storage is selected, you will be prompted to choose the preferred storage from the ones that have been connected to your Fluix account earlier.
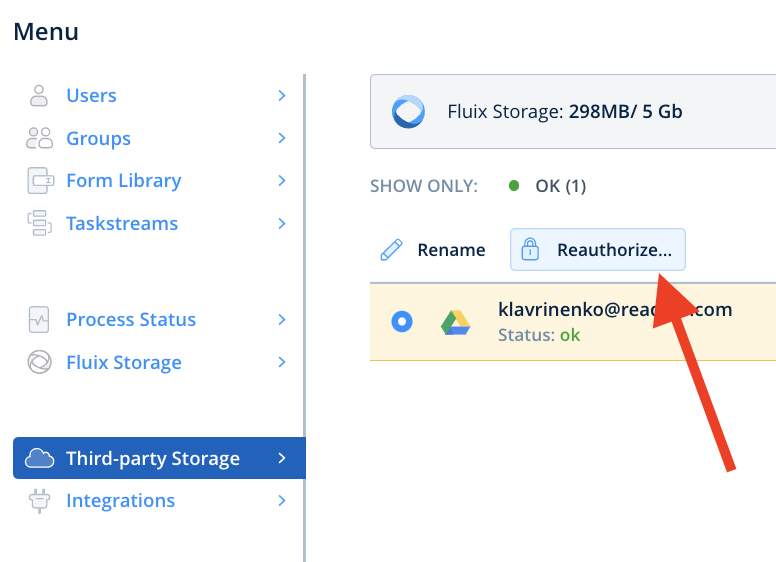
In the Third-party Storage tab, under the Menu section, you may find the list of already connected storages along with the names of all the tasks where they are being utilized, their current statuses, and the option of connecting new storage.
Once the storage is connected, it may have different statuses:
Not in use status means that the storage is not used in any taskstream yet. To proceed, you need to create a task and add storage as a source or destination for your files.
Reauthorization required status appears when the storage got disconnected from Fluix. To reauthorize, please select the storage and click on Reauthorize.
Error status shows that there are some problems with the connection between your storage and Fluix.
Fluix supports connecting to password-protected WebDAV resources over plain HTTP (insecure and not recommended) and HTTPS ( TLS 1.2). Basic, Digest, and NTLM authentication methods are supported.
When using TLS 1.2 encryption, we recommend using Basic authentication — TLS 1.2 guarantees secure transmission of credentials without the overhead that Digest and NTLM authentication create.
Feel free to contact us at support@fluix.io if you have any questions.
Was this article helpful?
Thanks for your feedback!
Oops, something went wrong. Please, try again later.
You can access your tasks in the Fluix app not only from iOS and Android devices but also from any web browser.
Note: Fluix web app is compatible with the majority of web browsers. For best performance, we recommend updating your browsers to the latest versions.
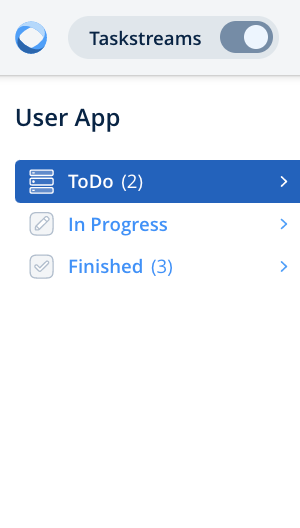
Log in with your Fluix credentials to fluix.io and start working on your tasks and forms. Once logged in, you’ll see the list of the following sections:
ToDo
In Progress
Finished
Document conflict: As Fluix can be accessed via a mobile device, and a web browser, it’s important to work with a file on one device at a time and make sure to save changes before switching to another platform. Otherwise, a conflict of documents might occur.
How to start working on tasks
To review and start working on a task and forms, simply tap on it.
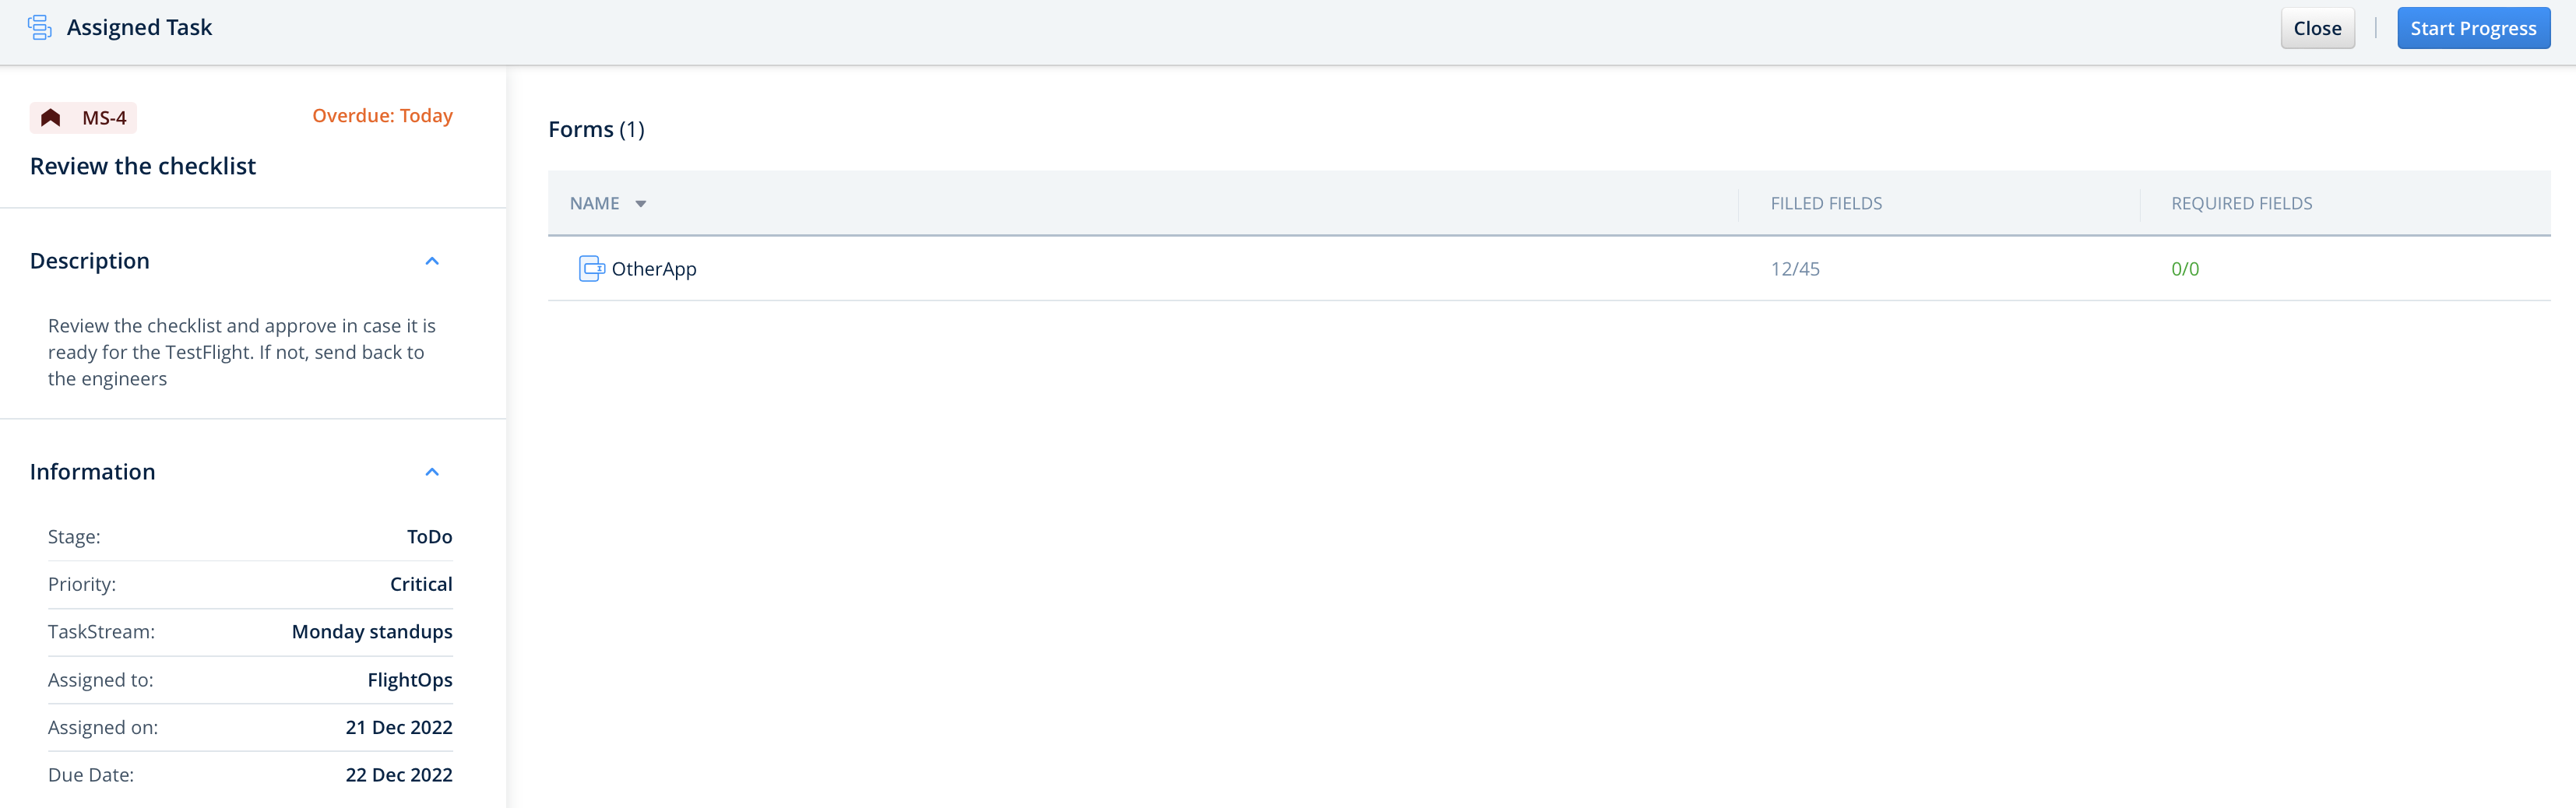
In the left sidebar, there is detailed information about the task, containing its full description, stage, priority, and taskstream name. If the task was taken from the Assigned tab, it will show to whom and when the task was assigned, as well as its due date if any.
To start working on a task or assign it to yourself (in case the task was initially assigned to the group in which you are a participant), tap the Start Progress button in the top right corner.
The following sections may be displayed in the ToDo tab, according to the setup:
Assigned
To Initiate
Assigned
You can be assigned a task as a member of a particular group or as a separate user only. In case the task was assigned to a group you are a member of, the name of the group will be displayed next to the Process ID.
Please note that once the task is assigned to a group and one of the group members assigns it to yourself, it will not be displayed in the ToDo tab.
The Assigned task may have a due date, which is pre-configured by the company’s account admin. When the task is overdue, it will be marked accordingly and show the number of overdue days.
To Initiate
Tasks in the To Initiate section are pre-configured by the admin and can be initiated by you at any time (even offline). You can initiate as many tasks as needed as these tasks are always available in the ToDo tab.
To move the task to the In Progress section, you should just start working on the task from the ToDo tab. The task you are working on will stay there until it’s finished.
The task can be deleted only in case it was initiated by you from the To Initiate section. Otherwise, it may be withdrawn from you by the company’s account admin.
Once tapping the Finish Task button, you might be provided with a list of alternative submit actions to choose from.
In the Finished tab, you may find the list of the last max 500 tasks you finished. It is impossible to make any further changes to the tasks at this stage, as all the tasks are displayed in the view mode only.
The list of tasks is sorted by the date and separated into sections according to the date the task was completed.
Feel free to contact us at support@fluix.io if you have any questions or comments.
Was this article helpful?
Thanks for your feedback!
Oops, something went wrong. Please, try again later.
You can make a copy of any existing Taskstream and then modify any task or submit action if needed. To do that, follow the steps below:
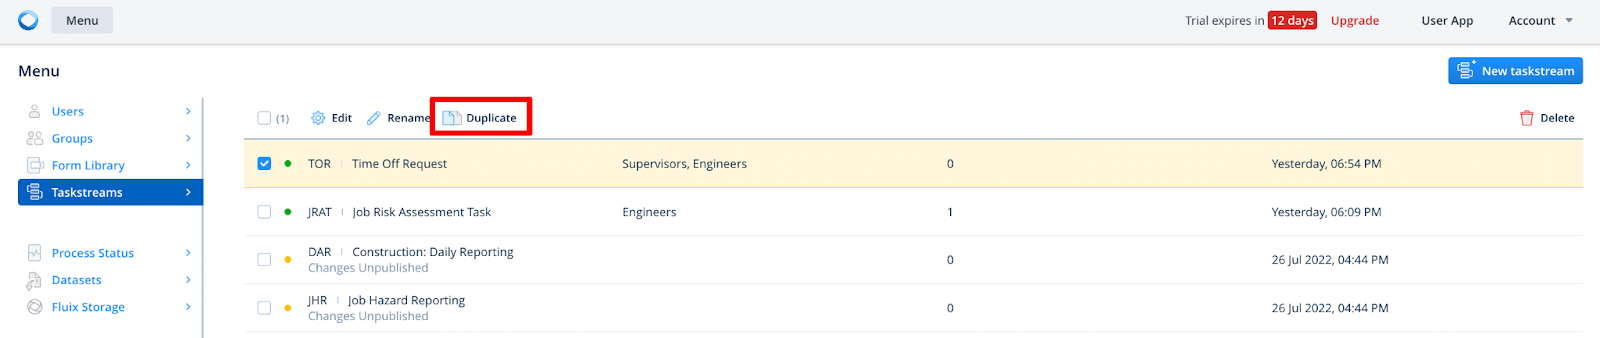
Step 1. Duplicate a Taskstream
Go to Menu > Taskstreams section of Fluix Admin Portal, select a Taskstream you want to copy, and click Duplicate:
Once a copy is created, start editing as needed. Below, you can find the guidelines on how to make changes in the duplicated Taskstream.
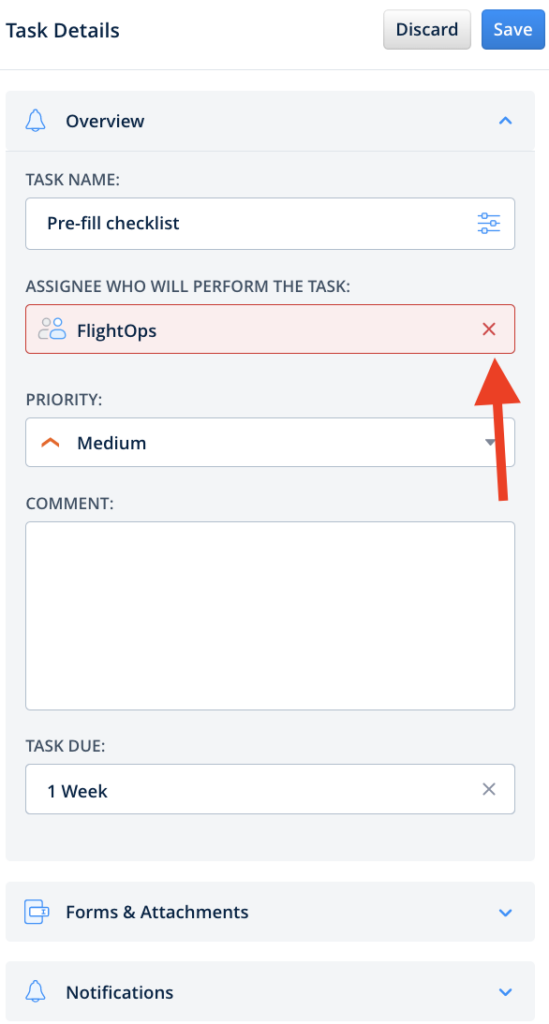
Step 2. Change Assignees
In order to change assignees, select the task and click on the cross icon next to the assignee’s name. To add a new assignee, click on Add Assignee and select a new assignee from a dropdown list:
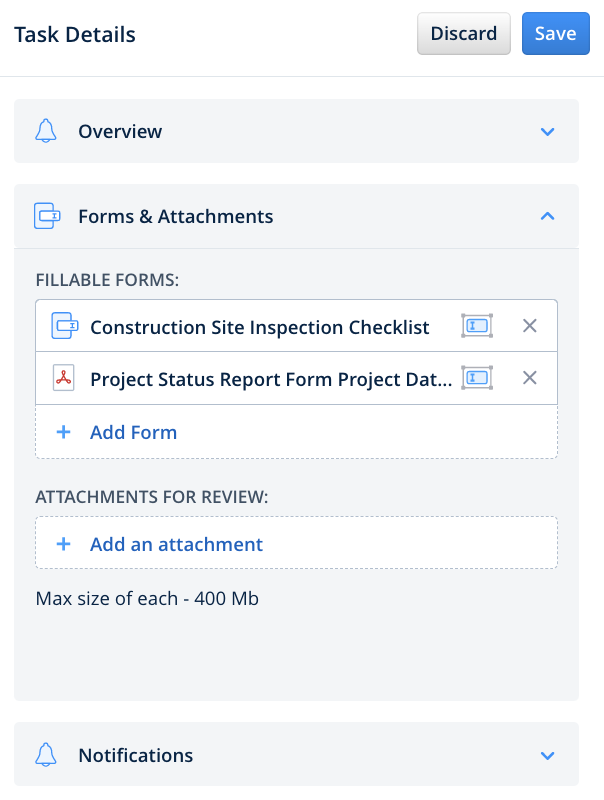
Step 3. Add or Replace Forms and Attachments
You can add new forms and attachments, or replace the current ones in the Forms tab. To replace them, click on the cross icon next to the form’s or attachment’s name. To add a new form or attachment, click on Add From or Add an attachment, select a source from where the form or the file should be taken, and the form or file itself.
Step 4. Modify Submit Actions
For the Upload to Storage submit action, please make sure to connect new storage or a folder. For the Submit by Email action, you may change the email address or add an additional one, or change the subject or text of the email. For the Share To option, you may edit the configuration of the integration in the Request Builder.
Step 5. Rename the Taskstream
Rename the Taskstream by clicking the Pencil icon in the top left corner of your screen and click the Save & Publish button to activate it.
Your new Taskstream is now ready for use.
In case of any questions feel free to contact us at support@fluix.io.
Was this article helpful?
Thanks for your feedback!
Oops, something went wrong. Please, try again later.
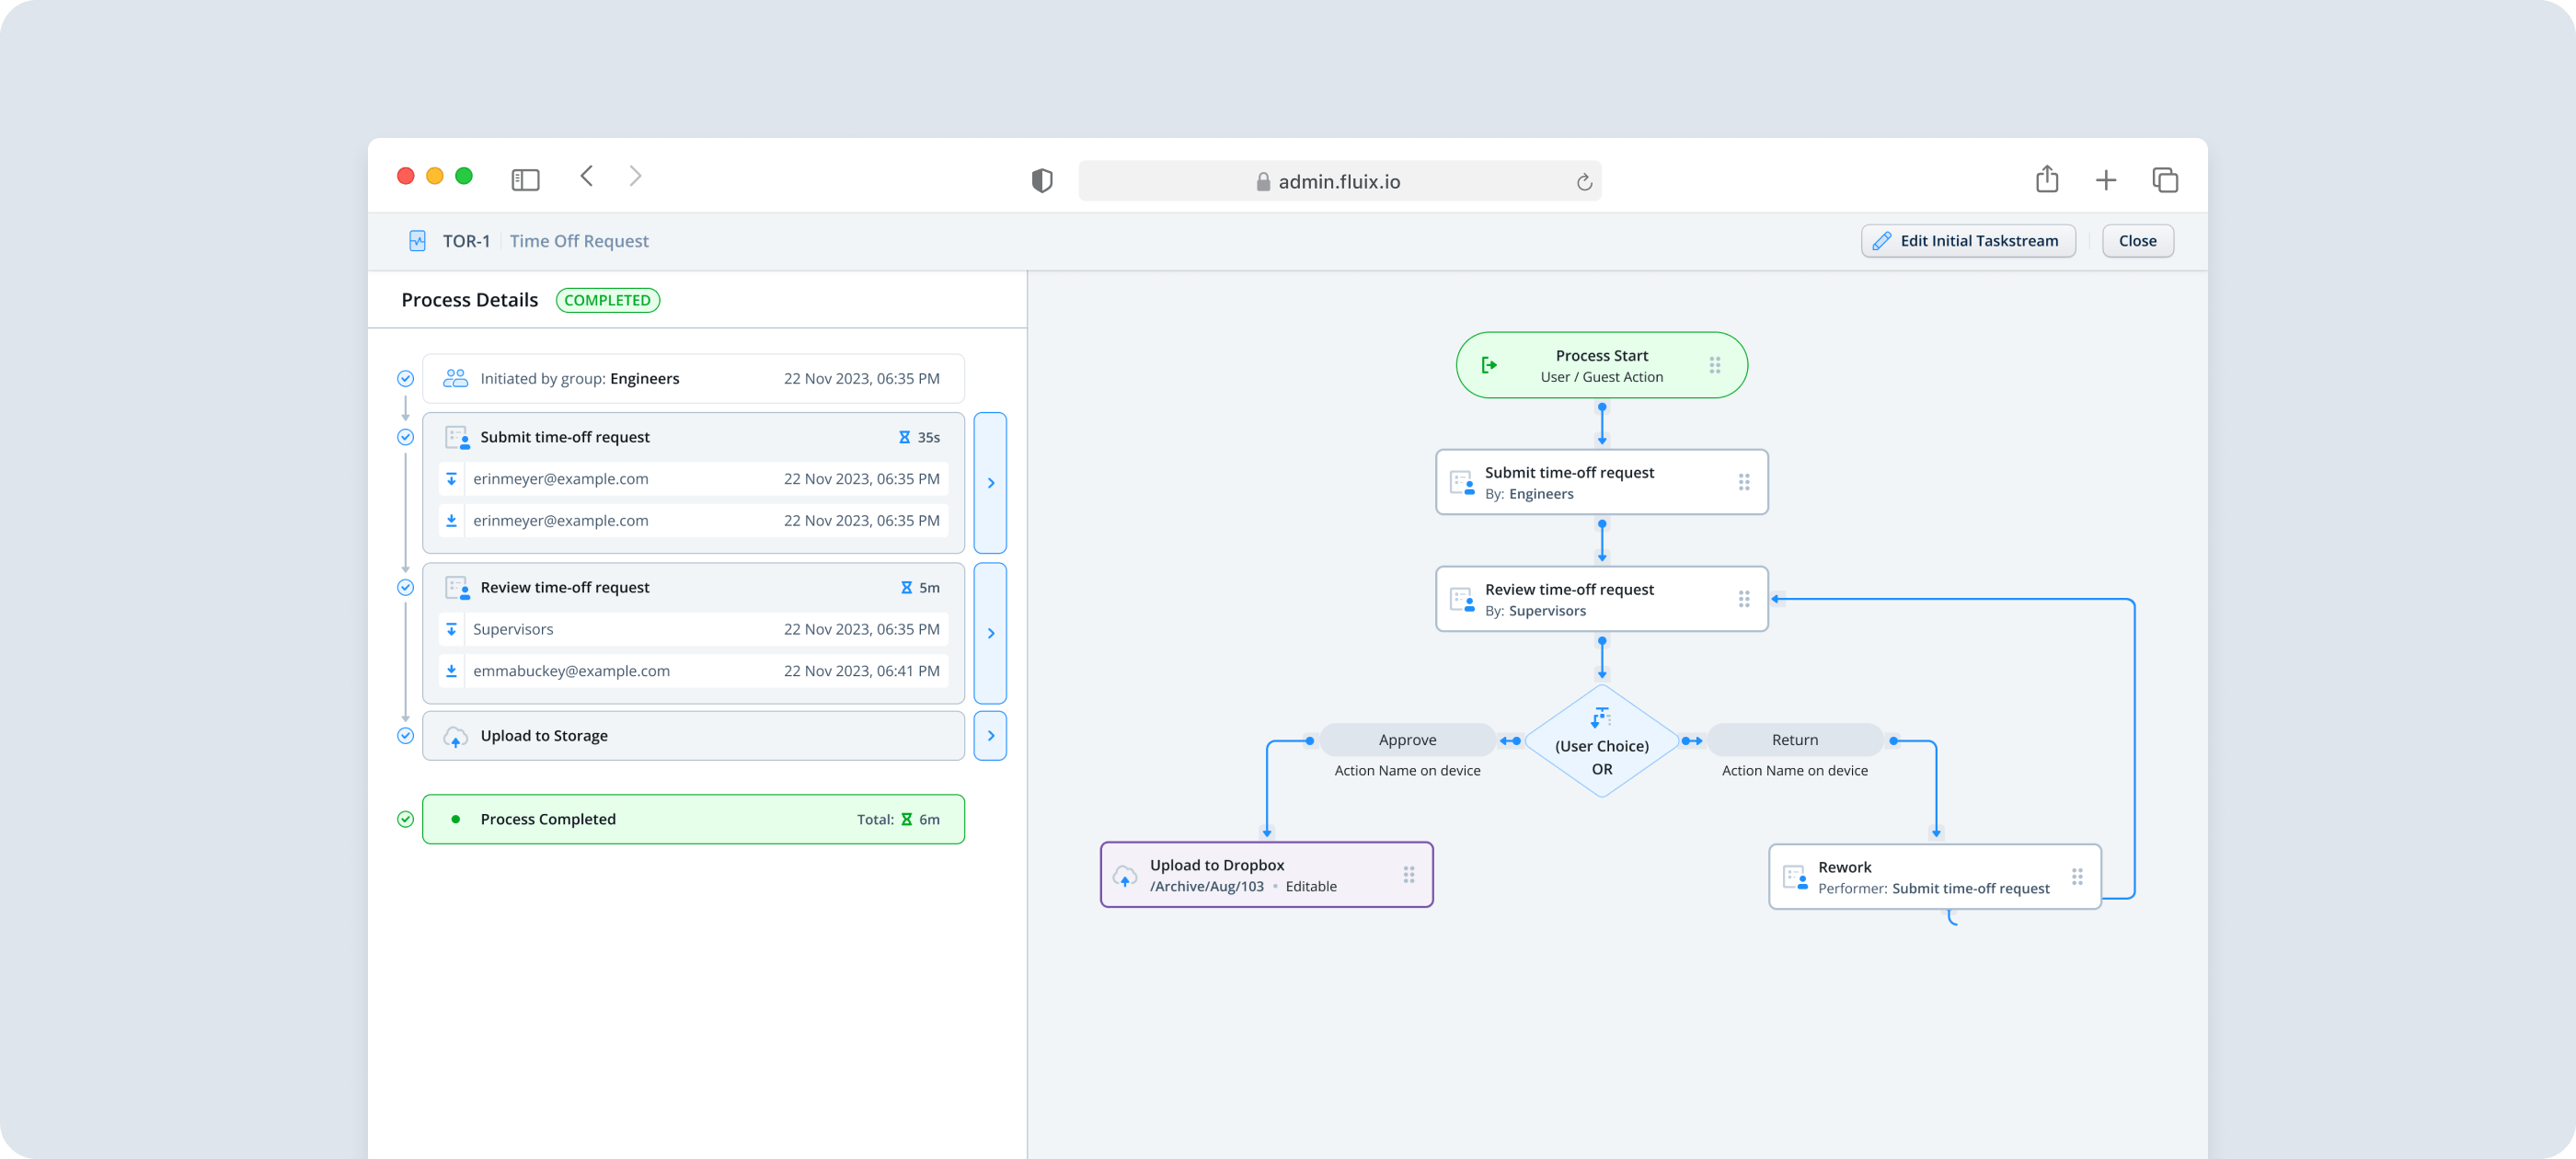
To check the details of the respective process, in the Process View, select the process that you would like to get more insights on and click Show Details.
There you will see the task’s history, track how much time taken by the group to complete the task, download the forms that were submitted within the task, troubleshoot, or take actions if needed. The Process Details block on the left side of the screen, by default, shows information from the beginning of the flow and the current status of this process. On the right side, you will see an overview of the whole Taskstream setup. In case you need to make any changes to the Taskstream, click Edit Initial Taskstream to open the Taskstream builder inedit mode.
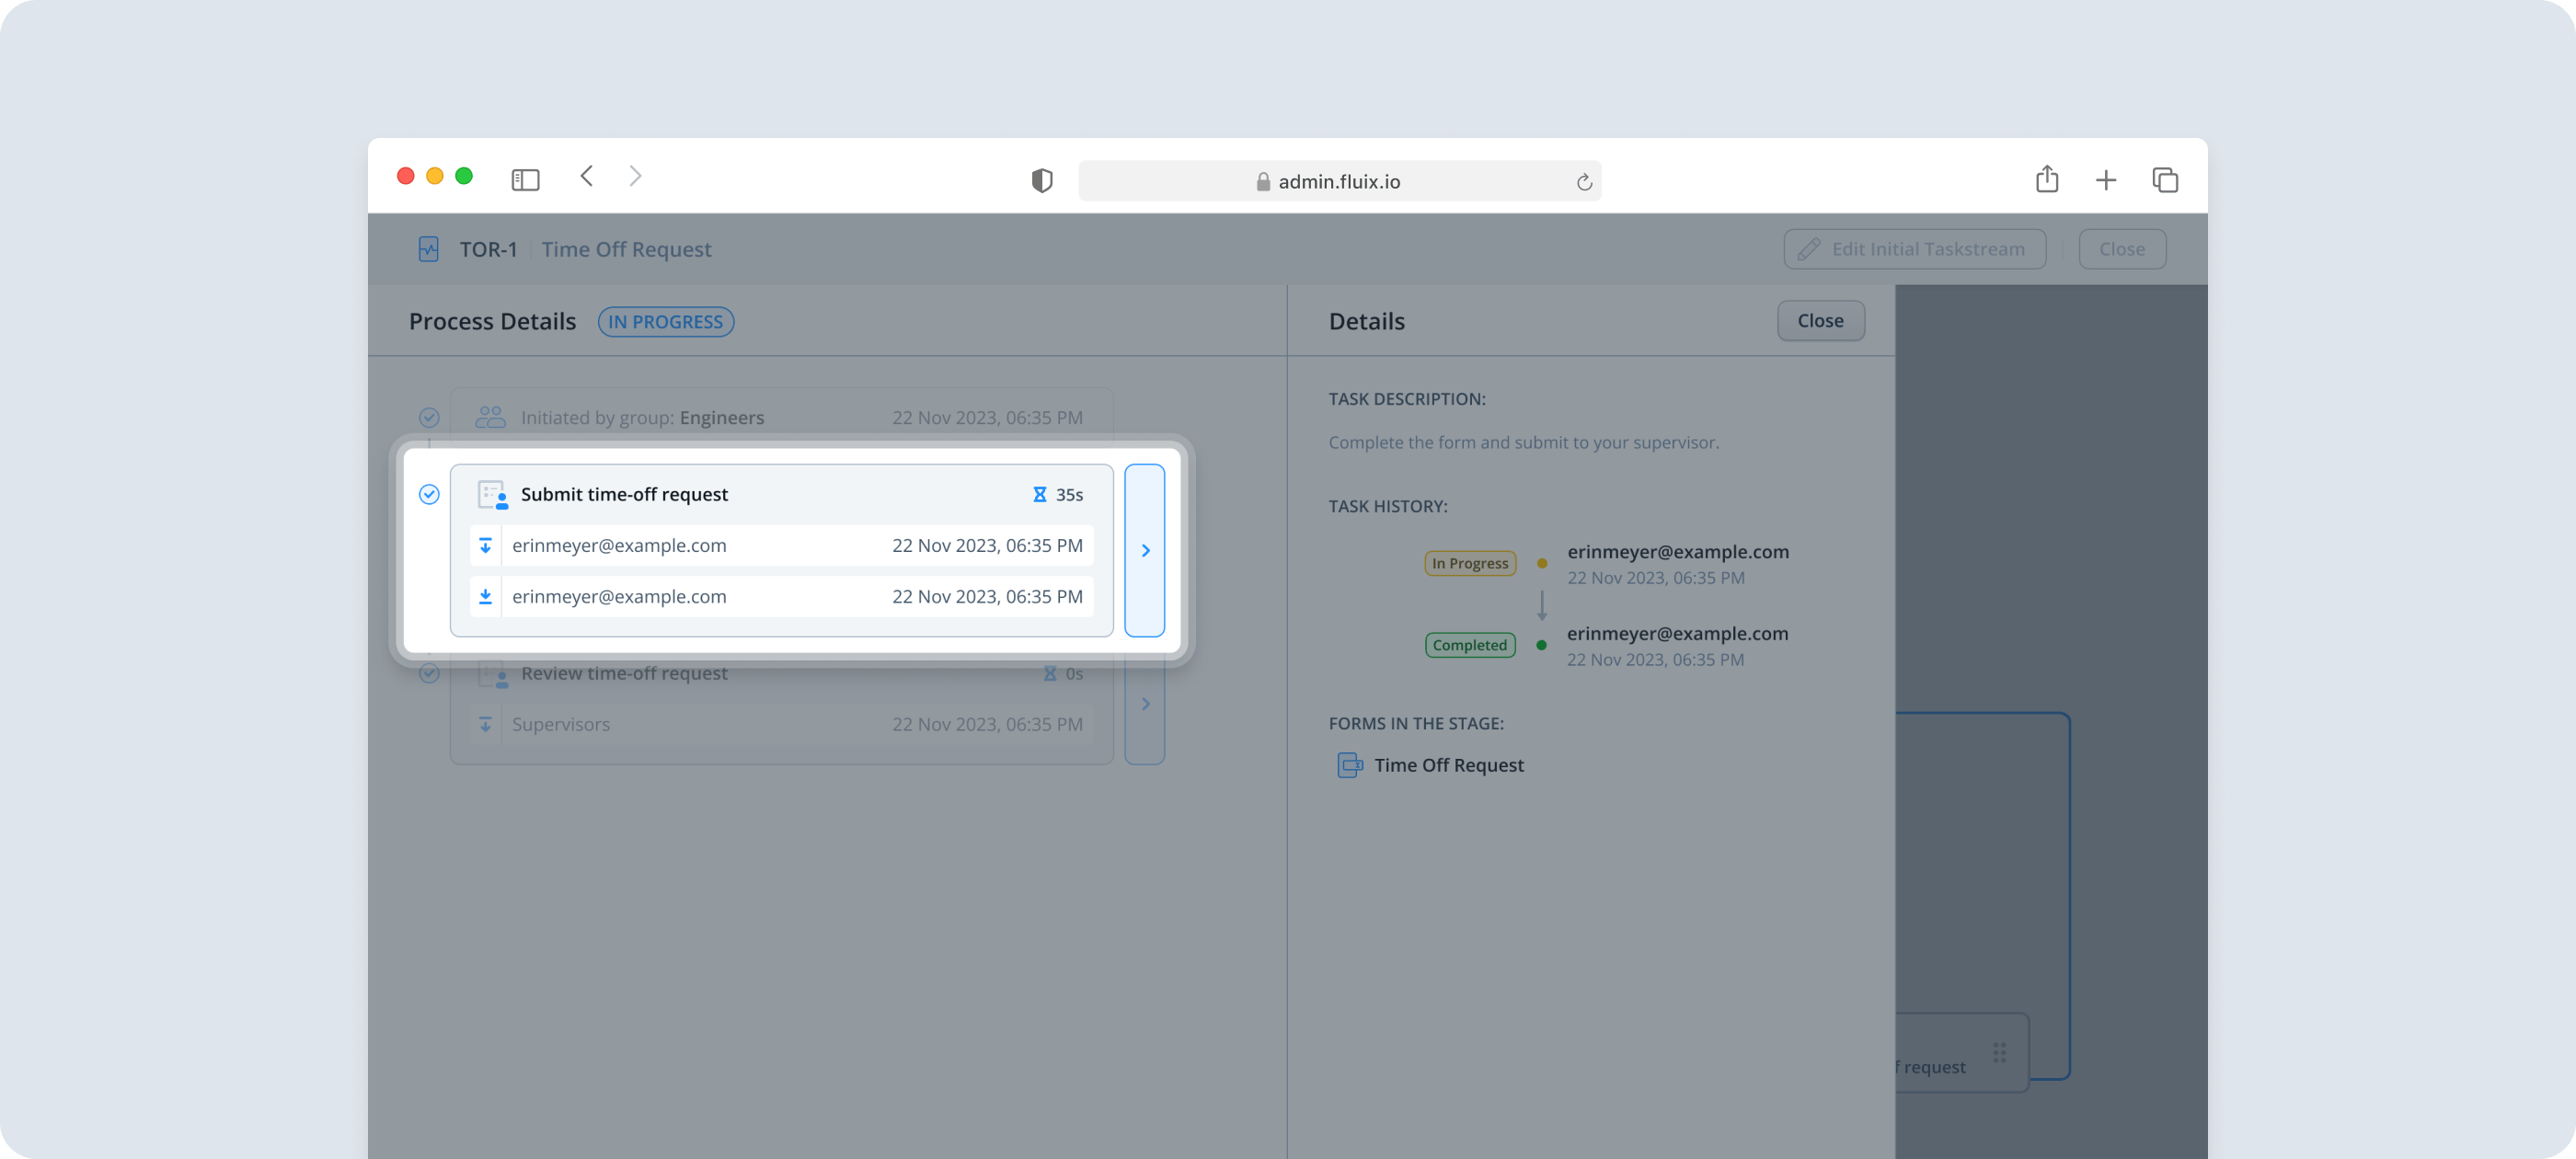
To check the history of the respective task, click on the blue arrow next to the task name.
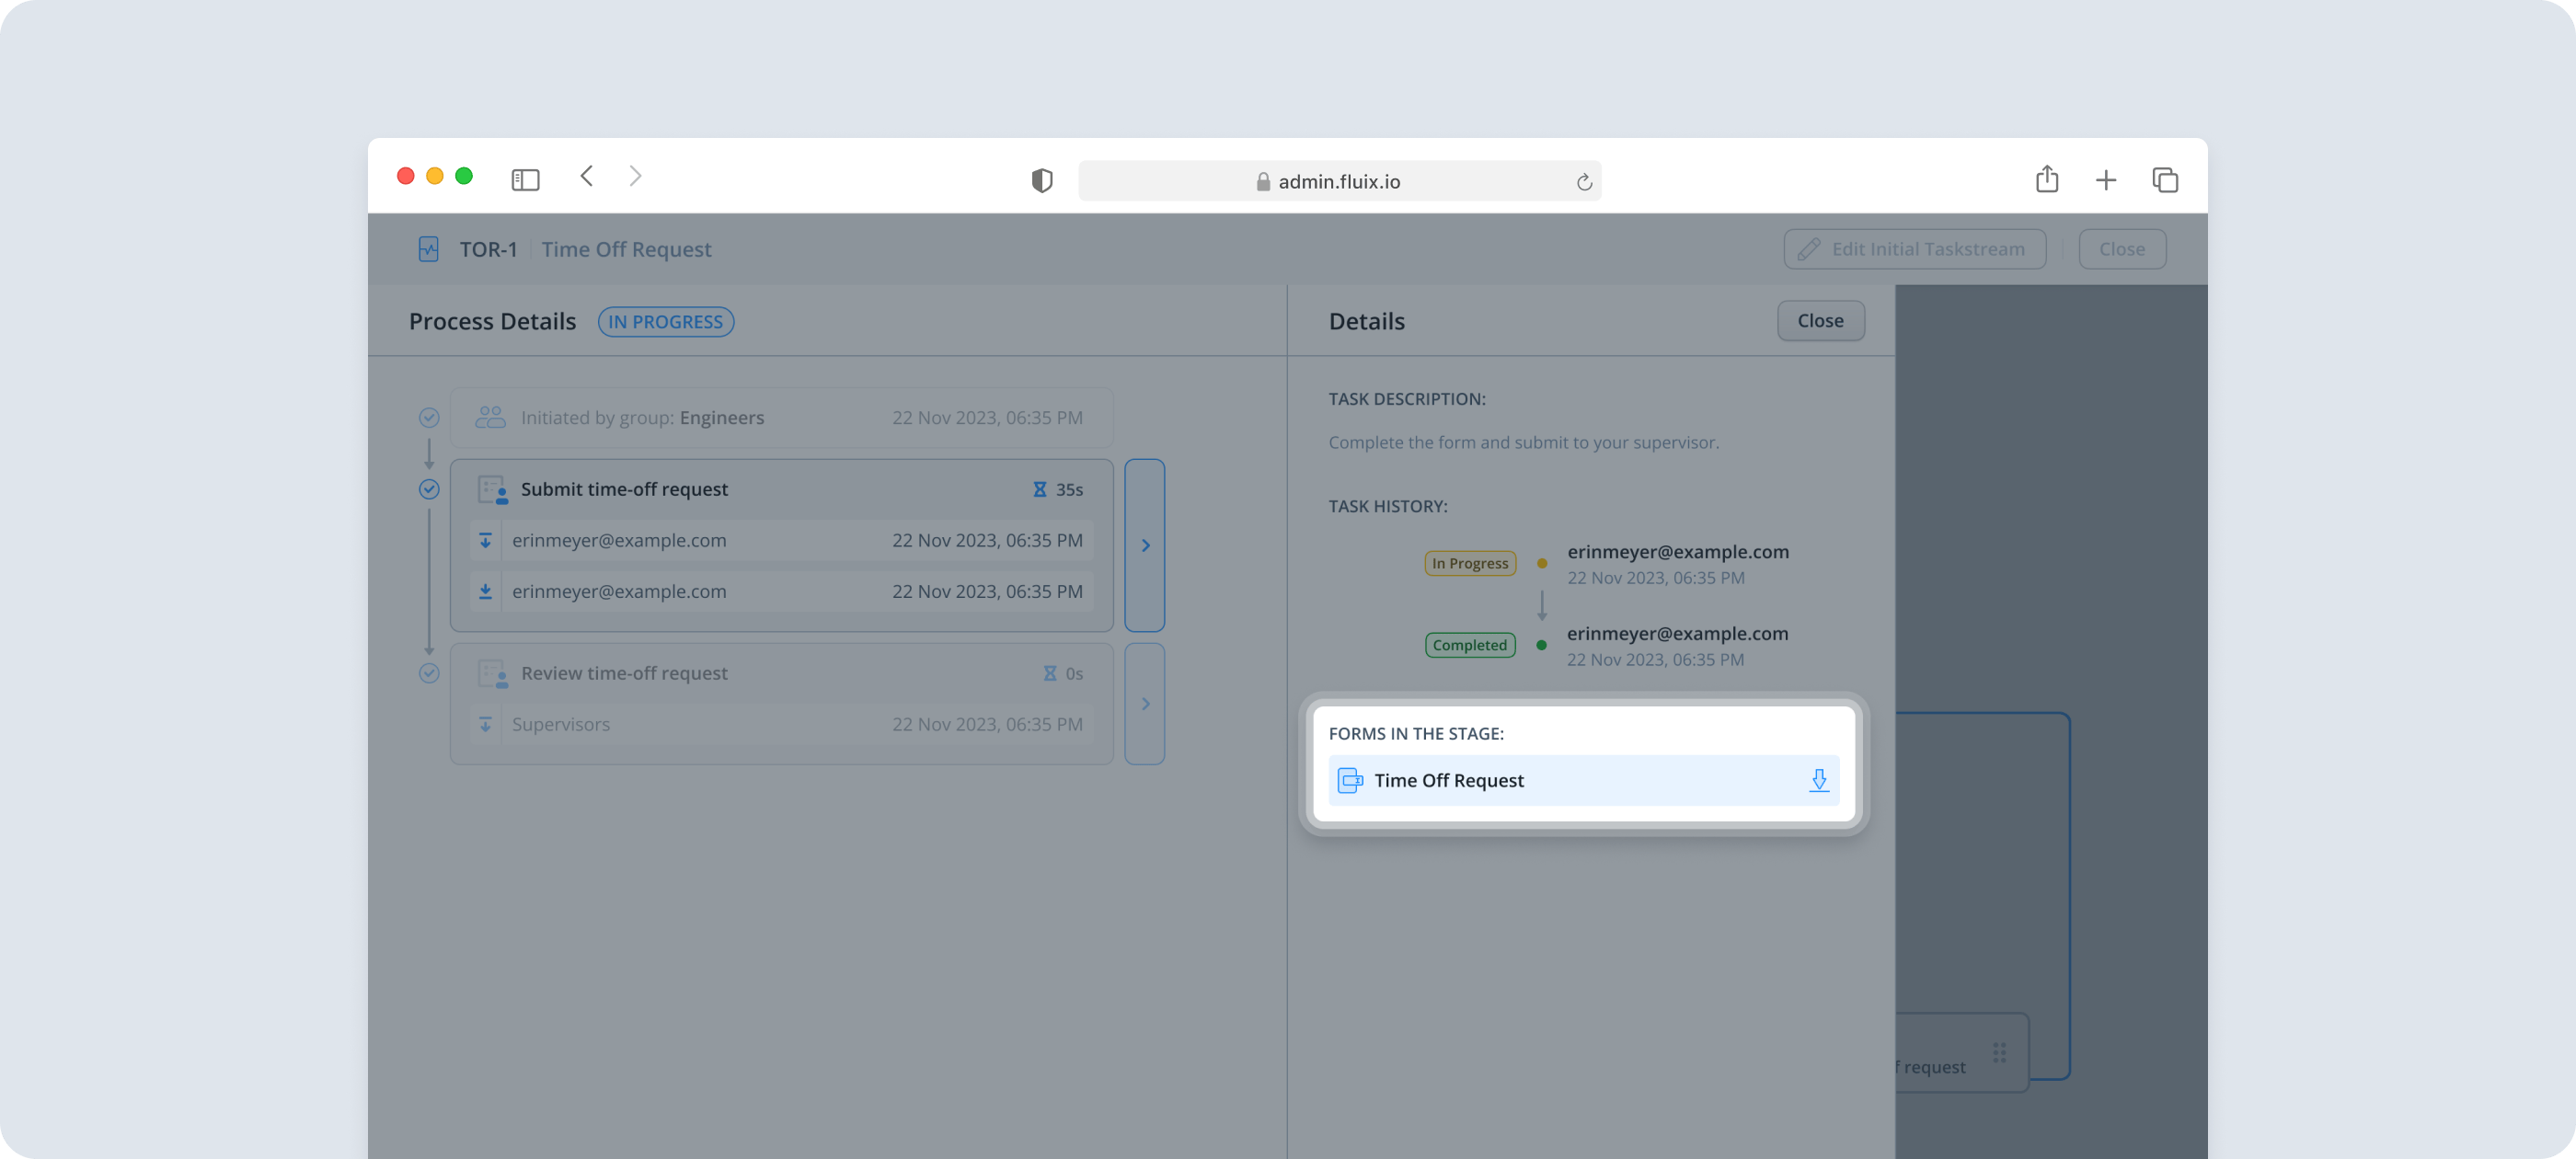
In the Details section, Fluix will mirror the Task Description from the Taskstream builder so that you have a complete overview of what the user who initiated the start of this process needed to do in this task. Task History section will show the email of the performer of the task. Forms in the Stage section store the version of the form that was submitted by the user or guest. In case you need to check the changes the user did in the form, click the Download icon.
Let’s check what the Details of the processes look like in the example of the two flows:
– successfully submitted;
– failed process.
Success Flow:
The user finished working on the respective task, hence it was successfully submitted to the path preconfigured in the submit action Upload to storage. Cloud storage will show the storage where the completed form will be stored: Fluix Storage or Third-party storage. The path section will show the directory where the submitted form will be stored. In the Attached forms section, you may download the form by clicking on the Download icon.
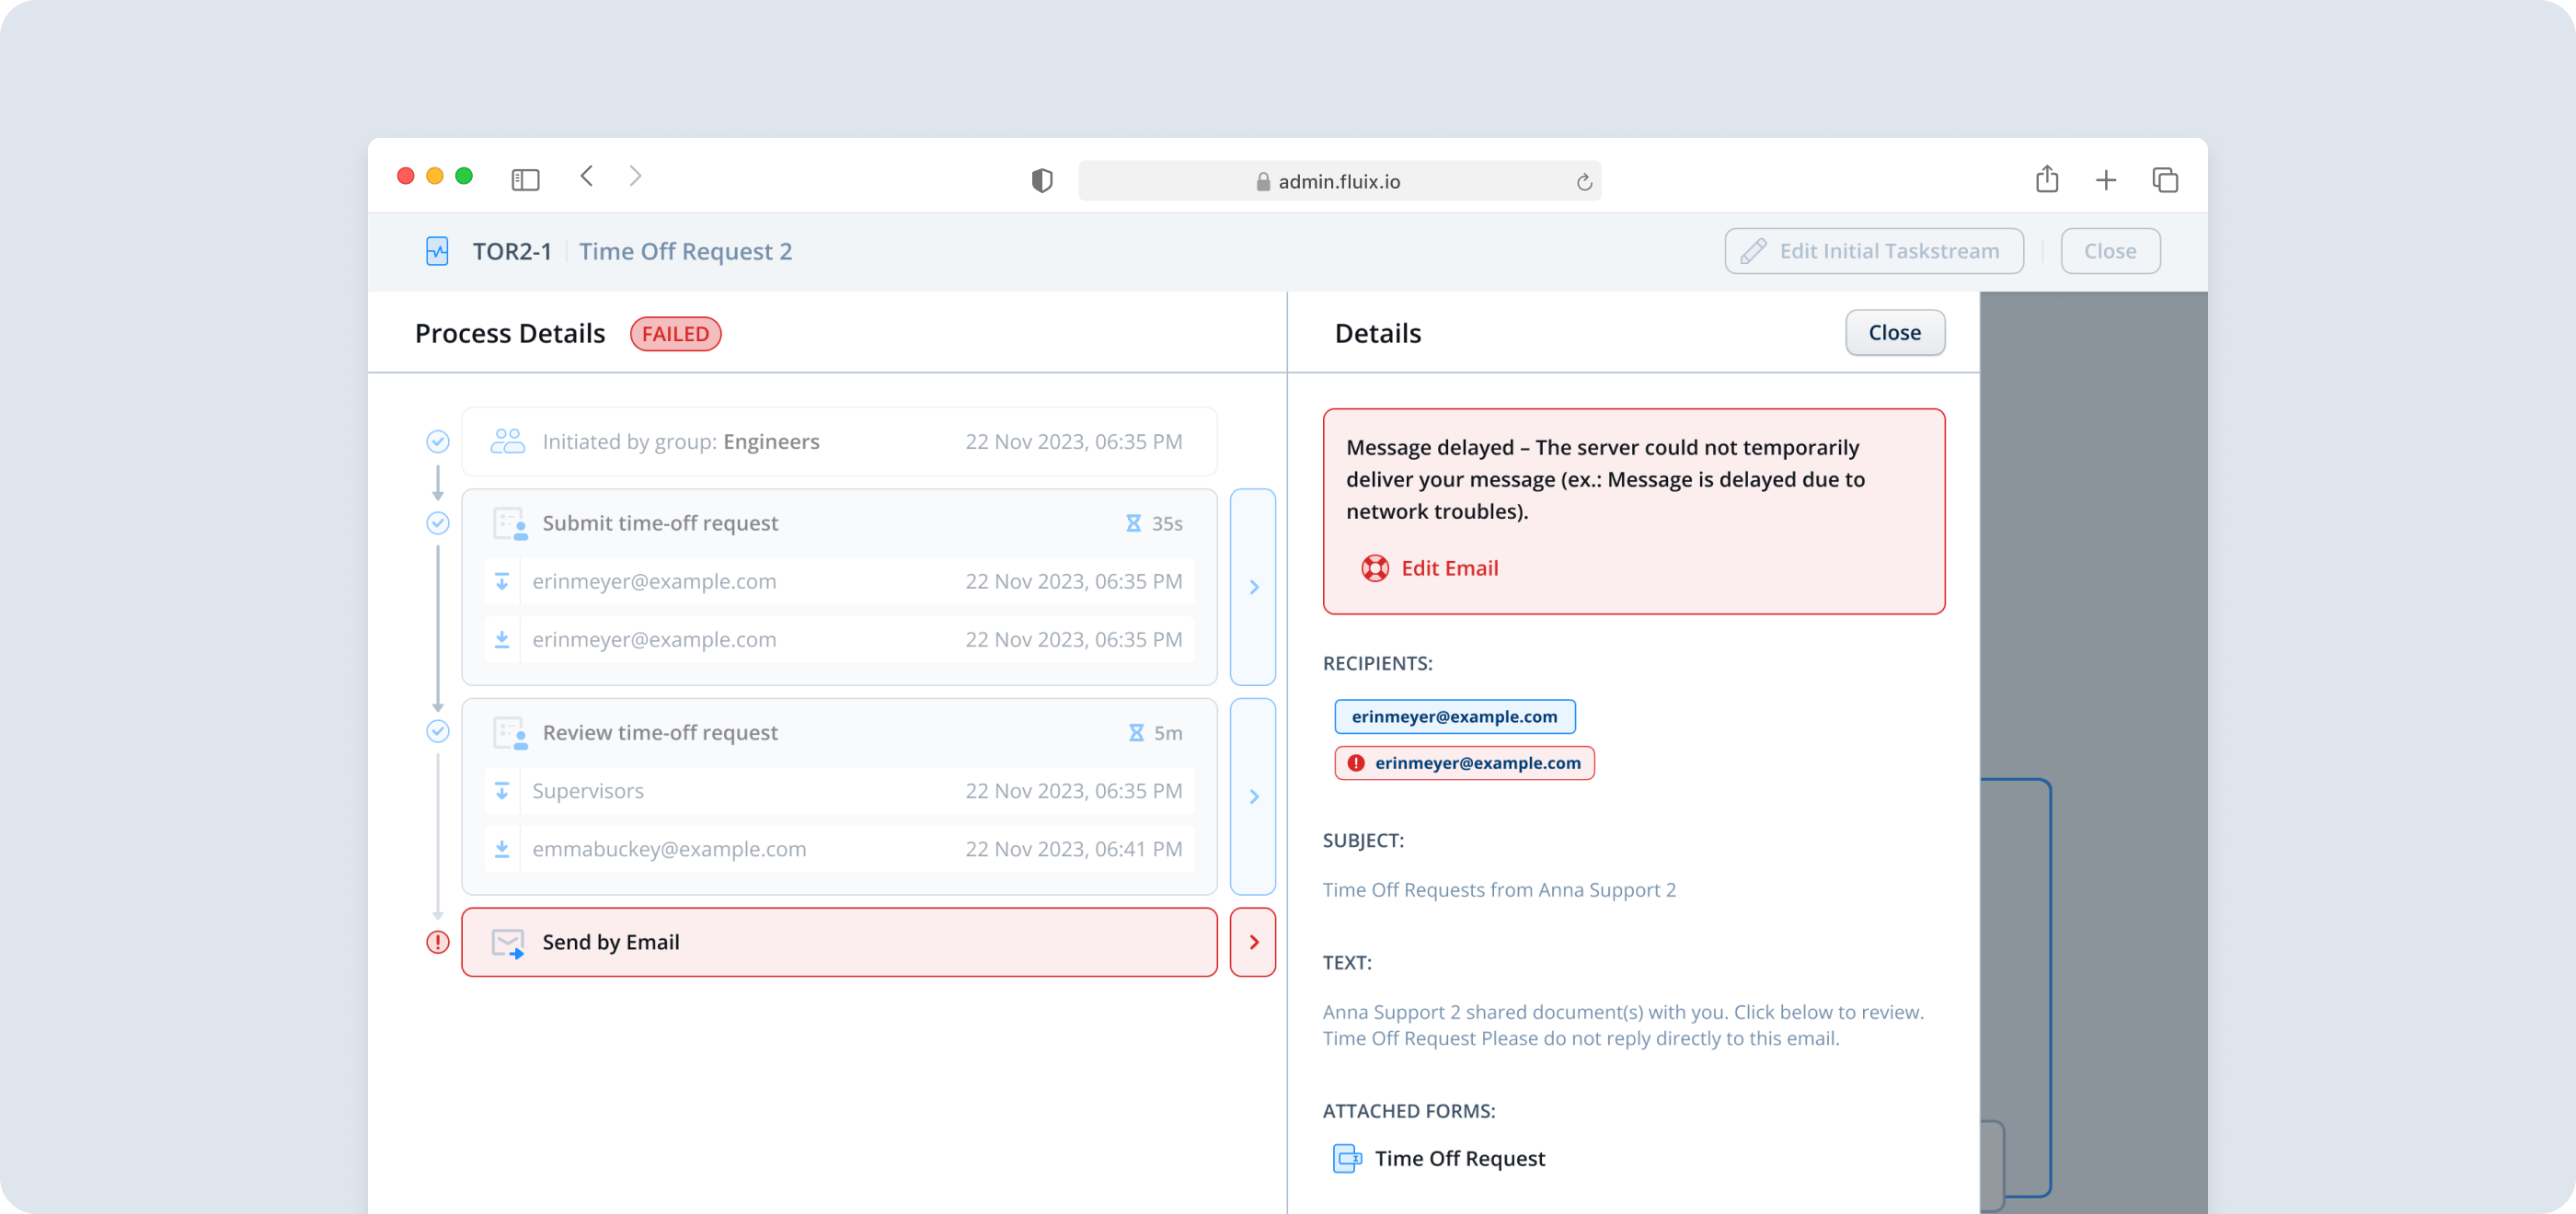
Failed Flow:
The user submitted the task to the preconfigured submit action Send by email; however, due to various reasons (e.g., typo in the email address, not existing email address, etc.), the process to which the task relates failed to be submitted. The submit action where the issue occurred will be highlighted in red. Click on the arrow next to the submit action to check the details.
There, you may check the email addresses to which the documents should have been submitted, therefore, you may check if the user who submitted the task might have mistyped the respective email address.
In case you experience issues understanding why the process failed, contact us at support@fluix.io to learn more about the issue.
Was this article helpful?
Thanks for your feedback!
Oops, something went wrong. Please, try again later.
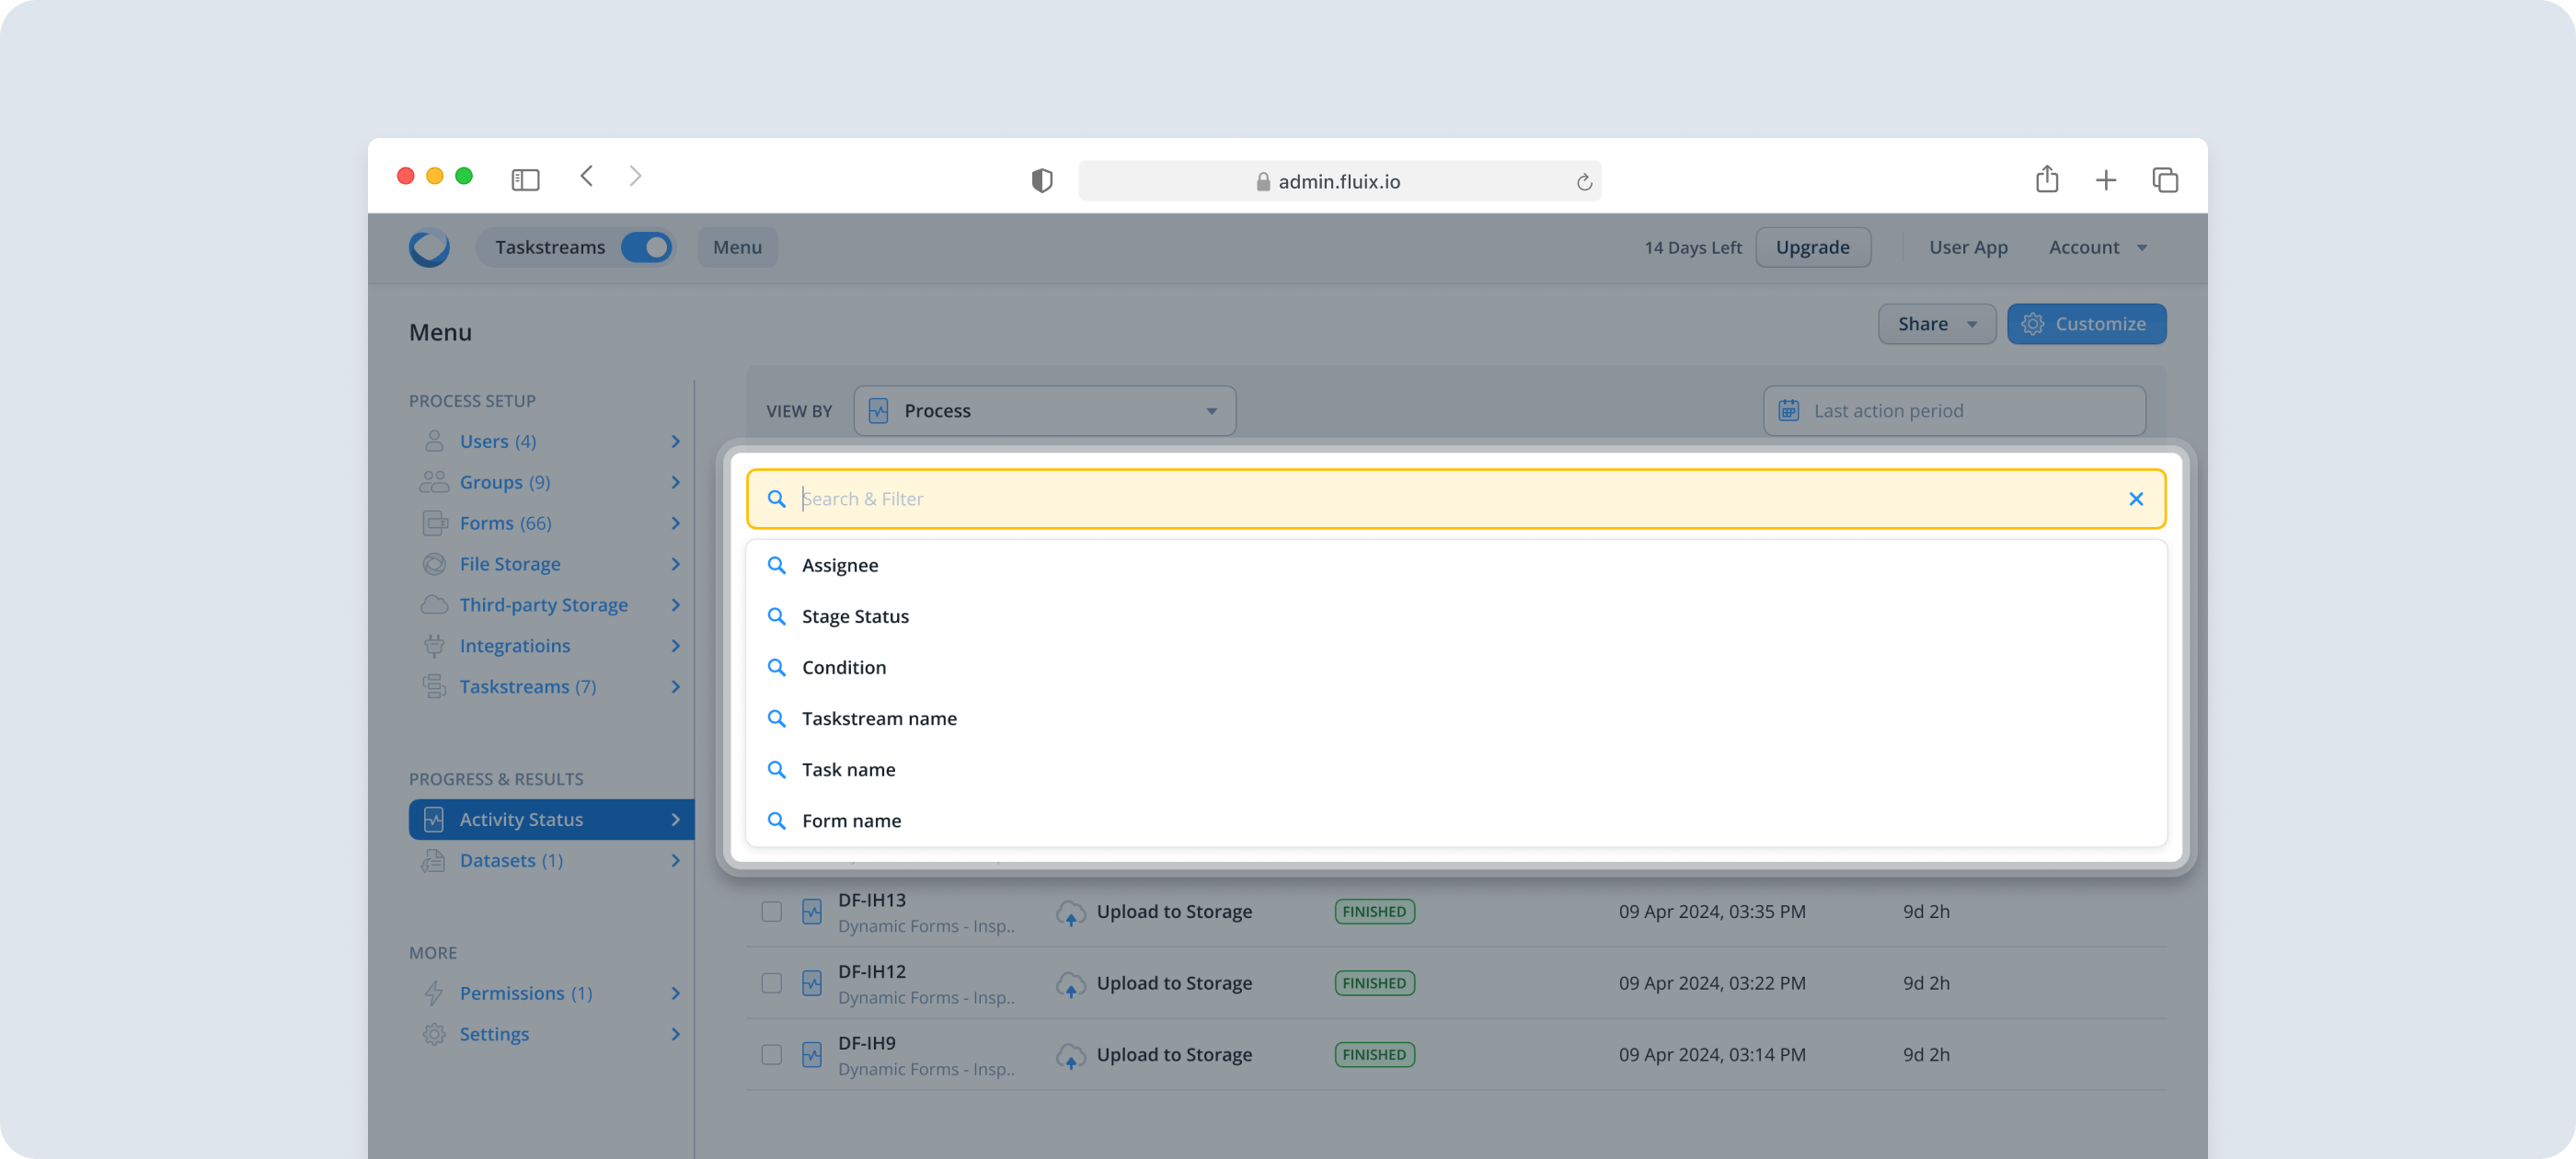
Fluix Activity Status is powered by the Smart Search functionality that allows you to filter the data based on certain parameters:
– Assignee filters the processes by the particular user or group who is assigned to perform the task. The list of users and groups can be selected in the dropdown menu. – Stage status filters the processes by To Do, In Progress, Finished, Failed, Deleted, and Suspended statuses. – Condition filters the processes to show those that are Overdue or Undelivered so that you can reach out to the user/group/guest and follow up about the progress of the task. – Taskstream name filter can be used in case you would like to check all the processes for the respective Taskstream. You may fill out either the full Taskstream name to filter the processes or the abbreviation of the Taskstream. – Task name filters the active processes based on the name you fill out in the Smart Search. – Form name filter will display the processes where the respective form is used. Fill out the form name in the Search bar to find its related process. Simply click on Search & Filter and select additional filters you would like to apply to your report.
The search and filtering can be performed using several filters at the same time to narrow down the search and make your report even more precise. After applying specific filters to the search, the widgets will automatically display the information based on the selected filters.
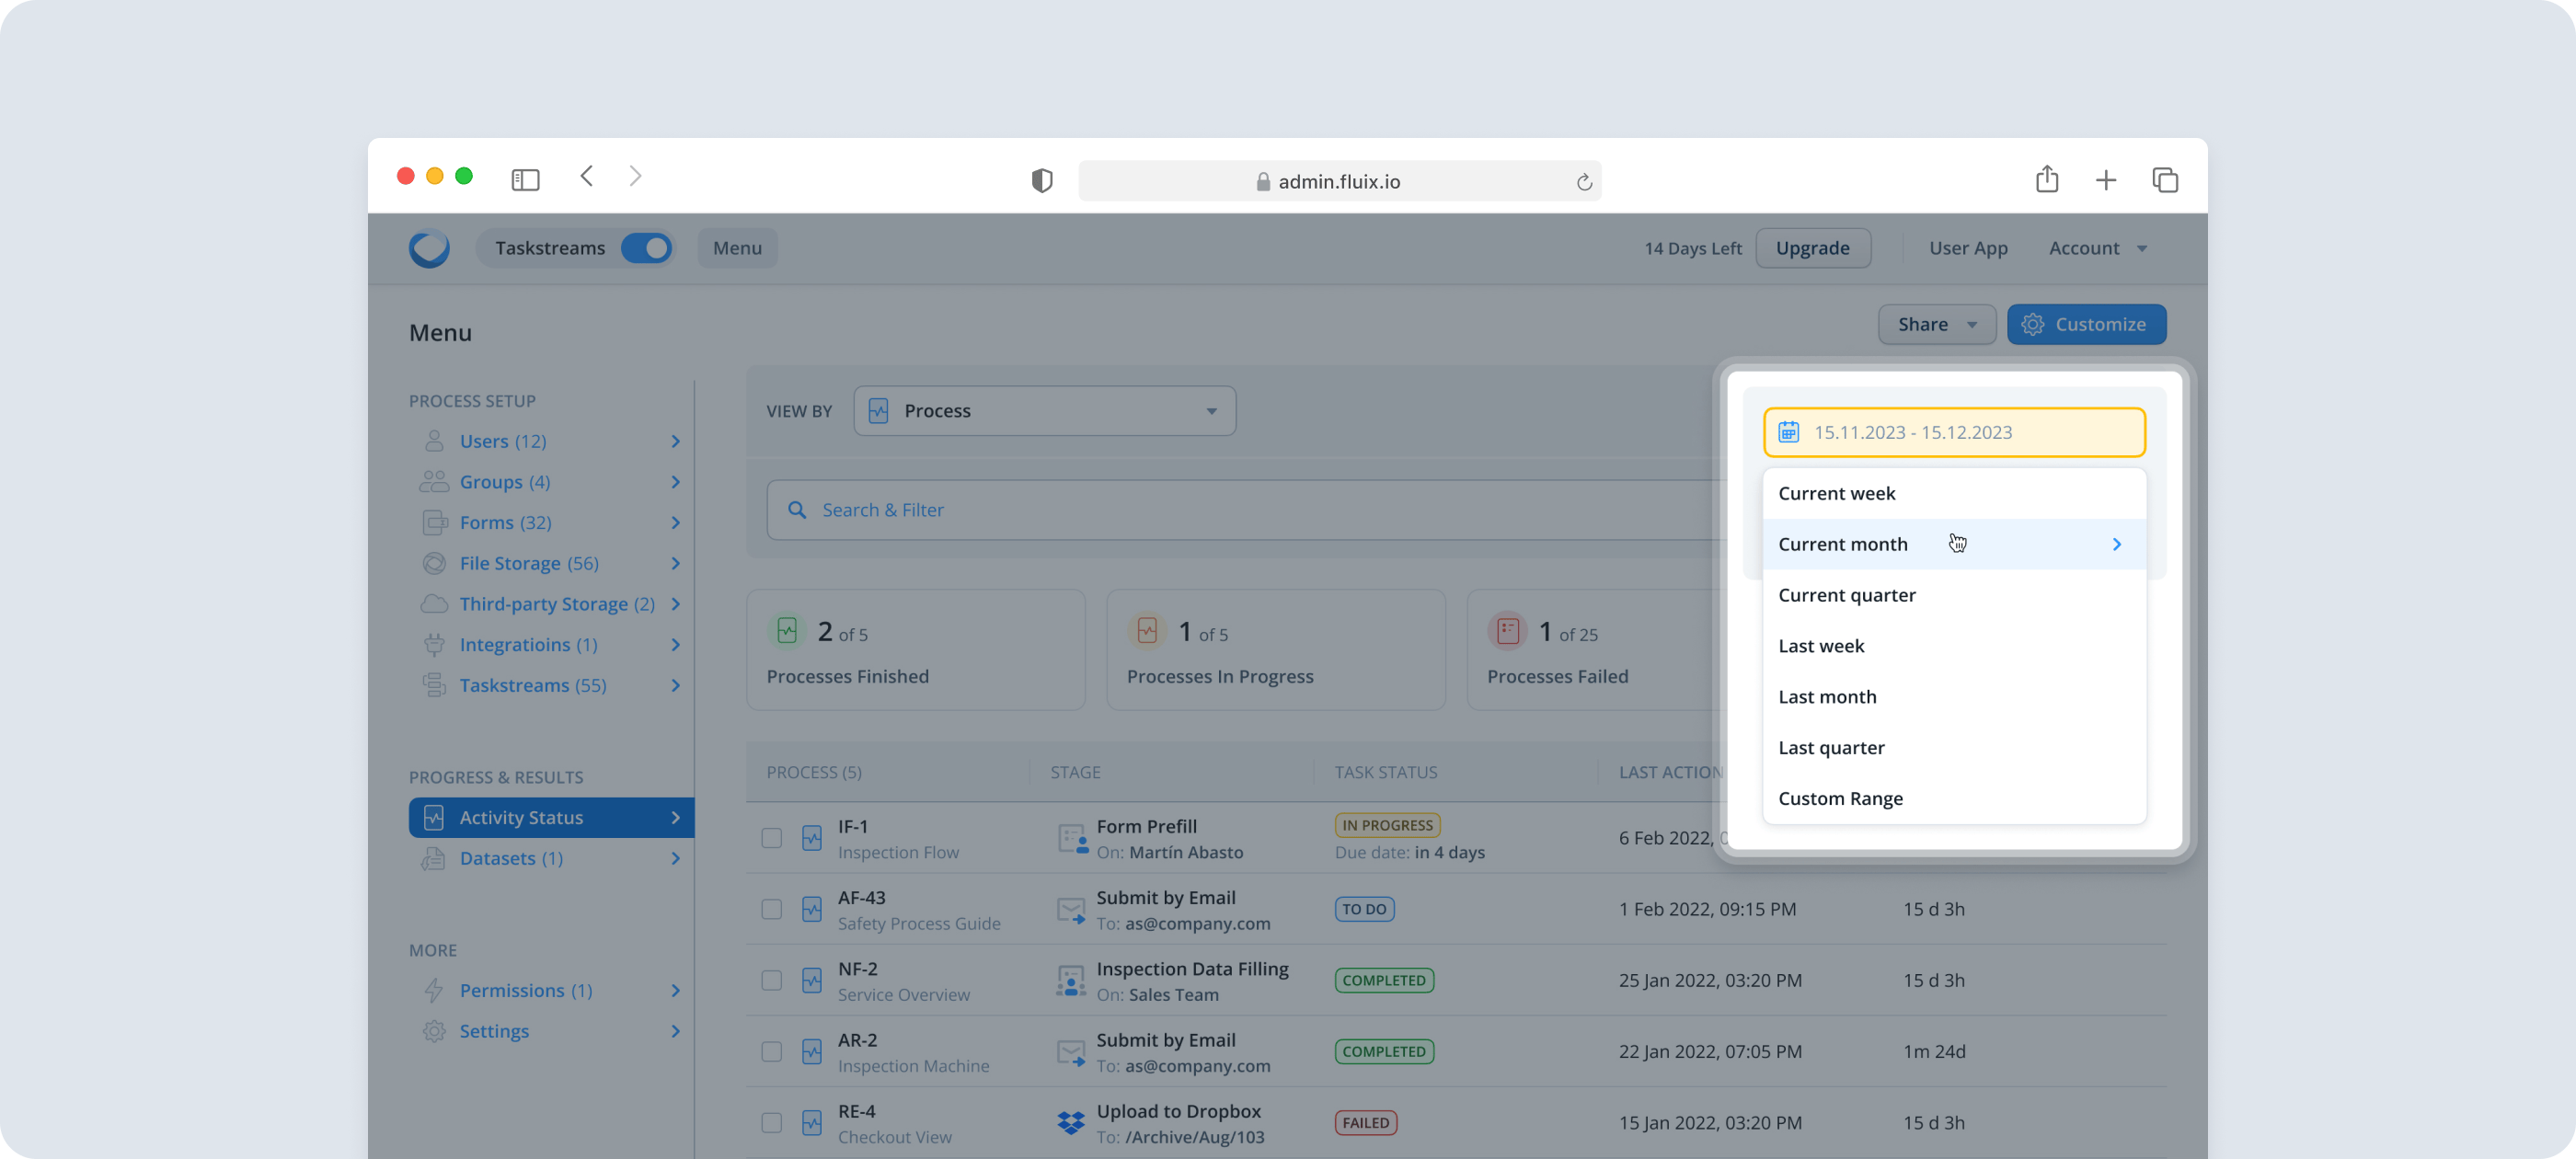
On the right, you may select the timeframe for which you can filter the processes in the account. Select the suggested Last Action Period from the list of available filters or set a Custom Range.
In case you have any additional questions about the functionality, contact us at support@fluix.io to learn more about it.
Was this article helpful?
Thanks for your feedback!
Oops, something went wrong. Please, try again later.
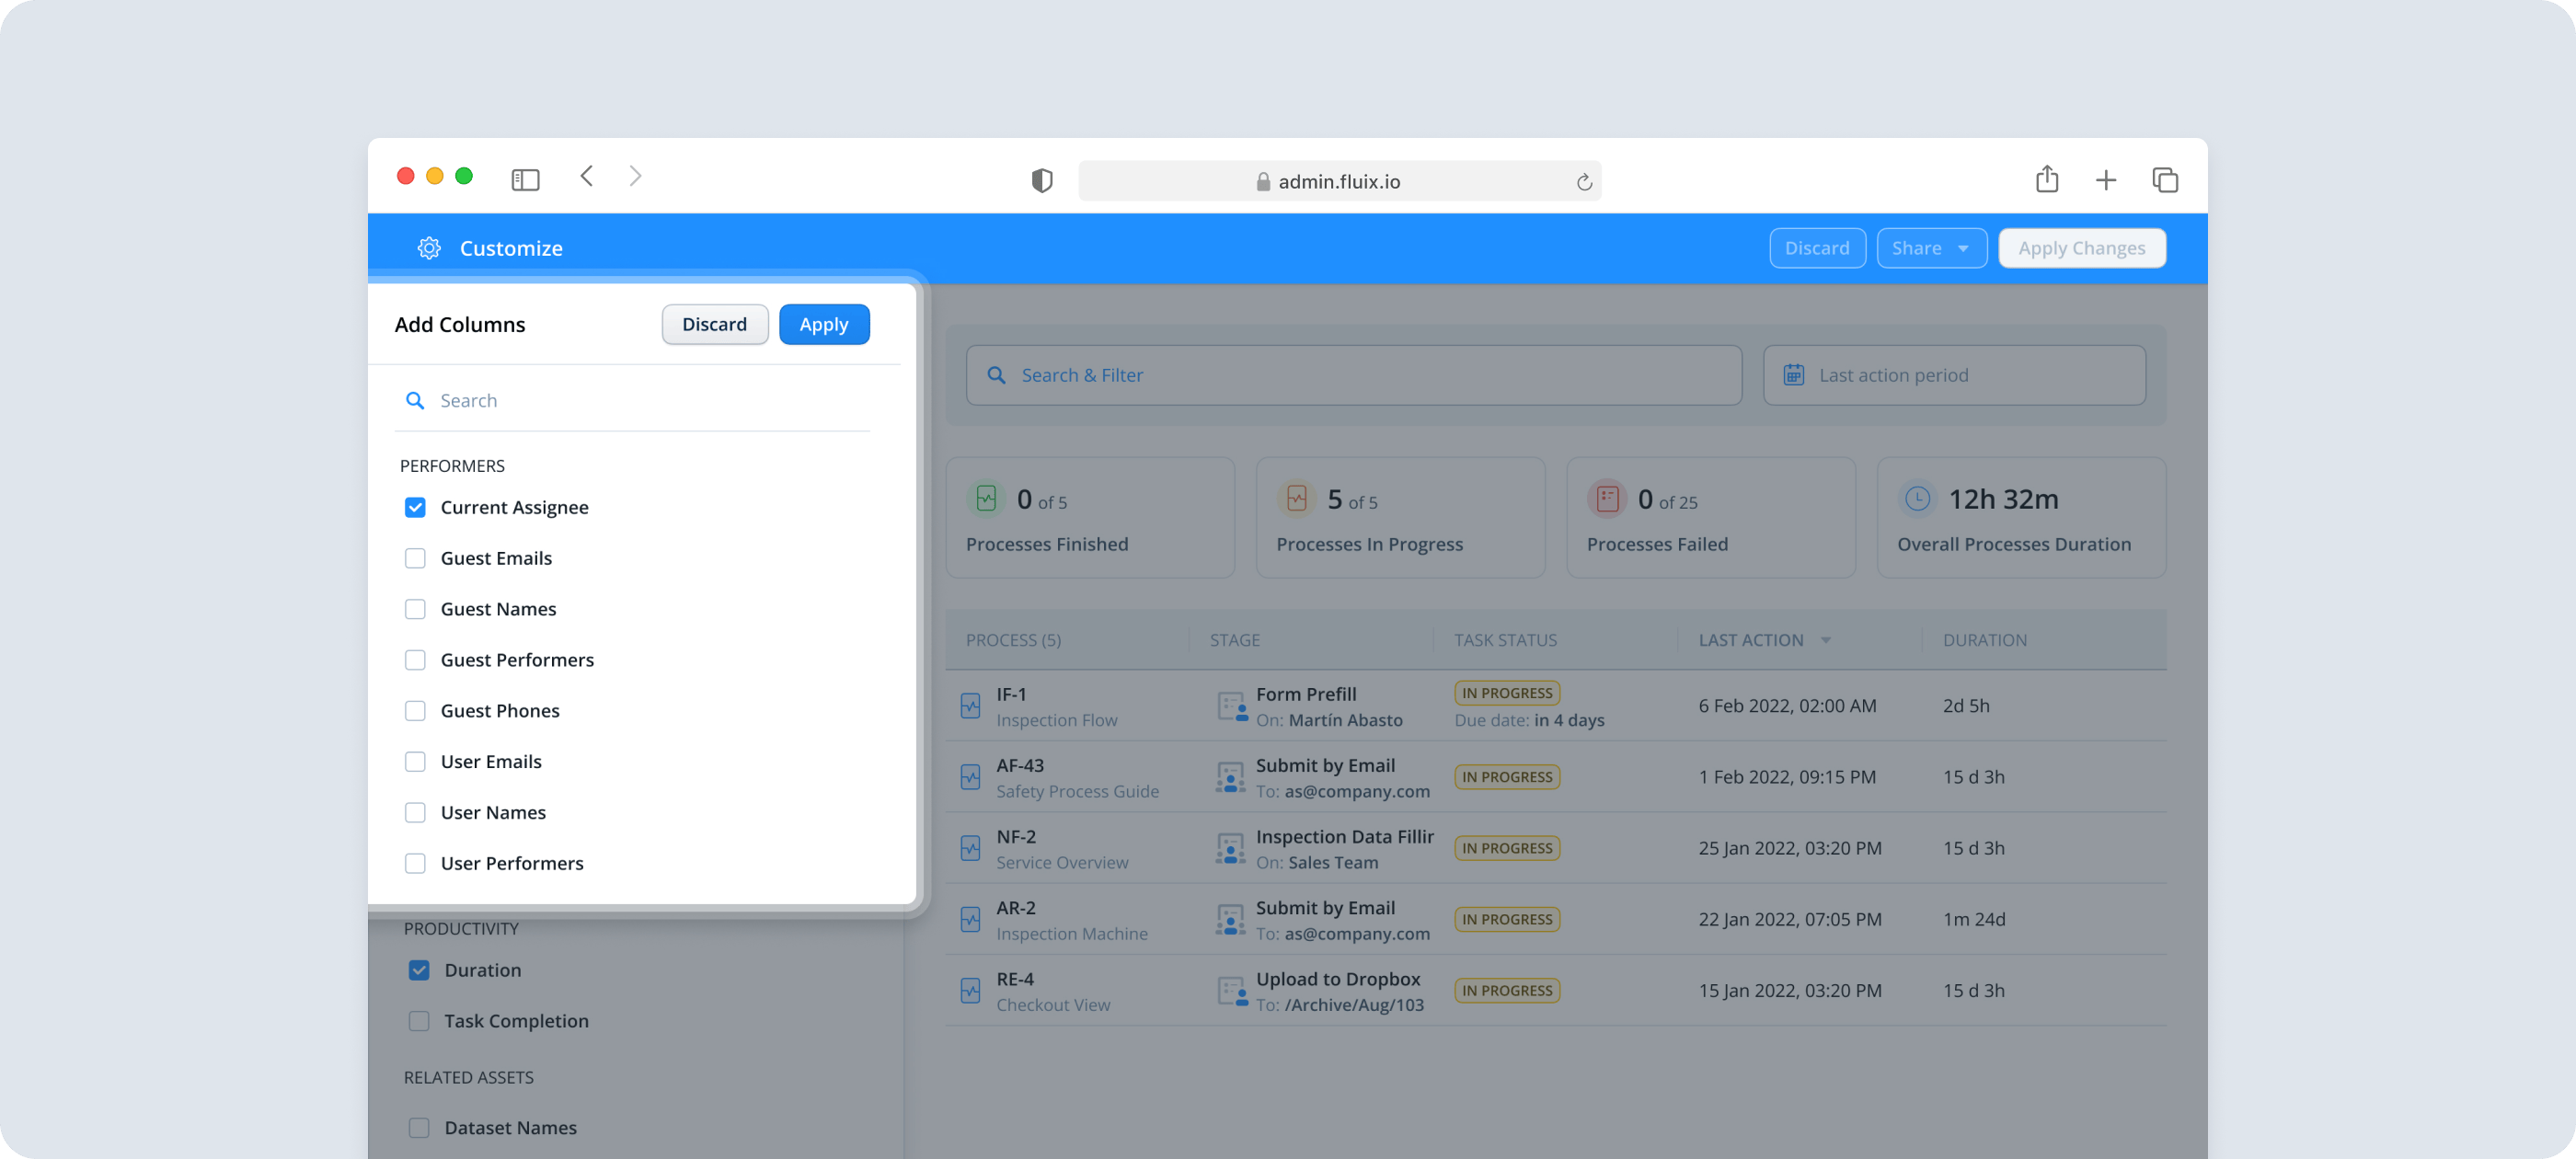
By clicking Customize, you may build a report tailored to your business needs and requirements in our Reports Builder.
On the sidebar, in the Columns section, you may select the columns data from which will be displayed in your report. Additionally, you may delete the columns that are no longer needed or move them by dragging them over. The number of columns that can be added to the report is unlimited. The data that can be added is filtered into separate sections, such as General with basic information about the tasks, Performers, which mostly contains information on who worked or is working on a task, Forms, Productivity, etc.
Select the parameters you would like to add to your report to see the full overview of the performance based on your business needs.
Please note: the first column (Process or Form) is added by default and cannot be deleted or moved.
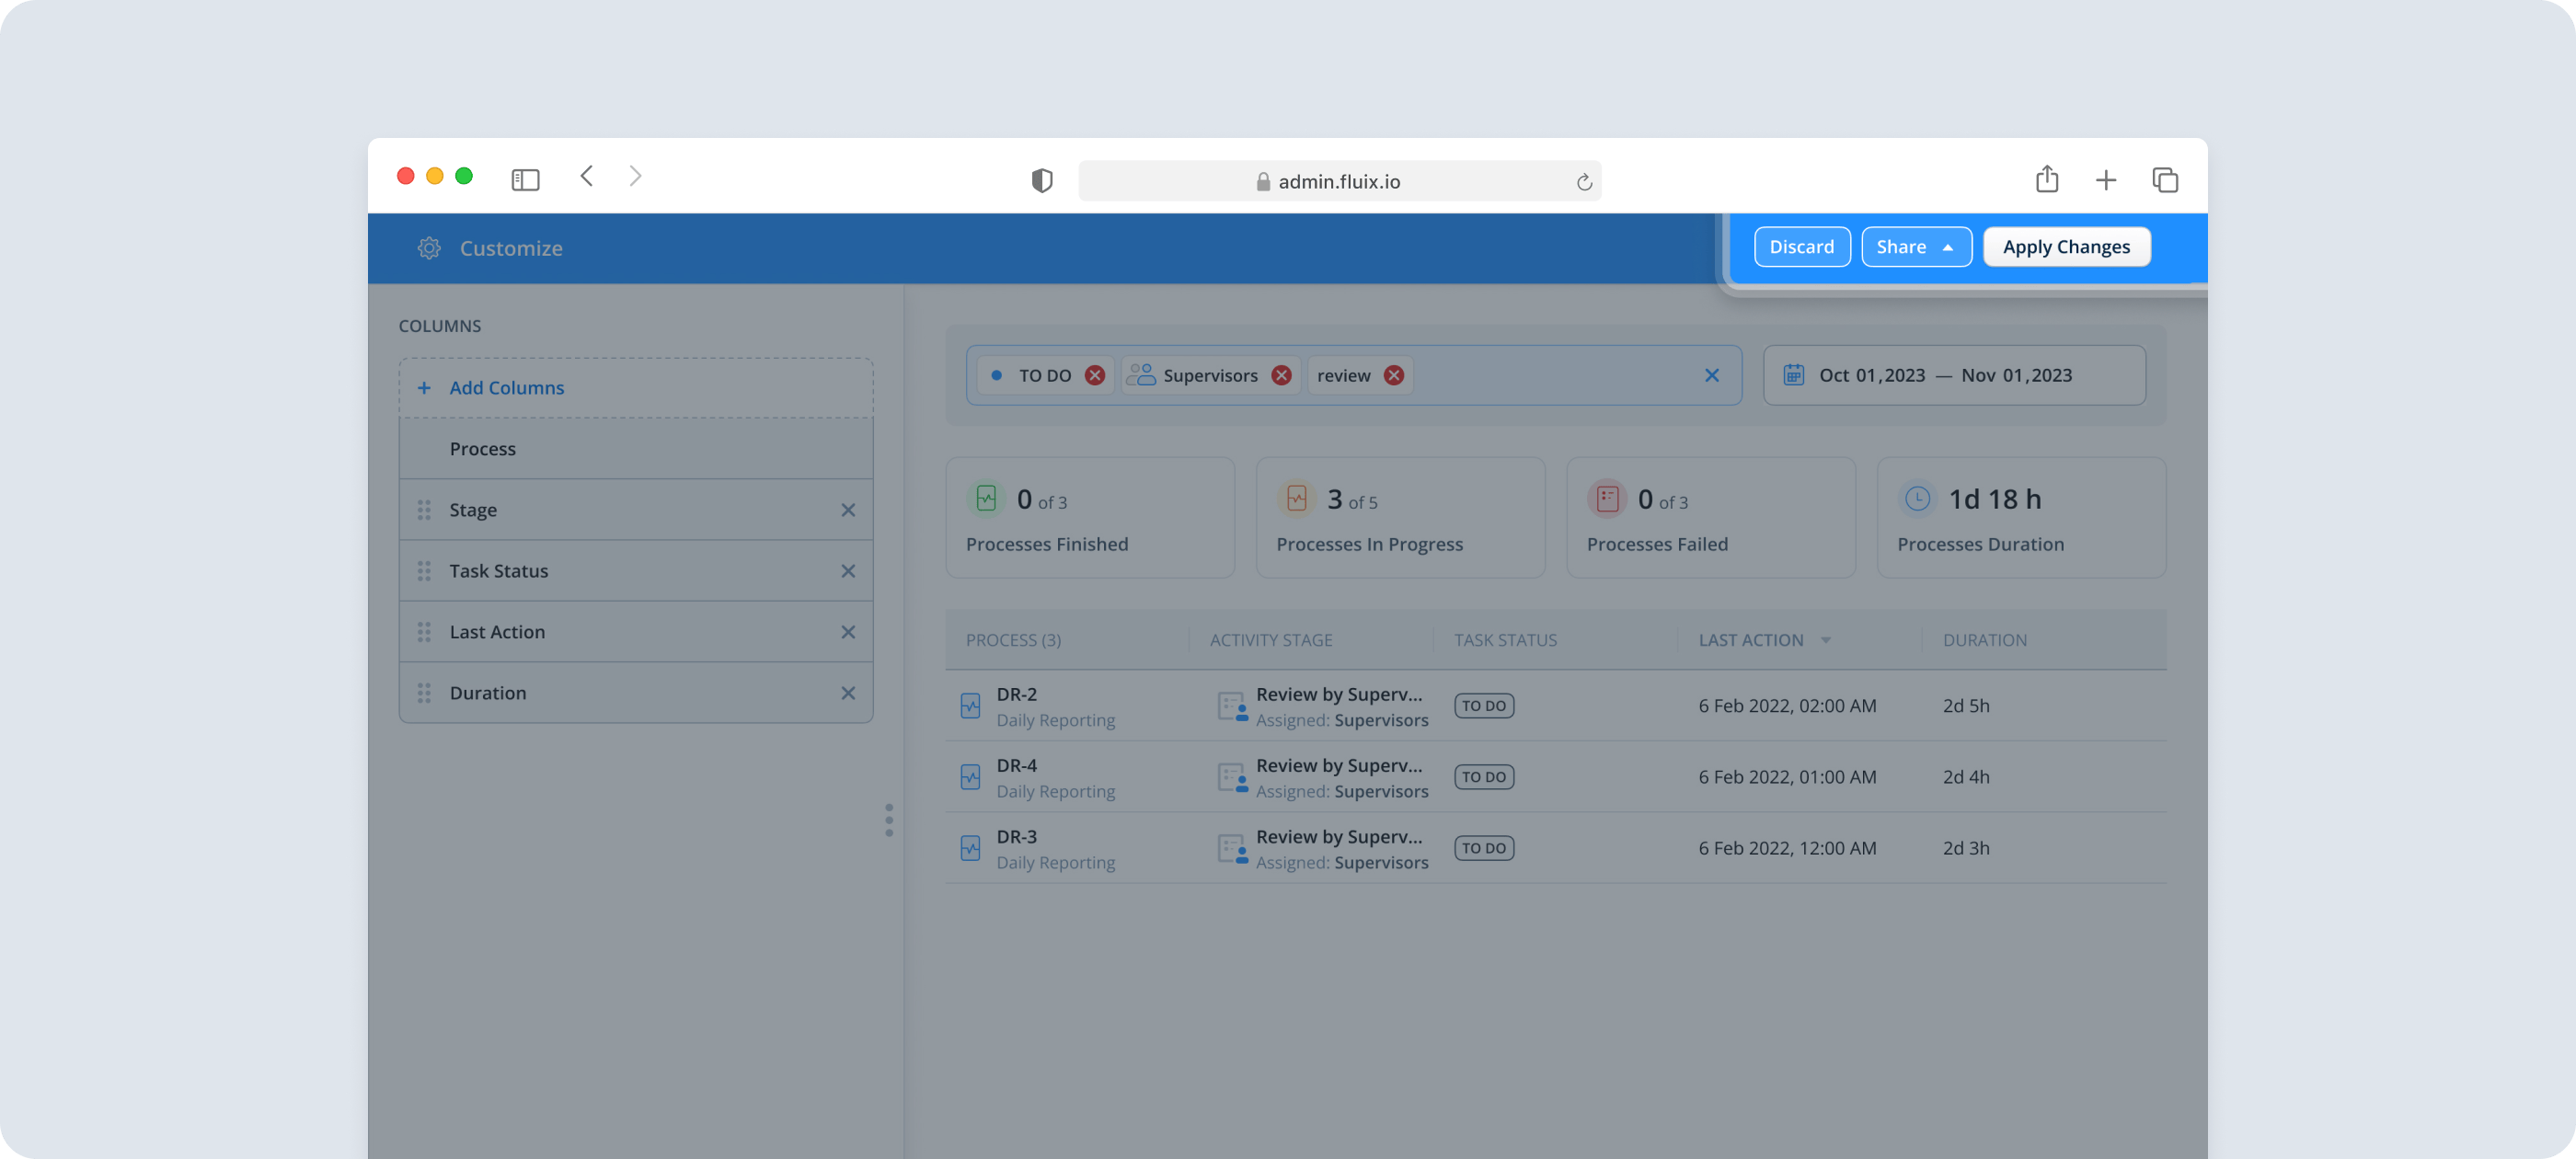
After you select all the needed parameters on the sidebar in the Columns section, click Apply to check the modified report. The Widgets in the Report Builder will automatically pull the data according to the selected parameters.
After customizing your report, there are two options for how you can use it:
You may click Apply Changes to publish the modified version of the report that will be available in the Activity Status section.
You may share the link to the customized report with your team members by clicking Share and selecting one of the options from below: 1. Link for Admins. You may copy the link to share it with your team. By sharing these links, other Fluix admins can open and check the exact report you created. Please note: to check the shared report, your team members should have Admin permissions in your Fluix account. 2. CSV. You may download the CSV file with the filtered data as a report to share with your team, stakeholders, or management as a file.
In case you have any questions or difficulties with setup, contact our support at support@fluix.io and we’ll be happy to help you.
Was this article helpful?
Thanks for your feedback!
Oops, something went wrong. Please, try again later.