


Fluix is a go-to software for managing documents related to maintenance and operations.
Pre- and post-flight inspections ensure aircraft safety and airworthiness in aviation operations.
Let’s explore one of the scenarios on how you may automate the evaluation process and manage maintenance records efficiently with Fluix:
- You configure the workflow in Fluix Admin portal.
- Enable Maintenance Technicians to send digital pre-flight checklists directly to Pilots.
- Pilot fills out the checklist and submits it to the company storage.
Fluix supports working with PDF forms. You can use your existing PDFs or create custom ones using the Form Builder in the Fluix Admin Portal.
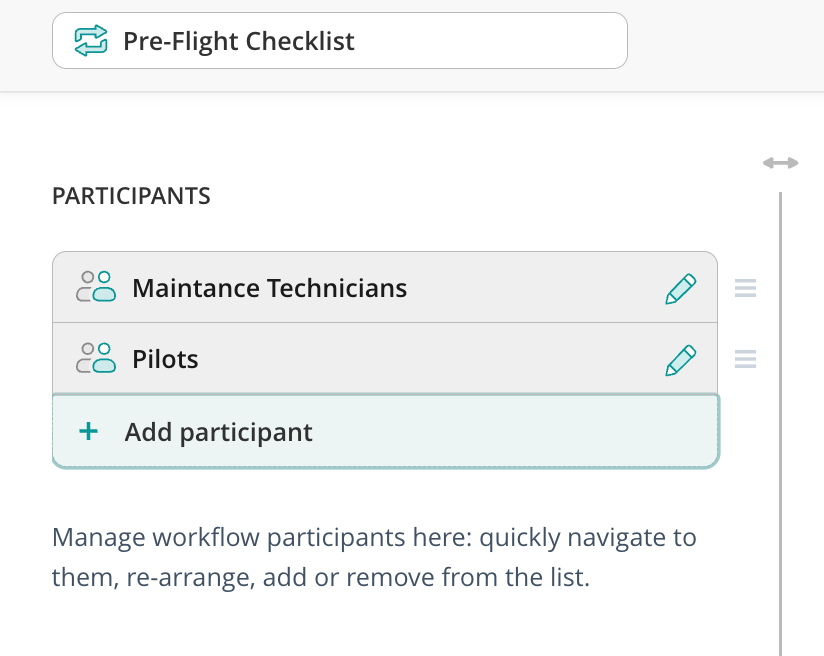
Step 1: Define Participants in Your Workflow
Identify the users or groups involved in the document workflow. In our tutorial, we’ll use two groups of users who will be working within one process:
- Maintenance Technicians
- Pilots
Once you add participants, you can organize and manage them in the workflow builder. The left-hand sidebar displays a list of participants, which you can adjust by dragging, replacing, or adding new ones.
Note: Users in a group will have access to all documents configured for that group in different workflows. Learn more about user groups here.
Step 2: Mapp and build a Workflow
Create the document source
Use a Template document source as the basis for your checklists that Maintenance Technicians will access and fill out. This ensures the original files remain unchanged while distributing blank forms to users.
- Choose the storage location for your templates. You may select Fluix Storage as a document source or your third-party storage. To learn more about supported third-party storages, check these articles.
- Specify the root folder or build a path with the offered templates. For example, in Fluix storage, create a Pre-Flight Checklists root folder.
Once selected, the path will appear next to the Templates section in the workflow setup.

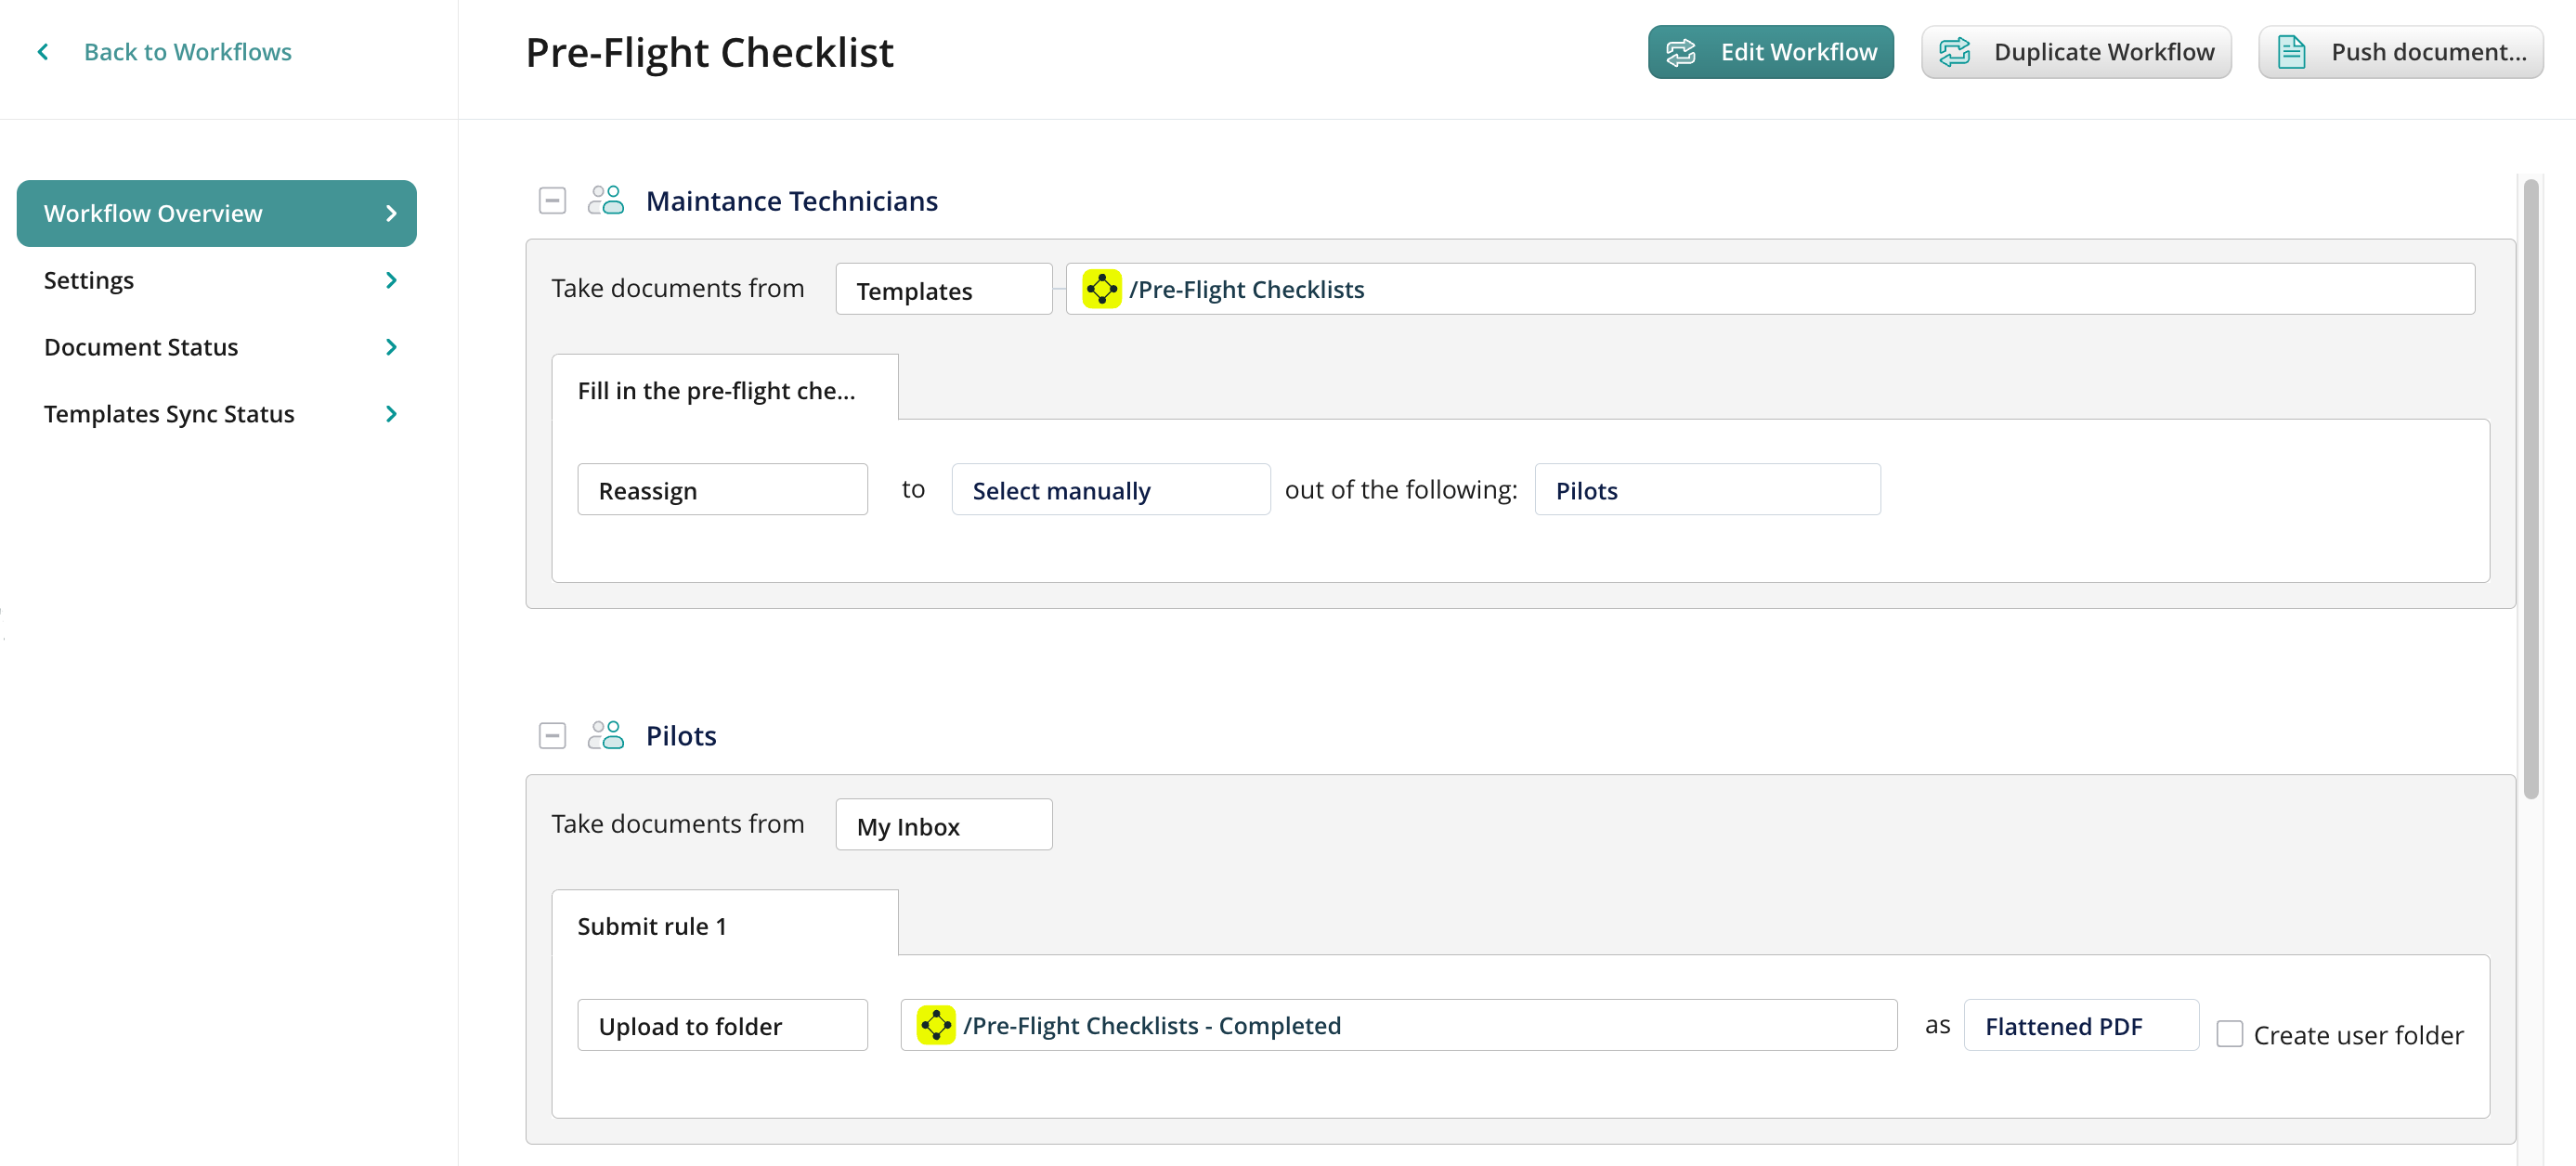
Configure Submit Actions for the Checklist
Establish how documents will flow between Maintenance Technicians and Pilots. You may usethe Reassign submit action to let the Maintenance Technician submit documents to a specific Pilot within the workflow.
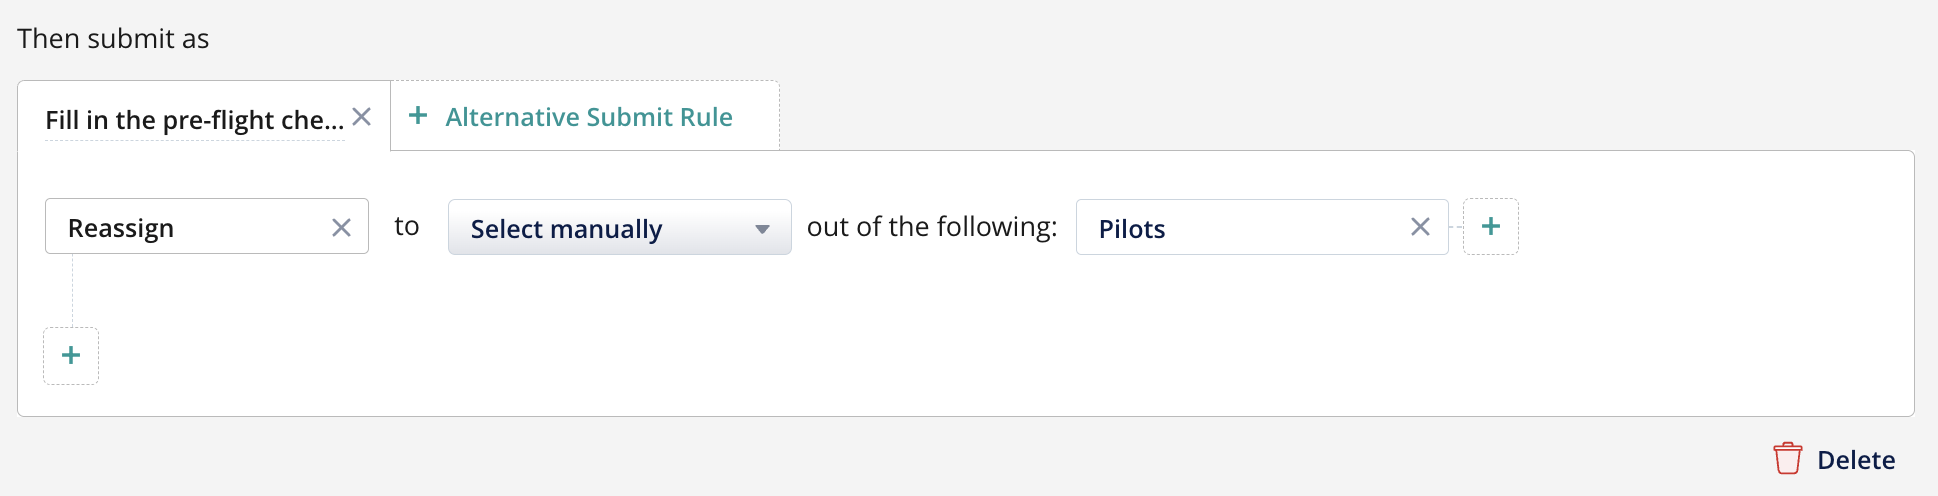
- Use the Select Manually option to allow the Technician to choose the recipient (a specific Pilot from the group). Below is an example of how the Maintenance Technician will see the reassign with dropdown.
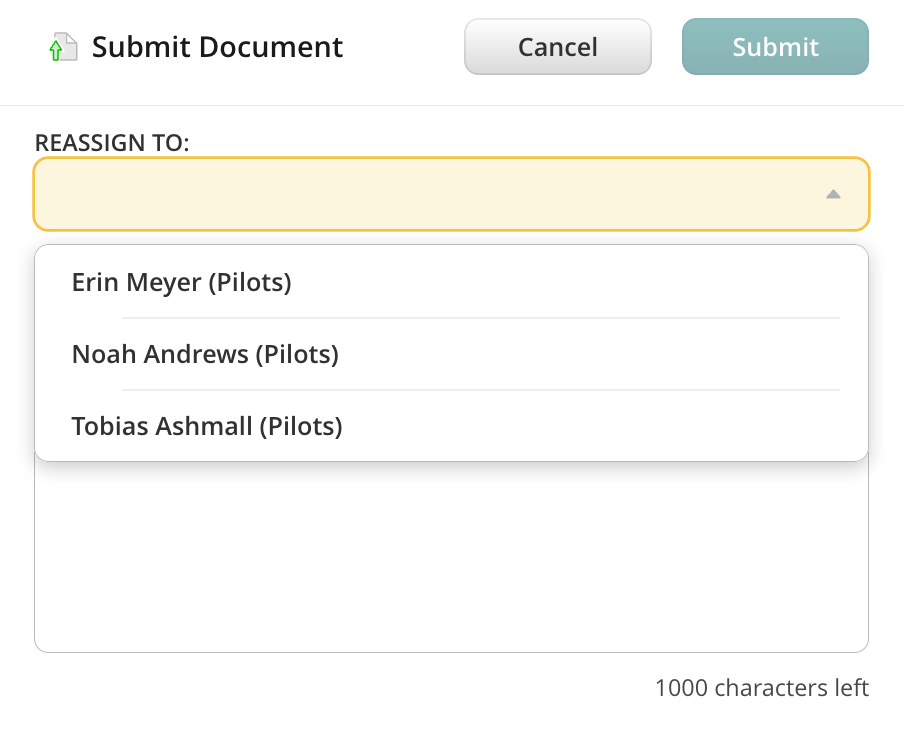
The reassigned document will arrive in the My Inbox section of the Pilot’s Fluix account.
Final Submission and Archiving
Once the Pilot fills in the checklist, it can be stored for further action. Add a final submission step where Pilots archive completed documents:
- Use the Upload to Folder rule to save the completed checklist to the appropriate folder in Fluix Storage or your third-party storage.
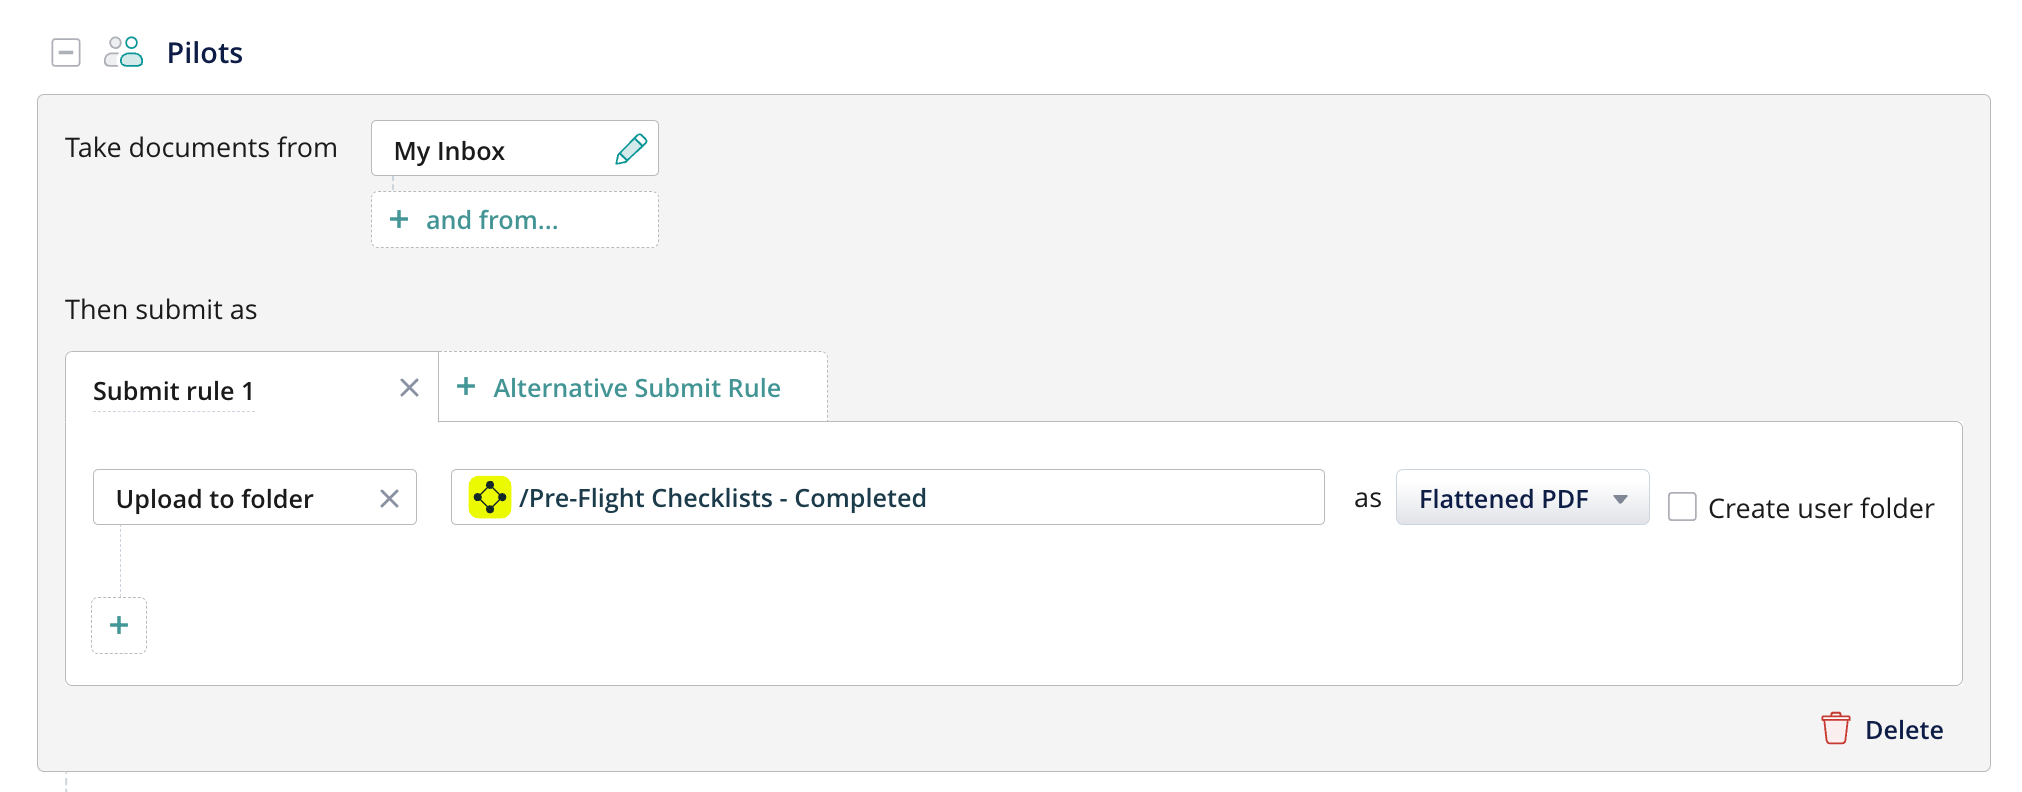
Choose a file format for the submit rule:
- Editable PDF: Keeps forms editable.
- Flattened PDF: Submits non-editable forms (digital signatures will not be editable).
- XFDF: Submits form data only.
Step 3: Activate and Test the Workflow
- Save and publish the workflow. The final look of the workflow draft will look like this:
2. Add yourself to the group that participates in the workflow and test it:
- Open the Fluix app on an iOS device or switch to User Mode in the admin portal in the web browser.
- Navigate to the Templates section, open the folder you configured as a document source, complete a form, and submit it.
Step 4: Track Document Status
In the Document Status section of the workflow, you can track each step of the document distribution.
- Who worked on the document;
- The date and time of submissions;
- Saved versions of the file;
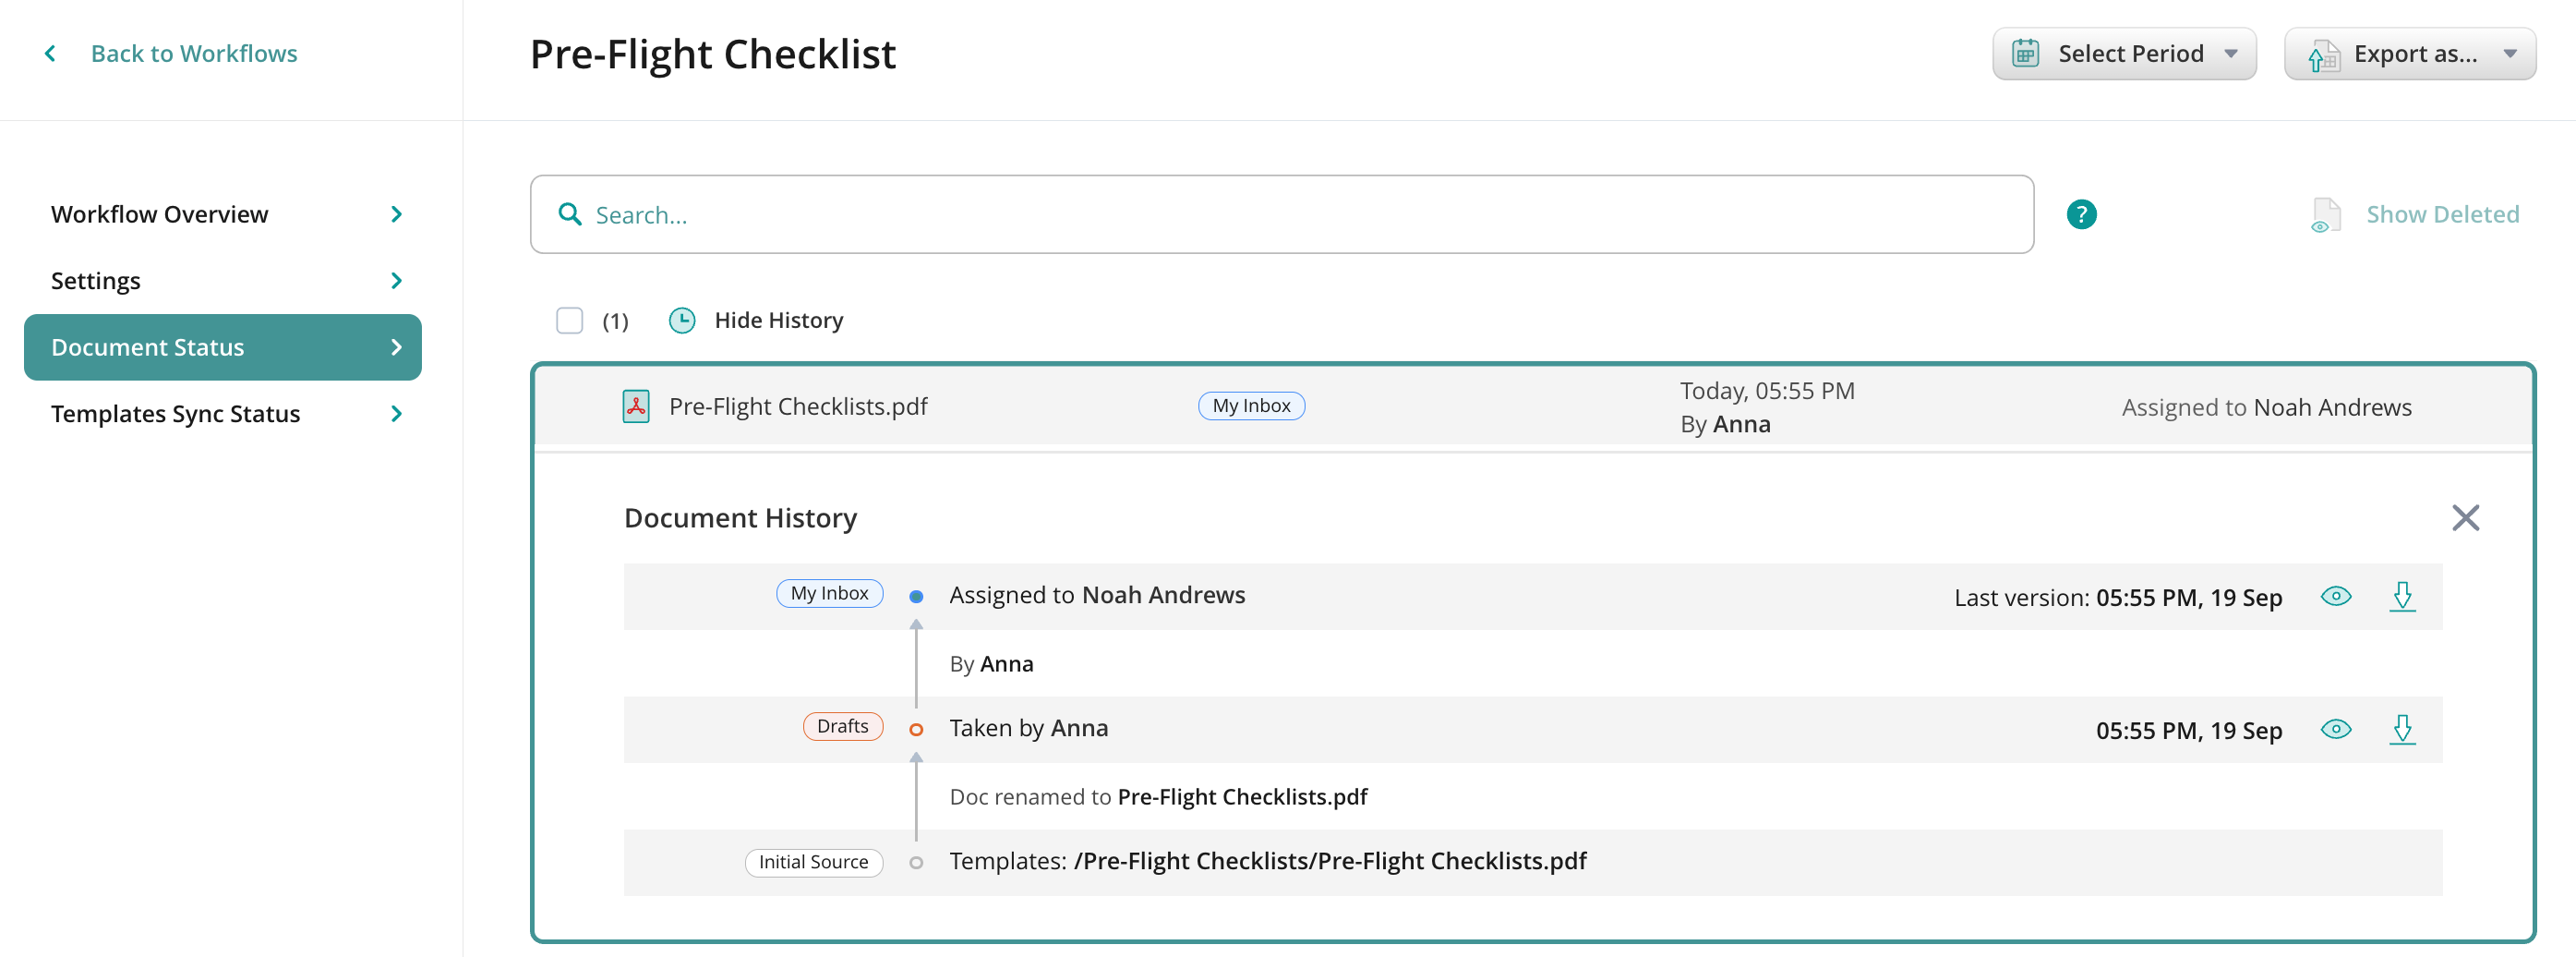
- Reassign the document to another user from the group in case the current one is not able to finish work on it;
- Track the deleted workflow documents;
- In the Template Sync Status section of your workflow, check if all group members have synced their devices with the workflow. This will ensure that the users have access to the latest versions of the documents they need for work.
Step 5: Configure Security Settings
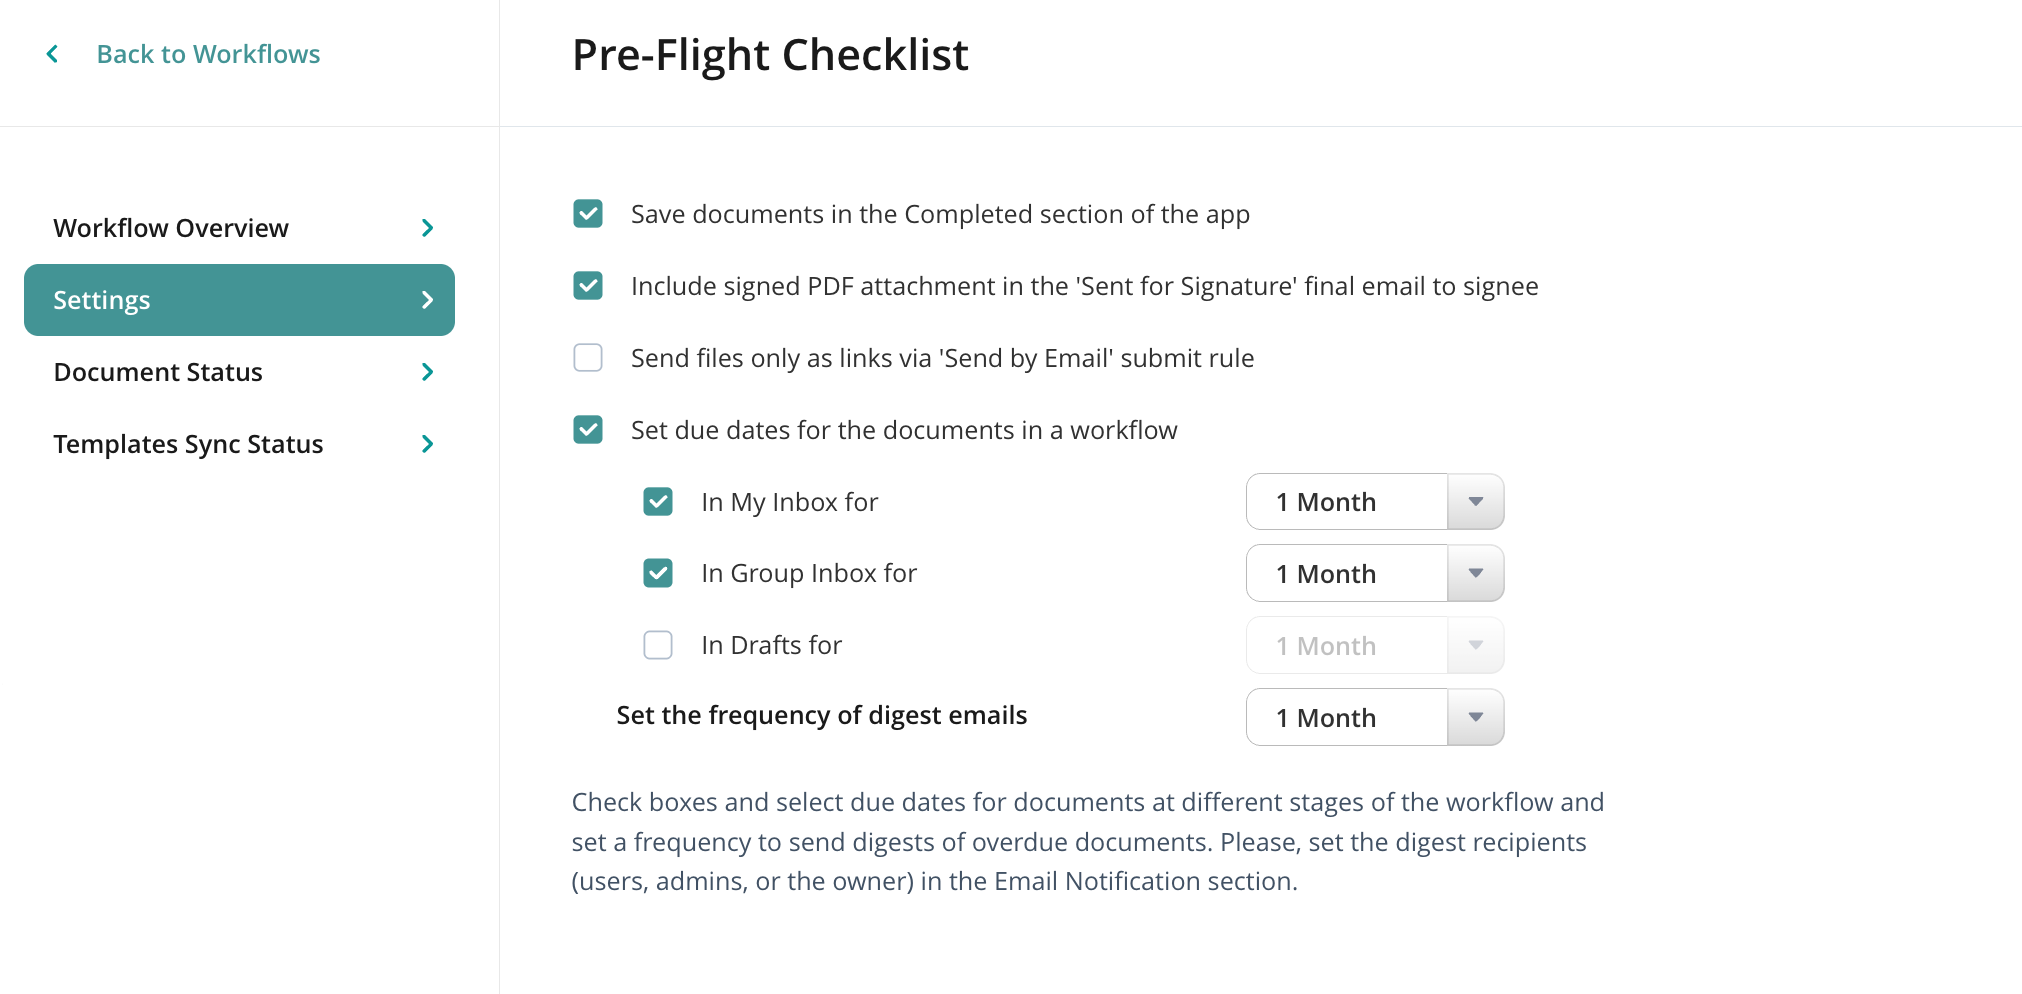
In addition to the workflow customization, you may set up various levels of security settings for the workflow documents.
- Save documents in the Completed section of the app & due dates for the documents:
To control these settings, open the Settings section of the workflow, and check the box next to both options accordingly:
- Decide whether you want the workflow participants to store the submitted documents in the Completed section on their devices.
- Select due dates for documents at different stages of the workflow, e.g., My Inbox or Group Inbox, and set a frequency for sending digests of overdue documents.
2. Offline access and keeping the completed workflow documents
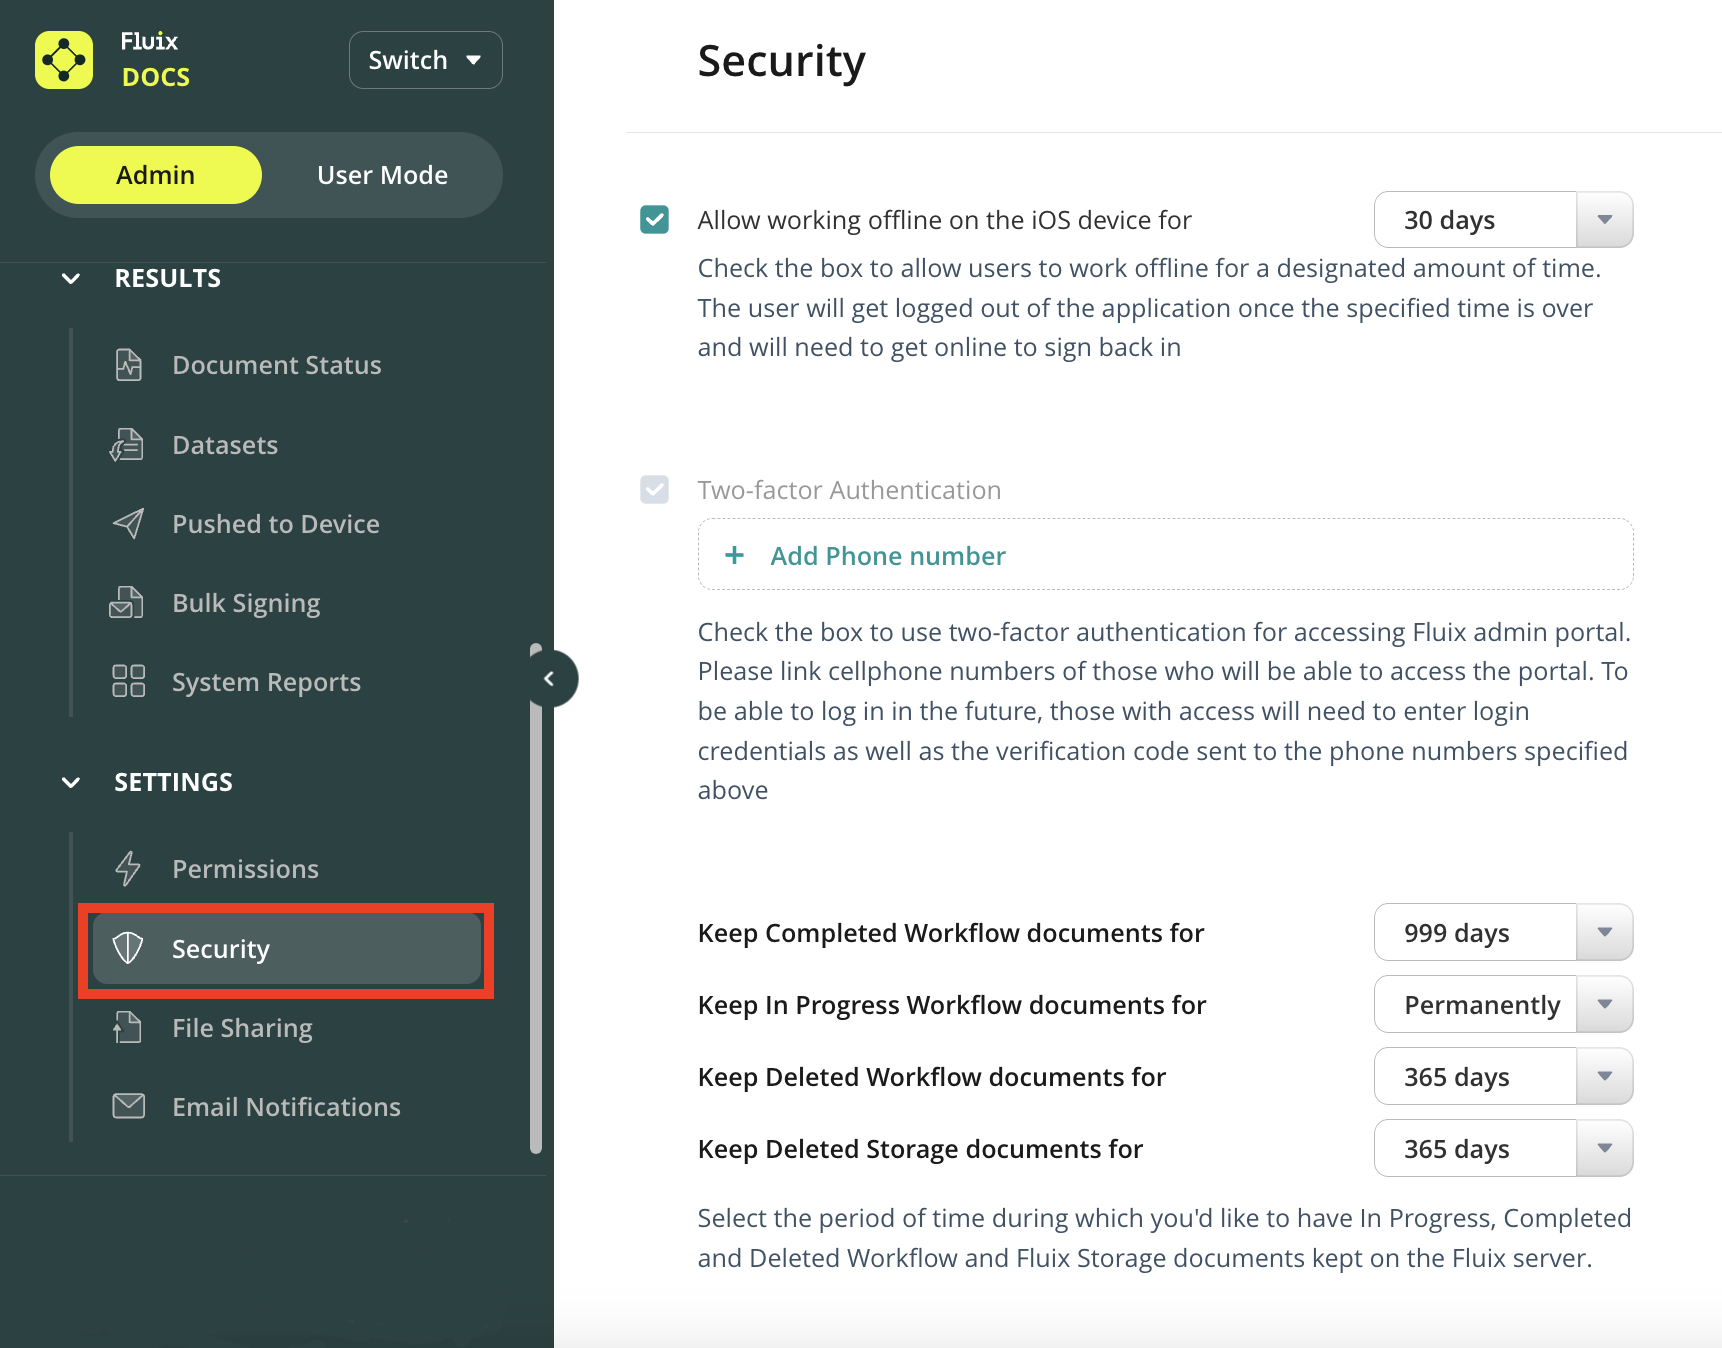
In the Security section of the Admin Portal, you may configure the additional settings, such as:
- Allow working offline on the IOS device.
- Retention policy – is the amount of time during which all workflow documents on different stages (e.g. Drafts, My Inbox, Group Inbox, Sent for Signature, Completed, Deleted) will be stored on Fluix servers.
Ensure you configure the retention policy for documents on different stages according to regulatory compliance, verifying adherence to safety and operational standards. These documents serve as a valuable historical reference for investigating incidents and reviewing operational procedures.
Feel free to contact us at support@fluix.io if you have any questions or comments.