


Fluix is a web and mobile-based cloud platform that helps teams set up digital document management and workflow automation. In this integration, Fluix serves as an electronic data capture system.
HubSpot is an all-in-one marketing, sales, and customer service platform that helps businesses attract, engage, and delight customers. It includes tools for website design, email marketing, social media management, lead generation, customer relationship management (CRM), and more.
What Fluix + HubSpot integration does
By integrating Fluix and HubSpot, salespeople can save valuable time when closing deals with prospects. This is achieved by automatically populating customer data to Fluix forms based on the information that is stored in your HubSpot account. As a result, the sales process becomes more streamlined and efficient, enabling HubSpot to focus on building relationships and closing deals faster rather than manually filling out the form.
Example of Fluix + HubSpot integration
Let’s look into a real-life scenario as an example of configuring the Integration.
Your HubSpot account contains all the information about your prospects and customers. When the salesperson changes the specific field of the customer card in HubSpot, it triggers a webhook and pre-fills the pre-configured form in Fluix Taskstream. A new task is created for the salesperson in Fluix where he/she fills out the rest of the Customer Agreement form and sends it for e-signing using the Guest task in Fluix. The prospect signs the contract and the completed document is uploaded directly to Fluix or your company’s storage.
Note: Integration requires a Core account in Fluix and a HubSpot account.
Step 1 – Create the Start event in Fluix
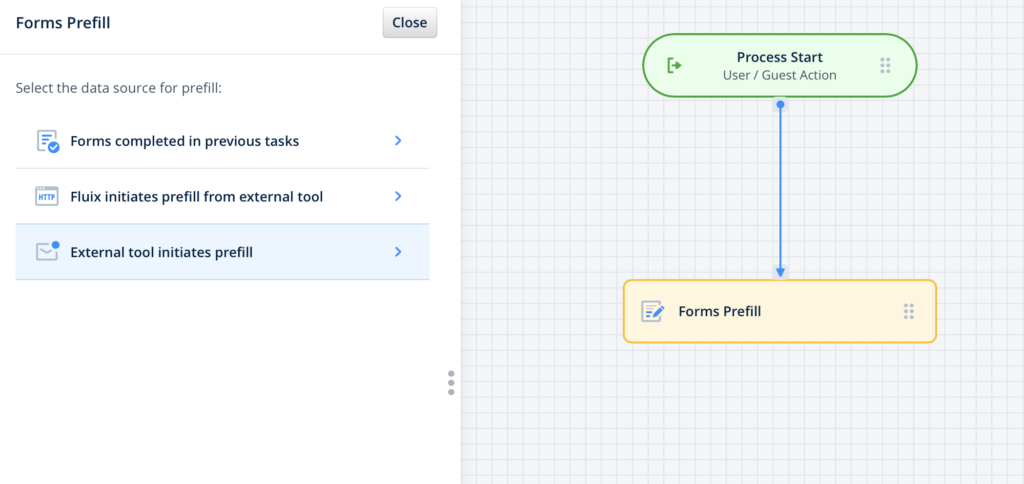
Navigate to the Fluix admin portal, Taskstreams section, to create a new Taskstream. Drag and drop the Process Start event and select External tool initiates prefill from the list of options.
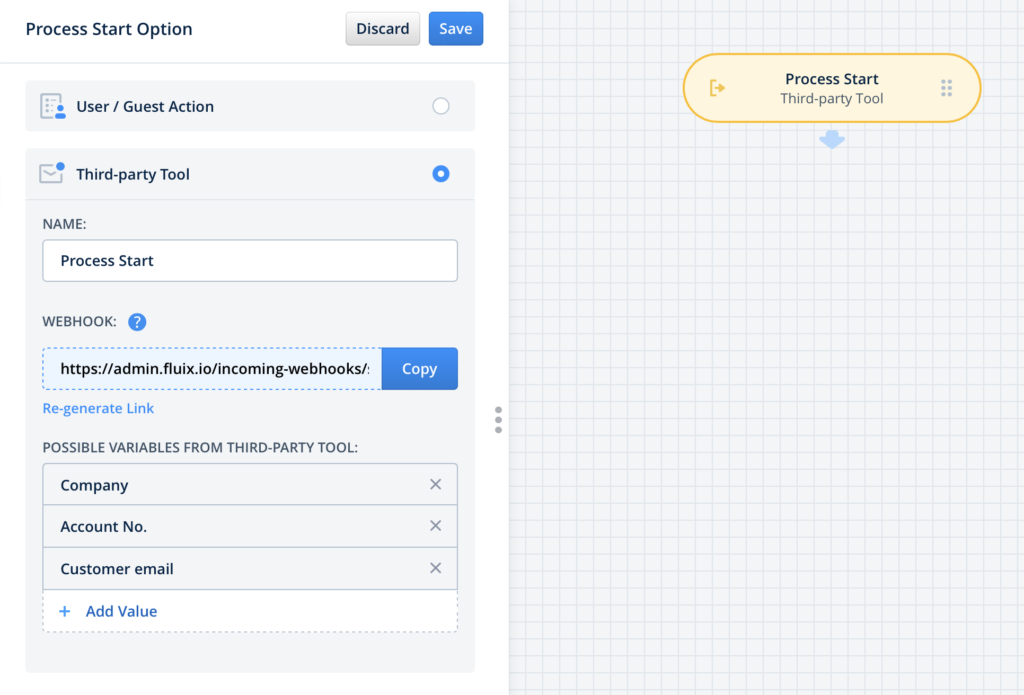
Add the Possible Variables (property names) from HubSpot. When the respective fields are changed in your HubSpot account, the process will be triggered automatically.
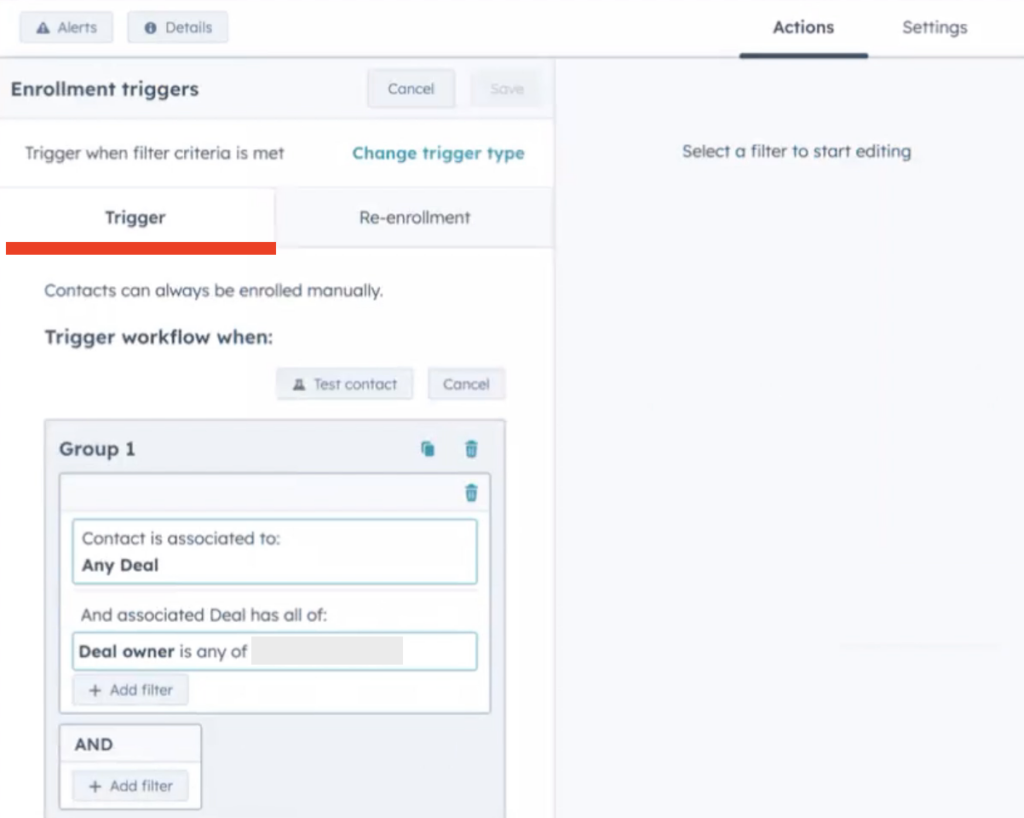
Step 2 – Create a Workflow in HubSpot
Navigate to your HubSpot account, and open the Automation > Workflows section from the main Dashboard.

In the upper right corner tap the button Create workflow and select if you would like to proceed with creating it from scratch or using the workflow template.
Configure the trigger that will start the prefill action in Fluix. As an example, the following configurations can be set up in your HubSpot workflow:
To learn more about creating the workflow in HubSpot, please follow this link.
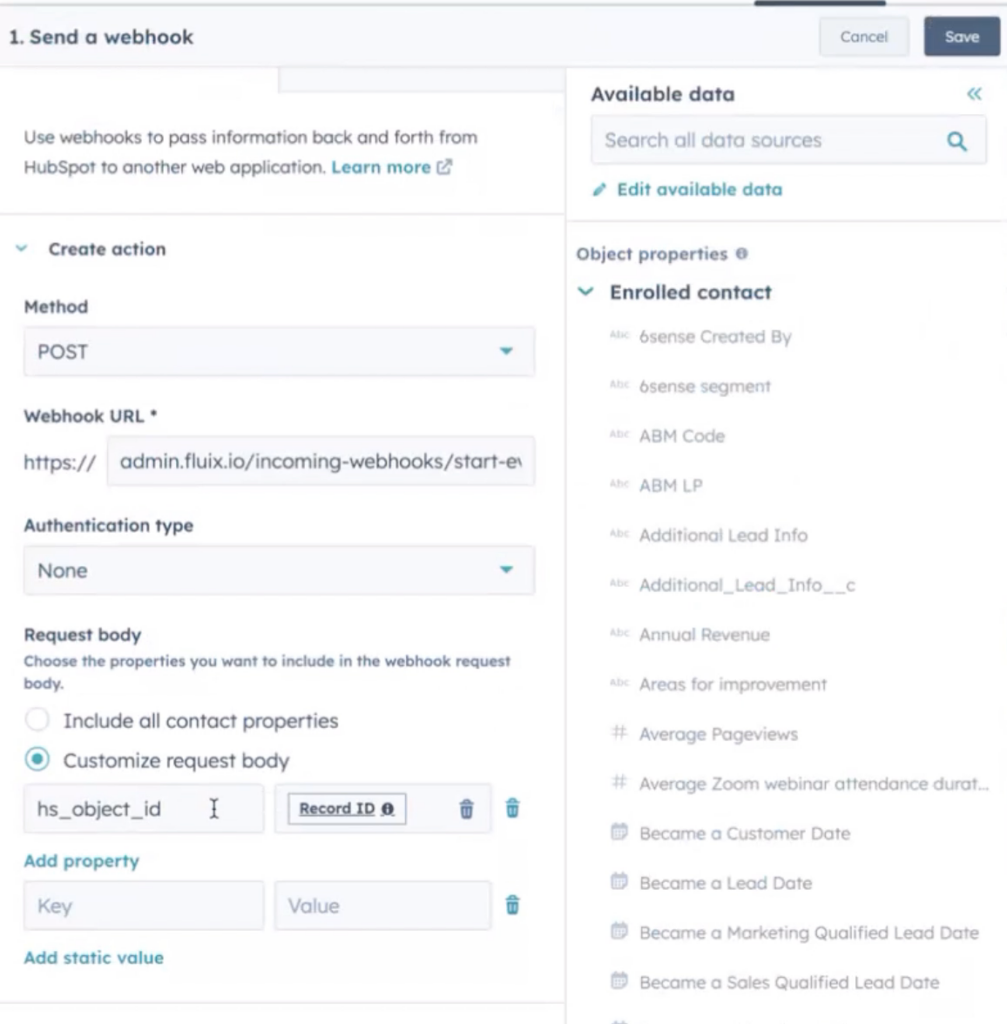
Once the trigger is configured, add the submit action in HubSpot. In our scenario, it will be a Send a webhook action.
To configure the Send a webhook action, in the Method section select POST from the dropdown list. In the Webhook URL section paste the webhook available in the Start Event action from Step 1.
In the Request body section select the properties that you would like to send in the webhook request. These properties are the possible variables that you configured in Step 1 in the Start Event.
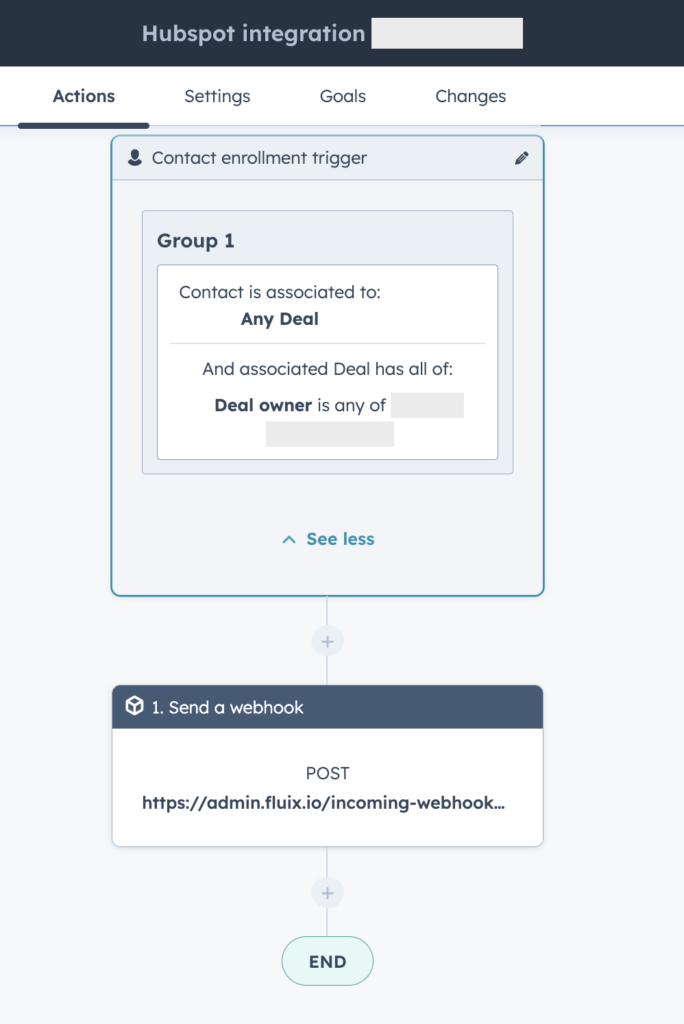
Once done, save the changes in the submit action Send a webhook. The final configurations of the workflow in HubSpot should look like in the image below.
Step 3 – Create a form pre-fill from a third-party tool submit action
Drag and drop Form prefill submit action to the Taskstream chart and connect it with the User task that your team will be working on.
Click on the Form prefill element and select the External tool initiates prefill option from the list.
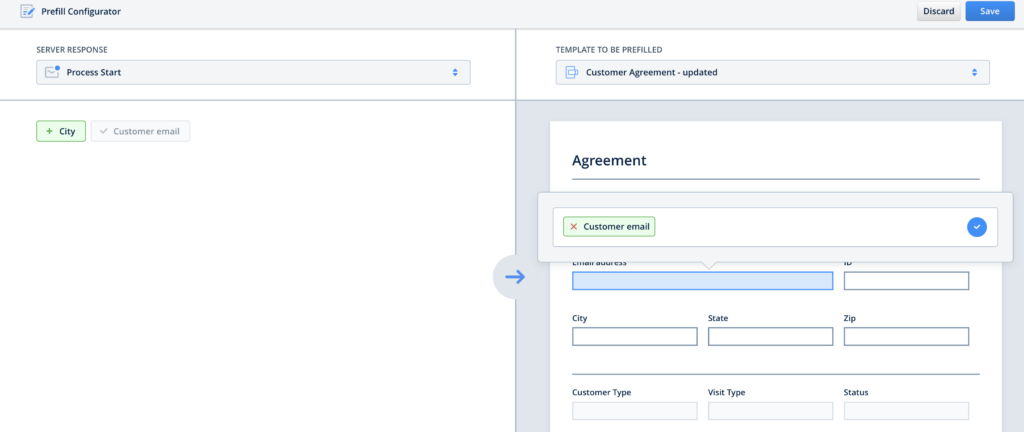
Add form that you would like to be pre-filled for the salesperson and click on the configuration icon to open Prefill Configurator. After that, map the fields (the possible variables from Step 1) from HubSpot with a Customer Agreement form that will be prefilled, and click the Save button.
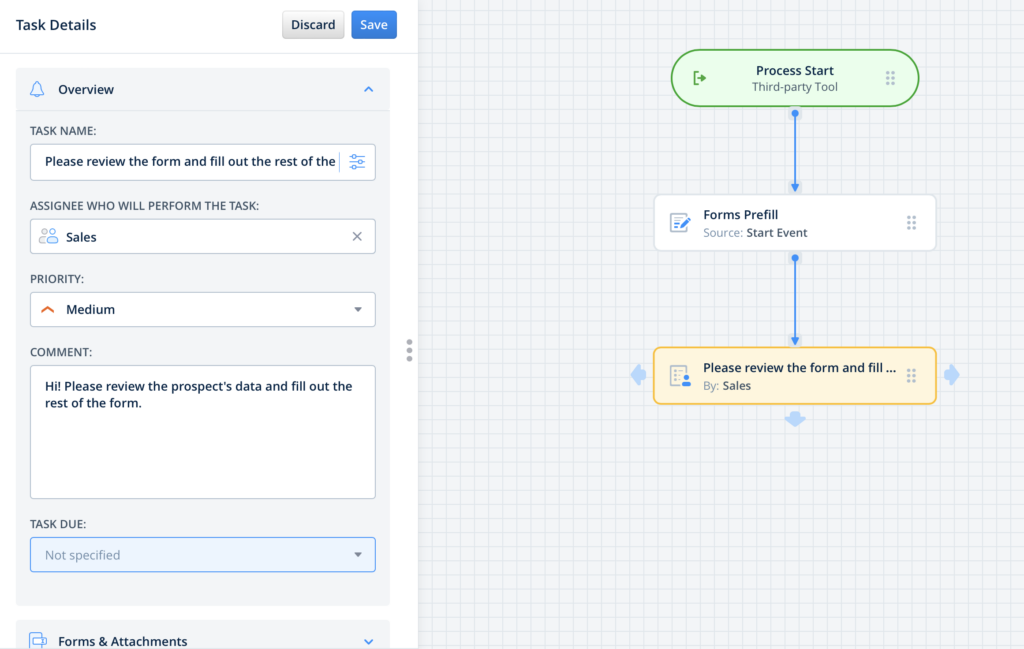
Step 4 – Create the User task
Drag and drop the User task, connect the task with the previous action, and configure it: add the description of the task, and add the Group to whom this task will be assigned. In the Forms and Attachments section, add the form by selecting the Used in the Taskstream option. Make sure that you have added yourself to the group of users in order to test the setup later.
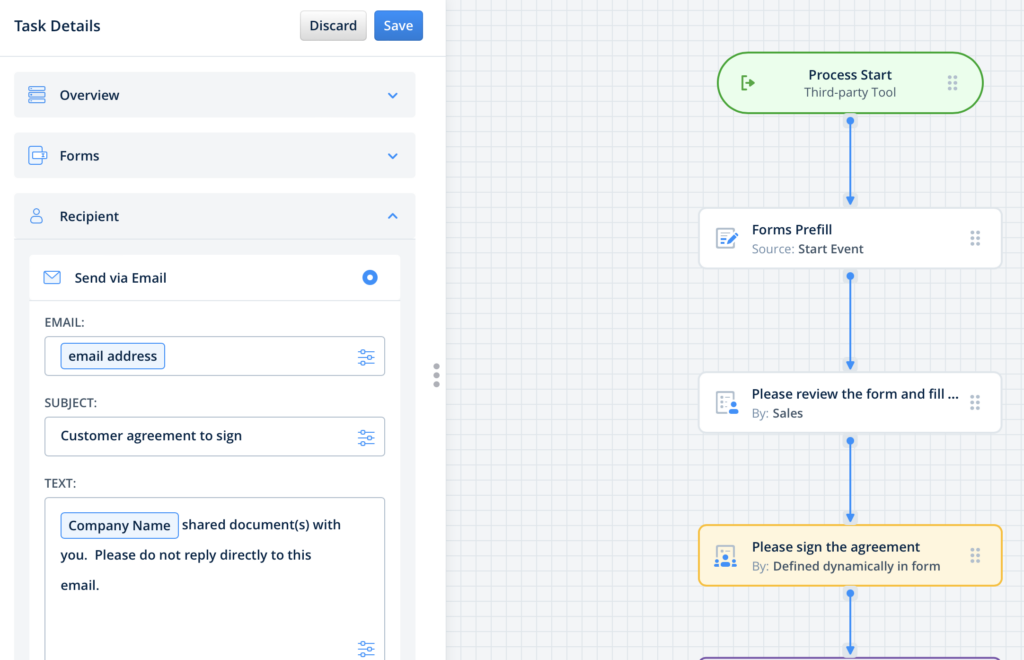
Step 5 – Creating the e-Sign task
Drag and drop the Guest task and connect it with the User task action. Fill out the task name and the description of the task that will be displayed to the Guest and specify the due date if needed. Add the form that will be sent to the prospect by clicking “Used in this taskstream” in the Forms section and add the email address to the Recipient section by configuring the dynamic values.
Step 6 – Configure the final destination for the form
When the Guest completes the task, it will be automatically pushed down the process. For example, the document can be sent to the salesperson for review, and after getting approval, it can be uploaded directly to your company’s cloud storage or any other tool, the data from it can be extracted for further analysis or the document can be simply shared by email.
In case you have any questions or difficulties with setup, contact our support at support@fluix.io and we’ll be happy to help you.