


Fluix is a web and mobile-based cloud platform that helps teams set up digital document management and workflow automation. In this integration, Fluix serves as an electronic data capture system.
Monday.com is a project management platform that gives the ability to shape business processes, delegate tasks and track their progress. Besides that, monday.com can be used as a CRM tool that will allow you to manage leads or sales pipelines.
What Fluix + monday.com integration does
By integrating Fluix and monday.com, you can create a seamless flow of information and automate various steps in your business processes. This helps to reduce manual effort, improve data accuracy, and enhance collaboration across teams. For example, once your team member completes the form in the Fluix app, the integration with Monday.com comes into play and a new task in monday.com for your team will be created. Alternatively, you may configure the process, that will upload the completed documents in Fluix in the selected Board in your monday.com account.
Note. Integration requires a PRO Plan account in Fluix and an account in monday.com. You can register for a free trial account in both Fluix and Monday.com to try the option.
Step 1 – Create the repetitive process in Fluix
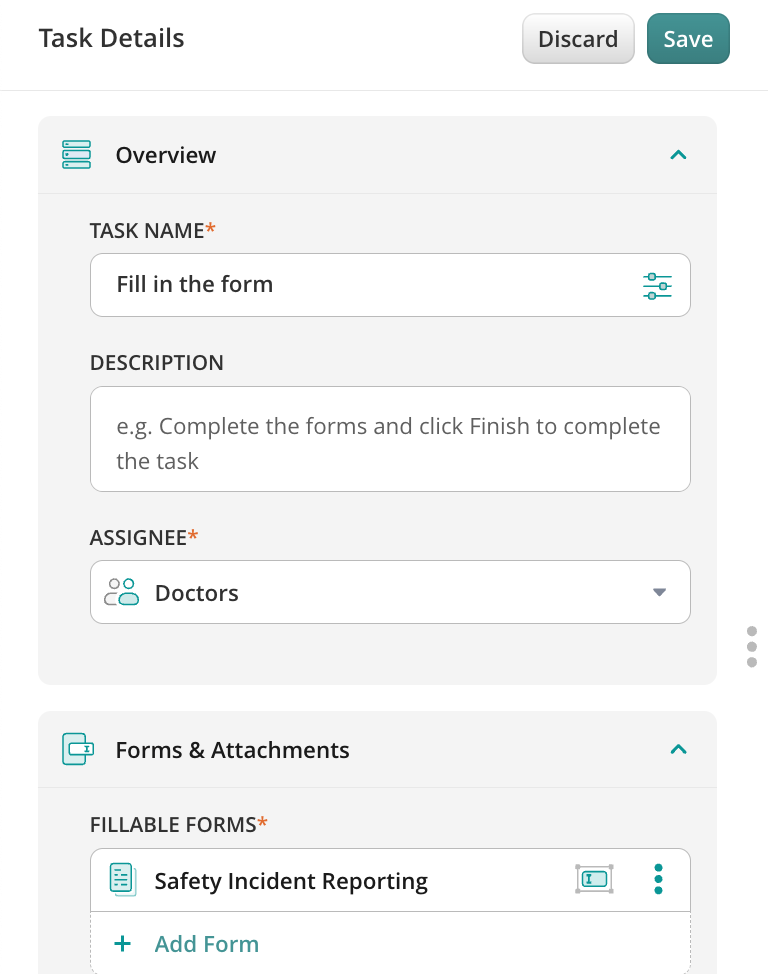
Navigate to the Fluix Admin portal, Workflow section, to create a new Workflow. Add a User task to the working area and configure it by adding fillable forms and assigning it to the team that will work on it on a regular basis. Make sure that you have added yourself to the group of users in order to test the setup later.
Step 2 – Connecting Fluix with monday.com
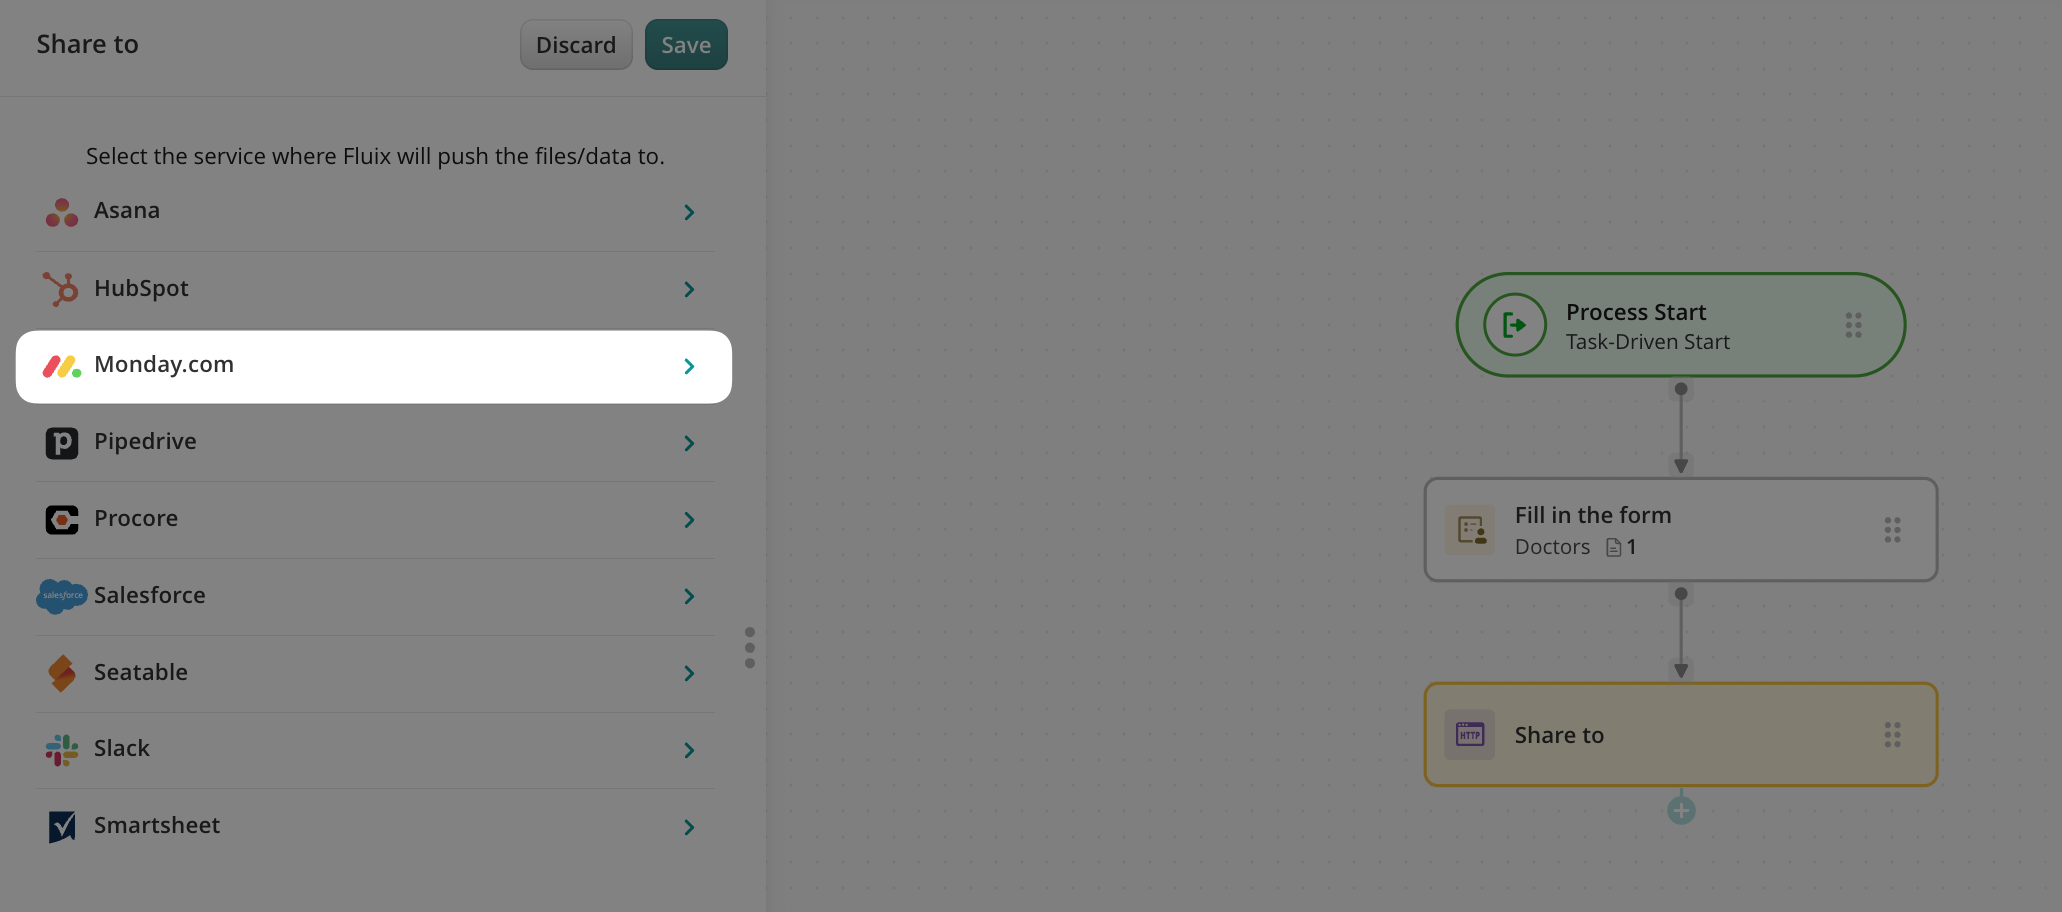
Add a Share to submit action to the Workflow chart and connect it with the User task your team will work on.
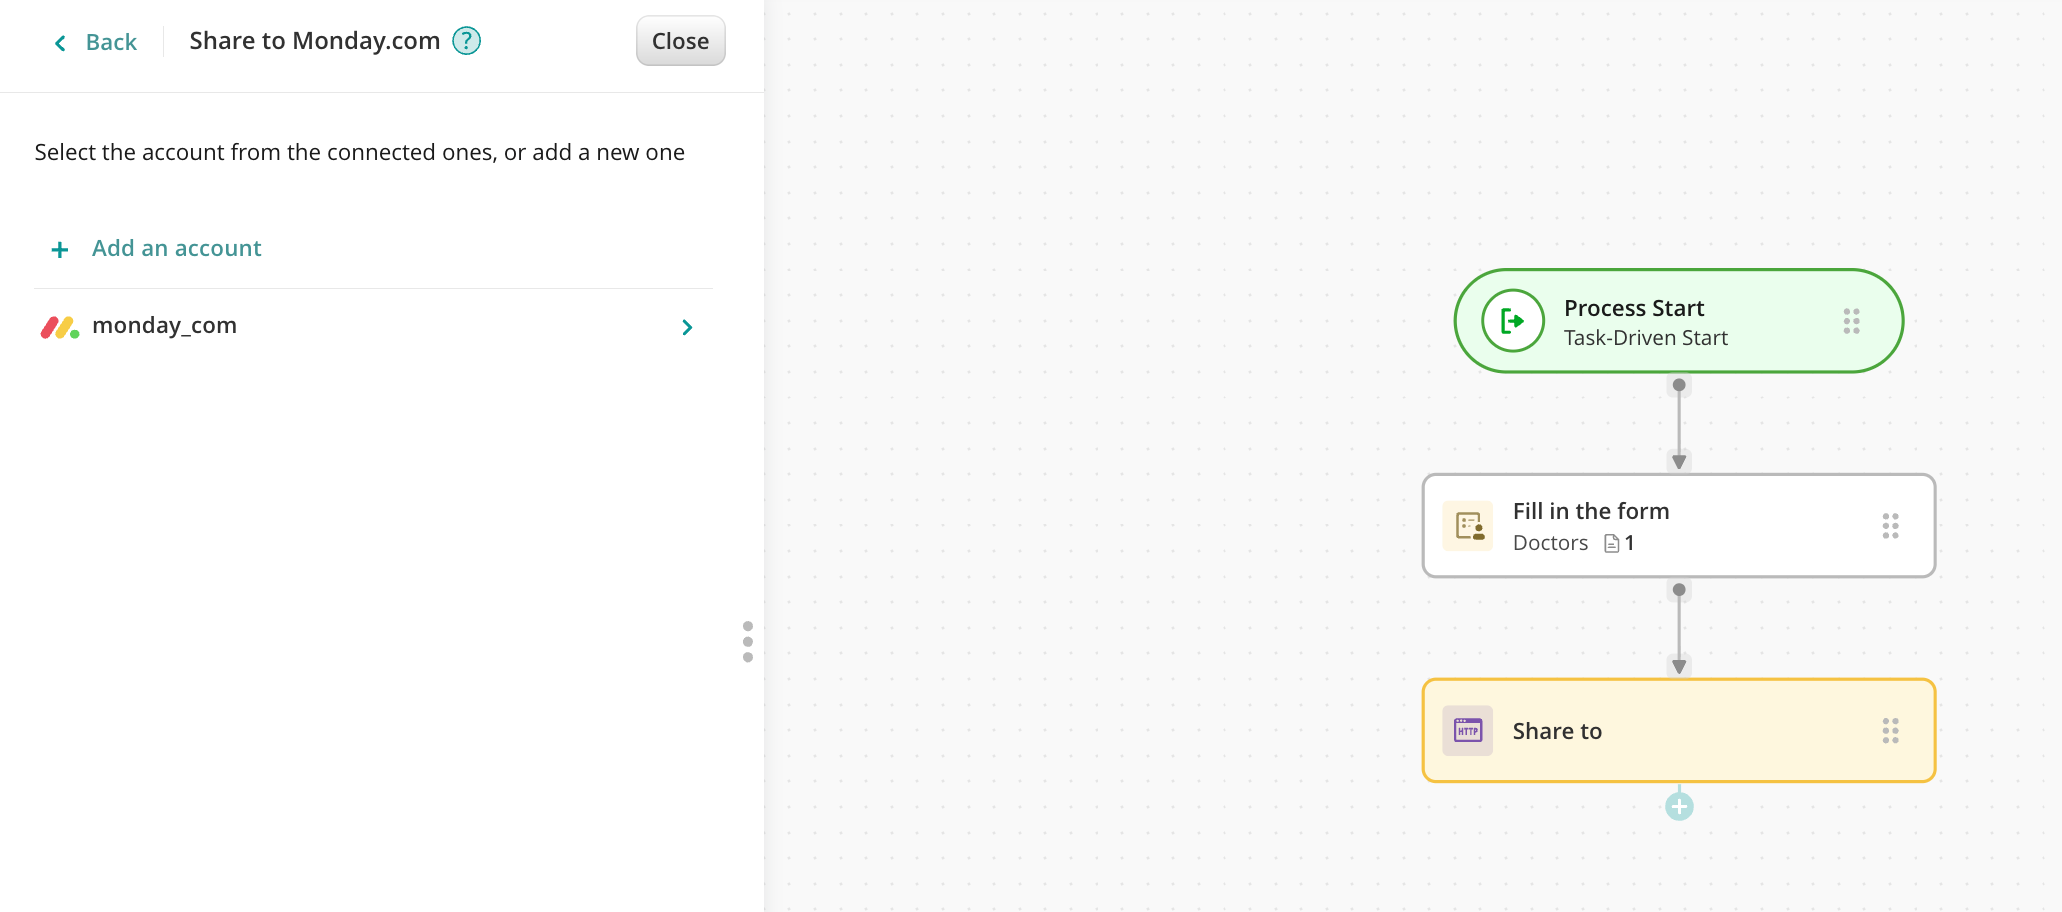
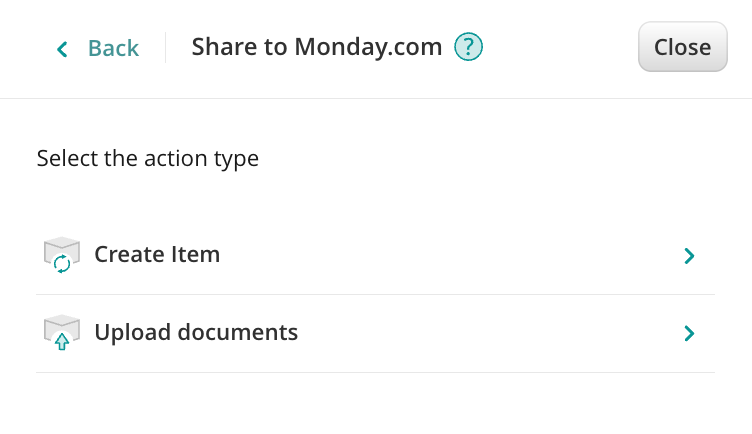
Click on the Share to element and select monday.com among the list of third-party tools.
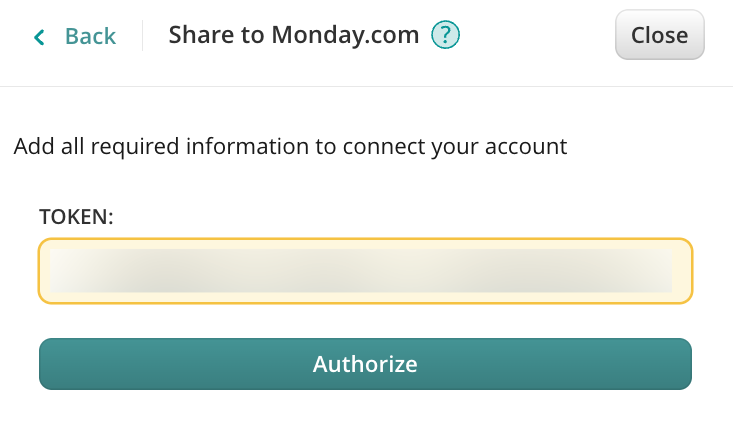
In order to locate the token, please follow the instructions below:
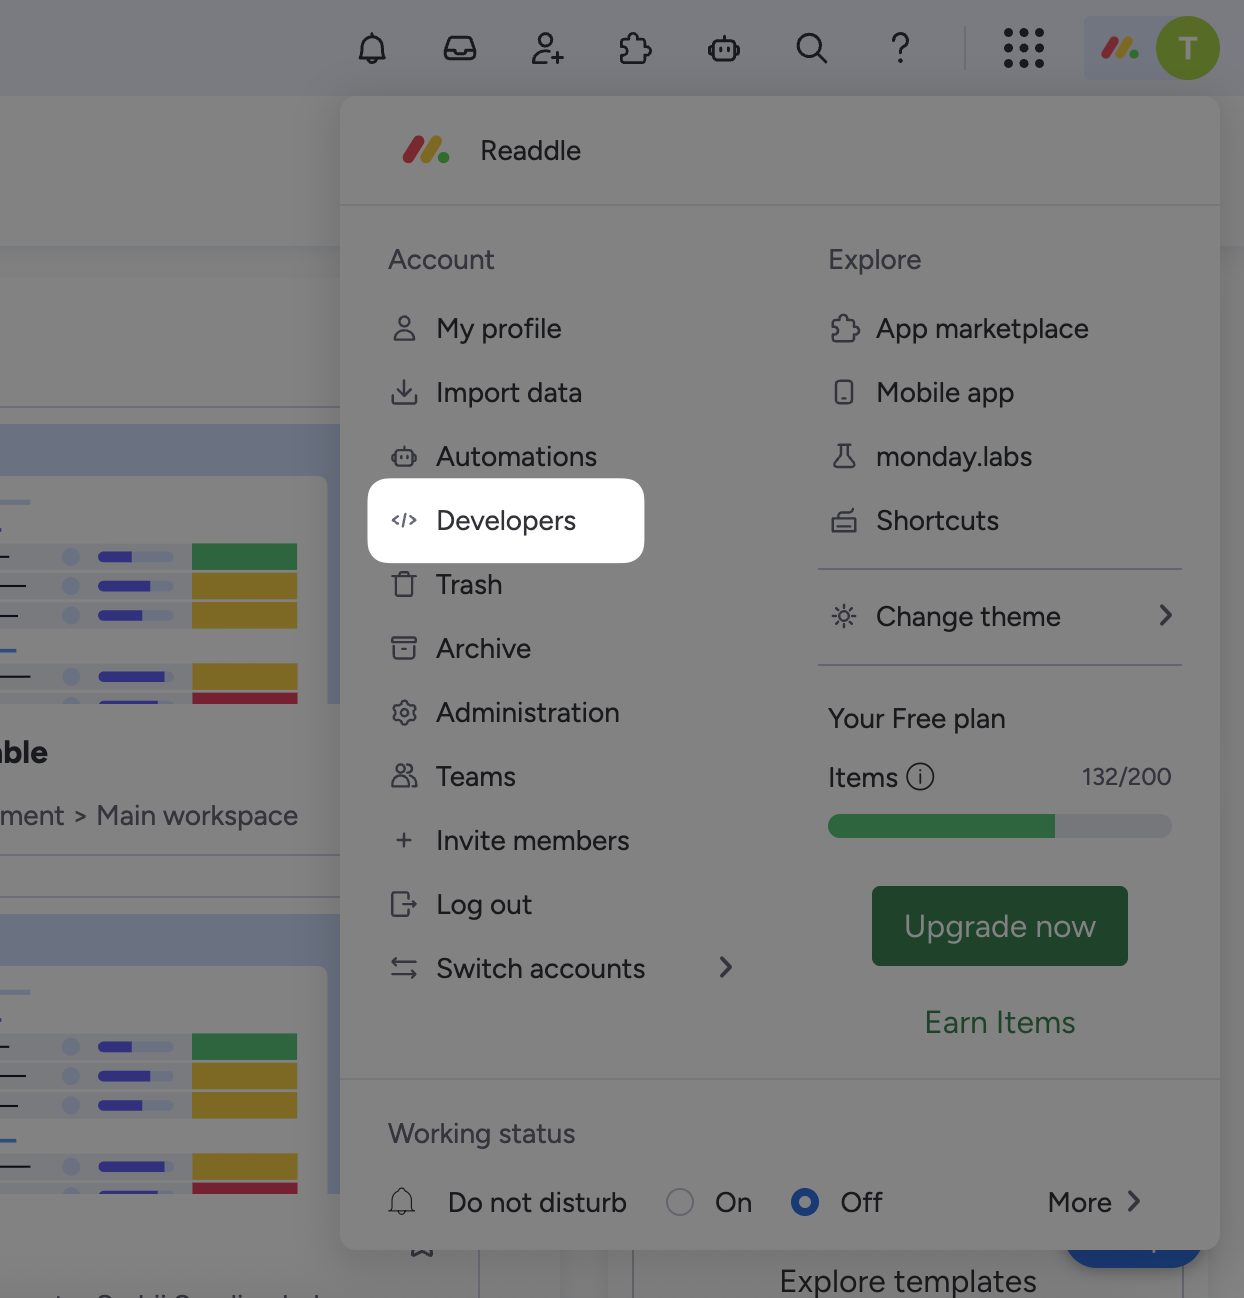
- Go to your monday.com account, click on your avatar in the top right corner, and select the Developers section.
- In the left menu of the Developer Center, click API token.
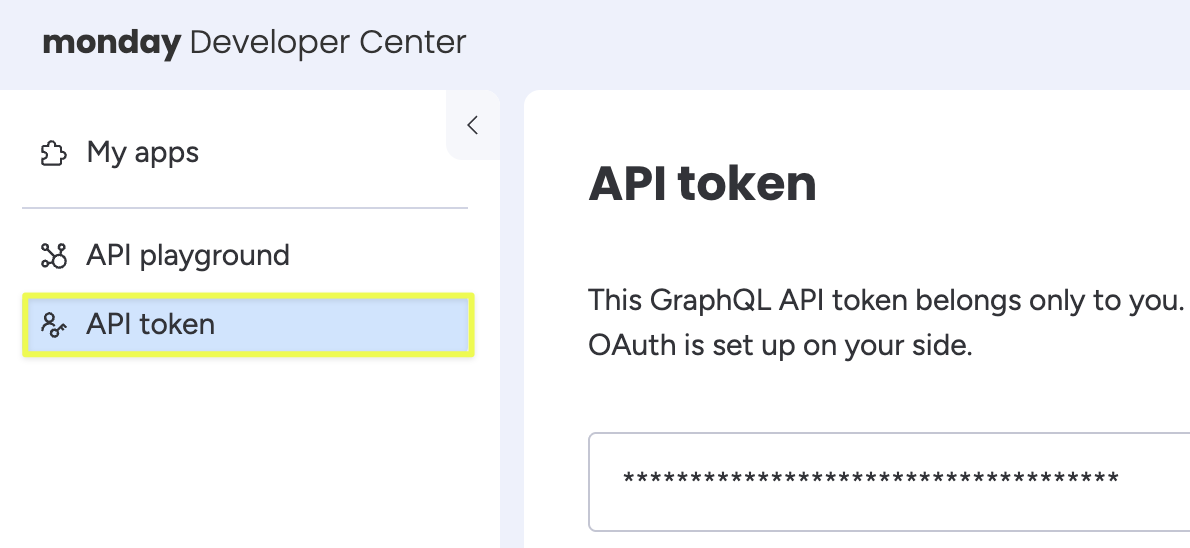
- Copy the token from the monday.com account and paste it into the Token section in Fluix and click the Authorize button.
The connected monday.com account will be automatically added to the accounts:
Step 3 – Configure the data extraction
Let’s look at 2 real-life scenarios as examples of configuring the automation of processes between Fluix and monday.com.
By implementing this automation, we can eliminate the need for excessive internal communication between teams regarding task statuses, resulting in significant time savings.
Here’s how it works: When a Fluix user fills out and submits a form within the Fluix platform, the automated process will trigger the creation of a new task (referred to as an “Item”) or the document distribution in the pre-configured Item in monday.com. This eliminates the need for manual updates or notifications, as the automation takes care of this process.
Scenario 1: Create a new task (item) in monday.com once the process is finished in Fluix
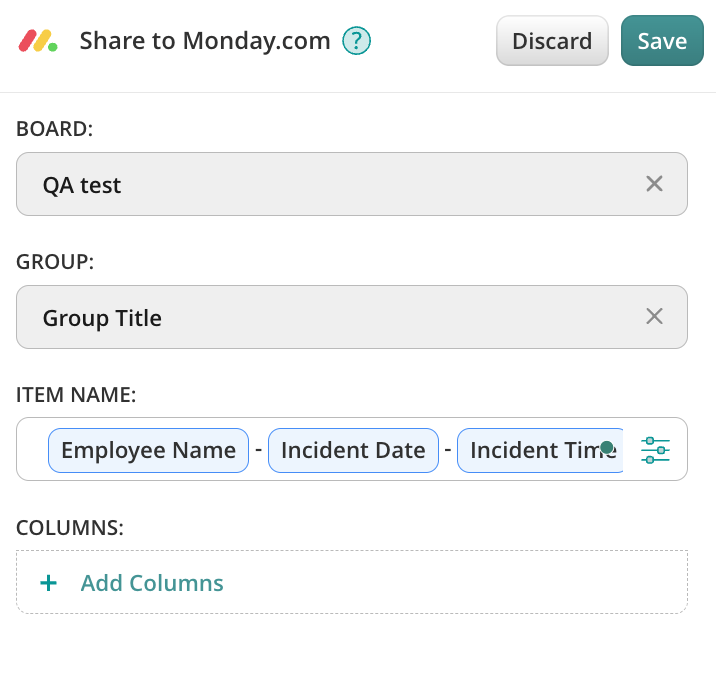
Click on the connected monday.com account, and select the Create Item option from the list. Click the Board field and select the board (table) from the list of available options in which you would like to automatically create new Items upon submission of the forms. Select the Group to which the item will be added.
By using the dynamic values, configure the Item name that will be created in the selected Board. Select the form from the Workflow under the Attached forms section. Add the columns from the selected board that should be filled out accordingly upon the submission of the form.
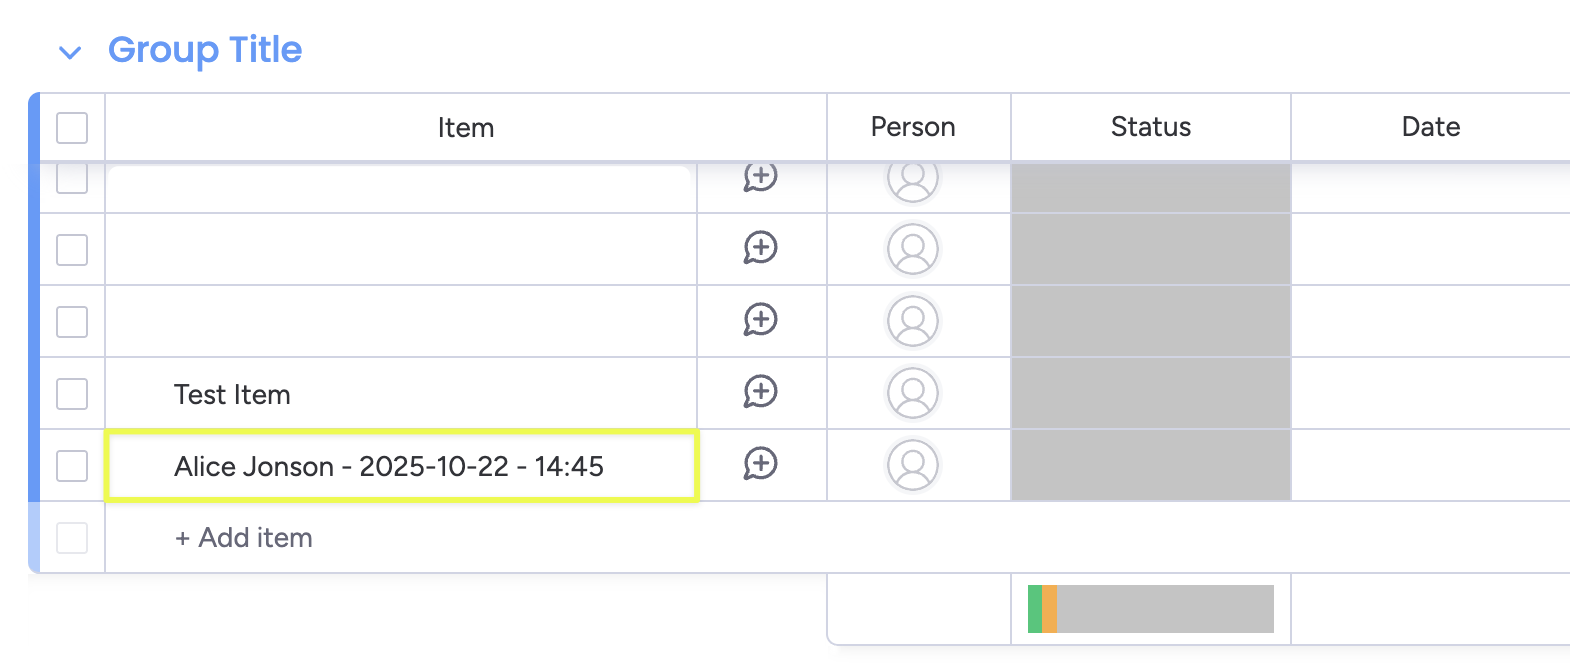
Therefore, once the Fluix user finishes the respective process in Fluix, a new task on the pre-configured board will be created taking into account the dynamic values that are selected for the Item name.
Scenario 2: Upload the completed documents in Fluix to the respective item in monday.com
Click on the connected monday.com account, and select the Upload documents option.
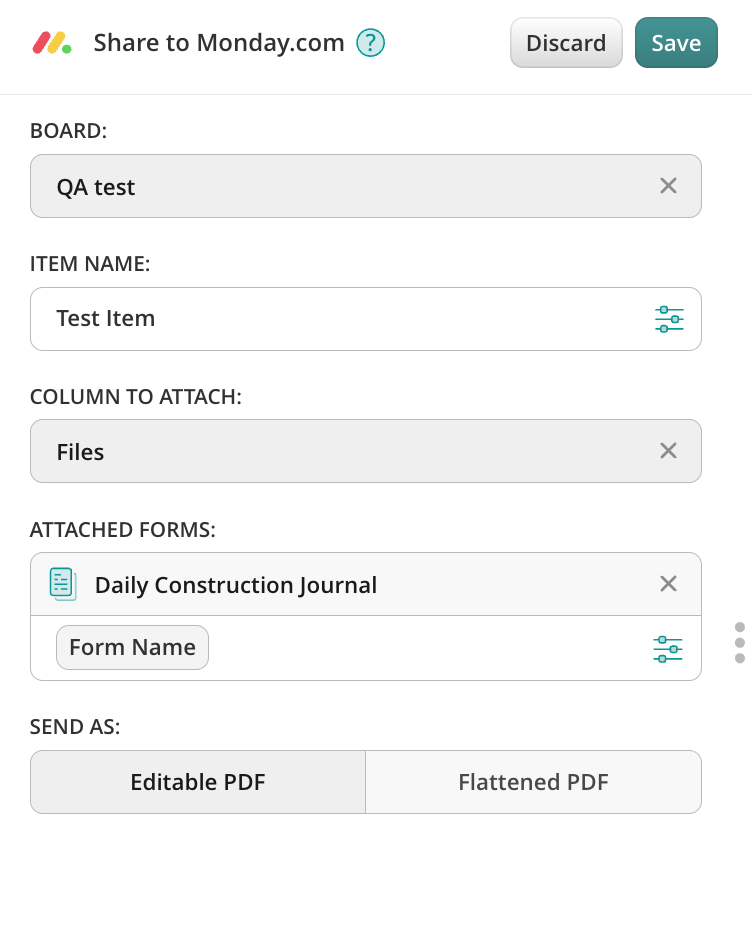
Select the Board from monday.com to which you would like to upload the completed in Fluix documents.
Copy and paste the name of the Item from the Board in monday.com to which you would like the completed documents to be submitted. Please note that the Item should have a column that can contain a file.
Select the Column in the Item to which the files will be attached, and select the form that will be attached. Make sure you add the dynamic values to the name of the form and select in which format the form should be submitted: editable PDF or flattened PDF. Save the submit action by tapping the Save button.
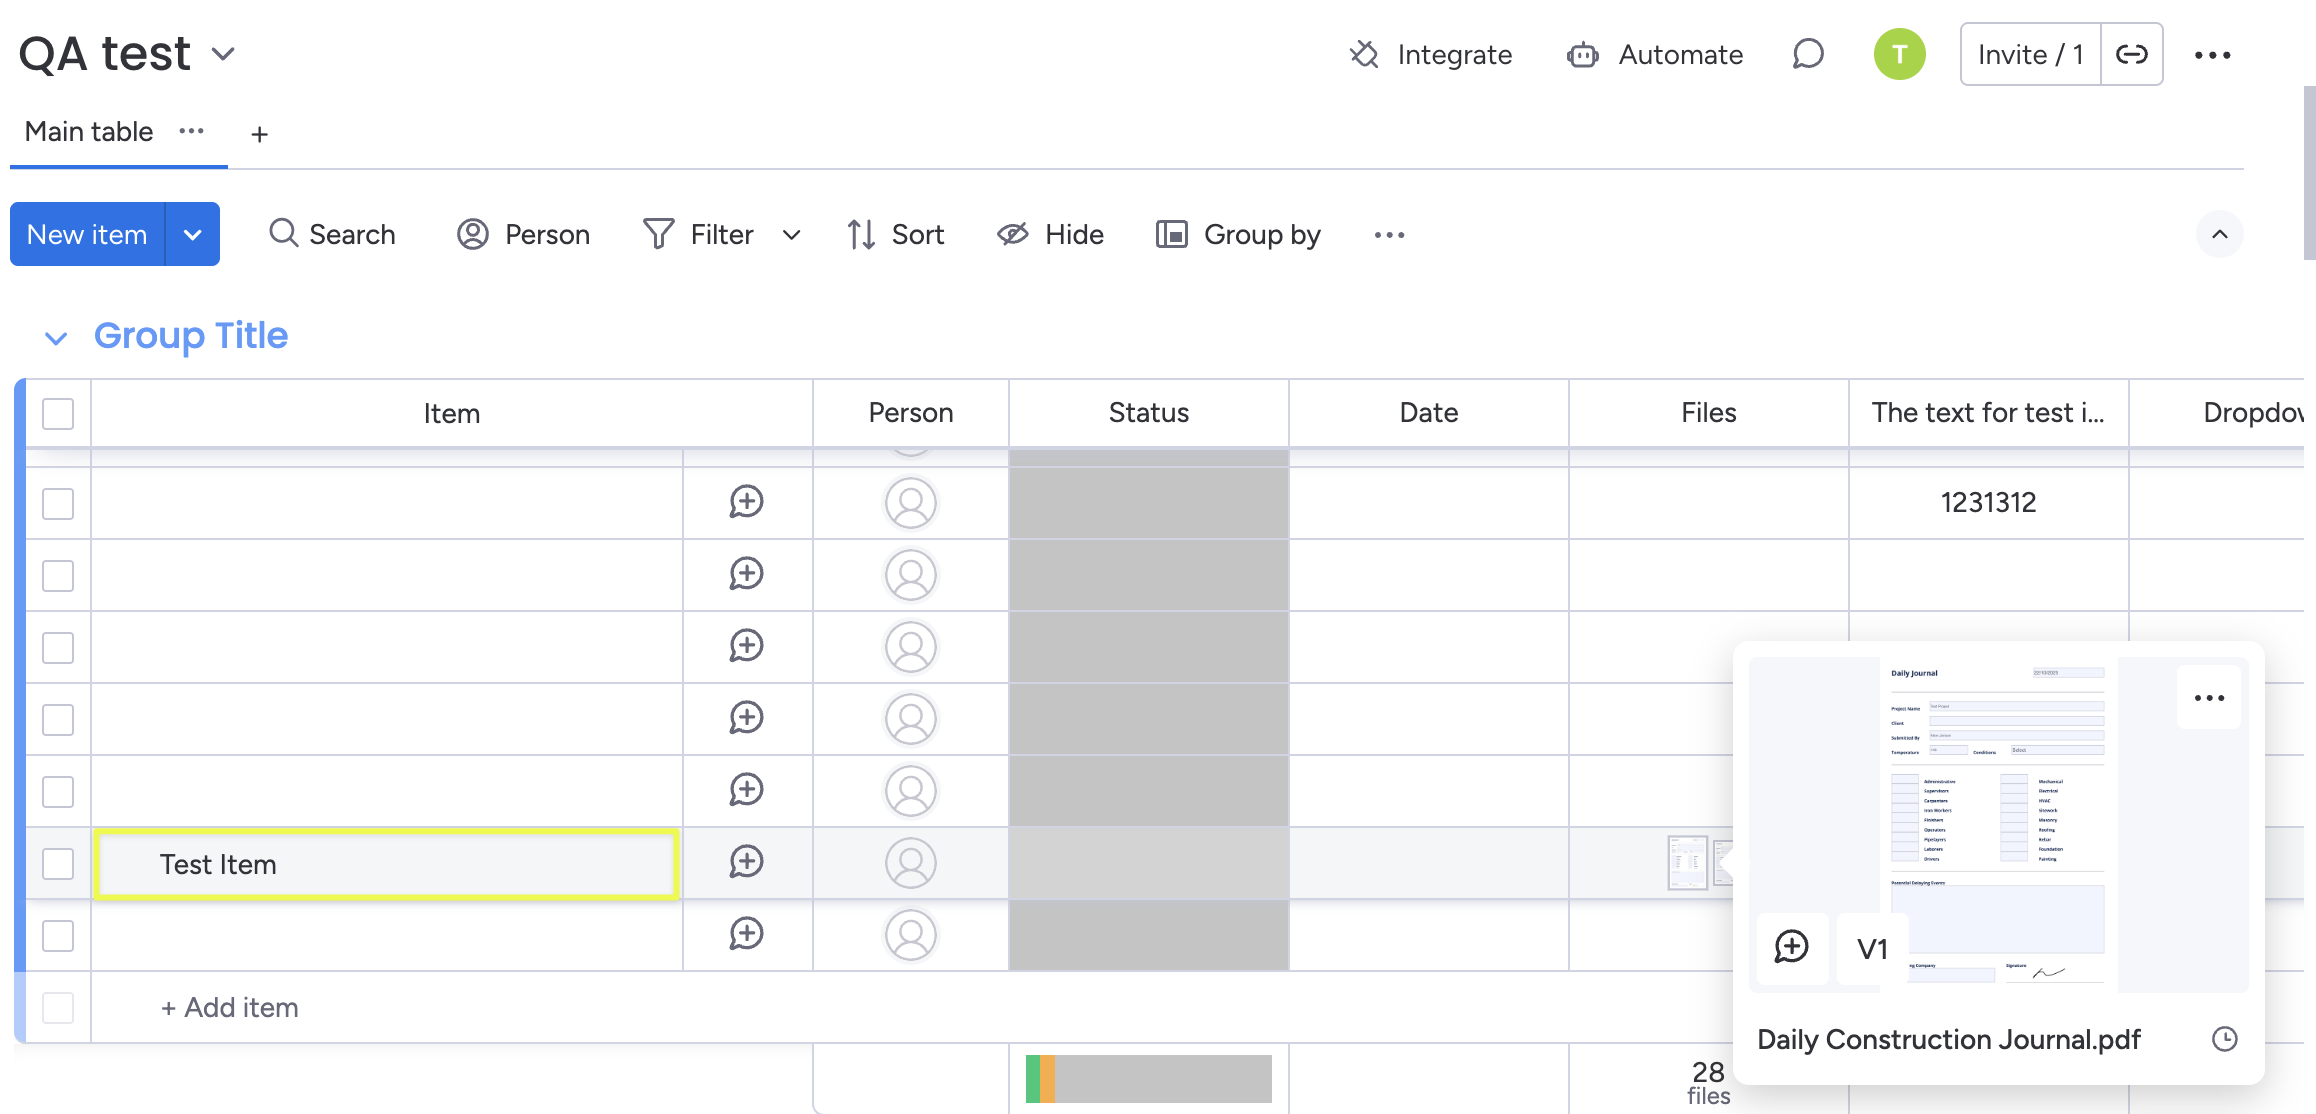
Once the user submits the form in Fluix, the document will be added to the pre-configured Board and Item in the Workflow.
Step 4 – Save and test the setup
Once you fill out all the fields, click Save&Publish to activate the Workflow.
Open the user app on your mobile device or click User App in the right corner of the admin portal. Navigate to the task that you created, fill in the form, and finish it. Once the task is submitted in Fluix, a new item will be created in the respective board, or the submitted form will be attached to the selected board in your company’s monday.com account.
Additionally, check the full tutorial on how to test a workflow below:
In case you have any questions or difficulties with setup, contact our support at support@fluix.io, and we’ll be happy to help you.