PDF form is a popular format for fillable forms for a number of reasons:
Uniform appearance which is critical for business and legal documents
PDF remains intact regardless of the device and operating system
The form looks similar to the paper form which is critical for non-techy team members who used to work with paper forms for years
Digital signature
Security. It is possible to make form fields required, hidden, view-only. Moreover, the form itself can be protected with a password.
In this article you’ll learn how to create a fillable PDF form in two tools: Adobe Acrobat Pro and Fluix.
Note: in case you need to create a fillable PDF form for your individual use, we advise you to create it in Adobe Acrobat. To create fillable forms for collaboration with your team, choose Fluix mobile form filling software and workflow automation solution.
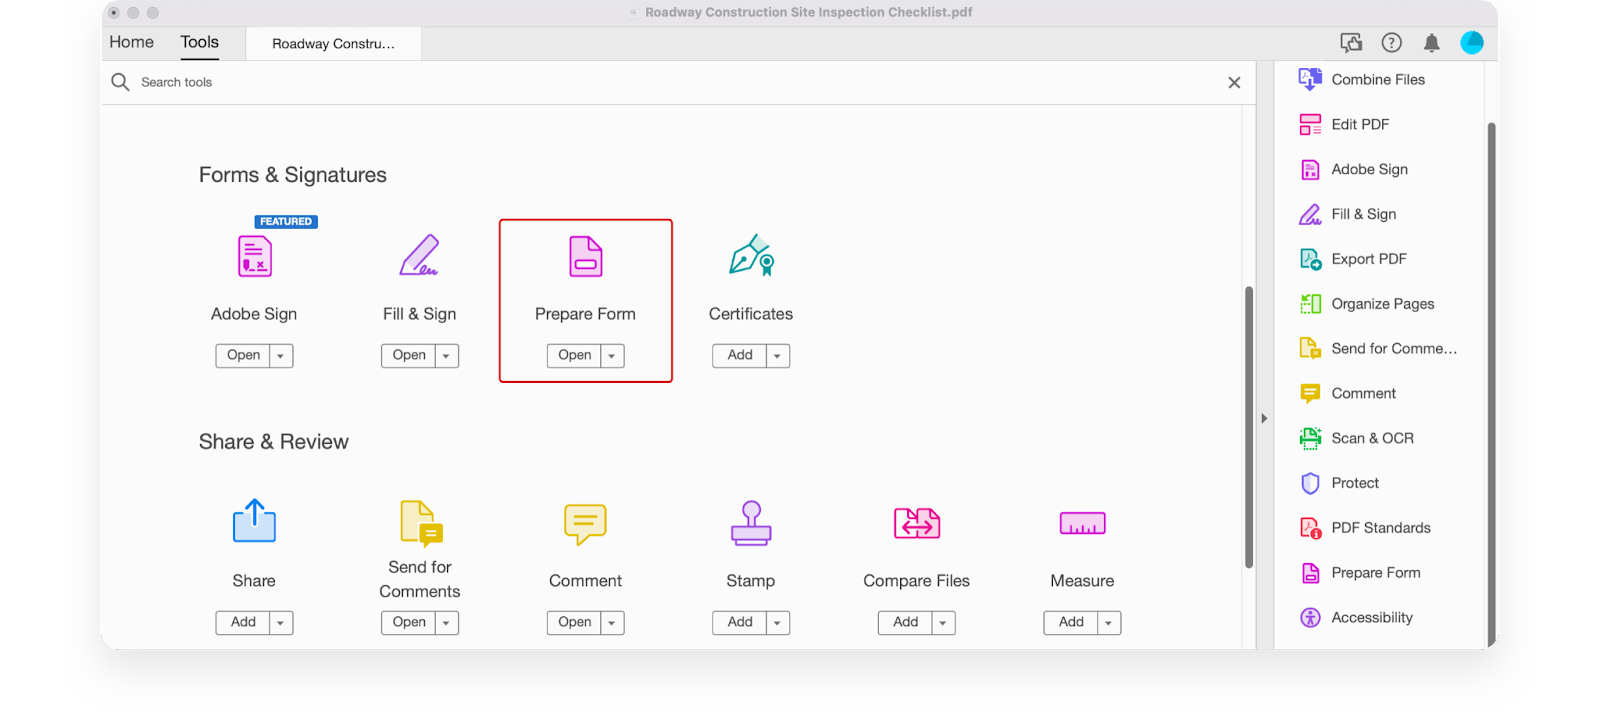
Creating a fillable PDF form in Adobe Acrobat Pro
Note: to create a fillable PDF form in Adobe, start with a trial account, or buy a license.
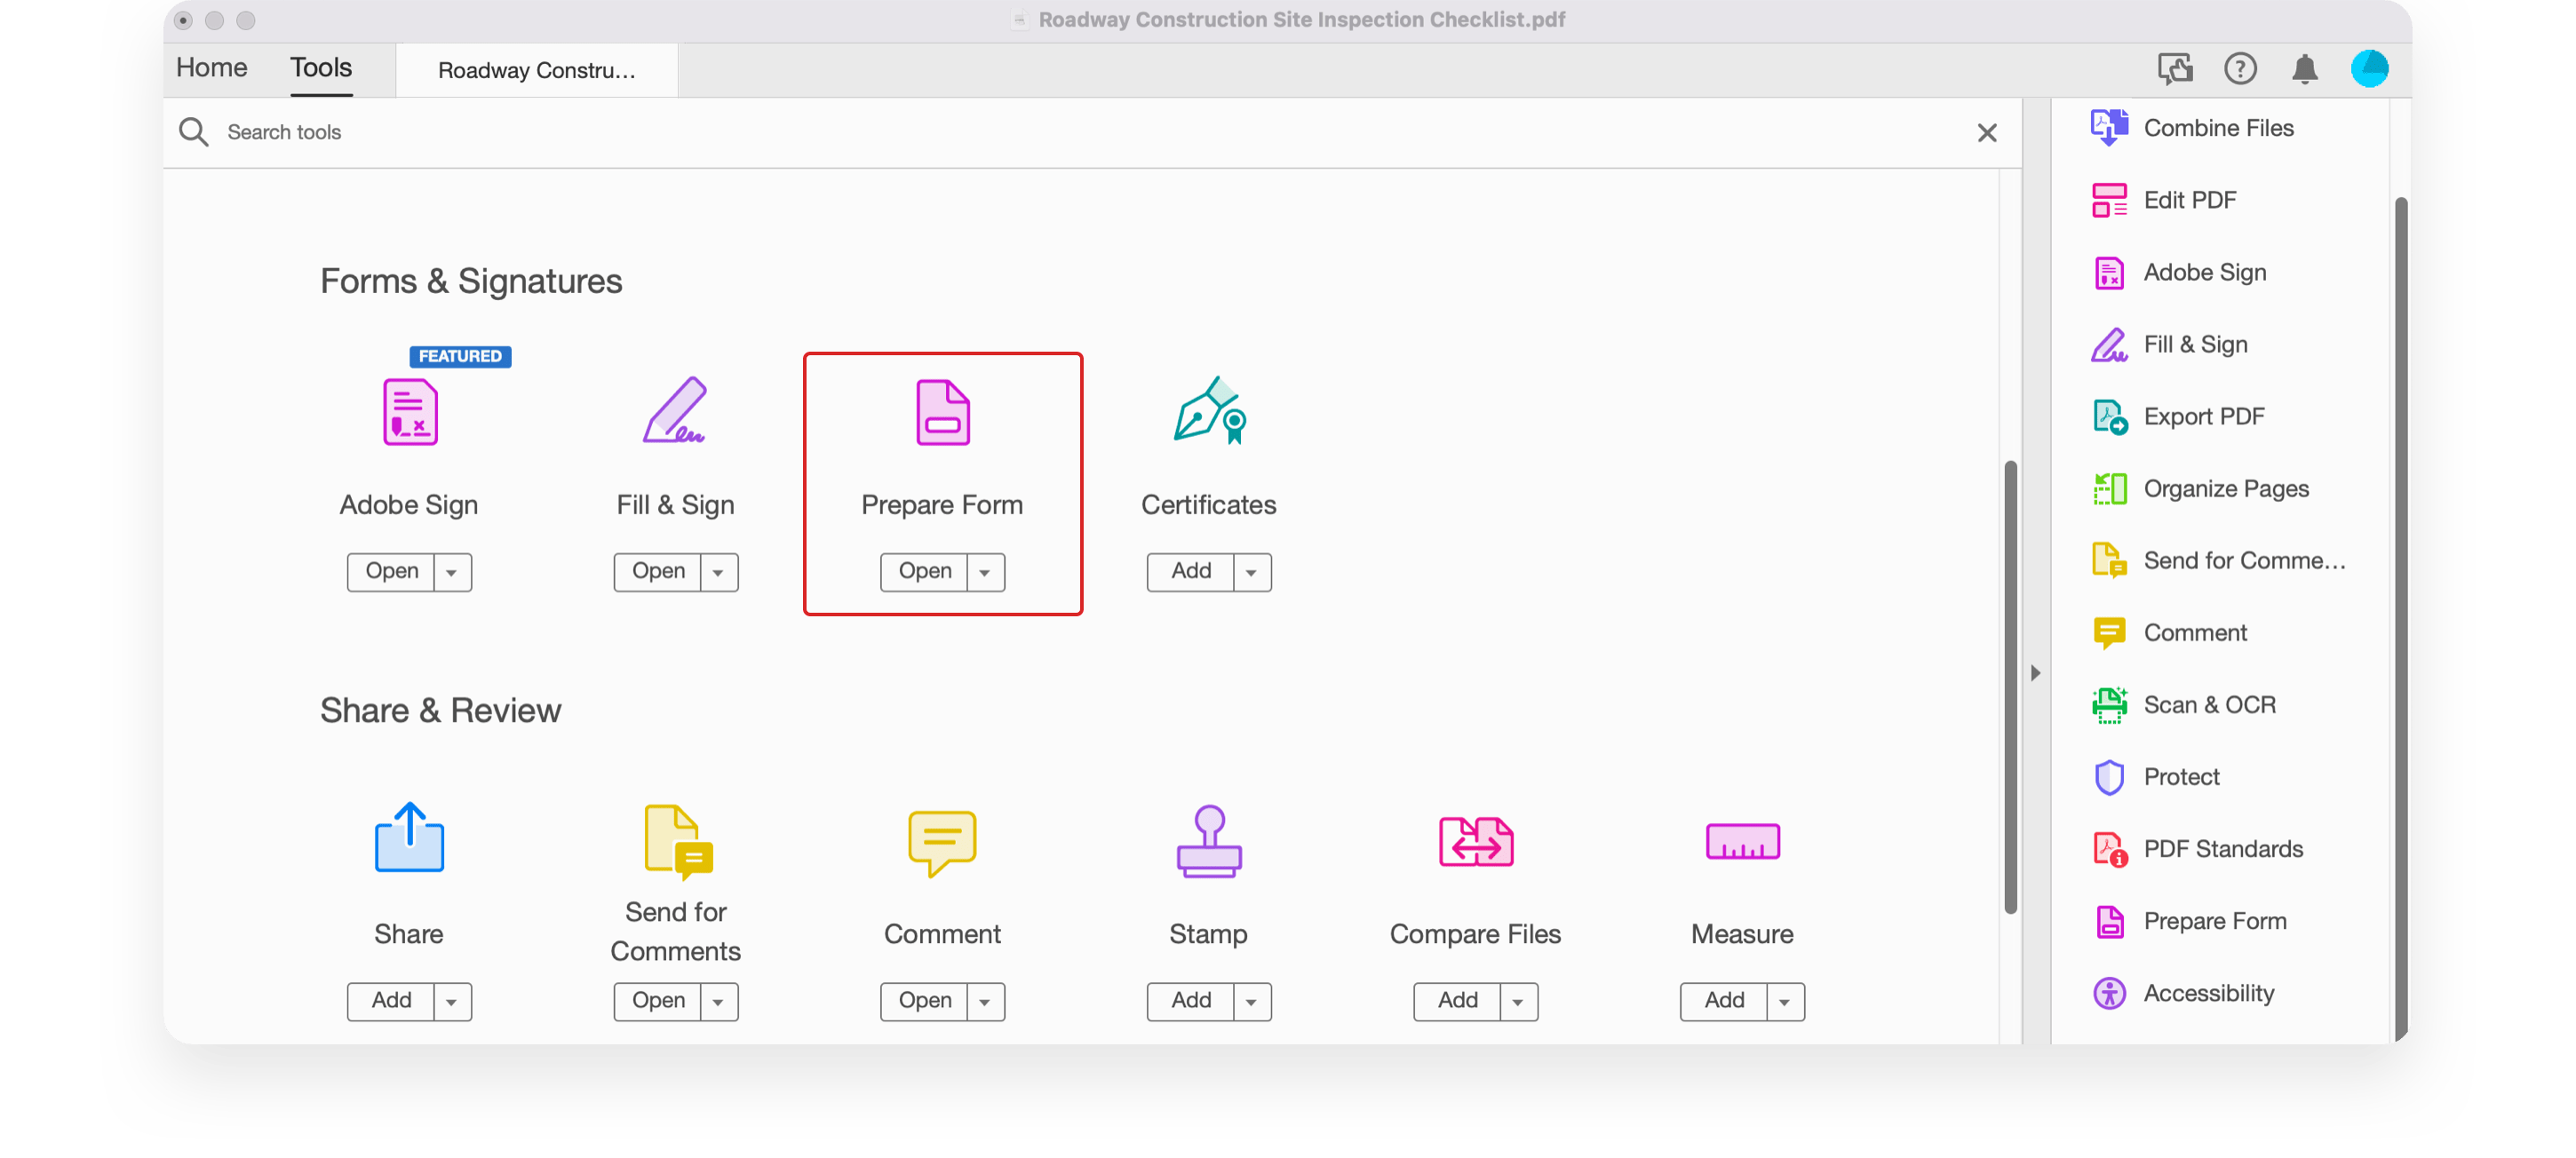
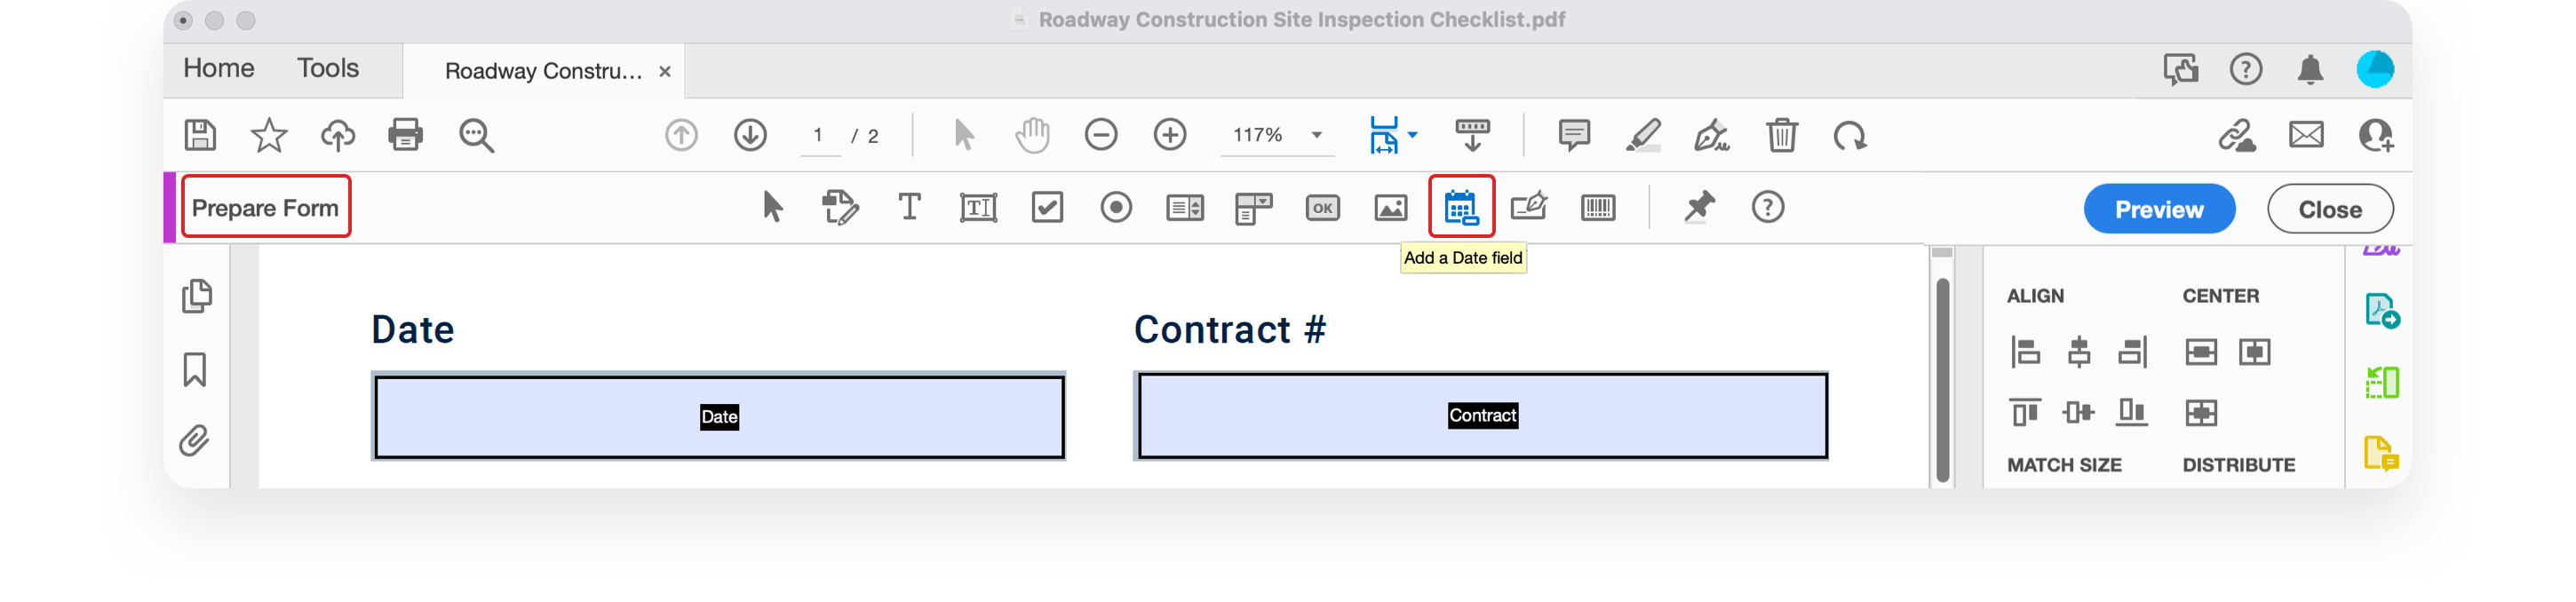
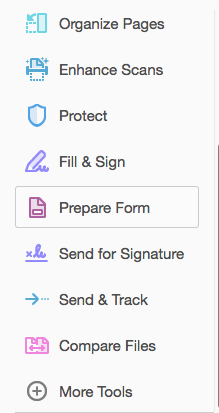
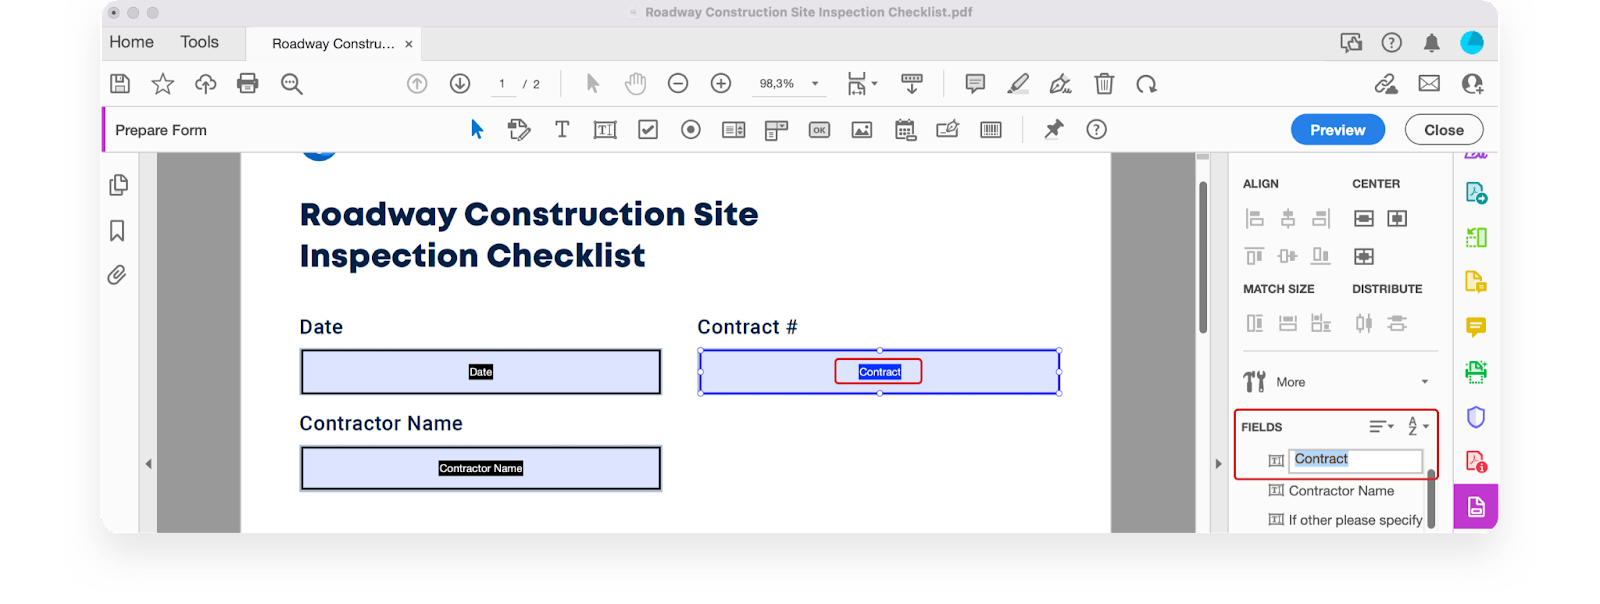
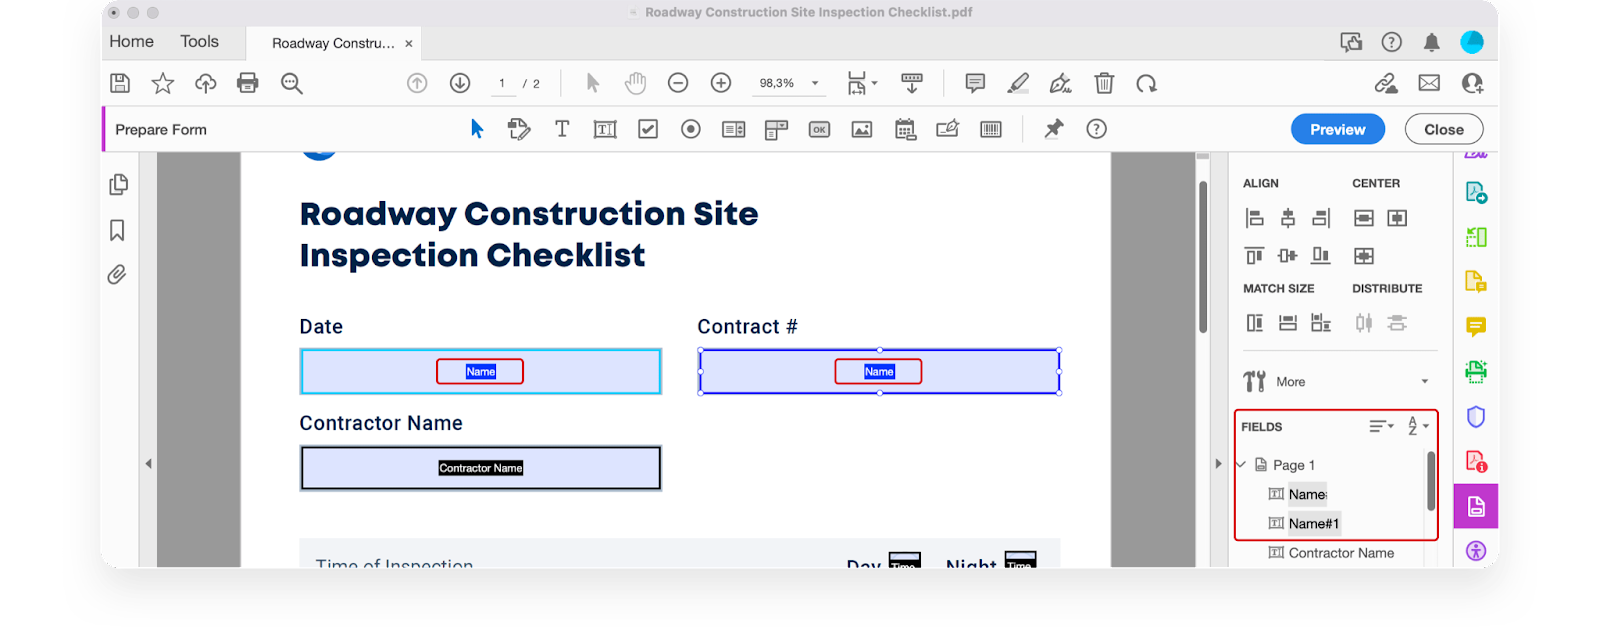
To start creating a form, open Adobe Acrobat Pro and click Prepare Form.
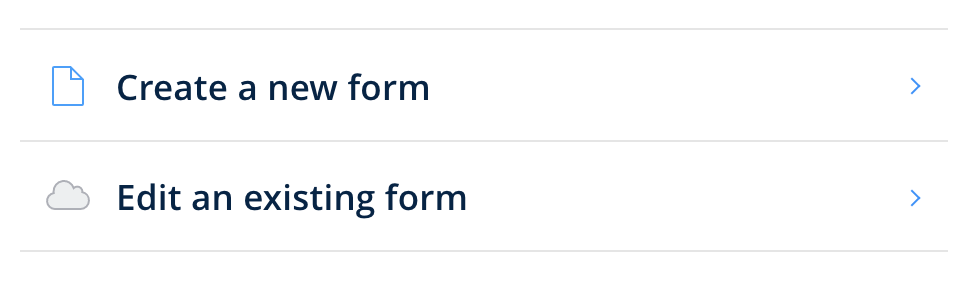
In the suggested list of options you will need to either select a form you already have in a different format, or select Create New to create a form from scratch.
In the opened interface you will see the menu of elements on top of the page:
To add an element, drag & drop it from the menu to the form.
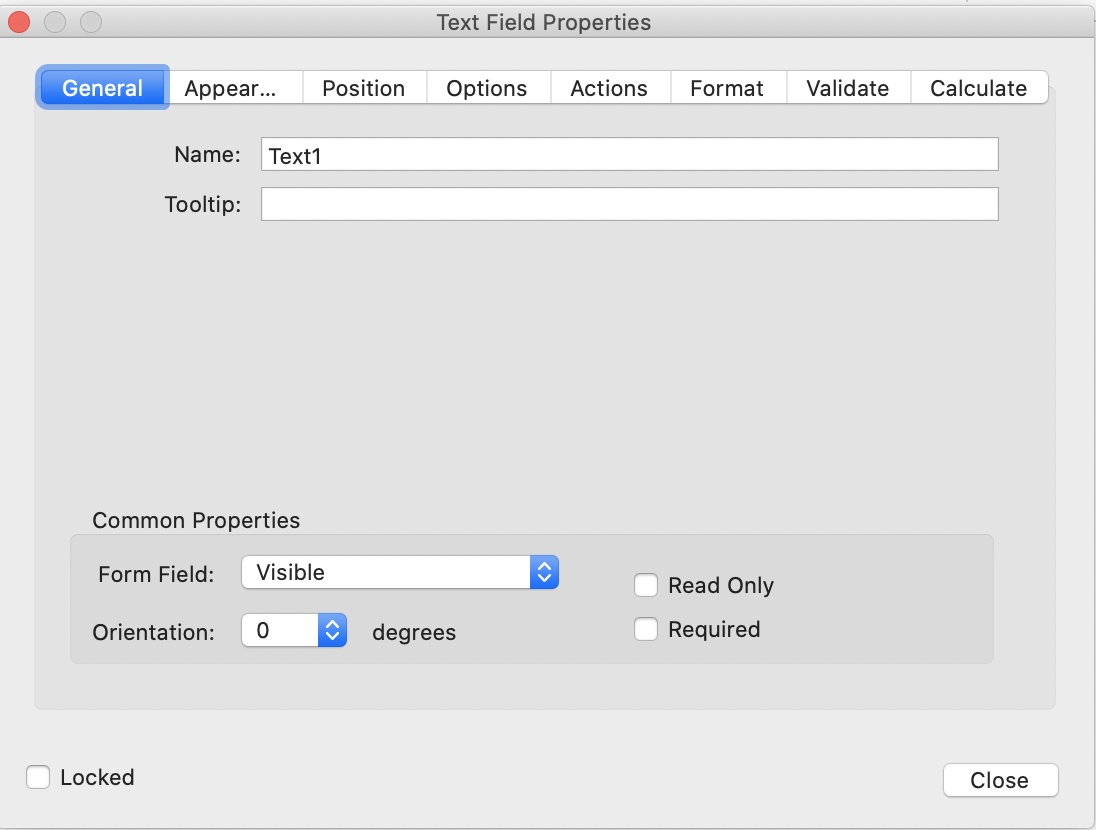
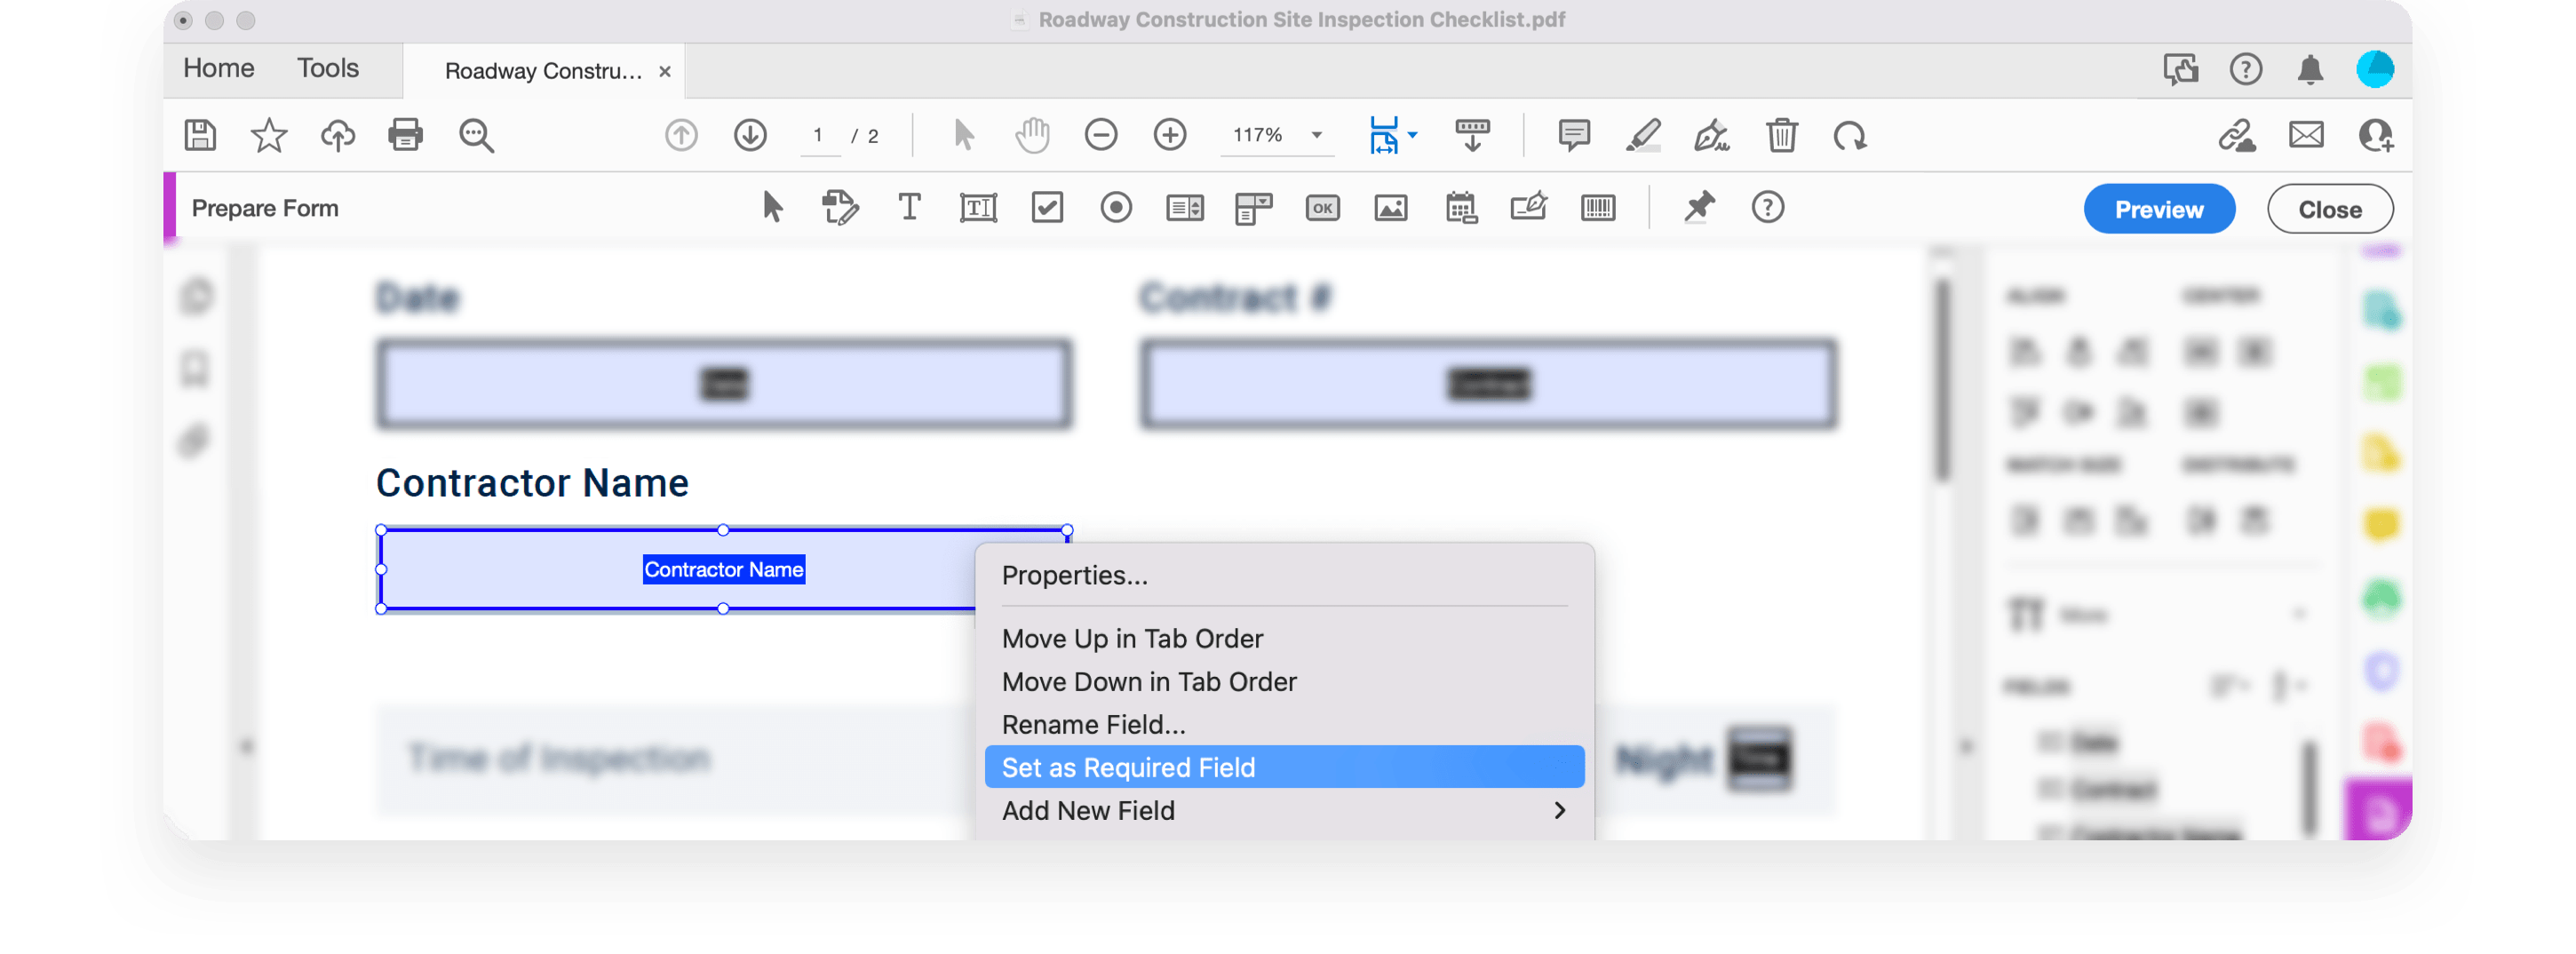
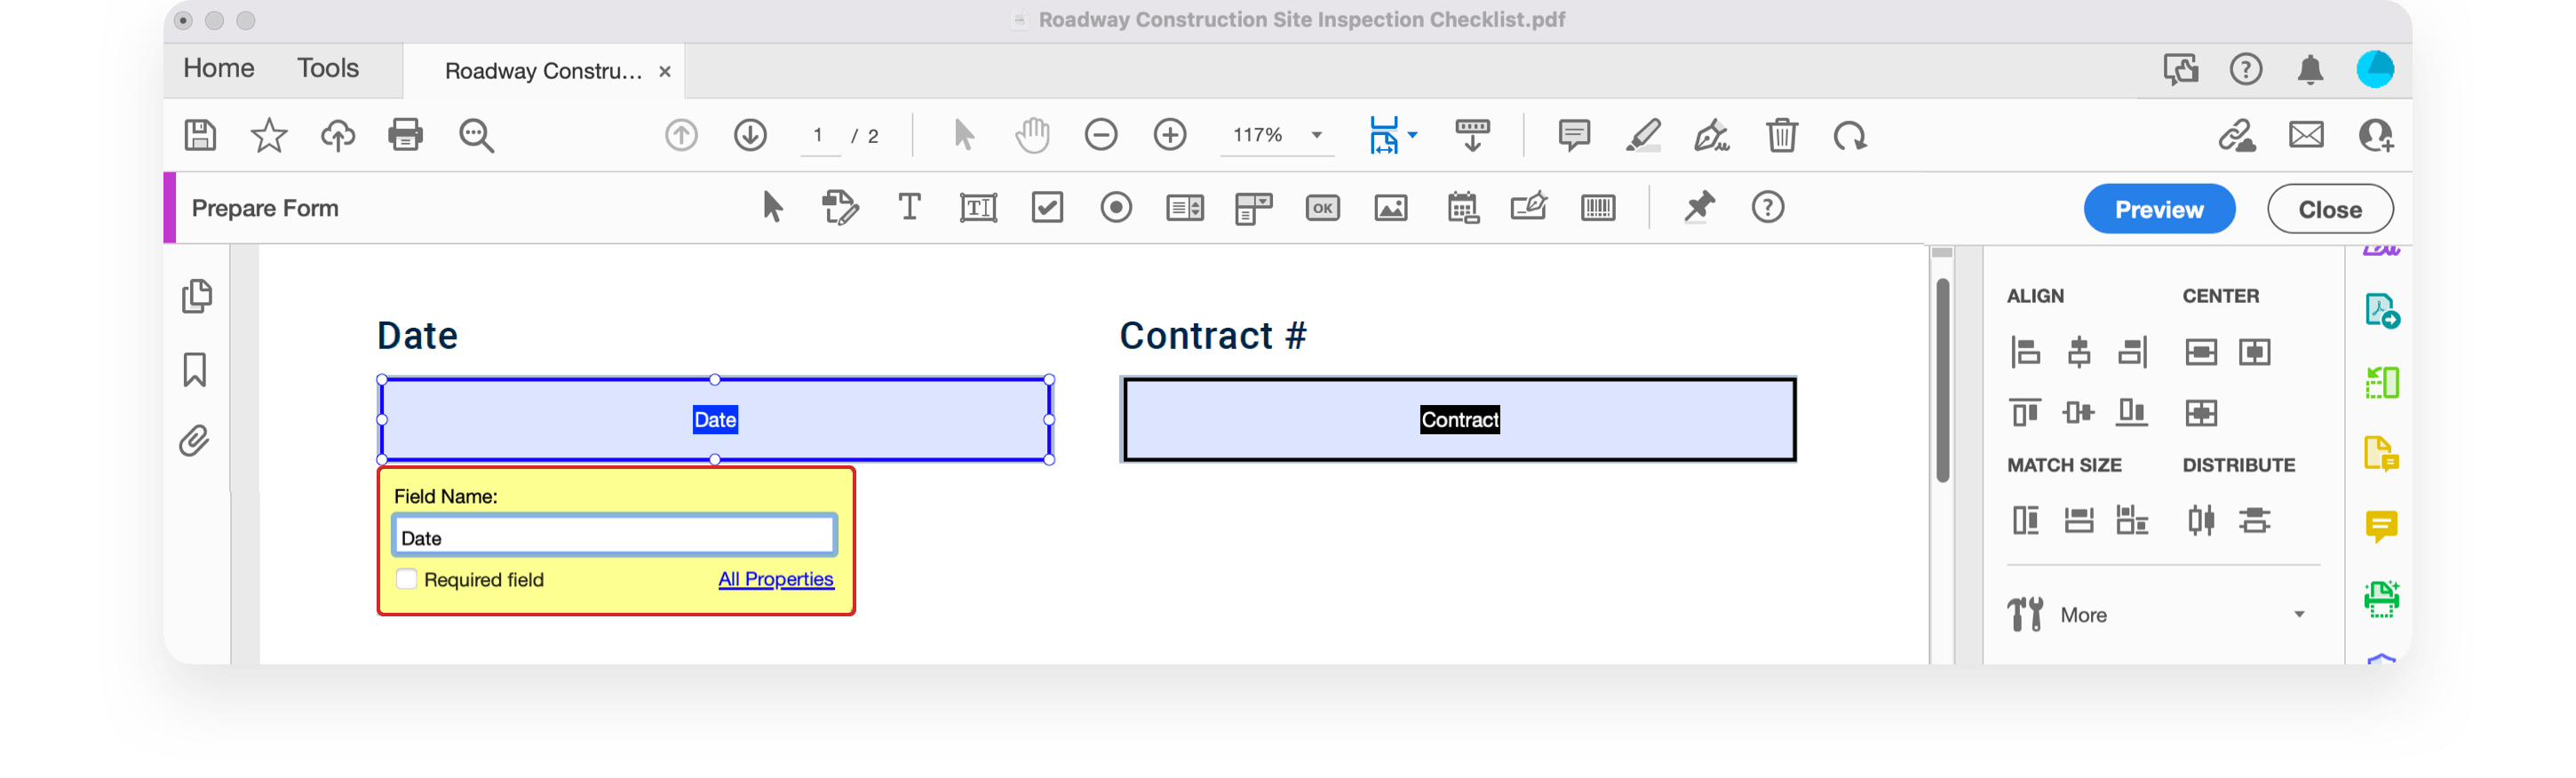
To change the properties of the added field, double click on it:
Here you can learn how to add date, image, signature fields, and get other tips on form creation.
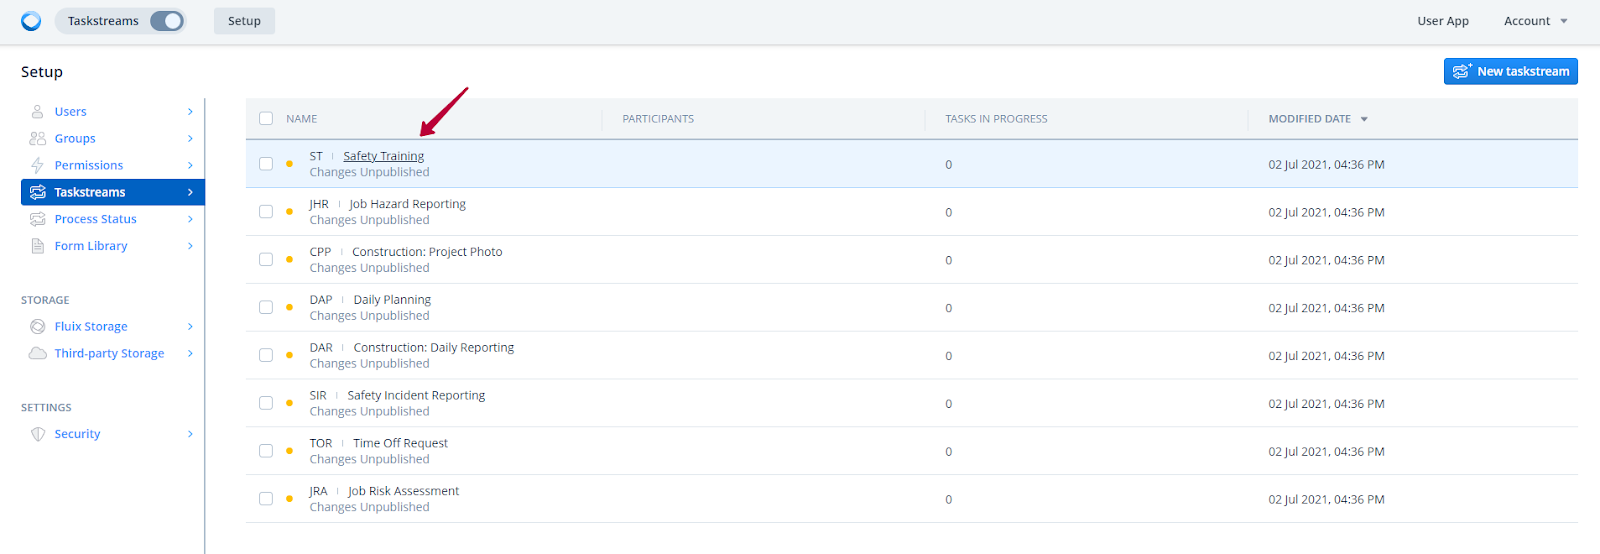
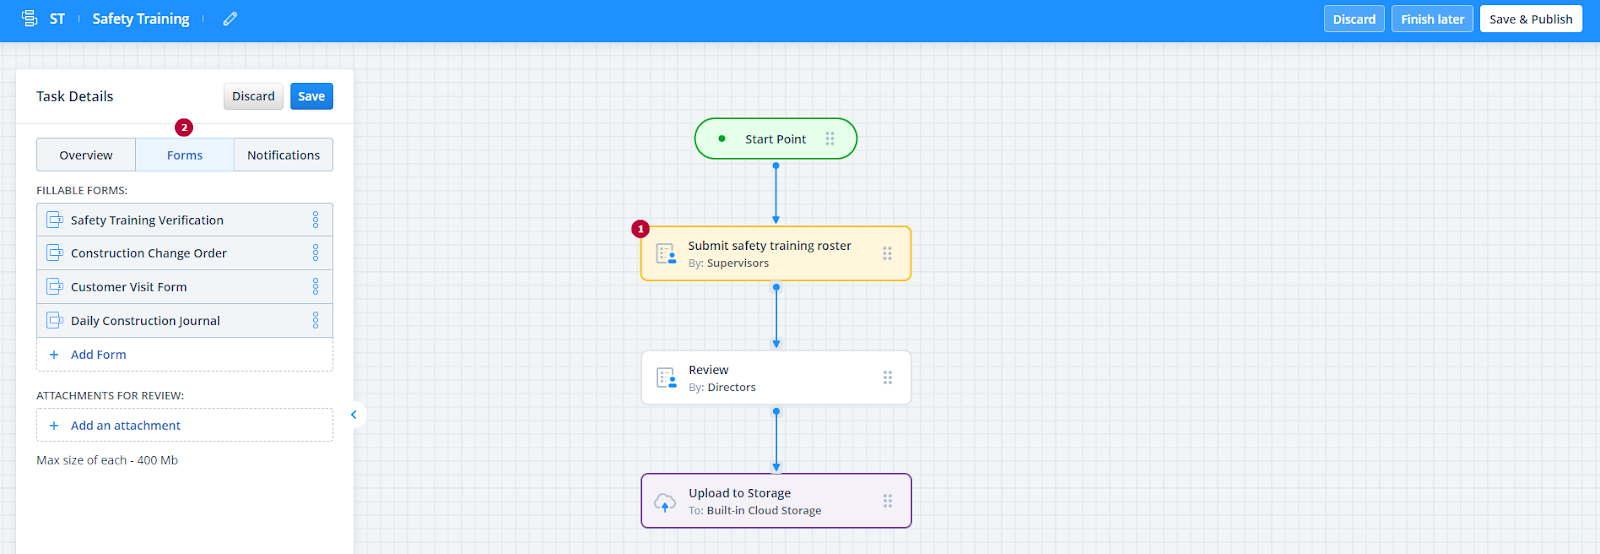
Creating a fillable form in Fluix
Then you will need to subscribe to the service to use the Fluix app for the daily paper-based processes together with your team.
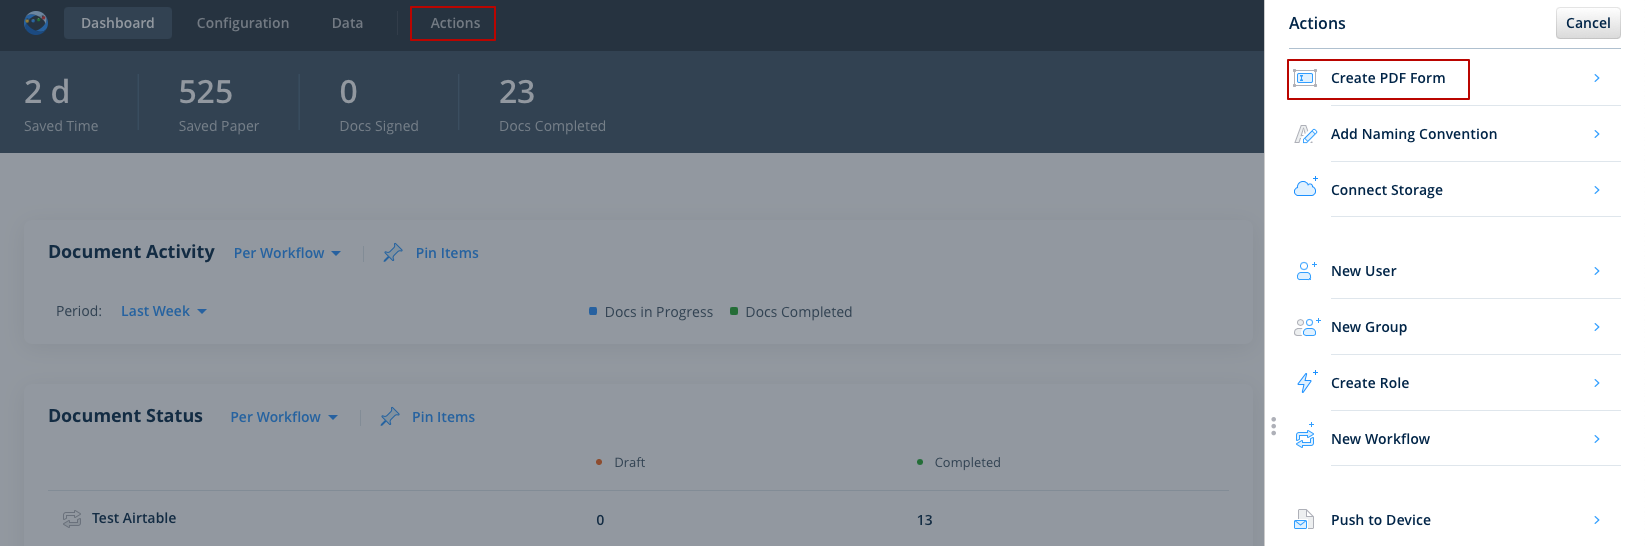
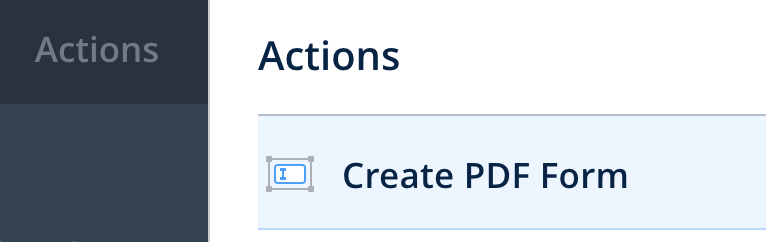
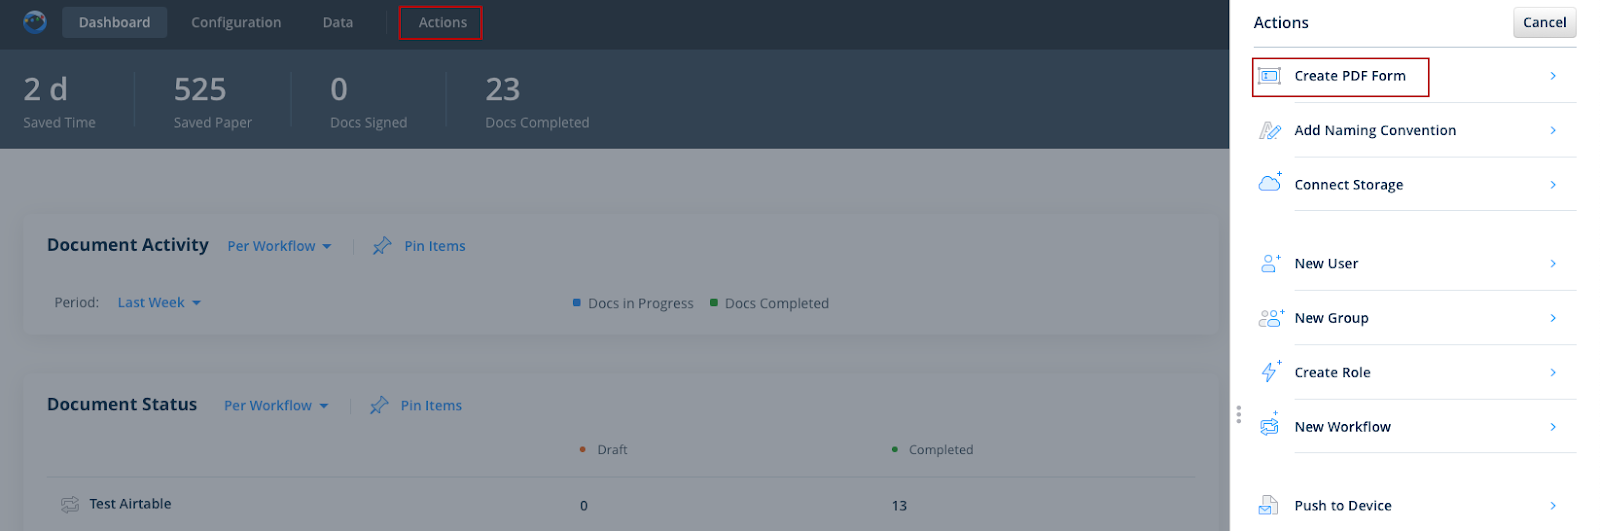
To start creating a fillable form in Fluix, open Fluix admin portal and navigate to Actions -> Create PDF Form.
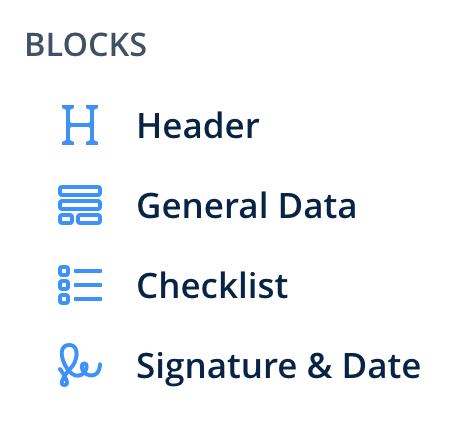
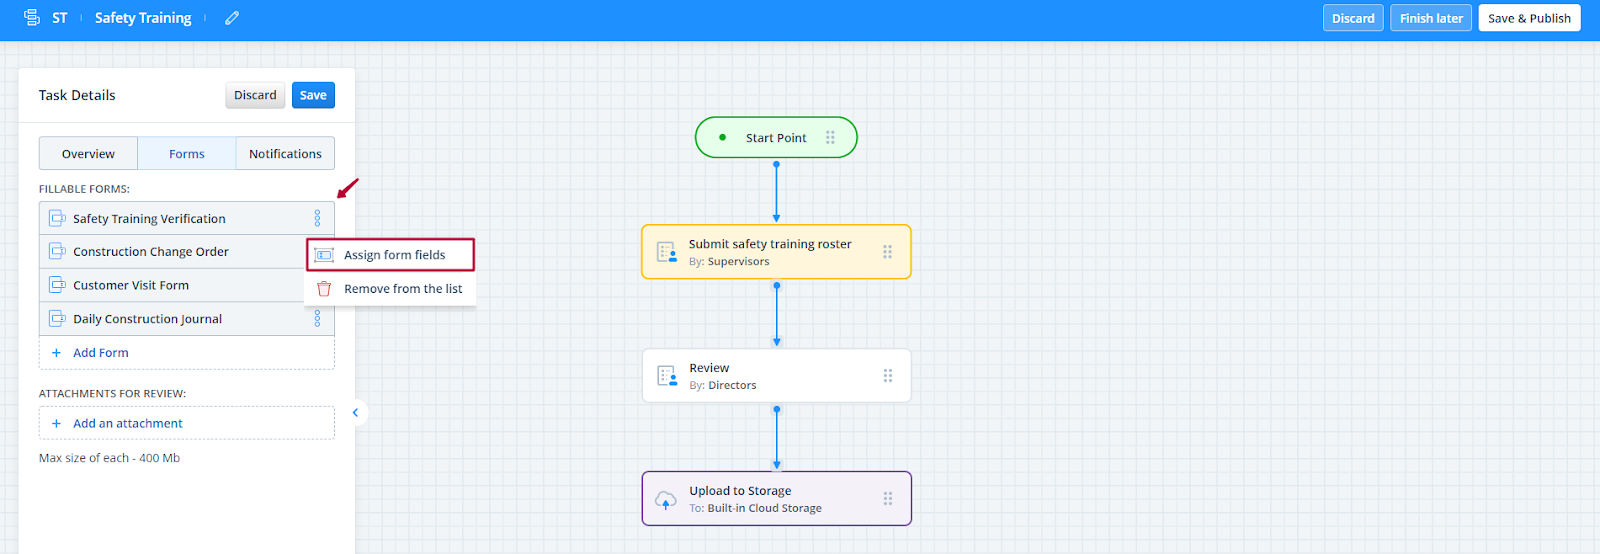
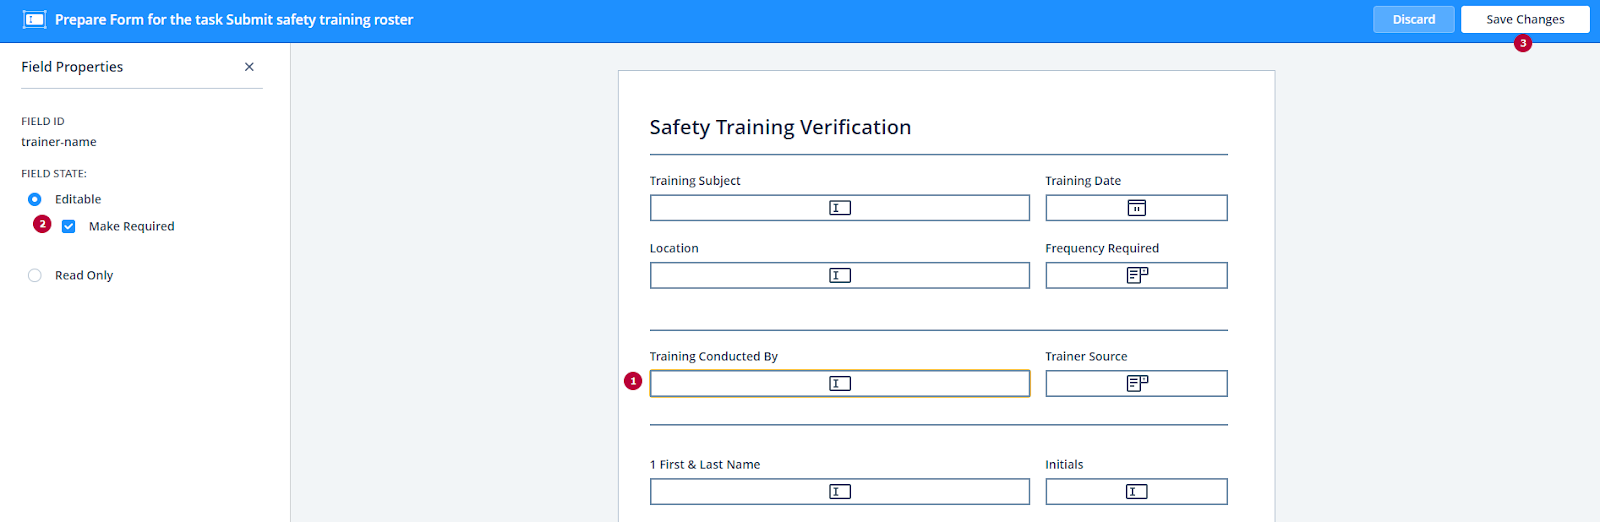
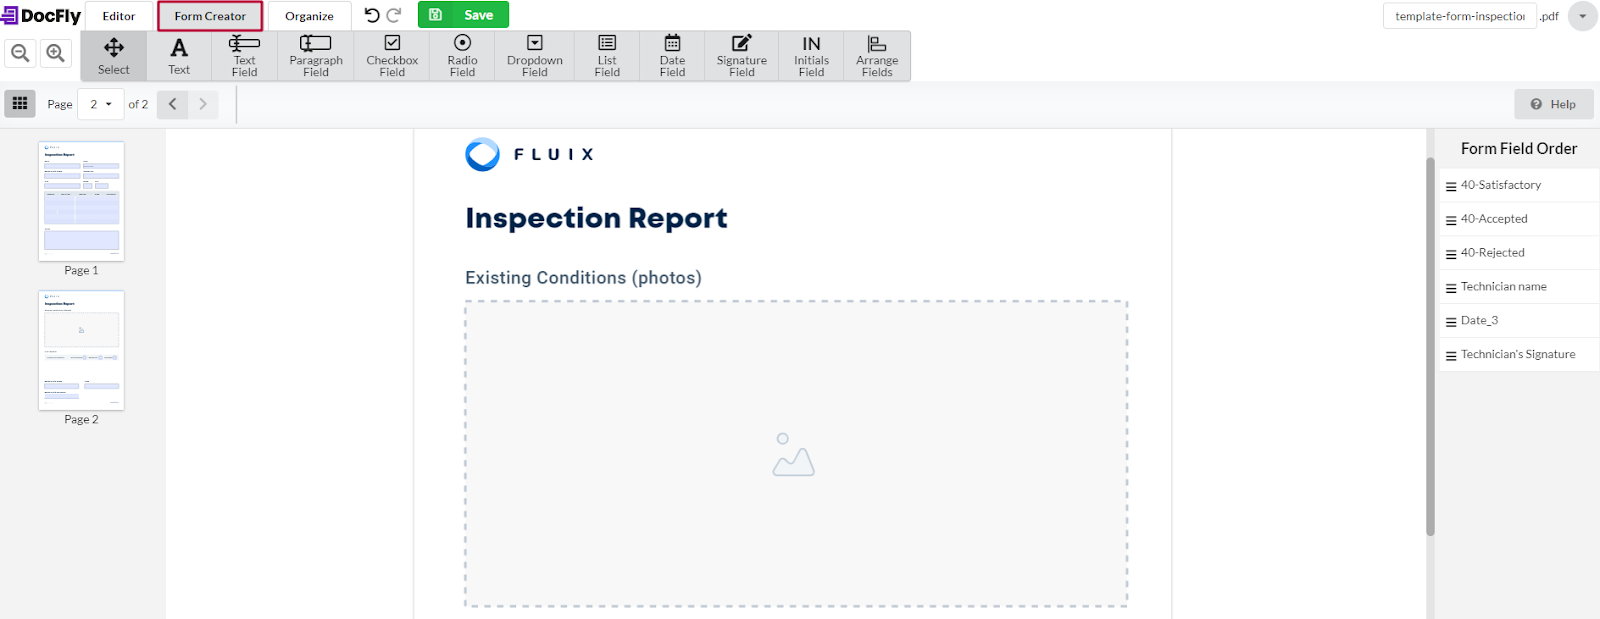
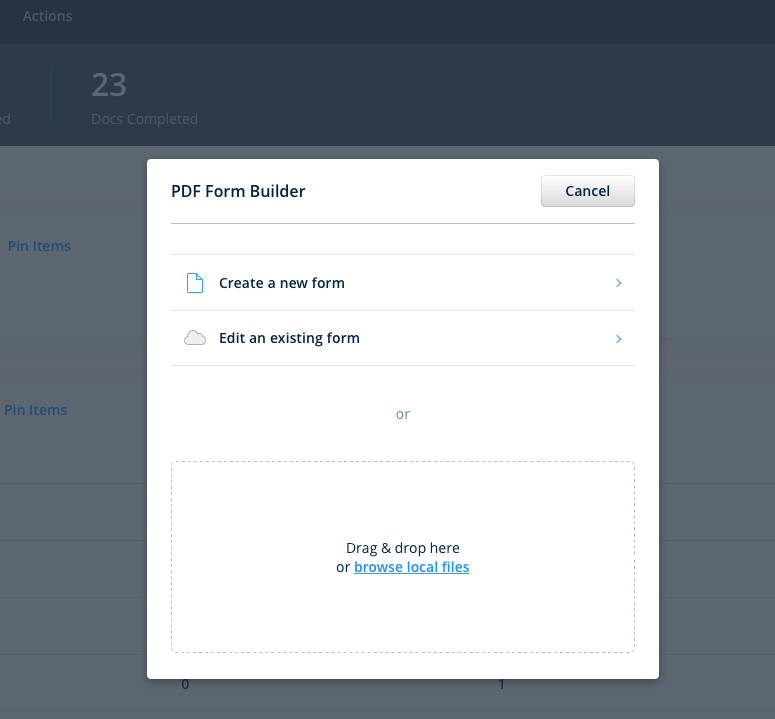
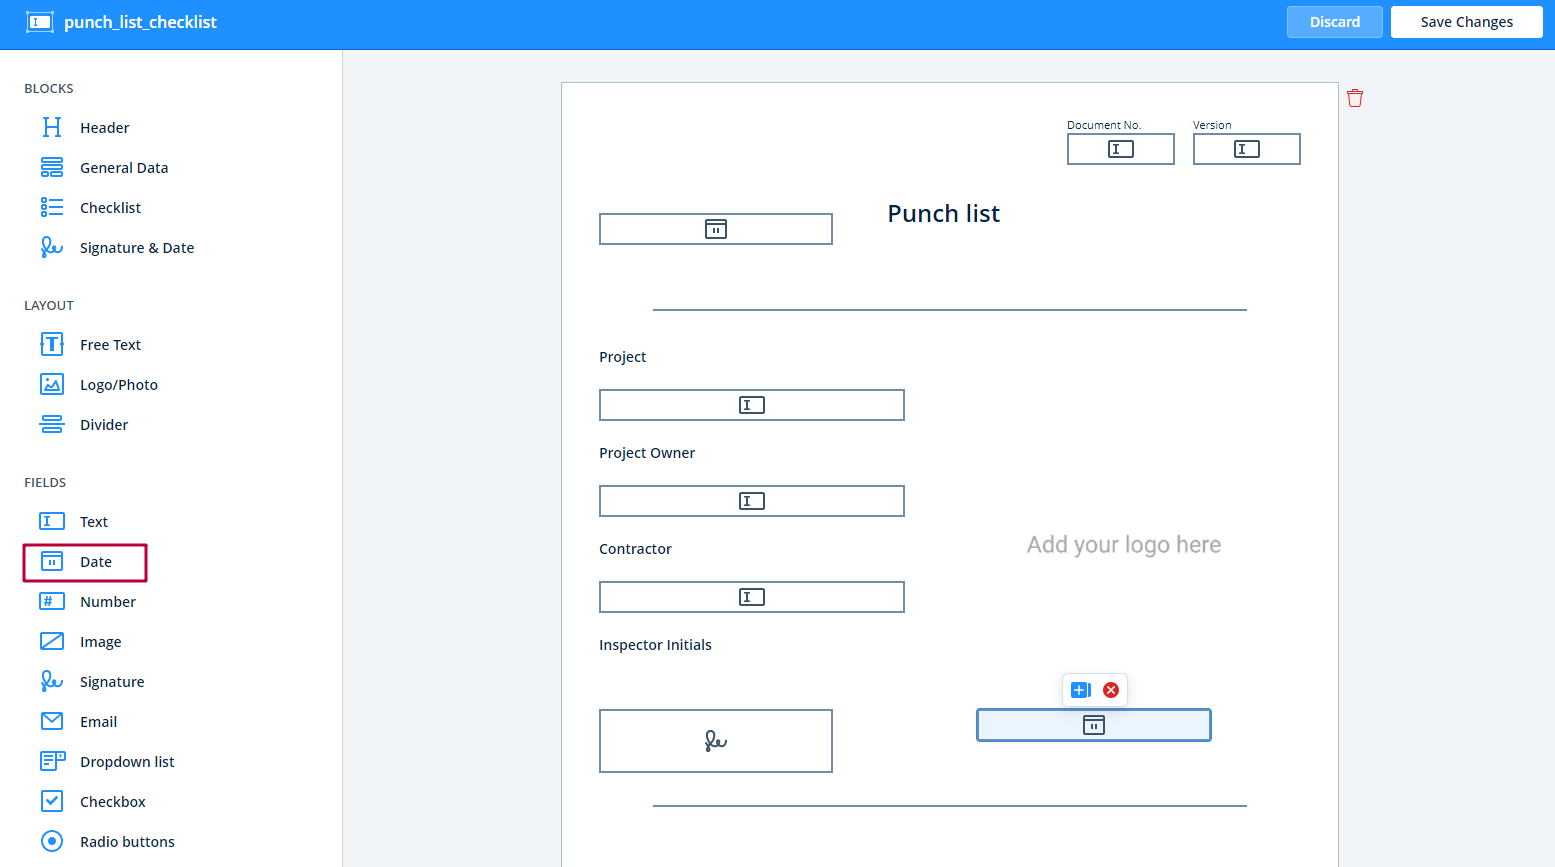
Choose whether you want to create a form from scratch, or edit an existing form.In the Form Builder menu, you will see a list of elements on the left. Tap on any of them to start creating a form. To create a form faster, you can choose blocks:
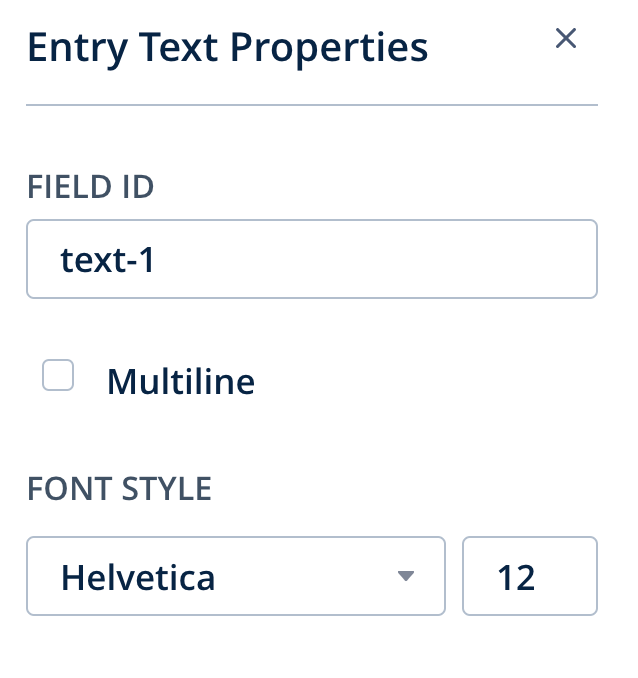
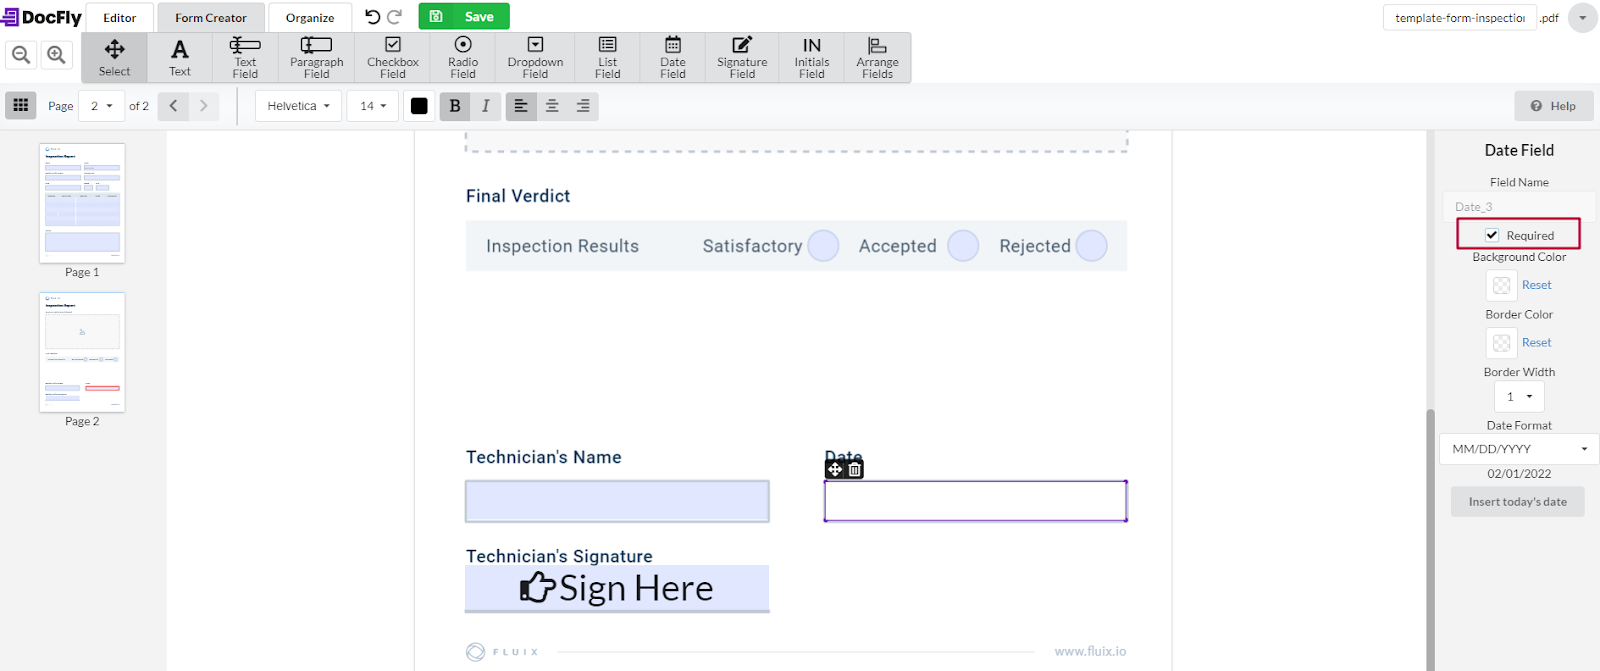
By clicking on the added element, you will see its properties:
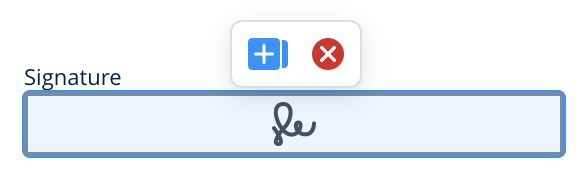
To delete or duplicate an element, hover your mouse pointer over it and choose the option:
To add a new page, click Add page at the bottom:
To delete a page,click on the garbage bin icon in the right upper corner of the page:
Once the form is ready, click Save Changes in the top right corner and choose the option you need:
Fluix built-in cloud storage is an integral part of the Fluix system. It allows you to store and manage the forms that your team need to fill out. To start using a fillable form you created in the daily work of your team, create a workflow.
In case of any questions feel free to contact us at support@fluix.io.
Was this article helpful?
Thanks for your feedback!
Oops, something went wrong. Please, try again later.
It’s hard to keep a unified folder structure organized when each fieldworker names documents up to their own will. Hours of time are wasted searching for files, proper naming, and structuring.
File naming convention prevents this kind of a mess and arranges your documents in a logical order. It describes, at a glance, what the document is about, what it contains, and how it is related to other files. Therefore, it can be said that file naming is some kind of passport or identity code for your documents.
How it works:
Firstly, you set up a naming convention in the file template, then upload it to your storage folder used in a workflow.
Each time a fieldworker fills out fields used in your pre-configured naming convention, the file name changes accordingly.
Benefits for the field workers:
Saving time on manual entry when renaming documents.
Eliminating human error.
Browsing file names more effectively and effectively.
Benefits for the office staff:
Unified file structure in the destination storage folder.
No time waste on manual corrections.
Quick file search.
You can configure automatic document naming with Naming Convention in Fluix, or set it up in Abobe Acrobat Pro.
Here are the steps to proceed:
1. Open the PDF document in Adobe Acrobat Pro:
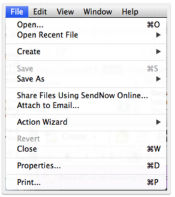
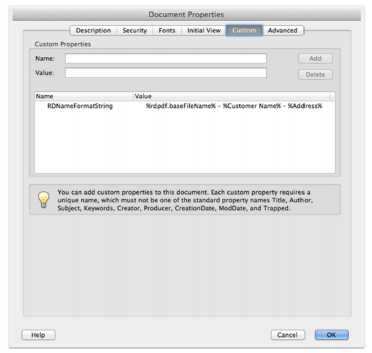
2. Go to File > Properties > Custom:
3. In the Name field, type RDNameFormatString
4. In the Value field, specify the desired name format string. Here’s the example:
Original File Name – Customer Name (Work Order), then type in the Value field: %rdpdf.baseFileName% – %Customer Name% (%Work Order%)
5. While filling in the Value field, keep in mind the following things:
You should type the field names exactly the same as in your PDF document.
Order and number of field names used are optional.
The percent character (%) has a special meaning in the name format string. If you wish to use the percent character as part of your file, then use it twice – ‘%%’ in the format string becomes ‘%’ in the resulting filename.
The slash character (/) cannot be used in a file name, so all slashes will be replaced with hyphens (-).
6. When done, press the Add button, then OK.
Built-In Parameters
There are a few built-in parameters that you can use. These naming parameters remove any need for using certain form fields in your PDF document.
rdpdf.baseFileName – Name of the PDF file without extension (the ‘.pdf’ is dropped). Do not need a form field asking for the name of the PDF file.
rdpdf.currentDateShortStyle – Current date in a short format – “3/26/20” on March 26, 2020 (date format depends on device’s local settings). Do not need a form field asking for the date.
rdpdf.currentDateMediumStyle – Current date in a medium format – “Mar 26, 2020” on March 26, 2020 (date format depends on device’s local settings). Do not need a form field asking for the date
rdpdf.currentTime – Current time in 24-hour ‘HH:mm’ format – “13:47” at 1:47 pm. Do not need a form field asking for the time.
rdpdf.currentTime{hh:mm} – Current time in ‘HH:mm’ format – “1:47” at 1:47 pm. Do not need a form field asking for the time.
rdpdf.userName – Name of the user currently logged into Fluix. Do not need a form field asking for the user’s name
rdpdf.userEmail – Email of the user currently logged into Fluix. Do not need a form field asking for the user’s email.
Does paperwork clog up your daily routine? Then consider Fluix – a lightweight document management software solution, which helps to digitize paperwork and automate the document workflow across your company.
This article provides step-by-step instructions for adding an image field to a PDF using Fluix and Adobe Acrobat.
How to Add Image to a PDF in Fluix
Fluix is professional document management software with an inbuilt form builder. It allows users to both manage PDF forms online and offline (fill in, comment, review, sign, add images, add fields) and use them for task assignments within automated workflows.
Note: To use this tool, you need a Fluix license or to request free trial.
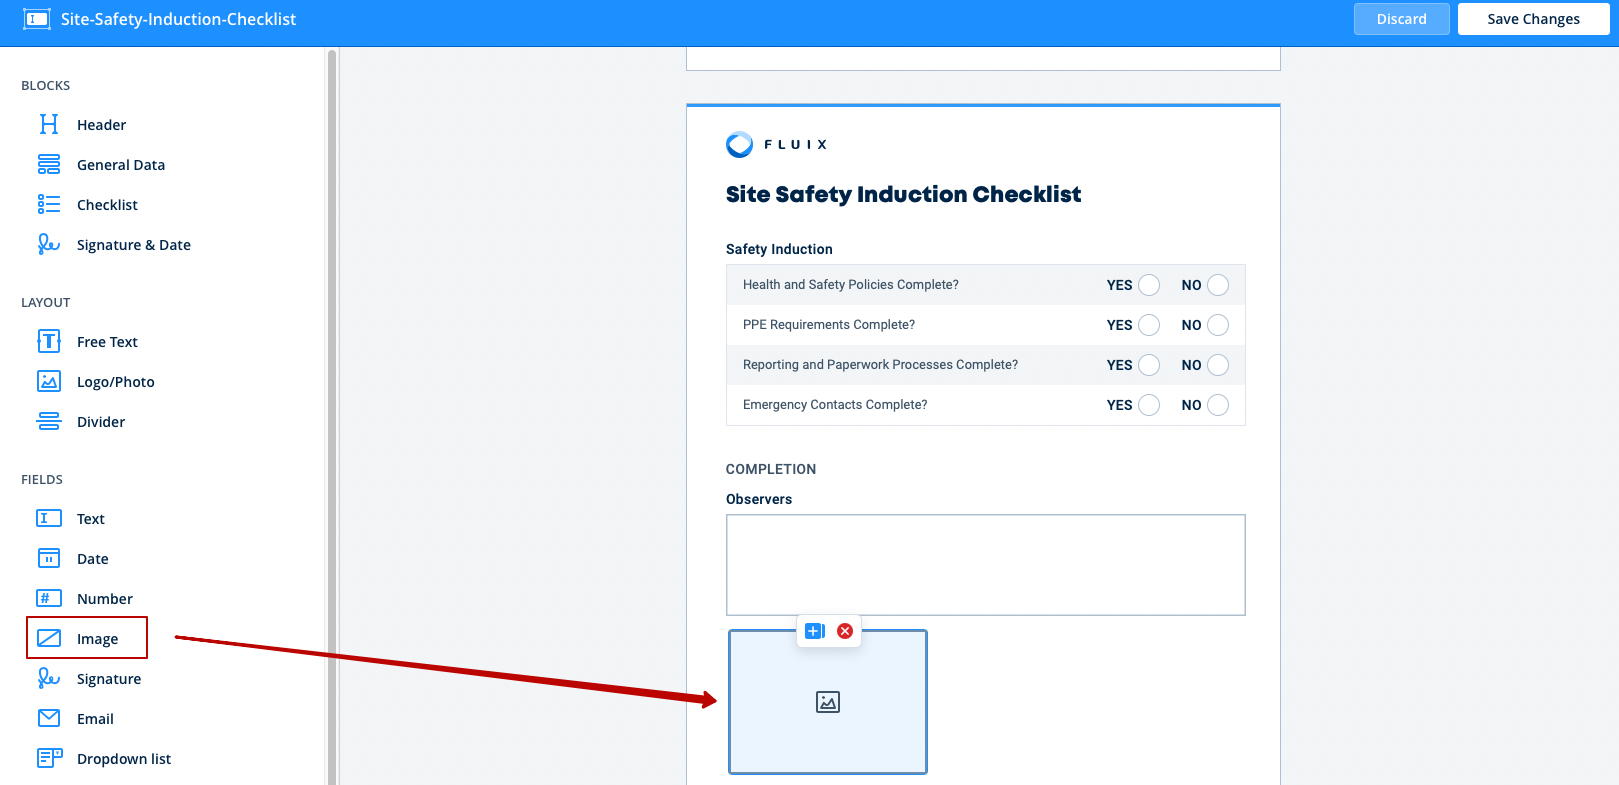
Step 1.Go to Actions and click Create PDF Form.
Step 2. Choose whether you edit an existing form or upload a new one.
Step 3.Click Image and drag it to the designated place in the form.
Adobe Acrobat is a PDF app that lets you manage PDF files: view, comment and fill out, and documents. Acrobat works best for personal needs, allowing you to create a professional resume, research paper, hand-out, etc.
Note: To use this tool, you need an Adobe Acrobat Pro license.
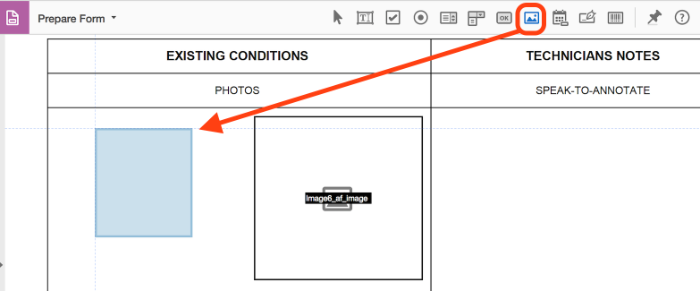
Step 1.Open your PDF form in Adobe Acrobat, choose the Prepare Form mode and click Add an Image Field.
Step 2. Drag it to the designated place in your form.
Step 3. Save changes to the PDF form.
Have To Fill Out And Share PDFs Every Day?
See how Fluix can automate PDF workflows for your team
Note: To use this tool, you will need Fluix license.
In Fluix you can add signature field both as an admin for a form that will be used by all team members of a workflow, and as a user on iPad/iPhone for a particular form.
Adding signature field in Form Builder
Step 1. Open your PDF form in Fluix Form Builder under Actions:
Step 2. Choose whether you need to edit an existing form, or create a new one:
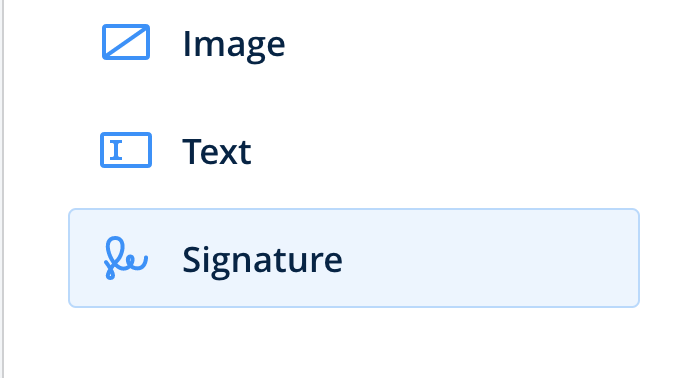
Step 3. Click on the Signature and drag it to the designated place in a form
Step 4. Save changes to the PDF form.
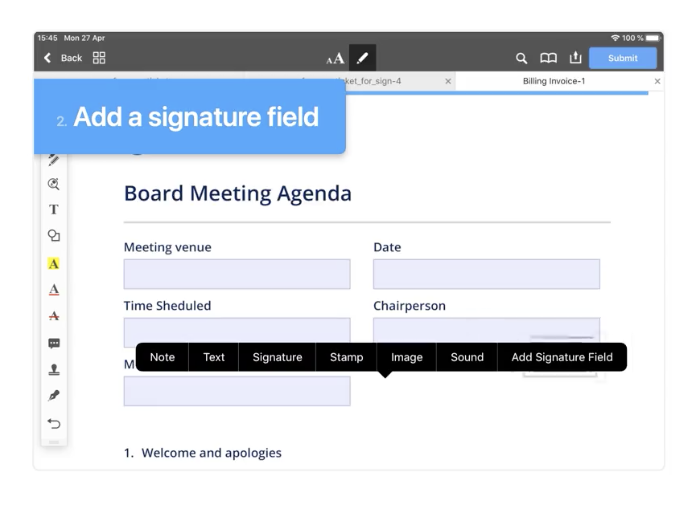
Adding signature field on iPad/iPhone
Step 1 – Tap and hold on the document and select Add Signature Field:
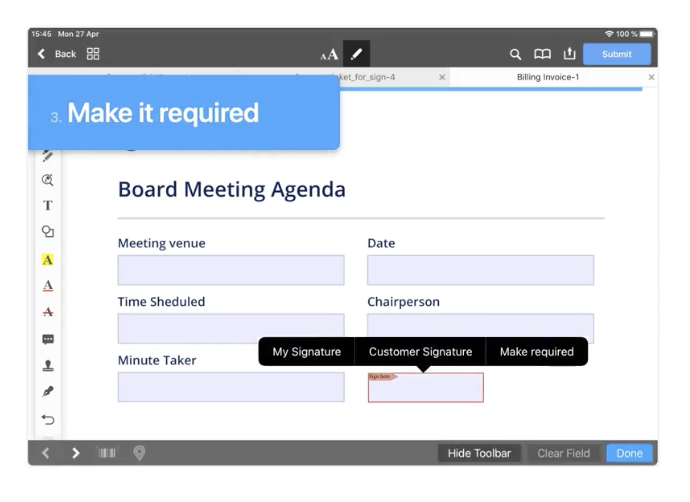
Step 2 – Drag and drop it to the designated place Step 3 – Tap and hold on the document and select Make required
Adobe Acrobat
Note: To use this tool, you will need Adobe Acrobat Pro license.
Step 1. Open your PDF form in Adobe Acrobat, choose Prepare Form mode
Step 2. Click on the Signature Field and drag it to the designated place in your form
Step 3. Save changes to the PDF form.
Form with signature field
Now, you only need to simply tap the respective field in the PDF form and sign on mobile device.
Once the field is added, you can also make it required. In case a form participates in a document flow, by configuring mandatory fields you will ensure the signature is collected before the form is passed to the next step of the flow.
Dealing with mountains of paperwork every day? Then consider Fluix, a lightweight document management software solution, which helps to digitize paperwork and automate the document workflow across your company.
Need To Fill Out And Share Forms Fast?
See how Fluix can automate PDF workflows for your team
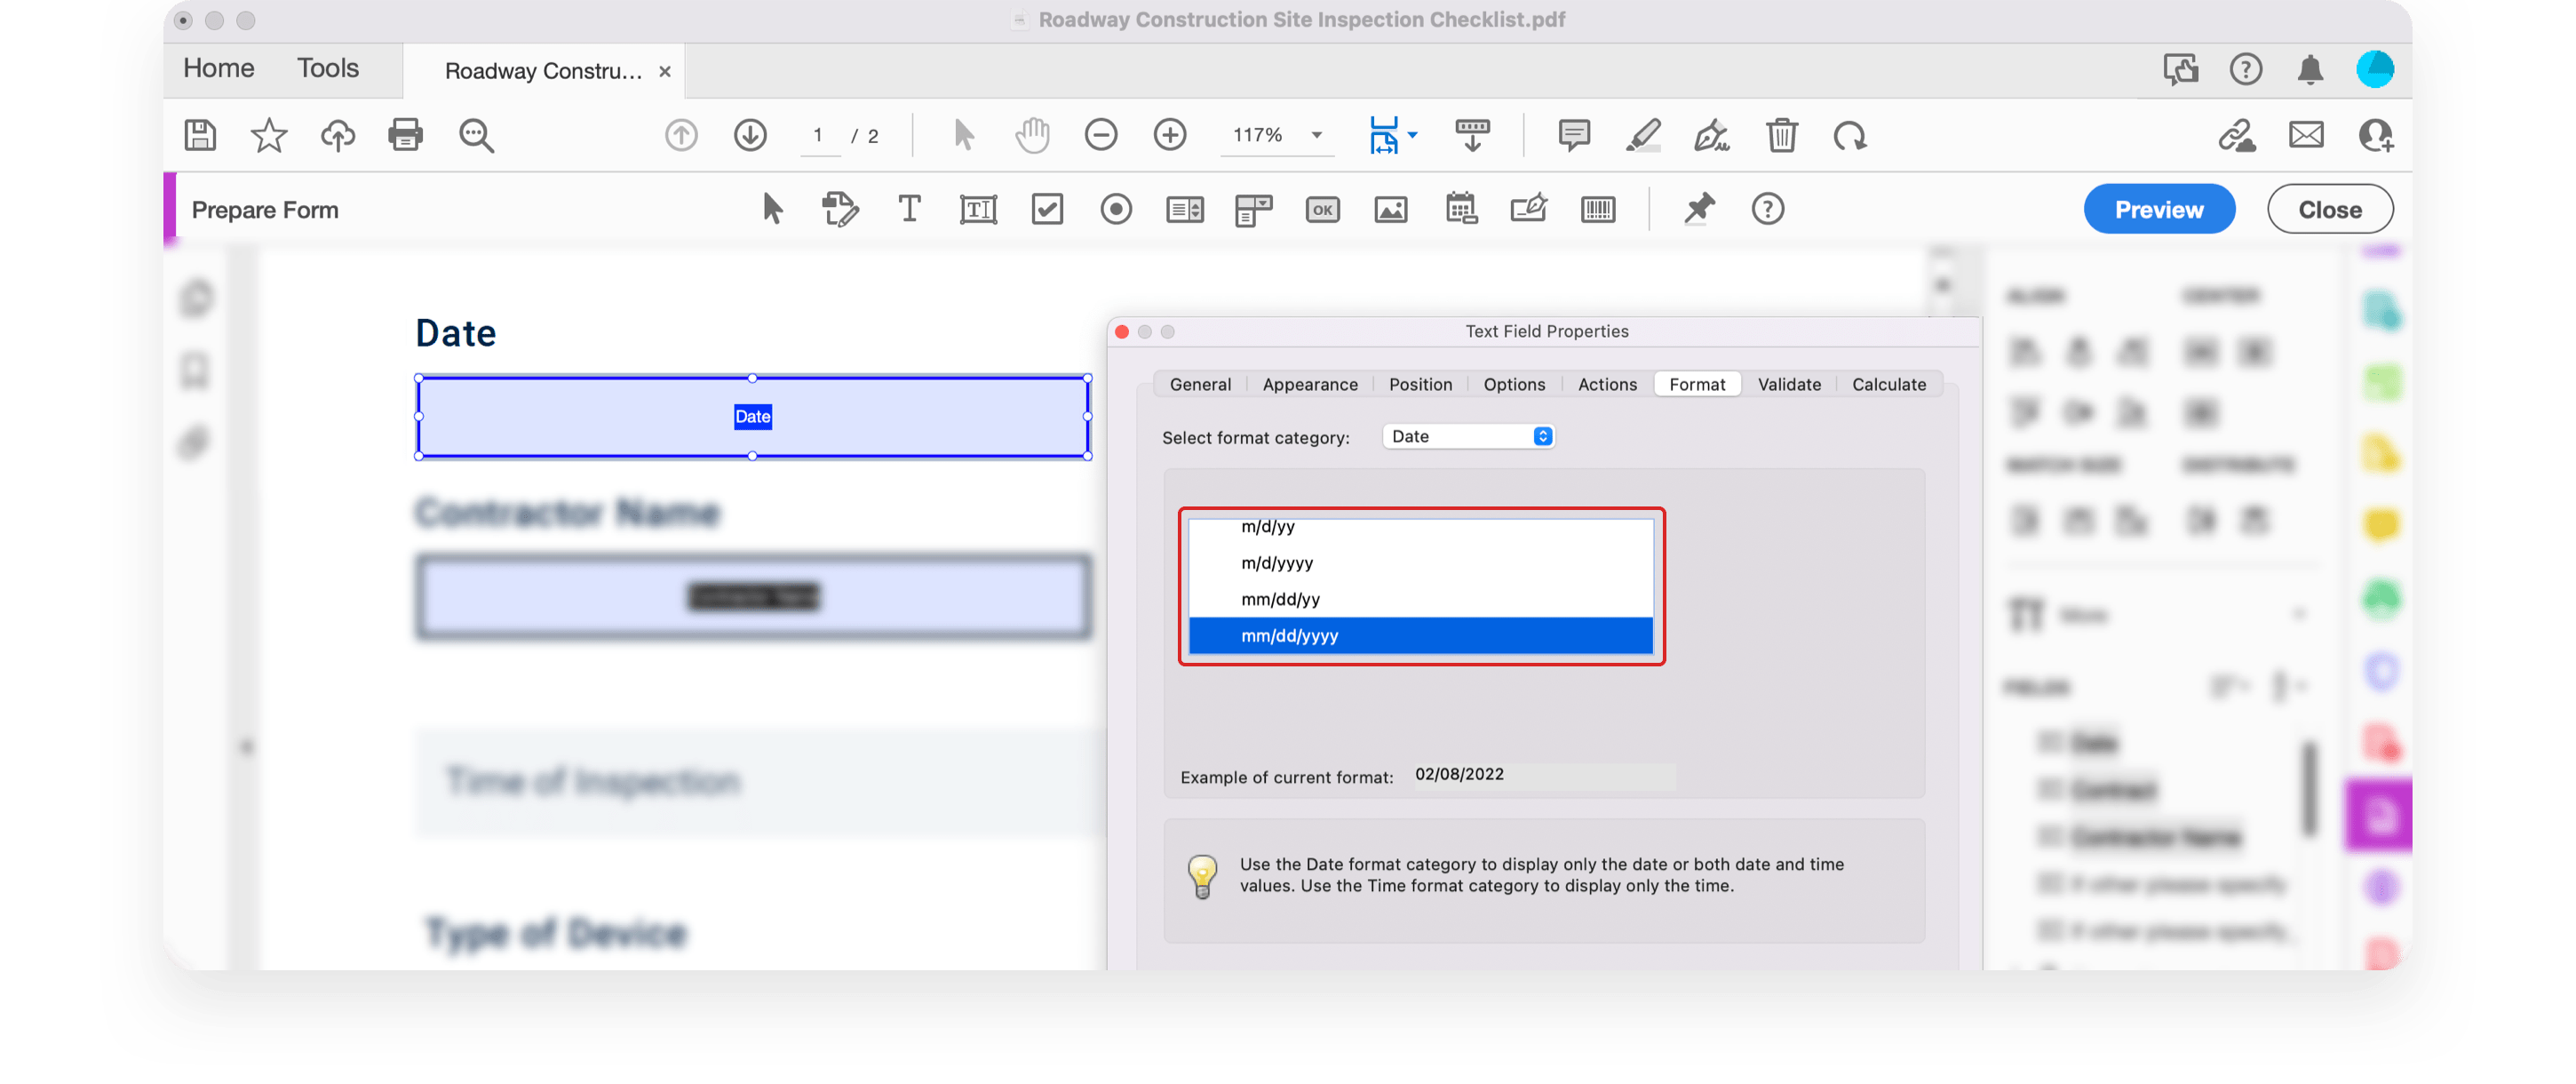
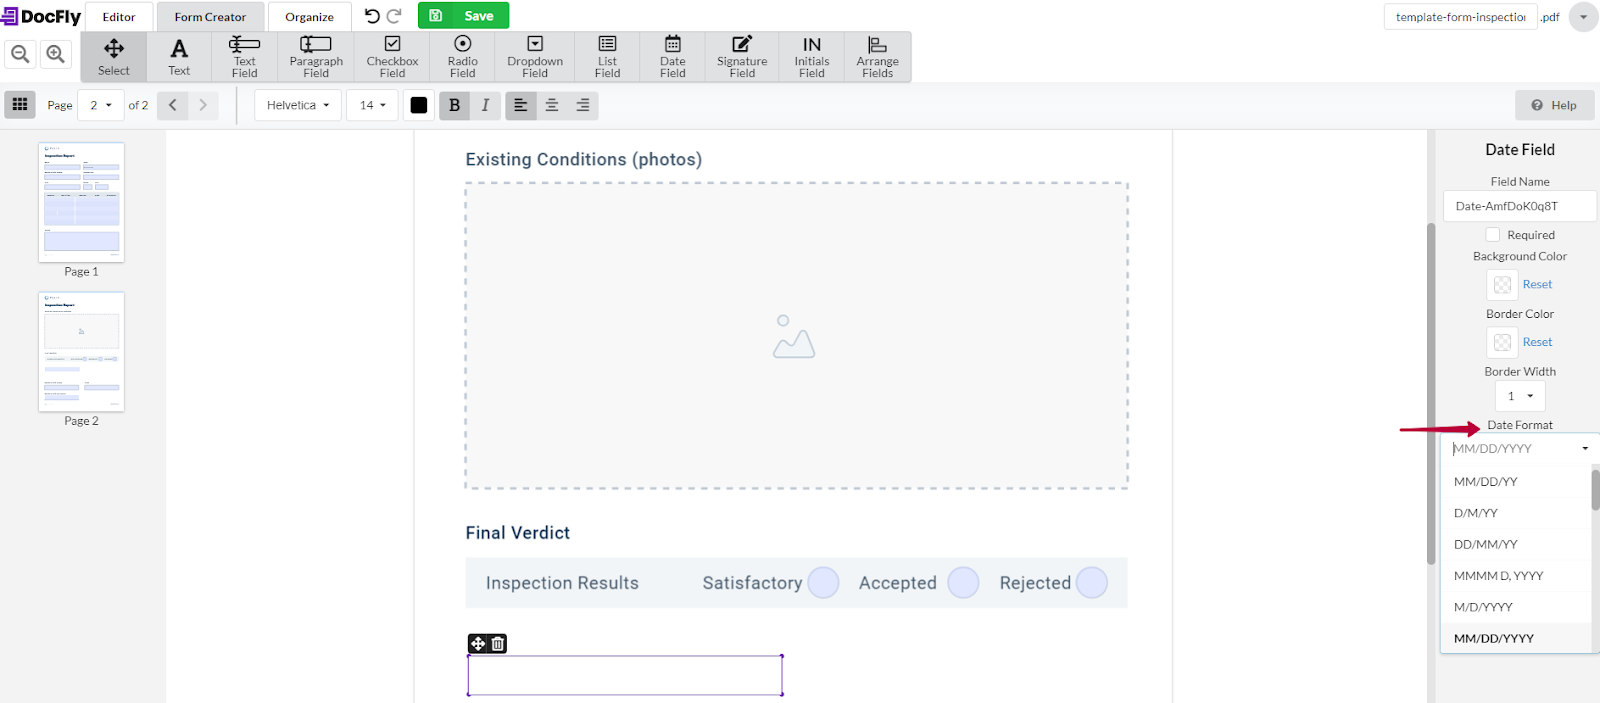
2. Choose whether you need to edit an existing form, or create a new one. 3. In Fields, click Date and drag the added field where you need it in the form.
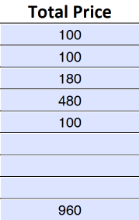
When you’re on the go, it can be useful to make quick calculations within a PDF form.
Using form-filling software like Fluix, ensures your sums are always accurate. And you can pre-fill regular calculations so they are automated and ready to use, saving you loads of admin time.
Step 1. Open a PDF form in Adobe Acrobat Pro and select Prepare Form in the list of tools:
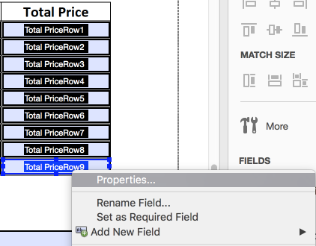
Step 2. Find the field where you want the final calculations to be shown, right click on the field and proceed to the field Properties:
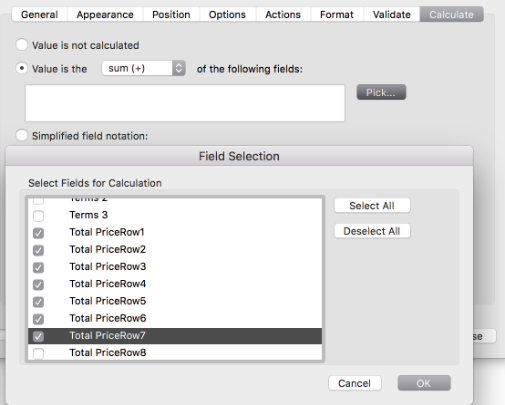
Step 3. Under Properties, go to Calculations and the second option Value is. For a sum, select the fields you want to be added up under Pick button:
Step 4. When calculation is in place, the field you’ve chosen will add up the values automatically:
Step 5. Save changes to the PDF form and upload it to the storage folder that is used in a workflow.
Does paperwork clog up your daily routine? Then consider Fluix – a lightweight document management software solution, which helps to digitize paperwork and automate the document workflow across your company.
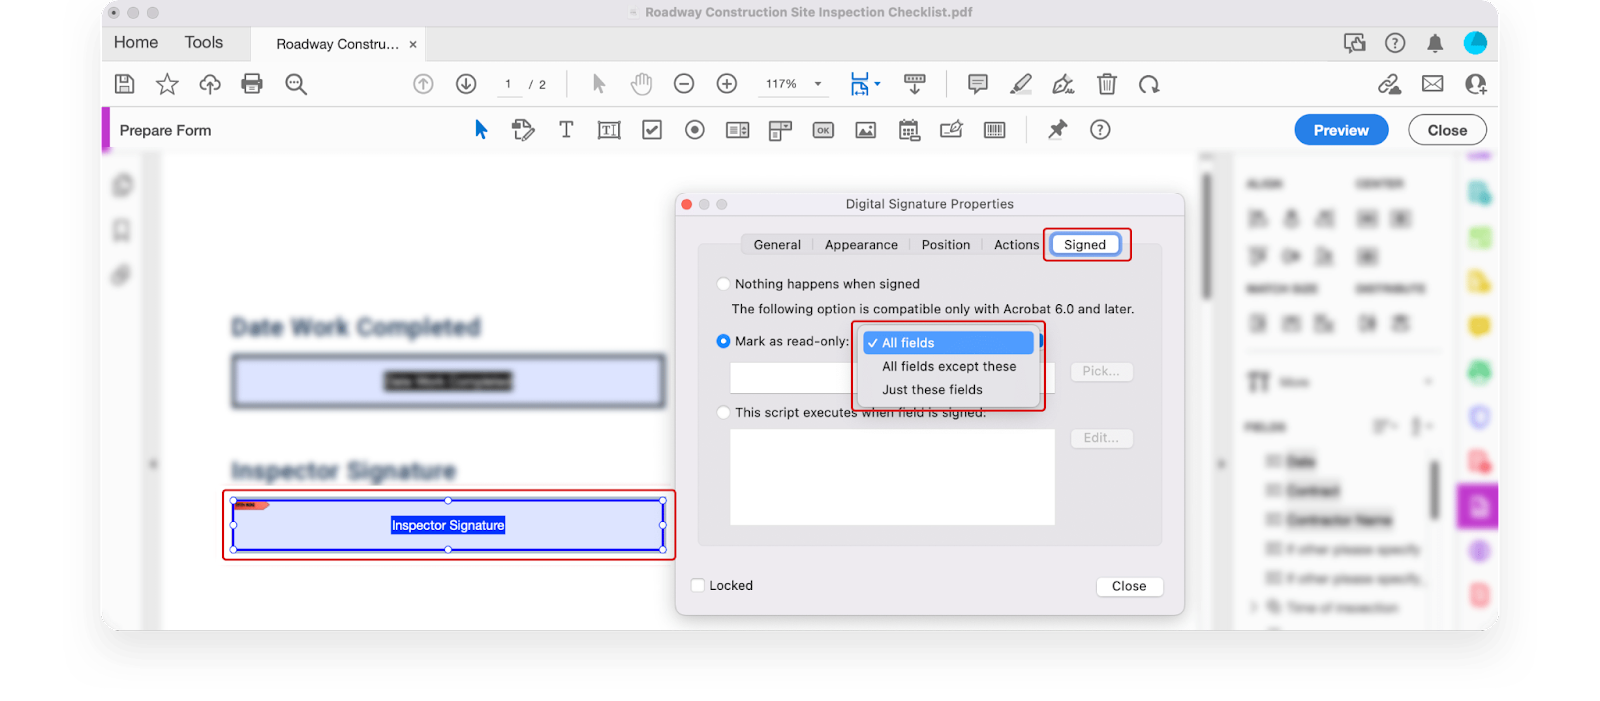
Step 1. Open a PDF in Adobe Acrobat Pro and choose Forms & Signatures > Prepare Form.
Step 2. Double-click the necessary signature field to open its Properties.
Step 3. In Signed, tick the box Mark as read-only. Select one of the options: All fields, All fields except these, Just these fields.
Step 4. Save changes.
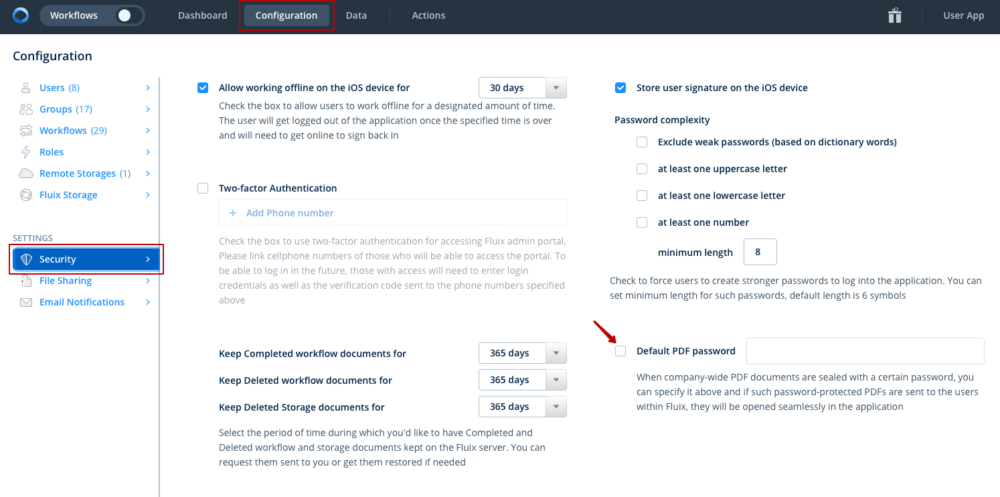
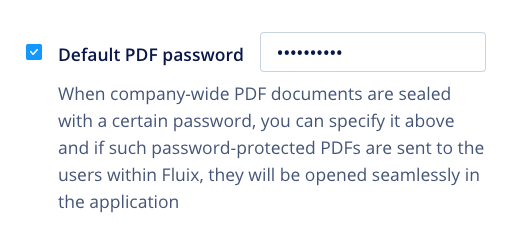
Note. In Fluix, you can protect documents with sensitive data with a password. This way, only users who have a password granted by the admin can access the document and edit it.
To enable password protection, go to Configuration > Settings > Security and tick the Default PDF password box.
There are many examples when flattening a PDF may prevent files from being edited. E.g., you sent a contract for a signature to your customer in fully editable mode. Your customer both signed and changed some details in the contract.
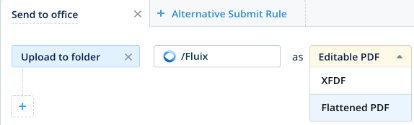
Here is how you can make a whole document or selected fields read-only:
1) Via workflow setting in Fluix. The document will be automatically flattened when submitted. Make sure that nobody needs to edit/correct the document once it was submitted:
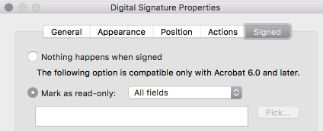
2) Automatically, based on built-in events, e.g. digital signature added – achieved with configuration in Acrobat Pro. To enable it, open the file that has a signature field, go to the field Properties-Signed, and select which fields will become read-only once signature is placed:
3) Automatically, based on certain conditions, e.g. all fields in a specific section fully completed – achieved with Javascript.
4) Manually, by end user tapping a button, e.g. Section finished – achieved with Javascript.
Does paperwork clog up your daily routine? Then consider Fluix – a lightweight document management software solution, which helps to digitize paperwork and automate the document workflow across your company.
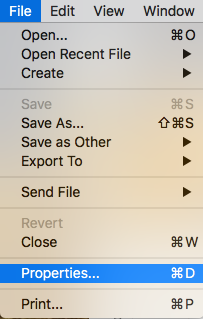
Step 1. Open a PDF in Adobe Acrobat Pro, proceed to the File option on the top menu bar and select Properties in the list:
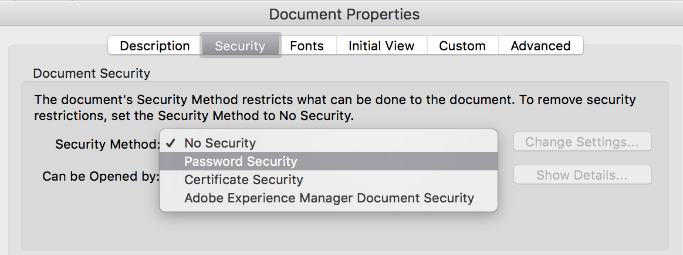
Step 2. Choose Password Security in the dropdown below:
Step 3. In the Permissions section, choose whether printing and editing is allowed. For more granular permissions as to editing, select Changes Allowed:
Step 4. Once all permissions and restrictions are set up, enter a password that will later allow you to change these settings.
Step 5. Save changes to the PDF form and upload it to the folder that is used in a workflow.
Wish your daily job didn’t include so much paperwork? Then consider Fluix – a lightweight document management software solution, which helps to digitize paperwork and automate the document workflow across your company.
Having sensitive information in PDF might be tricky, but you can always password protect it, so people outside your organization wouldn’t have a way to even open it.
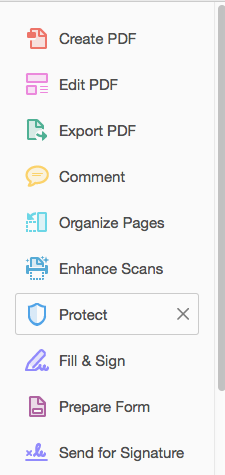
Steps 1. Open your PDF in Adobe Acrobat Pro and proceed to the Protect option under Tools or in the right side bar:
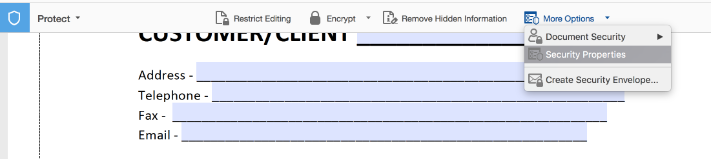
Step 2. Under More Options select Security Properties:
Step 3. Choose Password Security in the dropdown below:
Step 4. Tick the checkbox next to Require a password to open a document and come up with a password for this file:
Step 5. Save changes to the PDF form and upload it to the folder that is used in a workflow.
As a result, any person will need to enter a password in order to open a PDF.
In case you’d like your users to open such protected PDFs without entering password manually each time they open a document, consider a document management software solution like Fluix.
Tired of dealing with so much paperwork at the office? Then consider Fluix – a lightweight document management software solution, which helps to digitize paperwork and automate the document workflow across your company.
While capturing data in a form in some cases extra pages with designated fields need to be added. For example, more photo fields should be added to the inspection checklist.
We can suggest to you several ways how to duplicate pages in a PDF form:
1. In the Fluix app, you can copy pages on the go on the iOS device. Here is a separate guide on how to do this. 2. In Adobe Acrobat Pro, you can add JavaScript to the form template.
How the script works
This duplicate function copies a source page and inserts it into a document after another specified page.
Note: You will need an Adobe Acrobat Pro license. This function is developed by Fluix and won’t be available when working with the document in Adobe Acrobat or any other PDF editor.
Steps to add the script
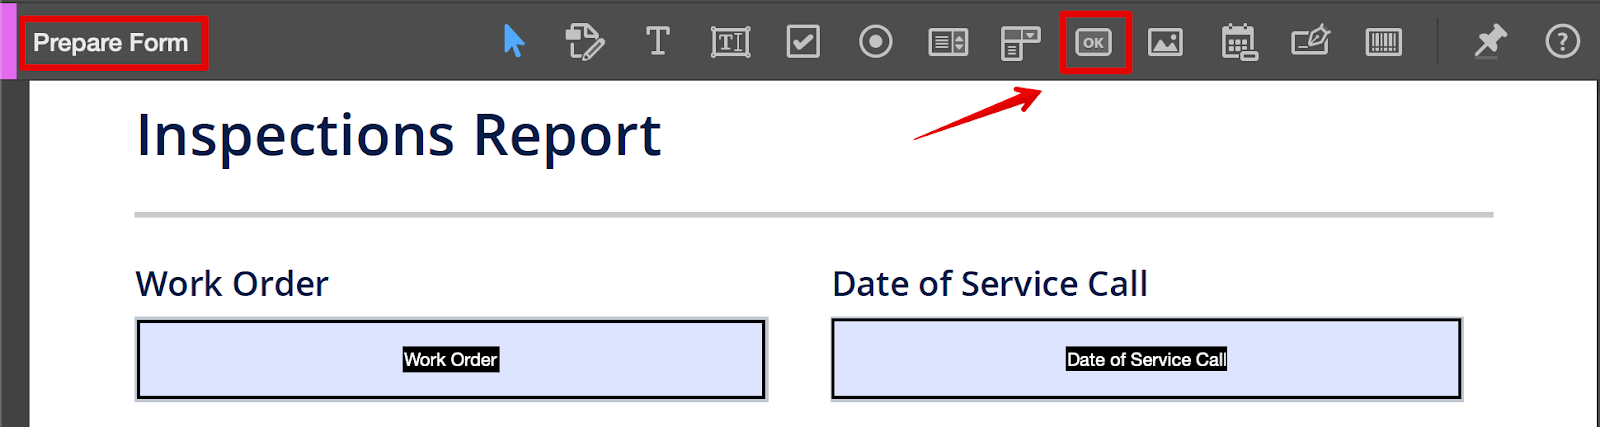
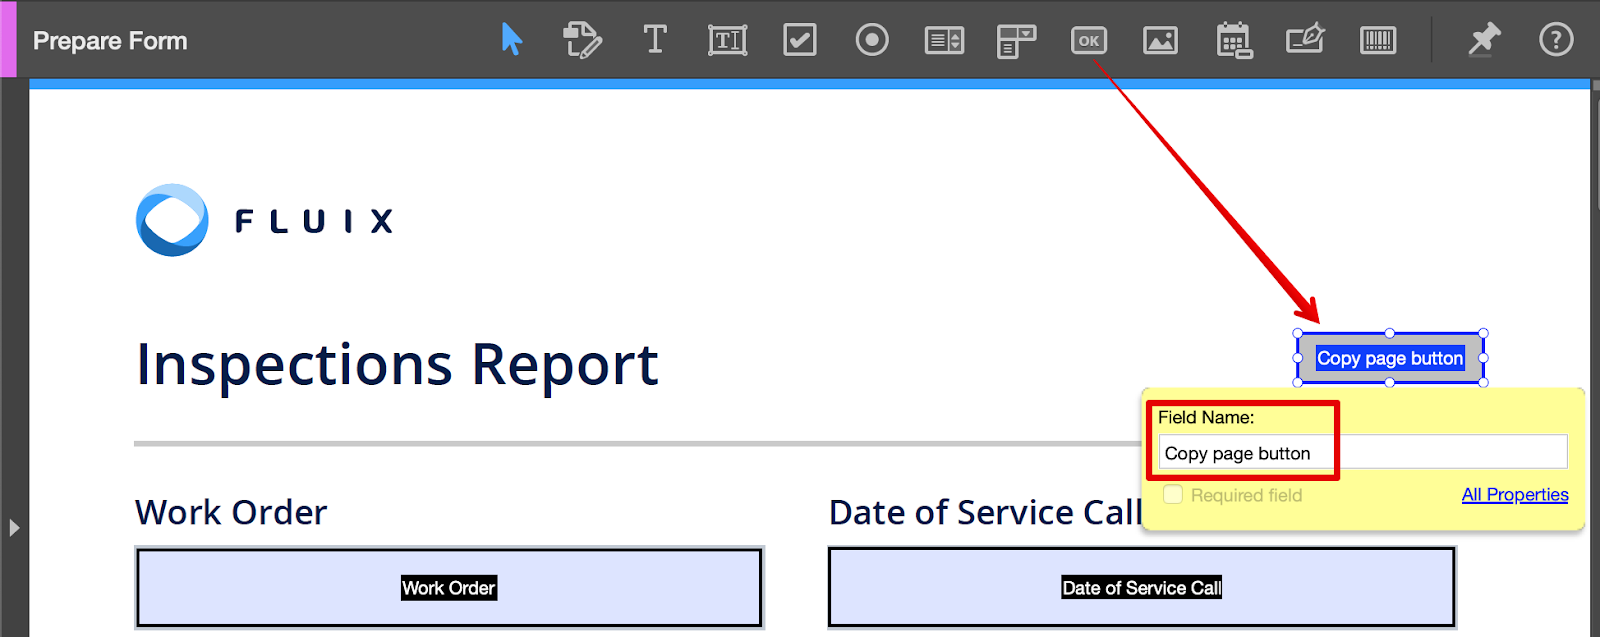
Step 1: Open your PDF form in Adobe Acrobat, choose the Prepare Form mode and click on the button as shown below:
Step 2: Having clicked on the button, drag it to the designated place in your form and specify its field name in the popup (the name will be shown to you only in the Adobe Acrobat, while it won’t be displayed to the app users in Fluix):
Step 3: Click All Properties to proceed with configuring the actions for this button.
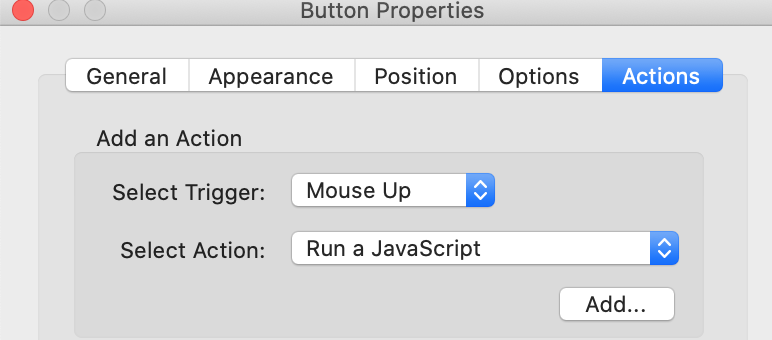
Step 4: Go to the Actions tab, select Mouse up as a trigger, select Run a JavaScript as an action and click Add to specify the following Javascript:
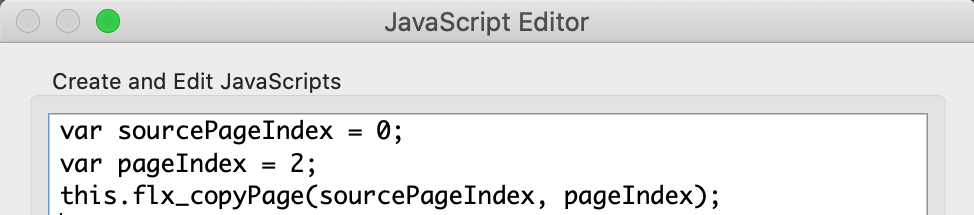
var sourcePageIndex = *page number*;
var pageIndex = *page number*;
this.flx_copyPage(sourcePageIndex, pageIndex);
Arguments:
sourcePageIndex – the number of the page that is going to be copied
pageIndex – the number of the page after which the copied page needs to be inserted
The index value of the pages starts from 0, i.e. the first page of the document = 0, the second one = 1, the third = 2, and so on. If it’s needed to insert the copied page before the first page, the index value should be -1.
For example, the JavaScript below copies the first page and inserts it after the third page of the document:
Once the JavaScript is created, click OK.
Note: The function may display alerts using a standard app.alert() PDF JavaScript method (NOTE: The function fails silently in case invalid page indices are passed as arguments).
Step 5 (optional): To inform the Fluix app users about the action this button performs, go to the Options tab and select whether you would need to add a Label or Icon to the button.
Step 6: Once done, click Close, save changes to the PDF and upload it to the storage folder that is used in a workflow.
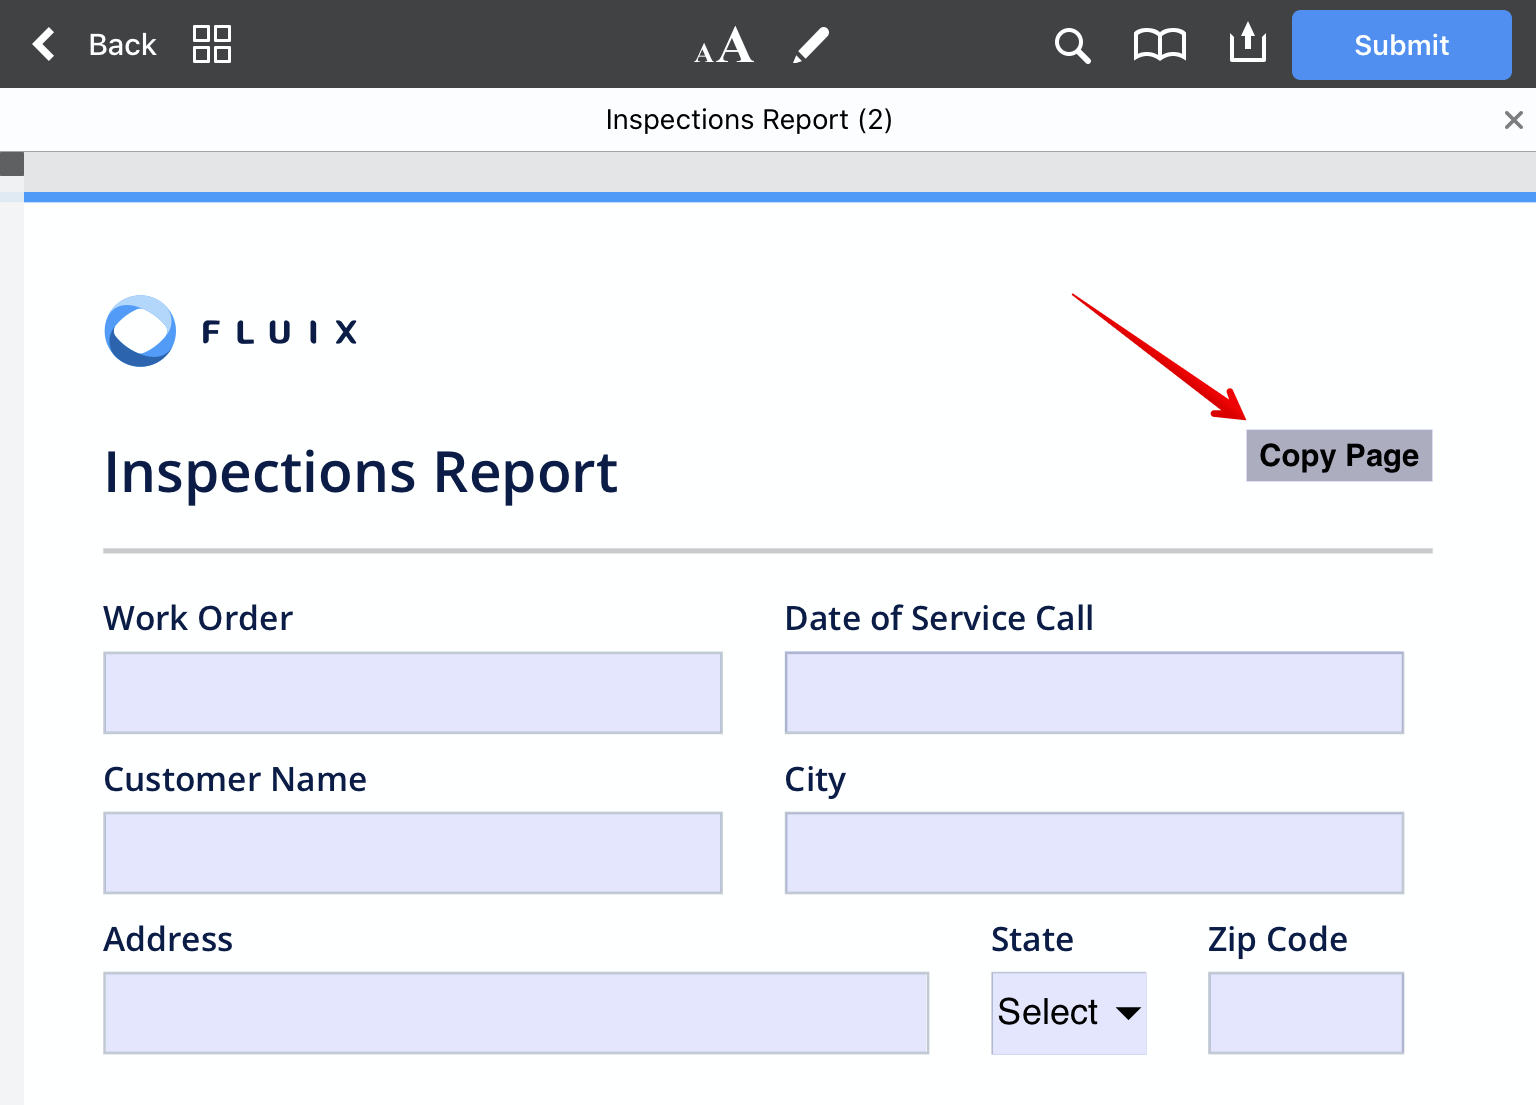
Button in a Form
Users in the Fluix app will be able to add pages with a click of a button:
In case of any questions feel free to contact us at support@fluix.io.
Was this article helpful?
Thanks for your feedback!
Oops, something went wrong. Please, try again later.
Fluix presents HTTP replies with Content-Type “text/plain” and “text/ html” to the user. For other content types the “Form successfully submitted.” is shown.
2. Objects scriptable in Fluix
field
event
doc
app
util
console
field Object
Properties
borderColor
borderStyle
charLimit
currentValueIndices
defaultValue
display
fillColor
hidden
name
numItems
page
print
readonly
rect
required
strokeColor
textColor
textSize
type
userName
value
valueAsString
Methods
buttonGetCaption
buttonImportIcon, parameters are not supported
buttonSetCaption
checkThisBox
clearItems
defaultIsChecked
deleteItemAt, nIdx is required
getArray
getItemAt
insertItemAt
isBoxChecked
setFocus
setItems
event Object
Properties
change
changeEx
name
rc
selStart
selEnd
source
target
targetName
type
value
willCommit
doc Object
Properties
calculate
numFields
numPages
pageNum
URL, can be used in combination with ” pdfefile://” scheme to transfer data to a form.
openDoc, Ignores all parameters except “cPath”. cPath is a relative path according to the current document. Returns null.
util Object
Methods
printd
printf
printx
scand, Note that Fluix is more strict than Acrobat Pro to correspondence cDate to cFormat.
3. Custom JS API
flx_CopyPage(nSourcePage, nPage)
Copies a source page and inserts it into a document after specified page index. Defined on a document level.
This function represents a simplified routine of manually copying & pasting a single page via page manager in Fluix iOS app (available since app v. 2.36).
Arguments:
nSourcePage – (required) the zero-based index of the page to copy
nPage – (required) the zero-based index of the page after which the copied page is inserted (-1 means before the first page)
Return Value: The function returns boolean result of the operation
Side effect: Function may display alerts using standard app.alert() PDF JavaScript method (NOTE: The function fails silently in case invalid page indices are passed as arguments)
4. Workflow JS API
app.fluixUser
This property can be used to pre-fill/get User full name, User Group(s) and Company name
The property app.fluixUser contains the following keys:
fullName — user full name in Fluix
companyName — company name in Fluix
groups — the array of groups (strings)
fluixShouldSubmit
This is a special function fluixShouldSubmit(submitRuleName) which should be defined on a document level.
Fluix calls this function upon document submit on device of User App (e.g. to validate the fields, user groups, etc.)
Argument: The only function argument is a string, the name of submit rule from admin portal
Return Value: The function should return boolean true when submit is allowed or false if not.
Side effect: Function may display alerts using standard app.alert() PDF JavaScript method. Alerts may contain Yes / No buttons that could allow PDF author to display non-fatal warning.
Was this article helpful?
Thanks for your feedback!
Oops, something went wrong. Please, try again later.