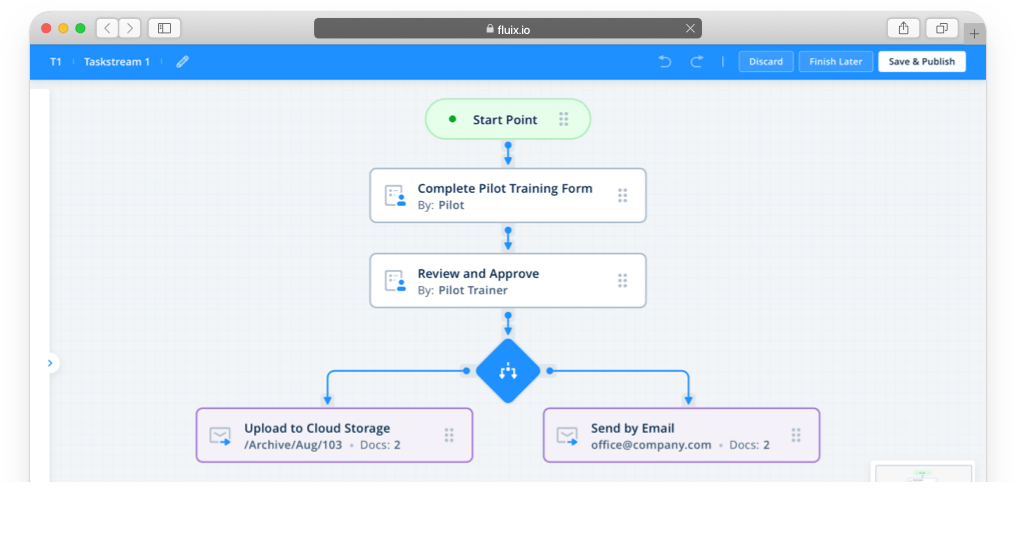
A workflow is a way to automate your document processes. Through workflows, users and groups can receive files on their iPads, annotate PDFs, fill out forms and digitally sign documents. All of these documents can be submitted automatically to the next step in the process.
A workflow is a template for repetitive work performed by your team members. The job of the Administrator is to model such a sequence of tasks to achieve a business goal, while Users only need to follow the configured processes. This separation allows everybody to focus on their core competence according to the role in a company and current workflow step, and automate the technical routine of in-between transitions.
In other words, the workflow itself is a collection of tasks and actions that have to be performed.
For example, below is the basic flowchart showing how your sales team can capture signatures on the contracts and send copies to the office and the customer:
In terms of workflow, it will look like a number of steps:
1. Your sales representative takes a form template from a specific folder on his iPad, fills it out, and emails it to a customer to sign.
2. After the customer signs the document, the sales representative sends the signed copy to your office:
Before you proceed with a workflow, here are the starting points to begin modeling your process:
1) Tasks
What is the business goal of the process?
Do you know the precise flow of actions to achieve the goal?
2) Participants
Who will work on each specific task?
Can you organize users in groups to make workflows role-based?
Do you offer users to select the cases to work on, or directly assign them?
3) Documents
Who creates a piece of work in the first place?
Do you have templates for all document types to be circulated?
Where does your company currently store documents?
Do you know the answers to the above? Then you are ready to learn how to Create a Workflow in the next article. In case you need our assistance, feel free to contact your Customer Success Manager or our Fluix Support Team at support@fluix.io, we are always here to help!
Was this article helpful?
Thanks for your feedback!
Oops, something went wrong. Please, try again later.
The first step in creating a workflow is adding participants. You can select either single users or groups of users. To apply the workflow to all users in the account, select All Users:
Once the participants are added, in the left-hand sidebar you will see a list, which you can alter by dragging blocks around, replacing, deleting, or adding new participants:
Name the Workflow
In the top left corner, type in the workflow name. The name will be visible for the admins only, the end-users won’t see it on their devices.
Once ready, the next step is to create a submit rule for the selected participant. Please, proceed to the next article Determining document sources for details.
Each Workflow rule is a pair of incoming Document source and outgoing Submit rule, that controls how users receive and send documents at each step of the workflow. Naturally, each participant needs to have at least one Document source to take part in the workflow.
For each participant in a workflow, you will need to define the document source. This is where documents will be distributed from.
Depending on the goal, you can select from the below:
Templates is a document source that is best used when you need to distribute blank forms and protect the original files on your remote storage from being overwritten. Each time a user opens a template file, it looks the same as on your remote storage. After a user fills out any information, a copy is saved to Drafts on his device for further actions, while the original template on storage remains intact.
Cabinet is a folder that reflects the files that are stored on remote storage making them accessible for a group of users in the section called Cabinet on the device. When documents appear via Cabinet, they are available for viewing to the entire group, however, only 1 user can start working on it by assigning it to himself. Once assigned to a particular user, the document becomes unavailable to the rest of the group.
Company Drive acts as a mirror between your storage and Fluix app and has a set of pre-configured actions. By choosing Company Drive as your document source, you will have a few options of actions to choose from:
Automatically sync iPad and storage, saving all changes. The content of the linked folder on remote storage will sync to the user’s device. All changes made by the user will sync back to storage, i.e. original files in the folder will get overwritten. This option is usually chosen to distribute manuals and any kind of instructions.
Automatically sync iPad and storage, no changes saved. The content of the linked folder on remote storage will sync to the user’s device. All changes made to files by a user on the device will be saved in a created copy on the device only, while the initial files on storage will stay intact.
Manually download. A list of files and folders located in the linked folder on remote storage is displayed to the user on the device. Files get downloaded only when they are opened. A user can make any changes to the files and they will be saved on his devices only. This option is usually selected to save the device space.
My Inbox is Inbox for the documents that are sent to a single user in the following way:
Group Inbox is Inbox for the documents that are sent to a group of users in the following way:
pushed by Admin
reassigned from another user
Once a document is reassigned to a group of users, the entire group can access it. Once one of the users in this group assigns the document to himself/herself, the document will no longer be available for others.
Other Apps allows your users to open documents from other applications on iPad/iPhone to Fluix, act on them and submit further as per workflow rules, pre-configured by the admin.
Add Storage
After the type of document source is selected, please select the file storage and choose the root or particular folder with files that your users will get access to:
After selecting which document sources the workflow will involve, you will have to determine what happens to them by creating submit actions. Please, follow the next article to learn how to create submit rules.
After the source is added, the next step is to add a submit rule for the document.
The first Submit rule is configured with Create Submit Rule button. Depending on the selected document source, the relevant submit rules are available:
To customize the name of the Submit button for the end-user on the device and web app, tap on the Submit rule button to edit it:
Reassign
This action is used to move documents from one user/group to another within the same workflow. Such routing does not require additional saving to the storage, or sending over email. You can preconfigure to whom the documents will be reassigned from the drop-down list of workflow participants.
Additionally, if a user needs to be able to choose a recipient, then choose the Select manually option.
The reassigned documents arrive in either the My Inbox (for a user) or Group Inbox (for groups) section on the device.
Send by Email
This action is used to send documents from Fluix to any email without wasting time on manual entering of the email address and message in the field. You can preconfigure the recipients’ addresses, email subject, custom message, and the document format:
To add preconfigured recipients, enter their e-mails into the ‘to’ field. After each email address, press the ‘+’ button to add the next recipient. Enable Allow user to add more recipients if your users need to add all or some recipients by themselves.
The following file formats are available:
Editable PDF: the entire document is submitted as one editable PDF file
XFDF: the form field data is extracted and submitted, while the whole PDF form is not
Flattened PDF: the entire document is submitted as a non-editable PDF file (digital signature data is also lost once a file is flattened).
To have the document name included in the subject of the email, add %document% in the subject field.
Note: If a workflow submit rule contains an incorrect pre-defined email address when a user submits files from this workflow, then a delivery failure notification will be sent to a user, an admin, and an owner of the Fluix account.
Upload to Folder
This action is used to move documents to a folder on your remote storage.
Data can be saved to storage in the following formats:
Editable PDF: the entire document is submitted as one editable PDF file
XFDF: the form field data is extracted and submitted, while the whole PDF form is not
Flattened PDF: the entire document is submitted as a non-editable PDF file (digital signature data is also lost once a file is flattened)
You can also have subfolders labeled with the user’s e-mail automatically created within the destination folder. Check Create user folder to enable this option. The folder is created once the user submits to the storage for the first time.
Submit by HTTP
This action is used to transfer data to a preconfigured URL. Enter the destination URL and select the file format in the corresponding fields.
Submit by HTTP can be performed in the following formats and methods:
Editable PDF: the entire document is submitted as one editable PDF file
XFDF: the form field data is extracted and submitted, while the whole PDF form is not
POST values: key-value pairs are extracted from a form and submitted to the HTTP URL as POST request attributes
Flattened PDF: the entire document is submitted as a non-editable PDF file (digital signature data is also lost once a file is flattened)
Return to Source
This action is used whenCabinetis selected as a document’s source:
Once users submit a document, it will be automatically uploaded back to the source that it was initially distributed from.
Send for Signature
This action is used when documents need to be emailed and digitally signed by a user outside of Fluix.
For this action, make sure to add Inbox as a document source. This way, once a document is signed and returned to Fluix, it will reside under the Inbox tab and can then reach its final destination.
Extract Data
This action will extract the data from the completed PDFs into reports available to the admin in the Data section.
The submit may contain several actions, e.g. send by email and save to storage, that happens simultaneously once triggered.
Upload to CRM/ERP
1. First, you will need to navigate to the workflow builder in the Fluix admin portal (Configurations–>Workflows–>New workflow) and create a new Upload to CRM/ERP submit rule.
2. After you have it in place, you will have to configure its parameters (endpoint URLs, header values, HTTP methods, etc.) based on your needs and the API integration requirements of the service in question. Please note that these requirements differ based on the service you would like to integrate with. Therefore, this is the right place where your inbound IT specialist may join or when to reach out to our support team for assistance.
3. Save changes in workflow. From that moment, upon every single submission of a document, the data will be automatically uploaded to the system.
Alternative submit actions
When a workflow requires a user to be able to choose how a document moves, alternative submit actions are needed. Once the first submit action is created, press the Alternative Submit Rule button to begin creating an alternative one.
After the submit action is selected, the workflow can be published. For details, please proceed to the next article Publishing a Workflow.
Was this article helpful?
Thanks for your feedback!
Oops, something went wrong. Please, try again later.
In case you haven’t finished the workflow, you can always do that later and save the draft by clicking Finish Later. After you are done, click Save & Publish the workflow. Once done, the workflow participants will get access to the folders and documents that were preconfigured in this workflow. That is why we recommend that you test the workflow right after you publish it in order to ensure it is built in the way you expected.
Was it helpful? Feel free to contact us at support@fluix.io if you have any questions or comments.
For each workflow you can create separate configurations:
Save documents in the Completed section of the app — saves and stores every document that your end-users submit on their devices and web app. Users cannot delete completed documents on their devices, however, they can regulate their number in the app settings on iOS devices. We recommend turning this setting off when working with sensitive data like credit card information or any other data your end-users should not have constant access to.
Include signed PDF attachments in the “Sent for signature” final email to signee — allows signees to receive attached PDF files in their final emails upon signing the document.
Send files only as links via “Send by email” submit rule — sends all your documents as links within the specific workflow once the Send by email submit rule has been applied.
Set due dates for the documents in a workflow — allows you to determine the due date for the document at the My Inbox, Group Inbox, or Drafts stage on the user’s device. Once the due date comes, an Overdue label appears next to the document name and the email with a list of such overdue documents is sent. In addition, you can set up automatic email notifications that will remind your colleagues to take action upon the files that were sitting in Fluix for the period you indicate.
Set the frequency of digest emails — allows you to decide how often your users or/and admins will receive email notifications about files being overdue. For more information on how to set up such notifications visit the article on Email notifications.
Was that helpful? Learn about workflow document statuses in the next article or contact us at support@fluix.io if you have any questions or comments.
Under the Workflowssection, you can find the Document Status tab, which provides information on the current status of all the documents within the workflow.
To track the documents from all the workflows, please go to the Document Status tab under the Documents section.
A document can have one of the following statuses:
My Inbox —The document has been assigned to a user but the user has not started working on it yet or the document was signed via remote signing and returned to the user to submit it according to the next workflow rule.
Drafts. The document is currently being worked on by a particular user but hasn’t been submitted yet. Please, note that the document in the Outgoing tab on the iPad will be listed under Drafts on the Admin Portal until it is submitted from the iPad.
Group Inbox. The document has been assigned to a particular group but none of the group members has started working on it yet.
Sent for Signature. The document was sent for signature but hasn’t been signed yet.
Completed. The document has gone through the complete workflow.
Deleted. The document has been removed from the user’s device or the web admin portal. This label will be displayed in case the Show Deleted button is on.
The documents can be sorted by their names by clicking on the column header.
The list includes 100 last documents. To see the older documents, please scroll down.
By selecting any document you can perform the following actions:
Show History to see the initial document source, time of document modifications with its status, and assignee, open or download the document revision if needed.
Openthe document to view it.
Download the document to the Admin’s computer without removing it from the workflow.
Reassign the document to move it from one workflow participant to another (user or group). This will remove the document from the current assignee’s device and transfer it to the new one, with changes made by the current one saved.
Resubmit the document that failed to be submitted.
Void the document that was sent for signature and needs to be returned to the user’s My Inbox tab on the device.
Delete the workflow document both from the user’s device and the Web admin portal.
To see the documents that were deleted by an Admin or a user, click Show Deleted. Please, note that the list will omit those documents that were deleted according to the retention policy (see Security Settings section).
You can also export the list of documents with or without document revision history.
Was it helpful? Feel free to contact us at support@fluix.io if you have any questions or comments.
Was this article helpful?
Thanks for your feedback!
Oops, something went wrong. Please, try again later.
The Templates Sync Status section is located in each workflow where the Templates are selected as a document source. In this section, you can check the sync status of the Template documents on the users’ iOS devices. Those users who access Fluix from the web browser are always up-to-date and their sync status is not shown here.
There are three sync statuses:
Up to date (green checkmark) — means the device is fully synchronized with the company server and the user has the latest copies of template documents.
Outdated (red cross) — shows that either the user hasn’t logged in to the app yet or the sync hasn’t been completed properly.
Not available (yellow exclamation mark) — is displayed for the storages that are synced directly to the device and their sync status is not available (FTP, SFTP, Share File).
Click on the user to see full details with the list of devices, storage names and sync statuses, and the time of the last sync:
Was it helpful? Feel free to contact us at support@fluix.io if you have any questions or comments.
You can make a copy of an existing workflow and then modify any details, including participants, document source, and submit rules as needed. To do that, follow the steps below:
Step 1. Duplicate a Workflow
Go to Configuration > Workflows section of Fluix Admin Portal, select a workflow you want to copy, and click Duplicate:
Once a copy is created, name it in the upper left corner and start editing as needed.
Step 2. Change Participants
In order to change participants, click the Pencil icon next to the participant’s name. You will find two options: Replace or Delete.
Choose Replace option and select a new participant from a dropdown list.
Step 3. Change Document Source
You can change the type of your document source or select a different folder to be connected. To change the type of the documents source, click the Pencil icon next to the document source and choose the Replace option.
In order to change the connected folder while keeping the existing document source type, click on the name of the current folder and connect a new one.
You will see then a pop-up window. Click the Back to Root button to be redirected to a root folder of your connected storage.
If you want to change the storage connected to your workflow as well, click the icon of the currently connected storage and select a new one.
Step 4. Modify Submit Rules
For the Reassign submit action, the changes will be done automatically by Fluix. For the Upload to Folder submit action, please make sure to connect a new folder.
Step 5. Rename the Workflow
Rename the workflow in the top left corner of your screen and click the Save & Publish button to activate it.
Your workflow is now ready for use.
Was it helpful? Feel free to contact us at support@fluix.io if you have any questions or comments.
To delete a workflow, select it in the list of workflows and click Delete.
In case a workflow contains documents, which haven’t been completed yet, it will be moved to the Archiving state:
If you do not need those documents in progress, select the archiving workflow and click Delete once again:
Alternatively, you can wait until your users complete all documents in progress and the workflow will be deleted automatically.
The completed documents from the deleted workflow will be still available both in the Document Status on the Admin Portal and in the Completed tab on users’ devices (if the respective setting Save documents in the Completed section of the appis enabled in the Workflow Configuration section). To delete them, follow the Document Status, select the documents and click Delete.
Can’t find what you’re looking for? Feel free to contact us at support@fluix.io if you have any questions or comments.
To send a document from your PC, Fluix Storage, or Remote Storage directly to a workflow, use the Push to Workflow option. If pushed to a single user, he/she will see it in My Inboxon the device or web browser version, if the document was pushed to a Group of users — they will find it in Group Inbox. The respective My Inbox or Group Inbox sources should be configured in a workflow. After the documents are received by users, they will act on them and submit them to the next stage of the workflow, so please ensure that the submit rule configured in a workflow, meets your expectations.
Only PDFs and ZIP archives with multiple PDFs can be pushed to a workflow. The maximum file size that can be sent is 400 MB per file.
Select a workflow or once inside a workflow, click on the Push Document button:
In the pop-up window, select a user or group of users this document will go to.
Attach a PDF file or .zip folder with PDFs.
Add a message if needed:
Press Push.
Can’t find what you’re looking for? Feel free to contact us at support@fluix.io if you have any questions or comments.
In Fluix you can also connect your internal storage (e.g. behind the corporate Firewall or on-prem) to Fluix workflows. Files will be synced directly to the Fluix app on iOS devices beyond the Fluix server. In this case, Fluix workflows will be limited to our Company Drive option. Company Drive acts as a mirror between your storage and Fluix app. It can be configured in several ways, you can read more here.
The Internal storage option will prompt your users to enter their credentials upon accessing documents on an iPad or an iPhone thus eliminating the need to create individual workflows for each user.
Setup
1. Go to Configuration in Admin Portal and then select Remote Storage.
2. Click on Connect Storage and scroll down to Internal Storages where you can select either WebDav or sFTP connection.
3. After the storage has been connected, you can proceed with the workflow setup. Go to Workflows -> New Workflow, in the dropdown window select Internal Workflow and proceed with building a workflow.
Note that this type of workflow does not support any submit rules. Annotated files can be either saved as a local copy on the device or synced back to the storage (See the options in the screenshot down below).
Can’t find what you’re looking for? Feel free to contact us at support@fluix.io if you have any questions or comments.