


Google Calendar is a time-management and scheduling tool. It allows users to create and manage events, set reminders, and schedule meetings across devices, making it easier to stay organized.
Fluix is a web and mobile-based cloud platform that helps teams set up digital document management and workflow automation. In this integration, Fluix serves as a mobile app for data capture, review, and approval.
What integration Fluix + Google Calendar does
By integrating Fluix with a Google Calendar, teams can streamline document-related tasks alongside their daily schedules. Fluix enables the capture and organization of important documents, while Google Calendar keeps team members on track with deadlines, meetings, and task notifications.
Picture this: You can use Google Calendar to schedule client meetings, demos, and follow-ups. Fluix can be used to manage contracts, quotes, and proposals, allowing clients to sign documents digitally. As deadlines approach, calendar reminders ensure the sales team follows up promptly with clients or gets contracts signed. The integration between Fluix and Google Calendar ensures timely communication and prevents delays in closing deals.
In order to set up a Google Calendar integration in Fluix, please follow the steps below.
Step 1 – Create a Workflow
Note: Here is the video on our YouTube channel on how to create a Workflow in Fluix.
Follow the steps listed below to create Workflow:
- Drag and drop the “Process Start” element -> click to open it -> select the “External Software Trigger” option

- Click the “Proceed” button

- Choose the “Webhook” option from the list

- Navigate to the Fluix admin portal -> Workflows section
- Click the “New Workflow” button, and select “Blank template”
- Name your Workflow and click the “Next” button
- Add the value “summary” to the ‘ Variables Property Names’ field -> click the “Add as new value” button

Step 2 – Configure Prefill of the form
Drag and drop the Forms Prefill task and link it to Process Start.
- In the configuration settings, select the ‘External tool initiates prefill’ option
- Choose the form that your team will later complete

- You can choose from forms created in Fluix, import a fillable PDF file, create a new form in Fluix, or try our new functionality and ‘Create New Form with AI.’

- After the form is uploaded, click on the configurator button at the right side of the form name in the ‘Templates to be prefilled’ block

- In the Prefill Configurator, map the fields in the form that should be filled with data from the Google Calendar. In our case, the meeting title will be pulled to the field we select.

Step 3 – Finish the process mapping
Add the necessary Workflow elements to complete your business process. Drag and drop the User Task, then configure the Task Name by adding the Naming Convention, and select the field that will be populated with data from Google Calendar.
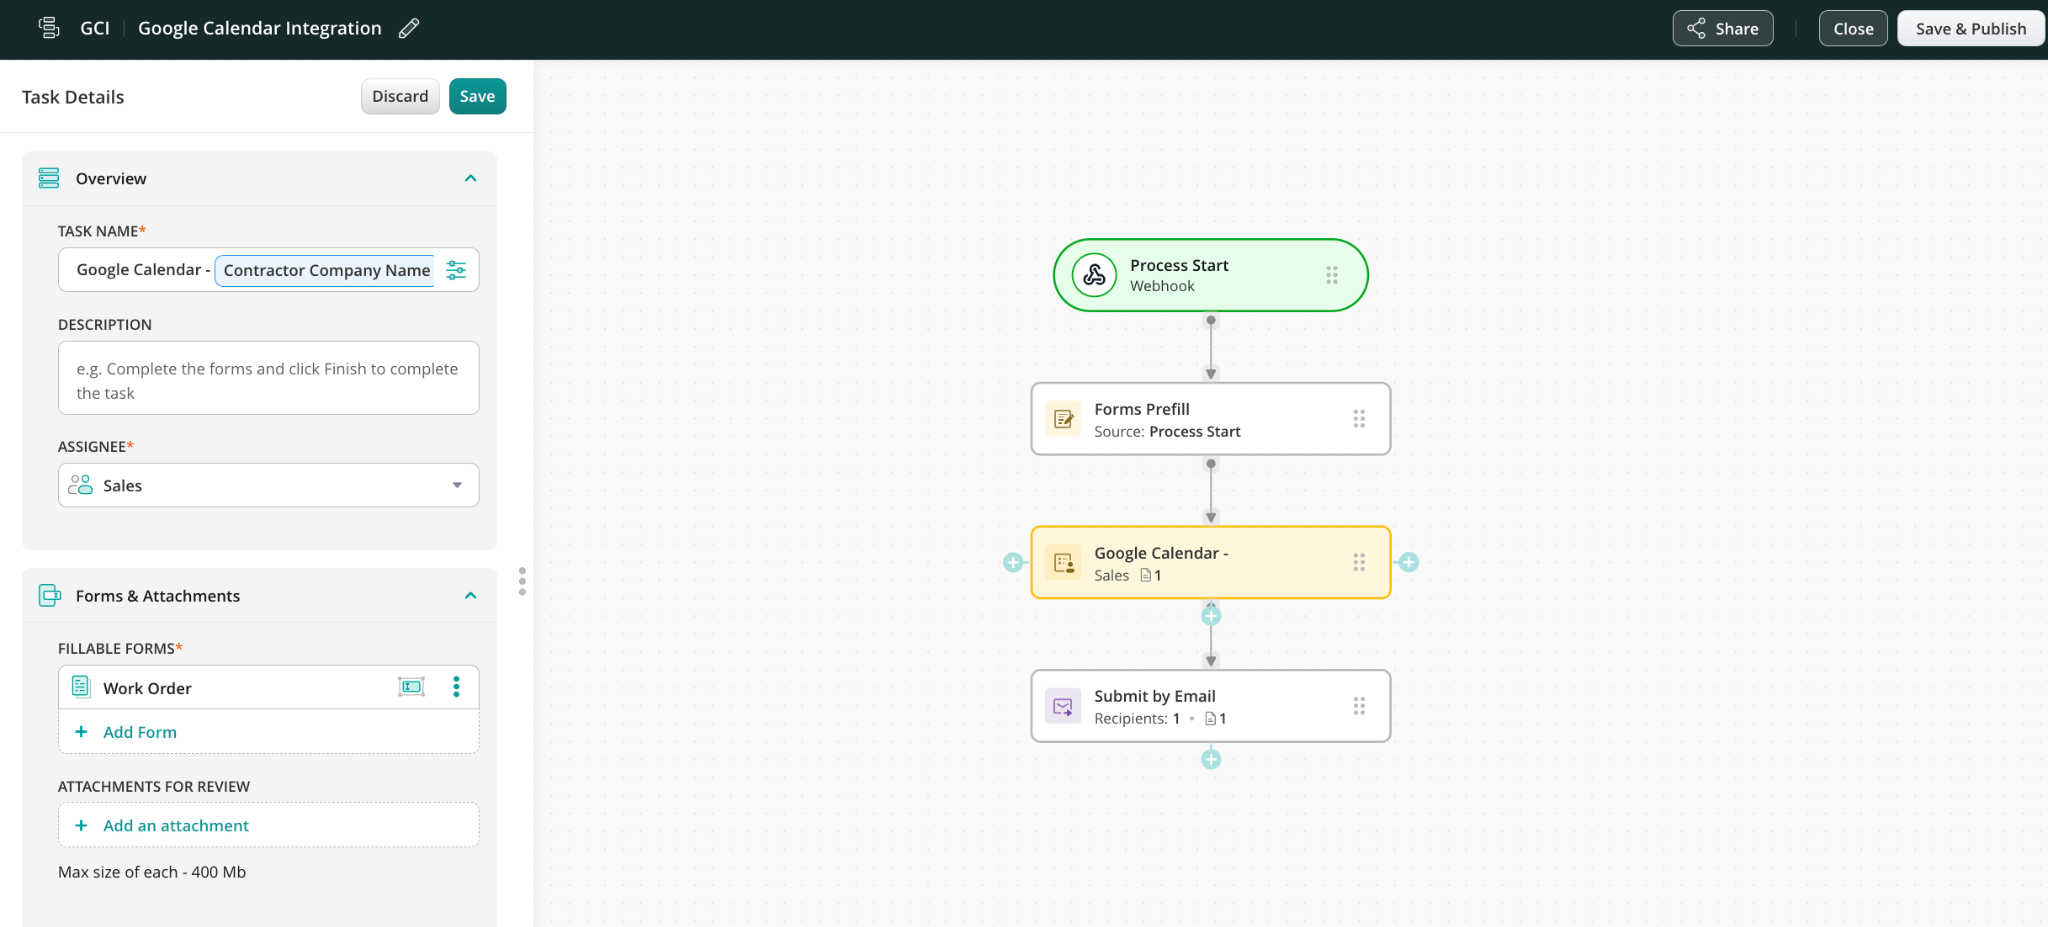
To finish the process, add the submit action: Upload to Storage, Send by Email, or Share to, depending on your business logic.
Step 4 – Create a New Google Apps Script Project to connect the Google Calendar
- Navigate to Google Drive and log in with your Google account.
- Click on the + “New project” button, select “More” at the bottom of the dropdown menu, then choose Google Apps Script.
- Once you are in the editor, click on New Project at the top and give your project a name (e.g., “Fluix Calendar Integration”).


- In the code editor, you’ll see the default code: function myFunction(). Delete it so you can start with fresh code.

- Paste the code below into the editor:
function sendToWebhook(event) {
try {
var url = “YOUR_WEBHOOK_URL”;
if (event) {
// Log the event data to ensure it's correct
Logger.log("Event data: " + JSON.stringify(event));
var payload = JSON.stringify({
"summary": event.getTitle(),
"description": event.getDescription(),
"start": event.getStartTime(),
"end": event.getEndTime(),
"creator": event.getCreators()[0]
});
var options = {
"method": "post",
"contentType": "application/json",
"payload": payload
};
var response = UrlFetchApp.fetch(url, options);
Logger.log("Webhook response: " + response.getContentText());
} else {
Logger.log("Event is undefined.");
}
} catch (e) {
Logger.log("Error sending to webhook: " + e.message);
}
}
function calendarEventHandler() {
try {
var calendarId = “YOUR_CALENDAR_ID”;
var calendar = CalendarApp.getCalendarById(calendarId);
if (!calendar) {
Logger.log("Calendar not found.");
return;
}
var now = new Date();
var events = calendar.getEvents(now, new Date(now.getTime() + 60 * 60 * 1000)); // Get events for the next hour
Logger.log("Events data: " + JSON.stringify(events));
if (events && events.length > 0) {
var scriptProperties = PropertiesService.getScriptProperties();
var sentEvents = scriptProperties.getProperties();
for (var i = 0; i < events.length; i++) {
var event = events[i];
Logger.log("Event: " + JSON.stringify(event));
if (event.getTitle() && event.getStartTime() && event.getEndTime() && event.getCreators().length > 0) {
var eventId = event.getId();
var eventStartTime = event.getStartTime();
// Check if the current time is past the event's start time and if the event has already been sent
if (now >= eventStartTime && !sentEvents[eventId]) {
sendToWebhook(event);
// Mark the event as sent
scriptProperties.setProperty(eventId, 'sent');
} else {
Logger.log("Event not yet started or already sent: " + eventId);
}
} else {
Logger.log("Event missing necessary properties: " + JSON.stringify(event));
}
}
} else {
Logger.log("No events found.");
}
} catch (e) {
Logger.log("Error retrieving events: " + e.message);
}
}
function createTrigger() {
ScriptApp.newTrigger('calendarEventHandler')
.timeBased()
.everyMinutes(1)
.create();
}
- Replace “YOUR_WEBHOOK_URL” – copy the webhook link from the created Workflow by clicking on the Process Start.

- Replace “YOUR_CALENDAR_ID” – with the ID of the Google Calendar you want to monitor (the email associated with the calendar).

- Click on the floppy disk icon or press Ctrl + S to save the script.
- Click on the ‘Deploy’ button -> choose ‘New Deployment’

- Select type “Web app” -> Add the “Description” -> click on the ‘Deploy’ button.


Step 5 – Set Up Triggers
- Click on the clock icon (Triggers) in the left-hand sidebar and click Add Trigger at the bottom right.

- Set the following options:
1. Choose which function to run: calendarEventHandler
2. Select event source: Time-driven
3. Select type of time-based trigger: Minute timer
4. Select minute interval: Every minute
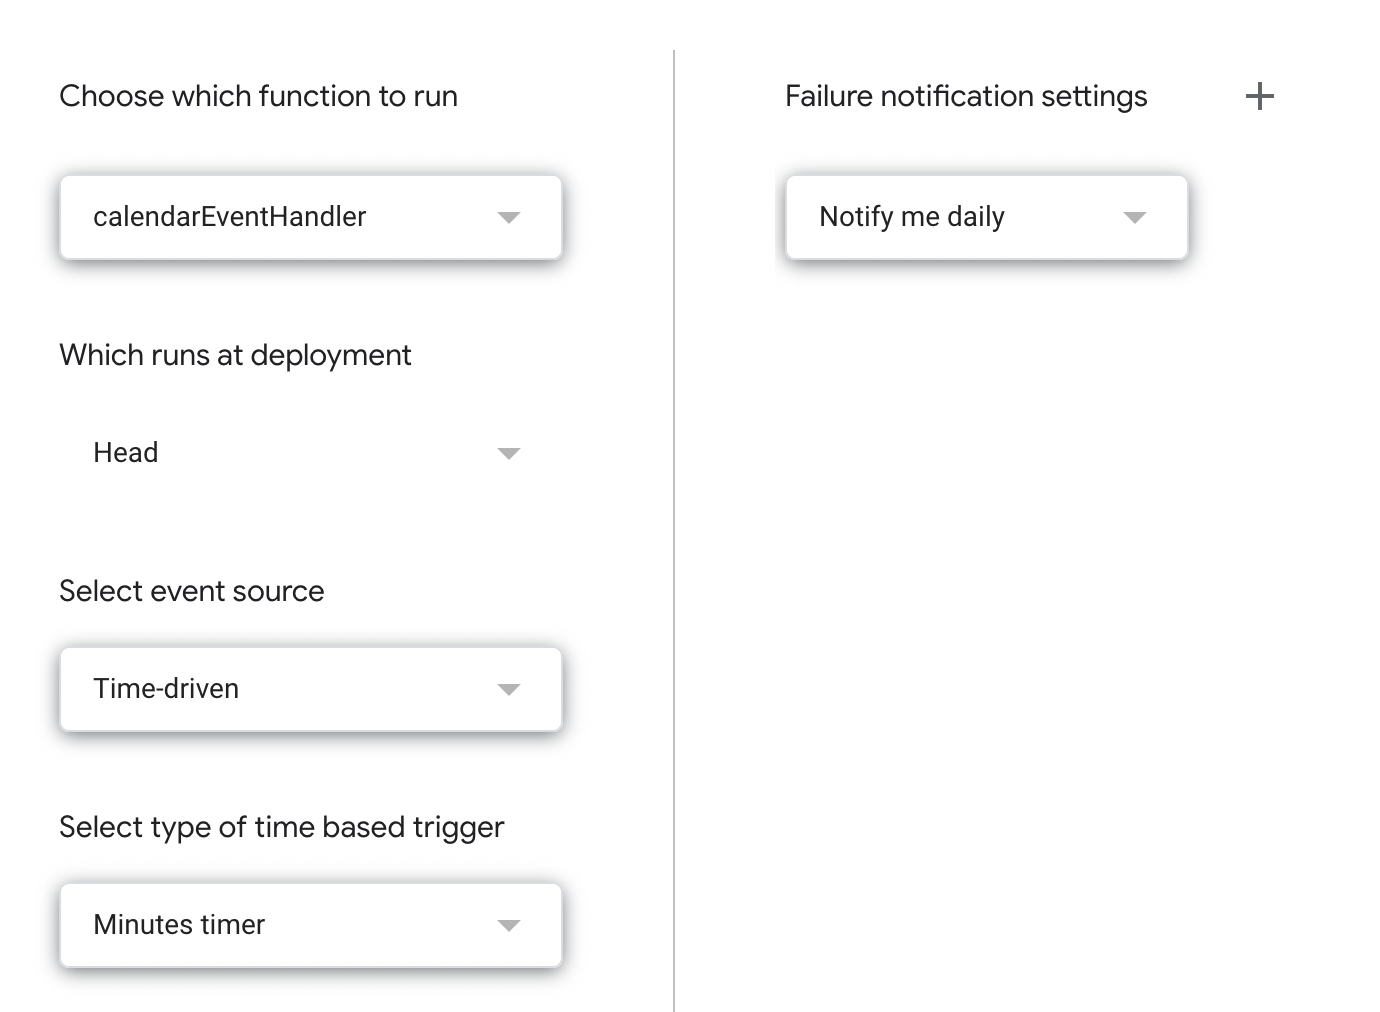
- Click on the Save button.
Step 6 – Create an event and test the setup
- Click “Save & Publish” button in the upper right corner to save the workflow.

Make sure that you have added yourself to the group of users so that you can test the setup later.
Open the Google Calendar and create a New Event. Click on the “+” icon located in the top-left corner. Enter a title in the Event name field (e.g., contractor company name), set the Start time and End time, then save the event.
The task will be initiated according to the time selected when creating an event.
- Open the Fluix Tasks app or the User App from the top-right corner of the Admin Portal.
- Go to the Assigned section to locate the new task.
- Complete the form and submit it once you have finished.
- The form will then be sent to its preconfigured destination.

In case you have any questions or difficulties with setup, contact us at support@fluix.io and we’ll be happy to help you.