


Pipedrive is a customer relationship management (CRM) cloud-based system that is also used as an account-management tool to drive the sales process.
By integrating Fluix and Pipedrive you will eliminate manual work and save time for your team by streamlining field-to-office collaboration. In particular, Fluix will automate the process of filling out documents on mobile devices and upload the completed forms and data to Pipedrive.
Note. Integration requires a Core account in Fluix and an account in Pipedrive.
Let’s look at how this integration works.
Step 1 – Preparing a fillable form
Before creating the integration, you will need to prepare a form that will be filled out by your field team in the Fluix app and then appear in Pipedrive. The common fields that need to be added to a form are:
- Organization name
- Client name
- Client email address
- Client phone number
- Deal value
- Currency of the deal
Some of the fields can be omitted, e.g. organization name if you’re not working with the organizations. Subsequently, the configurations below related to organizations can be skipped.
Keep the form at hand while configuring the workflow in Fluix since you will need to enter several form fields’ names.
Step 2 – Configuring the integration
In your Fluix account, go to Configuration -> Workflows. Select the workflow or create a new one for the forms that need to be filled out and then appear as attachments in a created Deal (Organization or Person) and the data that will be extracted from these forms and added to the relevant fields.
In the selected workflow, add a submit action called Upload to CRM/ERP. Since Deals can be associated with a Person, an Organization, or both, we will provide you with guidance on how to create all of them using Fluix. Therefore, you will need to configure 4 requests for each of the processes listed below:
- 1. Create an Organization
- 2. Create a Person
- 3. Create a Deal
- 4. Upload a document
Process 2.1 – Configuring a request for creating an Organization
1. Configure the request name, let’s say “Create an Organization”, select POST as the data type, and add the following URL – https://%domain%/v1/organizations, where the parameter %domain% is your Pipedrive account’s address in the web app. You may find it in the address bar when the Pipedrive tab is opened:

For example, in our case, the URL will be the following – https://fluix-sandbox.pipedrive.com/v1/organizations
2. Go to the Header tab and enter the following:
- Header name – Content-type
- Header value – application/json

3. Go to the URL Params tab and enter the following:
- Parameter name – api_token
- Parameter value – Secure Value

Note: We recommend entering the value manually since it will allow adding already preset parameters from the dropdown list.
4. Once added, go back to your Pipedrive account, click on your account name, go to the Personal Preferences tab and open the API tab. Copy your personal API token that is going to be used to authenticate your Pipedrive account in Fluix.

5. Go back to Fluix, click Secure Value, add this copied token to the Value field, and click Save.

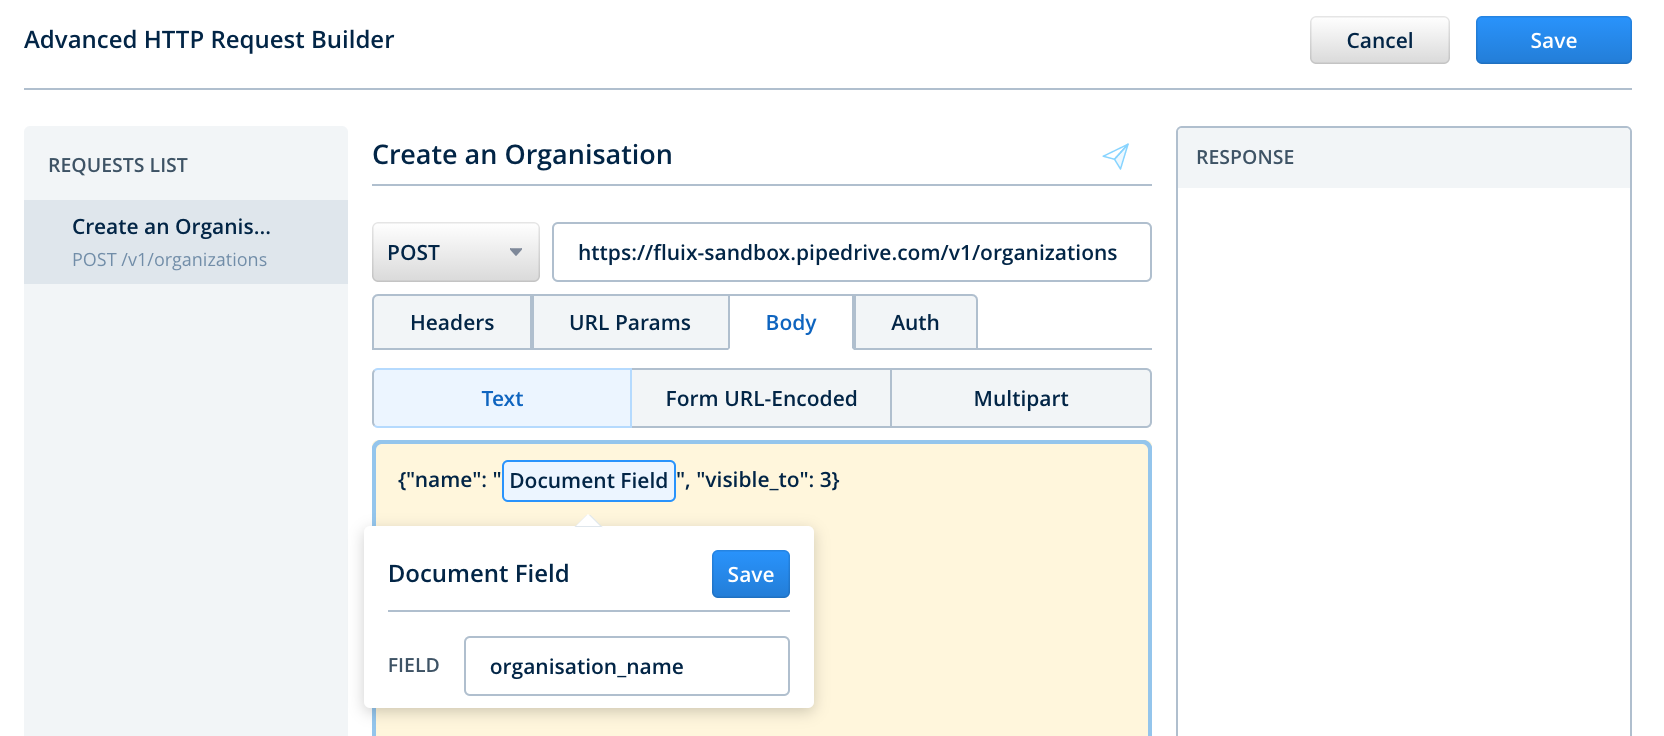
6. Go to the Body tab:
- Enter the following in the Text tab: {“name”: “Document Field”, “visible_to”: 3}
- Configure the Document Field value by clicking on it and specifying a field name from your form that can be taken for naming a new Organization in your Pipedrive account.
- In our case, we have a field ‘organisation_name’ in our document that implies that the users will add the name of the company to this field while filling out a form in Fluix.
- The parameter “visible_to”: 3 means that the created organization will be visible to the entire company. If you need to make it visible only to the owner & followers, add 1 instead of 3.
- Click Save to apply the changes.
Process 2.2 – Configuring a request for creating a Person
1. Configure the request name, let’s say “Create a Person”, select POST as the data type, and add the following URL – https://%domain%/v1/persons, where the parameter %domain% is your Pipedrive account’s address in the web app.
2. Go to the Header tab and enter the following:
- Header name – Content-type
- Header value – application/json

3. Go to the URL Params tab and enter the following:
- Parameter name – api_token
- Parameter value – Secure Value

4. Click Secure Value, add your personal API token from your Pipedrive account to the Value field, and click Save.
5. Go to the Body tab:
- Enter the following in the Text tab: {“name”: “Document Field”, “email”: “Document Field”, “phone”: “Document Field”, “org_id”: “Response Body”, “visible_to”: 3 }
- Configure the Document Field values by clicking on them and specifying a field name from your form:
- “name”: “Document Field” – the form field name that implies that the users will add the client name to this field while filling out the form in Fluix.
- “email”: “Document Field” – the form field name that implies that the users will add the client’s email address
- “phone”: “Document Field” – the form field name that implies that the users will add the client’s phone number
- After specifying each of the Document Field values, click the save button to apply the changes.
- Configure the Response Body parameter by clicking on it, selecting the Create an Organization request, and specifying the key path as ‘data.id’.
- Click the Save to apply the changes.
Process 2.3 – Configuring a request for creating a Deal
1. Configure the request name, let’s say “Create a Deal”, select POST as the data type, and add the following URL – https://%domain%/v1/deals, where the parameter %domain% is your Pipedrive account’s address in the web app.
2. Go to the Header tab and enter the following:
- Header name – Content-type
- Header value – application/json

3. Go to the URL Params tab and enter the following:
- Parameter name – api_token
- Parameter value – Secure Value

4. Сlick Secure Value, add your personal API token from your Pipedrive account to the Value field, and click Save.
5. Go to the Body tab:
- Enter the following in the Text tab: {“title”: “Document Name”, “value”: “Document Field”, “currency”: “Document Field”, “person_id”: “Response Body”, “visible_to”: 3 }
- Configure the Document Field values by clicking on them and specifying a field name from your form:
- “value”: “Document Field” – the form field name that implies that the users will add the value of a deal to this field while filling out the form in Fluix.
- “currency”: “Document Field” – the form field name that implies that the users will add the currency of a deal.
- After specifying each of the Document Field values, click the save button to apply the changes.
- Configure the Response Body parameter by clicking on it, selecting the Create a Person request, and specifying the key path as ‘data.id’.
- Click Save to apply the changes.

Process 2.4 – Configuring a request for Uploading a File
1. Configure the request name, let’s say “Upload a File”, select POST as the data type, and add the following URL – https://%domain%/v1/files, where the parameter %domain% is your Pipedrive account’s address in the web app.
2. Go to the URL Params tab and enter the following:
- Parameter name – api_token
- Parameter value – Secure Value

3. Сlick Secure Value, add your personal API token from your Pipedrive account to the Value field, and click Save.
4. Go to the Body tab and select the Multipart tab:
- Part name – organization_id
- Part value – Response Body
- Configure the Response Body parameter by clicking on it, selecting the Create an Organization request, and specifying the key path as ‘data.id’.

- Part name – person_id
- Part value – Response Body
- Configure the Response Body parameter by clicking on it, selecting the Create a Person request, and specifying the key path as ‘data.id’.

- Part name – deal_id
- Part value – Response Body
- Configure the Response Body parameter by clicking on it, selecting the Create a Deal request, and specifying the key path as ‘data.id’.

- Part name – file
- Part value – Document File
- Configure the Document File parameter by clicking on it, selecting the necessary document type.

- After specifying each of the Part values, click the save button to apply the changes.
After all the requests were configured, click Save in the top right corner of the Advanced HTTP Request Builder. To save changes in a workflow, click Save & Apply to apply the changes to the workflow and go to test the setup.
Step 3 – Testing the integration
Go to the Fluix app on the device or User App in the web browser version. Open a test form, fill it out and submit it through the workflow.
In Pipedrive, you will see a new Deal added to the Pipeline in the first section on the left. A new Organization and a Person will be associated with this Deal as well as the filled-out document will be attached to each of these items.
In case you have any questions or difficulties with setup, contact our support at support@fluix.io and we’ll be happy to help you.
Check other business integrations here.